(Image credit: Future)
It doesn’t matter the kind of content you keep on your computer, you’ll always have reasons to hide certain files and folders. Perhaps you have important documents and videos that you want to keep under wraps or prevent users from accidentally deleting certain files if you share your PC with others.
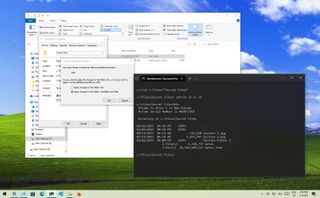
For whatever reason, on Windows 10, you can quickly hide a file or folder in two different ways, including using File Explorer or the «attrib» command-line tool with Command Prompt.
This guide will walk you through the easy steps to hide a file and folder on Windows 10. In addition, you’ll learn the steps to access those hidden items as needed.
How to hide files and folders from File Explorer
To hide files and folders through File Explorer on Windows 10, use these steps:
- Open File Explorer.
- Browse to the file or folder to hide on Windows 10.
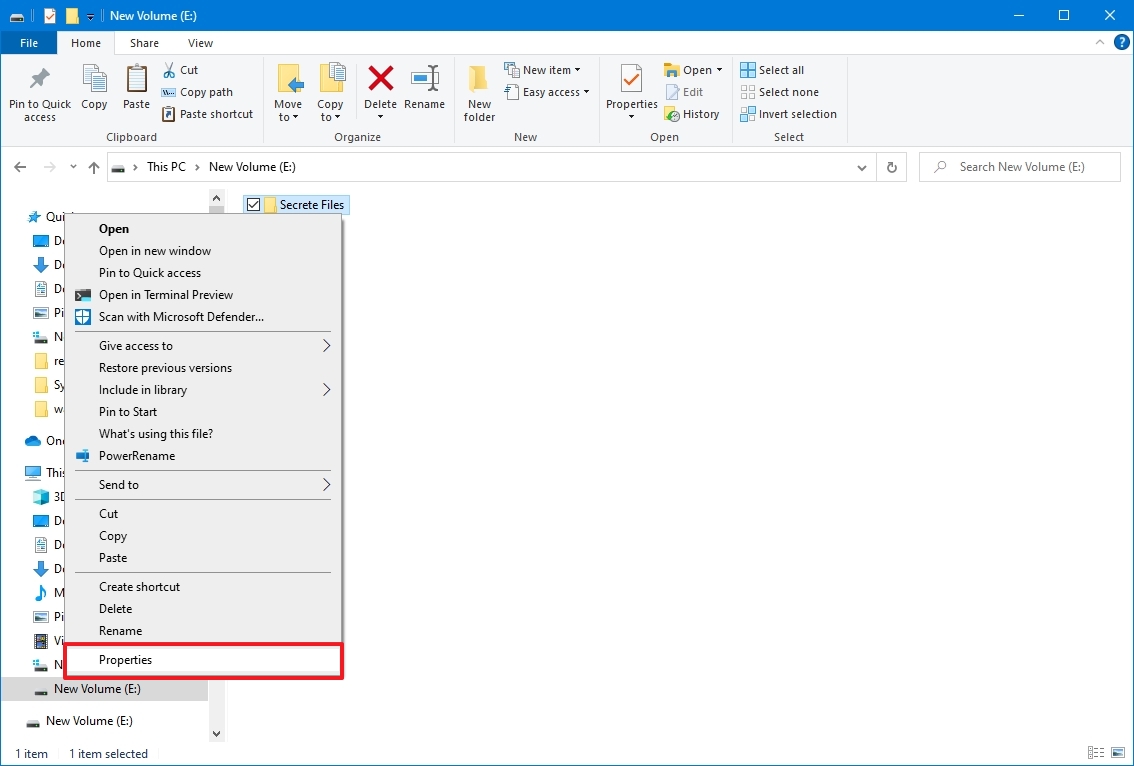
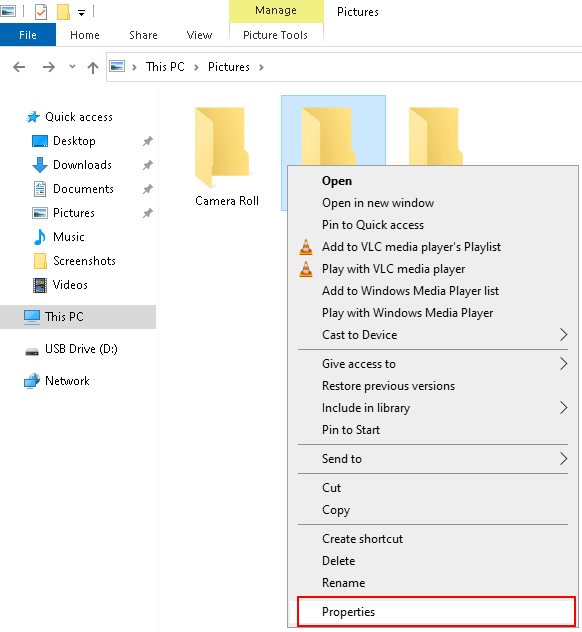
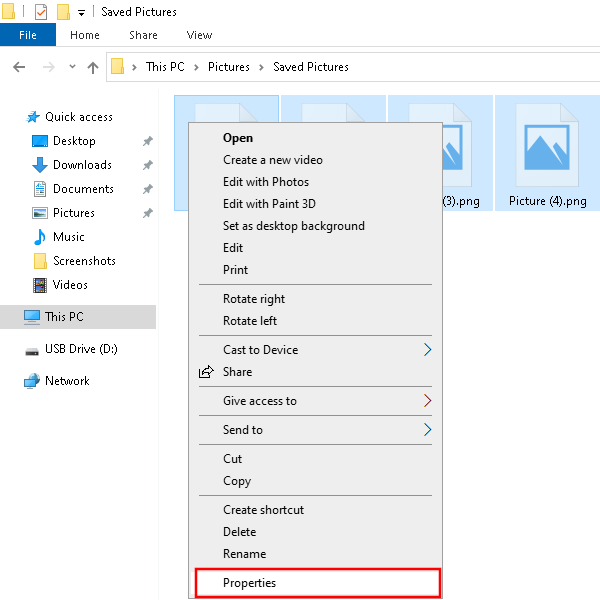
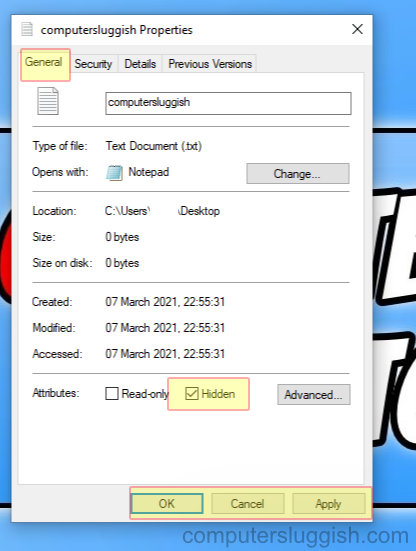
- Right-click the item and select the Properties option.
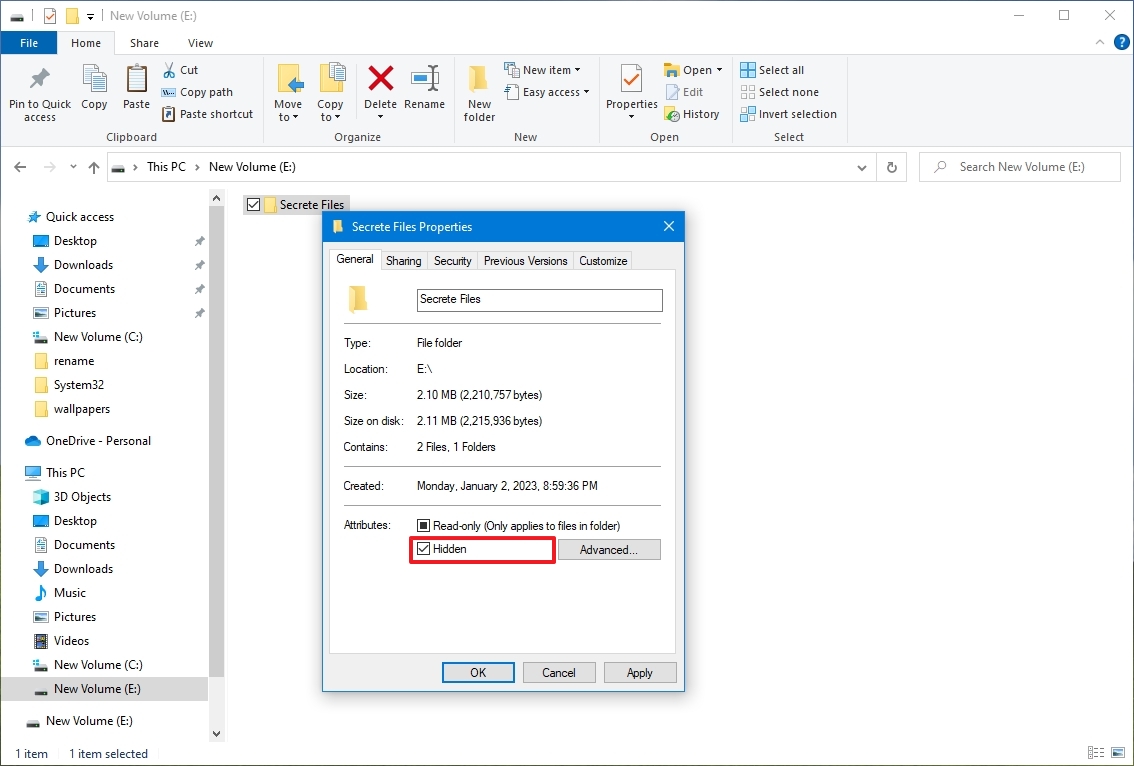
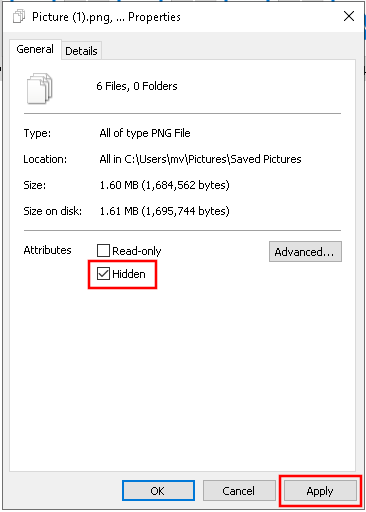
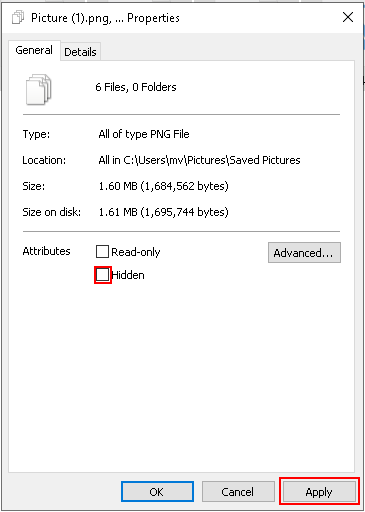
- Click the General tab,
- Under the «Attributes» section, check the Hidden option.
- Click the Apply button.
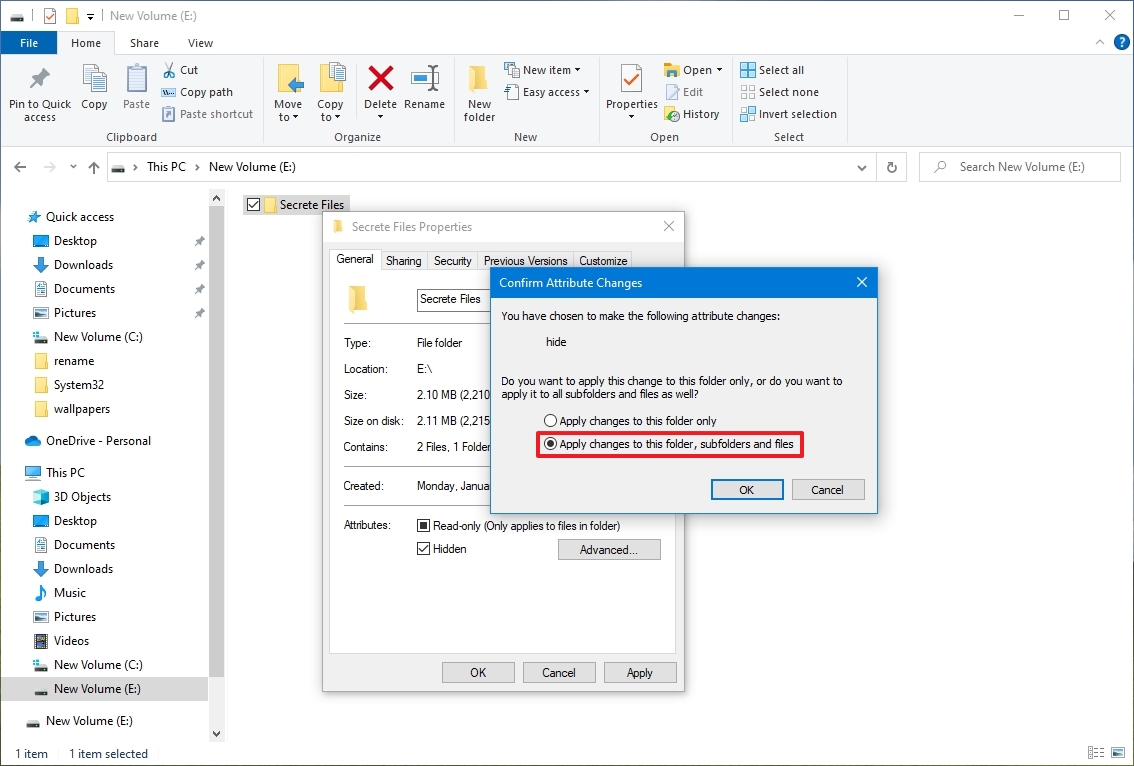
- Select the «Apply changes to this folder, subfolders, and files» option if hiding a folder with files and subfolders.
- Click the OK button.
- Click the OK button.
Once you complete the steps, the hidden items will not be visible anymore, as Windows 10 doesn’t show hidden files by default.
If you want to access your hidden items, you’ll have to type the complete path to the hidden folder or file you want to open and press Enter—for example, C:\Users\admin\Desktop\Files\Secret Files\Great Secret.txt.
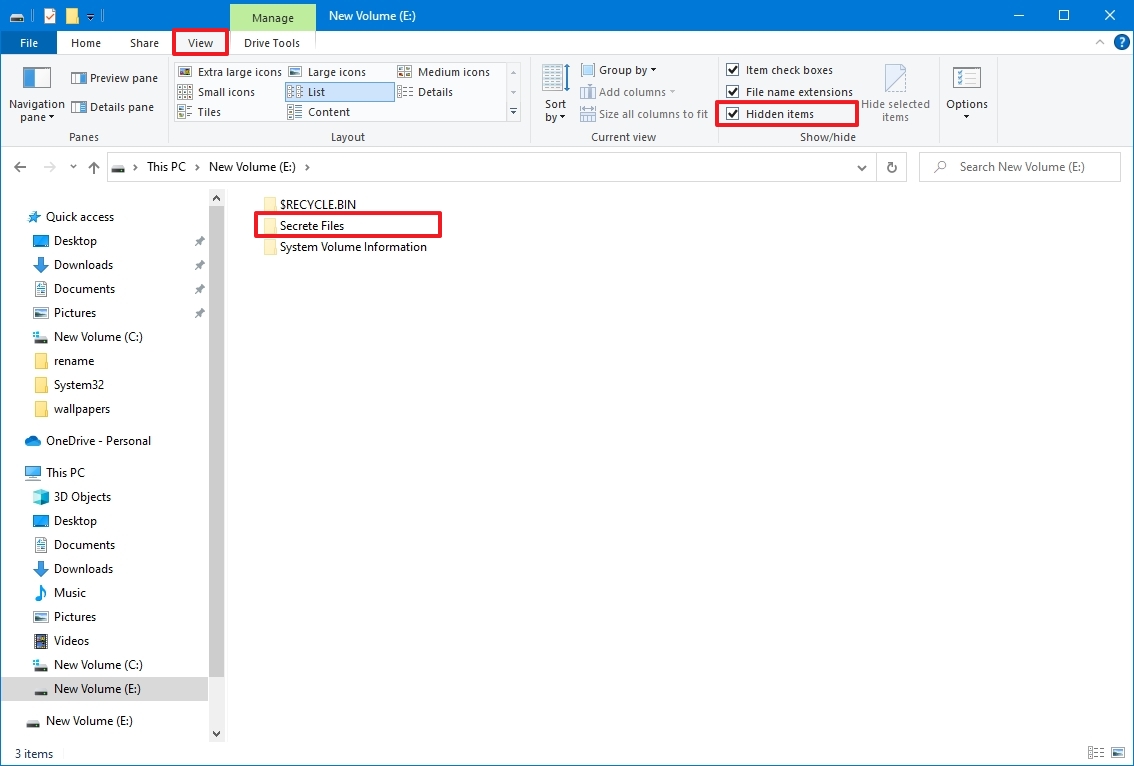
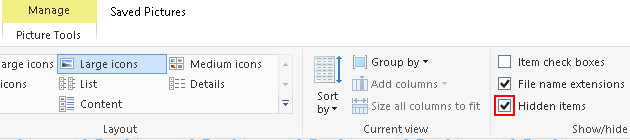
Or you can open File Explorer, click on the «View» tab, and check the «Hidden items» option. Then you can browse your hidden items as you normally do with other content.
At any time, you can make the files and folders visible again by using the same steps mentioned above, but this time on step 4 make sure to clear the Hidden option.
How to hide files and folders from Command Prompt
Alternatively, you can also use Command Prompt to hide files and folders on Windows 10.
To hide files and folders with commands on Windows 10, use these steps:
- Open Start.
- Search for Command Prompt and click the top result to open the app.
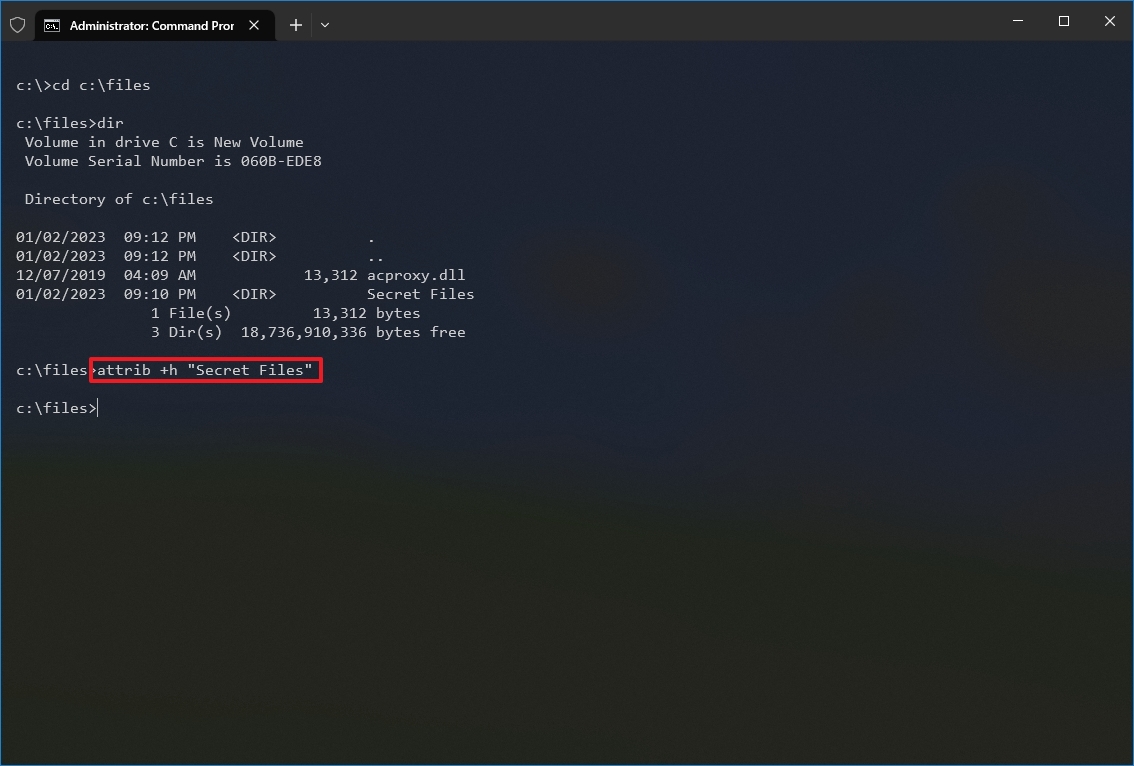
- Type the following command to navigate to the items you want to hide and press Enter: cd c:/SECRET-FILES-LOCATION
In the command, replace the path after «cd» with the path to your file or folder.
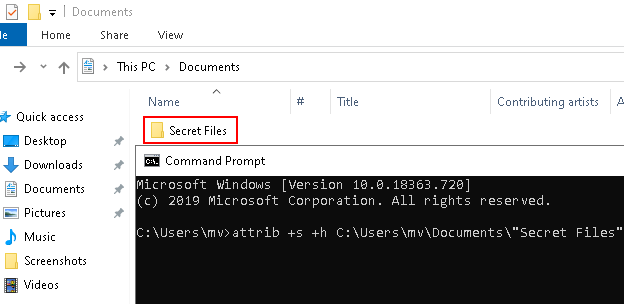
- Type the following command to hide a folder or file and press Enter: attrib +h «Secret Files»
In the command, replace «Secret Files» with the name of your folder or file. Quotation marks are only necessary when there are spaces in the name.
After you complete the steps, only the folder will be hidden, but the files and subfolders inside the folder will still be visible to anyone who know the path.
Hide subfolders
If you want to hide a folder with files and subfolders, which you also want to keep hidden, then you’ll need to use these steps:
- Open Start.
- Search for Command Prompt and click the top result to open the app.
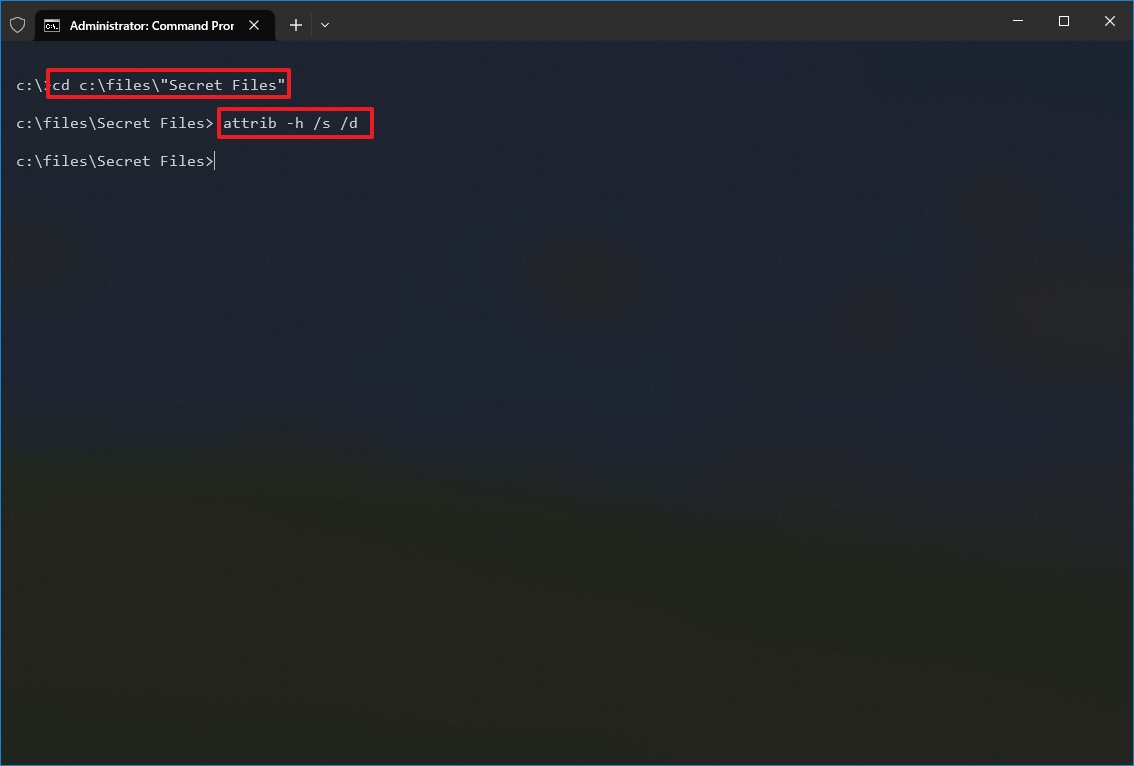
- Type the following command to navigate inside the hidden folder and press Enter: cd «SECRET-FILES-LOCATION»
In the command, replace «SECRET-FILES-LOCATION» with the name of your hidden folder.
- Type the following command to hide all files and folders inside the hidden folder and press Enter: attrib +h /s /d

After completing the steps, the items with the hidden attribute will no longer be visible.
Unhide files and folders
To make files and folders visible again with Command Prompt, use these steps:
- Open Start.
- Search for Command Prompt and click the top result to open the app.
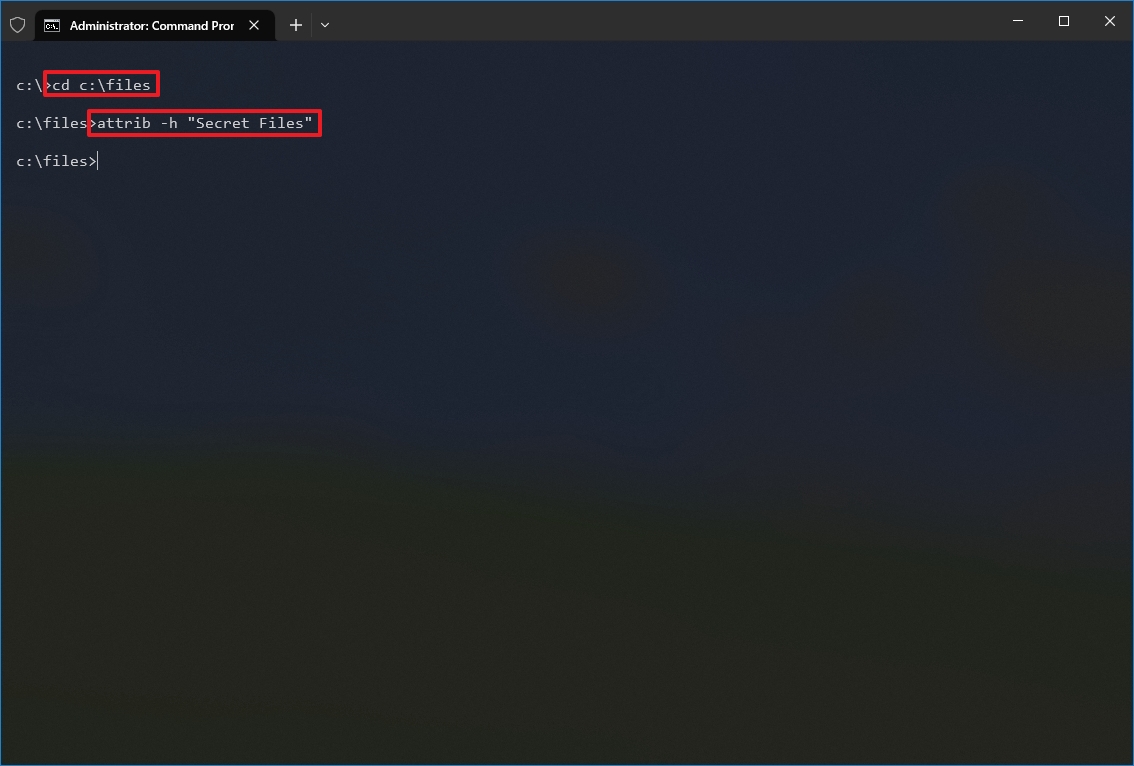
- Type the following command to navigate to the hidden items location and press Enter: cd «SECRET-FILES-LOCATION»
In the command, replace the path after «cd» with the path to your file or folder.
- Type the following command to make the items visible again and press Enter: attrib -h «Secret Files»
In the command, replace «Secret Files» with the name of your folder or file. Quotation marks are only necessary when there are spaces in the name.
Once you complete the steps, the folder will become visible again on Windows 10.
Remove hidden attribute
To remove the hidden attribute for files and subfolders inside of a folder, use these steps:
- Open Start.
- Search for Command Prompt and click the top result to open the app.
- Type the following command to navigate inside the hidden folder and press Enter: cd «Secret Files»
In the command, replace «Secret Files» with the name of your hidden folder.
- Type the following command to remove the hidden attribute from all files and folders inside the folder and press Enter: attrib -h /s /d
Once you complete the steps, the hidden attribute will be removed from any file or subfolder within the location.
More resources
For more helpful articles, coverage, and answers to common questions about Windows 10 or Windows 11, visit the following resources:
- Windows 11 on Windows Central — All you need to know
- Windows 10 on Windows Central — All you need to know

Cutting-edge operating system
A refreshed design in Windows 11 enables you to do what you want effortlessly and safely, with biometric logins for encrypted authentication and advanced antivirus defenses.
All the latest news, reviews, and guides for Windows and Xbox diehards.
Mauro Huculak is technical writer for WindowsCentral.com. His primary focus is to write comprehensive how-tos to help users get the most out of Windows 10 and its many related technologies. He has an IT background with professional certifications from Microsoft, Cisco, and CompTIA, and he’s a recognized member of the Microsoft MVP community.
This tutorial will show you step by step how to hide files and folders in Windows 10 from others. And also how to view and unhide hidden files and folders.
Methods:
How to hide files and folders in Windows 10 using File Explorer
1. Open File Explorer (Windows Explorer).
2. Go to the file or folder you want to hide.
3. Right-click on the file or folder and then click on Properties.
A “Properties” window will appear.
4. Check the box next to the Hidden option.
5. Click on the Apply button in the bottom right corner of the “Properties” window.
If you’re hiding a folder with files and subfolders, then a “Confirm Attribute Changes” window will appear. If you’re not hiding a folder, then you can continue with the last step (8).
6. Make sure that the Apply changes to this folder, subfolders, and files option is selected.
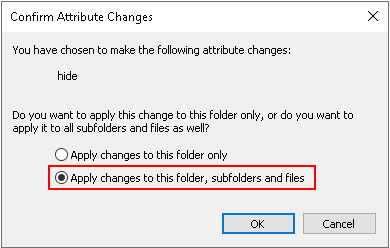
7. Click on the OK button.
8. Click on the OK button to close the “Properties” window.
This is an easy and fast way to hide files and folders, but it’s not a good and secure way. Someone with basic computer knowledge can find the files and folders easily and quickly.
This method is good for hiding files and folders for common users so that they hopefully don’t find and delete or edit the files or folders.
How to view hidden files and folders in Windows 10 using File Explorer
1. Open File Explorer (Windows Explorer).
2. Go to the location of the hidden file or folder.
3. Click on View located in the top menu of File Explorer.
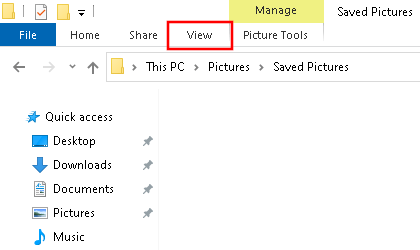
4. Check the box next to the Hidden items option.
You can now view the hidden file or folder.
How to unhide hidden files and folders in Windows 10 using File Explorer
1. Open File Explorer (Windows Explorer).
2. Go to the location of the hidden file or folder.
3. Click on View located in the top menu of File Explorer.
4. Check the box next to the Hidden items option.
You can now view the hidden file or folder.
5. Right-click on the file or folder and then click on Properties.
A “Properties” window will appear.
6. Uncheck the box next to the Hidden option.
7. Click on the Apply button in the bottom right corner of the “Properties” window.
If it’s a folder with files and subfolders, then a “Confirm Attribute Changes” window will appear. If it’s not a folder, then you can continue with the last step (10).
8. Make sure that the Apply changes to this folder, subfolders, and files option is selected.
9. Click on the OK button.
10. Click on the OK button to close the “Properties” window.
How to hide files and folders in Windows 10 using CMD (Command Prompt)
1. Open Windows Command Prompt.
Two ways to open Command Prompt:
- Type cmd into the search box and then click on Command Prompt when it appears.
- Press the Windows
 + R key combination, type cmd, and then press the Enter key on your keyboard.
2. Type a command similar to the commands below.
attrib +s +h C:\Users\mv\Documents\"Secret Files"attrib +s +h C:\Users\mv\Pictures\secret-picture.jpgattrib +s +h C:\Users\mv\Videos\"Secret Video.mp4"Replace C:\Users\mv\Documents\»Secret Files», C:\Users\mv\Pictures\secret-picture.jpg, or C:\Users\mv\Videos\»Secret Video.mp4″ with the path to the file or folder you want to hide on your computer.
Note: Quotation marks are only necessary when there are spaces in the name of the file or folder (e.g., Secret Files or Secret Video.mp4).
3. Press the Enter key on your keyboard.
The file or folder is now hidden.

This method is better than the first method because, with this method, Windows won’t show the hidden file or folder even if File Explorer is set to display hidden files and folders.
But:
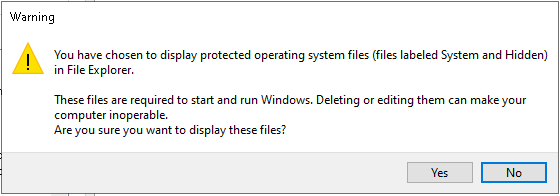
Someone can still view the hidden files or folders in File Explorer if they click on File (top left) > Change folder and search options > View > uncheck the Hide protected operating system files option.

But this will show a warning message and most people will probably freak out and not click Yes when the message appears.
How to make a hidden file or folder visible again in Windows 10 using CMD
1. Open Windows Command Prompt.
Two ways to open Command Prompt:
- Type cmd into the search box and then click on Command Prompt when it appears.
- Press the Windows + R key combination, type cmd, and then press the Enter key on your keyboard.
2. Type a command similar to the command you used to hide the file or folder but then replace attrib +s +h with attrib -s -h.
attrib -s -h C:\Users\mv\Documents\"Secret Files"attrib -s -h C:\Users\mv\Pictures\secret-picture.jpgattrib -s -h C:\Users\mv\Videos\"Secret Video.mp4"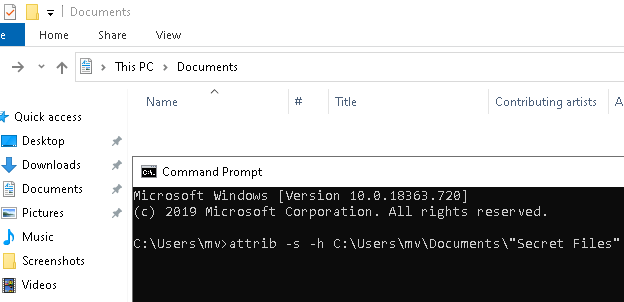
How to hide files and folders in audio files in Windows 10 using DeepSound
DeepSound is a free program that can hide files and folders in audio files. DeepSound also allows you to easily extract your secret files or folders from audio files.
DeepSound website
1. Open DeepSound.
2. Click on Open carrier files.
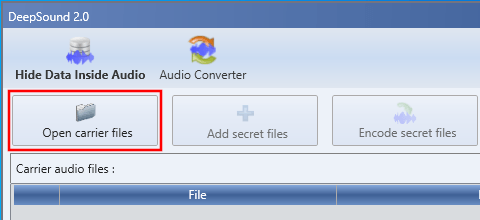
A “Open” window will appear.
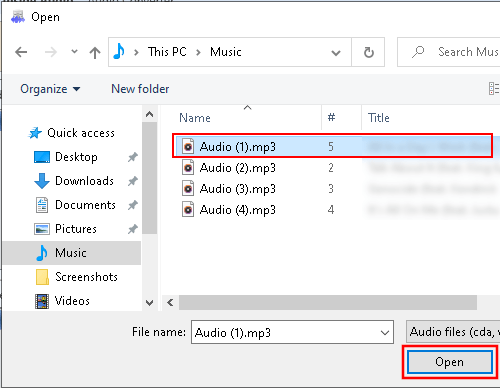
3. Go to the location on your computer where the audio file is stored you want to use to hide your secret data in.
4. Select the audio file.
5. Click on the Open button.
6. Click on Add secret files.
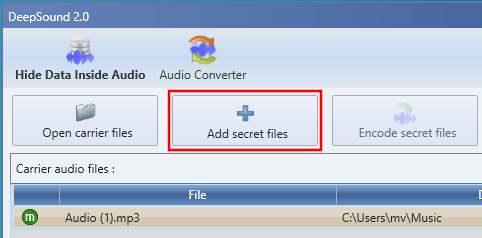
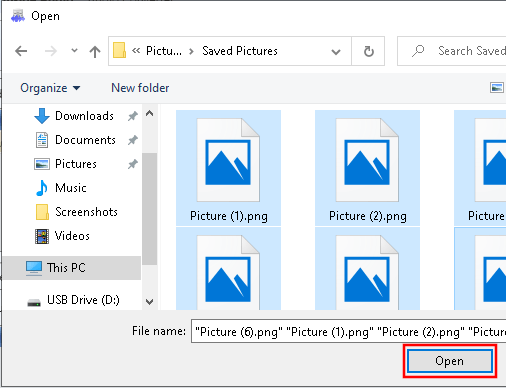
A “Open” window will appear.
7. Go to the location on your computer where the files or folders are that you want to hide.
8. Select the files or folders.
9. Click on the Open button.
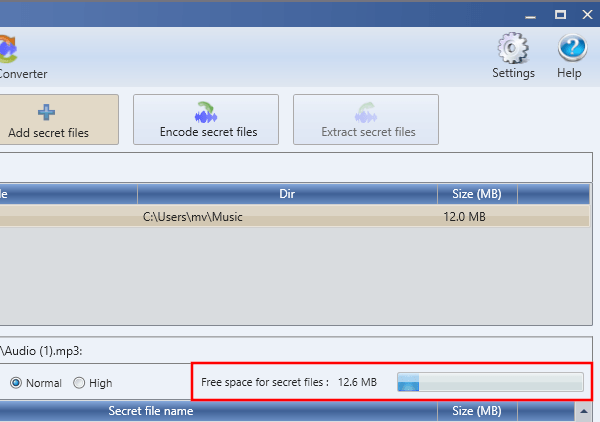
At Free space for secret files, you can see how much data (in MB) you can hide in the audio file.
10. When you’re ready, you click on Encode secret files.
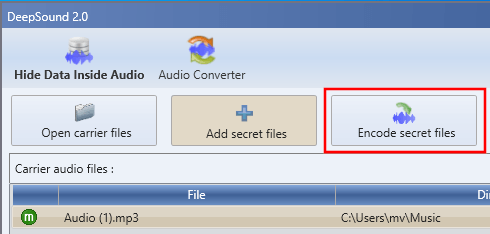
A “Encode secret files” window will appear.
11. At Output format, you can select an audio format.
12. At Output directory, you can see the location on your computer where DeepSound will save the audio file.
13. If you want to hide and protect your files or folder with a password, then check the Encrypt secret files (AES 256) option. If not, then you can skip the following two steps and continue with step 16.
14. Type your password twice.
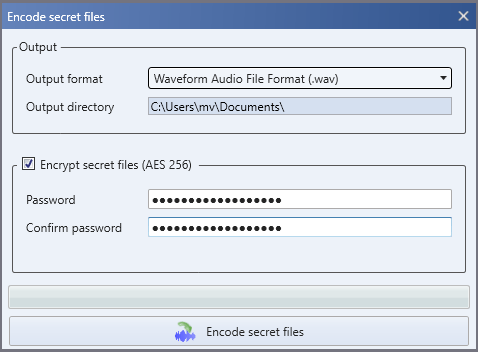
15. Click on Encode secret files button at the bottom of the “Encode secret files” window.
DeepSound will now hide your files or folders in an audio file.
To extract your files or folders from the audio file; click on Open carrier files. Select your audio file and click on Open. Enter your password if asked for and click on OK. Click on Extract secret files.
Windows
There are several reasons why one would want to hide a file or folder. Maybe, you want to stop others from reading that important file, or perhaps you don’t want others accessing your PC to open up a folder containing pictures or videos that you don’t want to share with others.
While Windows 10, like all earlier versions of the Windows operating system, does not offer a way to password protect a file or folder, but it does allow you to quickly hide a file or folder.
When you hide a file or folder, and when Don’t show hidden files, folders, and drives option is enabled in Folder Options, the file or folder doesn’t appear in the File Explorer (Windows Explorer).
In this guide, we will see how you can hide a file or folder in Windows 10.
Hide a file or folder in Windows 10
Step 1: Right-click on the file or folder that you would like to hide. Click Properties to open file/folder properties dialog.
Step 2: Under the General tab, under the Attributes section, check the box labeled Hidden. Finally, click the Apply button to hide the selected file or folder.
Make File Explorer hide hidden files and folders
The file or folder should disappear from File Explorer when you hide it. And if the file is still showing in File Explorer and file/folder icon is faded out, it’s because the File Explorer is configured to display hidden files and folders. Here is how to change that.
Step 1: Open Folder Options. There are six ways to open Folder Options in Windows 10. The easiest way is to click the File menu in File Explorer and then click Change folder and search options ( or only Options).
Step 2: Switch to the View tab of Folder Options or File Explorer Options. Check Don’t show hidden files, folders, and drives option. Click the Apply button.
To view hidden files and folders again
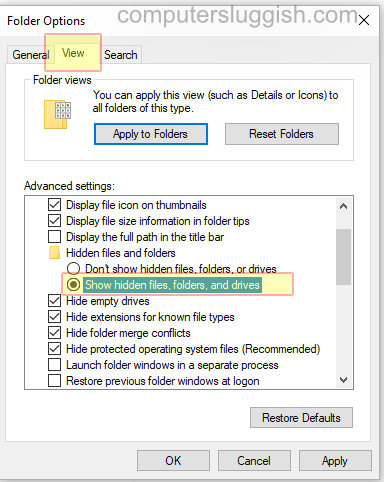
Step 1: Open Folder Options. Under the View tab, select the radio button labeled Show hidden files, folders, and drives option. Click the Apply button.
Step 2: The hidden file or folder should now appear in its original location, but the icon will be faded out. Right-click on the file or folder, click Properties, and then uncheck the Hidden checkbox and finally, click Apply button to see the file.
Using third-party tools to hide and password-protect files and folders
While the built-in option to hide files and folders is quite good, it doesn’t offer a secure way to hide files and folders yet. Therefore, anyone who gains access to your Windows 10 PC can easily access your hidden files and folders by making appropriate changes to Folder Options.
So, it’s a good idea to use third-party tools like Secret Folder (probably the best in its class) to password protect crucial files and folders in Windows 10.
When it comes to password protecting files and folders, there are quite a few good free software to choose from. You can refer to our top 4 free folder locker software for Windows 10 guide to download the best file and folder locker for Windows 10.
Keep your Files Hidden and Private!
Hiding files in Windows 10 can be done very easily and can be extremely handy if you would like a certain file to not be easily found.
Hiding files in Windows 10 can be achieved without the need of having to download additional software to your PC or laptop.
Although someone can still view the hidden files if they have the ‘Show hidden folders, files and drives’ option enabled, it still means you can kind of keep your files hidden if you are; allowing someone to quickly use your system, doing a remote screen share of your desktop, or maybe even recording or capturing your screen.
How To Hide your Files in Windows 10:
1. Find the file that you would like to hide > Right click on the file > Properties

2. Select the General tab
3. Tick the box for Hidden (next to attributes) > Press Apply > Press OK (your file will now become hidden)
If you have don’t have the ‘Show hidden files, folders or drives’ option enabled then you will no longer be able to see the hidden file, even though the file is still in the location where you left it.
There are two ways of being able to access the file again:
Method 1:
- Type the directory for the hidden file in File Explorer > Press enter and it will open the hidden file
Method 2:
- Open File explorer > Click the View tab
- Click on Options (you will now have the Folder Options window open)
- Select the View tab > Tick the box for Show hidden files, folders and drives
- Click Apply > Press OK

****Top Tip****
If you want the file no longer be hidden then you can easily show the file again
Check out our latest guides:
Hiding files and folders in Windows 10 is the most immediate method of making content invisible to prying eyes; Windows has always made it possible to do this via the graphical interface in an extremely simple way.
On the other hand, however, it must be said that hidden files can be viewed in an equally simple way. This is because, in practical terms, “hiding files and folders in Windows” means give the files in question the «hidden» attribute, which is read by Windows Explorer and the various components of the Windows shell.
The file or folder still resides on the disk, it does not disappear, and it is Windows itself that allows you to view them by playing with some settings of the Explorer.
That said, if we need it, we can hide files and folders in Windows 10 in a very simple way: let’s find out how to do it together!
Preliminary information
We always recommend doing an installation through one 100% genuine and original license, this is to avoid data loss or hacker attacks. We are aware that purchasing a license on the Microsoft store has a high cost. For this we have selected for you Mr Key Shop, a reliable site with free assistance specialized in in your language, secure payments and shipping in seconds via email. You can check the reliability of this site by reading the many positive verified reviews. Windows 10 licenses are available on this store at very advantageous prices. Furthermore, if you want to upgrade to the latest versions of Windows operating systems, you can also purchase the upgrade to Windows 11. We remind you that if you have a genuine version of Windows 10, the upgrade to the new Windows 11 operating system will be free. Also on the store you can buy the various versions of Windows operating systems, Office packages and the best antivirus on the market.
NOTE: : we reiterate that hiding a file in Windows 10 does not mean making it «disappear» from the disk but simply making it «invisible» to the entire Windows shell. This file can be safely viewed if the disk is opened by another operating system.
Hide a single file
Hiding a single file is very simple: just right click on the file itself and select Property.
Once the panel is open, just place a check mark on Read only and give OK. The file will immediately disappear from Windows Explorer.
Hide a folder
The procedure for hiding a folder is identical to the one to hide a file, with one substantial difference: once the change has been applied we will be asked if we also intend to hide the files contained in the folder and its sub-folders.
If we accept, all files included in the folder at that time (including subfolders) will also inherit the status of «hidden».
Hide multiple files
Windows 10 also makes it easy to hide multiple files at once; we will simply have to take care of select them all together using the mouse cursor or helping us with the CTRL or Shift keys.
Once this is done, once again, right click on one of the files of the selection and choose Property. Let’s put the check mark on Hidden away and let’s OK.
Make the files visible again
As we already mentioned at the beginning, hidden files are practically invisible to the operating system. To make them reappear again we have to act on the Explorer settings, telling the application to show hidden files as well.
Doing so is extremely simple: we open an Explorer window, then click on Show.
Let’s put the check mark on Hidden Elements: Our hidden files and folders will be visible again. At this point, if we want, we can clear the «Hidden» attribute from files and folders repeating the previous procedure and removing the check mark from Hidden.
BONUS: the command prompt
If for some reason we need to hide a file without using the Windows GUI using the command prompt instead, we can do it thanks to the «attrib» tool.
Attrib, as it is easy to guess, allows you to set or remove attributes to files and folders. In particular, the parameter h — where “h” stands for Hidden — can hide a file or folder.
So to hide a file via the command prompt we will have to type
attrib + H «percorsodelfile.estensione»
or, for folders,
attrib + H «percorsodellacartella»
Similarly, to make a file visible again via the command prompt we will have to type
attrib -H «percorsodelfile.estensione»
or, for folders,
attrib -H «percorsodellacartella»
Doubts or problems? We help you
Remember to subscribe to our Youtube channel for videos and other reviews. If you want to stay up to date, subscribe to our Telegram channel and follow us on Instagram. If you want to receive support for any questions or problems, join our Facebook community or contact us on Instagram. Don’t forget that we have also created a search engine full of exclusive coupons and the best promotions from the web!