
The git clone command is used to create a copy of a specific repository or branch within a repository.
Git is a distributed version control system. Maximize the advantages of a full repository on your own machine by cloning.
What Does git clone Do?
git clone https://github.com/github/training-kit.git
When you clone a repository, you don’t get one file, like you may in other centralized version control systems. By cloning with Git, you get the entire repository — all files, all branches, and all commits.
Cloning a repository is typically only done once, at the beginning of your interaction with a project. Once a repository already exists on a remote, like on GitHub, then you would clone that repository so you could interact with it locally. Once you have cloned a repository, you won’t need to clone it again to do regular development.
The ability to work with the entire repository means that all developers can work more freely. Without being limited by which files you can work on, you can work on a feature branch to make changes safely. Then, you can:
- later use
git pushto share your branch with the remote repository - open a pull request to compare the changes with your collaborators
- test and deploy as needed from the branch
- merge into the
mainbranch.
How to Use git clone
Common usages and options for git clone
git clone [url]: Clone (download) a repository that already exists on GitHub, including all of the files, branches, and commits.git clone --mirror: Clone a repository but without the ability to edit any of the files. This includes the refs, or branches. You may want to use this if you are trying to create a secondary copy of a repository on a separate remote and you want to match all of the branches. This may occur during configuration using a new remote for your Git hosting, or when using Git during automated testing.git clone --single-branch: Clone only a single branchgit clone --sparse: Instead of populating the working directory with all of the files in the current commit recursively, only populate the files present in the root directory. This could help with performance when cloning large repositories with many directories and sub-directories.- `git clone —recurse-submodules[=<pathspec]: After the clone is created, initialize and clone submodules within based on the provided pathspec. This may be a good option if you are cloning a repository that you know to have submodules, and you will be working with those submodules as dependencies in your local development.
You can see all of the many options with git clone in git-scm’s documentation.
Examples of git clone
git clone [url]
The most common usage of cloning is to simply clone a repository. This is only done once, when you begin working on a project, and would follow the syntax of git clone [url].
git clone A Branch
git clone --single-branch: By default, git clone will create remote tracking branches for all of the branches currently present in the remote which is being cloned. The only local branch that is created is the default branch.
But, maybe for some reason you would like to only get a remote tracking branch for one specific branch, or clone one branch which isn’t the default branch. Both of these things happen when you use --single-branch with git clone.
This will create a clone that only has commits included in the current line of history. This means no other branches will be cloned. You can specify a certain branch to clone, but the default branch, usually main, will be selected by default.
To clone one specific branch, use:
git clone [url] --branch [branch] --single-branch
Cloning only one branch does not add any benefits unless the repository is very large and contains binary files that slow down the performance of the repository. The recommended solution is to optimize the performance of the repository before relying on single branch cloning strategies.
git clone With SSH
Depending on how you authenticate with the remote server, you may choose to clone using SSH.
If you choose to clone with SSH, you would use a specific SSH path for the repository instead of a URL. Typically, developers are authenticated with SSH from the machine level. This means that you would probably clone with HTTPS or with SSH — not a mix of both for your repositories.
Related Terms
git branch: This shows the existing branches in your local repository. You can also usegit branch [banch-name]to create a branch from your current location, orgit branch --allto see all branches, both the local ones on your machine, and the remote tracking branches stored from the lastgit pullorgit fetchfrom the remote.git pull: Updates your current local working branch with all new commits from the corresponding remote branch on GitHub.git pullis a combination ofgit fetchandgit merge.git push: Uploads all local branch commits to the remote.git remote -v: Show the associated remote repositories and their stored name, likeorigin.
Contribute to this article on GitHub.
Get started with git and GitHub
Review code, manage projects, and build software alongside 40 million developers.
Sign up for GitHub
Sign in
- -l
- —local
-
When the repository to clone from is on a local machine,
this flag bypasses the normal «Git aware» transport
mechanism and clones the repository by making a copy of
HEAD and everything under objects and refs directories.
The files under.git/objects/directory are hardlinked
to save space when possible.If the repository is specified as a local path (e.g.,
/path/to/repo),
this is the default, and —local is essentially a no-op. If the
repository is specified as a URL, then this flag is ignored (and we
never use the local optimizations). Specifying--no-localwill
override the default when/path/to/repois given, using the regular
Git transport instead.If the repository’s
$GIT_DIR/objectshas symbolic links or is a
symbolic link, the clone will fail. This is a security measure to
prevent the unintentional copying of files by dereferencing the symbolic
links.NOTE: this operation can race with concurrent modification to the
source repository, similar to runningcp -r src dstwhile modifying
src. - —no-hardlinks
-
Force the cloning process from a repository on a local
filesystem to copy the files under the.git/objects
directory instead of using hardlinks. This may be desirable
if you are trying to make a back-up of your repository. - -s
- —shared
-
When the repository to clone is on the local machine,
instead of using hard links, automatically setup
.git/objects/info/alternatesto share the objects
with the source repository. The resulting repository
starts out without any object of its own.NOTE: this is a possibly dangerous operation; do not use
it unless you understand what it does. If you clone your
repository using this option and then delete branches (or use any
other Git command that makes any existing commit unreferenced) in the
source repository, some objects may become unreferenced (or dangling).
These objects may be removed by normal Git operations (such asgit commit)
which automatically callgit maintenance run --auto. (See
git-maintenance[1].) If these objects are removed and were referenced
by the cloned repository, then the cloned repository will become corrupt.Note that running
git repackwithout the--localoption in a repository
cloned with--sharedwill copy objects from the source repository into a pack
in the cloned repository, removing the disk space savings ofclone --shared.
It is safe, however, to rungit gc, which uses the--localoption by
default.If you want to break the dependency of a repository cloned with
--sharedon
its source repository, you can simply rungit repack -ato copy all
objects from the source repository into a pack in the cloned repository. - —reference[-if-able] <repository>
-
If the reference repository is on the local machine,
automatically setup.git/objects/info/alternatesto
obtain objects from the reference repository. Using
an already existing repository as an alternate will
require fewer objects to be copied from the repository
being cloned, reducing network and local storage costs.
When using the--reference-if-able, a non existing
directory is skipped with a warning instead of aborting
the clone.NOTE: see the NOTE for the
--sharedoption, and also the
--dissociateoption. - —dissociate
-
Borrow the objects from reference repositories specified
with the--referenceoptions only to reduce network
transfer, and stop borrowing from them after a clone is made
by making necessary local copies of borrowed objects. This
option can also be used when cloning locally from a
repository that already borrows objects from another
repository—the new repository will borrow objects from the
same repository, and this option can be used to stop the
borrowing. - -q
- —quiet
-
Operate quietly. Progress is not reported to the standard
error stream. - -v
- —verbose
-
Run verbosely. Does not affect the reporting of progress status
to the standard error stream. - —progress
-
Progress status is reported on the standard error stream
by default when it is attached to a terminal, unless--quiet
is specified. This flag forces progress status even if the
standard error stream is not directed to a terminal. - —server-option=<option>
-
Transmit the given string to the server when communicating using
protocol version 2. The given string must not contain a NUL or LF
character. The server’s handling of server options, including
unknown ones, is server-specific.
When multiple--server-option=<option>are given, they are all
sent to the other side in the order listed on the command line. - -n
- —no-checkout
-
No checkout of HEAD is performed after the clone is complete.
- —[no-]reject-shallow
-
Fail if the source repository is a shallow repository.
The clone.rejectShallow configuration variable can be used to
specify the default. - —bare
-
Make a bare Git repository. That is, instead of
creating<directory>and placing the administrative
files in<directory>/.git, make the<directory>
itself the$GIT_DIR. This obviously implies the--no-checkout
because there is nowhere to check out the working tree.
Also the branch heads at the remote are copied directly
to corresponding local branch heads, without mapping
them torefs/remotes/origin/. When this option is
used, neither remote-tracking branches nor the related
configuration variables are created. - —sparse
-
Employ a sparse-checkout, with only files in the toplevel
directory initially being present. The
git-sparse-checkout[1] command can be used to grow the
working directory as needed. - —filter=<filter-spec>
-
Use the partial clone feature and request that the server sends
a subset of reachable objects according to a given object filter.
When using--filter, the supplied<filter-spec>is used for
the partial clone filter. For example,--filter=blob:nonewill
filter out all blobs (file contents) until needed by Git. Also,
--filter=blob:limit=<size>will filter out all blobs of size
at least<size>. For more details on filter specifications, see
the--filteroption in git-rev-list[1]. - —also-filter-submodules
-
Also apply the partial clone filter to any submodules in the repository.
Requires--filterand--recurse-submodules. This can be turned on by
default by setting theclone.filterSubmodulesconfig option. - —mirror
-
Set up a mirror of the source repository. This implies
--bare.
Compared to--bare,--mirrornot only maps local branches of the
source to local branches of the target, it maps all refs (including
remote-tracking branches, notes etc.) and sets up a refspec configuration such
that all these refs are overwritten by agit remote updatein the
target repository. - -o <name>
- —origin <name>
-
Instead of using the remote name
originto keep track of the upstream
repository, use<name>. Overridesclone.defaultRemoteNamefrom the
config. - -b <name>
- —branch <name>
-
Instead of pointing the newly created HEAD to the branch pointed
to by the cloned repository’s HEAD, point to<name>branch
instead. In a non-bare repository, this is the branch that will
be checked out.
--branchcan also take tags and detaches the HEAD at that commit
in the resulting repository. - -u <upload-pack>
- —upload-pack <upload-pack>
-
When given, and the repository to clone from is accessed
via ssh, this specifies a non-default path for the command
run on the other end. - —template=<template-directory>
-
Specify the directory from which templates will be used;
(See the «TEMPLATE DIRECTORY» section of git-init[1].) - -c <key>=<value>
- —config <key>=<value>
-
Set a configuration variable in the newly-created repository;
this takes effect immediately after the repository is
initialized, but before the remote history is fetched or any
files checked out. The key is in the same format as expected by
git-config[1] (e.g.,core.eol=true). If multiple
values are given for the same key, each value will be written to
the config file. This makes it safe, for example, to add
additional fetch refspecs to the origin remote.Due to limitations of the current implementation, some configuration
variables do not take effect until after the initial fetch and checkout.
Configuration variables known to not take effect are:
remote.<name>.mirrorandremote.<name>.tagOpt. Use the
corresponding--mirrorand--no-tagsoptions instead. - —depth <depth>
-
Create a shallow clone with a history truncated to the
specified number of commits. Implies--single-branchunless
--no-single-branchis given to fetch the histories near the
tips of all branches. If you want to clone submodules shallowly,
also pass--shallow-submodules. - —shallow-since=<date>
-
Create a shallow clone with a history after the specified time.
- —shallow-exclude=<revision>
-
Create a shallow clone with a history, excluding commits
reachable from a specified remote branch or tag. This option
can be specified multiple times. - —[no-]single-branch
-
Clone only the history leading to the tip of a single branch,
either specified by the--branchoption or the primary
branch remote’sHEADpoints at.
Further fetches into the resulting repository will only update the
remote-tracking branch for the branch this option was used for the
initial cloning. If the HEAD at the remote did not point at any
branch when--single-branchclone was made, no remote-tracking
branch is created. - —no-tags
-
Don’t clone any tags, and set
remote.<remote>.tagOpt=--no-tagsin the config, ensuring
that futuregit pullandgit fetchoperations won’t follow
any tags. Subsequent explicit tag fetches will still work,
(see git-fetch[1]).Can be used in conjunction with
--single-branchto clone and
maintain a branch with no references other than a single cloned
branch. This is useful e.g. to maintain minimal clones of the default
branch of some repository for search indexing. - —recurse-submodules[=<pathspec>]
-
After the clone is created, initialize and clone submodules
within based on the provided pathspec. If no pathspec is
provided, all submodules are initialized and cloned.
This option can be given multiple times for pathspecs consisting
of multiple entries. The resulting clone hassubmodule.activeset to
the provided pathspec, or «.» (meaning all submodules) if no
pathspec is provided.Submodules are initialized and cloned using their default settings. This is
equivalent to running
git submodule update --init --recursive <pathspec>immediately after
the clone is finished. This option is ignored if the cloned repository does
not have a worktree/checkout (i.e. if any of--no-checkout/-n,--bare,
or--mirroris given) - —[no-]shallow-submodules
-
All submodules which are cloned will be shallow with a depth of 1.
- —[no-]remote-submodules
-
All submodules which are cloned will use the status of the submodule’s
remote-tracking branch to update the submodule, rather than the
superproject’s recorded SHA-1. Equivalent to passing--remoteto
git submodule update. - —separate-git-dir=<git-dir>
-
Instead of placing the cloned repository where it is supposed
to be, place the cloned repository at the specified directory,
then make a filesystem-agnostic Git symbolic link to there.
The result is Git repository can be separated from working
tree. - -j <n>
- —jobs <n>
-
The number of submodules fetched at the same time.
Defaults to thesubmodule.fetchJobsoption. - <repository>
-
The (possibly remote) repository to clone from. See the
GIT URLS section below for more information on specifying
repositories. - <directory>
-
The name of a new directory to clone into. The «humanish»
part of the source repository is used if no directory is
explicitly given (repofor/path/to/repo.gitandfoo
forhost.xz:foo/.git). Cloning into an existing directory
is only allowed if the directory is empty. - —bundle-uri=<uri>
-
Before fetching from the remote, fetch a bundle from the given
<uri>and unbundle the data into the local repository. The refs
in the bundle will be stored under the hiddenrefs/bundle/*
namespace. This option is incompatible with--depth,
--shallow-since, and--shallow-exclude.
Задача: форкнуть репозиторий в GitHub, создать ветку и работать с кодом.
Сразу появляется много вопросов — что такое GitHub, какие для этого нужны команды, зачем, а главное, как всем этим пользоваться? Давайте разберёмся.
Больше из рубрики Git: введение, основные команды, решение проблем.
Когда мы пишем код, мы постоянно туда что-то добавляем, удаляем, и иногда всё может ломаться. Поэтому перед любыми изменениями стоит сделать копию проекта. Если собирать проекты в папки с именами проект1, проект1_финали проект2_доделка, вы быстро запутаетесь и точно что-нибудь потеряете. Поэтому для работы с кодом используют системы контроля версий.
Система контроля версий — программа, которая хранит разные версии одного документа, позволяет переключаться между ними, вносить и отслеживать изменения. Таких систем много и все они работают по принципу компьютерной игры, где вы можете вернуться к месту сохранения, если что-то пошло не так.
Git — самая популярная система контроля версий. С Git можно работать через командную строку (или терминал). В каждой системе своя встроенная программа для работы с командной строкой. В Windows это PowerShell или cmd, а в Linux или macOS — Terminal. Вместо встроенных программ можно использовать любую другую — например, Git Bash в Windows или iTerm2 для macOS.
Как работает терминал: мы вводим команду и получаем ответ компьютера — или всё получилось, или где-то ошибка, или нужно ввести что-то ещё — например, пароль. Поэтому большая часть этой инструкции состоит из команд для терминала. Сначала будет непривычно, но вам понравится.
Но давайте по порядку — установим Git на компьютер.
Устанавливаем и настраиваем Git
Windows. Скачайте Git для Windows, запустите exe-файл, следуйте инструкциям.
macOS. Скачайте Git для macOS и запустите dmg-файл. Если он не запускается, зайдите в Системные настройки — Безопасность и нажмите кнопку Open anyway (Всё равно открыть).
Linux. Установите Git через встроенный менеджер пакетов. Если у вас Ubuntu, используйте команду sudo apt-get install git. Команды для других дистрибутивов можно посмотреть здесь.
Как проверить, что Git установился
Откройте терминал и введите команду
git --version
Если Git установлен, то вы увидите номер версии, например, 2.35.1.
Настраиваем Git
Теперь нужно ввести имя и адрес электронной почты, чтобы ваши действия в Git были подписаны, а ещё для привязки к GitHub.
Добавить имя (введите его внутри кавычек):
git config --global user.name "ваше имя"
Добавить электронную почту (замените email@example.com на вашу почту):
git config --global user.email email@example.com
Опция --global значит, что имя и почта будут использоваться для всех ваших действий в Git. Если вы хотите менять эту информацию для разных проектов, то вводите эти же команды, только без опции --global.
Регистрируемся на GitHub
GitHub (или Гитхаб) — веб-сервис на основе Git, который помогает совместно разрабатывать IT-проекты. На Гитхабе разработчики публикуют свой и редактируют чужой код, комментируют проекты и следят за новостями других пользователей.
Профиль на Гитхабе и все проекты в нём — ваше публичное портфолио разработчика, поэтому нужно завести профиль, если у вас его ещё нет.
- Зайдите на сайт https://github.com и нажмите кнопку Sign up.
- Введите имя пользователя (понадобится в дальнейшей работе), адрес электронной почты (такой же, как при настройке Git) и пароль.
- На почту придёт код активации — введите на сайте.
- Появится окно с выбором тарифного плана. Если вы пользуетесь Гитхабом для учёбы, то укажите, что профиль нужен только для вас и вы студент.
- Опросы и выбор интересов можно пропустить.
На этом всё — вы зарегистрировались и у вас есть собственный профиль.
Устанавливаем SSH-ключи
Чтобы получить доступ к проектам на GitHub со своего компьютера и выполнять команды без постоянного ввода пароля, нужно, чтобы сервер вас узнавал. Для этого используются SSH-ключи.
SSH — протокол для безопасного соединения между компьютерами.
SSH-ключ состоит из двух частей — открытого и закрытого ключа. Открытый ключ мы отправляем на сервер. Его можно не прятать от всех и не переживать, что кто-то его украдёт, потому что без закрытого ключа он бесполезен. А вот закрытый ключ — секретная часть, доступ к нему должен быть только у вас. Это важно.
Мы будем подключаться к GitHub по SSH. Это работает так:
- Вы отправляете какую-то информацию на GitHub, который знает ваш открытый ключ.
- GitHub по открытому ключу понимает, что вы это вы, и отправляет что-то в ответ.
- Только вы можете расшифровать этот ответ, потому что только у вас есть подходящий закрытый ключ.
А чтобы подключиться к GitHub с помощью SSH-ключа, сначала нужно его создать.
Проверяем SSH-ключи
Перед созданием нового SSH-ключа проверим, есть ли на компьютере другие ключи. Обычно они лежат в папке с названием .ssh — поэтому посмотрим, есть ли в ней что-то, с помощью команды в терминале:
ls -al ~/.ssh
Если у вас уже есть SSH-ключ, то в списке будут файлы с именами вроде id_rsa.pub, id_ecdsa.pub или id_ed25519.pub. А если терминал ругается, что директории ~/.ssh не существует, значит, у вас нет SSH-ключей. Давайте это исправим.
Создаём новый SSH-ключ
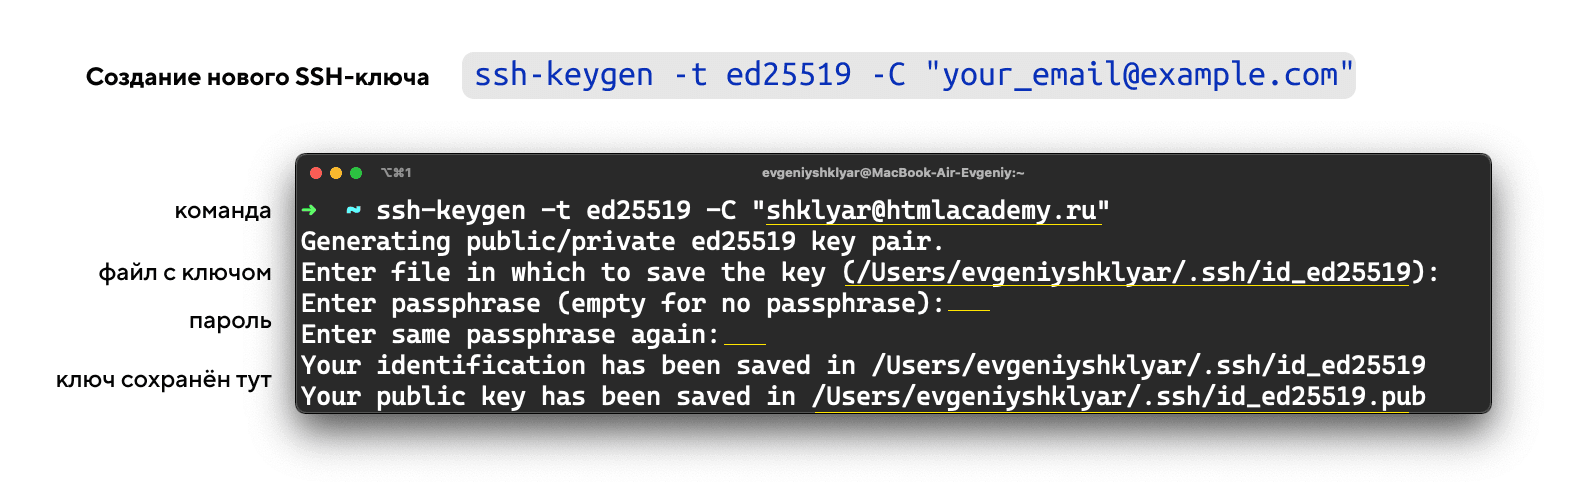
Откройте терминал и скопируйте туда эту команду. Не забудьте подставить в кавычки почту, на которую вы регистрировались на Гитхабе.
ssh-keygen -t ed25519 -C "your_email@example.com"
ed25519 — это алгоритм для генерации ключей. Если ваша система не поддерживает алгоритм ed25519 (и вы увидели ошибку), используйте немного другую команду с алгоритмом rsa:
ssh-keygen -t rsa -b 4096 -C "your_email@example.com"
Терминал спросит, куда сохранить ключ. Если не хотите менять имя файла, которое предлагает терминал, просто нажмите Enter.
> Generating public/private имя-ключа key pair.
> Enter a file in which to save the key (/c/Users/ваш-профиль/.ssh/id_имя-ключа):*[Press enter]*
Теперь нужно добавить пароль, которым будет зашифрован ваш ключ. Это стоит сделать, иначе в дальнейшем могут быть проблемы с настройкой, да и так просто безопаснее.
В результате создаётся новый SSH-ключ, привязанный к вашей электронной почте.
Создание ключа по шагам:
Добавляем SSH-ключ в ssh-agent
ssh-agent — программа для хранения и управления SSH-ключами. Давайте запустим её и добавим туда наш SSH-ключ. Запускаем командой eval "$(ssh-agent -s)":
eval "$(ssh-agent -s)"
Если в ответ терминал покажет надпись «Agent pid» и число — значит, всё ок, агент запущен.
Теперь добавим наш ключ командой.
ssh-add ~/.ssh/id_ed25519
Если у вашего ключа другое имя, замените название id_ed25519 именем файла с ключом (это правило применяется и дальше в инструкции). Если вы устанавливали пароль на ключ, введите его два раза после ввода команды ssh-add (терминал подскажет, когда это сделать).
Теперь, если всё хорошо, появится надпись Identity added — значит, можно переходить к добавлению ключа на GitHub.
Копируем SSH-ключ
Чтобы добавить ключ на GitHub, нужно сначала его скопировать из вашего файла командой clip. Вы не увидите ключ на экране, но он появится в буфере обмена, и его можно будет вставить на Гитхаб.
clip < ~/.ssh/id_ed25519.pub
Команда clip может не сработать на вашем компьютере, тогда есть два способа узнать ключ — простой и сложный.
Сложный способ. Найдите скрытую папку .ssh, откройте файл id_ed25519.pub в текстовом редакторе и скопируйте его содержимое.
Простой способ. Введите команду ниже и ключ появится прямо в терминале — его нужно вручную скопировать в буфер обмена. Ключ начинается с ssh-ed22519 или ssh-rsa (или похожей строки) — поэтому копируйте строку прямо с самого начала.
~ cat ~/.ssh/id_ed25519.pub

ssh-ed25519 AAAAC3NzaCZvnr4ax+Fr shklyar@htmlacademy.ru
Не копируйте этот ключ из статьи — он уже не работает.
Добавляем SSH-ключ на GitHub
Это нужно сделать, чтобы GitHub вас узнавал.
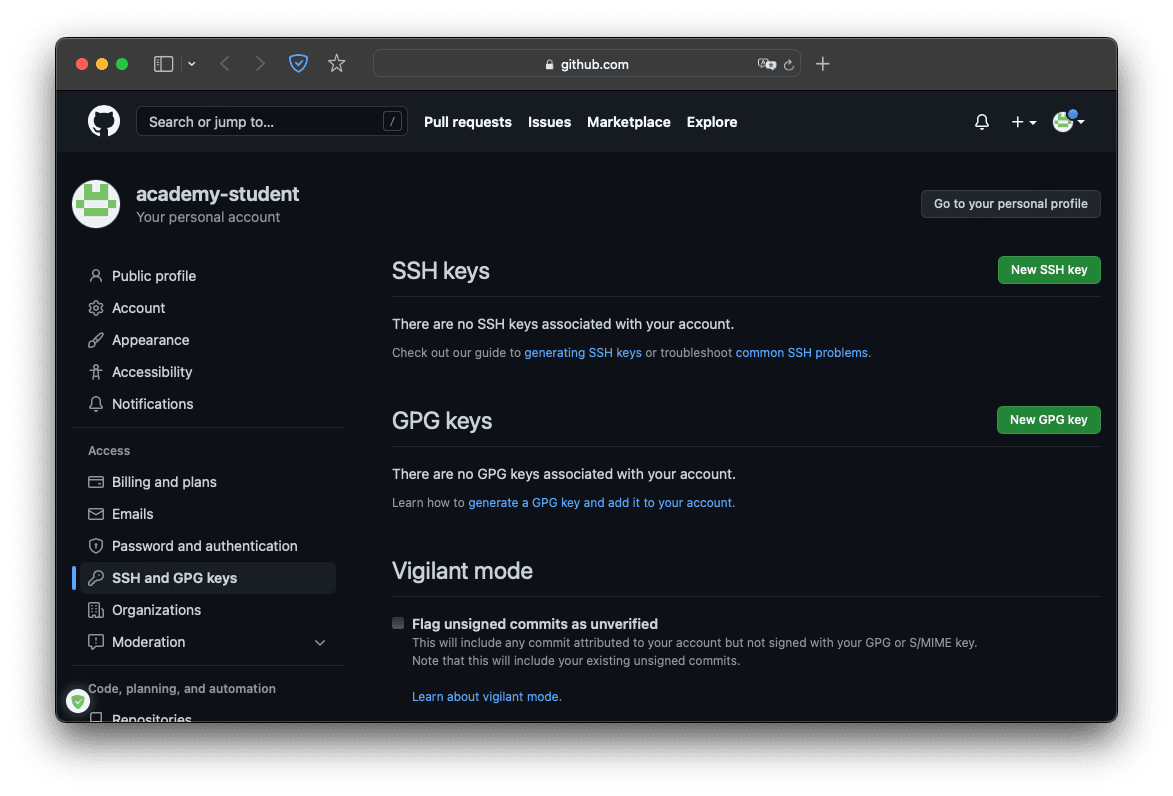
Перейдите на страницу для работы с ключами в вашем профиле на GitHub и нажмите кнопку New SSH key.
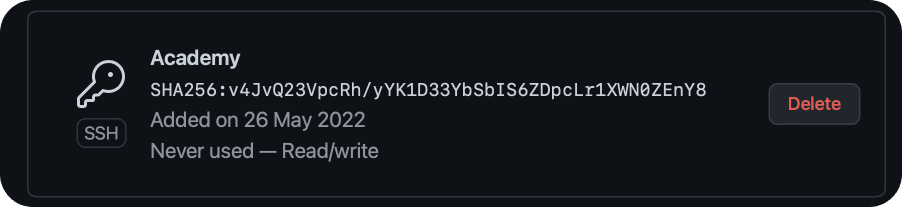
В поле Title нужно добавить название нового ключа. Например, если вы используете Mac, вы можете назвать ключ MacBook Air, или, если ключ для курсов Академии, то Academy. А ключ, который вы скопировали на прошлом шаге, вставьте в поле Key.
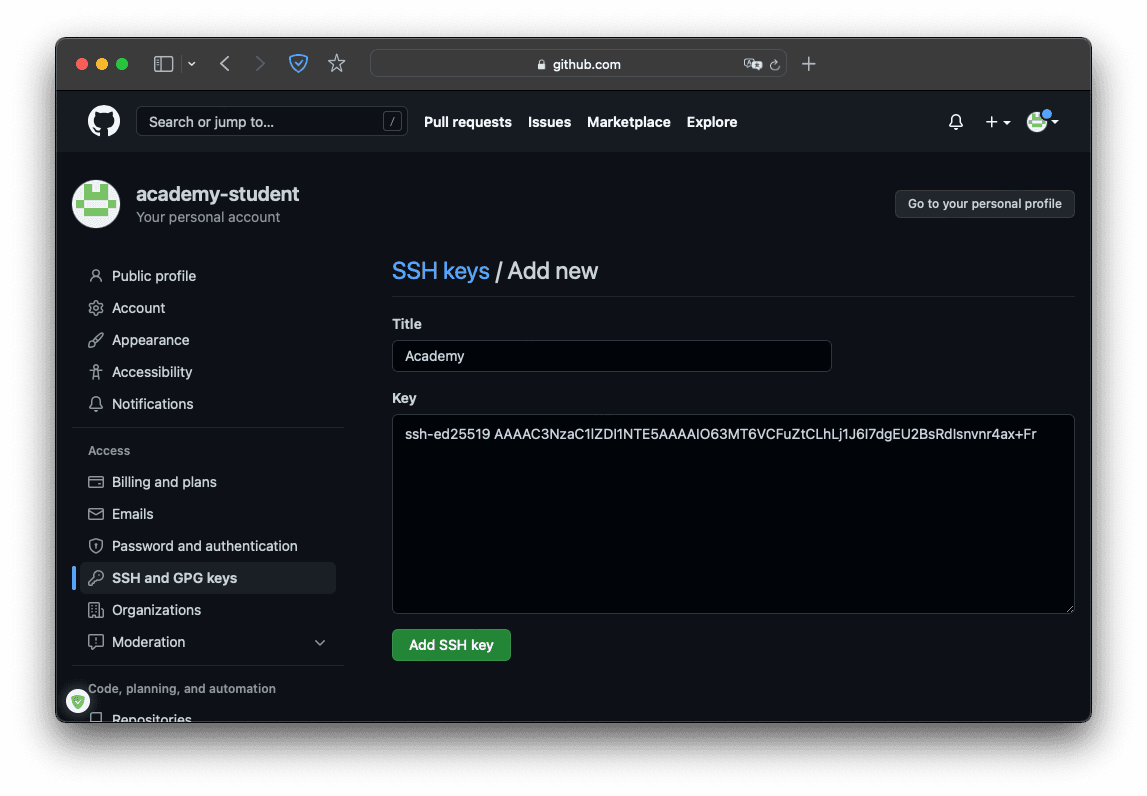
Не копируйте ключ со скриншота — он уже не работает.
Теперь нажмите кнопку Add SSH key и, если потребуется, введите свой пароль от GitHub, чтобы подтвердить сохранение. Если всё сделано верно, новый ключ появится в списке на странице https://github.com/settings/keys.
Теперь мы можем поработать с проектом в репозитории.
Что такое репозиторий
Репозиторий — папка с файлами вашего проекта на сервере GitHub. Так вы можете работать с проектом откуда угодно, не переживая, что какие-то файлы потеряются — все данные останутся в репозитории.
Если над проектом работает несколько программистов, сначала создаётся мастер-репозиторий — это общий репозиторий с рабочей версией проекта. А каждый программист работает с форком — то есть полной копией мастер-репозитория. В форке вы можете безнаказанно менять код и не бояться что-то сломать в основной версии проекта.
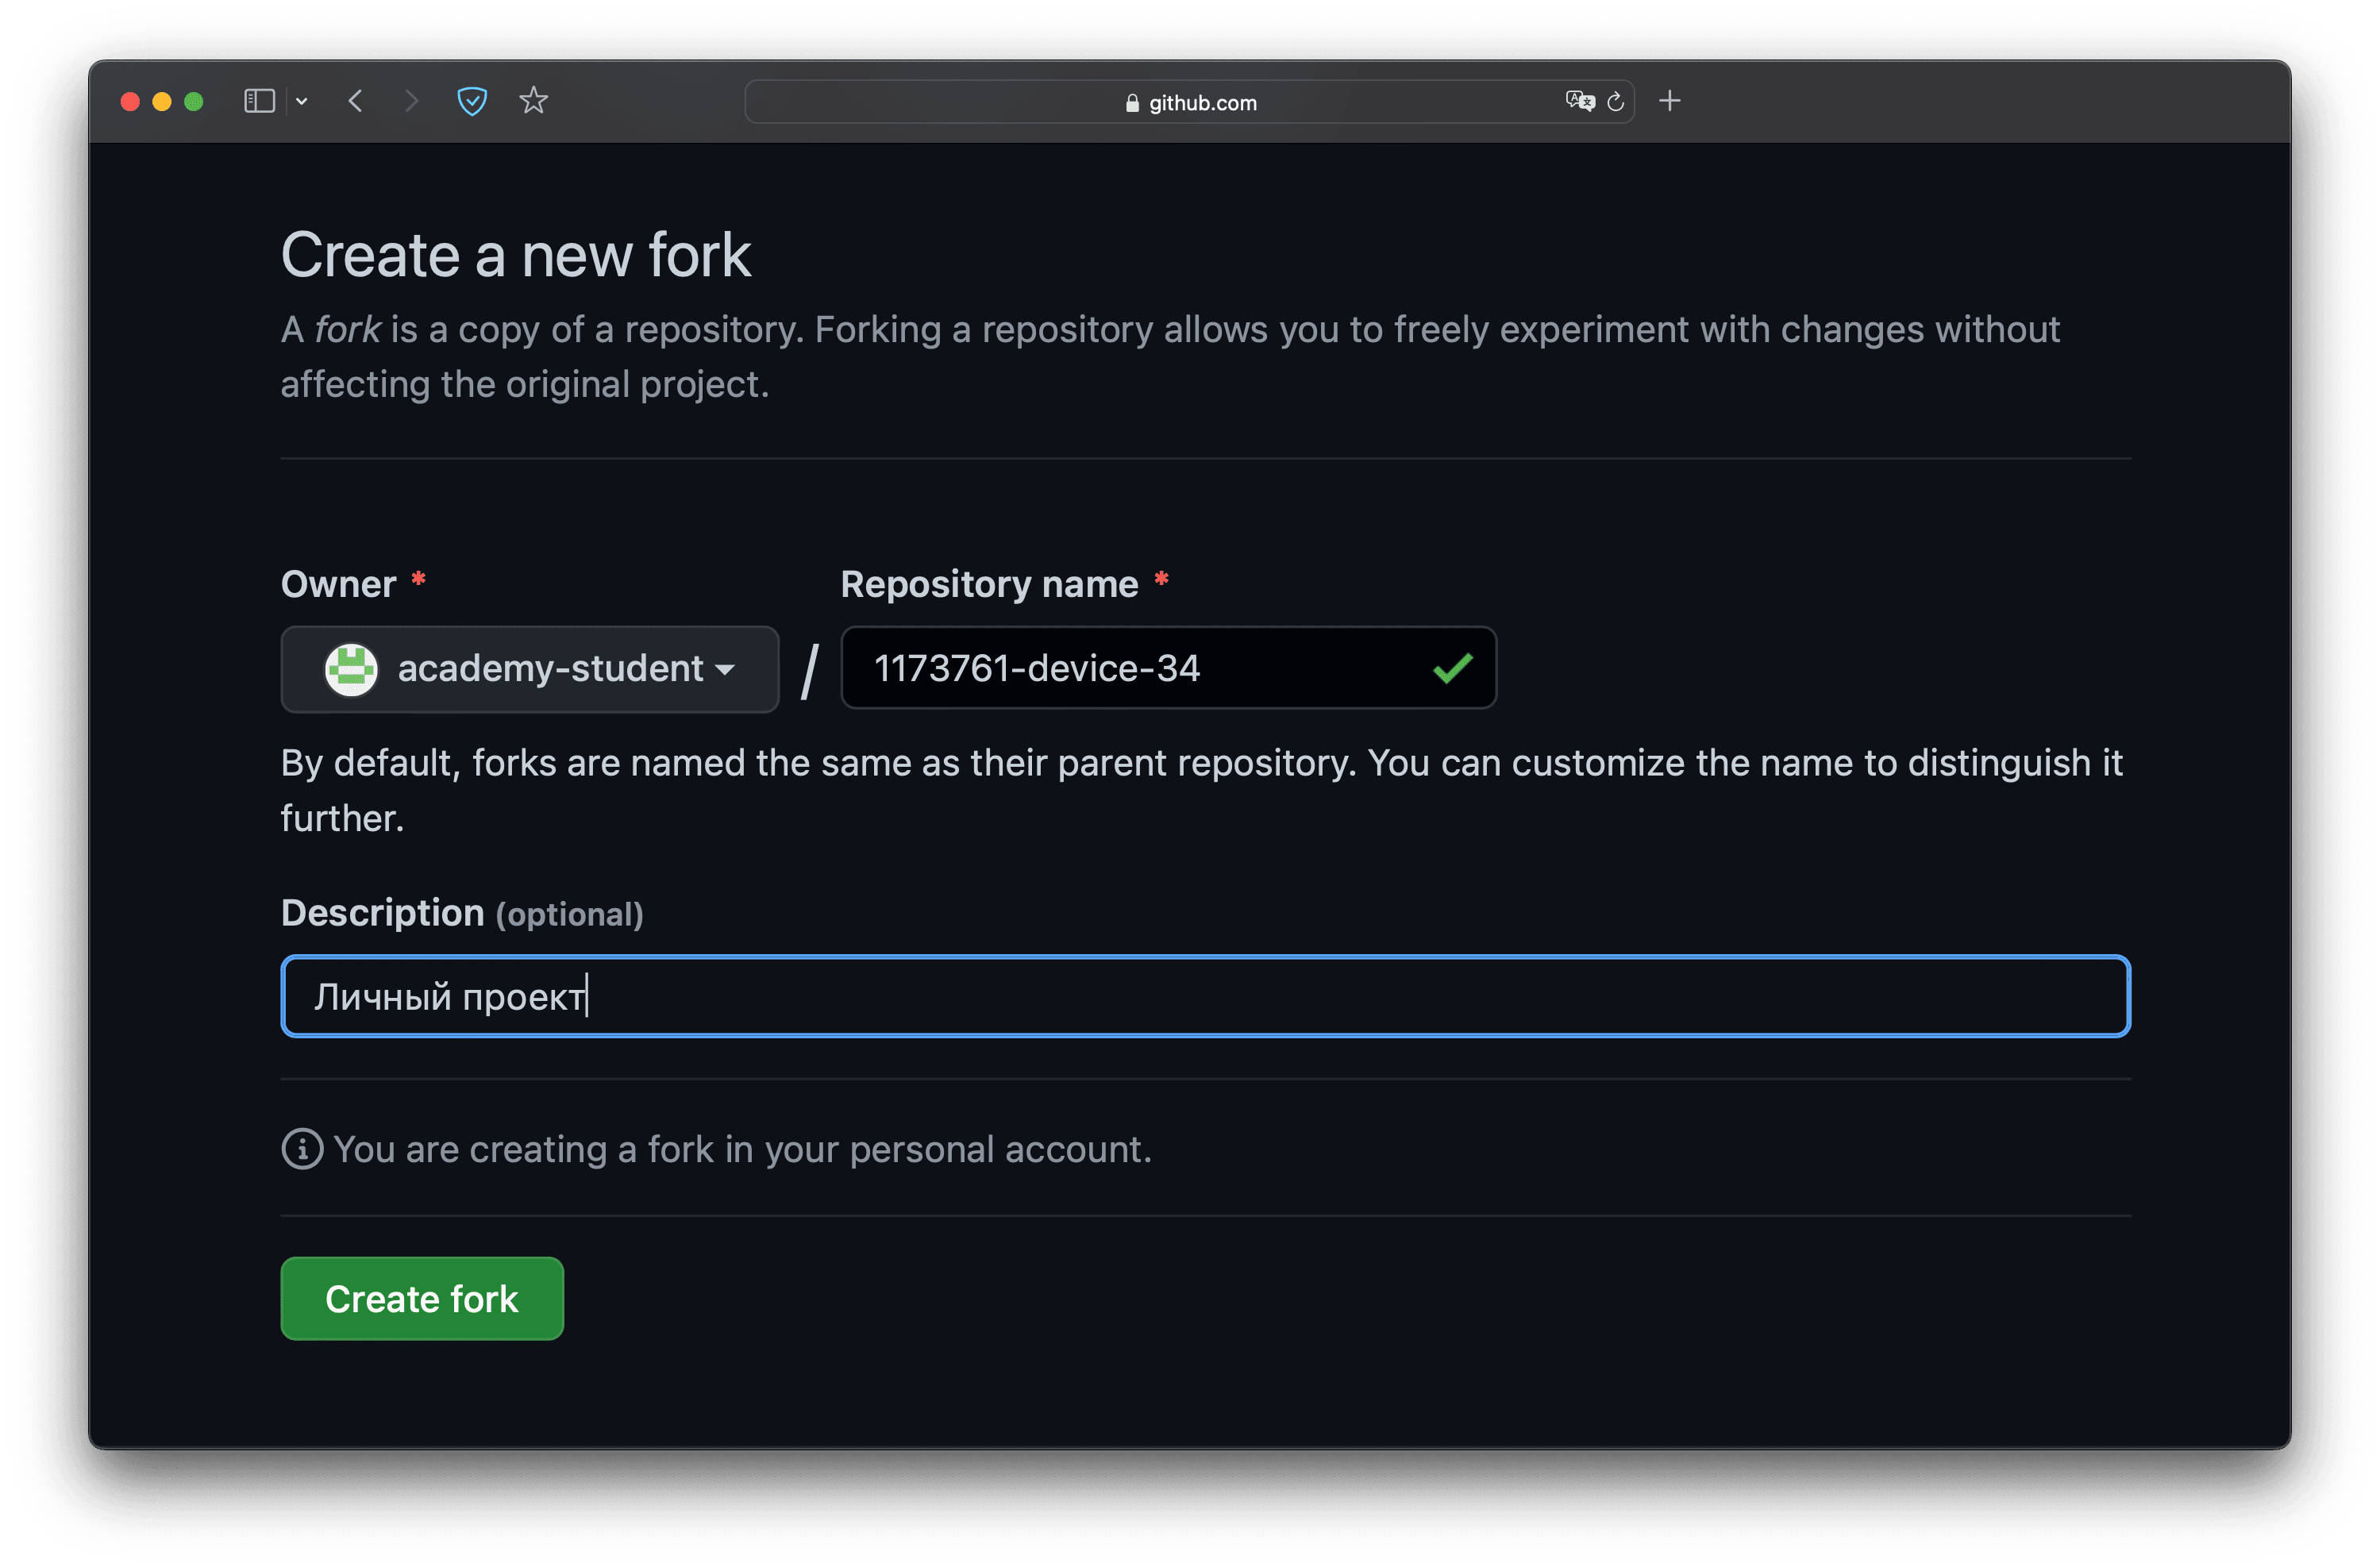
Делаем форк мастер-репозитория
Заходим в нужный репозиторий и нажимаем на «вилку» с надписью fork.

Появится окно Create a new fork — проверьте, что он называется так, как вам нужно, и жмите кнопку Create fork. Через пару секунд всё готово.
Клонируем форк на компьютер — git clone
Клонировать форк — значит скачать его, чтобы работать с кодом на своём компьютере. Тут нам и пригодится SSH.
Открываем терминал и переходим в папку с будущим проектом — для этого используем команду cd your-project. Если вы хотите, чтобы проект лежал в папке device, введите
cd device
Если такой папки на компьютере нет, то сначала введите md your-project, чтобы создать эту папку, а затем cd your-project. Когда перейдёте в папку, введите команду git clone для клонирования репозитория:
git clone git@github.com:your-nickname/your-project.git
Замените your-nickname на ваше имя пользователя на GitHub, а your-project на название проекта. Проще всего их найти прямо наверху страницы репозитория.
Если вы правильно настроили SSH-ключи, Git скопирует репозиторий на ваш компьютер.
➜  device git clone git@github.com:academy-student/1173761-device-34.git
Клонирование в «1173761-device-34»…
remote: Enumerating objects: 15, done.
remote: Counting objects: 100% (15/15), done.
remote: Compressing objects: 100% (14/14), done.
remote: Total 15 (delta 0), reused 15 (delta 0), pack-reused 0
Получение объектов: 100% (15/15), 145.07 КиБ | 900.00 КиБ/с, готово.
Если вы видите ошибку Error: Permission denied (publickey), скорее всего, вы ошиблись в настройке SSH-ключа. Вернитесь в этот раздел инструкции и повторите процесс настройки.
Кстати, если вы хотите, чтобы название папки с проектом у вас на компьютере отличалось от имени репозитория, можете дополнить команду клонирования, добавив в конце другое название:
git clone git@github.com:_your-nickname_/_your-project_.git folder_name
Теперь на вашем компьютере в папке your_project или в той, название которой вы указали, находится полная копия репозитория c GitHub.
В каждом репозитории есть как минимум одна основная ветка, которую создаёт сам Git — она называется master. Обычно в ней хранят проверенную версию программы без ошибок.
А если вы хотите исправить ошибку в коде или добавить что-то в проект, но не хотите сломать код в основной ветке, нужно создать новую ветку из master и работать из неё. Каждая ветка — что-то вроде второстепенной дороги, которая затем снова соединится с основной.
Создаём новую ветку — git branch
Откройте терминал и введите команду
git branch
Она показывает список веток, с которыми мы работаем в проекте, и выделяет текущую. Если мы находимся в master , то создаём новую ветку командой
git checkout -b имя-новой-ветки.
➜  1173761-device-34 git:(master) git checkout -b task1
Переключено на новую ветку «task1»
➜  1173761-device-34 git:(task1)
Если текущая ветка не master, переключитесь на неё с помощью команды checkout. После git checkout надо указать название нужной ветки.
git checkout master
Мы делаем это, чтобы новая ветка содержала свежую рабочую версию проекта. Если вы ошиблись в названии, например, допустили опечатку, вы можете изменить название ветки с помощью команды:
git branch -m старое-имя-ветки новое-имя-ветки.
Сохраняем изменения — git add
После того, как вы создали ветку и поработали в ней у себя на компьютере, нужно сохранить результат, чтобы появился в репозитории и не пропал.
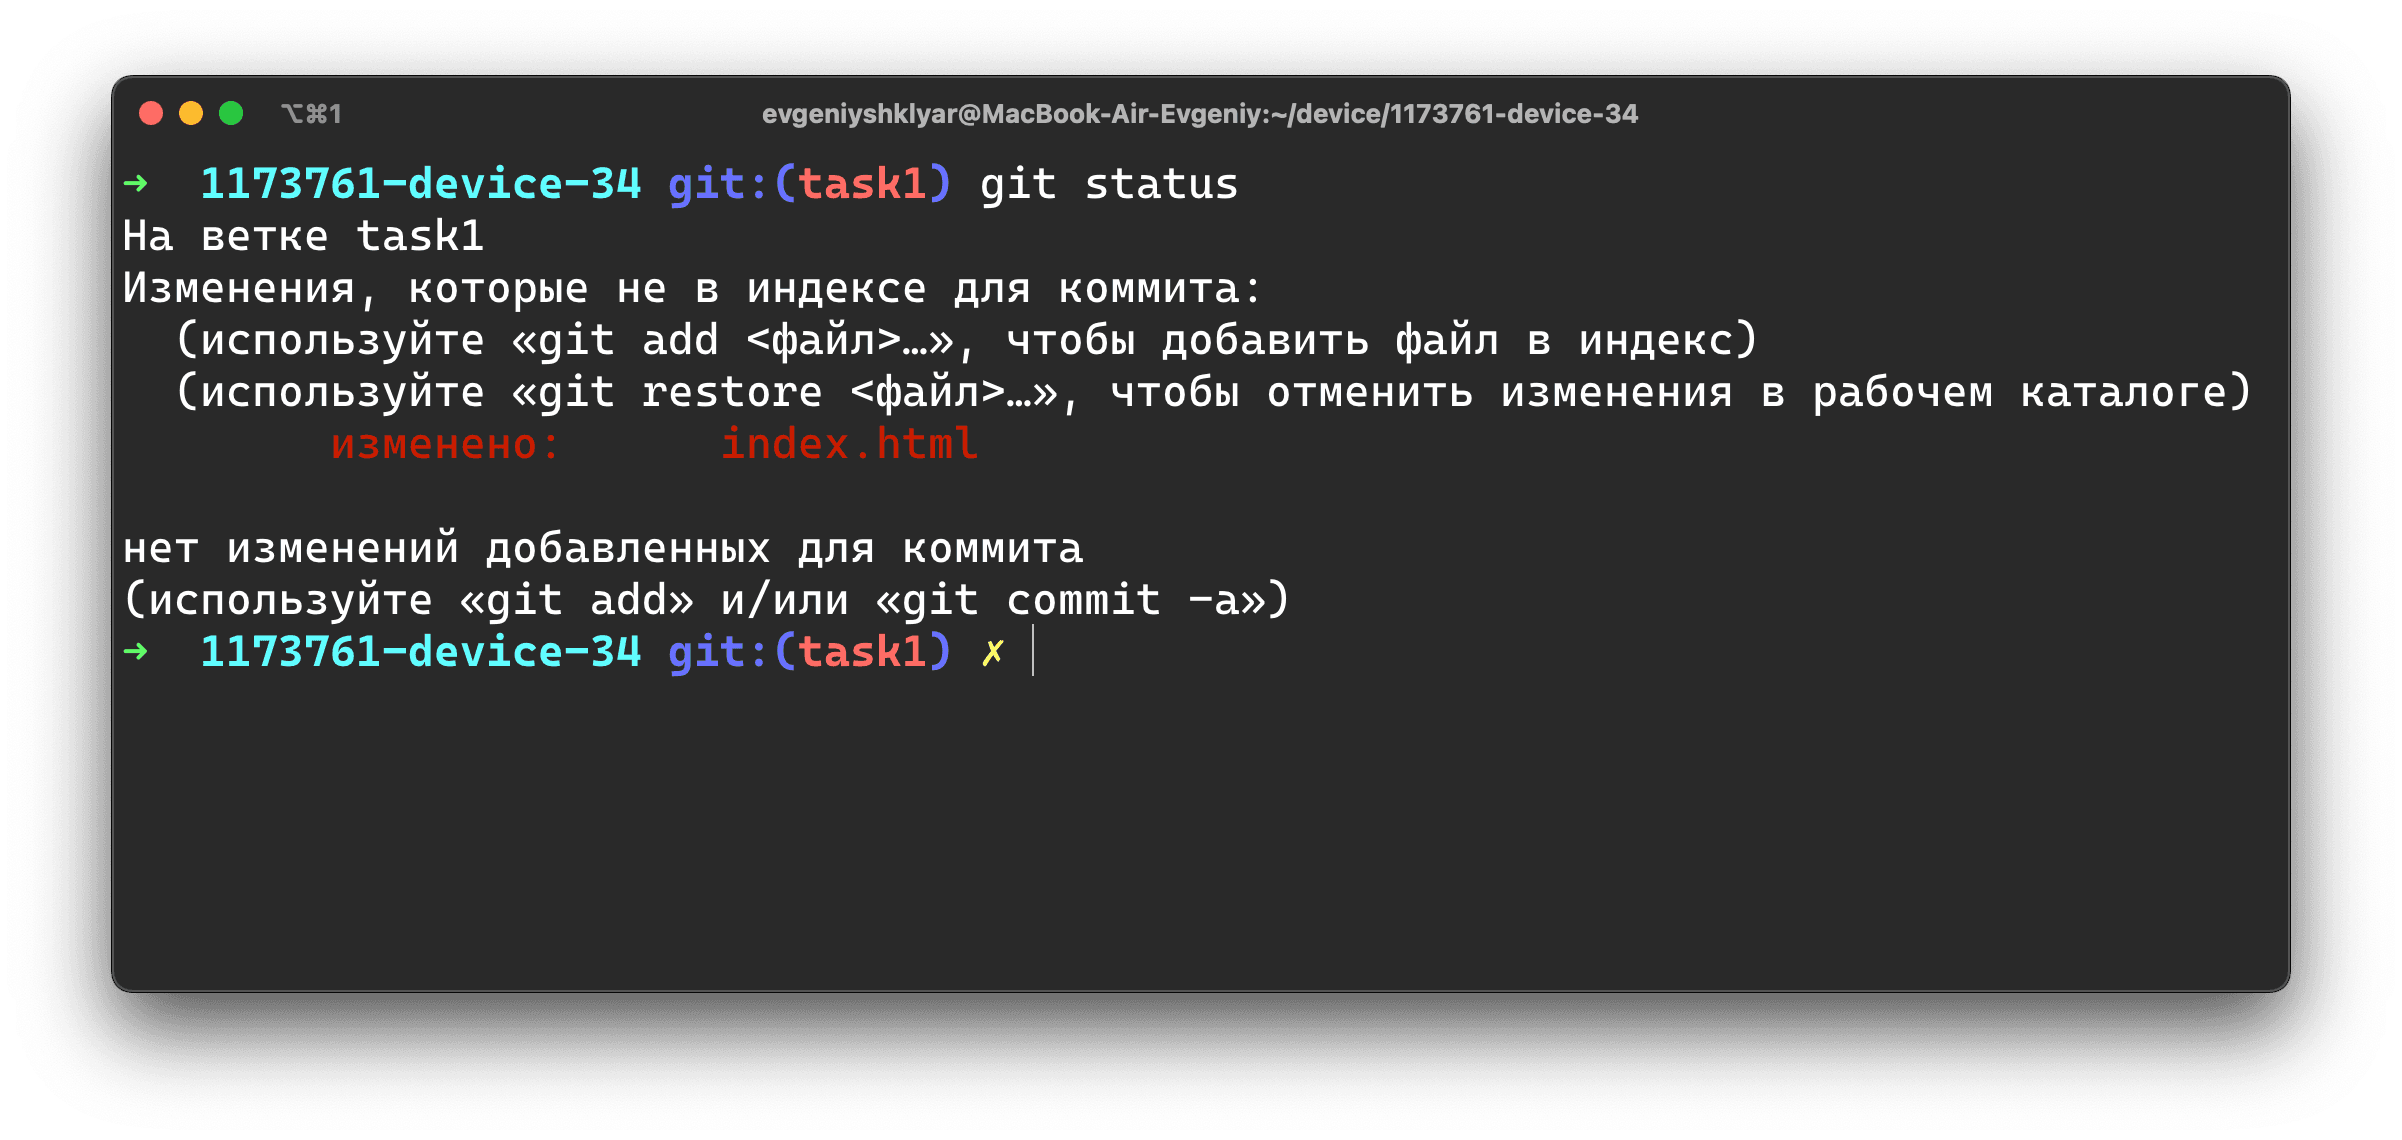
Если вы хотите сохранить изменения не во всех файлах, для начала введите команду git status. Она покажет текущее состояние в вашей ветке, а именно список с названиями изменённых файлов, если они есть, и укажет на те, которые ожидают записи и сохранения (обычно они выделены красным цветом).
Чтобы сохранить все изменения разом, используйте команду
git add -A
Чтобы сохранить изменения только отдельных файлов, укажите их имена вручную. Например, если вы изменили файл index.html, введите
git add index.html
Если название очень длинное, вы начните его писать, нажмите Tab и терминал сам предложит продолжение пути к файлу.
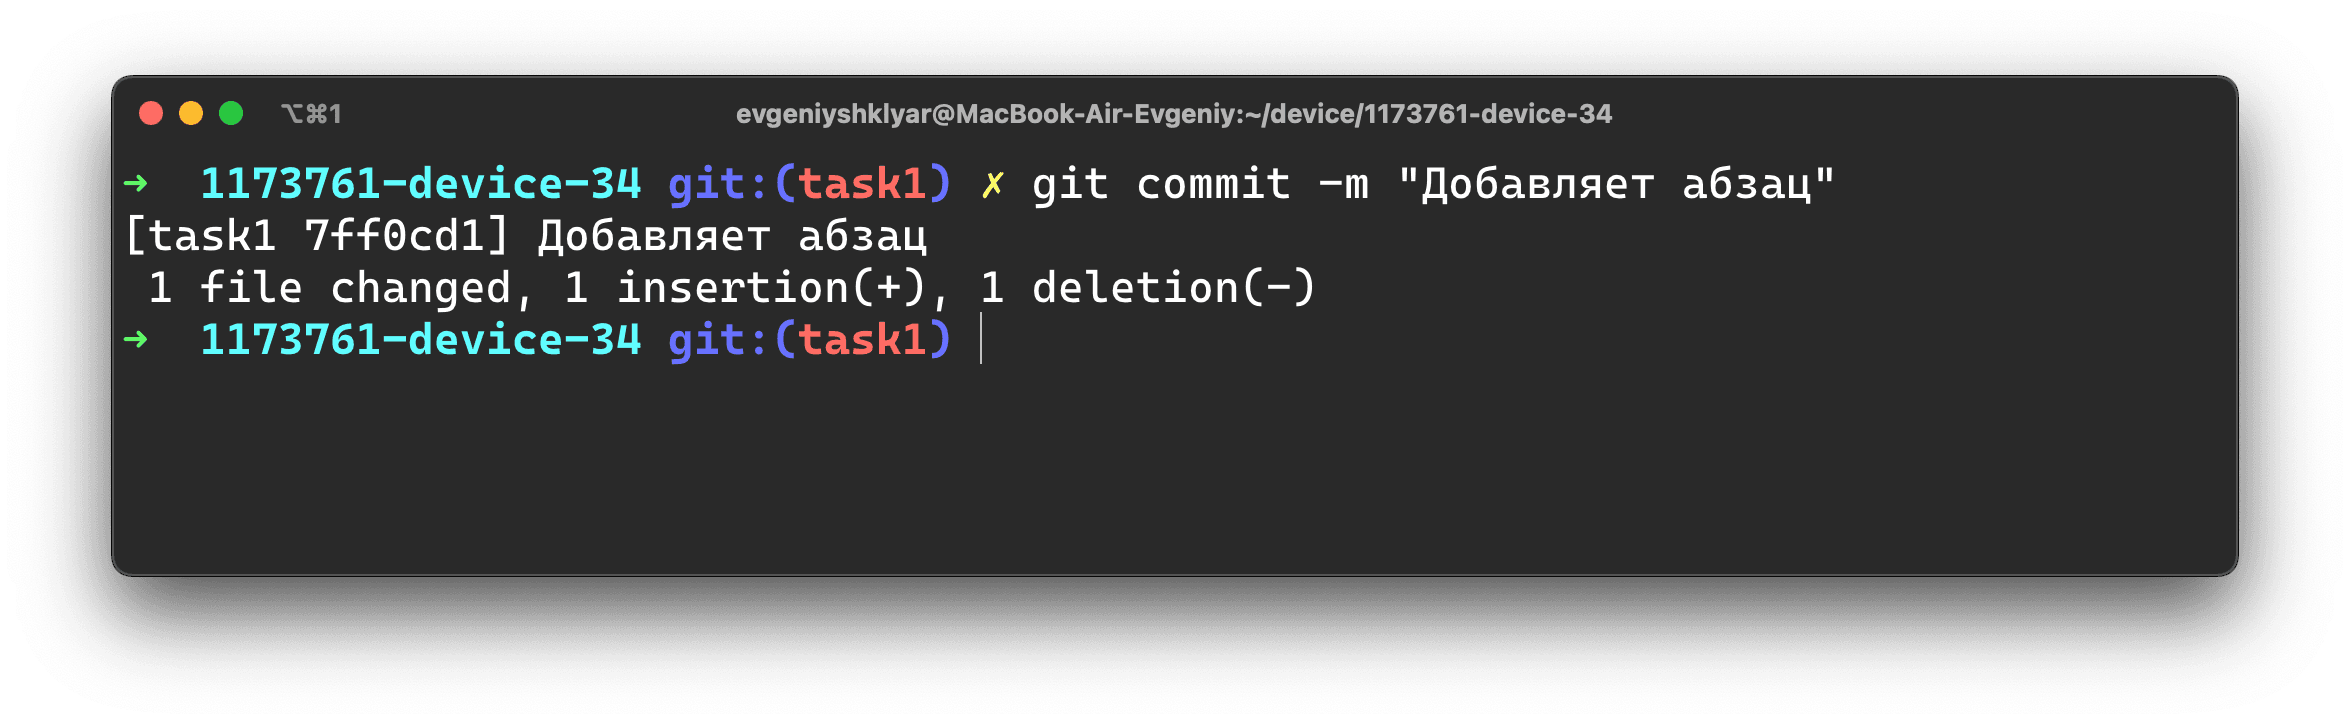
Делаем коммит — git commit
Сделать коммит — значит зафиксировать все сохранённые изменения и дать им название. Это делается с помощью команды commit
git commit -m "ваше сообщение"
Текст сообщения должен быть лаконичным и вместе с этим сообщать о том, что делает коммит (внесённые изменения). Например,
- Добавляет имя наставника в Readme
- Вводит функцию сортировки изображений
- Правит ошибку в поиске городов на карте
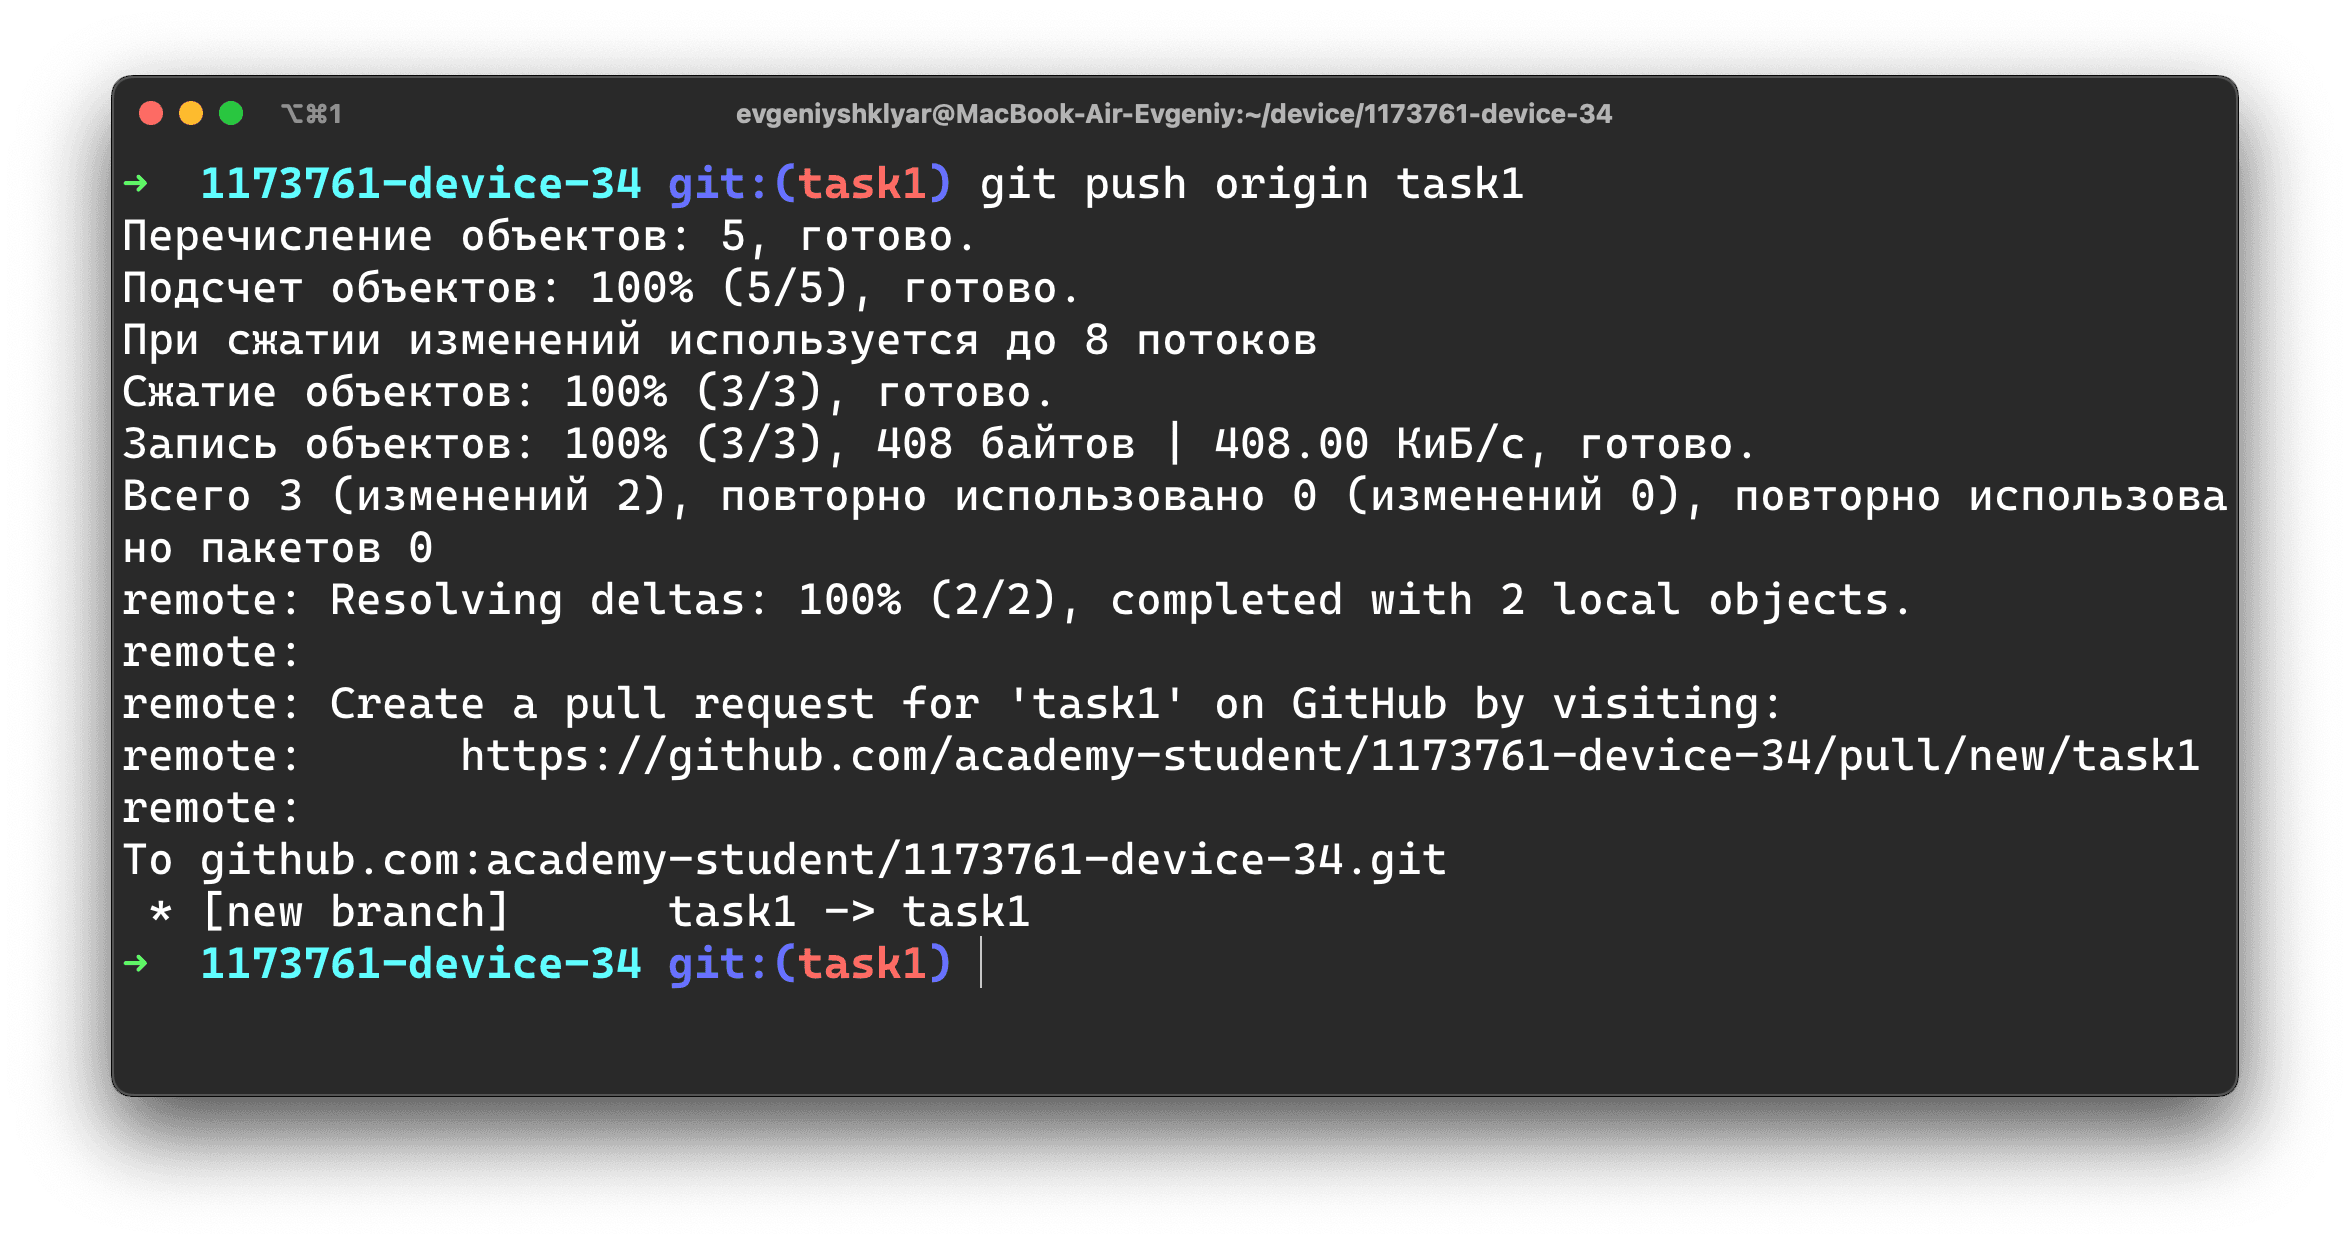
Отправляем изменения на GitHub — git push
Сохранённые изменения пока не видны коллегам, потому что находятся в нашем локальном репозитории. Нужно отправить коммиты на GitHub. Для этого введите команду
git push origin название-текущей-ветки
Где origin означает репозиторий на компьютере, то есть ваш форк. Слово origin — часть команды, не меняйте это название на своё.
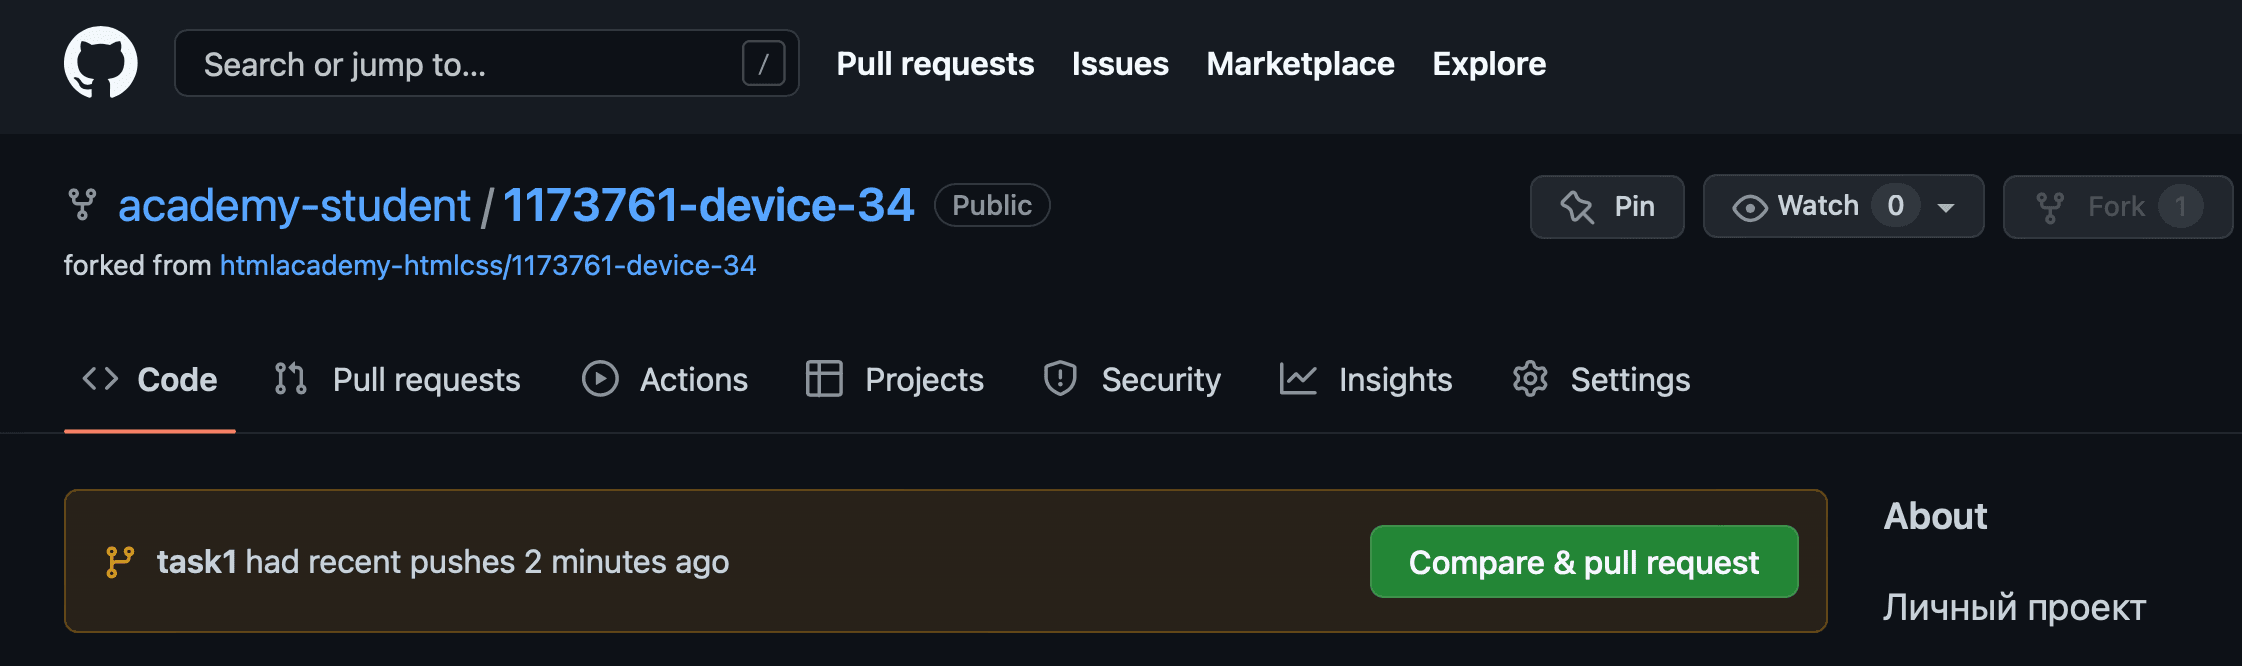
Создаём пулреквест
Пулреквест (или PR) — это предложение изменить код в репозитории. PR должен проверить администратор мастер-репозитория — это может быть коллега-разработчик, техлид или наставник на курсе.
Если к коду нет вопросов, пулреквест принимается. Если нужно что-то исправить — отклоняется, и придётся исправить код и снова пройти цепочку git add — git commit — git push. Если вы и дальше работаете в той же ветке, а пулреквест ещё не принят, все ваши изменения автоматически добавятся в пулреквест, созданный из этой ветки после команды git push origin название-текущей-ветки.
Чтобы создать пулреквест, зайдите на страницу вашего форка на GitHub. Вверху появилась плашка Compare & pull request, а ещё можно зайти на вкладку Pull Requests.
Нажмите на неё и окажетесь на странице открытия пулреквеста. Проверьте описание и нажмите Create pull request.
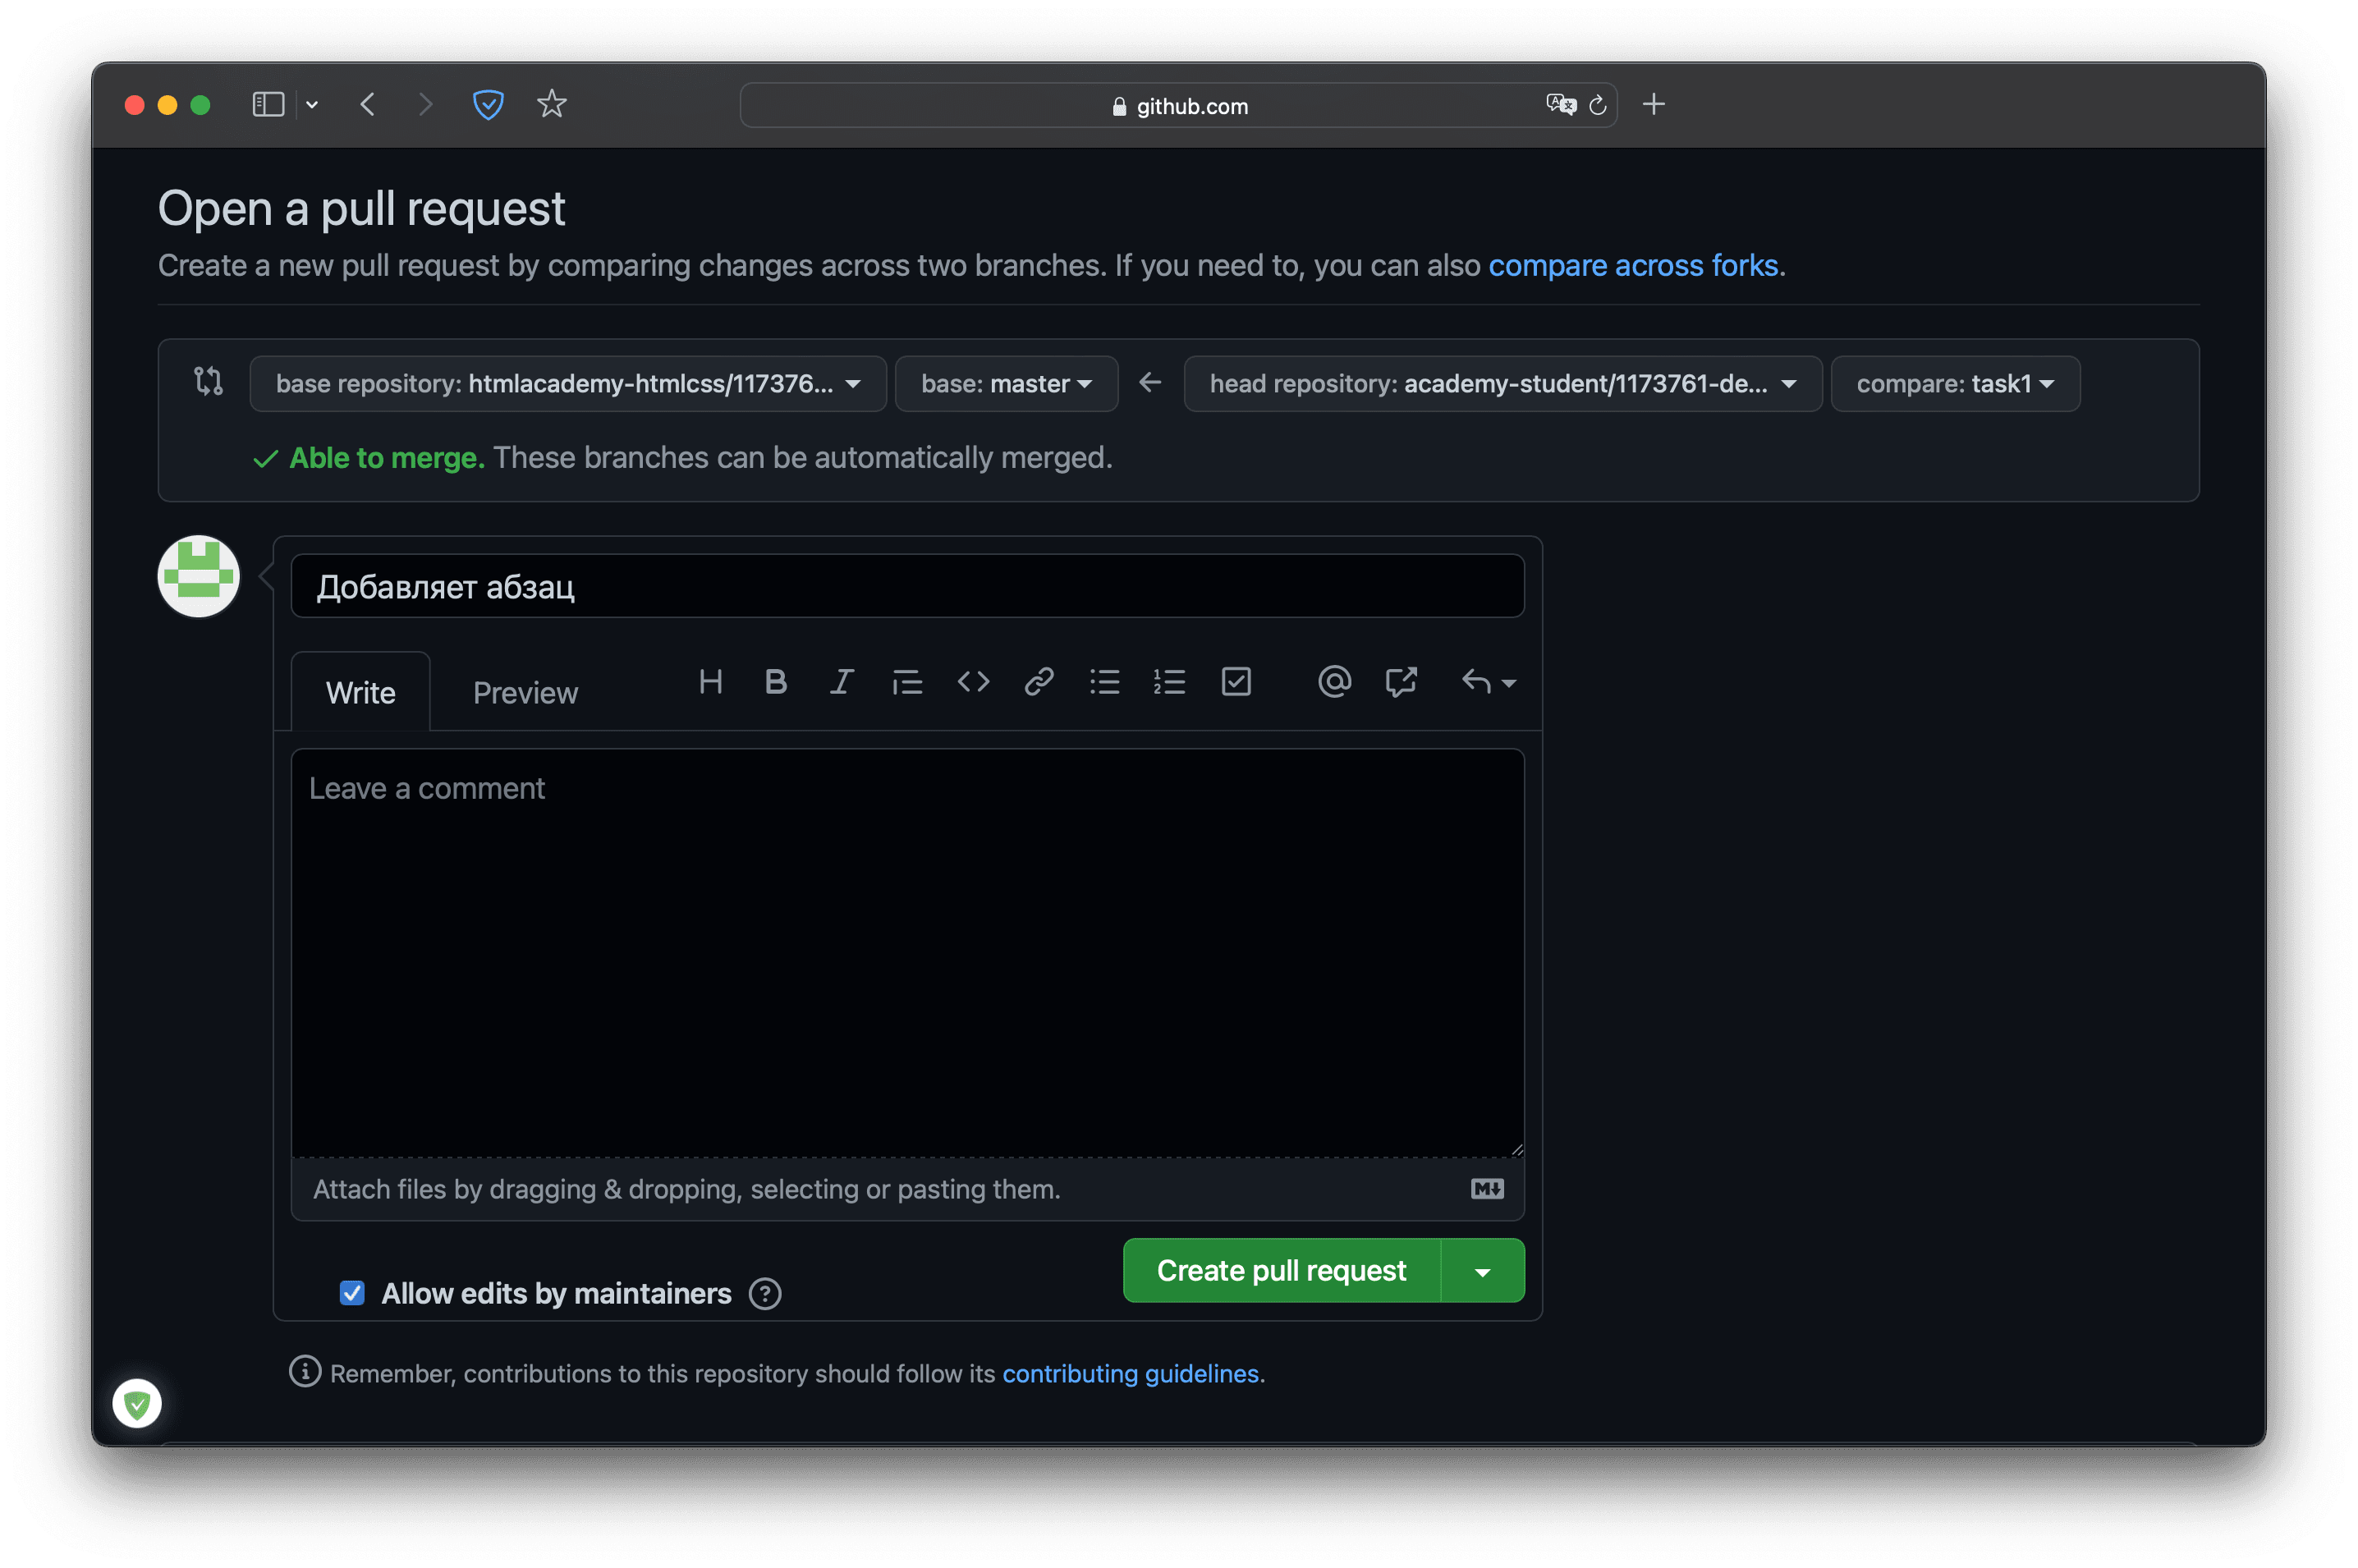
Готово, теперь ждём остаётся ждать одобрения пулреквеста или комментариев к нему.
Синхронизируем репозитории
Предположим, вы исправили код, руководитель или наставник одобрил ваши правки и принял пулреквест.

Теперь код в мастер-репозитории обновился, а в вашем форке нет, вы ведь не обновляли свою версию репозитория с тех пор, как клонировали её себе на компьютер. Приведём форк в актуальное состояние.
В локальном репозитории переключаемся на ветку master.
git checkout master
Забираем изменения из ветки master мастер-репозитория
git pull git@github.com:academy-student/1173761-device-34.git master
Отправляем изменения уже из своей ветки master в ваш форк на GitHub с помощью команды
git push origin master
Готово, теперь форк и оригинальный репозиторий находятся в актуальном состоянии.
Словарик
Система контроля версий — программа, которая хранит разные версии одного документа, позволяет переключаться между ними, вносить и отслеживать изменения.
Git — самая популярная система контроля версий. С Git можно работать через терминал.
Как работает терминал: мы вводим команду и получаем ответ компьютера — или всё получилось, или где-то ошибка, или нужно ввести что-то ещё.
GitHub (или Гитхаб) — веб-сервис, основанный на Git, который помогает совместно разрабатывать IT-проекты. На Гитхабе разработчики публикуют свой и редактируют чужой код, комментируют проекты и следят за новостями других пользователей.
SSH-ключ нужен, чтобы получить доступ к проектам на GitHub со своего компьютера и выполнять команды без постоянного ввода пароля, нужно, чтобы сервер нас узнавал.
ssh-agent — программа для хранения и управления SSH-ключами.
Репозиторий — папка с файлами вашего проекта на сервере GitHub или у вас на компьютере.
Мастер-репозиторий — это общий для всей команды репозиторий с рабочей версией проекта.
Форк — полная копия мастер-репозитория, в которой вы можете безопасно работать.
Клонировать форк — скачать его командой git clone, чтобы работать с кодом на своём компьютере.
Пулреквест (или PR) — предложение изменить код в репозитории. PR должен проверить администратор мастер-репозитория — это может быть коллега-разработчик, техлид или наставник на курсе.
«Доктайп» — журнал о фронтенде. Читайте, слушайте и учитесь с нами.
ТелеграмПодкастБесплатные учебники
You have created a repository on Github and want to create a local copy on your computer? We will use the git clone command in git to download a git repository on your computer.
git clone is the command that clones a repository into a local repository
This post will show you how you can sync a local copy of your Github remote repository on Windows.
First, you need to install Git on your computer.
- From Github Repository, click on Clone
- Copy the clone URL
- In Terminal (Mac) or command line (Windows git bash), move to local directory
- Use the git clone command along with the copied URL
How to Clone Github Repository in Windows
To clone your Github repo on Windows.
- Open Git Bash
If Git is not already installed, it is super simple. Just go to the Git Download Folder and follow the instructions.
- Go to the current directory where you want the cloned directory to be added.
To do this, input
cdand add your folder location. You can add the folder location by dragging the folder to Git bash.$ cd '/c/Users/j-c.chouinard/My First Git Project' - Go to the page of the repository that you want to clone
- Click on “Clone or download” and copy the URL.

- Use the git clone command along with the copied URL from earlier.
$ git clone https://github.com/USERNAME/REPOSITORY - Press Enter.
$ git clone https://github.com/USERNAME/REPOSITORY
Cloning into Git …
remote: Counting objects: 13, done.
remote: Compressing objects: 100% (13/13), done.
remove: Total 13 (delta 1), reused 0 (delta 1)
Unpacking objects: 100% (13/13), done.
Congratulations, you have created your first local clone from your remote Github repository. See how you can commit a file to your Github repository.
Duplicate a Repository
If you want to make private a forked repository, you can duplicate the repository.
Step 1: Go to Github
Step 2: Create a new repository
Here I will name my repository PVT-new-repository.
Step 3: Go to the old repository
Step 4: Click on “Clone or download” and copy the URL.
Step 5: Open Git Bash
Step 6: Create a bare clone of the repository.
$ git clone --bare https://github.com/username/old-repo.git
Step 7: Push a Mirror to the new repository.
$ cd old-repository.git
$ git push --mirror https://github.com/username/PVT-new-repository.git
Remove the temporary local repository you created in step 1.$ cd ..
$ rm -rf old-repository.git
Clone Your Github in VSCode
VSCode is a useful text editor built by Microsoft that can easily be used in Windows and MacOS. Here is how to install git in VSCode.
To clone the Github repository using VSCode, similar as before, copy the clone URL.
In Visual Studio Code, press Ctrl + Shift + P (on Windows), or Command + Shift + P (on Mac). and type Git: Clone.
Add the clone URL and choose the folder location where you desire cloning your repository.
Become a Git Master
Although very powerful, Git is very complex. I highly recommend that you follow Datacamp’s Git course to really become comfortable with Git commands and avoid painful mistakes.
- Introduction to Git
Git Useful Commands
| Git command | What it does |
|---|---|
| git clone | clone repository |
| git clone –bare | bare clone of the repository |
| git push –mirror | push mirror of repository |
| git commit -m “message” | commit to repository |
Other Version Control with Git and Github Posts
Learn Git and Github (Complete Guide)
Basics of Version Control
How to Use Git and Github with VSCode
Conclusion
This is it.
You now know how to Clone a Github Repository on Your Computer.

SEO Strategist at Tripadvisor, ex- Seek (Melbourne, Australia). Specialized in technical SEO. In a quest to programmatic SEO for large organizations through the use of Python, R and machine learning.

(Image credit: GitHub)
The Microsoft-owned GitHub platform is the largest of its kind for sharing and collaborating on a variety of code projects. It’s also completely free to use for individuals and if a repository is public, anyone can clone it and use the files within.
GitHub is used for a variety of reasons, not least as a way to distribute your own code. One of the absolute basics is cloning a repository from GitHub to your local machine. If you’ve never done this before it could seem like a foreign concept, but it’s really easy to do.
Whether you want to use regular old Windows or the Windows Subsystem for Linux (WSL) this is what you need to know.
Installing Git onto your PC
The main tool you’ll be using with GitHub is Git. This can be confusing, but Git is the tool and GitHub is the service that interacts with it; Git is completely separate and has nothing to do with Microsoft.
The basic definition of Git is that it’s a version control tool, allowing multiple people to interact with the same files independently with the option to merge changes into the master branch.
Git is also the tool that we’ll be using to clone a GitHub repo from the cloud to a local machine.
To install Git on Windows you can simply go to the website and download the executable, or if you want to use the Windows Package Manager, open up a new PowerShell window and enter
winget install git.
In WSL distros like Ubuntu and Debian you can install Git using the command
sudo apt install git. It should already be installed when you set up your WSL installation, but if it isn’t this command is all you need.
On Windows, the Git installation will come with its own terminal. You can use this if you wish, but you can also just interact with it inside PowerShell. Especially if it’s an environment you’re already comfortable with.
How to clone a GitHub repo to your PC
Cloning is one of the most basic functions of Git and one that you can use happily without getting in the weeds too much if all you’re interested in is being able to pull content from GitHub. Cloning is essentially downloading, in so much as you point your local Git client at the destination on GitHub and it will pull the content down, creating a new directory on your local machine.
Whether you’re working within PowerShell using Git for Windows or you’re inside WSL, the commands you need are the same. Git is platform-agnostic, so you can learn it once and use it everywhere.
When you clone the repo in the terminal, it will create your local folder inside whatever directory your command line is in at that point. So if you want to put it somewhere specific, find the right location in File Explorer then right-click and open in PowerShell/Windows Terminal. WSL distros can also access the Windows filesystem so if you’re using Linux on your Windows box, the same idea applies. It will only save to the Linux file system if you tell it to.
Cloning from GitHub basically requires you to get a web address to feed into the Git client. For this example, we’re going to clone the Microsoft Visual Studio Code repo.
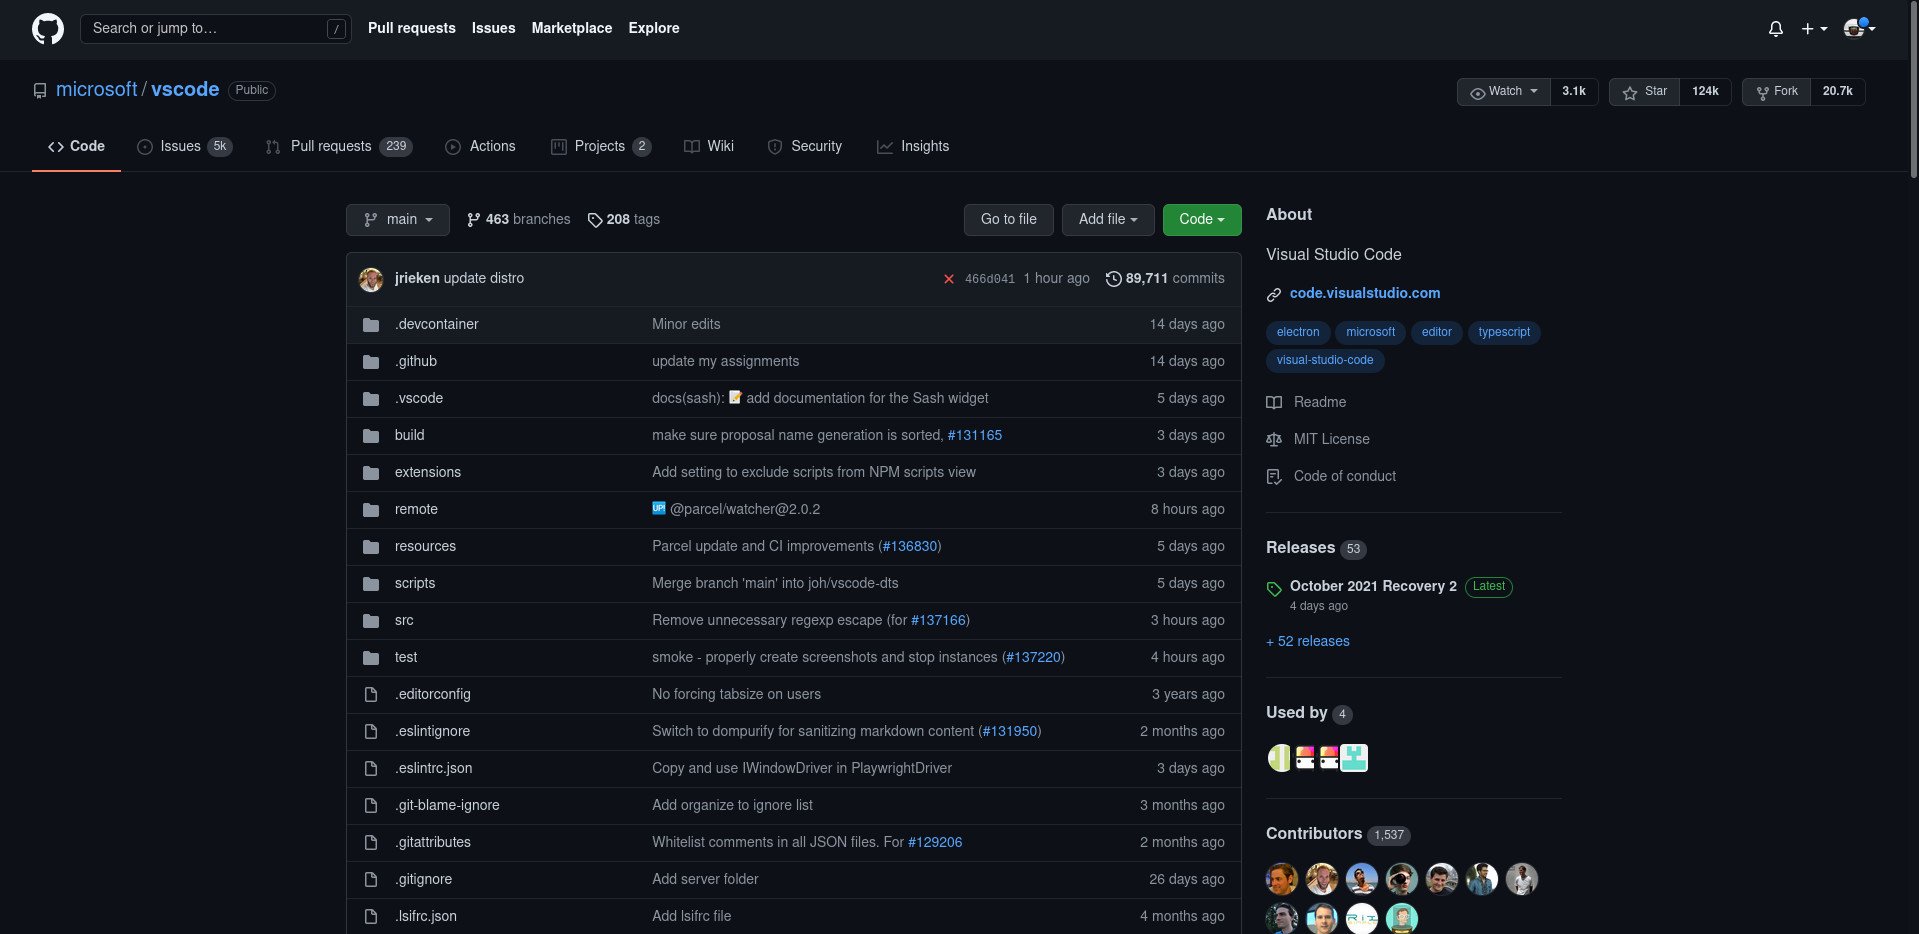
- Find the repo you want on the GitHub website. For this example, we’re using https://github.com/microsoft/vscode
- Click the button labeled Code.
- Select HTTPS.
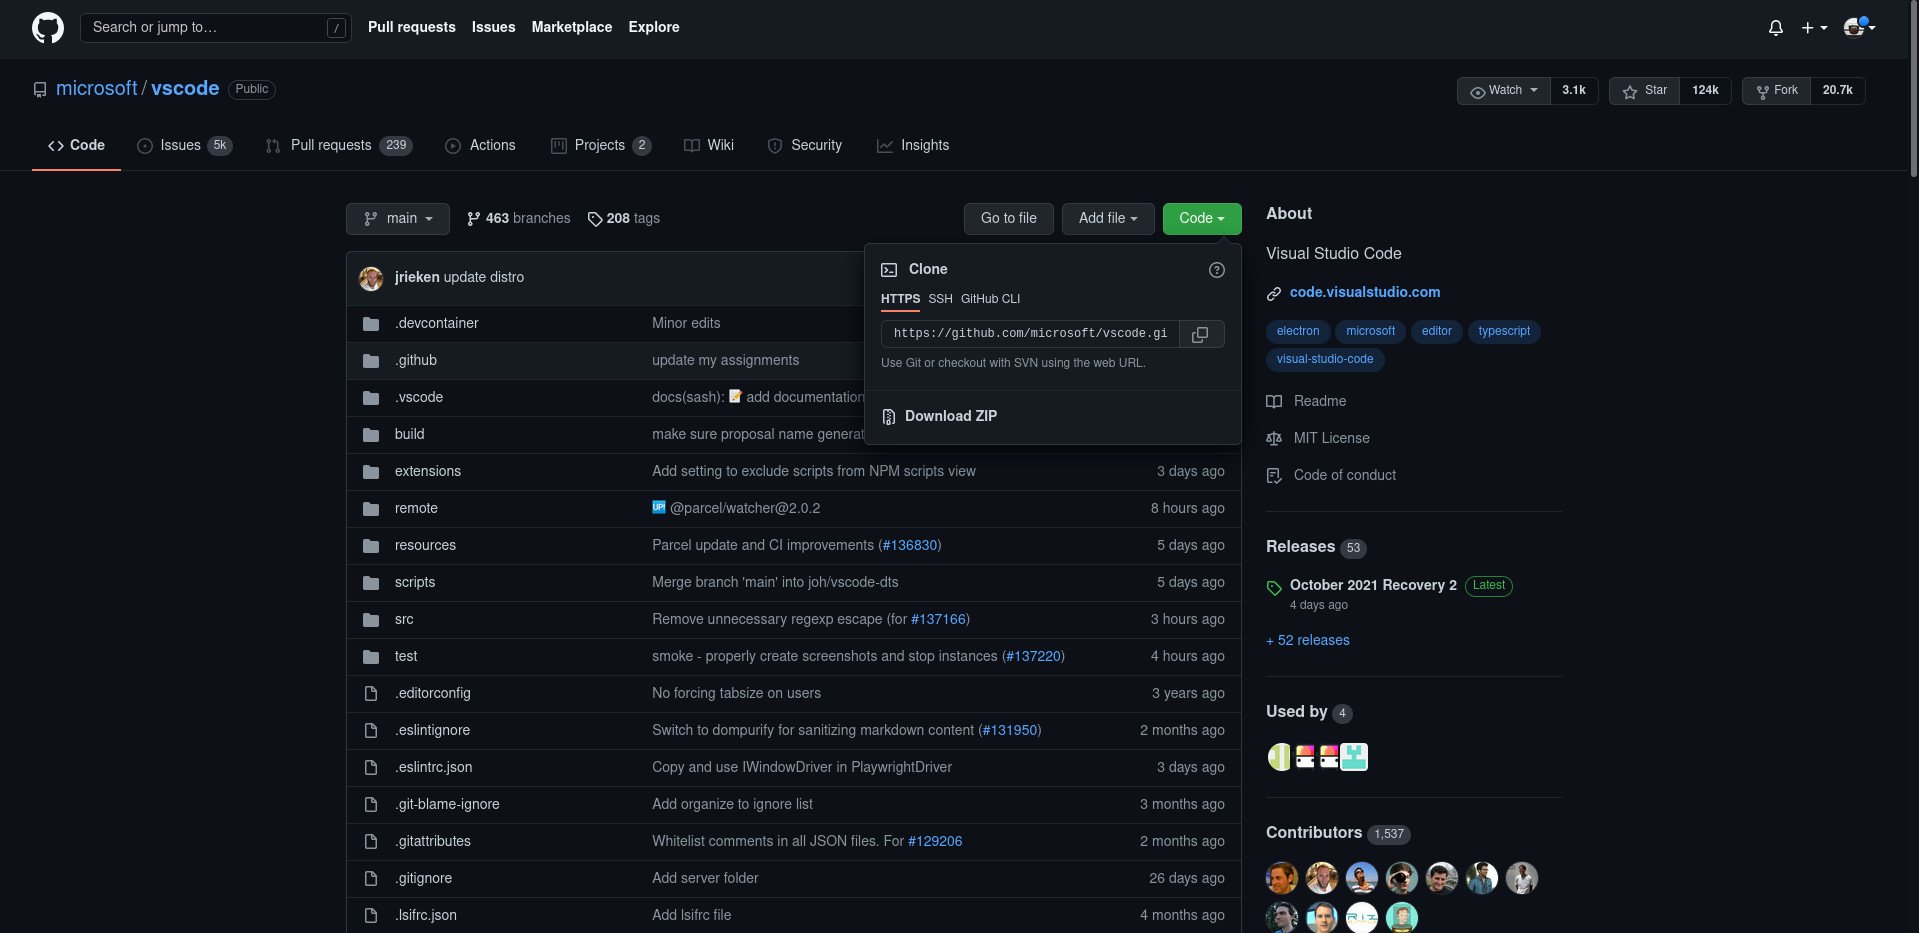
- Copy the URL.
- Open up your chosen terminal. Whether it’s WSL or PowerShell the Git commands are the same.
- In the terminal enter
git clone https://github.com/microsoft/vscode
Git will now pull the entire contents of the chosen repository down to your local machine. It doesn’t pick and choose; you get the whole lot. You’ll also get the README.md file which is used to create any text and instructions on the front page of the repo.
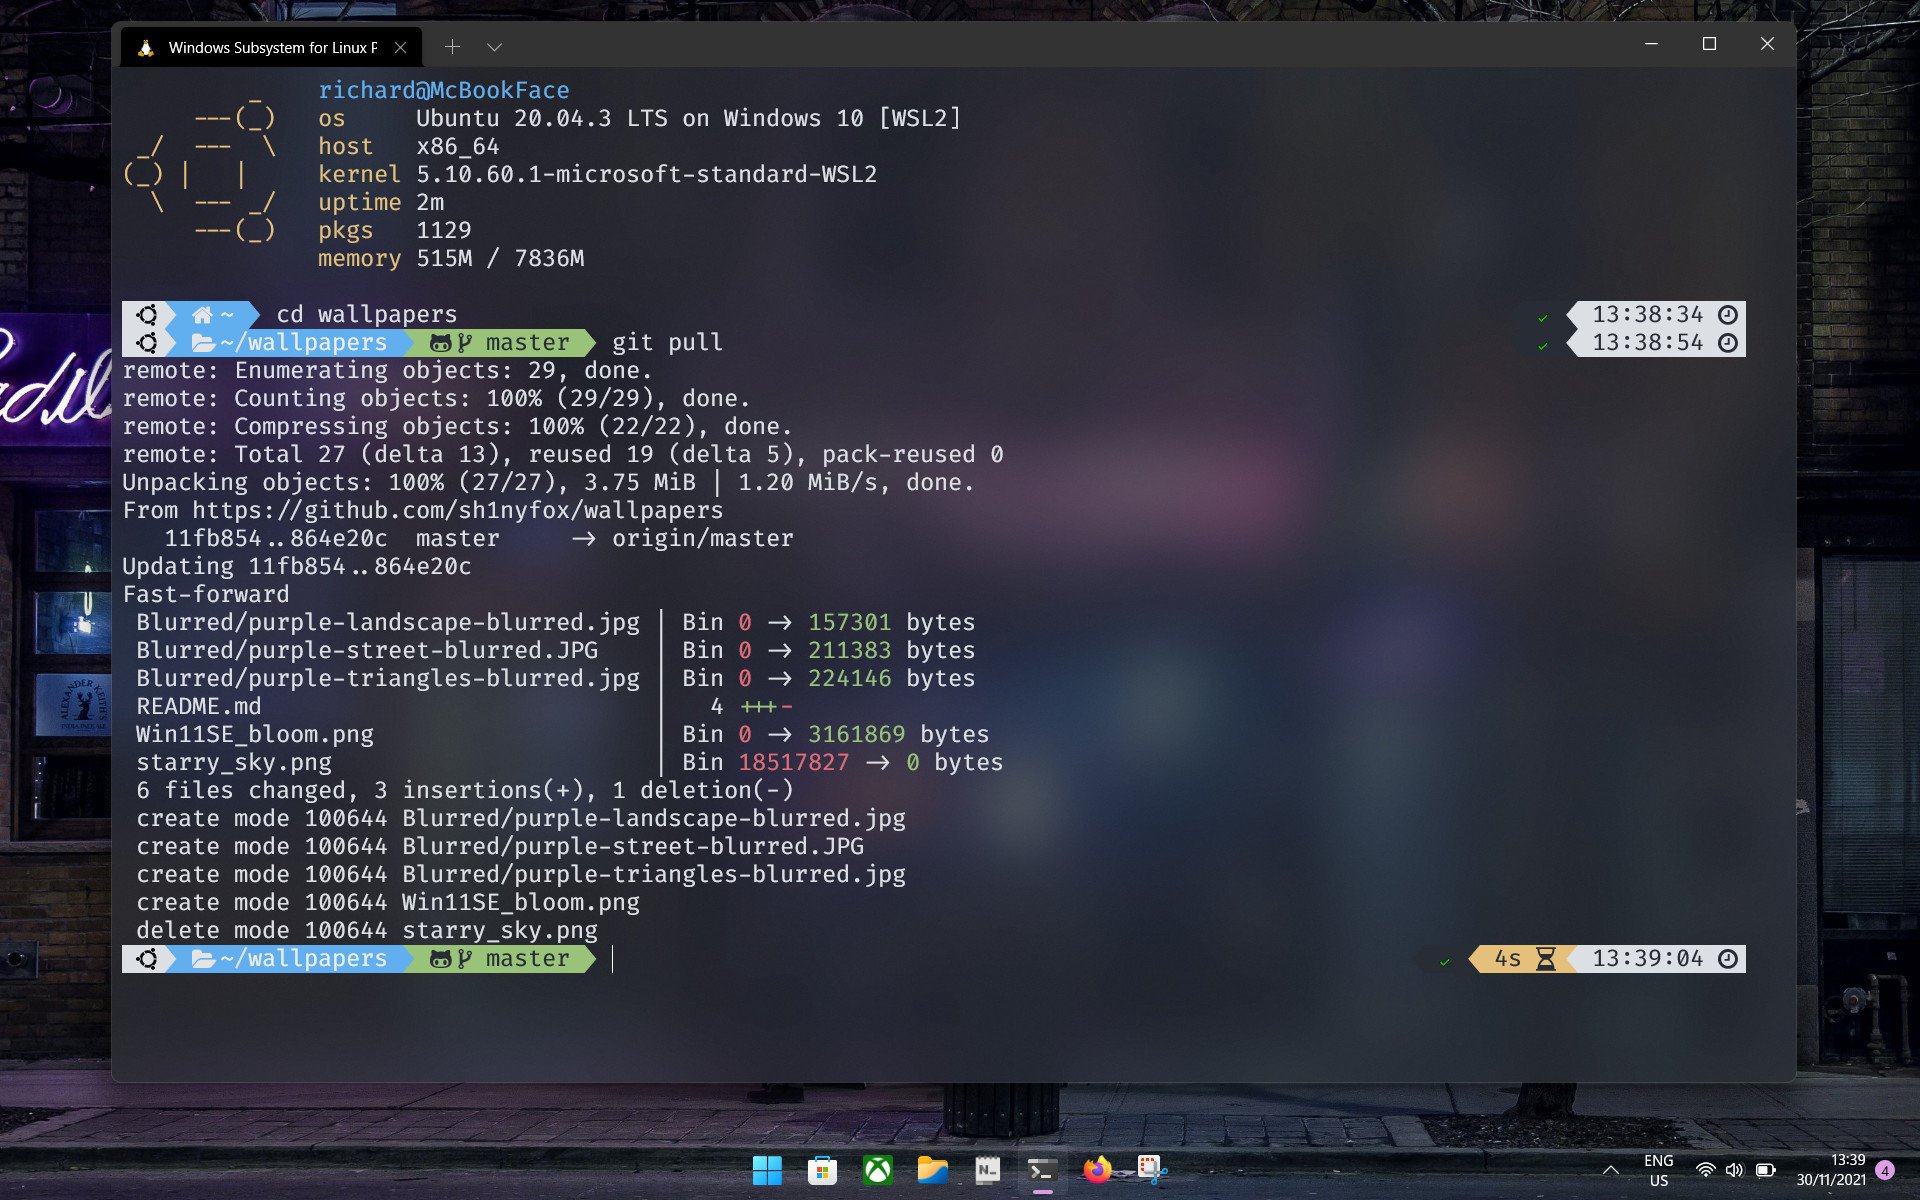
You now have a local copy of a GitHub repository, but what if it gets updated? Everything you pull from GitHub will be an initialized Git repository, with files inside that allow it to interact with Git, and in turn, allow you to pull updates. It allows much more but as this tutorial is only focused on cloning, updates are all we’re interested in.
To get the latest update to a GitHub repository, open up your terminal inside the folder you initially cloned (using the steps above if it’s easier) and enter
git pull. That’s all there is to it, and Git will now compare your copy of the repository to that hosted on GitHub and will download any changes.
You now know how to clone and pull updates from any GitHub repository. Unless you have the right permissions you won’t be able to make any changes to the hosted files, so anything you do locally is totally fine. Go forth and clone!
All the latest news, reviews, and guides for Windows and Xbox diehards.
Richard Devine is a Managing Editor at Windows Central with over a decade of experience. A former Project Manager and long-term tech addict, he joined Mobile Nations in 2011 and has been found on Android Central and iMore as well as Windows Central. Currently, you’ll find him steering the site’s coverage of all manner of PC hardware and reviews. Find him on Mastodon at mstdn.social/@richdevine