Windows 10 offers many personalization options, but if you want to change something integral like how your computer turns on, you’ll have to do so in the BIOS.
What are the BIOS, you ask? BIOS stands for basic input/output system, and it controls the behind-the-scenes functions of your laptop, such as pre-boot security options, what the fn key does, and boot order of your drives. In short, BIOS is connected to the motherboard of your computer and controls most everything.
While they are plenty of customizable options you can achieve from the front-end of Windows 10, only BIOS can change certain settings.
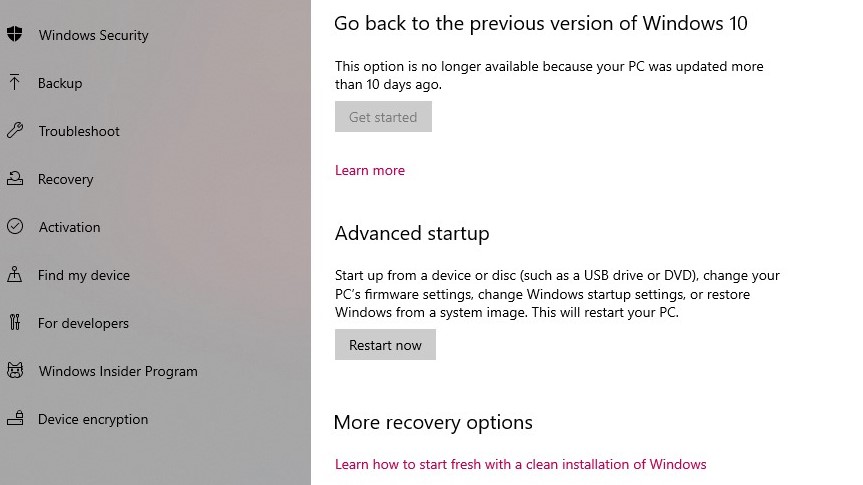
- In ‘Settings,’ select ‘Update & security.’
- Select ‘Recovery.’
- Choose ‘Restart now.’
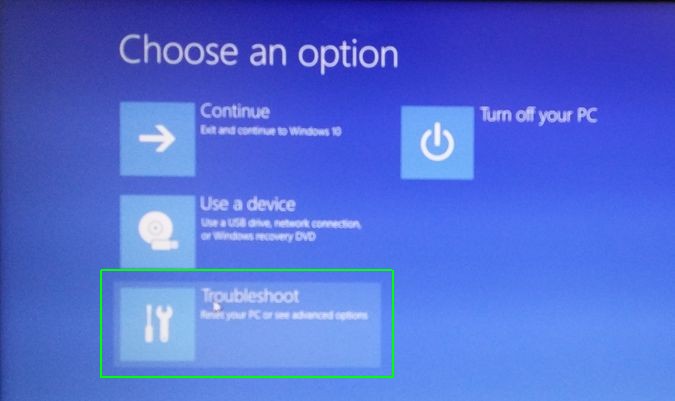
- After your computer restarts, select ‘Troubleshoot’ from the menu that appears.
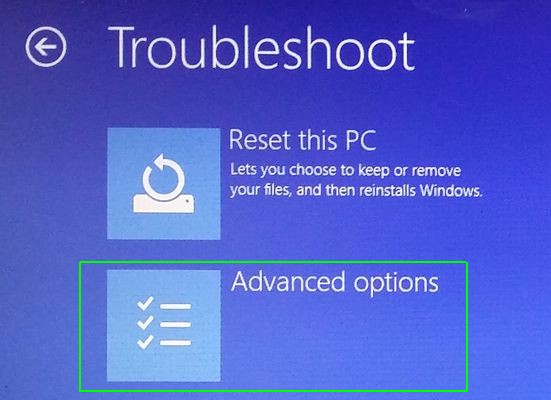
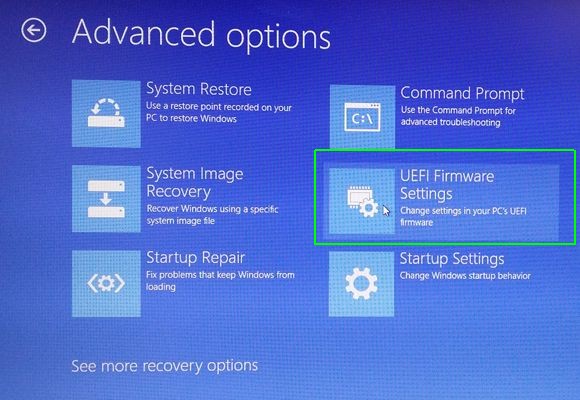
- Click ‘Advanced options,’ then choose ‘UEFI Firmware Settings.’
Accessing BIOS on Windows 10 is not the most intuitive process. This article will take you through it step-by-step, with photos.
Windows 10 BIOS
The BIOS used to be accessible on older devices by hitting F1 or F2 as the computer powered on. If you own a device that’s been made in the past four years, it probably turns on too fast to hit a key in time. That’s where this guide picks up.
Another important note: newer devices typically contain a newer version of BIOS called User Extensible Firmware Interface (UEFI). UEFI is expected to completely replace BIOS eventually.
Now, let’s dive into how to get to your Windows 10 BIOS.
How to access BIOS Windows 10
You can access BIOS through the front-end of your Windows 10 device. Here’s how:
1. Open ‘Settings.’
You’ll find ‘Settings’ under the Windows start menu in the bottom left corner.
-1.png?width=259&name=Screenshot%20(21)-1.png)
2. Select ‘Update & security.’
This is the last option on the page.
.png?width=737&name=Screenshot%20(32).png)
3. Under the ‘Recovery’ tab, choose ‘Restart now.’
In ‘Update & security,’ choose ‘Recovery’ from the sidebar menu.
.png?width=1556&name=Screenshot%20(33).png)
There will be a button to ‘Restart now.’ Once you click on this, it will restart your computer right away. So be prepared for that — have anything of importance saved and closed.
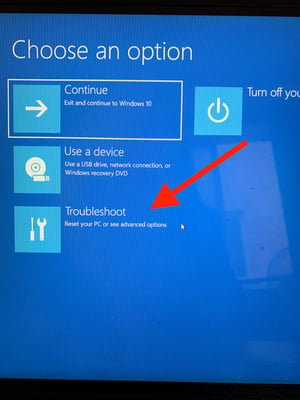
4. Select ‘Troubleshoot.’
After your computer restarts, a new screen will appear in place of the typical login screen. From this menu, choose ‘Troubleshoot.’
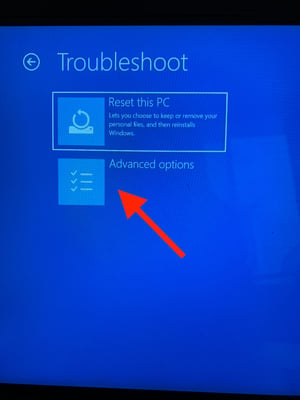
5. Click on ‘Advanced options.’
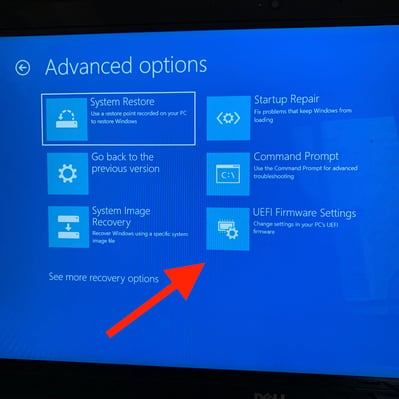
6. Select ‘UEFI Firmware Settings.’
It’s the last option on the menu.
Once you click on this, you’ll be inside your BIOS, or UEFI. From there, you can make specific changes on how your computer starts, when security software runs, and more. Exercise caution when poking around in the Windows 10 BIOS, however. Any changes you make can have unexpected repercussions if not made correctly.
How do you rate Windows 10?
Review Windows 10 and join hundreds of thousands of software users sharing their insights on G2. You’ll make your voice heard and help your peers in the process.

Want to know more Windows 10 tips and tricks? Check out these articles:
- How to find your MAC address on Windows 10
- How to turn on Bluetooth on Windows 10

Holly is the director of content marketing at G2. An avid reader and writer, Holly graduated from the University of Missouri with a dual major in Journalism and English. She firmly believes in the power of content and is constantly seeking ways to better engage and delight readers.
 Доброго времени!
Не многие пользователи знают, что в UEFI (BIOS) можно войти без использования и нажатия спец. клавиш (тех же Delete или F2). Это очень может выручить, если вы перебрали все возможные кнопки, а компьютер никак не реагирует на ваши нажатия…
Отмечу, что воспользоваться этим способом можно только при условиях, что:
- у вас установлена современная ОС Windows 8, 8.1, 10, 11 (в остальных данной возможности нет);
- ваша мат. плата должна поддерживать UEFI (если ваш ПК/ноутбук не старше 3-4 лет — то наверняка поддержка есть!);
- ОС должна загружаться и «хоть как-то» работать (если же ОС не установлена — рекомендую ознакомиться со справочной статьей с кнопками входа в BIOS для устройств разных производителей).
*
Итак, теперь ближе к теме…
*
Из Windows 11
Все действия рассмотрю по шагам (для большей наглядности и доступности).
- для начала необходимо открыть параметры Windows и перейти в раздел «Система / восстановление» (сочетание клавиш Win+i // либо Win+R, и команда «ms-settings:» (без кавычек));

Открываем параметры Windows 11 — вкладку восстановление
- далее согласиться на перезагрузку и запуск ПК с расширенными параметрами. См. пример ниже на фото; 👇

Расширенные параметры запуска
- после перезагрузки появится «синее меню»: в нем нужно будет выбрать вариант «Поиск и устранение неисправностей / доп. параметры / Параметры встроенного ПО UEFI»; 👇

Параметры встроенного ПО
- ну и после еще одной перезагрузки — появится окно BIOS (UEFI). Можно приступить к настройкам! 👌

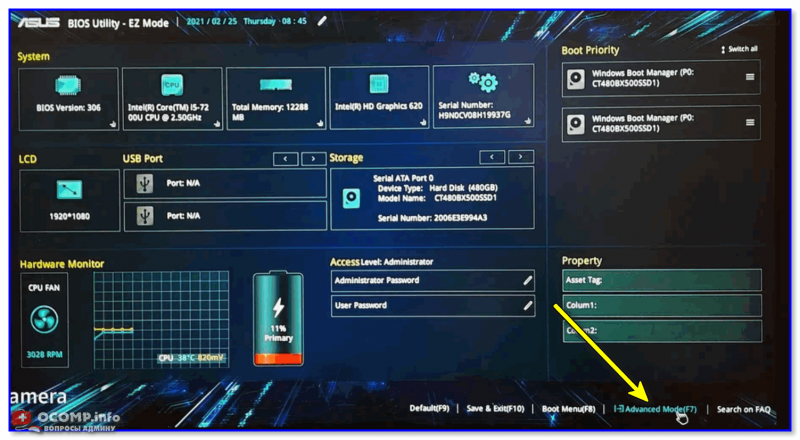
UEFI (Asus) — Advanced Mode

*
Из Windows 10
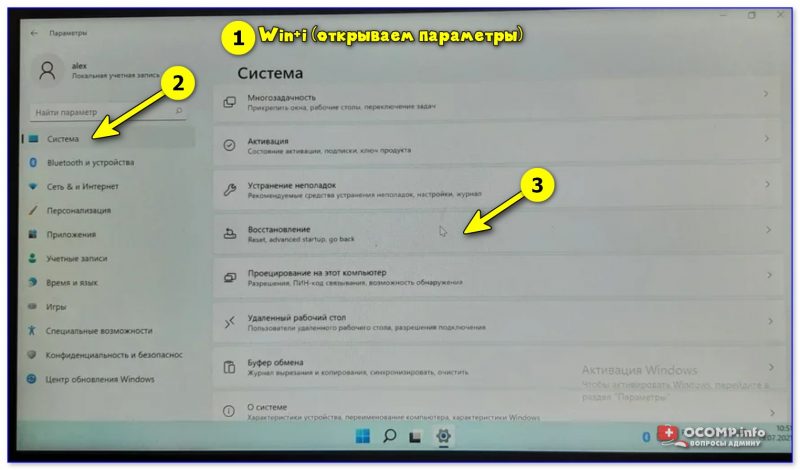
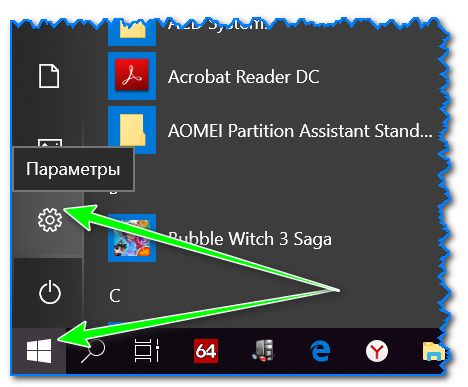
- Сначала необходимо зайти в параметры Windows (можно использовать сочетание Win+i, можно воспользоваться меню ПУСК);

Параметры (Windows 10)
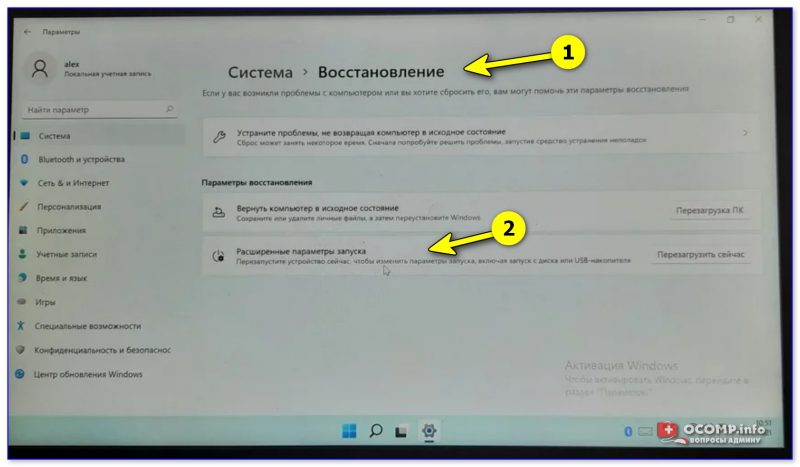
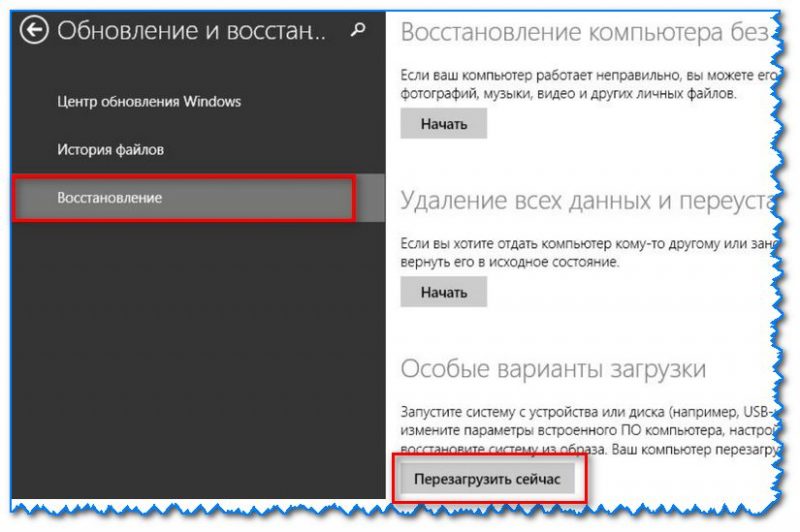
- далее необходимо открыть раздел «Обновление и безопасность/Восстановление» и найти подраздел «Особые варианты загрузки»: нажать в нем кнопку «Перезагрузить сейчас». См. пример ниже (цифры 1, 2, 3); 👇

Обновление и безопасность — восстановление (кликабельно)
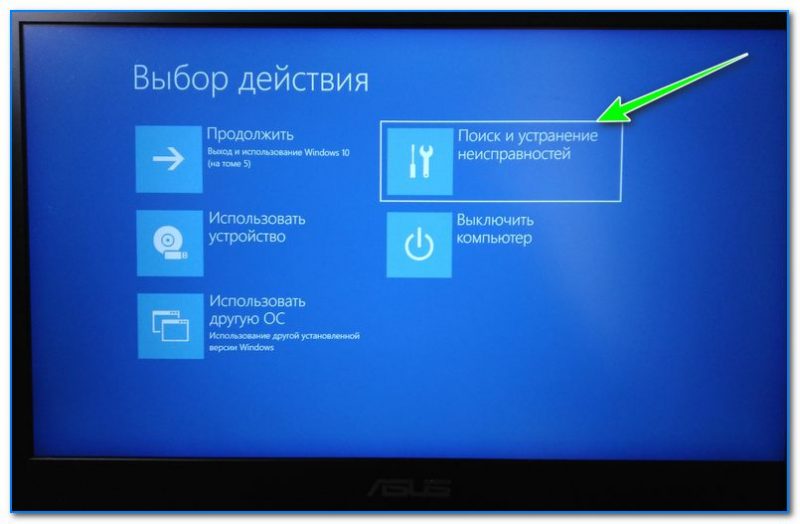
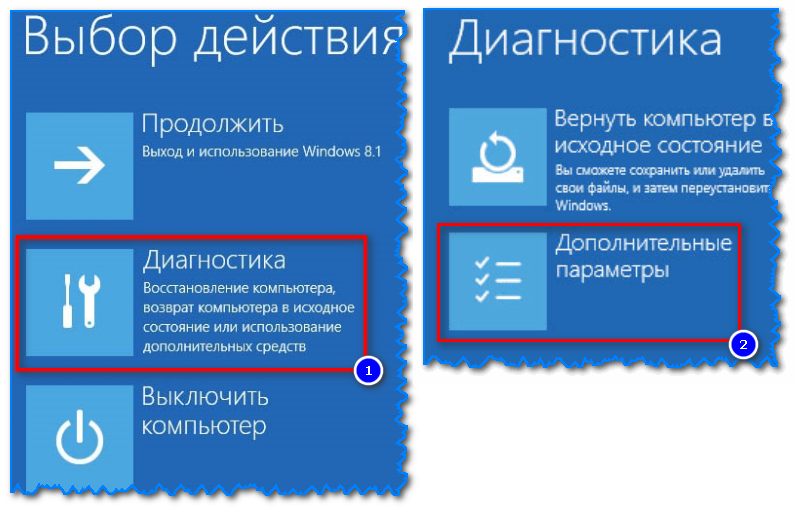
- после чего откройте раздел «Поиск и устранение неисправностей»;

Выбор действия (Windows 10)
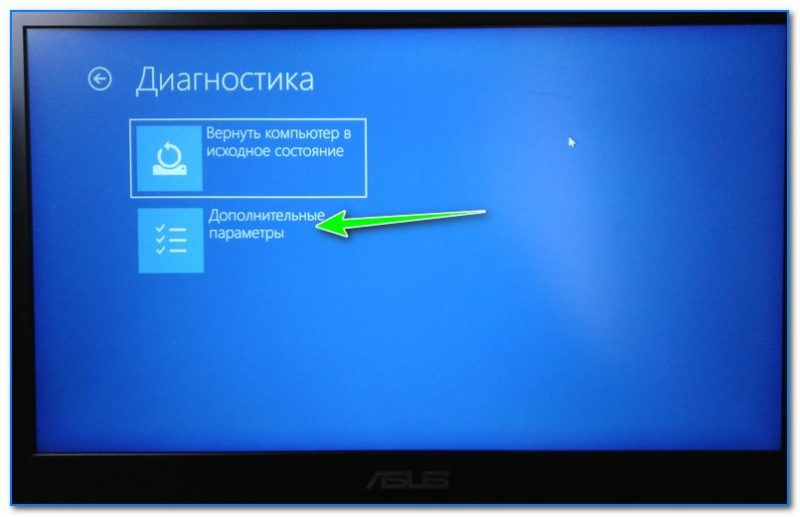
- затем подраздел «Дополнительные параметры»;

Диагностика — доп. параметры
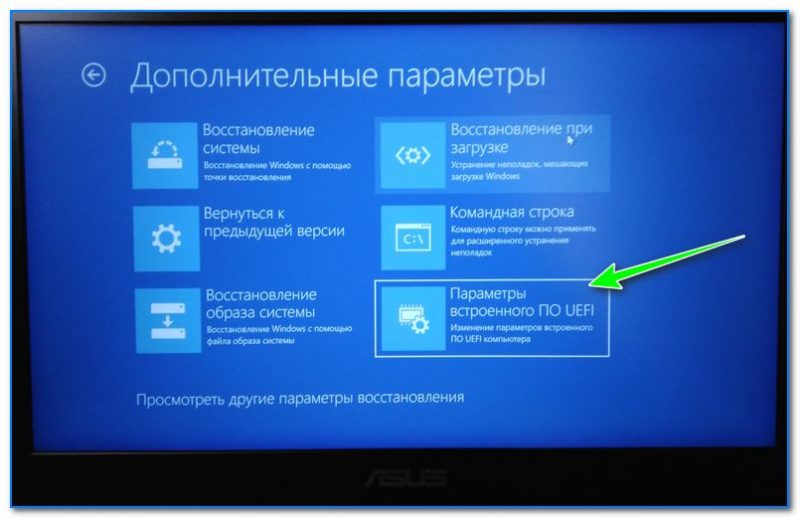
- далее вкладку «Параметр встроенного ПО UEFI» (пример на фото ниже 👇);

Параметры встроенного ПО
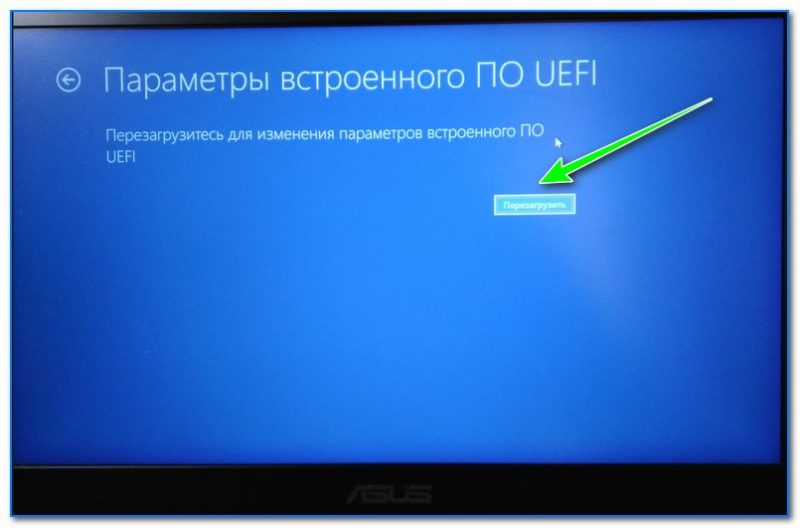
- ну и последнее, что осталось — это согласиться на перезагрузку; 👇

Перезагрузить
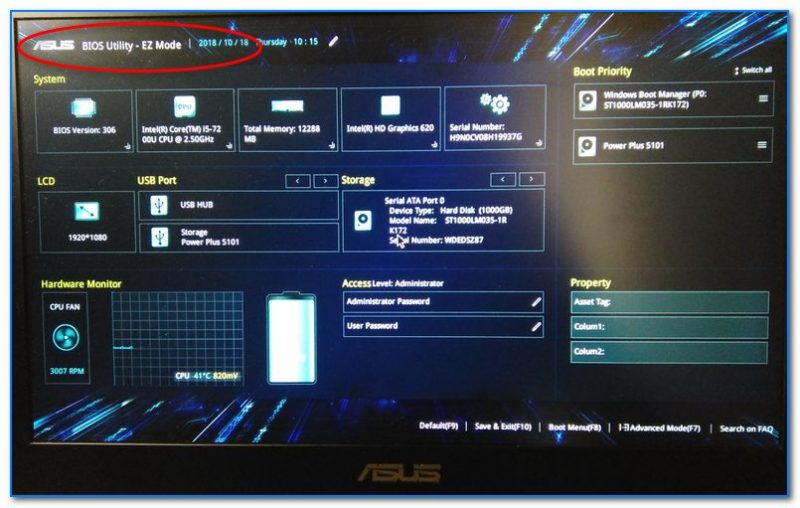
- после перезагрузки компьютера (ноутбука) у вас автоматически будет осуществлен вход в настройки UEFI (пример ниже 👇). Никаких кнопок дополнительно нажимать не нужно!

BIOS Utility — вход выполнен

*
Из Windows 8, 8.1
В принципе действия аналогичны, правда, интерфейс несколько отличается от Windows 10.
- сначала передвиньте ползунок мышки вправо, чтобы появилось боковое меню: выберите «Параметры» (см. скрин ниже 👇);

Windows 8 — параметры
- далее щелкните по ссылке «Изменение параметров компьютера»;

Изменение параметров компьютера
- затем откройте раздел «Обновление и восстановление»;

Обновление и восстановление
- после чего в разделе «Восстановление» найдите подраздел «Особые варианты загрузки» и щелкните по кнопке «Перезагрузить сейчас»; 👇

Восстановление — перезагрузить сейчас
- далее компьютер будет перезагружен, и вы увидите меню с выбором действия: откройте вкладку «Диагностика», затем «Доп. параметры»; 👇

Выбор действия — диагностика
- затем «Параметры встроенного ПО UEFI» и согласитесь на перезагрузку: после нее компьютер сам автоматически откроет настройки UEFI (BIOS). 👇

Параметры встроенного ПО (Windows


*
С помощью командной строки, меню ПУСК
👉 Командная строка
- открываем командную строку (если не знаете как — см. вот эту инструкцию);
- далее нужно ввести команду shutdown.exe /r /o и нажать Enter;

shutdown.exe в командной строке
- после чего увидите сообщение, что через минуту ваш сеанс будет завершен;

Ваш сеанс будет завершен
- по прошествии этой минуты, вы увидите меню с выбором действия (дальше действия аналогичны предыдущим описываемым шагам, см. выше). 👇
Выбор действия


*
Меню ПУСК
Еще один альтернативный вариант — это зайти в меню ПУСК, нажать по кнопке «Выключения», после зажать клавишу SHIFT и выбрать вариант «Перезагрузка». Дальнейшие действия аналогичны предыдущим шагам.

SHIFT + Перезагрузка
*
Дополнения по теме приветствуются…
Удачной работы.
👋
Первая публикация: 18.10.2018
Корректировка: 9.07.2021


Windows 10 gives you many configuration options directly within the operating system, but on every laptop or desktop, there are some settings you can only change in the BIOS (basic input/output system). This software is built right into your computer’s motherboard, and it controls everything from the boot order of your drives to preboot security options to whether the Fn key on your keyboard activates a function key or a media control.
However, since the BIOS is a pre-boot environment, you can’t access it directly from within Windows. On some older computers (or those deliberately set to boot slowly), you can hit a function key such as F1 or F2 at power-on to enter the BIOS.
However, most computers made in the past four years boot Windows 10 far too quickly to listen for a keypress at startup. To access your BIOS on a Windows 10 machine, you must follow these steps.
How to enter the BIOS on a Windows 10 PC
1. Navigate to Settings. You can get there by clicking the gear icon on the Start menu.
2. Select Update & Security.

3. Select Recovery from the left menu.
4. Click Restart Now under Advanced startup. The computer will reboot to a special menu.
5. Click Troubleshoot.
6. Click Advanced options.
7. Select UEFI Firmware Settings. If you don’t see this icon, then press Startup Settings instead. When your PC is restarting, tap F1 (or F2) to access the BIOS.
8. Click Restart.
Your system will restart and take you to the BIOS.
Get our in-depth reviews, helpful tips, great deals, and the biggest news stories delivered to your inbox.
Accessing the BIOS (or UEFI) can help you in several situations.
Quick Links
- Enter Windows 11’s BIOS by Pressing a Key
- Enter the BIOS on Windows 11 From Settings
- Enter Windows 11’s BIOS by Clicking Restart
- Enter Windows 11’s BIOS Using Windows Terminal
Key Takeaways
- Easily enter the BIOS (UEFI) on your Windows 11 PC by pressing a key like F2 or Delete during startup or restart through the Recovery page in Settings.
- You can access the BIOS using Windows Terminal by typing a specific command in PowerShell or Command Prompt and navigating through the Troubleshoot menu in the «Choose an Option» screen.
- You can hold Shift and click «Restart» anywhere in Windows 11 to restart to the Advanced Boot Menu, then navigate to Troubleshoot > Advanced Options > UEFI Firmware Settings.
Accessing the BIOS on your Windows 11 PC can help you solve a variety of problems or allow you to adjust low-level settings. There are multiple ways you can enter BIOS, and we’ll show you how to use all of them.
On most modern computers, you actually have UEFI instead of BIOS. It’s advanced low-level software that offers more features than traditional BIOS. However, many people still refer to it as BIOS, so that’s the term we’re using here.
Enter Windows 11’s BIOS by Pressing a Key
An easy way to enter BIOS on your Windows 11 PC is to use a key on your keyboard while powering on the computer. The advantage of this method is that you can use this even when your Windows OS doesn’t load.
To use this method, you will have to find the key that lets you enter BIOS on your specific computer. This key varies by manufacturer. When you start up your computer, on the first splash screen that opens (usually showing the manufacturer’s logo), you should see a message telling you which key you need to press to enter BIOS.
On most computers, this key is F2, but you should check on your computer’s splash screen to confirm.
Enter the BIOS on Windows 11 From Settings
If you can’t find the keyboard key to enter BIOS, or you prefer using graphical options, use Windows 11’s Settings app to enter BIOS.
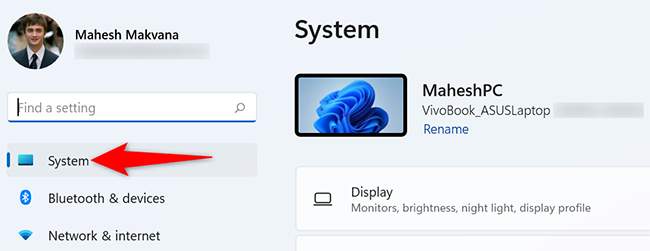
To do so, first, launch the Settings app on your PC. Do this by pressing Windows+i keys at the same time.
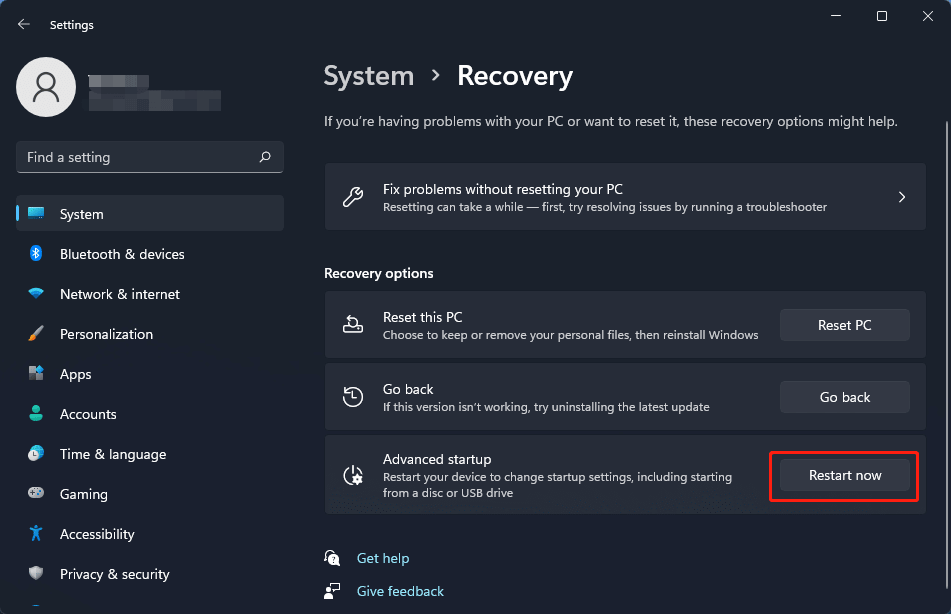
In Settings, from the left sidebar, select «System.»
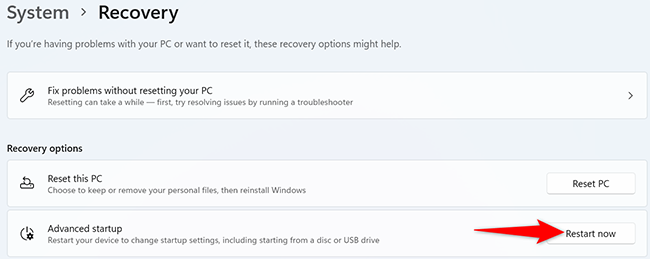
On the «System» page, click «Recovery.»
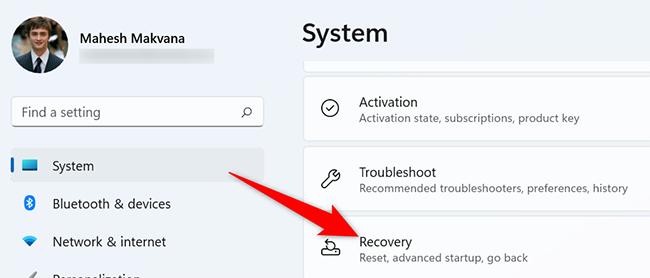
In the «Recovery» menu, next to «Advanced Startup,» click «Restart Now.»
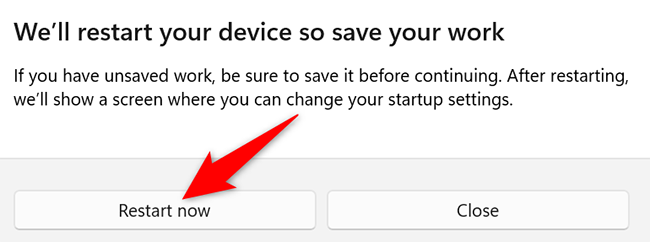
You will see a «We’ll Restart Your Device So Save Your Work» prompt. In this prompt, click «Restart Now» to restart your PC.
Make sure you save any unsaved work before restarting your PC.
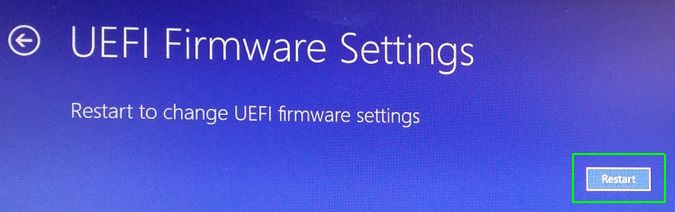
You will now see a «Choose an Option» screen. From here, head into Troubleshoot > Advanced Options > UEFI Firmware Settings and click «Restart.»
And you will be in your PC’s BIOS mode. In this mode, you can configure various options, like changing your startup disk.
Enter Windows 11’s BIOS by Clicking Restart
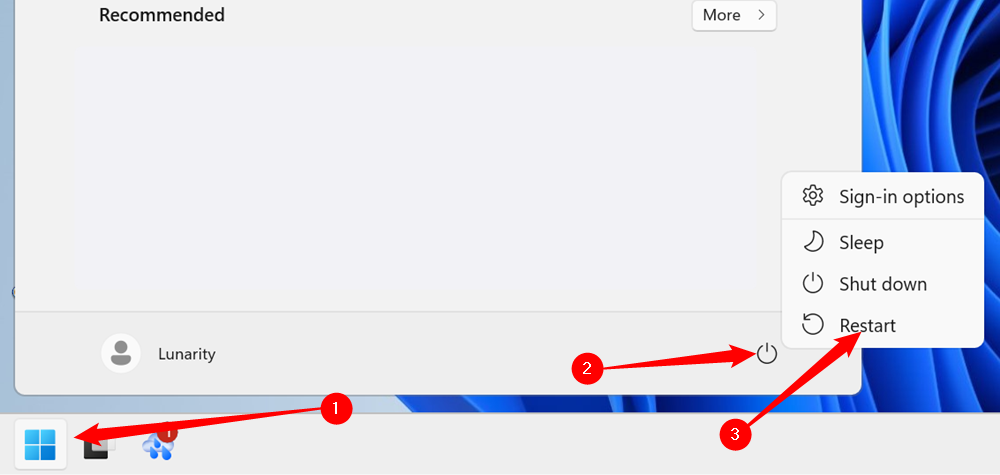
Windows 11, like Windows 10 before it, allows you to boot into the Advanced Boot Menu from within Windows. Click the Start button, mouse over the power icon, then hold Shift and left-click «Restart.»
Instead of restarting normally, your PC will open up the Advanced Boot Menu.
Once you’re in the Advanced Boot Menu, navigate to Troubleshoot > Advanced Options > UEFI Firmware Settings, then click «Restart» again. Your PC will boot into the BIOS. Once you make all of the changes you want, your PC will finish restarting normally.
Enter Windows 11’s BIOS Using Windows Terminal
To use a command to boot your PC in BIOS, use either PowerShell or Command Prompt utility on your PC.
First, open the «Start» menu and search for «Windows Terminal». Click the app in the search results.

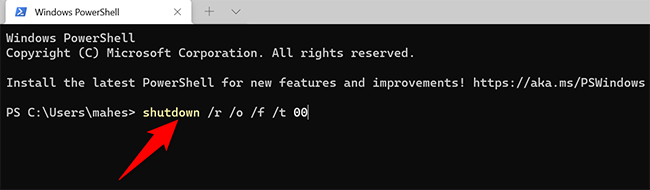
In Windows Terminal, type the following command and press Enter. This command works in both PowerShell and Command Prompt shells, so you can use either.
shutdown /r /o /f /t 00
On the «Choose an Option» screen that opens, navigate to Troubleshoot > Advanced Options > UEFI Firmware Settings, and click «Restart.» Your PC will then enter BIOS.
You’re all set.
Did you know you can check and even update your BIOS version?
-
Home
-
News
- [5 Ways] How to Get Into BIOS on Windows 11 on Restart?
By Helen | Follow |
Last Updated
This article sponsored by MiniTool official website mainly introduces altogether six solutions for accessing Windows 11 BIOS settings. Most of them are easy to operate and time-saving. Read the details below and find the one that suits you most.
Are you running the latest Windows 11? Are you used to its new design and features? Do you like it? Do you know how to enter Windows 11 BIOS settings?
The easiest way to enter Win 11 BIOS settings is by pressing a certain key on your keyboard while booting up the computer. As for which key to press, it depends on your manufacturer. You can find it on the first splash screen when your start up your machine or your computer manual.
The below are the BIOS settings keys for some popular brands of PCs.
- Dell: F2 or F12
- HP: F10
- Lenovo: F2, Fn + F2, F1, or Enter followed by F1
- Asus: F9, F10, or Del
- Acer: F2 or Del
- Microsoft Surface: Press and hold the volume up button
- Samsung/Toshiba/Intel/ASRock/Origin PC: F2
- MSI/Gigabyte/EVGA/Zotac/BIOStar: Del
Yet, if you still do not know which key to tap, don’t worry, there are several other general methods that can help you get into your BIOS settings.
#1 Access Windows 11 BIOS by Shift + Restart
First of all, you can reach your Win11 BIOS by making use of the Shift key while restarting.
- On the sign-in or lock screen, press the Shift key on the keyboard and tap on the power button (or click on the Power option on the bottom right of the monitor). Then, choose the Restart option in the menu.
- When Windows 11 restarts, you will be shown the Advanced startup screen (Choose an option).
- Then, move to Troubleshoot > Advanced options > UEFI Firmware Settings and press Restart.

Finally, your computer will restart into UEFI/BIOS.
#2 Open Windows 11 BIOS Settings Through Settings
Secondly, you can launch Win11 BIOS settings from the Settings application.
- Open Windows 11 Settings.
- Navigate to System > Recovery > Restart now.
- Be sure to save your unsaved work and click Restart now.
- Then, go to Troubleshoot > Advanced options > UEFI Firmware Settings and press Restart.
#3 Launch Win11 BIOS from Windows Run
Thirdly, you are able to get Windows 11 BIOS using the Windows Run command. Just open the Run box, input shutdown /r /o, and press Enter. If you want to enter your BIOS faster, just type shutdown /r /o /f /t 00 and click OK.
Then, select Troubleshoot > Advanced options > UEFI Firmware Settings and press Restart to boot into system BIOS settings.
#4 Reach Win11 BIOS Settings with Command
Also, you can access Windows 11 BIOS settings with the help of command-line, CMD, PowerShell, or Terminal
- Open CMD, PowerShell, or Terminal.
- Type shutdown /r /o /f /t 00 or shutdown /r /o and press Enter.
- Follow the guide to Troubleshoot > Advanced options > UEFI Firmware Settings and press Restart to arrive at Windows 11 BIOS/UEFI settings.
#5 Get Windows 11 BIOS via a Shortcut
Finally, you can also access your Win11 UEFI/BIOS system using a shortcut.
- Right-click on the Windows 11 desktop and select New > Shortcut.
- In the Create Shortcut window, input shutdown /r /o /f /t 00 or shutdown /r /o for the location of the item.
- Then, just follow the instruction to finish creating a BIOS shortcut.

When you have successfully created the BIOS settings shortcut, just double-click on it and choose Troubleshoot > Advanced options > UEFI Firmware Settings and tap Restart to boot your computer into the BIOS environment.
Windows 11 Assistant Software Recommended
The new and powerful Windows 11 will bring you many benefits. At the same time, it will also bring you some unexpected damages such as data loss. Thus, it is strongly recommended that you back up your crucial files before or after upgrading to Win11 with a robust and reliable program like MiniTool ShadowMaker, which will assist you to protect your increasing data automatically on schedules!
MiniTool ShadowMaker TrialClick to Download100%Clean & Safe
Also Read:
- Roku Supported Video/Audio/Image Formats for Playing/Streaming
- [Full Review] 240 FPS Video Definition/Samples/Cameras/Conversion
- Google Video Editor on Android/iPhone/iPad/Chromebook/Windows/Mac
- Fix Adobe Media Encoder Error Code: -1609629695 and Similar Issue
- Hashtag for Instagram Photography: Wedding/Portrait/Landscape…
About The Author

Position: Columnist
Helen Graduated from university in 2014 and started working as a tech editor in the same year. Her articles focus on video creation, editing, and conversion. She also has a good knowledge of disk management and data backup & recovery. Through an in-depth exploration of computer technology, Helen has successfully helped thousands of users solve their annoying problems.