-
Главная
-
Инструкции
-
Windows
-
Как сгенерировать SSH-ключ для Windows: пошаговая инструкция
SSH — это сетевой протокол прикладного уровня, необходимый для обеспечения безопасного подключения, а после и управления операционной системой. Через него можно удаленно выполнять команды в терминале компьютера. Создать удаленное подключение к серверу через SSH можно с помощью паролей или SSH-ключей. В данной статье мы рассмотрим, как создать ключи в операционной системе Windows.
SSH-ключ в Windows — это один из способов безопасного подключения к удаленному серверу. Преимущество данного метода подключения — это отсутствие возможности взлома, как это происходит с паролем.
Для подключения создаются два SSH-ключа:
- Публичный — ключ, хранящийся на сервере в определенном каталоге. Это комбинация символов, которая шифрует данные при обращении к серверу.
- Приватный — зашифрованный ключ, который располагается на компьютере клиента. Он отвечает за расшифровку полученных данных. При его генерации можно добавить пароль для дополнительной защиты.
Для корректной и полной работы SSH—ключей необходимо будет отключить аутентификацию по паролю.
После создания SSH-ключей в Windows и из сохранении на сервер, при подключении к серверу будет происходить их проверка. Если публичный ключ соответствует приватному, то подключение выполнится.
Существует два варианта генерации SSH-ключей в Windows. Первый — использование OpenSSH клиента, второй — использование клиента PuTTY. Ниже опишем инструкции по созданию ключей, используя и первый, и второй вариант. В качестве операционной системы будет использоваться Windows 10.
OpenSSH клиент
- Для начала нужно проверить установлен ли OpenSSH клиент на Windows 10. Для этого зайдем в «Параметры», а после перейдем во вкладку «Приложения». Далее нажимаем на ссылку «Дополнительные компоненты», как показано на картинке ниже.

В открывшемся окне в строку поиска вводим «Клиент OpenSSH». Если в списке он будет найден, то можно сразу приступать к генерации ключей. Если же он отсутствует, то нужно нажать на кнопку «Добавить компонент», а после найти его и выбрать среди всех доступных, используя строку поиска. Далее останется нажать кнопку «Установить» снизу слева и можно переходить ко второму шагу.
- Теперь нужно открыть командную строку. Для этого открываем диалоговое окно «Выполнить» (комбинация клавиш Win+R), вводим в строку
cmdи нажимаем кнопку «ОК».
- В открывшемся окне вводим команду:
ssh-keygenПосле этого запустится процесс генерации.
В первую очередь пользователю будет предложено ввести путь к папке, в которой будут храниться ключи. Чтобы оставить вариант по умолчанию (.../.ssh/id_rsa), предложенный системой, нужно нажать клавишу «Enter».
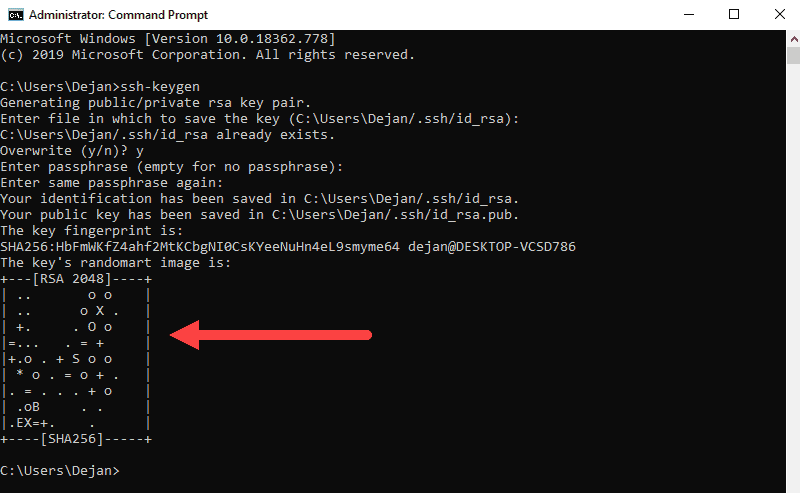
Далее пользователю будет предложено ввести ключевое слово к ключу. Чтобы пропустить этот шаг, нажмите также клавишу «Enter» 2 раза.
- Проверим, что все ключи успешно сгенерированы. Для этого переходим в соответствующий каталог на своем компьютере. У нас это
/.ssh/id_rsa, так как мы оставили все по умолчанию.
Как видно по картинке выше, ключи сгенерированы успешно.
Переходим к варианту их создания с помощью клиента PuTTY.
PuTTY
Клиент PuTTY был популярным, когда OpenSSH отсутствовал в Windows. Но и сейчас его не перестают использовать. Он находится в свободном доступе на официальном сайте разработчика. Рассмотрим ниже подробную инструкцию по генерации SSH-ключей на Windows 10 в PuTTY.
- Для начала необходимо скачать архив клиента PuTTY с официального сайта.
- После его нужно будет разархивировать и запустить файл
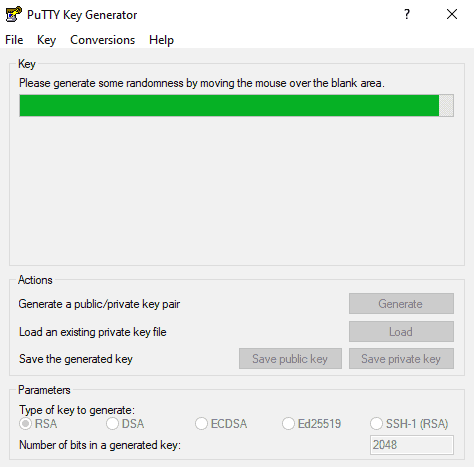
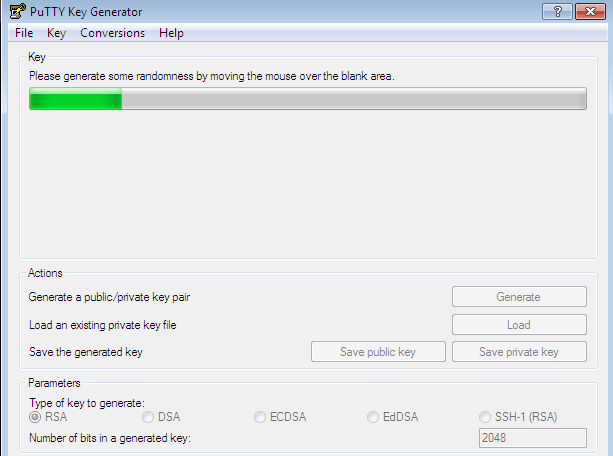
puttygen.exeот имени администратора. - В открывшемся окне выбираем классический и повсеместно использующийся тип ключа для генерации — RSA. Длину оставляем 2048 бит и нажимаем кнопку «Генерировать».
- Во время генерации нужно водить курсором по серой области внутри окна до заполнения зеленой полоски. Это позволит улучшить защищенность генерируемого ключа, благодаря созданию псевдослучайности.
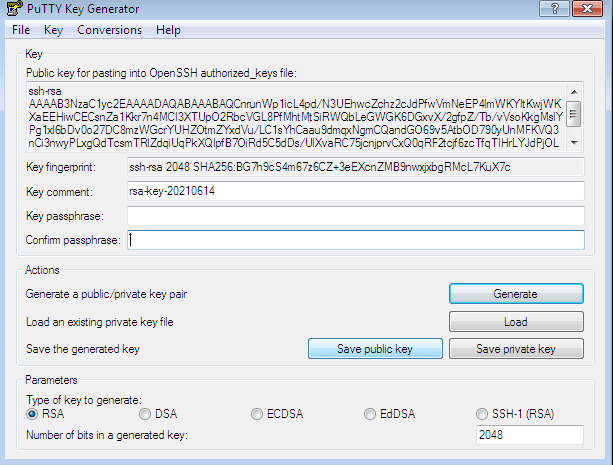
- После успешной генерации нужно сохранить публичный и приватный ключ на компьютере. Для этого создадим папку на диске.
Ключи успешно созданы и сохранены на локальной машине. На этом этапе их генерация закончена.
Заключение
В данной инструкции были рассмотрены два варианта создания SSH-ключей в Windows. Для подключения к серверу нужно скопировать в него созданный публичный ключ. При попытке соединиться с сервером будет происходить проверка публичного ключа на стороне сервера с приватным на стороне клиента. Если вы пользуетесь облачными серверами Timeweb Cloud, то можете добавить сгенерированный публичный ключ в разделе «SSH-ключи» в панели управления.

For encrypted connections between a client and a server, an SSH key, or Secure Shell key, is used as authentication. It’s commonly used for gaining remote access to servers and other network devices because of the safety it offers in authenticating and establishing a secure link between two machines. In this article, you will learn how to Generate SSH keys in Windows 11. Kindly refer to these related guides: How to Fix OneDrive Error 0x80071129: The tag present in the reparse point buffer is invalid on Windows 11, how To Scan WordPress websites With WPScan For Security Vulnerabilities, how to Fix Failed to open the Group Policy Object on this Computer, and how To Fix WordPress error “The Link You Followed Has Expired”.
To use SSH key authentication, a combination of keys—a public and a private one—must be generated. The client computer stores the private key while the public key is sent to the server or other device you’re trying to connect to. The server will ask for the client’s public key when the client initiates a connection. The server then compares the key to a roster of approved keys, and grants entry to the client if there is a match. This method is a safe and effective means to verify distant links.
The use of SSH keys for authentication has many benefits over the use of passwords. They are more secure and difficult to break than other passcode systems. Furthermore, since the client can identify without human input, SSH keys offer a safe method for automating distant duties. Please, see how to add and modify the Windows Registry from the Command Prompt.
The SSH key can be generated on Windows 11 in various ways, which I have outlined below.
Option 1: Generate SSH Keys in Windows 11 using OpenSSH Client
Step 1: Confirm that the OpenSSH Client is installed.
It is necessary to first determine if the OpenSSH client is installed on the system. To do so, follow the steps below:
Press the Windows key + I to open the system settings, and choose “Apps.” Click on “Optional features” from the “Apps” configuration panel.

Under the “Installed features” search menu, type “OpenSSH.” The OpenSSH client and server tools are already installed on the system, as can be seen.

The OpenSSH client utility comes pre-installed on Windows 11. In any event, if OpenSSH is not already installed, you must install it first. To do so, go to the “Apps” settings and choose the “Add Optional Feature” option.

Next, in the search box, type “OpenSSH” if the OpenSSH client and server are not installed, they will show in the search results. Since the OpenSSH client and server utilities are already installed on the system, the search result is empty.

Step 2: Launch the Command Prompt.
To launch the Windows Command Prompt, click the “Search” button in the Windows 11 Desktop Taskbar. In the search field, type “command prompt” and choose Command Prompt as Administrator from the display results.

Step 3: Create SSH Keys in Windows 11
To generate an SSH key, use the “ssh-keygen” command. You must give the following information:
- Enter the location where you want to store your SSH key or press Enter to continue with the default location.
- Add a passphrase or password, input it, then retype it for confirmation.
It is not required to input a passcode; just hit the Enter key to proceed.

As you can see, we successfully generated SSH keys on Windows11.
Step 4: Confirm Key Creation
SSH keys are often saved in the “C:\Users\<username>\.ssh” directory. Go to the place where you stored the ssh key. There are two files there: “id rsa” and “id rsa.pub.”

You can see that the SSH key was successfully produced in the “C:\Users\<username>\.ssh” directory.
Option 2: Use PuTTY to generate keys.
PuTTY is open-source and free software. It is available from the PuTTY latest release website.
After installing PuTTY, hit the Windows key or open the Windows and enter “puttygen” to launch the “PuTTYgen” software.

When it’s open, you’ll notice the different sorts of keys to produce at the bottom of the window. If you’re unsure, choose “RSA” and then enter “4096” in the text box labeled “Number of bits in a generated key.” Another option is to pick “EdDSA,” then select “Ed25519 (255 bits)” from the drop-down menu that appears below it.

All you have to do now is click “Generate,” and PuTTY will begin to work. Depending on the power of your machine, this shouldn’t take long, and PuTTy will ask you to move your mouse about within the window to assist provide a bit more randomness during key creation.

After that, click “Save Public Key” to store your public key. Save it anywhere you like with the name “id rsa.pub” or “id ed25519.pub,” depending on whether you chose RSA or Ed25519 in the previous step.

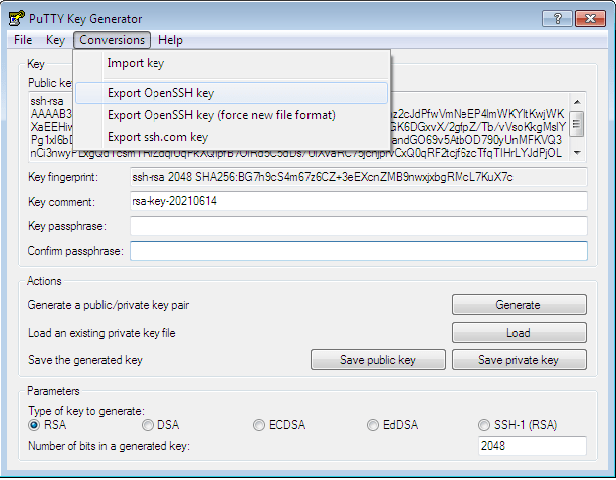
The private key must now be stored. Choose “Export OpenSSH Key” from the “conversions” option at the top. In most cases, you want to store this without a password, so choose “Yes” in the following dialog box. Select a place to store the key and give it a name (for example, putty key).

Your keys have been produced, and you may now exit the PuTTY key generator. To utilize your new key with PuTTY, go to the PuTTY setup and open “Connection” and “Auth.” Choose the private key you just stored under “Private Key file for authentication.”
Conclusion
Even though SSH keys are more secure and convenient than passwords, it is important to keep track of and safeguard them. It is important to safely keep keys and only allow authorized sites and devices to access them. In addition, keys should be changed frequently and revoked when they are no longer required.
I hope you found this blog post helpful on how to Generate SSH keys in Windows 11. If you have any questions, please let me know in the comment session.
Modified: 13 Dec 2022 21:28 UTC
On Windows, you can create SSH keys in many ways. This document explains how to use two SSH applications, PuTTY and Git Bash.
We recommend ECDSA or RSA keys. DSA keys are supported, but not recomended.
PuTTY
PuTTY is an SSH client for Windows. You can use PuTTY to generate SSH keys. PuTTY is a free open-source terminal emulator that functions much like the Terminal application in macOS in a Windows environment. This section shows you how to manually generate and upload an SSH key when working with PuTTY in the Windows environment.
About PuTTY
PuTTY is an SSH client for Windows that you will use to generate your SSH keys. You can download PuTTY from www.chiark.greenend.org.uk.
When you install the PuTTY client, you also install the PuTTYgen utility. PuTTYgen is what you will use to generate your SSH key for a Windows VM.
| This page gives you basic information about using PuTTY and PuTTYgen to log in to your provisioned machine. For more information on PuTTY, see the PuTTY documentation |
|---|
Generating an SSH key
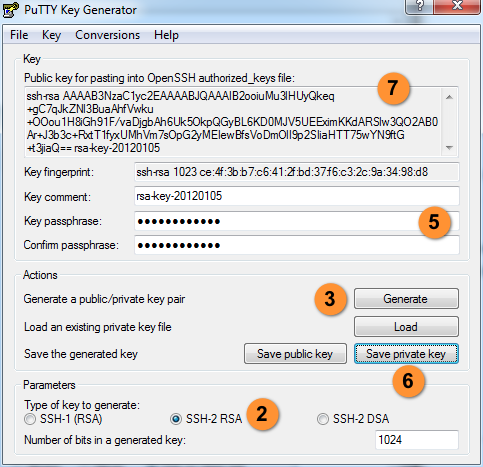
To generate an SSH key with PuTTYgen, follow these steps:
- Open the PuTTYgen program.
- For Type of key to generate, select SSH-2 RSA.
- Click the Generate button.
- Move your mouse in the area below the progress bar. When the progress bar is full, PuTTYgen generates your key pair.
- Type a passphrase in the Key passphrase field. Type the same passphrase in the Confirm passphrase field. You can use a key without a passphrase, but this is not recommended.
- Click the Save private key button to save the private key. You must save the private key. You will need it to connect to your machine.
- Right-click in the text field labeled Public key for pasting into OpenSSH authorized_keys file and choose Select All.
- Right-click again in the same text field and choose Copy.
Importing your SSH key
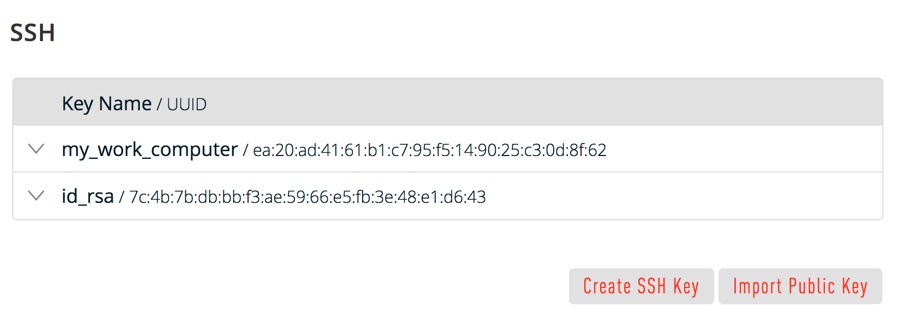
Now you must import the copied SSH key to the portal.
- After you copy the SSH key to the clipboard, return to your account page.
- Choose to Import Public Key and paste your SSH key into the Public Key field.
- In the Key Name field, provide a name for the key. Note: although providing a key name is optional, it is a best practice for ease of managing multiple SSH keys.
- Add the key. It will now appear in your table of keys under SSH.
![]() PuTTY and OpenSSH use different formats of public SSH keys. If the text you pasted in the SSH Key starts with
PuTTY and OpenSSH use different formats of public SSH keys. If the text you pasted in the SSH Key starts with —— BEGIN SSH2 PUBLIC KEY, it is in the wrong format. Be sure to follow the instructions carefully. Your key should start with ssh-rsa AAAA….
Once you upload your SSH key to the portal, you can connect to your virtual machine from Windows through a PuTTY session.
Git Bash
The Git installation package comes with SSH. Using Git Bash, which is the Git command line tool, you can generate SSH key pairs. Git Bash has an SSH client that enables you to connect to and interact with Triton containers on Windows.
To install Git:
- (Download and initiate the Git installer](https://git-scm.com/download/win).
- When prompted, accept the default components by clicking Next.
- Choose the default text editor. If you have Notepad++ installed, select Notepad++ and click Next.
- Select to Use Git from the Windows Command Prompt and click Next.
- Select to Use OpenSSL library and click Next.
- Select to Checkout Windows-style, commit Unix-style line endings and click Next.
- Select to Use MinTTY (The default terminal of mYSYS2) and click Next.
- Accept the default extra option configuration by clicking Install.
When the installation completes, you may need to restart Windows.
Launching GitBash
To open Git Bash, we recommend launching the application from the Windows command prompt:
- In Windows, press Start+R to launch the Run dialog.
- Type
C:\Program Files\Git\bin\bash.exeand press Enter.
Generating SSH keys
First, create the SSH directory and then generate the SSH key pair.
One assumption is that the Windows profile you are using is set up with administrative privileges. Given this, you will be creating the SSH directory at the root of your profile, for example:
C:\Users\joetest- At the Git Bash command line, change into your root directory and type.
mkdir .ssh-
Change into the .ssh directory
C:\Users\joetest\.ssh - To create the keys, type:
ssh-keygen.exe- When prompted for a password, type apassword to complete the process. When finished, the output looks similar to:
Ssh-keygen.exe
Generating public/private rsa key pair.
Enter file in which to save the key (/c/Users/joetest/.ssh/id_rsa): /c/Users/joetest/.ssh/
Enter passphrase (empty for no passphrase):
Enter same passphrase again:
Your identification has been saved in /c/Users/joetest/.ssh/
Your public key has been saved in /c/Users/joetest/.ssh/
The key fingerprint is:
SHA256:jieniOIn20935n0awtn04n002HqEIOnTIOnevHzaI5nak joetest@periwinkle
The key's randomart image is:

 +---[RSA 2048]----+
 |*= =+.           |
 |O*=.B            |
 |+*o* +           |
 |o +o.  .         |
 | ooo  + S        |
 | .o.ooo* o       |
 |  .+o+*oo .      |
 |   .=+..         |
 |   Eo            |
 +----[SHA256]-----+

$ dir .ssh
id_rsa  id_rsa.pub
Uploading an SSH key
To upload the public SSH key to your Triton account:
- Open Triton Service portal, select Account to open the Account Summary page.
- From the SSH section, select Import Public Key.
- Enter a Key Name. Although naming a key is optional, labels are a best practice for managing multiple SSH keys.
- Add your public SSH key.
When Triton finishes the adding or uploading process, the public SSH key appears in the list of SSH keys.
What are my next steps?
- Adding SSH keys to agent.
- Set up the Triton CLI and CloudAPI on Windows.
- Set up the Triton CLI and CloudAPI.
- Create an instance in the Triton Service Portal.
- Set up the
triton-dockercommand line tool. - Visit PuTTYgen to learn more about the PuTTYgen and to see
the complete installation and usage guide.
Introduction
SSH stands for Secure Shell and is a method used to establish a secure connection between two computers.
SSH works by authenticating based on a key pair, with a private key being on a remote server and the corresponding public key on a local machine. When the keys match, access is granted to the remote user.
This guide will show you how to generate an SSH key pair in Windows 10 using OpenSSH or PuTTY.

Prerequisites
- A system running Windows 10
- A user account with administrative privileges
- Access to the command prompt
- A web browser (optional, to download PuTTY)
Generate an SSH key in Windows 10 with OpenSSH Client
Step 1: Verify if OpenSSH Client is Installed
First, check to see if you have the OpenSSH client installed:
1. Open the Settings panel, then click Apps.
2. Under the Apps and Features heading, click Optional Features.
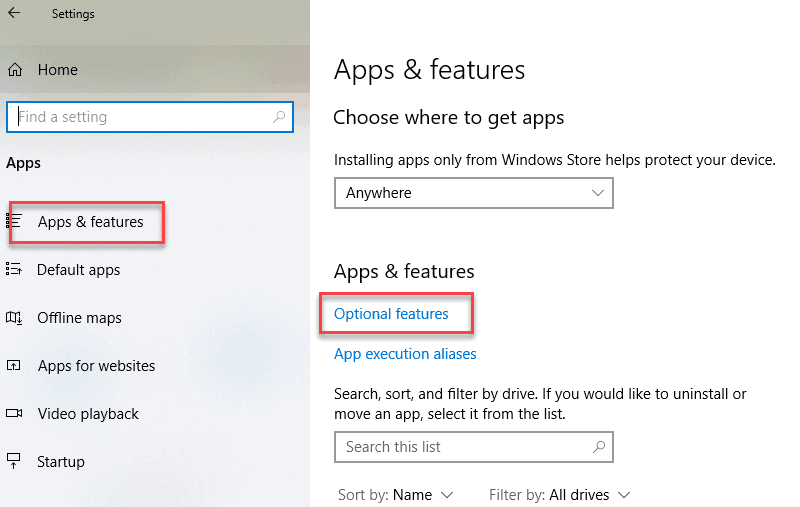
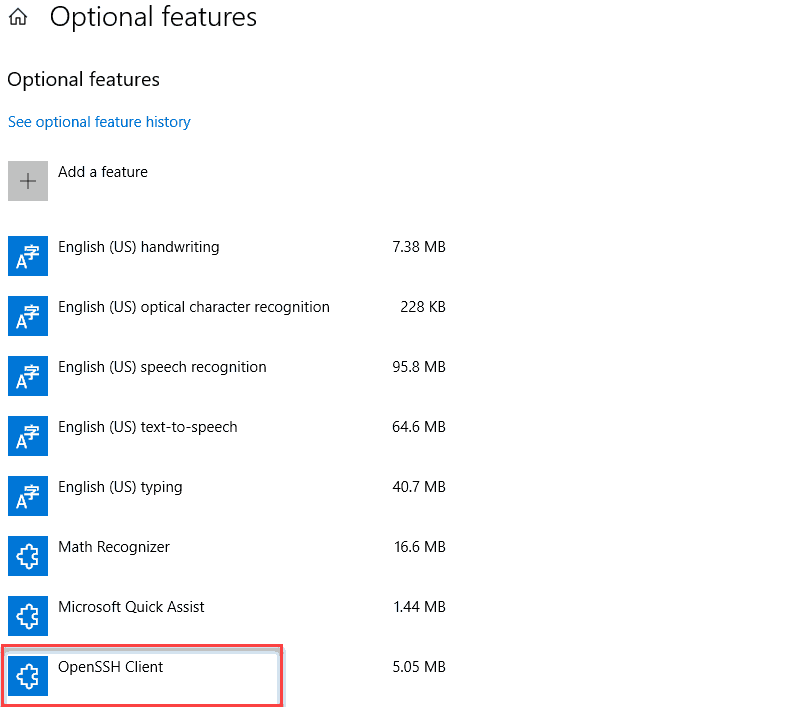
3. Scroll down the list to see if OpenSSH Client is listed.
- If it’s not, click the plus-sign next to Add a feature.
- Scroll through the list to find and select OpenSSH Client.
- Finally, click Install.
Step 2: Open Command Prompt
1. Press the Windows key.
2. Type cmd.
3. Under Best Match, right-click Command Prompt.
4. Click Run as Administrator.
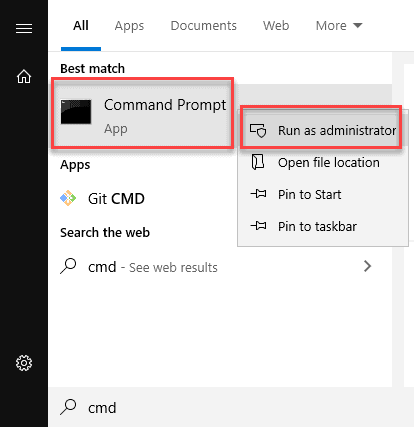
5. If prompted, click Yes in the Do you want to allow this app to make changes to your device? pop-up.
Step 3: Use OpenSSH to Generate an SSH Key Pair
1. In the command prompt, type the following:
ssh-keygen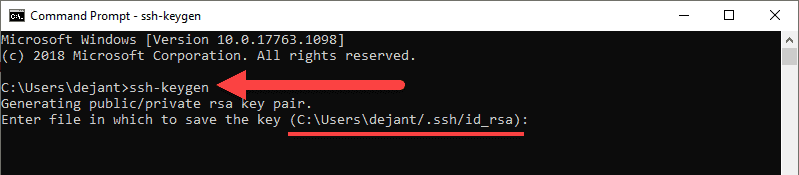
2. By default, the system will save the keys to C:\Users\your_username/.ssh/id_rsa. You can use the default name, or you can choose more descriptive names. This can help distinguish between keys, if you are using multiple key pairs. To stick to the default option, press Enter.
Note: If a file with the same name already exists, you will be asked whether you want to overwrite the file.
3. You’ll be asked to enter a passphrase. Hit Enter to skip this step.
4. The system will generate the key pair, and display the key fingerprint and a randomart image.
5. Open your file browser.
6. Navigate to C:\Users\your_username/.ssh.
7. You should see two files. The identification is saved in the id_rsa file and the public key is labeled id_rsa.pub. This is your SSH key pair.
Note: Normally, the public key is identified with the .pub extension. You can use Notepad to see the contents of both the private and public key.
Generate SSH Keys Using PuTTY
Before OpenSSH was included with Windows, the PuTTY tool was the gold standard for generating SSH keys.
Step 1: Install PuTTY
1. Browse to the developer’s page, and download the installer for PuTTY:
- https://www.chiark.greenend.org.uk/~sgtatham/putty/latest.html
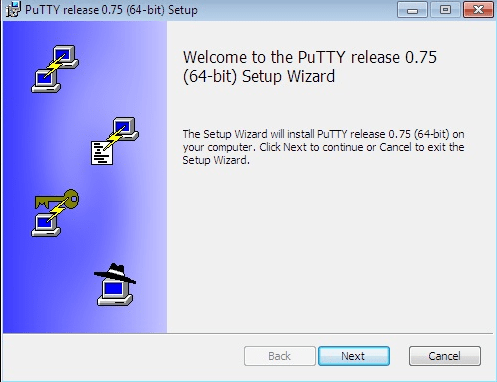
2. Double-click the downloaded file and follow the installation wizard to finish the installation.
- On the initial dialog of the installation wizard, click Next.
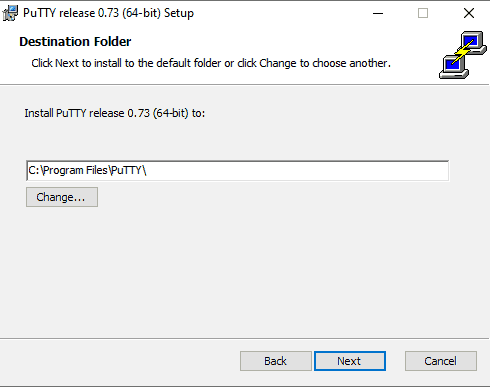
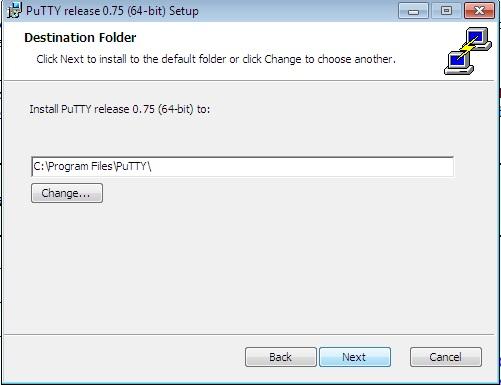
- Select the destination folder. Use the default installation configuration unless you have a specific need to change it. Click Next to move on to the next screen.
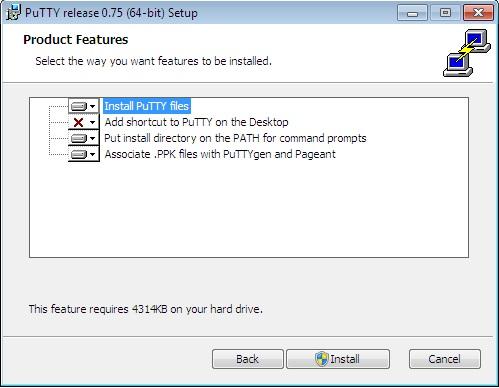
- Select PuTTY product features to be installed. Stick to the defaults if you do not have any specific needs. Click Next to move on to the next screen.
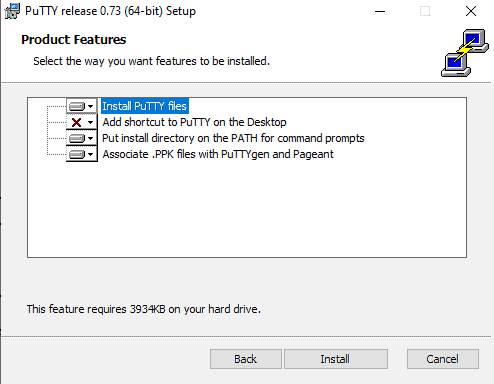
- Once the process completes, click Finish to exit the installation wizard.
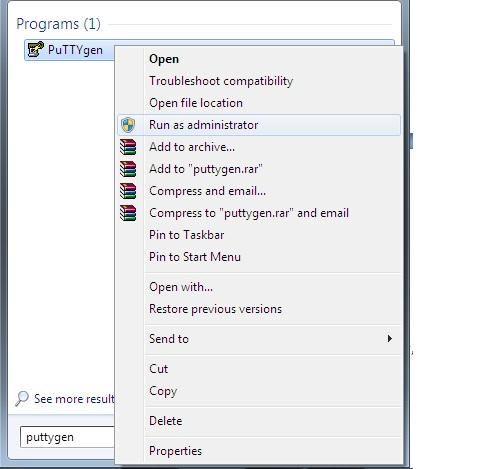
Step 2: Run the PuTTY SSH Key Generator
1. Press the Windows key.
2. Type puttygen.
3. Under Best Match, right-click PuTTYgen.
4. Click Run as administrator.
5. If prompted, click Yes on the Do you want to allow this app to make changes to your device? pop-up.
Step 3: Use PuTTY to Create a Pair of SSH Keys
The process outlined below will generate RSA keys, a classic and widely-used type of encryption algorithm. The PuTTY keygen tool offers several other algorithms – DSA, ECDSA, Ed25519, and SSH-1 (RSA).
If you require a different encryption algorithm, select the desired option under the Parameters heading before generating the key pair.
1. In the PuTTY Key Generator window, click Generate.
2. Move the cursor around in the gray box to fill up the green bar.
3. Save the public key:
- Click the button labeled Save public key.
- Choose a location to save the key.
- Give the key a name (e.g., putty_key.pub)
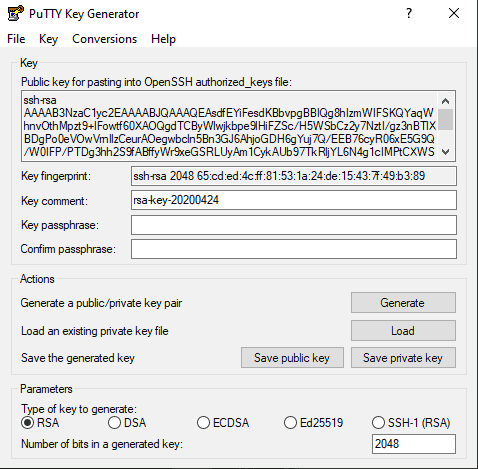
4. Save the private key:
- Click the Conversions menu at the top.
- Click Export OpenSSH key.
- You’ll be asked if you want to save a key without a passphrase. Click Yes.
- Choose a location to save the key (usually the same folder as the public key).
- Give the key a name (e.g., putty_key).
Using Your SSH Keys
To use your SSH keys, copy your public SSH key to the system you want to connect to. Use your private SSH key on your own system. Your private key will match up with the public key, and grant access.
For further details and troubleshooting, see our guide on paswordless SSH login using SSH keys.
Conclusion
This article has provided two methods of generating SSH key pairs on a Windows 10 system. Use the SSH keys to connect to a remote system without the use of passwords.
If you’ve ever used SSH for a secure connection to your server or another computer, you probably have an idea of what SSH keys are. Basically, an SSH key is a way to authenticate who you are and establish a safe, secure connection with another system. But SSH keys must be generated. So how do you generate SSH keys in Windows 10? This question is actually more common than you think since a lot of people prefer getting a Linux VPS and working with that instead of double-booting their PC or migrating from Windows. In this article, I’ll show you how you can generate an SSH Key in Windows 10. We’ll be using the popular Windows SSH client PuTTY to do the work. Now, before diving into the technical stuff, let’s look at a few definitions, just so we’re on the same page. This will help you follow the instructions better.
Generate SSH Key in Windows 10 by PuTTY
Let’s talk about SSH first. What is SSH? And what does SSH have to do with keys and making keys? The Secure Socket Shell or Socket Shell (SSH) is a popular protocol for creating safe and encrypted connections. SSH keys are standard components of the SSH protocol used to authenticate both sides and establish secure shell sessions. They’re used in connections between all types of operating systems and platforms. So, whether you’re trying to connect to a Linux VPS or a dedicated server running the latest Windows Server edition, you need to generate and use SSH keys. Before explaining SSH keys in detail, and discussing how to generate SSH keys in Windows 10, let’s speak about the SSH protocol.
“Also read: Use SSH to Connect to a Remote Server ”
What is the SSH Protocol?
SSH is a well-known protocol, especially between IT gurus and system administrators. It gives users a more secure way of accessing other systems over an unsecured network. It provides a public-key and strong password authentication. Using this protocol, you can remotely manage applications and systems, move files from one system to another, and execute commands. SSH protocol listens on the TCP port 22 by default.
What are SSH Keys?
SSH protocol, SSH keys are access credentials used to authenticate both hosts and users. Another use case is machine-to-machine or single-to-single access. SSH keys enable automation to enable the cost-effective and possible authentication required in computer-dependent and modern cloud services.
They come in various sizes, but the most common choice is an RSA 2048-bit encryption. Functionally, SSH keys gather passwords, grant access, and control the access level. There are some ways to enable or generate SSH in Windows 10. In the following, we will explain how to generate SSH key Windows using PuTTY. But before starting, let us have some checks to see whether SSH Key exists in Windows or not.

Windows 10 VPS Hosting
Get yourself an efficient Windows 10 VPS for remote desktop, at the cheapest price out there. FREE Windows 10 running on NVMe SSD storage and high-speed internet.
Check Out Windows 10 VPS Plans
Checking For Existing SSH Keys in Windows 10
Before generating an SSH key, you’d better check for existing SSH keys. To do so, do the following steps:
- Open Windows Command-Line by typing cmd on the search box of the Windows taskbar.
- In the command prompt environment, type ssh-keygen
- If you don’t have any SSH-keygen, you will see this message:
‘ssh-keygen’ is not recognized as an internal or external command, operable program, or batch file
- The default directory for your SSH keys should be something like this:
/c/Users/YourUserName/ .ssh/id_rsa.pub
Note: if you installed git with bash, you should open git Bash instead of cmd.
Generate SSH key Windows Using PuTTY
PuTTY is a free and open-source implementation used for terminal emulation in PCs running in Microsoft Windows. It can support several protocols such as SSH, Telnet, SCP, rlogin, and raw socket connection. Using PuTTY, you can generate SSH Key in Windows 10 via Windows terminal. To generate SSH Key in Windows 10 using PuTTY, perform the following steps:
“Also read: connect to your website via SSH”
Step 1: Download PuTTY
If you don’t already have PuTTY on your system, you can download it from this link. After downloading, install it.
Step 2: Install PuTTY
By clicking on the downloaded file, you can start the installation process. You can read this article about Connect to a Linux Server Using PuTTY or Simply follow the installation wizard. On the first page, click on Next.
Next, select the destination folder. The default destination is C drive\Program files\PuTTY\. You can change it to your desired address.
Now, it’s time to select Product Features to be installed. If you do not have any specific requirements, follow the default choice, and click on Install to move to the next screen.
Congratulations. You install PuTTY. You finished the first steps to generate an SSH Key in Windows 10. Now, let’s jump into the next step.
Step 3: Run the PuTTY SSH Key Generator
- Press the Windows key on your keyboard.
- In the search bar, type PuTTYgen (you can also use cmd and type PuTTYgen).
- Right-Click on PuTTYgen, and select Run as administrator.
- If prompted, select YES.
Step 4: Use PuTTY to Generate SSH Key in Windows 10
Now, to generate SSH Key in Windows 10, do the following steps:
- On the PuTTY generator page, click on generate.
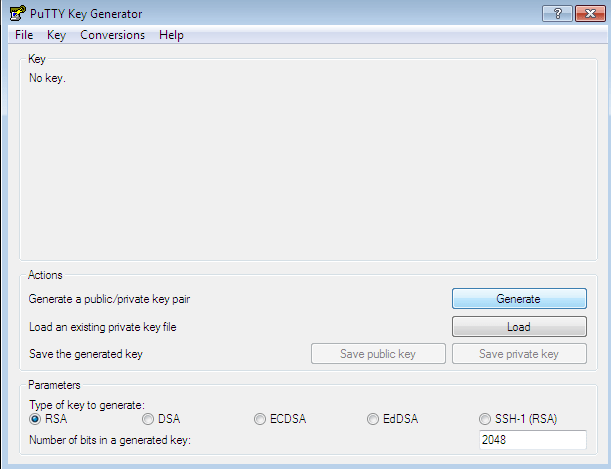
- The thing about moving the cursor is obviously a joke, so no need to tire yourself out. Wait until the progress bar is all green.
- Save the public key by clicking on the Save public key button. Choose a location for saving this key and give it a name.
- To save the Private Key, click on the Conversation menu.
- By clicking on Export OpenSSH Key, you’ll be asked, “Are you sure you want to save key without a passphrase to protect it?” Select “yes.”
- Choose a location for saving the Key.
- Give your private key a name.
Congratulations. You’ve managed to generate the SSH key we wanted by using PuTTY, one of the best SSH clients for Windows. Of course, you can also generate keys using OpenSSH, the client native to Windows 10, but the app lacks some of the more essential features, so most prefer using PuTTY or its alternatives.
Also Read : Install MikroTik CHR on VPS (Using PuTTY)
Are SSH Keys Enough for Server Security?
So, it seems you’ve got security handled — you’ll be connected to your server with a secure key, and that’s that. But what about your server? Are you sure it’s secure? Without a security-minded server provider, all the effort you just spent on SSH security will mean nothing. Cloudzy, for example, knows the importance of security to its users and provides an AI-powered firewall and intelligent DDoS protection on all its Linux VPS plans. So, if you want to work with any Linux distro you want without risking double-booting your laptop, you should check out our Linux VPS plans.