Contents
- 1 How do I remove get Windows 10 start?
- 2 How do I get rid of annoying Windows 10 icon?
- 3 How do I completely remove Windows 10?
- 4 How do I remove Get Start in Windows 11?
- 5 How do I get rid of Windows 10 app geek?
- 6 How do you remove a whiteboard?
- 7 How do I remove get help from taskbar?
- 8 How do I remove HP Support Assistant from taskbar?
- 9 Can I downgrade Windows 10?
- 10 How do I completely wipe my hard drive and operating system?
- 11 How do I get rid of Get Started app?
- 12 What can I delete from Windows 10?
- 13 How do you remove whiteboard from Windows?
- 14 How do you remove a whiteboard from a laptop?
- 15 How do I hide the bottom right icon in Windows 10?
- 16 How do you uninstall Windows help and support?
- 17 Can I delete Microsoft get help?
- 18 Will there be a Windows 11?
- 19 How do I permanently remove HP Support Assistant?
- 20 Can I remove HP Support Assistant?
How do I remove get Windows 10 start?
Replies (2)
- Press Windows key + R on your keyboard to open the run dialog box.
- In the Open field, type regedit.
- Click OK.
- Click Yes on the User Account Control (if prompted).
- Navigate to HKEY_LOCAL_MACHINESOFTWAREPoliciesMicrosoftWindowsCurrentVersionGwx.
- Right click.
- Click Modify.
How do I get rid of annoying Windows 10 icon?
Really annoying icon wont go away. How to remove?
- Go to start menu/search msconfig.
- On the system configuration window go to the services tab.
- Tick on hide all microsoft service so that this won’t be affected.
- Choose to disable all services.
- Next, go to the startup tab and on the window choose to open task manager.
How do I completely remove Windows 10?
How to Remove Windows 10 and Reinstall Another OS
- Open Settings.
- Go to Update & Security.
- Click Recovery.
- Under the Advanced Startup section, select the Restart Now button.
- Select Use a Device.
- Navigate to the factory partition, the USB drive, or the DVD drive as applicable.
How do I remove Get Start in Windows 11?
To uninstall through settings, open the Windows Settings app and go to ‘Apps’ on the left panel, and select the ‘Apps & features’ option from the right pane. Then, find the unwanted app in the list of apps, click the three-dot menu button next to the app, and select ‘Uninstall’ to remove the app.
How do I get rid of Windows 10 app geek?
Uninstall the App Normally
Just right-click an app on the Start menu—either in the All Apps list or the app’s tilke—and then select the “Uninstall” option. (On a touch screen, long-press the app instead of right-clicking.)
How do you remove a whiteboard?
Go Settings, Apps, Apps & features, scroll down to the program, click on it, click on Uninstall.
How do I remove get help from taskbar?
To uninstall Get Help in Windows 10, do the following.
- Open PowerShell as administrator.
- Type or copy-paste the following command: Get-AppxPackage *Microsoft.GetHelp* -AllUsers | Remove-AppxPackage.
- Hit the Enter key. The app will be removed!
How do I remove HP Support Assistant from taskbar?
To remove HP Support Assistant icon from the taskbar: ✔️ Open HP Support Assistant, ✔️ Select “Updates and tune-ups.” ✔️Then click “Other settings” on the bottom left and uncheck the taskbar options in the “How would you like to be notified?”
Can I downgrade Windows 10?
If you upgraded to Windows 10, but you don’t like it, don’t worry. You can always downgrade to a previous version of Windows. There are several reasons why you would want to downgrade your Windows 10 laptop or PC to a previous version of Windows.
How do I completely wipe my hard drive and operating system?
- Step 1: Back up your hard-drive data.
- Step 2: Don’t just delete files from your computer.
- Step 3: Use a program to wipe your drive.
- Step 4: Physically wipe your hard drive.
- Step 5: Do a fresh installation of the operating system.
How do I get rid of Get Started app?
All you have to do is to go to Site Settings/Manage Site Features and deactivate “Getting Started” feature.
What can I delete from Windows 10?
12 Unnecessary Windows Programs and Apps You Should Uninstall
- QuickTime.
- CCleaner.
- Crappy PC Cleaners.
- uTorrent.
- Adobe Flash Player and Shockwave Player.
- Java.
- Microsoft Silverlight.
- All Toolbars and Junk Browser Extensions.
How do you remove whiteboard from Windows?
To delete: Tap the . . . button for the whiteboard you want to delete, and then select Delete. Warning: This will permanently delete the whiteboard.
How do you remove a whiteboard from a laptop?
The alcohol in the hand gel should loosen up the ink without damaging the machine or the screen. If you do not have any antibacterial hand gel on hand, you may substitute it for plain rubbing alcohol. Keep in mind, however, that you will need to rub at the whiteboard marker for much longer in order to remove it.
How do I hide the bottom right icon in Windows 10?
How to Show and Hide Windows 10 System Tray Icons
- Open the Settings app.
- Click Personalization.
- Click Taskbar.
- Click Select which icons appear on the taskbar.
- Click toggles to On for icons you want to show, and Off for icons you want to hide.
How do you uninstall Windows help and support?
Click the Services tab, click to select the Hide All Microsoft Services check box, and then click Disable All.
Can I delete Microsoft get help?
Since this is an inbuilt app in your case, it could be possible that the app is getting new updates through Microsoft Store. However, if you are not interested in using the app you can uninstall it using the PowerShell command.
Will there be a Windows 11?
Windows 11 is here, and if you own a PC, you might be wondering whether it’s time to upgrade your operating system. After all, you are likely to get this new software free. Microsoft first revealed its new operating system in June, its first major software upgrade in six years.
How do I permanently remove HP Support Assistant?
In Windows, search for an open Uninstall a program. On the Programs and Features window, select HP Support Assistant, then click Uninstall. Click Yes on the Programs and Features screen to confirm you want to uninstall HP Support Assistant. Restart your computer to complete the process.
Can I remove HP Support Assistant?
But if you want to uninstall it, you can uninstall the HP Support Assistant like other programs.On the Programs and Features window, select HP Support Assistant, and then click Uninstall. Click Yes to confirm you want to uninstall HP Support Assistant.
How To Disable The «Get Windows 10» Icon And Notifications
Select the KB3035583 update with a click or a tap and then press the Uninstall button found at the top of the updates list. Confirm that you want to uninstall this update and wait for the process to finish. Then, reboot your device. Now, the «Get Windows 10» app is completely removed from your system.
Can you Downgrade from Windows 10 to Windows 7?
Well, you can always downgrade from Windows 10 to Windows 7 or any other Windows version . Depending on how you upgraded to Windows 10, the downgrade to Windows 8.1 or older option could vary for your computer.
Can I Get Rid of Windows 10?
If you can use Windows 10 normally, you can uninstall the update from the Settings app. To find this option, head to Settings > Update & Security > Recovery. Under “Go back to the previous version of Windows 10,” click “Get started” and click through the wizard that appears.
How do I Remove Windows 10 Update from Windows 7?
Open Control Panel.
Choose Uninstall a program under Programs section to continue.
Then click View install updates in the left panel to view all updated installed on your computer.
Rightclick the Windows update you wish to uninstall and choose Uninstall.
Click Yes.
How do I Get Rid of the Windows 10 Upgrade Notification?
Open Start.
Click on Update & Security.
Click on Windows Update .
Click the Advanced options button.
Turn off the Show a notification when your PC requires a restart to finish updating toggle switch.
Is Microsoft Still Offering Free Windows 10?
While the free upgrade offer ended last year, Microsoft will still let you install Windows 10 and activate it using a valid Windows 7 or Windows 8.
Can I Roll Back Windows 10 to 7?
In the Settings app , find and select Update & security. Select Recovery. Select Go back to Windows 7 or Go back to Windows 8.1. Select Get started button, and it will revert your computer to an older version.
How do I Disable Unwanted Services in Windows 10?
To turn off services in windows, type: «services. msc» into the search field. Then doubleclick on the services you want to stop or disable.
You can get rid of these by going to Settings > System > Notifications & Actions and unchecking Get Tips, Tricks, and Suggestions As You Use Windows.
Why does Windows 10 Keep Asking for Microsoft Account?
Go to Settings>Accounts>YourInfo . If it says «sign in with a local account , instead» , then whats happened is your Microsoft account has been integrated into your computer account. Click, and you should be back to a local account, which password demand can be suppressed.
How to Uninstall Windows 10 and Downgrade to Windows 7 or …

Just before Microsoft officially announced that Windows 10 will launch on July 29th, Windows 7 and 8.1 users began to notice a new icon in their Notification Area. This Get Windows 10 notification is the tool for reserving your free upgrade for the new operating system and according to the Windows 10 FAQ page there is an advantage to clicking the icon and reserving your copy today if you intend to upgrade.

If you reserve your copy through this system in the notification tray, Microsoft will preload your device with the upgrade before July 29th so when the day comes you won’t have to waste any time downloading it. The preload will require 3GB download at some point before July 29th, so you will just have to make sure you have the storage space if you plan to upgrade.
If you are planning to upgrade this guide will show you the quick and easy process for reserving it and additionally explain how to get the Get Windows 10 notification if it isn’t showing up for you, how to get rid of it if you don’t want it, or how to cancel your reservation.
Free upgrade to Windows 10
For the first year after the launch of Windows 10 on July 29th, all copies of Windows 7 with the SP1 update and Windows 8.1 updated devices are eligible for a free upgrade to the new operating system.
Windows 10 comes with a variety of new features that will offer a more seamless experience between devices, use on the go, and a touch screen experience, all the while bringing back familiar features in a fresh way, like the new Start Menu with Live Tiles. To read about all of the many features, such as Cortana and Microsoft Edge, that would be too long to list here, head over to Microsoft’s website for Windows 10 for more details or WinBeta’s Windows 10 section for our coverage of the announced and anticipated features.
What’s required for the upgrade
Microsoft has also detailed the system requirements for Windows 10 and a much longer list of requirements for specific features such as Cortana and Windows Hello. The full list of requirements can be read in our coverage from yesterday but below is the system hardware requirements for running Windows 10.
- Latest OS: Make sure you are running the latest version either Windows 7 SP1 or Windows 8.1 Update.
- Processor: 1 gigahertz (GHz) or faster processor or SoC
- RAM: 1 gigabyte (GB) for 32-bit or 2 GB for 64-bit
- Hard disk space: 16 GB for 32-bit OS 20 GB for 64-bit OS
- Graphics card: DirectX 9 or later with WDDM 1.0 driver
- Display: 1024×600
Finally, as mentioned earlier, the pre-install will take up 3 GB of storage space on your device.
How to reserve your upgrade
First, find the ‘Get Windows 10’ icon in the Notification Area of your device. Right click the icon and left click ‘Reserve your free upgrade.’

At this point, the ‘Get Windows 10’ app will open and give you the option to enter an email address for a confirmation message.

After you have reserved your free upgrade, the ‘Get Windows 10’ app will still be accessible by left click the same ‘Get Windows 10’ icon in the Notification Area.
From the hamburger menu in this App, you can access a quick intro to features of Windows 10, a tool that assesses if your device is ready for the upgrade, and an option to view the confirmation of your upgrade. It is from this last part of the hamburger menu that you cancel your reservation.

How to cancel a reservation
First open the ‘Get Windows 10’ app from you the Notification Area. Next click the hamburger menu button and select ‘View Confirmation’ under the ‘Getting the upgrade section.’ Next, click ‘Cancel reservation.’ Then click the option to confirm your choice.

After you have canceled your reservation, the ‘Get Windows 10’ icon will remain in your Notification Area in case you change your mind. But if you are sure you don’t want to upgrade and want to get rid of that Get Windows 10 notification, read on to the next section.
How to get rid of the ‘Get Windows 10’ icon
The ‘Get Windows 10’ app was installed as part of the recommended Windows update KB3035583. To get rid of the notification simply uninstall that update.
To do this first open your ‘Control Panel’ by right clicking the start menu and selecting ‘Control Panel.’ Next, from your ‘Control Panel’ select ‘Programs and Features.’

Then select ‘View installed updates’ from the top left of the window. Once you are viewing installed updates, search for KB3035583.

Select ‘Update for Microsoft Windows (KB3035583)’ and click Uninstall button directly above the listing of the update.

How to install the Get Windows 10 app
If you don’t see the ‘Get Windows 10’ icon in your notification area and want to reserve your copy, or you just went through the uninstall process listed above but have since changed your mind, all you need to do is install the KB3035583 update for Windows.
Go to ‘Control Panel.’ Open ‘Windows Update.’ Click ‘Show all available updates.’

Search under the list of ‘Recommended’ updates for ‘Update for Microsoft Windows (KB3035583)’ and click Install. If ‘Update for Microsoft Windows (KB3035583)’ is not listed you can also try clicking ‘Check for updates.’
So there you have it. Windows 10 is set to be released on July 29th, so now is the time to prepare your systems!
by Ivan Jenic
Passionate about all elements related to Windows and combined with his innate curiosity, Ivan has delved deep into understanding this operating system, with a specialization in drivers and… read more
Updated on
XINSTALL BY CLICKING THE DOWNLOAD
FILE
Windows 10 has been here since July 2015, but some users still don’t want to upgrade their systems. They prefer to stick to the current (older) version of Windows they have. But it seems that Microsoft wants you really bad to upgrade to Windows 10, so it almost forces you to do so.
We already talked about the way to prevent Windows 10 upgrades, and remove the Get Windows 10 button. This method required installing a third-party software called GWX Control Panel. And users who weren’t satisfied by the fact that Microsoft is forcing them to upgrade to Windows 10 constantly complained about this decision. So, the company decided to ‘help’ them.
Microsoft engineers recently provided a tweak which will remove Get Windows 10 app and prevent all upgrade notifications on Windows 7 and Windows 8.1.
But you should keep in mind that this is not Microsoft’s official guide, as the company probably still wants you to switch to Windows 10, but it looks like some of its employees think different (hope they’ll keep their jobs).
How we test, review and rate?
We have worked for the past 6 months on building a new review system on how we produce content. Using it, we have subsequently redone most of our articles to provide actual hands-on expertise on the guides we made.
For more details you can read how we test, review, and rate at WindowsReport.
How to Prevent Windows 10 Upgrade on Windows 7/ 8.1
As one of Microsoft employees points out on Community forums, to prevent Windows 10 upgrade, you have to perform one registry tweak. Here’s exactly what you need to do:
- Go to Search, type regedit, and open Registry Editor
- Navigate to the following path:
- HKEY_LOCAL_MACHINESOFTWAREPoliciesMicrosoftWindowsGwx

- Create a new REG_DWORD called “DisableGwx,” and set its value to 1
- Reboot your computer
These instructions were suggested by users before, but Microsoft never used them to show people how to block Windows 10 upgrade prompts, for the very obvious reasons that you probably already know. Microsoft wants as many users of Windows 10 as possible.
But even if this action is effective, this can be only temporary, because some people are reporting that Microsoft reset their stings, and re-enabled Get Windows 10 button, with updates.
If you don’t want to bother with registry tweaks and creating DWORDs, you can simply download GWX Control Panel, because it basically does the same thing.
But we can’t tell you how long it will work because it looks like preventing Windows 10 upgrade becomes harder and harder with new system updates.
If you don’t want to use this Registry Tweak, you can try other methods, such as:
- Disable the Windows Update Service from Services

- Set your internet connection on a metered connection
Many Windows 10 users want to block system updates as well. So, it seems that this attitude is not valid only for Windows 7 or Windows 8.1 users. Even Windows 10 users prefer to use an older Windows 10 version rather than installing a new one.
If you upgraded to Windows 10 and you want to roll back to Windows 7 or Windows 8.1, check out this guide to learn what are the steps to follow.
RELATED POSTS TO CHECK OUT:
- How to bring the Windows 7 Task Manager to Windows 10
- Windows 7 KB4457139 makes it easier to upgrade to Windows 10
- How to Enable the Legacy Windows 7 Boot Menu Using Windows 10
![]()
Introduction
Wanting to get rid of the Windows 10 download on your computer? Whether you’re experiencing compatibility issues, performance problems, or simply prefer an earlier version of Windows, there are several methods you can try to remove the Windows 10 update and revert back to your previous operating system.
Windows 10, the latest version of Microsoft’s operating system, brought many exciting features and improvements. However, it may not be suitable for everyone, and some users may find it more beneficial to stick with their previous version of Windows. Fortunately, there are multiple methods available to help you uninstall Windows 10 and go back to the version you were using before the upgrade.
In this article, we will explore several effective methods to get rid of the Windows 10 download from your computer. These methods include uninstalling the update, disabling the Windows Update service, using tools such as the Show or Hide Updates Tool, the Group Policy Editor, and the Windows Registry Editor. Additionally, we will cover using the Media Creation Tool to reinstall your previous version of Windows and rolling back to the previous version. Let’s dive into each method and find the one that suits your needs.
It’s important to note that before you proceed with any of these methods, you should always back up your important files and data to prevent any potential loss. Additionally, it’s advisable to create a system restore point or disk image in case you need to revert back to your current system configuration.
Now, let’s explore the various techniques you can utilize to get rid of the Windows 10 download and return to your preferred version of Windows.
Method 1: Uninstall Windows 10 Update
If you recently installed the Windows 10 update and you’re not satisfied with it, you can uninstall it and revert back to the previous version of Windows. Follow these steps to uninstall the Windows 10 update:
- Press the Windows key + I on your keyboard to open the Settings app.
- Click on “Update & Security” from the options.
- In the left-hand menu, select “Windows Update.”
- Click on “View update history.”
- Click on “Uninstall updates.”
- A list of installed updates will appear. Look for the Windows 10 update, which may be labeled as “Feature Update to Windows 10” or “Windows 10 Version [version number].”
- Right-click on the update and select “Uninstall.”
- Follow the on-screen instructions to complete the uninstallation process. Your computer will restart, and the Windows 10 update will be removed.
Please note that the availability of the uninstall option may vary depending on how long ago you installed the Windows 10 update. If the uninstall option is not available or grayed out, you may need to try an alternative method to remove the Windows 10 download.
This method allows you to easily revert back to your previous version of Windows by removing the Windows 10 update. However, keep in mind that once you uninstall the update, you may no longer receive security patches, bug fixes, and new features available in Windows 10. Therefore, it’s crucial to regularly update your operating system to ensure optimal performance and security.
Now that you know how to uninstall the Windows 10 update, let’s move on to the next method, which involves disabling the Windows Update service.
Method 2: Disable Windows Update Service
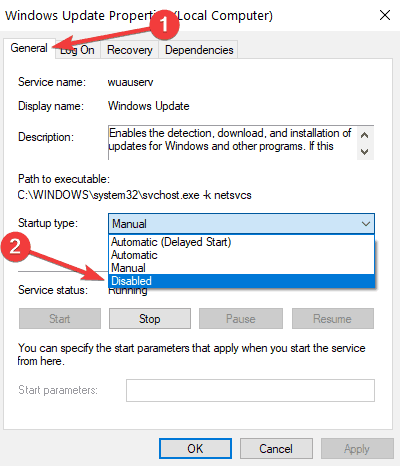
If you want to prevent Windows 10 from automatically downloading and installing updates, you can disable the Windows Update service. Here’s how:
- Press the Windows key + R on your keyboard to open the Run dialog box.
- Type “services.msc” (without quotes) and press Enter. This will open the Services window.
- Scroll down and locate the “Windows Update” service.
- Right-click on the service and select “Properties.”
- In the Properties window, under the “General” tab, locate the “Startup type” dropdown menu.
- Select “Disabled” from the dropdown menu.
- Click on the “Apply” button, then click “OK” to save the changes.
Disabling the Windows Update service will prevent Windows 10 from automatically checking for and downloading updates. However, it is important to note that this method should only be used if you are confident in your ability to manually install updates and ensure the security of your system.
Keep in mind that disabling the Windows Update service can leave your system vulnerable to security risks and prevent you from getting important updates that could improve your computer’s performance and stability. It is recommended to regularly check for updates manually or use alternative methods to manage the Windows Update process.
Now that you know how to disable the Windows Update service, let’s explore the next method which involves using the Show or Hide Updates Tool.
Method 3: Use the Show or Hide Updates Tool
If you want to selectively hide or prevent certain updates from being installed on your Windows 10 computer, you can utilize the Show or Hide Updates Tool. This tool allows you to choose which updates to install and which ones to hide. Here’s how you can use it:
- Download the Show or Hide Updates Tool from the official Microsoft website and save it to your computer.
- Run the tool by double-clicking on the downloaded file.
- When the tool opens, it will start scanning for updates on your system.
- Once the scan is complete, you will see a list of available updates.
- Scroll through the list and look for the specific update or updates you want to hide.
- Check the box next to the update you want to hide.
- Click on the “Next” button to proceed.
- The tool will apply the changes, and the selected updates will be hidden from installation.
By using the Show or Hide Updates Tool, you have the flexibility to choose which updates you want to install and which ones you prefer to avoid. This method is particularly useful if you have specific updates that cause issues or conflicts with your computer’s hardware or software.
However, it’s important to note that using this tool to hide updates means those updates will not be installed, and your system may miss out on important security patches, bug fixes, and new features. Therefore, it’s recommended to periodically review the hidden updates and unhide them if necessary.
Now that you know how to use the Show or Hide Updates Tool, let’s move on to the next method, which involves utilizing the Group Policy Editor.
Method 4: Use the Group Policy Editor
If you have Windows 10 Pro, Enterprise, or Education edition, you have access to the Group Policy Editor, which allows you to have more control over Windows updates. By using this method, you can change the settings to prevent Windows 10 from automatically downloading and installing updates. Here’s how to do it:
- Press the Windows key + R on your keyboard to open the Run dialog box.
- Type “gpedit.msc” (without quotes) and press Enter. This will open the Group Policy Editor.
- In the Group Policy Editor window, navigate to “Computer Configuration” > “Administrative Templates” > “Windows Components” > “Windows Update.”
- In the right-hand pane, double-click on “Configure Automatic Updates.”
- In the configuration window that opens, select the “Enabled” option.
- From the “Options” dropdown menu, choose one of the following options:
- “2 – Notify for download and notify for install”: Windows will notify you when updates are available, but they will not be installed automatically.
- “3 – Auto download and notify for install”: Windows will download updates automatically, but they will not be installed automatically. You will be notified when updates are ready for installation.
- “4 – Auto download and schedule the install”: Windows will download updates automatically and schedule a specific time for installation. You will be notified when updates are ready for installation.
- Click on the “Apply” button, then click “OK” to save the changes.
By using the Group Policy Editor, you can customize the Windows Update settings according to your preference. This method gives you more control over updates, allowing you to choose when and how they are installed on your computer.
It is important to note that the Group Policy Editor is not available in Windows 10 Home editions. If you’re using the Home edition, you may need to consider other methods to manage Windows updates.
Now that you know how to use the Group Policy Editor to control Windows updates, let’s move on to the next method, which involves making changes using the Windows Registry Editor.
Method 5: Use the Windows Registry Editor
If you’re comfortable making changes to the Windows Registry, you can utilize the Windows Registry Editor to prevent Windows 10 from automatically downloading and installing updates. Before proceeding with this method, it’s essential to note that modifying the Registry is a sensitive process and should be done with caution. Here’s how to use the Windows Registry Editor:
- Press the Windows key + R on your keyboard to open the Run dialog box.
- Type “regedit” (without quotes) and press Enter. This will open the Windows Registry Editor.
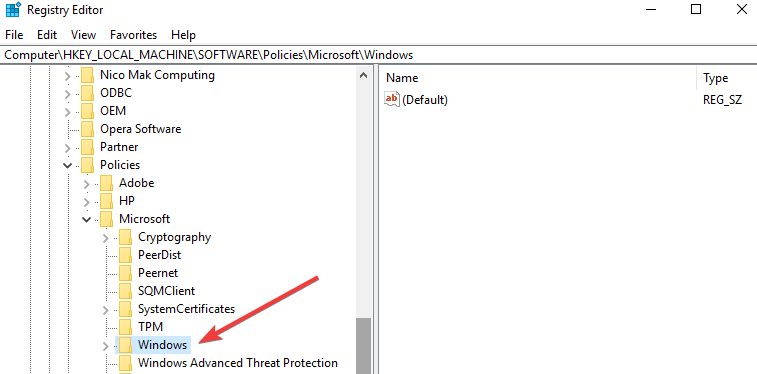
- In the Registry Editor window, navigate to the following key:
HKEY_LOCAL_MACHINE\SOFTWARE\Policies\Microsoft\Windows\WindowsUpdate(Note: If the “WindowsUpdate” key does not exist, you may need to create it. Right-click on the “Windows” key, select “New,” and then choose “Key” to create a new key. Rename it as “WindowsUpdate”.)
- In the “WindowsUpdate” key, right-click on the right-hand pane and select “New” and then “DWORD (32-bit) Value”.
- Name the new value “AUOptions” (without quotes).
- Double-click on the “AUOptions” value and set its “Value data” to one of the following:
- 2: Notify before download.
- 3: Automatically download and notify for installation.
- 4: Automatically download and schedule the installation.
- 5: Allow local administrators to choose the update settings.
- Click on the “OK” button to save the changes.
Using the Windows Registry Editor gives you the ability to fine-tune the Windows Update settings to suit your preferences. However, it’s essential to exercise caution when making changes to the Registry, as any incorrect modification can potentially cause system issues.
If you’re uncomfortable working with the Registry or unfamiliar with its workings, it is advisable to seek assistance from a knowledgeable individual or consult official Microsoft documentation before proceeding.
Now that you know how to use the Windows Registry Editor, let’s move on to the next method, which involves using the Media Creation Tool to reinstall your previous version of Windows.
Method 6: Use the Media Creation Tool
If you want to get rid of the Windows 10 download and revert back to your previous version of Windows, you can use the Media Creation Tool provided by Microsoft. This tool allows you to create installation media or upgrade your current system to another version of Windows. Here’s how you can use the Media Creation Tool:
- Visit the official Microsoft website and download the Media Creation Tool.
- Run the tool by double-clicking on the downloaded file.
- When the tool opens, select the option to “Create installation media for another PC.”
- Choose your preferred language, edition, and architecture (32-bit or 64-bit).
- Select either a USB flash drive or an ISO file as the installation media.
- Follow the on-screen instructions to create the installation media.
- Once the installation media is created, insert the USB flash drive or mount the ISO file on your computer.
- Restart your computer and boot from the USB flash drive or the mounted ISO file.
- Follow the prompts to reinstall your previous version of Windows.
- During the installation process, you may be prompted to enter your product key. Ensure you have the product key for your previous version of Windows handy.
- Complete the installation process and allow your computer to restart.
Using the Media Creation Tool gives you the flexibility to reinstall your previous version of Windows and remove the Windows 10 upgrade. It’s important to note that this process will erase all the data on your computer, so make sure to back up your important files and documents before proceeding.
Once the reinstallation is complete, you can restore your backed-up files and set up your computer with your desired settings. Remember to regularly check for updates and install them to keep your system secure and up to date.
Now that you know how to use the Media Creation Tool, let’s move on to the final method, which involves rolling back to the previous version of Windows.
Method 7: Roll Back to the Previous Version of Windows
If you recently upgraded to Windows 10 but are not satisfied with it, you have the option to roll back to your previous version of Windows. Windows 10 provides a built-in feature that allows you to revert back within a limited time period after the upgrade. Here’s how you can roll back to the previous version of Windows:
- Press the Windows key + I on your keyboard to open the Settings app.
- Click on “Update & Security” from the options.
- In the left-hand menu, select “Recovery.”
- Under the “Go back to the previous version of Windows 10” section, click on the “Get started” button.
- Follow the on-screen instructions to complete the rollback process.
During the rollback process, your computer will restart multiple times. It’s important to note that rolling back to the previous version of Windows will remove all the applications and settings you installed after the upgrade to Windows 10. Additionally, any applications that came with your previous version of Windows may need to be reinstalled.
It’s advisable to back up your important files and documents before proceeding with the rollback, as there is a risk of data loss during the process. You may also need to reinstall any software or applications that are incompatible with your previous version of Windows.
Once the rollback process is complete, your computer will be restored to the previous version of Windows, and you can continue using it as before. It’s recommended to review your Windows Update settings to prevent the automatic installation of Windows 10 in the future, if desired.
Now that you know how to roll back to the previous version of Windows, you have successfully gone through all the methods to get rid of the Windows 10 download and return to your previous operating system.
Conclusion
Getting rid of the Windows 10 download and reverting back to your previous version of Windows is possible through several methods. Whether you choose to uninstall the Windows 10 update, disable the Windows Update service, use tools like the Show or Hide Updates Tool or the Group Policy Editor, modify the Windows Registry, use the Media Creation Tool, or roll back to the previous version, you have options to suit your needs and preferences.
It’s important to keep in mind that each method has its own advantages and considerations. Uninstalling the update or disabling the Windows Update service may prevent automatic updates but can leave your system vulnerable to security risks. Using tools like the Show or Hide Updates Tool or the Group Policy Editor gives you more control over updates, but you need to stay diligent in managing them. Modifying the Windows Registry requires caution, as incorrect changes can lead to system issues. Reinstalling the previous version of Windows through the Media Creation Tool or rolling back within the limited time period after the upgrade gives you a fresh start but involves data loss and potential application reinstallation.
As with any changes to your computer’s operating system, it’s crucial to back up your important files and data before proceeding with any of these methods. Additionally, regularly updating your operating system and keeping it secure is essential for optimal performance and protection against security threats.
By following the methods provided in this article, you can successfully remove the Windows 10 download and return to the previous version of Windows that best suits your needs. Choose the method that aligns with your comfort level and ensure that you carefully follow the instructions to achieve the desired outcome.
Now you have the knowledge and tools to take control of your Windows operating system and make the changes necessary to create the computing experience you desire.