Follow these steps to automatically diagnose and repair Windows security problems by turning on UAC, DEP protection, Windows Firewall, and other Windows security options and features.
-
Select the Download button on this page.
-
In the File Download dialog box, click Run or Open, and then follow the steps in the Windows Security Troubleshooter.
Notes:
-
This troubleshooter might be in English only. However, the automatic fix also works for versions of Windows in other languages.
-
If you’re not on the computer that has the problem, save the troubleshooter to a flash drive or a CD, and then run it on the computer that has the problem.
Download
What it fixes
-
Checks the following Windows security features and enables them if needed
-
Phishing Filter or Smartscreen Filter
-
User Account Control (UAC)
-
Data Execution Prevention (DEP)
-
Windows Firewall
-
Antivirus protection status and updates
Runs on
-
Windows 7
-
Windows 8
-
Windows 8.1
-
Windows 10
See also
Stay protected with Windows Security
What’s new in Windows Security
Need more help?
Want more options?
Explore subscription benefits, browse training courses, learn how to secure your device, and more.
Communities help you ask and answer questions, give feedback, and hear from experts with rich knowledge.
Find solutions to common problems or get help from a support agent.
Windows issues can be incredibly frustrating and disruptive, but with the right knowledge and troubleshooting steps, you can tackle them like a pro. In this guide, we will explore a wide range of methods and techniques to help you resolve common Windows issues efficiently. Whether you’re a beginner or an experienced user, this guide aims to equip you with the necessary tools and knowledge to troubleshoot and fix Windows problems effectively.
Introduction to Windows Issues
1. Understanding the Common Types of Windows Issues
Windows issues can manifest in various forms, such as slow performance, software crashes, boot problems, and network connectivity issues. Understanding these common types of issues will help you identify and address them more effectively.
2. Why It’s Important to Fix Windows Issues Promptly
Resolving Windows issues promptly is crucial to ensure the smooth operation of your system. Ignoring or delaying fixes can lead to further complications and potential data loss. Additionally, fixing issues promptly enhances your overall computing experience by improving performance, stability, and security.
Preparing for Troubleshooting
1. Creating System Restore Points
Before attempting any troubleshooting steps, it’s essential to create a system restore point. This allows you to revert your system back to a stable state if any unexpected issues occur during the troubleshooting process.
2. Backing Up Your Data
Prioritize data backup to avoid permanent loss or corruption. Regularly back up your important files and documents to an external storage device, cloud storage, or another secure location.
3. Understanding Event Viewer Logs
Event Viewer provides detailed logs of events and errors occurring within your system. Familiarize yourself with this powerful tool, as it can provide valuable insights into the root causes of Windows issues.
Basic Troubleshooting Steps
1. Restarting Your Computer
Restarting your computer is a simple yet effective troubleshooting step. It can resolve temporary glitches, clear system resources, and address minor software conflicts.
2. Checking for Windows Updates
Keeping your Windows operating system up to date is vital for stability and security. Regularly check for and install Windows updates to ensure you have the latest bug fixes and security patches.
3. Running System File Checker (SFC) Scan
The System File Checker (SFC) scan checks for corrupted or missing system files and attempts to repair them. This can often resolve issues related to system file corruption.
4. Scanning for Malware and Viruses
Malware and viruses can cause a wide range of Windows issues. Use reputable antivirus software to perform regular scans and remove any detected threats.
5. Checking Hardware Connections
Loose or faulty hardware connections can lead to various issues. Ensure all cables, peripherals, and internal components are securely connected and functioning correctly.
Advanced Troubleshooting Methods
1. Using Safe Mode
Safe Mode allows you to boot your computer with only essential drivers and services, making it easier to diagnose and fix issues caused by problematic software or drivers.
2. Repairing Startup Issues
If your computer fails to boot properly, you can use startup repair tools, such as the Windows Recovery Environment (WinRE) or Startup Repair, to diagnose and fix startup problems.
3. Resolving Blue Screen of Death (BSOD) Errors
Blue Screen of Death (BSOD) errors indicate critical system issues. Understanding how to analyze and troubleshoot BSOD errors can help you identify and fix underlying problems.
4. Fixing Driver Issues
Outdated or incompatible drivers can cause various Windows issues. Learn how to identify problematic drivers and update them using manufacturer websites or dedicated driver update utilities.
5. Troubleshooting Network Connectivity Problems
Network connectivity problems can be complex to troubleshoot. Explore network diagnostic tools and follow step-by-step guides to address issues related to internet connectivity and network adapters.
6. Resolving Application Compatibility Issues
Some applications may encounter compatibility issues with certain Windows versions. Utilize compatibility mode settings or application-specific troubleshooting guides to resolve compatibility-related problems.
7. Dealing with Windows Update Problems
Windows updates can sometimes fail to install or cause issues during the update process. Learn how to troubleshoot Windows Update problems, including using the Windows Update Troubleshooter and resetting Windows Update components.
Specific Windows Issues and Solutions
1. Slow Performance and High Resource Usage
Investigate common causes of slow performance, such as excessive startup programs, background processes, and insufficient system resources. Implement optimization techniques like disabling unnecessary startup items and managing system resources effectively.
2. Windows Not Booting or Startup Issues
Troubleshoot and resolve common causes of startup problems, including faulty hardware, corrupt system files, and incompatible drivers. Follow step-by-step guides to repair the Windows boot process and restore system functionality.
3. Internet Connection Problems
Troubleshoot internet connectivity issues by checking physical connections, resetting network settings, and diagnosing network adapters. Understand common network problems and their respective solutions.
4. Application Crashes and Errors
Learn how to troubleshoot application crashes and errors using methods like reinstalling the application, updating drivers, checking for compatibility issues, and analyzing error logs.
5. Printer and Peripheral Device Issues
Troubleshoot common printer and peripheral device issues, including driver problems, connectivity issues, and hardware conflicts. Follow manufacturer guidelines and utilize troubleshooting utilities provided with the devices.
6. Audio and Video Problems
Address audio and video issues by checking audio and display settings, updating drivers, and troubleshooting common problems like audio playback glitches, distorted visuals, or video playback errors.
Tools and Utilities for Troubleshooting
1. Windows Task Manager
Master the use of Windows Task Manager to monitor and manage system processes, check resource usage, identify problematic applications, and terminate unresponsive tasks.
2. Resource Monitor
Explore the Resource Monitor tool to gain deeper insights into system resource usage, including CPU, memory, disk, and network activity. Identify resource-intensive processes and troubleshoot performance issues accordingly.
3. Device Manager
Understand the Device Manager’s role in managing hardware devices and drivers. Learn how to update, roll back, disable, or uninstall device drivers to resolve hardware-related problems.
4. Windows Troubleshooters
Windows Troubleshooters provides automated diagnosis and repair for various common Windows issues. Discover different built-in troubleshooters and how to utilize them effectively.
5. Event Viewer
Utilize Event Viewer to examine detailed logs of system events, errors, and warnings. Learn how to navigate Event Viewer to identify and troubleshoot underlying issues.
6. System Configuration (msconfig)
Learn how to use System Configuration to manage startup programs, services, and boot options. Adjusting these settings can help troubleshoot issues related to software conflicts or resource allocation.
7. Windows Registry Editor (regedit)
Familiarize yourself with the Windows Registry Editor to troubleshoot issues related to registry corruption or incorrect settings. Exercise caution when making changes to the registry and always back it up before making modifications.
Additional Tips for Efficient Troubleshooting
1. Keeping Windows and Drivers Updated
Regularly update your Windows operating system and drivers to ensure you have the latest bug fixes, security patches, and compatibility enhancements.
2. Maintaining Adequate Disk Space
Insufficient disk space can impact system performance and cause issues. Regularly clean up temporary files, uninstall unused applications, and consider expanding your storage capacity if necessary.
3. Managing Startup Programs
Optimize system startup time and resource usage by managing startup programs. Disable unnecessary applications from starting up with Windows to improve overall performance.
4. Cleaning Temporary Files and Junk Data
Accumulated temporary files and junk data can clog up your system and lead to performance issues. Utilize built-in tools like Disk Cleanup or third-party software to regularly clean up and optimize your system.
5. Optimizing System Performance
Implement additional system optimization techniques, such as adjusting power settings, configuring visual effects, managing virtual memory, and utilizing performance monitoring tools to enhance overall system performance.
Getting Help and Support
1. Windows Support Resources
Familiarize yourself with official Windows support resources, including documentation, knowledge bases, and official forums. These resources provide valuable information and solutions for specific Windows issues.
2. Community Forums and Discussion Boards
Engage with online communities, forums, and discussion boards dedicated to Windows troubleshooting. Share your issues, seek advice, and learn from the experiences of others.
3. Seeking Professional Assistance
If all troubleshooting efforts fail or you’re dealing with complex issues, consider seeking professional help from certified technicians or Microsoft support services. They can provide expert guidance tailored to your specific situation.
Conclusion:
Fixing Windows issues may seem challenging, but armed with the right knowledge and troubleshooting methods, you can address them like a pro. This comprehensive guide has covered a wide range of troubleshooting steps, tools, and techniques that will help you overcome common Windows problems efficiently. Remember to create system restore points, back up your data, and exercise caution when making changes to your system. By following the methods outlined in this guide and staying proactive in maintaining your Windows environment, you can ensure a smooth and trouble-free computing experience.
Disclaimer: The information provided in this guide is for educational purposes only. The steps and methods outlined may vary depending on your specific system configuration and the nature of the Windows issue. Always exercise caution and back up important data before making any changes to your system.
This tutorial includes a list of the most common problems in Windows 10 and 11 and basic tips to solve them. Nearly any Windows problem can be fixed using its own tools: system utilities and troubleshooters, advanced booting, Command Prompt, Control Panel, and the latest hardware drivers. Are you experiencing any of the issues below? There is a solution for each one.
Content
- 1. Unresponsive Applications
- 2. Slow PC
- 3. Blue Screen Errors
- 4. Hard Disk/SSD Failure
- 5. Mouse and Touchpad Issues
- 6. Registry Errors
- 7. Audio Not Working
- 8. Windows Login Problems
- 9. BIOS Issues
- 10. USB Ports Not Working
- 11. Monitor/Display Problems
- 12. Bluetooth Not Working
- 13. Windows Won’t Download or Install Updates
- 14. Wi-Fi Disabled Suddenly
- Frequently Asked Questions
1. Unresponsive Applications
When a Windows application freezes, nothing moves on the screen, and even other programs feel unresponsive. Apps mostly behave like this because of overheating in the cabinet/laptop bottom and memory issues.
- To unfreeze the stuck applications, open the Task Manager using Ctrl + Alt + Del or from Run command Win + R followed by
taskmgr. - Right-click to end those tasks in «Processes.» If you managed to save your work, perform a clean reboot.

To determine an external cause of overheating, verify there aren’t any power supply issues. Check your laptop’s battery and AC adapter for any signs of trouble: if they have swollen in size, it’s time to replace the hardware.
Cleaning up the cooling fan may be required for a very old computer. If you have insufficient RAM, consider adding more of it.
2. Slow PC
Close on the heels of applications freezing, a slow PC is the bane of every Windows user. It can make completing the most basic tasks torture.
You can speed up your Windows 11 or 10 device even if you aren’t planning to upgrade the RAM anytime soon.
- Replace any antivirus with Windows Defender, the only antivirus you’ll ever need.
- Open the Windows tool, Disk Cleanup, in the search bar, which frees up space on your computer by erasing Windows updates, Windows upgrade log files, temporary files, Recycle Bin, and memory dump files.

- Disable startup apps from «Settings -> Apps -> Startup.» The only startup tasks you really need are services, such as Intel Graphics Command Center and Realtek Audio driver. Everything else is optional.

- Consider a cloud download of your Windows operating system. It downloads the latest system files from Microsoft’s servers to give you a fresh Windows installation. Once you click «Reset PC» in «Settings -> System -> Recovery options,» the option is displayed in a key step as shown.

- Periodically clearing the browser cache for Google Chrome or Microsoft Edge can also give you a slight boost in performance. If you’re using an older PC, consider uninstalling any RAM-intensive software and games.
3. Blue Screen Errors
There is no simple explanation for blue screen errors, but they do cause annoyance. Also known as bug check or stop code errors, they expose the fault lines of third-party software, hardware, Microsoft code, or some corrupted memory.
Each blue screen error has its own stop code that is displayed on the screen, such as «0x000000xyz.» They can be viewed in Event Viewer, which opens from Win + R by typing eventvwr.exe or eventvwr.msc.

After you see a blue screen, analyze dump files generated by the crash using Debug with Windbg. The best way to fix these errors is using Windows advanced startup menu (aka boot menu). To launch this, go to «Settings -> System -> Recovery -> Advanced Startup -> Restart.»
Use one of these options in the advanced startup menu:
- Uninstall Updates: usually, the blue screen is caused by incompatible drivers or third-party software.
- System Restore: reverting the operating system to an earlier date and time when the problem wasn’t there.
- Startup Repair: use if you havea blue screen due to boot issues.
- Factory Image Restore: reverting the PC back to the condition in which it was shipped (to be used only in extreme cases).

Outlined below are many other ways to deal with blue screen problems, depending on the stop code error source:
- Kernel data in page error
- Critical process died error
- WDF_violation error
In rare cases, the blue screen crashes may be caused by hardware. Look under the hood in motherboard and the power supply for the exact reason.
4. Hard Disk/SSD Failure
Whether you use a hard disk drive (HDD) or solid state drive (SSD), they can fail due to short circuits, data corruption, physical damage – or could just wear out.
To get a hardware health report for your HDD/SSD, run the following code in Command Prompt (Admin mode). If the answer is «OK,» the hard disk failure is down to software errors that can be easily fixed.
wmic followed by diskdrive get status

For any hard disk errors you’re facing, employ the following holy trinity of Command Prompt fixes (Admin mode).
Chkdsk
This command does a complete health check of the hard disk. For more specific disk drive checks, modify it as chkdsk C:/f/x/r or chkdsk D:/f/x/r.
You should see a message similar to «Windows has scanned the file system and found no problems. No further action is required.» If not, move on to the next tool.

System File Checker
You can use sfc/scannow, which repairs the Windows-protected files and replaces corrupted drivers.

DISM
Next up, execute the Deployment Image Servicing and Management (DISM) commands in the order below:
DISM /Online /Cleanup-image /scanhealth
DISM /Online /Cleanup-image /restorehealth

SSD users should set their Power mode for «Best performance» in «Settings -> System -> Power & battery.» You don’t want your laptop to power off every time, as frequent discharging is not healthy for your SSD.

Moreover, defragment your hard drive disk (HDD) if you use one. This will eliminate any problems due to bad sectors in your disk drive. For SSD users, there are comparable disk optimization tools.
5. Mouse and Touchpad Issues
Another annoying issue is the mouse lagging behind in receiving inputs, or the touchpad freezing for no reason.
If you’re using a touchpad on a laptop, go to «Settings -> Bluetooth & devices -> Touchpad.» Leave the Touchpad toggle on when a mouse is connected. Enable all default touchpad sensitivity options.

You can correct your mouse settings from «Settings -> Bluetooth & devices -> Mouse.» Make sure «Left» is the primary mouse button and that the mouse pointer speed is at a comfortable level. Keep all the default options enabled.

After clicking on additional mouse settings, select a desirable pointer speed from the «Pointer Options» tab.

If the mouse or touchpad just aren’t working properly, they can be fixed via Device Manager. Open it by typing Win + R followed by devmgmt.msc. Select the desired mouse or touchpad hardware drivers. Right-click it to view its «Properties» and update or reinstall the drivers.
6. Registry Errors
A corrupt registry in Windows 11 or 10 is a den of future troubles, as it spells DLL errors and crashes. It may occur in the course of using a computer frequently.
The best way to keep the Windows registry healthy is to clean boot your Windows device.
- Open the «System Configuration» app from the search bar or by typing
msconfigin the Run menu. - Head to «Services» and check «Hide all Microsoft services.»

- Click all third-party services, such as Google and other apps. They will need to be disabled. After a restart, Windows will offer a clean boot environment.

- The DLL errors in the registry can be traced to one of the key classes in the Registry Editor. Open it from Run command by typing
regedit. - Navigate to the exact path of any software causing trouble and create new keys or DWORD (32-bit) values by following troubleshooting requirements.

- The issues due to a corrupt registry are generally resolved after a simple Windows update. You can also use the
sfc/scannowandDISM.execommands in Command Prompt for additional protection.
7. Audio Not Working
If a laptop or desktop PC fails to produce any sound, you can no longer listen to music, movies, and YouTube or attend videoconferencing calls. Follow the steps below to troubleshoot.
- Go to «Control Panel -> Hardware and Sound -> Sound.»
- This will open a pop-up where you can see a checkmark next to the playback device you’re using. If it’s headphones, you will not receive any audio on the laptop speakers and vice versa. Do check for issues with wireless headphones.

- Windows 11 and 10 offer a default troubleshooter for each error source. Search for the «Find and fix problems with playing sound» troubleshooter option and enable it to apply repairs automatically.

- After running this troubleshooter, the audio problems should disappear. You can fix audio driver issues by restarting audio services from
services.mscin Run. - Turn off the option for sound effects and enhancements by going to «Settings -> System -> Sound -> Speakers.»
8. Windows Login Problems
The most probable causes for sign-in problems in Windows are forgotten passwords or PINs. Therefore, it’s essential to store them safely. (Consider using a password manager for web, desktop, and mobile.)
If you still can’t log in, you might have multiple accounts on your Windows device. You can access them using netplwiz in the Run menu. Removing unnecessary accounts can fix login problems immediately. Restart the computer to ensure the problem is fixed.

To avoid login problems in the future, instead of shutting down from the Lockscreen window, go back inside the logged-in desktop for a proper shutdown.
For repeat troubles with login, sign in using Safe mode and run the Startup Repair tool as covered above. You can also «Disable fast startup» from «Power Options» in the Control Panel.
9. BIOS Issues
While a corrupt BIOS is enough cause to replace your computer or hard disk, in most cases, it’s a simple maintenance issue. You can access the BIOS menu by pressing the boot keys repeatedly after a Windows reboot. Depending on your PC manufacturer, the boot keys could be F2, F6, F12, or Esc.
Once inside the BIOS Settings menu, look for an option that says «Load defaults» (ours is at the bottom under «Maintenance»), as it will load the BIOS defaults specific to your computer.

Once you set Factory or the current BIOS defaults, your Windows device will restore its settings after a quick restart.
Note: you will never face any BIOS issues if you have enabled UEFI mode.
When you notice errors such as «This PC can’t run the current version of Windows,» or the computer is stuck in the BIOS boot screen forever, you have to check and update the BIOS information. Otherwise, you shouldn’t handle BIOS settings.
10. USB Ports Not Working
Sometimes your PC or laptop won’t respond well to inserting or removing a USB device. If there is nothing wrong with the USB drive, it would indicate the USB ports may have malfunctioned.
- If there is no physical damage to the USB port, but it isn’t working properly, go to the necessary driver in Device Manager and check its «Properties.»
- The status may show «This device is working properly.» If it doesn’t, restart your computer and check it one more time.

- Right-clicking the USB driver in Device Manager leads to other options that let you install and update the drivers.
11. Monitor/Display Problems
Are you facing issues in your monitor or display such as black screens, blank screens, haziness, or a distorted view? Just as with mice, keyboards, and other peripherals, these issues can be resolved from Device Manager.
Go to the monitor you use and right-click it to view the driver properties. If it shows a status such as «This device is working properly,» you’re good to go. However, if the drivers are shown as outdated, you need to update and reinstall those as in the previous example.

Here’s a simple trick to ensure there is no conflict with the monitor display. As it depends on the Power supply, you can accelerate it to ensure a timely display of graphics. Go to «Shutdown settings» from «Control Panel -> Hardware and Sound -> Power Options -> System Settings.» Check «Turn on fast startup.»

If you’re using multiple monitors on Windows, ensure that the primary and secondary monitors are properly marked. The scale of display resolution should be according to computer screen size recommendations.
12. Bluetooth Not Working
Bluetooth is an integral part of the Windows experience. Whether it is mice, touchpads, headphones, USB devices, and smart gadgets, things don’t feel the same when Bluetooth stops working.
- Go to «Settings -> Bluetooth & Devices» and ensure your target Bluetooth hardware is paired successfully. Keep the Bluetooth toggle on for your device.

- If there is continued trouble with Bluetooth pairing, run a troubleshooter for Bluetooth. In Windows, this option is available by going to «Settings -> System -> Troubleshoot -> Other troubleshooters -> Bluetooth.»

- After running the Bluetooth troubleshooter, you may notice a few changes to your system. It will fix small issues, such as troubles with Bluetooth radio.

Following a simple restart, the Bluetooth pairing will be successful. If you continue to face problems, uninstall and reinstall the secondary Bluetooth device. You may additionally have to fix a few drivers from the Device Manager.
13. Windows Won’t Download or Install Updates
This problem can surface when you’re upgrading from a current version of Windows to something higher. You may find that Windows is taking way longer to download or install the updates.
- In most cases, the problem can be fixed with a simple PC restart and by refreshing the update screen. Go to «Check for Updates» and see whether the glitch is gone.
- If you still can’t pursue the necessary updates, run a troubleshooter for Windows Update from «Settings -> System -> Troubleshoot -> Other troubleshooters.»

- Running the Windows Troubleshooter can help you fix any security settings, missing files, or service registration problems. The same results can be achieved using SFC, DISM, and other file path correction tools.

14. Wi-Fi Disabled Suddenly
Your computer Wi-Fi is what makes everything come together. If the Wi-Fi stops working suddenly, you can’t connect to the Internet. To fix Wi-Fi issues in Windows, follow the steps below.
- Go to «Control Panel -> Network and Internet -> Network and Sharing Center.» This will open a Network Connections window.
- Choose your desired Wi-Fi connection to disable and enable it.

- Ensure that the Wi-Fi router has not been giving you any trouble recently.
- Make sure you didn’t turn the Airplane mode on by mistake. You can disable it from «Settings -> Network & Internet.»
- If your Wi-Fi fails to show up altogether, try enabling SSID broadcast and a few other things.
Frequently Asked Questions
What are the most common Windows error messages?
The most common error messages in Windows 11 and 10 are:
- Boot device not found
- DLL errors
- Update errors
- Security certificate errors
- Blue screen of death (BSoD) errors
- Access denied
- Slow or no Internet connection
Why does Windows 10 sometimes become unstable?
Windows 10 is unstable because it lacks support for cutting-edge features, such as Trusted Platform Module (TPM), Virtualization-based Security (VBS), and UEFI Secure boot. While Microsoft intends to support Windows 10 until the end of 2025, you should consider migrating to Windows 11, as it offers more stability thanks to an error-free user interface and several advanced functionalities.
How do I know if my Windows apps are faulty?
If you keep the SmartScreen filter on in Windows Security, it will alert you whenever downloaded apps cause trouble. It will also prevent you from installing such apps.
Image credit: Pixabay. All screenshots by Sayak Boral.

Sayak Boral is a technology writer with over eleven years of experience working in different industries including semiconductors, IoT, enterprise IT, telecommunications OSS/BSS, and network security. He has been writing for MakeTechEasier on a wide range of technical topics including Windows, Android, Internet, Hardware Guides, Browsers, Software Tools, and Product Reviews.
Subscribe to our newsletter!
Our latest tutorials delivered straight to your inbox
Among the most common emerging problems in Windows 11, slow performance is on the top. Furthermore, you might have to deal with issues File explorer, slow boot, battery drain, overheating, lagging in games, and many other on this version. Therefore, you can try some workarounds manually to fix Windows 11 performance problems.You can check solutions to similar nature issues in – How to Fix Windows 11 disk usage 100% or high.
There could be multiple reasons behind performance issues in Windows 11 such as outdated OS, incompatible graphics driver, corruption in hard disk, conflicts in programs, low disk space, and others. Moreover, the PC might require extra hardware or resources to boost the performance even if the machine you are using meets the system requirement of Windows 11. Performance issues may also arise when the Operating system performs unnecessary actions in response to write operations especially when a feature called “NTFS USN journal” remains enabled. The feature is enabled only on the C: disk by default; so none of the bugs will affect any other partitions or drives.
Here is How to Fix Windows 11 performance problems –
Way-1: Install Windows update
Every single patch released by Microsoft is solely to improve the user experience from an Operating System and the primary intention is always to provide maximum security. However, users can also experience the latest UI, handy tools, and a stable operating system.
Every code that comes with a new patch is enough to deal with loopholes, errors, outdated software components, and conflicts. If we do not carry out Windows update, the system will not giveaway the best performance. Therefore, follow the below guidelines to install the latest patches for Windows 11 –
- Press – Windows + I.
- Select – Windows Update.
- Click – Check for updates.
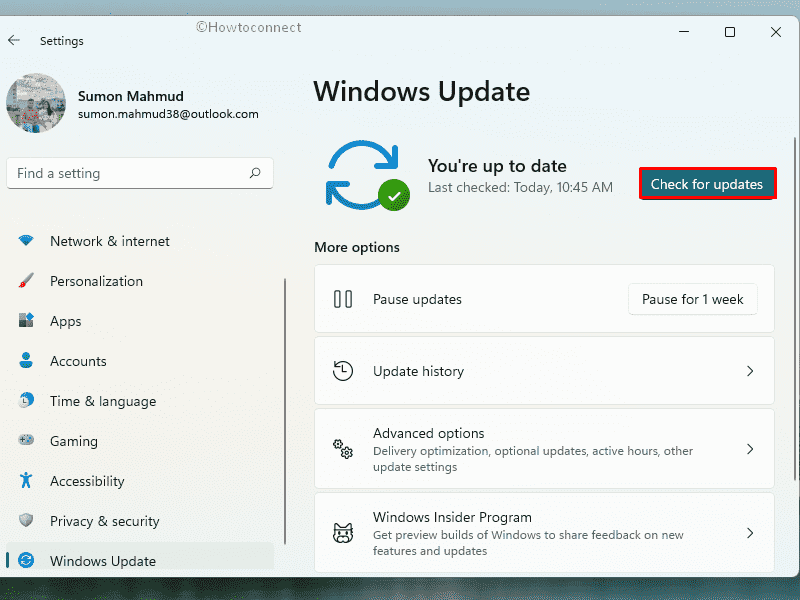
- If available, allow the update to download and install.
- When a notification prompts, click – Restart now.
Way-2: Update graphics driver
When Windows 11 operated computers run at a relatively slower speed, there is a possibility that the graphics card driver has got some issues. Mostly outdated drivers are responsible for slow performance as they effectively maintain the inter hardware-software relation overall.
You must maintain the drivers in fully updated condition on a higher priority basis to avoid Windows 11 performance problems. This will not only keep the device in a great operating condition but also will protect it from harmful glitches every time. This is quite frustrating that we usually pay less attraction and neglect updating the drivers leading to get a low performance from Windows 11. Before it gets belated, here are the guidelines to update the Graphics card driver –
- Press – Windows + X.
- Select – Device Manager.
- Look for – Display adapters.
- Double-click the same.
- Right-click on the graphics driver and select – Update driver.
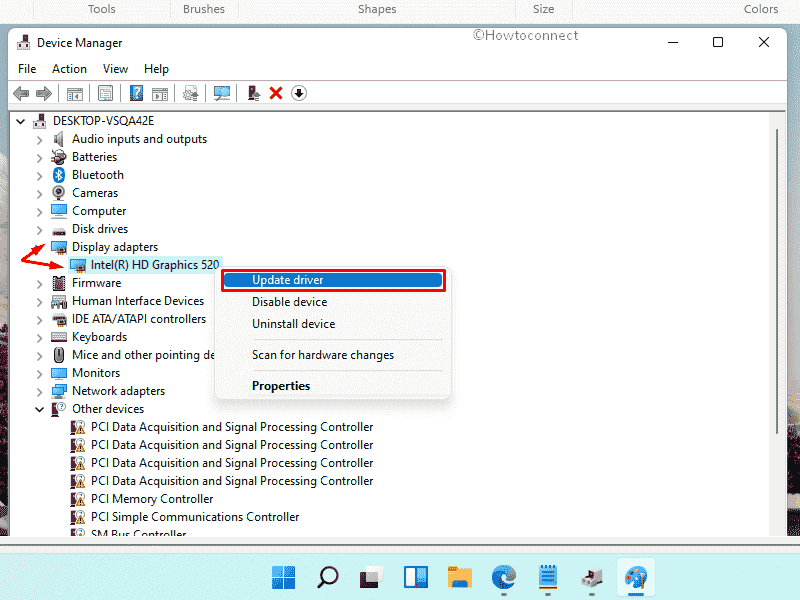
- Click – Search automatically for drivers.
- If any updated version of the driver is available, it’ll be installed automatically and the system will notify about the same.
- In case the system shows the best-suited driver is already installed, visit the manufacturers’ website for a manual update.
See – How to update drivers in Windows 11 (Best ways)
Way-3: Run Windows Update troubleshooter
Windows updating takes place in the Operating System automatically when any new release is available for a specific device. Though this is an autonomous process, it might involve glitches as well. Incomplete installation of an update can create potential issues including slow boot of Windows. The issue should be resolved automatically with a fix developed by Microsoft usually but that doesn’t happen every time.
Windows Update troubleshooter is a handy utility to fix up update-related troubles. If you are experiencing Windows 11 performance problems, run the troubleshooter using the below steps –
- Press – Win + I.
- From the right pane of the Settings page, click – Troubleshoot.
- On the next page, select – Other troubleshooters.
- Click – Run.
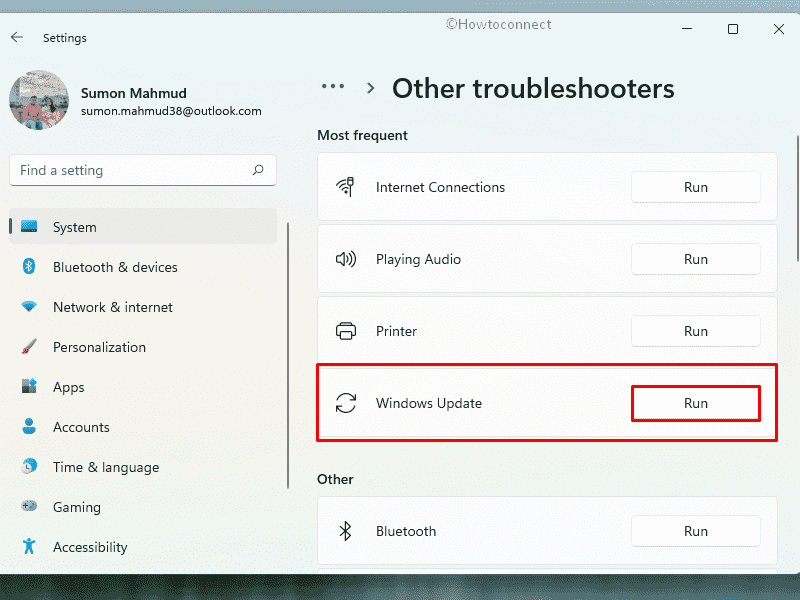
- Follow onscreen instructions to carry out the process.
- If the utility suggests a fix, apply it or do accordingly.
Way-4: Disable unnecessary startup programs
The greater number of programs you install in the system, the longer time it will take to boot up Windows. More often this has come to light that, various unnecessary programs loading at the booting phase increases the startup time of a computer.
Startup programs such as antivirus applications, webcam software, native keyboard if installed will be loading automatically and these are really necessary. Other than these few, any other programs like Spotify, adobe Acrobat, and others are not so necessary as Startup programs. Therefore, if you are experiencing Windows 11 performance problems, disable them sharply. Windows has specific procedures to disable the startup applications and here are the guidelines –
- Press – Ctrl + Shift + Esc.
- If the Task Manager is in compact view, click – More details.
- Shift to – Startup tab.
- Find the programs that are unnecessary and you hardly use.
- Select the same and from bottom, click – Disable.
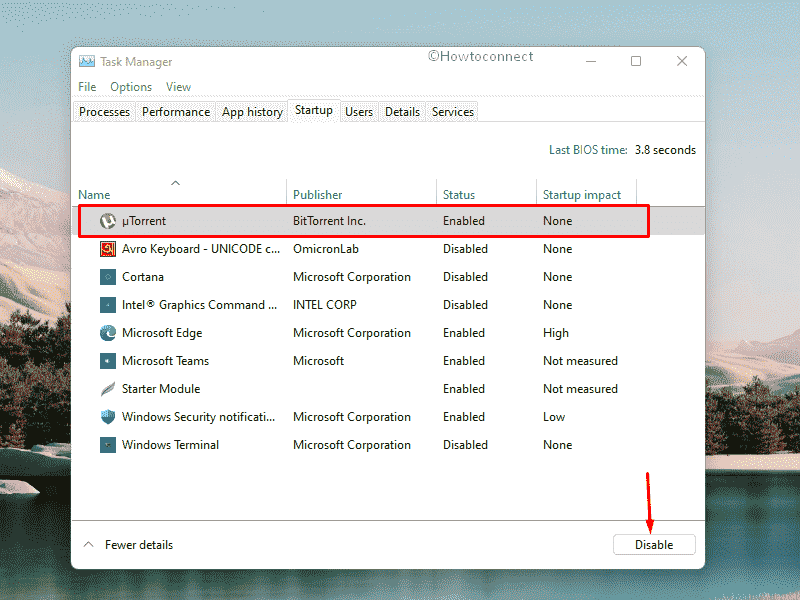
- Reboot Windows.
Way-5: Get rid of junk files
Having junk files on the computer is nothing new and these things aren’t as harmful as bloatware or viruses. When using the device, applications, some files are created for the acceleration of the task and their execution. They help to run a program smoothly and stores recovery backup for accidental data loss as well.
However, a lot of junk files, temporary files are not well suited for a smooth operation of OS for sure. We cannot expect top-notch performance from Windows 11 with piled-up junk files in it over time. Steps to be taken to delete these components can be easily carried out by using the default tool. Here are the guidelines to clean up junk files from Windows 11 –
- Press – Windows + R.
- In Run Dialog box, type – clenmgr.exe.
- Hit – Enter key.
- When a pop-up appears where C: is selected as disk drive, click – OK.
- From the bottom of the next wizard, click – Clean up system files.

- Hit – OK for the next pop-up.
- When Disk Cleanup window shows up, again click – OK.
- For final confirmation, click – Delete files.
- Once completed, restart the device.
Way-6: Take help of Performance Troubleshooter
While encountering any Windows 11 performance problems, you may consider running Performance Troubleshooter. This is a really crucial utility in the latest inclusion of Windows that brings a lot more room for the users to bring the most out of the OS. To run the tool, follow the below guidelines –
- Press – Start button.
- Type in – cmd.exe.
- When Command Prompt appears at top of the search result, choose – Run as administrator from the right flyout.
- Allow the User Account Control by clicking Yes.
- On the elevated Command Prompt, type the following and hit Enter –
msdt.exe /id PerformanceDiagnostic
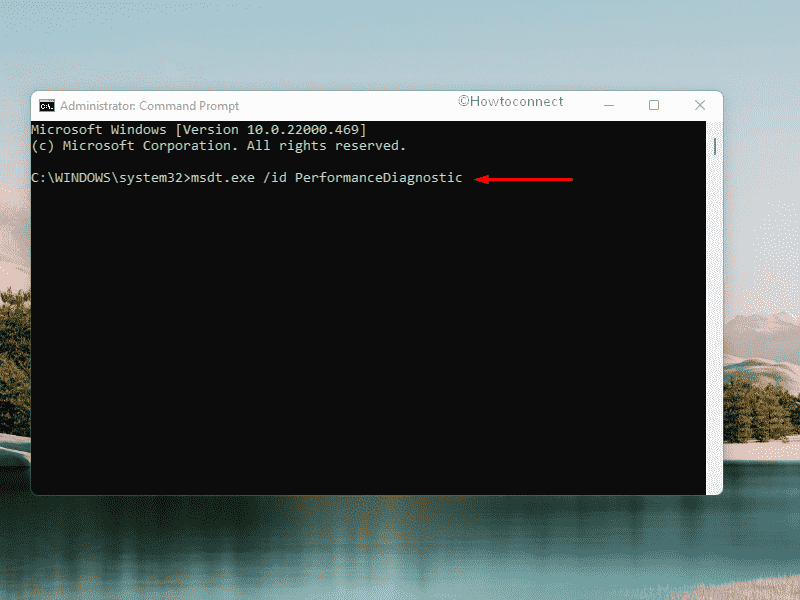
- Follow on-screen instructions to continue the process.
- If anything incorrect is found, the utility will adjust settings to improve operating system speed and performance.
Way-7: Scan full system for malware
Various types of malware are available in recent times for attacking the security of an Operating system. These bugs are so well coded that, it’s really hard for even a strongly coded security interface to demise them. Some trojans, bloatware, spyware, worms are always in a race to target the system and can easily cause havoc in the system files.
After being affected by malware, system files lose their integrity, necessary components which affect the regular operation. Windows 11 starts running slow, crashes follow-through, and drags more frequently which is never expected. To make the system run smoothly again, you can run a full system malware scanning and Fix Windows 11 performance problems. Instead of having a wide scale of anti-malware programs, we would prefer to try out Windows Security. The application has a robust construction and real-time features to detect and resolve any strong virus. Here are the guidelines to run the scan –
- Press – Windows key.
- Type – Windows Security.
- Hit – Enter.
- Click – Virus & threat protection.
- From the right pane, click – Scan options.
- Select – Full scan.
- Finally, click – Scan now.

- After it finishes scanning the full system, follow the recommendations of Windows Security.
Way-8: Check for corrupted system files
As mentioned earlier, the system files lose integrity and valuable components once being attacked by viruses. Few other reasons like sudden power surge, outage, conflicts of similar programs in the OS will lead the system files to go missing or damage them.
Windows system files are the core components for running the OS without any trouble. Once these files are at stake, Windows 11 cannot perform as it was supposed to and you observe abnormalities like slow starting and low performance. However, you can fix the corrupted system files and recover the missing ones with SFC and DISM scan. These are built-in utility run in Command Prompt when you execute dedicated command tools.
- Press – Win+S.
- Type – cmd.
- Select – Run as administrator.
- Click Yes when User Account Control prompts.
- Type – SFC /Scannow.
- Hit – Enter.
- When System File Checker finishes scanning the system, run the following command in the same way –
DISM.exe /Online /Cleanup-Image /Restorehealth
Way-9: Scan disk for error
Disk errors take place when the system is unable to finish data writing to a file, or form an inaccessible file. This is a severe issue in Windows that causes data loss and significantly affects the regular operation of the OS.
If you are having Windows 11 performance problems upfront, there might be errors in your disk drive. The easiest way to check and fix the former is to run Disk Checking tool. The utility is well designed to fix any data corruption in the disk once executed in Elevated Command Prompt. To run this, follow the below guidelines –
- Open Command Prompt as administrator.
- Type in – chkdsk C: /f /r /x
- Hit – Enter.
- When the scanning process ends, reboot Windows.
Way-10: Run Windows boot performance diagnostics
You may often observe Windows 11 start a bit slow or shows performance problems. Mostly, disabling a few unnecessary Startup programs will reduce this time and make PC faster. But the performance optimization issue still prevails when the booting process takes a lot of time even after a relatively fast startup. Here comes the Windows Boot performance diagnostic tool. The utility is built to determine the root causes and offer automatic fixes for the glitches. Here are the steps to run Windows boot performance diagnostics –
- Right-click on Start.
- Select – Run.
- Enter the below command in the Run dialog box –
%systemroot%\system32\msdt.exe -id MaintenanceDiagnostic- Hit – Enter.
- Once the Troubleshooter wizard comes in, click Next button.
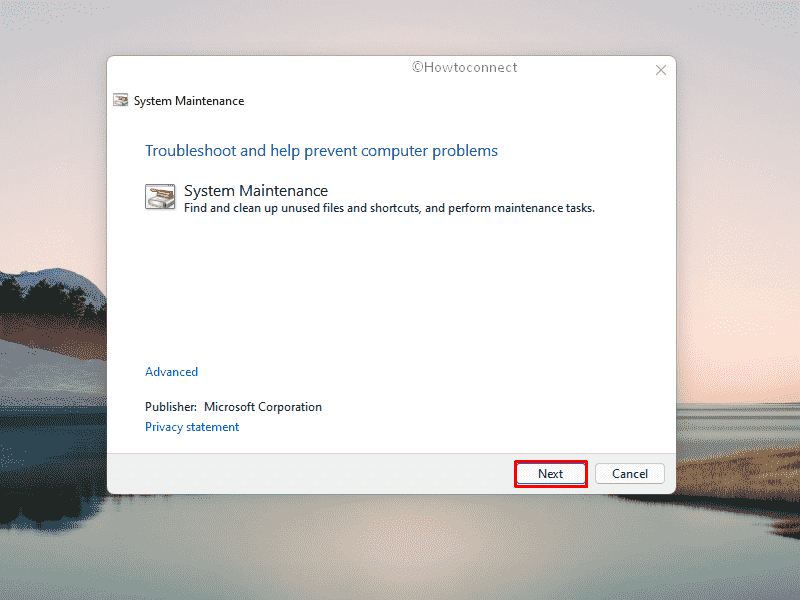
- Click – Try troubleshooting as an administrator.
- Comply with on-screen instructions to complete the process.
- Restart once the tool finishes the task.
Way-11: Fix RAM issues
it might be the RAM for which the device is offering Windows 11 performance problems. For a defective RAM, the machine freezes frequently, reboots all of a sudden and brings up a few glitches like blue screen errors. Corruption in the system files is a leading cause to bring up performance issues in the OS that can be caused by troublesome RAM.
RAM can be faulty when it is subjected to be removed from a powered-up device or it is separated from the motherboard when the laptop is still not fully discharged. Static discharge can be another reason to make your RAM faulty which occurs when a user touches it without making it grounded. Usually, such issues need a complete replacement of the unit and you can ask the help from purchase centers. But before you decide to buy a new one, run the memory diagnostic tool to check where the real problem is.
- Click – Start.
- Type – mdsched.exe.
- Hit – Enter.
- When Memory Diagnostic tool appears, click – Restart now and check for problems.
- Doing so will reboot the system and start diagnosing.
- The test result will appear on the screen after login back in.
If you don’t see the result, check it manually with the help of the next steps –
- Press – Windows+R.
- In dialog box, type – eventvwr.msc.
- Hit – Enter.
- Go to the right pane and click – Find.
- In the search box, type – MemoryDiagnostics-Results.
- Press – Enter.
- Check the result thoroughly and take further steps.
Way-12: Uninstall unwanted third-party programs
Installing third-party programs on various occasions doesn’t always help instead, they cause the system to run slowly. These programs often alter the Windows experience beyond your attention. The controlling alternation takes place in the form of browsing sometimes leading to unidentified downloads, unauthorized installations, error messages, and modification of settings.
In order to get a better Windows experience, you should rely on the default applications and programs from Microsoft Store only. There are great variations of software for aiding specific tasks that would definitely meet your requirements. Avoid installing unnecessary applications to have a low performance from Windows 11 and associated glitches. To uninstall any third-party program, follow the below guidelines –
- Press – Win+S.
- Type – appwiz.cpl.
- Hit – Enter.
- When Programs and Features window shows up, look for the unwanted apps.
- Right-click on an unnecessary application and select – Uninstall.
- Click – Uninstall once confirmation prompt appears.
- Restart Windows once the process ends.
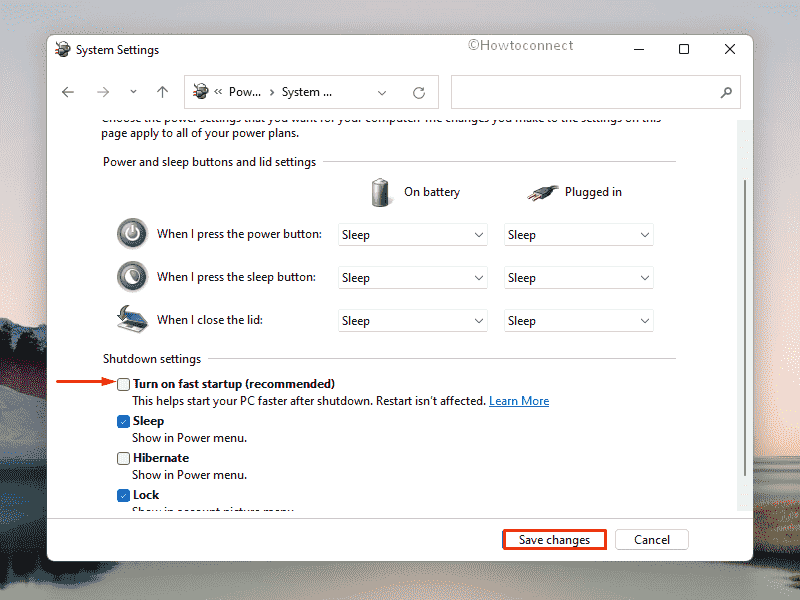
Way-13: Turn off Fast boot
Fast Boot in Windows computers is a special feature provided to shorten the bootup time from a fully shut down condition. However, this doesn’t help many of us as it will prevent the device from a regular shut down. Therefore, compatibility issues rise up sharply especially in the machines not supporting the Sleep mode or hibernation.
If you are having Windows 11 performance problems in a UAD-2 Firm Wire machine, disable this feature right away. To do so, here are the guidelines –
- Open Control Panel.
- Choose – Power Options.
- From the left overlay, click – What the power buttons do.
- Hit the link that says – Change settings that are currently unavailable.
- Uncheck the box set before Turn on fast startup (recommended).
- Click – Save Changes.
Way-14: Move Windows 11 to SSD
Solid State Drive is the latest technology that operates more quietly, with high efficiency without any moving components. It has very few breakable parts than a traditional HDD having spinning platters making the reading and writing operations faster.
SSDs offer a significantly fast boot time for Windows 11 computers, data transfers are immediate and it has a very high bandwidth. The business world today needs ultra-high-speed data handling which can be achievable by SSDs only. If you are facing Windows 11 performance problems while having a traditional; HDD, can consider swiping to SSDs.
To do so, follow How to Reinstall Windows 10 or 11 from HDD to SSD
Way-15: Rollback to the former Windows version
After performing the above tips and tricks if you are still having performance issues with Windows 11, the computer may not have the proper specifications to run the OS. It might be a bit old PC and cannot really cope with the higher configuration of Windows. If this is true, we regret to recommend you to go back to earlier versions of OS, i.e. Windows 10 preferably.
- Press – Windows + I.
- Select – Windows Update.
- Shift to the right-hand side.
- Click – Update history.
- Once on the next page, click – Recovery options.
- Hit – Go back.
- Comply with the on-screen instructions to finish the process.
Methods list:
Way-1: Install Windows update
Way-2: Update graphics driver
Way-3: Run Windows Update troubleshooter
Way-4: Disable unnecessary startup programs
Way-5: Get rid of junk files
Way-6: Take help of Performance Troubleshooter
Way-7: Scan full system for malware
Way-8: Check for corrupted system files
Way-9: Scan disk for error
Way-10: Run Windows boot performance diagnostics
Way-11: Fix RAM issues
Way-12: Uninstall unwanted third-party programs
Way-13: Turn off Fast boot
Way-14: Move Windows 11 to SSD
Way-15: Rollback to the former Windows version
That’s all!!
Repair any Windows problems such as Blue/Black Screen, DLL, Exe, application, Regisrty error and quickly recover system from issues using Reimage.
Special Offer
Outbyte PC Repair

Windows 11, 10, 8, 7
Trusted and Monitored ![]()
| Compatibility | Win 11, 10, 8, 7 |
| Download Size | 21.2 MB |
| Requirements | 300 MHz Processor, 256 MB RAM, 50 MB HDD |
Limitations: trial version offers an unlimited number of scans, backups and restores for free. Registration for the full version starts from USD 29.95.
Most computers begin to suffer stability malfunctions with continued use, although to a different degree that may depend on different factors. Reduced stability that manifests itself in various computer malfunctions may be caused by a wide array of issues, most of them related to system elements and the damage it may have sustained. Over time, with software installs and uninstalls, as well as other PC activity, system elements get filled with outdated or corrupt entries that may cause application or system malfunctions and lead to freezes and crashes, as well as various other computer issues.
An effective way to fix crashes and issues on a PC is with the help of a special software that safely performs system elements cleanup and repair, and tunes up system settings
The article provides details on the symptoms and causes of PC issues and shows how to fix a PC.
- 1 Ways to repair Windows malfunctions
- 2 Symptoms of Windows malfunctions
- 3 Causes of Windows malfunctions
Ways to repair PC malfunctions
Advanced PC users may be able to fix Microsoft Windows 7 or 8 malfunctions by manually editing system elements entries or removing individual keys found to be corrupt or invalid, as well as applying other manual PC bug fixes. Users may seek professional help from an IT technician, who can help avoid a full PC crash, fix PC power supply and other hardware, as well as clean the computer from issues that may be causing stability malfunctions or general malfunctions. However, since any manipulations with system elements carry a risk of rendering the operating system unbootable, whenever a user is in any doubt of their technical skills or knowledge, they may use a special software that provides safe PC fixes and is meant to fix system issues and other computer malfunctions without requiring any special skills.
The following steps may fix the PC issues:
- Download Outbyte PC Repair
Special offer. See more information about Outbyte; uninstall instructions; EULA; Privacy Policy. - Install and launch the application
- Click the Scan Now button to detect issues and abnormalities
- Click the Repair All button to fix the issues
The same application can be used to run preventative measures to reduce the chance of this or other system issues appearing in the future.
Symptoms of Windows malfunctions
The most common symptoms of PC issues are application or system freezes (when an application or the whole system stops responding to mouse clicks or any other user actions for a brief period of time, but later returns to normal operation), application or system crashes (when an application or the whole system stops responding to user actions and nothing can bring it back to normal operation; application has to be terminated or a PC reboot is required), random computer reboots that are not initiated by the user, various warning messages or BSOD («blue screen of death» or the «STOP warning»), as well as connectivity issues that cannot be fixed by adjusting network settings. Malfunctions with software uninstalls or reinstalls can also be a sign that PC needs to be repaired.
Causes of PC malfunctions
Computer issues are typically caused by invalid or corrupt system elements entries that get left over by various applications or appear due to software or system malfunctions, badly written application code or program incompatibilities. Whenever a PC is turned off in the middle of a Windows update being installed, an application task gets aborted midway or system files get moved on the hard drive, PC issues may appear as a result. Other common reasons for computer issues are virus or other malware activity, as well as incorrect software uninstalls, attempts by inexperienced users to manually edit system elements entries and a number of other factors.