There are many reasons why you might receive an error message when upgrading or installing Windows 11, but common errors can be fixed with a few steps that you can do on your own. Note: An upgrade takes your device from an older version of Windows, such as Windows 7, Windows 8.1, or Windows 10 to Windows 11.
Before searching for a specific error code, try the tips listed in General fixes. If those don’t fix your upgrade or installation problem, check the table of error codes at the bottom of this article.
General fixes
Here are some things you can try to fix upgrade and installation errors:
Unplug any nonessential hardware devices. These could include headphones, printers, scanners speakers, USB flash drives, and external hard drives.
If you’re using a laptop and it’s plugged in to a docking station, undock it.
It’s a good idea to make sure that all important updates are installed before trying to upgrade Windows. This includes updates to hardware drivers on your device.
For information and to make sure you’re up-to-date, see Windows Update: FAQ.
Use Windows Defender to protect your device during the upgrade—non-Microsoft antivirus software can sometimes cause upgrade problems. As long as you have installation media and all required activation information, you can always reinstall the software after you upgrade.
To remove an antivirus application, go to Control Panel\Programs\Programs and Features. Select the program, and then select Uninstall. Select Yes to confirm.
Outdated software can cause problems with a Windows upgrade, so removing old or nonessential applications can help.
If you plan to reinstall the application later, make sure you have the installation media and all required activation information before removing it.
To uninstall software, go to Control Panel\Programs\Programs and Features. Select the program, and then select Uninstall. Select Yes to confirm.
To upgrade to Windows 11, you need enough space on your hard drive for the installation to take place.
To view how much hard drive space is available on your computer, select File Explorer on the taskbar (known as Windows Explorer in Windows 7) or press Windows logo key + E.
Then select Computer or This PC and look under Hard Disk Drives or under Devices and drives. If there are multiple drives listed, the system drive is the drive that includes a Microsoft Windows logo above the drive icon. You’ll see the amount of available space under the drive.
If it looks like your drive is running low on space, see Tips to free up drive space on your PC.
0xC1900101 Errors
An error that begins with 0xC1900101 is usually a driver error. If you see any of these error codes, try the following steps first to fix the problem. If these steps don’t work, see Resolve Windows upgrade errors for more detailed technical info.
-
0xC1900101 — 0x2000c
-
0xC1900101 — 0x20017
-
0xC1900101 — 0x30018
-
0xC1900101 — 0x3000D
-
0xC1900101 — 0x4000D
-
0xC1900101 — 0x40017
-
Make sure that your device has enough space. Your device requires at least 16 GB of free space to upgrade a 32-bit OS, or 20 GB for a 64-bit OS. For more info, see Free up drive space in Windows.
-
Run Windows Update a few times. Download and install any available updates in Windows Update, including software updates, hardware updates, and some third-party drivers. Use the Windows Update Troubleshooter to fix Windows 11 Update errors.
-
Check third-party drivers and download any updates. You can find third-party drivers and installation instructions for any hardware you’ve added to your device on the manufacturer’s website.
-
Unplug extra hardware. Remove all external storage devices and drives, docks, and other hardware you might have plugged into your device that isn’t needed for basic functionality.
-
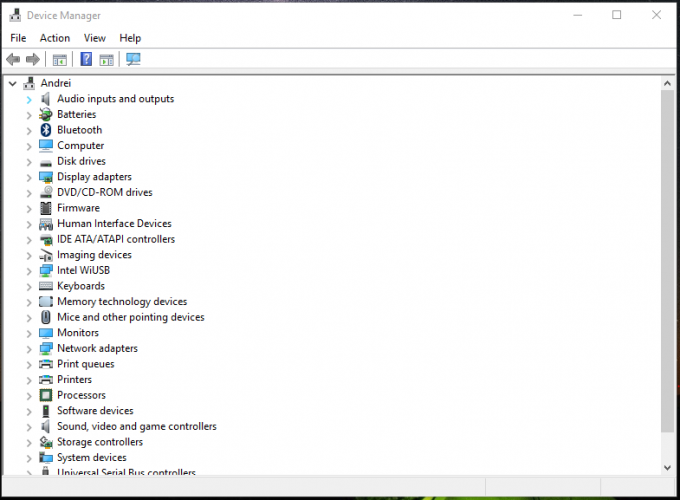
Check Device Manager for errors. In the search box on the taskbar, type device manager. Choose Device Manager from the results. In the window that pops up, look for any device with a yellow exclamation mark beside it (you may have to select each category to switch to the list of devices). Press and hold (or right-click) the device name and select either Update Driver Software or Uninstall to correct the errors.
-
Remove third-party security software. Make sure you know how to reinstall your programs and that any necessary product keys are on hand. Windows Defender will help protect your device in the meantime.
-
Repair hard-drive errors. In the search box on the taskbar, type command prompt. Choose Command Prompt from the list of results. In the window that pops up, type chkdsk/f C: and press the Enter key. Repairs automatically start on your hard drive, and you’ll be asked to restart your device.
Note: You must have administrator permissions on your device to do this.
-
Do a clean restart into Windows. See How to perform a clean boot in Windows.
-
Restore and repair system files. In the search box on the taskbar, type command prompt. Choose Command Prompt from the list of results. In the window that pops up, type DISM.exe /Online /Cleanup-image /Restorehealth and press the Enter key. (Learn to repair a Windows image)
Note: You must have administrator permissions on your device to do this.
Other Common Errors
The following table lists the most common upgrade and installation errors and some things you can try to fix them. If you continue having problems upgrading or installing Windows, contact Microsoft support.
|
Error |
What it means and how to fix it |
|---|---|
|
0xc1900223 |
This indicates that there was a problem downloading and installing the selected update. Windows Update will try again later and there is nothing you need to do at this time. |
|
0xC1900208 – 0x4000C |
This could indicate that an incompatible app installed on your PC is blocking the upgrade process from completing. Check to make sure that any incompatible apps are uninstalled and then try upgrading again. |
|
0xC1900107 |
A cleanup operation from a previous installation attempt is still pending, and a system restart is required to continue the upgrade. Restart the device and run setup again. If restarting device does not resolve the issue, then use the Disk Cleanup utility and clean up the temporary files and the System files. For more information, see Disk cleanup in Windows. |
|
0x80073712 |
A file needed by Windows Update is likely damaged or missing. Try repairing your system files: In the search box on the taskbar, type command prompt. Choose Command Prompt from the list of results. In the window that appears, type DISM.exe /Online /Cleanup-image /Restorehealth and press the Enter key. |
|
0xC1900200 – 0x20008 0xC1900202 – 0x20008 |
This may signify that your PC doesn’t meet the minimum requirements to download or install the upgrade to Windows 11. Learn more about the minimum requirements for Windows 11. |
|
0x800F0923 |
This might indicate that a driver or other software on your PC isn’t compatible with the upgrade to Windows 11. For info about how to fix this problem, contact Microsoft support. |
|
0x80200056 |
This could mean that the upgrade process was interrupted because you accidentally restarted your PC or signed out of your PC. Try upgrading again and make sure your PC is plugged in and stays turned on. |
|
0x800F0922 |
This error might mean that your PC couldn’t connect to the Windows Update servers. If you’re using a VPN connection to connect to a work network, disconnect from the network and turn off the VPN software (if applicable) and try upgrading again. The error could also mean there isn’t enough free space in the System Reserved partition. You might be able to fix this problem by using third-party software to increase the size of the System Reserved partition. |
|
Error: We couldn’t complete the updates. Undoing changes. Don’t turn off your computer. Error: Failure configuring Windows Updates. Reverting changes. |
These are generic errors that might appear any time a Windows update fails. You’ll need to determine the specific error code to investigate how to best resolve this problem. You can find the error code for the failed update by viewing your update history. Look for the update that wasn’t installed, note the error code, and then contact Microsoft support. To view your update history in Windows 11:
|
|
Error: The update isn’t applicable to your computer. |
This error might mean that your PC doesn’t have the required updates installed. Check to make sure that all important updates are installed on your PC before you try upgrading. |
|
0x80070070 – 0x50011 0x80070070 – 0x50012 0x80070070 – 0x60000 |
This likely indicates that your PC doesn’t have enough space available to install the upgrade. Free some space on the drive and try again. Get tips for freeing up drive space |
|
0x80300024 |
The specified disk operation is not supported by the target disk, partition, or volume. Make sure your machine meets the minimum requirements to install Windows. |
|
0x80070002 0x20009 |
The system cannot find the file specified. If you have a disk or disks where you are not installing Windows 11 on, remove those disks. |
|
0xC1900101 0x20017 0xC1900101 0x30017 |
A driver has caused a problem. Disable or remove all 3rd party antivirus or antispyware from your system. Disconnect all peripheral devices that are connected to the system, except for the mouse, keyboard and display. Contact your hardware vendor to obtain updated device drivers. |
|
0x8007042B 0x4000D |
Windows Setup terminated unexpectedly due to another process running in the background. When you start Windows by using a normal startup, several applications and services start automatically, and then run in the background. These programs include basic system processes, antivirus software, system utility applications, and other software that has been previously installed. These applications and services can cause interference when you attempt to upgrade to the latest version of Windows 11. To help you determine whether a background program is interfering with the upgrade, a «clean boot» may be needed. See How to perform a clean boot in Windows. |
|
0x800700B7 0x2000a |
Windows Setup terminated unexpectedly due to another process running in the background. Uninstall any antivirus or antispyware software and update again. |
There are many reasons why you might receive an error message when upgrading or installing Windows 10, but common errors can be fixed with a few steps that you can do on your own. Note: An upgrade takes your device from an older version of Windows, such as Windows 7 or Windows 8.1, to Windows 10.
Before searching for a specific error code, try the tips listed in General fixes. If those don’t fix your upgrade or installation problem, check the table of error codes at the bottom of this article.
General fixes
Here are some things you can try to fix upgrade and installation errors:
Unplug any nonessential hardware devices. These could include headphones, printers, scanners speakers, USB flash drives, and external hard drives.
If you’re using a laptop and it’s plugged in to a docking station, undock it.
It’s a good idea to make sure that all important updates are installed before trying to upgrade Windows. This includes updates to hardware drivers on your device.
For information and to make sure you’re up-to-date, see Windows Update: FAQ.
Use Windows Defender to protect your device during the upgrade—non-Microsoft antivirus software can sometimes cause upgrade problems. As long as you have installation media and all required activation information, you can always reinstall the software after you upgrade.
To remove an antivirus application, go to Control Panel\Programs\Programs and Features. Select the program, and then select Uninstall. Select Yes to confirm.
Outdated software can cause problems with a Windows upgrade, so removing old or nonessential applications can help.
If you plan to reinstall the application later, make sure you have the installation media and all required activation information before removing it.
To uninstall software, go to Control Panel\Programs\Programs and Features. Select the program, and then select Uninstall. Select Yes to confirm.
To upgrade to Windows 10, you need enough space on your hard drive for the installation to take place.
To view how much hard drive space is available on your computer, select the Start button, then in the search box on the taskbar, type File Explorer (known as Windows Explorer in Windows 7).
Then select Computer or This PC and look under Hard Disk Drives or under Devices and drives. If there are multiple drives listed, the system drive is the drive that includes a Microsoft Windows logo above the drive icon. You’ll see the amount of available space under the drive.
If it looks like your drive is running low on space, see Tips to free up drive space on your PC.
0xC1900101 Errors
An error that begins with 0xC1900101 is usually a driver error. If you see any of these error codes, try the following steps first to fix the problem. If these steps don’t work, see Resolve Windows upgrade errors for more detailed technical info.
-
0xC1900101 — 0x2000c
-
0xC1900101 — 0x20017
-
0xC1900101 — 0x30018
-
0xC1900101 — 0x3000D
-
0xC1900101 — 0x4000D
-
0xC1900101 — 0x40017
-
Make sure that your device has enough space. Your device requires at least 16 GB of free space to upgrade a 32-bit OS, or 20 GB for a 64-bit OS. For more info, see Free up drive space in Windows.
-
Run Windows Update a few times. Download and install any available updates in Windows Update, including software updates, hardware updates, and some third-party drivers. Use the Windows Update Troubleshooter to fix Windows Update errors.
-
Check third-party drivers and download any updates. You can find third-party drivers and installation instructions for any hardware you’ve added to your device on the manufacturer’s website.
-
Unplug extra hardware. Remove all external storage devices and drives, docks, and other hardware you might have plugged into your device that isn’t needed for basic functionality.
-
Check Device Manager for errors. Select the Start button, then in the search box on the taskbar, type device manager. Choose Device Manager from the results. In the window that pops up, look for any device with a yellow exclamation mark beside it (you may have to select each category to switch to the list of devices). Press and hold (or right-click) the device name and select either Update Driver Software or Uninstall to correct the errors.
-
Remove third-party security software. Make sure you know how to reinstall your programs and that any necessary product keys are on hand. Windows Defender will help protect your device in the meantime.
-
Repair hard-drive errors. Select the Start button, then in the search box on the taskbar, type command prompt. Choose Command Prompt from the list of results. In the window that pops up, type chkdsk/f C: and press the Enter key. Repairs automatically start on your hard drive, and you’ll be asked to restart your device.
Note: You must have administrator permissions on your device to do this.
-
Do a clean restart into Windows.
Learn how. -
Restore and repair system files. Select the Start button, then in the search box on the taskbar, type command prompt. Choose Command Prompt from the list of results. In the window that pops up, type DISM.exe /Online /Cleanup-image /Restorehealth and press the Enter key. (Learn to repair a Windows image)
Note: You must have administrator permissions on your device to do this.
Other Common Errors
The following table lists the most common upgrade and installation errors and some things you can try to fix them. If you continue having problems upgrading or installing Windows 10, contact Microsoft support.
|
Error |
What it means and how to fix it |
|---|---|
|
0xc1900223 |
This indicates that there was a problem downloading and installing the selected update. Windows Update will try again later and there is nothing you need to do at this time. |
|
0xC1900208 – 0x4000C |
This could indicate that an incompatible app installed on your PC is blocking the upgrade process from completing. Check to make sure that any incompatible apps are uninstalled and then try upgrading again. |
|
0xC1900107 |
A cleanup operation from a previous installation attempt is still pending, and a system restart is required to continue the upgrade. Restart the device and run setup again. If restarting device does not resolve the issue, then use the Disk Cleanup utility and clean up the temporary files and the System files. For more information, see Disk cleanup in Windows. |
|
0x80073712 |
A file needed by Windows Update is likely damaged or missing. Try repairing your system files: Select the Start button and type command prompt in the search box on the taskbar. Choose Command Prompt from the list of results. In the window that appears, type DISM.exe /Online /Cleanup-image /Restorehealth and press the Enter key. |
|
0xC1900200 – 0x20008 0xC1900202 – 0x20008 |
This may signify that your PC doesn’t meet the minimum requirements to download or install the upgrade to Windows 10. Learn more about the minimum requirements for Windows |
|
0x800F0923 |
This might indicate that a driver or other software on your PC isn’t compatible with the upgrade to Windows 10. For info about how to fix this problem, contact Microsoft support. |
|
0x80200056 |
This could mean that the upgrade process was interrupted because you accidentally restarted your PC or signed out of your PC. Try upgrading again and make sure your PC is plugged in and stays turned on. |
|
0x800F0922 |
This error might mean that your PC couldn’t connect to the Windows Update servers. If you’re using a VPN connection to connect to a work network, disconnect from the network and turn off the VPN software (if applicable) and try upgrading again. The error could also mean there isn’t enough free space in the System Reserved partition. You might be able to fix this problem by using third-party software to increase the size of the System Reserved partition. |
|
Error: We couldn’t complete the updates. Undoing changes. Don’t turn off your computer. Error: Failure configuring Windows Updates. Reverting changes. |
These are generic errors that might appear any time a Windows update fails. You’ll need to determine the specific error code to investigate how to best resolve this problem. You can find the error code for the failed update by viewing your update history. Look for the update that wasn’t installed, note the error code, and then contact Microsoft support. To view your update history in Windows 8.1:
To view your update history in Windows 7:
|
|
Error: The update isn’t applicable to your computer. |
This error might mean that your PC doesn’t have the required updates installed. Check to make sure that all important updates are installed on your PC before you try upgrading. |
|
0x80070070 – 0x50011 0x80070070 – 0x50012 0x80070070 – 0x60000 |
This likely indicates that your PC doesn’t have enough space available to install the upgrade. Free some space on the drive and try again. Get tips for freeing up drive space |
|
0x80300024 |
The specified disk operation is not supported by the target disk, partition, or volume. Make sure your machine meets the minimum requirements to install Windows 10. |
|
0x80070002 0x20009 |
The system cannot find the file specified. If you have a disk or disks where you are not installing Windows 10 on, remove those disks. |
|
0xC1900101 0x20017 0xC1900101 0x30017 |
A driver has caused a problem. Disable or remove all 3rd party antivirus or antispyware from your system. Disconnect all peripheral devices that are connected to the system, except for the mouse, keyboard and display. Contact your hardware vendor to obtain updated device drivers. |
|
0x8007042B 0x4000D |
Windows Setup terminated unexpectedly due to another process running in the background. When you start Windows by using a normal startup, several applications and services start automatically, and then run in the background. These programs include basic system processes, antivirus software, system utility applications, and other software that has been previously installed. These applications and services can cause interference when you attempt to upgrade to the latest version of Windows 10. To help you determine whether a background program is interfering with the upgrade, a «clean boot» may be needed. See How to perform a clean boot in Windows. |
|
0x800700B7 0x2000a |
Windows Setup terminated unexpectedly due to another process running in the background. Uninstall any antivirus or antispyware software and update again. |
 button. In the search box, type Update, and then, in the list of results, Select Windows Update > View update history.
Go through the solutions below to install Windows 10 successfully
by Milan Stanojevic
Milan has been enthusiastic about technology ever since his childhood days, and this led him to take interest in all PC-related technologies. He’s a PC enthusiast and he… read more
Updated on
Reviewed by
Vlad Turiceanu

Passionate about technology, Windows, and everything that has a power button, he spent most of his time developing new skills and learning more about the tech world. Coming… read more
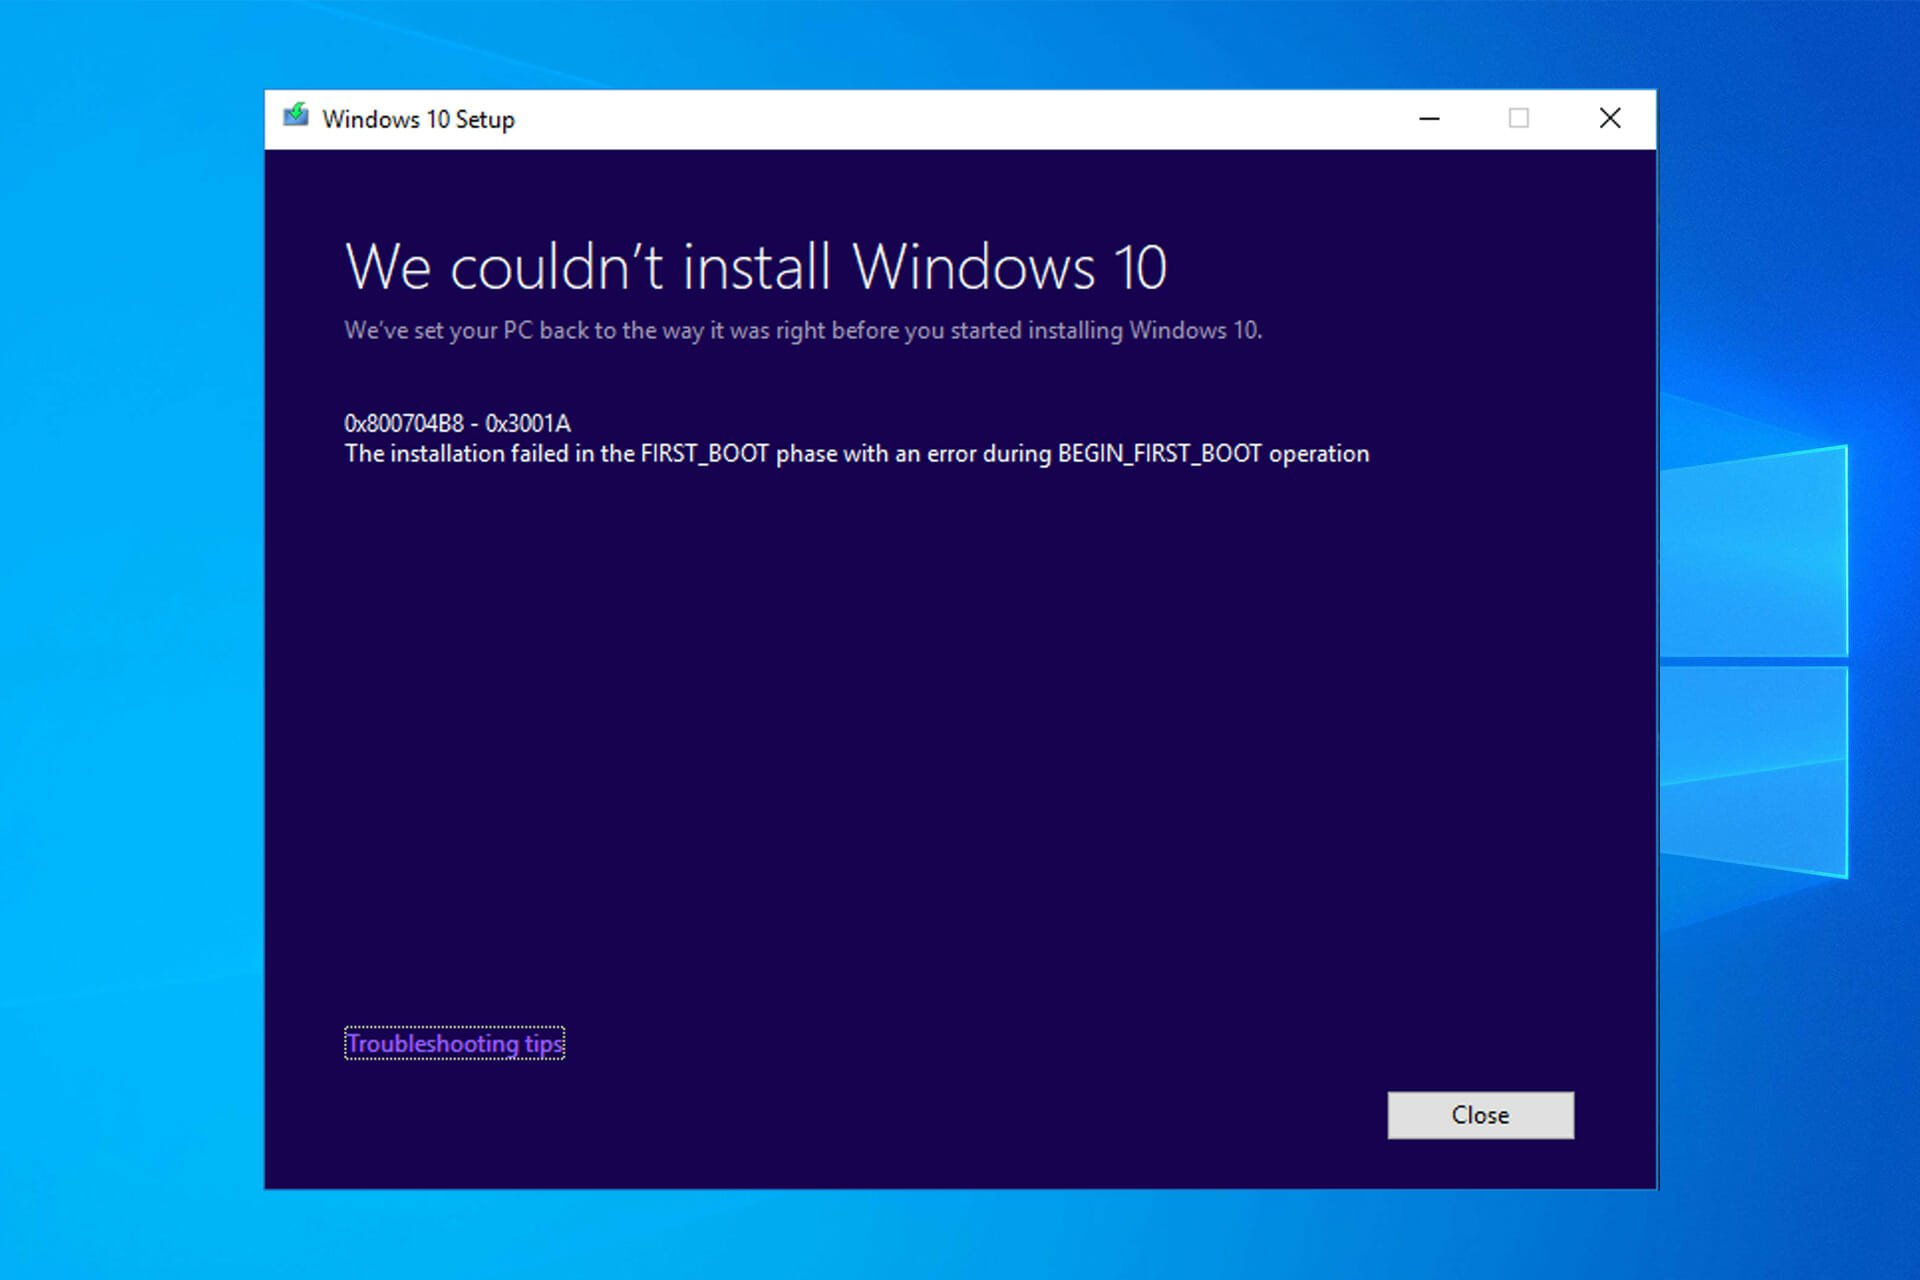
- Windows 10 installation has failed error can be caused by driver errors.
- The problem could also either arise due to an interrupted upgrade process from accidentally restarting your PC, or being out of charge.
- To fix this, try performing the installation again, and this time make sure your PC is plugged in and stays on through the process.
XINSTALL BY CLICKING THE DOWNLOAD
FILE
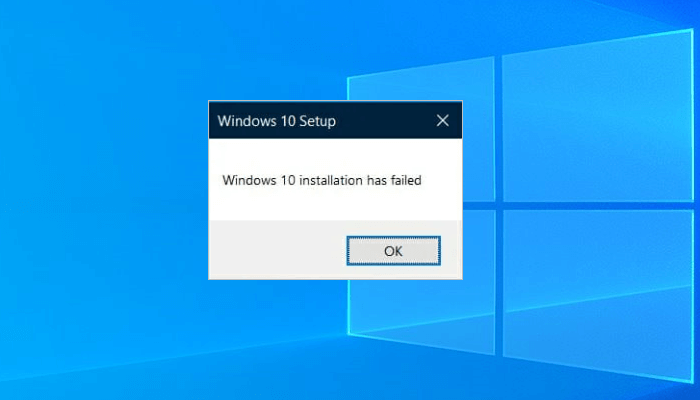
If you’re having trouble trying to install Windows, you’ll be relieved to know there are working solutions to get you out of the rut. When Windows 10 installation has failed, first you’ll have to determine the cause.
To understand why you cannot perform a Windows 10 install, here is a list of the commonly experienced errors that hinder the installation:
- Driver errors such as incompatibility with Windows 10 upgrade
- A file needed by Windows Update is missing or is damaged
- Interrupted upgrade process due to restarting your PC or you’re signed out
- Your PC couldn’t connect to Windows Update servers
- Not enough free space in the System Reserved partition
- Your PC doesn’t have the required updates installed
- Incompatible apps installed block the installation
- Your PC doesn’t meet the minimum requirements to install Windows 10
- Your PC doesn’t have enough space to install Windows 10
Why won’t windows 10 install?
This warning can indicate that your computer is missing certain essential updates that have not been installed.
Before attempting the upgrade, you should first double-check that your computer has all of the necessary updates loaded.
Lack of storage space, third-party VPN or antivirus software, or other incompatible applications are other typical contributing factors.
Why can’t I install Windows 10 on any partition?
Users have reported that if the SSD disk on your computer isn’t clean, installation issues with Windows 10 might arise.
It is recommended that before attempting to reinstall Windows 10, you first delete any partitions and files stored on your solid-state drive (SSD).
For more information and solutions to this particular case, check out our guide on how to fix Windows 10 cannot be installed to this disk.
Why can’t I install Windows 10 from USB?
If this happens, it’s possible that a media driver is missing on your PC. This isn’t the only problem, and many reported that Windows cannot be installed to this disk message.
If this happens, check your hard drive and its settings in BIOS and make sure that everything is in order. Hard drives aren’t the only problem, and few users reported that they can’t install Windows 10 to SSD.
Keep in mind that this issue affects all versions, and many reported that they can’t install Windows 11 due to these problems. However, there are a couple of solutions that can help you with this issue.
Each of these errors has a solution, so you need not worry about upgrading or getting to finally install Windows 10.
How do I fix Windows 10 not installing?
- Why won’t windows 10 install?
- Why can’t I install Windows 10 on any partition?
- Why can’t I install Windows 10 from USB?
- How do I fix Windows 10 not installing?
- 1. Fix Driver errors
- 2. Keep your PC on and try installing again
- 3. Turn off VPN software and increase the size of System Reserved partition
- 4. Check for pending updates
- 5. Uninstall incompatible apps
- 6. Check if your computer meets the minimum requirements
- 7. Free up space on your hard drive
- 8. Run DISM tool
1. Fix Driver errors
Sometimes you can’t install Windows 10 because of driver errors such as incompatibility with Windows 10 upgrade.
This solution helps fix the driver errors so you can try the installation again.
How we test, review and rate?
We have worked for the past 6 months on building a new review system on how we produce content. Using it, we have subsequently redone most of our articles to provide actual hands-on expertise on the guides we made.
For more details you can read how we test, review, and rate at WindowsReport.
How to fix driver errors before performing a Windows 10 install
- Ensure your computer has enough space, at least 16 GB, to upgrade a 32-bit operating system, or 20 GB for a 64-bit OS
- Run Windows Update to download and install available updates including software, hardware and third-party drivers.
- Check for third-party drivers and download any updates available. You can find these on the manufacturer’s website.
- Unplug excess hardware such as external storage device and drives, docks, and any other hardware not necessary for basic functioning of your computer.
- Check Device Manager for drive errors by doing the following:
- Right click Start
- Select Device Manager
- Look for devices with a yellow exclamation mark next to it

- Right click the device
- Click Update Driver Software or Uninstall to fix the error
- Remove third-party security software, and use Windows Defender to protect your computer
- Repair hard-drive errors by doing the following:
- Click Start
- Type CMD in the search field box
- Click Command Prompt app from the search results

- Type chkdsk/f C: in the window that pops up
- Press Enter. Repairs will start automatically on your hard drive.
- Restart your computer once complete. The can’t install Windows 10 update error will be solved.

It is known that Windows 10 has drivers compatibility and this problem is not resolved yet. So, the reason why you can’t install Windows 10 might be your driver.
You need to update all your drivers, but doing it manually could be very annoying, so we recommend you to download a dedicated third-party tool to do it automatically.
Most common Windows errors and bugs can result from faulty or incompatible drivers. An outdated system can lead to lags, system issues, or even BSoDs.
You can prevent these problems by using an automatic tool that will search and install the correct drivers on your computer with just a few clicks. That’s why we recommend you use Outbyte Driver Updater.
Here’s how to do it:
- Download and install the Outbyte Driver Updater app.
- Launch the software.
- Wait for the app to detect all incompatible drivers.

- Afterward, it will show you a list of the drivers found to select the ones to Update or Ignore.
- Click on Update & Apply Selected to download and install the newest versions.
- Restart your PC to ensure the applied changes.


Outbyte Driver Updater
Use this software and solve all driver-related issues from your PC.
Disclaimer: You may need to upgrade the app from the free version to perform specific actions.
2. Keep your PC on and try installing again
When you can’t install Windows 10, it could also either be due to an interrupted upgrade process from accidentally restarting your PC, or you could also be signed out.
To fix this, try performing the installation again but make sure your PC is plugged in and stays on through the process.
3. Turn off VPN software and increase the size of System Reserved partition
Performing a Windows 10 installation can also fail when the computer can’t connect to Windows Update servers.
Not having enough free space in the System Reserved partition also causes difficulty installing Windows 10.
If you’re using a VPN connection to connect to a work network, disconnect from the network then turn off the VPN software.
To fix the limited space issue, you can use a third-party software to increase the size of the System Reserved partition.
Try installing Windows 10 again.
4. Check for pending updates
For a healthy computer, you need to keep updating Windows with the latest system updates, and drivers. This also helps resolve any issues or difficulties you may be experiencing.
If you cannot install Windows 10 on your PC, you should check to ensure all your computer’s important updates are installed.
Use this solution when your PC doesn’t have the required updates installed.
Here’s how to check and install Windows Update (manually):
1. Go to Start.
2. In the search field, type Windows Updates.
3. Click on Windows Updates Settings from the search results.
4. Press on Check for updates.
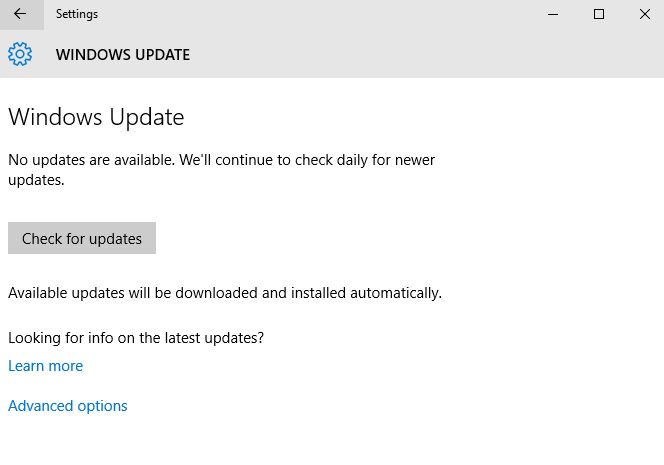
5. Install the latest Windows Updates.
5. Uninstall incompatible apps
This solution works when incompatible apps installed block the installation.
Check to ensure you’ve uninstalled incompatible apps before trying to install Windows 10 again.
In order to find incompatible apps, check Device Manager by using these steps:
- Right click Start
- Select Device Manager
- Look for devices with a yellow exclamation mark next to it
Once you identify any incompatible apps, uninstall them by doing the following:
- Right click Start
- Select Control Panel
- Select Program

- Click Programs and Features
- Click Uninstall a program
- Select the app you want to uninstall
- Click Uninstall

Check if you’re able to install Windows 10 after uninstalling the incompatible apps.
- ALSO READ: How to remove software leftovers
6. Check if your computer meets the minimum requirements
Use this solution when your PC doesn’t meet the minimum requirements to install Windows 10.
Go to this link to get more information about the minimum requirements for installing Windows 10.
- FIX: We couldn’t create a new partition error on Windows 10/11
- FIX: Windows 10/11 couldn’t be installed
- Fix: Background Apps are Grayed Out on Windows 10
- Security Settings Blocked Self-signed Application [Fix]
- Disk at 99% in Windows 10? You Can Fix It in 8 Steps
- Internet Explorer Not Opening? 7 Ways to Quickly Fix it
7. Free up space on your hard drive
This solution works when your PC doesn’t have enough space to install Windows 10.
Free up some space on the drive then try to install Windows 10 again.
Follow these steps to check the available disk space:
- Click Start
- Select Settings
- Go to System
- Click The used disk space for each drive will be displayed. What you need is enough space on your hard drive. This also works when you can’t install Windows 10 on SSD.
8. Run DISM tool
If you still cannot install the OS, run the DISM tool, or Deployment Image Servicing and Management tool.
The DISM tool helps fix Windows corruption errors when Windows Updates and service packs fail to install due to corruption errors, like if you have a damaged system file.
Here’s how to run the DISM command on your PC to check if it helps you when you can’t install Windows 10:
- Click Start
- In the search field box, type CMD
- Click Command Prompt in the search results list
- Type Dism /Online /Cleanup-Image /ScanHealth
- Type Dism /Online /Cleanup-Image /RestoreHealth
Once the repair is complete, reboot your computer and try to the installation again.
We love feedback. Let us know in the comments section whether any of these steps did the trick for you.
![]()
| Workable Solutions | Step-by-step Troubleshooting |
|---|---|
| 1. Check the System Requirements | Make sure you’re running the latest version — either Windows 7 SP1 or…Full steps |
| 2. Rebuild BCD | First, you’ll need to boot from your Windows 10 media creation tool. Once you’re…Full steps |
| 3. Run Windows 10 Clean Boot | Open Run dialog. Type msconfig in the box and click «OK» to…Full steps |
| 4. Repair Corrupted System Files | Restart your PC from the Windows installation media. Choose «Repair your computer…Full steps |
| Other Solutions | Run Windows Update Troubleshooter > Use Windows 10 Installation Repair Services…Full steps |
Windows 10 installation failures can be frustrating and costly. In this article, we explore some of the most common reasons for Windows 10 installation failures and offer solutions to help you get your system up and running. Whether it’s a driver conflict, a missing file, or something else, we’ll show you how to troubleshoot the problem and get your computer back on track. So don’t give up – read on for tips on how to fix the «Windows 10 installation has failed» error.
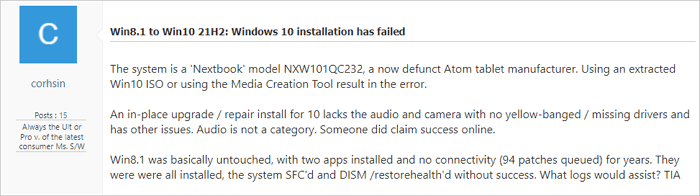
Windows 8.1 to Windows 10 21H2: Windows 10 Installation Has Failed
Windows 10 installation has failed for many users trying to upgrade from Windows 8.1. Here’s a real case from TenForums:
Windows 10 installation has failed for a variety of reasons. The most common cause is that the Windows 8.1 to Windows 10 21H2 update is incompatible with your computer’s hardware. Other reasons include problems with the Windows Update service or the Windows 10 files themselves.
- There needs to be more space on your hard drive.
- There is something wrong with your file system.
- Your language package is conflicted with your system.
- Your computer doesn’t meet the minimum system requirements.
No matter what the cause is, read the solutions below to fix the «Windows 10 installation has failed» error.
Bonus Tip: Recover Windows 11/10/8/7 Data Without OS
EaseUS Data Recovery Wizard is a powerful data recovery software that can help you recover data even if Windows 10 installation has failed. With this software, you can easily recover data from your hard drive without entering your Windows system. This software is straightforward to use and can help you recover data quickly. Moreover, this software is very safe to use and will keep your data safe even if Windows 10 installation has failed.
- Support data recovery for Windows 11/10/8.1/8/7/XP.
- Restore data after formatting, accidental deletion, and a system crash.
- Recover deleted files from different storage devices, including hard drives, SSDs, USB flash drives, and memory cards.
Download and run EaseUS data recovery software to recover data without entering Windows 10.
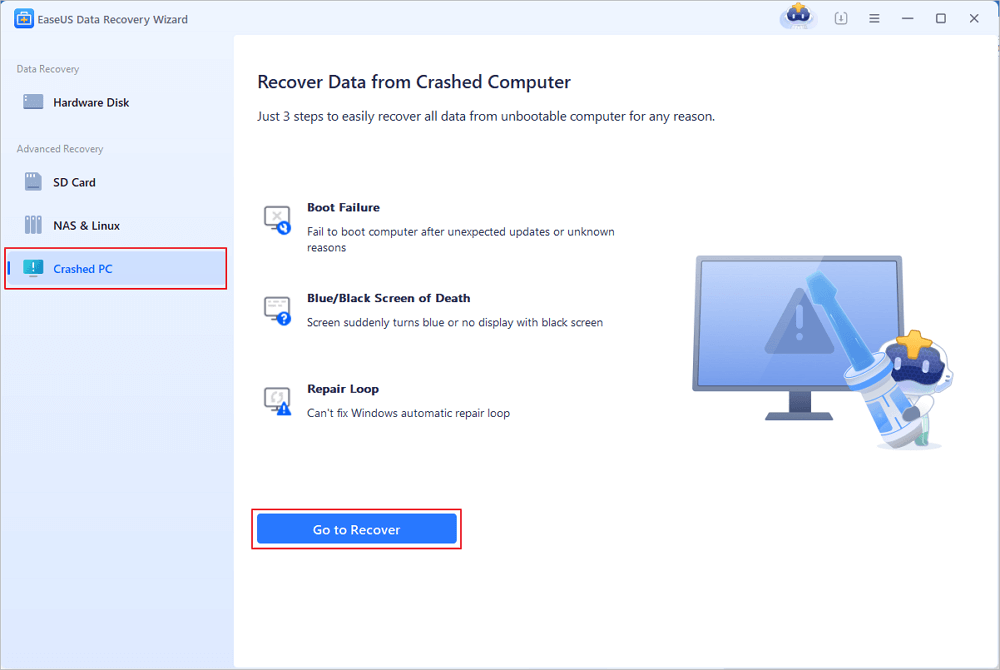
Step 1. Create a bootable disk
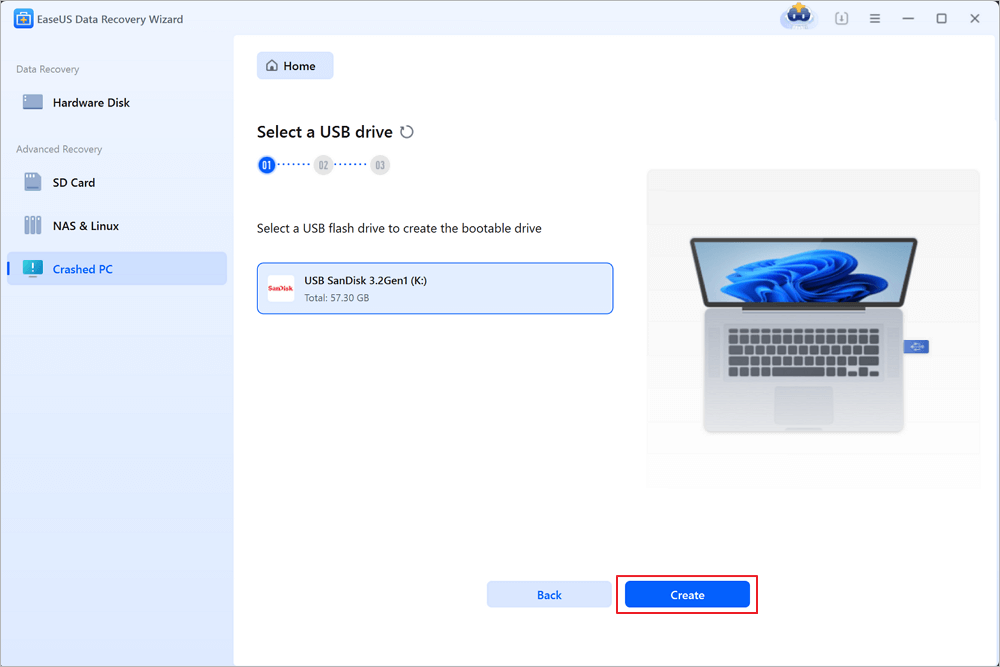
Launch EaseUS Data Recovery Wizard, choose «Crashed PC Recovery» and click «Go to Recover».
Select an empty USB to create the bootable drive and click «Create».
Warning: When you create a bootable disk, EaseUS Data Recovery Wizard will erase all data saved in the USB drive. Back up important data beforehand.
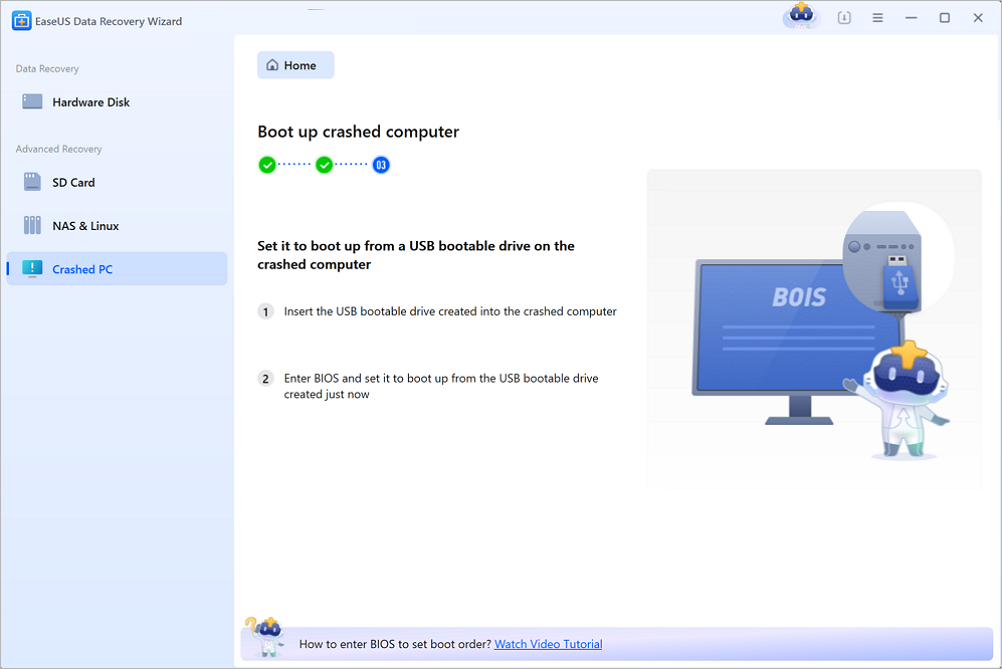
Step 2. Boot your computer from the bootable USB
Connect the bootable disk to the PC that won’t boot and change your computer boot sequence in BIOS. For most users, it works well when they restart their computer and press F2 simultaneously to enter BIOS.
Set to boot the PC from «Removable Devices» (bootable USB disk) beyond Hard Drive. Press «F10» to save and exit.
Step 3. Recover data from a crashed system/PC
After booting from EaseUS Data Recovery Wizard bootable disk, select the drive you want to scan to find all your lost files. Preview and recover the files you need to a safe location.

6 Ways to Fix Windows 10 Installation Has Failed
Windows 10 installation has failed error is a widespread issue. But don’t worry, as we have 6 Ways to Fix Windows 10 installation has failed error. After following one of these ways, you can overcome this problem.
Fix 1. Check the System Requirements
Windows 10 installation has failed is a Windows 10-specific error that usually appears when users are attempting to upgrade their Windows 7 or 8.1 installations to Windows 10. The most basic method to fix the installation failed error is to check Windows 10 system requirements.
- Latest OS: Make sure you’re running the latest version — either Windows 7 SP1 or Windows 8.1 Update.
- Processor: 1 gigahertz (GHz) or faster processor or SoC
- RAM: 1 gigabyte (GB) for 32-bit or 2 GB for 64-bit
- Hard disk space: 16 GB for 32-bit OS or 20 GB for 64-bit OS
- Graphics card: DirectX 9 or later with WDDM 1.0 driver
- Display: 800 x 600
If your computer meets the minimum requirements, keep reading. If your device doesn’t meet the requirements, you need to get a new laptop or computer.
Fix 2. Rebuild BCD to Fix Windows 10 Installation Has Failed
If you’ve been trying to install Windows 10 and have got the message that «Windows 10 installation has failed,» there’s a good chance that your boot configuration data (BCD) is corrupted. Windows use BCD to store information about the boot process, and if it’s corrupted, it can cause all sorts of problems. Fortunately, there’s a way to rebuild BCD and fix the problem.
First, you’ll need to boot from your Windows 10 media creation tool. Once you’re at the recovery options screen, select «Command Prompt». From there, you’ll need to type the following commands:
- bootrec /fixmbr
- bootrec /fixboot
- bootrec /rebuildbcd
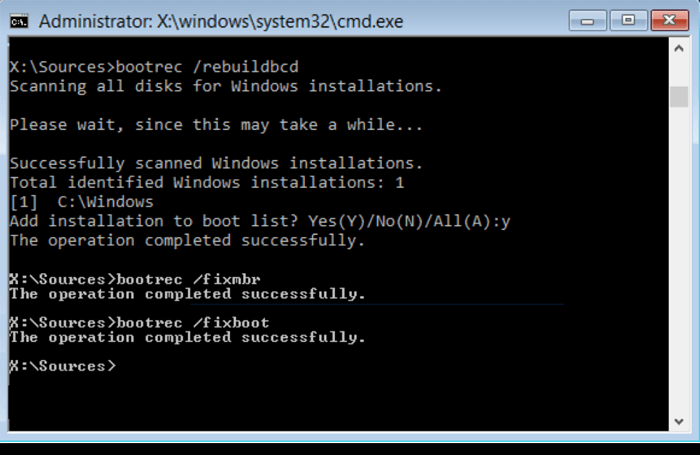
This will rebuild BCD and hopefully fix the problem so you can install Windows 10 successfully. Once these steps are complete, restart your computer and see if the issue has been resolved. If not, you may need to try other troubleshooting steps. But rebuilding the BCD can often fix problems with a failed Windows 10 installation.
Fix 3. Run Windows 10 Installation in Clean Boot
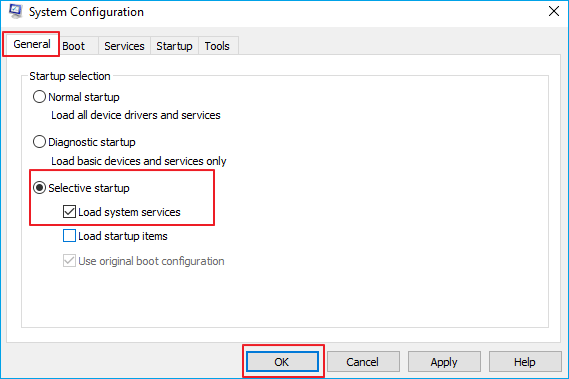
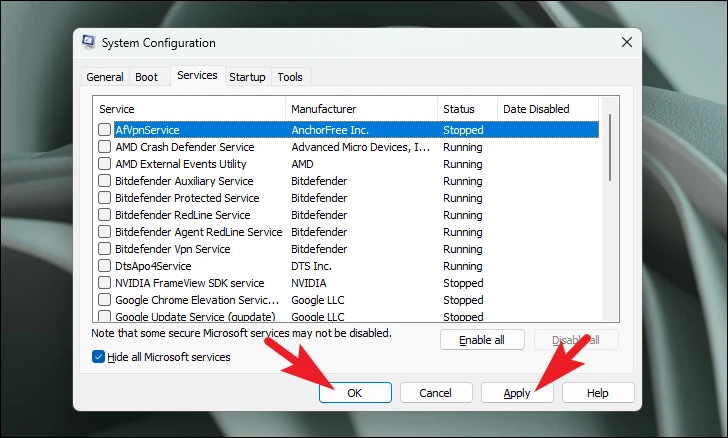
Clean boot is a process of starting Windows 10 by using the minimum set of drivers and startup programs. This helps eliminate software conflicts that can occur when you install a program or run a program in Windows 10. To perform a clean boot, you must boot into Safe Mode and follow the instructions below.
Step 1. Open Run dialog.
Step 2. Type msconfig in the box and click «OK» to continue.
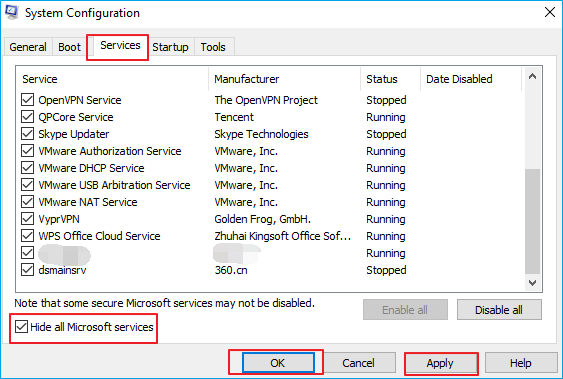
Step 3. Go to the «General > Selective startup» and uncheck the option Load startup items.
Step 4. Select the «Services» tab, check «Hide all Microsoft services» and click «Disable all».
Then, check whether the error that Windows 10 installation has failed is solved.
Fix 4. Repair Corrupted System Files to Fix Windows 10 Installation Has Failed
If you can’t install Windows 10 because of the file system, you can repair it to fix this. Follow the steps below to repair you will need to repair the file system using a tool like the Windows 10 repair tool. This will scan the hard drive for any corrupt or damaged files and repair them. Once the file system has been repaired, you should be able to install Windows 10 successfully.
Step 1. Restart your PC from the Windows installation media.
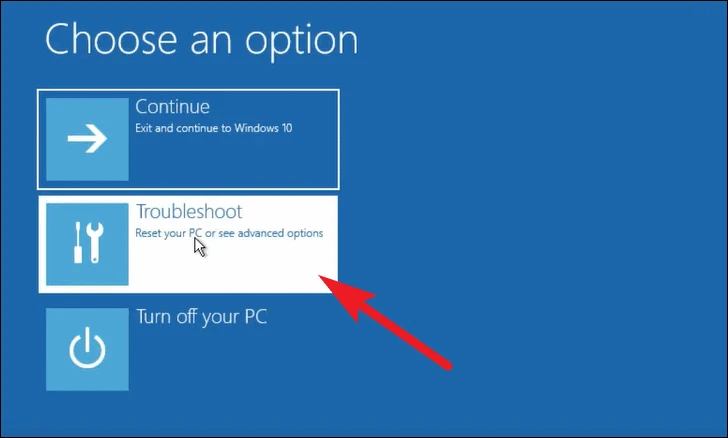
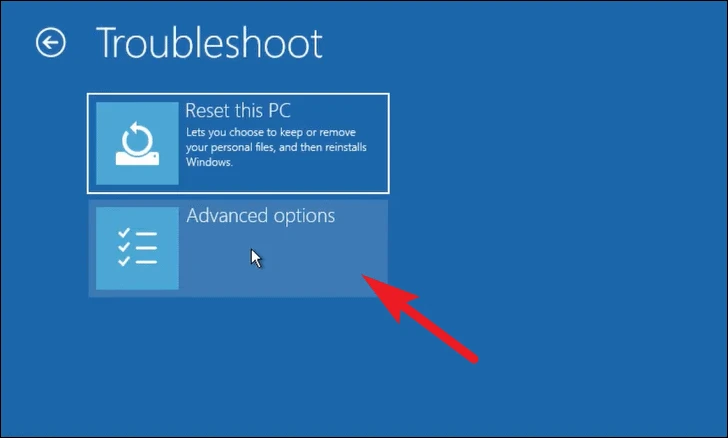
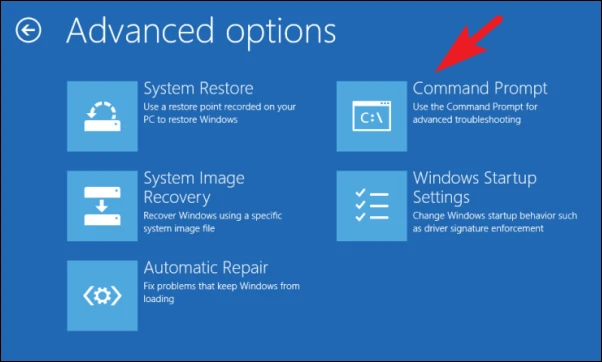
Step 2. Choose «Repair your computer > Troubleshoot > Advanced options > Command Prompt».
Step 4. Type sfc /scannow and hit Enter.
Step 5. Type chkdsk /f /r /x C: and hit Enter.
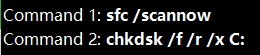
Then, check whether you can install Windows 10 or not.
Fix 5. Run Windows Update Troubleshooter to Fix Windows 10 Installation Error
If you’re having trouble with Windows update or installation, run Windows Update Troubleshooter. This built-in tool can help solve many common issues related to updates. To run the troubleshooter, follow these steps:
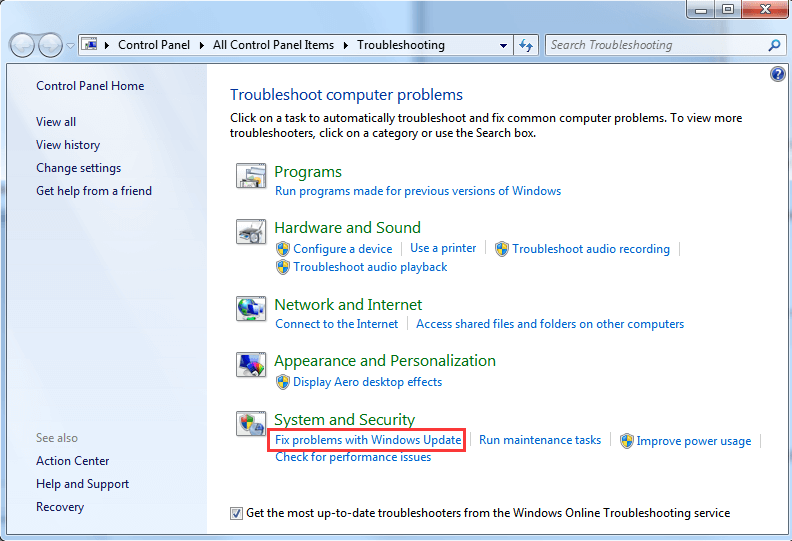
Step 1. Press «Windows + X» and select «Control panel».
Step 2. In the search box, type troubleshooter and click «Troubleshooting».
Step 3. Under System and Security, click «Fix problems with Windows Updates».
If the troubleshooter doesn’t fix your problem, you can try a few other things, such as download Windows 10 full version manually.
Fix 6. Turn to Windows 10 Installation Repair Services
If you find it difficult to solve the installation problem on your own, you can turn to professional manual Windows repair services. EaseUS’s experts can help you solve system startup errors like system failure, BSOD, unbootable devices, etc.
Consult with EaseUS data recovery experts for one-on-one manual recovery service. We could offer the following services after a FREE diagnosis
- Repair corrupted RAID structure, unbootable Windows OS, and corrupted virtual disk file
- Recover/repair lost partition and re-partitioned drive
- Unformat hard drive and repair raw drive(Bitlocker encrypted drive)
- Fix disks that become GPT-protected partitions
If you prefer a video tutorial, watch this video below to fix the Windows 10 installation has failed error.
- 00:15 Fix Windows 10 installation has failed by unplugging the devices
- 01:16 Fix Windows 10 installation has failed using dism commands
- 02:35 Fix Windows 10 installation has failed by doing a clean boot
- 03:18 Fix Windows 10 installation has failed using the media creation tool
Conclusion
As you can see, there are a number of ways that you can fix the Windows 10 installation has failed error. In most cases, one of these methods should successfully allow you to install or upgrade to Windows 10 without any issues. If you still can’t fix the problem, try contacting Microsoft support for additional help.
By the way, it’s an excellent choice to recover data without OS to avoid data loss. EaseUS data recovery software is one of the best choices that can help you retrieve lost photos, documents, videos, and more.
Windows 10 Installation Has Failed FAQs
If you’re getting the ‘Windows 10 installation has failed’ error, there are a number of potential solutions in this blog post. Check to see if your computer meets the system requirements for Windows 10, rebuild the BCD, run Windows 10 installation in clean boot, or repair corrupted system files. If you still have problems, check the FAQs to get additional help.
1. How to fix Windows 11 installation failed?
To fix Windows 11 installation has failed:
- Fix 1. Configure PC
- Fix 2. Remove 0xC1900101
- Fix 3. Upgrade System Disk
- Fix 4. Redownload Windows 11
2. Windows 10 installation failed at 74, how to fix?
To fix Windows 10 installation failed at 74:
- Change the system locale to English
- Fix Windows 10 stuck problem with Troubleshooter
- Delete the Software Distribution folder
3. Why is my Windows 10 not installing?
There are several reasons for Windows 10 not installing:
- Not enough space
- Device Manager errors
- Hard drive errors
- Third-party drivers’ errors…
Many users reported that Windows 10 installation is getting failed without any error code. The error code helps you understand what kind of error your device is facing so you can take appropriate steps to resolve it. But when there is no error code, you’re flying blind and it makes troubleshooting the situation somewhat difficult.
Still, it’s not impossible and we have compiled a list of solutions that will help you quickly resolve this problem and enable you to install Windows 10 on your device.
General Fixes
Before going on to try the fixes listed below, here are some general easy fixes you should try to resolve the installation error:
- Remove any peripherals: If you have any non-essential external hardware peripherals plugged in, like headphones, USB devices, external hard drives, printers, scanners, etc., unplug them. They can interfere with the installation. If your laptop is connected to a docking station, also undock it.
- Update Drivers: Make sure all the important drivers are updated before installing Windows.
- Uninstall third-party anti-virus: If you’re using any third-party anti-virus software, uninstall it and use only Microsoft Defender, at least while you’re trying to upgrade the Windows. Third-party anti-virus software can often cause problems with Windows updates. Once the installation completes, you can reinstall the software. But make sure you have the required activation information before uninstalling so you can reactivate it.
- Free Up Disk Space: You should have enough space on your hard drive so that the Windows installation can take place. If it doesn’t get the required space, the installation will fail. Check the disk space from File Explorer (or, Windows Explorer in Windows 7) and free up space if required.
Try updating Windows after performing these fixes. If you still see an error code, then proceed with the more technical fixes listed below.
Method 1: Deploy DISM and SFC Command
Deployment Image Servicing and Management scans will check and repair the existing operating system files installed on your device along with other system files.
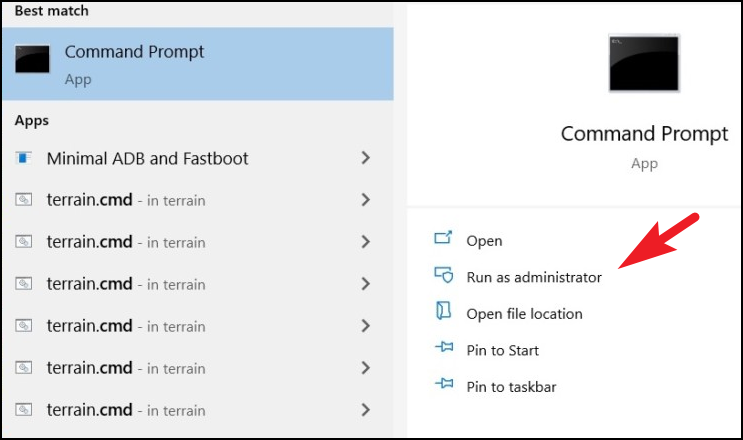
Head to the Start Menu and type ‘Command Prompt’ to search for it. Then, click on the ‘Run as administrator’ option from the right section of the menu to continue.
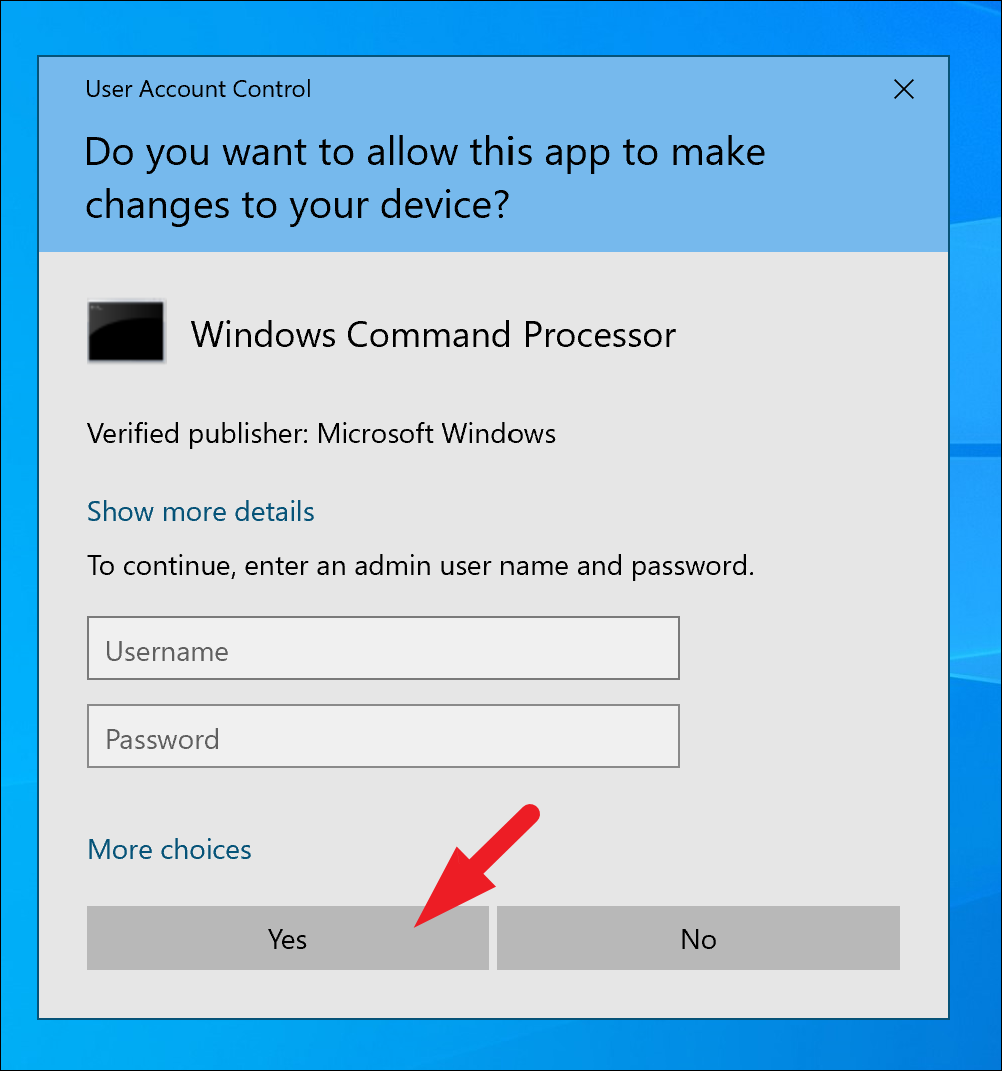
Next, if you are not logged in with an admin account, enter the credentials for one. Otherwise, click on the ‘Yes’ button to proceed.
Then, type or copy+paste the below-mentioned command and hit Enter on your keyboard. This will restore the currently installed OS image on your device.
DISM/ Online/Cleanup-Image/RestoreHealth 
Once completed, type or copy+paste the following command and hit Enter to check and repair the System files on your PC.
SFC /scannow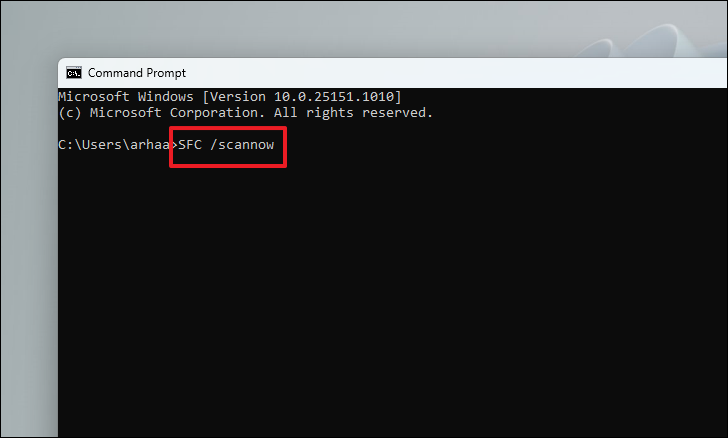
If after the scan, you get the message that the scan was successful, try updating your Windows again or move on to the next fix. But if it finds corrupted files in the scan, remove those files and then try updating your PC.
Method 2: Rebuild Boot Configuration Data (BCD)
Typically responsible for a proper boot of your computer, many users have reported that rebuilding their BCD data helped fix their Windows 10 installation problem.
To rebuild your PC, you will need to access the Advanced Startup Repair tool on your system. To do so, turn on your PC, and at the first sign of boot, press and hold the ‘Power’ button for 10 seconds to force shut down. You can also unplug your PC if you are on a desktop system.
Repeat this process three times and on the fourth time, let your PC restart as usual. The Advanced Startup Repair will automatically kick in and you will be greeted by a blue screen. Click on the ‘Troubleshoot’ tile to proceed.
After that, click on the ‘Advanced Options’ tile to continue.
Next, click on the ‘Command Prompt’ tile.
After that, type or copy+paste the below-mentioned commands, one at a time, and hit Enter after entering each one of them to execute them.
bootrec /FixMbrbootrec /RebuildBcd bootrec /ScanOs
bootrec /FixBoot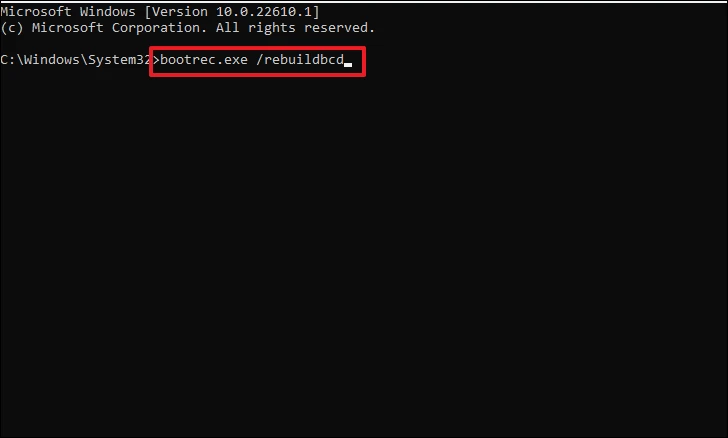
Once you have executed all the commands, reboot your PC again and check if the problem persists.
Method 3: Uninstall Conflicting Language Packs
Many users have verified that removing additional language packs from their system enabled them to fix the problem on their PC.
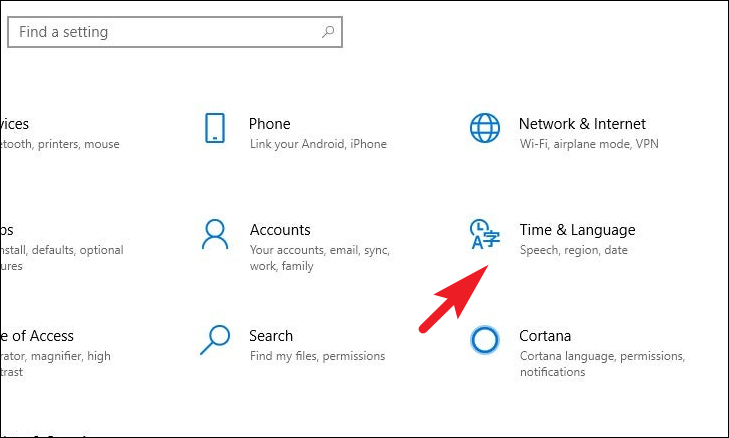
First, open the Settings app from the Start Menu. Alternatively, press the Windows+I keys on your keyboard to open the app.
After that, select the ‘Time & Language’ tile to proceed.
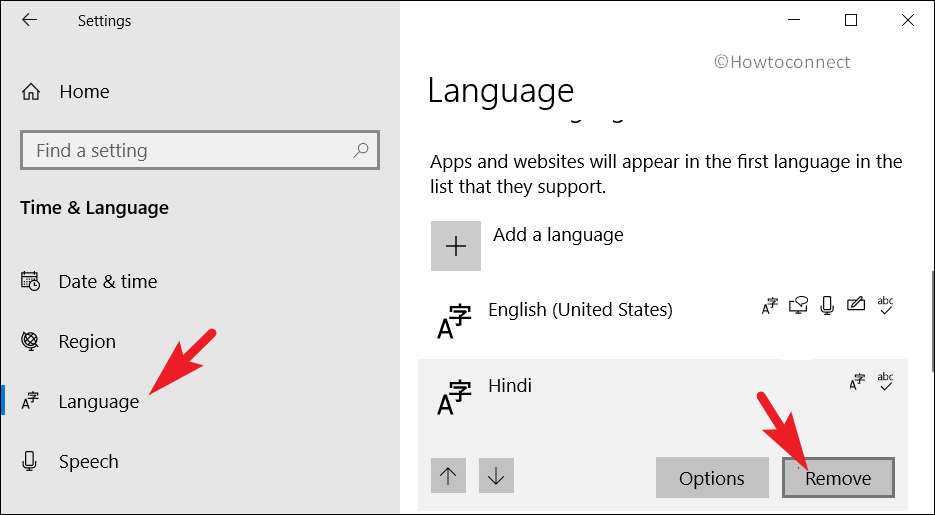
Next, click on the ‘Language’ tab from the left sidebar. Then, click on the language pack you wish to remove to expand the tile. Next, click on the ‘Remove’ button from the expanded view to uninstall the language from your system.
Repeat the above-mentioned process if you have multiple languages installed on your system. Once done, restart your system and check if the issue is resolved.
Method 4: Run Installation in Clean Boot
Many a time a third-party service or software might interfere in the installation process of Windows. You can eliminate this issue by running the installation in a clean boot where only essential Microsoft services are running.
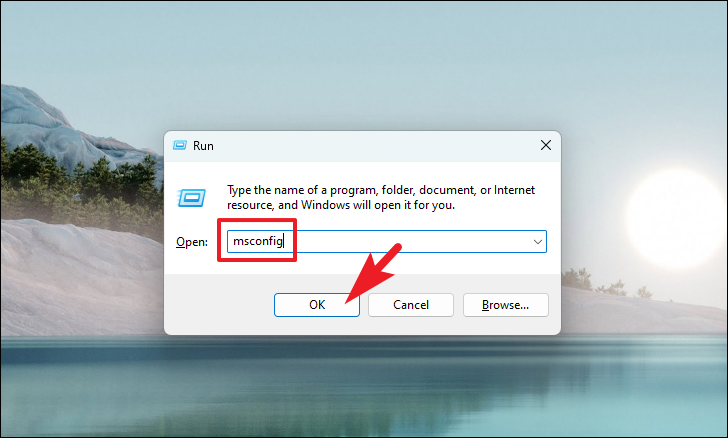
First, press the Windows+R keys together on your keyboard to bring up the Run command utility. Then, type msconfig and hit Enter on your keyboard to proceed.
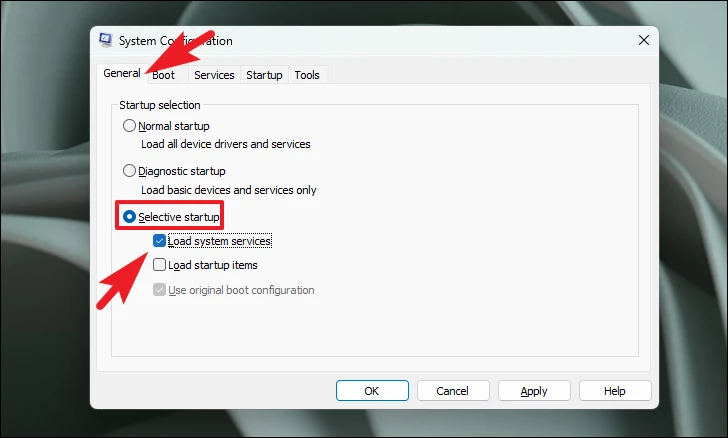
After that, click on the ‘Selective startup’ option and then click to select the ‘Load system services’ option.
Then, click on the ‘Services’ tab and click on the checkbox preceding the ‘Hide all Microsoft services’ option. Then, click on the ‘Disable all’ button to disable all but Microsoft services.

Then, click on the ‘Apply’ button to apply the changes and click on the ‘OK’ button to close the window
Now, restart your PC from the Start Menu. The PC will start in clean boot mode and run the installation again.
There you go, folks. Using the methods stated in this guide, you can easily and quickly resolve the installation error for Windows 10 on your PC.
Updating your operating system periodically is essential to keep the system safe. However, the issue of Windows 10 installation stuck at 46 percent turns it into a lengthy process. If you are also facing the said issue and are looking for a solution, you are at the right place. We bring a perfect guide that will help you solve the Fall Creators Update issue. So, continue reading!

Table of Contents
How to Fix Windows 10 Installation Stuck at 46 Percent Issue
In this section, we have compiled a list of methods to fix the issue of Fall Creators Update stuck at 46 percent and arranged them according to user convenience. But before delving into the methods directly, check these basic troubleshooting solutions listed below:
- Make sure to have an active internet connection to fix Windows update taking forever issue and download the files effortlessly.
- Disable third-party antivirus software installed in your system, and disconnect the VPN client, if any.
- Check if there’s sufficient space in C: Drive to download the update files.
- Use Windows Clean Boot to analyze whether any unwanted third-party applications or programs are causing the problem. Then, uninstall them.
Method 1: Run Windows Update Troubleshooter
Troubleshooting the system is one of the easy methods to fix Windows 10 installation stuck issue. If you troubleshoot your system then, the following list of actions will take place:
- Windows Update Services is shut down by the system.
- The C:\Windows\SoftwareDistribution folder is renamed to C:\Windows\SoftwareDistribution.old
- All the download cache present in the system is wiped off.
- Finally, the Windows Update Service is rebooted.
So, follow the instructions listed below to run the Automatic troubleshooter in your system:
1. Hit the Windows key and type Control Panel in the search bar, as shown.

2. Open Control Panel from the search results.
3. Now, search for the Troubleshooting option using the search bar and click on it.

4. Next, click on the View all option in the left pane.

5. Scroll down and select Windows update as depicted.

6. Next, select Advanced as depicted below.

7. Here, ensure that the box next to Apply repairs automatically is checked and click on Next.

8. Follow the on-screen instructions to complete the troubleshooting process.
Most of the time, the troubleshooting process will fix Fall Creator’s update stuck issue. Thereafter, try to run the Windows update again.
Note: The troubleshooter lets you know if it could identify and fix the problem. If it says that it could not identify the issue, try the rest of the methods discussed in this article.
Method 2: Perform Clean Boot
Follow the below-mentioned steps to fix the issues concerning Windows 10 Installation stuck at 46 percent.
Note: Make sure you log in as an administrator to perform Windows clean boot.
1. To launch the Run dialog box, press the Windows + R keys together.
2. Enter the msconfig command, and click on OK.

3. Next, switch to the Services tab in the System Configuration window.
4. Check the box next to Hide all Microsoft services, and click on Disable all button as highlighted.

5. Now, switch to the Startup tab and click the link to Open Task Manager as depicted below.

6. Switch to the Startup tab in the Task Manager window.
7. Next, select the unrequired startup tasks and click Disable from the bottom right corner, as highlighted
For example, we have shown how to disable Skype as a startup item.

8. Exit the Task Manager and click on Apply > OK in the System Configuration window to save the changes.
9. Finally, restart your PC.
Also Read: Perform Clean boot in Windows 10
Method 3: Rename Software Distribution Folder
You can also fix the Fall Creators Update stuck issue by renaming the SoftwareDistribution folder as follows:
1. Type cmd in the Windows search bar. Click on Run as administrator to launch Command Prompt.

2. Type the following commands one by one and hit Enter after each command.
net stop bits
net stop wuauserv
net stop cryptSvc
net stop msiserver

3. Now, type the command given below to rename the Software Distribution folder and hit Enter.
ren C:\Windows\SoftwareDistribution SoftwareDistribution.old

4. Again, execute the given commands to reset the Windows folder and rename it.
net start wuauserv
net start cryptSvc
net start bits
net start msiserver

5. Restart your system and check if Windows 10 installation stuck problem is fixed now.
Also Read: How to Fix Error 0x80300024
Method 4: Run SFC & DISM Scan
Windows 10 users can automatically, scan and repair their system files by running System File Checker. It is a built-in tool that also lets the user delete corrupt files.
1. Launch Command Prompt with administrative privileges, as earlier.
2. Type sfc /scannow and press the Enter key.

3. System File Checker will begin its process. Wait for the Verification 100 % completed statement.
4. Now, type Dism /Online /Cleanup-Image /CheckHealth and hit Enter.
Note: The CheckHealth command determines if there are any corrupt local Windows 10 image.

5. Then, type the command given below and hit Enter.
DISM.exe /Online /Cleanup-Image /ScanHealth
Note: ScanHealth command performs a more advanced scan and determines if the OS image has any problems.

6. Next, execute DISM /Online /Cleanup-Image /RestoreHealth command, as shown. It will repair issues automatically.

7. Restart your PC and check if the said issue is fixed or not.
Method 5: Free-up Disk Space
Windows update will not be completed if you do not have enough disk space in your system. Therefore, try to clear unwanted applications and programs using the Control Panel:
1. Navigate to Control Panel implementing the steps mentioned in Method 1.
2. Change the View by option to Small icons and click on Programs and Features, as shown.

3. Here, select rarely used applications/programs in the list and click on Uninstall, as highlighted.

4. Now, confirm the prompt by clicking on Uninstall.
5. Repeat the same for all such programs & apps.
Also Read: What is Windows 10 Boot Manager?
Method 6: Update/ Reinstall Network Driver
To solve the Windows 10 Installation stuck issue in your system, update or reinstall your system drivers to the latest version with relevance to the launcher.
Method 6A: Update Network Driver
1. Press the Windows + X keys and select Device Manager, as shown.

2. Double-click on Network adapters to expand it.
3. Now, right-click on your network driver and click on Update driver, as highlighted.

4. Here, click on Search automatically for drivers to download and install the latest driver automatically.
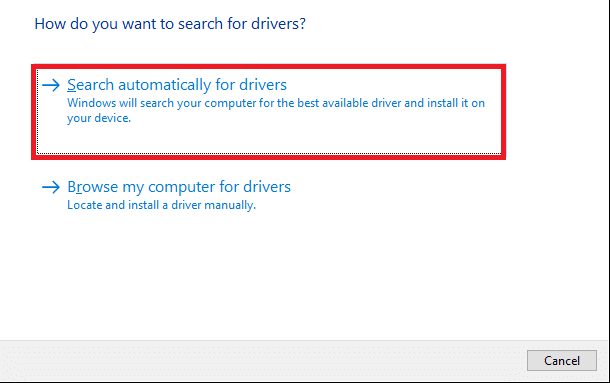
Restart your computer and check if the Fall Creators update stuck at 46 percent issue is fixed.
Method 6B: Reinstall Network Driver
1. Launch Device Manager and expand Network adapters, as earlier.
2. Now, right-click on the network driver and select Uninstall device.

3. A warning prompt will be displayed on the screen. Check the box Delete the driver software for this device and click Uninstall.
4. Download and install the drivers through the manufacturer’s website. Click here to download Intel Network Drivers.
5. Then, follow the on-screen instructions to complete the installation and run the executable.
Finally, check if the issue is fixed now.
Method 7: Disable Windows Defender Firewall
Some users reported that Windows 10 Installation stuck at 46 percent issue disappeared when Windows Defender Firewall was turned off. Follow these steps to disable it:
1. Launch Control Panel as instructed in Method 1.
2. Select the View by option to Category and click on System and Security as shown below.

3. Now, click on the Windows Defender Firewall option.

4. Select Turn Windows Defender Firewall on or off from the left pane.

5. Now, select Turn off Windows Defender Firewall (not recommended) option in all network settings, as illustrated below.

6. Reboot your Windows 10 PC.
Also Read: How to Block or Unblock Programs In Windows Defender Firewall
Method 8: Disable Antivirus Temporarily
If you want to disable your antivirus temporarily, follow the steps listed in this method.
Note: The steps may differ from software to software. Here Avast Free Antivirus is taken as an example.
1. Navigate to the Antivirus icon in the Taskbar and right-click on it.
2. Now, select the antivirus settings option. Example: For Avast antivirus, click on Avast shields control.

3. Temporarily disable Avast using the below options:
- Disable for 10 minutes
- Disable for 1 hour
- Disable until computer is restarted
- Disable permanently
4. Choose the option according to your convenience and check if the Fall Creators Update issue is fixed now.
Recommended:
- 5 Ways to Repair Steam Client
- How to End Task in Windows 10
- Fix DISM Error 87 in Windows 10
- How to Delete Win Setup Files in Windows 10
We hope that this guide was helpful and you were able to fix Windows 10 installation stuck at 46 percent issue. Let us know which method worked for you the best. Also, if you have any queries/suggestions regarding this article, then feel free to drop them in the comments section below.