Safe mode starts Windows in a basic state, using a limited set of files and drivers. If a problem doesn’t happen in safe mode, this means that default settings and basic device drivers aren’t causing the issue. Observing Windows in safe mode enables you to narrow down the source of a problem, and can help you troubleshoot problems on your PC.
There are two versions of safe mode: Safe Mode and Safe Mode with Networking. Safe Mode with Networking adds the network drivers and services you’ll need to access the internet and other computers on your network.
Select from the following sections to find out how to start your PC in safe mode from Settings, from the sign-in screen, or from a black or blank screen.
-
Press Windows logo key + I on your keyboard to open Settings. If that doesn’t work, select the Start button, then select Settings .
-
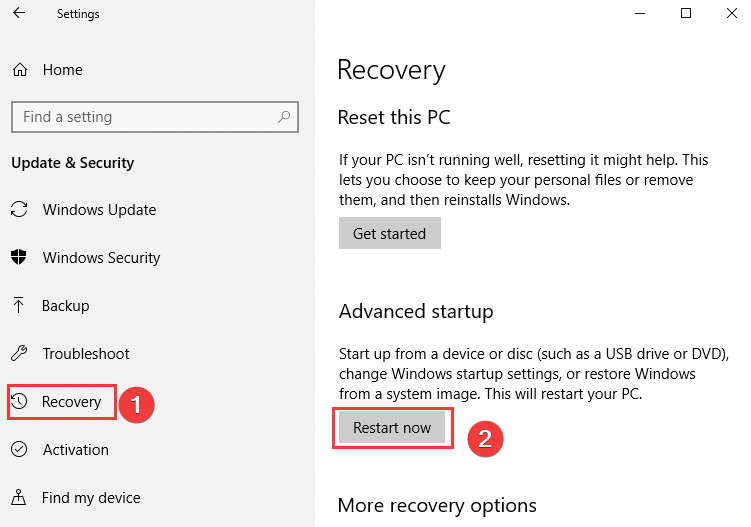
Select System > Recovery .
Open Recovery Settings -
Under Recovery options, next to Advanced startup, select Restart now.
-
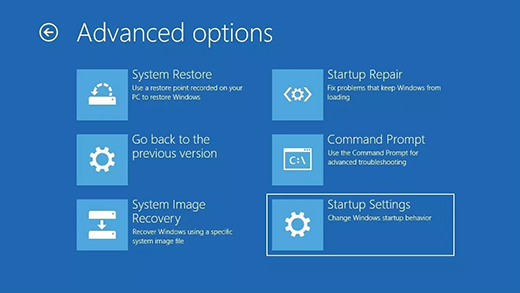
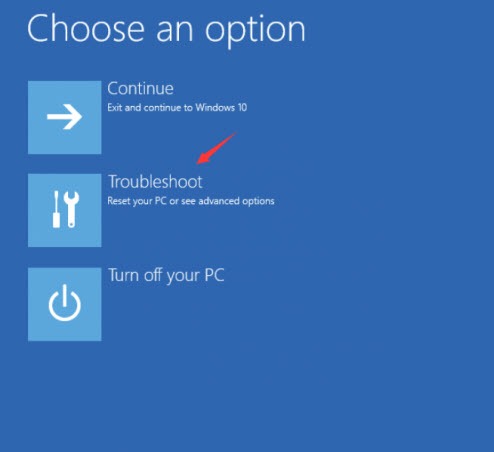
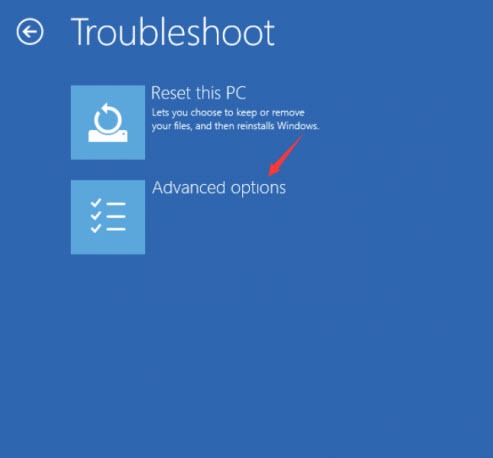
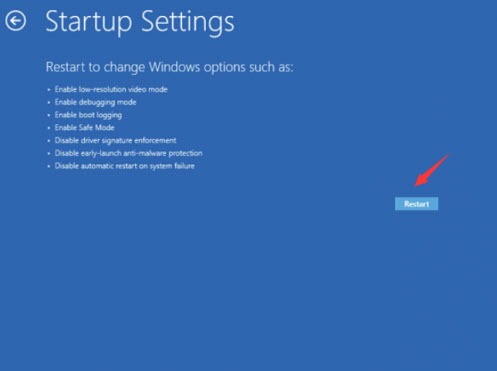
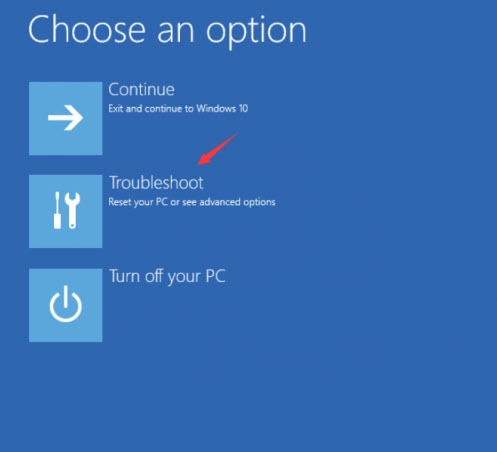
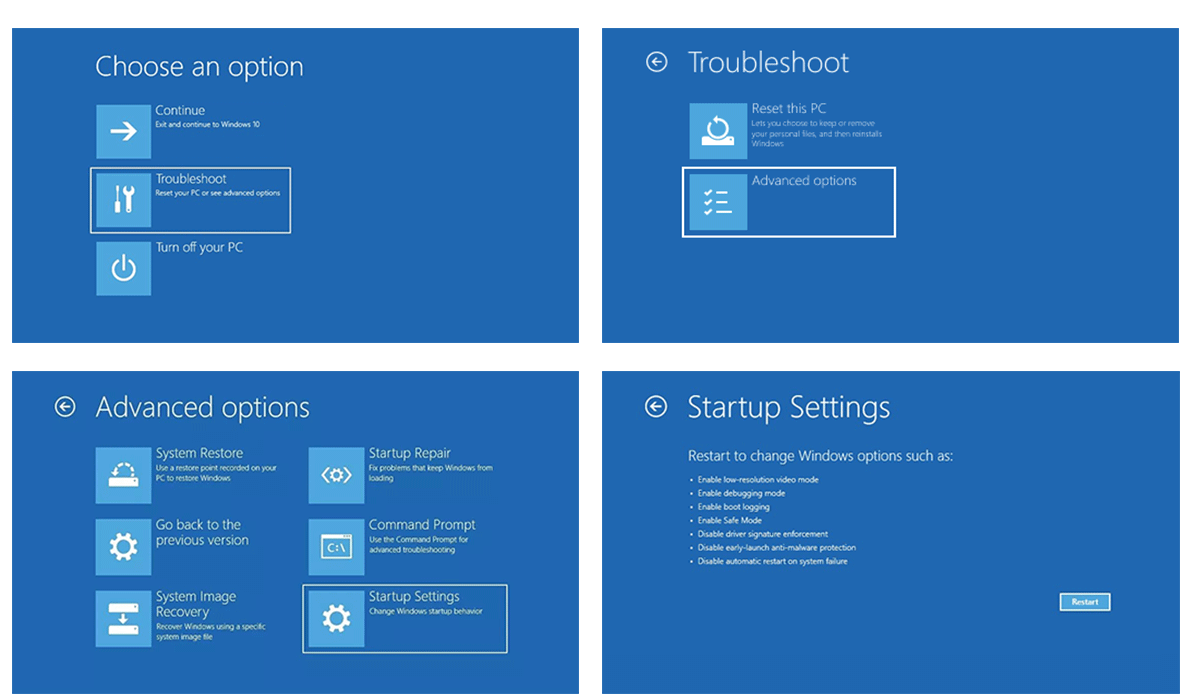
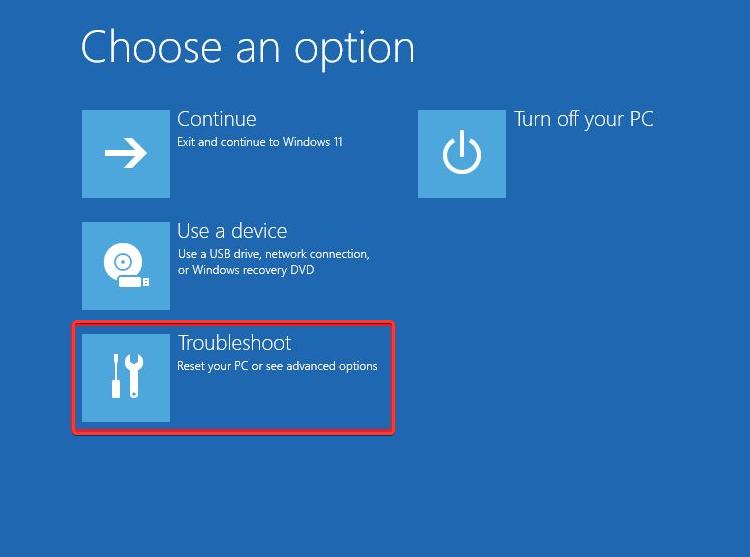
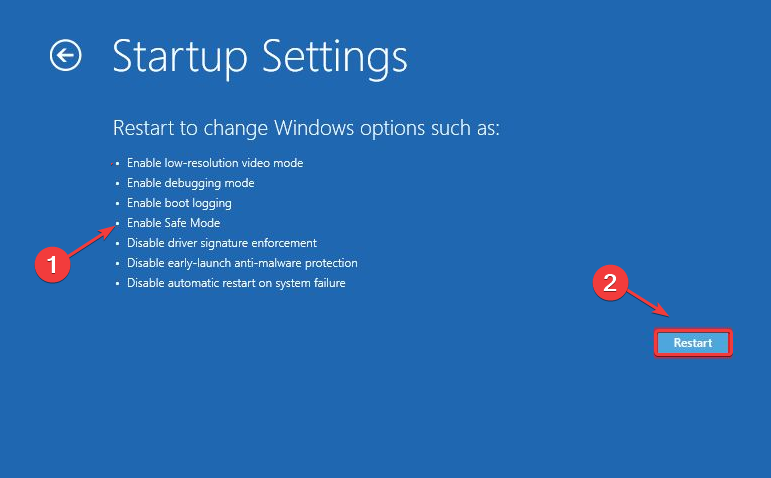
After your PC restarts to the Choose an option screen, select Troubleshoot > Advanced options > Startup Settings > Restart. You may be asked to enter your BitLocker recovery key.

-
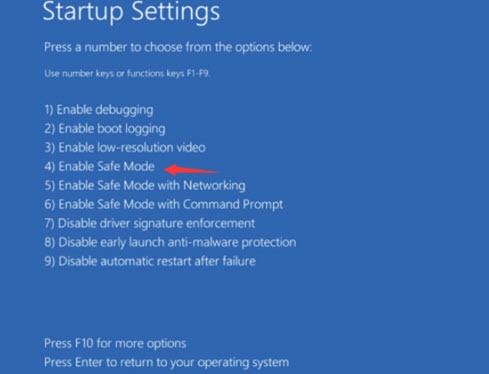
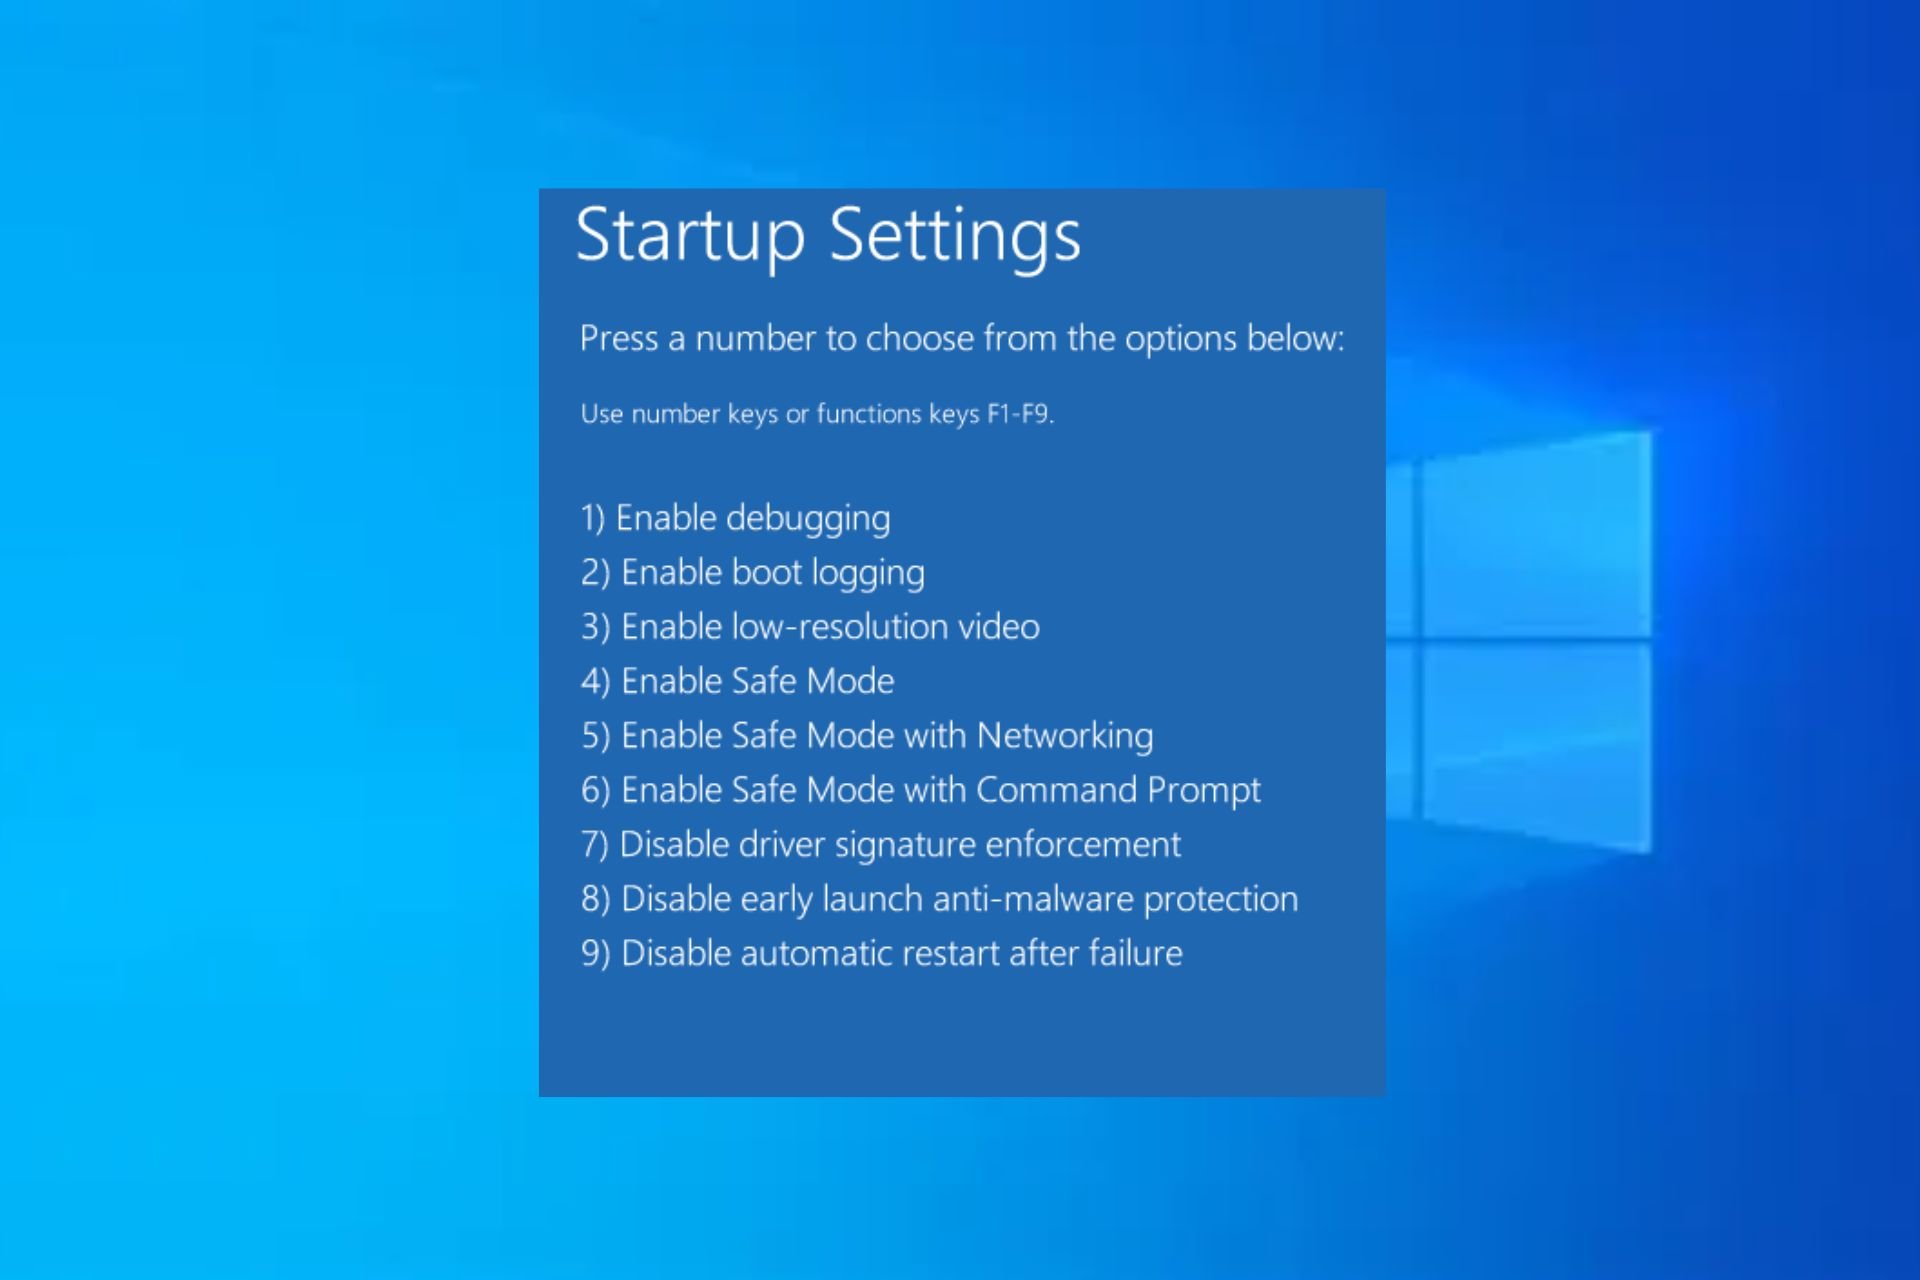
After your PC restarts, you’ll see a list of options. Select 4 or press F4 to start your PC in Safe Mode. Or if you’ll need to use the internet, select 5 or press F5 for Safe Mode with Networking.


When you can’t open Settings to get into safe mode, restart your device from the Windows sign-in screen.
-
On the Windows sign-in screen, press and hold the Shift key while you select Power > Restart .
-
After your PC restarts to the Choose an option screen, select Troubleshoot > Advanced options > Startup Settings > Restart. You may be asked to enter your BitLocker recovery key.
-
After your PC restarts, you’ll see a list of options. Select 4 or F4 to start your PC in safe mode. Or if you’ll need to use the internet, select 5 or F5 for Safe Mode with Networking.
Note: If you’ve encrypted your device, you’ll need your BitLocker key to start in safe mode.
Before you enter safe mode, you need to enter the Windows Recovery Environment (winRE). To do this, you will repeatedly turn your device off, then on:
-
Hold down the power button for 10 seconds to turn off your device.
-
Press the power button again to turn on your device.
-
On the first sign that Windows has started (for example, some devices show the manufacturer’s logo when restarting) hold down the power button for 10 seconds to turn off your device.
-
Press the power button again to turn on your device.
-
When Windows restarts, hold down the power button for 10 seconds to turn off your device.
-
Press the power button again to turn on your device.
-
Allow your device to restart into Automatic Repair, and select Advanced options to enter winRE.
Now that you are in winRE, you will follow these steps to take you to safe mode:
-
On the Choose an option screen, select Troubleshoot > Advanced options > Startup Settings > Restart.
-
After your device restarts, you’ll see a list of options. Select option 5 from the list or press F5 for Safe Mode with Networking.
If you need more info on a black or blank screen error, see Troubleshoot black screen or blank screen errors.
Notes: Restarting your device should be sufficient to exit you from Safe Mode back into normal mode. However, if for some reason your machine is still booting into Safe Mode on its own after restarting, try this:
-
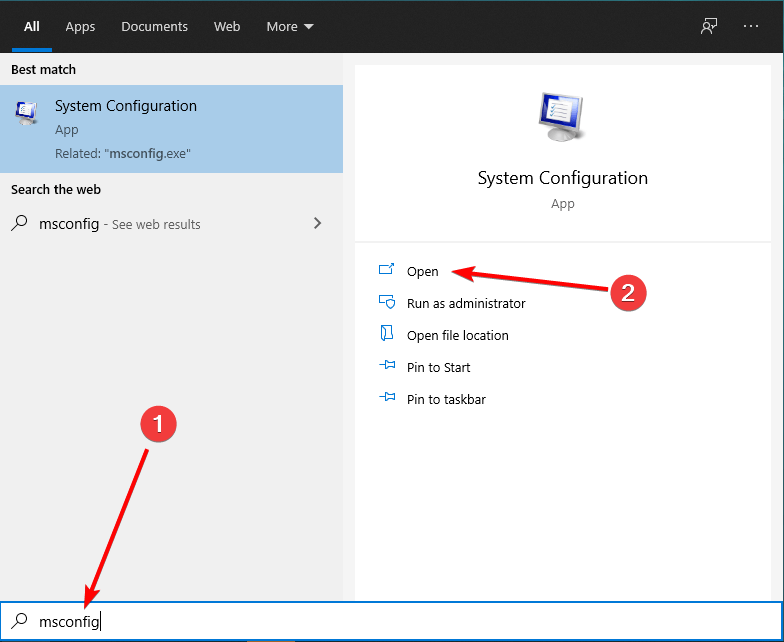
Press the Windows logo key + R.
-
Type msconfig in the Open box and then select OK.
-
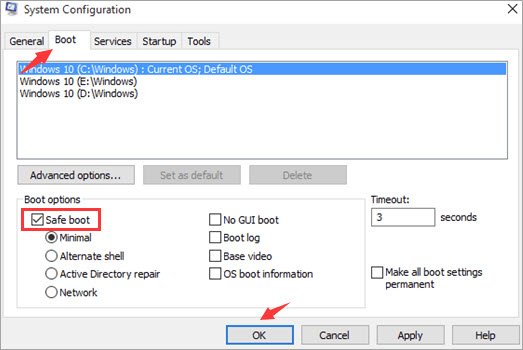
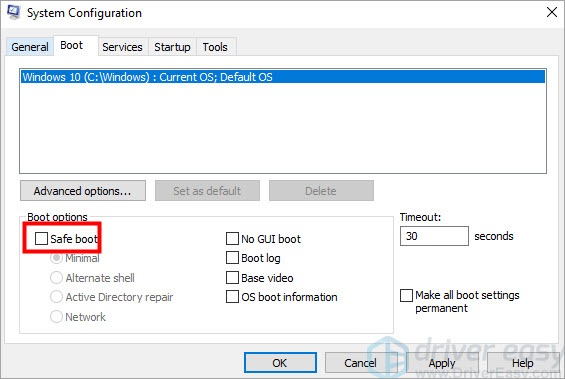
Select the Boot tab.
-
Under Boot options, clear the Safe bootcheckbox.
-
Press Windows logo key + I on your keyboard to open Settings. If that doesn’t work, select the Start button, then select Settings .
-
Select Update & Security > Recovery .
Open Recovery Settings -
Under Advanced startup, select Restart now.
-
After your PC restarts to the Choose an option screen, select Troubleshoot > Advanced options > Startup Settings > Restart. You may be asked to enter your BitLocker recovery key.
-
After your PC restarts, you’ll see a list of options. Select 4 or press F4 to start your PC in Safe Mode. Or if you’ll need to use the internet, select 5 or press F5 for Safe Mode with Networking.
When you can’t open Settings to get into safe mode, restart your device from the Windows sign-in screen.
-
On the Windows sign-in screen, press and hold the Shift key while you select Power > Restart .
-
After your PC restarts to the Choose an option screen, select Troubleshoot > Advanced options > Startup Settings > Restart. You may be asked to enter your BitLocker recovery key.
-
After your PC restarts, you’ll see a list of options. Select 4 or F4 to start your PC in safe mode. Or if you’ll need to use the internet, select 5 or F5 for Safe Mode with Networking.
Note: If you’ve encrypted your device, you’ll need your BitLocker key to start in safe mode.
Before you enter safe mode, you need to enter the Windows Recovery Environment (winRE). To do this, you will repeatedly turn your device off, then on:
-
Hold down the power button for 10 seconds to turn off your device.
-
Press the power button again to turn on your device.
-
On the first sign that Windows has started (for example, some devices show the manufacturer’s logo when restarting) hold down the power button for 10 seconds to turn off your device.
-
Press the power button again to turn on your device.
-
When Windows restarts, hold down the power button for 10 seconds to turn off your device.
-
Press the power button again to turn on your device.
-
Allow your device to fully restart. You will enter winRE.
Now that you are in winRE, you will follow these steps to take you to safe mode:
-
On the Choose an option screen, select Troubleshoot > Advanced options > Startup Settings > Restart.
-
After your device restarts, you’ll see a list of options. Select option 5 from the list or press F5 for Safe Mode with Networking.
If you need more info on a black or blank screen error, see Troubleshoot black or blank screen errors.
Notes: Restarting your device should be sufficient to exit you from Safe Mode back into normal mode. However, if for some reason your machine is still booting into Safe Mode on its own after restarting, try this:
-
Press the Windows logo key + R.
-
Type msconfig in the Open box and then select OK.
-
Select the Boot tab.
-
Under Boot options, clear the Safe bootcheckbox.
Need more help?
Want more options?
Explore subscription benefits, browse training courses, learn how to secure your device, and more.
Communities help you ask and answer questions, give feedback, and hear from experts with rich knowledge.
Find solutions to common problems or get help from a support agent.

Safe Mode is a way to run Windows in its most basic form. It uses only absolutely essential files and drivers.
For example, in Safe Mode, your screen will display only 16 colors and a very low resolution, and you won’t be able to print documents or hear audio. It also won’t load many programs in the background.
Safe Mode is designed to help you troubleshoot computer problems.
Sometimes Windows 10 will automatically start in Safe Mode (e.g. if it has a problem loading normally). But sometimes you’ll need to start it in Safe Mode manually (e.g. if you get a blue screen error every time you start Windows).
This article explains how to manually start Windows 10 in safe mode.
4 ways to start Windows 10 in Safe Mode
- Start Safe Mode by pressing F8 at startup
- Start Safe Mode by turning off your PC 3 times
- Start Safe Mode using the System Configuration tool
- Start Safe Mode from the login screen
- Can’t solve the problem? Try this fix…
Method 1: Start Safe Mode by pressing F8 at startup
IMPORTANT: This method must be manually enabled from within Windows. If you haven't already enabled it, and you can't access Windows to do so, skip to method 2 below.
First, you have to enable the F8 key method
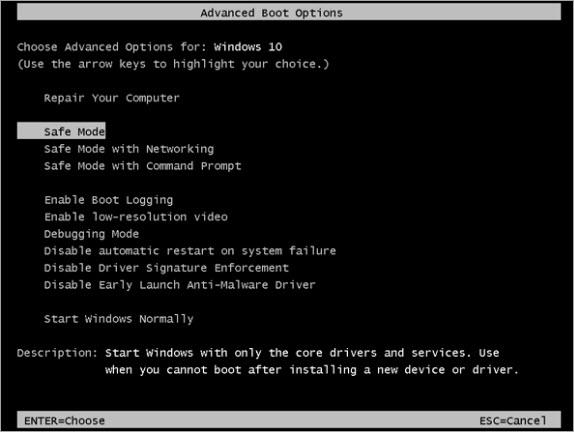
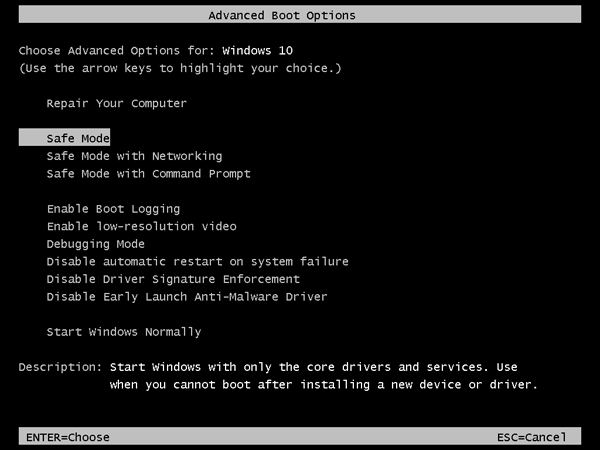
On Windows 7, you could press the F8 key as your computer was booting to access the Advanced Boot Options menu. From there, you could access Safe Mode.
But on Windows 10, the F8 key method doesn’t work by default. You have to manually enable it.
Here’s how to get the F8 key to start Safe Mode in Windows 10:
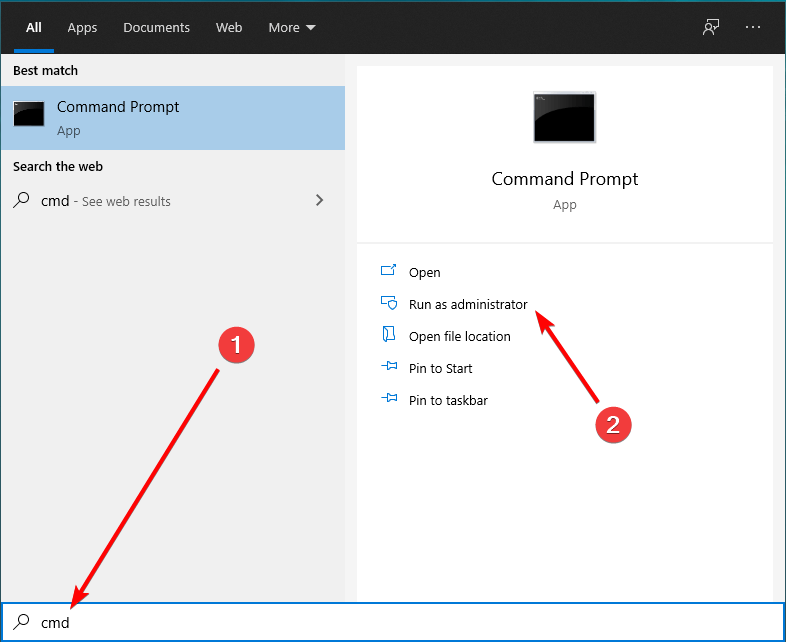
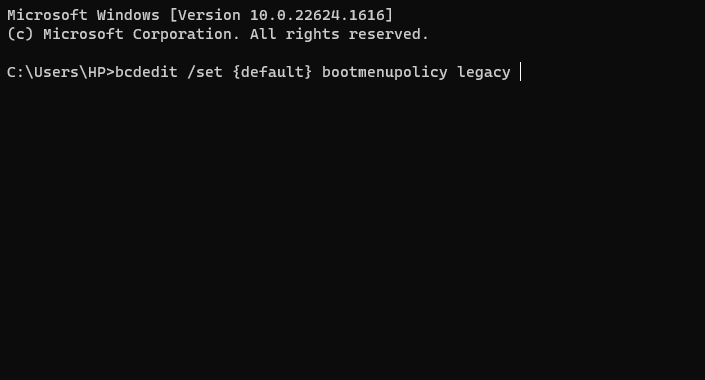
1) Click the Windows start menu and type cmd, then click Run as administrator:
2) Copy this command:
bcdedit /set {default} bootmenupolicy legacy
3) Paste the copied command into the Command Prompt (right-click in the Command Prompt to paste), then press the Enter key on your keyboard.

4) Reboot your PC.
Now you can start Safe Mode using the F8 key
Now that you’ve enabled the F8 method, you can use it to start Safe Mode:
1) Ensure your computer is turned off.
2) Turn your computer on.
3) Before anything appears on your screen, press F8 repeatedly until the Boot Options menu below displays. Then select Safe Mode.
If the Boot Options menu above doesn’t display, and instead Windows just launches normally, it’s likely that you didn’t press F8 early enough.
Method 2: Start Safe Mode by turning off your PC 3 times
If you’re unable to launch Windows, and you haven’t enabled the F8 method above, this is how to start Safe Mode:
1) Ensure your computer is off.
2) Press the power button to turn on your PC, and when you see the small spinning circle of dots that indicates Windows is starting, press and hold the power button until your PC shuts down. You’ll have to hold it for 4-5 seconds.
Do this again, and then again. After you’ve done it 3 times, start your computer again and let it run. It should now go into Automatic Repair mode:

3) Wait for Windows to diagnose your PC:

4) Click Advanced Options:

5) Click Troubleshoot:
6) Click Advanced options:
7) Click Startup Settings:

 Click Restart.
Your computer will restart and present a list of different startup options.
9) On your keyboard, press the number 4 key to enter Safe Mode without internet access or the number 5 key to enter Safe Mode with internet access:

IMPORTANT: If you follow these instructions, Windows will start in Safe Mode every time it restarts, until you undo your changes.
If you’re able to launch Windows normally, you can boot into Safe Mode using the System Configuration tool:
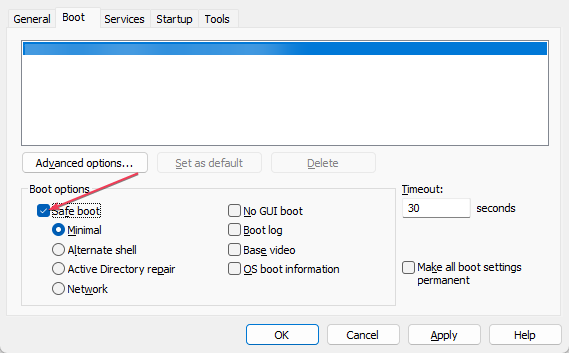
1) Click the Windows start menu and type msconfig, then click Open:
2) Select the Boot tab, then check Safe boot and click OK.
3) When you’re prompted to restart your computer to apply these changes, click Restart and you’ll boot into Safe Mode.

To turn off Safe Mode and go back to normal mode
When you want to return Windows to normal mode, you just have to undo your changes:
1) Click the Windows start menu and type msconfig, then click Open:
2) Select the Boot tab, then UNcheck Safe boot and click OK.
3) When you’re prompted to restart your computer to apply these changes, click Restart and you’ll boot into normal mode.
Method 4: Start Safe Mode from the login screen
If you can boot to the login screen, you can enter Safe Mode from there:
1) On your keyboard, hold down the Shift key.
2) While holding down the Shift key, click the power button at the bottom right of the screen, then select Restart.

The Windows RE (Recovery environment) screen will then display.
3) Click Troubleshoot:
4) Click Advanced options:

5) Click Startup Settings:

6) Click Restart.

Your computer will then restart and another screen opens showing a lot of different startup options.
7) On your keyboard, press the number 4 key to enter Safe Mode without internet access or the number 5 key to enter Safe Mode with internet access:
Can’t solve the problem? Try Driver Easy.
If you couldn’t solve your computer problem in Safe Mode but you can still run Windows normally, give Driver Easy a try.
Many computer problems are caused by outdated device drivers. So updating your drivers should always be one of the first fixes you try.
Driver Easy will automatically update all your device drivers to the latest correct version with just a couple of clicks. It will automatically recognize your system and find the correct drivers for it. You don’t need to know exactly what system your computer is running, you don’t need to risk downloading and installing the wrong driver, and you don’t need to worry about making a mistake when installing.
You can update your drivers automatically with either the FREE or the Pro version of Driver Easy. But with the Pro version it takes just 2 clicks (and you get full support and a 30-day money back guarantee):
1) Download and install Driver Easy.
2) Run Driver Easy and click Scan Now button. Driver Easy will then scan your computer and detect any problem drivers.

3) Click the Update button next to any flagged device to automatically download and install the correct version of that driver (you can do this with the FREE version).
Or click Update All to automatically download and install the correct version of all the drivers that are missing or out of date on your system (this requires the Pro version – you’ll be prompted to upgrade when you click Update All).

Windows 10 Safe Mode is one essential diagnostic method to help you identify and fix possible causes of Windows 10 PC issues. This MiniTool post provides 6 ways with step-by-step guides on how to start Windows 10 in Safe Mode (while booting) to troubleshoot the problems you are having with your Windows 10 PC.
How to Start Windows 10 in Safe Mode – Quick Guide
- Press and hold Shift key and click Start > Power > Restart.
- Click Troubleshoot > Advanced options > Startup Settings > Restart after you enter into Win-RE.
- Press F4, F5, or F6 key to boot into Safe Mode in Windows 10.
Windows 10 PC is not working well? Once the computer is infected with malware, virus or installed some improper drivers, the PC may not behave normally, and freeze or crash occasionally.
Windows 10 Safe Mode may be helpful to help you diagnose and fix the issues of your computer. So, how to start Windows 10 in Safe Mode (while booting)?
Check the 6 ways with detailed guides on how to boot in Safe Mode Windows 10, and how to use Safe Mode to fix issues on Windows 10 PC.
If you suffer some data loss due to errors in Windows 10 PC, an ultimate data recovery guide is also provided in the second part of this tutorial to help you easily recover deleted files for free.
Also read: Learn the best tips and tricks for data recovery hard drive on Windows 11/10/8/7.
Tip: MiniTool Power Data Recovery, professional data recovery software to help recover any deleted/lost files from Windows computer, USB, memory card, external hard drive, SSD, etc. Rescue data in various data loss situations.
MiniTool Power Data Recovery TrialClick to Download100%Clean & Safe
Windows 10 Safe Mode
What Is Safe Mode?
Safe Mode is a built-in diagnostic mode of Windows 10 (7, 8, etc.) computer operating system. If you start Windows 10 PC in Safe Mode, it will only allow starting up basic system programs and services in booting process. A Windows 10 PC booted in Safe Mode is a stripped down version of computer.
Windows 10 Safe Mode is designed to help users to troubleshoot most problems within the OS of Windows 10 PC. It is also widely used to remove malware or ransomware in computer.
How Does Windows 10 Safe Mode Work?
In Windows 10 Safe Mode, the OS will be started with only core components, and many other non-necessary drivers or services such as video drivers, sound will be disabled. Third-party startup programs are also prevented from loading. And this makes it easier to isolate causes of operating system problems.
For instance, you can start Windows 10 in Safe Mode to identify if it’s the Windows 10 default settings and drivers are causing the misbehaving of Windows 10 PC, or to diagnose if it’s the installation of poor-configured software/programs that prevents Windows 10 PC from booting in a normal state. Windows 10 Safe Mode allows you to safely remove bugged programs, solve driver issues, diagnose hardware conflicts, and more.
Besides, sometimes if you can’t start Windows 10 PC normally, but you can still start Windows 10 in Safe Mode. This makes it a good option to troubleshoot problems of PC, e.g. blue screen, black screen because of malware, virus infection, or inferior hardware drivers.
When You Need to Start Windows 10 in Safe Mode
If your Windows 10 PC seems to have some problems, doesn’t function well, keeps crashing/freezing, or occur blue screen/black screen time to time, then you may try to start Windows 10 in Safe Mode to fix some Windows 10 issues.
The Three Types of Windows 10 Safe Mode
Windows 10 offers three types of Safe Mode. You can choose to boot Windows 10 in any type of Safe Mode based on your own need.

- Enable Safe Mode: This is the most basic type of Safe Mode. It starts Windows 10 by loading the most essential settings and services of the system. Any other unnecessary programs, drivers or services won’t be loaded. This puts the PC in a safer status by cutting off the possible malware or virus that may move through third-party software, drivers, or local networks.
- Enable Safe Mode with Networking: If you choose to start Windows 10 in safe mode with networking, then it will add other necessary drivers and services that are required to access the networks, while keeping the same set of drivers and services of Safe Mode. This is not as safe as Safe Mode, but it’s useful when you need to access the Internet.
- Enable Safe Mode with Command Prompt: If you choose to boot Windows 10 in Safe Mode with Command Prompt, then your computer will display a big Command Prompt window. Professionals can easily use command lines to fix related issues of Windows 10 PC. However, if you don’t know much about CMD, it’s not advised to choose this option. Both Safe Mode and Safe Mode with Command Prompt are not connected to network.
Let’s cut to chase, check how to start Windows 10 in Safe Mode in these 6 ways, namely, through Settings, msconfig (System Configuration), Start menu, F8 key, from sign-in screen, black/blank screen.
How to Start Windows 10 in Safe Mode – 6 Ways
- Start Windows 10 in Safe Mode from Settings
- Boot Windows 10 into Safe Mode through msconfig
- Start Windows 10 in Safe Mode While Booting from Start Menu
- Start Windows 10 PC in Safe Mode from Login Screen
- Start Windows 10 in Safe Mode from a Black/Blank Screen
- Boot in Safe Mode Windows 10 While Booting through F8 Key
Quick Video Guide:
1. How to Start Windows 10 in Safe Mode from Settings
If you’ve already logged into Windows 10 computer, then you can boot into Safe Mode in Windows 10 with Advanced Startup tool.
Step 1 – Open Windows Settings
You can click Start menu and click Settings on Windows 10 PC. Or press Windows and I keys on the keyboard to open Windows 10 Settings.
Step 2 – Enter into Startup Settings Window
Then you can click Update & Security, choose Recovery option from the left panel, and click Restart now under Advanced startup to enter Windows RE (Recovery Environment).
Next you can click Troubleshoot -> Advanced options -> Startup Settings -> Restart.
Step 3 – Choose a Safe Mode Option
You can now choose preferred Safe Mode option to start Windows 10 in Safe Mode.
Press 4 or F4 on the keyboard to start Windows 10 PC in Safe Mode; press 5 or F5 to boot Windows 10 in Safe Mode with Networking; press 6 or F6 to access Windows 10 in Safe Mode with Command Prompt.
2. How to Start Windows 10 in Safe Mode through msconfig
If you can enter into Windows 10 system, you can also try another way to boot into Safe Mode in Windows 10, namely, using Windows System Configuration (msconfig.exe) tool.
Step 1 – Open Windows System Configuration Tool
You can press Windows + R key, input msconfig in Windows RUN window and hit Enter to open the System Configuration utility.
Step 2 – Select a Safe Boot Option
Then you can click Boot tab. Under Boot options, you can choose a preferred Safe boot option based on your own need.
- Minimal equals to Safe Mode.
- Alternate shell refers to Safe Mode with Command Prompt.
- Network refers to Safe Mode with Networking.
- Active Directory repair option is used to repair the Active Directory server.

Generally, you can choose either Minimal or Network option to start Windows 10 in Safe Mode to troubleshoot problems in Windows 10 system.
Tip: Booting Windows 10 in Safe Mode through msconfig, your computer will start in Safe Mode each time you start your Windows 10 PC. To get out of Safe Mode, you can check the part of “How to get out of Safe Mode Windows 10” later in this post.
If you can log in Windows 10, you can also boot into Safe Mode in Windows 10 by using Start menu.
Step 1. You can press and hold Shift key on the keyboard, and click Start menu on Windows 10 at the same time. Then click the Power icon in the Start menu and choose Restart.

Step 2. After you get into the Choose an option screen, you can click Troubleshoot -> Advanced options -> Startup Settings -> Restart, to enter into the Startup Settings window.
Step 3. Next press F4, F5, or F6 to choose a desired Safe Mode option to start Windows 10 in Safe Mode while booting.
4. How to Start Windows 10 in Safe Mode While Booting from Login Screen
If you can’t log in Windows 10, but you can enter into the Sign-in screen, you can also enter Safe Mode in Windows 10 from the login screen by using Shift + Restart.
Step 1. You can restart the Windows 10 PC. When you see the Sign-in screen, you can also press the Shift key and don’t release, and click the Power icon at the bottom-right and choose Restart.

Step 2. After you enter into the WinRE screen, click as follows: Troubleshoot -> Advanced options -> Startup Settings -> Restart.
Step 3. After the Windows 10 PC restarts, you can see a list of Windows startup options. You can then press F4 to boot Windows 10 in Safe Mode, or press F5 to start in Safe Mode in Windows 10 with Networking.
5. How to Start Windows 10 in Safe Mode from a Black/Blank Screen
If your Windows 10 PC can’t start normally, you can also choose to boot Windows 10 in Safe Mode to troubleshoot problems there.
To boot your Windows 10 PC in Safe Mode from a black or blank screen, you need to enter into the Windows Recovery Environment (WinRE) at first by turning off and on the PC 3 times.
Step 1. Enter into WinRE
You can press and hold the Power button on your PC for 10 seconds to turn off the computer, then turn on the PC by pressing the Power button again. When the computer is going to boot the operating system (e.g., the computer manufacturer’s logo appears when restarting), rightly press the Power button again for about 10 seconds to turn off the device.
Follow the same process to turn off and on your Windows 10 PC 3 times. When the PC is turned on for the third time, the computer should enter into the Automatic Repair window now. If not, follow the same steps until the WinRE screen shows.
If the Automatic Repair couldn’t repair your Windows 10 PC problems, you can click Advanced options to enter into Windows Recovery Environment screen to try other options to repair PC.
Step 2. Enter into Startup Settings
In the WinRE window, you can then enter into the Startup Settings window by clicking Troubleshoot -> Advanced options -> Startup Settings -> Restart.
Step 3. Start Windows 10 in Safe Mode with Networking
Then you can press F5 to start Windows 10 PC in Safe Mode with Networking. And this is a suggested option when you need to troubleshoot a black or blank computer screen. You can search on the Internet for solutions to the issues.
6. How to Boot in Safe Mode Windows 10 While Booting through F8 Key
In Windows 7, you can continuously press F8 key to enter into Advanced options window before logging into Windows. And we know that this method isn’t working in Windows 10 and 8 because Windows 10/8 has much faster booting speed.
However, you can still make F8 work again in Windows 10 with the BCD (Boot Configuration Data) Edit command.
Step 1. Open Administrator Command Prompt window
You can press Windows key and R key on computer keyboard at the same time to open RUN window. Then type cmd in the box, and press Ctrl + Shift + Enter key at the same time to run the Administrator Command Prompt window. Please do not simply click OK, because it won’t open the Command Prompt (Admin) window.

Step 2. Reactivate F8 key function
Then you can type this command line: bcdedit /set {default} bootmenupolicy legacy. And hit Enter key.

Step 3. Reboot Windows 10 PC in Safe Mode
Next you can close the Command Prompt window, and restart your PC. Now before the Windows logo appears, you can constantly press F8 to enter into the Advanced Boot Options screen.
You can then use the arrow keys on the keyboard to choose to start Windows 10 in Safe Mode, Safe Mode with Networking, or Safe Mode with Command Prompt.
Tip: Please be noted that you can only reactivate F8 function in Windows 10 on condition that the Windows PC can start normally. If you can’t access Windows 10 PC, you should try other ways in this post to boot in Safe Mode Windows 10.
If you want to get rid of the F8 key function in Windows 10, you can follow the same operation to get into the Administrator Command Prompt window, and input this command line: bcdedit /set {default} bootmenupolicy standard. Hit Enter and restart computer again.

How to Get Out of Safe Mode Windows 10
To get out of Safe Mode in Windows 10, you can follow the steps below realize it.
Step 1. You can press Windows and R key on the keyboard. And then input msconfig and hit Enter again to open the System Configuration window.
Step 2. Tap Boot icon and uncheck the Safe boot option, and click OK. Then your Windows 10 computer will boot in normal screen next time you start the PC.

Click to Tweet
How to Use Safe Mode to Fix Your Windows 10 PC Issues
Starting Windows 10 PC in Safe Mode can help you fix some problems of your computer.
1. Recover Lost Data/Files in PC
If your computer is infected by malware or virus, or has a system crash or hard drive error, you may lose some important data and files, and can’t start Windows 10 normally.
After you access Windows 10 in Safe Mode, you can use the best free data recovery software like MiniTool Power Data Recovery to easily recover deleted files or lost data in 3 simple steps.
MiniTool Power Data Recovery is a 100% clean data recovery tool which is compatible with Windows 10/8/7.
You can use this software to recover lost or mistakenly deleted files from PC hard drive, external hard drive, SSD, USB flash drive, pen drive, SD card (from Android, cameras, etc.), and more, under various kinds of data loss situations.
Download and install MiniTool Power Data Recovery on Windows 10/8/7, and follow the detailed guide below to recover lost data and files with ease.
MiniTool Power Data Recovery TrialClick to Download100%Clean & Safe
Step 1 – Run MiniTool Power Data Recovery
Launch MiniTool Power Data Recovery to enter into the main UI. All the detected drives and devices on PC are displayed.
Step 2 – Scan for Lost Data on PC
Choose one partition under Logical Drives and click Scan button, and it will automatically scan for all lost, deleted and normal files on this partition. If you don’t know which partition contains the deleted/lost files, you can click Devices tab and choose the whole disk to scan.
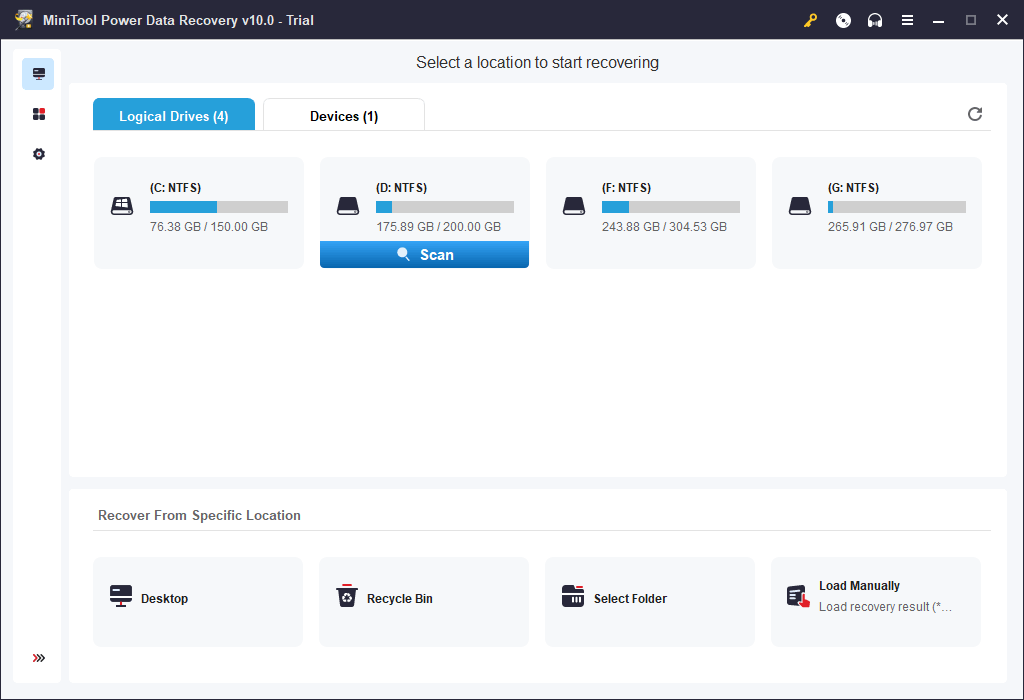
Step 3 – Preview and save lost files
After the scanning is finished, you can browse from the scan result to find your needed files, and click Save button to store the wanted files to another drive or partition, or external hard drive, USB drive, etc.
MiniTool Power Data Recovery allows you to preview up to 70 types of files.
Show Lost Files, Find, Filter functions are available to help you quickly find the wanted files.

Tip: If your Windows 10 PC can’t boot normally and your computer haven’t installed this software before, it’s advised to start Windows 10 in Safe Mode with Networking. Thus, you can download and install MiniTool Power Data Recovery Free on your PC in Safe Mode to recover lost data in PC.
If your computer can’t boot or even can’t start in Safe Mode, you can still recover data and files in Windows 10 PC with MiniTool Power Data Recovery. Related guide: How to Recover Data When PC Won’t Boot
2. Remove Malware or Virus
If your computer is crashed or stops working because of malware or virus infection, you may boot Windows 10 in Safe Mode to scan and remove malware/virus.
You can also use Windows Defender in Windows 10 to scan and kill the malware and virus in PC. If you don’t have an antivirus program in your Windows 10 PC, it’s also possible to download and install one in Safe Mode only if you start Windows 10 in safe mode with Networking.
3. Uninstall Improper Software
If your Windows 10 computer can’t normally start or work because of some recently installed programs which may have conflicted drivers, you can uninstall the suspicious software from the Control Panel in Windows 10 Safe Mode. Then restart your computer to see if the problem is fixed.
4. Perform System Restore
If your Windows 10 computer runs unstable recently, you can perform a System Restore to restore the system to an earlier state which has a good configuration. But what if Windows 10 System Restore stucks in normal Windows 10 start mode? Then you may try to start Windows 10 in Safe Mode to run a successful System Restore without crashing.
Beyond above, you can also boot Windows 10 in Safe Mode to fix Windows 10 black screen, blue screen issues like the Kernel Data Inpage Error, and more.
Click to Tweet
Bottom Line
This post illustrates 6 ways for how to start Windows 10 in Safe Mode (while booting) with step-by-step guides. If your computer doesn’t run well, can’t boot, or has some other problems, you may try to start Windows 10 in Safe Mode to fix issues of your Windows 10 computer, and recover lost data and files with MiniTool Power Data Recovery Free. Besides, you can also use this MiniTool software to perform RAID data recovery, SD card data recovery, and SSD data recovery.
If you still have problems about how to boot in Safe Mode Windows 10, please contact [email protected].
Windows 10 Safe Mode FAQ
How to start Windows 10 in Safe Mode while booting?
This tutorial introduces 6 ways with detailed guides to allow you to start Windows 10 in Safe Mode while booting. You can try one of them.
How do I start Win 10 in Safe Mode?
You can check the 6 ways in this post to easily enter in Safe Mode on Windows 10.
How do I boot up in Safe Mode?
You can boot into Safe Mode on Windows 10 via Settings, msconfig, Start Menu, Login screen, F8 key, etc. The detailed instructions are included in this tutorial.
Can I boot in Safe Mode from BIOS?
You can press F8 key during booting to enter into Windows Advanced Boot Options screen, and choose a Safe Mode option to boot Windows 10 into Safe Mode.
Restart PC into Windows RE to enable Safe Mode
by Vladimir Popescu
Being an artist his entire life while also playing handball at a professional level, Vladimir has also developed a passion for all things computer-related. With an innate fascination… read more
Updated on
- If you’re experiencing certain issues with your Windows PC, you can troubleshoot the issues by booting into Safe Mode.
- You can tweak your System Configuration to force start Windows 10 in Safe Mode.
- If you’re unable to get past the Login screen, follow the instructions provided in this article to access Safe Mode
Safe Mode boots Windows in a basic state using a minimal collection of files and drivers. The Safe Mode option exists to help you troubleshoot Windows.
If you do not know how to enter Safe Mode Windows 10, we will take you through some of the different methods on how to start Windows 10 in Safe Mode.
- What does it mean to start in Safe Mode?
- How do I boot in Safe Mode Windows 10?
- 1. Use the Settings app
- 2. Enable the F8 Key to enter Safe Mode
- 3. Turn off your computer 3 times to enter Safe Mode
- 4. Use the System Configuration tool
- 5. Enter Safe Mode from the Login Screen
What does it mean to start in Safe Mode?
Starting in Safe Mode simply means booting the operating system (OS) with a limited set of drivers, services, and applications. When Windows starts normally, it loads all the drivers and services required to run the operating system and all the software installed on it.
However, some of these drivers and services may cause problems and prevent Windows from starting properly. So, Safe Mode allows you to troubleshoot these issues by starting Windows with only the minimum required drivers and services.
How we test, review and rate?
We have worked for the past 6 months on building a new review system on how we produce content. Using it, we have subsequently redone most of our articles to provide actual hands-on expertise on the guides we made.
For more details you can read how we test, review, and rate at WindowsReport.
Since Windows runs a basic set of drivers and services with minimal functionality, that means some features and programs may not work. So, the Safe Mode in Windows 10 PC is a stripped-down version of your computer.
How do I boot in Safe Mode Windows 10?
1. Use the Settings app
- Press the Windows + I keys to open the Settings app.
- Click on Update & Security on the right pane.

- Next, select Recovery on the left pane. Under Advanced Startup, click Restart Now.

- Once the computer restarts, on the Choose an Option screen, select Troubleshoot

- Then click on Advanced Options. Choose Startup Settings.

- Select F4 to start the computer in Safe Mode and click on Restart.


By using the Windows Settings app, you can enter the start Windows 10 in safe mode while booting.
2. Enable the F8 Key to enter Safe Mode
- Left-click the Start button and type cmd in the Search box.
- Right-click on Command Prompt from the search results and select Run as administrator on the right pane.
- Next, paste the following command in the Command Prompt Window and press Enter:
bcdedit /set {default} bootmenupolicy legacy
- Now, turn off your computer and on it again.
- Before anything appears on the screen, press F8 repeatedly till the Boot options appear on your screen.

- Select Safe Mode from the menu.

If the Boot options don’t display, and your Windows launches normally, you probably didn’t press the F8 key early.
3. Turn off your computer 3 times to enter Safe Mode
- Shut down your computer. Press the Power button to turn it back on.
- Once the computer is loading, press and hold the Power button for 4-5 seconds until your PC shuts down.
- Repeat the same process 3 times.
- Now, start your computer again and let it run. It should now go into Automatic Repair mode. Wait for Windows to diagnose your PC and choose Advanced Options.

- Next, click on Troubleshoot.
- Then, click on Advanced options and click on Startup settings.
- Press 4 to Enable Safe mode or press 5 for Safe mode with Networking.

By turning off your computer 3 times, your computer is made to believe there is an error that needs to be fixed.
- Protected: How to Download Video from Facebook on PC
- Microsoft Authenticator App: Download & Install
- How to Change the Icon Size on Windows 10
4. Use the System Configuration tool
- Left-click the Start button and type msconfig in the Search box and select System Configuration utility.
- Navigate to the Boot tab, then check the box with Safe boot and click OK.

- Once prompted, click on the Restart button to enter Safe mode.
To disable this feature, you can follow the same steps and uncheck the Safe boot box and proceed to restart your PC.
5. Enter Safe Mode from the Login Screen
- Once in the Login screen, hold down your Shift key and click the Power button at the bottom-right side of the screen. Then, select Restart.
- The Windows Recovery (WinRE) screen will now display. Click on Troubleshoot.
- Click on Advanced option and click on Startup settings.
- Now, click on the Restart button.
- Press 4 to Enable Safe mode or press 5 for Safe mode with Networking.
If you’re able to boot your PC to the login screen, follow the steps above to enter safe mode Windows 10.
And that’s it on how to start Windows 10 in Safe Mode. Hopefully, you should be able to boot your PC to Safe Mode using any of the methods provided.
Alternatively, you can explore our detailed guide to know how to add safe mode to the boot menu on Windows 10.
If you have any questions or suggestions, do not hesitate to use the comments section below.
![]()
Microsoft is the world’s leading desktop OS development firm with a market share greater than all other desktop OS in the world. The latest release of Windows OS by Microsoft is Windows 10 and it has definitely made its way into a competitive market with distinction. Windows 10 is the successor of the previous version of Windows i.e. Windows 8 and includes some major changes in GUI.
Entering the Safe Mode in previous versions of Windows excluding Windows 8 was a lot easier as compared to the later builds i.e. Windows 8 and Windows 10. By pressing the F8 button at the start-up on previous versions of Windows, users could enter the Safe Mode without any problem but with fast booting feature inside Windows 8 and Windows 10, it is practically impossible to interrupt the booting process and F8 is no more helpful.
So, this guide will assist you through towards entering the safe mode inside Windows 10.
Method # 1: Using “Shift (Button) + Restart (Option)” Combination
This method is a lot easier as compared to others. Using a combination can let you enter into the Safe Mode. Follow the steps below to enter the Safe Mode using a combination.
1. Go to Start Menu and click on the Power button located on the bottom left pane.

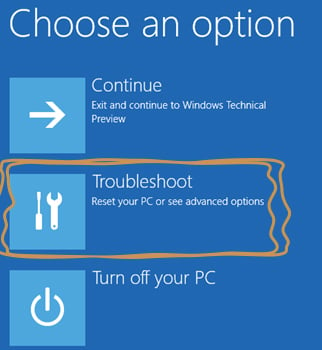
2. While pressing the Shift key on the keyboard, click on the Restart option using the left mouse button. It would interrupt the normal start of PC by displaying a list of options to select from. Select Troubleshoot from the options and it would take you to the next screen.
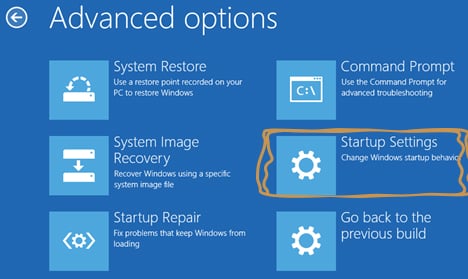
3. On the next screen, click on Advanced Options highlighted in the image below.

4. Inside the Advanced options screen, select the Startup Settings and restart your PC using the button below.
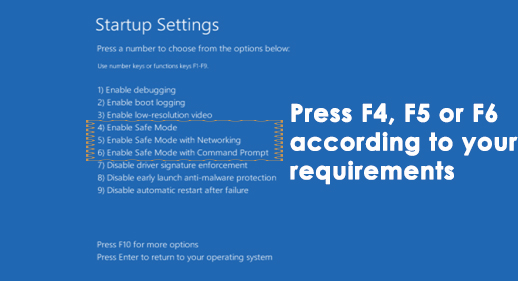
5. After the PC is rebooted, you will find a number of options to select from a list using F1 – F9 function keys. If you want to boot the computer into Safe Mode, press the F4, F5 or F6 function keys depending on your requirements. Now, your PC will boot in Safe Mode.
Method # 2: Using System Configuration Tool
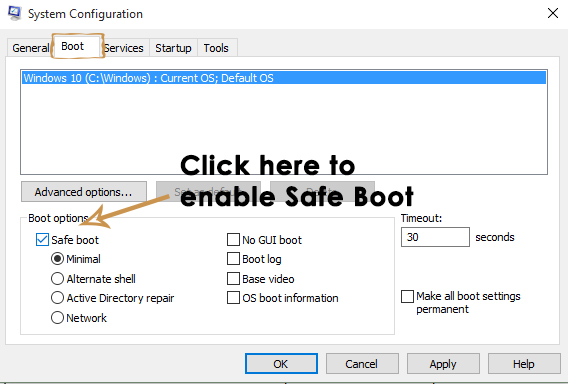
This is the easiest of all methods. The system configuration tool is provided inside Windows 10 to help the users to change the configuration of Windows according to their requirements. In order to boot your Windows in Safe Mode using SCT, follow the steps below.
1. Open the Run window by pressing Win + R on the keyboard and type msconfig inside the text field. Press the Enter key to execute the program. You can also open it by searching System Configuration Tool inside cortana.
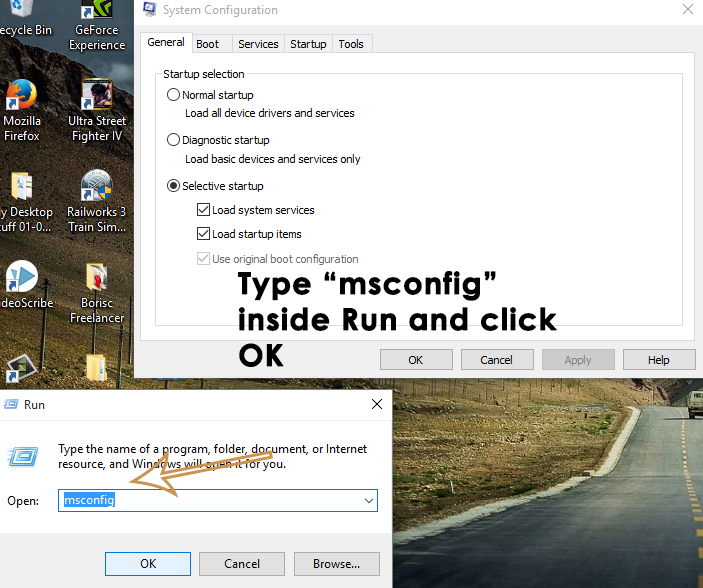
2. Navigate to the Boot tab and check the box labeled as Safe boot inside Boot options. Click on Apply and OK button afterwards. Click on the Restart button if you want to restart your PC at the same exact time. You can also restart your PC manually by clicking on Exit without restart
Method # 3: Using a Recovery Drive to Boot Windows
A recovery drive is a resource that helps the users to boot their PCs if something bad happens to the Windows. Windows 10 has introduced a unique app called Recovery Drive app that lets the users create a recovery inside a USB. This recovery USB is then used to boot the Windows into Safe Mode. To create a USB recovery drive, follow the instructions below.
1. Search for Recovery Drive using Cortana and run it as an administrator. Connect the USB dongle and click Next button in order to create a recovery drive.

2. Boot your computer with this recovery drive and follow the instructions of Method #1 in order to boot the system in Safe Mode.
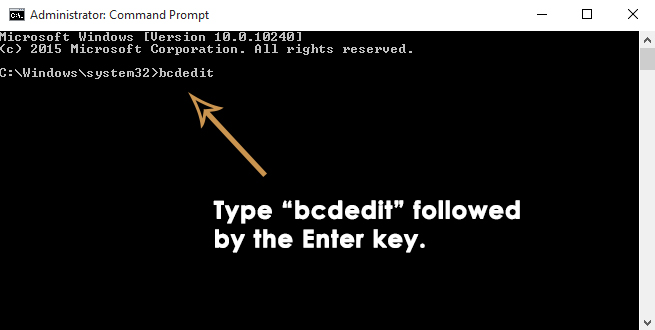
Method # 4: Starting Safe Mode at Startup Using Command Prompt
If you can’t start the safe mode using above methods as your PC doesn’t let you boot Windows, then you might need to start it up in safe mode using Command Prompt. Follow the steps below to enter into safe mode at startup using command prompt.
1. Open an elevated command prompt by using a Windows 10 Installation Media. Boot the PC using Windows 10 bootable USB and inside the Setup, choose Repair your computer.

2. On the next screen, follow the instructions mentioned in Method # 1 to open the Advanced Options. Click on Command Prompt and enter your password credentials in order to boot PC using a command prompt.
3. When inside the Command prompt, type bcdedit followed by the Enter key
4. After hitting Enter key, it would display a minimal list of options organized into sections. At the top, you will see Windows Boot Manager Check for the Default option and note of its identifier that will be located to the right. In my case, it is set to {current}.
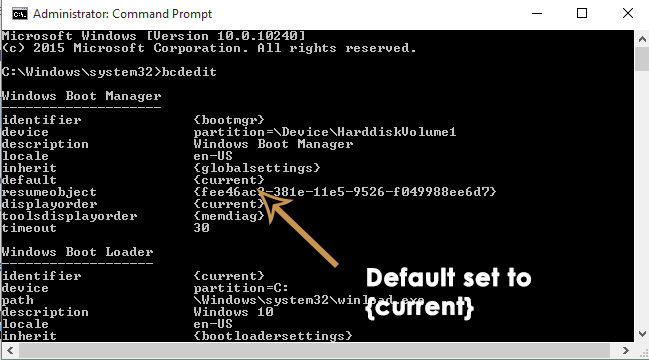
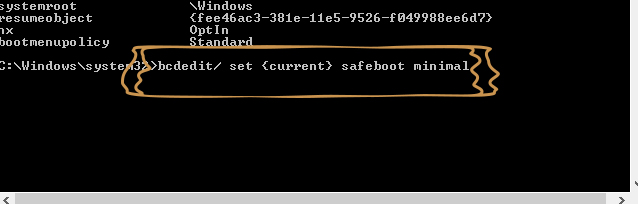
5. To boot Windows 10 in safe mode, type the following line inside the command prompt and hit Enter
bcdedit /set {current} safeboot minimal
Note: In the above command, {current} is an identifier which you noted before.
If you want to start Windows 10 in Safe Mode with Networking, just replace the safeboot minimal with safeboot network in the above command.
Method # 5: Enable legacy Advanced Boot Options to Use “F8” Key
You can set the old F8 key method that was used to interrupt the normal startup of Windows. So, follow the instructions to enable legacy Advanced Boot Options.
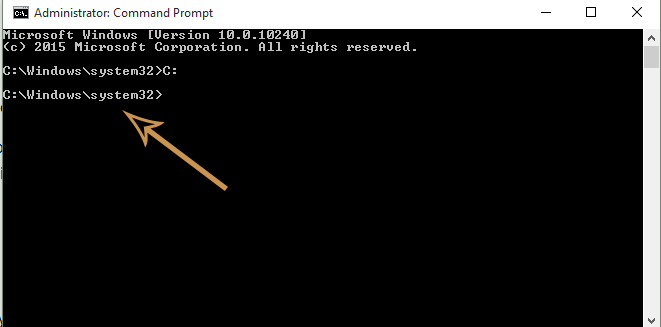
1. Open the command prompt by following instructions inside Method # 4 Type C: inside the command prompt and hit Enter key.
2. Inside the command prompt, copy and paste the following command to execute. Press Enter
bcdedit /set {default} bootmenupolicy legacy

3. Now, make sure your Hard Drive is set at first position inside Boot order (BIOS) to load the Windows from Hard Drive.
4. Restart your PC and press F8 key repeatedly until it boots you inside Advanced Options. Select the Safe Mode using the arrow keys on your keyboard and that’s all you need to do.