Windows 10 gives you many configuration options directly within the operating system, but on every laptop or desktop, there are some settings you can only change in the BIOS (basic input/output system). This software is built right into your computer’s motherboard, and it controls everything from the boot order of your drives to preboot security options to whether the Fn key on your keyboard activates a function key or a media control.
However, since the BIOS is a pre-boot environment, you can’t access it directly from within Windows. On some older computers (or those deliberately set to boot slowly), you can hit a function key such as F1 or F2 at power-on to enter the BIOS.
However, most computers made in the past four years boot Windows 10 far too quickly to listen for a keypress at startup. To access your BIOS on a Windows 10 machine, you must follow these steps.
How to enter the BIOS on a Windows 10 PC
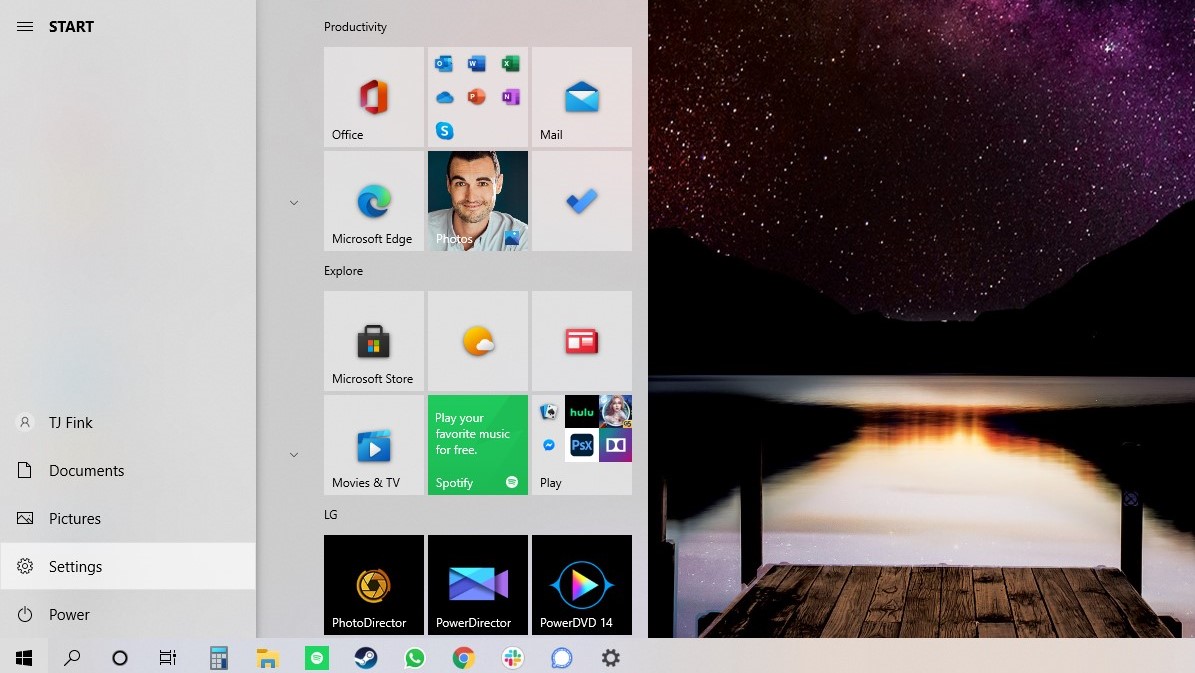
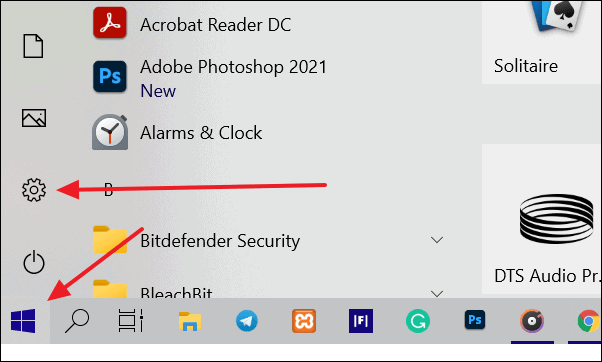
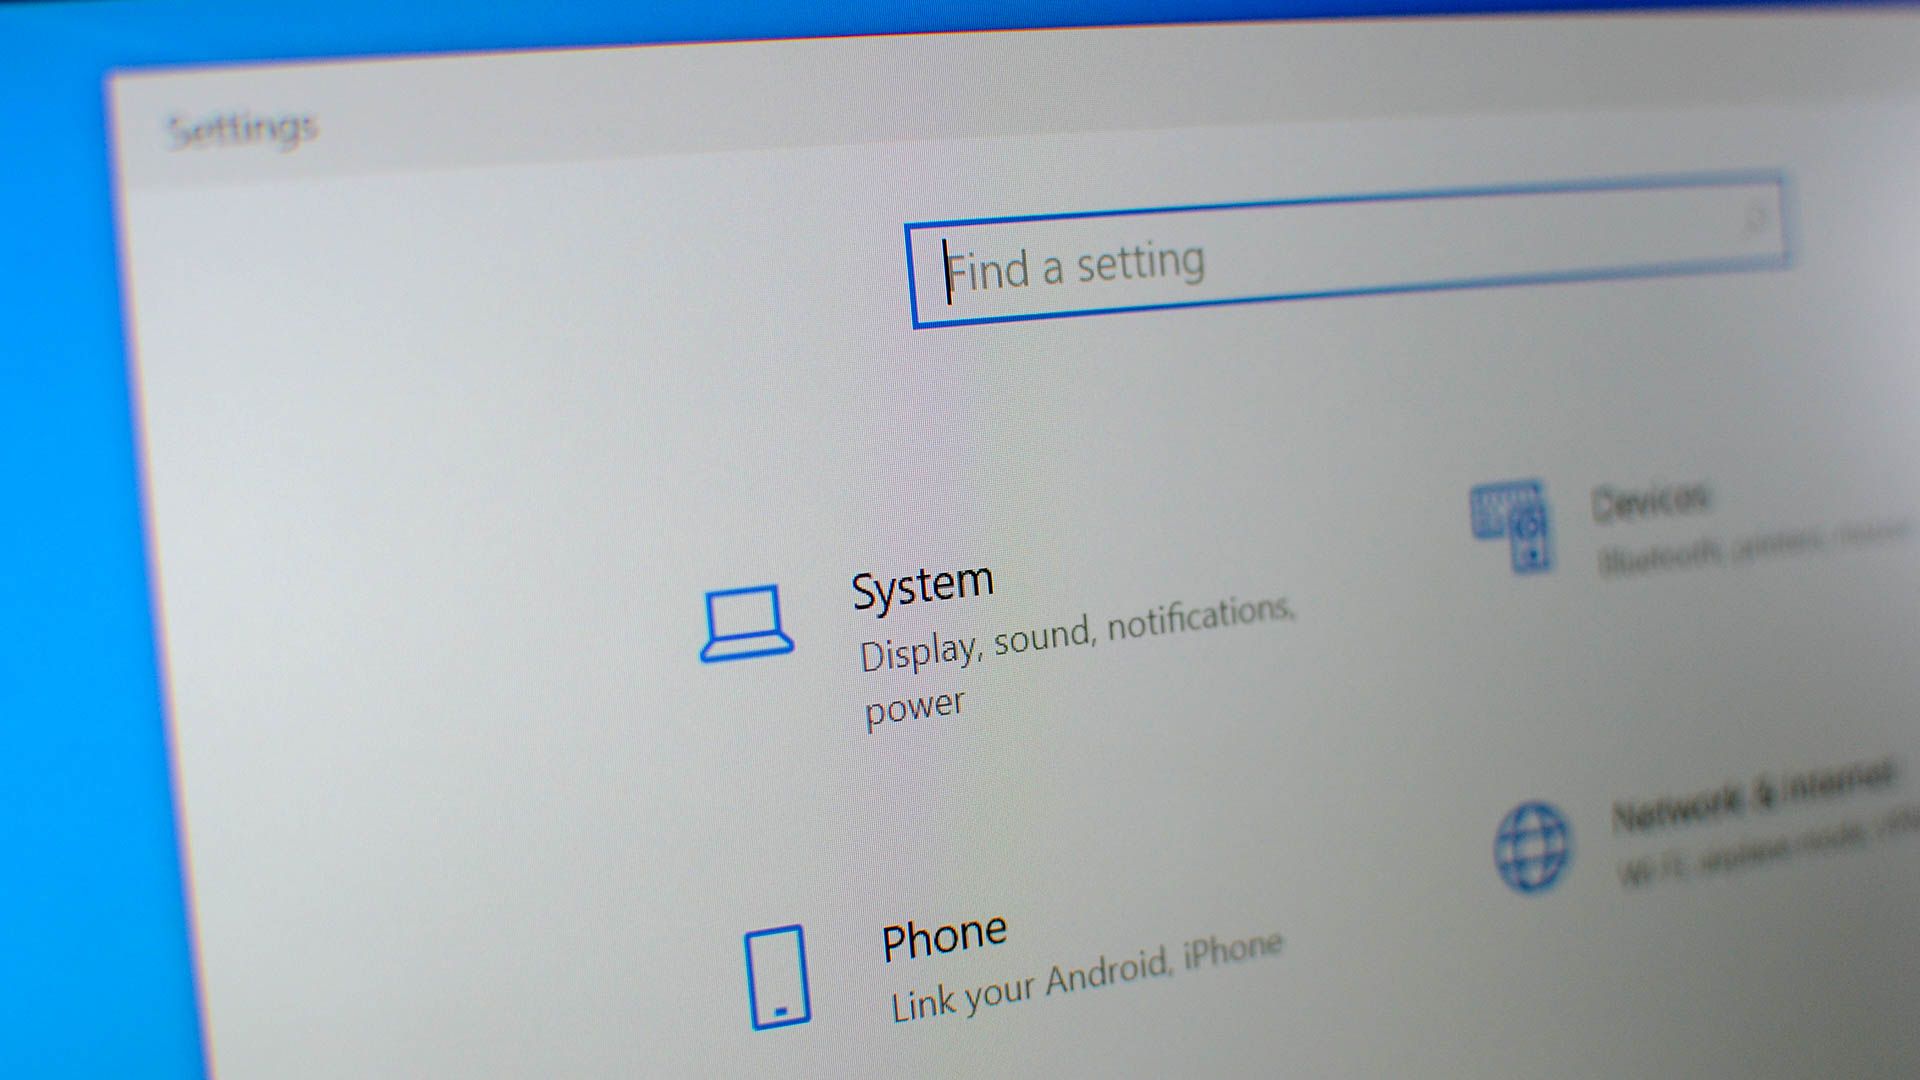
1. Navigate to Settings. You can get there by clicking the gear icon on the Start menu.
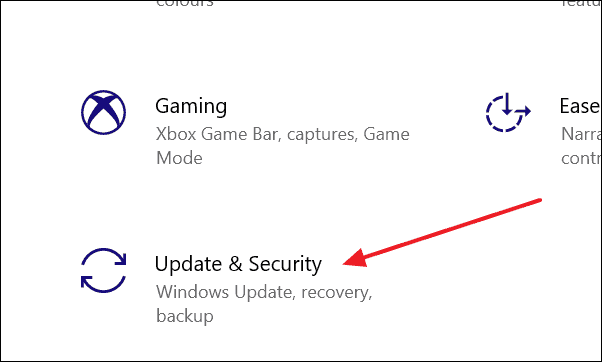
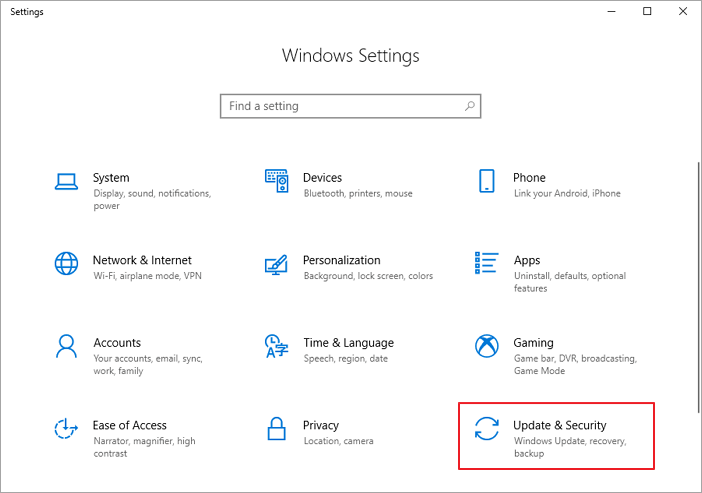
2. Select Update & Security.

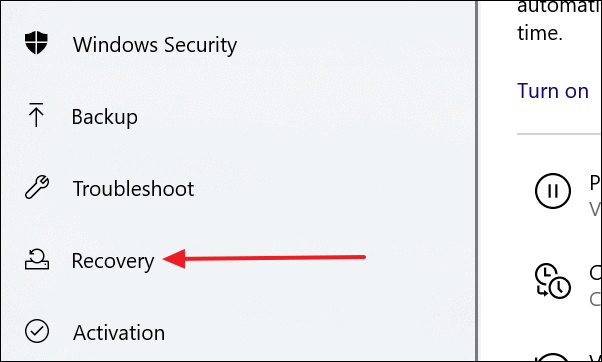
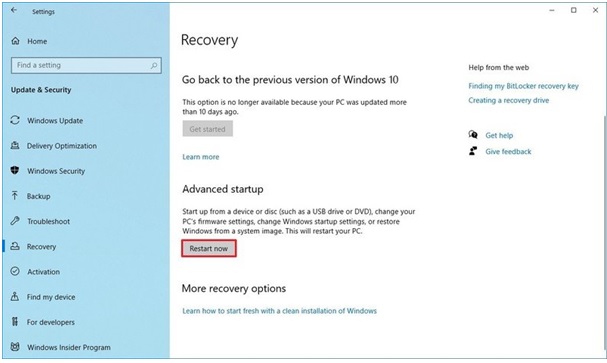
3. Select Recovery from the left menu.
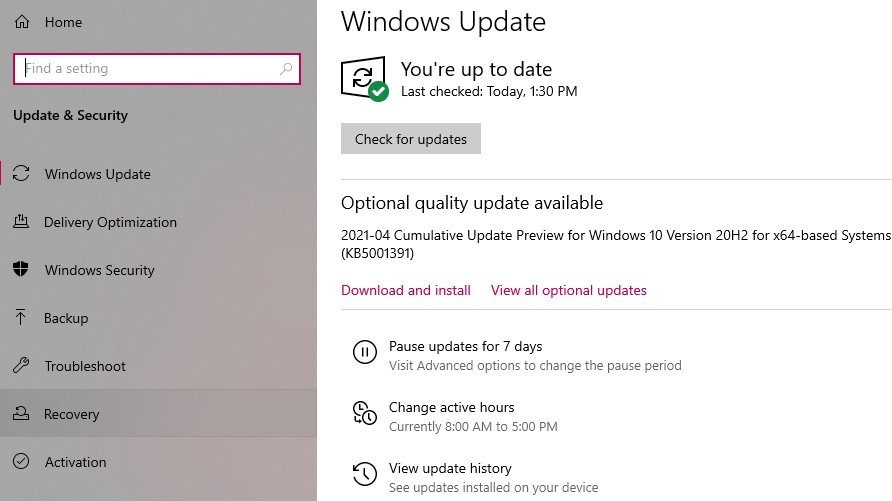
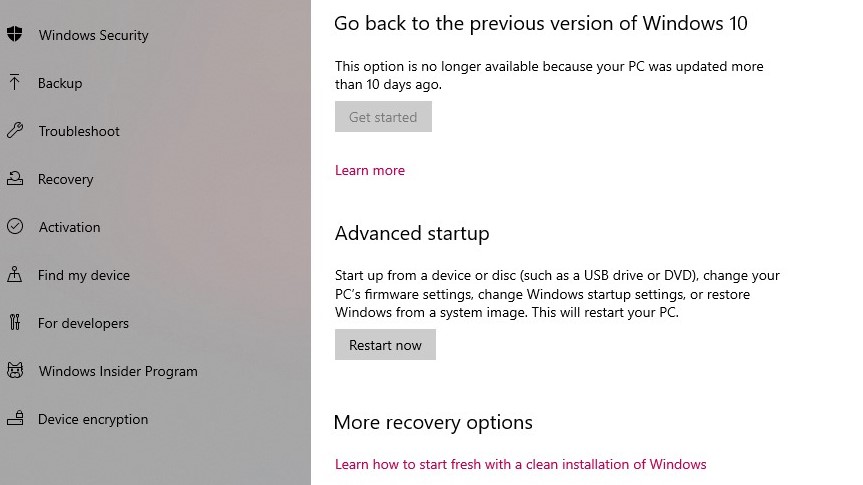
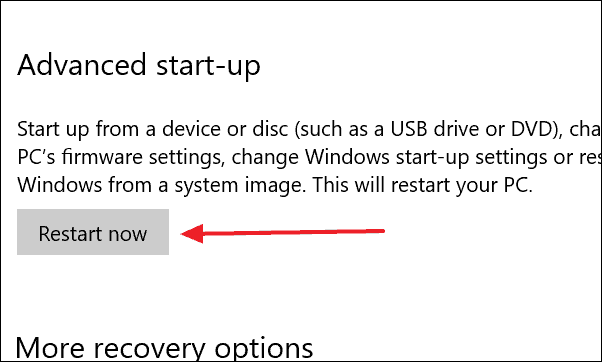
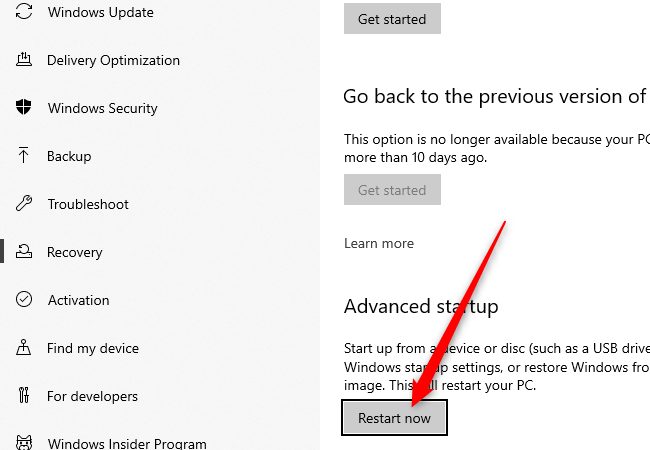
4. Click Restart Now under Advanced startup. The computer will reboot to a special menu.
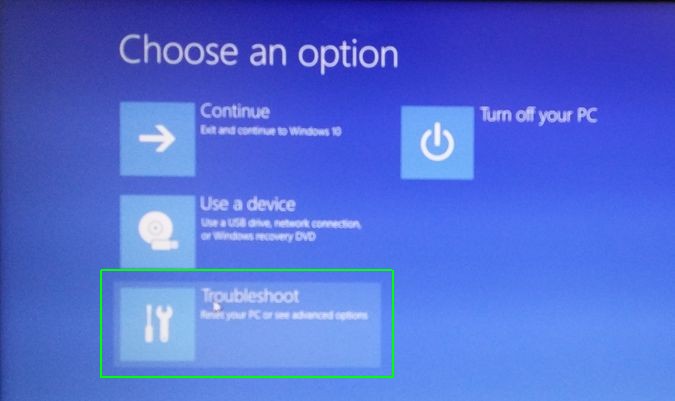
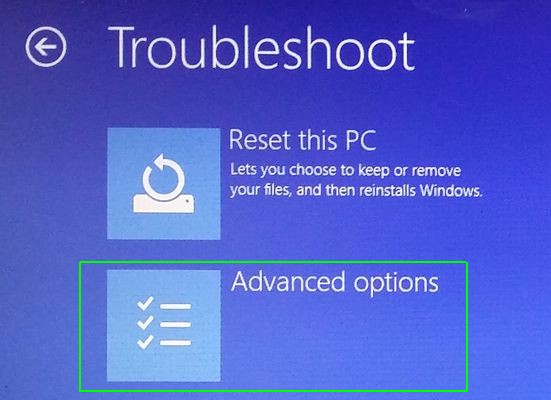
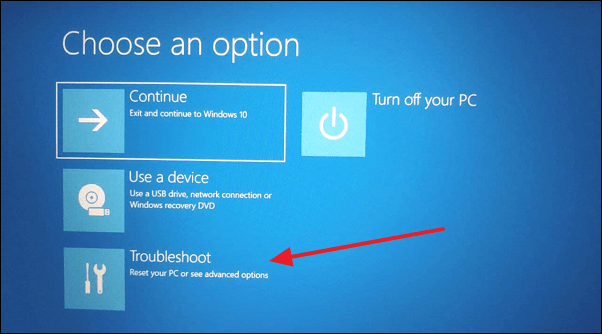
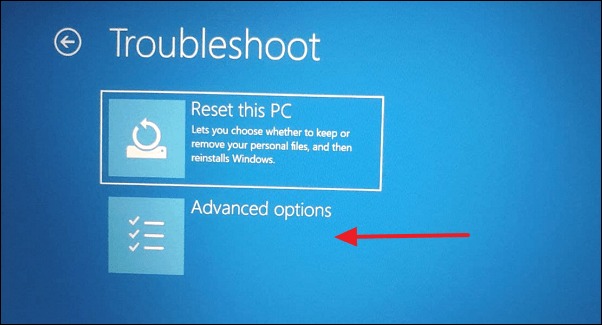
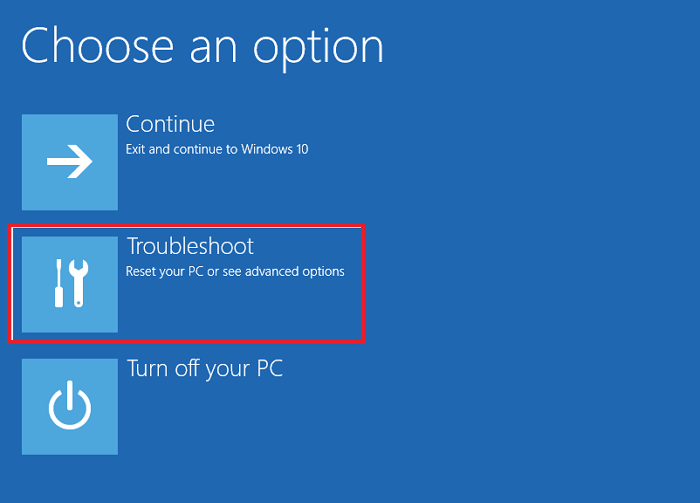
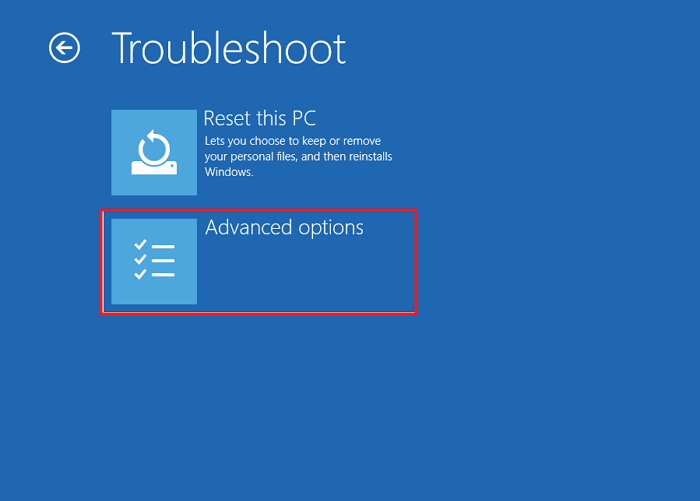
5. Click Troubleshoot.
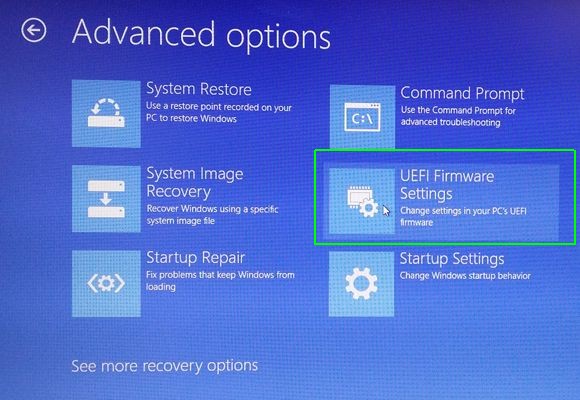
6. Click Advanced options.
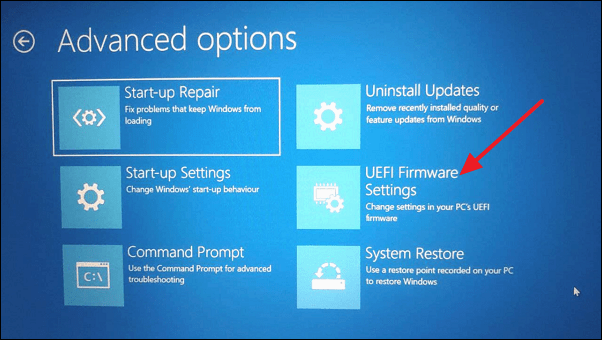
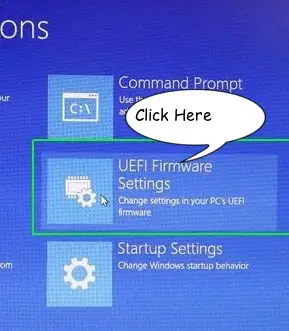
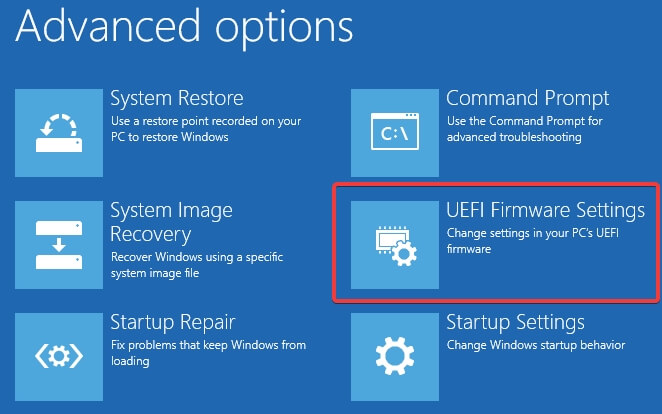
7. Select UEFI Firmware Settings. If you don’t see this icon, then press Startup Settings instead. When your PC is restarting, tap F1 (or F2) to access the BIOS.
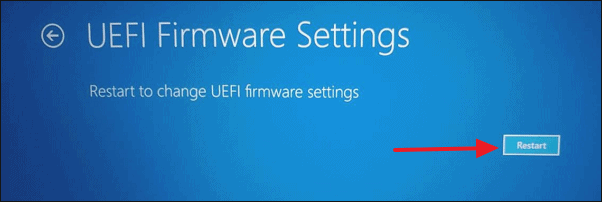
8. Click Restart.
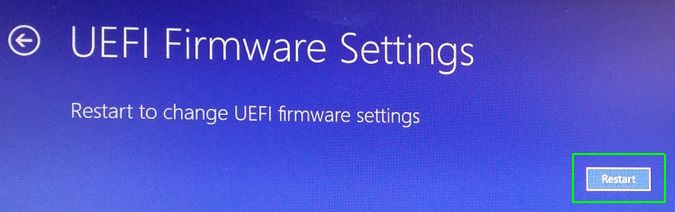
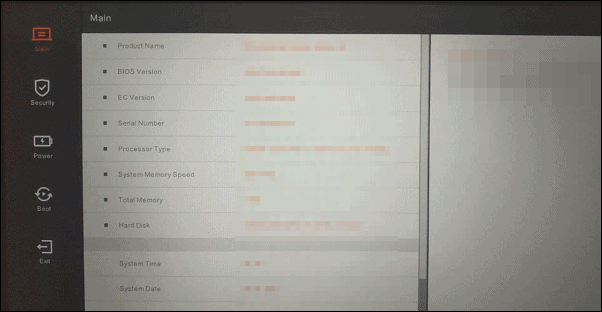
Your system will restart and take you to the BIOS.
Get our in-depth reviews, helpful tips, great deals, and the biggest news stories delivered to your inbox.
Basic Input Output System (BIOS) is the most important low-level software that is embedded on the motherboard. Its prime function is booting and configuring the hardware of the computer. It has been replaced by the Unified Extensible Firmware Interface (UEFI), in the latest Windows, which is a modern software with faster boot times. better security and to support larger capacity hard disk, etc.
In the BIOS, you can change the way the system boot, you can change the time and date of the system, or enable hardware components. There are two easy ways to enter BIOS/UEFI settings on Windows 10. Let us see how to enter BIOS.
Accessing BIOS through Windows Settings
One of the simple ways to access BIOS is through ‘Settings’ of Windows 10. To access, open ‘Settings’ by clicking on the start button and then click on the gear icon.
It opens Windows Settings. In there, click on the ‘Update and Security’ option.
The Windows Update settings will open. Click on the ‘Recovery’ option on the panel on the right side.
In Recovery settings, click on the ‘Restart Now’ button in the ‘Advanced start-up’ section.
Your computer will restart and show you some options as seen in the image below. Click on the ‘Troubleshoot’ option.
From the Troubleshoot screen, click on ‘Advanced Options’.
To enter BIOS, click on ‘UEFI Firmware Settings’ from the Advanced options screen.
It will ask you to restart your computer. Click on the ‘Restart’ button.
Your computer will now restart and take you directly into BIOS settings.
Using Command Prompt to Enter BIOS
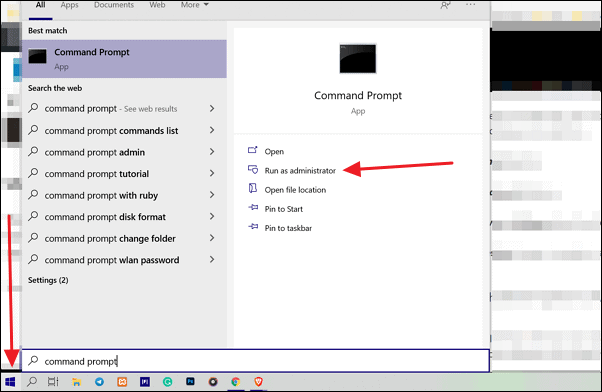
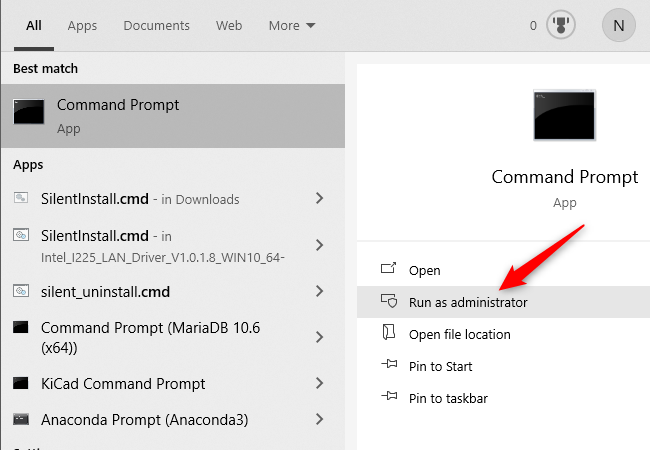
You can also access BIOS through the Command Prompt. Click on the Start button and type ‘Command Prompt’. It will show ‘Command Prompt’ in search results. Select the ‘Run as administrator’ option from expanded options in the Start menu.
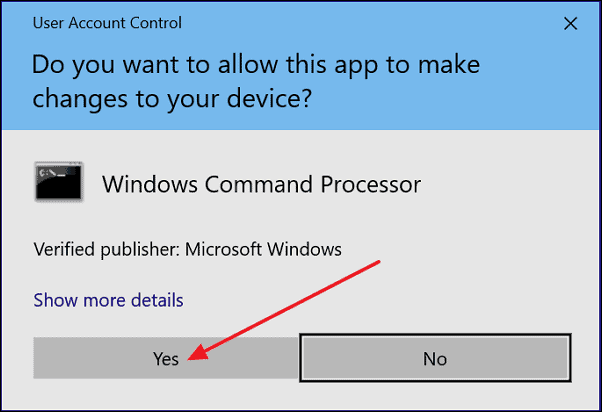
It will show a warning. Click on ‘Yes’ to proceed.
Once the Command Prompt window is open, type the following command and hit Enter.
shutdown.exe /r /o
Your computer will restart and show you some options (like in the first method) from which you have to go to Troubleshoot → Advanced options, and then click on ‘UEFI Firmware Settings’ option. It will ask you to restart your computer and when you click on the ‘Restart’ button, it will take you to BIOS directly.
If you want to overclock components or simply change the boot sequence, you need to do that from BIOS. In this article, we are going to explain how to enter BIOS in Windows 10 and 11.
The simplest way to enter BIOS is to Shift-Click on the Restart button from Windows 10/11 Start menu. Another way is to press the BIOS hotkey, F2, F8, or Delete, while your computer boots up. If you still have trouble entering the BIOS, continue reading below to find out other solutions.
Table of Contents
- What Does BIOS Do for Your System?
- When Do You Need to Access BIOS?
- How to Enter Bios in Windows 10?
- Method-1: From Settings App
- Method-2: Using the specific key from the Keyboard
- Frequently Asked Questions
- What is the BIOS key for HP?
- What’s the BIOS key for Dell?
- How to set BIOS?
- Conclusion
What Does BIOS Do for Your System?
Here’s what the BIOS does to keep your computer running:
BIOS stands for Basic Input Output System. It’s a small software installed on every computer by the manufacturer company itself.
When Do You Need to Access BIOS?
Many Users Don’t Know What BIOS Is. It’s Totally Okay As Knowing BIOS Matters Isn’t A Mandatory Thing For Every Pc User. But If You Know The BIOS Stuffs, You Can Manage
Some Extra Facilities From It. Moreover, In Many Cases, You Have To Access Your BIOS Setting To Get Rid Of Problems
- Many users don’t know what BIOS is. It’s totally okay as knowing BIOS matters isn’t a mandatory thing for every pc user. But if you know the BIOS stuffs, you can manage
some extra facilities from it. Moreover, in many cases, you have to access your BIOS setting to get rid of problems. - As BIOS isn’t a part of OS, you have to access your BIOS if you want to change some settings related to your computer’s hard drive, motherboard, or components not related to OS.
- You can change your boot order from the BIOS setting. You must have to access BIOS if you want to change your boot order.
- You can change the settings of your Hard drive, Floppy drive, CD/DVD drive from BIOS.
- You can change CPU, PC memory settings, and System Voltages from BIOS.
- You can create, change, or remove the BIOS password from BIOS settings.
- You can customize your power button functions from BIOS. You can disable your computer’s logo if you wish.
- You can enable or disable the Power On Self Test, CPU internal cache, BIOS caching from BIOS settings.
- You can check CPU and System temperatures, Fan speeds, System voltages here. You can change Fan speed settings if you wish.
- You can choose to overclock both CPU and RAM to enhance performance.
There are several ways you can enter BIOS in windows 10. Let’s see them one by one.
Method-1: From Settings App
We cannot enter into BIOS directly from the settings menu as it’s a part of Windows 10. We will use the recovery app to enter into BIOS. Let’s go.
- Click on the windows start icon and then click on the option Settings.

- Now Click on the option ‘Update and Security’.


Your computer will be restarted now and you will be taken to the BIOS.
Method-2: Using the specific key from the Keyboard
This is an old method used to enter into BIOS in earlier versions of windows. This a simple technique to enter into BIOS but it isn’t that much efficient in Windows 10 as boot time is now faster than earlier versions of windows. But this is a relatively faster way to enter into BIOS. Let’s go to work.
- At first, make sure your computer is turned off. If not, turn off your computer.
- Now turn on your computer. Before loading your computer with OS, you will see a message on your computer’s screen regarding which key you have to press if you want to enter into BIOS. You will see message somewhat like the below messages:
- Enter BIOS by pressing [A Key name]
- Setup [A Key name]
- Press [A Key name] to enter BIOS
- Press [A Key name] to access BIOS
- Press [A Key name] to enter setup
- Press [A Key name] to enter system configuration
You have to notice the message carefully and find out the key or keys your system is telling to press in the message. Now several cases can happen→
- One thing can happen you cannot notice the error message as Windows 10 boot time is faster. If this happens, restart the process and try to notice the message carefully. You can pause this startup process by pressing the pause button from your keyboard. If you cannot notice the desired message, press Esc to hold your startup process while turning on your system and then notice the BIOS message.
- You may see the logo of your computer instead of any message regarding BIOS settings. If you see any logo of your computer while turning on your system, then press the Esc key from your keyboard. This time you should see a BIOS message.
- If you cannot see any BIOS message by any means (But you should), then visit the official website of your computer’s system providers and search that information. You can find it there.

- This time you should find out the key(s) you have to press to enter into BIOS. Now restart or turn on(if it’s been turned off) your computer and press the key(s) quickly while your computer is being turned on. You have to press the desired key(s) before your OS has been loaded. You are done now. You will be taken to BIOS after pressing the selected key(s).


Frequently Asked Questions
What is the BIOS key for HP?
Usually for HP computers and laptops, the BIOS key is F10. Keep pressing it while your computer boots up to enter BIOS.
What’s the BIOS key for Dell?
For Dell computers and laptops, it’s F12.
How to set BIOS?
To manually set the BIOS, find the Load Optimized Defaults or Load Safe Defaults option in BIOS, select the option, hit Enter and then Save Changes.
Conclusion
Hope, now you know to enter BIOS in windows 10. I have described two simple methods. I would suggest you follow method-1 as it is easier than method-2. However, if you cannot enter BIOS with method-1, you can follow method-2 to get your things done. Follow the above-mentioned instructions carefully and hopefully, you have to face no problem. Go, check your BIOS!
The BIOS, or UEFI, can be used to configure your hardware and customize your system.
Quick Links
- What Is the BIOS?
- Accessing the BIOS/UEFI at Startup
- Accessing the BIOS From Within Windows 10
- Creating a Shortcut to Access the BIOS
- What to Do If You Can’t Access the BIOS
Key Takeaways
- The BIOS (or UEFI) is a software that initializes and tests hardware on your computer, and can be accessed to customize hardware functions.
- Certain options in the BIOS can physically damage your computer, so caution is necessary when making changes.
- There are multiple ways to access the BIOS, including during startup by using specific keys, through Windows 10 settings, or by creating a shortcut on your desktop. You may also Shift+Click the «Restart» button.
The BIOS, or UEFI, is a powerful tool for configuring your PC’s hardware such as your RAM, CPU, motherboard, and more. It also has options that can increase the security of your PC. Here are a few different ways to access the BIOS.
What Is the BIOS?
The Basic Input-Output System (BIOS) is low-level software that is programmed onto your computer’s motherboard. When you turn on your computer, the BIOS initializes and tests all of the hardware in your PC to ensure it is functioning correctly. By accessing the BIOS, you can customize how your PC’s hardware functions.
Be careful though — some of the options available in the BIOS can physically damage your computer.
If you’re going to try overclocking components, be sure you understand what overclocking is, and take the necessary precautions to do it safely. You can also do things like enable XMP profiles to change your RAM speed, or boot your computer from a disk or USB drive.
The BIOS has been replaced by the Unified Extensible Firmware Interface (UEFI) on modern computers, but the term BIOS is commonly used to refer to UEFI. UEFI adds a number of new features that make it different from BIOS.
Accessing the BIOS/UEFI at Startup
When you start your PC, there will usually be a splash screen that displays the manufacturer’s name or logo. To access your BIOS, you can hit a key while the manufacturer’s splash screen is visible. The keys you can press to access the BIOS will typically be displayed near the bottom. Usually, the key will be either F2 or Delete, but not always. The manual for your computer or motherboard will also contain this information.
If you don’t see anything because the screen flashes by too quickly, or hitting the correct key doesn’t bring you into the BIOS, it is possible that Fast Boot is enabled in the BIOS, or you have Fast Startup mode enabled in Windows 10.
Fortunately, there are other ways to access the BIOS.
Accessing the BIOS From Within Windows 10
There are a handful of ways to access the BIOS from Windows 10.
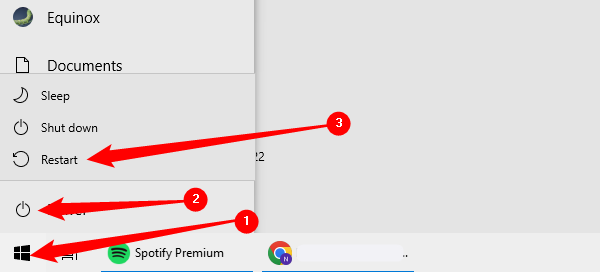
The simplest way to access the BIOS is with the Start button. Click the Start button, hit the power icon, and then hold Shift while you click «Restart.»
Alternatively, you can hit the Start button, in the search bar type «Change Advanced Startup Options» and then hit Enter. Go to the Advanced startup section of the window that pops up, and click the «Restart now» button.
If you used either of the two preceding methods, you’ll be sent to a blue screen with multiple options. Go to Troubleshooting > Advanced Options > UEFI Firmware Settings. You should then be at the BIOS.
If you don’t see «UEFI Firmware Settings» there are two likely explanations. The first is that the computer you’re using doesn’t have UEFI at all — this is especially likely if your PC is older, and actually has BIOS rather than UEFI. The second possibility is that your motherboard does have UEFI, but Windows 10 is booting from a drive that was partitioned using MBR and not GPT. If your boot drive was partitioned using MBR, it’ll force UEFI to use a BIOS Legacy mode that disables access from within Windows 10.
If you’d rather use Command Prompt to access the BIOS, click the Start button, type «cmd» in the search bar, and then select «Run as administrator.»
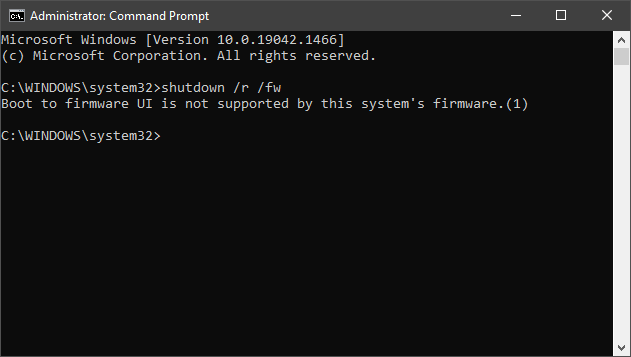
Then, type shutdown /r /fw into the Command Prompt window and press Enter.
If it worked, a window will pop up informing you that your PC will shut down in less than a minute.

You can type shutdown /r /fw /t 0 into the Command Prompt to remove the waiting period and restart instantly.
If you see the message «Boot to firmware UI is not supported by this system’s firmware» when you try to run the shutdown command, it probably means that your motherboard doesn’t have UEFI. It could also mean that Windows 10 is installed on a disk that was partitioned with MBR.
If you can’t access the BIOS/UEFI from within Windows 10, and your PC has Fast Boot enabled in the BIOS/UEFI, you’ll have to do some troubleshooting.
Creating a Shortcut to Access the BIOS
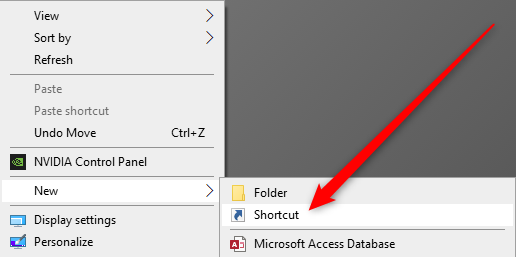
The command to shut down and go into the BIOS can easily be made into a shortcut for faster and more convenient access. Right-click empty space on your desktop and select New > Shortcut.
In the window that appears, type shutdown /r /fw where it says to type the location of the item, and then hit next. Name the shortcut something appropriate, then click «Finish.»
Once the icon is on your desktop, right-click it, and hit «Properties.» In the Properties window, click «Advanced.»
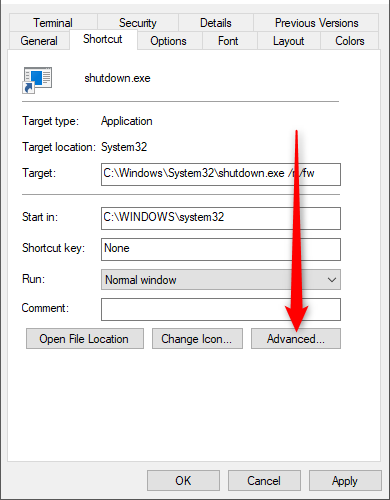
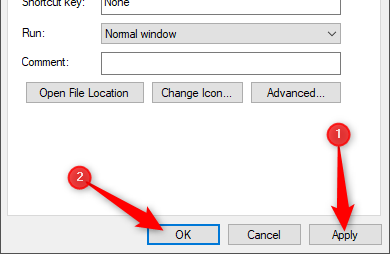
On this window, tick «Run as administrator», then hit «OK.»
Back on the Properties window, click «Apply» and then «OK» to finish creating the shortcut.
If you’d like, you can customize the icon of the shortcut by hitting the «Change Icon» button in the properties window. You can then select an icon from a number of default options, or you can make your own high-resolution icons out of any image.
What to Do If You Can’t Access the BIOS
If you can’t access your BIOS during startup, Fast Boot or Fast Startup could be the culprit. The terms Fast Boot and Fast Startup are often used interchangeably but are actually distinct.
Fast Boot usually refers to a setting in the BIOS or UEFI that changes the initial startup process of the computer. Fast Boot skips some of the hardware checks and initializations that normally occur when your PC is first turned on so that your operating system, like Windows 10, loads more quickly. There is an additional setting (sometimes called Ultrafast Boot) that is even faster because it doesn’t initialize things like USB controllers or disk drives. When that setting is enabled, USB devices like your mouse and keyboard won’t be usable until the operating system loads. It also prevents booting from DVDs or USB drives.
If that is the case for you, your best option is to try clearing your PC’s CMOS to reset your BIOS settings. Some newer or higher-end motherboards include buttons to clear the CMOS — check on the back of your PC, near the USB ports. If it is there, press and hold it for at least 10 seconds. By default, Fast Boot and Ultrafast Boot are disabled, so clearing your CMOS should enable you to hit the appropriate button to get into the BIOS during startup.
Fast Startup is a Windows feature that enables your computer to start more quickly after it was shut down. Windows 10’s Fast Startup mode can interfere with your ability to reach the BIOS if your computer had been shut off with Fast Startup mode enabled. Fast Startup mode doesn’t affect restarts though, so you should be able to reach your BIOS after a restart even with Fast Startup enabled.
If none of that works, you should check the documentation that came with your computer or motherboard. There may be more specific instructions for your machine that can help.
Why Need to Enter BIOS
Under normal circumstances, you do not need to enter the BIOS to modify because the default settings are already optimized when the computer leaves the factory, and changing the BIOS will have certain risks. However, you may enter the BIOS when encountering the following situations:
- Enter the BIOS to change the boot order for reinstalling the operating system. For example, boot from a USB drive or CD-ROM drive.
- Change the system date and time in the BIOS.
- Set specific parameters in the BIOS settings.
- Check hardware configuration information like serial number, machine type, etc.
How to Enter BIOS on Windows 10 via Function Key
After rebooting your computer, you can enter BIOS with a certain hotkey. The interval for pressing a key to enter BIOS is short so you need to prepare in advance and press the right key at the right time.
Step 1. Click the Power button and restart your computer.

Step 2. As soon as the startup screen appears, press the BIOS hotkey such as F2, F10, Esc, or DEL.
Step 3. Keep holding the hotkey until the BIOS screen comes up.
The exact key or key combination to access BIOS varies for different computers. Here are the keys to enter BIOS on popular computer brands.
- HP: F10 or Esc
- Dell: F2 or F12
- Acer: F2 or Del
- Lenovo: F2 or Fn + F2
- Asus: F2 or Esc
- Samsung: F2
- Sony: F1, F2, or F3
- Microsoft Surface Pro: Volume Up Button
How to Access BIOS on Windows 10 or Windows 11 via Settings
How to boot in BIOS Windows 10 without restarting? If you have UEFI firmware, you may have an easier way to boot into BIOS is using the Settings features on Windows 10 or Windows 11.
Step 1. Click the Windows button in the toolbar and choose «Settings». Or press Win + I keys to open Settings on Windows 10/11. If you are using a touch screen, swipe in from the right edge of the screen, and then select «Settings».
Step 2. On Settings main windows, click «Update & security».
Step 3. Click «Recovery» on the left panel. Find Advanced startup, click «Restart now».
Step 4. Then, the boot options window will appear. Click «Troubleshoot».
Step 5. Select «Advanced» options.
Step 6. Click «UEFI Firmware Settings».
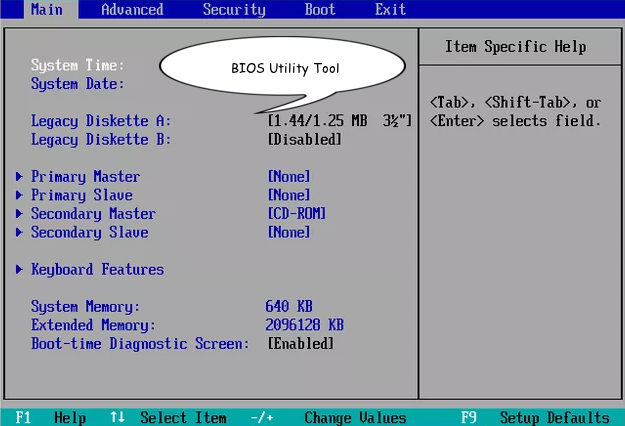
Step 7. Choose Restart to open UEFI BIOS. This displays the BIOS setup utility interface and you can change the BIOS settings.
Additional Guide: How to Restore Data on Windows 10/11 for BIOS Issue
Booting into BIOS can make you change the boot order, check or change hardware configuration. If you run into unexpected data loss because of system installation or hardware problems, EaseUS data recovery software comes to help you out.
EaseUS Data Recovery Wizard enables you to recover lost data whether your computer is bootable or not. If your OS crashed and the computer is inaccessible, you can boot from our bootable USB drive to get off data in the WinPE environment. Learn how to recover data from a PC/laptop that won’t boot.
For data recovery on a Windows computer, this software offers full options to restore lost or permanently deleted files from HDD, SSD, external hard drive, USB flash drive, memory card, digital camera, etc. What’s more, it still can repair corrupted files in various file formats for documents, graphics, videos, audio, and email.
Free download EaseUS file recovery tool to restore data in simple clicks.
Note: To guarantee a high data recovery chance, install EaseUS data recovery software on another disk instead of the original disk where you lost files.
Step 1. Launch EaseUS Data Recovery Wizard on your Windows 11, Windows 10, Windows 8, or Windows 7 computer. Select the disk partition or storage location where you lost data and click «Scan».

Step 2. This recovery software will start scanning the disk to find all lost and deleted files. When the scan process completes, click «Filter» > «Type» to specify lost file types.

Step 3. Preview and restore lost Windows files. You can double-click to preview the scanned files. Then, select the target data and click the «Recover» button to save them to another safe spot in the PC or an external storage device.

Concluding Words
BIOS, Basic Input/Output System, is the built-in core processor software used to boot up your system. Whether you need to change the boot order or update your BIOS, knowing how to enter BIOS is essential. To access BIOS on a Windows PC, you can press your BIOS hotkey to make it, which could be F10, F2, F12, F1, or DEL.
Besides, if there is data loss occurs for any reason, take a professional file recovery and repair tool — EaseUS Data Recovery Wizard for help.