A virtual machine emulates a computer
system so anyone can run different operating systems and programs. It works
great for testing out new features without risking your current ecosystem. You
will also be able to test software compatibility in an isolated environment.
Running a virtual machine can be
demanding and not all computers are capable of doing so. But these days, users
can create one using Windows 10.

What Do You Need?
Your computer needs to meet a couple of
requirements for you to be able to create and run a virtual machine. Here’s
what you’ll need:
- A 64-bit processor that has Secondary Level Address Translation or SLAT. Find info about your processor using these tools.
- Windows 10 Pro, Education, or Enterprise.
Note: Windows Home users can upgrade to the Pro version. Go to Settings (Windows + I) > Update and Security > Activation.
- At least 4 GB of memory. Having
more RAM would be better. - A BIOS setup where virtualization
has been enabled. - Hard drive space for the OS you’ll
be adding.
What is Hyper-V?
Windows 10 uses a
software called Hyper-V to handle virtualization. You will need to activate it
if you want to add virtual machines. Some Hyper-V features include being able
to run operating systems and entire hardware components like hard drives and
network switches.
Advanced users can even
use it for server virtualizations if they want.
Turn On Virtualization in BIOS
First, restart your computer. As the
computer boots, press the corresponding key that lets you enter BIOS. The
button differs from one PC to another. However, it’s usually F10, Delete,or the F2 key.
Once you enter the BIOS, you can start enabling virtualization settings. The BIOS interface varies depending on the brand.
Exit once you’re done making all the
changes to the BIOS settings and restart your PC.
Turning On Hyper-V
You will need Hyper-V to manage your
virtual machines. This can be done by accessing the Control Panel or
PowerShell.
Control Panel
Open the Control Panel. Now go to Programs
and Features > Turn Windows
Features On or Off.
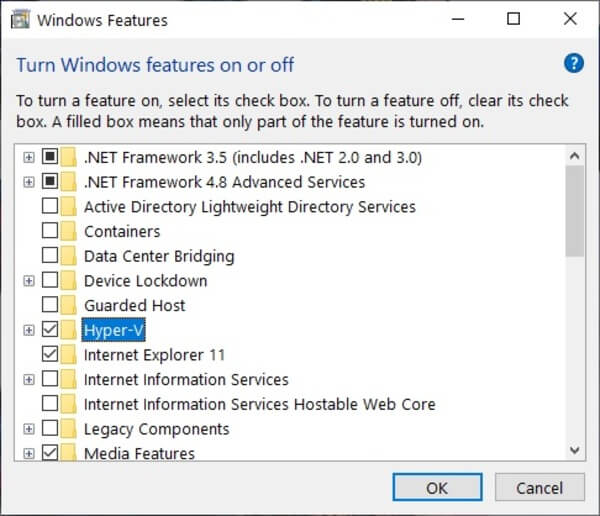
Search for a folder called Hyper-V. Tick all the subfolders under
Hyper-V and hit OK.
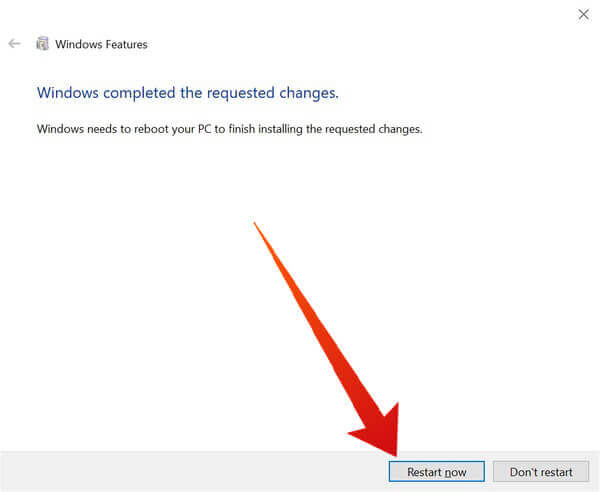
Windows will then try to configure
Hyper-V. This might prompt a restart after it confirms all the changes.
PowerShell
Open PowerShell
and enter the following line:
Enable-WindowsOptionalFeature
-Online -FeatureName Microsoft-Hyper-V -All

If PowerShell responds and says that the
command cannot be found, make sure you’re running it as an administrator.
Restart the computer after you’re done.
Creating a Virtual Machine
Once ready, you can start using Hyper-V to create virtual machines in Windows 10. Here’s what you need to do:
Go to Control Panel > Administrative
Tools and double-click Hyper-V
to launch the application.
On the left-hand pane of Hyper-V, select
the name of your computer so you can work on it. You can add a new virtual
machine by going to Action > New > Virtual Machine.
A new window will open called New Virtual Machine Wizard. Complete
the steps and click Finish when
you’re done to create a new machine.
New machines will be shown inside Hyper-V. The same application is used to control the machines. For example, you can turn the machines on and off through Hyper-V.
Also, you can read my post on converting an existing PC into a Hyper-V virtual machine. Enjoy!
One of the most powerful features baked into Windows 10 is native support for hardware virtualization. This is via a virtualization platform called Hyper-V. Once you enable virtualization on Windows 10, it opens the door to creating a virtual machine on your system. This machine is completely separate from your main system. You can thus go crazy with it. If you want, install anything you want on it without worrying about messing up with the main system.
Before you can do that though, you’d have to enable hardware virtualization on Windows 10.
Hardware Virtualization System Requirements
- Windows 10 Pro or Enterprise
- 64-bit processor with Second Level Address Translation (SLAT)
- 4GB system RAM at minimum
- BIOS-level Hardware Virtualization support
Check Hardware Virtualization support
First of all, make sure your device supports hardware virtualization. You can also check that it is enabled in the BIOS or UEFI firmware settings.
- Launch a command prompt or Windows PowerShell window.
- Enter the command given below.
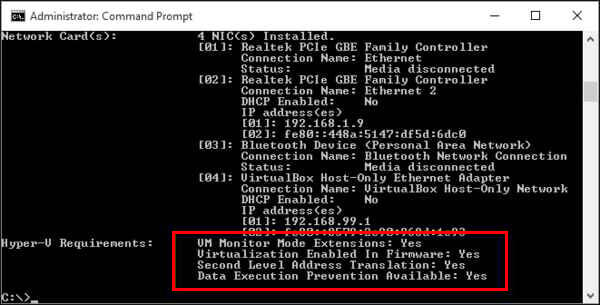
systeminfo.exe
- Wait few seconds (It takes a few seconds to gather information about your system but then gives you a result)
- Look under Hyper-V Requirements.
- See that Virtualization Enabled In Firmware reads Yes. (If it does, then you can use Windows Sandbox.)

Alternatively, you can also see if Virtualization is enabled under the Performance tab of the Task manager.
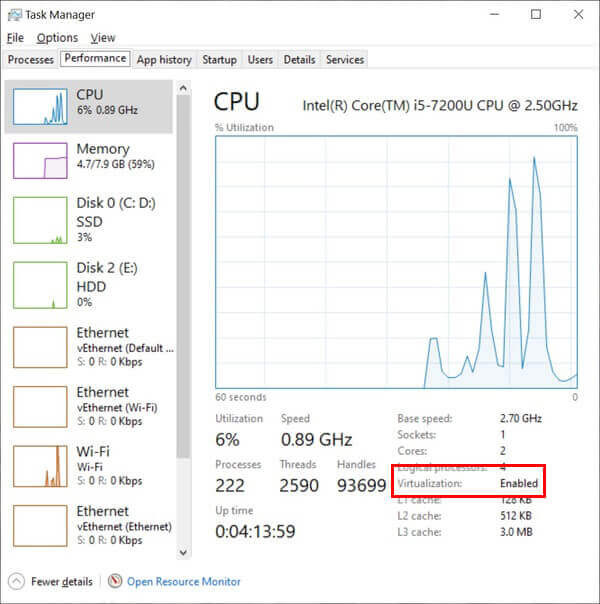
The virtualization status will be in enabled mode if you check on the CPU performance screen. If it’s not, you’ll have to enable this in the BIOS or UEFI settings.
Related: How to Setup Dual Display in Windows 10
Enable Virtualization on PC BIOS Setting
Every PC has a different version of BIOS screen and settings. Also, the steps to steps to enable virtualization from the BIOS depends on the PC manufacturer. Normally, BIOS settings can be accessed using the function keys (F1, F2, F3, F10, or F12) during boot. On some PCs, it’s the ESC, or Delete key.
Moreover, the keys are different from manufacturer to manufacturer and even among devices from the same manufacturer. Still, if you don’t already know the correct key for your machine, Google it. When you boot your PC, tap the key about twice per second as soon as the screen turns on. An easier and more universal way is to do this from the Windows 10 Settings.
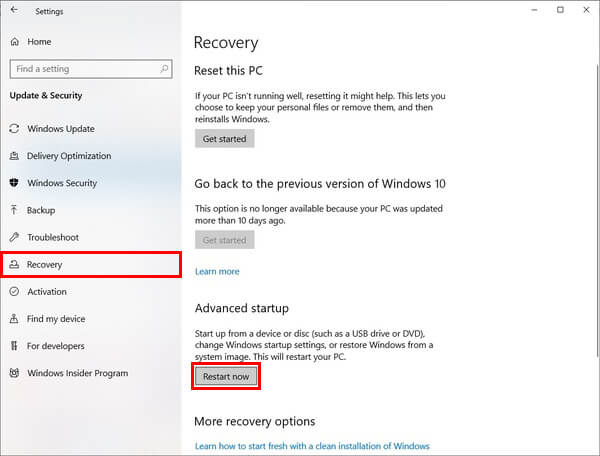
- Go to Windows Settings
- Click on Update & Security
- Now click on Recovery
- Click Restart now under Advanced startup.

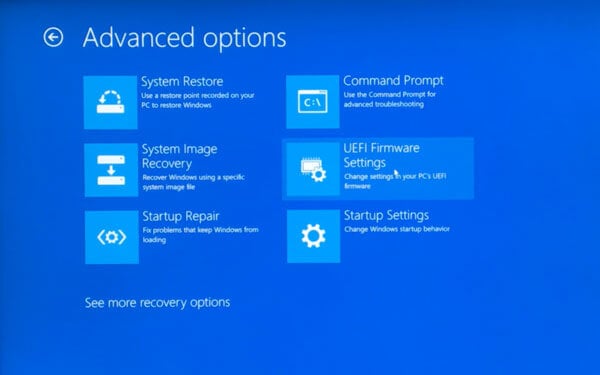
- Go to Troubleshoot
- Click on Advanced Options
- Now click on UEFI Firmware Settings
- Click Restart.
This method only works if you use UEFI-boot. And this is also a setting that can be changed from the BIOS. If you don’t know this, you don’t have to worry about it. All Windows PCs ship with UEFI boot enabled by default.
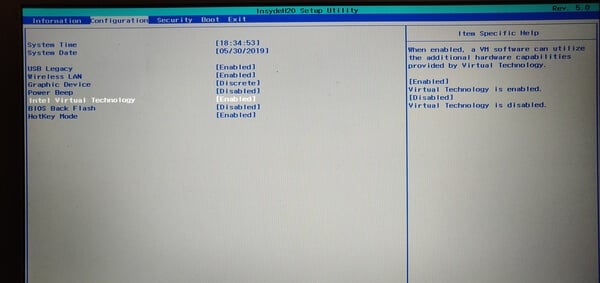
Look for something like an Advanced menu or tab. You’ll most likely find the setting you need to turn on under this. In addition to all the other things that can be different, this can also be labeled differently. It could be Advanced Mode, or simply Configuration like it is on my Lenovo Ideapad.
Finally, look for the setting which has Virtualization is its name and turn it on. Sometimes it’s named completely vaguely. For instance, Vanderloop. Depending upon your processor and other factors, these are the names commonly used.
- Intel Virtualization Technology,
- AMD-V,
- Hyper-V
- VT-X
- Vanderpool
- SVM
Related: How to Get Microsoft Edge with Chromium Engine on Windows 10?
Enable Hyper-V Virtualization in Windows 10
Now that virtualization support is enabled in the BIOS, enable it on Windows 10.
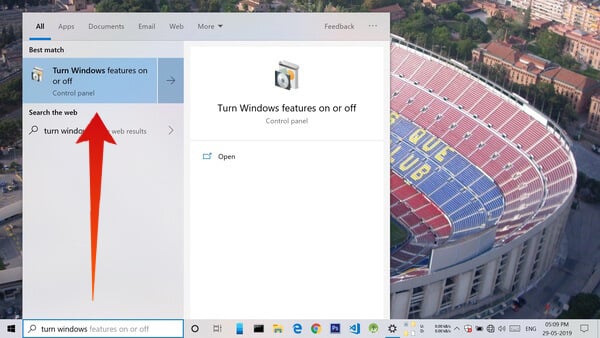
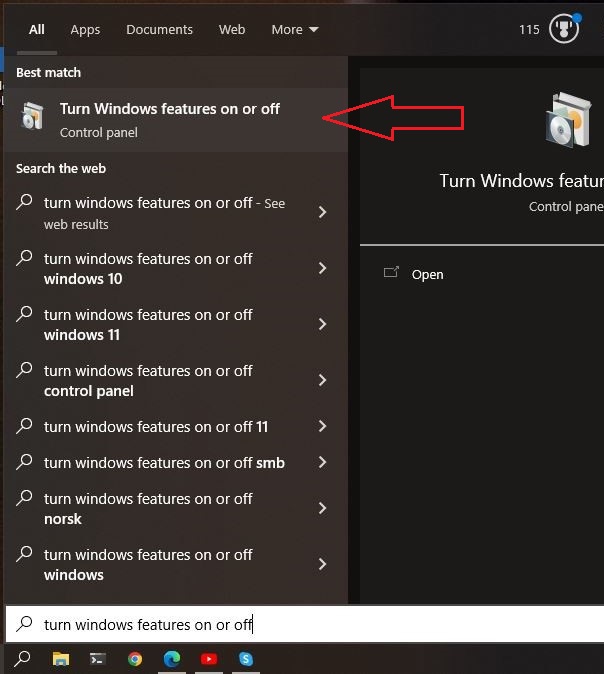
- Press the Windows key to get the Search box.
- Type “turn windows features on or off” and click on it to open it.

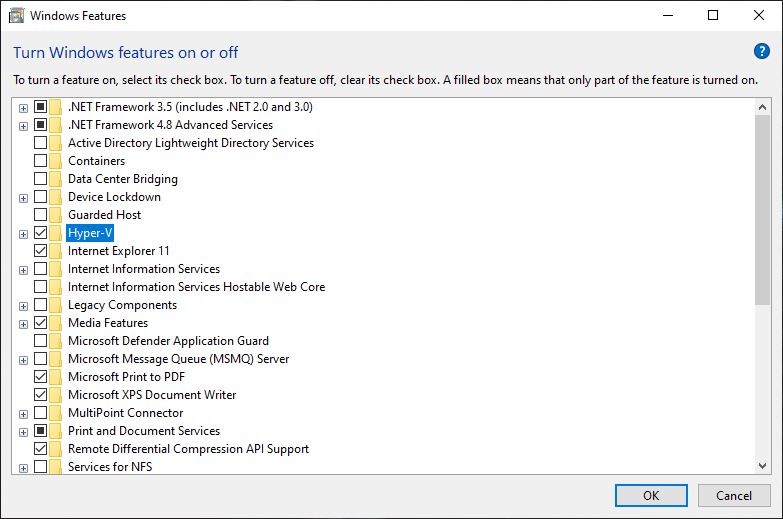
- Scroll down and check the box next to Hyper-V.

- Click OK.
- Windows will install the necessary files to enable virtualization.
- You’ll then be asked to reboot PC.

- Click Restart now.
Related: How to Recover Lost Space on SD Card with Windows 10?
Advantages of Windows Virtualization
Windows 8 was the first ever Windows version to natively support Hardware virtualization. Consequently, Windows 10 also supports it natively. But the platform has gained many features since then. This includes features like Enhanced Session Mode, high fidelity graphics, USB redirection, Linux secure boot, etc.
With Windows virtualization, you can test apps inside a virtual machine without compromising your main system. We’ve already mentioned that at the start. And the new Windows 10 May 2019 update actually has a built-in feature that lets you do that. They call it Windows Sandbox.
Virtualization also allows you to install a Linux shell on Windows. For instance, Ubuntu, Debian, Kali Linux, etc. are available from the Microsoft Store. Not only can you then use the powerful Linux terminal and commands but also the Linux GUI. One can even use a full-blown Linux desktop on Windows, although that’s not quite practical.
Disclosure: Mashtips is supported by its audience. As an Amazon Associate I earn from qualifying purchases.
There are several things that make Windows 10 the best Windows version there has ever been. One such feature is the support for hardware virtualization and therefore, the ability to create virtual machines. To those unaware and in layman’s terms, virtualization is the creation of a virtual instance of something (the list includes an operating system, storage device, network server, etc.) on the same set of hardware. Creating a virtual machine allows users to test beta applications in an isolated environment, use and easily switch between two different operating systems, etc.
Although virtualization is a feature that most users have no use for, it is disabled by default on Windows. One needs to manually enable it from the BIOS menu and then install Windows’ virtualization software (Hyper-V). In this article, we will be covering all the little details of enabling virtualization on Windows 10 and also show you how to create a virtual machine.

Table of Contents
Requisites for Virtualization
Hardware virtualization was first introduced in Windows 8 and has since evolved to include a greater number of features such as enhanced session mode, high fidelity graphics, USB redirection, Linux secure boot, etc. in Windows 10. Although, better and more virtualization features also demand a more powerful system. Below is a list of prerequisites your computer needs to possess in order for you to create and run a virtual machine.
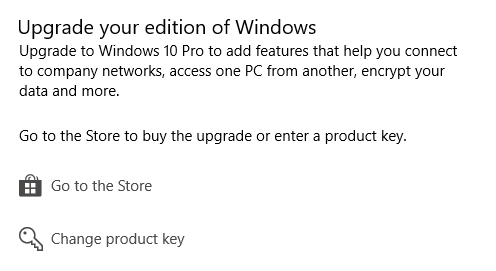
1. Hyper-V is only available on Windows 10 Pro, Enterprise, and Education versions. If you have Windows 10 Home and wish to create a virtual machine, you will need to upgrade to the Pro version. (If you are unsure about your Windows version, type winver in the start search bar or run command box and press enter.)

2. Your computer should be running on a 64-bit processor that supports SLAT (Secondary Level Address Translation). To check for the same, open the System Information application and review the System Type & Hyper-V Second Level Address Translation Extensions entries.

3. A minimum of 4gb of system RAM should be installed, although, having more than that would make for a much smoother experience.
4. There should also be enough free storage space to install the desired OS on the virtual machine.
Check if Virtualization is enabled in BIOS/UEFI
Virtualization technology may be already enabled on your computer. To check if that is indeed the case, follow the below steps.
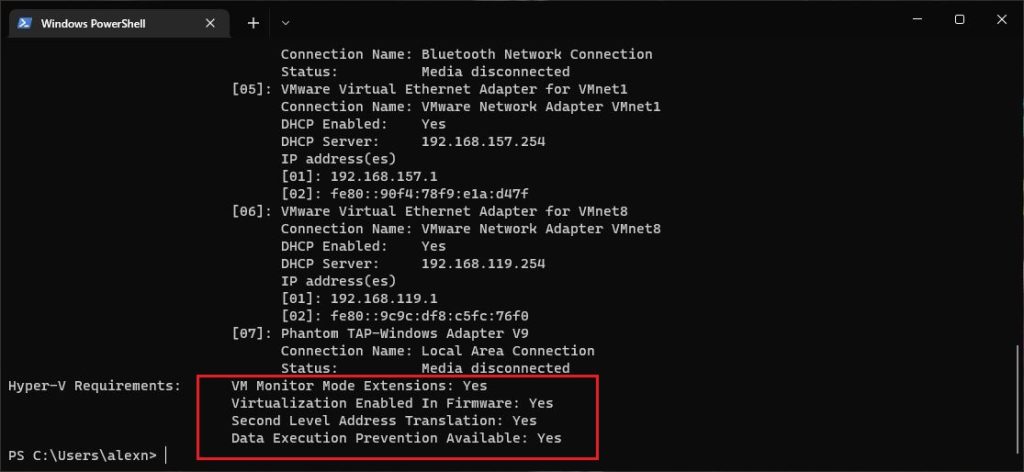
1. Search for Command Prompt or Powershell (either of them works) in the search bar and click on Open.

2. Type systeminfo.exe and press enter to execute the command. It may take a few seconds for the window to gather all the system information and display it for you.
3. Scroll through the displayed information and try to locate the Hyper-V Requirements section. Check the status for Virtualization Enabled in Firmware. It should, as obvious, read Yes if Virtualization is enabled.

Another way to check if virtualization is enabled is to open Windows Task Manager (Ctrl + Shift + Esc) and in the Performance tab, check its status (Ensure the computer’s CPU is selected on the left). If virtualization isn’t enabled, first enable it from the BIOS menu and then install Hyper-V to create virtual machines.

Enable Virtualization in BIOS/UEFI
BIOS, the software that is responsible for making sure your computer boots on properly, also handles a number of other advanced features. As you might have guessed, BIOS also contains the settings to enable virtualization technology on your Windows 10 computer. To enable Hyper-V and manage your virtual machines, you will need first to enable virtualization in the BIOS menu.
Now, BIOS software differs from manufacturer to manufacturer, and also the mode of entry (BIOS key) to the BIOS menu is different for each. The easiest way to enter BIOS is to press one of the following keys repeatedly (F1, F2, F3, F10, F12, Esc, or Delete key) when the computer boots. If you do not know the BIOS key specific to your computer, follow the below guide instead and enable virtualization on Windows 10 PC:
1. Open Windows Settings by pressing the hotkey combination of Windows key + I and click on Update and Security.

2. Using the left navigation menu, move to the Recovery settings page.
3. Here, click on the Restart now button under the Advanced startup section.

4. On the Advanced startup screen, click on Troubleshoot and enter Advanced Options.
5. Now, click on UEFI Firmware Settings and reboot.
6. The precise location of Virtualization or Virtual Technology settings will be different for each manufacturer. In the BIOS/UEFI menu, look for the Advanced or Configuration tab, and under it, enable virtualization.
3 Ways to Enable Hyper-V in Windows 10
Microsoft’s native hypervisor software is called Hyper-V, and it lets you create and manage virtual computer environments, also known as virtual machines on a single physical server. Hyper-V can run operating systems virtually, along with hard drives and network switches. Advanced users can even use Hyper-V to virtualize servers.
While Hyper-V is built-in on all supported PCs, it needs to be enabled manually. There are exactly 3 ways to install Hyper-V on Windows 10, all of which are explained in detail below.
Method 1: Enable Hyper-V From the Control Panel
This is the easiest & most straightforward method as you have a graphical user interface at your disposal. You merely need to navigate your way to the required destination and tick a box.
1. Press Windows key + R to launch the Run command box, type control or control panel in it, and click on OK to open the same.

2. Look for Programs and Features in the list of All Control Panel items and click on it. You can change the icon size to small or large to make looking for the item easier.

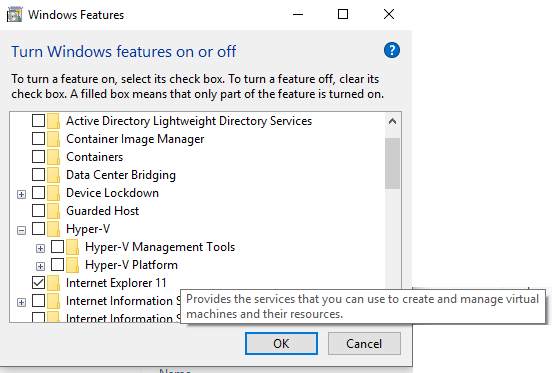
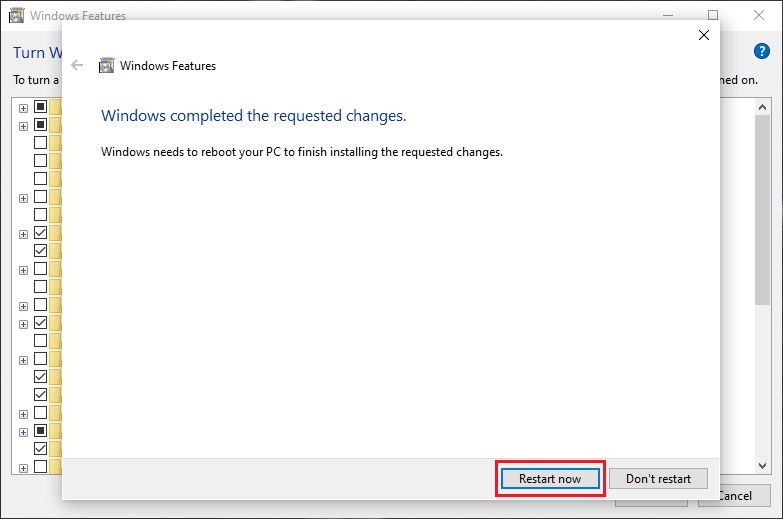
3. In the Programs and Features window, click on the Turn Windows features on or off hyperlink present on the left.

4. Finally, enable Virtualization by ticking the box next to Hyper-V and click on OK.

5. Windows will automatically start downloading and configuring all the files required to create a virtual machine on your computer. Once the download process completes, you will be requested to Restart.
Click on Restart now to reboot your PC immediately or click on Don’t restart and restart manually at a later time as per your convenience. Virtualization will only be enabled after the reboot, so do not forget to perform one.
Method 2: Enable Hyper-V using Command Prompt
A single command is all you need to enable and configure Hyper-V from the Command Prompt.
1. Type Command Prompt in the Start search bar (Windows key + S), right-click on the search result, and select Run as Administrator.

Note: Click on Yes in the User Account Control pop-up that appears requesting permission to allow the program to make changes to the system.
2. In the now elevated Command Prompt window, type the below command and press enter to execute it.
Dism /online /Get-Features | find “Microsoft-Hyper-V”

3. You will now receive a list of all available Hyper-V related commands. To install all Hyper-V features, execute the command
Dism /online /Enable-Feature /FeatureName:Microsoft-Hyper-V-All

4. All Hyper-V features will now be installed, enabled, and configured for your use. To complete the process, a computer restart is required. Press Y and hit enter to restart from the command prompt itself.
Method 3: Enable Hyper-V using Powershell
Similar to the previous method, you only need to execute a single command in an elevated Powershell window to install all Hyper-V features.
1. Similar to Command Prompt, Powershell also needs to be launched with administrative privileges to enable Hyper-V. Press Windows key + X (or right-click on the Start button) and select Windows Powershell (Admin) from the power user menu.

2. To obtain a list of all available Hyper-V commands and features, execute
Get-WindowsOptionalFeature -Online | Where-Object {$_.FeatureName -like “Hyper-V“}
3. Execute the first command in the list to install and enable all Hyper-V features. The entire command line for the same is
Enable-WindowsOptionalFeature -Online -FeatureName Microsoft-Hyper-V -All
4. Press Y & hit enter to restart your PC and enable Hyper-V.
How to create a Virtual Machine using Hyper-V?
Now that you have enabled virtualization and set up Hyper-V on Windows 10, it is time to put the technology to use and create a virtual machine. There are multiple ways to create a virtual machine (Hyper-V Manager, PowerShell, and Hyper-V Quick Create), but the easiest one is by using the Hyper-V Manager application.
1. Open Control Panel using your preferred method and click on Administrative Tools. You can also open the same (Windows Administrative Tools) directly through the search bar.

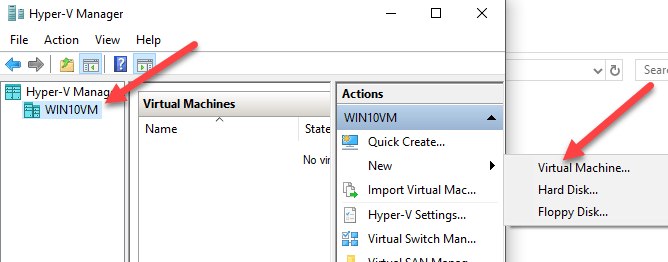
2. In the following explorer window, double-click on Hyper-V Manager.
3. A Hyper-V manager window will open soon. On the left, you will find the name of your computer, select it to proceed.
4. Now, click on Action present at the top and select New, followed by Virtual Machine.
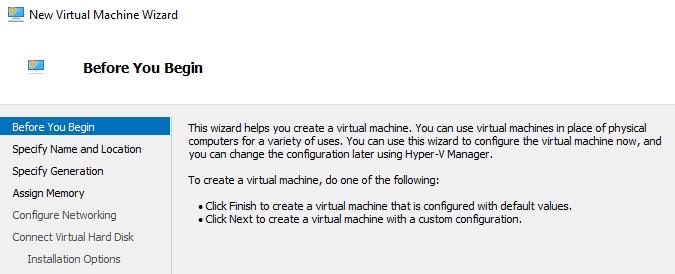
5. If you want to create a Virtual Machine with the most basic configuration, directly click on the Finish button in the New Virtual Machine Wizard window. On the other hand, to customize the Virtual Machine, click on Next and go through the individual steps one by one.
6. You will find the new virtual machine on the right panel of the Hyper-V Manager window. Options to turn it on or off, shut down, settings, etc. will also be present there.
Recommended:
- 8 Ways to Open Windows Services Manager in Windows 10
- How to Fix Windows 10 running slow after update
- 3 Ways to Share Wi-Fi Access without revealing Password
So that is how you can enable virtualization and create a virtual machine on Windows 10 PC. If you are having a hard time understanding any of the steps, comment down below, and we will get back to you ASAP.
One of the most powerful features baked into Windows 10 is native support for hardware virtualization. This is via a virtualization platform called Hyper-V. Once you enable virtualization on Windows 10, it opens the door to creating a virtual machine on your system. This machine is completely separate from your main system. You can thus go crazy with it. If you want, install anything you want on it without worrying about messing up with the main system.
Before you can do that though, you’d have to enable hardware virtualization on Windows 10.
Hardware Virtualization System Requirements
- Windows 10 Pro or Enterprise
- 64-bit processor with Second Level Address Translation (SLAT)
- 4GB system RAM at minimum
- BIOS-level Hardware Virtualization support
Check Hardware Virtualization support
First of all, make sure your device supports hardware virtualization. You can also check that it is enabled in the BIOS or UEFI firmware settings.
- Launch a command prompt or Windows PowerShell window.
- Enter the command given below.
systeminfo.exe
- Wait few seconds (It takes a few seconds to gather information about your system but then gives you a result)
- Look under Hyper-V Requirements.
- See that Virtualization Enabled In Firmware reads Yes. (If it does, then you can use Windows Sandbox.)

Alternatively, you can also see if Virtualization is enabled under the Performance tab of the Task manager.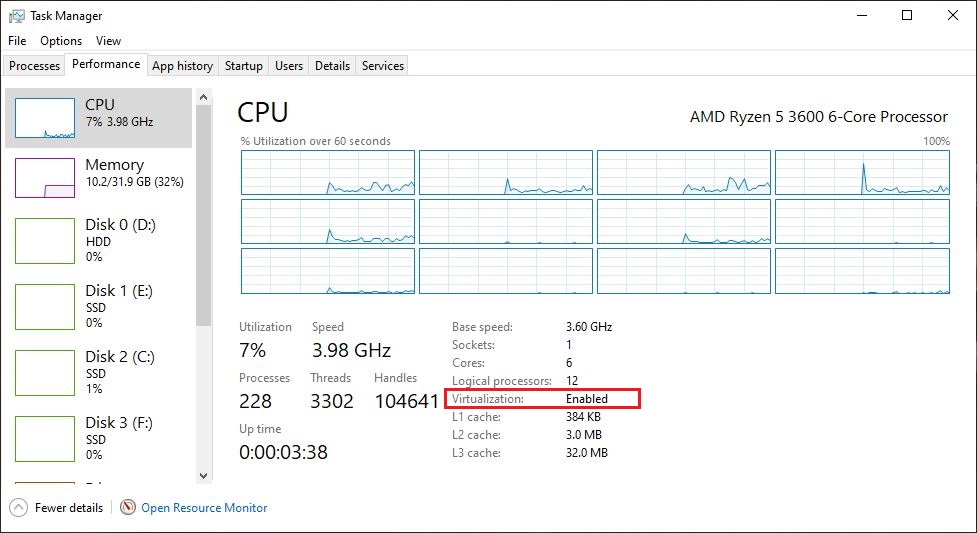
The virtualization status will be in enabled mode if you check on the CPU performance screen. If it’s not, you’ll have to enable this in the BIOS or UEFI settings.
Enable Virtualization on PC BIOS Setting
Every PC has a different version of BIOS screen and settings. Also, the steps to steps to enable virtualization from the BIOS depends on the PC manufacturer. Normally, BIOS settings can be accessed using the function keys (F1, F2, F3, F10, or F12) during boot. On some PCs, it’s the ESC, or Delete key.
Moreover, the keys are different from manufacturer to manufacturer and even among devices from the same manufacturer. Still, if you don’t already know the correct key for your machine, Google it. When you boot your PC, tap the key about twice per second as soon as the screen turns on. An easier and more universal way is to do this from the Windows 10 Settings.
- Go to Windows Settings
- Click on Update & Security
- Now click on Recovery
- Click Restart now under Advanced startup.

- Go to Troubleshoot
- Click on Advanced Options
- Now click on UEFI Firmware Settings

- Click Restart.


This method only works if you use UEFI-boot. And this is also a setting that can be changed from the BIOS. If you don’t know this, you don’t have to worry about it. All Windows PCs ship with UEFI boot enabled by default.
Look for something like an Advanced menu or tab. You’ll most likely find the setting you need to turn on under this. In addition to all the other things that can be different, this can also be labeled differently. It could be Advanced Mode, or simply Configuration like it is on my Lenovo Ideapad.
Finally, look for the setting which has Virtualization is its name and turn it on. Sometimes it’s named completely vaguely. For instance, Vanderloop. Depending upon your processor and other factors, these are the names commonly used.
- Intel Virtualization Technology,
- AMD-V,
- Hyper-V
- VT-X
- Vanderpool
- SVM
Enable Hyper-V Virtualization in Windows 10
Now that virtualization support is enabled in the BIOS, enable it on Windows 10.
- Press the Windows key to get the Search box.
- Type “turn windows features on or off” and click on it to open it.

- Scroll down and check the box next to Hyper-V.

- Click OK.
- Windows will install the necessary files to enable virtualization.
- You’ll then be asked to reboot PC.
- Click Restart now.
Advantages of Windows Virtualization
Windows 8 was the first ever Windows version to natively support Hardware virtualization. Consequently, Windows 10 also supports it natively. But the platform has gained many features since then. This includes features like Enhanced Session Mode, high fidelity graphics, USB redirection, Linux secure boot, etc.
With Windows virtualization, you can test apps inside a virtual machine without compromising your main system. We’ve already mentioned that at the start. And the new Windows 10 May 2019 update actually has a built-in feature that lets you do that. They call it Windows Sandbox.
Virtualization also allows you to install a Linux shell on Windows. For instance, Ubuntu, Debian, Kali Linux, etc. are available from the Microsoft Store. Not only can you then use the powerful Linux terminal and commands but also the Linux GUI. One can even use a full-blown Linux desktop on Windows, although that’s not quite practical.
Необходимость включить виртуализацию в windows 10 возникает при использовании программ-эмуляторов, либо виртуальных приборов (приводов). Они способны функционировать без применения виртуализации, но для получения высокой производительности, рекомендуется включить ее. Эта инструкция вам в помощь.
Что нужно знать каждому
Включение виртуализации возможно только тогда, когда ваш ПК/ноутбук поддерживает такую функцию. При ее отсутствии (не поддерживается) вы не только потеряете время, но и рискуете нарушить настройки БИОСа.
Большинство виртуальных приборов и эмуляций при запуске сообщают если устройство поддерживает эту функцию и рекомендуют ее активировать. Некоторые могут не сообщать, поэтому полагаться на них нельзя.
В случае, когда сообщение не появляется при запуске виртуального прибора/эмулятора, возможны такие варианты:
- Функция«IntelVirtualizationTechnology» уже включена и работает (что случается не часто);
- Виртуализация отключена, но ваша программа не видит этого и не может сообщить о необходимости включения;
- Ваше устройство не поддерживает такую функцию;
Как определить есть она или нет
Прежде чем искать virtualization technology в БИОСе, убедитесь поддерживается ли она вашим устройством. Потом рекомендую выяснить активирована она или нет. Только после этого переходите к включению, если функция имеется но не активирована.
В диспетчере задач
Для тех кто не любит скачивать и устанавливать посторонний софт, из-за геморроя с лицензией и вирусами подойдет такой способ проверки наличия функции vt x на устройстве. Шаги следующие:
- Запустите диспетчера нажатием сразу трех клавишей «Shift+Ctrl+ESC»;
- Открывайте вкладочку «Производительность»;
- Кликните ЛКМ слева вверху подраздел «ЦП»;
- Внизу смотрите что прописано поле слова «Виртуализация»;

- Варианты всего два «Откл» либо «Вкл» (слова могут быть прописаны полностью);
- Ниже смотрите наличие строчки «ПоддержкаHyper-V»;
- Когда у вас «Откл» но в выше написанной строчке «ДА», выполните включение через BIOS;

Используя программы
Проверить наличие функции vt x на устройстве можно скачав и установив нужный софт. Убедитесь, что ваш антивирус активен, скачивайте программы исключительно с сайтов производителей. Ниже приведу пример наиболее распространенных и проверенных утилит, позволяющих выяснить, поддерживается ли у вас виртуализация.
Процессоры intel
Прежде чем включить vt на ноутбуке либо ПК с процессором от «Интел», следует скачать и установить утилиту «IntelProcessorIdentificationUtility» с сайта производителя. Затем скачайте архивом кликнув «Download».

Распакуйте и установите, затем запустите. Во вкладочке «Processor» следует кликнуть плюсик, чтобы открыть подпункт «CPU TECHNOLOGIES». В нем найдите строчку «IntelVirtualizationTechnology».

Когда рядом есть отметка, значит функция поддерживается.
У процессоров amd
Включить аппаратную виртуализацию на устройстве с процессором АМД можно после проверки утилитой с длиннющим названием: «AMDVirtualizationTechnology and MicrosoftHyper-VSystem CompatibilityCheckUtility». Скачиванием и распаковкой вы получите рабочую версию, не требующую установки. Запустите программу с файла как на картинке.

- Раскроется окошко, строчка вверху в зеленом цвете означает, что функция поддерживается и активна;

- Когда надпись в красном цвете, аппаратная виртуализация виндовс 10 не поддерживается;

- В случае, когда надпись серая, функция имеется но не включена, выполните включение;

Включить аппаратную виртуализацию в windows 10 в отличие от прочих ОС возможно без использования BIOSa. Для этого:
- Кликните иконку «Пуск» и перейдите в строчку «ПанельУправления»;

- Выбирайте строчку «КрупныеЗначки» в правом углу сверху странички;
- Переходите к «ПрограммыИкомпоненты»;

- Выберите «ВключениеИлиОтключениеКомпонентовWindows»;

- Там кликайте «HuperV» затем «ОК»;

- Когда включить виртуализацию таким способом не вышло, переходите к следующим ниже;
Как происходит включение в БИОСе
Сначала вам следует перейти в настройки БИОСа. Как правило, открываются они нажатием кнопочки «Delete», либо «F2», либо «ESC» сразу после включения ПК/ноутбука. Внутри настройки BIOS/UEFI разнятся в различных моделях, в зависимости от материнки, процессоров и произвдителей. Поэтому при активации vt x интерфейсы могут выглядеть по разному. Не теряйтесь, ищите строки сходные по смыслу.
Если процессор amd
Включить виртуализацию в биосе на устройстве с АМД можно по-разному, в зависимости от того, старый BIOS у вас ли новый UEFI. Определитесь, какой тип у вас смотрите соответствующий пункт инструкции.
БИОС УЕФИ
Выяснили, что у вас поддерживается виртуализация, как включить подскажет эта инструкция. В БИОС вы уже попали в предыдущем пункте, теперь:
- Смотрите нижний угол в правой стороне экрана, кликайте там подраздел «AdvanceMode»;

- Зайдите на вкладочку «Advanced», отыщите и выделяйте строчку «SVMMode»;

- Подпункт может иметь иное наименование: «AMD-V» либо «SecureVirtualMachine»;
- Установите режим «Enabled» («Включено» или иной с этим же смыслом);

- Переходите ко вкладочке «Save&Exit» и кликайте «SaveChangesАndExit», чтобы сохранить установленные настройки;

- Кликните «ОК»;

- Затем выполните перезагрузку;
Для устройств с материнкой фирмы «GIGABYTE» и процом «AMDRyzen» БИОС выглядит по другому, включить amd v нужно так:
- Кликаете подпункт «РасширенныеНастройкиЧастот»;
- Затем «РасширенныеНастройкиЯдраЦП»;
- Во вкладочке «M.I.T.» отыщите подпункт «SVMMode» и около него укажите параметр «Разрешить»;

- Теперь откройте вкладочку «чипсет» и установите параметр «Разрешить» около строчки «IOMMU»;

- Нажмите «F10»- чтобы выйти с сохранением установленных параметров;
Простой БИОС
Включить виртуализацию в bios на процессоре АМД можно так:
- Переходите ко вкладочке «Advanced»;
- Там выбирайте подпункт пункт «CPUConfiguration»;
- Переходите к строчке «SecureVirtualMachinMode» выберите ее и нажмите «Энтер»;
- Установите параметр «Enabled»;

- Если имеется вкладочка «Configuration», отыщите в ней подпункт «AMD SVM Support» и там укажите параметр «Enabled»;
- Надавите «F10» для сохранения и перезагрузки;
Когда процессор intel
На устройствах с процессорами «Интел» необходимый подраздел может именоваться «IntelVirtualizationTechnology», «Vanderpool», «IntelVT-x» либо «VirtualizationExtensions». Отыщите такой, и в нем включите виртуализацию.
БИОС uefi
Новый тип BIOS для включения функции требует следующих действий:
- Кликайте слева внизу «Advanced Mode»;
- Переходите ко вкладочке «Advanced»;
- Выбирайте в списке строчку «CPUConfiguration»;
- Там ищите «IntelVirtualizationTechnology» и укажите параметр «Enabled»;

- Нажимайте «F10» и кликните подтверждение для сохранения параметров и перезагрузки;
В случае, когда у вас меню русифицированное:
- Открывайте вкладочку «Дополнительно»;
- Там подпункт «КонфигурацияПроцессора»;
- Отыщите подраздел «IntelVirtualizationTechnology» и установите напротив него «Включено»;
- На вкладочке «Advanced» переходите к «SystemAgent (SA)Configuration», в разделе где есть «CPU Configuration»;
- Укажите в строчке «VT-d» параметр «Enabled»;

- Смотрите внимательно, подпункт «Advanced Mode» бывает не отдельной вкладкой а совмещенной с «Exit»;

- Наиболее часто располагается в правом верхнем уголке;
Обычный БИОС
Для вариантов со старым привычным BIOS включение следующее:
- Открывайте вкладочку «Advanced»;
- Когда присутствует подраздел «CPUConfiguration» кликают его, но он может отсутствовать;
- Тогда ищите «VT-d» и «IntelVirtualizationTechnology» в обоих подразделах укажите параметр «Enabled»;

- Далее сохраните настройки кнопкой, соответствующей сохранению в вашем варианте БИОСа, например «F10» но может быть и иная;
