Published August 2021
This article is intended for users who are not able to upgrade to Windows 11 because their PC is not currently Secure Boot capable. If you are unfamiliar with this level of technical detail, we recommend that you consult your PC manufacturer’s support information for more instructions specific to your device.
Secure Boot is an important security feature designed to prevent malicious software from loading when your PC starts up (boots). Most modern PCs are capable of Secure Boot, but in some instances, there may be settings that cause the PC to appear to not be capable of Secure Boot. These settings can be changed in the PC firmware. Firmware, often called BIOS (Basic Input/Output System), is the software that starts up before Windows when you first turn on your PC.
To access these settings, you can consult your PC manufacturer’s documentation or follow these instructions: Run Settings > Update & Security > Recovery and select Restart now under Advanced startup. From the next screen, select Troubleshoot > Advanced options > UEFI Firmware Settings > Restart to make changes.
To change these settings, you will need to switch the PC boot mode from one enabled as “Legacy” BIOS (also known as “CSM” Mode) to UEFI/BIOS (Unified Extensible Firmware Interface). In some cases, there are options to enable both UEFI and Legacy/CSM. If so, you will need to choose for UEFI to be the first or only option. If you are unsure how to make any necessary changes to enable the UEFI/BIOS, we recommend that you check your PC manufacturer’s support information on their website. Here are a few links to information from some PC manufacturers to help get you started:
-
Dell
-
Lenovo
-
HP
While the requirement to upgrade a Windows 10 device to Windows 11 is only that the PC be Secure Boot capable by having UEFI/BIOS enabled, you may also consider enabling or turning Secure Boot on for better security.
See also
Windows 11 System Requirements
Ways to install Windows 11
Windows help & learning
Need more help?
Want more options?
Explore subscription benefits, browse training courses, learn how to secure your device, and more.
Communities help you ask and answer questions, give feedback, and hear from experts with rich knowledge.
Explore different methods to enable secure boot
by Vladimir Popescu
Being an artist his entire life while also playing handball at a professional level, Vladimir has also developed a passion for all things computer-related. With an innate fascination… read more
Updated on
- You can use Windows PowerShell or Registry Editor to enable secure boot without BIOS.
- Also, you can convert MBR to GPT to start the process using Advanced Options.
XINSTALL BY CLICKING THE DOWNLOAD
FILE
Enabling Secure boot without entering BIOS is tricky, but what if you can’t see the option on your BIOS menu?
Some methods enable you to upgrade to Windows 11 without hassle, and we will cover them all in this guide, so make sure to read through them.
What can I do to enable Secure Boot without entering BIOS?
Before engaging in detailed methods, make sure you have all of these:
- Your computer firmware must support Secure Boot. The feature is found in UEFI firmware settings.
- A valid Secure Boot certificate must be installed on the computer.
- The system must have the correct Windows version; Windows 8 and above have the Secure Boot feature.
- Make sure your BIOS is up to date.
- The boot mode should be UEFI instead of Legacy.
1. Use the Registry Editor
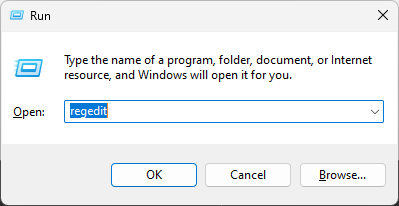
- Press Windows + R to open the Run window.

- Type Regedit and press Enter to open Registry Editor.
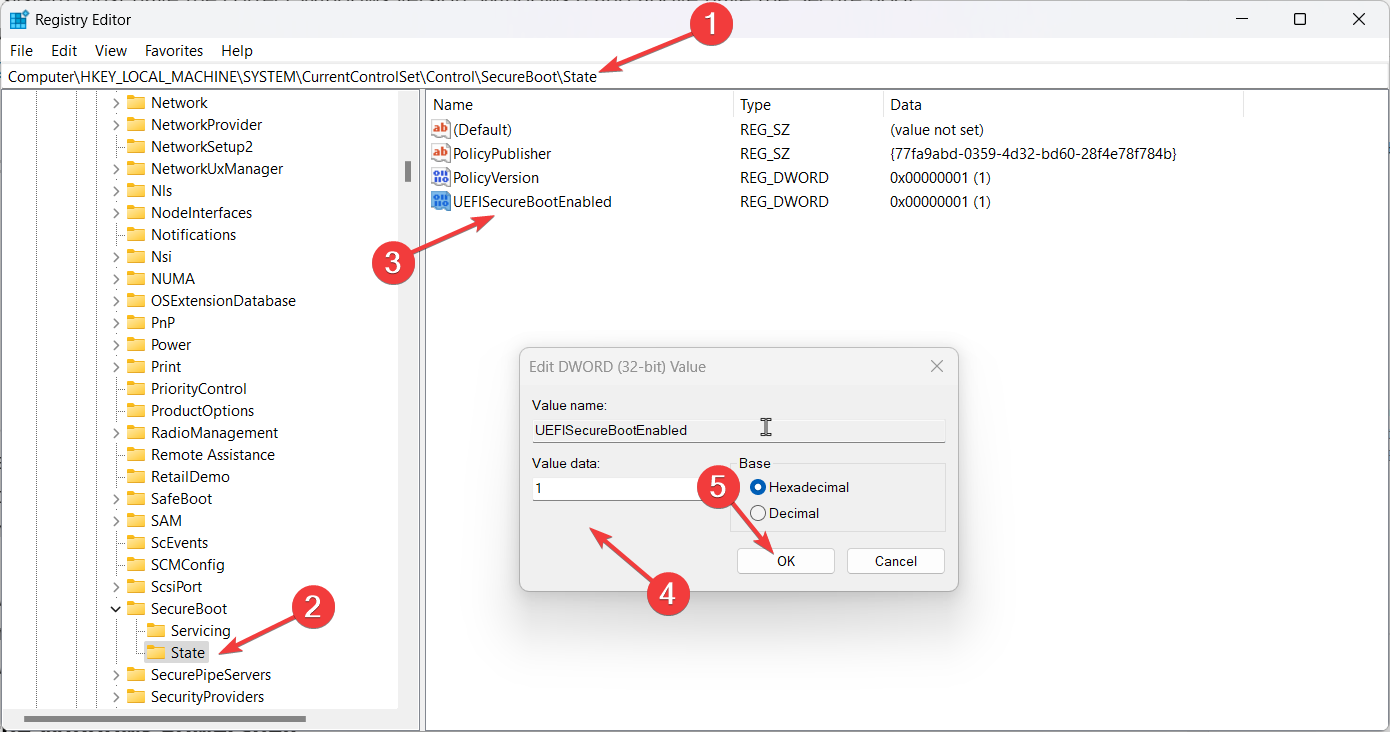
- Follow this path:
Computer\HKEY_LOCAL_MACHINE\SYSTEM\CurrentControlSet\Control\SecureBoot\State - Now locate and double-click the DWORD UEFISecureBootEnabled.

- Change the Value data to 1 and click OK.
- Now restart your computer to confirm the changes.
2. Use the Windows PowerShell
- Press the Windows key, type PowerShell, and click Run as administrator.

- Type the following command and press Enter:
Set-SecureBootUEFI -Enable - Restart your PC to confirm the changes.

- How to Use Steam Deck’s Keyboard in Desktop Mode
- How to Format an NVMe SSD on Windows 11
- How to Download & Install New Microsoft Office Fonts
- Offline Files on Windows 11: How to Enable or Disable
3. Change MBR to GPT
3.1 Check the partition style
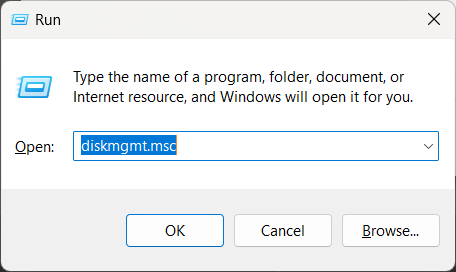
- Press Windows + R to open the Run box.

- Type diskmgmt.msc and hit Enter to open Disk Management.
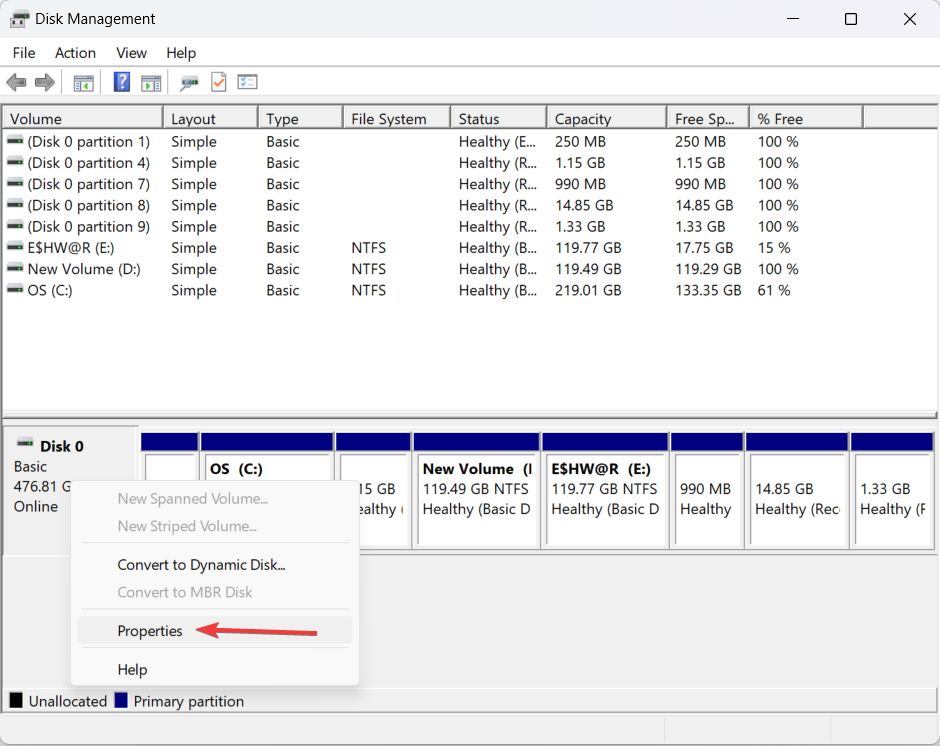
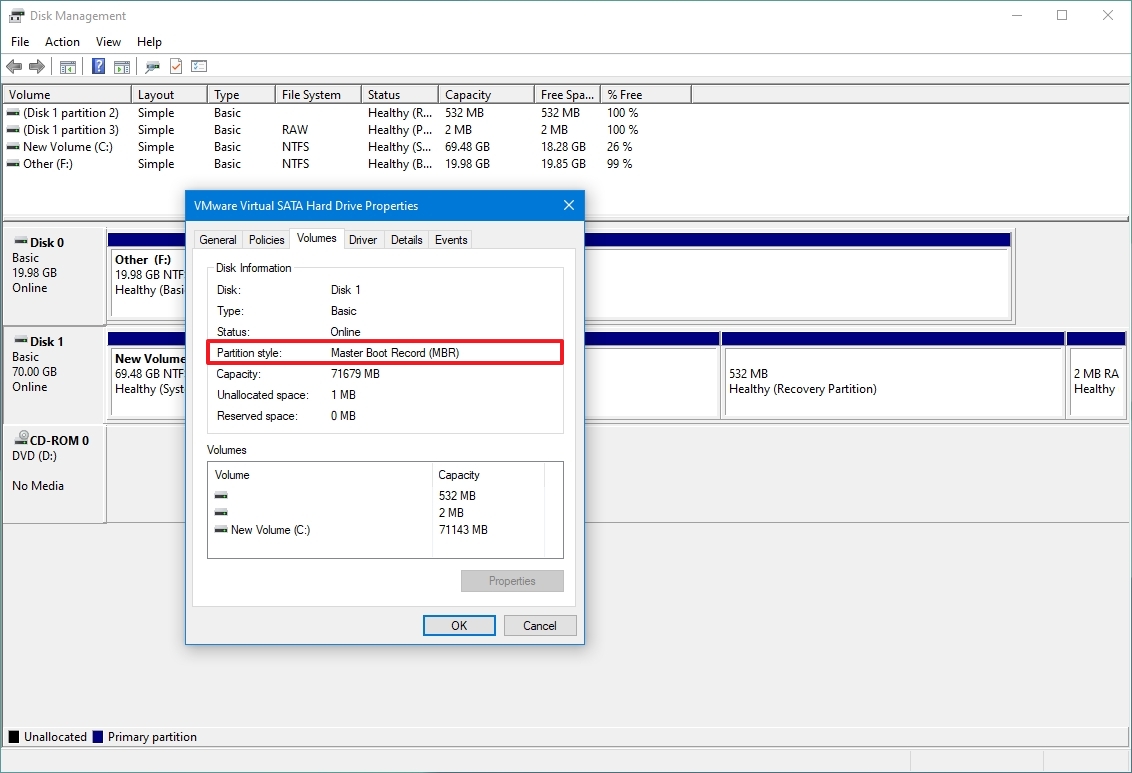
- Right-click on Disk 0 and select Properties.

- Now go to the Volumes tab, and check the partition style. If it is MBR, proceed.
3.2 Change the partition style
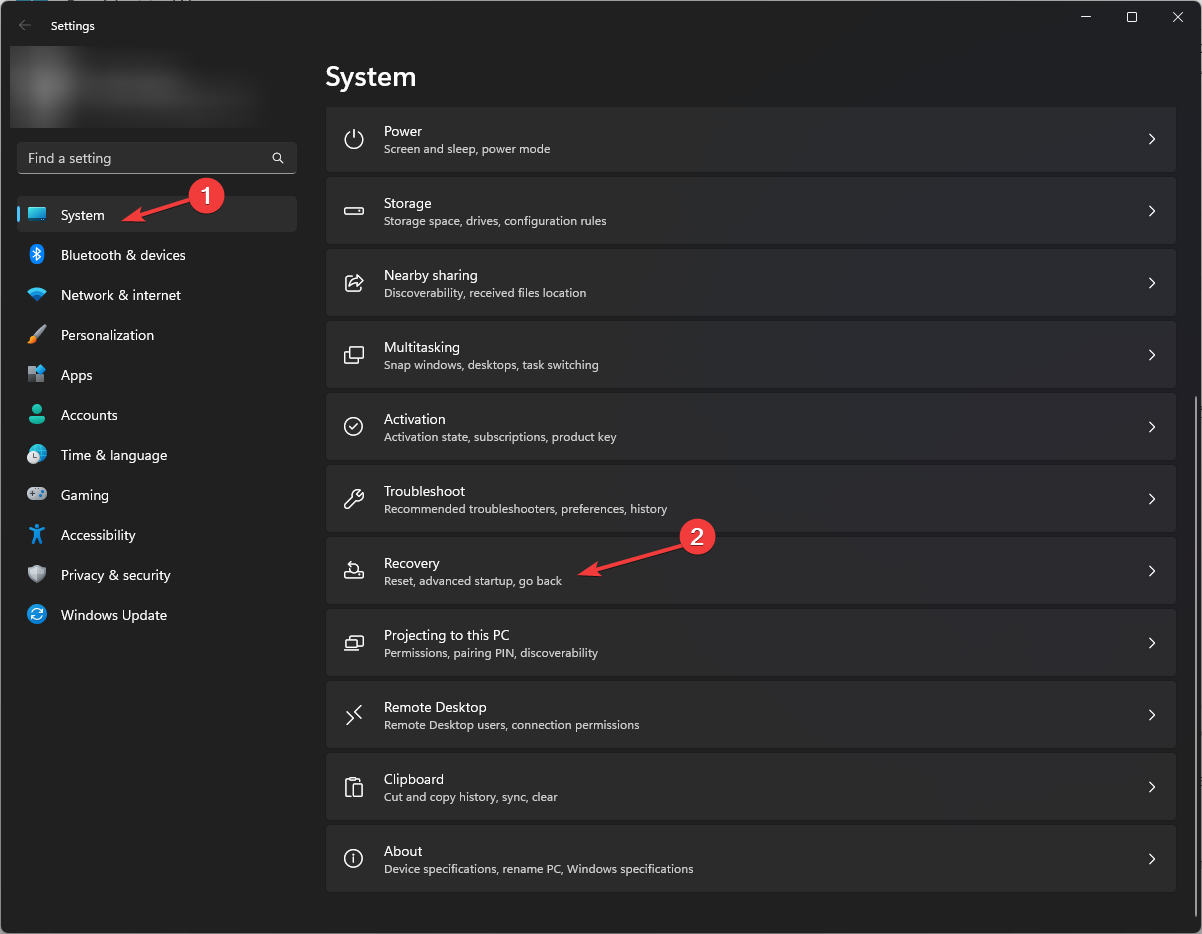
- Press Windows + I to open Settings.
- Go to System, then click Recovery.

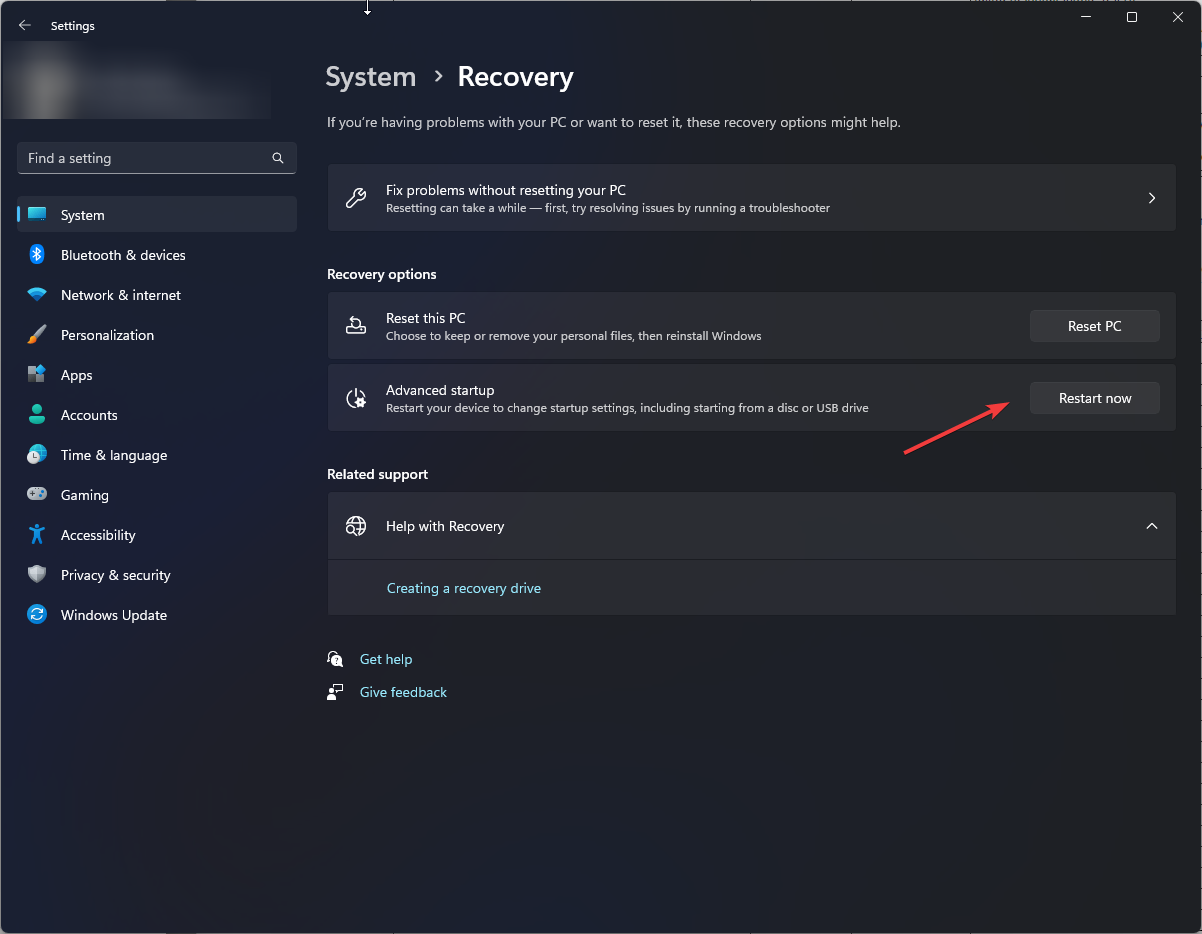
- Under Advanced startup, click Restart now.
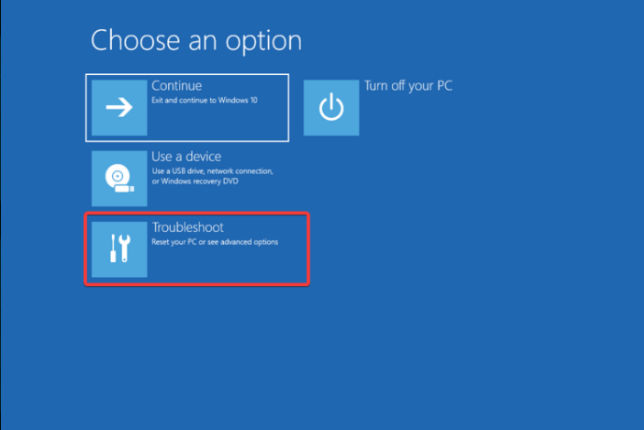
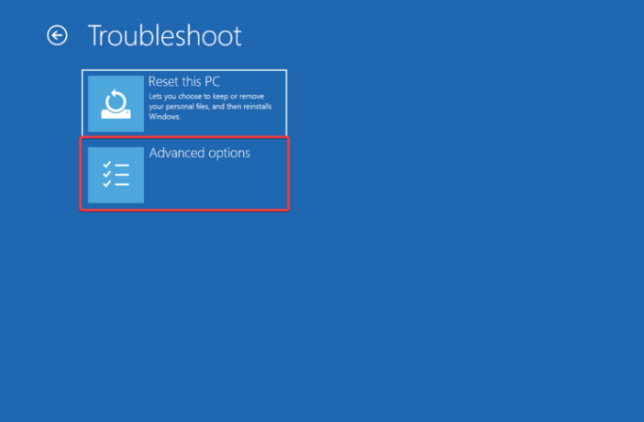
- Now from Choose an option window, click Troubleshoot.

- Click Advanced Options.

- Select Command Prompt from the Advanced Options window.
- The computer will restart, select the user account and enter the password.
- Now you will get the Command Prompt window.
- Type the following command and press Enter:
mbrtogpt / validate / disk : 0 - Once you get validation completed successfully, copy and paste the following command and press Enter:
mbrtogpt / convert / disk : 0 - Now when you have the conversion completed successfully message, type the following command and press Enter: exit
- From Choose an option screen, click Turn off your PC. Restart your computer and try to install Windows.
So, these are methods that you can use to enable secure boot without BIOS. Try them and let us know what worked for you in the comments below.
![]()
(Image credit: Future)
As part of the system requirements, alongside a Trusted Platform Module (TPM), a device must have «Secure Boot» enabled to install Windows 11.
Secure Boot is a security feature available on most modern hardware with UEFI firmware to provide a secure environment to start Windows and prevent malware from hijacking the system during the boot process. In other words, Secure Boot allows the computer to boot only with trusted software from the Original Equipment Manufacturer (OEM).
The benefit of this feature is a more secure experience, which is one of the reasons Microsoft is making it a requirement to install Windows 11. The only problem is that enabling this feature will prevent running other operating systems like Linux.
This guide will walk you through the steps to check and enable Secure Boot to upgrade from Windows 10 to 11.
How to check Secure Boot state on Windows 10
To check the Secure Boot state on Windows 10, use these steps:
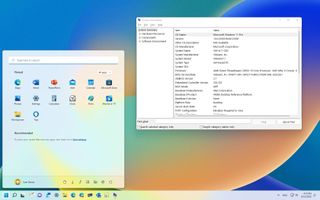
- Open Start.
- Search for System Information and click the top result to open the app.
- Click on System Summary on the left pane.
- Check the «Secure Boot State» information:
- On — the feature is enabled.
- Off — the feature is disabled or not supported.
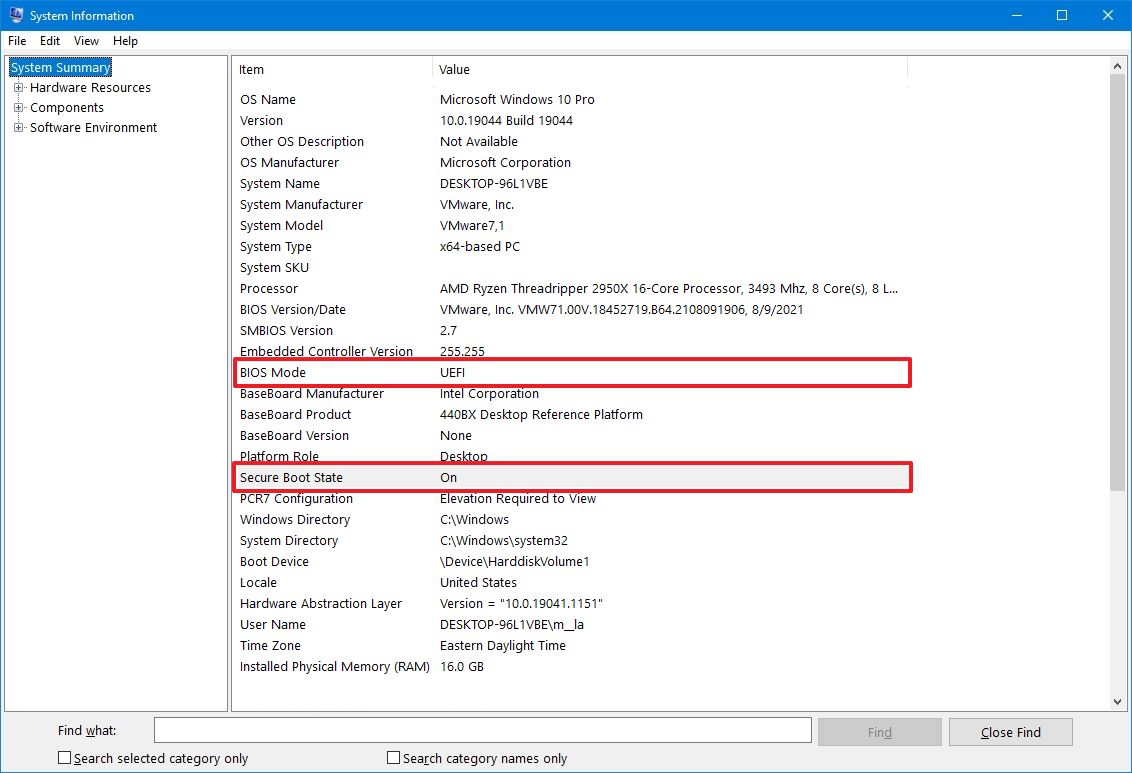
- Check the «BIOS Mode» information:
- UEFI — indicates you can enable Secure Boot.
- Legacy (BIOS) — indicates you can enable the feature, but it will require additional steps.
Once you complete the steps, if the «Secure Boot State» is Off and BIOS Mode is UEFI, you can use the steps outlined below to enable a more secure experience and comply with the Windows 11 requirements.
If the «Secure Boot State» is set to Off and «BIOS Mode» to Legacy, then you want to create a backup of your computer, use the following instructions to convert the installation from MBR to GPT, and then continue with the steps to enable Secure Boot.
How to convert MBR to GTP drive on Windows 10
If you plan to upgrade Windows 10 to Windows 11 on older hardware that supports UEFI, you must first convert the drive from the legacy MBR partition style to GPT in order to switch the system firmware type properly. Otherwise, the computer will no longer start correctly.
On Windows 10, you can use the MBR2GPT command-line tool to change the partition type from MBR to GTP without reinstalling Windows.
Check MBR or GPT partition style
To check the current drive partition style, use these steps:
- Open Start.
- Search for Disk Management and click the top result to open the experience.
- Right-click the Windows 10 disk (not the volume) and select the Properties option.
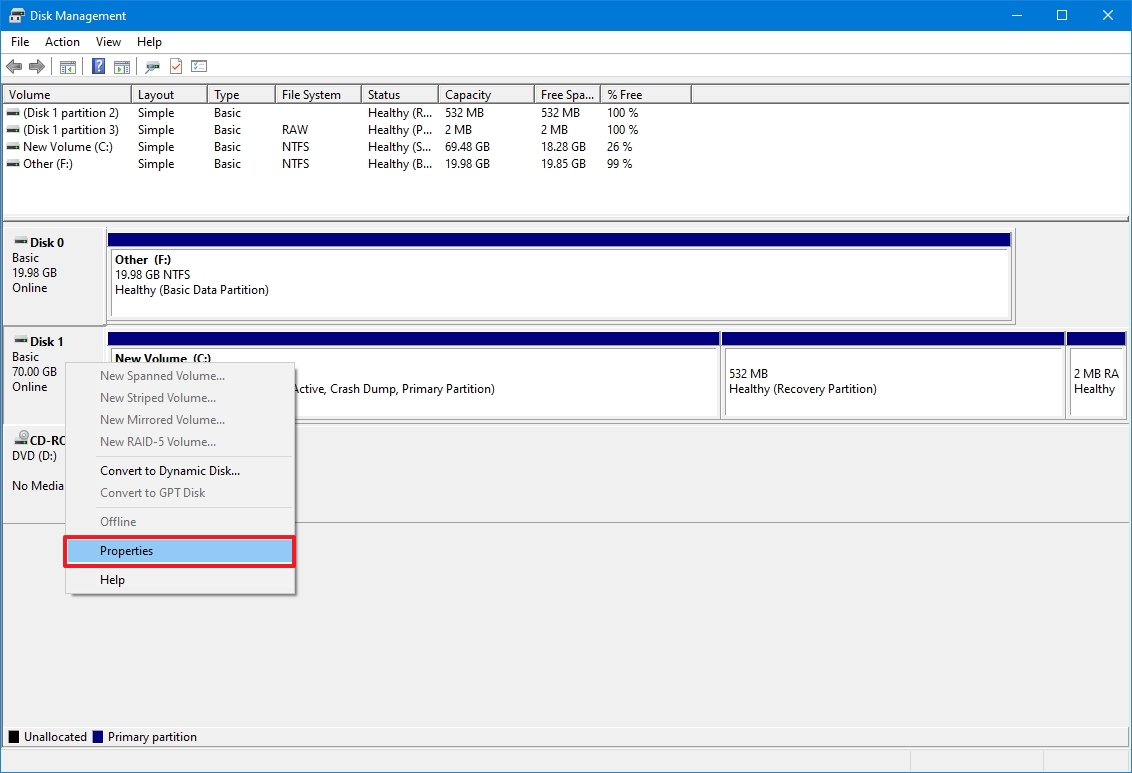
- Click on the Volumes tab.
- Under the «Partition style» field, if the field reads GUID Partition Table (GPT), the drive does not need conversion, but if you see the Master Boot Record (MBR) label, you can use the conversion tool to switch.
- Click the Cancel button.
Once you complete the steps, if the drive needs conversion, use the instructions outlined below.
Convert MBR to GPT partition style
To convert MBR to GPT partition style on Windows 10, use these steps:
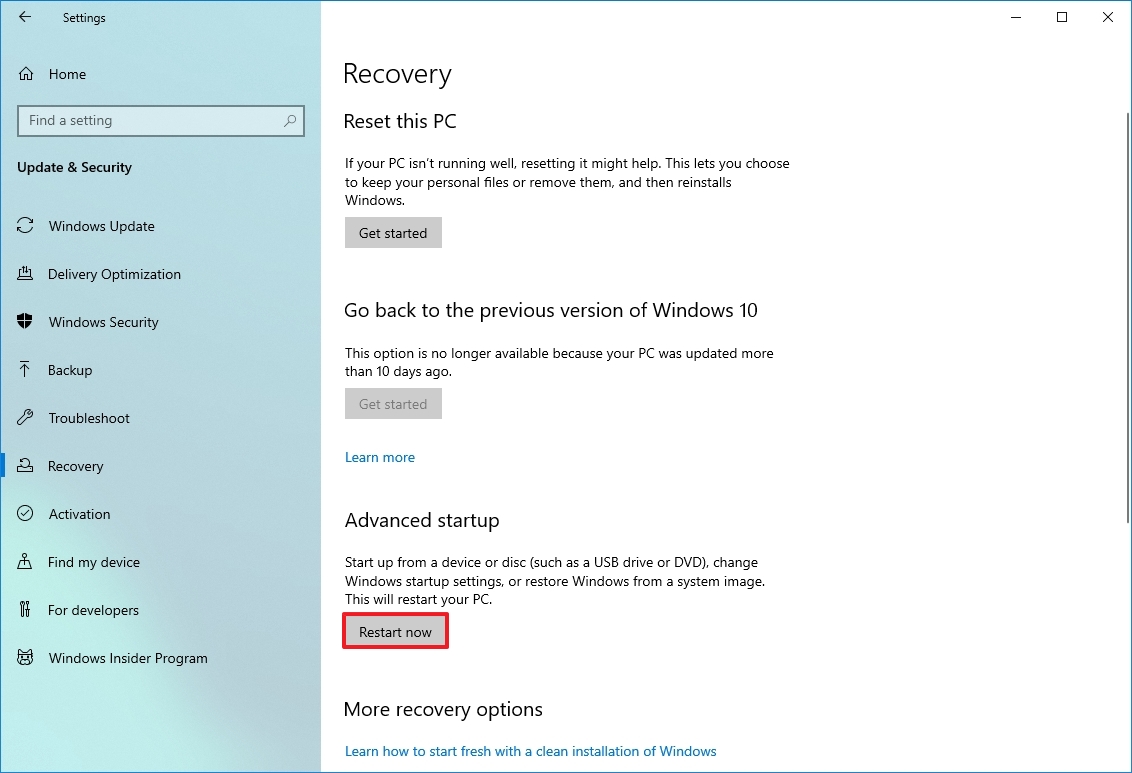
- Open Settings.
- Click on Update & Security.
- Click on Recovery.
- Under the «Advanced startup» section, click the Restart now button.
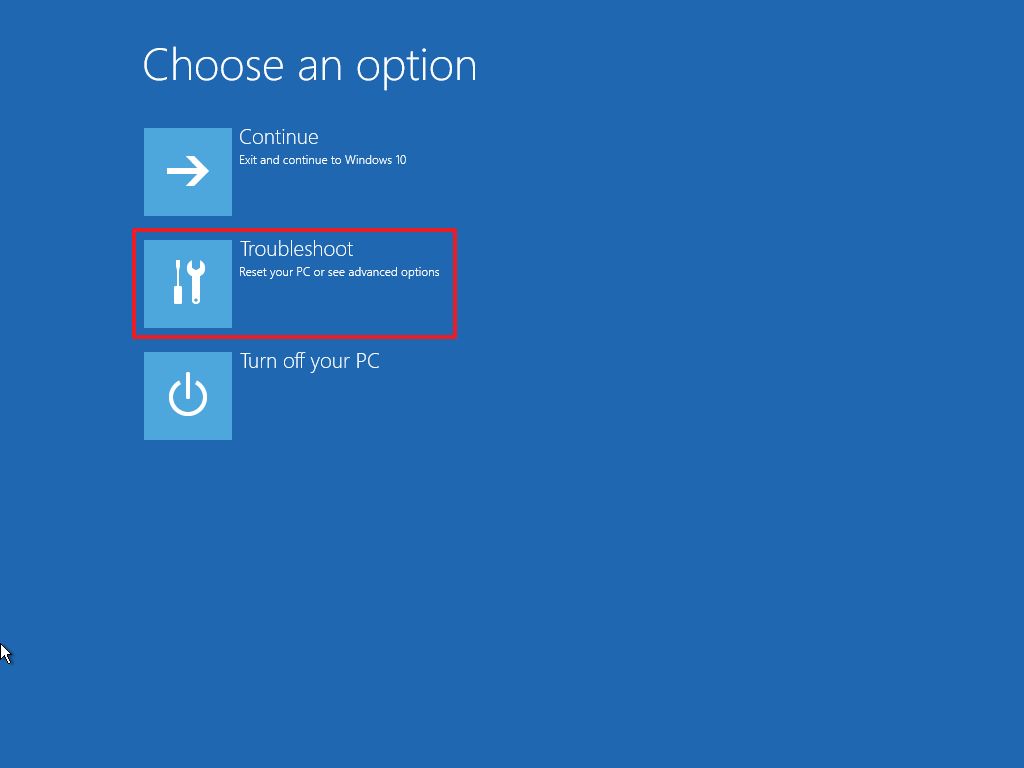
- Click the Troubleshoot option.
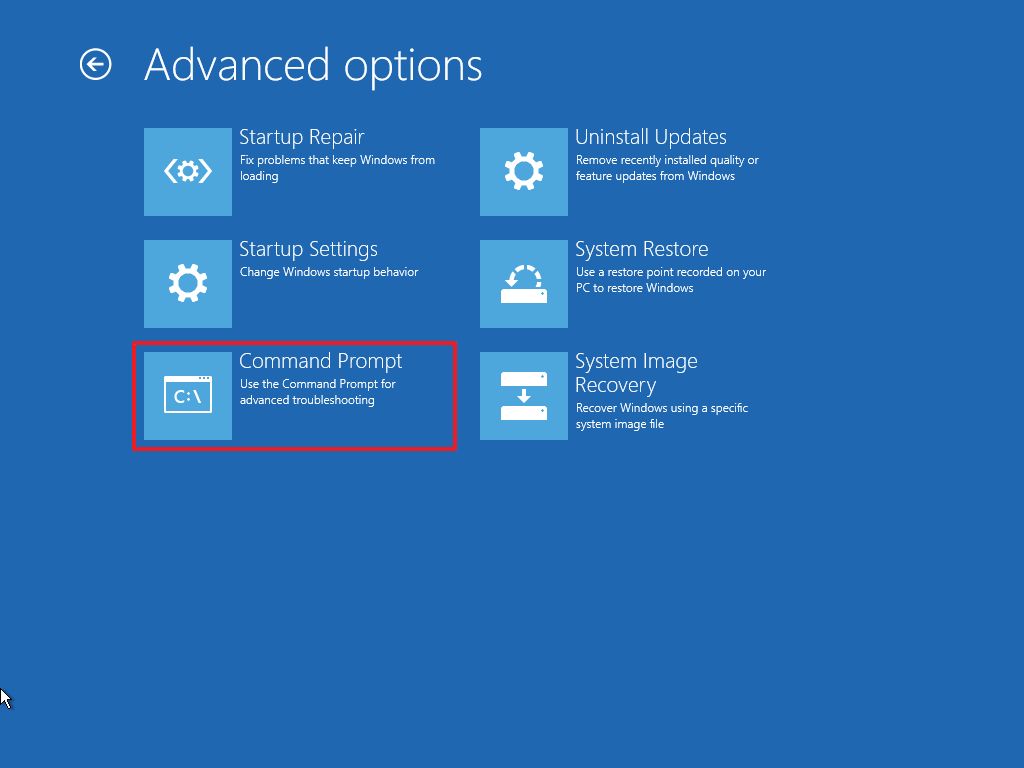
- Click on Advanced options.
- Click the Command Prompt option.
- Select your administrator account and sign in (if applicable).
- Type the following command to validate that the drive meets the requirements and press Enter: mbr2gpt /validate
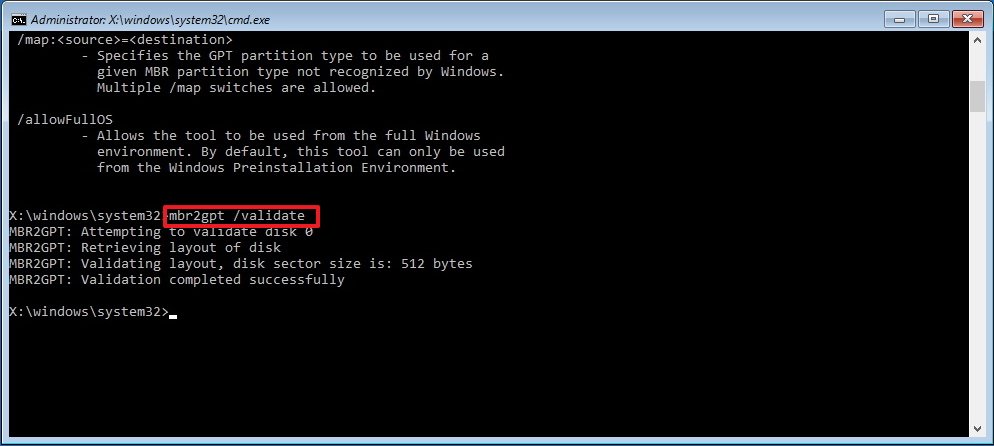
- Quick tip: The mbr2gpt.exe is located in the «System32» folder inside the «Windows» folder. If you want to see all the available options, use the mbr2gpt /? command.
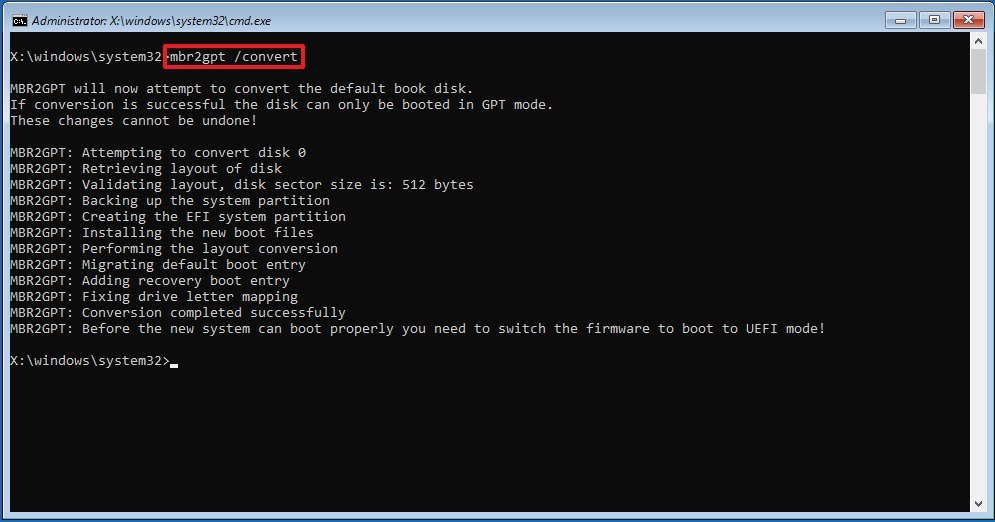
- Type the following command to convert the drive from MBR to GPT and press Enter: mbr2gpt /convert
- Click the Close button.
- Click the Turn off your PC option.
After you complete the steps, the command-line tool will change the partition type to GPT to comply with the system requirements to install Windows 11.
If the conversion is successful, the return code should be «0,» but if the process fails, you may see one of the 11 error codes.
How to enable Secure Boot on Windows 10
Changing the incorrect firmware settings can prevent a computer from starting correctly. You should access the motherboard settings only when you have a good reason. It’s assumed you know what you’re doing.
Also, these steps assume the device is already running with UEFI firmware. If the computer is still in the legacy BIOS, you may first need to convert the drive using MBR to GPT (see above steps). The conversion is unnecessary if you plan to perform a clean installation, but you must go through the conversion before an in-place upgrade. Converting the drive partition should not affect the installation, but creating a backup is always recommended before proceeding.
To enable the Secure Boot on a computer with UEFI firmware, use these steps:
- Open Settings.
- Click on Update & Security.
- Click on Recovery.
- Under the «Advanced startup» section, click the Restart now button.
- Click on Troubleshoot.
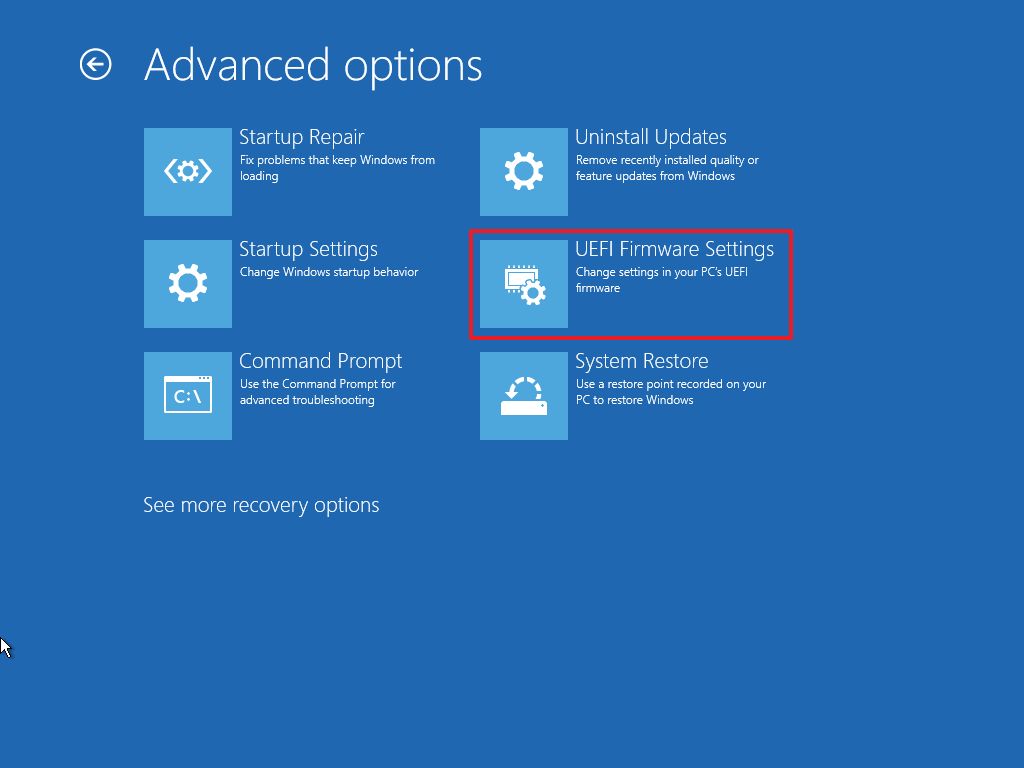
- Click on Advanced options.
- Click the UEFI Firmware Settings option.
- Quick tip: If you have a legacy BIOS, the option will not be available.
- Click the Restart button.
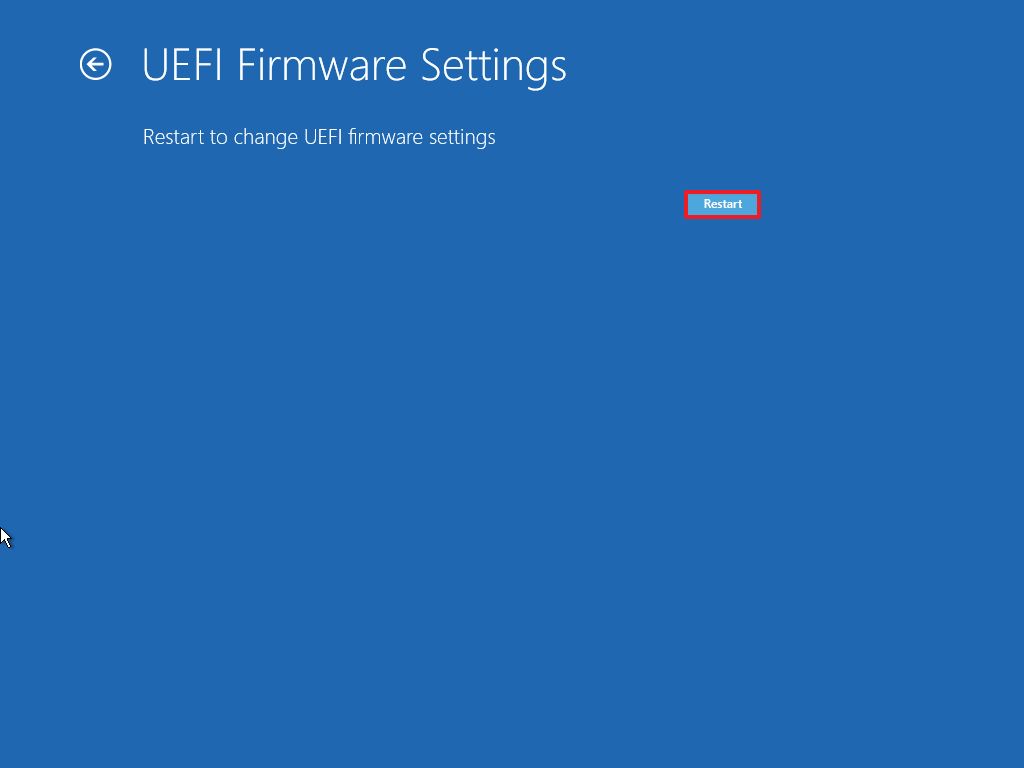
- Open the boot or security settings page.
- Quick note: The UEFI settings are different per manufacturer and even per computer model. You may need to check the manufacturer support website for more specific details to find the settings.
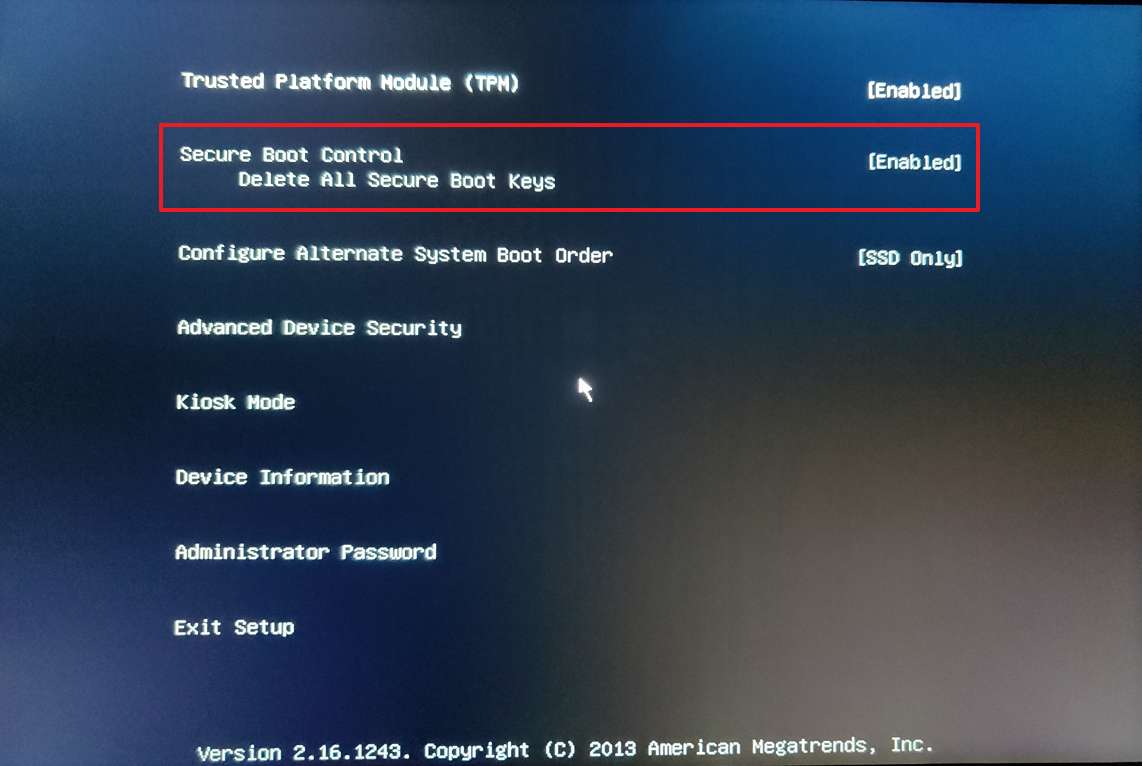
- Select the Secure Boot option and press Enter.
- Select the Enabled option and press Enter.
- Exit the UEFI settings.
- Confirm the changes to restart the device.
After you complete the steps, the computer will start using the Secure Boot feature to comply with the Windows 11 requirements.
How to enable Secure Boot during startup
You can also enable Secure Boot on the computer during startup instead of using the Settings app.
To access the device firmware during the boot process on Windows, use these steps:
- Press the Power button.
- See the screen splash to identify the key you must press to enter the firmware (if applicable).
- Press the required key repeatedly until you enter the setup mode. Usually, you need to press the Esc, Delete, or one of the Function keys (F1, F2, F10, etc.).
- Open the boot or security settings page (as needed).
- Select the Secure Boot option and press Enter.
- Select the Enabled option and press Enter.
- Exit the UEFI settings.
- Confirm the changes to restart the device.
Once you complete the steps, Secure Boot will enable you to support the installation of Windows 11.
If you cannot access the keyboard’s firmware, you may need to check the manufacturer documentation to find the keyboard key to use during boot. Here are some brands and their respective keys to access the motherboard’s firmware:
- Dell: F2 or F12.
- HP: Esc or F10.
- Acer: F2 or Delete.
- ASUS: F2 or Delete.
- Lenovo: F1 or F2.
- MSI: Delete.
- Toshiba: F2.
- Samsung: F2.
- Surface: Press and hold the volume up button.
More resources
For more helpful articles, coverage, and answers to common questions about Windows 10 and Windows 11, visit the following resources:
- Windows 11 on Windows Central — All you need to know
- Windows 10 on Windows Central — All you need to know
All the latest news, reviews, and guides for Windows and Xbox diehards.
Mauro Huculak is technical writer for WindowsCentral.com. His primary focus is to write comprehensive how-tos to help users get the most out of Windows 10 and its many related technologies. He has an IT background with professional certifications from Microsoft, Cisco, and CompTIA, and he’s a recognized member of the Microsoft MVP community.
Microsoft has labeled secure boot as a requirement to install Windows 11. It is a security feature provided by Unified Extensible Firmware Interface (UEFI) that prevents your system from being vulnerable to malware during the start-up process.
Secure boot allows your system to boot up only by using the trusted software from the Original Equipment Manufacturer (OEM). It provides a unique protection strategy by detecting and preventing malware from hijacking and infecting your system.
So, how do you enable it? The guide below can help you understand and effectively enable secure boot in your system.
Table of Contents
How to Check if Secure Boot Is Enabled
Before entering the BIOS, it’s smart to check if secure boot is enabled and available in your system. You can do so by following the steps shown below:
- On the Start menu, search for and select System Information.
- From the left panel, select System Summary.
- Scroll down till you see Secure Boot State and note whether it’s enabled or not.
- Here, you can also see the BIOS mode your system is using.


Your system will be more secure once you enable secure boot as it helps resist attacks to boot loaders and key operating system files of your PC. There are a few steps you can follow before you enable secure boot in your system.
Converting MBR to GPT partition and changing the BIOS mode to UEFI is not a prerequisite to enabling secure boot in your system. But these steps are handy if you are upgrading your operating system to Windows 11.
Convert MBR Drive Partition to GPT
Windows 11 does not boot up on the MBR drive partition. Hence, you should first convert the disk partition from MBR to GPT. Additionally, it’s recommended to back up your files before changing the disk partition as a safety measure. The steps below show you how to change your disk partition to GPT.
- Right-click on the Start menu icon and select Disk Management.
- Now, right-click on your disc and go to Properties.

- Click on Volumes.
- If it reads GPT on Partition Style, you can move on over to the next step.
However, if the Partition Style is set as MBR, you should convert it into GPT.
- Close the window.
- Press the Windows Key + R on your keyboard to open the Run dialog box.
- On the Start menu, search for cmd and run as administrator.
- Type the following command and hit enter.
mbr2gpt.exe /convert /allowFullOS
- After the processing is completed, your disk partition will be set as GPT.


Change the BIOS Mode From Legacy to UEFI
The UEFI firmware interface is known to address the limitations of the Legacy firmware. UEFI is more efficient and has additional security features than the Legacy firmware. It’s also more user-friendly and uses a GPT disk partition that can support up to 9.4ZB of storage.
The steps below show how to change your firmware to UEFI.
- While your PC is booting up, enter the BIOS setup by pressing F2, or the Delete button.
However, this button configuration varies depending on your system. - Go to the Boot tab.
- Set the Boot Mode to UEFI.

- Press F10 to save your changes and then, restart your PC.

Enable Secure Boot
If the secure boot state is not enabled on your system, you should manually enable it through the BIOS settings. The general layout of the BIOS will be different depending on your system manufacturer, however, the core idea remains the same.
The steps below show how you can enable secure boot in your system.
- While your PC is booting up, you can enter the BIOS setting by tapping the BIOS key set by your system manufacturer.
Tap either F10, F12, F1, F2, or the Delete button on your keyboard during Windows startup to enter the BIOS. - Look for the secure boot option in either the Boot, Security, Authentication or Custom tab.
- Enable Secure Boot.

- Press F10 to save your changes.

Alternatively, you can enter the BIOS and enable the secure boot through the Windows recovery environment as well. This companion feature of Windows 10 can help a user in troubleshooting, recovering and the booting up processes.
Here’re the steps:
- Go to Settings on your PC.
- Click on Updates & Security.
- Select Recovery.
- Click on Restart Now.

- Choose Troubleshoot.

- Select Advanced Options.
- Click UEFI Firmware Settings.

- Restart your system when prompted. You’ll now enter the BIOS setting.
- Once here, head on over to the Boot tab.
- Enable Secure Boot.
- Press F10 to save your changes


And, Voila! Secure Boot is now enabled on your PC. Furthermore, the entire process is the same if you want to enable secure boot through Windows 11 user mode.
- Зачем включать режим безопасной загрузки на Windows 11?
- Как проверить, включена ли безопасная загрузка?
- Включение безопасной загрузки из-под Windows 10
- Включение безопасной загрузки из настроек BIOS/UEFI
Сразу обозначим такой момент — безопасную загрузку в Windows 11 включить не то чтобы невозможно, это, скажем так, нелогично. Ведь требования к компьютеру со стороны данной версии операционной системы гласят, что для ее установки тот должен поддерживать Secure Boot (это и есть «Безопасная загрузка»). Т.е. если установка Windows 11 прошла успешно, это значит, что функция Secure Boot уже и так активна.
Потому мы будем рассматривать вопрос, как включить безопасную загрузку для последующей установки Windows 11. А это уже можно сделать через Windows 10, точнее — из среды восстановления (WinRE). Есть и «традиционный» способ активации Secure Boot — из пользовательского интерфейса (настроек) чипа BIOS/UEFI.
Зачем включать режим безопасной загрузки на Windows 11?
Если вкратце функция Secure Boot предназначена для защиты Windows и, как следствие, компьютера от вредоносных программ, способных загружаться вместе с операционной системой. Подобные вирусы считаются наиболее опасными, т.к. они загружаются до антивируса, благодаря чему последний не может их обнаружить. Обычно так действуют самые изощренные вирусы — шифровальщики данных (и по совместительству — вирусы-вымогатели), руткиты (открывают удаленный доступ к компьютеру), майнеры («добывают» криптовалюту, используя мощности компьютера) и т.д.
И, конечно, безопасная загрузка просто необходима для пользователей Windows 10, решивших обновиться до Windows 11 через «Центр обновлений» либо путем записи на загрузочную флешку оригинального образа системы (у неоригинальных, т.е. пиратских/модифицированных образов эта функция проверки наличия Secure Boot может быть отключена).
Как проверить, включена ли безопасная загрузка?
Невозможность обновиться с 10-ки до Windows 11 может быть связана с несколькими причинами. Потому сначала не мешало бы убедиться, действительно ли на компьютере отключена безопасная загрузка. Для этого:
- Вызовите сочетанием клавиш «Win + R» окно «Выполнить», введите в него без кавычек команду «msinfo32» и нажмите «ОК»:
 1
1
- Откроется окно «Сведения о системе». В правой его части найдите элемент «Состояние безопасной загрузки»:
- Если здесь указано «Откл.», значит, Secure Boot либо не включен, либо вообще не поддерживается компьютером.
Другой способ — использование бесплатной программы WhyNotWin11, которая предназначена для определения совместимости компьютера с Windows 11:
- Скачать программу WhyNotWin11 можно на нашем сайте.
- Просто запустите ее и посмотрите, что указано напротив «Secure Boot»:
Теперь, когда мы выяснили, что причина невозможности обновления до Windows 11 кроется в отключенной функции Secure Boot, можно приступать к ее включению.
Включение безопасной загрузки из-под Windows 10
Для начала откройте окно «Параметры» сочетанием клавиш «Win + I» (или кликнув по значку «Параметры» с изображением шестеренки в меню «Пуск»). Далее откройте в этом окне вкладку «Восстановление», затем в правой его части в блоке «Особые варианты загрузки» кликните по кнопке «Перезагрузить сейчас»:
Дальнейшие действия будут выполняться после перезагрузки компьютера:
- После включения компьютера операционная система войдет в режим восстановления «WinRE». Кликните по кнопке «Поиск и устранение неисправностей»:
- Далее выбираем «Дополнительные параметры»:
- Далее «Параметры встроенного ПО UEFI»:
Включение безопасной загрузки из настроек BIOS/UEFI
Для начала нам нужно попасть в сами настройки (пользовательский интерфейс) чипа BIOS/UEFI. Обычно это можно сделать путем нажатия функциональной клавиши (от F1 до F10, а чаще всего — F2) или клавиши Del/Delete сразу после включения компьютера. Но существуют и другие варианты открытия настроек BIOS/UEFI — здесь все зависит от модели материнской платы.
Это можно выяснить самому — при включении компьютера на экране обычно присутствует надпись с указанием клавиши, нажатие на которую приведет к открытию настроек BIOS/UEFI. Например, «Press <Del> to enter setup», «Press <F2> to run setup» или «Press F1 to continue, DEL to enter SETUP», как здесь:
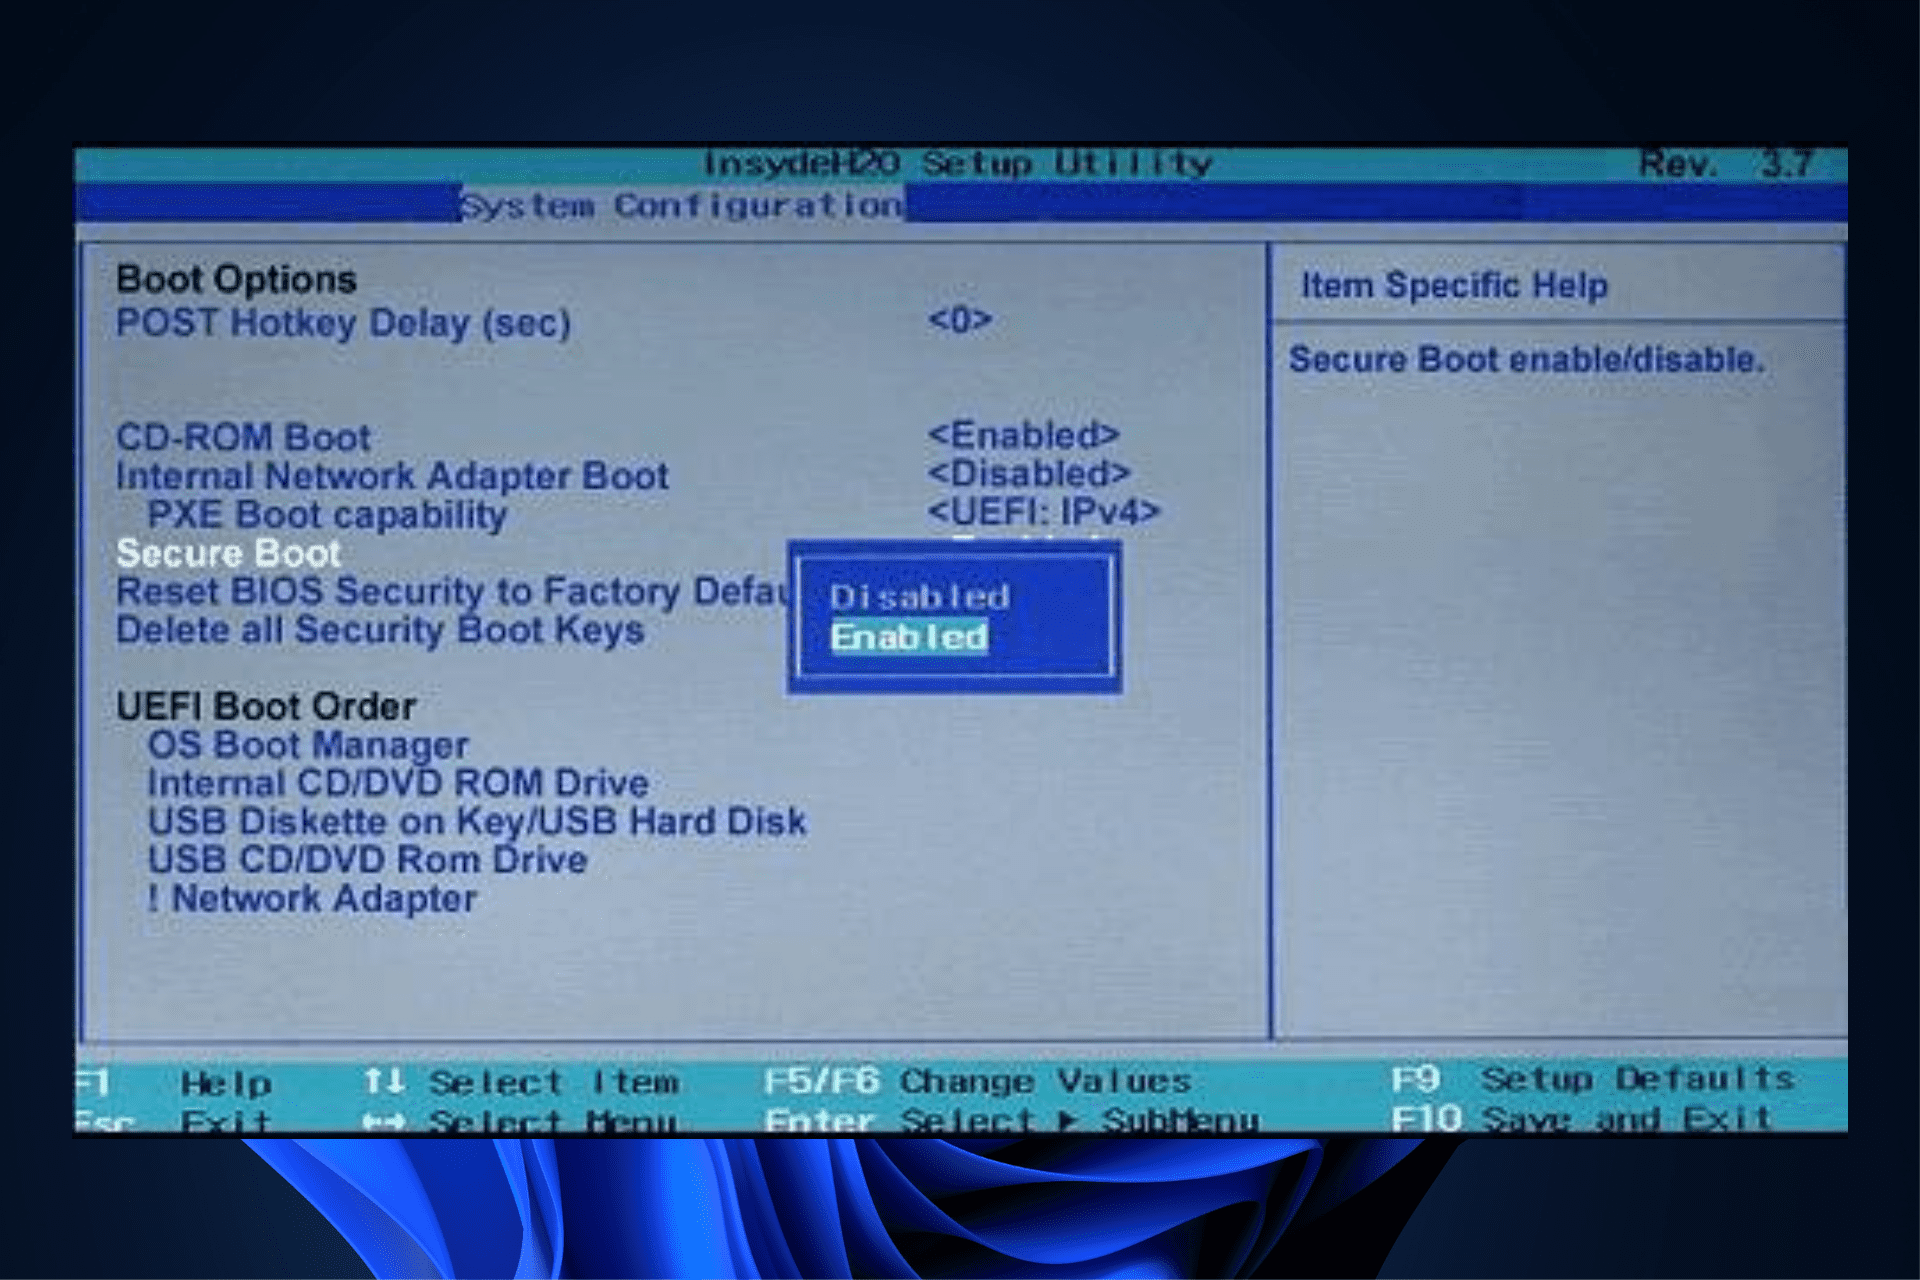
После входа в пользовательский интерфейс BIOS/UEFI, предстоит немного «покопаться» в нем (мы не может точно сказать, где находится нужная опция, т.к. данный интерфейс может иметь разную структуру). Нам требуется найти опцию, которая отвечает за активацию безопасной загрузки. В большинстве случаев она находится во вкладке/в разделе «Boot», но не всегда. Опция, как правило, прямо так и называется — «Secure Boot».
Вот пример пользовательского интерфейса BIOS/UEFI, в котором нужная опция расположена в разделе «System Configuration»:
А в этом конкретном случае нужная нам опция находится в меню «Security»:
Вот пример расположения опции «Secure Boot» в современном графическом интерфейсе UEFI материнской платы Asus:
Если опцию «Secure Boot» не удается найти, возможно, что предварительно нужно активировать или перенастроить какой-либо другой параметр BIOS/UEFI. Об этом можно узнать из документации к материнской плате или просто в интернете. Но чтобы начать поиски, потребуется сначала определить модель платы. Это можно сделать из рассмотренного раньше системного приложения «msinfo32», т.е. «Сведения о системе»:
На этом и завершим.