Use Remote Desktop on your Windows, Android, or iOS device to connect to a Windows 10 PC from afar. Here’s how to set up your PC to allow remote connections and then connect to the PC you set up.
Note: While a Remote Desktop server (as in, the PC that you are connecting to) needs to be running a Pro edition of Windows, a client machine (the device you are connecting from) can be running any edition of Windows (Pro or Home), or even a different operating system altogether.
-
Set up the PC you want to connect to so it allows remote connections:
-
Make sure you have Windows 11 Pro. To check this, select Start , and open Settings . Then, under System , select About , and under Windows specifications, look for Edition. For info on how to get Windows 11 Pro, go to Upgrade Windows Home to Windows Pro.
-
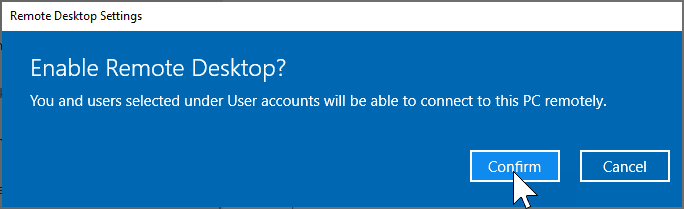
When you’re ready, select Start , and open Settings . Then, under System , select Remote Desktop, set Remote Desktop to On, and then select Confirm.
-
Make note of the name of this PC under PC name. You’ll need this later.
-
-
Use Remote Desktop to connect to the PC you set up:
-
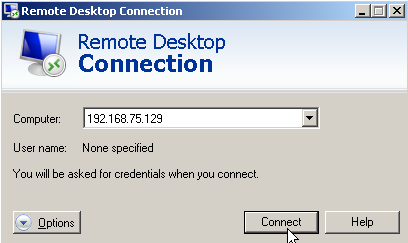
On your local Windows PC: In the search box on the taskbar, type Remote Desktop Connection, and then select Remote Desktop Connection. In Remote Desktop Connection, type the name of the PC you want to connect to (from Step 1), and then select Connect.
-
On your Windows, Android, or iOS device: Open the Remote Desktop app (available for free from Microsoft Store, Google Play, and the Mac App Store), and add the name of the PC that you want to connect to (from Step 1). Select the remote PC name that you added, and then wait for the connection to complete.
-
-
Set up the PC you want to connect to so it allows remote connections:
-
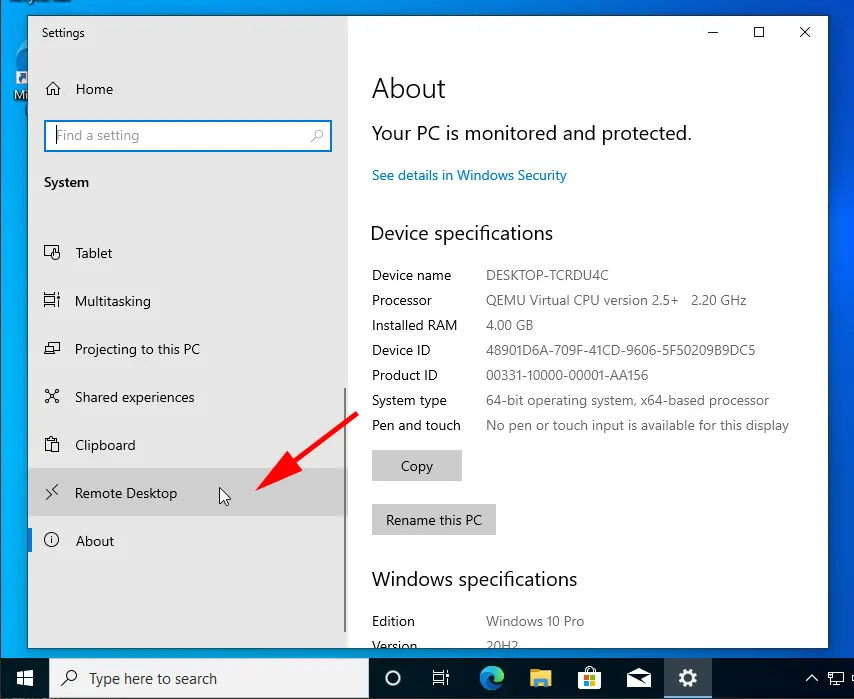
Make sure you have Windows 10 Pro. To check this, go to Start > Settings > System > About and look for Edition. For info on how to get Windows 10 Pro, go to Upgrade Windows 10 Home to Windows 10 Pro.
-
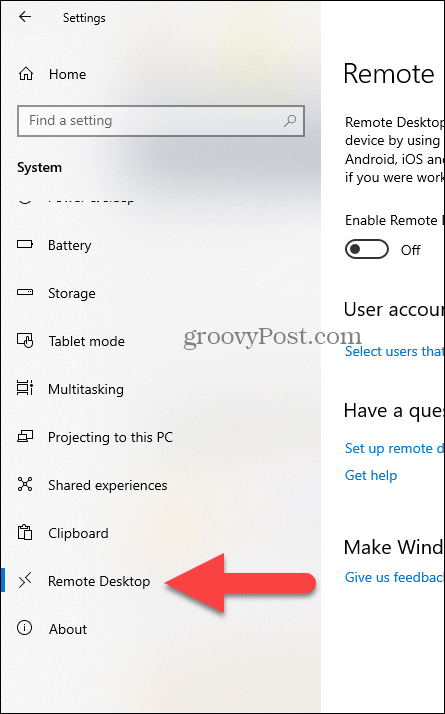
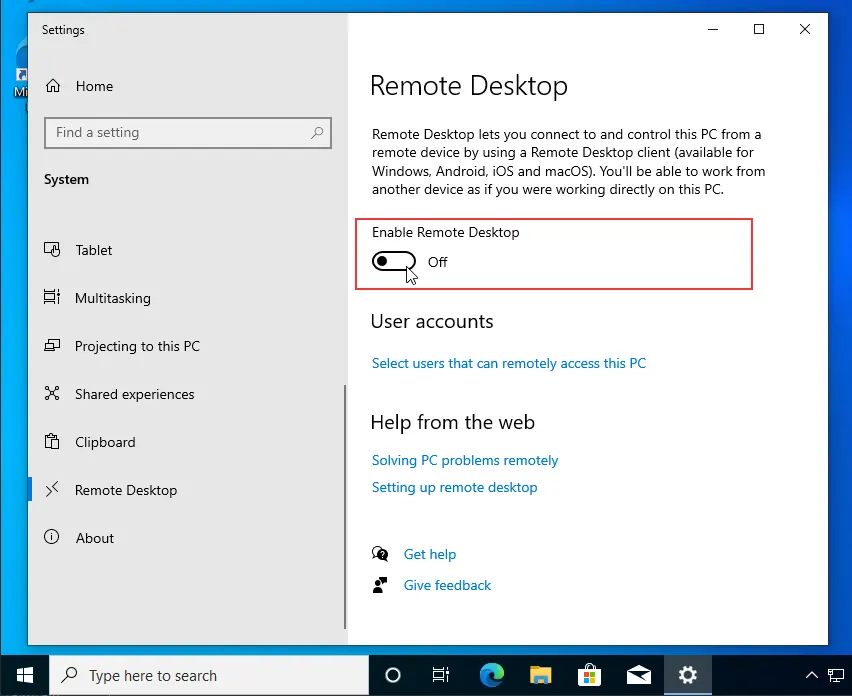
When you’re ready, select Start > Settings > System > Remote Desktop, and turn on Enable Remote Desktop.
-
Make note of the name of this PC under How to connect to this PC. You’ll need this later.
-
-
Use Remote Desktop to connect to the PC you set up:
-
On your local Windows PC: In the search box on the taskbar, type Remote Desktop Connection, and then select Remote Desktop Connection. In Remote Desktop Connection, type the name of the PC you want to connect to (from Step 1), and then select Connect.
-
On your Windows, Android, or iOS device: Open the Remote Desktop app (available for free from Microsoft Store, Google Play, and the Mac App Store), and add the name of the PC that you want to connect to (from Step 1). Select the remote PC name that you added, and then wait for the connection to complete.
-
Enable Remote Desktop
Need more help?
Want more options?
Explore subscription benefits, browse training courses, learn how to secure your device, and more.
Communities help you ask and answer questions, give feedback, and hear from experts with rich knowledge.


*This article was updated to accommodate a guide for enabling Remote Desktop on Windows 11.
Microsoft Remote Desktop is most frequently used to provide technical support or control a computer remotely. It allows you to get full access to your Windows PC from another Windows, Mac, or Linux computer in order to transfer files, play video games, operate locally-attached peripherals, etc.
But before using Remote Desktop Protocol (RDP) to connect to a remote device, you should enable Remote Desktop first.
In this guide, we’ll explain how to allow remote desktop access to your computer using the Settings app in Windows 10/11 or the more traditional Control Panel.
Note: Remote Desktop is not available on Windows 10 and Windows 11 Home edition. Remote Desktop is only available for Pro and Enterprise versions. However, you could still use third-party solutions like Chrome Remote Desktop or Teamviewer to set up Remote Desktop on Windows 10/11 Home.
Enable RDP via System Settings in Windows 11
Let’s take a closer look at how to turn on RDP on Windows 11 with the help of the standard Settings app.
- Open Start → Settings.
- In the Settings window, select “System”. Then scroll down and click “Remote Desktop” on the right pane.

- Click the toggle switch button to enable the Remote Desktop on your Windows 11 device. Confirm your action in the pop-up window.


Once done, your PC is set up to connect via RDP. To connect to the remote machine, you can use, for example, the new Remote Desktop app or classic Remote Desktop Connection.
Allow RDP connections on Windows 10 using Settings
Using the Settings app, follow the steps below to enable remote access on Windows 10:
-
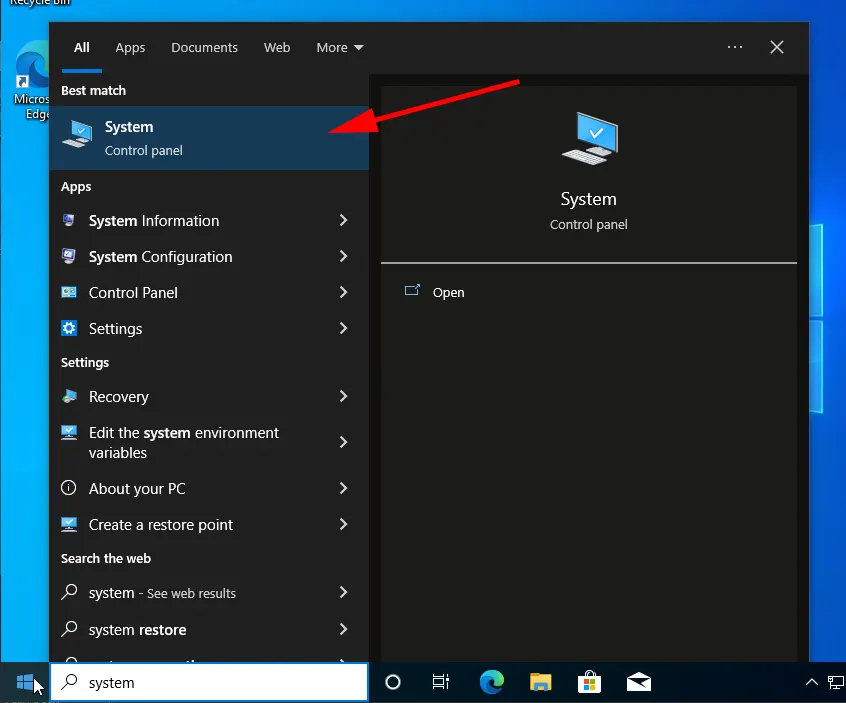
Open Settings on a Windows 10 device and select “System”.

-
Click “Remote Desktop”.
-
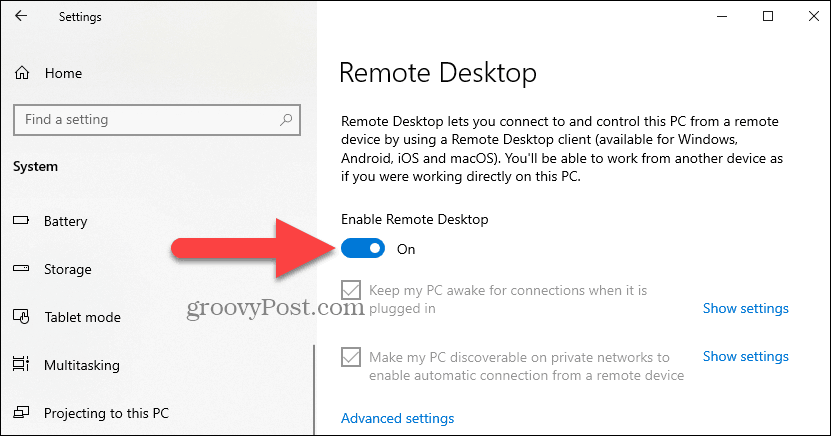
Toggle the “Enable Remote Desktop” switch to “On”.
-
Hit “Confirm”.


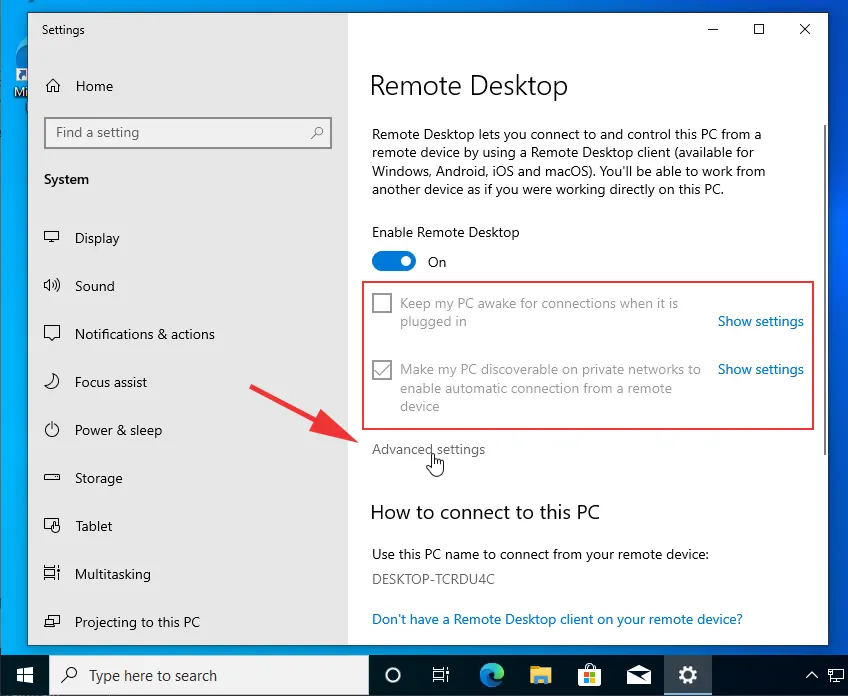
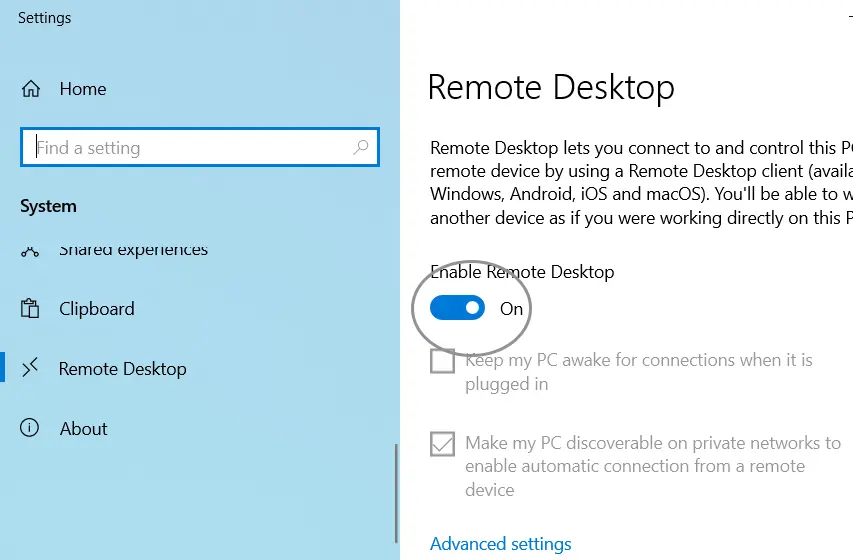
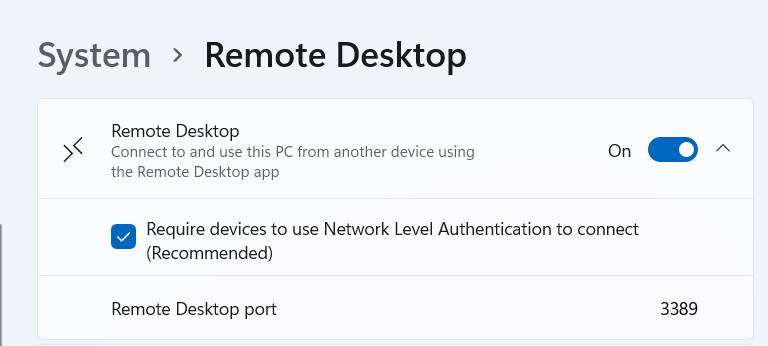
Once you’ve allowed Remote Desktop on Windows 10, there will be two additionally enabled options:
- • Keep my PC awake for connection when it’s plugged in.
- • Make my PC discoverable on private networks to enable automatic connection from a remote device.
These settings ensure that users always can connect to the remote machine whenever they like.

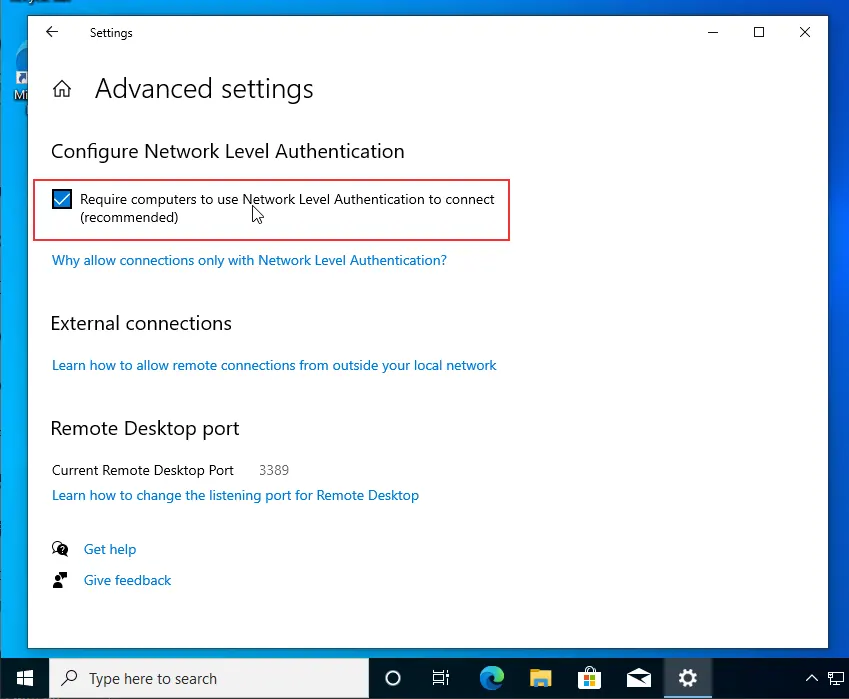
If users go to the “Advanced settings” window, they’ll see extra advanced features, like the option to require computers to utilize “Network Level Authentication” when connecting remotely.
This ensures the connections are more secure by restricting access only to those who can authorize the connection with the network before they can access the device.

Users will also find the current Remote Desktop port on the “Advanced settings” page. This information is useful if the user ever needs to reconfigure a router to permit remote desktop access from outside of their network.
Note: By default, the port number is set to 3389.
Allow remote connections on Windows 10/11 using the Control Panel
Even though the Settings app is an easy option for enabling remote access, it can also be done using the Control Panel. Below you’ll find the instructions on how to enable remote desktop on Windows 10 or 11 via the Control Panel:
- Open the Control Panel. The most optimal way would be to type in the query in the search box.

- Select “System and Security”.

- Under the “System” section, click “Allow remote access”.

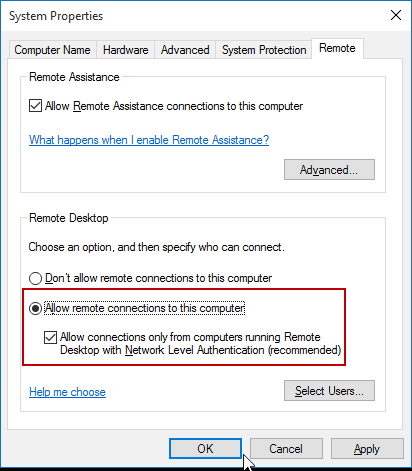
- The System Properties window will appear. In the Remote tab, check the box “Allow Remote Assistance connections to this computer” in the section Remote Assistance. Then, select “Allow remote connections to this computer” in the section Remote Desktop.

- Hit “Apply” and then “OK”.


That’s it! Now, it will be possible to connect to this computer from a remote machine over RDP.
After turning on the remote desktop on Windows 10/11, it’s time to connect to the remote computer using the modern Remote Desktop application (recommended) or with the built-in Remote Desktop Connection (RDC) utility that comes with every Windows version.
If you would then need to disable Remote Desktop access to your Windows 10/11 device, then you should not experience any issues since you will need just to reverse the steps from this guide.
Note: Enabling RDP access in Windows 10/11 via the Control Panel, makes the “Network Level Authentication” option switched on by default (however, it is an option that users should keep on regardless).
Enabling RDP access through the Control Panel is available on previous Windows versions which will allow you to create a remote desktop connection from Windows 10 to Windows 7. However, the Settings app is only present in Windows 10 and 11.

Remote Desktop Protocol (RDP) has been a feature of Windows since the XP Pro days. Here’s a look at using it in Windows 10 with the Remote Desktop app.
Remote Desktop Protocol (RDP) has been a feature of Windows since the XP Pro days. It makes it easy to connect from one PC or device to another to retrieve files or provide PC support.
There are several free utilities out there that will get you set up with a remote connection. Some that come to mind are services such as join.me, TeamViewer, and Chrome Remote Desktop and are especially handy when connecting between different platforms. But if you’re in a pure Windows environment, here’s a look at how to enable the built-in RDP utility in Windows 10, which will allow you to connect to your Windows box remotely.
The Remote Desktop or RDP feature is disabled by default, so you will need to enable it in the settings. There are several ways to do this; let’s review the easiest.
-
- Open Settings
- Click System > Remote Desktop
-
- Click the toggle Enable Remote Desktop
- Click Confirm when prompted.

Expert Note:
You can also enable Remote Desktop using the System Properties. Press the Windows Key and Type: advanced system. Click View advanced system settings.

Click the Remote tab and select Allow remote connections to this computer. Keep the box checked for Network Level Authentication for better security. Also, note that you will need to enable incoming remote connections on the PC you’re connecting.
Remote Into Your PC
You have a couple of choices when it comes to how you remotely connect to the other computer. You can use the traditional desktop app or the Remote Desktop universal app. For this, I’m connecting to my Windows Home Server on my home network. I’m also going to use the app that you can install from the Store. It’s more versatile and can be used on mobile platforms, including iOS and Android.
Tip: If you have many PCs and devices on your home network, a useful free utility to use is Advanced IP Scanner.
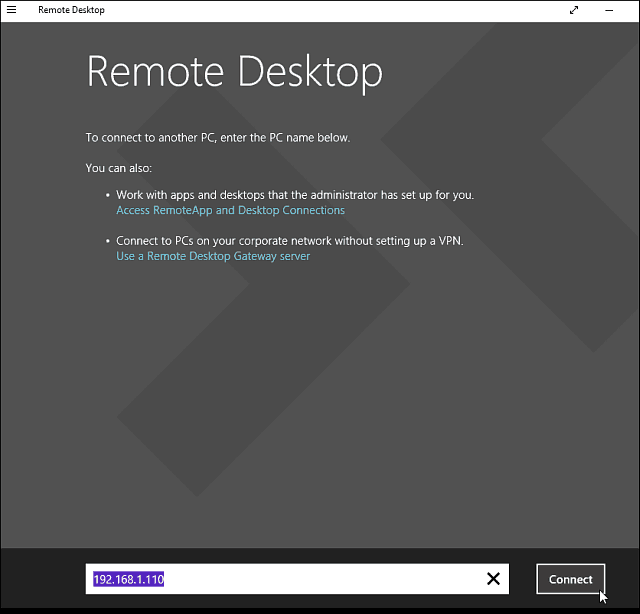
Launch the app and type a name for the PC or device, its hostname or IP address, and select Connect.
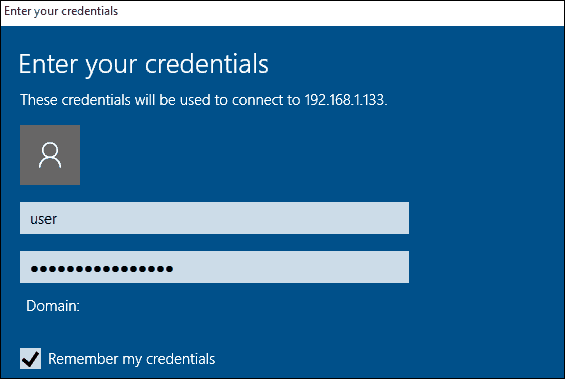
Next, enter the username and password used for the computer you’re connecting into. Also, if you’re going to remote into it often, check the box to remember your credentials.
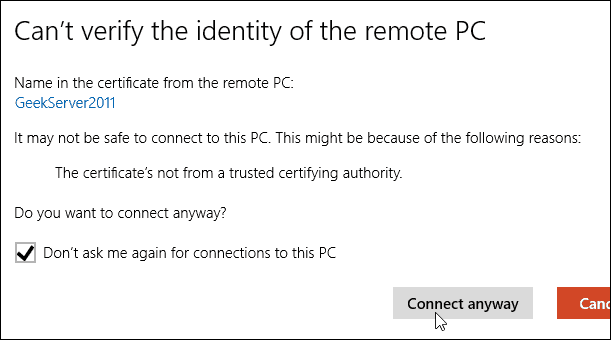
If you get the following security message, click Go ahead and Connect and check the box not to remind you again. You know what you’re doing; no reason for Windows to be constantly nagging you.
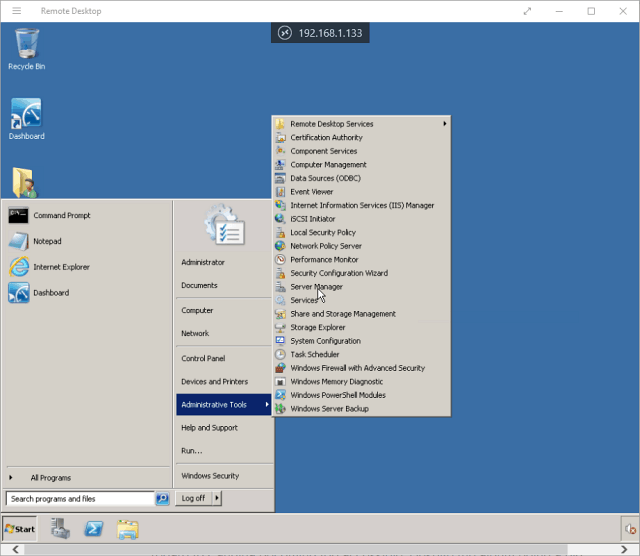
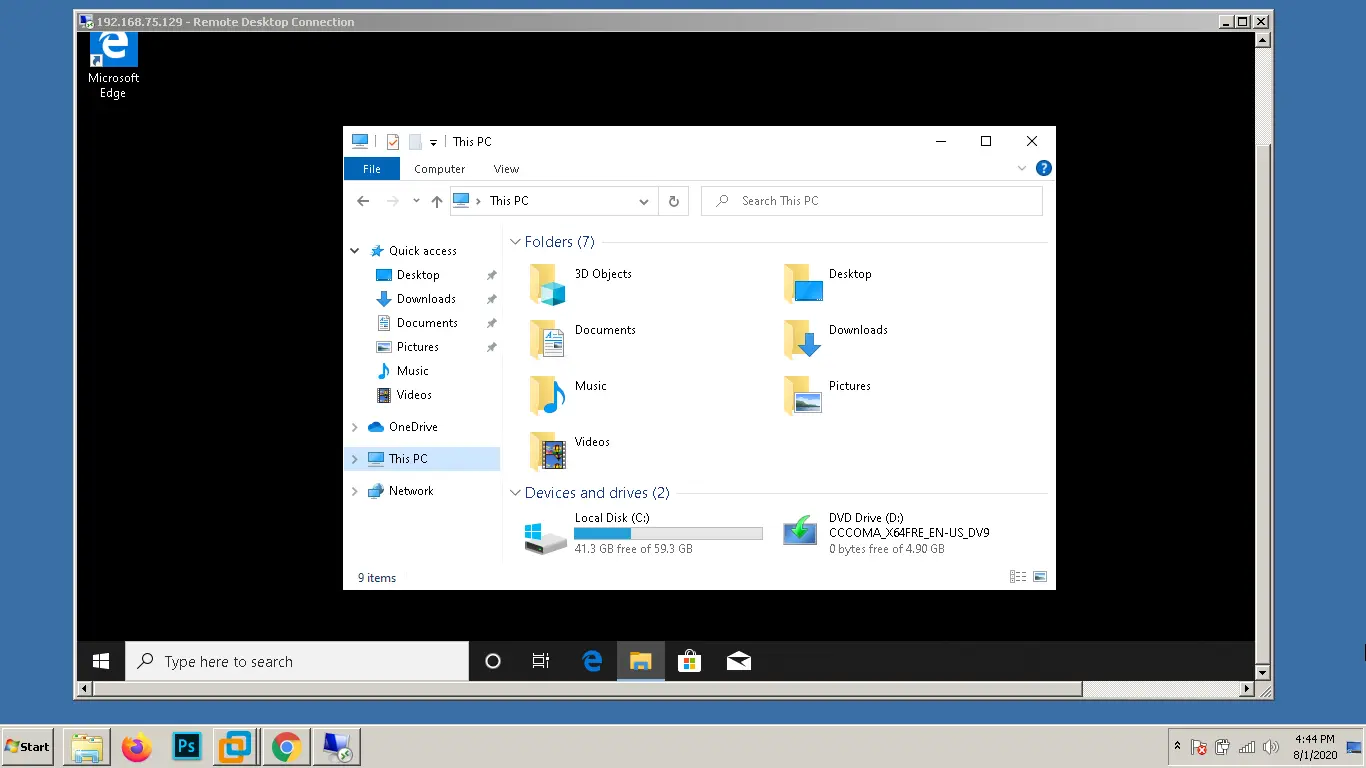
There you have it. You can now start using the remote computer for configuration, remote support, or however you need to use it.
I should also mention that you can go to Settings > connection settings in the app and configure the appearance, devices and make other adjustments that work for you.

More About Remote Desktop Connections
If you’re running a previous version of Windows or looking to remote access your Windows PC from your smartphone or tablets, check out the articles linked below for more.
- How to Enable Remote Desktop in Windows 7
- Make Remote Desktop Connections Work Faster
- Enable Remote Desktop for Windows 8
- Using the Windows Phone Remote Desktop App
- Remote Desktop Into Windows from a Mobile Device
![]()
При работе с компьютером возникают такие ситуации, когда необходимо предоставить удаленный доступ по сети интернет к компьютеру. Для систем на базе семейства Windows данная функция называется удаленным рабочим столом и для большинства редакций она включена по умолчанию. Сегодня же мы разберемся с тем, как же включить удаленный рабочий стол в Windows 10 и позволить подключаться к нашему компьютеру по сети.
Нажмите на кнопку Пуск и начните вводить слово «System«. Вам будет почти сразу предложено открыть меню настройки системы.
Перейдите в меню «Remote Desktop«
Нажмите на переключатель «Enable Remote Desktop«.
Это позволило нам включить службу удаленного рабочего стола Windows 10. Далее, нам необходимо настроить службу удаленного рабочего стола для правильной работы и подключения к сервису. В том случае, если вам необходимо всегда держать ваш компьютер в активном состоянии и доступным для автоматического обнаружения по локальной сети, то вы можете установить соответствующие ползунки в активное состояние, предварительно настроив обнаружение компьютера по сети. Установив нужные нам параметры переходим в раздел «Advanced settings«.
Убедитесь, что параметр безопасности подключения «Network Level Authentication» отмечен как активный.
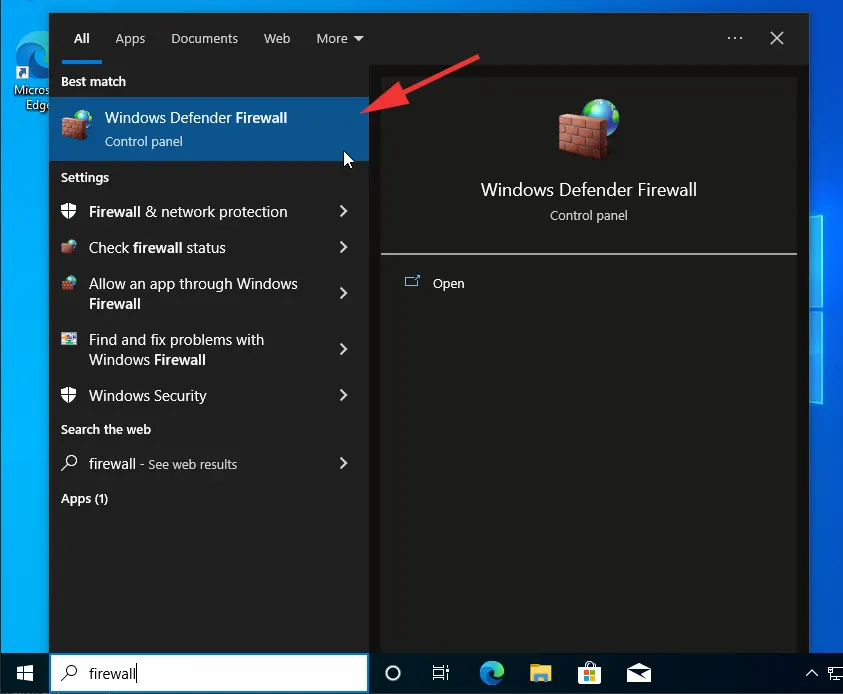
После включения удаленного рабочего стола в системе Windows 10, нам необходимо разрешить входящие подключения в Windows Firewall. Для этого откройте Пуск и введите «Windows Firewall«, после чего нажмите на предложенный вариант.
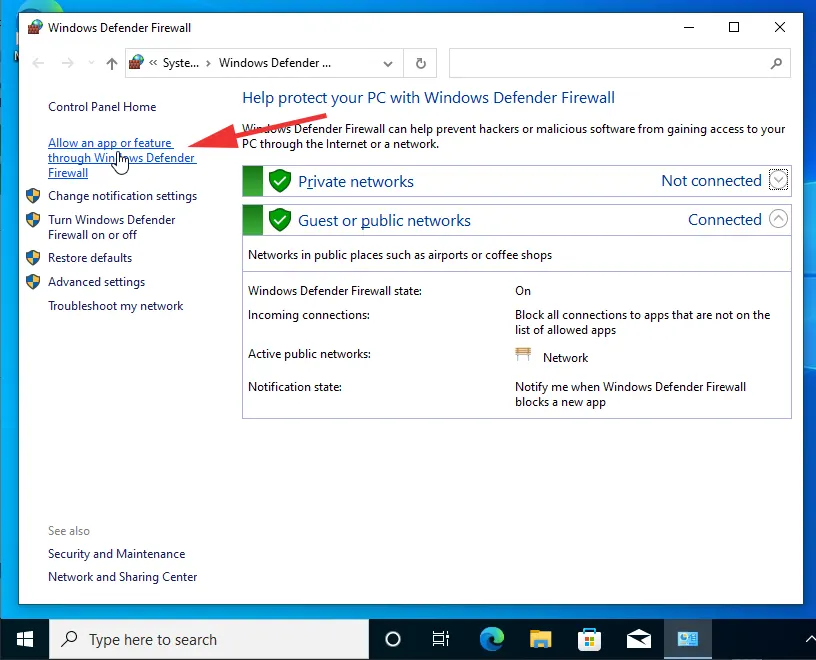
В новом окне нажмите на пункт «Allow an app or feature through Windows Defender Firewall«.
В списке сервисов найдите «Remote Desktop«. В том случае, если параметры зон не отмечены галочками — вам необходимо отметить их и сохранить изменения.
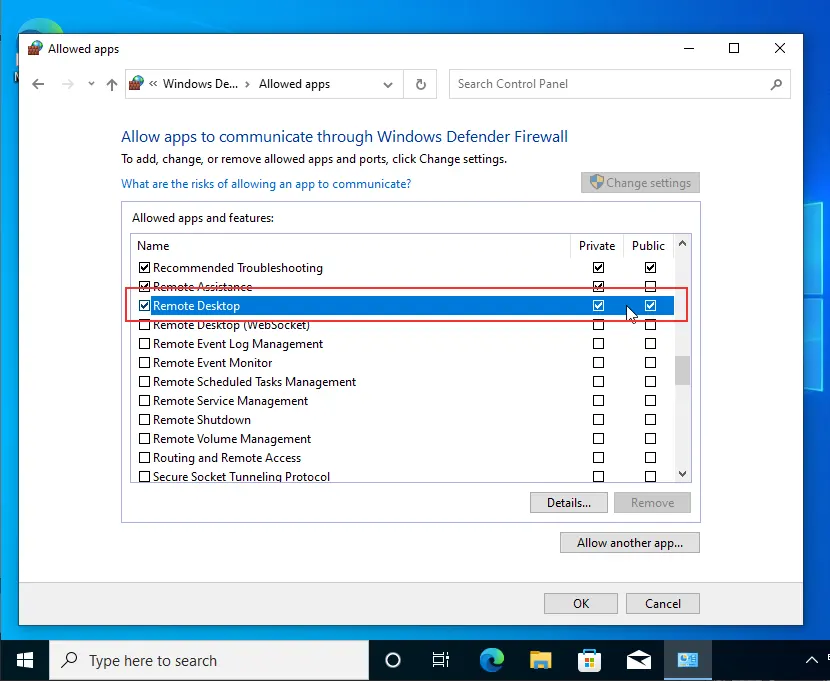
Так же вы можете перейти в список всех правил входящих соединений и в списке правил найти правила связанные с «Remote Desktop (TCP/UDP-In)«. Убедитесь, что данные правила отмечены зеленой галочкой и в состоянии Enabled указано «Yes«
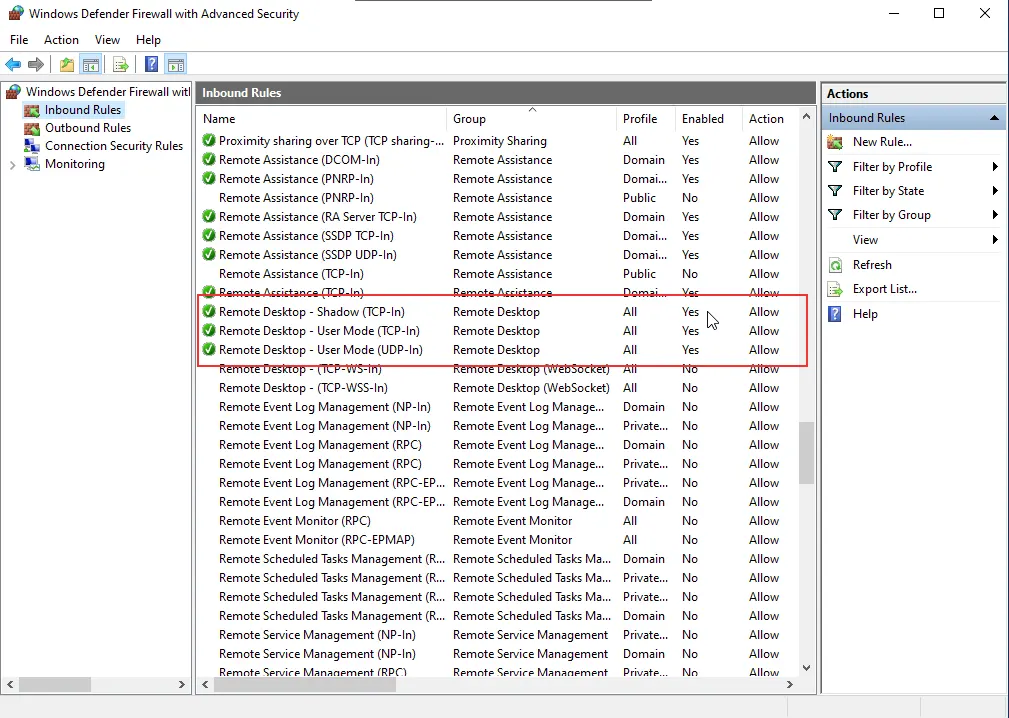
В том случае, если они неактивны, вам необходимо выбрать правило, либо выделить несколько сразу, и нажать правой кнопкой мыши по нему, после чего нажать на кнопку включения «Enable Rule«

Этих действий достаточно для того, чтобы включить удаленный рабочий стол в Windows 10.
Надеемся, что данный материал будет полезен для вас и хотим напомнить, что мы предоставляем услуги аренды удаленного рабочего стола на Windows 10.
https://finerdp.com/ru/rdp-server
The Remote desktop feature in Microsoft Windows 10/11 allows users to access their Windows 10 PC from a remote Computer using a remote desktop client. Once you enable the remote desktop, you can access your Windows 10 computer from anywhere from any device.
By default, the remote desktop connection is disabled and blocked by the Windows Firewall in Windows 10/11. If you want to enable remote desktop, go through the following steps (for Windows 10):
- Open System Settings — Right-click on the Windows Start button and select System from the menu.
- Open Remote Desktop Settings — Click on the Remote desktop link on the left to open the Remote Settings window.
- Allow Remote Connections — Under the Remote Desktop section, Turn «Enable Remote Desktop» on, and then choose Confirm.
That is all you need to do. You don’t have to configure the Firewall manually anymore.
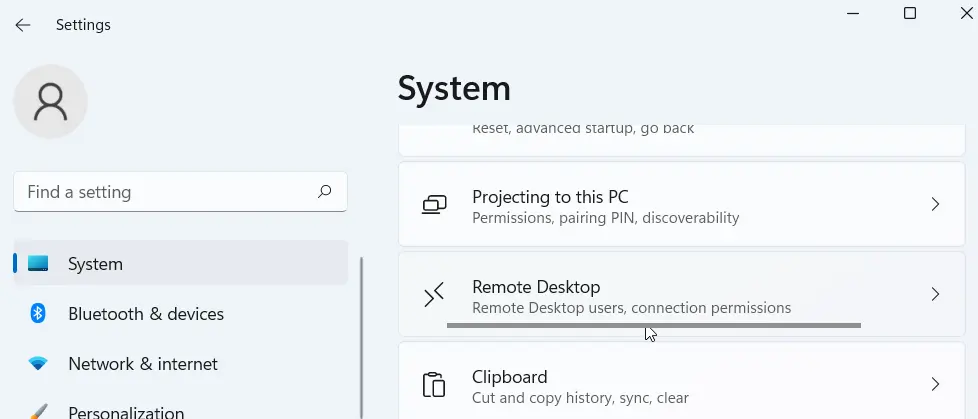
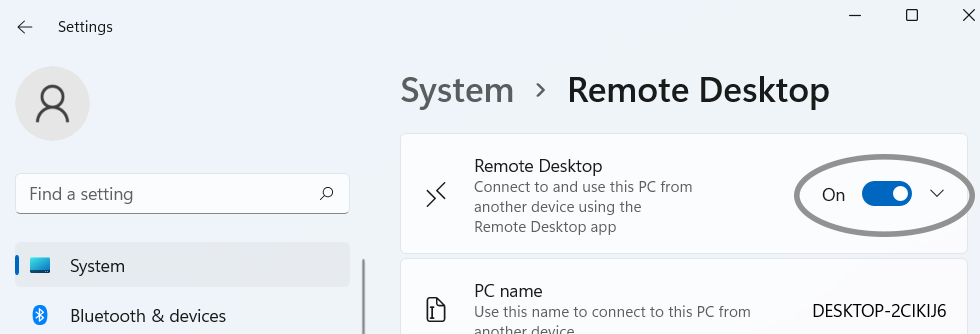
If you are on Windows 11, right-click the start button and select Settings from the menu. On the left panel, choose System and scroll down to find the Remote Desktop link.
On the remote desktop page, Turn on the toggle switch as shown in the following screenshot.
Again, the firewall does not need to be configured.
Enable Remote Desktop Connection From Windows Firewall
We now need to allow remote desktop connections to our Windows 10 PC from the Windows Firewall. (enabled by default in Windows, so this step is not required anymore).
- Open Windows Firewall (Start button > Windows System > Control Panel) — From the Control Panel Go to Systems and Security > Windows Defender Firewall.
- From the Firewall, Click on the Allow an app or feature through Windows Defender Firewall link in the left pane.
- Click Change settings and then check the two boxes next to Remote Desktop (for private and public networks).
- Click OK to save the new settings.

You can now connect to your Windows 10 PC from a remote computer using a Remote Desktop Client.
From the RDP Client, use the IP Address of your Windows 10 PC to connect.

Then, log in using your Windows username and password.
This way you can access your Microsoft Windows desktop from any operating system or any device using an RDP Client.
If your RDP client throws an error when connecting to the remote PC (for example: ERROR: CredSSP: Initialize failed, do you have correct kerberos tgt initialized?), try turning off Network Level Authentication.
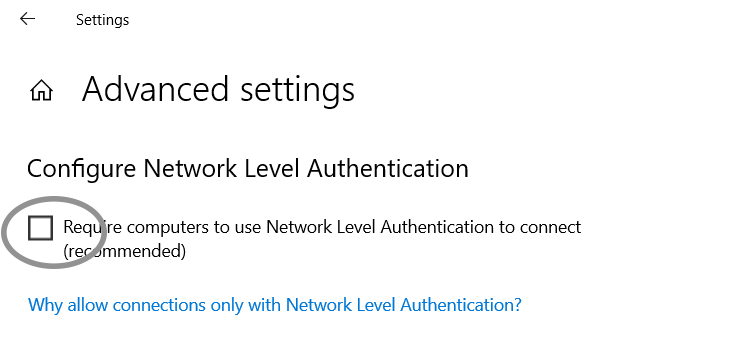
Go to Advanced settings in the Remote Desktop pane and then uncheck the «Require computers to use Network Level Authentication to connect» option.