Hyper-V is Microsoft’s virtualization platform. It is available on Windows Server operating systems and Microsoft has also added the Hyper-V functionality to Windows 8.1, Windows 10, and Windows 11.
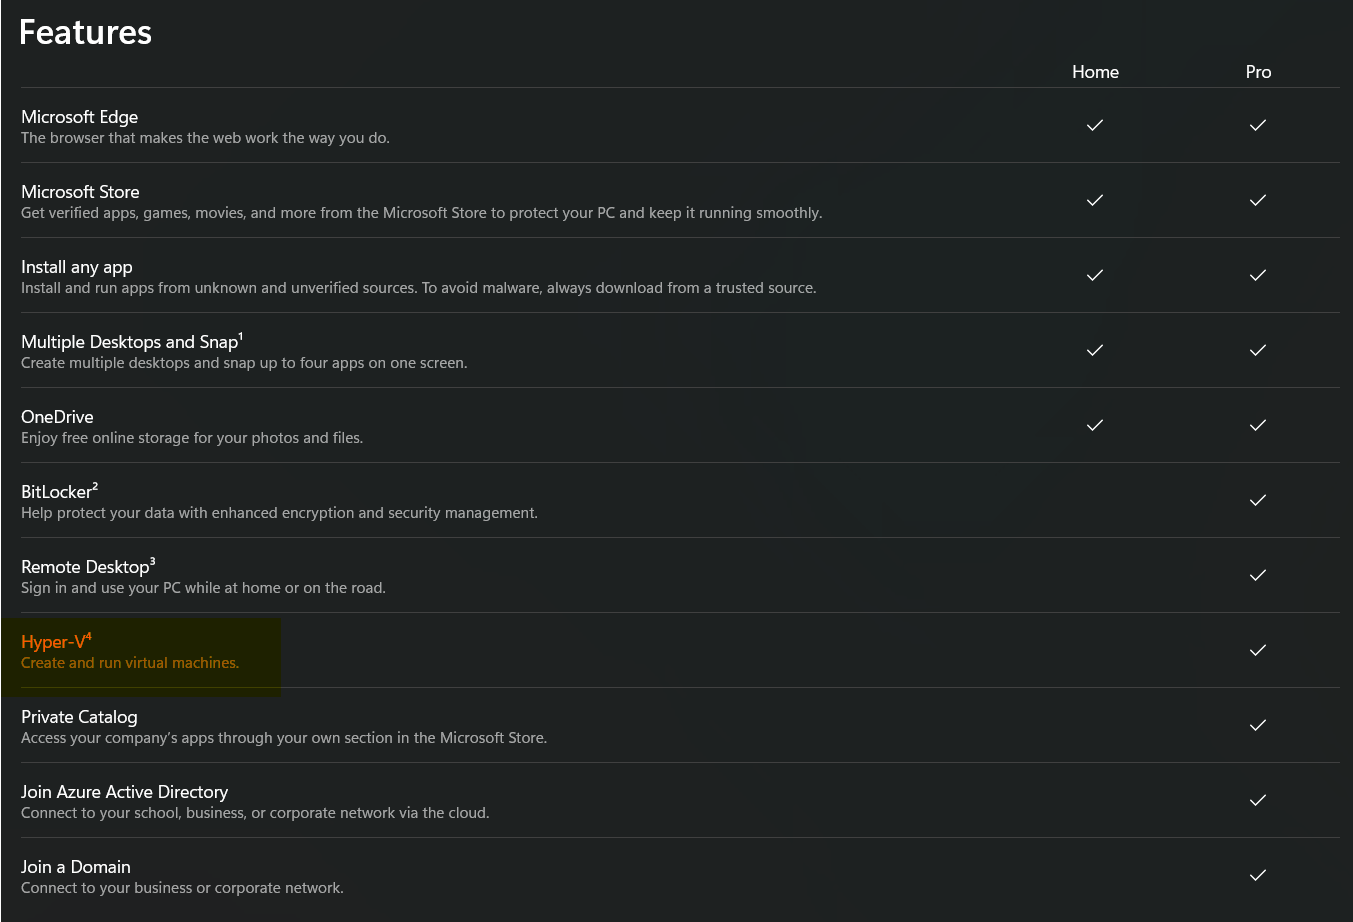
Unfortunately, the Hyper-V feature is only available in Windows 10 Professional, Enterprise, and Education editions. You can’t install it on Windows 10 Home edition by default.
However, using the steps in this article, we’ll show you how to enable Hyper-V in the Windows 10 Home edition.
Table of contents
- Does Your System Support Virtualization?
- Enable Virtualization in Firmware/BIOS
- Install Hyper-V in Windows 10 Home
- How to Enable Hyper-V on Windows 10 (Pro, Enterprise, Education)
- Enable Hyper-V from Optional Features
- Enable Hyper-V from Command Prompt
- Enable Hyper-V from Windows PowerShell
- How to Disable Hyper-V in Windows 10 (Home, Pro, Enterprise, Education)
- Closing Thoughts
Does Your System Support Virtualization?
Before moving forward, we need to check if our system supports virtualization. Hardware virtualization is required for Hyper-V to function correctly. Otherwise, you can use other virtualization platforms like Virtualbox and VMWare.
There are four basic requirements for Hyper-V to be installed on a Windows 10 computer:
- VM Monitor Mode Extensions
- Virtualization enabled in firmware
- Second Level Address Translation (SLAT)
- Data Execution Prevention
All four of these requirements can be easily checked through a Command Prompt cmdlet. Run the following cmdlet in an elevated Command Prompt and obtain the results on the four requirements:
systeminfoThis will generate a list, and you will find the section “Hyper-V Requirements” at the end of the list containing the details of the 4 requirements, as in the image below:
 1")
If these requirements are met, the results will display “Yes.” However, if you find that “Virtualization Enabled In Firmware” states “No,” you need to enable it using the guide below.
Enable Virtualization in Firmware/BIOS
Most modern computers support all the requirements of Hyper-V. But some systems have virtualization disabled from BIOS. You can go to the BIOS setup computer at the startup and enable Virtualization using the following steps:
-
Restart your computer and enter the BIOS setup using the hotkey.
-
Here, look for the “Virtualization” tab and click on it, or use the arrow keys on the keyboard to highlight it and press Enter.
-
Now enable Virtualization.
 2")
Enable virtualization from BIOS -
Now save the new settings and exit BIOS. The system will now reboot normally.
 2")
When it reboots, continue with the following steps to install and enable Hyper-V.
Install Hyper-V in Windows 10 Home
Note: Since Windows Home edition comes without Hyper-V, you must first install it. If you have the Pro, Education, or Enterprise editions, then you may skip this step and proceed to the next section of this article. To check which edition you have, type in winver in the Run Command box and obtain your operating system’s details.
Follow the steps below to install and enable Hyper-V in Windows 10 Home:
-
Download Hyper-V Installer by clicking on the following link:
Hyper-V installer and enabler for Windows 10 Home (317 bytes, 35,747 hits)
-
Once downloaded, right-click on the file and select Run as Administrator from the context menu. This will trigger the installation script.
 4")
Run as admin -
If prompted with a UAC, click Yes.
Click Yes on User Access Control It may take some time to complete the installation. Please let it complete without interruption.
-
Once complete, press Y to continue.
Press Y to continue The computer will now reboot and update.
 4")
 5")
 6")
Once rebooted, Hyper-V will have installed and automatically enabled on your Windows Home.
How to Enable Hyper-V on Windows 10 (Pro, Enterprise, Education)
The method given above automatically enables Hyper-V as well as installing it on a Windows Home. However, if you are running Windows Pro, Education, or Enterprise edition, then you can enable Hyper-V using any one of the following methods.
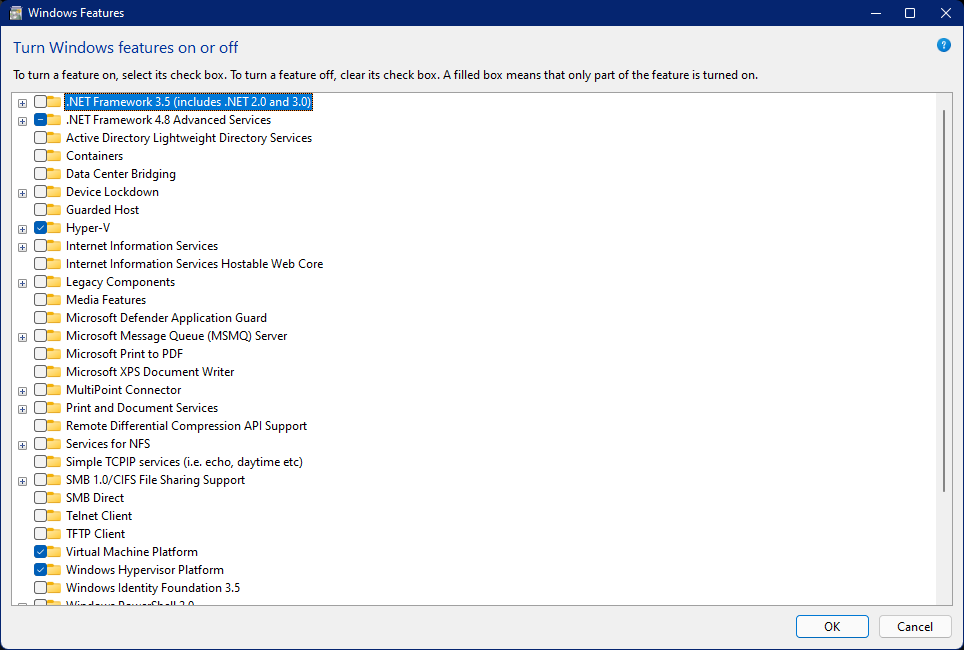
Enable Hyper-V from Optional Features
Since Hyper-V is an optional feature that one can enable when needed, you can enable it from the Optional Features applet. Here is how:
-
Open the Optional Features applet by typing in optionalfeatures in the Run Command box.
 7")
Open the Optional Features applet -
Now look for the “Hyper-V” option from the list and check the box next to it. Then click Ok.
 8")
Enable Hyper V from Optional Features -
You will now see a window applying the changes. Click Close when it is done.
 9")
Close installation window
 7")
 8")
 9")
Hyper-V will now be installed and enabled. You can now access the Hyper-V manager by searching for it in the search box in the taskbar or through the Start menu.
 10")
Alternatively, you can also use the other 2 command-line methods to enable Hyper-V on Windows 10.
Enable Hyper-V from Command Prompt
Follow these steps to enable Hyper-V using the DISM command tool in the Command Prompt:
-
Run the following cmdlet in an elevated Command Prompt:
DISM /Online /Enable-Feature /All /FeatureName:Microsoft-Hyper-VEnable Hyper V from Command Prompt -
When asked, enter Y to restart the computer:
Enter Y
 11")
 12")
The computer will now restart, When it does, Hyper-V should be enabled successfully.
Enable Hyper-V from Windows PowerShell
If you’d rather prefer to use Windows PowerShell, here is how to enable Hyper-V:
-
Run the following cmdlet in an elevated PowerShell:
Enable-WindowsOptionalFeature -Online -FeatureName Microsoft-Hyper-V-AllEnable Hyper V using PowerShell -
When asked, enter Y and hit Enter to restart the computer:
Enter Y When the computer reboots, Hyper-V will have installed successfully.
 13")
 14")
These are the 3 methods to enable Hyper-V in Windows 10, provided that the hardware is supported and Hyper-V is installed.
How to Disable Hyper-V in Windows 10 (Home, Pro, Enterprise, Education)
If you don’t want this functionality on your computer, you can always disable it. There are three ways to disable it:
-
From Optional Features
-
Open the Optional Features applet by typing in optionalfeatures in the Run Command box.
Open Optional Features applet -
Uncheck the box next to Hyper-V and click Ok.
 16")
Disable Hyper-V from Optional Features -
When done, click Restart now to finalize the changes.
Restart PC
-
-
From Command Prompt
Run the following cmdlet in an elevated Command Prompt to disable Hyper-V:
DISM /Online /Disable-Feature /FeatureName:Microsoft-Hyper-V-allIf asked for a reboot, enter Y for Yes.
Disable Hyper V from Command Prompt -
From PowerShell
Run the following cmdlet in an elevated PowerShell to disable Hyper-V:
Disable-WindowsOptionalFeature -Online -FeatureName Microsoft-Hyper-V-AllIf asked for a reboot, enter Y for Yes.
Disable Hyper V from Windows PowerShell
 16")
 17")
 18")
 19")
Closing Thoughts
Sometimes Hyper-V is very useful even for home users. It can be used to test and evaluate new software without hurting the host system. But there are times when enabling virtualization support or installing Hyper-V is not recommended.
Hyper-V requires some system resources to run its virtual machines. For example, if you have 4 GB RAM, you won’t be able to give any resources to the virtual machine. So it would not be wise to enable Hyper-V functionality.
For what purpose do you want to enable Hyper-V functionality on your Windows 10 Home computer? Please share your thoughts in the comments below.
Hyper-V is supported in Pro, Enterprise and Education Edition of Windows 10 and Windows 11. This guide will show you how to enable Hyper-V in Home Editions of Windows 10 and Windows 11.
Hyper-V in Windows 10 and Windows 11 Home Edition
Hyper-V in Windows 10 and Windows 11 allows running Virtual Machine. It is supported only in Pro, Enterprise and Education Edition of Windows 10 and Windows 11 by default. But this guide will show you how to enable it in Home Editions of Windows 10 and Windows 11.
Check if virtualization is enabled:
- Search for
Command Promptin Windows Start Menu and open it. - Type
systeminfoand press Enter. Wait for the process to finish - Once the results appear, search for the
Hyper-V Requirementssection which is usually the last one.

- If it says
A hypervisor has been detected. Features required for Hyper-V will not be displayed.that means Hyper-V is already enabled and there is no reason following this guide anymore. - Otherwise, check for
Virtualization Enabled in Firmware:.- If its
Yes, click here. - If its
No, click here.
- If its
- If it says

Enable virtualization
The process of enabling virtualization can vary a lot depending on the motherboard manufacturer, but it can be summarized in a few steps:
- Completely Shutdown you Computer.
- Turn on the computer and while it is booting up, keep pressing the key to open the BIOS (usually it is
Del,F1,F2,F4,F11, orF12). This key depends on the Motherboard manufacturer. You can easily google it out. - Once you get into the BIOS, it may look very scary or intimidating, but don’t worry, you will get it right. Mouse may not work in BIOS so you might have to use the Directional or Arrow keys and the Enter key of the Keyboard to navigate.
- Search for the CPU configuration section, it can be called
CPU configuration,processor,NorthbridgeorChipsetand may be under anadvancedoradvanced modetab or menu. - Now you need to look for the virtualization option and enable it, it can have different names such as
Hyper-V,Vanderpool,SVM,AMD-V,Intel Virtualization TechnologyorVT-X.
- Search for the CPU configuration section, it can be called
- Once its enabled, save and reboot your pc.
If this part did not help you, you can specifically go the Website of the Mother Board Manufacturer of your Computer and ask for help there.
Enable Hyper-V
- Open File Explorer on windows and Navigate to a folder.
- Right click anywhere in a blank space inside the folder. Select
Newand then ClickText Document. - Open the file in Notepad and copy and paste the following text into it.
pushd "%~dp0" dir /b %SystemRoot%\servicing\Packages\*Hyper-V*.mum >hyper-v.txt for /f %%i in ('findstr /i . hyper-v.txt 2^>nul') do dism /online /norestart /add-package:"%SystemRoot%\servicing\Packages\%%i" del hyper-v.txt Dism /online /enable-feature /featurename:Microsoft-Hyper-V -All /LimitAccess /ALL pause - Click
Filefrom the Menu bar in the top of Notepad, then clickSave as.... In the Save as Window that appears, Change the File name to"Hyper-V.bat"and click save. - Now Double click
Hyper-V.batto run it. This will take some time but will install all features required for Hyper-V. A Restart might be required after it is done. - After Restarting Windows, search for
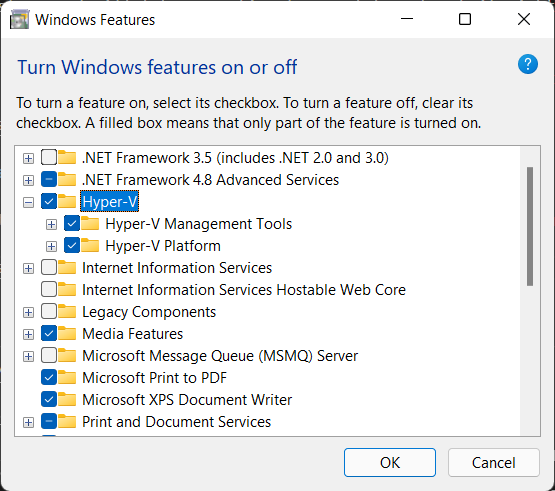
Turn Windows features on or offin the Start Menu search bar and open it.
- In the Window, lookout for
Hyper-V,Virtual Machine PlatformandWindows Hypervisor Platform. Then check the check boxes before them and clickOK. This will also take some time and then a Restart is necessary.
Thats it Hyper-V is enabled.
Looking for more How To posts? Check out our How To Page for all the latest tips on Windows, Microsoft Teams, LinkedIn, and more!
Did you know that if you enable Hyper-V on Windows 10, you can create, delete and manage virtual machines? Using a virtual machine (VM) lets you test out any new and unstable operating systems and try out new apps and features in a contained virtualized desktop environment.
It also helps keep your physical PC safe from any bugs, performance, and/or stability issues of the VM. Hyper-V is Microsoft’s implementation of a virtual machine manager, although there are others, notably from Oracle and VMWare.
Of course, this is only the case if your PC meets these necessary requirements to enable Hyper-V on Windows 10:
- Windows 10 Enterprise, Pro, or Education edition
- 64-bit processor with Second Level Address Translation (SLAT)
- CPU support for VM Monitor Mode Extension (VT-c on Intel CPUs)
- Minimum of 4 GB RAM
There are a couple of things that need to be addressed before we go any further:
1. Hyper-V cannot be enabled on Windows 10 Home.
2. Hyper-V is built into Windows 10 as an optional feature that needs to be enabled, so there is no “Hyper-V download” available.
The best thing you can do is to upgrade to a different Windows version either by opening Settings > Update and Security > Activation or purchase a Windows license directly from Microsoft.
Another cool trick is that you can upgrade your Windows edition via the Microsoft Store directly on your Windows PC.
Enable Hyper-V on Windows 10
If your PC meets all of the requirements, then you are ready to go. So how do you enable Hyper-V? Enable Hyper-V by using Windows Settings, Command Prompt (CMD) and the Deployment Image Servicing and Management tool (DISM), and Windows PowerShell.
Here are the three simple methods:
1. Windows Settings
1. Right-click the Windows button on your desktop and select Apps and Features
2. Choose Programs and Features located on the right.

3. Select Turn Windows features on or off.

4. Check the box next to Hyper-V, including Hyper-V Management Tools and Hyper-V Platform, and click OK.

2. CMD and DISM
1. Open Command Prompt (CMD) as Administrator.
2. Copy and paste the following command:
DISM /Online /Enable-Feature /All /FeatureName:Microsoft-Hyper-V
3. Press Enter when finished to run the command.

3. Windows PowerShell
1. Open Windows PowerShell as Administrator.
2. Copy and paste the following command:
Enable-WindowsOptionalFeature -Online -FeatureName Microsoft-Hyper-V -All
3. Press Enter when finished to run the command.
Whichever method you choose to enable Hyper-V, you will be prompted to restart your system for the changes to take effect. You will not be able to use Hyper-V until you restart your Windows 10 PC.
Once you restart your PC, you can get started using desktop virtualization tools, including the ability to create a Windows 11 virtual machine on Windows 10.
Looking for more Microsoft content? Check out our other news hubs for Microsoft/Office 365, including Microsoft Teams news!
Do you know of any other ways to enable Hyper-V on Windows 10? Let us know in the comments!
Windows 10/11 Home edition doesn’t come with Hyper-V by default, if you try to enable it from «Turn on Windows features» option from control panel you would not find Hyper-V listed.
This is because Hyper-V is a Professional and Enterprise edition feature, but it is possible to enable it from the command line.
Enable Hyper-V from command line
We’re going to use the Windows Terminal so make sure you install it from the Windows Store.
Step 1. Check Minimum System Requirements
Your PC should support Hardware virtualisation for Hyper-V to work.
If you do not have hardware virtualisation, you will need to use an alternative such as VirtualBox or VMware Workstation Player.
Note: Many Windows 10 PCs—and all PCs that come preinstalled with Windows 11—already have virtualization enabled, so you may not need to follow these steps.
For Windows 10, run the followind command in the terminal
Get-ComputerInfo -property "HyperV*"
You should get the below output
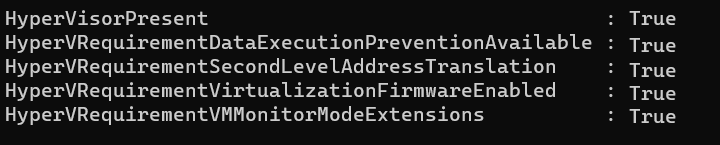
This means that your PC supports hardware virtualisation.
Step 2. Enable Hyper-V
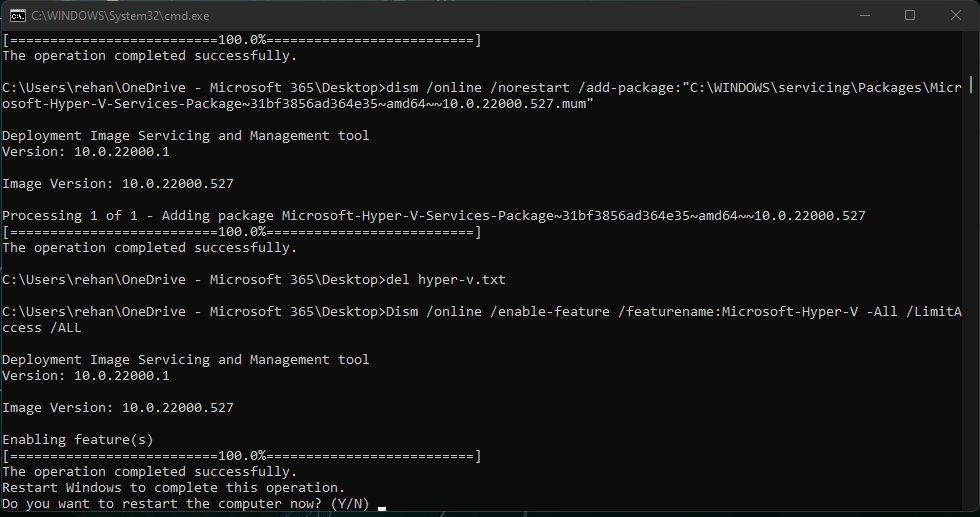
Create a file on your PC called «enable-hyperv.bat» and paste the following code in it.
pushd "%~dp0"
dir /b %SystemRoot%\servicing\Packages\*Hyper-V*.mum >hyper-v.txt
for /f %%i in ('findstr /i . hyper-v.txt 2^>nul') do dism /online /norestart /add-package:"%SystemRoot%\servicing\Packages\%%i"
del hyper-v.txt
Dism /online /enable-feature /featurename:Microsoft-Hyper-V -All /LimitAccess /ALL
pause
Now run the batch file as an administrator, as shown below. 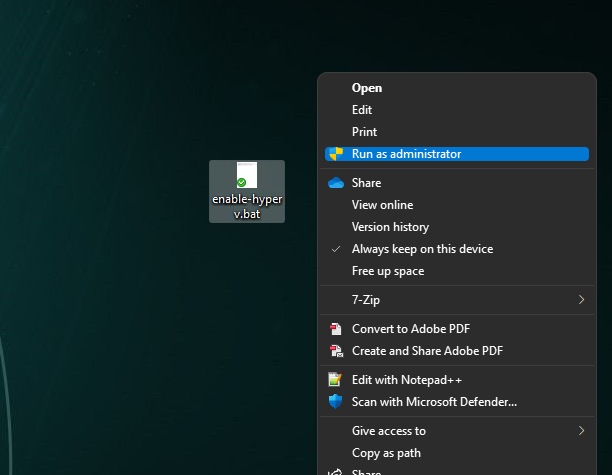
This will go through several steps and will take some time to complete. Though it might seem it’s repeating the same steps, let it complete without interruption.
Once the process is complete, you should see the following message asking for confirmation to reboot your PC. Press Y to reboot.
Step 3. Check if Hyper-V is enabled
Open your teminal and run optionalfeatures to see the status of Windows features. You should be able to see a Hyper-V feature listed now.
Starting Hyper-V Manager
Go to the start menu and search for Hyper-V, open the Hyper-V Manager.
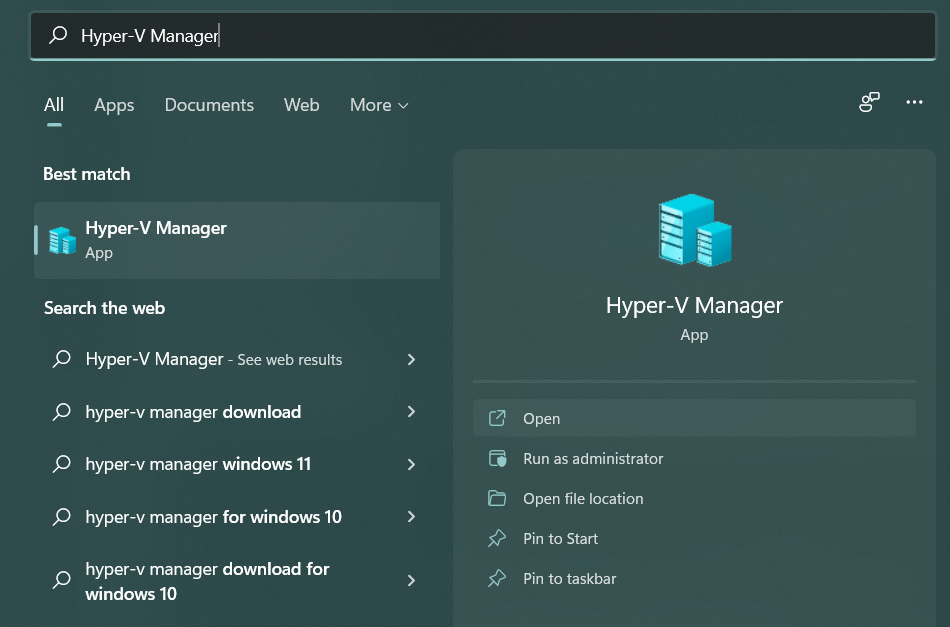
From here you can start creating VMs, creating a new VM, or even creating a new VM template.
For a quick start, follow this guide to installing Ubuntu on Hyper-V