You will learn everything you need to know about dual-booting Linux and Windows.
I assume you already have Windows installed on your computer and you only need to install Linux to dual boot. This post will guide you through the following key points of the dual boot installation:
- Essential BIOS settings for successful dual boot.
- How to shrink your Windows partition to get free space for Linux.
- How to install Linux, using Linux Mint as an example.
- How to set the boot order in your computer to see the menu where you can choose between Linux and Windows to boot.
- Finally, I will explain why I am not a fan of dual-booting and why I recommend using Windows in a virtual machine as I showed in this post.
*NOTE: Before you apply any actions from in this post, please back up all your important data.*
BIOS settings
Unfortunately, most of the computers have BIOS configured specifically for Windows, and likely you won’t be able to install Linux on it without changing some settings. BIOS interface may differ from one computer to another but the main settings are the same.
I will use the BIOS of my Acer Swift 1 laptop as an example here.
Get into BIOS
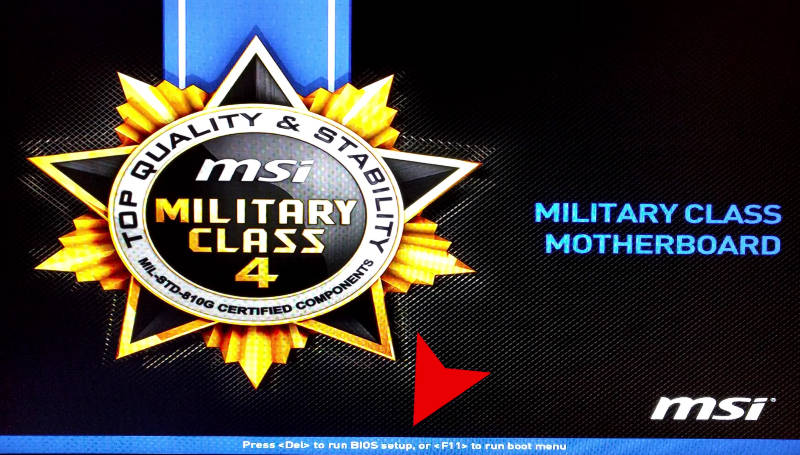
First, you need to get into BIOS, usually, you just need to press a specific key during the boot. In my Acer Swift 1, I press F2. Just google your computer model and bios key term, and you will find the key you need to press. Sometimes, you may also see it on the screen during the boot:
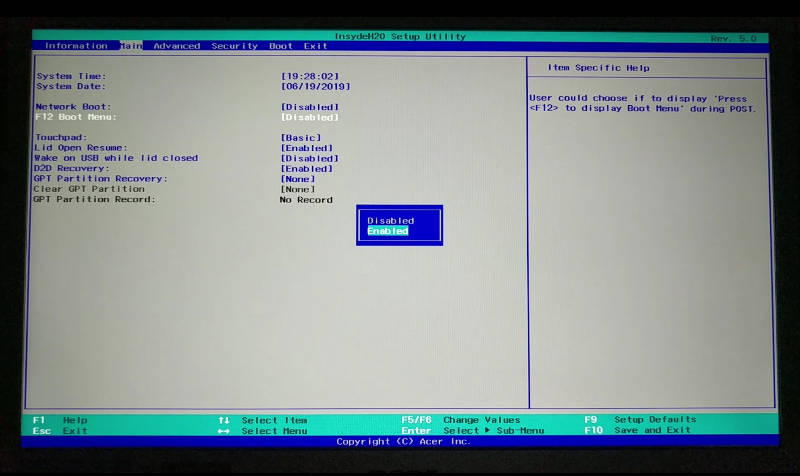
Set the BIOS password
Next, you may need to set a password in your BIOS because it won’t allow you to change any security settings without a password. This is the menu to set the password on my Acer Swift 1:
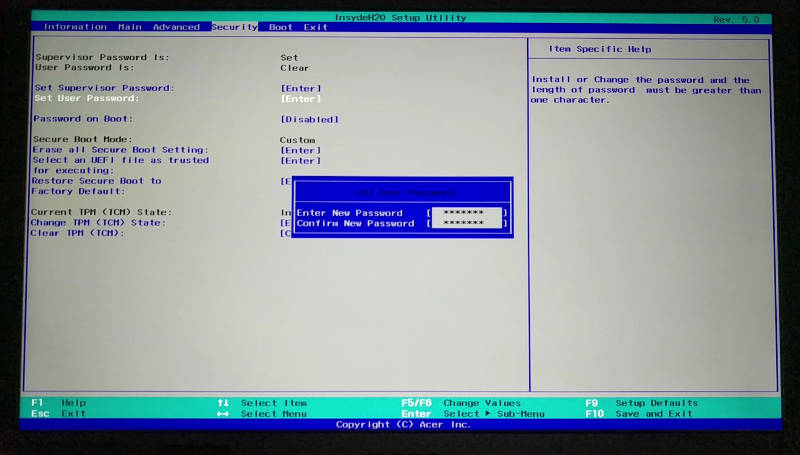
You should be able to find the same in your BIOS. It is also possible that you can proceed without setting a password.
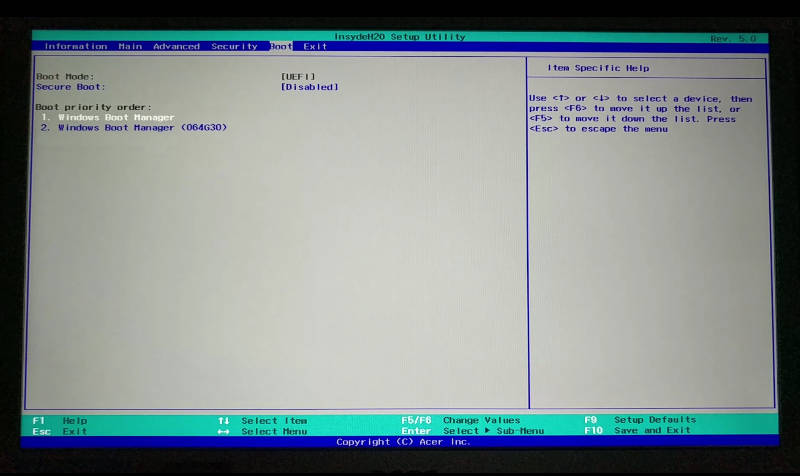
Disable Secure booting and change the Boot order
Next, you need to go to the Boot menu and disable Secure booting and move your bootable USB flash drive to the first place in the boot order:
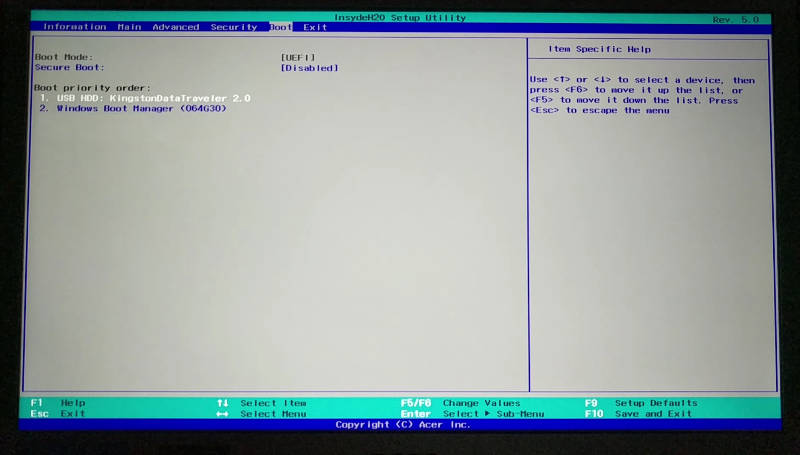
Check this description of the commands on the right or bottom of your BIOS interface, it explains how to navigate and change options in your BIOS.
I am not going to stop here on how to create a bootable USB drive. I have already explained how to create a bootable USB from the command line or using graphical programs.
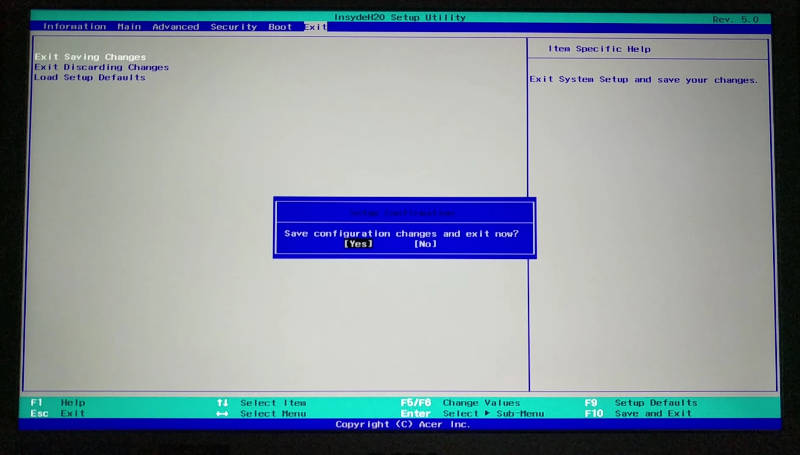
Save BIOS settings
In the end, go to the exit menu and exit BIOS with saving the changes:
If you have done everything correctly, you should boot in your Live USB Linux system:
Get free space for Linux
Boot into Live Linux session
Boot from the Live Linux USB. I will use Linux Mint installer as an example here, if you use Ubuntu or any Ubuntu-based distro, the process will not differ at all. If your distro is not Ubuntu-based, you still need to do the same steps as you will see in this post but the installer may look slightly different.
To install Linux alongside Windows, you can actually select such an option in the installation wizard:
It will automatically find free space on your hard drive and install Linux there. However, if you want to have little more control over how much space you allocate to Windows and Linux, you can get free space and assign it for Linux manually.
Shrink the Windows partition with GParted
Most of the Linux distros have GParted included in a Live ISO. If it is not, install it from the Software Center. Then open GParted and select the hard drive with your Windows installed:
Your Windows hard drive will be partitioned similarly to the one you see above. Most likely it will have the EFI partition, and this means you need to install Linux in the EFI mode too.
To shrink the Windows partition to get free space for Linux, you need to select the largest partition, click on the Partition menu in GParted, and select resize.
All white space is free space. So, you can shrink this partition with your mouse, or by selecting its size precisely with the number. You can take a maximum of free space for Linux if you aim to use mainly Linux, but leave some free space for Windows too, because it may not be able to work without free space left.
Click resize. Read this warning to know the risk and click OK. You will see how your partitions will look like after you apply the resizing:
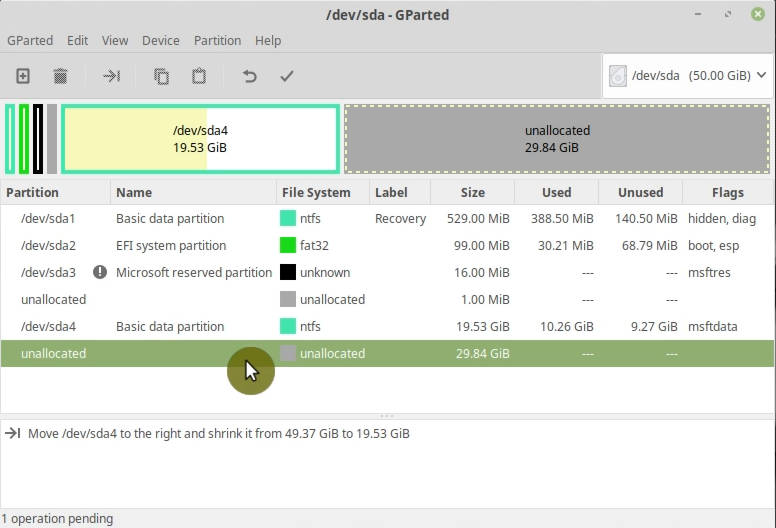
So far, no changes to your hard drive have been applied. It is only a plan of action. You still can cancel everything, if you have done a mistake somewhere. However, if you are happy with this partition table. Click apply. This action will be irreversible.

Resizing will take some time. Hopefully, it will finish successfully and you can proceed with the installation.
Install Linux
To install Linux, click on the Install icons on your desktop or in your menu.
The installation process is pretty standard.
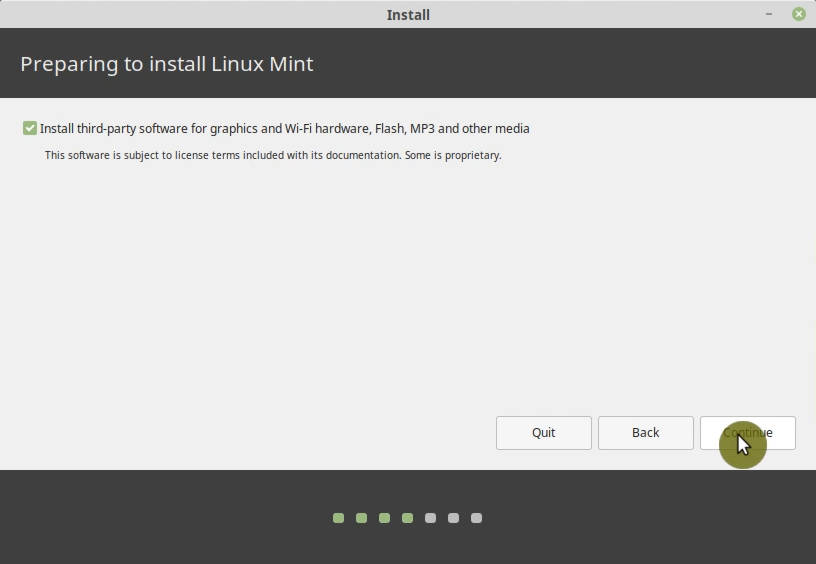
I recommend to include the third party software in the installation:
Select Manual partitioning
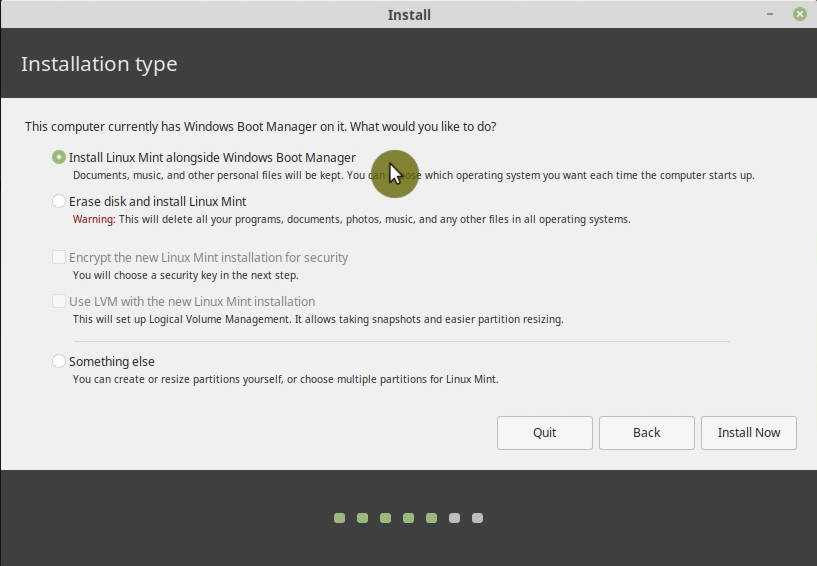
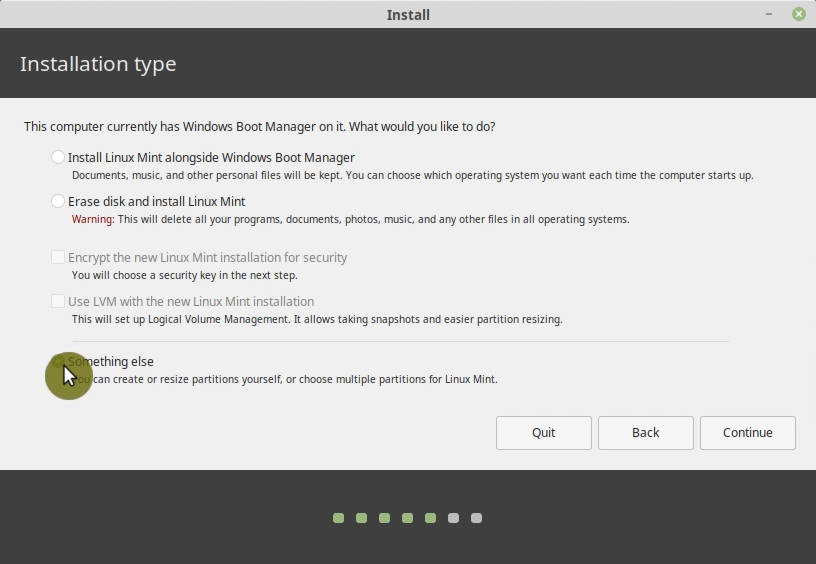
As I mentioned before, you can select the option to Install Linux alongside Windows automatically, but I personally prefer the manual way. That’s why we shrank the Windows partition and released some free space for Linux. Manual way not only gives more control but it also helps to understand what happens to your system when you install two systems alongside each other. So, select Something else here:
Create Linux Partition
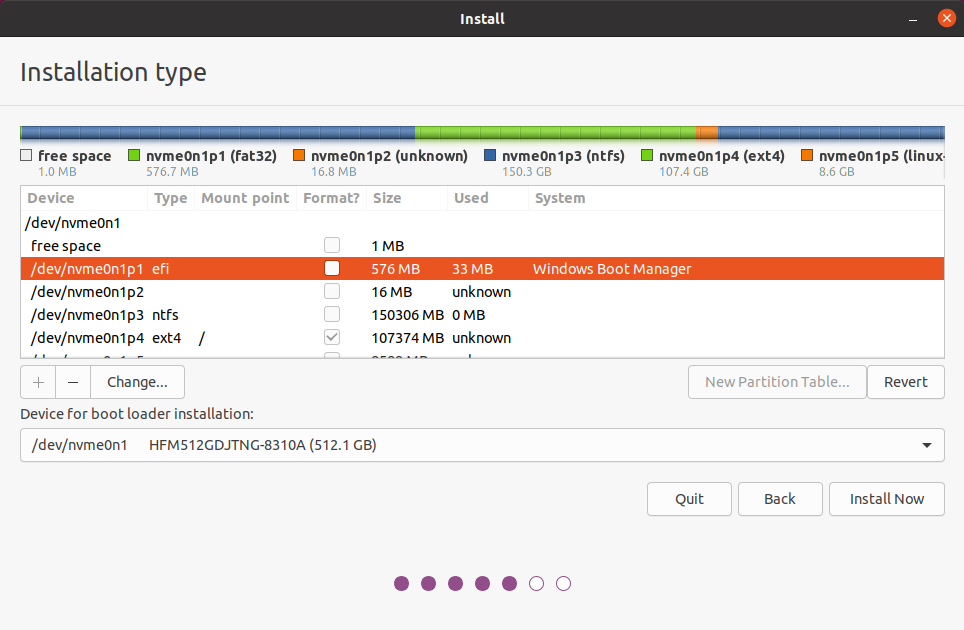
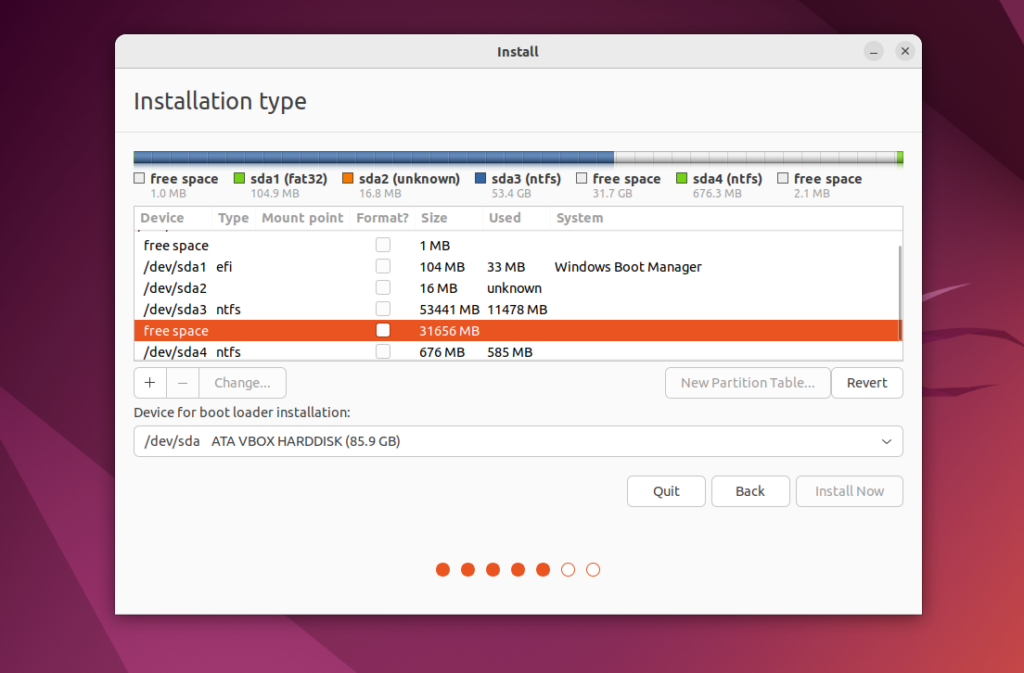
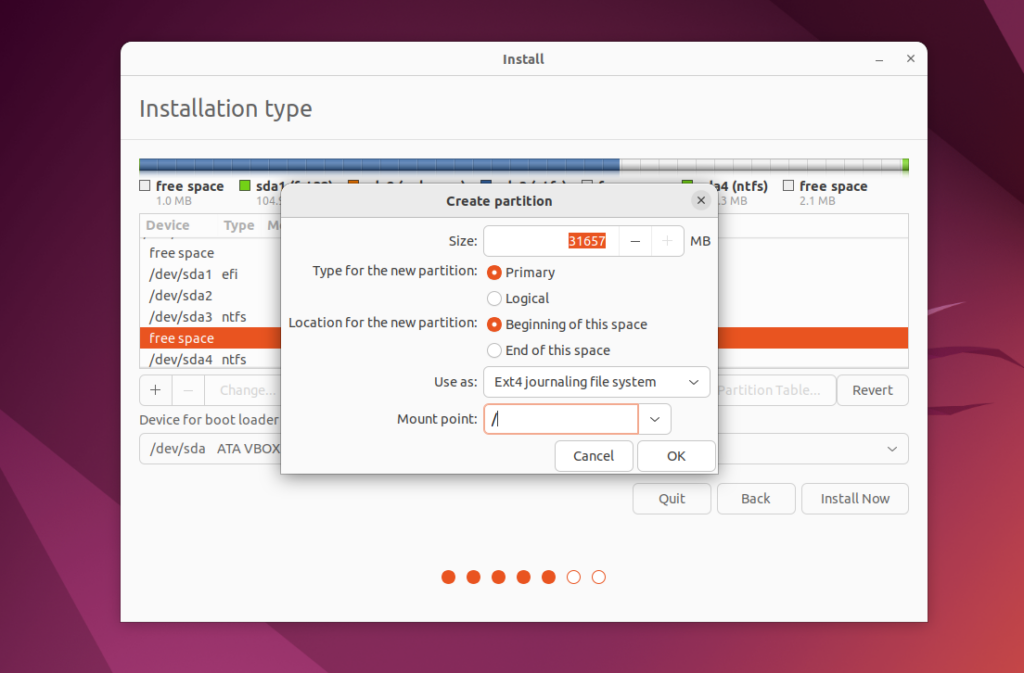
The new screen will show you the partitions of your hard drive. You need to select the free space we have created in the previous step. Then click on the add sign, to create a Linux partition in this free space:
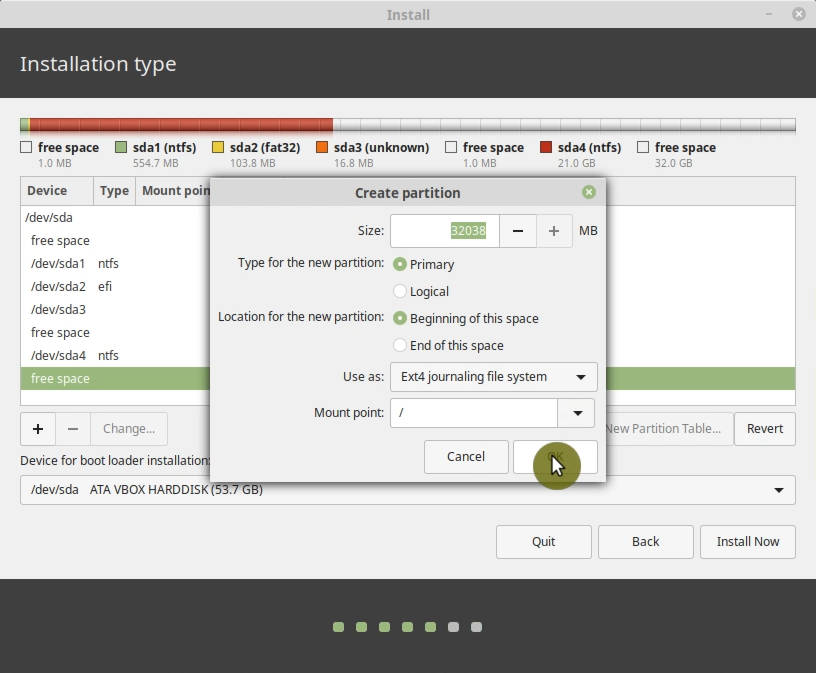
You can keep all the options at default here but importantly you need to assign / as a mounting point to this partition.
You can also split this free space into two parts and assign one to the system / and one to /swap. But I believe it is much better to use a swap file instead. Ubuntu installer creates a swap file by default.
I already explained the difference between a swap file and swap partition previously.
Check the EFI partition
Next, you need to select the EFI partition, it is usually of several hundred megabytes in size. Make sure it is detected as EFI:
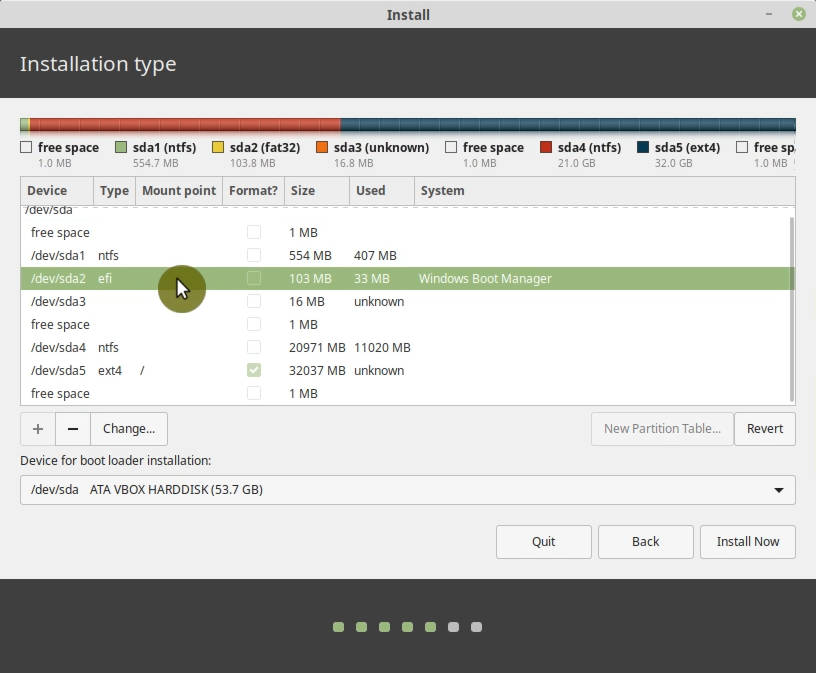
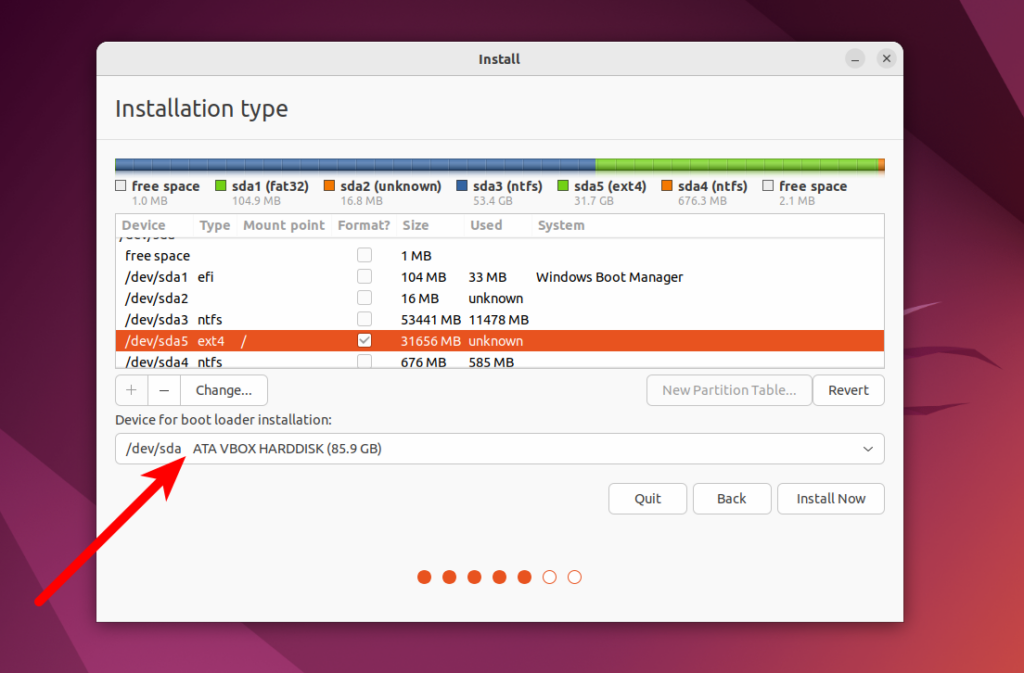
Boot loader installation
Boot loader installation doesn’t matter here because it will be UEFI installation, so the boot loader will be installed in the EFI partition. You can keep the default selection.
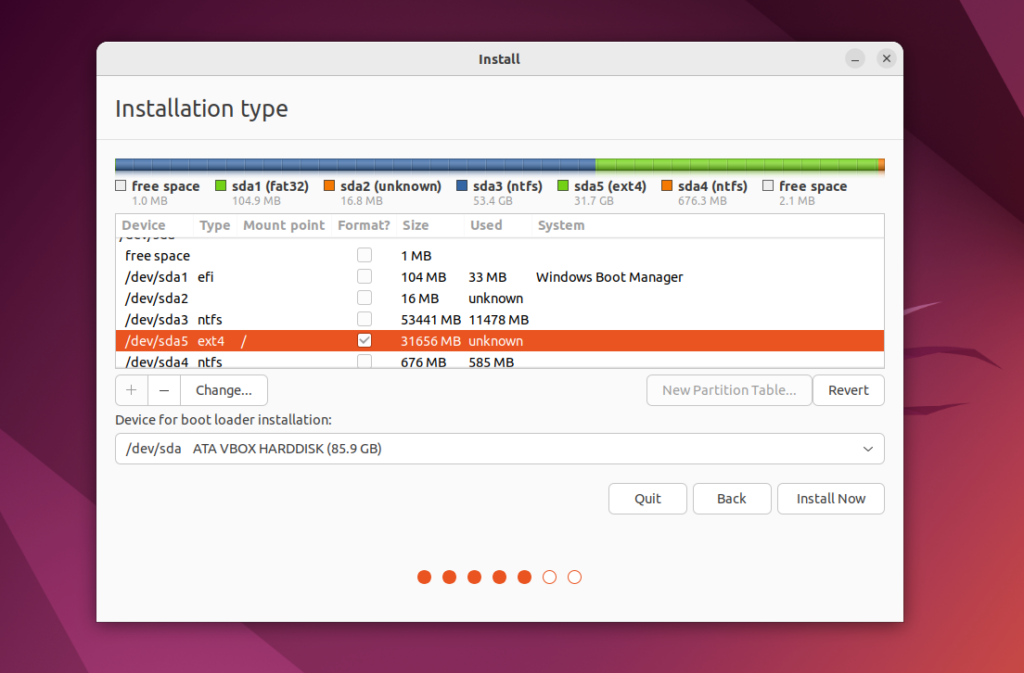
Format column
Finally, check that only the new Linux partition will be formatted in the Format column. Because if you have other partitions selected for formatting, be careful you will lose all the data stored in those partitions. If everything is fine, click Install.
Finalize the installation
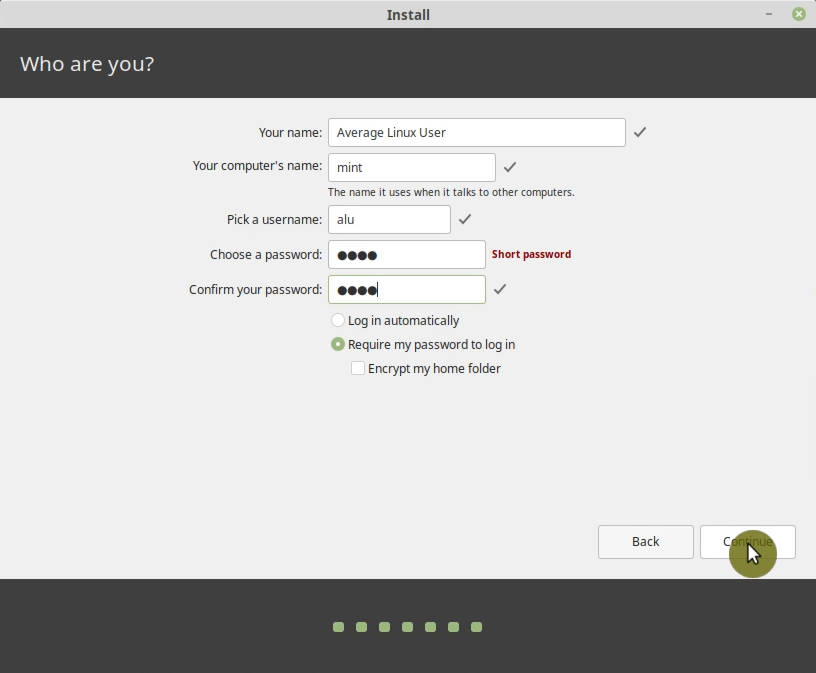
While the system is installing, select your location, provide your user information, set the password, etc.:
And then just wait until the system is installed.
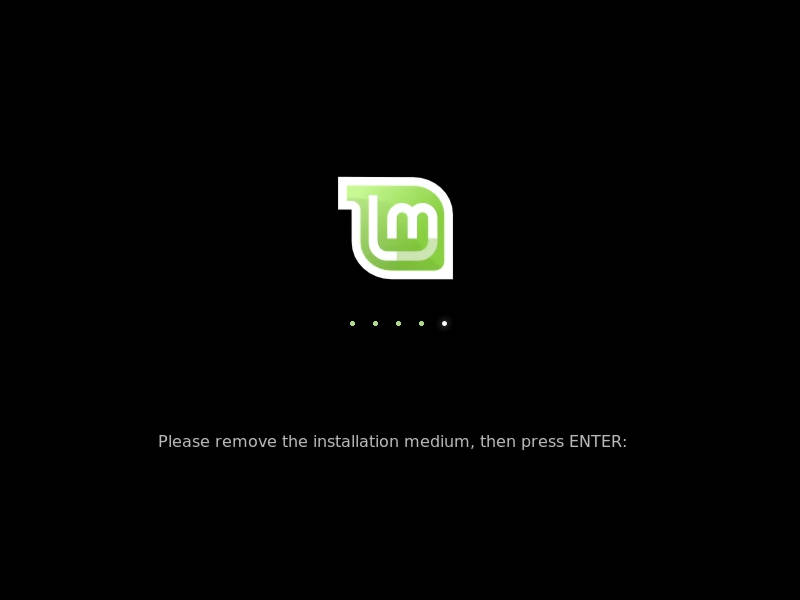
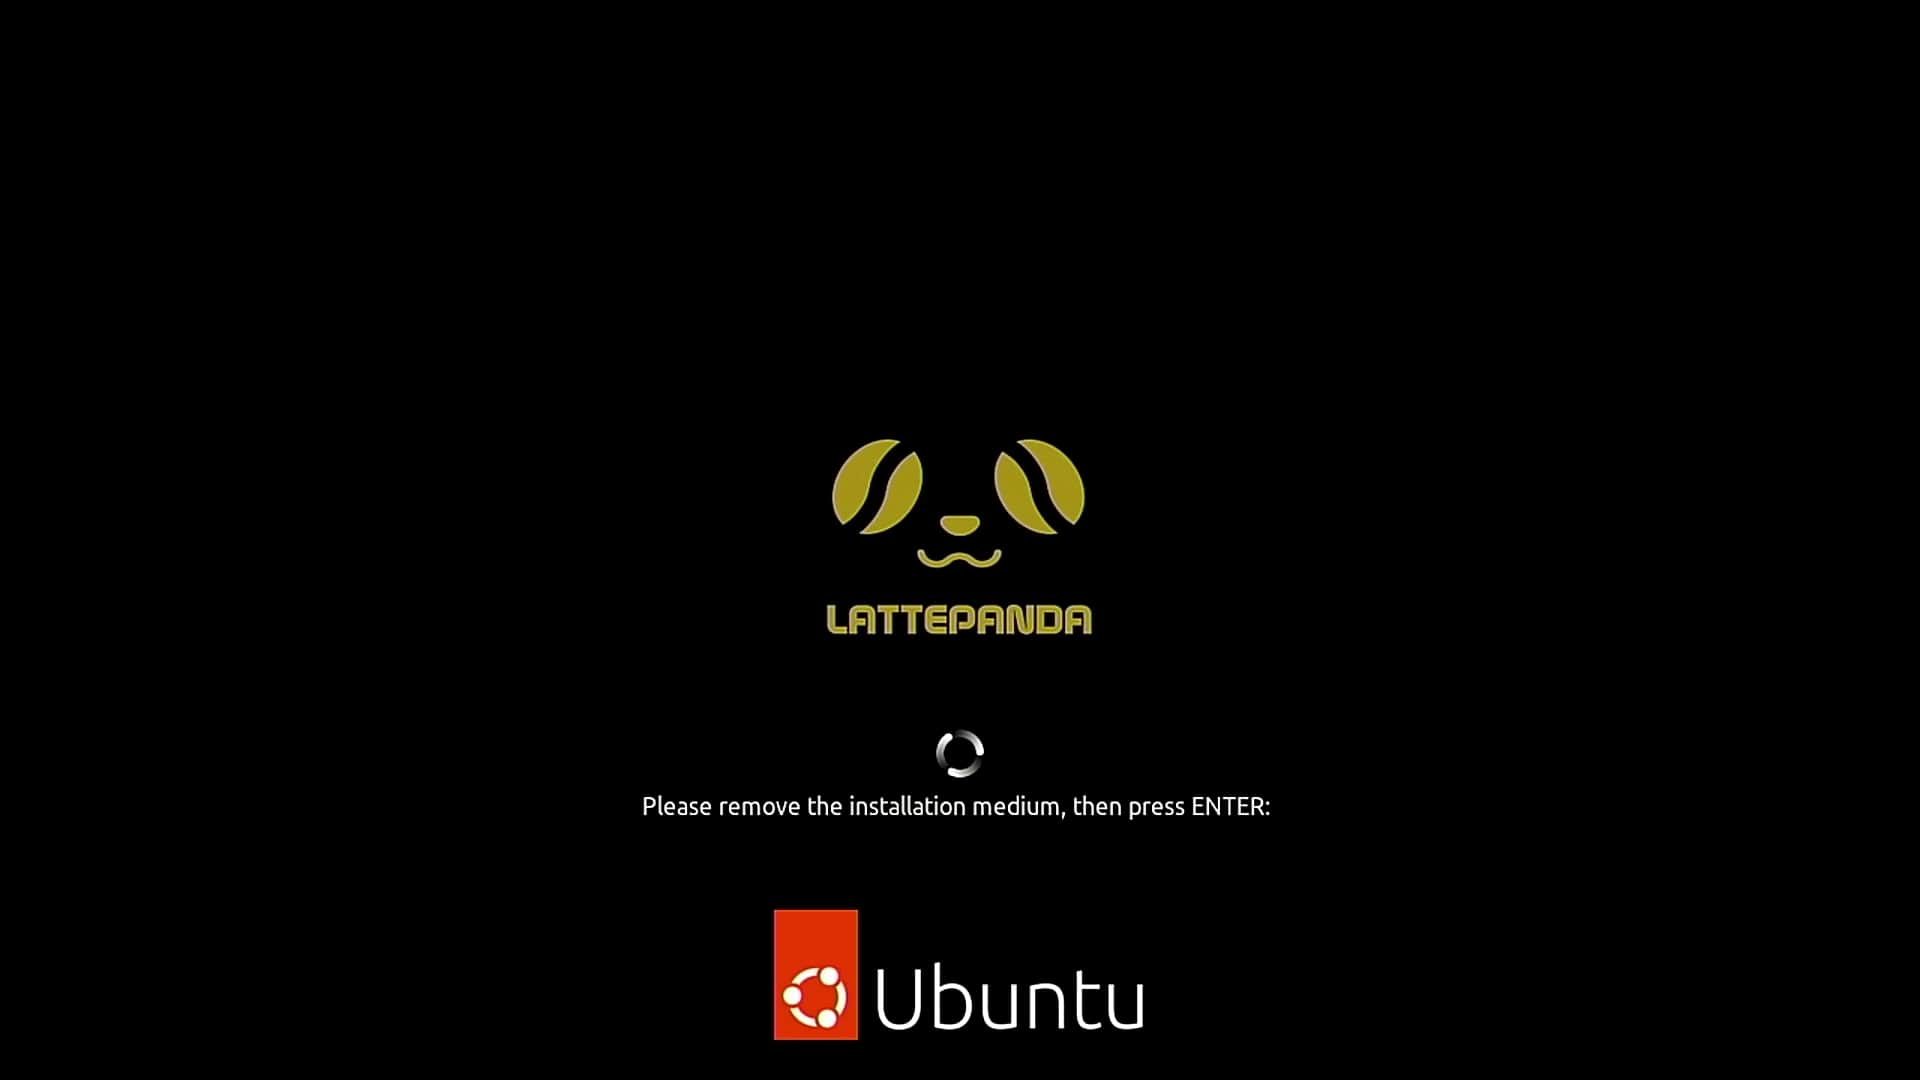
After the installation, reboot the system and do not forget to remove your installation USB when you are requested to do so:
Boot into the new system
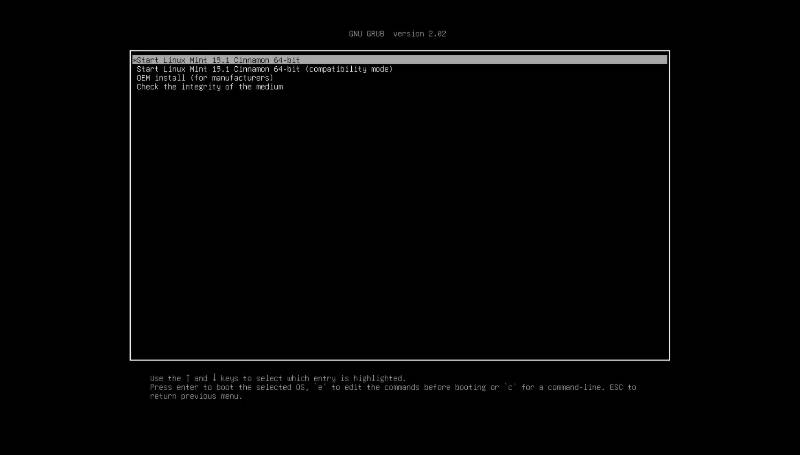
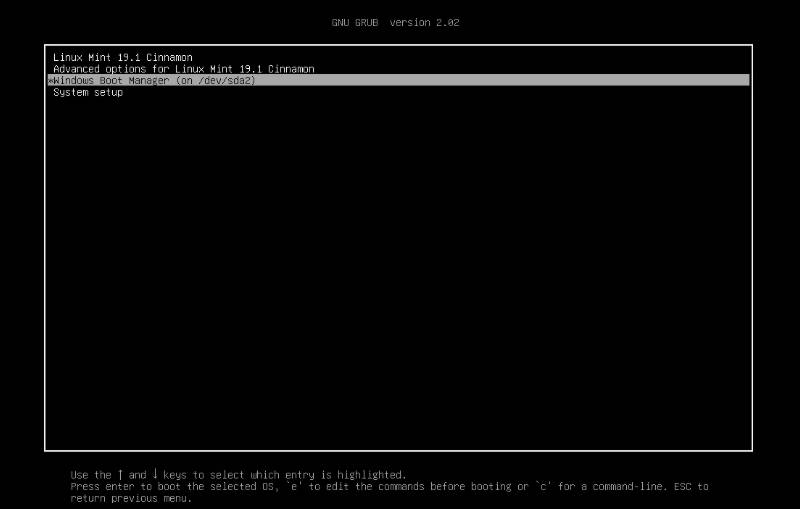
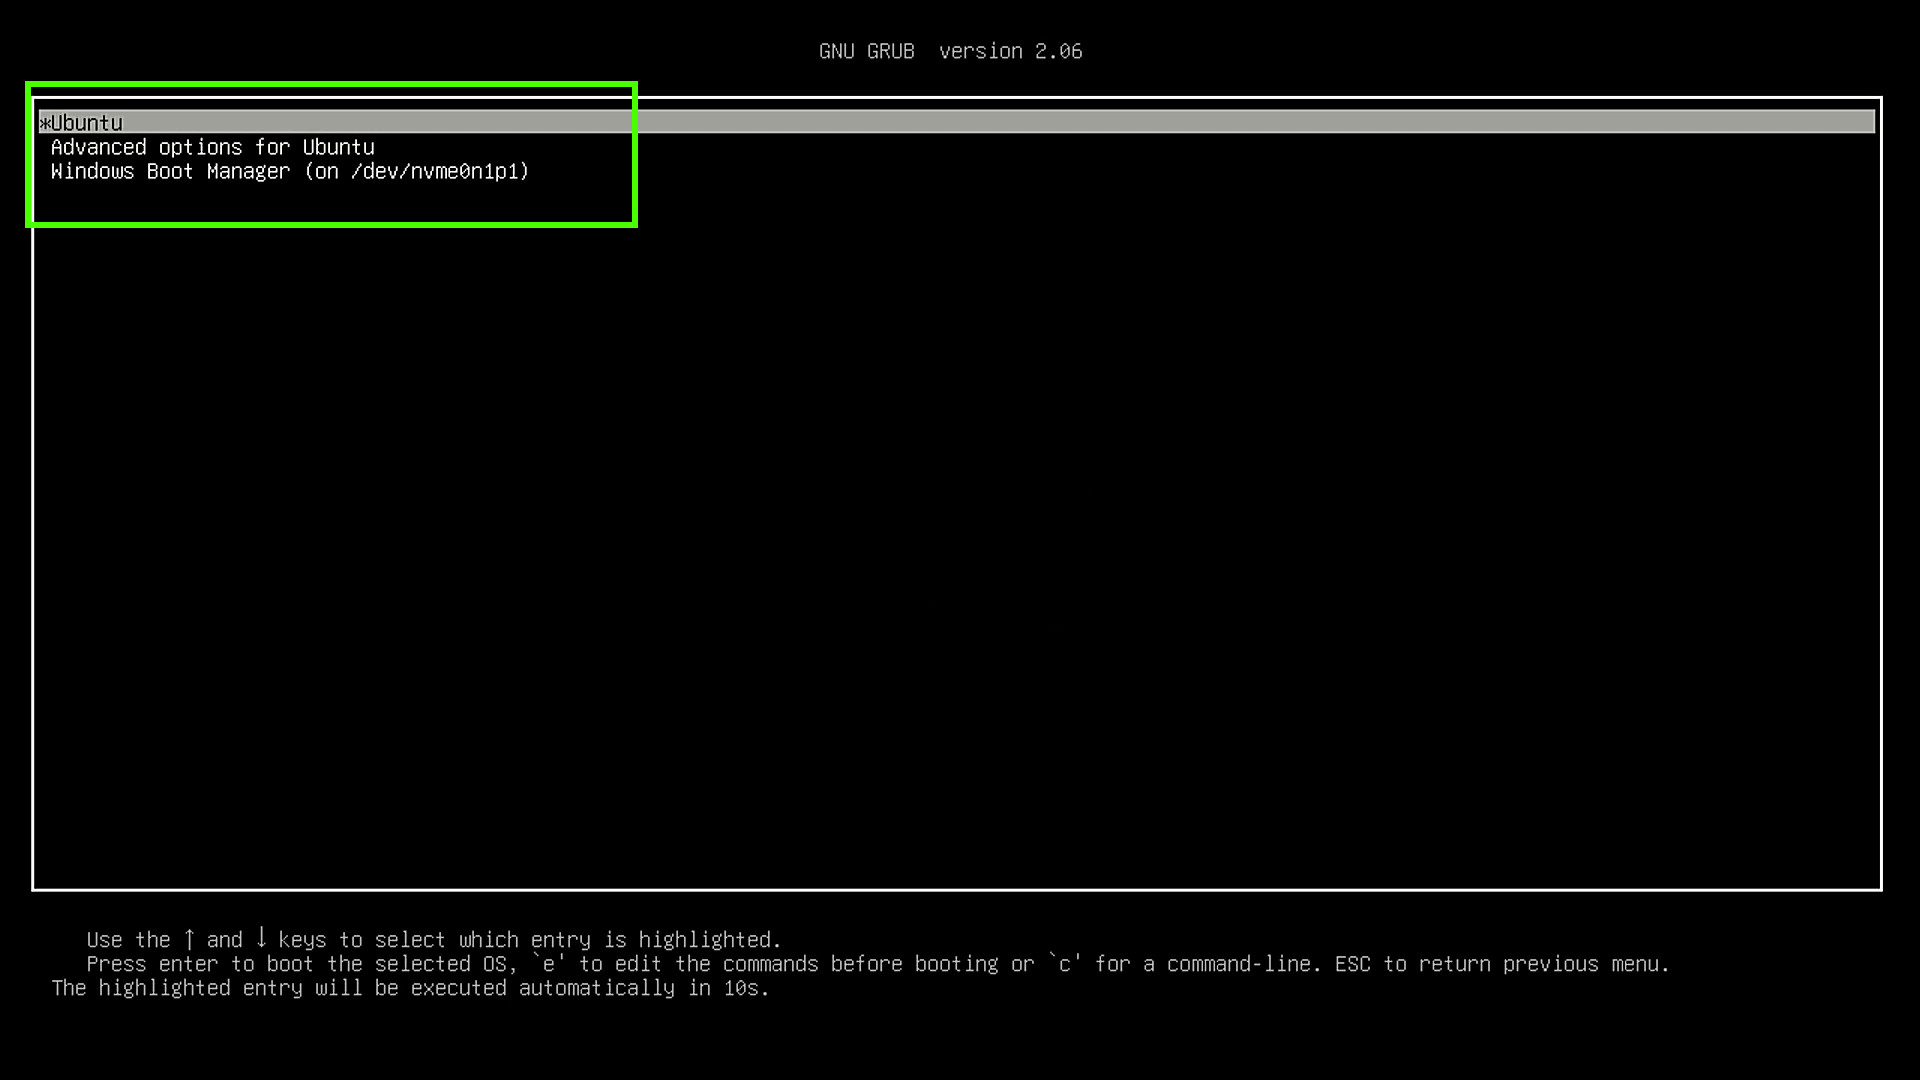
You should see this GRUB menu after the reboot. Here you can select between Linux, which will boot by default in 10 sec, and Windows:
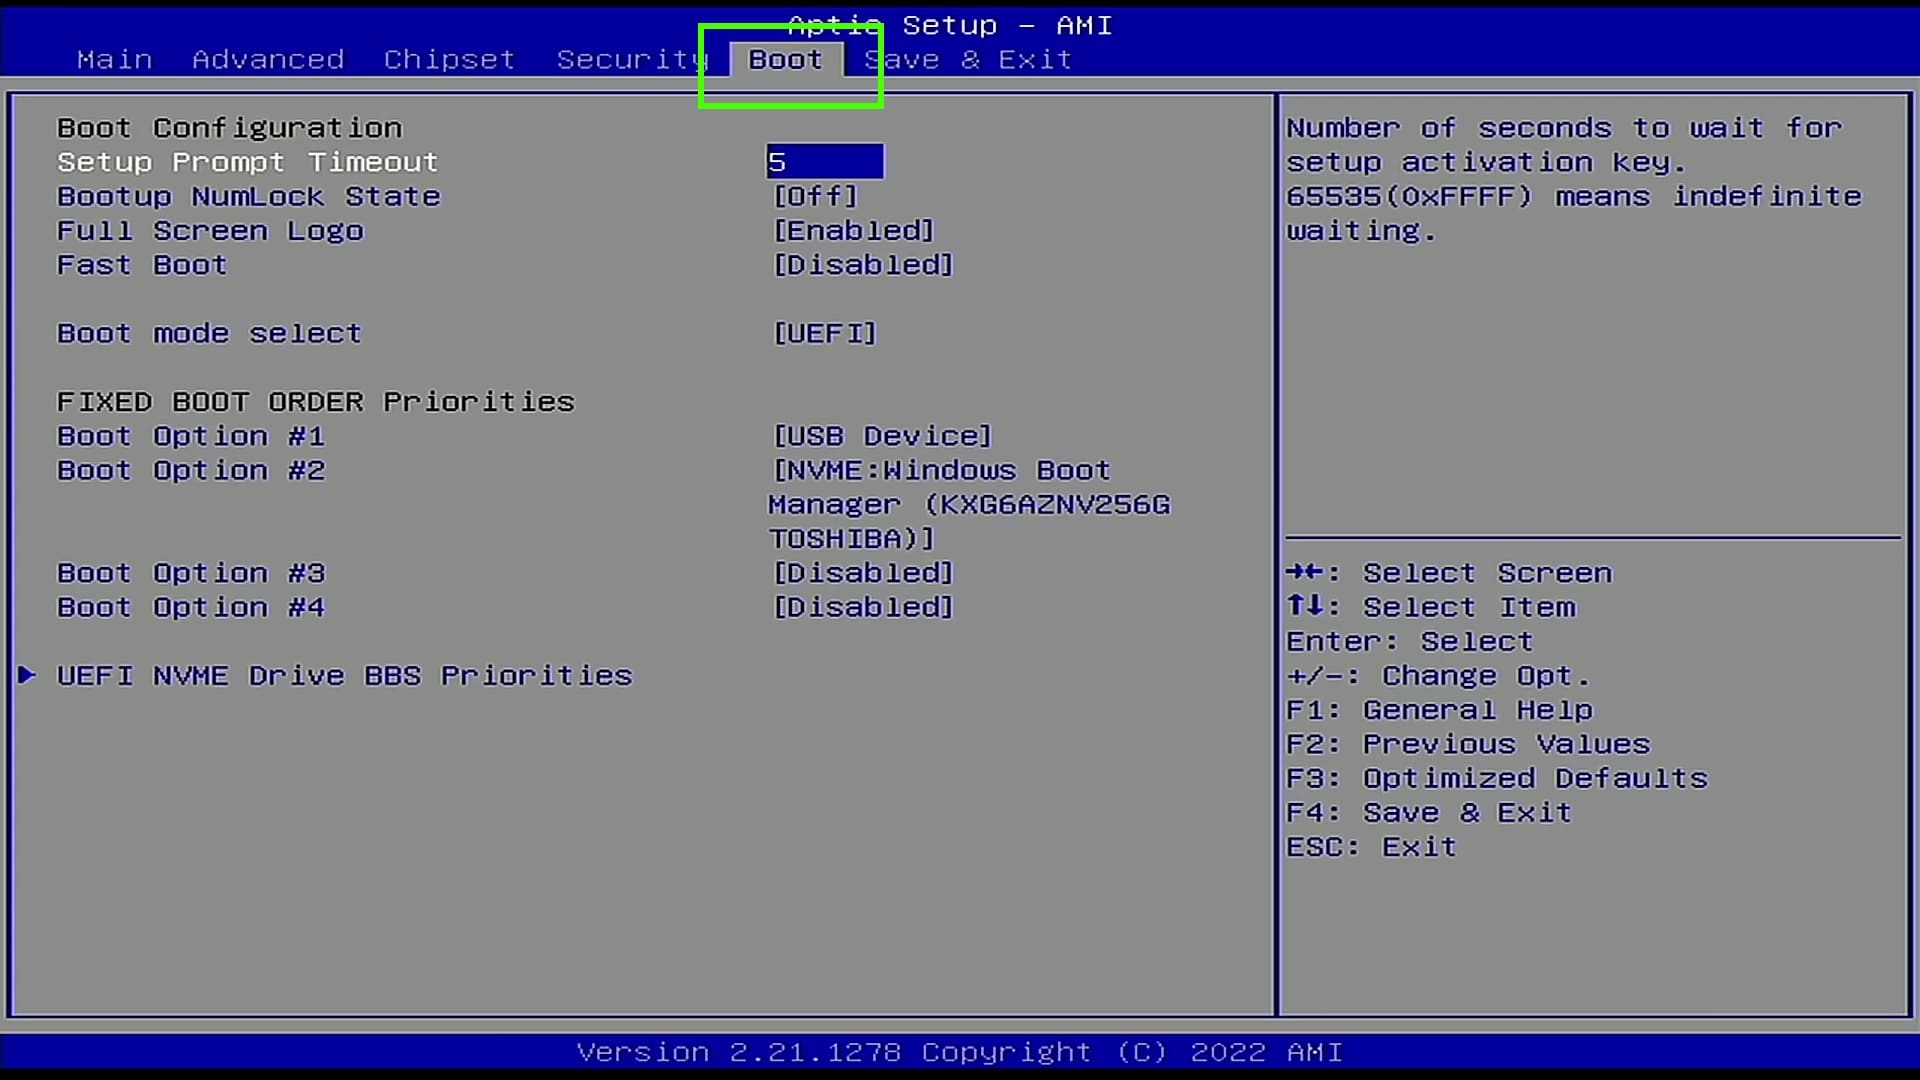
Boot options in BIOS
If it happened that after the reboot, you booted directly in your Windows and you did not see any Linux menu, do not get upset. Likely, you have done everything right and you just need to change the boot order in your BIOS. Like I had to do in my Acer Swift 1.
In the Main tab, find the Boot menu and enable it:
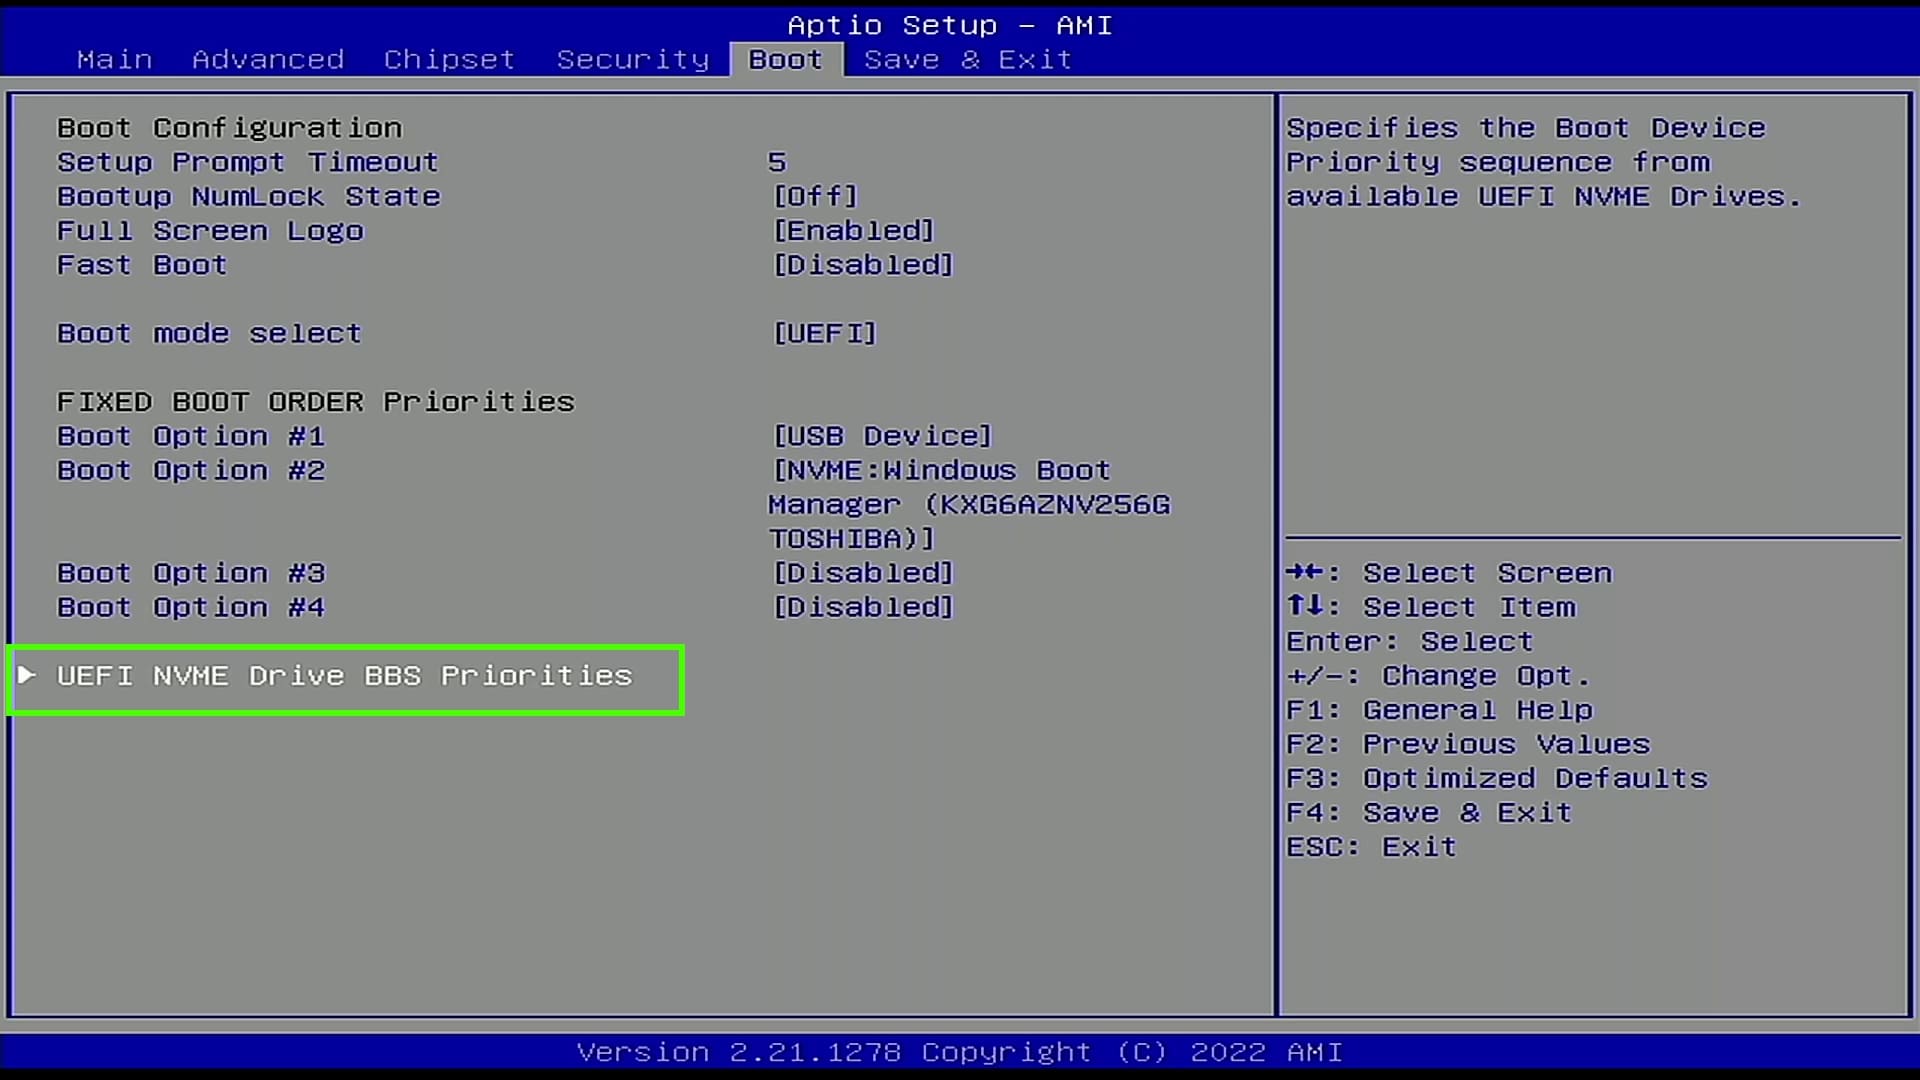
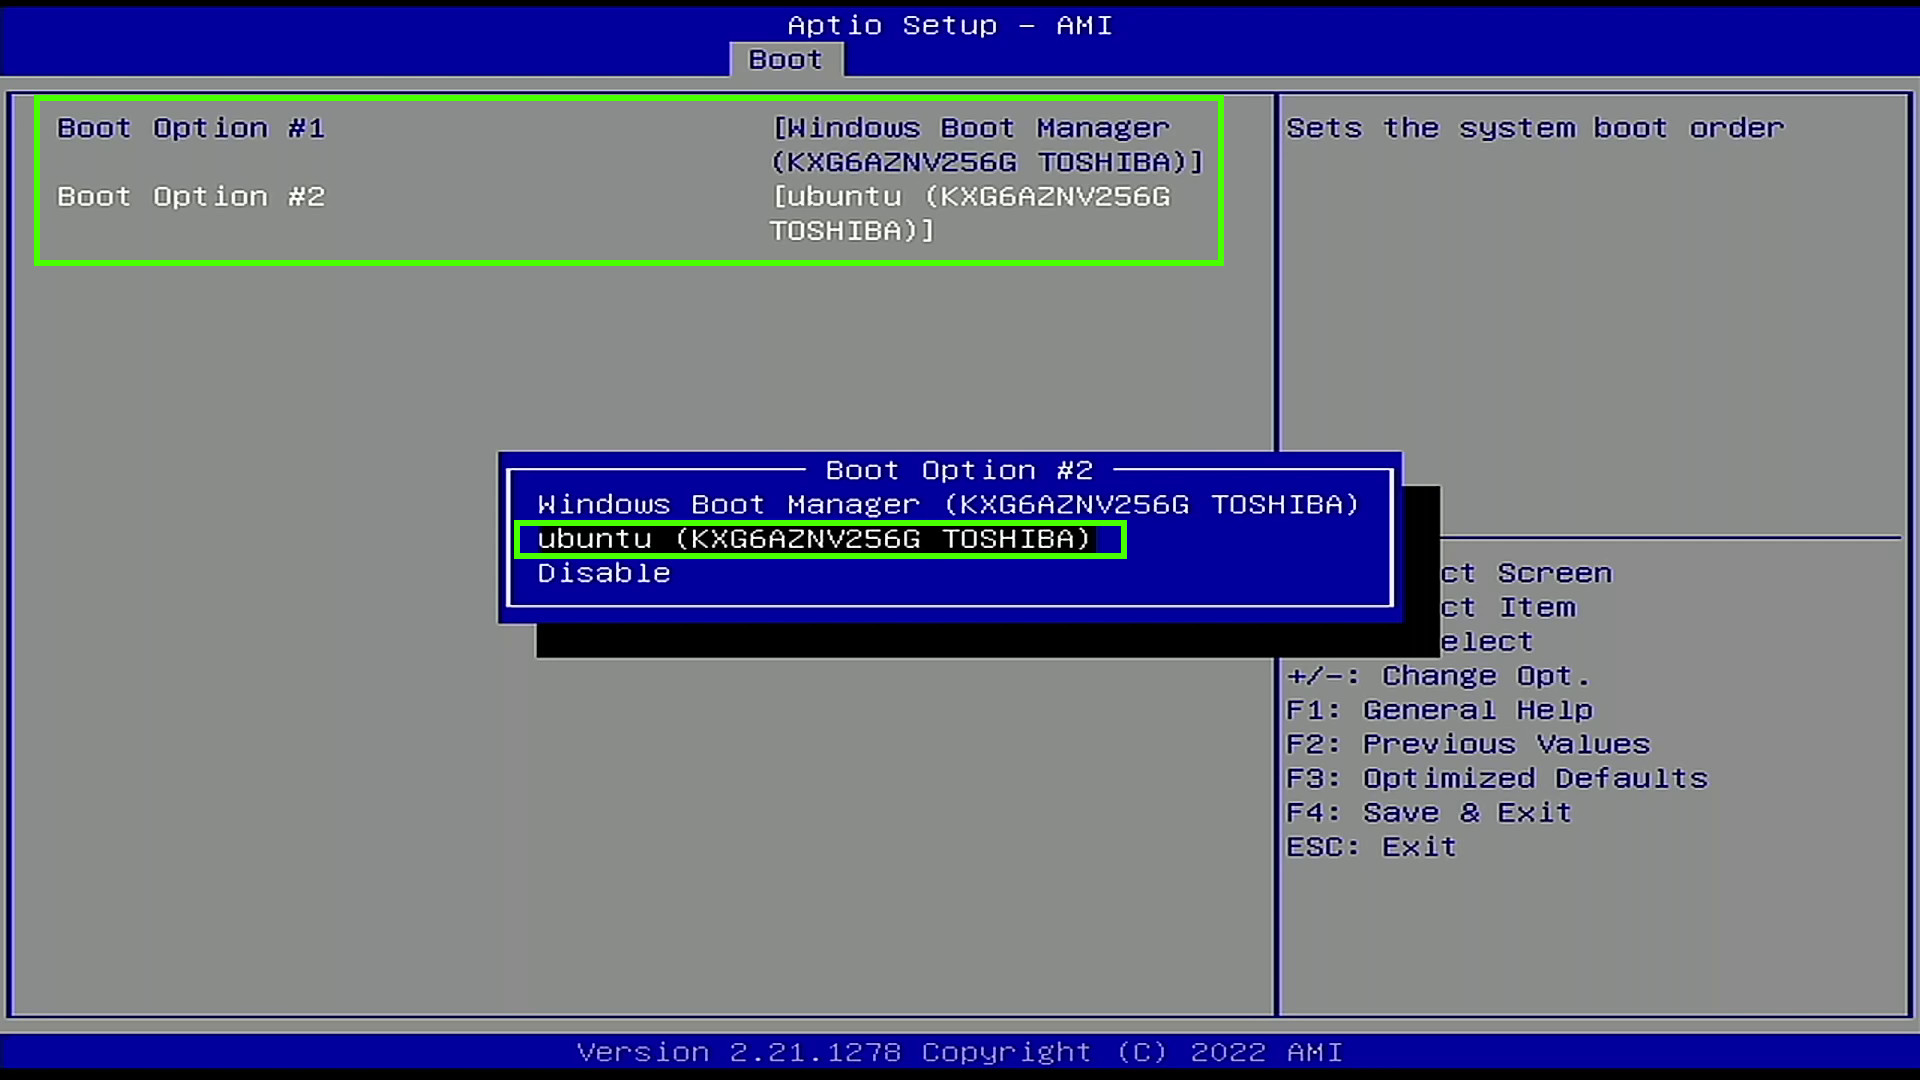
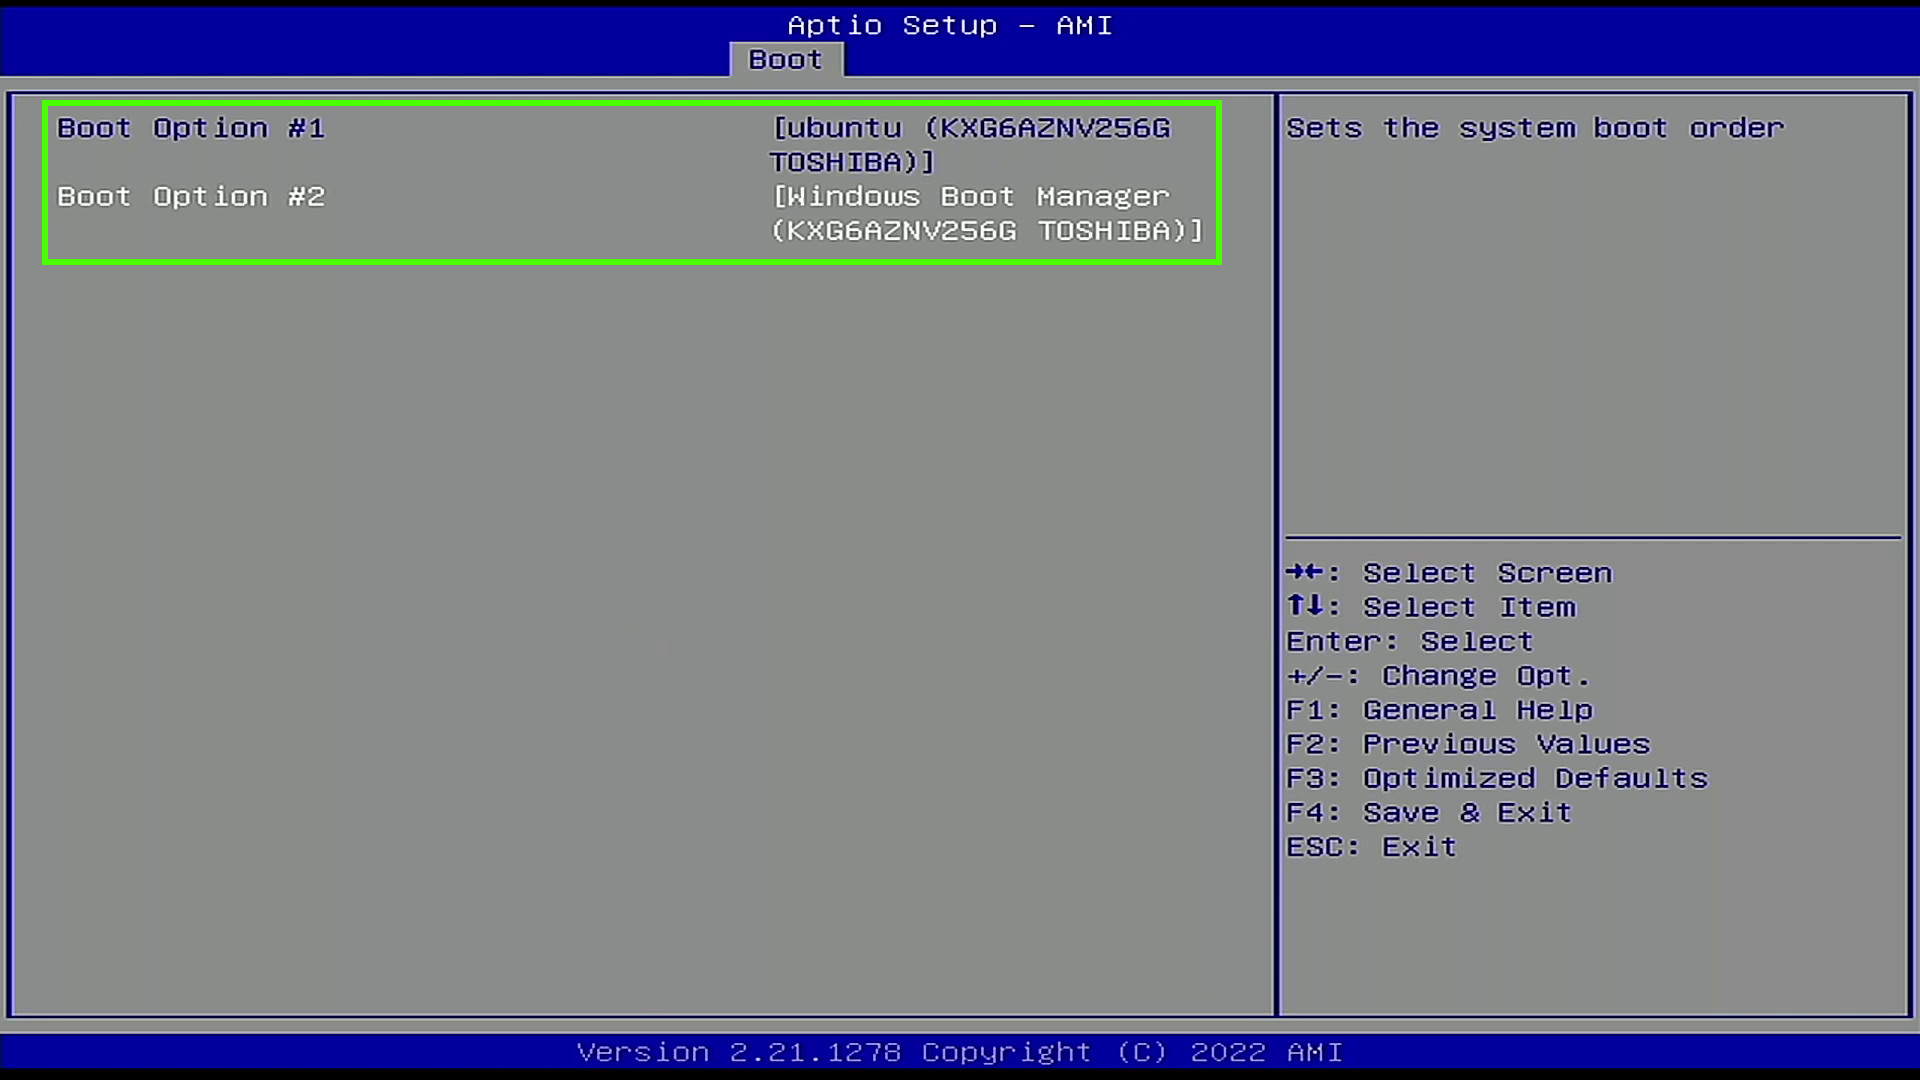
Change the Boot order
Then go to the Boot order and you should see an additional boot option there that appeared after you installed Linux. In my case, it is still called Windows Boot Manager without the code in brackets. This is actually my Linux boot file. I do not know why BIOS branded it as Windows. So, I make it a first boot option:
And save the BIOS changes. After the reboot, you should see the GRUB menu with the choice of boot options.
If you still boot into Windows by default, try to open the boot menu during the start of your system by pressing the F12 key (or whatever key is assigned to your BIOS Boot menu). It should bring this BIOS boot menu:
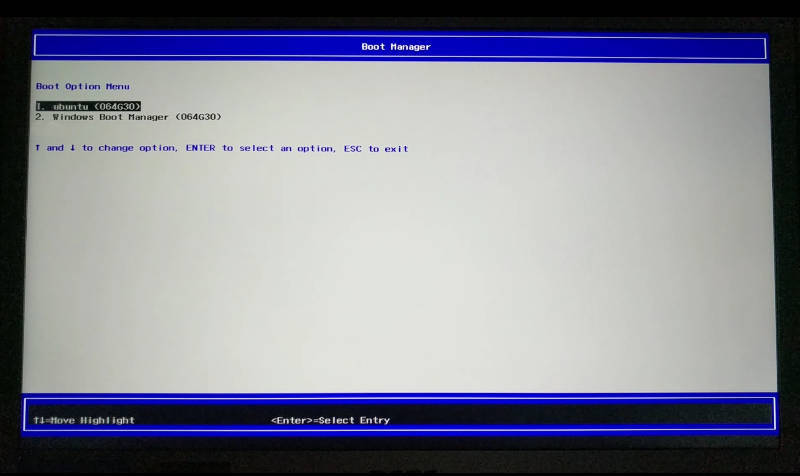
Where I can choose Ubuntu and my Linux Mint will boot. So, the BIOS Boot menu helps to make sure that Linux works, you just need to check your boot order settings, maybe Linux is not the first option there. Try different orders until you get Linux booting the first.
Why I do not recommend dual-booting
There are three main reasons I stopped dual-booting and this is also why I do not recommend dual boot.
-
If you use Windows in dual boot, it is possible that some updates of Windows may break your Linux installation. Theoretically, it should not happen, but it happens. Maybe Windows changes the Linux bootloader in the UEFI partition. I do not know.
-
If you dual boot, you will never switch to Linux. If you are used to Windows, you will tend to boot into Windows more often and you won’t like to reboot to get to Linux. So, you will not use Linux much and thus will never switch to Linux completely.
-
On the other hand, if you prefer Linux, Windows will just take too much space on your hard drive that is never used. So, this is not good either.
I recommend using Windows in a Virtual machine such as VirtualBox. This way your Windows can be accessed from within Linux. Windows will be less powerful than if it was installed in dual boot, but you still can do most of the things you would normally do. A virtual machine also isolates your Windows file system and this provides better protection against viruses. You can read my post on how to install Windows 10 in VirtualBox and maybe you will like that option more than dual-booting.

Gone are the days when Linux and Windows were like two opposing forces. Microsoft has embraced the open-source community quite cordially in recent years, and as a result we have things like Windows Subsystem for Linux baked right into our Windows installations.
That doesn’t mean that we no longer need a full blown Linux installation. In fact, machines with both Windows and Linux running side by side are quite common.
But do you know what’s more common than machines running both operating systems? Machine owners who have tried to dual boot their machines and ended up losing a lot of data in the process.
So if you’re one of the victims or one of those who are trying to avoid possible disasters in their upcoming dual booting adventure, this article is for you. Here you’ll learn about:
- How to install any Linux distribution alongside Windows
- How to get rid of Linux without messing up Windows if necessary
- Common problems, misconceptions, and their solutions, and
- Some generally geeky stuff to impress you peers
Without any further ado, let’s grab a mug of coffee or tea or at least water and jump right into the process.
Some Assumptions I’m Making
Before I jump into the core of the tutorial, I want to clarify a few things. To make this entire article approachable, I’m making following assumptions about your system:
- Your computer is using UEFI and not BIOS
- You already have Windows installed on your machine
- You have a USB drive large enough (4GB) to boot Linux from
- You have enough space (25GB) to install Linux on your HDD or SSD
That’s pretty much it. If you have all of the above ready, you’re good to go.
How to Create a Bootable Linux USB Drive
There are multiple tools that can help you to create a bootable Linux USB drive. Among all these tools, my favorites are:
- balenaEtcher
- Fedora Media Writer
Both of these tools are open-source, free to use, and available on pretty much all major platforms. For this article, I’ll go with Fedora Media Writer simply because there are not a lot of tutorials talking about it and because I use it personally.
Like the name suggests, Fedora Media Writer is a tool created by Red Hat for making bootable Linux USBs. Once you’ve downloaded the program, install it on your system and fire it up.
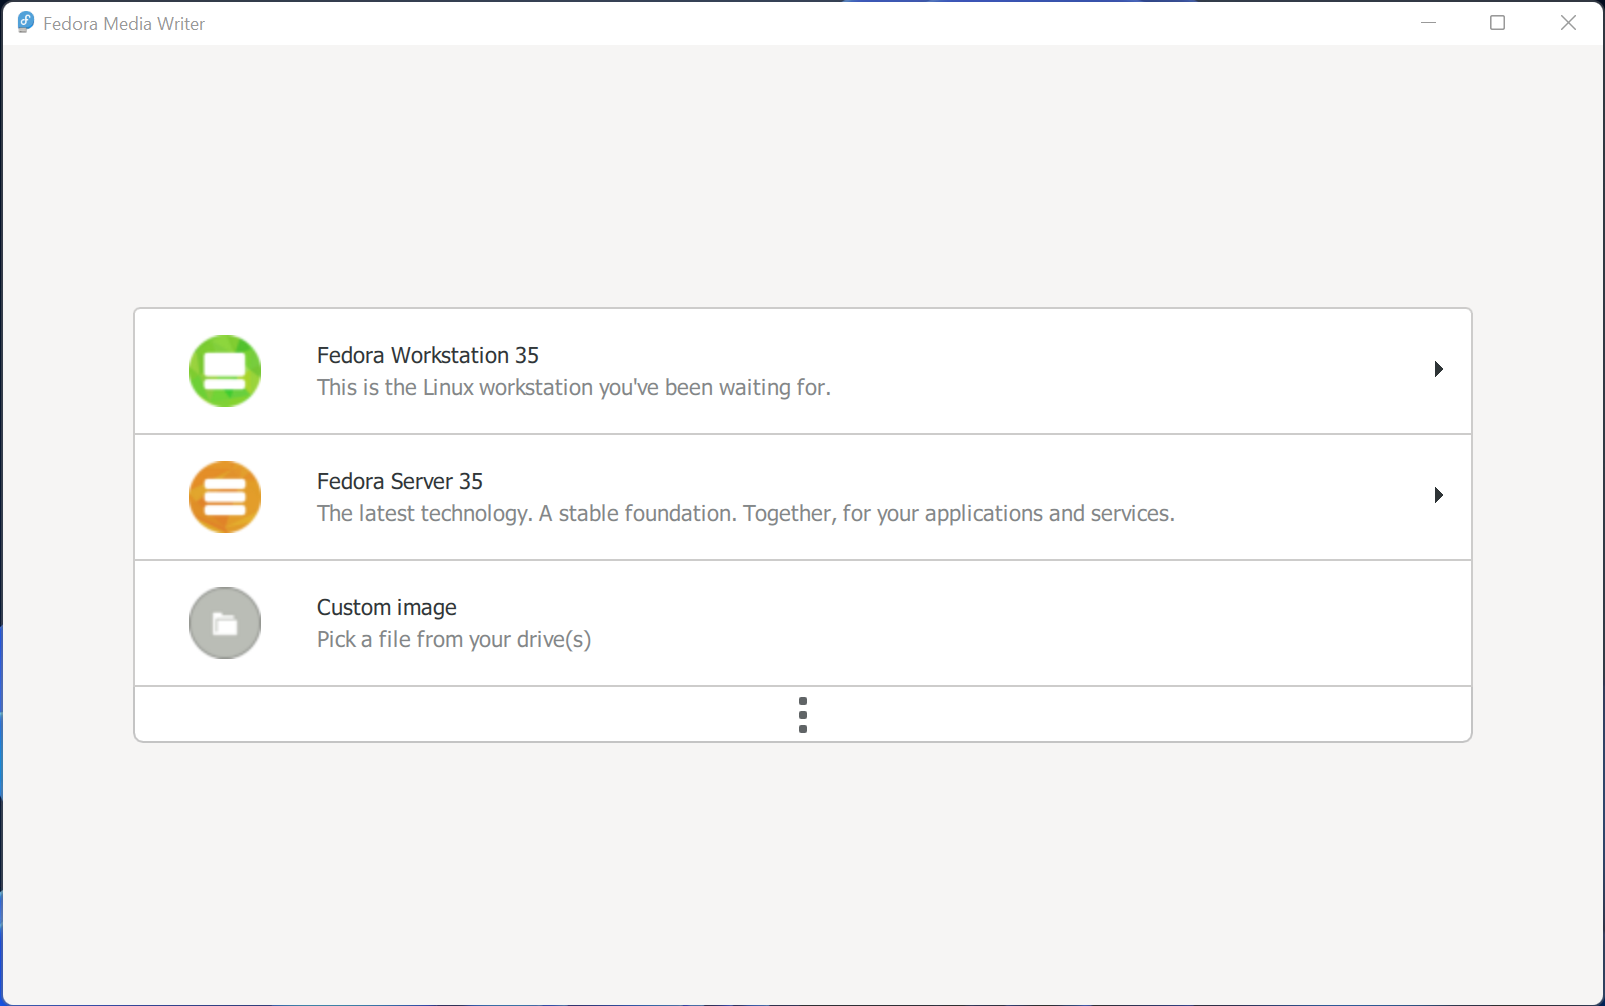
This is how it looks. As you can see, you’ve got the option to download the latest Fedora ISOs as well as an option to pick a custom image file from your drives.
Unless you’re planning on installing Fedora (spoiler! it’s my favorite) on your machine, you’ll have to go ahead and download your desired ISO file.
In this article, I’ll use Ubuntu because it’s more popular among newcomers. But the things you’ll learn here can be applied to any other Linux distribution.
Go ahead and download the ISO for Ubuntu from their download page. Ubuntu 20.04 LTS (the latest long term release at the time of writing) is around 2.67GB in size. Once you’ve finished downloading the file, go back to Fedora Media Writer, click on «Custom Image», and select the ISO file you’ve just downloaded.
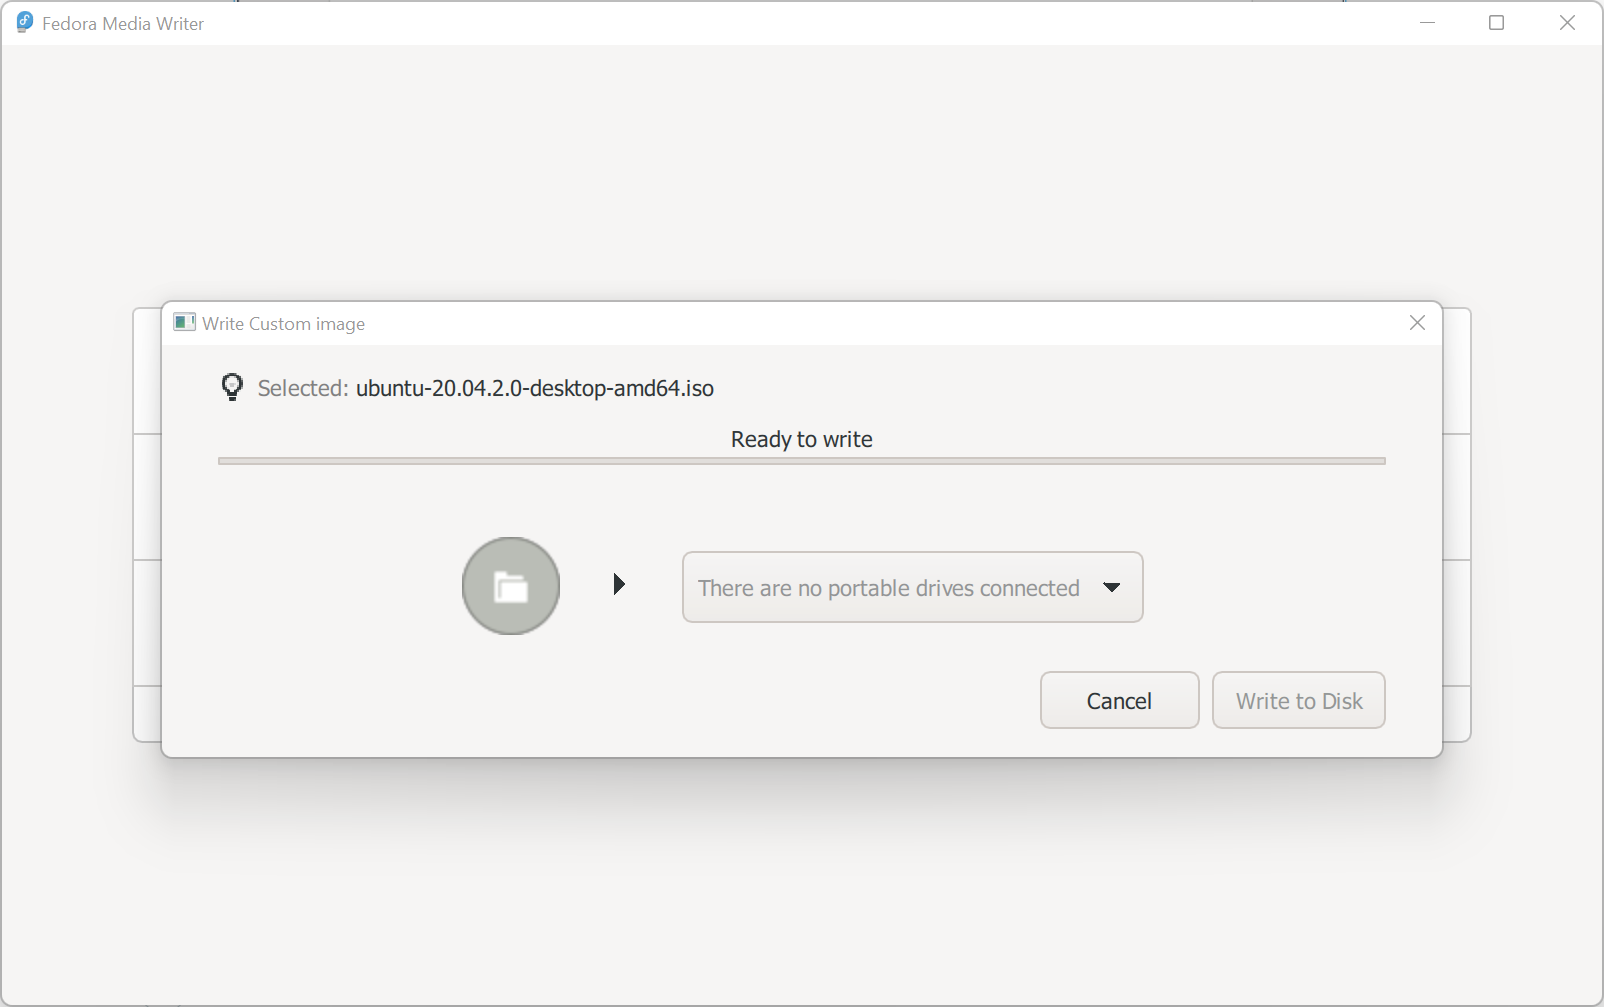
The «Write to Disk» button is grayed out because there are no USB drives attached to the computer. Connect your USB drive and the button should turn bright red.
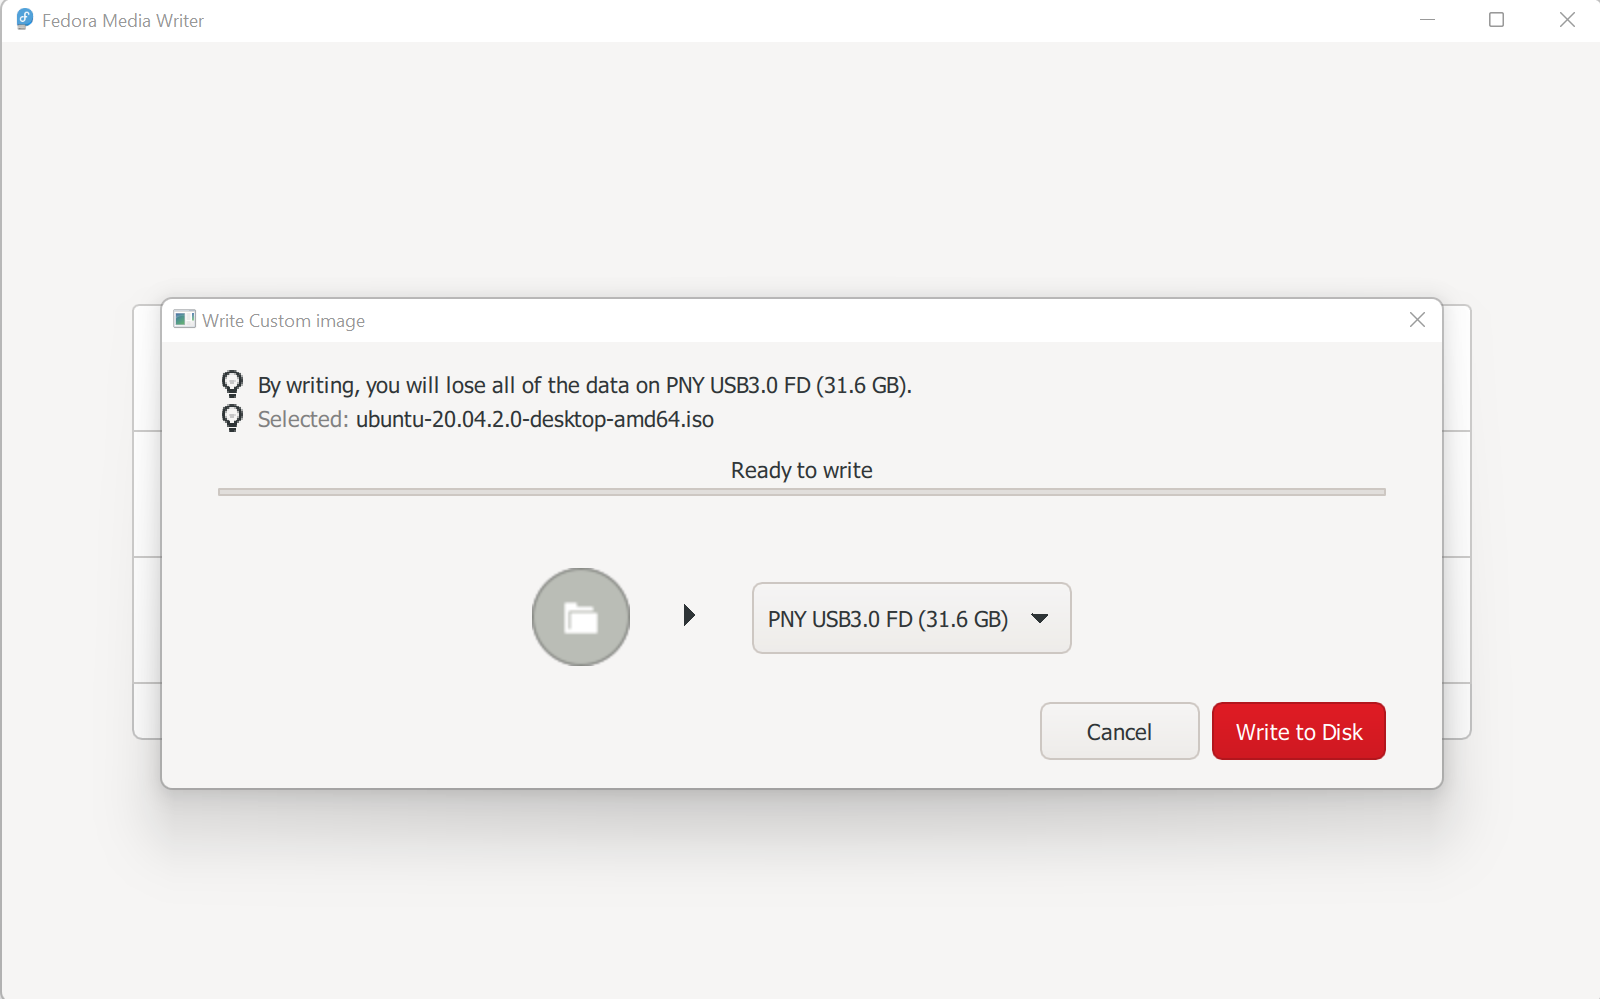
Recheck that the correct USB drive is selected in the dropdown and hit the «Write to Disk» button. Depending on your machine’s transfer rate, this process may take a few minutes. Once it’s done, disconnect the USB drive and set it aside. You’ll need it soon.
How to Prepare Your Computer for Installing Linux
Again, it’s not uncommon to find people who have failed to boot from a Linux USB drive. This can happen if you haven’t configured your computer properly.
To do so, go to your Control Panel. Not the new Settings application, but the OG Control Panel.
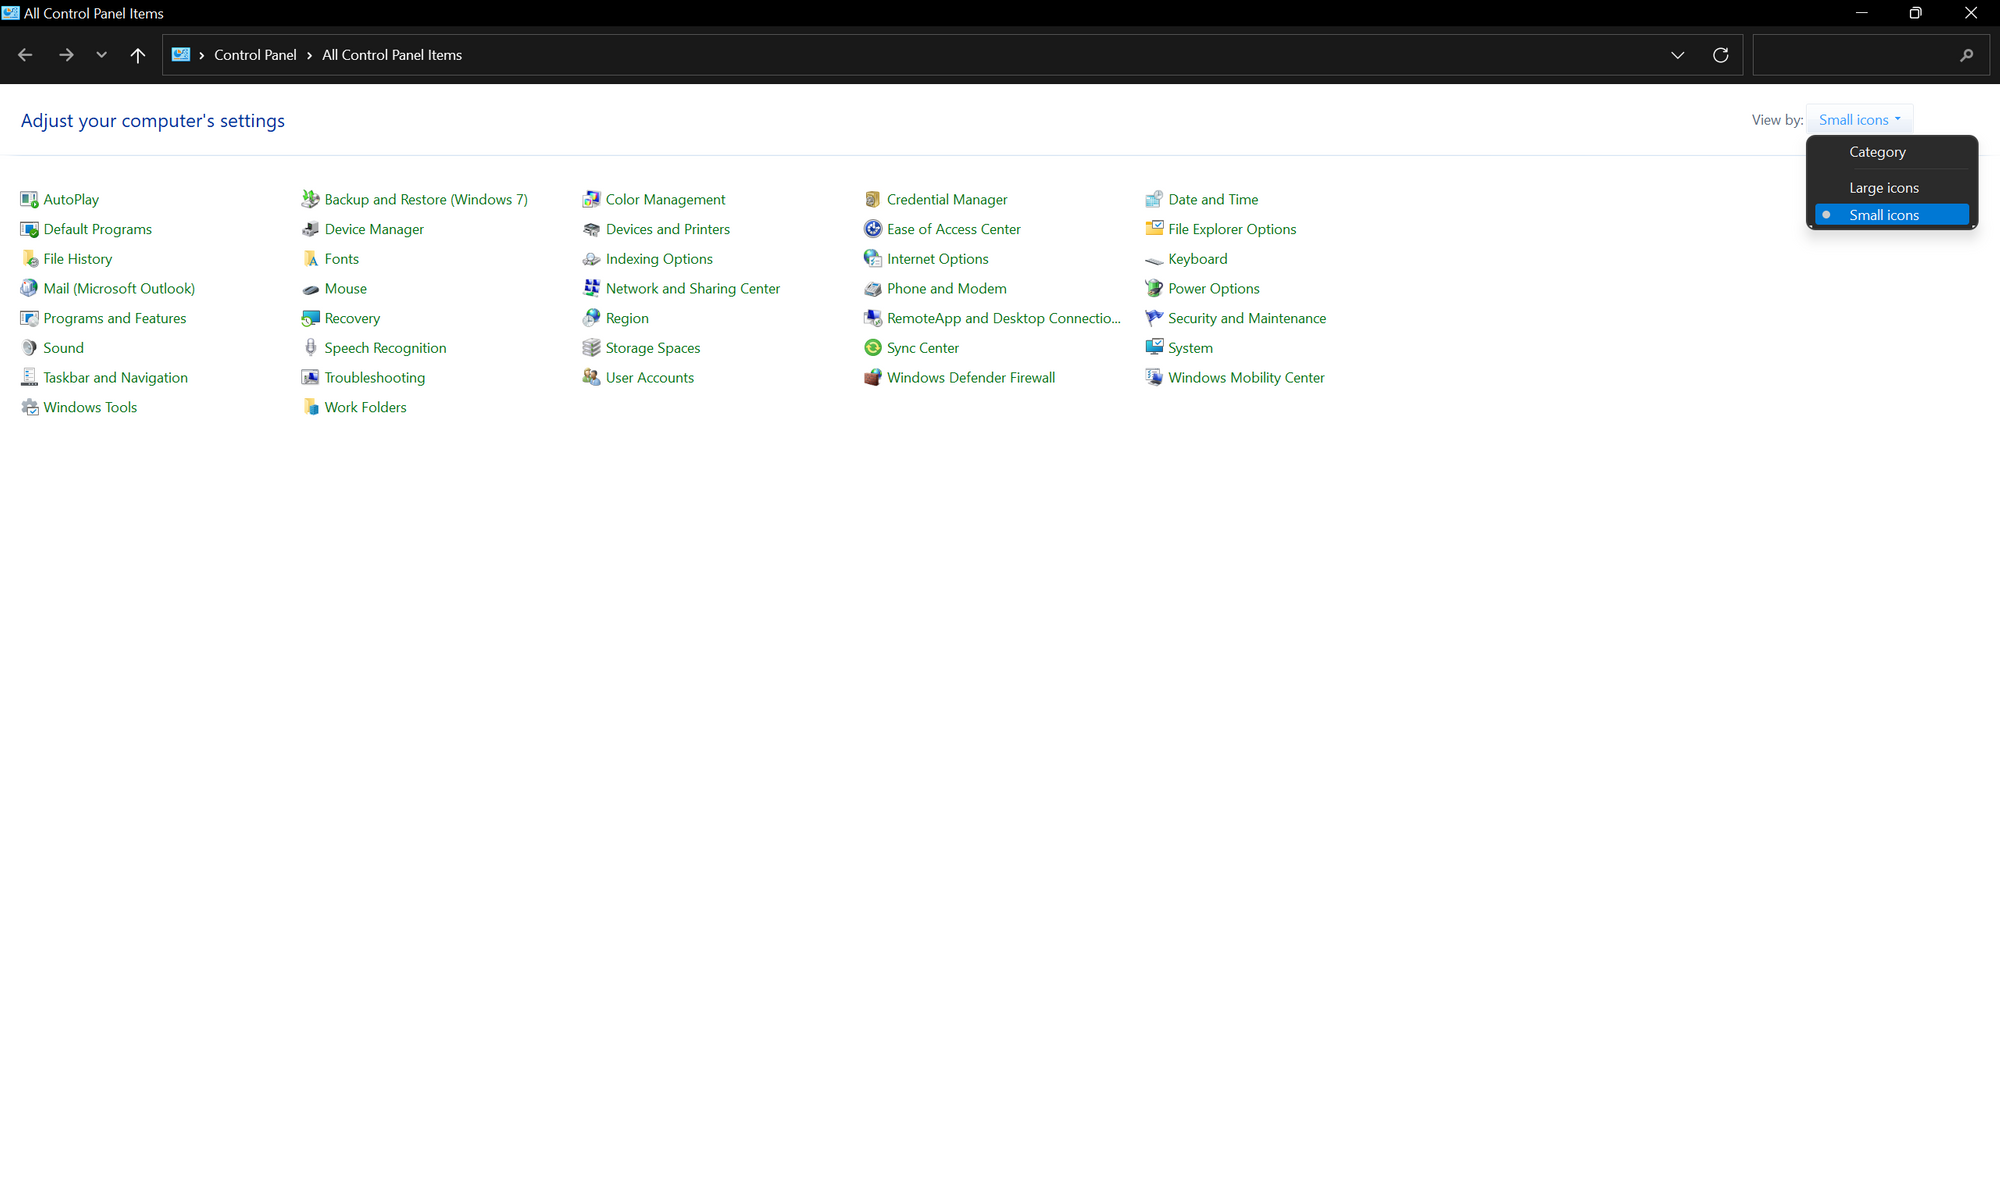
Make sure Control Panel is either on «Small icons» or «Large icons» mode and not on the «Category mode». Now go to «Power Options» and from the left side-bar, click on «Choose what the power buttons do».
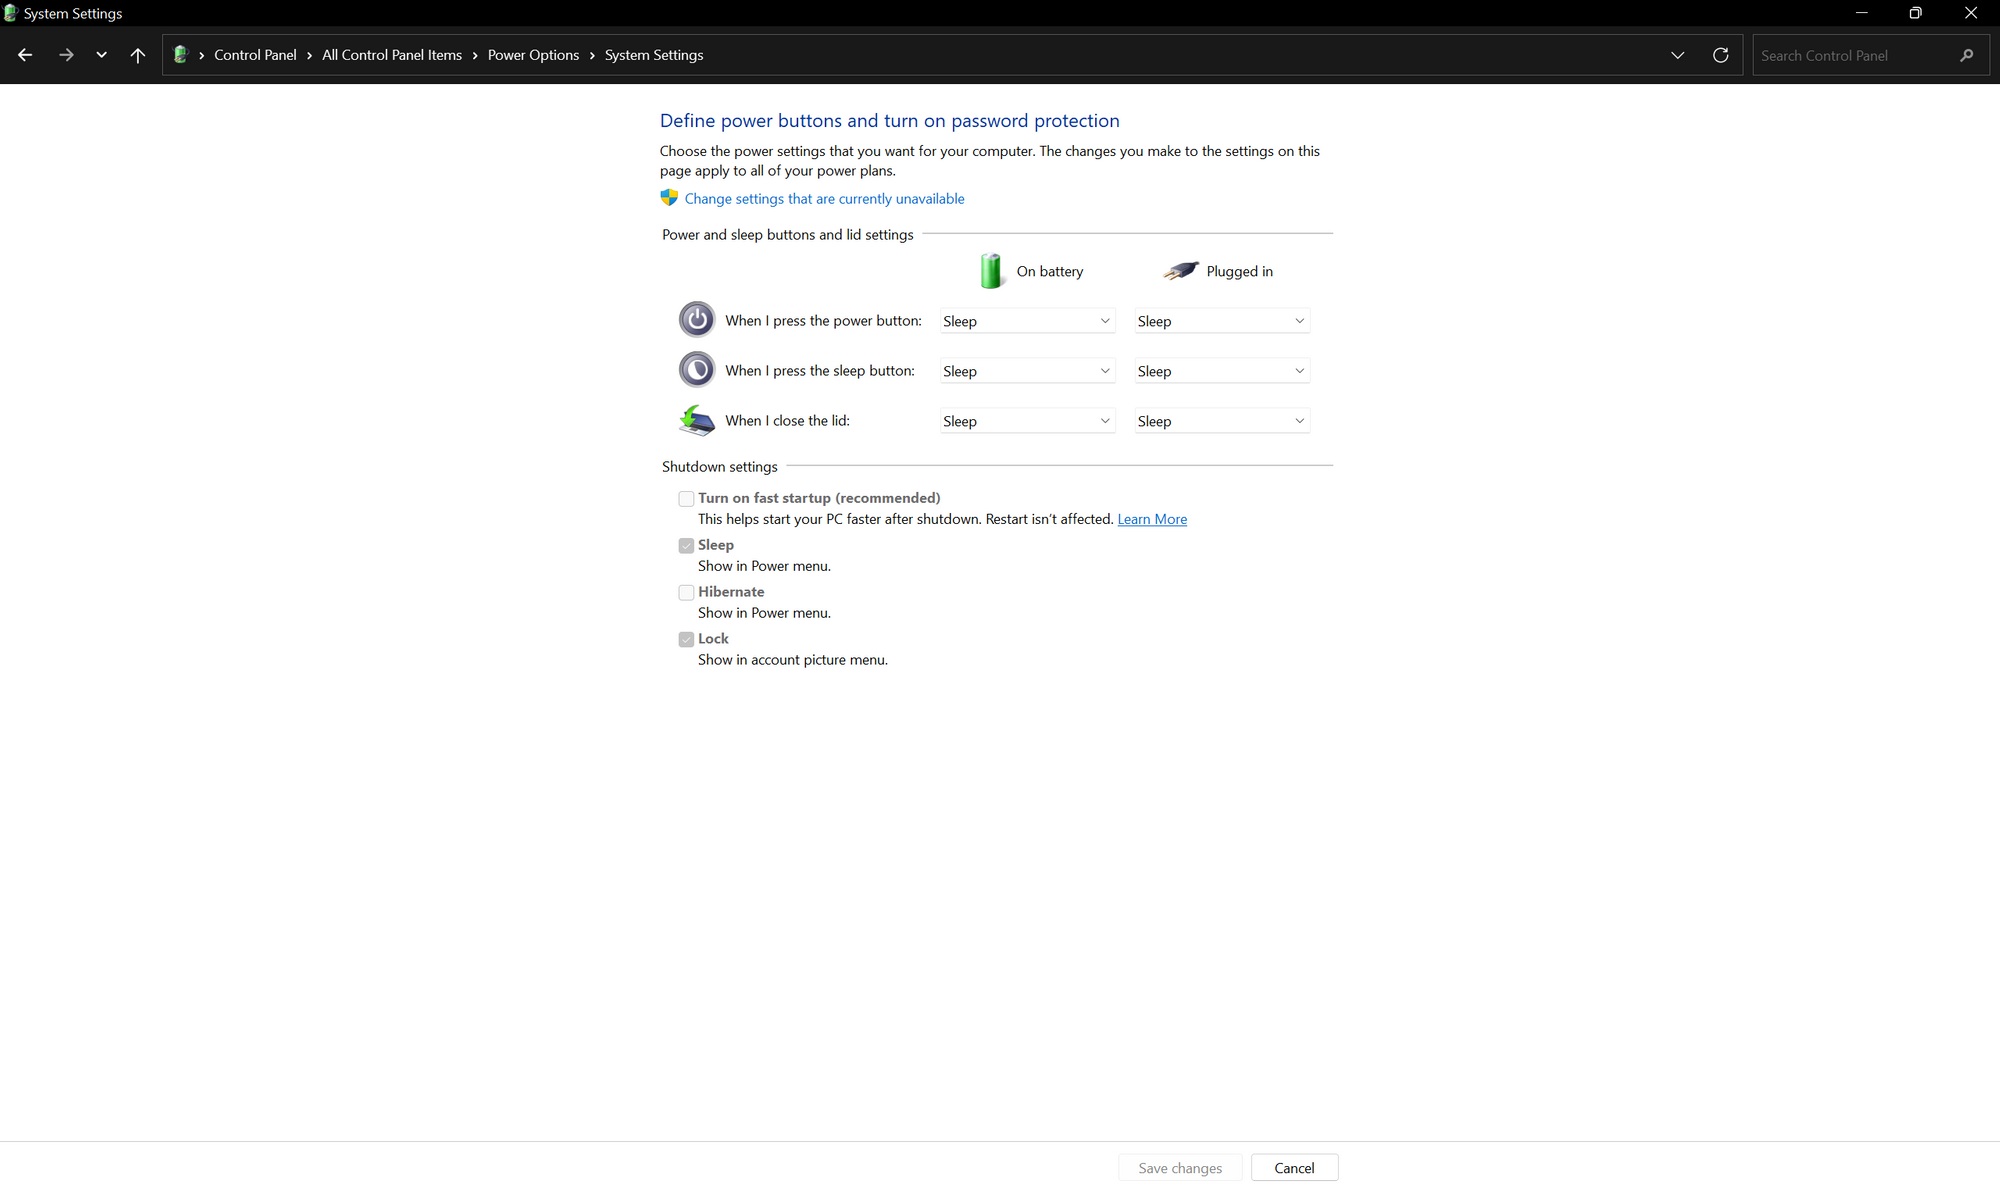
Click on the Change settings that are currently unavailable link and uncheck the «Turn on fast startup (recommended)» option and hit «Save changes».
According to Walter Glenn’s article,
Fast Startup combines elements of a cold shutdown and the hibernate feature. When you shut down your computer with Fast Startup enabled, Windows closes all applications and logs off all users, just as in a normal cold shutdown.
At this point, Windows is in a state very similar to when it’s freshly booted up: No users have logged in and started programs, but the Windows kernel is loaded and the system session is running.
Windows then alerts device drivers that support it to prepare for hibernation, saves the current system state to the hibernation file, and turns off the computer.
When you start the computer again, Windows does not have to reload the kernel, drivers, and system state individually. Instead, it just refreshes your RAM with the loaded image from the hibernation file and delivers you to the login screen. This technique can shave considerable time off your start up.
I know this sounds like a nice to have feature, but the problem is, if you keep fast startup enabled in a dual boot system, Linux will be unable to use any of the drives shared between the two operating systems because they’re hibernated and held by Windows.
Next, boot into your motherboard’s UEFI configuration screen. Depending on your motherboard or laptop brand, the key can change but in most cases pressing the «Del» key should get you in.
Once you’re there, you’ll have to change one setting in particular:
- Turn off secure boot – this is one of the features of UEFI that helps prevent attacks and malware during boot. Disabling it is not strictly necessary but depending on the distribution you’ve chosen you may or may not face issues during installation. Disable it to be safe.
Save the updated settings and boot back to Windows. Now it’s time to prepare some disk space for Linux to fit into.
How to Create Additional Partitions for Installing Linux
Now it’s time to make some room for the new OS. Based on the state of your HDD or SSD, it can either be very straightforward or quite tricky.
Let me explain what we’re going to do. There is a utility built into Windows called «Disk Management» that’s useful when you want to mess around with your partitions.
You can use this to squeeze out some space out of your existing partitions. To do so, open Disk Management by searching for it in the start menu.
Keep in mind that it may pop up as «Create and format hard disk partitions» instead of Disk Management. Fire it up and have a good look at its user interface:
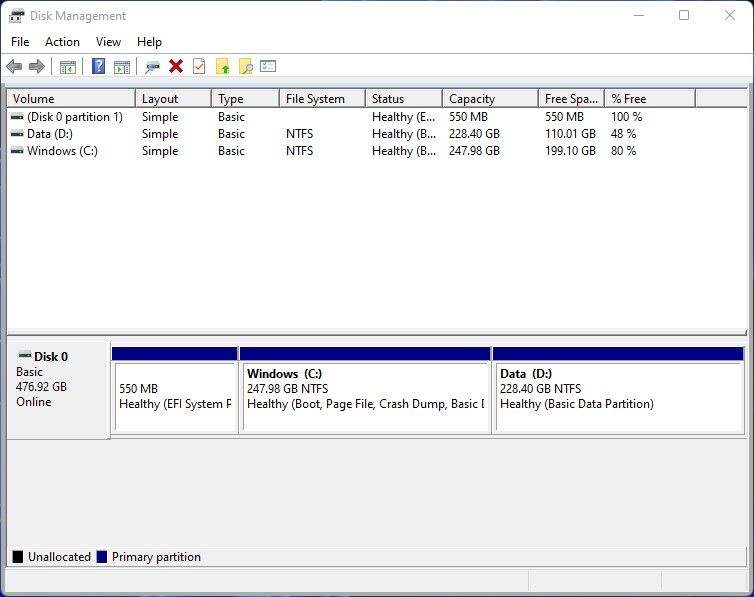
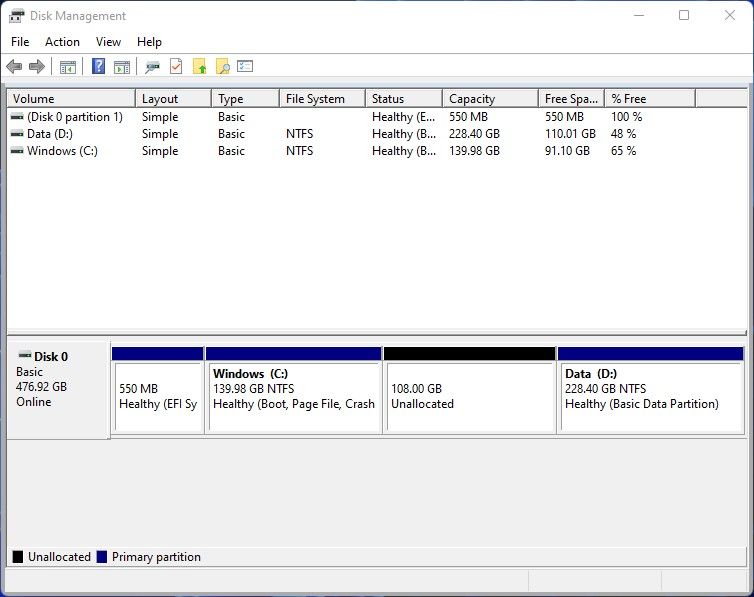
This screenshot is from one of my machines that doesn’t have Linux installed. I’ll use this device as the guinea pig for this article. It has a 512GB NVME SSD and 8GB of RAM.
The user interface is divided into two parts. The top one is a list of all your partitions and the bottom part has all the physical disks connected to your computer listed vertically.
The below screenshot is from my desktop workstation that has a 250GB NVME SSD and a 1TB HDD. I have both Windows and Linux installed on the second disk. So if you have multiple disks on your machine as well, I would suggest you install the OS on the disk that contains the EFI partition.

If you look at the beginning of Disk 1, that 550MB FAT32 partition is the EFI. On your machine, it may be much smaller.
Let’s get back to our guinea pig device. As you can see from the screenshot, the Windows (C:) partition is almost 250GB. I’ll cut off 108GB from this partition.
- 100GB for root
- 8GB for swap
In Linux, the root directory contains all other directories and files on the system. When your RAM gets full, Linux moves the inactive pages from memory to the swap space. Having a swap space is not mandatory but it’s good to have.
There is no hard and fast rule for determining the swap space. The recommended size for swap when you have a 4GB-8GB RAM is 2 times that size, and for 8GB-16GB is 1.5 times that size. Considering I don’t do any memory intensive tasks on this laptop, I will break the rule here.
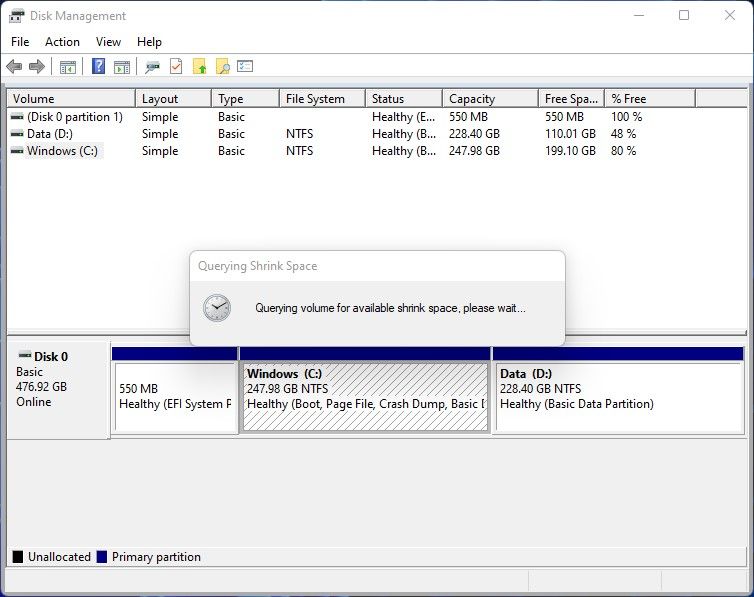
To cut off some space from your desired partition, right click on it from the bottom part and click on «Shrink». Once you do that, Disk Management will start calculating the amount available for shrinking.
You may think that the entire free space of a partition should be shrinkable, but that’s not true. Sometimes there are unmovable files scattered around your partition that may prevent you from using the full free space. In those cases, use a tool like Defraggler to optimize your drive.
After Disk Management has finished querying the partition, you’ll see the following window:

As you can see, I have 160311MB of space available to shrink. Dividing the value by 1024 will give you the size in gigabytes which in my case is around 156GB.
But I want to shrink my partition by 108GB. Multiplying this value by 1024 gives the value in megabytes of 110592MB.
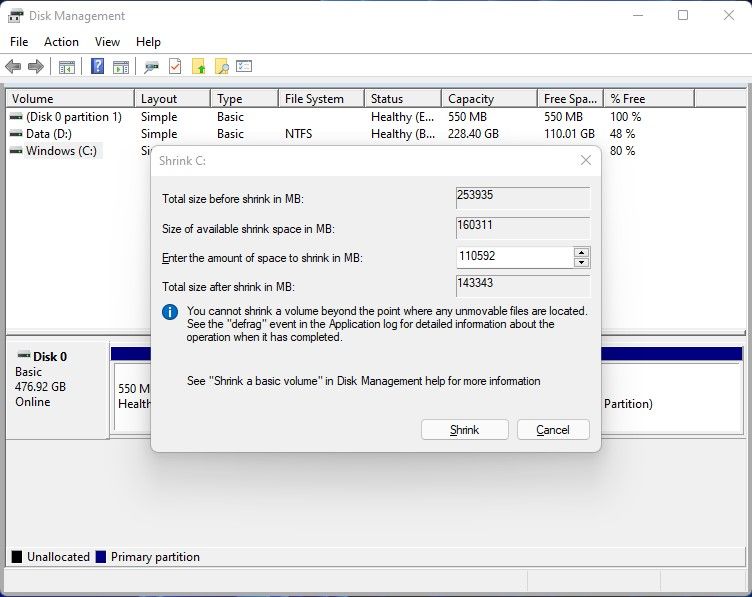
Once you have your desired size calculated, hit the «Shrink» button. The shrinking process doesn’t take that long. Once the process is done the bottom part of the user interface will update.
As you can see, I now have 108GB of unallocated space. To be honest, this is enough for proceeding to the next step. But to make your life easier, I would suggest that you create two RAW partitions before going forward.
To do so, right click on the unallocated space and click on the «New Simple Volume» option. A new wizard window will show up. Press the «Next» button and on the next step, the wizard will ask about the new partition’s size:
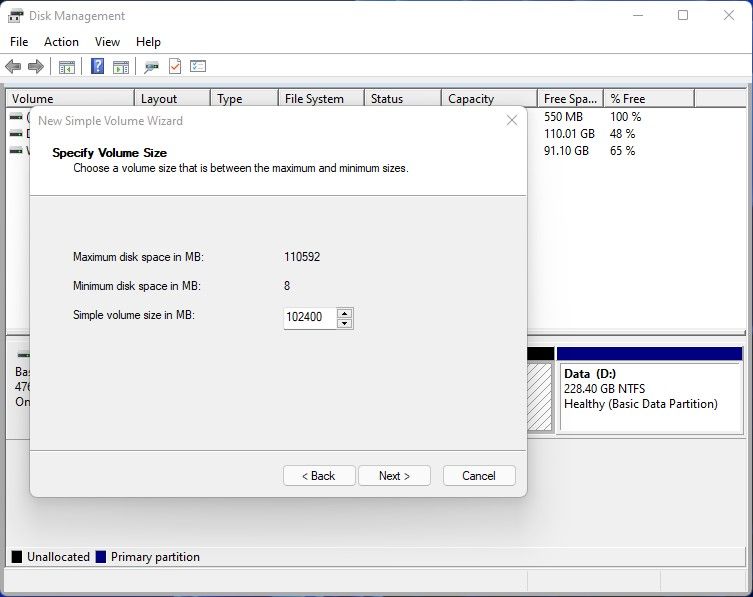
I want to create the 100GB root partition. Multiplying that value by 1024 gives the value in megabytes which is 102400MB. Once you have the size calculated, hit «Next».
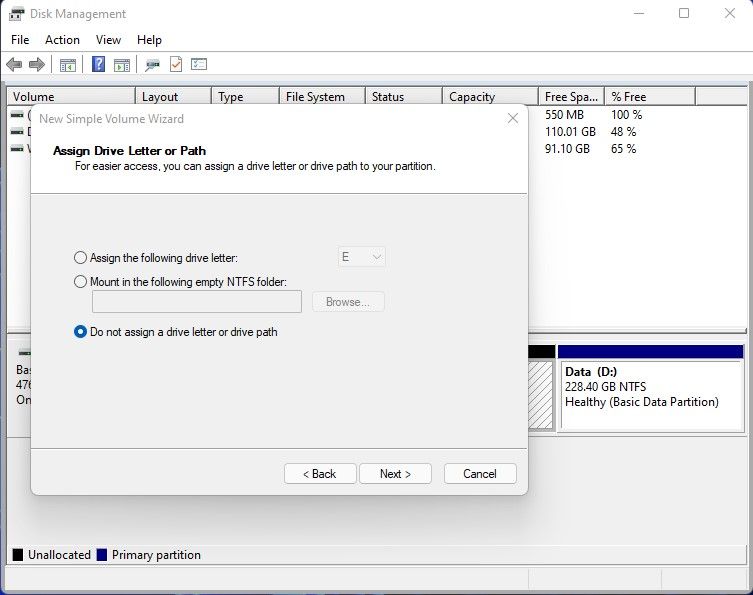
In the next step, the wizard will ask you about the drive letter. Choose «Do not assign a drive letter or drive path» and hit «Next».
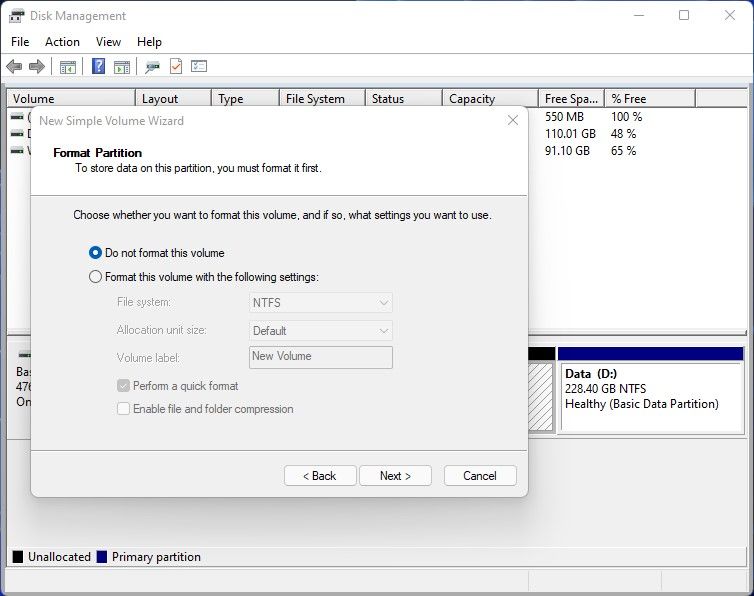
In this step, select the «Do not format this volume» option and hit «Next». Finally hit finish on the last step. Follow the same process for creating your swap partition.

I now have a 100GB RAW partition for the Linux root and a 8GB RAW partition for swap. Close the disk management tool and grab another mug of coffee or tea or at least water because we’re going deeper into the rabbit hole.
How to Install Linux Alongside Windows
Okay everyone, it’s getting real now. We’re going to do it. But first, you’ll have to figure out which key to use to get into your boot menu.
On the device I’m using, pressing the F2 button takes me to the UEFI configuration screen. From there, pressing F8 takes me to the boot menu. So make sure you’ve done the research for your device.
Some tutorials may instruct you to change the boot order from your UEFI configuration screen, but I don’t recommend doing that. The SSD or HDD that contains your bootloader should always be on the top.
Now connect the bootable USB device that you set aside on the first section and reboot your computer into the boot menu. From the boot menu, select the bootable USB drive and hit enter.
The GNU GRUB menu will appear. Pick the first one that says «Ubuntu». Wait until the file integrity check finishes or you can just skip it by hitting «Ctrl + C» on your keyboard.
You’ll hear a beautiful chime and with that, the majestic Ubuntu installer will show up:
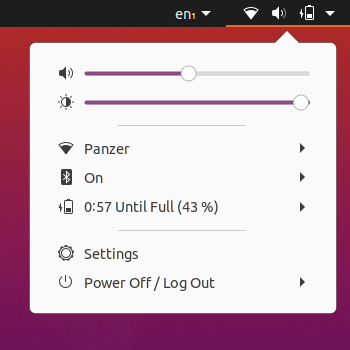
Before you hit the «Continue» button, I would suggest that you get connected to the internet. If you’re using an ethernet cable then you should be connected already. But if you’re using wireless, then check the top right corner of your screen for the Wifi icon:
Once you’re connected, hit the «Continue» button on the installer:
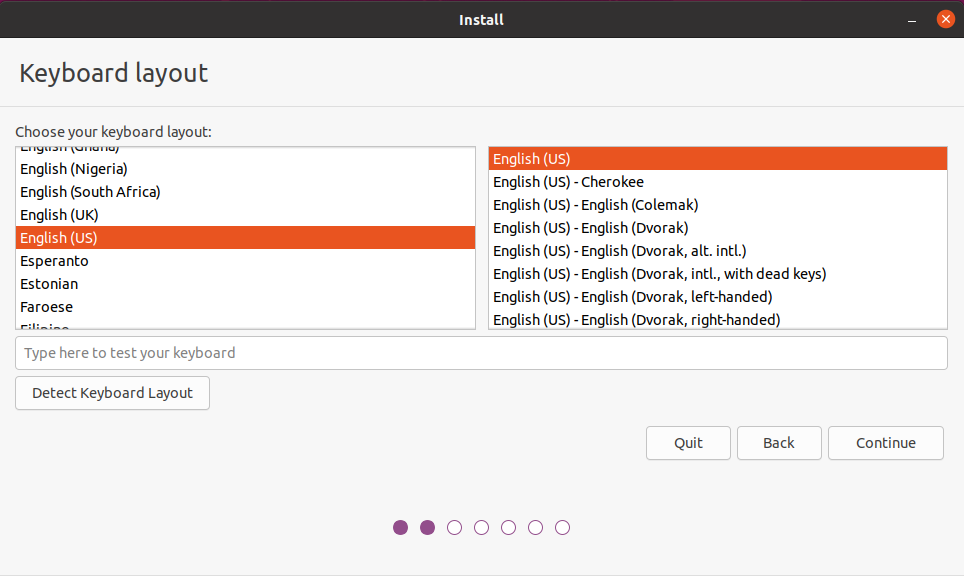
Pick the correct keyboard layout for yourself and hit «Continue».
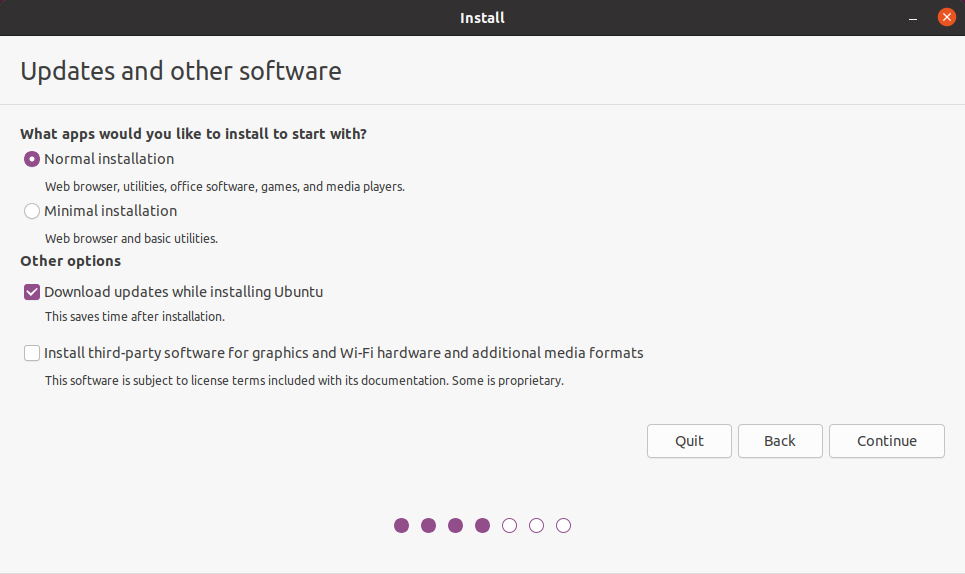
The «Normal installation» will give you a bunch of useful software and games from the get go, whereas the «Minimal installation» will give you the essentials only.
Keep the «Download updates while installing Ubuntu» option checked. This will download updated package files from the internet during installation.
The third option needs some explanation. Assume that you’re using an NVIDIA GPU. When Ubuntu detects that GPU, Ubuntu will load the open-source drivers for NVIDIA GPUs known as «nouveau».
If you check the «Install third-party software for graphics and Wi-Fi hardware and additional media formats» option, NVIDIA will attempt to install proprietary drivers provided by NVIDIA itself. It’ll also install codecs for proprietary media formats such as MPEG.
This device I’m using has an AMD GPU and uses the open-source «amdgpu» driver. I’ll leave this unchecked considering I can install the codecs as necessary by myself. Do what you prefer and hit the «Continue» button.
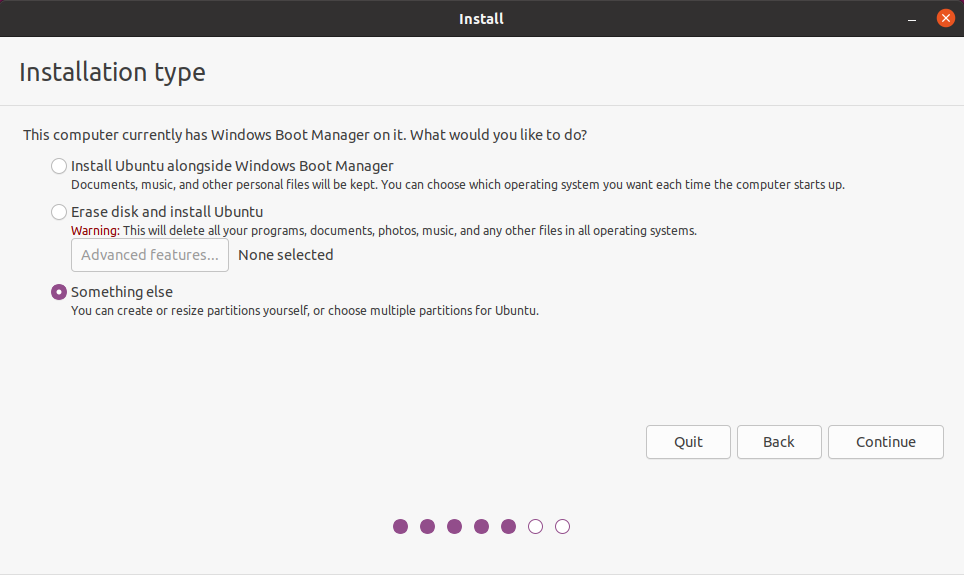
Okay this step needs attention. The Ubuntu installer is smart enough to detect whether you have other OSes installed on your machine or not. If yes, the installer will offer you the option to install Ubuntu alongside them. Don’t pick that option. I repeat, don’t pick that option.
Choose «Something else» and hit the «Continue» button.
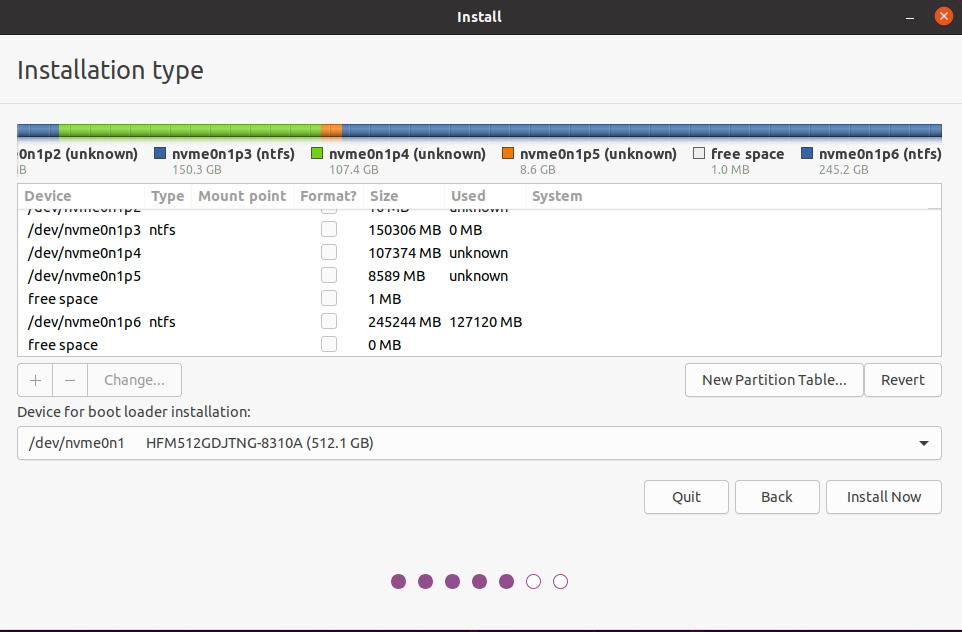
This part can be a bit tricky. This is why I instructed you to create the partition from Windows instead of leaving the space unallocated. If you had left it unallocated, figuring out which part of the disk you should use would have become much more difficult.
At the top you can see a multi-colored line along with legends for which color represents which partition. Find out the two partitions you created from Windows.
In my machine, «nvme0n1p4» and «nvme0n1p5» are the ones. Now from the list, find the one you created for the root (nvme0n1p4 in my case) and double click on it:
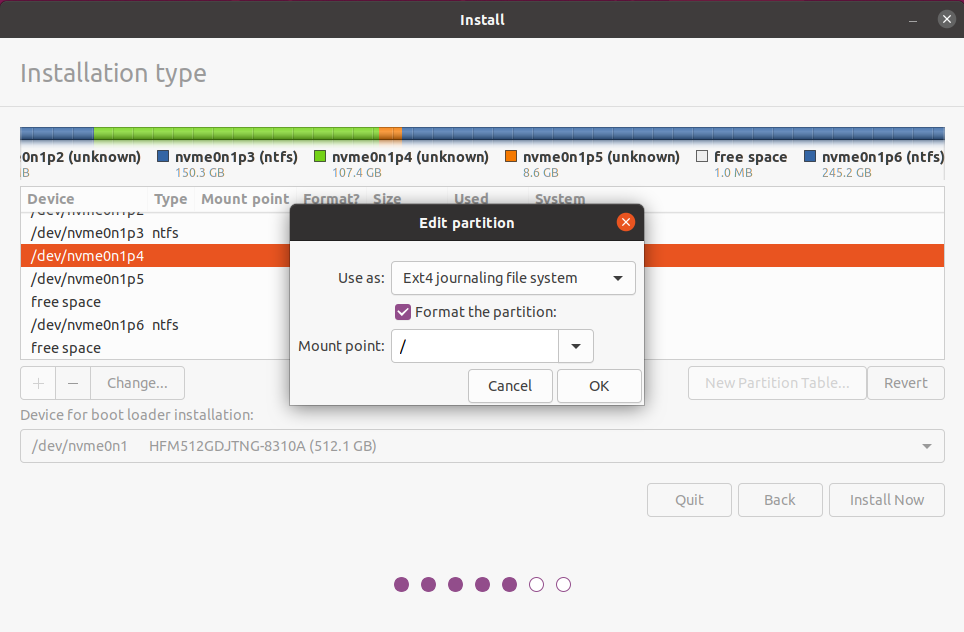
Choose «Ext4 journaling file system» from the «Use as» dropdown and «/» as the «Mount point» dropdown. According to the The Linux Information Project:
A mount point is a directory (typically an empty one) in the currently accessible filesystem on which an additional filesystem is mounted (i.e., logically attached).
Hit the «OK» button. Next double click on the partition you created for the swap space:
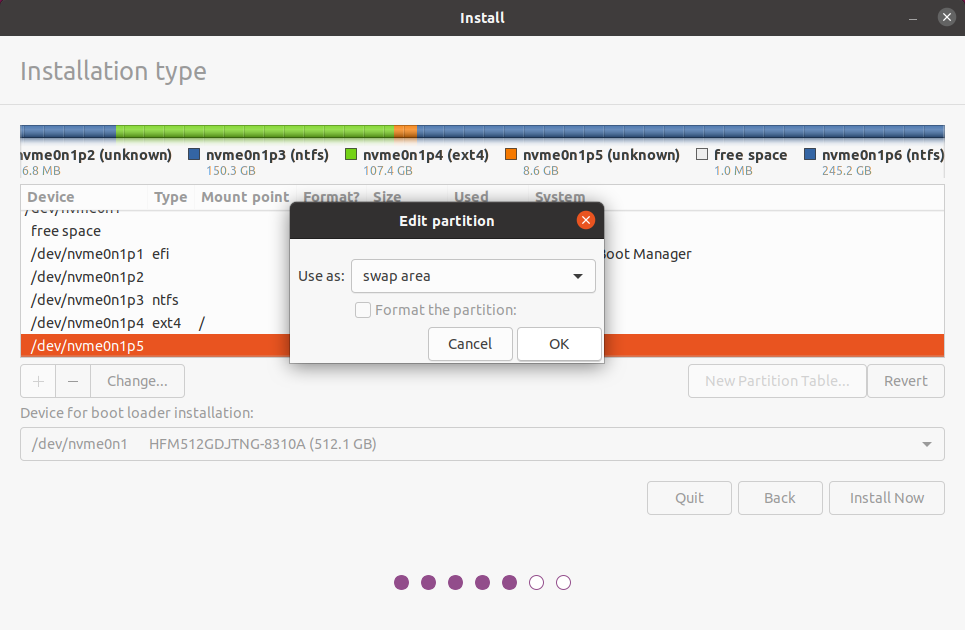
Choose «swap area» from the «Use as» dropdown menu and hit the «OK» button. There is one more partition to configure. That is the EFI partition. Scroll through the list and find the FAT32 partition.
On my machine, the «nvme0n1p1» is the EFI partition. Double click on it:
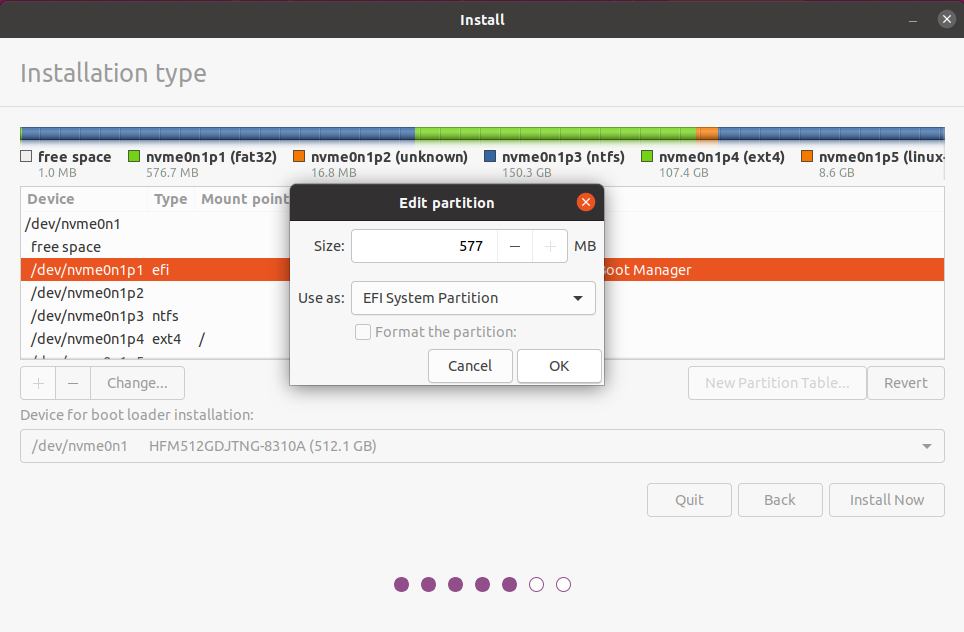
Make sure «EFI System Partition» is selected from the «Use as» dropdown menu. This is the partition that’ll contain your bootloader. Make sure you’re not formatting this partition. Hit the «OK» button.
Also, the default mount point for the EFI partition is «/boot/efi». Some distributions like Fedora will require you to write this mount point manually. So make sure you’re putting the correct mount point.
Recheck the partition configuration once again and if everything looks fine, hit the «Install Now» button.

The installer will ask you about your time zone. I live in Dhaka, Bangladesh so that’s what I’ve chosen. Hit the «Continue» button.
Fill out all the information as you see fit and hit the «Continue» button.
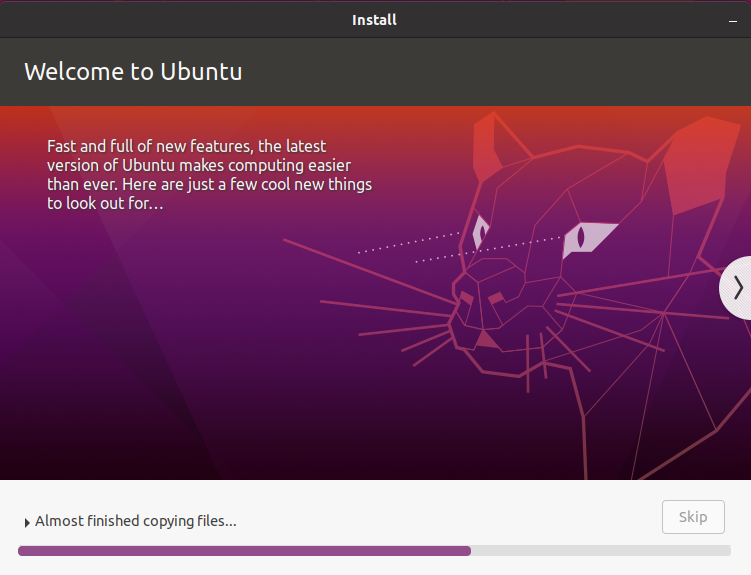
The installation process shouldn’t take long. Back when I was a kid, I loved looking at this slideshow.
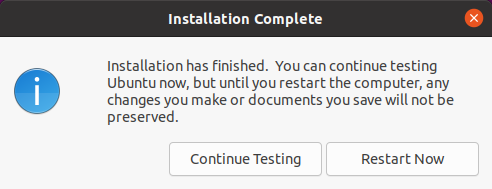
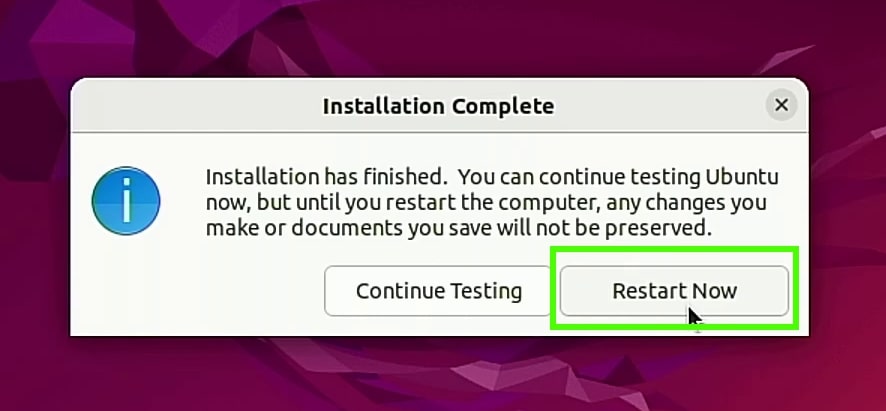
Once the installation is done you can either continue testing or restart. If you choose to restart, Ubuntu will instruct you to disconnect the USB drive and hit Enter.
The machine will reboot and the GRUB menu will show up again. Take a look at the list, and you’ll see both Ubuntu and Windows Boot Manager on the menu. Boot into Ubuntu because you have one last thing to do.
How to Sync the Time Between Windows and Linux
This is one of the common problems that people with a dual boot system face. When you boot into Windows and then boot into Linux, you’ll find Linux’s clock all messed up. The same thing will happen if you first boot into Linux and then boot into Windows.
Let me explain why this happens. Your computer (or rather every computer in the world) has two clocks. One is the system clock that lives within the OS, and the other is the hardware clock that lives in your motherboard and keeps track of time even when your computer is not running.
The problem is that Windows assumes that your hardware clock is running in your local time and Linux assumes that your hardware clock is running in UTC time and applies an offset according to your location.
The easiest way to fix this issue is to make your Linux distribution use local time like Windows does. To do so, execute the following command in the Linux terminal:
timedatectl set-local-rtc 1 --adjust-system-clockNow restart your computer into Windows, sync the system clock and go back to Linux. The time should not be messed up now.
How to Remove Linux From a Dual Boot System
Say for some reason you didn’t like your time with Linux and want to get rid of it. This would be sad, but life is hard, ain’t it?
Removing Linux from a dual boot system is a two step process:
- Getting rid of the GRUB bootloader
- Getting rid of the Linux partitions
To get rid of the GRUB bootloader you’ll have to remove the corresponding files from the EFI partition. The problem is that the partition is hidden by default.
To make if accessible you’ll have to use the diskpart program. It’s a disk management utility like the Disk Management tool but it’s a command line interface.
Boot into Windows. From the start menu, open Command Prompt as an administrator. To do so, just search for «cmd» in your start menu and when the Command Prompt shows up, press the «Ctrl + Shift + Enter» key combination.
Now write diskpart in the command prompt window and hit enter to start the program.
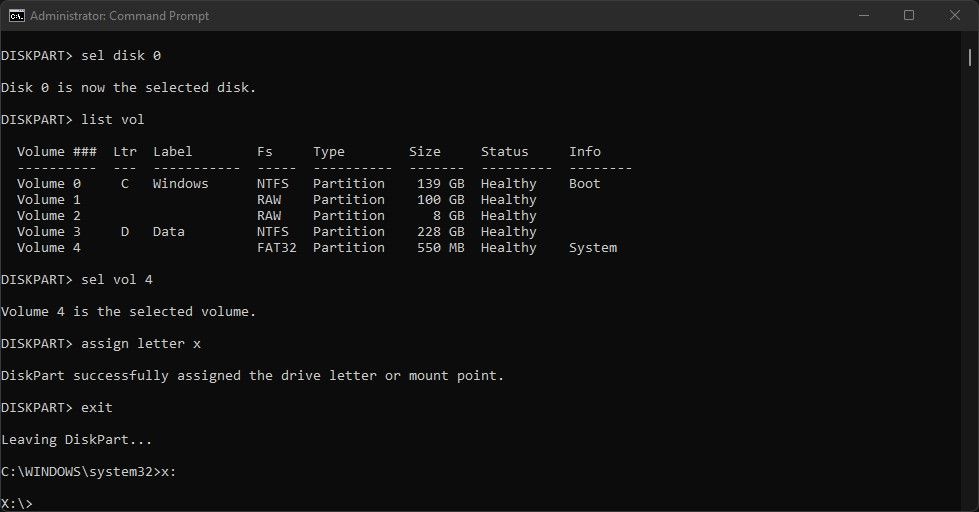
Next, write list disk and hit enter to get a list of all the connected disks:
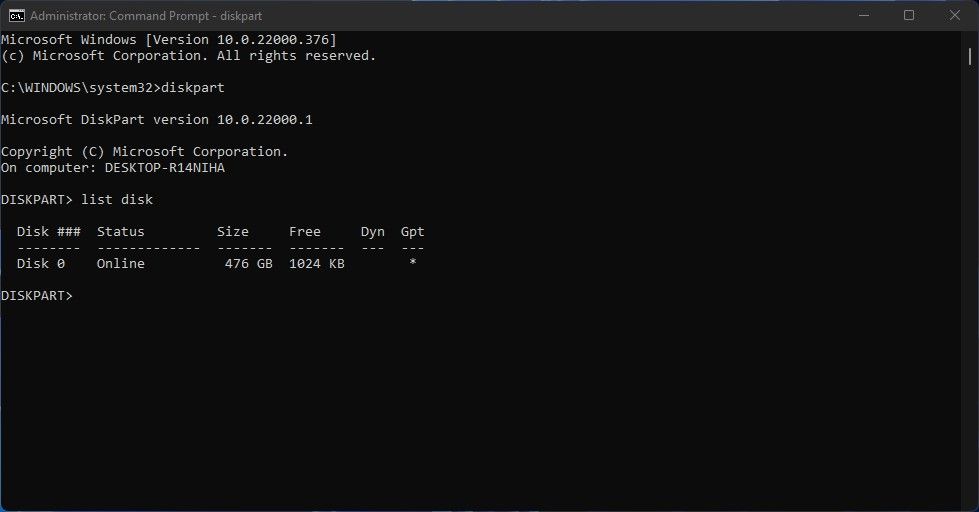
This device has only one physical disk but you may have multiple. Write sel disk <disk number> to select the desired disk.
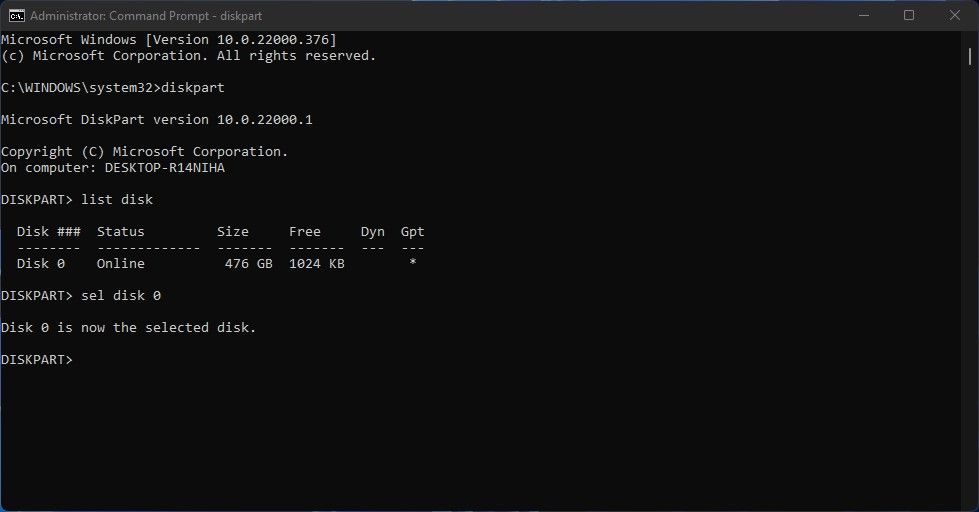
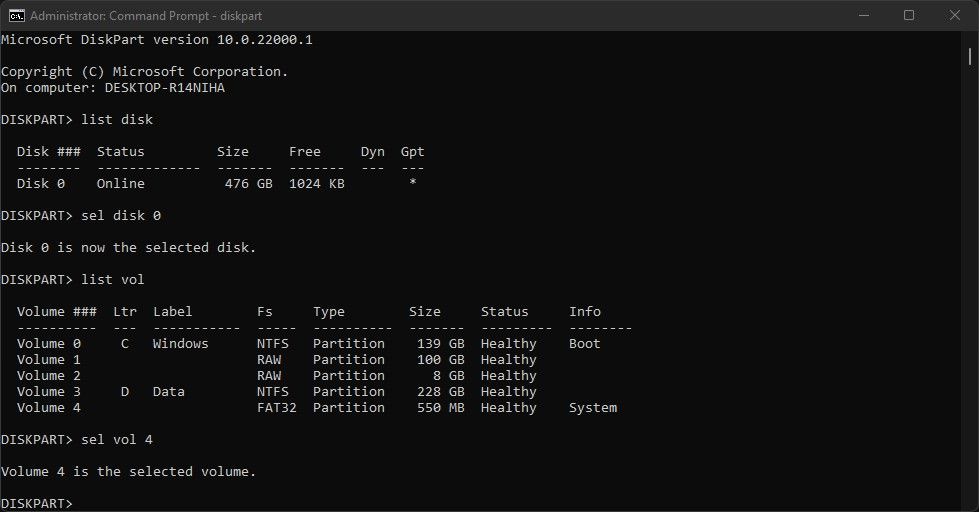
Then write list vol and press enter to list out all the partitions in this disk.
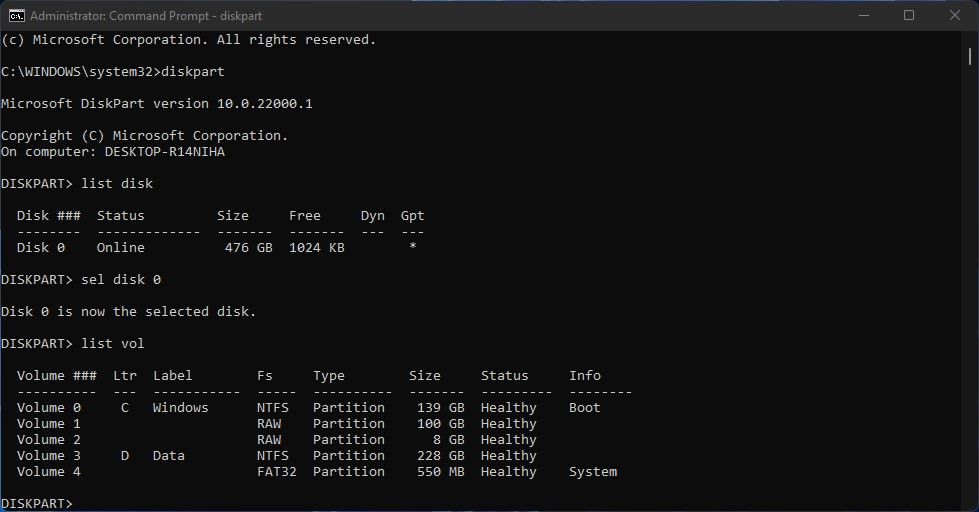
Judging by the size and format, I can say that Volume 4 is the EFI partition. Keep in mind this can be much smaller on your system but it will be always a FAT32 partition. Write sel vol <volume number> to select the desired volume.
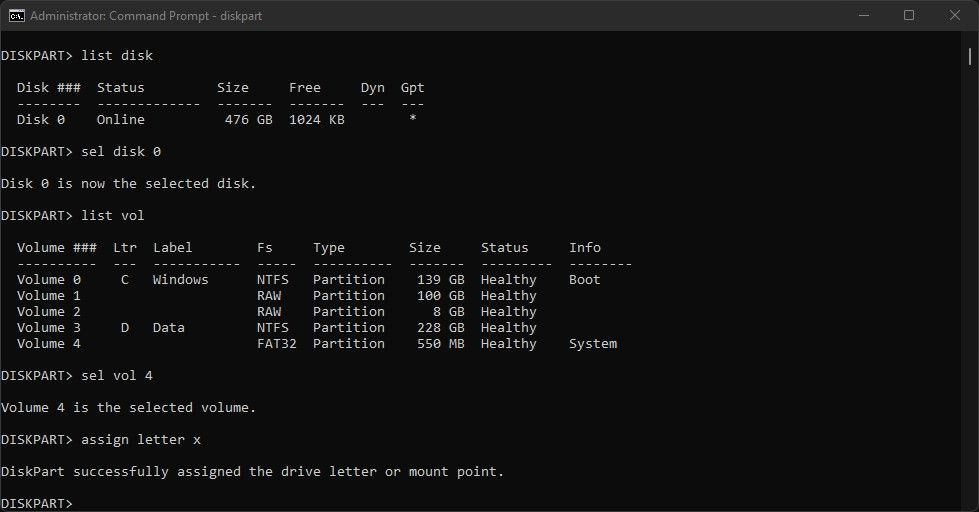
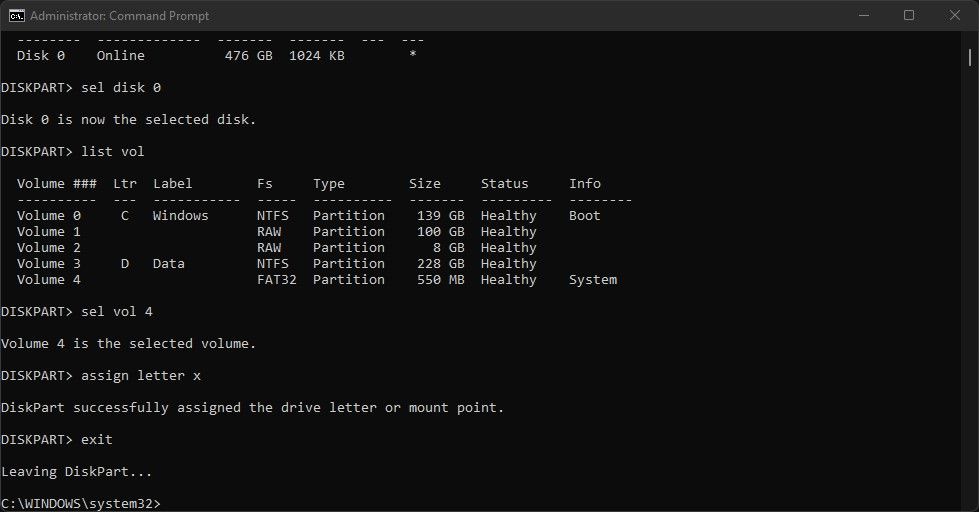
Finally write assign letter x and hit enter to assign the letter x to this partition.
Exit diskpart by writing exit and hitting enter:
Now the partition has become accessible. From the same command prompt window, go inside the EFI partition by writing x: and hitting enter.
To get a list of all the folders in there, write dir and hit enter.
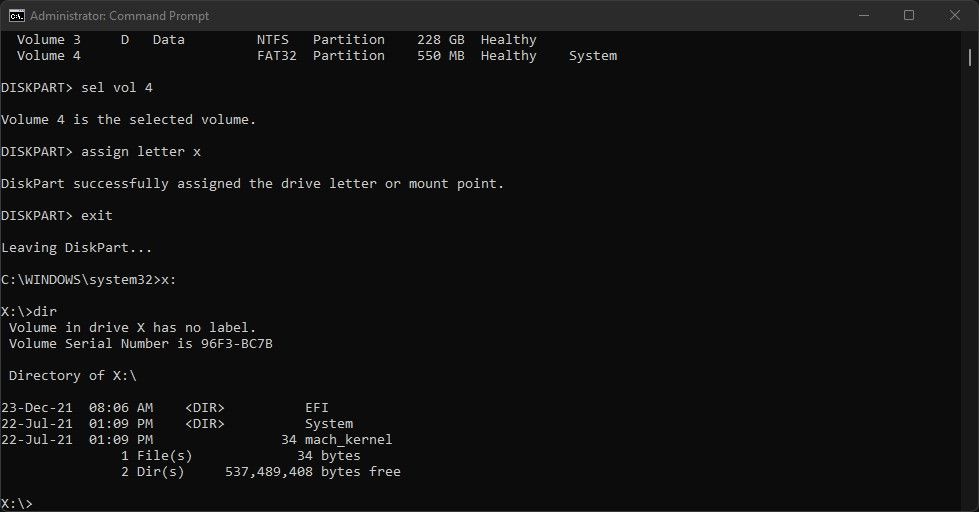
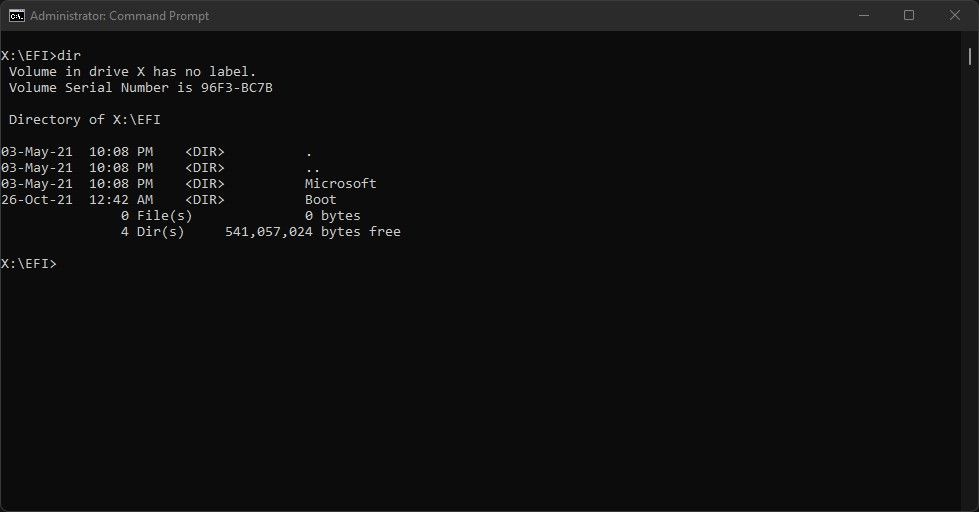
Now write cd EFI to go inside that EFI folder and write dir once again to list out the contents.
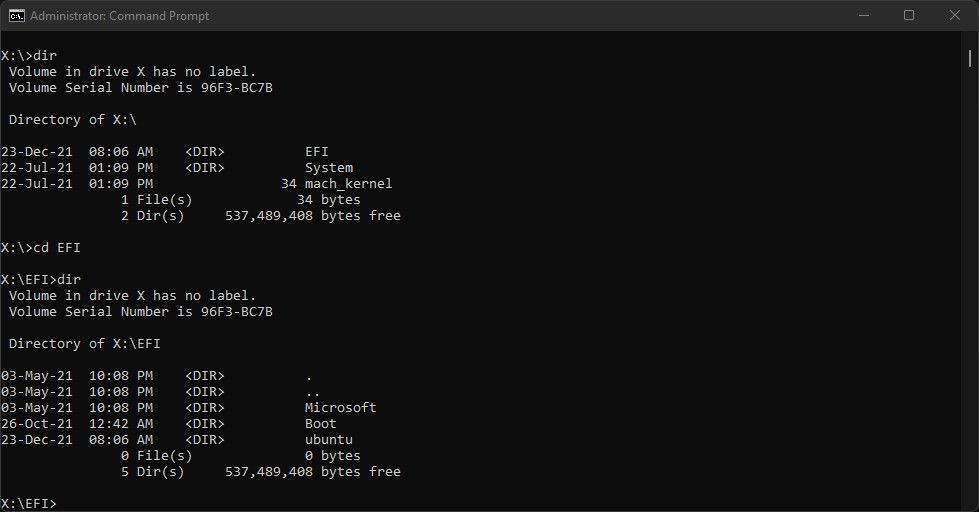
You’ll have to get rid of that ubuntu folder. To do so, write rmdir /s ubuntu and hit enter. Command prompt will ask you whether you’re sure or not. Write Y and hit enter to confirm. Then use dir one last time to make sure it’s gone.
That’s it. Next, open Disk Management once again like you did before and from the bottom part, right click on the Linux oriented partitions and choose «Delete Volume» from the list.
After deleting the partitions, you can either create a new one using the unallocated space or extend the partition on the left of it to dissolve the unallocated space.
Finally reboot your computer and check whether the Ubuntu has gone away from your machine or not.
What About Other Linux Distributions?
The techniques learned in this article is relevant for any Linux distributions out there.
So, whenever you’re dual booting a system, make sure that
- Secure Boot is disabled
- Fast Startup is disabled
And during the installation
- Do not choose any guided/automatic installation type
- Make sure to not format the EFI/ESP partition
- Make sure to mount your partitions properly
As long as you’re sticking to these few rules, you should be good to go.
Just keep in mind that there are some rare cases when a distribution may not use GRUB as a bootloader.
Take the very popular «Pop!_OS» for example. It uses «systemd-boot» as its default bootloader. As a result you’ll have to keep pressing the Space button (or maybe any button on the keyboard) during startup, otherwise the boot menu won’t show up and you’ll boot into Pop!_OS directly.
Another thing that I’ve seen: some motherboards such as my MSI B450 Tomahawk Max, chooses the Windows Boot Manager by default even though I have a working Linux installation. If you see something like this, go into your UEFI configuration screen and look for relevant options.
Conclusion
I would like to thank you from the bottom of my heart for the time you’ve spent reading this article.
I also have a personal blog where I write about random tech stuff, so if you’re interested in something like that, checkout https://farhan.dev. If you have any questions or are confused about anything – or just want to get in touch – I’m available on Twitter and LinkedIn.
Learn to code for free. freeCodeCamp’s open source curriculum has helped more than 40,000 people get jobs as developers. Get started
Maybe you already have read a lot of articles on the Internet and are interested in the open-source operating system that is called Linux. Maybe you even have installed it on VirtualBox or run in Live mode and learned how it looks and works. But now, you can have a question «How to install it on my computer and start using it every day?». If you are a beginner, you probably don’t want to lose Windows, because when something goes wrong you always can switch to Windows and continue work. And, of course, all your applications and games are installed on Windows. You can install Linux with Windows for Dualboot. It was an ideal option for me a few years ago.
In this guide, I will explain how to install Linux on Windows 10 or 11. Everything will be performed in Windows 11, but it should work in Windows 10, 8 and 7 too.
I assume that you already have installed Windows and you already have decided where to get disk space for the Linux installation but don’t know how to do it. Here you will get a detailed explanation of this. Most of PC and notebooks with Windows 10 or 11 have UEFI instead of regular BIOS nowadays, so I will use it in this article. But if you have an old BIOS, there will not be many differences during the installation process.
Table of Contents
Basics
If you want to install Linux on the same drive as Windows, you have to create a few additional partitions. At least one, preferably two. Linux users do not install Linux on one partition like Windows, although this option is possible. Linux is very flexible, so it allows to place system and user files on different partitions. It gives a big benefit for system reinstallation. You can reinstall the system on the system partition independently from your home partition and your files will not be deleted.
Here are these partitions:
- Root — for system files;
- Home — for your own files;
Minimum system requirements for storage size are different for various distributions. Usually, it is between 10 and 30 GB. But it is only enough for installing the operating system and multiple additional applications. If you want to install a lot of applications and games you should add extra 30-60 GB. I recommend using for Linux root partition 50-100 GB, as same as for drive C for Windows. A home partition must be as large as possible.
Previously, I recommended making a swap partition as well. But in modern distributions, a file is usually used for this purpose instead of a separate partition. So if you are a beginner, you can leave it as is by default.
Prepare the Partition for Installing in Windows
1. Backup Important Data
You must free up some space near existing Windows 10 or 11 before you be able to install Linux there. If you don’t want to lose your data, you should create a backup for important data before you start doing something. If everything goes well, your system and files will be fine. But the filesystem may be corrupted by any sudden failure, for example, a power cut or you can do something wrong. So, make sure that you have copied your important files to an external drive and created a system restore the image using Control Panel or Settings utility:
You also can use third-party tools, for example, Acronis or Clonezilla. If you want to shrink not a system partition, you can just copy important files from there.
2. Shrink a Windows Partition
Now, let’s prepare the partition for installing Windows and Linux. The simplest way to do this — use the default Disk Management tool in Windows.
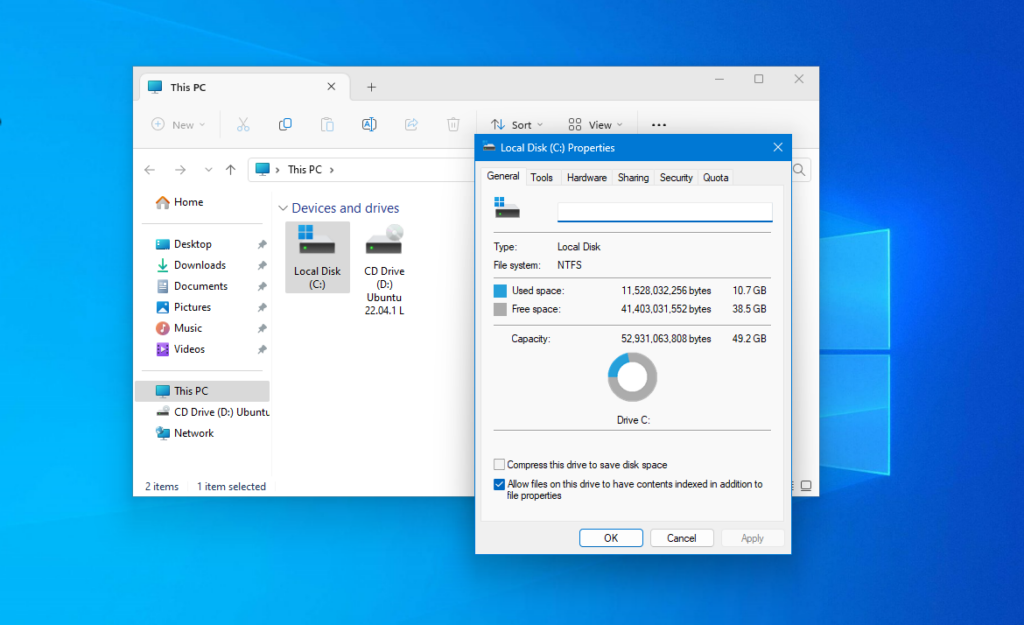
First of all, you can open This PC and view information about the drive, which you want to use for installing Linux:
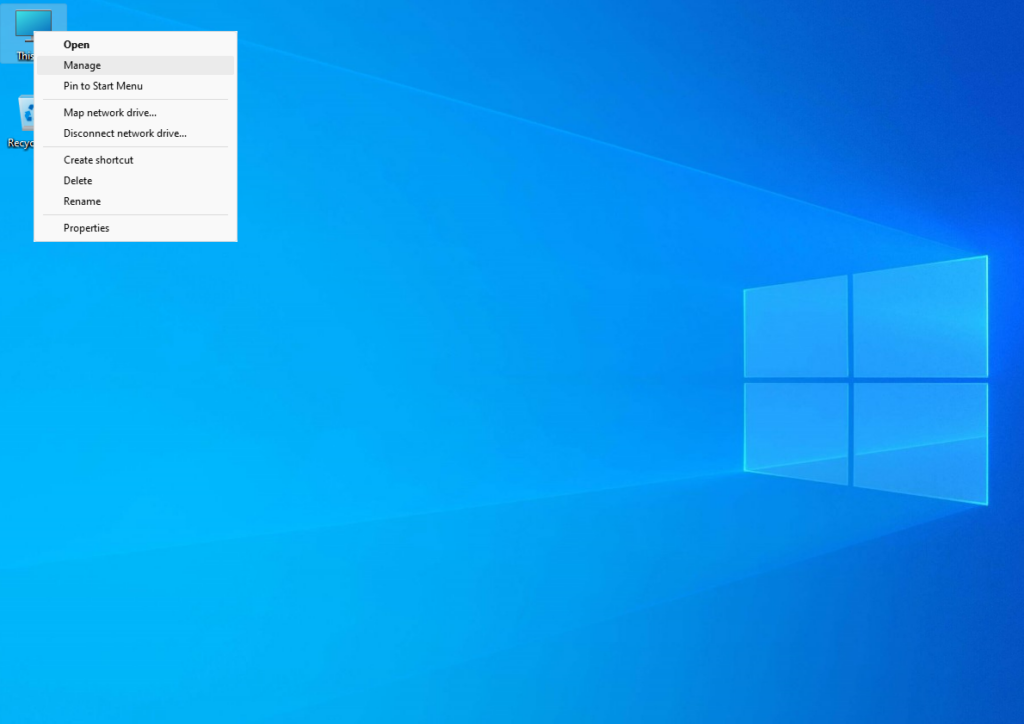
Then, open the contextual menu for the This PC shortcut and click on Manage:
Then, open the Disk Management tool:
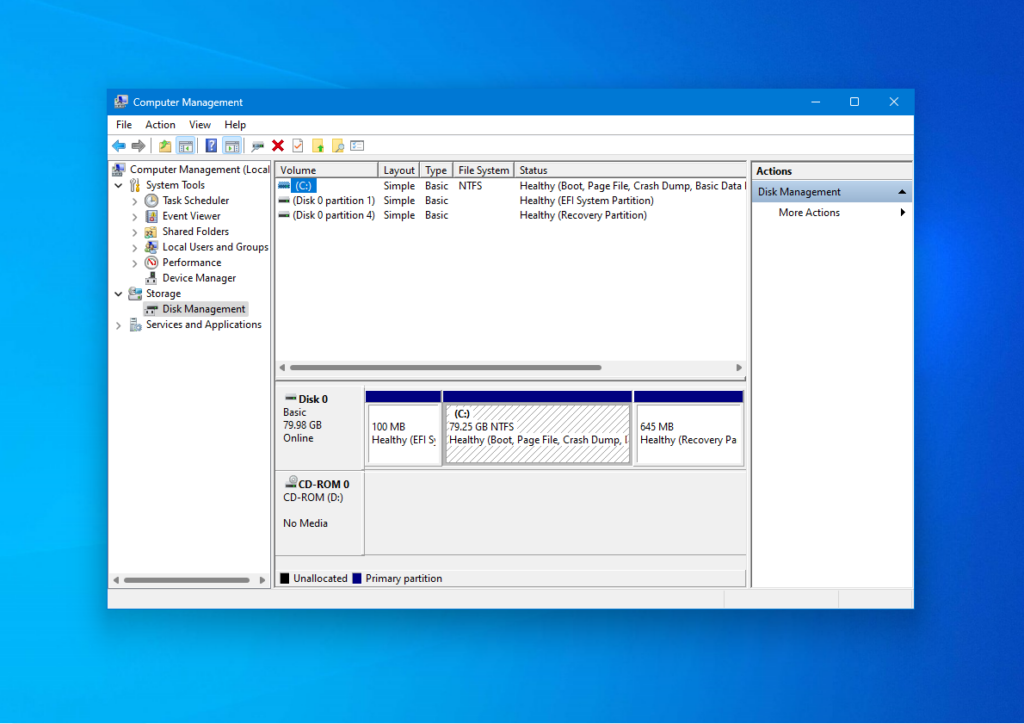
Here you can see the disks list, and system drive C: on Disk 0. If you have an additional drive for files it will be marked by D or E letter. I will explain how to shrink the system drive C: to get a free space. For other drives, everything is similar.
Open the contextual menu for the selected drive and choose the Shrink Volume option:
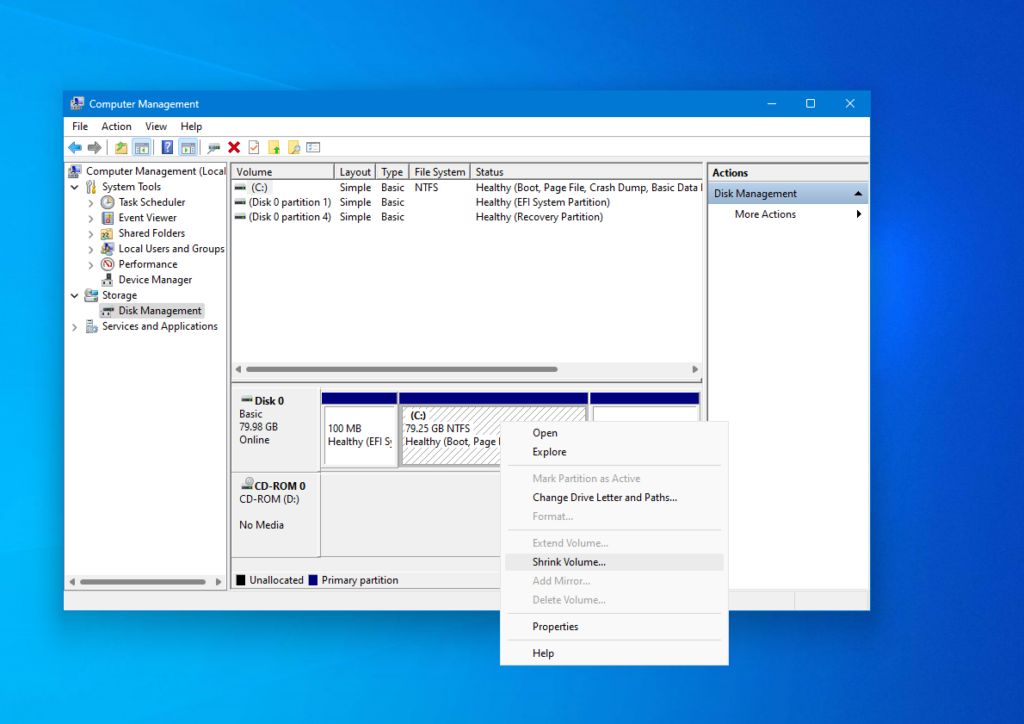
Enter how many megabytes to reduce the volume in the Enter the amount of space to shrink in MB field and press the Shrink button.

Pay attention, that you can’t enter a value that is larger than the amount of free space on the drive. So free up some space if you haven’t already. After this, you will see Unallocated Space which can be used for creating required partitions.
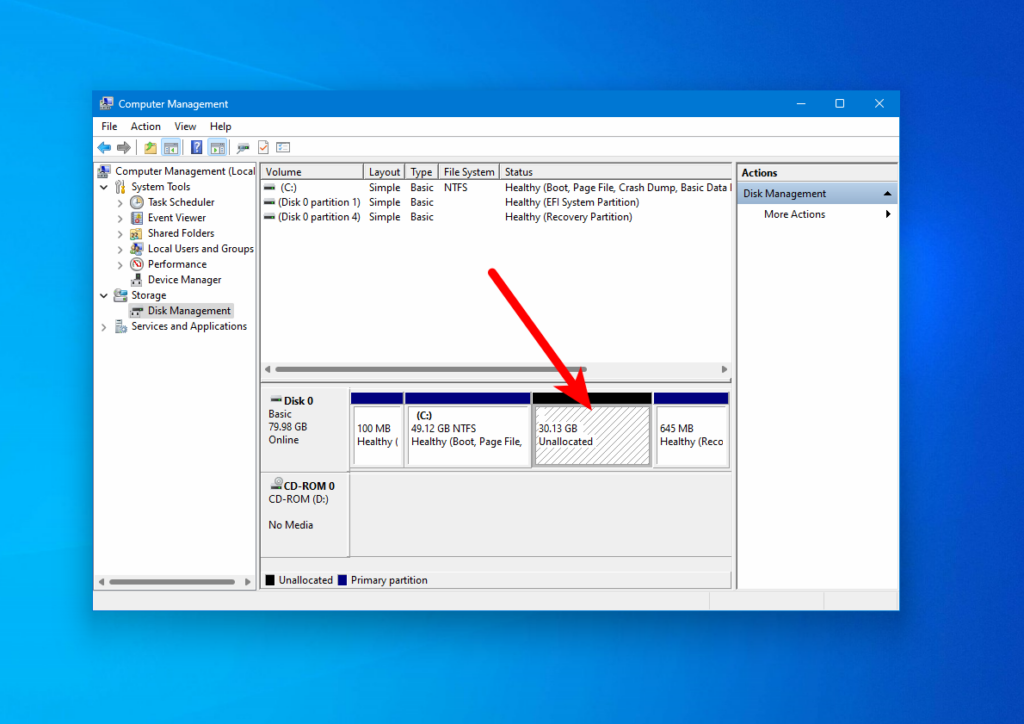
That’s it. Now you have space to install Linux with Windows. There is no sense to create Linux partitions in the Disk Management utility. We have done all operations which probably can corrupt Windows, and can continue creating Linux partitions using Linux tools.
Boot from USB in Windows
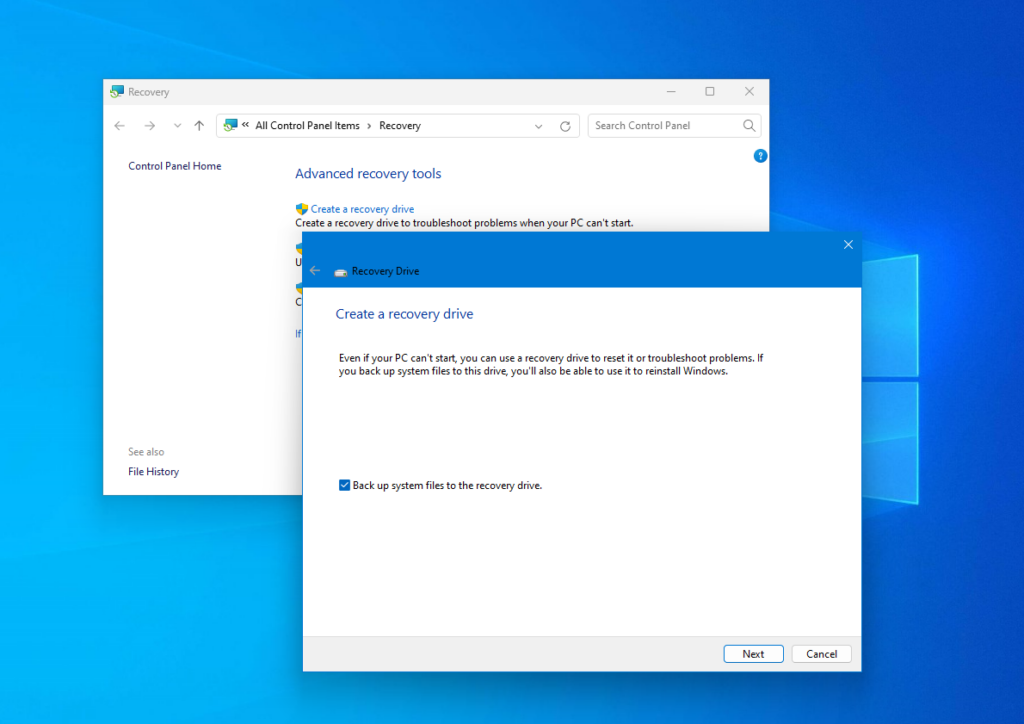
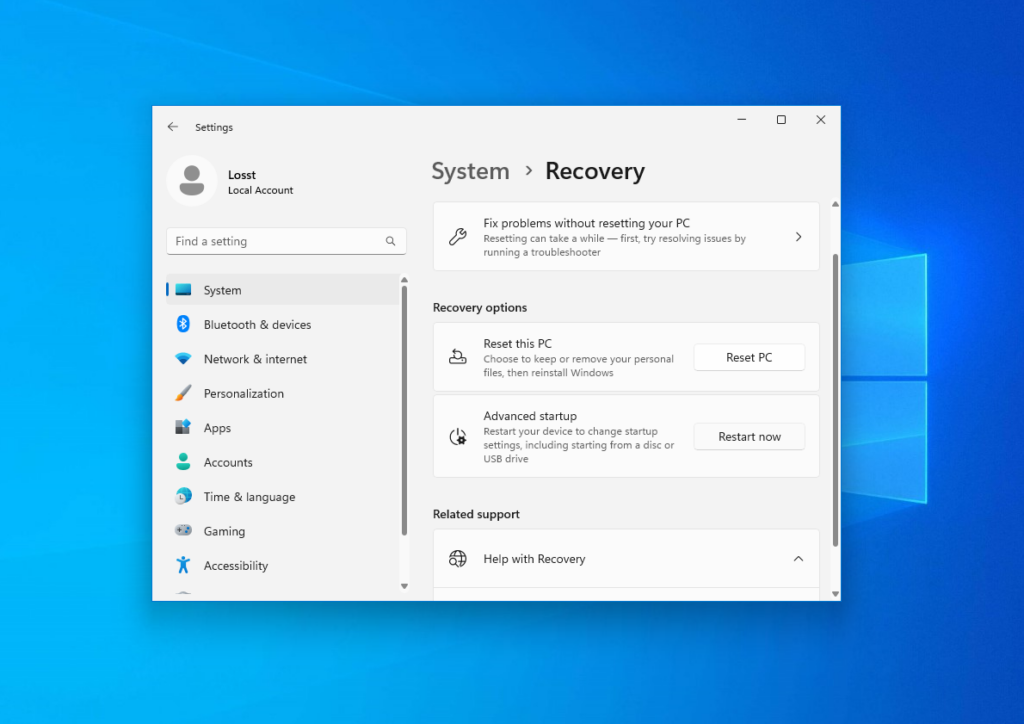
Most computers with Windows 10 and 11 have UEFI. This means that you can have trouble entering to BIOS setup interface and choosing the right device for booting. But you can reboot into the BIOS interface directly from Windows. Just open Settings, then System, and Recovery. Find there the Advanced Setup and press Restart Now:
Then, click on Troubleshoot -> Advanced Options -> EFI Firmware Settings after reboot:
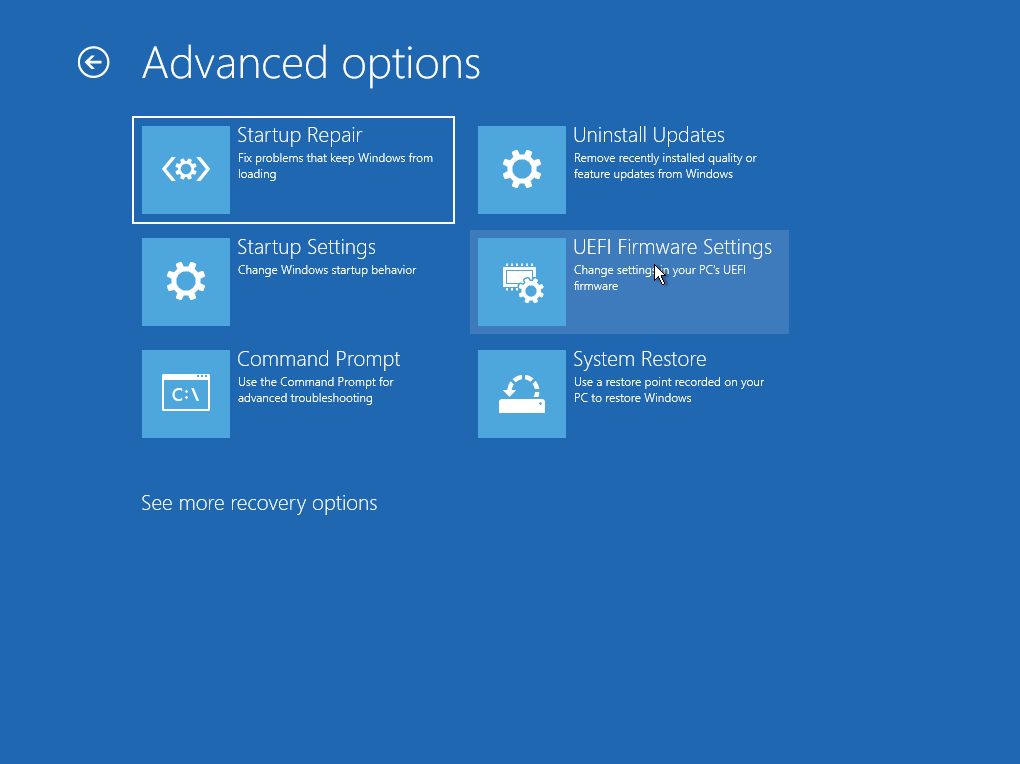
Here you can configure which device will be used for booting and boot your Linux USB drive.
Prepare the Partition for Installing in Windows
It is not the next step of this guide but an alternative option for how to shrink Windows partitions in Linux. If you don’t want to use the Disk Management tool in Windows, you can do the same thing using any LiveCD Linux distribution and the application for disk management that is called Gparted.
For example, you can do it in Ubuntu. Boot into LiveCD, open the Activities menu, and type Gparted there:
The main window of the application will look like this:
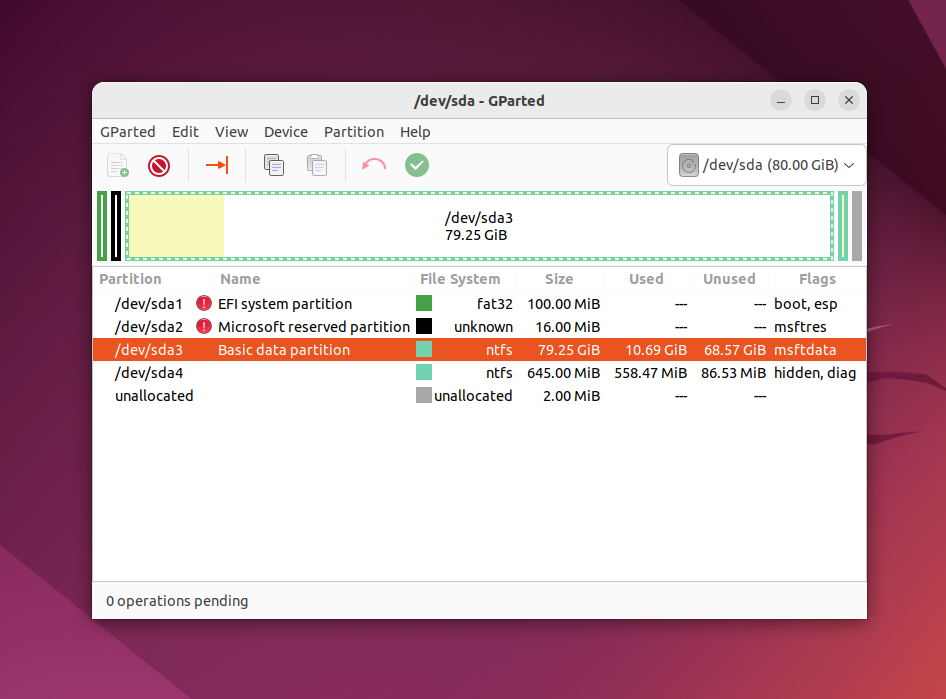
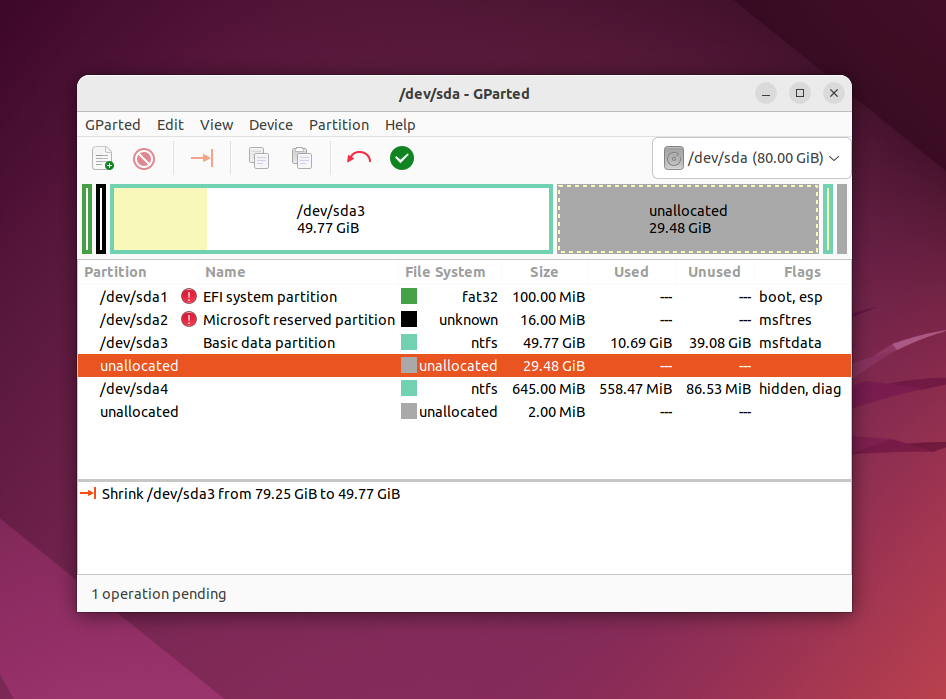
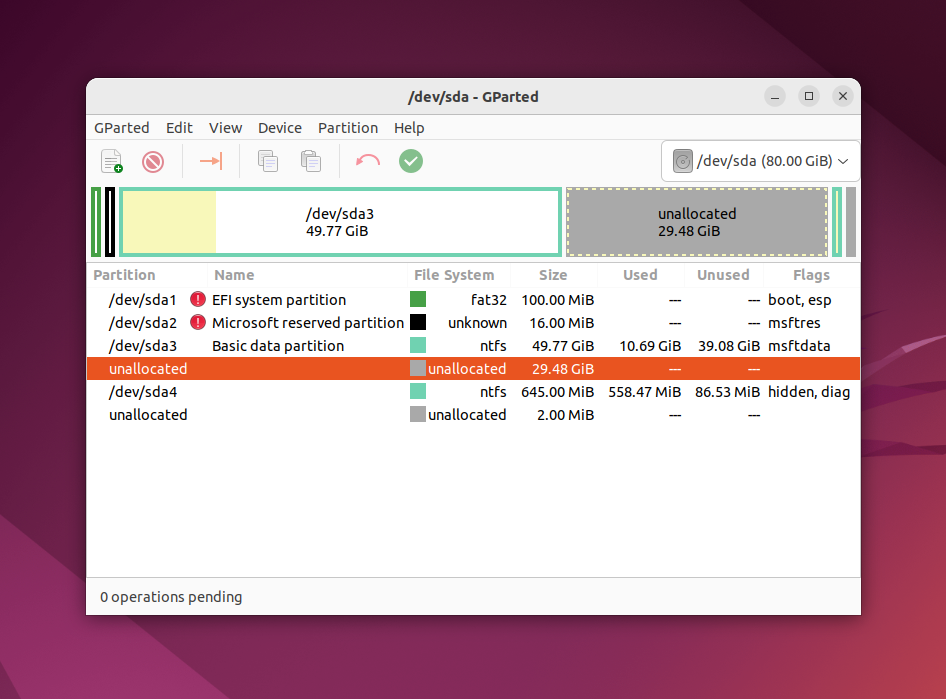
Note, that the Linux partition naming strategy differs from Windows. Partitions are just files in the special dev filesystem in Linux. You will understand later how it works, but at this moment you should know that each partition has a name that is started from /dev/sd. Then, you can see a letter which reflects a physical drive (sda, sdb, sdc, sdd, etc). At the end of the disk name, a decimal number is appended which reflects the partition number. For example, sda1, sda2.
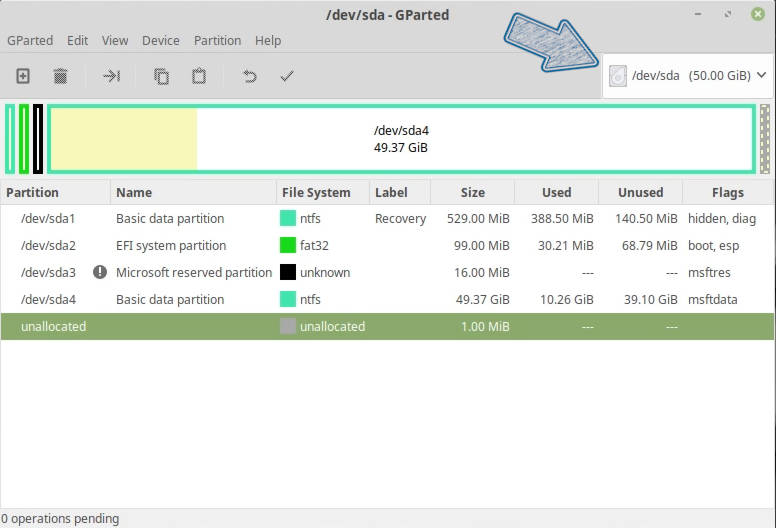
You can see not only the drive name but also the filesystem, size, and free space for each disk in Gparted. Use this information to find out which name has your Windows partition. In this example, you can see a lot of partitions but you shouldn’t delete them if you don’t want to break your system. Here is their description:
- /dev/sda1 — EFI partition with bootloader files;
- /dev/sda2 — a partition reserved by Windows;
- /dev/sda3 — a system partition with Windows installed, drive C;
- /dev/sda4 — a recovery partition for Windows.
Here the /dev/sda3 partition has NTFS filesystem and took 79 Gb as same as the system Windows partition, so that’s what we need.
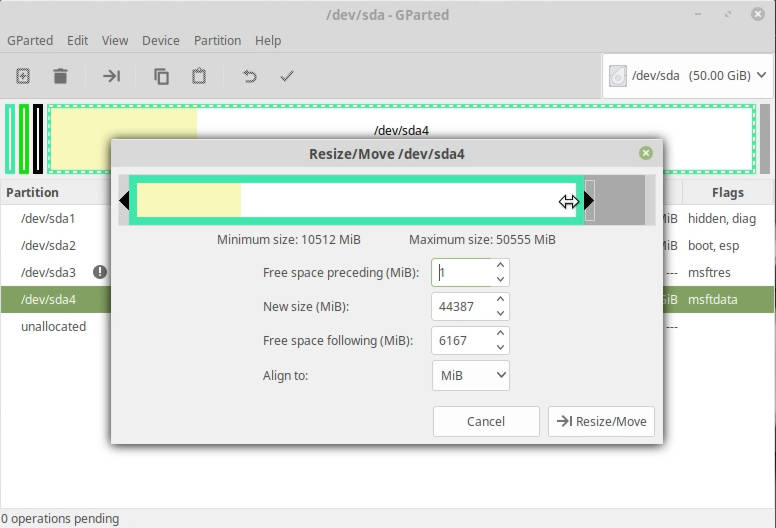
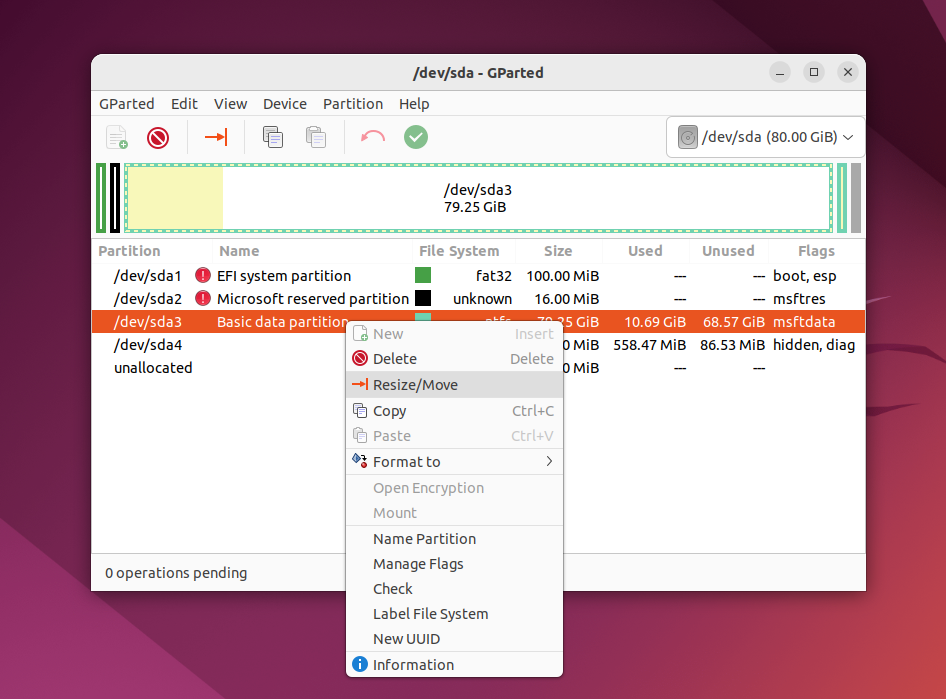
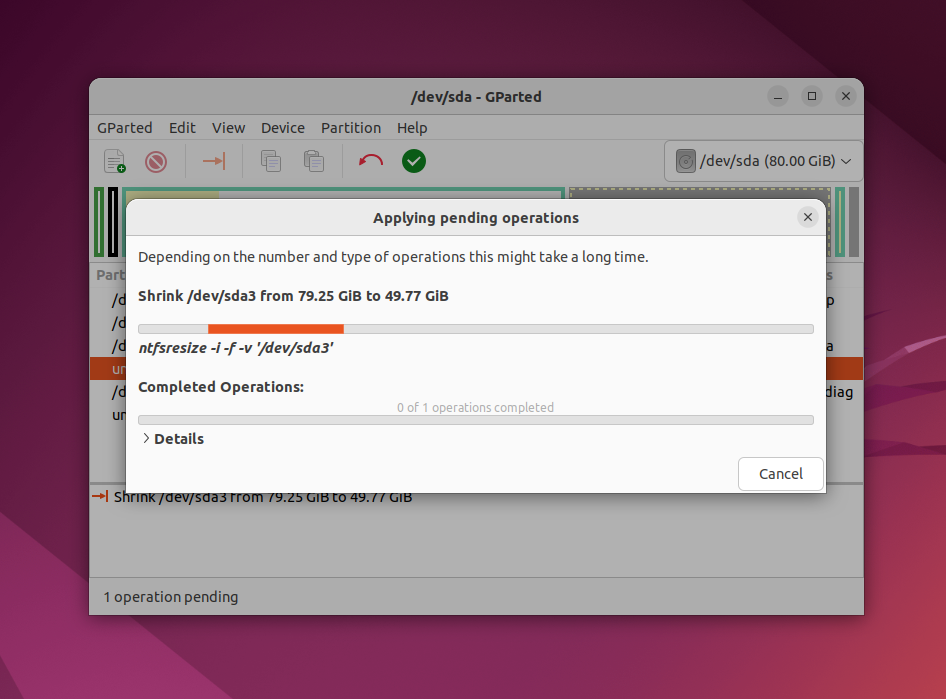
Let’s do the same thing as in the previous example — shrink the partition size for /dev/sda3 (C) to 50 Gb to install Linux on Windows. Make right-click on the /dev/sda3 partition and select the Resize/Move section:
In the next window, you can enter the wanted size manually in the New size field or use the slider:
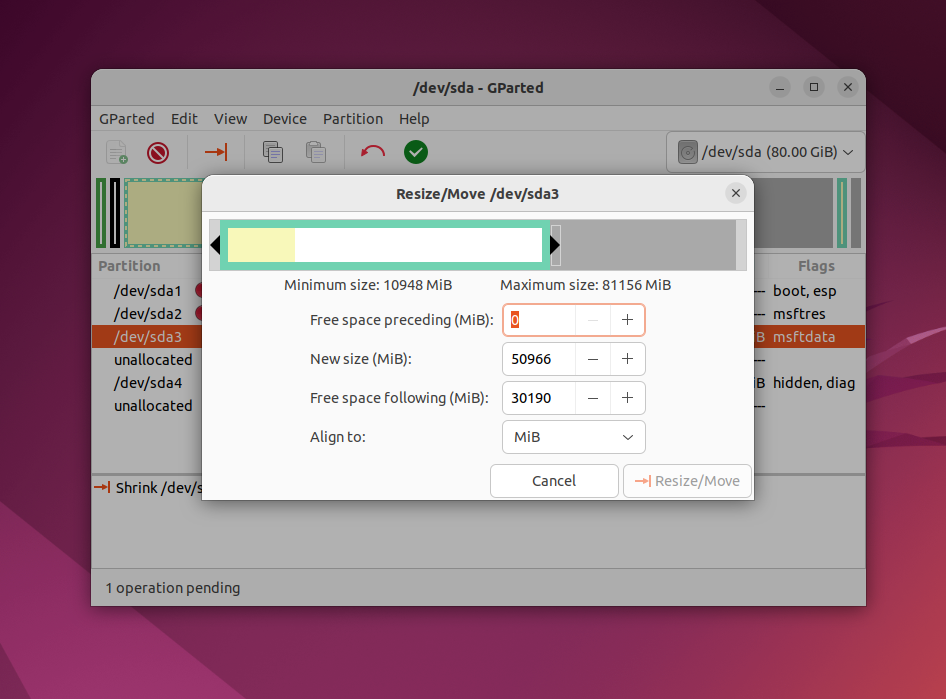
After this, press Resize/Move. You will see freed space but there are no real changes on the physical drive.
Pay attention, that you shouldn’t move the start of a system partition. You can carefully shrink a partition size by adding free space after it, but don’t try to get free space before it like this:
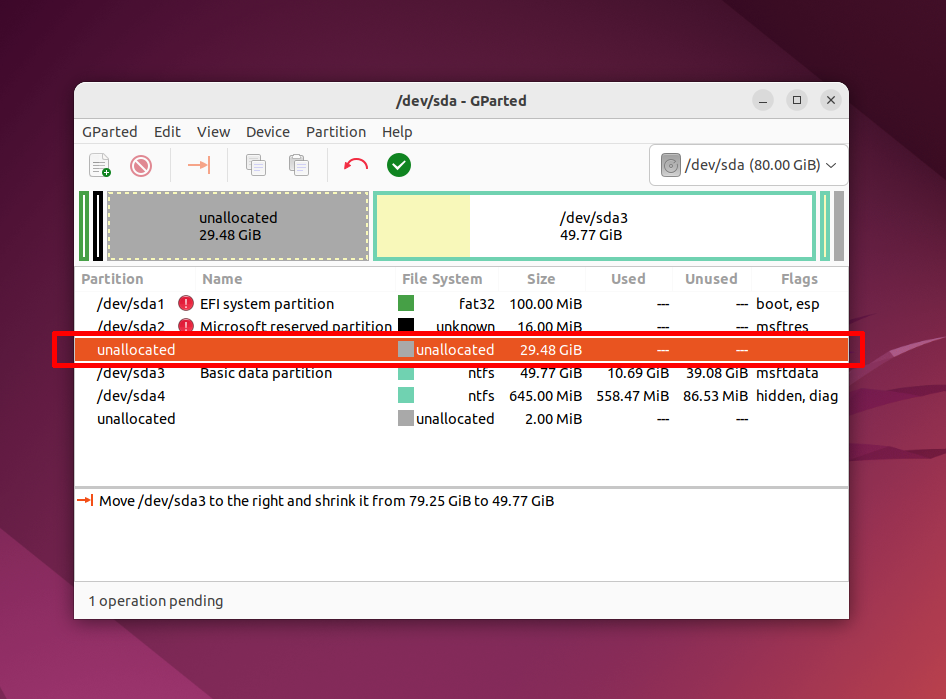
In this case, the Windows bootloader can be corrupted. It can be restored easily but I think you don’t want extra trouble.
When you are done with this, press the green button or select Apply All Operations in the Edit menu.
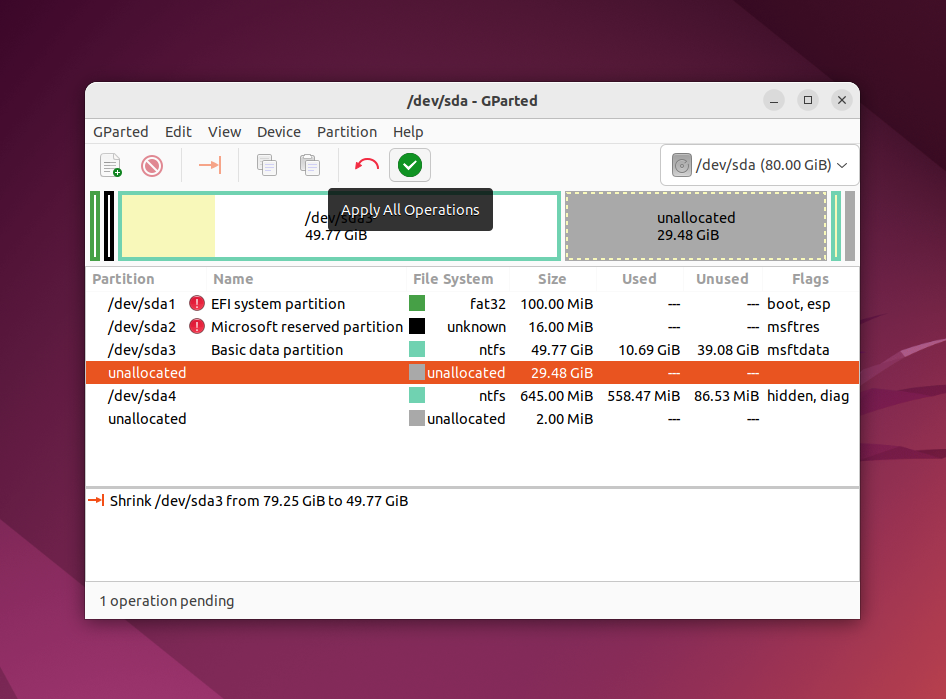
The application will ask for confirmation. Ensure that the confirmation alert looks the same as in the following screenshot:
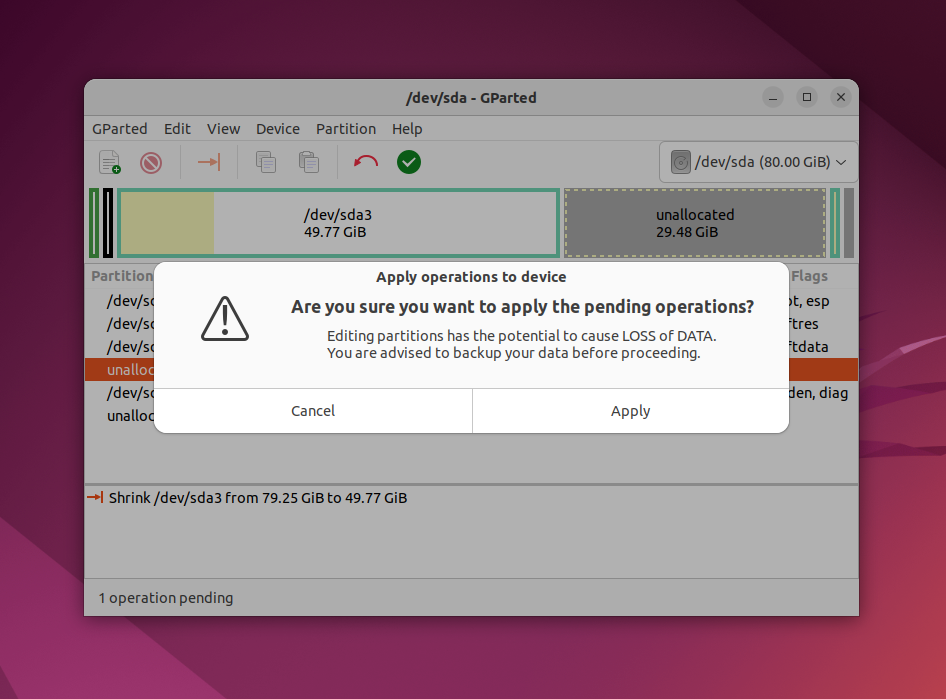
If the application warns that you are trying to move the start sector of the partition, you have done something wrong and you should cancel all and try again. Reducing the size of the filesystem can take a few minutes:
After this, you will see that the /dev/sda3 partition was reduced and free space appeared after it.
That’s it. I will not explain how to create Linux partitions here, let’s do it in the Linux installation tool.
I will not explain in detail how to install Ubuntu or any other distribution. It already has been explained in a lot of articles on the Internet or this site. Let’s have a look at how to do disk partitioning. You can use any distribution, actions will be pretty same. But I will use Ubuntu as an example in this article because it is the most popular Linux distribution for beginners.
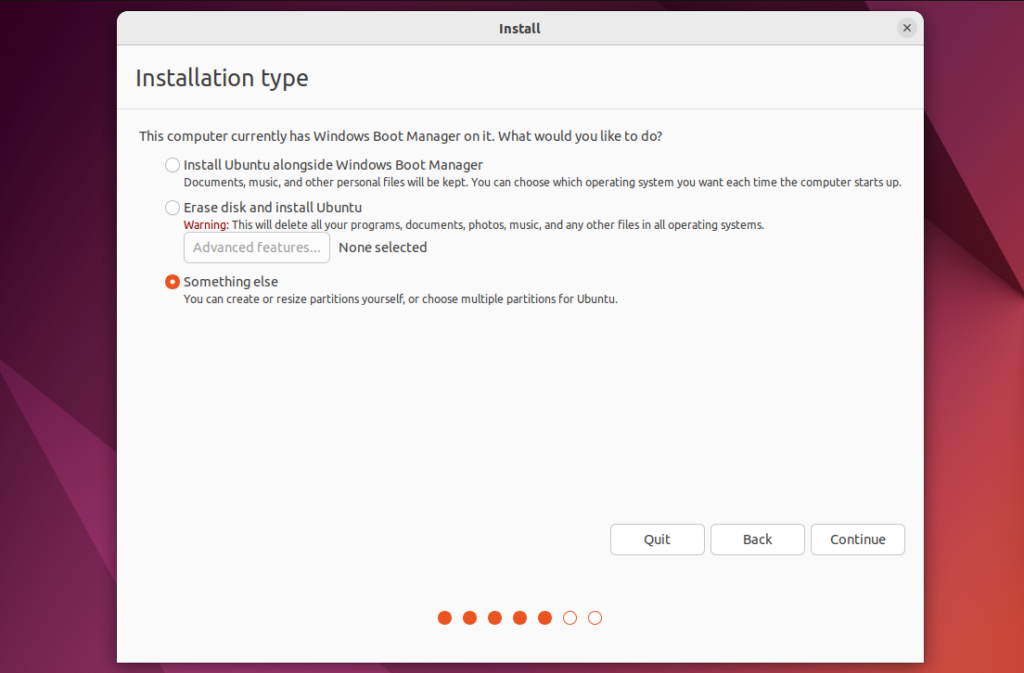
1. Choose a partitioning method
You can choose the partitioning method in the Installation type step. By default the Install Ubuntu alongside Windows Boot Manager option will be selected. In this case, Ubuntu will be installed in the free space automatically:
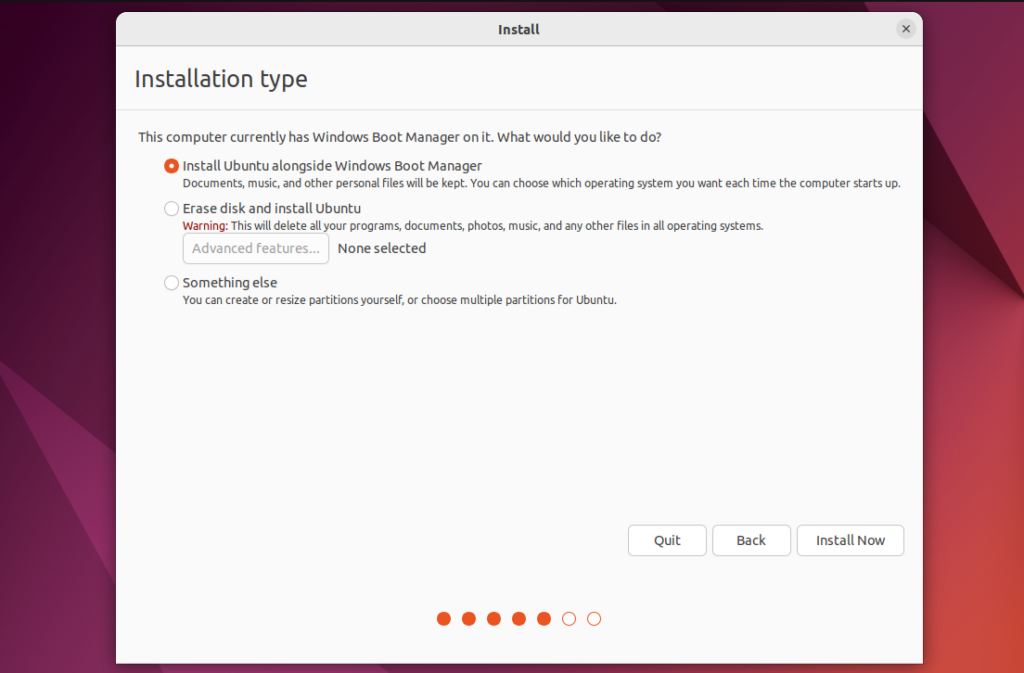
But I recommend choosing the manual method. Select Something else option for this. In this case, you will have more control over the installation process:
2. Create Partitions
If you choose the manual partitioning method, you will see this window on the next step:
Click on Free space and then click on the plus button to create a new partition. Then enter a size for a new partition and mountpoint. You must create at least a root partition. It must be not less than 25 GB. But I recommend allocating for this partition 50 — 100 GB. Then, specify / as the mountpoint.
After this, the partition will appear in the list:
You can create a home partition in the same way if you have space for it. But use /home as the mountpoint.
2. Install Bootloader
In UEFI systems bootloader should be installed on the EFI partition. So it is important to choose this partition or even a drive which has this partition for installing a bootloader. In this case, this is /dev/sda1. You can configure it using the Device for bootloader installation section at the bottom of the window:
Systemd mounts this partition automatically, so you don’t have to specify mountpoint for it. If everything is done correctly, you will see the Grub bootloader after installing, and there you will be able to select a operating system for booting.
If you are installing Linux on a non-UEFI system, you can leave the default value for bootloader configuration. There are multiple ways to install a bootloader and they depend on the partition table. It will be described in another article.
Then, you can continue the installation process as usual, and installing Linux with Windows 10 or 11 will be completed successfully.
3. Complete Installation
Many users want to know: «How to boot into my Windows after all of this?» Don’t worry, the Grub bootloader will find the Windows bootloader and will output the menu where you can select a operating system for booting:
So dual-booting for Windows and Linux will be configured automatically. If everything goes wrong and you don’t see the Grub bootloader, you always can repair the Windows bootloader or reinstall Grub using LiveCD. If everything is done correctly, you will be able to access your Windows.
Wrapping Up
In this article, we have explained how to install Linux on Windows 10 or 11, how to resize and create partitions on the Windows drive and specify those partitions for Linux installation. There is no sense to explain how to install each Linux distribution. There are dozens of different distributions and all actions will be pretty same. If you have any questions or suggestions on how to improve the article, use the comments form below!
Found a mistake in the text? Let me know about that. Highlight the text with the mistake and press Ctrl+Enter.

The article is distributed under Creative Commons ShareAlike 4.0 license. Link to the source is required .
Taking your first steps into the world of Linux can be a scary proposition. After all, we have a whole new world of terminal commands, desktop environments and applications to learn. Thankfully Linux installation has improved leaps and bounds from the earliest text based installers used in the late 1990s (Debian and Slackware) via graphical installers in the early 2000s (Corel Linux, Mandrake). From the 2010s we have seen better graphical installers providing reassurance as we test out Linux.
The first steps into Linux fall under two paths. A single board computer such as the Raspberry Pi. Or more traditionally a dual boot setup, where Windows and Linux are installed to the same machine, often on the same boot drive. Using a custom boot menu, GRUB, we can choose between the two operating systems when we power on our PC.
In this how to, we shall learn how to dual boot Linux with Windows, using Ubuntu and Windows 11. The steps are the same with Windows 10 or with
Creating a Linux Install USB
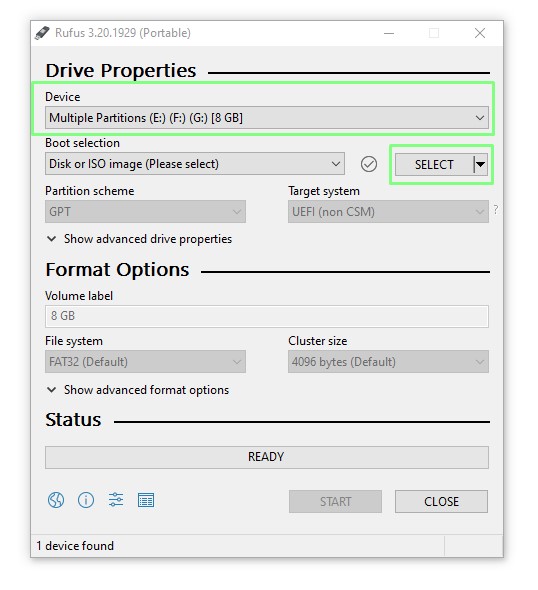
Our Linux distro is typically downloaded as an ISO image (ISO originally being referred to as CD / DVD sized images) of a live Linux OS that we can test on our machine. To use the ISO with a UEFI / Secure Boot system we need to use Rufus, a popular free utility that writes ISO files to USB Flash drives.
Our goal is to create a bootable USB stick containing our chosen Linux OS. A minimum capacity of 8GB is recommended for your USB drive.
For this project you will need
- Computer running Windows 10 / 11 (We tested with Windows 11)
- USB Flash drive, 8GB or larger
- Linux distro (we chose Ubuntu)
1. Download and install Rufus for your operating system.
2. Insert a USB drive into your machine and open Rufus.
3. Select your USB drive using Device, and then click SELECT and select the Linux OS that you wish to install. In our case it was Ubuntu 22.04.1.
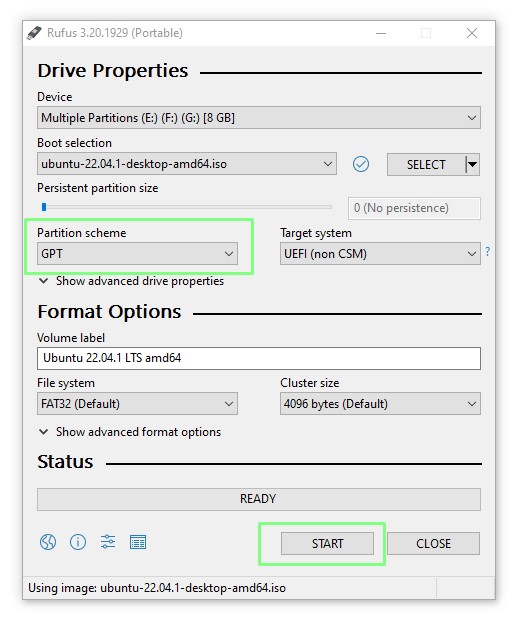
4. Select the GPT partition scheme and click START to write the OS to the USB drive. GPT is the latest partition scheme and necessary for installing Ubuntu on a UEFI system. It is gradually replacing MBR.
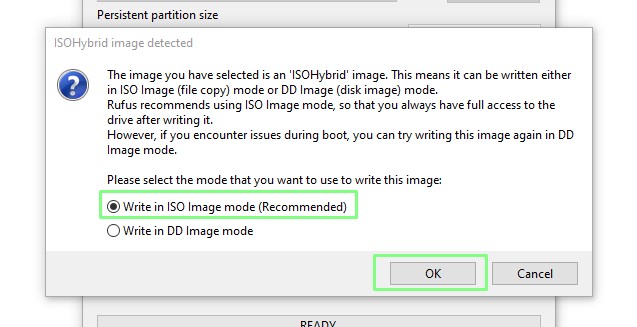
5. When prompted select “Write in ISO image mode” and click OK.
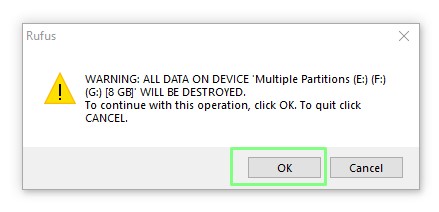
6. Read and understand the prompts to ensure that Linux OS will be written to the correct drive. There is no going back should you make a mistake.
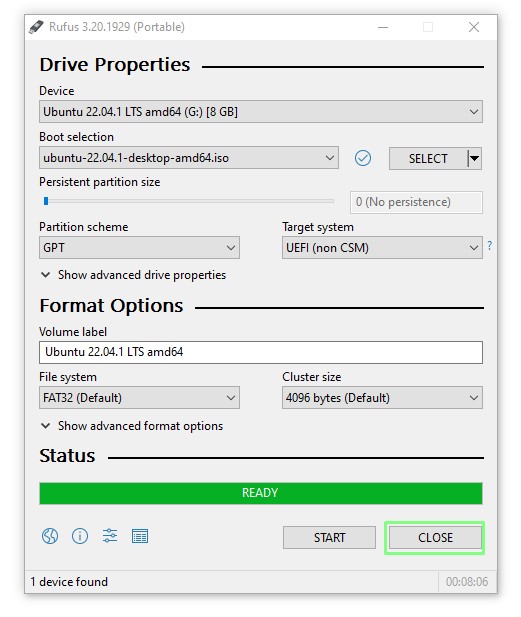
7. Click CLOSE to exit Rufus and remove the USB drive from the machine.
How to Install Linux for Dual Boot
The Linux installer has come a long way. Gone are the old days of scary user interfaces and in their place are inviting and easy to use installers that guide you through the process. We’re going to use the Ubuntu 22.04.1 installer to split our 256GB NVMe drive in half. Giving Windows and Ubuntu enough space for a basic dual boot install. Then we will follow a typical Ubuntu installation.
1. Insert the USB drive into your computer and boot from it. Each computer is a little different, Some will offer a function key to select a boot device, some need to be selected from the BIOS.
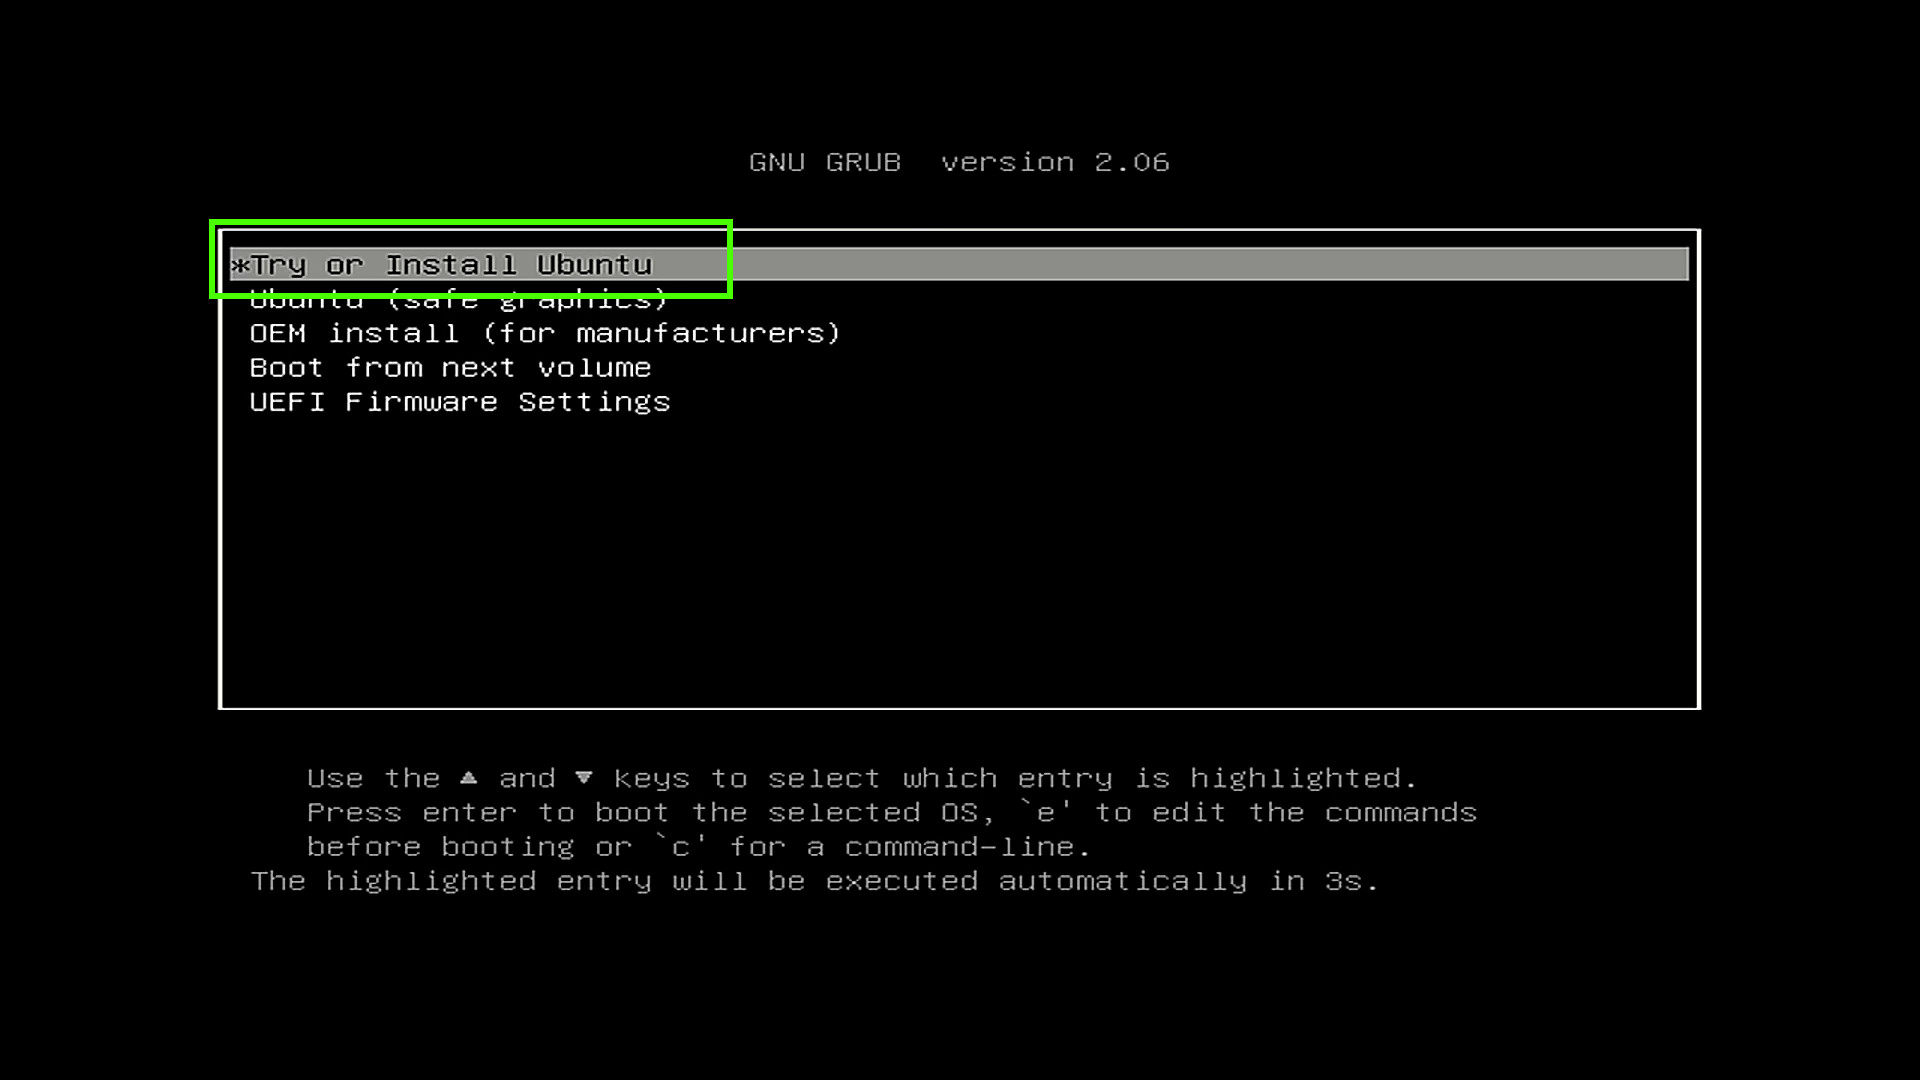
2. From the GRUB menu select “Try or Install Ubuntu” (or your Linux OS of choice) and press Enter . The GRUB menu is a custom boot menu used on Linux devices. It can also be customized to show a background image.
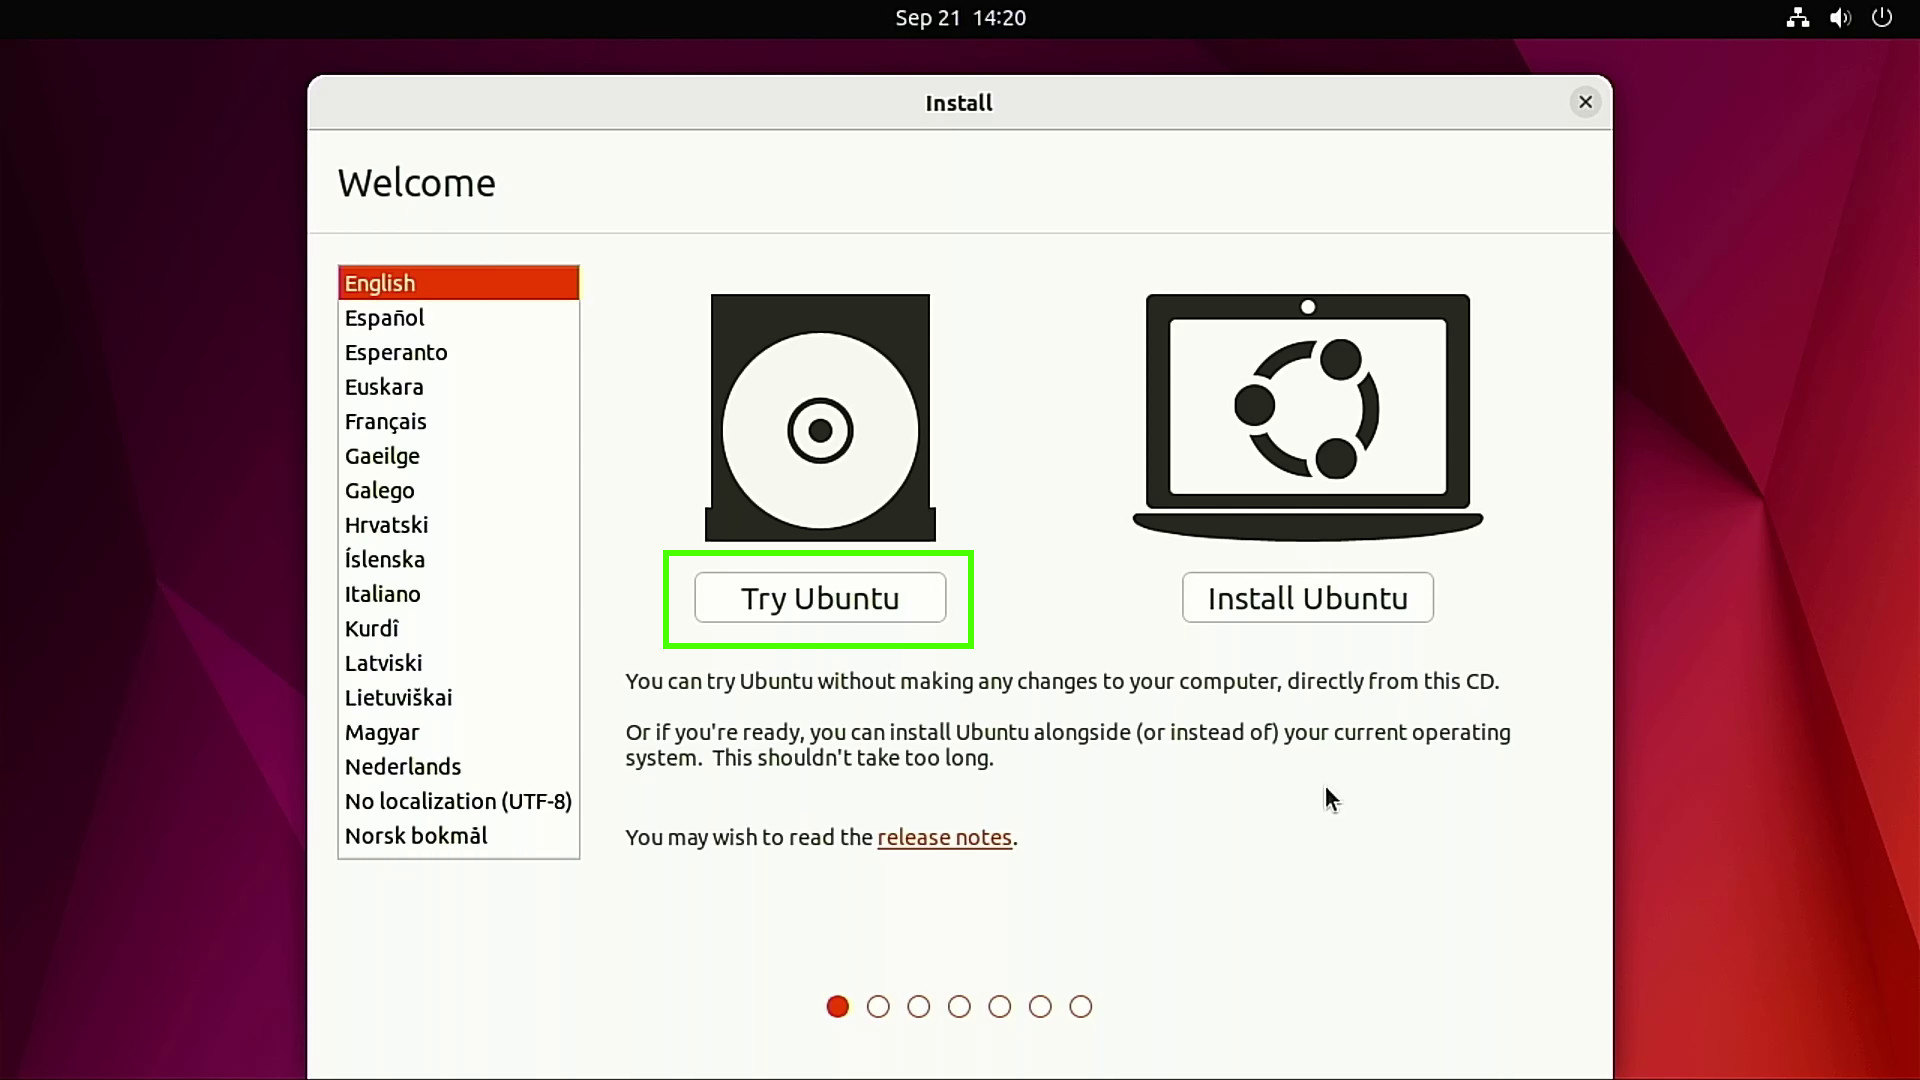
3. When prompted, click Try Ubuntu to load the OS into RAM as a “Live Distro”. Live Distros give us enough of the operating system to test on our machine without making any changes to the system. They are also useful as recovery devices to boot broken computers.
4. Test your hardware to make sure that everything you need is working. Check audio, Wi-Fi, Bluetooth etc before moving onwards.

5. Double click on the Install icon to launch the installer application.
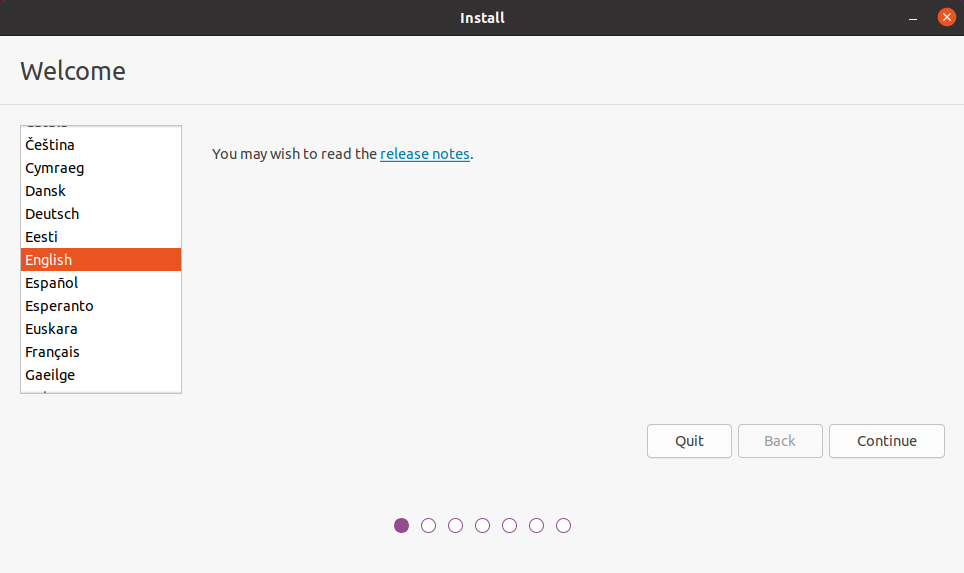
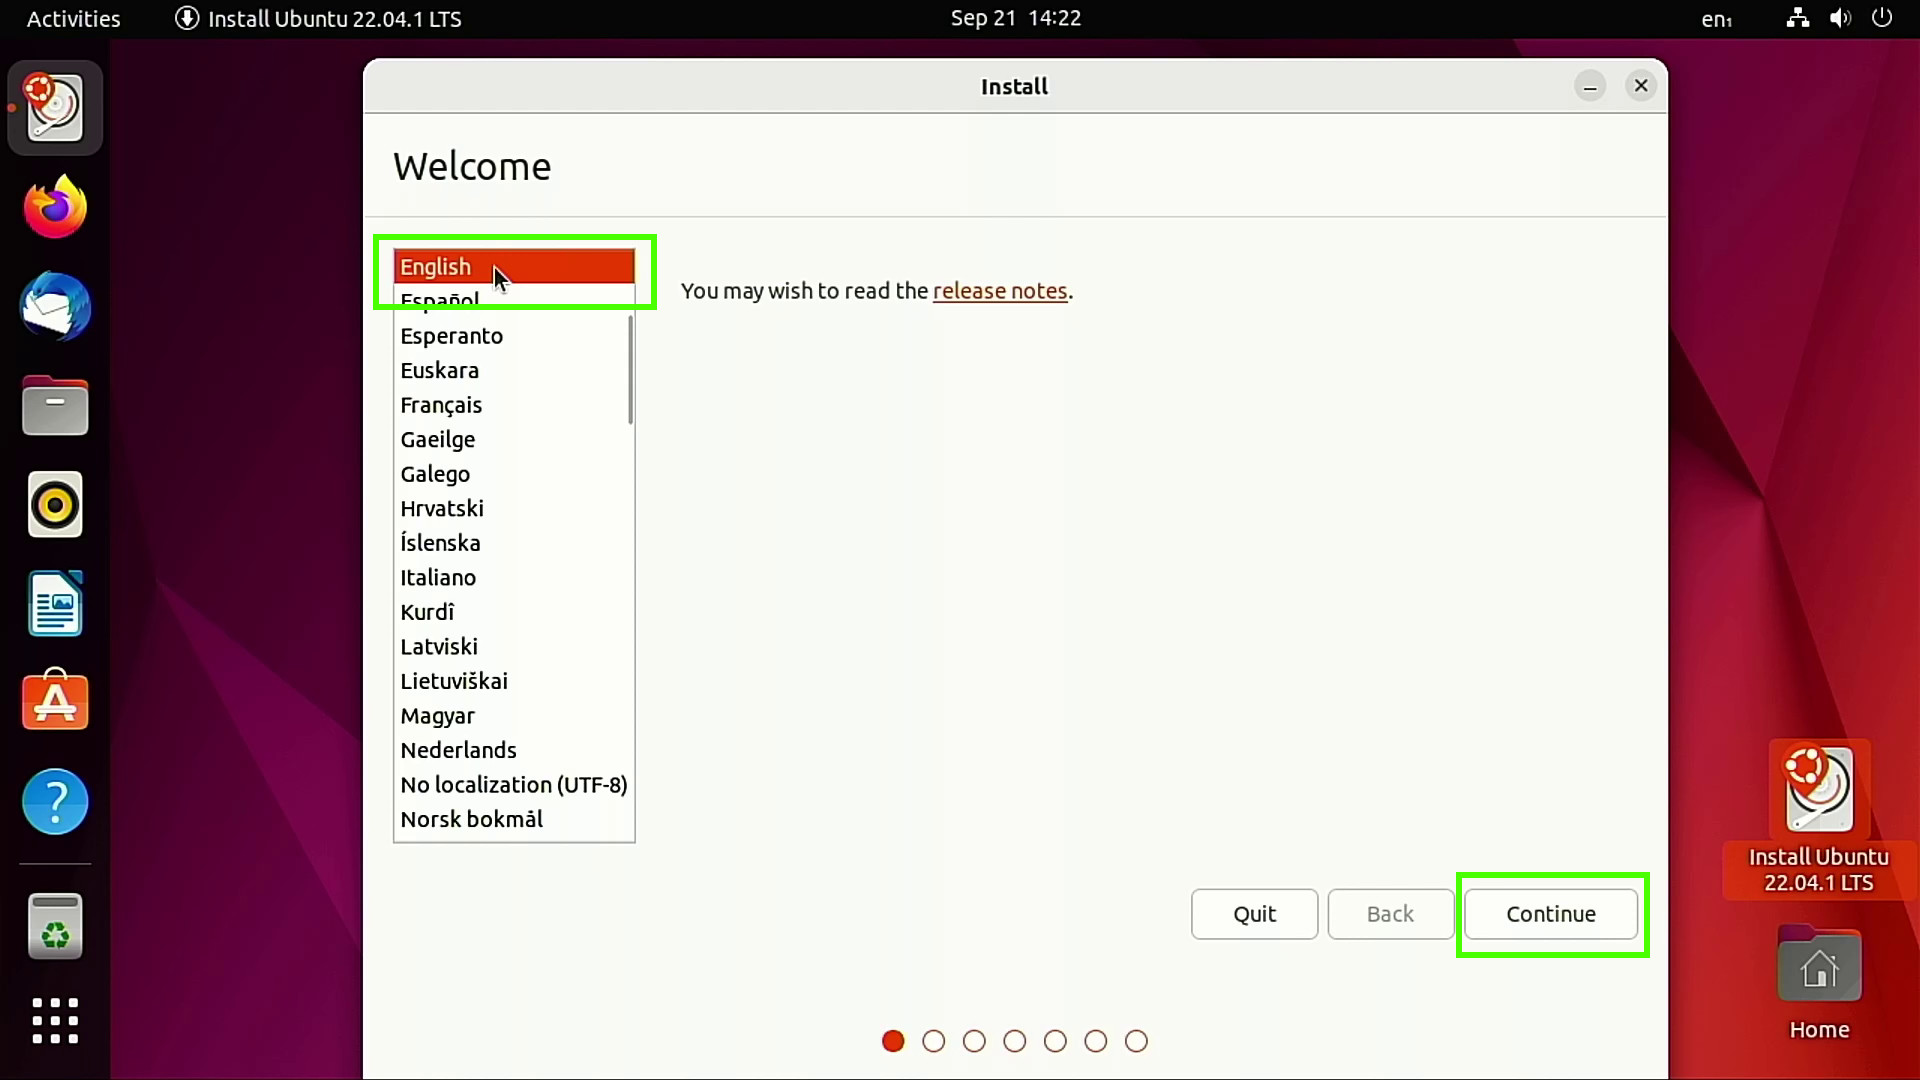
6. Select your language and click Continue.
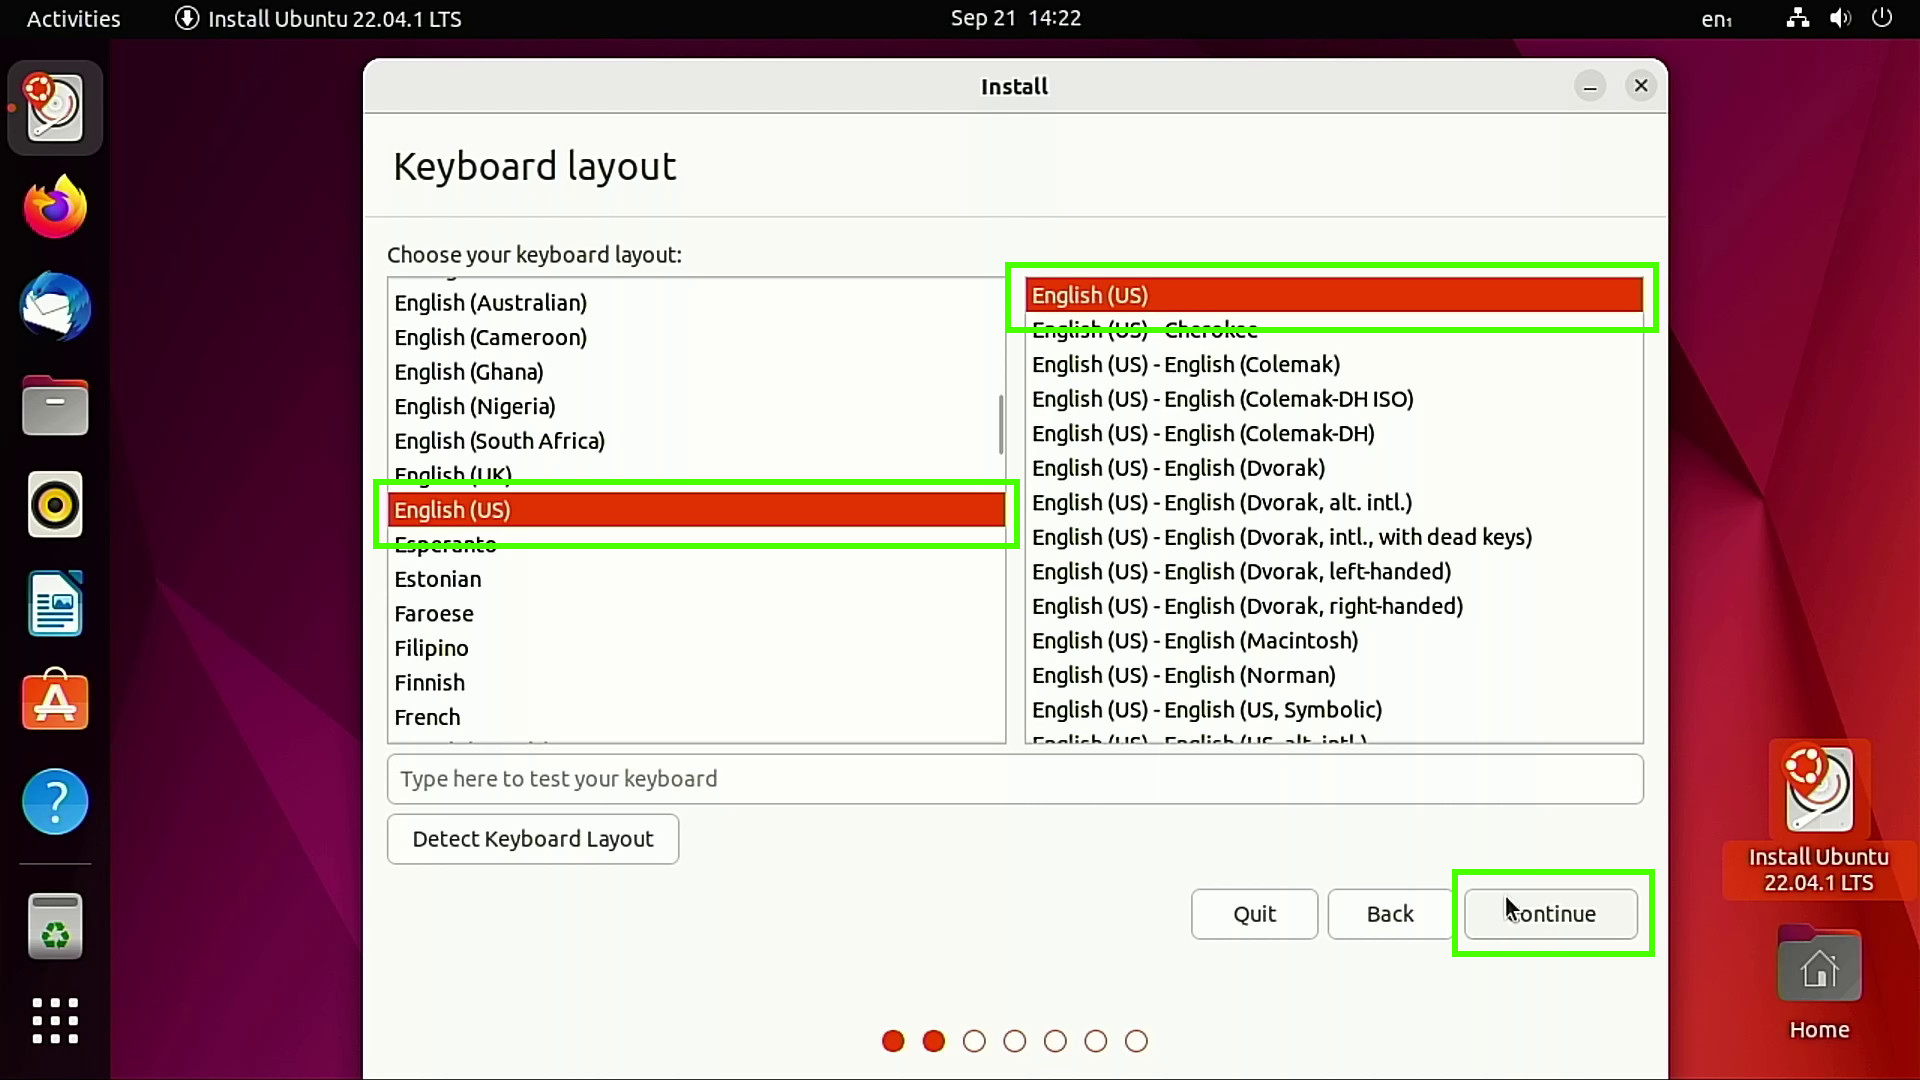
7. Select your preferred keyboard layout and click Continue.
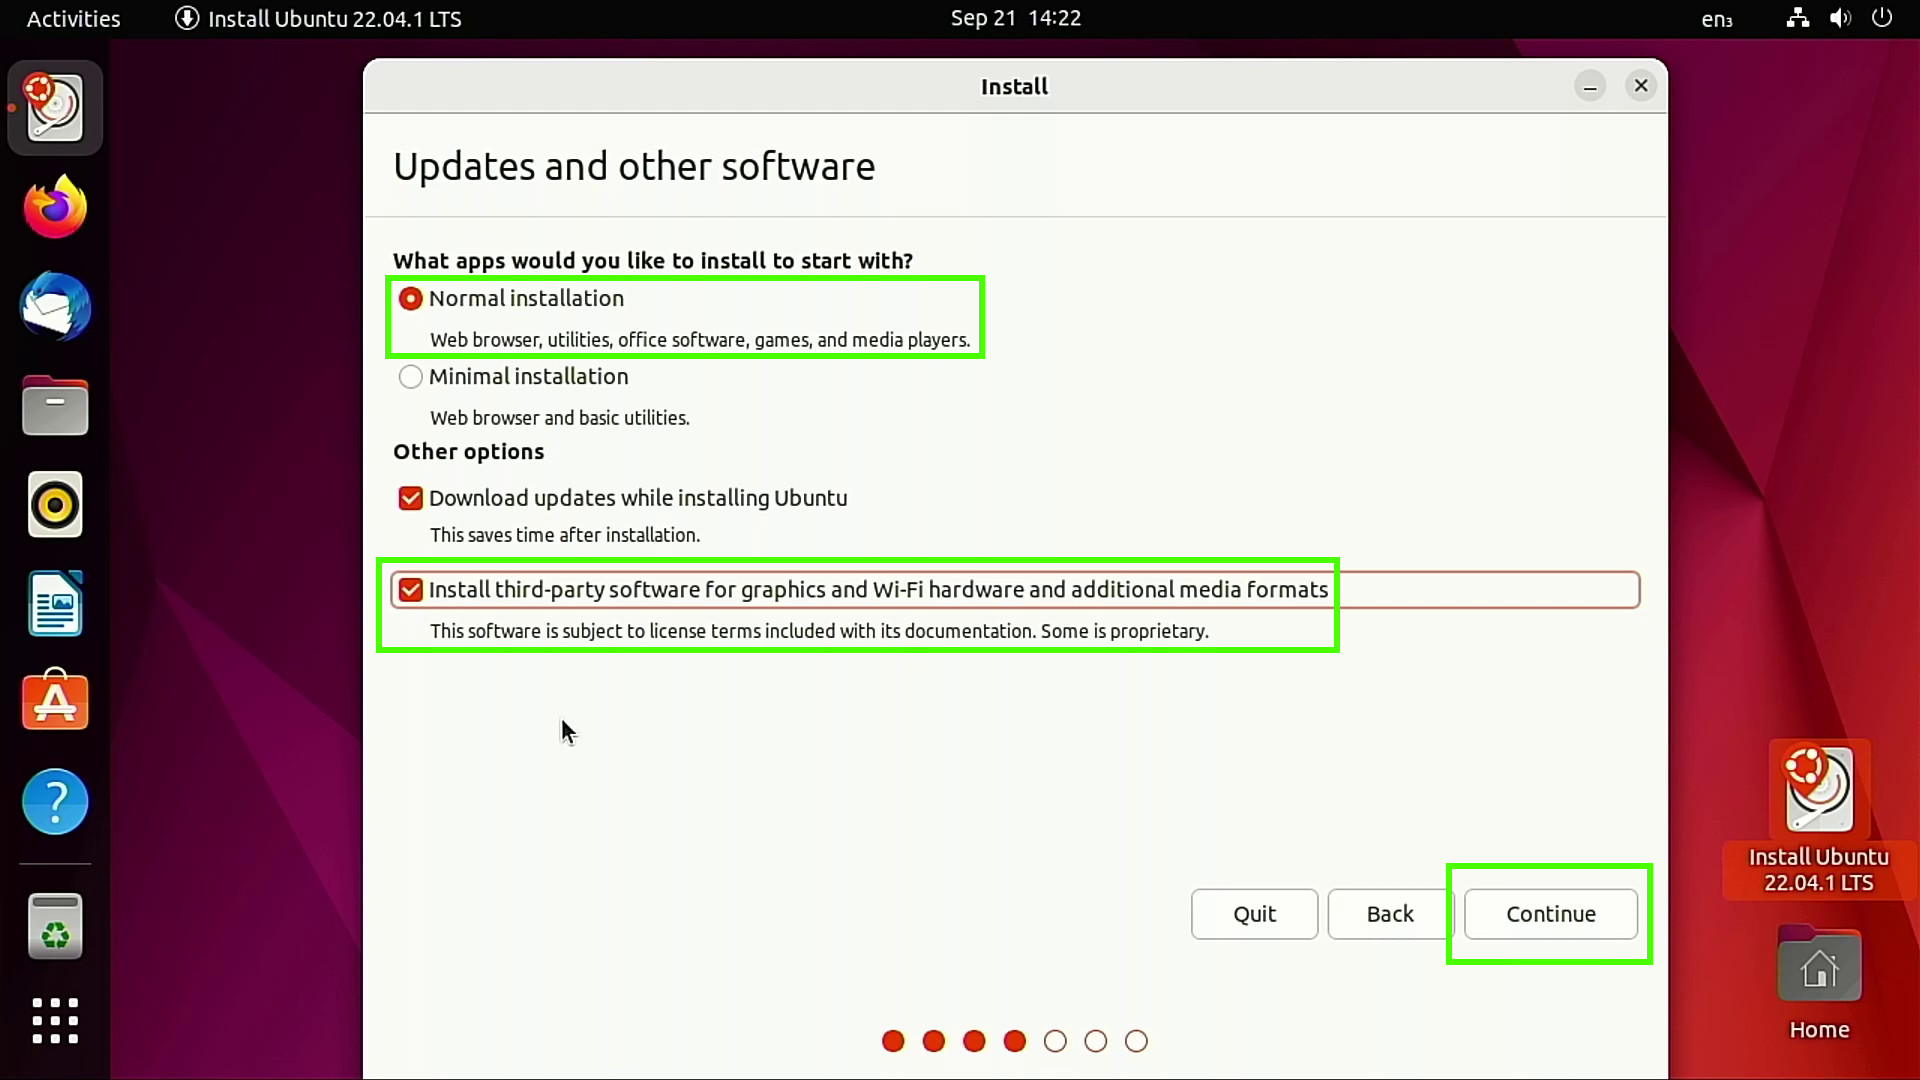
8. Select a Normal Installation and optionally install third-party software, then click Continue. Third-party software includes drivers and applications which may not match the permissive license used by your Linux distro. If you would like to know more, check the website of your chosen Linux OS.
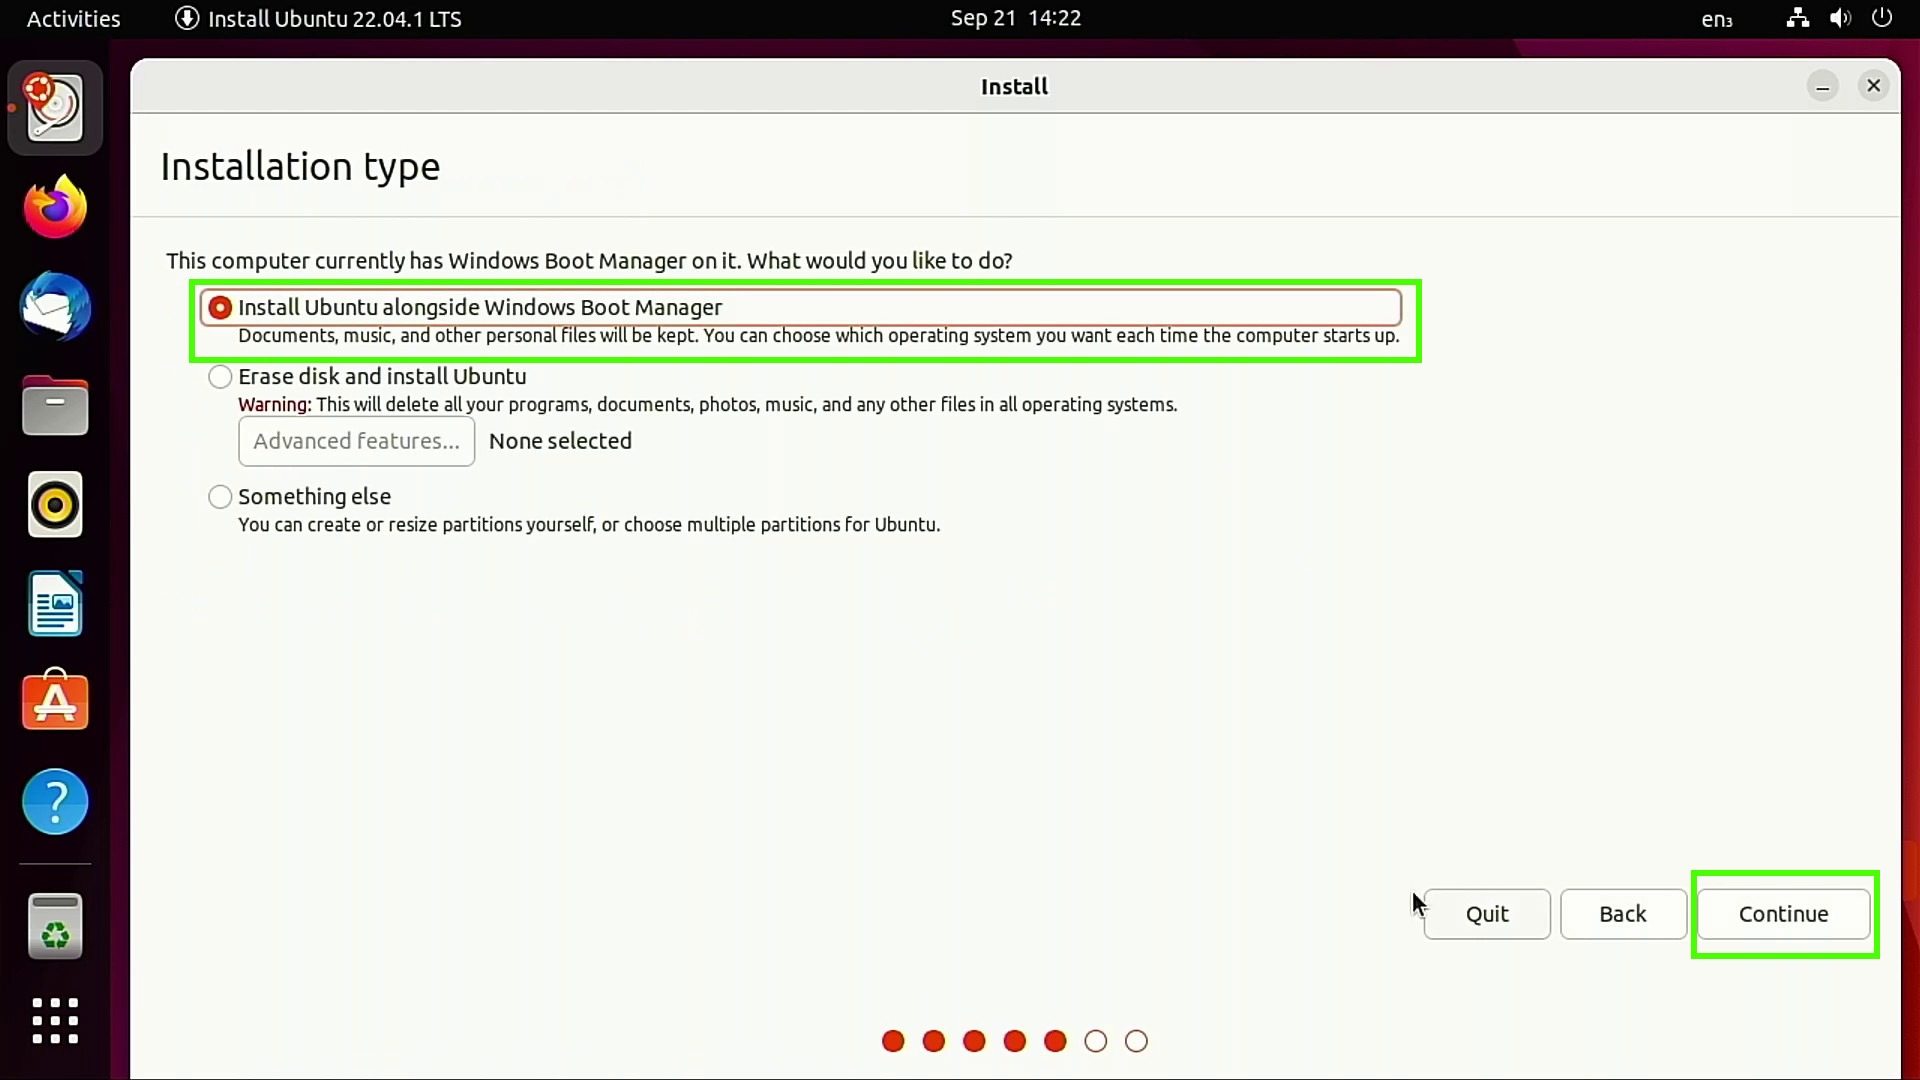
9. Select “Install Ubuntu alongside Windows Boot Manager” and click Continue. Any other option will either delete the entire contents of the drive, or require manual configuration, so take great care.
10. Ensure that the correct drive has been selected, and slide the center slider to adjust how much space each OS will have.
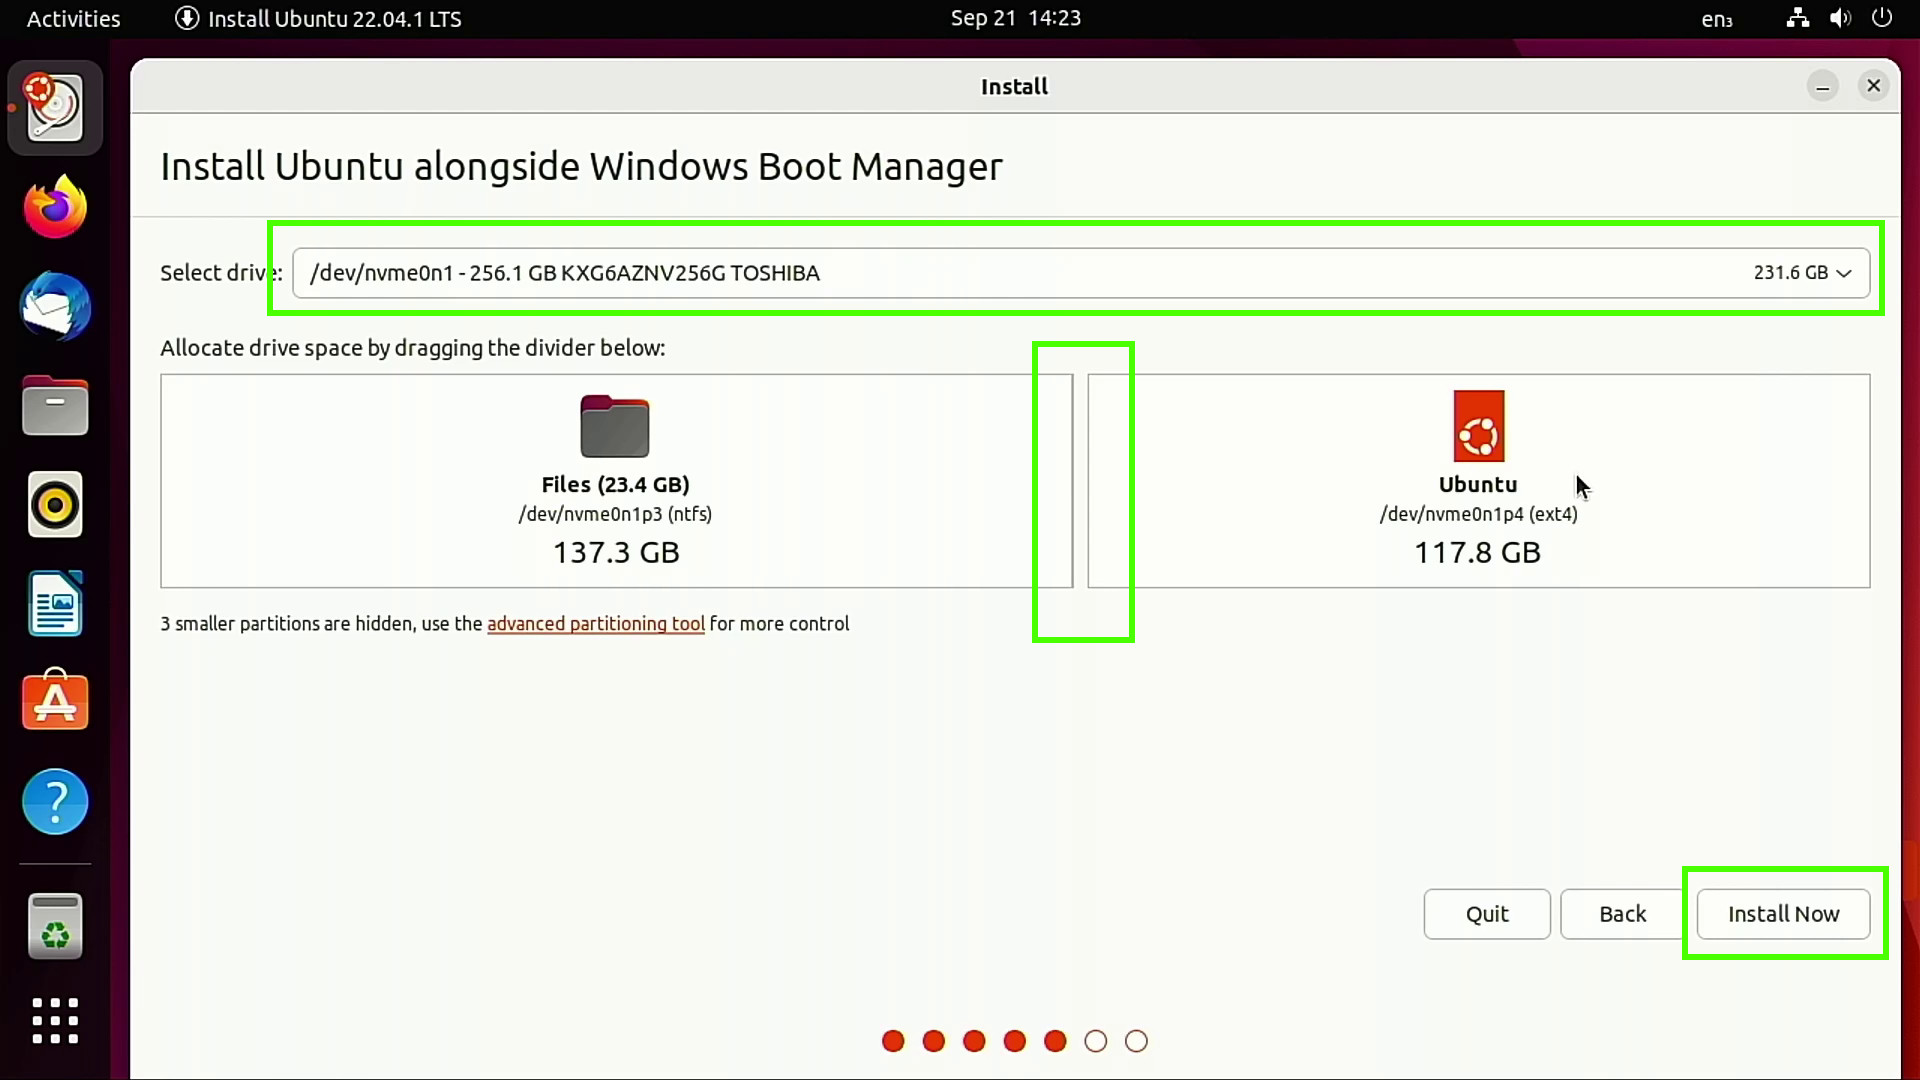
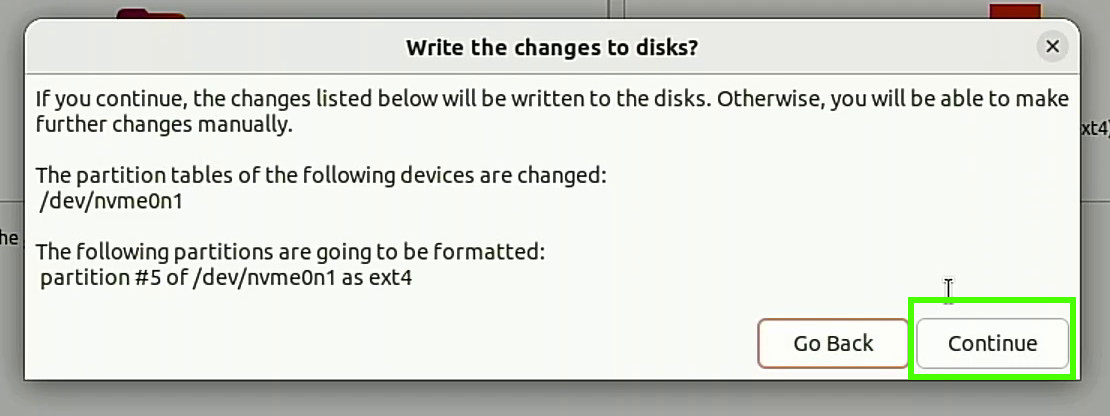
11. Click Continue to write the changes to the disk. Check that everything is correct before moving onwards. Changes made now cannot be easily remedied.
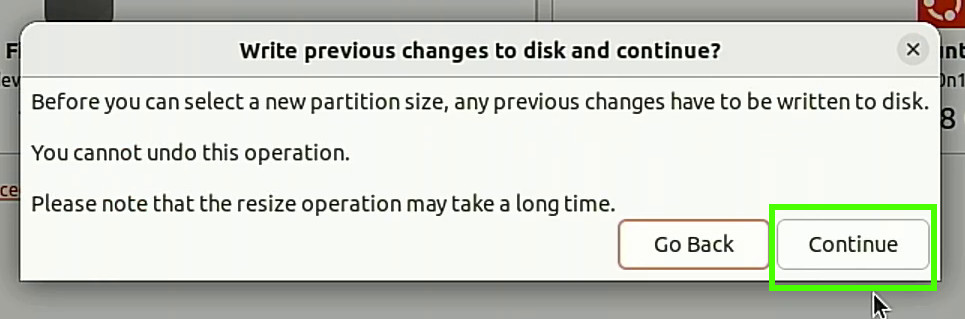
12. Click Continue when asked if you are sure.
13. Set your location and click Continue.
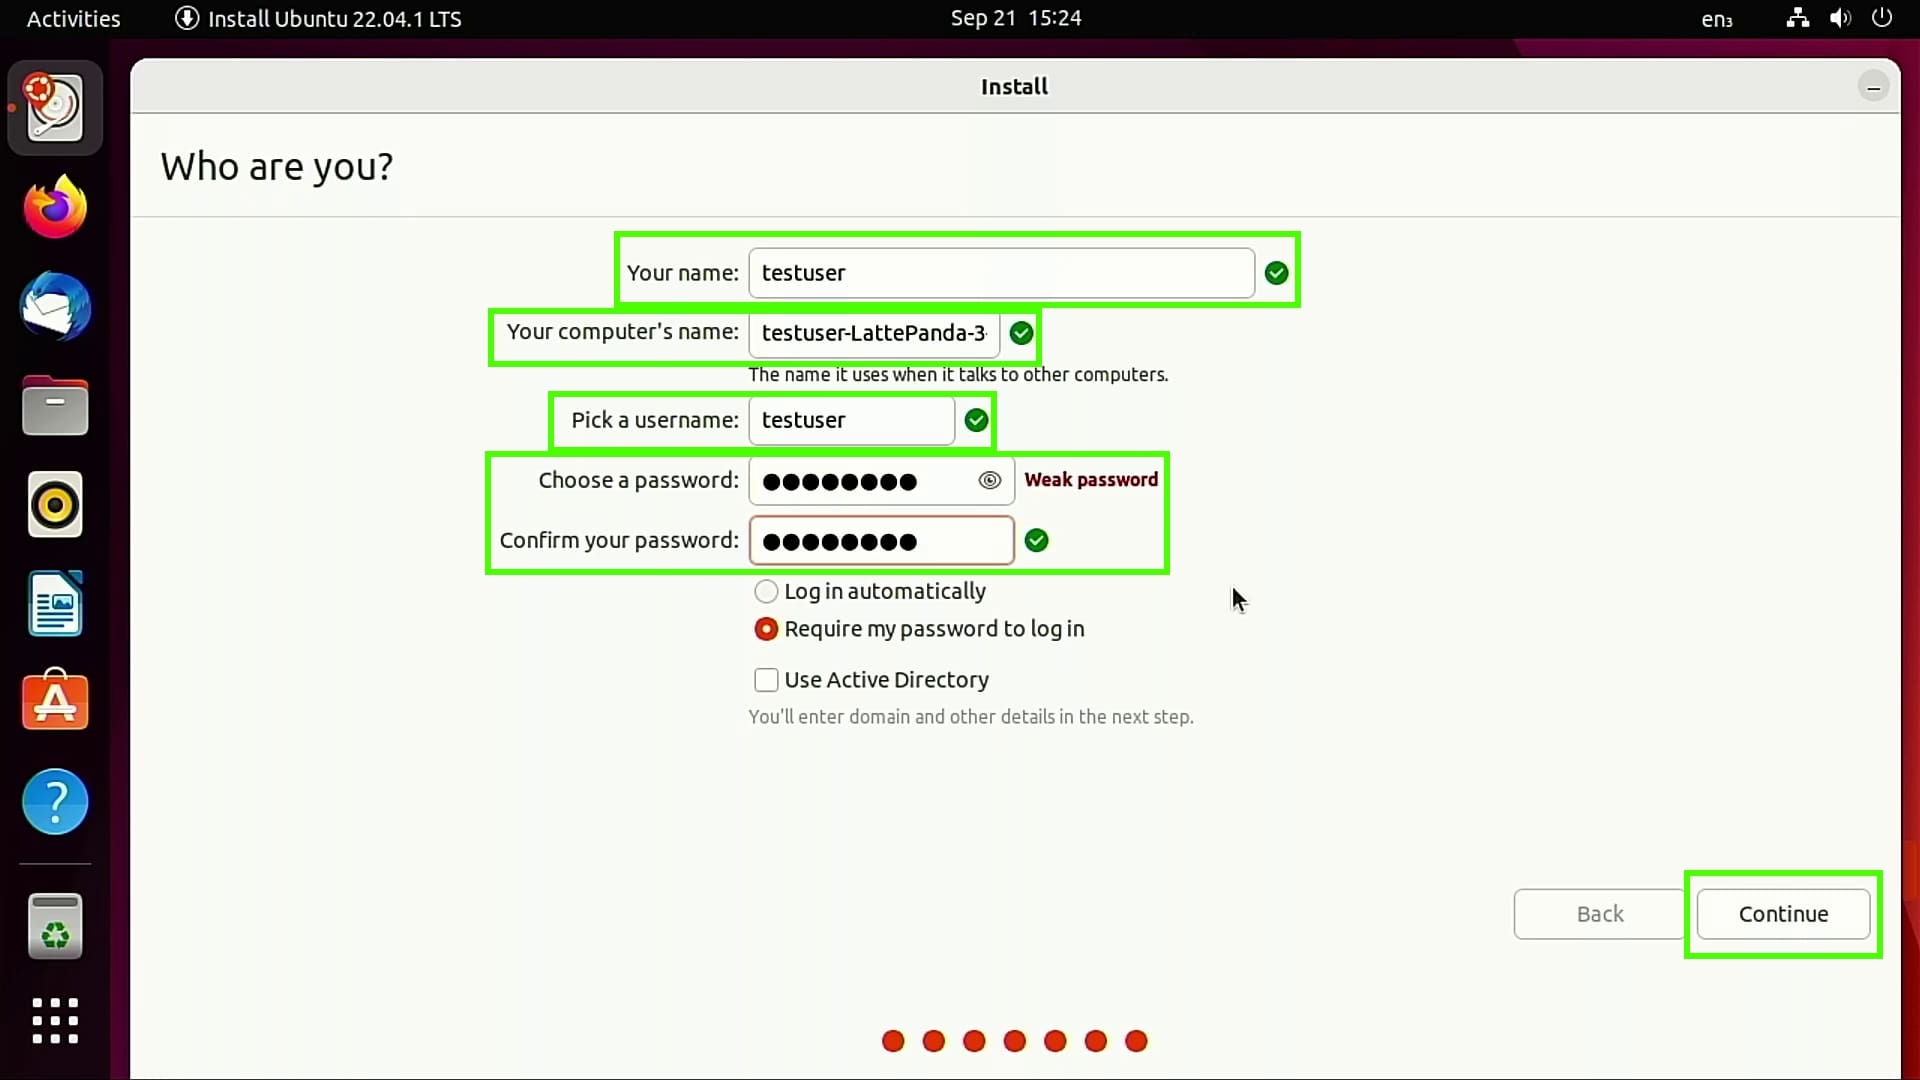
14. Set up your user account, with your real name, computer name, username and provide a strong password. Click Continue when ready.
The installation will take a few minutes to complete.
15. Click on Restart Now to reboot your computer.
16. Remove the USB drive and press Enter when prompted.
First Linux Dual Boot
The first boot of a Linux dual boot system requires a little fine tuning in our BIOS. We need to tell the system to boot from our Linux install, which will trigger the GRUB menu to load. From there we can select an OS to boot from. Each BIOS is a little different, so use these steps as a general guide and refer to the manual for your motherboard for more specific information.
1. Open your BIOS menu. See our story on how to enter your BIOS if you don’t know how to do this already.

2. Select the Boot menu.
3. Select UEFI NVMe Drive BBS Priorities.
4. Set Boot Option 1 to be the Linux install.
5. Check that the change has been made, then save and exit the BIOS.
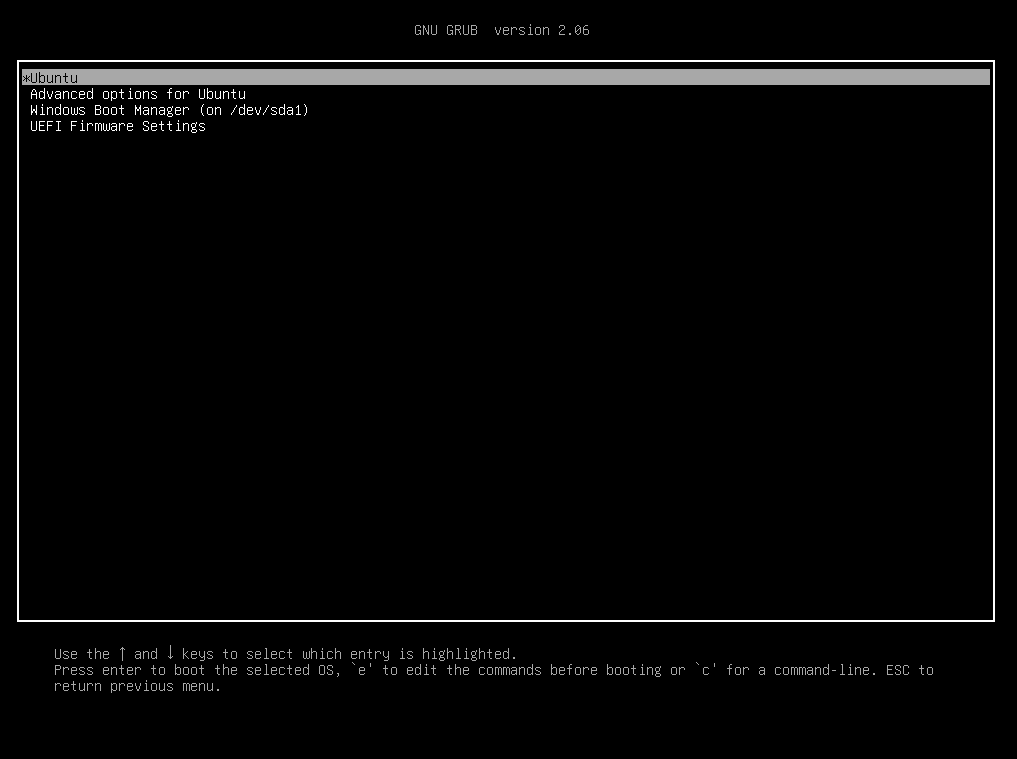
6. The system will now boot to GRUB, choose your Linux OS and press Enter. If we leave GRUB for 10 seconds, it will choose the default option, typically Linux.
7. Boot to the Linux desktop and check that everything is correct.
8. Reboot to GRUB and select Windows to check that everything is working.
Join the experts who read Tom’s Hardware for the inside track on enthusiast PC tech news — and have for over 25 years. We’ll send breaking news and in-depth reviews of CPUs, GPUs, AI, maker hardware and more straight to your inbox.
Linux is a great operating system with widespread hardware and software support, but the reality is that sometimes you have to use Windows, perhaps due to key apps that won’t run on Linux. Thankfully, dual-booting Windows and Linux is very straightforward—and I’ll show you how to set it up, with Windows 10 and Ubuntu, in this article.
Before you get started, make sure you’ve backed up your computer. Although the dual-boot setup process is not very involved, accidents can still happen. So take the time to back up your important files in case chaos theory comes into play. In addition to backing up your files, consider taking an image backup of the disk as well, though that’s not required and can be a more advanced process.
Prerequisites
To get started, you will need the following five items:
1. Two USB flash drives (or DVD-Rs)
I recommend installing Windows and Ubuntu via flash drives since they’re faster than DVDs. It probably goes without saying, but creating bootable media erases everything on the flash drive. Therefore, make sure the flash drives are empty or contain data you don’t care about losing.
If your machine doesn’t support booting from USB, you can create DVD media instead. Unfortunately, because no two computers seem to have the same DVD-burning software, I can’t walk you through that process. However, if your DVD-burning application has an option to burn from an ISO image, that’s the option you need.
2. A Windows 10 license
If Windows 10 came with your PC, the license will be built into the computer, so you don’t need to worry about entering it during installation. If you bought the retail edition, you should have a product key, which you will need to enter during the installation process.
3. Windows 10 Media Creation Tool
Download and launch the Windows 10 Media Creation Tool. Once you launch the tool, it will walk you through the steps required to create the Windows media on a USB or DVD-R. Note: Even if you already have Windows 10 installed, it’s a good idea to create bootable media anyway, just in case something goes wrong and you need to reinstall it.
4. Ubuntu installation media
Download the Ubuntu ISO image.
5. Etcher software (for making a bootable Ubuntu USB drive)
For creating bootable media for any Linux distribution, I recommend Etcher. Etcher works on all three major operating systems (Linux, MacOS, and Windows) and is careful not to let you overwrite your current operating system partition.

Image by:
Les Pounder, CC-BY-SA 4.0
Once you have downloaded and launched Etcher, click Select image, and point it to the Ubuntu ISO you downloaded in step 4. Next, click Select drive to choose your flash drive, and click Flash! to start the process of turning a flash drive into an Ubuntu installer. (If you’re using a DVD-R, use your computer’s DVD-burning software instead.)
Install Windows and Ubuntu
You should be ready to begin. At this point, you should have accomplished the following:
- Backed up your important files
- Created Windows installation media
- Created Ubuntu installation media
There are two ways of going about the installation. First, if you already have Windows 10 installed, you can have the Ubuntu installer resize the partition, and the installation will proceed in the empty space. Or, if you haven’t installed Windows 10, install it on a smaller partition you can set up during the installation process. (I’ll describe how to do that below.) The second way is preferred and less error-prone. There’s a good chance you won’t have any issues either way, but installing Windows manually and giving it a smaller partition, then installing Ubuntu, is the easiest way to go.
If you already have Windows 10 on your computer, skip the following Windows installation instructions and proceed to Installing Ubuntu.
Installing Windows
Insert the Windows installation media you created into your computer and boot from it. How you do this depends on your computer, but most have a key you can press to initiate the boot menu. On a Dell PC for example, that key is F12. If the flash drive doesn’t show up as an option, you may need to restart the computer. Sometimes it will show up only if you’ve inserted the media before turning on the computer. If you see a message like, «press any key to boot from the installation media,» press a key. You should see the following screen. Select your language and keyboard style and click Next.

Click on Install now to start the Windows installer.

On the next screen, it asks for your product key. If you don’t have one because Windows 10 came with your PC, select «I don’t have a product key.» It should automatically activate after the installation once it catches up with updates. If you do have a product key, type that in and click Next.

Select which version of Windows you want to install. If you have a retail copy, the label will tell you what version you have. Otherwise, it is typically located with the documentation that came with your computer. In most cases, it’s going to be either Windows 10 Home or Windows 10 Pro. Most PCs that come with the Home edition have a label that simply reads «Windows 10,» while Pro is clearly marked.

Accept the license agreement by checking the box, then click Next.

After accepting the agreement, you have two installation options available. Choose the second option, Custom: Install Windows only (advanced).

The next screen should show your current hard disk configuration.

Your results will probably look different than mine. I have never used this hard disk before, so it’s completely unallocated. You will probably see one or more partitions for your current operating system. Highlight each partition and remove it.
At this point, your screen will show your entire disk as unallocated. To continue, create a new partition.

Here you can see that I divided the drive in half (or close enough) by creating a partition of 81,920MB (which is close to half of 160GB). Give Windows at least 40GB, preferably 64GB or more. Leave the rest of the drive unallocated, as that’s where you’ll install Ubuntu later.
Your results will look similar to this:

Confirm the partitioning looks good to you and click Next. Windows will begin installing.

If your computer successfully boots into Windows, you’re all set to move on to the next step.
Install Ubuntu
Whether it was already there or you worked through the steps above, at this point you have Windows installed. Now use the Ubuntu installation media you created earlier to boot into Ubuntu. Insert the media and boot your computer from it. Again, the exact sequence of keys to access the boot menu varies from one computer to another, so check your documentation if you’re not sure. If all goes well, you see the following screen once the media finishes loading:

Here, you can select between Try Ubuntu or Install Ubuntu. Don’t install just yet; instead, click Try Ubuntu. After it finishes loading, you should see the Ubuntu desktop.

By clicking Try Ubuntu, you opt to try out Ubuntu before you install it. Here, in Live mode, you can play around with Ubuntu and make sure everything works before you commit to the installation. Ubuntu works with most PC hardware, but it’s always better to test it out beforehand. Make sure you can access the internet and get audio and video playback. Going to YouTube and playing a video is a good way of doing all of that at once. If you need to connect to a wireless network, click on the networking icon at the top-right of the screen. There, you can find a list of wireless networks and connect to yours.
Once you’re ready to go, double-click on the Install Ubuntu 20.04 LTS icon on the desktop to launch the installer.
Choose the language you want to use for the installation process, then click Continue.

Next, choose the keyboard layout. Once you’ve made your selection, click Continue.
You have a few options on the next screen. You can choose a Normal or a Minimal installation. For most people, Normal installation is ideal. Advanced users may want to do a Minimal install instead, which has fewer software applications installed by default. In addition, you can choose to download updates and whether or not to include third-party software and drivers. I recommend checking both of those boxes. When done, click Continue.

The next screen asks whether you want to erase the disk or set up a dual-boot. Since you’re dual-booting, choose Install Ubuntu alongside Windows 10. Click Install Now.

The following screen may appear. If you installed Windows from scratch and left unallocated space on the disk, Ubuntu will automatically set itself up in the empty space, so you won’t see this screen. If you already had Windows 10 installed and it’s taking up the entire drive, this screen will appear and give you an option to select a disk at the top. If you have just one disk, you can choose how much space to steal from Windows and apply to Ubuntu. You can drag the vertical line in the middle left and right with your mouse to take space away from one and gives it to the other. Adjust this exactly the way you want it, then click Install Now.

You should see a confirmation screen indicating what Ubuntu plans on doing. If everything looks right, click Continue.
Ubuntu installs in the background, but you still have some configuration to do. While Ubuntu tries its best to figure out your location, you can click on the map to narrow it down to ensure your time zone and other things are set correctly.

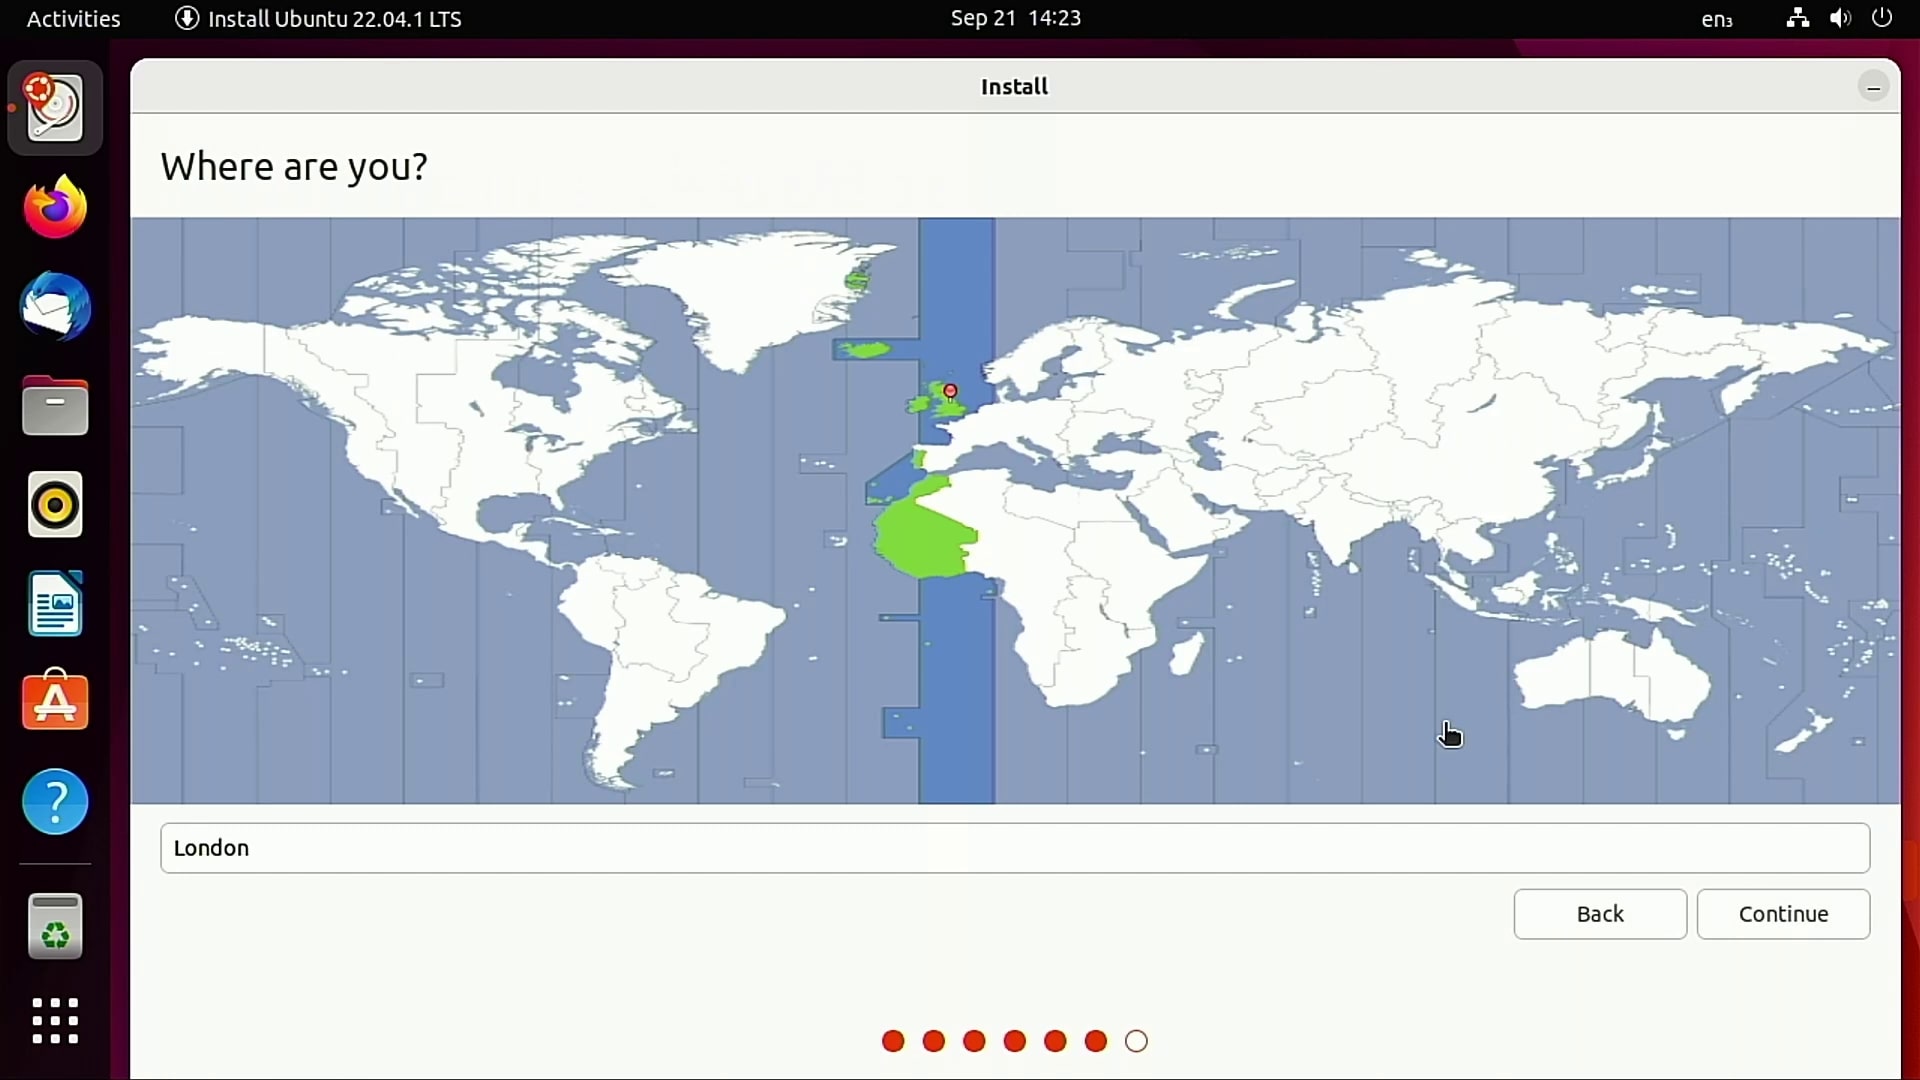
Next, fill in the user account information: your name, computer name, username, and password. Click Continue when you’re done.

Once the installation finishes, reboot your PC.
If all went according to plan, you should see a screen similar to this when your computer restarts. Choose Ubuntu or Windows 10; the other options are for troubleshooting, so I won’t go into them.

Try booting into both Ubuntu and Windows to test them out and make sure everything works as expected. If it does, you now have both Windows and Ubuntu installed on your computer.
This article was originally published in 2018 and has been updated by Seth Kenlon.
 This work is licensed under a Creative Commons Attribution-Share Alike 4.0 International License.