
You don’t have to have two different computers to use Linux and Windows 10. It’s possible to have a Linux distro installed on a computer with Windows 10 preinstalled.
In this article, I will show you how to dual boot Windows 10 and the popular Ubuntu Linux distro. But before that, you have to install Ubuntu on your Windows 10 PC.
Before you go through this process, you must backup your files. That’s because installing an OS is a risky process. Sometimes it can overwrite the existing OS and delete all your files.
N.B.: Most of the processes in this article take time to get done, so you need to be patient.
What We’ll Cover – A step-by-step Guide to Dual-Booting Windows 10 and Linux
- Prerequisites
- How to Partition your Hard Drive for Ubuntu
- How to Optimize your Hard Drive for More Partition Space (Optional)
- How to Download Ubuntu in ISO Image Format
- How to Make an Ubuntu (Linux) Bootable USB Drive
- How to Install Ubuntu Linux Distro along with Windows 10
- Now You Can Dual Boot Ubuntu and Windows 10
- Conclusion
Prerequisites
Most importantly, there are some things you must have in place if you want to use (and dual boot) Ubuntu and Windows 10 on the same PC:
- A computer preinstalled with Windows 10
- A partitioned hard drive
- A BIOS in UEFI mode (Unified Extensible Firmware Interface)
- An empty USB drive of at least 4Gig for creating a bootable disk
- An internet connection to download Ubuntu ISO image (the Linux distro) and Rufus (a bootable drive creation tool)
How to Check If Your PC BIOS is in UEFI Mode
To check if your PC BIOS comes in UEFI mode, search for “system information” and hit ENTER.
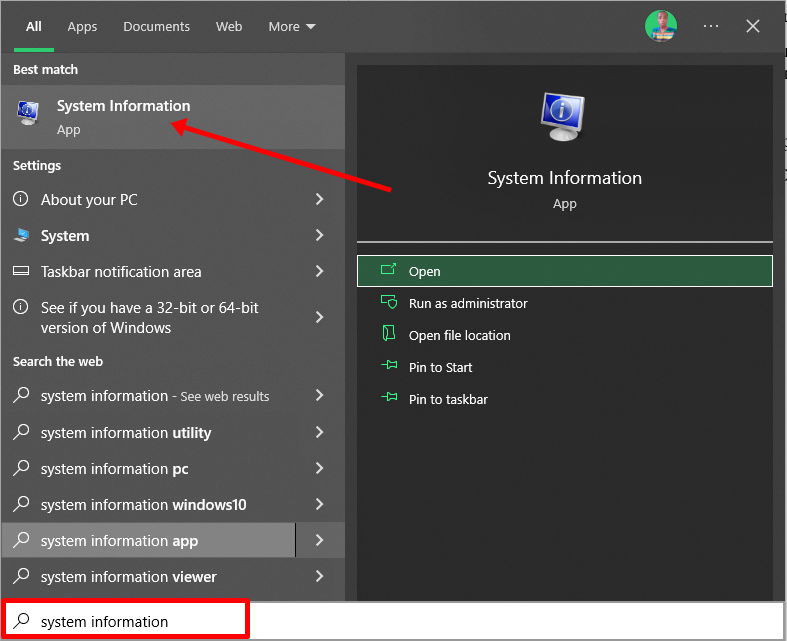
Look under BIOS mode to confirm that your PC BIOS mode comes as UEFI.
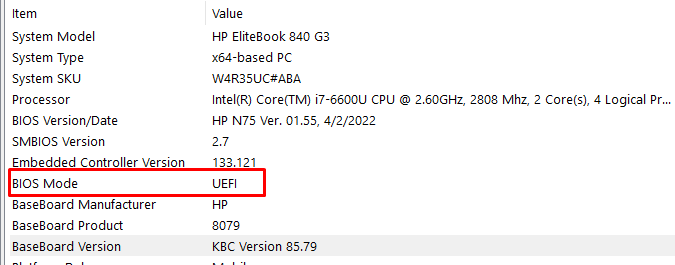
If your PC BIOS is not in UEFI mode, the two operating systems won’t see each other. You can learn more about the difference between these two modes here.
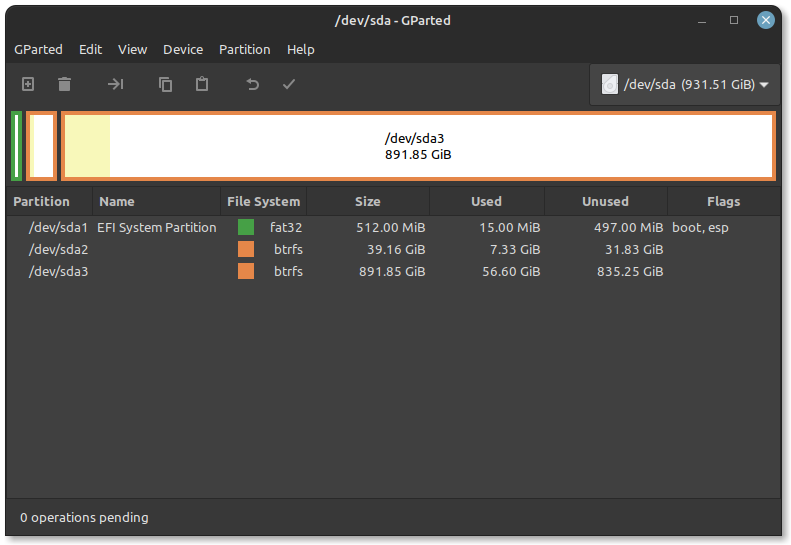
How to Partition your Hard Drive for Ubuntu
You have to partition your hard drive because you must set aside at least 20Gig for Ubuntu to live in and boot from.
To partition your hard drive, follow the steps below:
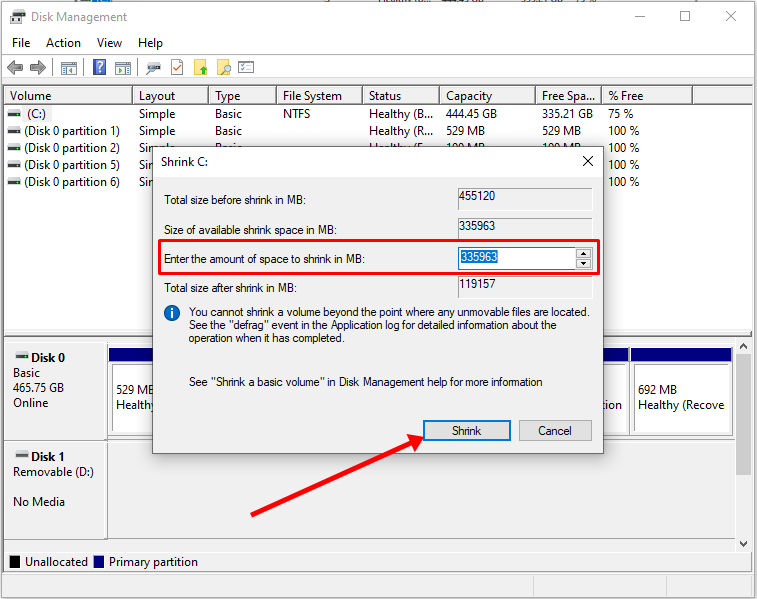
Step 1: Right-click on Start and select “Disk Management”.
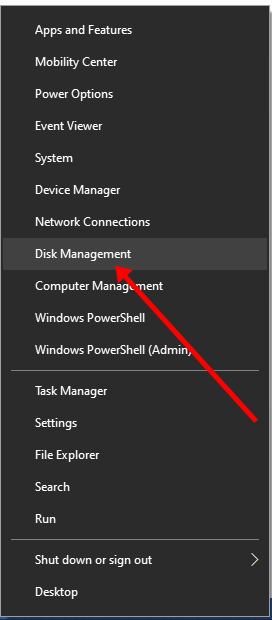
Step 2: Right-click on your C drive and select shrink volume.
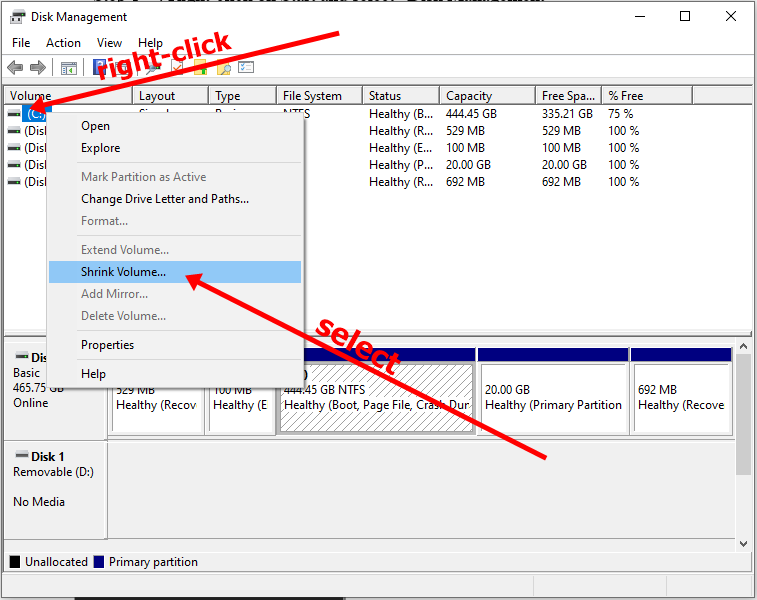
Step 3: Select at least (20000) 20Gig for Ubuntu and click “Shrink”. IT can take some time to complete, so be patient.
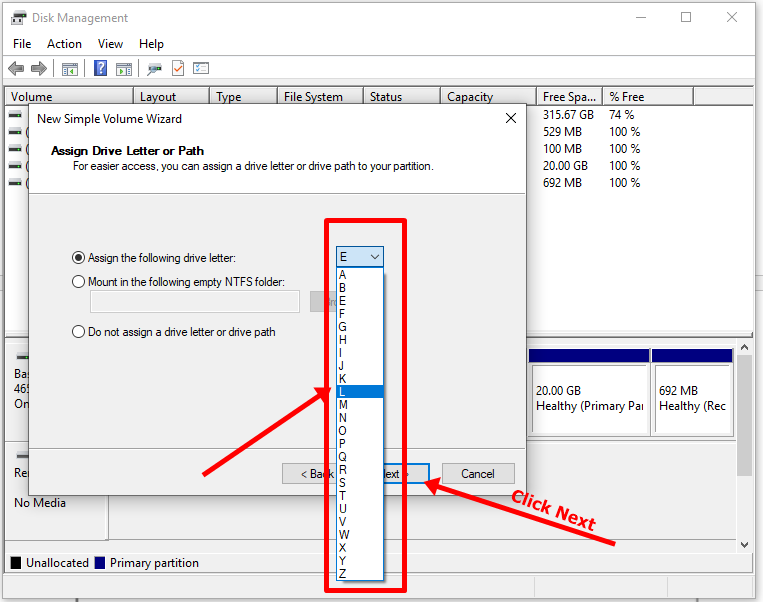
Step 4 (optional): You can go ahead and assign a letter to the new volume. Right-click on the unallocated space and select “New Simple Volume”.
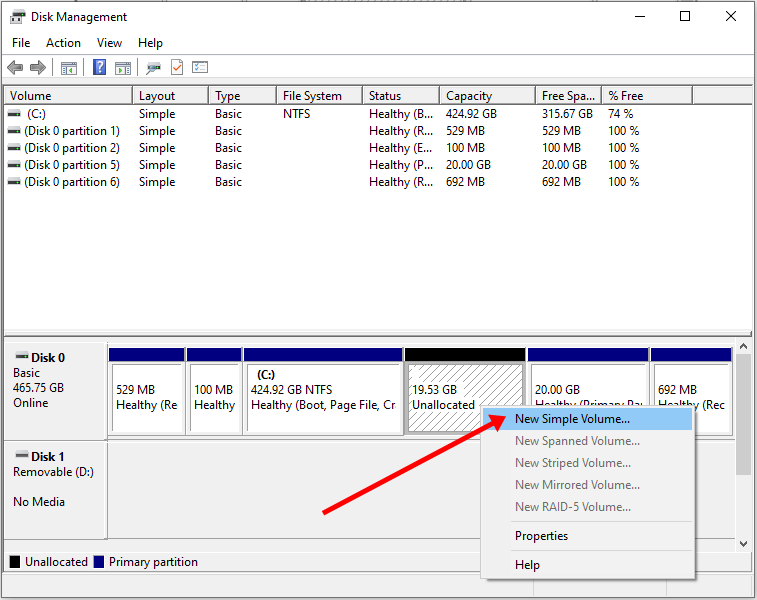
Step 5: Follow the wizard and assign a letter to the drive, then follow the rest of it.
After completing the wizard, the drive should be listed on your computer.
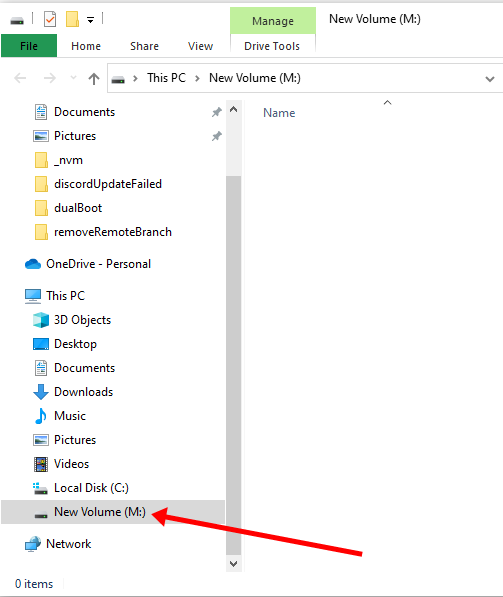
Congrats! You’ve successfully partitioned your hard drive.
N.B.: If you have a lot of free space in your hard drive but your PC still didn’t give you up to 20Gig partition space, then you need to optimize your PC’s hard drive. Proceed to the next section of this article to do that.
How to Optimize your Hard Drive for More Partition Space (Optional)
The common purpose of hard disk optimization is to speed up your computer during boot time and make it run smoother.
At the same time, the process will defragment the hard disk and make free space more available for partitioning.
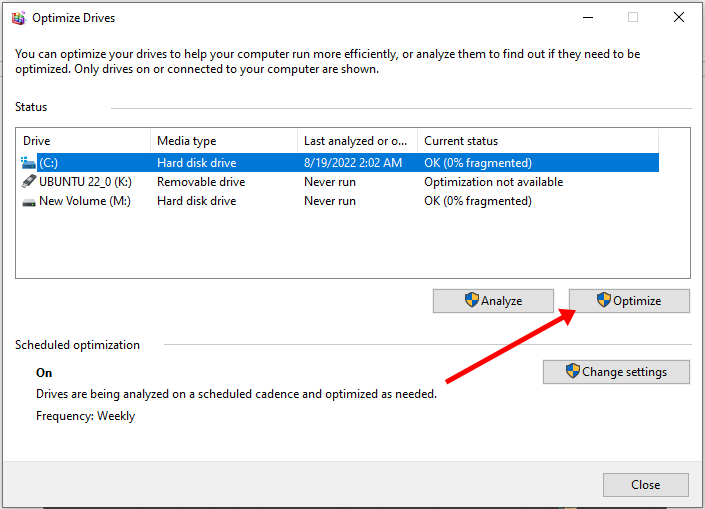
To optimize your hard drive, click Start (Windows logo key), search for “defrag” and select “Defragment and Optimize Drives”.
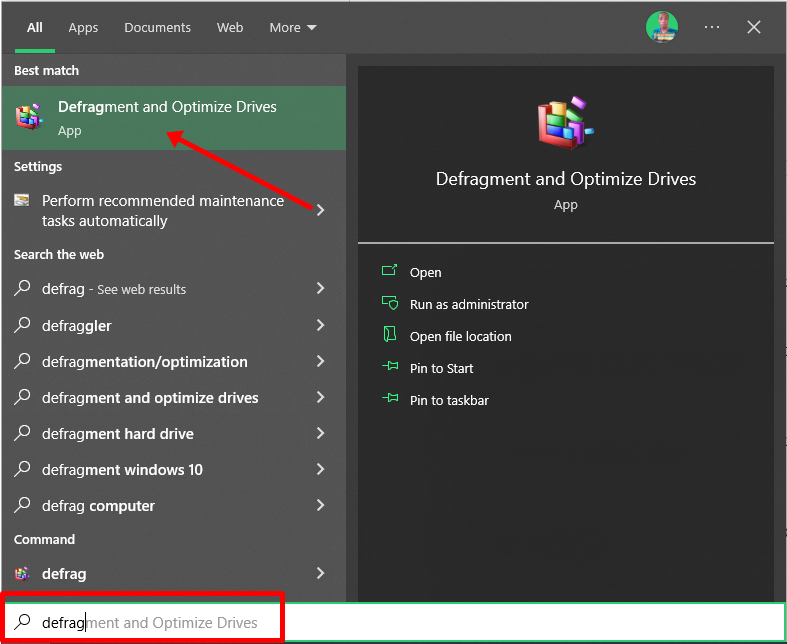
Make sure your C drive is highlighted, then click “Optimize”.
After you’ve been able to set aside at least 20Gig for Ubuntu by partitioning your hard drive, then it’s time to download Ubuntu and make a bootable USB.
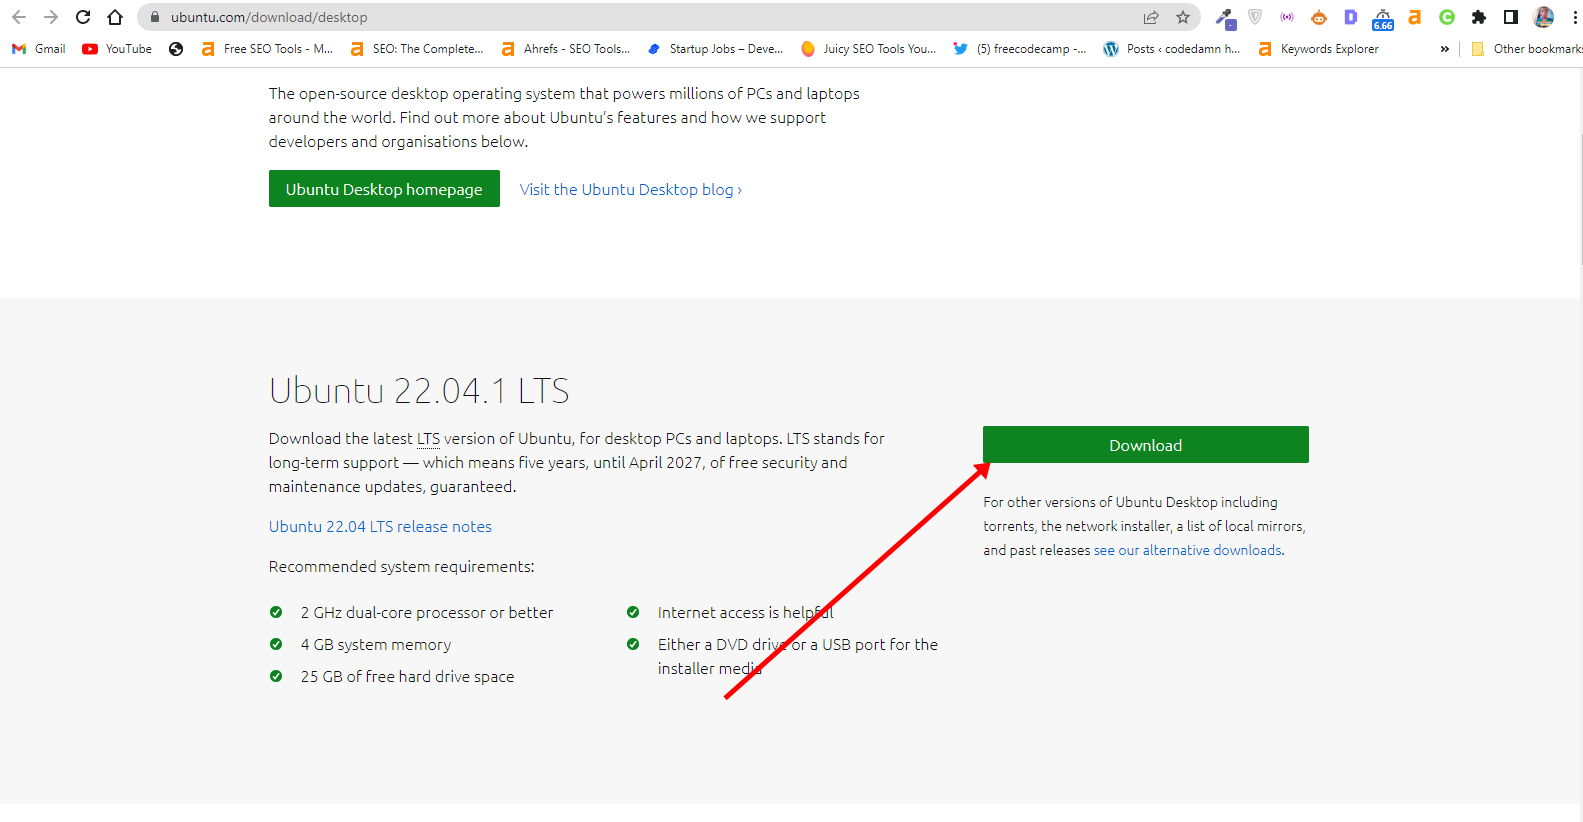
How to Download Ubuntu in ISO Image Format
The next thing is to download Ubuntu in ISO image format so you can install Ubuntu. You can download it from the Ubuntu distro website.
After downloading Ubuntu, don’t do anything with it yet. You need to make a bootable USB and put it in there. That’s how you’ll be able to use it.
The reason you can’t install Ubuntu just like that is that it doesn’t come as an executable. It comes in form of ISO (optical disk image). That means you have to find a disk to put it in before it can work.
The next part of this guide shows how you can put the downloaded Ubuntu ISO on a USB stick.
How to Make an Ubuntu (Linux) Bootable USB Drive
You won’t be able to make a bootable USB drive for Ubuntu by just placing the downloaded ISO image in it. Follow these steps to get it done:
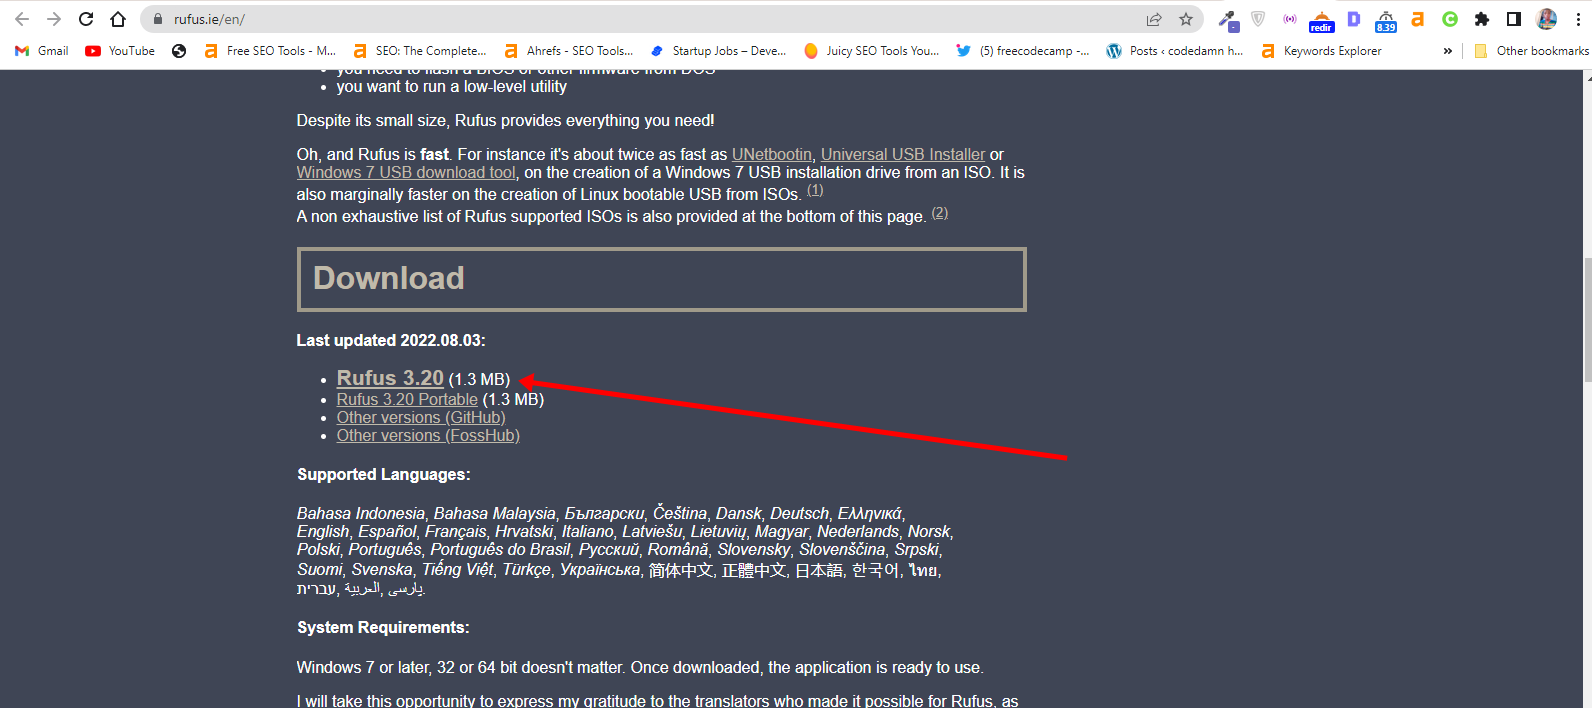
Step 1: You need to download a bootable USB drive creation tool like Rufus. You can download Rufus from their website.
Step 2: Insert the empty USB drive into your Windows 10 PC. Right-click on Rufus and select “Open”.
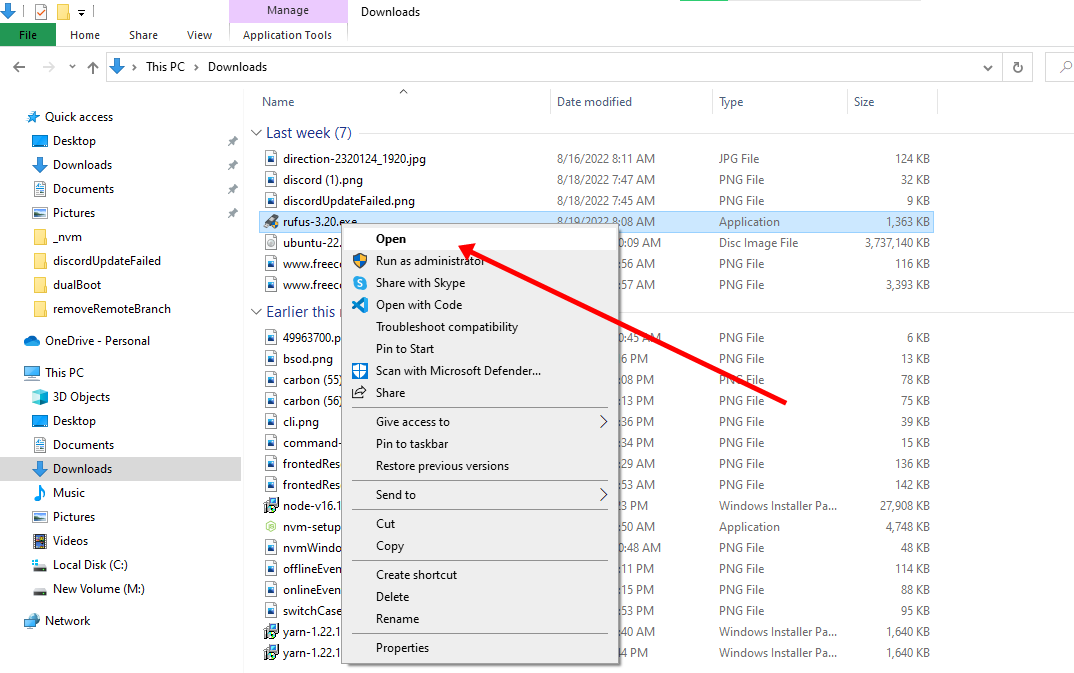
Step 3: Under “Device”, select your USB drive. And under “Boot selection”, click the “Select” button and select the Ubuntu ISO file you downloaded
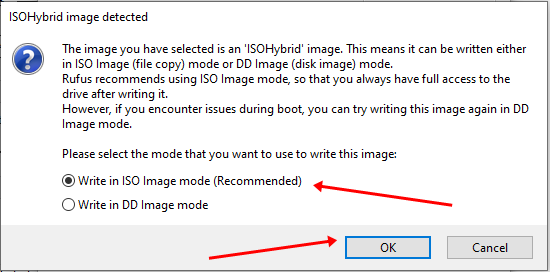
Step 4: Leave every other thing as default and click the “START” button to start burning the Ubuntu distro to the drive.

Step 5: Click OK to start the process.
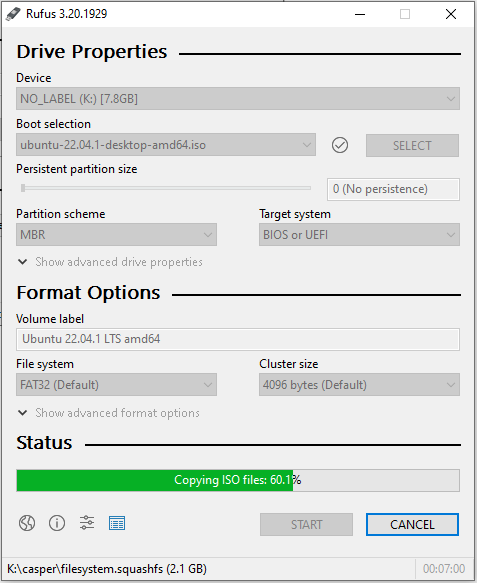
Once the process is done, you should see “READY” on a green background. Click the Close button. Its time to install Ubuntu.
Congrats! Now you have a bootable drive with which you can install Linux.
The next step is to install the Ubuntu distro on your Windows 10 PC. To do this, you have to boot your PC from the bootable USB drive you created.
How to Install Ubuntu Linux Distro along with Windows 10
Step 1: Ensure the bootable drive is inserted into your Windows 10 PC
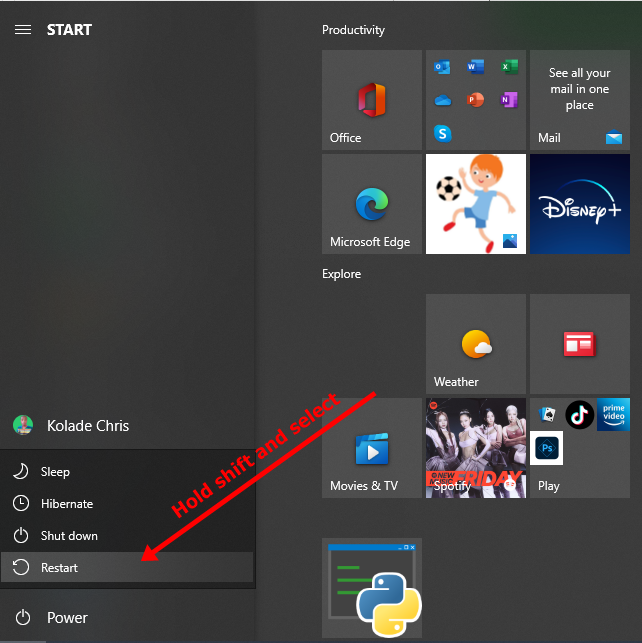
Step 2: Right-click on Start, hold SHIFT, and select Restart.
Step 2: Select “Use a Device”.
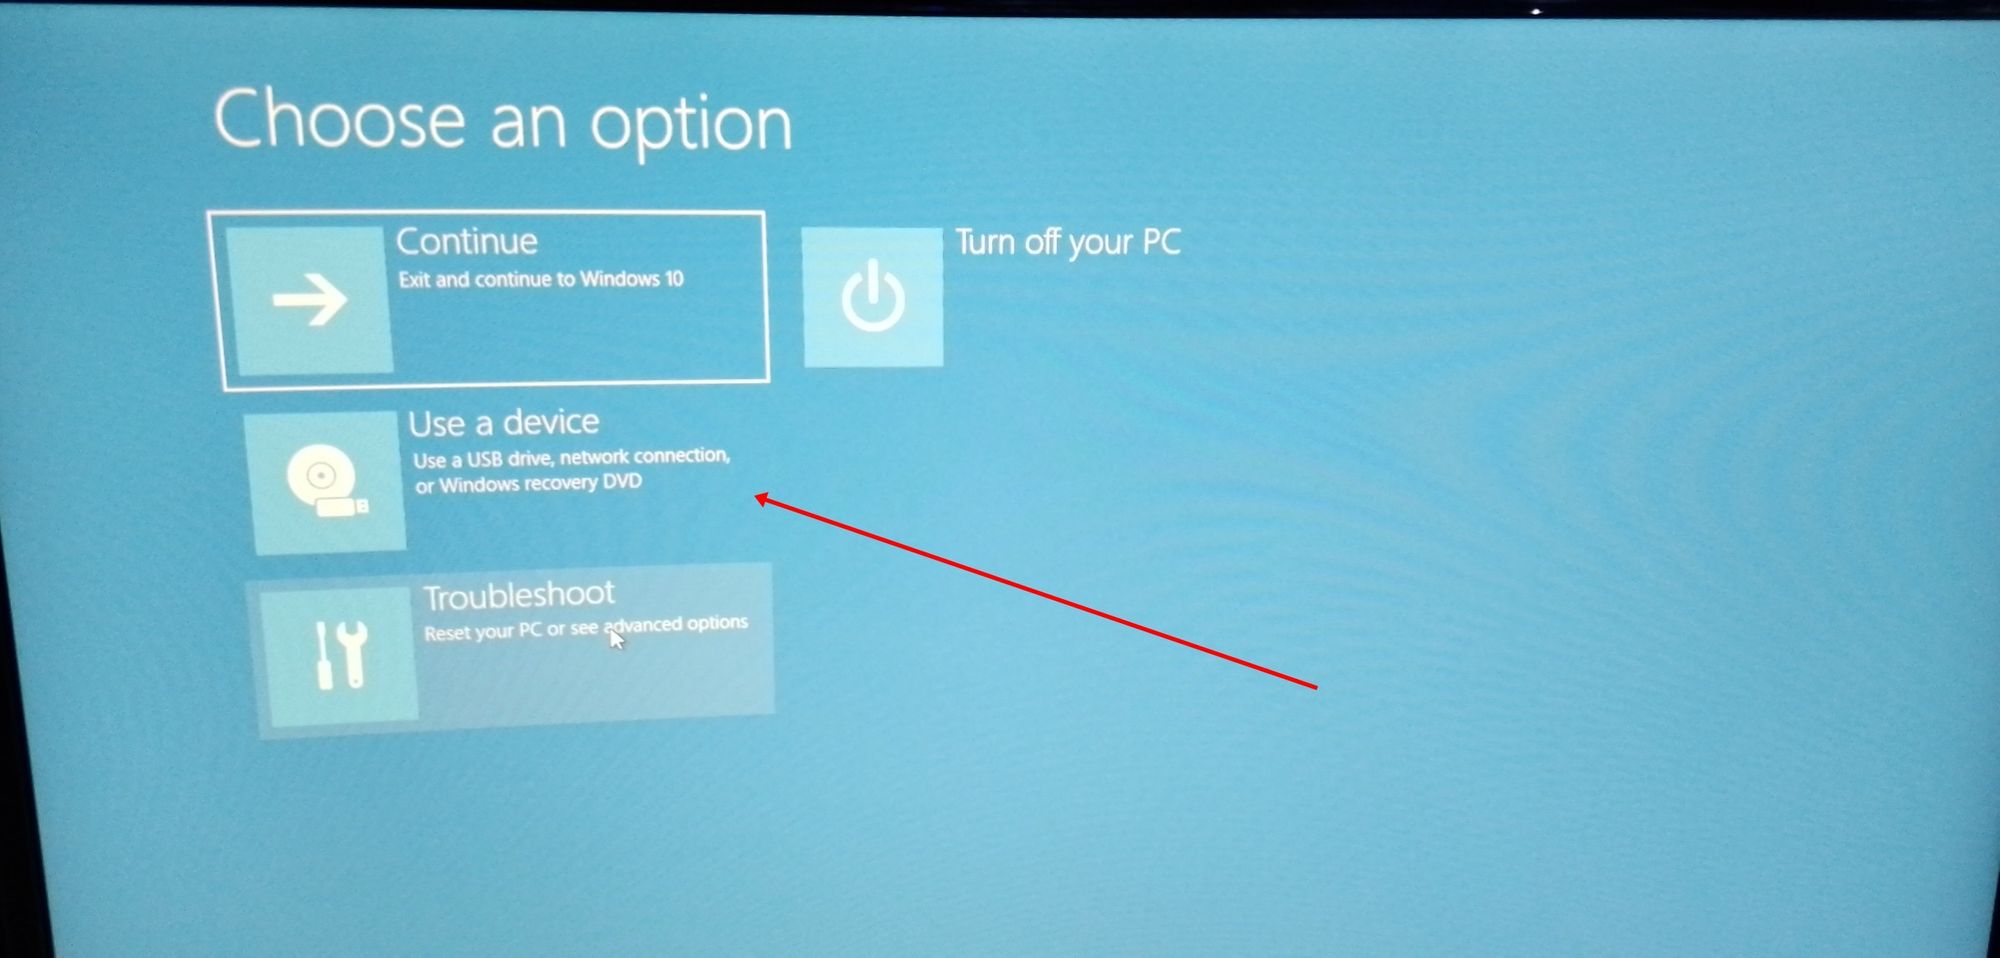
Step 3: On the next screen, you should see several devices you can boot from.
You may see the bootable drive as the name of the USB brand.
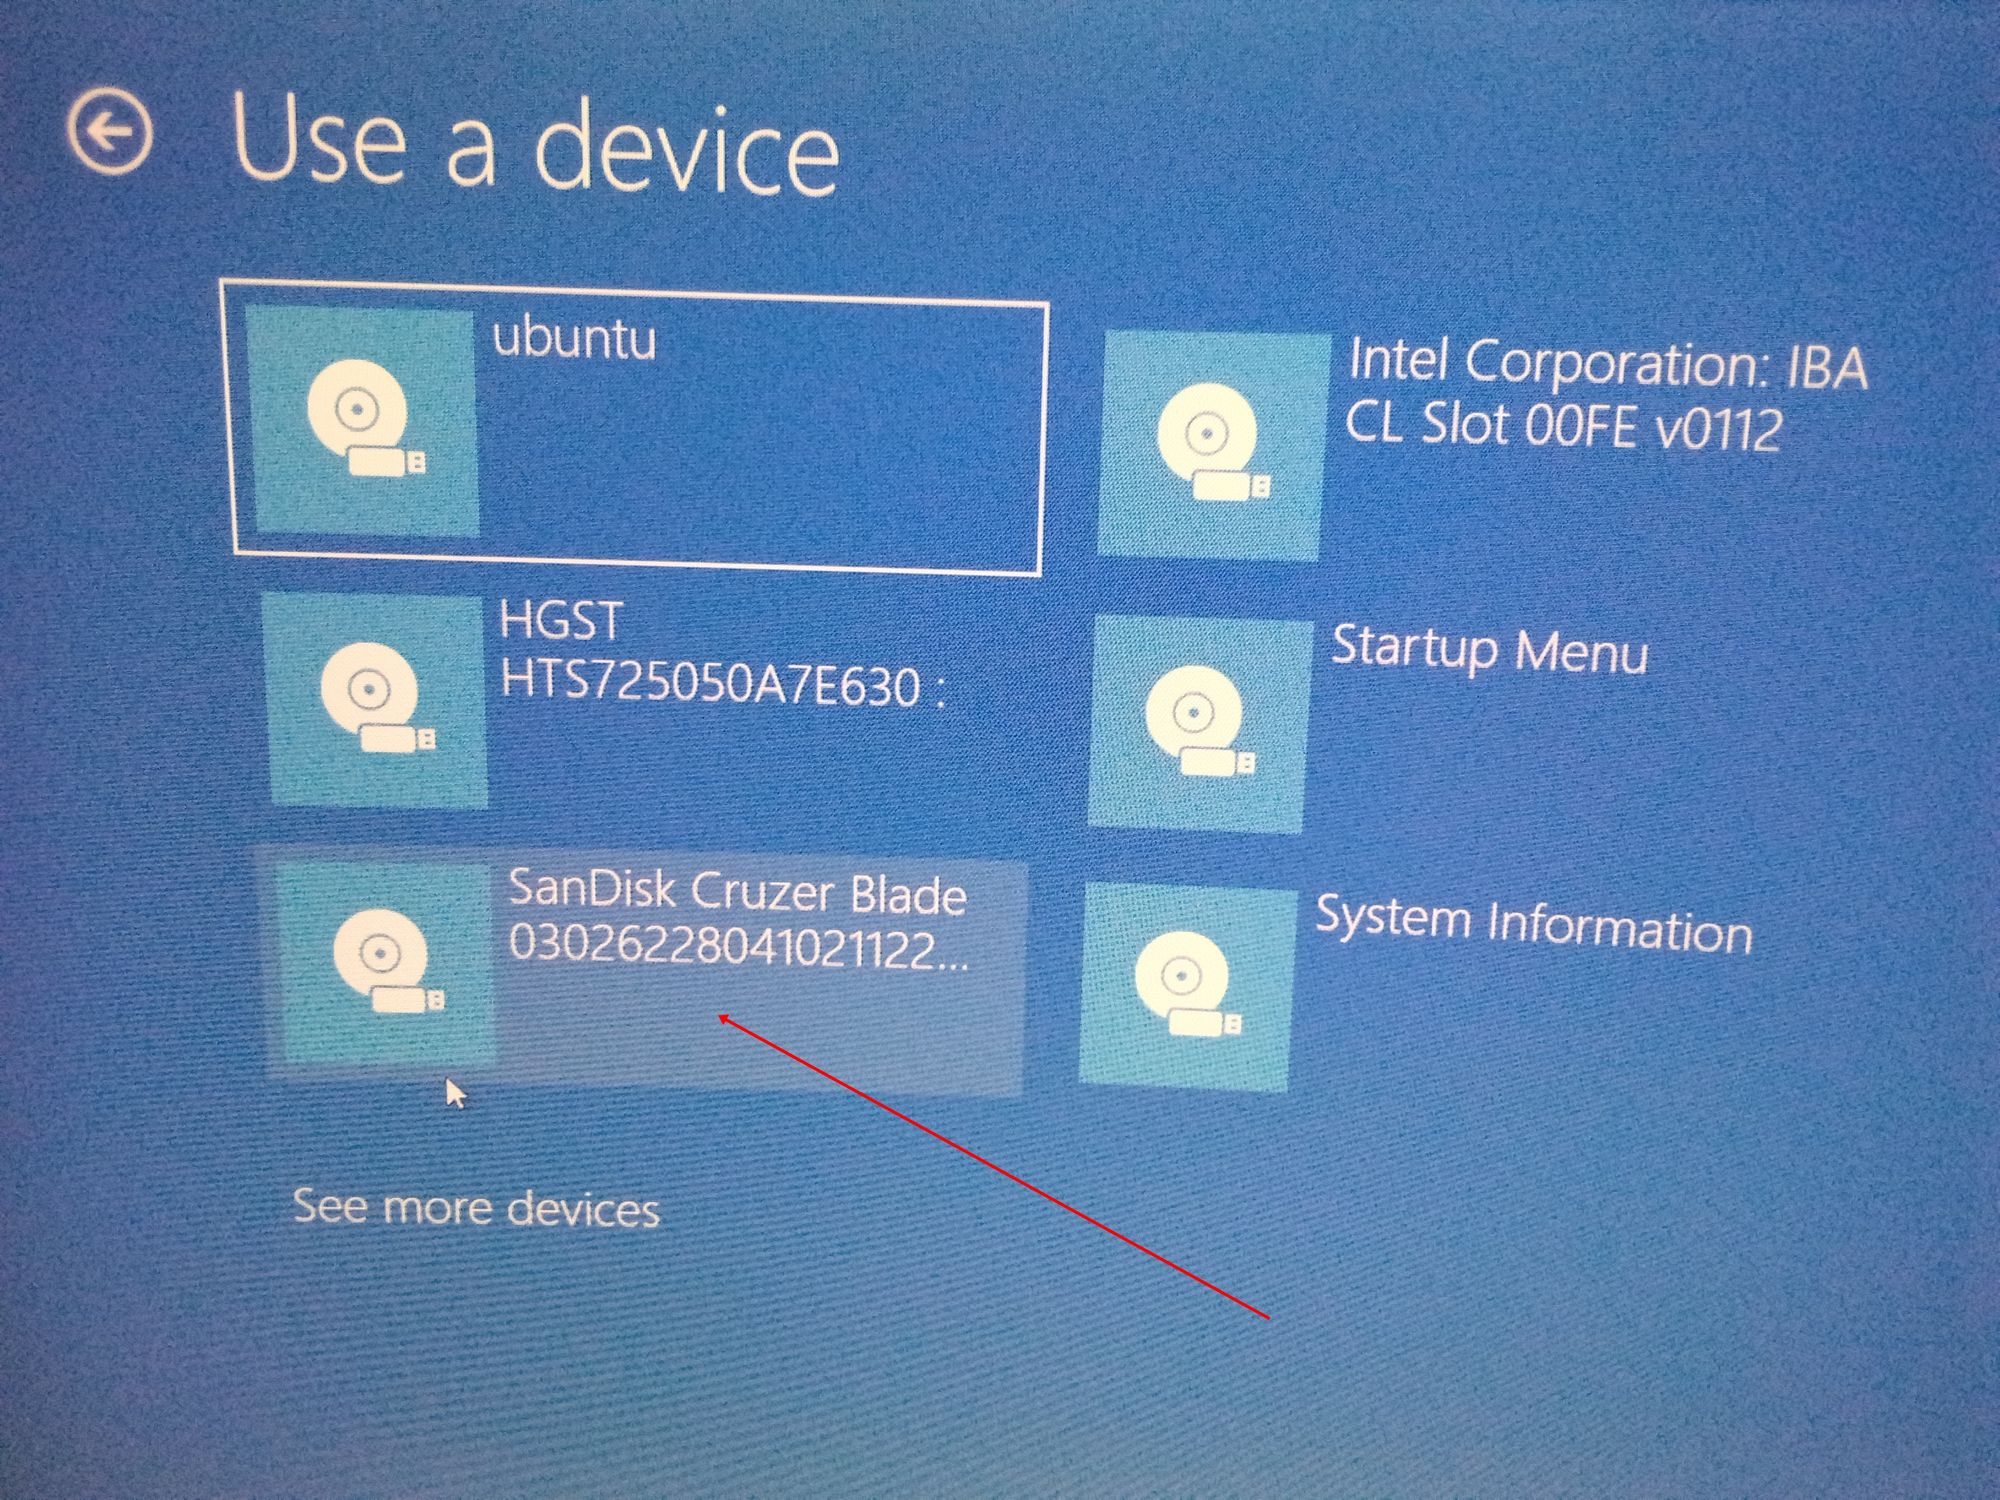
It’s possible to see it as “Ubuntu” too. Some other times, you might not see it, so you need to click on “See more devices».
If you still cannot see your bootable drive, head over to your boot menu by getting into BIOS. You will see it there.
N.B.: You should be very careful while making changes in BIOS. Whatever you do there has a lasting effect on your computer. If you are not sure of what you’re doing there, you should contact an IT professional.
Step 4: Choose «Install Ubuntu». You can also try it before installing it.
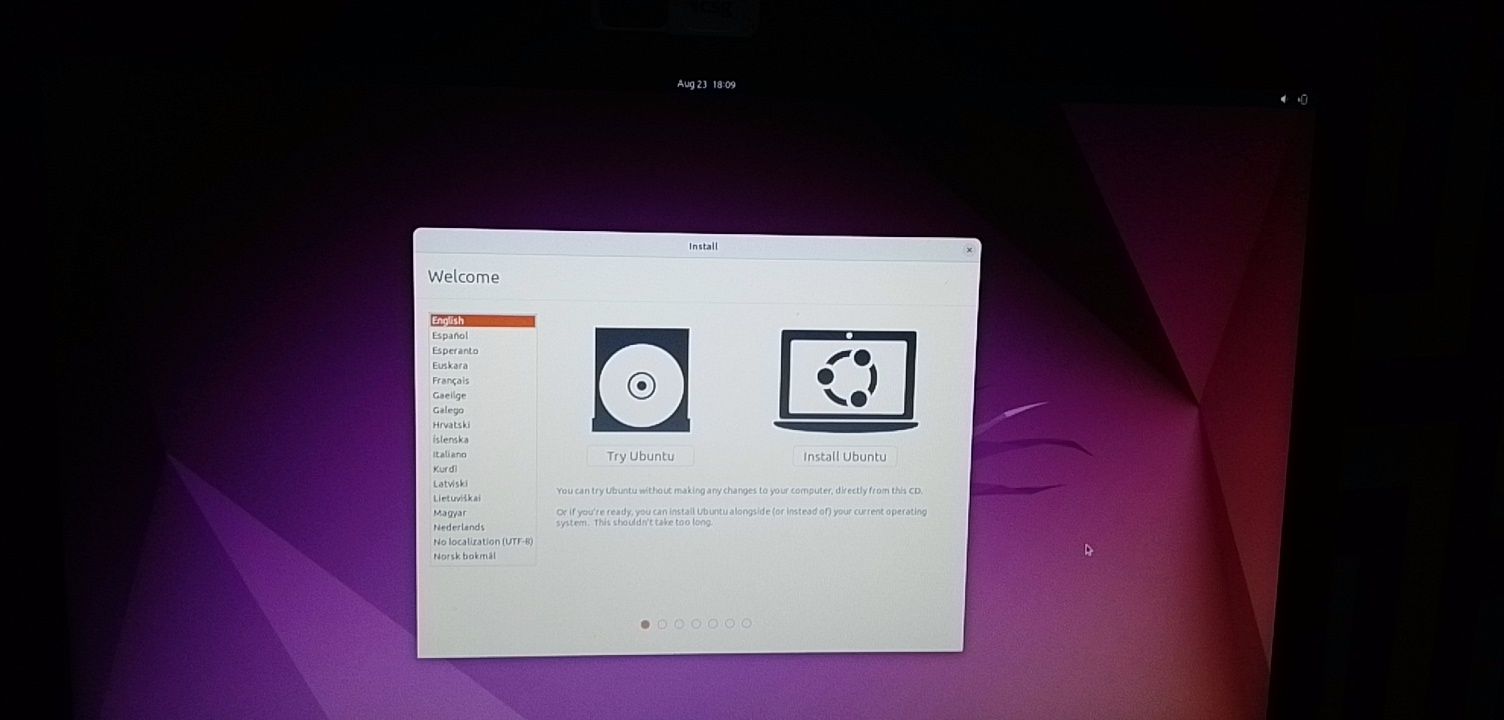
Follow other prompts of the installation wizard and make sure you don’t replace your Windows 10 OS installation with Ubuntu. This is why I suggested you back up all your files.
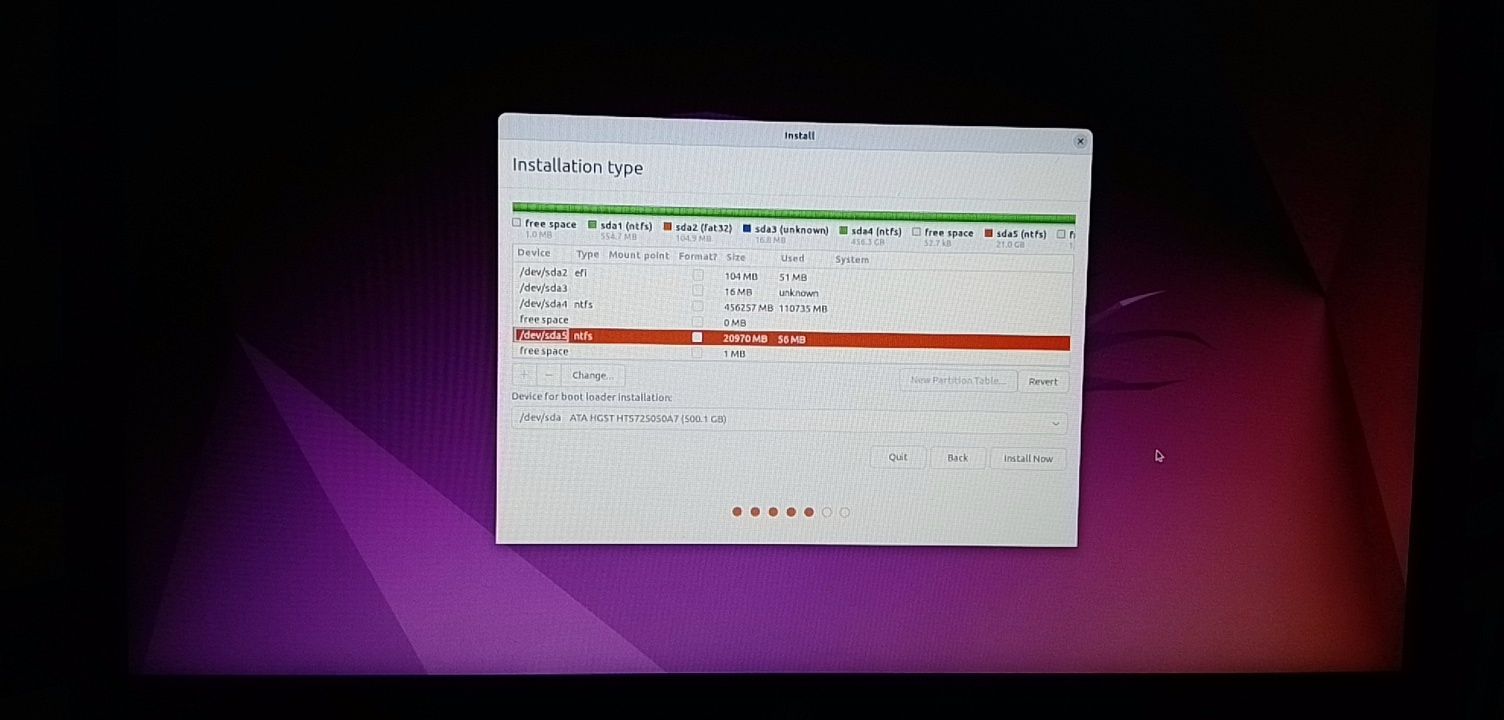
When you get to the point to select the partition you made, scroll to the partition you made earlier and press ENTER.
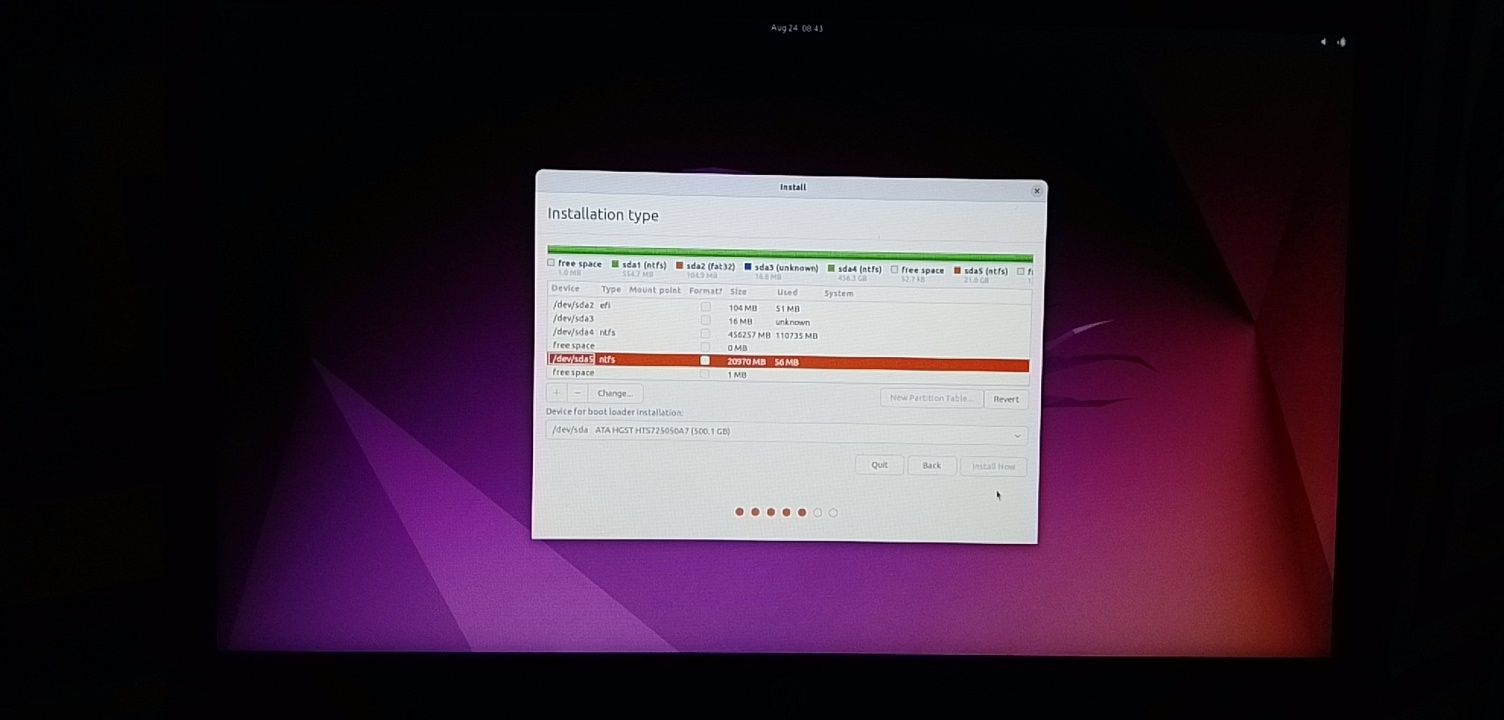
Click OK to select all the space in the partition.
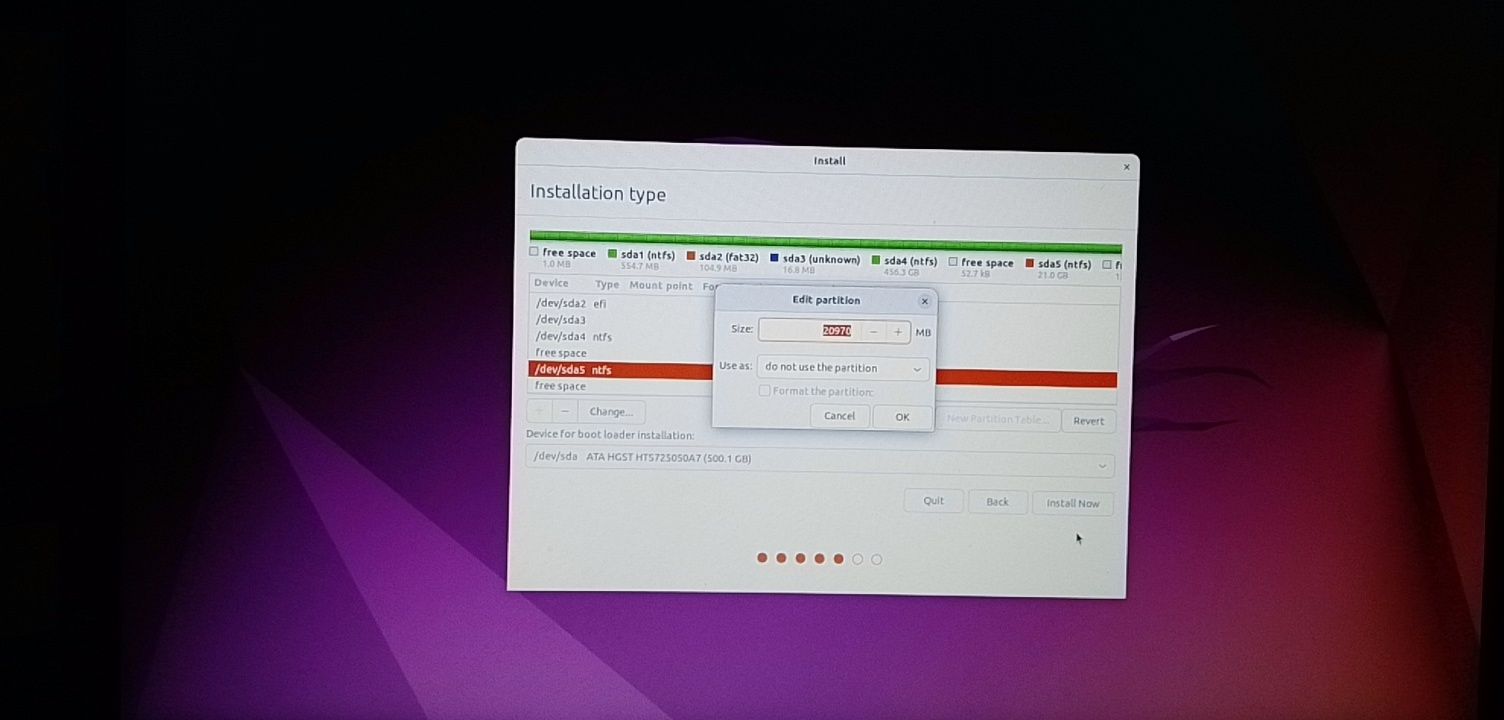
This time around, the “Install now” button will not be greyed out anymore.
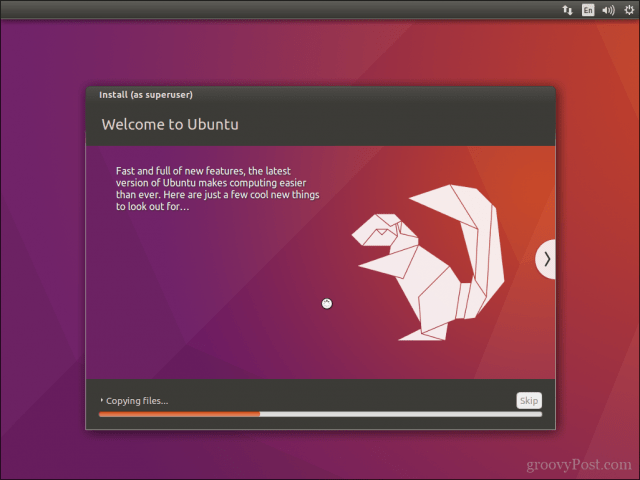
Follow other prompts until Ubuntu starts installing.
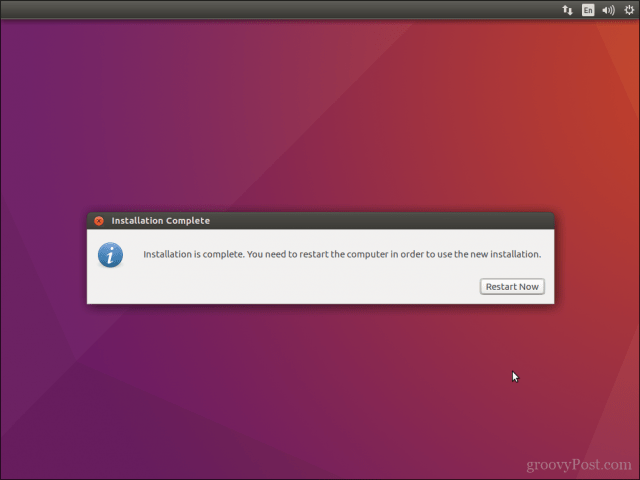
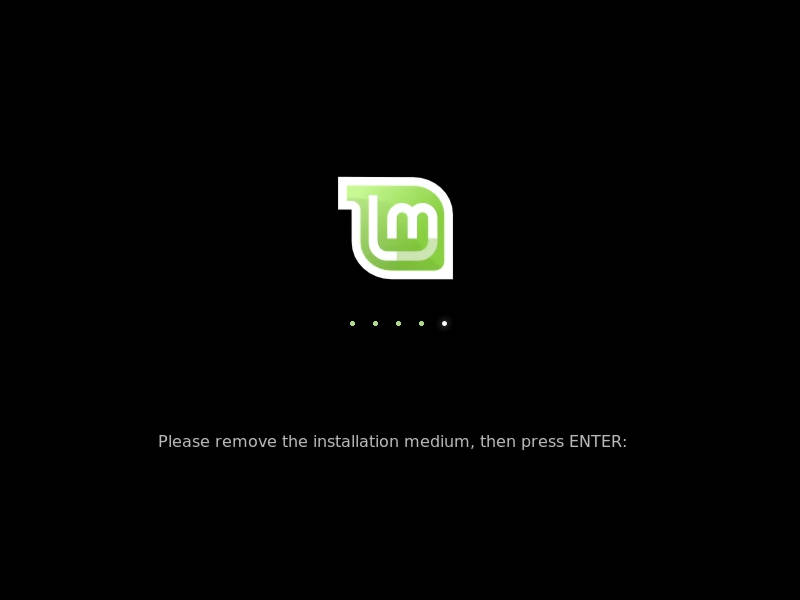
After the installation is done, Ubuntu will prompt you to remove the bootable drive and press ENTER to reboot your Computer.
Now You Can Dual Boot Ubuntu and Windows 10
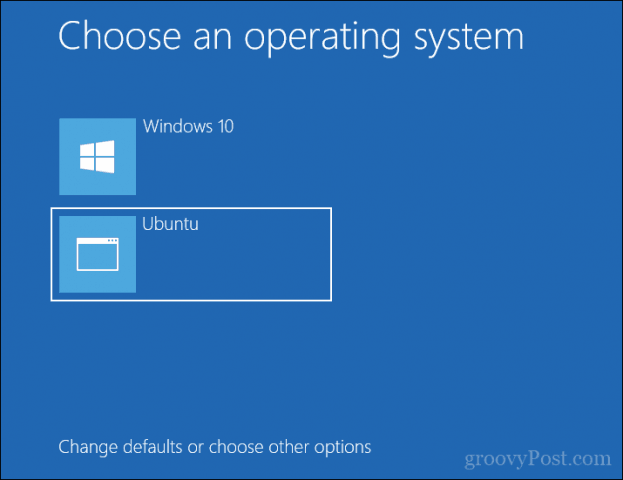
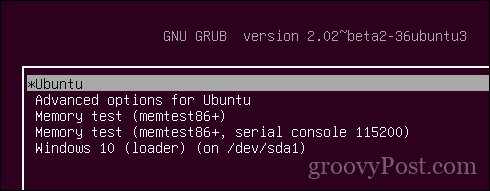
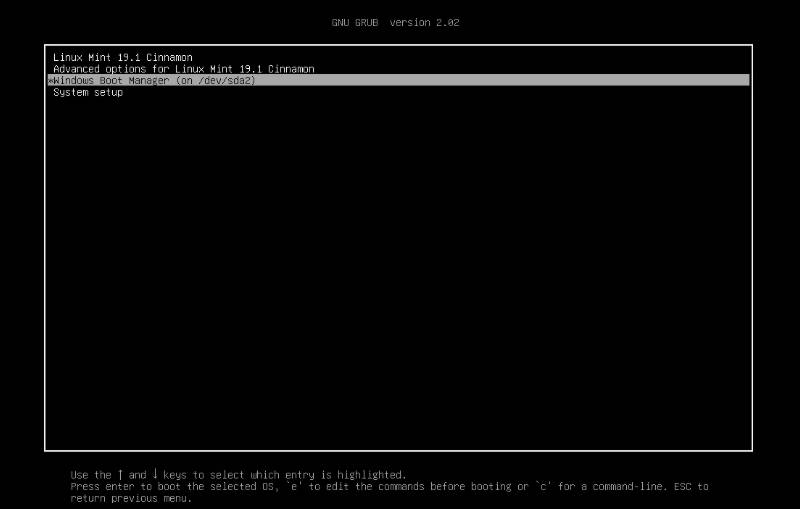
Immediately after you reboot the computer, you should see a screen that looks as shown below:
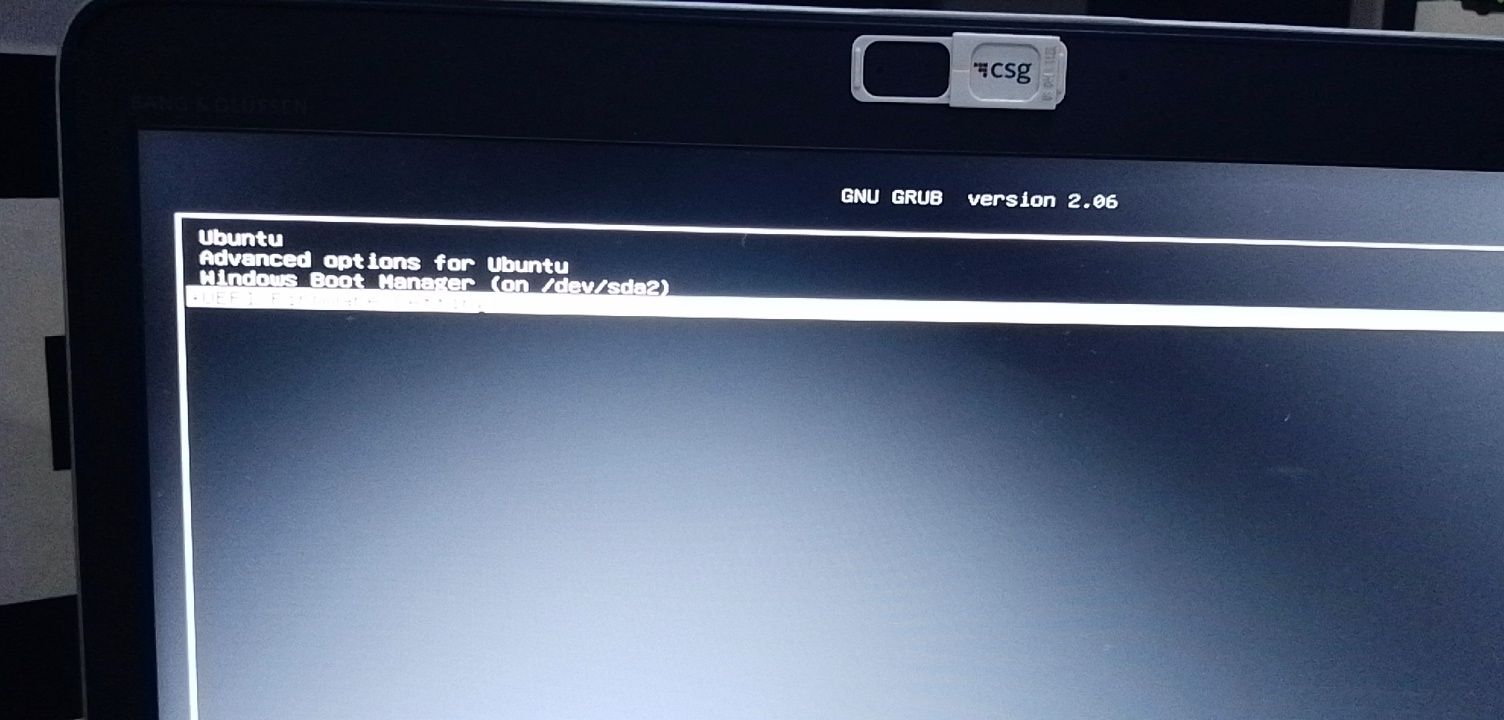
Now, you can select which one to boot into between Ubuntu and Windows 10.
To boot into Ubuntu, select Ubuntu. And to boot into Windows 10, select Windows boot manager.
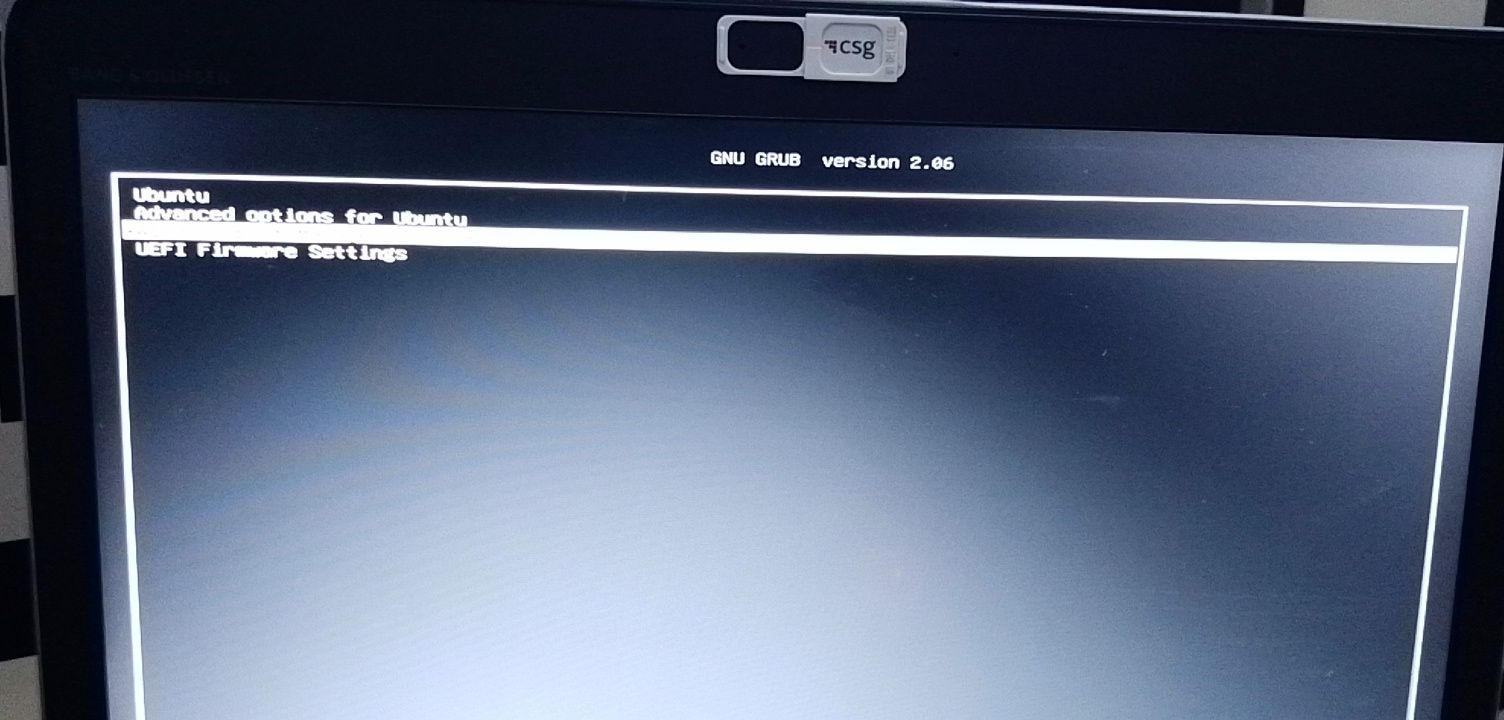
You can also get into your BIOS from the same place by choosing UEFI Firmware Settings.
Conclusion
I hope this article helps you dual boot Ubuntu and Windows 10 on your computer.
The ultimate aim of this article was to show you how to dual boot Ubuntu and Windows 10.
But the article went beyond that to show you how to:
- check if your PC’s BIOS is in UEFI mode
- partition your hard drive
- optimize your hard drive
- make a bootable USB drive
- install Ubuntu Linux Distro along with Windows on your Windows 10 PC.
If you find this article helpful, kindly share it with your friends and family.
Learn to code for free. freeCodeCamp’s open source curriculum has helped more than 40,000 people get jobs as developers. Get started

Running Windows 10 and Linux on the same computer is easier than ever. Here’s how to do it.
A computer that boots both Windows 10 and Linux can easily be the best of both worlds. Having easy access to either of the operating systems lets you enjoy the benefits of both. You can hone your Linux skills and enjoy the free software only available for Linux platforms. Or, you can switch back to Windows 10 to use apps like Photoshop, AutoCAD or Microsoft Office. The beauty of dual booting is that it lets each operating system take full advantage of the hardware resources of your computer. While virtual machines and the Windows Subsystem for Linux can give you a taste of the Linux experience, dual booting lets you tap its full potential.
The good news is that Windows 10 and Linux live in harmony better than ever these days. Dual booting Windows 10 and Linux used to be a precarious process that could wreck your Windows installation, your Linux installation or both. While the process isn’t quite a smooth as dual booting macOS and Windows with Boot Camp, it comes close. In this article, we’ll show you how to safely install Windows 10 and Linux on the same hard drive. It doesn’t matter if you’re starting with Linux or starting with Windows—dual booting is easy to set up either way.
Dual Boot Linux with Windows 10 – Linux Installed First
Let’s start with the (slightly) harder way first; you already have a copy Linux installed and you want to install Windows on a partition. The first step is to create the partition where Windows 10 will be installed. We have covered how to create partitions in Linux, so, start by reviewing our article on how to do that.
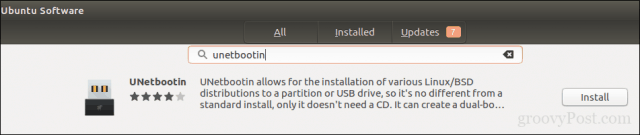
Once you have your partition set up, you will need to purchase Windows 10, download the ISO file then create a bootable copy. Creating a bootable copy of Windows 10 on Linux can be done using the free Unetbootin (USB thumb drive) or Brasero software if you are installing from a DVD.
Create Bootable Windows 10 Install Media Using Unetbootin
Unetbootin can be downloaded from the Software Center in Ubuntu. Once you have it up and running, launch it. Make sure you are using a thumb drive with at least 8 GBs of free space.
Select the Disk Image radio box, click the browse button (represented by an ellipsis …), browse to the ISO file then click Open. Chose the medium from the Type list box—in this case, your USB drive. Click on the drive list box then select your USB thumb drive.
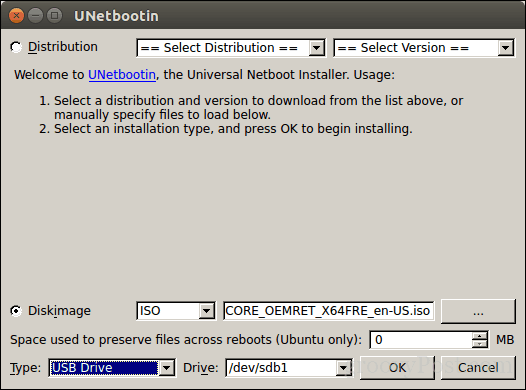
Note: If you are not offered the option to select your thumb drive, you need to format it using the FAT32 file system. Open the file manager, right-click the thumb drive then click Format.
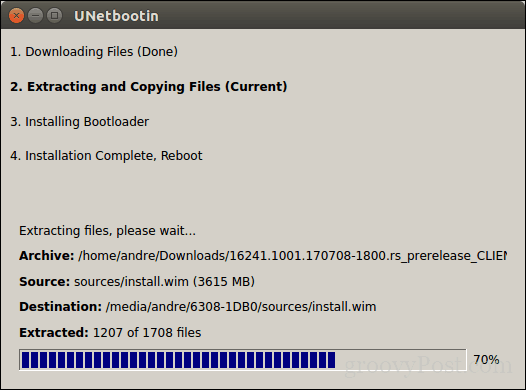
Click OK, then wait while the bootable copy is created.
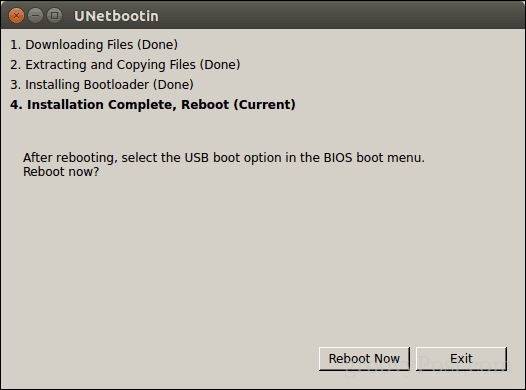
When complete, click Exit.
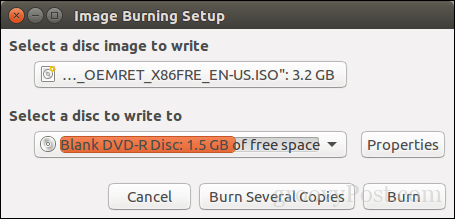
Create Bootable Windows 10 Install Media Using Brasero
If you already made a bootable USB with Unetbootin, you can skip this part. If you are still using an old school system with a DVD drive, you can use the Brasero DVD Burning software, which you can download from the Software Center also. Please keep in mind, Windows 10 ISO files are getting larger beyond the standard 4.7 GB DVDs. So, in some cases, it’s best you use 8.5 GB dual-layer DVDs if supported by your drive. If you can’t, then it’s best you use a USB thumb drive.
In Brasero, click Burn Image.
Select your disc image, make sure a blank DVD disc is inserted then click Burn.
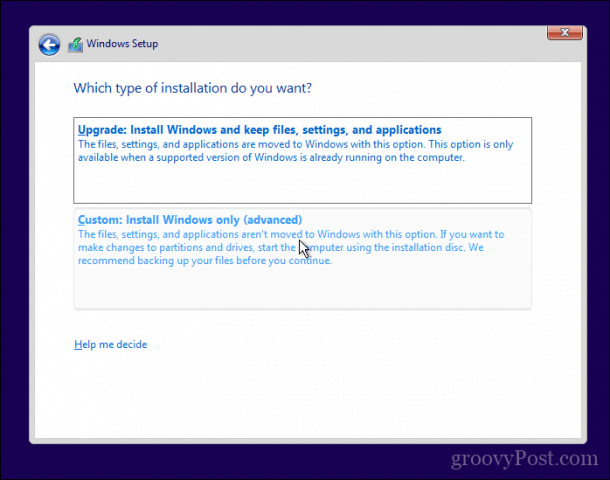
After preparing your install media, insert it or connect it. Reboot your computer, then configure your BIOS to boot from the drive. Windows 10 will boot into setup as it normally does. After you arrive at the setup screen, click Custom: Install Windows only (advanced).
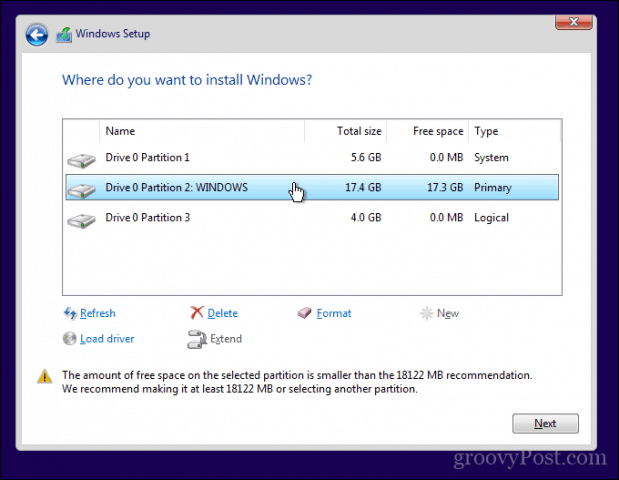
Make sure you select the right partition; don’t wipe out your Linux installation. Click Next then wait while Windows 10 Setup copies files to the drive. Your computer will be rebooted several times.
When setup is complete, follow the instructions to complete the out of box experience.
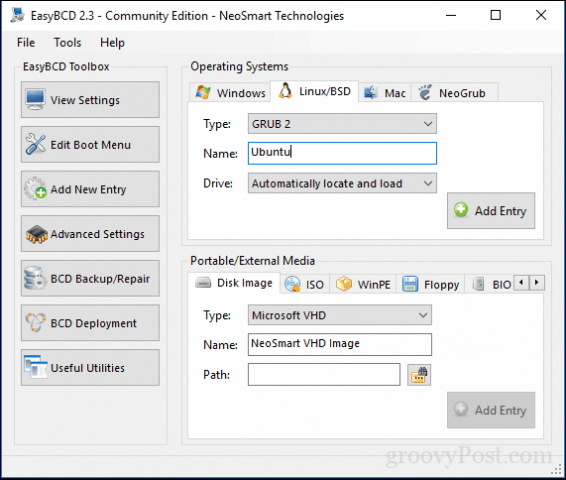
After that’s complete, you might notice the obvious—there is no way to boot into Linux anymore. Here is how you fix that. Download a free utility called EasyBCD from Neosmart Technologies. Proceed to install EasyBCD then launch it. Select the Linux/BSD tab. Click in the type list box, select Ubuntu; enter the name of the Linux distribution, choose automatically locate and load then click Add Entry. Reboot your computer.
You will now see a boot entry for Linux on the Windows graphical boot manager.
Dual Boot Linux with Windows 10 – Windows Installed First
For many users, Windows 10 installed first will be the likely configuration. In fact, this is the ideal way to dual boot Windows and Linux. Again, I will be using the Ubuntu Linux distribution. You can download the Ubuntu Linux ISO image from Canonical’s web page then create a bootable copy using Unetbootin for Windows or burn to a blank DVD using disc image in Windows 10.
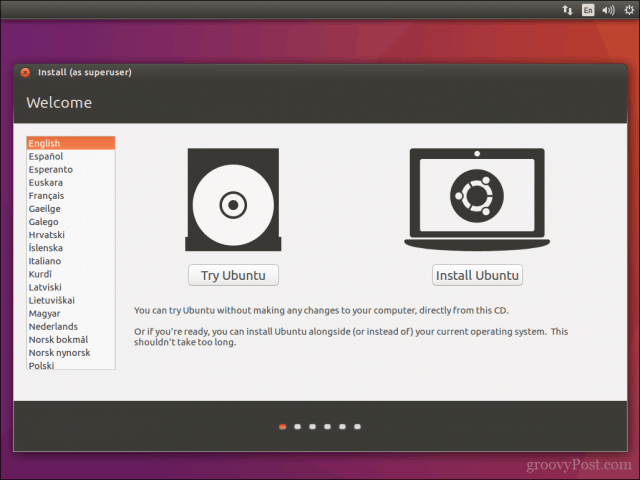
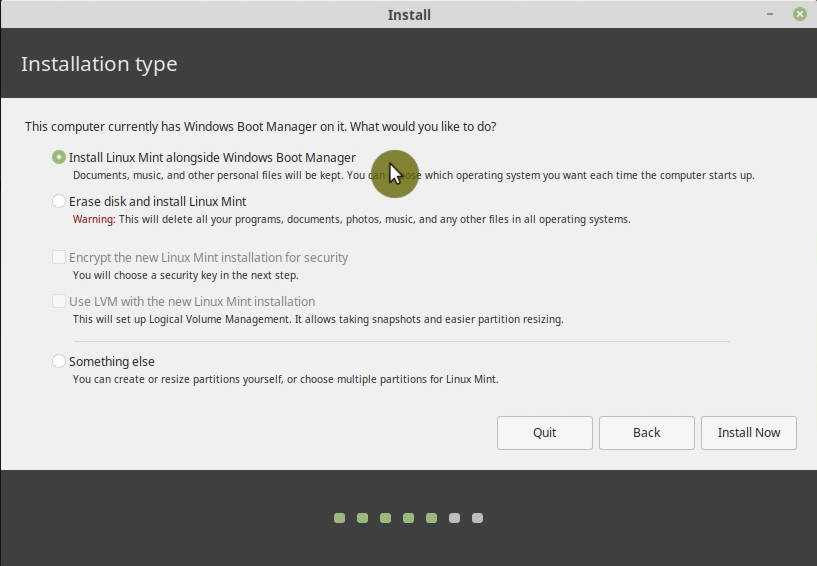
After creating your install media, configure your BIOS to boot from it. Ubuntu’s installation wizard intelligently detects existing Windows installations. It will ask you if you would like to install Ubuntu alongside Windows.
At the Ubuntu install screen, click Install Ubuntu.
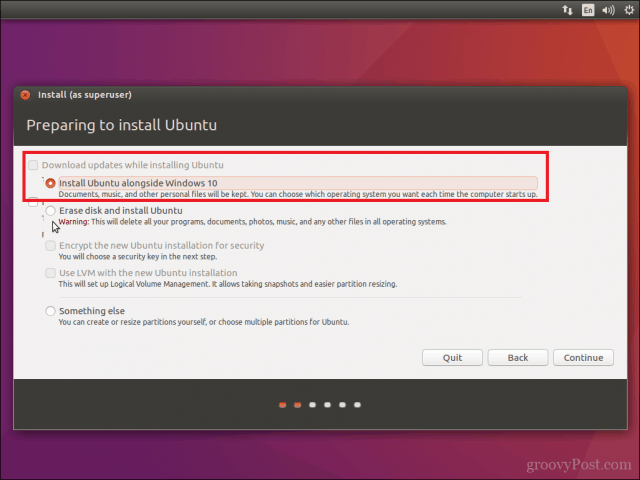
Choose whether you want to download and install updates and third-party drivers and codecs then click Continue.

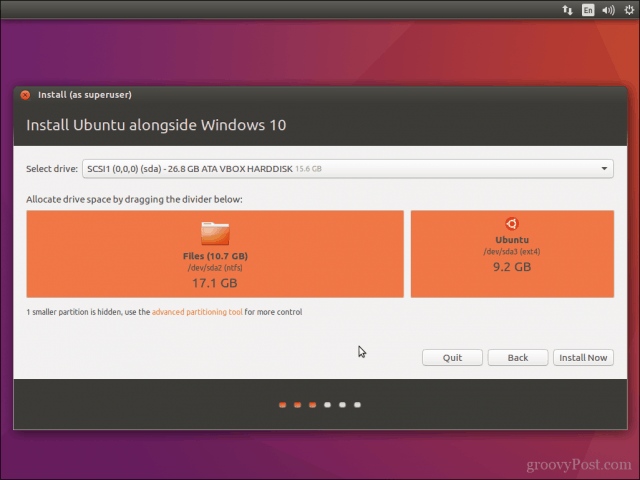
Select the option Install Ubuntu alongside Windows 10 then click Continue.
Ubuntu’s installer will set a default allocation of space for the installation. If you have enough space, you can resize the partition by placing your mouse between the divider then drag it left or right to make adjustments. Once you are satisfied with the allocated amount for your Ubuntu installation, click Install Now.
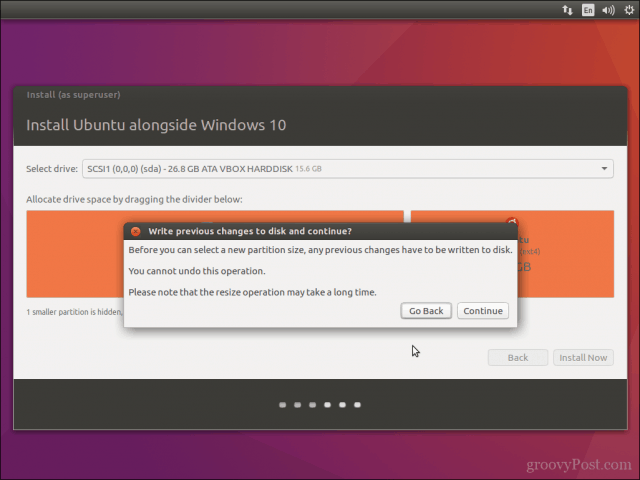
Click Continue to confirm changes.
Click Continue again.
Enter your time zone then click Continue.

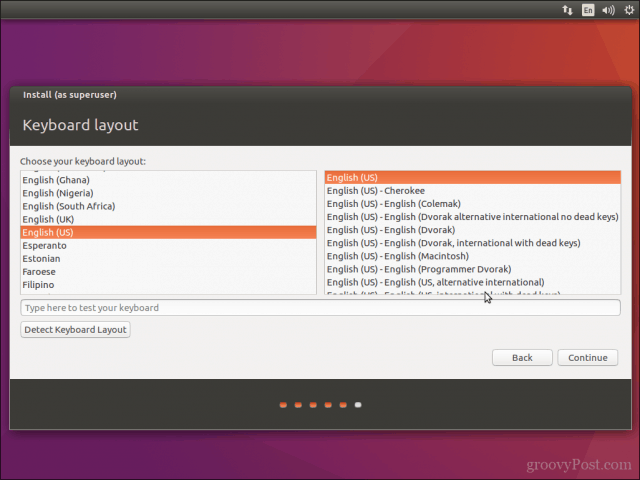
Select your keyboard layout, click Continue.
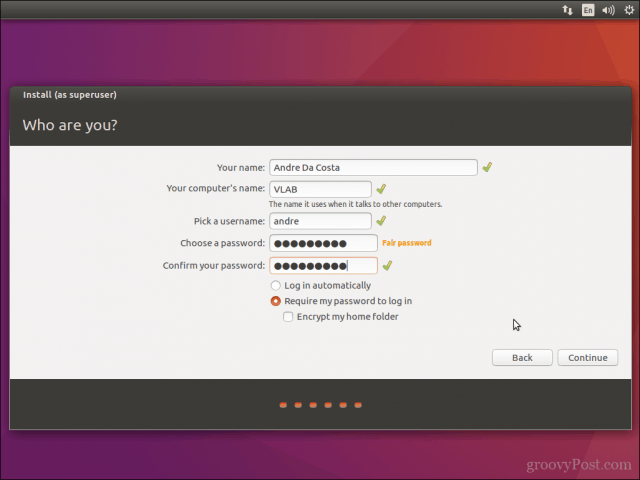
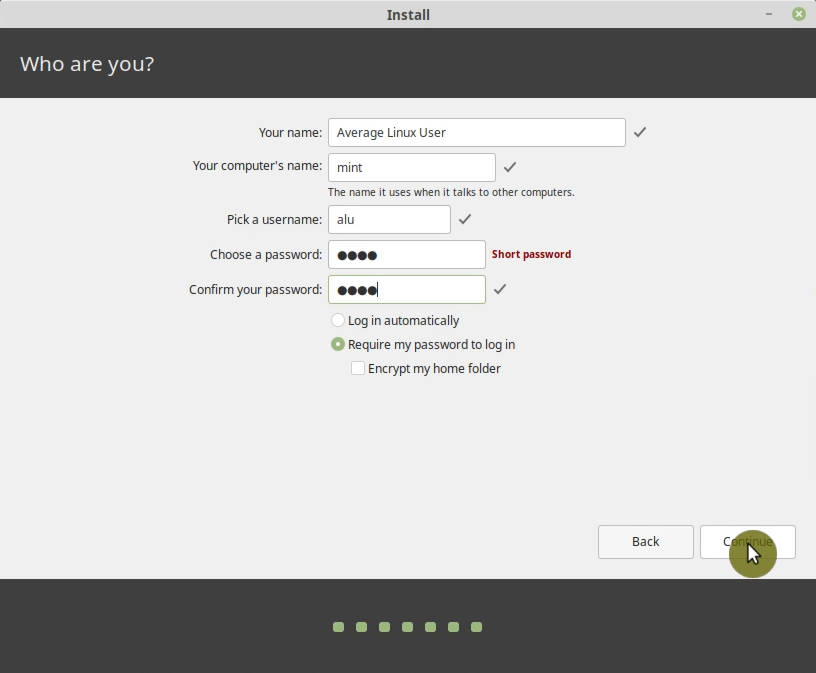
Create your user account by providing your full name, computer name, login name, and password. Choose whether you want to log in automatically or be prompted for a password. You can also encrypt your home folder for extra security. Click Continue.
Wait while Ubuntu copies files.
When complete, click Restart Now.
Ubuntu will add a boot entry for Windows 10 to the GRUB boot manager, which you can select using the up or down arrow then hitting Enter.
That’s it, Windows 10 and Ubuntu is now set up on your computer.
Let us know what you think. If you have done this before, share some of your tips with us. By the way, what’s your favorite distro?
![]()
You will learn everything you need to know about dual-booting Linux and Windows.
I assume you already have Windows installed on your computer and you only need to install Linux to dual boot. This post will guide you through the following key points of the dual boot installation:
- Essential BIOS settings for successful dual boot.
- How to shrink your Windows partition to get free space for Linux.
- How to install Linux, using Linux Mint as an example.
- How to set the boot order in your computer to see the menu where you can choose between Linux and Windows to boot.
- Finally, I will explain why I am not a fan of dual-booting and why I recommend using Windows in a virtual machine as I showed in this post.
*NOTE: Before you apply any actions from in this post, please back up all your important data.*
BIOS settings
Unfortunately, most of the computers have BIOS configured specifically for Windows, and likely you won’t be able to install Linux on it without changing some settings. BIOS interface may differ from one computer to another but the main settings are the same.
I will use the BIOS of my Acer Swift 1 laptop as an example here.
Get into BIOS
First, you need to get into BIOS, usually, you just need to press a specific key during the boot. In my Acer Swift 1, I press F2. Just google your computer model and bios key term, and you will find the key you need to press. Sometimes, you may also see it on the screen during the boot:
Set the BIOS password
Next, you may need to set a password in your BIOS because it won’t allow you to change any security settings without a password. This is the menu to set the password on my Acer Swift 1:
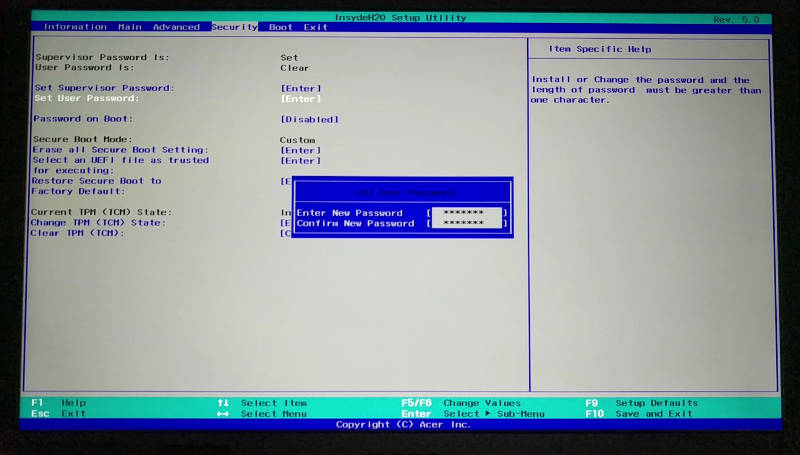
You should be able to find the same in your BIOS. It is also possible that you can proceed without setting a password.
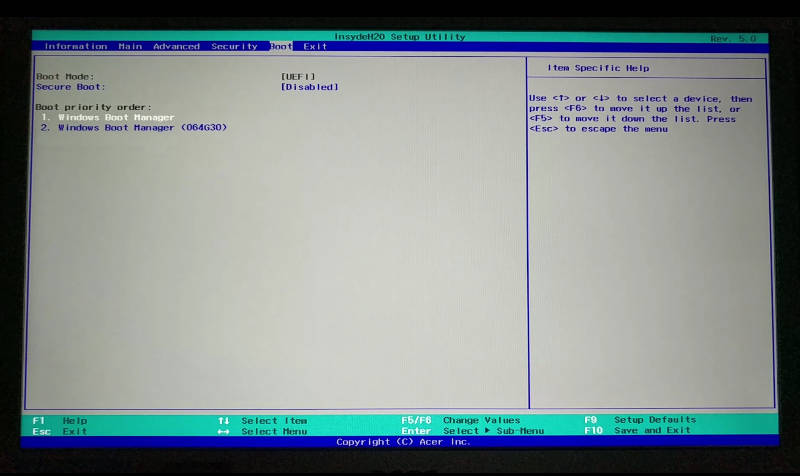
Disable Secure booting and change the Boot order
Next, you need to go to the Boot menu and disable Secure booting and move your bootable USB flash drive to the first place in the boot order:
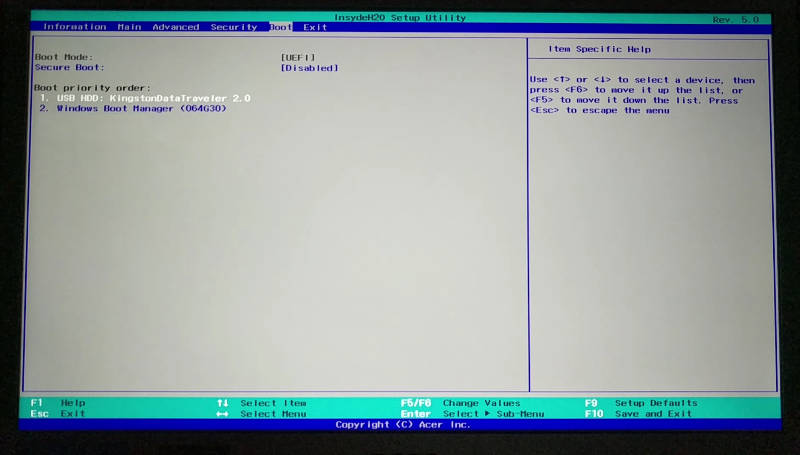
Check this description of the commands on the right or bottom of your BIOS interface, it explains how to navigate and change options in your BIOS.
I am not going to stop here on how to create a bootable USB drive. I have already explained how to create a bootable USB from the command line or using graphical programs.
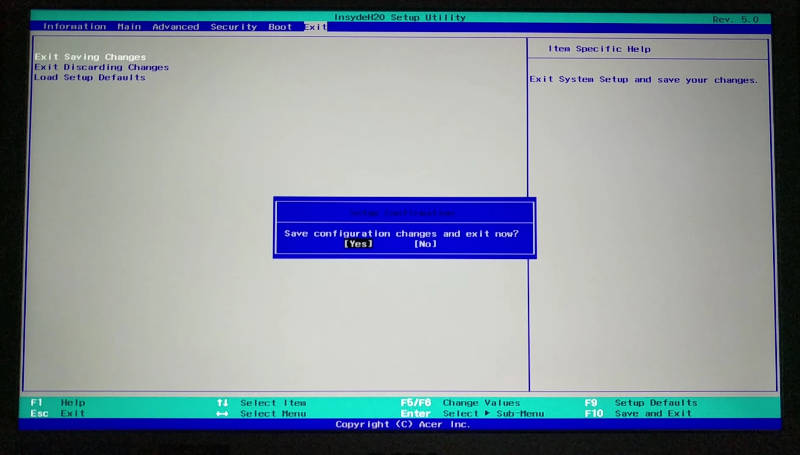
Save BIOS settings
In the end, go to the exit menu and exit BIOS with saving the changes:
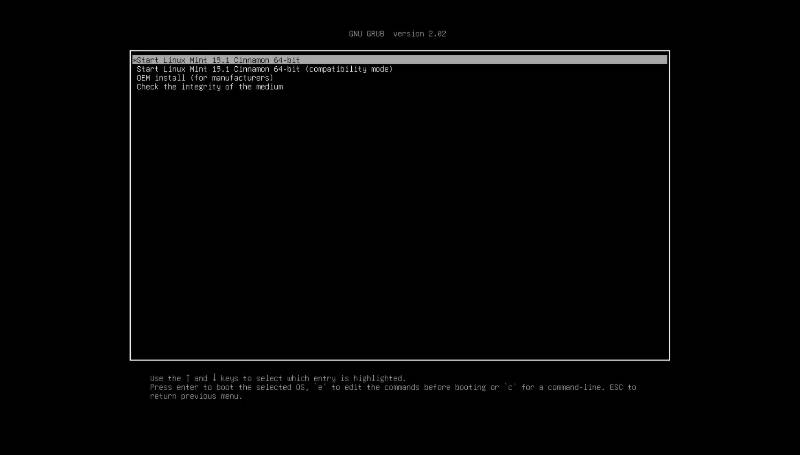
If you have done everything correctly, you should boot in your Live USB Linux system:
Get free space for Linux
Boot into Live Linux session
Boot from the Live Linux USB. I will use Linux Mint installer as an example here, if you use Ubuntu or any Ubuntu-based distro, the process will not differ at all. If your distro is not Ubuntu-based, you still need to do the same steps as you will see in this post but the installer may look slightly different.
To install Linux alongside Windows, you can actually select such an option in the installation wizard:
It will automatically find free space on your hard drive and install Linux there. However, if you want to have little more control over how much space you allocate to Windows and Linux, you can get free space and assign it for Linux manually.
Shrink the Windows partition with GParted
Most of the Linux distros have GParted included in a Live ISO. If it is not, install it from the Software Center. Then open GParted and select the hard drive with your Windows installed:
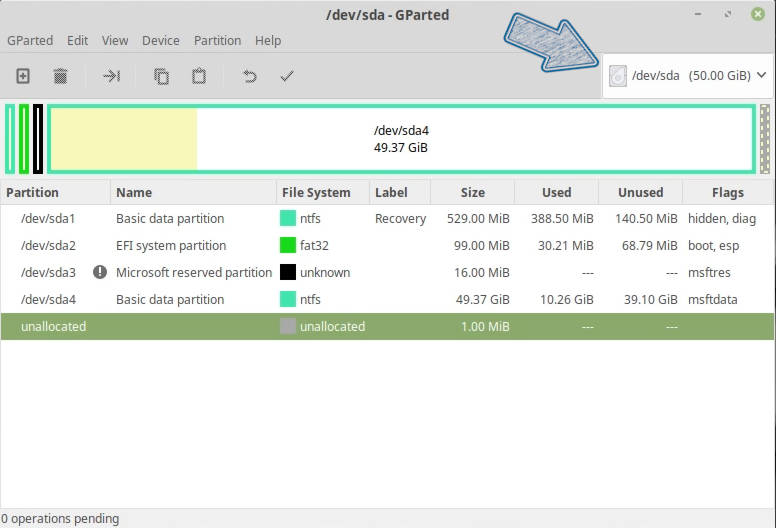
Your Windows hard drive will be partitioned similarly to the one you see above. Most likely it will have the EFI partition, and this means you need to install Linux in the EFI mode too.
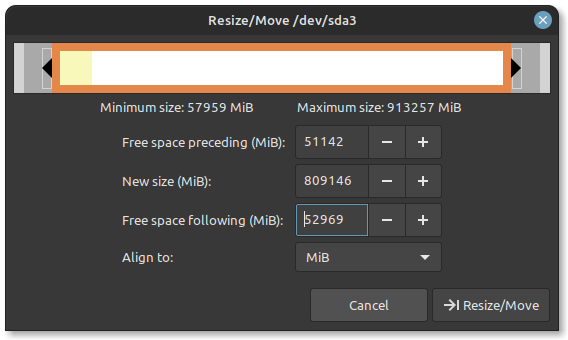
To shrink the Windows partition to get free space for Linux, you need to select the largest partition, click on the Partition menu in GParted, and select resize.
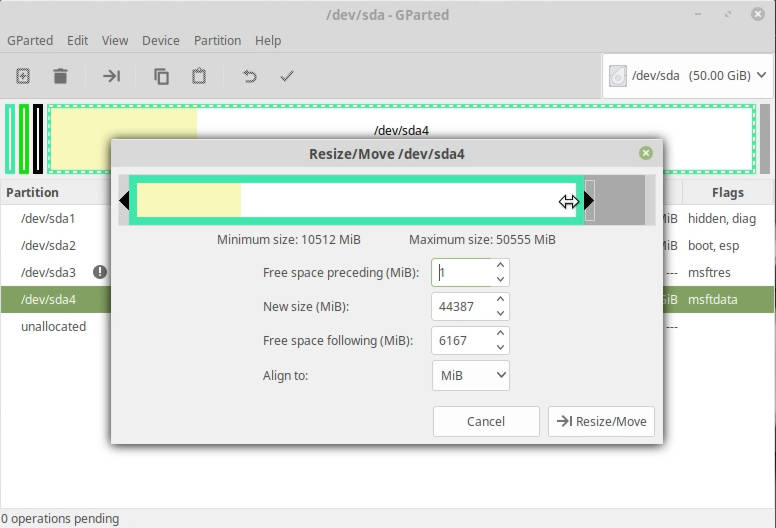
All white space is free space. So, you can shrink this partition with your mouse, or by selecting its size precisely with the number. You can take a maximum of free space for Linux if you aim to use mainly Linux, but leave some free space for Windows too, because it may not be able to work without free space left.
Click resize. Read this warning to know the risk and click OK. You will see how your partitions will look like after you apply the resizing:
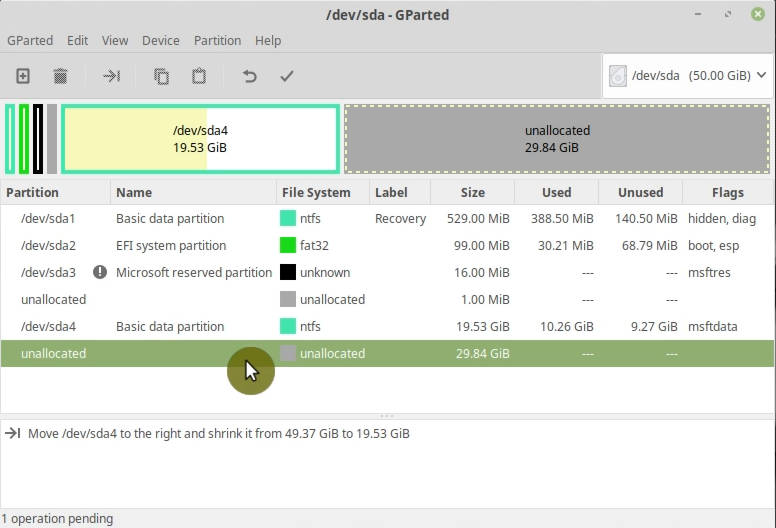
So far, no changes to your hard drive have been applied. It is only a plan of action. You still can cancel everything, if you have done a mistake somewhere. However, if you are happy with this partition table. Click apply. This action will be irreversible.

Resizing will take some time. Hopefully, it will finish successfully and you can proceed with the installation.
Install Linux
To install Linux, click on the Install icons on your desktop or in your menu.
The installation process is pretty standard.
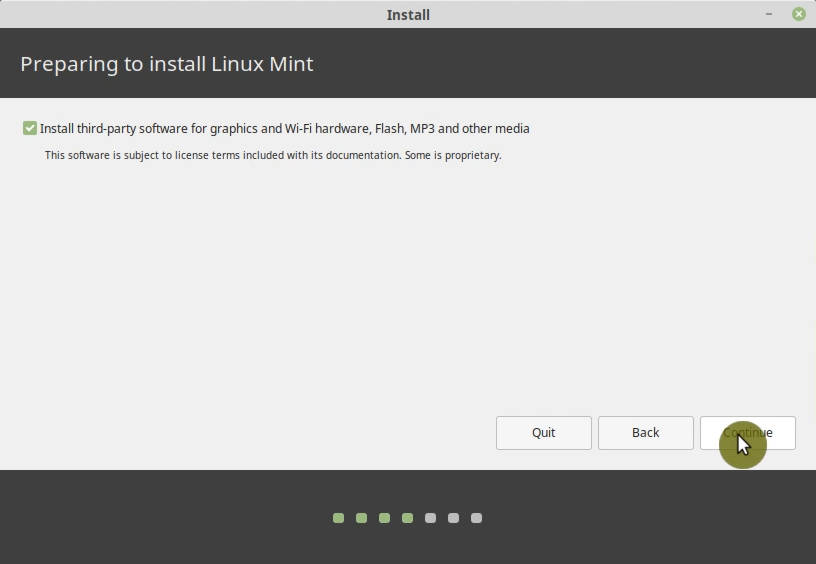
I recommend to include the third party software in the installation:
Select Manual partitioning
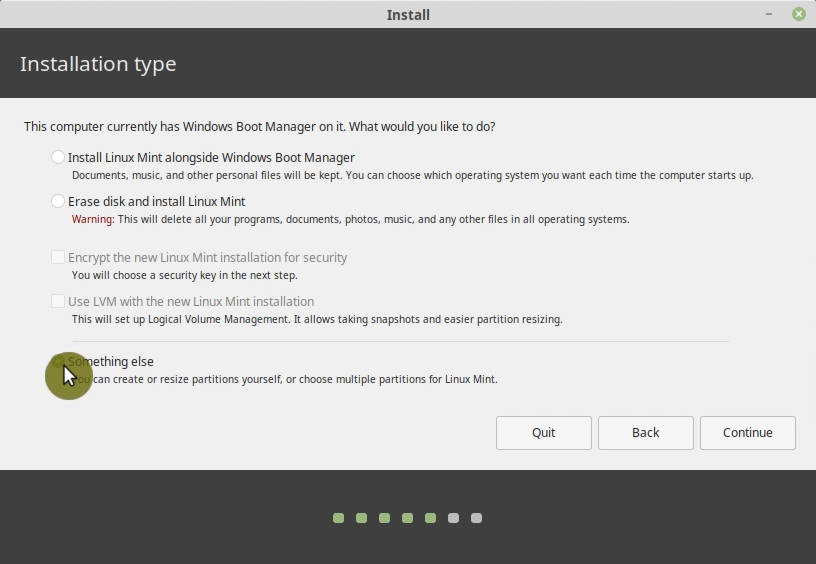
As I mentioned before, you can select the option to Install Linux alongside Windows automatically, but I personally prefer the manual way. That’s why we shrank the Windows partition and released some free space for Linux. Manual way not only gives more control but it also helps to understand what happens to your system when you install two systems alongside each other. So, select Something else here:
Create Linux Partition
The new screen will show you the partitions of your hard drive. You need to select the free space we have created in the previous step. Then click on the add sign, to create a Linux partition in this free space:
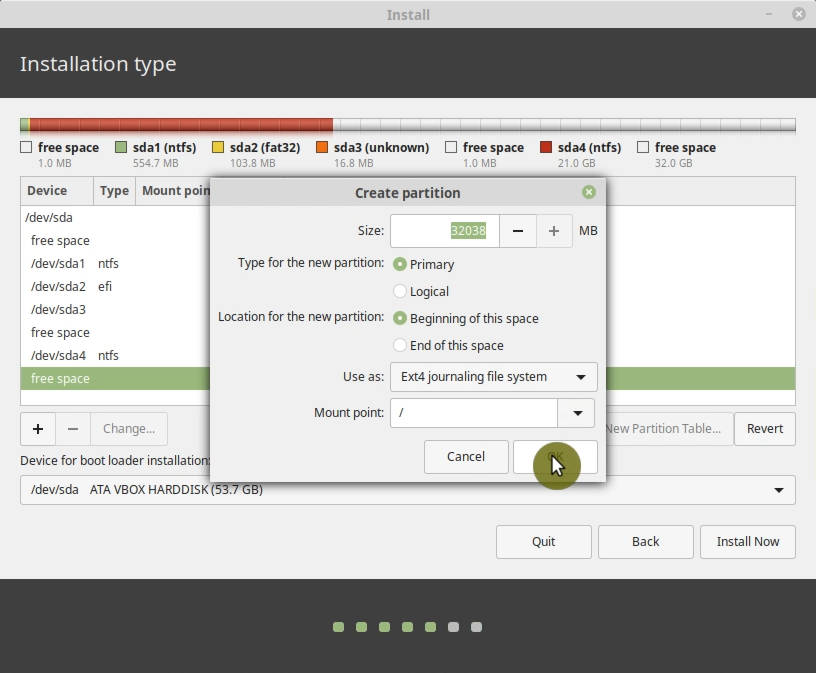
You can keep all the options at default here but importantly you need to assign / as a mounting point to this partition.
You can also split this free space into two parts and assign one to the system / and one to /swap. But I believe it is much better to use a swap file instead. Ubuntu installer creates a swap file by default.
I already explained the difference between a swap file and swap partition previously.
Check the EFI partition
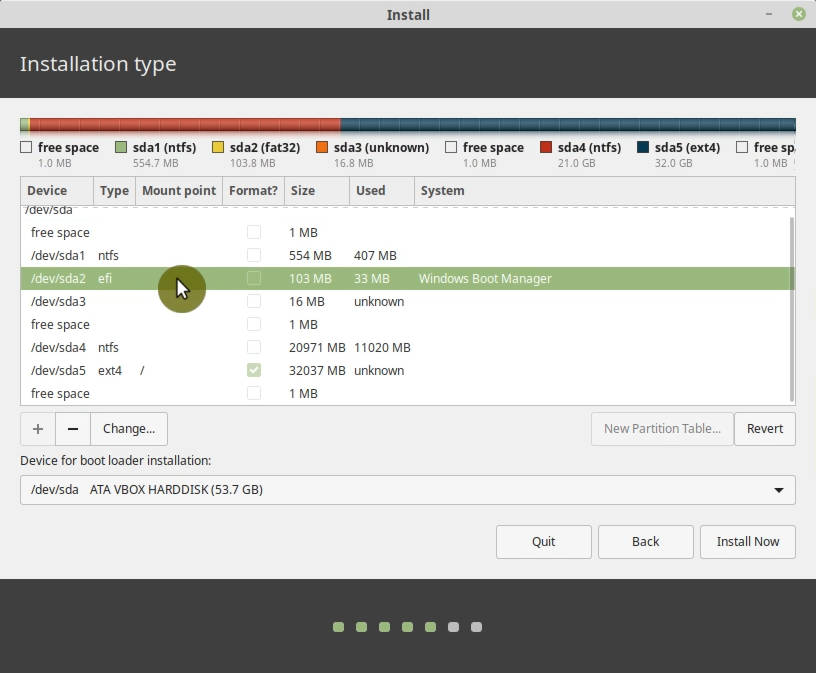
Next, you need to select the EFI partition, it is usually of several hundred megabytes in size. Make sure it is detected as EFI:
Boot loader installation
Boot loader installation doesn’t matter here because it will be UEFI installation, so the boot loader will be installed in the EFI partition. You can keep the default selection.
Format column
Finally, check that only the new Linux partition will be formatted in the Format column. Because if you have other partitions selected for formatting, be careful you will lose all the data stored in those partitions. If everything is fine, click Install.
Finalize the installation
While the system is installing, select your location, provide your user information, set the password, etc.:
And then just wait until the system is installed.
After the installation, reboot the system and do not forget to remove your installation USB when you are requested to do so:
Boot into the new system
You should see this GRUB menu after the reboot. Here you can select between Linux, which will boot by default in 10 sec, and Windows:
Boot options in BIOS
If it happened that after the reboot, you booted directly in your Windows and you did not see any Linux menu, do not get upset. Likely, you have done everything right and you just need to change the boot order in your BIOS. Like I had to do in my Acer Swift 1.
In the Main tab, find the Boot menu and enable it:
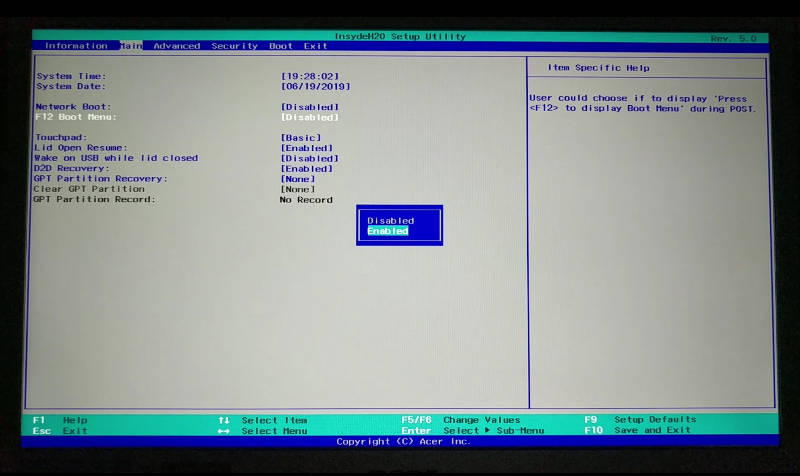
Change the Boot order
Then go to the Boot order and you should see an additional boot option there that appeared after you installed Linux. In my case, it is still called Windows Boot Manager without the code in brackets. This is actually my Linux boot file. I do not know why BIOS branded it as Windows. So, I make it a first boot option:
And save the BIOS changes. After the reboot, you should see the GRUB menu with the choice of boot options.
If you still boot into Windows by default, try to open the boot menu during the start of your system by pressing the F12 key (or whatever key is assigned to your BIOS Boot menu). It should bring this BIOS boot menu:
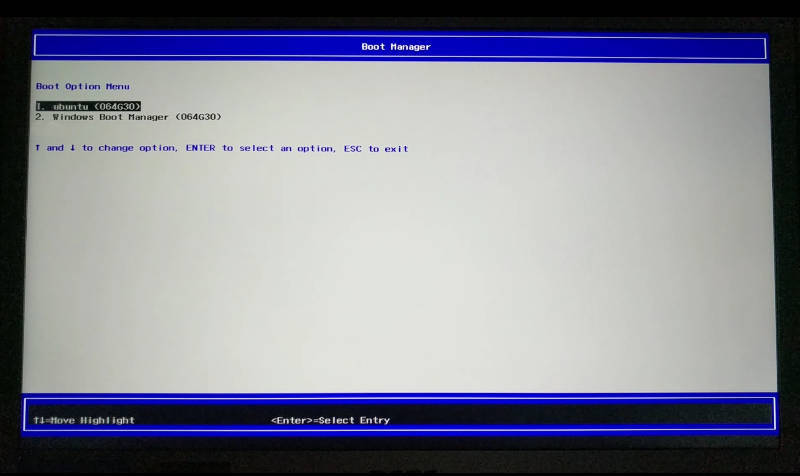
Where I can choose Ubuntu and my Linux Mint will boot. So, the BIOS Boot menu helps to make sure that Linux works, you just need to check your boot order settings, maybe Linux is not the first option there. Try different orders until you get Linux booting the first.
Why I do not recommend dual-booting
There are three main reasons I stopped dual-booting and this is also why I do not recommend dual boot.
-
If you use Windows in dual boot, it is possible that some updates of Windows may break your Linux installation. Theoretically, it should not happen, but it happens. Maybe Windows changes the Linux bootloader in the UEFI partition. I do not know.
-
If you dual boot, you will never switch to Linux. If you are used to Windows, you will tend to boot into Windows more often and you won’t like to reboot to get to Linux. So, you will not use Linux much and thus will never switch to Linux completely.
-
On the other hand, if you prefer Linux, Windows will just take too much space on your hard drive that is never used. So, this is not good either.
I recommend using Windows in a Virtual machine such as VirtualBox. This way your Windows can be accessed from within Linux. Windows will be less powerful than if it was installed in dual boot, but you still can do most of the things you would normally do. A virtual machine also isolates your Windows file system and this provides better protection against viruses. You can read my post on how to install Windows 10 in VirtualBox and maybe you will like that option more than dual-booting.
In this article, we are going to learn how can you dual boot windows 10 and Linux Mint and switch between them as per your needs. Although it is laced with many features, Linux isn’t perfect yet. You still might need your Windows installation because of some proprietary software programs or games that just cannot run on Linux.
Note: This only works if you install Windows 10 first, or you already have a Windows installation on your hardware first. You cannot install Linux Mint first and then Install Windows, Windows installer will simply remove your Linux Installation.
Let’s get right into the steps to dual boot windows 10 and Linux mint on your system. You can replace Linux Mint with Ubuntu and follow the partitioning section below.
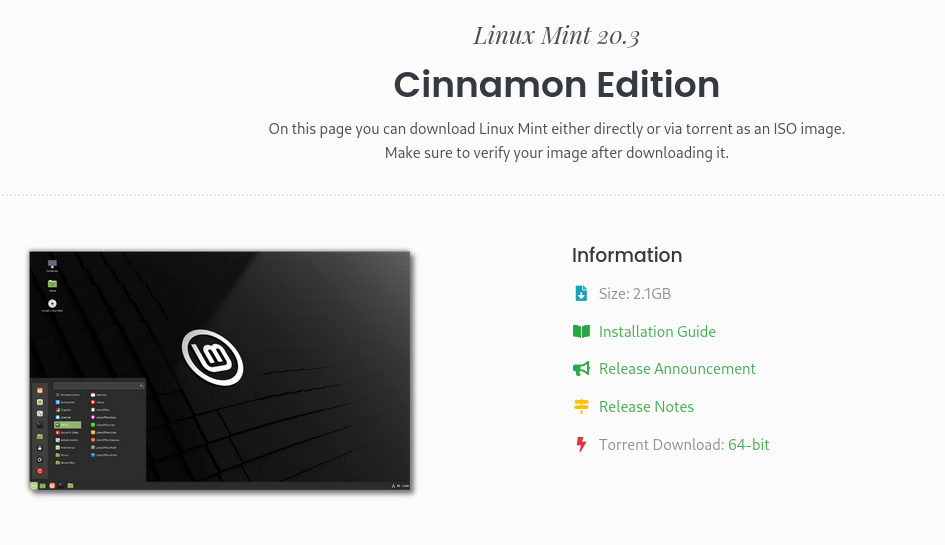
1. Download Linux Mint ISO.
Go to Linux Mint’s official website, and download the edition of Mint that you prefer. No matter which edition you pick, the installation method will be the same. For the sake of this tutorial, I’m using Linux Mint – Cinnamon edition.
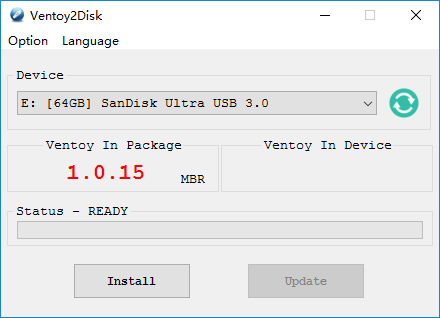
2. Create a bootable USB stick using Ventoy.
Pick any USB drive of at least 4 GB capacity and make sure that you have no important data in it, as this process will erase it. From Ventoy’s official GitHub page, download the latest version of the Ventoy-Windows.zip file.
Open your downloads folder and extract it there. Now, insert your Flash drive and open Ventoy2Disk.exe. Make sure that your USB stick is selected, if not, click on the refresh button, Now click on install.
3. Transfer the ISO file to the Flash Drive
Navigate to your Downloads folder and look for the Linux Mint ISO you just downloaded. Copy the ISO using Ctrl + C, now navigate to the Ventoy USB and simply paste it there by pressing Ctrl + V.
4. Disable Secure Boot
Check your Laptop/Motherboard manufacturer website for the key you need to press to access the BIOS menu. It is different for each manufacturer. Don’t worry if you can’t find it, it’s usually one of these keys – DEL, Esc, F2, F10 or F12.
Restart your PC and press the key which will lead you to the BIOS menu when the manufacturer logo comes on the screen. Navigate to ‘Boot Options’ using the arrow keys on your keyboard and there, disable ‘Secure Boot’, and using the F5 & F6 keys, change the boot priority order so that your Ventoy USB will be on top and hence booted first. Press F10 key to save and exit.
Now, on the next screen, select Linux Mint and press enter. In a few seconds, you will be greeted with Mint’s Cinnamon desktop interface
5. Free Up Space
Now, before we proceed to the installation, press the ‘Super’ key (or Windows key) on your keyboard look for software named GParted, and launch it. We have to free up some space where we will install Linux Mint.
Select any partition and right click, resize your other partition so that you have at least 50 GB – 60 GB of unallocated disk space.
Click on Resize and hit apply changes, this process will take some time if the partition you are shrinking has any Data on it. Although not always, this process can corrupt your files.
When the process is complete, close GParted. Now we are ready to install Linux Mint on your device alongside Windows.
6. Begin Installation
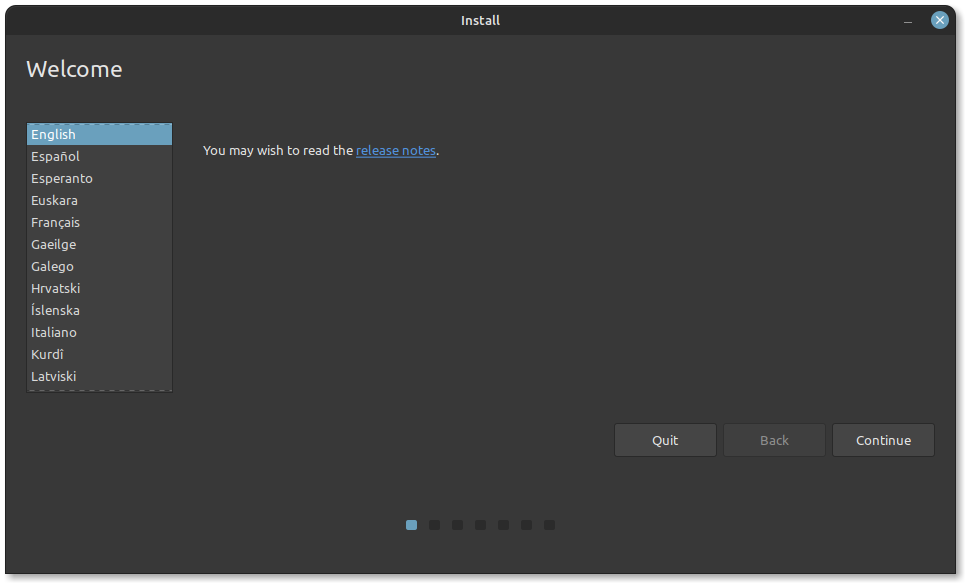
Launch the Installer, select your Language and hit continue.
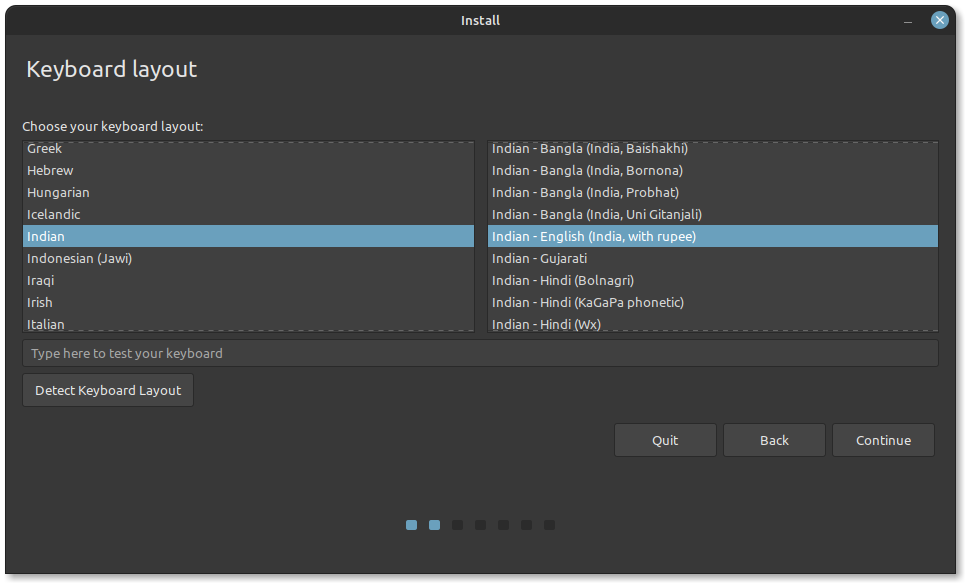
On this step, you need to select your keyboard layout.
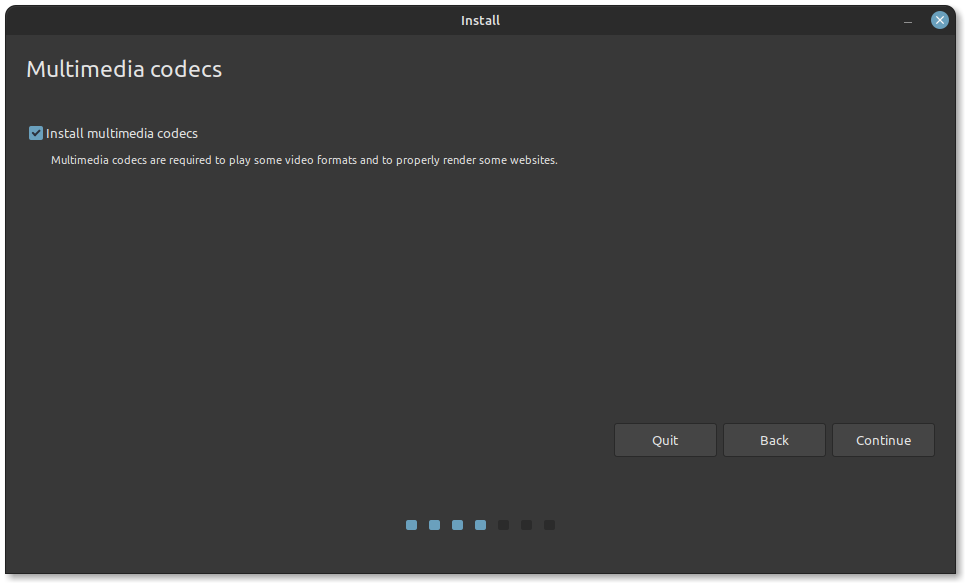
If you are connected to the Internet, the Installer will give you an option to Install Multimedia codecs, click on the checkbox and hit continue.
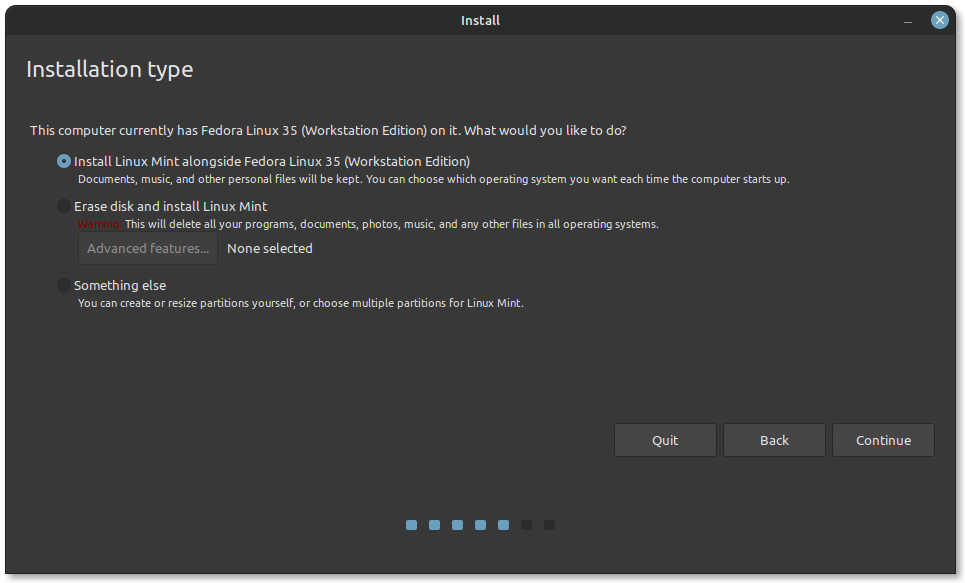
In this step, if the installer detects your Windows installation, then great! Just hit continue, select the unallocated space we just created, and click on the Install button.
7. Drive Partitions For Dual Boot
For some reason, if the installer does not detect Windows, select ‘Something else’ as the installation type and hit continue.
Next, you’ll see an NTFS partition within the list. This is your Windows partition.
Make sure you do not make any modifications to these NTFS partitions as they will contain Windows system files unless you know exactly which drives are non-Windows drives.
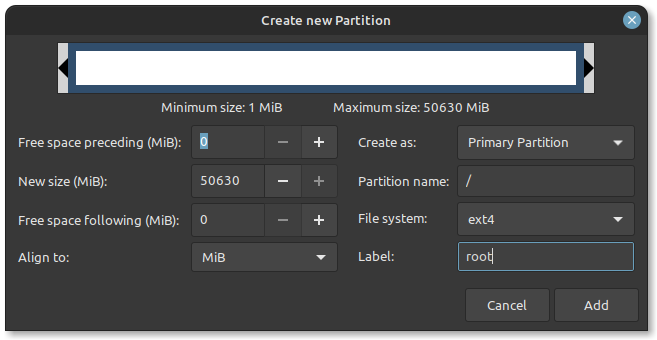
We’ll only work on partitioning the unallocated spaces. So go ahead and right-click on the unallocated space and select create a partition.
I’m dedicating my full 50 GB to this partition, but if you want, you can also create a /home partition. Finally, when you are sure of the changes you are going to make, click on Install now.
8. Complete The Installation
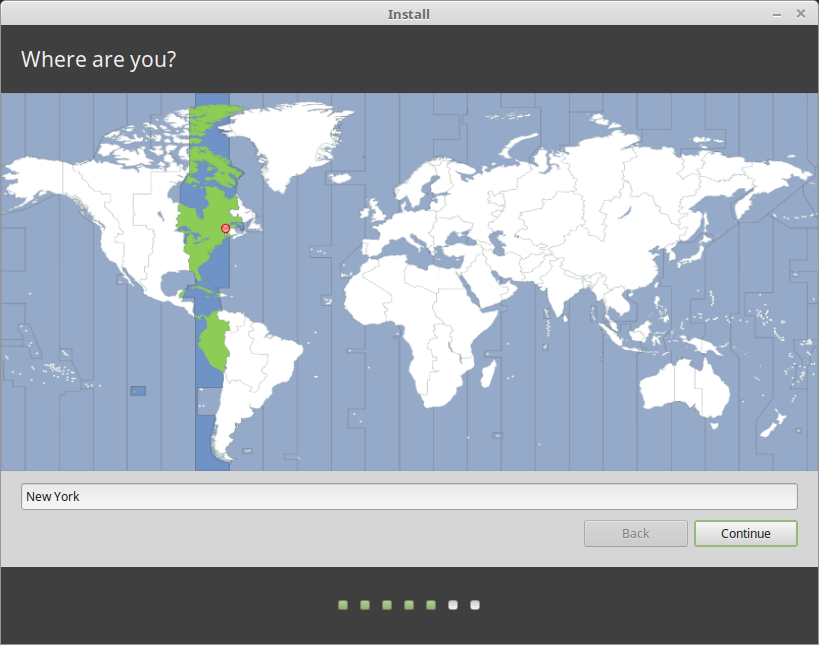
Choose your Time-Zone in the next section and hit next.
Lastly, set up your Username and a desktop password. Click on continue. This installation will take 10-15 minutes from this point. The installer will then ask you to restart your PC and then remove your Installation media and press Enter.

9. Update your Installation
The next time you start your PC, the GRUB bootloader will ask you to pick between Linux Mint and Windows 10. Boot once into Linux mint, open Terminal, and type in the following commands to update your system.
$ sudo apt update && sudo apt full-upgrade
If you do not see Windows 10 or any other operating system that you have installed alongside Linux, go ahead and run the following command on your terminal:
Conclusion
You have successfully installed & updated Linux Mint 20.3 alongside Windows 10.
Dual booting is the process of installing two operating systems on a single machine. In reality, such a system allows for the installation of various operating systems. However, how does the computer know which operating system to boot? The boot area can be occupied by a boot loader that comprehends various file systems and numerous operating systems. One of the operating systems on the disc can be booted once it has been loaded. The disc may be divided into several partitions, each of which houses a distinct operating system. A boot manager application presents a menu when a computer turns on, enabling the user to select the operating system to use.
Linux Mint is a community-driven Linux distribution based on Ubuntu. It has a lot of packages. It’s one of the most popular, safe, and reliable desktop Linux distributions. In this article, we’ll install it alongside windows aka dual boot Windows and Linux Mint.
Prerequisites:
- A USB drive at least of 8GB.
- HDD or SSD having at least 20 GB free space.
Procedure to Dual Boot
Follow the below steps to dual-boot Windows and Linux mint.
Step 1: Download your favorite Linux Mint flavor from https://www.linuxmint.com/download.php
Step 2: Create a bootable USB drive so that you can boot Linux Mint. You can do this by using the Rufus https://rufus.ie/en/ tool which is a very good tool for this purpose.
Note: If you’re using UEFI based system (most probably) then use the GPT partition scheme as shown in Step 2 below image, otherwise use MBR.

Step 3: Make a partition for Linux Mint to install.
a) Open your disk management application by Pressing Win key -> Search to create and format ->

b) Select the disk on which you’ve enough space in my case Disk 0 then right-click and select Shrink Volume and shrink as per your requirement. Since I have a lot of space so I shrunk 200 GB (1 GB = 1024MB)

Step 4: Boot the USB drive.
Plug in your USB drive and restart the computer, while booting depending on your system press F9 or F10, or F12. You can easily find your boot menu key using Google. Since the computer gets restarted so I can not take a screenshot of the restart so I didn’t add that in this step.
NOTE: Be careful while performing the below steps
Step 5: Start the installation by clicking on Install Linux Mint

b) Select the language which you are comfortable with.

Step 6: Installation type.
a) Automatic Partitioning – The installer will format the HDD or SSD drive (where your Windows is installed) and it will take care of creating the required partitions.
NOTE: Use this option only if you don’t mind the partition layout and size.

If you selected this option then confirm auto partitioning. Click on Continue

b) Manual Partitioning
Something else – Use this option in case you want to create partitions as per your need. Click on Continue

Step 7: Create partitions for Linux Mint installation. You can choose home and root partition sizes as per your need.
For UEFI-based systems:
- EFI – 1 GB
- swap – 2 GB
- /home – 100 GB
- / (root) – Remaining (97 GB)
For Legacy BIOS systems:
- /boot – 1 GB
- swap – 2 GB
- /home – 100 GB
- / (root) – Remaining (97 GB)
Select the free space and then click on ‘+’ at the bottom left to create a partition. Make sure you select the correct free space in my case I knew I’ve shrunk 200 GB of space so I got confirmed by seeing the size of the free space.

For EFI partition:

For Legacy BIOS systems:

For swap partition:

For /home partition:

For / (root) partition:

Step 8: Review your partition and click on Install Now.

Step 9: Click on Continue to create the partition as per the plan.

Step 10: Additional configuration.
a) Select your Timezone

b) Enter user information along with the password.

Step 11: Linux Mint installation.

Linux Mint installation has been completed, restart your computer.

Step 12: Reboot and choose the Linux Mint to boot.

As you can see we’ve successfully installed Linux Mint alongside Windows.
Last Updated :
07 Nov, 2022
Like Article
Save Article