Follow these steps to temporarily turn off real-time Microsoft Defender antivirus protection in Windows Security. However, keep in mind that if you do, your device may be vulnerable to threats.
-
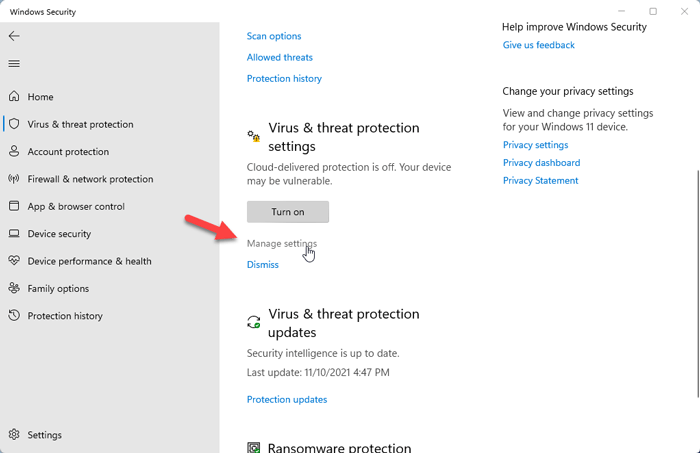
Select Start and type «Windows Security» to search for that app.
-
Select the Windows Security app from the search results, go to Virus & threat protection, and under Virus & threat protection settings select Manage settings.
-
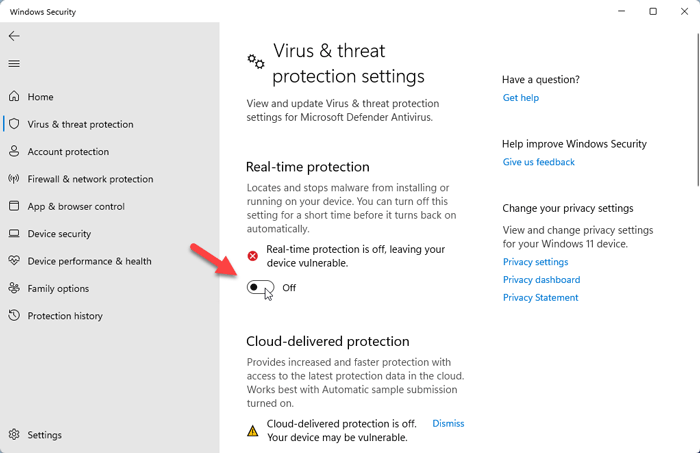
Switch Real-time protection to Off. Note that scheduled scans will continue to run. However, files that are downloaded or installed will not be scanned until the next scheduled scan.
Notes:
-
If you just want to exclude a single file or folder from antivirus scanning you can do that by adding an exclusion. This is safer than turning the entire antivirus protection off. See Add an exclusion to Windows Security.
-
If you install a compatible non-Microsoft antivirus program Microsoft Defender antivirus will automatically turn itself off.
-
If Tamper Protection is turned on, you’ll need to turn Tamper Protection off before you’ll be able to turn Real-time protection off.
How malware can infect your PC
Need more help?
Want more options?
Explore subscription benefits, browse training courses, learn how to secure your device, and more.
Communities help you ask and answer questions, give feedback, and hear from experts with rich knowledge.
Дарёному коню в зубы не смотрят, но не в нашем случае)!
В Windows 10 имеется интегрированный антивирус Windows Defender («Защитник Windows»), который выполняет функции защиты нашего компьютера и данных на нём от нежелательных программ.
Встроенное решение от Microsoft пагубно влияет на производительность системы, запускаясь вместе с ней, работает в фоновом режиме, собирая статистику о системе, и имеет привычку обновляться в «удобное» для него время. Также бывают ситуации, например, когда необходимо настроить устройство под себя или установить какой-то файл из Интернета, что, конечно же, «Защитник Windows» будет блокировать.
Тогда перед Вами станет задача отключить данную систему или вовсе искоренить из системы, но есть проблема: полностью удалить или отключить Windows Defender у Вас не выйдет – эта система глубоко интегрирована в Windows 10 и в последующие версии, начиная с 1903 version (С выходом Windows 10 May 2019 Update (версия 1903) Microsoft представила функцию «Защита от подделки», которая предотвращает изменение настроек приложения «Безопасность Windows» и антивируса Microsoft Defender вне интерфейса Windows. Под термином «настройки» здесь также учитываются инструменты командной строки, изменения реестра и групповых политик).
Однако, не спешите отчаиваться, есть несколько обходных путей, при помощи которых мы сейчас отключим антивирус Windows.
Для этого нам понадобятся 2 программы:
1) Defender Control — https://www.sordum.org/9480/defender-control-v2-1/ (официальный сайт) 2) Reg organizer — https://chemtable.ru/organizer.htm (официальный сайт)
Далее по пунктам:
1. Устанавливаем и открываем Defender Control:

2. Нас интересует 3 файл «Defender_Settings». Открываем его, нас перекидывает в «Параметры Безопасности Windows», отключаем все ползунки до самого конца страницы.

3. Далее открываем первую папку «dControl» и открываем первое приложение.

-
В открывшимся окне выбираем пункт «Отключить Защитник Windows», после чего Вы должны увидеть характерный красный цвет интерфейса.


5. Устанавливаем и открываем Reg organizer.
6. В левой панели открываем вкладку «Другие функции» и выбираем «Редактор Реестра»:

Далее просто копируете путь: HKEY_LOCAL_MACHINE\SOFTWARE\Policies\Microsoft\Windows Defender
Вы сразу попадаете в нужную папку, где необходимо правой кнопкой мыши нажать на пустое место, выбрать «Создать 32-битный целочисленный параметр (REG_DWORD)». Далее обязательно называем новый ключ DisableAntiSpyware и нажимаем «ОК».
Затем двойным щелчком откройте редактор ключа и задайте ему значение «1». Проверьте, чтобы все значения были, как на скриншоте ниже.

7. Отлично, осталось немного! Теперь чуть выше находим «Автозапуск программ», заходим в него. Выбираем Windows Security, правой кнопкой мыши выбираем пункт «Удалить и не давать появиться снова». Жмём «ОК».

Перезагружаем компьютер и радуемся отсутствию Defender-а. Победа!
Если кому-то будет полезно регулярное временное отключение, то:
Открываем PowerShell от имени Администратора и прописываем:
Set-MpPreference -DisableRealtimeMonitoring $true — чтобы выключить
Set-MpPreference -DisableRealtimeMonitoring $false — чтобы включить
Немного рекомендаций от автора: (к прочтению необязательно)
Несмотря на возможность отключения Защитника Windows, автор статьи не рекомендует использовать компьютер без антивируса вообще. Будет хорошо иметь на своём ПК антивирусное решение или хотя бы раз в месяц использовать » Полное сканирование системы». Для избежания проблем, советую обратить внимание в сторону отечественных ПО: Антивирус Kaspersky, Dr.Web и NANO Антивирус. Первые два антивируса входят в «Реестр отечественного ПО», а третий, в свою очередь, – «Единый реестр российских программ для ЭВМ и БД».
Пройдёмся кратко по каждому:
1) Dr.Web:
Российский производитель антивирусных средств защиты информации. Продукты Dr.Web разрабатываются с 1992 года. Это один из первых антивирусов в мире. Компания «Доктор Веб» — ключевой игрок на российском рынке программных средств обеспечения базовой потребности бизнеса — безопасности информации.
Стоимость: от 1209 ₽ в год (1 ПК + 1 Android)
Пробный период платной версии: 30 дней, (без техподдержки и защита только 1 ПК).

Также имеется Dr.Web CureIt! — лечащая утилита «Dr.Web CureIt!», которая не является постоянным средством для защиты компьютера от вирусов, но способна вылечить инфицированную систему однократно.
2) Kaspersky Total Security:
Стоимость: от 1709 Р в год
Пробный период платной версии: 30 дней
«Лаборатория Касперского» — международная компания, работающая в сфере информационной безопасности и цифровой приватности с 1997 года. Глубокие экспертные знания и многолетний опыт компании лежат в основе защитных решений и сервисов нового поколения, обеспечивающих безопасность бизнеса, критически важной инфраструктуры, государственных органов и рядовых пользователей. Обширное портфолио «Лаборатории Касперского» включает в себя передовые технологии для защиты конечных устройств, ряд специализированных продуктов и сервисов, а также кибериммунные решения для борьбы со сложными и постоянно эволюционирующими киберугрозами.

Помимо платных версий, имеются полностью бесплатные решения. В полностью бесплатной версии доступно:
· Помогает обеспечить безопасность устройств
Решение Kaspersky Free оснащено передовыми технологиями безопасности. Оно автоматически анализирует новые угрозы в реальном времени, помогая защищать компьютеры, мобильные устройства и планшеты, в том числе iPad.
· Бесплатный антивирус и не только
Kaspersky Free – это бесплатное антивирусное решение, которое защищает компьютеры с ОС Windows и мобильные устройства Android от вредоносного ПО, зараженных файлов, опасных приложений и подозрительных сайтов.
· Безопасность без замедления работы
Система безопасности защищает устройства, не мешая вашей работе. Kaspersky Free получает обновления автоматически, благодаря чему у вас всегда будет актуальная версия антивируса.
3) NANO Антивирус:
Стоимость: от 799 Р в год
Пробный период платной версии: 30 дней
Компания NANO Security создана в 2009 году на базе коллектива высококвалифицированных специалистов, работающих в области антивирусной безопасности с 2003 года.
Главной идеей проекта было предложить основанные на тщательно изученных предпочтениях пользователей и клиентов программные продукты, выгодно отличающиеся по ряду параметров от антивирусных решений других производителей.
Сегодня NANO Security представляет собой команду профессионалов, обладающих высокими компетенциями. В компании работают опытные эксперты в области информационной безопасности: программисты, аналитики, тестировщики и т.д.

Надеюсь, статья вышла для Вас полезной.
Далее планирую написать про хорошие антивирусные решения, которые продолжают на сегодняшний день работать/продаваться/обновляться на территории РФ.
If you want to turn off or disable Windows Security in Windows 11, here is how you can do that. It is possible to disable Windows Defender or Microsoft Defender in Windows 11 with the help of this step-by-step guide. You can get it done using Windows Security settings, Local Group Policy Editor, Registry Editor, and Windows PowerShell.
Windows Security (Formerly, Microsoft Defender) is the in-built security shield or antivirus available in Windows 11, Windows 10, and older versions. However, if you think that Windows Security is making your system slower or want to install another third-party antivirus tool, you can disable the native antivirus using this guide.
It is possible to enable or disable Microsoft Defender in Windows 11 permanently and temporarily. Depending upon the situation, you could try different methods as mentioned below.
How to disable Windows Security in Windows 11 using Settings
To disable Windows Security in Windows 11 using Settings, follow these steps:
- Press Win+S to open the Taskbar search box.
- Type windows security and click on the search result.
- Switch to the Virus & threat protection tab on the left side.
- Click the Manage settings option under the Virus & threat protection settings.
- Toggle the Real-time protection, Cloud-delivered protection, Automatic sample submission, and Tamper protection buttons.
- It disables the Microsoft Defender Antivirus.
To get started, you need to open the Windows Security panel on your system. For that, press Win+S to open the Taskbar search box, type windows security, and click on the individual search result.
Then, switch to the Virus & threat protection tab on the left side and click on the Manage settings option under the “Virus & threat protection settings.”
Here you can find four toggle buttons:
- Real-time protection
- Cloud-delivered protection
- Automatic sample submission
- Tamper protection
You need to toggle those buttons to turn Microsoft Defender Antivirus off on your PC.
As mentioned, it disabled the Microsoft Defender Antivirus in Windows 11. However, it is temporary, and Windows Security continuous to run other background services even though you disable Microsoft Defender Antivirus.
How to disable Windows Security in Windows 11 permanently
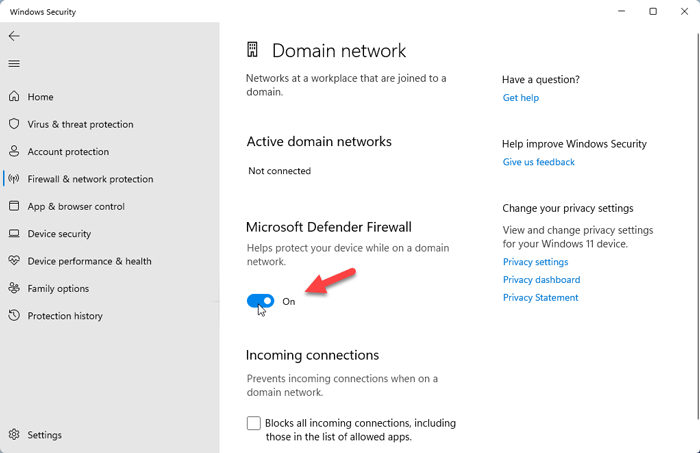
To disable Windows Security in Windows 11 permanently, you need to open each setting one after one and disable all of them. For example, you need to open the Firewall & network protection tab and go to Domain network, Private network, and Public network.
Then, toggle the Microsoft Defender Firewall button to disable Microsoft Defender Firewall in Windows 11.
After that, go to the Device security tab, click on the Core isolation details option, and toggle the Memory integrity button.
How to disable Microsoft Defender in Windows 11 using Group Policy
To disable Microsoft Defender in Windows 11 using Group Policy, follow these steps:
- Press Win+R to open the Run prompt.
- Type gpedit.msc > hit the Enter button.
- Go to Computer Configuration > Administrative Templates > Windows Components > Microsoft Defender Antivirus.
- Double-click on the Turn off Microsoft Defender Antivirus setting.
- Select the Enabled option.
- Click the OK button.
- Go to the Real-time Protection folder.
- Double-click on the Turn off real-time protection setting.
- Select the Enabled option.
- Click the OK button.
At first, you need to open the Local Group Policy Editor. For that, press Win+R to open the Run prompt, type gpedit.msc, and hit the Enter button. Then, navigate to the following path:
Computer Configuration > Administrative Templates > Windows Components > Microsoft Defender Antivirus
Here you can find a setting called Turn off Microsoft Defender Antivirus on the right side. You need to double-click on it and select the Enabled button.
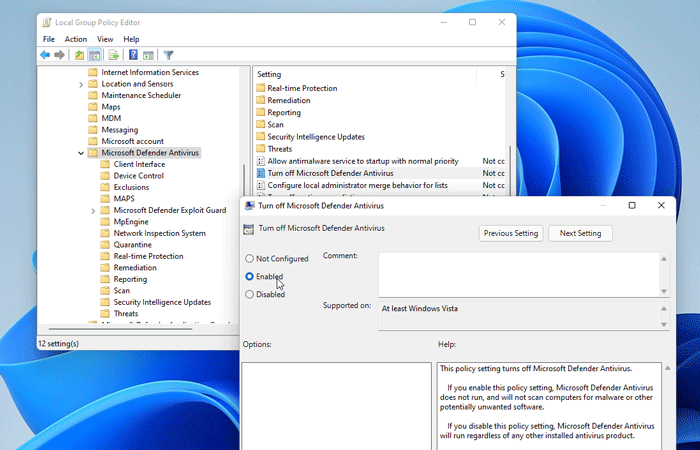
Click on the OK button to save the change.
Next, you need to expand the Microsoft Defender Antivirus folder and select the Real-time Protection folder. Here you can find a setting called Turn off real-time protection.
You need to double-click on it and select the Enabled option.
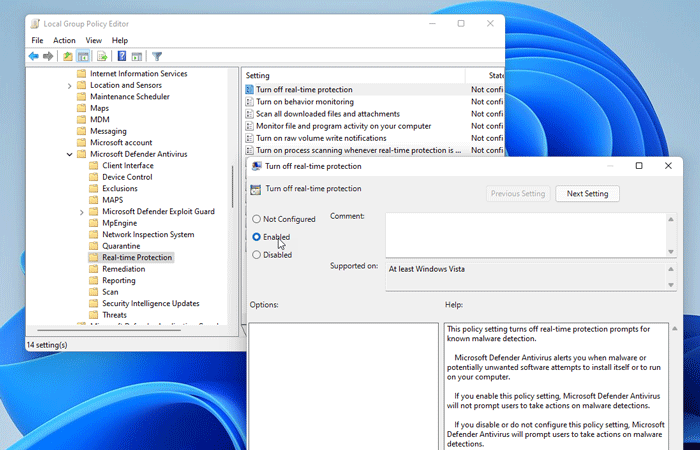
Click the OK button to save the change.
After that, Microsoft Defender Antivirus will be disabled immediately.
How to disable Microsoft Defender in Windows 11 using Registry Editor
To disable Microsoft Defender in Windows 11 using Registry Editor, follow these steps:
- Press Win+R to open the Run dialog.
- Type regedit > hit the Enter button > click the Yes option.
- Go to: HKEY_LOCAL_MACHINE\SOFTWARE\Policies\Microsoft\Windows Defender
- Right-click on Windows Defender > New > DWORD (32-bit) Value.
- Name it as DisableAntiSpyware.
- Double-click on it to set the Value data as 1.
- Click the OK button.
- Right-click on Windows Defender > New > Key.
- Name it as Real-Time Protection.
- Right-click on Real-Time Protection > New > DWORD (32-bit) Value.
- Name it as DisableRealtimeMonitoring.
- Double-click on it to set the Value data as 1.
- Click the OK button.
- Restart File Explorer or computer.
To learn more about these steps, continue reading.
Precaution: Before getting started, it is recommended to backup Registry files.
At first, you need to open the Registry Editor on your computer. For that, press Win+R to open the Run dialog, type regedit, and press the Enter button. If the UAC prompt appears, click the Yes option.
Next, navigate to the following path:
HKEY_LOCAL_MACHINE\SOFTWARE\Policies\Microsoft\Windows Defender
Right-click on the Windows Defender key and select New > DWORD (32-bit) Value.
Following that, name it as DisableAntiSpyware and double-click on it to set the Value data as 1.
Click the OK button to save the change.
Next, you need to right-click on the Windows Defender key and select New > Key.
Name it as Real-Time Protection. Then, right-click on it and select New > DWORD (32-bit) Value.
Name it as DisableRealtimeMontoring and double-click on it to set the Value data as 1.
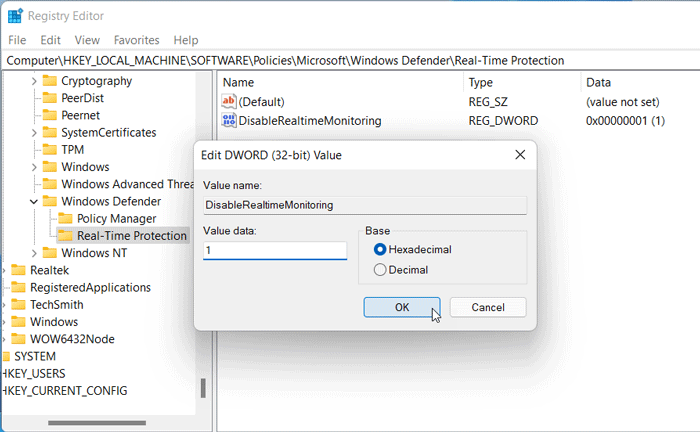
Click the OK button to save the change. At last, you need to restart File Explorer or restart Windows 11 computer.
How to disable Microsoft Defender in Windows 11 using PowerShell
It is possible to disable Microsoft Defender in Windows 11 using PowerShell. In other words, you can uninstall Microsoft Defender Antivirus with the help of Windows PowerShell. To uninstall Microsoft Defender using Windows PowerShell in Windows 11, follow these steps:
- Right-click on the Start menu or press Win+X.
- Select Windows Terminal (Admin) from the menu.
- Click on the Yes option.
- Enter this command: Uninstall-WindowsFeature -Name Windows-Defender
To get started, you need to open Windows PowerShell as administrator. As Windows 11 comes with Windows Terminal, you can open that as well. For this example, we are going to use Windows Terminal as administrator. To open it, press Win+X, select Windows Terminal (Admin), and click the Yes option.
Then, enter this command:
Uninstall-WindowsFeature -Name Windows-Defender
If in the future, you change your mind and want to re-install Windows Defender or Microsoft Defender in Windows 11, you can enter this command:
Install-WindowsFeature -Name Windows-Defender
It will be installed immediately.
Wrap up: Disable Windows Security and Microsoft Defender in Windows 11
Disabling Windows Security or Microsoft Defender Antivirus in Windows 11 is not that difficult as long as you follow the aforementioned guides. However, you must have an administrator account to turn of Microsoft Defender easily.
- How to open Task Manager in Windows 11
- How to Restart File Explorer in Windows 11
- How to Disable or Remove Startup Programs in Windows 11
- How to remove Widgets icon from Taskbar on Windows 11

Sudip Majhi
The article, you are reading, is written by Sudip, who starts and ends the day with computer. He contributes to some top media publications after gathering 10 years of experience in content writing in technology field. Email him to say hello!
Our guide on how-to disable Windows Defender in Windows 10
What is Windows Defender?
Windows Defender (now known as Microsoft Defender Antivirus) is an always on, anti-malware software that guards your computer from external threats. The antivirus is developed by Microsoft to protect computers from virus threats that are running the Windows 10 operating system.
This antivirus comes preinstalled with any version of Windows 10. Windows Defender protects your computer in realtime from not only viruses, but also ransomware, rootkits, trojans, spyware, and many forms of malicious attacks. The program is free to use, and Microsoft sends regular updates on Windows 10.
Why turn off Windows Defender?
Good question you ask! If Microsoft Windows Defender is a free antivirus that protects your system from malware attacks, then why would anyone feel the need to disable it or turn it off? There are however specific cases where you would want to disable the Windows Defender.
You may want to install specific software or program on your system, but Microsoft Windows Defender in Windows 10 might keep interrupting. Take 3rd Party Software as an example. Windows Defender can treat programs or applications from small developers as a threat, and it will not allow you to install it. This can sometimes be helpful as you don’t know if the software is legitimate or it may contain some form of malware which may breach your security.
Nevertheless, sometimes you’re sure that the software is safe and legitimate and want to install it, but the Windows Defender keeps deleting it. In this case, you might want to disable Windows Defender temporarily.
There may arise a case where you don’t trust the capabilities of Microsoft Windows Defender and decide to install a third-party antivirus for virus threat protection. There are numerous third-party antivirus programs on the market that can be used in place of Windows Defender.
One benefit of installing a third-party antivirus is that it gives you more security and control over it. You can disable it at any time and re-enable it again.
You may also want to disable Windows Defender in Windows 10 as it utilizes a lot of resources when it runs in the background. You may not have enough ram, or you may want the processor to focus on some specific task rather than waste resources on scanning your computer.
These are just a few reasons for disabling the Microsoft Defender antivirus.
Whatever your reason may be, Microsoft Windows Defender in Windows 10 is still a valuable resource. Something is better than nothing, meaning your computer is much more prone to being infected while using it with the Defender disabled. If you’re planning to use another antivirus, then disabling the Windows Defender is justifiable. The Defender antivirus does not have a disable or uninstall option anywhere. Keep in mind that when Windows Defender disable, the security of your computer will be at risk of malware attacks.
Let’s look into how to turn off Windows Defender.
Windows Defender can still be disabled on Windows 10 through settings, registry, and through group policy.
Let’s look into each one, step by step on how to turn off Windows Defender.
Turn off Windows Defender through settings:
This is one of the fastest and easiest ways to disable Windows Defender. All of the operations are going to be done through settings. Just follow these steps:
1. Open Start by clicking on the Windows logo on the bottom left of your screen.
2. On the Start menu, locate and click on Open Settings by clicking on the gear-shaped icon on the left panel.

3. Windows Settings will open up. Proceed by clicking on Update & Security. It will be the last option.

4. Next, proceed by clicking on Windows Security on the left side panel.

5. Under Protection Areas, click on Virus & threat protection.

6. The Virus & threat protection Window will open up. Under Virus & threat protection settings, proceed by clicking on Manage settings.

7. Real time protection will be the first option in front of you. Under real time protection, click on the blue ON switch.

8. Windows will prompt you if you want to make the change. Click on Yes. You’ll see the message stating that real time protection is off, an indication that you have successfully turned off the Windows Defender.

Anytime you can follow steps 1 to 7 and again click on the Off button to re-enable real time protection.
The benefit of turning off real time protection through virus threat protection settings is convenience and speed. You can quickly turn it off and then again on. One thing to keep in mind is that when you restart your computer, Windows Defender will automatically be turned on. By disabling real time protection, you can install your desired application or software which you previously could not, but your security will be at risk. You can also make your desired system changes. This is not a permanent solution, but it is the fastest solution through virus threat protection settings.
How to disable Windows Defender through the registry:
This is a bit of lengthy process to disable Windows Defender:
Follow these steps to permanently disable Windows Defender through Registry.
1. Open Start, by clicking on the Windows logo on the bottom left of your screen.
2. Type “Regedit” in the search bar, and proceed by clicking on the Registry Editor with the blue icon. Click on yes when prompted by Windows.

3. The registry editor will open. On the left side, you’ll see different options. You need to locate to Microsoft Defenders location, by expanding the following:
- First, expand the “HKEY_LOCAL_MACHINE” folder by double-clicking on it.
- Next, expand the “SOFTWARE” folder.
- Scroll down and find the “Policies” folder and expand it.
- Expand the “Microsoft” folder.
- Next, click once on the “Windows Defender” folder.

4. Now, right-click on the “Microsoft Defender” folder and hover your cursor above “New.” A new menu will pop out. Proceed by clicking on “DWORD (32-bit) Value”.

5. A new file will appear on the right side with the option to name it. Enter “DisableAntiSpyware” as the name and hit Enter.

6. Next, double click on the newly created “DisableAntiSpyware” file.
7. Edit the value under “Value data:” as 1.

8. Press “Ok” on the bottom to save the value.
9. Finally, restart your system for the changes to take place. After restarting, the Microsoft Windows Defender will be disabled successfully.
If anytime you want to enable the Windows Defender again, follow these steps:
- Open the registry editor.
- Locate to the “Windows Defender.”
- Double click on “DisableAntiSpyware.”
- Edit the “Value Data” as 0, and click on Ok.
- Restart your system for the changes to take effect.
This method is a bit tricky and lengthy, but this will disable Windows Defender permanently. Restarting your computer will not enable the Defender again. Through this method, you can install any app and tweak any setting without the fear of Windows Defender interrupting in Windows 10. Your computer’s security will be compromised so make sure to enable the Defender again so your security stays active.
How to turn off Windows Defender through Group Policy:
This is our last instruction set to disable Windows Defender.
Follow these steps to turn off Windows Defender permanently:
1. Press “Win + R,” Window key, plus the “R” key together.
2. A dialogue box will appear. Type in “gpedit.msc” and hit Enter.
3. The local group policy editor Window will open in front of you.

4. Under “Computer Configuration,” double-click on “Administrative Templates.”
5. Next, click on “Windows Components” to expand it.
6. Scroll down, locate, and click on “Windows Defender Antivirus.”

7. On the right side, double-click on “Turn off Windows Defender Antivirus.”

8. A new Window opens. Highlight the “Enabled” option on the left and click on Apply and then Ok.

9. Finally, restart your computer for the changes to take effect.
In case you need to enable Windows Defender again, follow steps 1 to 7, highlight the “Not Configured,” click on Apply and then Ok. Restart your computer, and Windows Defender will be enabled again.
This is the third and final way to disable Windows Defender permanently. In this way, the Defender antivirus will not enable itself automatically when you restart your system. This is a permanent fix for the Defender antivirus.
Verdict:
Temporarily disabling the Defender antivirus to install some software or tweak some settings, is fine. There is no issue with that, but disabling the Defender antivirus for a prolonged time can put your security at risk. At any time, your system can be attacked by malicious programs. So, it’s a good practice to at least have a third-party antivirus installed, or to just disable it temporarily.
Windows 11, like previous versions, comes pre-packaged with Windows Security – an in-built antivirus to keep your PC secure out-of-the-box. Formerly known as Windows Defender, Windows Security offers reliable protection and enough features to keep your PC secure in more ways than one. But it is far from perfect.
If Windows’ native antivirus is proving to be an annoying hassle that you’d rather do without, disabling it might be the wise thing to do. In this guide, we go through a few common reasons for turning Windows antivirus off and a few ways of turning it off, both temporarily and permanently.
When should you turn off the Windows Security antivirus in Windows 11?
The most common reason for turning off Windows Security is when it starts to flag certain files as a threat and prevents access to them. If you know those files to be safe and want to stop the antivirus from coming in the way, disabling it temporarily is the only way out.
The Windows Security antivirus is also quite resource-hungry and on older systems, your system is bound to feel the crunch when it’s operational in the background. Windows Security also becomes redundant when there’s a third-party antivirus suite also installed.
Case 1: Turn off Windows Security temporarily (2 ways)
When you don’t want to get rid of the Windows Security for good, and only need to keep it quiet for a while, disabling real-time protection will temporarily turn off the antivirus. Here’s how to do it:
Method #1: From Windows Security
Press Start, type windows security, and hit Enter.

Then click on Virus & threat protection in the left pane.

Scroll down and click on Manage settings under “Virus & threat protection settings”.

Now toggle the switch under Real-time protection to Off.

Your Windows antivirus is now turned off.
Method #2: From Settings
Another way to get to the real-time protection settings is from the Settings app. Here’s how to get there:
Press Win+I to open Settings. Then click on Privacy & security in the left pane.

Click on Windows Security.

Then click on Virus & threat protection.

This will open the Windows Security app. Now, as before, click on Manage settings under ‘Virus & threat protection settings’, and then toggle off real-time protection.
Your antivirus will remain turned off until the next boot.
Case 2: Turn off Windows Security permanently (4 ways)
The above methods are good temporary solutions to turning off Windows antivirus. But if you’re looking for a more permanent solution, you have to disable a few extra settings. Here are a few step-by-step guides for disabling the antivirus on Windows:
Method #1: Using the Registry
Follow the steps given below to modify the registry and permanently turn off the Windows antivirus,
Step 1: Disable Real-time protection from Windows Security
Open Windows Security from the Start menu as shown before.
Then click on Virus & threat protection in the left pane.
Click on Manage settings under ‘Virus & threat protection settings.
Then toggle off Real-time protection.
Step 2: Disable Tamper Protection
Windows Security has a security feature called ‘Tamper Protection’ that prevents unauthorized changes from being made to the antivirus. So, before changing registry keys to permanently disable the antivirus, we will have to disable Tamper Protection first. Here’s how:
On the same ‘Virus & threat protection settings’ page in the Windows Security app, scroll down and find Tamper Protection and toggle it Off.

Step 3: Change ownership of the Windows Defender folder in the registry
Now, press Start, type regedit, and hit Enter.

Navigate to the following location:
HKEY_LOCAL_MACHINE\SOFTWARE\Microsoft\Windows Defender
Alternatively, copy the above and paste it into the registry editor’s address bar.

Then hit Enter.
We will now have to change the ownership permission of the ‘Windows Defender’ folder here in order to make changes to its subordinate keys. To do so, right-click on the Windows Defender folder in the left pane and select Permissions.

Click on Advanced.

Now click on Change in the ‘Owner’ field.

Click on Advanced.

Click on Find Now.

Scroll down and select Everyone and then click OK.

Click OK.

Now click on the box next to Replace owner on subcontainers and objects and place a check there.

Click Apply.

Then place a check next to Replace all child object permission entries… at the bottom. Then click Apply.

When prompted, click Yes.

Click OK.

Now, in the ‘permissions’ window, check the Allow box next to Full control.

Then click OK.

Note: If you’re unable to gain permissions and are getting an “Access Denied” error message, you will have to boot into safe mode and repeat the same procedure.
Step 4: Create and modify new registry values
Now, right-click on the empty space on the right, select New, then click on DWORD (32-bit) Value.

Name this key DisableAntiVirus.

Double-click on it and change its value to 1. Then click OK.

Similarly, create two more DWORD (32-bit) values and name them DisableAntiSpyware and ServiceStartStates and change their values to 1.

Once done, restart your system normally. Your Windows Security antivirus will now be disabled permanently.
Method #2: Using the Group Policy Editor
The Group Policy Editor can also be used to permanently disable Windows’ antivirus. Here’s how to do so:
Step 1: Disable Real-time protection from Windows Security
First things first, disable real-time protection from Windows Security. Open Windows Security from the Start menu.
Then click on Virus & threat protection in the left pane.
Scroll down and click on Manage settings.
Turn off real-time protection.
Step 2: Disable Tamper Protection
Next, to ensure real-time protection isn’t turned on automatically at the next boot, we will need to disable tamper protection as well.
In the same Windows Settings window, scroll down and toggle off Tamper Protection.
Step 3: Disable Windows Defender Completely from the Group Policy Editor
Now, press Start, type gpedit, and click on Edit Group Policy.

Once Group Policy opens up, expand the Administrative Templates.

Then expand Windows Components.

Then click on Microsoft Defender Antivirus.

Then, on the right, double-click on Turn off Microsoft Defender Antivirus.

Click on Enabled.

Then click OK.

Step 4: Disable Defender Services from Task Scheduler
One last thing to do now is to disable the services that force defender to restart at startup. Here’s how to do so:
Press Start, type Task Scheduler, and hit Enter.

Then expand the Task Scheduler Library branch on the left.

Expand Microsoft.

Then Windows.

Then scroll down and click on Windows Defender.

On the right, you’ll see the following four tasks:

- Windows Defender Cache Maintenance
- Windows Defender Cleanup
- Windows Defender Scheduled Scan
- Windows Defender Verification
Right-click on them one-by-one and select Disable.

Do so for all four tasks. Then close Task Scheduler. Now, to update the policies, press Win+R and open the RUN dialog box. Type the following:
gpupdate /force

Hit Enter. Wait for the policies to be updated.

Then restart your system for good measure. Windows Security’s antivirus will now be permanently disabled.
Method #3: Using Autoruns for Windows utility tool
Autoruns is a downloadable Windows utility tool offered by Microsoft that can disable the services responsible for restarting Windows Defender at startup. Here’s how to use it:
Firstly, disable real-time protection and Tamper Protection from the Windows Security app as shown earlier.
Then follow the link below to download the Autoruns utility tool.
Autoruns | Download link
Click on Download Autoruns and Autorunsc.

Once downloaded, right-click on the file and select Extract all.

In the extraction wizard, click Extract.

Once done, it is now time to boot into safe mode. To do so, press Start, type msconfig , and hit Enter.

Click on the Boot tab to switch to it.

Then select Safe boot under ‘Boot options’ and make sure the “Minimal boot” option is selected.

Then click OK.

Now restart your computer and you’ll boot straight into safe mode. Open the folder where Autoruns was extracted. Then double-click on Autoruns64.exe.

Click on Agree.

Once Autoruns opens, click on the Services tab.

By default, the Windows services are hidden. To view them, click on Options.

Then uncheck Hide Windows Entries.

Now scroll down and uncheck WinDefend.

Close Autoruns and open the System Configuration app again (search msconfig in Start). Then select Normal startup and click OK.

Finally, restart your system.
Once you’re booted up, you can check to confirm whether the changes have worked. Open the Windows Security app. You should see ‘Unknown’ written under ‘Virus & threat protection’ on the Security at a glance page.

Refrain from clicking on it as it will update the information and run the services again, thereby undoing all that you’ve done so far.
Method #4: By installing a third-party antivirus app
The Windows Defender antivirus is an integral part of your computer’s security and thus cannot be uninstalled. However, when you install a third-party antivirus software, Windows Defender will turn itself off. So go ahead and install your favorite antivirus program to disable Windows’ antivirus.
After installation, you can check whether Windows Defender is turned off. To do so, open Windows Security and click on Settings in the bottom left corner.

Then click on Manage providers under ‘Security providers’.

You should see ‘Microsoft Defender Antivirus turned off.

Have Microsoft Defender Antivirus periodically scan for threats
Even if you have turned off Microsoft Defender Antivirus and have given preference to your antivirus software, you can still turn on periodical scanning in Windows’ antivirus to get an additional layer of security. To do so, press Start, type Windows Security, and hit Enter.
Now click on Virus & threat protection.
Here, you will see the message that your “Antivirus is turned on”. Below it, click on Microsoft Defender Antivirus options.

Then turn on Periodic scanning.

How to reset Windows Defender
If you’ve made changes that you want to do, the best option is to reset Windows Defender.
Here’s how to do so:
Press Win+I to open Settings. Then click on Apps in the left pane.

Click on Installed apps.

Then search for Windows Security in the search bar above. Click on the three-dot menu next to Windows Security.

Click on Advanced options.

Now scroll down and click on Reset.

Click on Reset again to confirm.

Once done, you’ll see a tick next to the Reset option.

FAQs
In this section, we answer a few commonly asked queries concerning the Windows Defender antivirus.
Does Windows 11 have an antivirus?
Yes, Windows Security, also known as Windows Defender, has all the security features provided by any other antivirus o the market, including real-time protection.
How do I turn my antivirus off?
To turn off your Windows antivirus, follow the guide given above.
Where do I find antivirus on Windows 11?
Your antivirus on Windows 11 is housed inside the Windows Security app which can be accessed via the Start menu as well as the Settings app. Refer to the guide above to know more.
Is it okay to turn off antivirus?
Although it is not recommended to do so, it is okay to turn off the antivirus temporarily. If you have a third-party antivirus application, or if it’s just your preference, then you can go ahead and turn off Windows Defender antivirus permanently.
How do I change my antivirus settings on Windows 11?
The Windows Defender antivirus settings can be changed from the Windows Security app. Everything from real-time protection to scanning and firewall settings can be changed from the Windows Security app. You can also monitor your device performance and health from within the app itself.
We hope you were able to disable the in-built antivirus on Windows using the methods listed above.