
Contents
- 1 How to Ignore SmartScreen Warnings and Grant Access Manually
- 2 How to Disable SmartScreen Filters in the Windows Security Center
- 3 How to Disable SmartScreen Filter using Group Policy
- 4 How to Disable SmartScreen Filters using the Registry Editor
- 5 How to Enable or Disable Windows Defender Application Guard and Secure Sign-In
Microsoft SmartScreen is a cloud-based anti-phishing and anti-malware component available in Windows 10 via different products.
As Windows Defender SmartScreen it protects Windows 10 directly against malicious files and apps. It checks any attempts to download and run files and apps using a dynamic cloud-based list of reported phishing sites and malicious software sites.
Additional reputation checks for apps and downloaded programs analyze digital signatures used to sign files.
How Microsoft Defender SmartScreen works
If the checked URL, file, app, or certificate has been marked as safe, users won’t see any warnings. If there is no such existing reputation, the item is marked as a higher risk and SmartScreen shows a warning message to the user.
Microsoft SmartScreen is also part of Microsoft Edge where it blocks malicious websites and downloads.
The cloud-based backend used by Microsoft SmartScreen is constantly learning and updated using data provided my millions of connected devices.
Using that data Smartscreen can also block potentially unwanted apps and protect devices against malicious content and files those apps might access on the internet.
How to turn off SmartScreen Windows 10
You can disable SmartScreen in Windows 10 completely or case by case the various Windows SmartScreen filters. However, in most cases you would not want to turn off SmartScreen and instead grant access manually to a blocked file, app or program if necessary.
Admins can alternatively use the Windows 10 group policy and regedit to disable SmartScreen in Windows 10 on the system level. For that purpose group policy offers to disable several SmartScreen filters. The regedit-method is more general.
How to Ignore SmartScreen Warnings and Grant Access Manually
Windows SmartScreen uses different warning messages based on the same principle. Access will be blocked and you will only see an “OK”-button to close that SmartScreen warning.
To grant access manually you will have to first click a link and then select the previously hidden option to ignore the Windows SmartScreen filter.
The option to override SmartScreen warning will not be available if it has been disabled via Group Policy or regedit (see below).
Here is an example:
- When you see the SmartScreen message, click on “More info”The SmartScreen warning is usually called “Windows protected your PC”.

- Select “Run anyway”, “Open anyway” or similarThis will disable SmartScreen just for this particular case and you might put your system at risk.


If you know what you are doing you can also turn off SmartScreen in Windows 10 completely or partially in the Windows Security Center.
How to Disable SmartScreen Filters in the Windows Security Center
To turn off SmartScreen you won´t find the required options in Windows 10 settings but in the Windows Security Center.
- Open “Windows Security”

- Open “App & browser control” in Windows Security

- Click “Reputation based protection settings”

- Disable “Check apps and files” to turn off Windows Defender SmartScreen
You won´t be able to disable Windows Defender SmartScreen if you are using third-party antivirus software. Then Windows Defender SmartScreen will automatically be turned off and the shown option be greyed out.

- Disable SmartScreen for Microsoft Edge
If you decide to turn off SmartScreen for Microsoft Edge you won´t see warnings about malicious sites and downloads inside the browser. If you however use the “Check apps and files”-option above, you might still see a warning when you try to open a malicious file you have downloaded via Edge.

- Disable SmartScreen for Potentially Unwanted Apps
The option “Potentially unwanted app blocking” protects you against apps with low reputation that might show unwanted behaviour such as adware or be malicious like fake-apps that try to rip you off with in-app sales.

- Disable SmartScreen for Microsoft Store apps
The option “SmartScreen for Microsoft Store apps” controls the behaviour of store apps and potentially annoying or malicious content they might load from the internet.


How to Disable SmartScreen Filter using Group Policy
You can turn off SmartScreen via Group Policy using different filters or turn those filters permanently off. Then no changes to those SmartScreen filters can be made on the user level and the respective options in Windows Security will be greyed out.
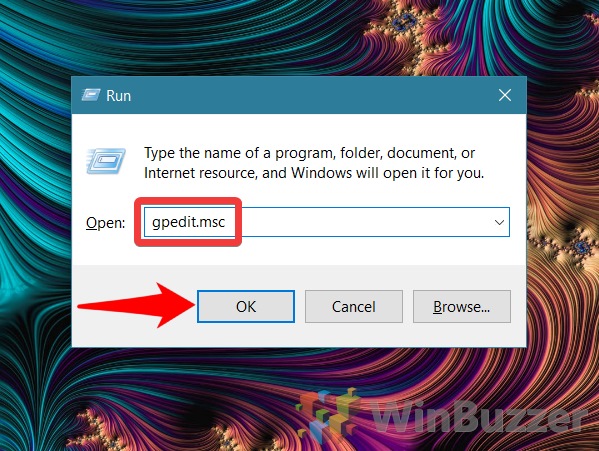
- Open Group Policy
Open Windows 10 group policy via search or the “Windows + R” run-dialog using the command “gpedit.msc”.

- Open the needed group policy
There are different available group policies you can use to turn off Windows SmartScreen filters case by case. You can find them navigating in the left pane to their respective paths. Here we show you how this looks like for the first one.
Administrative Templates\Windows Components\Windows Defender SmartScreen\Explorer\Configure Windows Defender SmartScreen
This policy setting turns on Microsoft Defender SmartScreen generally to check apps and files on your device.

Administrative Templates\Windows Components\Windows Defender SmartScreen\Explorer\Configure App Install Control
This policy setting is intended to prevent malicious content from affecting your user’s devices when downloading executable content from the internet. It does not protect against malicious content from USB devices, network shares, or other non-internet sources.
Administrative Templates\Windows Components\Windows Defender SmartScreen\Microsoft Edge\Configure Windows Defender SmartScreen
This policy setting turns on Microsoft Defender SmartScreen in Microsoft Edge for websites and downloads.
Administrative Templates\Windows Components\Windows Defender SmartScreen\Microsoft Edge\Prevent bypassing Windows Defender SmartScreen prompts for files
This policy setting stops users from bypassing the Microsoft Defender SmartScreen warnings about potentially malicious files. If you enable this setting, it stops users from bypassing the warning, stopping the file download.
Administrative Templates\Windows Components\Windows Defender SmartScreen\Microsoft Edge\Prevent bypassing Windows Defender SmartScreen prompts for sites
This policy setting stops users from bypassing the Microsoft Defender SmartScreen warnings about potentially malicious sites. If you enable this setting, it stops employees from bypassing the warning, stopping them from going to the site.
- Enable SmartScreen Group Policies
You can enable or disable SmartScreen filters shown listed above individually. In some cases there will be additional Options to choose from as shown below.


How to Disable SmartScreen Filters using the Registry Editor
Users of Windows 10 Home that don´t have access to group policies can turn SmartScreen off also via regedit.
- Open “regedit”
Open the Windows 10 registry editor using search or the “Windows + R” run-dialog using the command “regedit”.

- Open the required path and create DWORD
Go to the following location, right-click and choose “New – DWORD 832-bit) Value”.
Computer\HKEY_LOCAL_MACHINE\SOFTWARE\Policies\Microsoft\Windows\System

- Name DWORD and set value
Name the value as “EnableSmartScreen”, double-click on the newly created value and set “Value Data” to “0” to turn off SmartScreen.

- Create second DWORD for the SmartScreen blocking level
Right-click on the right panel select “New – String Value” and name the value as “ShellSmartScreenLevel”.

- Set SmartScreen blocking level
Double-click on the new string value and set either “Warn” or “Block” as “Value data” according to your preference.
“Warn” will shows a SmartScreen warning message that can be bypassed.
“Block” shows a warning message and also blocks you from running the app or file manually.


How to Enable or Disable Windows Defender Application Guard and Secure Sign-In
In Windows 10 you can also turn Windows Defender Application Guard on or off via Windows Features or enable or disable secure sign-in for the Ctrl+Alt+Del hotkey.
3 Ways To Disable SmartScreen Defender in Windows 10 PC – permanently and temporarily. Windows 10’s built-in feature is now called an antivirus defender, where this defender can detect viruses on your Windows computer and laptop.

Table of Contents
But many are complaining about this feature because according to him it is no longer useful considering there are still other antiviruses that have more optimal work than Windows Defender on Windows 10.
Read more:
- How to Activate Windows Defender on Windows 10
- How To Fix Windows 10 License Will Expire Soon
- Best Ways To Activate Windows 7 Permanently Offline
- Best Tricks To Activate Windows 8 Permanently Offline
Maybe I can help you in turning off this Windows Defender antivirus. Previously I just wanted to review a little about what is Windows Defender and the function of the antivirus.
Understanding Windows Defender Antivirus Applications
Understanding Windows Defender is a feature to maximize the performance of laptops and computers that have the Windows 10 operating system installed. Windows 10 itself has several variants including the pro and home versions. Both versions are both used in the Windows operating system that you are using now.
Windows Defender function
Windows 10 security center you can imagine as the default Windows itself. The purpose of this antivirus is made so that it can protect against all computer threats in the form of viruses, but the default Windows antivirus is not as maximum as other anti-viruses, where you can only check and know even a mild virus can not detect the presence of trojan viruses, ransomware and so on.
I usually use the function of Windows Defender only to monitor whether the file manager, host, or system32 folder there is a dangerous virus or not even though it only detects a little but is still light to use.
Other functions you can know like seeing if there are the latest Windows updates, virus scans, folder scans, and so on, you can see yourself in the latest Windows Defender when running your Windows on a laptop …
But some people assume that Windows Defender is only burdensome at startup (when booting) because it will work when the laptop or computer is turned on to process the scanning of files for your benefit when opening the computer/laptop.
Well, therefore I made a tutorial on how to disable the Windows Defender Security Center in Windows 10. I will divide the two ways in handling this case, it can be said to be permanent and only by temporarily shutting down (when the startup will be active again)
By shutting down Windows 10 antivirus you can install virus-detected software even though the software is not a virus (it could be said to be a dangerous file). For example, such as when you are looking for a keygen for activation of Adobe and Corel services, then you can read it and the following reviews for you.
How to Disable Windows Antivirus on Windows 10
Removing an active system will occur several obstacles including the laptop there will be no update notification about the Defender application and including you will not be supported directly by Microsoft. But don’t worry friend, you can still use the device safely, you can change the anti-virus to another option.
Anti-virus which in my opinion is very helpful is avg tuneup, avast, asset, and Smadav. The choice depends on which you want to use from the third category I mentioned earlier. Remember, friend, never install too much antivirus so as not to burden the device system. For those of you who can’t wait to get to the core of how to disable Windows Defender Win 10, please refer to the following.
#1. Temporarily turn off Windows Defender
The first step on how to disable antivirus on Windows 10 is only to anticipate if you want to install pirated applications that require using Keygen. If you are confused about the default Windows antivirus display, you can follow the steps below.
First, prepare a laptop that has been turned on, friend, then you can select Start Menu -> Type Defender -> Click Windows Defender / Directly Enter.

Second, after entering it will look like this, then select the Virus & Threat Protection menu.

Third, if you have changed the appearance as below you can click on the Virus & Threat Protection Settings menu to solve the problem of disabling Windows Defender.

Fourth, after entering the menu will appear as below, point your cursor to the blue deactivation icon/button in the real-time protection text.
A notification will appear that you want to turn off in the Windows Defender application if asked to select Yes or No, select Yes only. Turn it off until it turns gray.

After that, what do you want to install, now you can install programs like Keygen. So, whether deactivating Windows Defender above can help you? If not, please use the next method.
#2. Permanently Turn Off Windows Defender Via Group Policy
This second tutorial has indeed been turned off forever even though your device is restarting. It’s different from temporarily deactivating it will still run again if the laptop/ computer is restarted and restarted. Following the tutorial on disabling the protection feature.
a. Open the start menu or press the Windows key on your keyboard.
b. Then type it like this: gpedit.MSC then press enter.
c. Then there will be a UAC prompt, you can confirm it by pressing Yes.
d. After that, point the cursor to choose Local Computer Policy -> Computer Configuration -> Administrative Templates -> Windows Components -> Windows Defender SmartScreen -> Microsoft Edge -> Configure Windows Defender SmartScreen.
Read more: How to Activate Windows 10 Permanently
e. Then turn off the defender by pressing the Disabled button. Selecting disabled means that you will not receive real-time protection.

f. After that, click Apply and then OK, if you don’t believe this is a permanent method, please just check on Windows Defender, there must be dead real-time protection or you can restart it first, then check.
#3. Using the Registry Editor
If you have not succeeded in disabling the antivirus application above, you can disable it via the registry editor. Just a reminder that using a registry editor is very risky and dangerous, so don’t blame me if this method doesn’t work.
1. Press the Windows key on your keyboard to open the Start menu, then type the word regedit.exe and then press enter.
2. The next step appears in a confirmation window, please click Yes.
3. Move your cursor to select HKEY_LOCAL_MACHINE -> SYSTEM -> CurrentControlSet -> Services -> SecurityHealthService. Next, you can find the right Start key. If you don’t find the option as drawn, double-click on the SecurityHealthService folder.

4. Then click the preference twice, change the value data value to 4 then click OK, then restart your computer or laptop to feel the windows defender is not active.

For those of you who want to revive it, you can change the value data to number 2 again then reload your computer or laptop.
Those are the three steps to turn off Microsoft’s default antivirus program, friend, if you use methods number 2 and 3, be careful, friend, because it is not certain that your device does not even work and your device crashes instead.
Thus my review of the world of laptops and computers with an interesting discussion, that way you will no longer have the name of the Windows Defender application active again when using the permanent method but if you still use the temporary method only when the laptop/computer is on.
Read more:
- How to Fix Windows Script Host Disabled In Windows PC
- The Best Antivirus Software to Protect Windows 10 PCs
- How to Remove and Clean a Virus on a Windows 10 Laptop
Conclusion:
I have ended up here about the review if there are questions you can comment below. Thank you for reading my article about how to turn off the Windows Defender application on Windows 10 temporarily and permanently.
Don’t forget to bookmark and always visit every day Technadvice.com because here you can find the latest technology information such as How-to Guide Tips and Tricks Blogging Digital Marketing Windows Android Root Social Media games, ETC. Best of luck.
 Фильтр SmartScreen встроенного в Windows антивируса Microsoft Defender призван предотвращать запуск потенциально небезопасных файлов, особенно программ, скачанных из Интернета: он реагирует не только на файлы, которые действительно предоставляют угрозу, но и, например, малоизвестные «неопознанные» утилиты, скачанные в сети. Также он защищает от посещения потенциально небезопасных сайтов в браузере Microsoft Edge.
При желании вы можете отключить фильтр SmartScreen в Windows 11, чтобы предупреждения вида «Система Windows защитила ваш компьютер» не появлялись. В этой инструкции подробно о способах это сделать. Также может быть полезным: Как отключить Microsoft Defender в Windows 11.
Способы отключения фильтра SmartScreen
При срабатывании фильтра SmartScreen для программ, скачанных из Интернета, пользователь обычно видит следующее предупреждение с текстом «Фильтр SmartScreen в Microsoft Defender предотвратил запуск неопознанного приложения», хотя возможны и иные варианты.

Для запуска программы в этом случае можно нажать по ссылке «Подробнее», а затем — кнопку «Выполнить в любом случае». Это не всегда удобно и, если вы решили отключить эту функцию, можно использовать один из следующих методов.
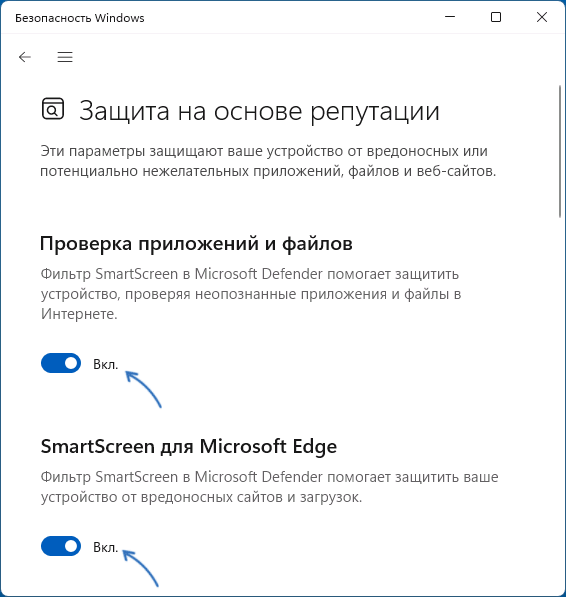
Безопасность Windows
Первый способ отключения фильтра SmartScreen — использование параметров в окне «Безопасность Windows». Шаги будут следующими:
- Откройте «Безопасность Windows» с помощью значка в области уведомлений или используя поиск в панели задач.
- Откройте раздел «Управление приложениями и браузером».

- В разделе «Защита на основе репутации» нажмите «Параметры защиты на основе репутации».

- Отключите фильтр SmartScreen в пункте «Проверка приложений и файлов», а если требуется — то и фильтр SmartScreen для Microsoft Edge.

- Пролистайте список доступных настроек ниже: там доступны ещё две опции: блокировка потенциально нежелательных приложений и фильтр SmartScreen для приложений из Microsoft Store, которые тоже можно отключить. С вниманием отнеситесь к первой из них: она предназначена для блокировки тех приложений, которые часто действительно являются нежелательными: например, могут внедрять рекламу или скачивать дополнительные, ненужные пользователю программы.


В большинстве случаев этих настроек достаточно и какие-либо другие действия для отключения функции предпринимать не нужно, однако есть и дополнительные варианты выполнить необходимое действие.
Реестр Windows
Отключить фильтр SmartScreen можно в редакторе реестра Windows 11. Чтобы сделать это вручную, выполните следующие шаги:
- Нажмите клавиши Win+R на клавиатуре, введите regedit и нажмите Enter
- Перейдите к разделу реестра
HKEY_LOCAL_MACHINE\SOFTWARE\Microsoft\Windows\CurrentVersion\Explorer
- Дважды нажмите по параметру SmartScreenEnabled и измените его значение на Off. При отсутствии параметра с таким именем, нажмите правой кнопкой мыши в правой панели редактора реестра выберите пункт Создать — Строковый параметр и создайте параметр с указанным именем.

- Дополнительно может иметь смысл создать параметр DWORD с именем EnableSmartScreen и значением 0 в разделе реестра
HKEY_LOCAL_MACHINE\SOFTWARE\Policies\Microsoft\Windows\System

Также вы можете создать REG-файл со следующим кодом для отключения фильтра SmartScreen:
Windows Registry Editor Version 5.00

[HKEY_LOCAL_MACHINE\SOFTWARE\Microsoft\Windows\CurrentVersion\Explorer]
"SmartScreenEnabled"="Off"
[HKEY_LOCAL_MACHINE\SOFTWARE\Policies\Microsoft\Windows\System]
"EnableSmartScreen"=dword:00000000
"ShellSmartScreenLevel"=-
После чего «запустить» этот файл и согласиться с добавлением данных в реестр.
Редактор локальной групповой политики
Если на вашем компьютере установлена Windows 11 Pro или Enterprise, вы можете использовать редактор локальной групповой политики для отключения SmartScreen для проверки файлов из Интернета:
- Нажмите клавиши Win+R, введите gpedit.msc и нажмите Enter.
- Перейдите в раздел Конфигурация компьютера — Административные шаблоны — Компоненты Windows — Проводник.
- Дважды нажмите по параметру «Настроить функцию SmartScreen» Защитника Windows.

- Установите значение «Отключено» для него, затем примените настройки.

- Дополнительные политики фильтра SmartScreen можно найти в разделе Конфигурация компьютера — Административные шаблоны — Компоненты Windows — SmartScreen защитника Windows. Например, в подразделе Explorer можно отключить политику с тем же названием «Настроить функцию SmartScreen», а в разделе «Microsoft Edge» — отключить SmartScreen для этого браузера.


SmartScreen в настройках Microsoft Edge
Если вы пользуетесь браузером Microsoft Edge и задача — отключить SmartScreen в этом браузере, сделать это можно в его настройках:
- Откройте меню Microsoft Edge и перейдите в пункт «Настройки».
- Откройте раздел настроек «Конфиденциальность, поиск и службы», также можно ввести edge://settings/privacy в адресную строку и нажать Enter, чтобы сразу попасть в нужный раздел настроек.
- Пролистайте страницу настроек внизу до раздела «Безопасность».
- Отключите «Фильтр SmartScreen в Microsoft Defender».


В том же разделе настроек есть опция отключения блокировки скачивания потенциально нежелательных приложений: отключать ли её — на ваше усмотрение.
Завершая статью, обращаю ваше внимание на то, что к отключению встроенных функций безопасности Windows 11 и других версий ОС не стоит прибегать без необходимости и четкого осознания возможных последствий.
Windows Defender Smartscreen is a security feature that helps protect your computer from potential threats. If you disable Windows Defender Smartscreen, you may be at risk of potential attacks.
To disable Windows Defender Smartscreen, open the Control Panel and click on the Security tab. Under the heading “SmartScreen”, select “Disable”.
The SmartScreen filter works by analyzing the downloaded files and the websites on your computer. It uses a large database of black and white list websites to determine if any of them contain malware. When it detects a risky file or website, SmartScreen will stop it from running. Windows will also show you a list of safe websites, which can be accessed. Changing this setting will enable SmartScreen without affecting the system’s performance.
EnableSmartScreen is a REG_DWORD value stored in the System folder. It can be edited using the context menu in Windows Explorer. You can double-click the SmartScreenEnabled string value to turn off the program. This setting is also stored in Windows Registry Editor. You can find it in Explorer by typing ‘Windows Security’ into the Start/Search box. Once you have found the value, you can delete it.
There are some times when you might want to disable Windows Defender SmartScreen on your PC. If you’re not a fan of the annoying feature, there are several ways to do it. First, you can disable Windows Defender SmartScreen by choosing the “Warn when potentially malicious” radio button. Next, you should immediately re-enable it after you’re done. SmartScreen prevents you from taking unauthorized actions, including downloading malware.
Should I Disable Windows Defender SmartScreen?How Do I Turn Off SmartScreen on Windows 10 2021?How Do I Turn Off Windows 7 SmartScreen?How Do I Bypass SmartScreen on Windows 10?Is Windows Defender SmartScreen Good?Why is Windows Defender SmartScreen Running?How Can I Disable Windows Defender in Windows 10?
Once you’ve disabled SmartScreen, you can easily enable it again by visiting the App & Browser Control icon in Windows Defender. There, you can select the different filters that are used to block malicious content. Alternatively, you can disable SmartScreen altogether. Remember that SmartScreen will always block known harmful content and warn you before you run any unrecognized applications. However, if you’re concerned about the security of your PC, disabling it may be a better option.
Windows SmartScreen is an important security feature on Windows 10. It blocks malicious websites and downloads that can harm your computer. While you should never download and run malicious applications, SmartScreen will alert you if any suspicious files or sites try to install themselves on your PC. Additionally, SmartScreen will block any programs that don’t have digitally signed binaries or information. But there is one big downside to SmartScreen – it can sometimes block safe applications that you may be using.
How Do I Turn Off SmartScreen on Windows 10 2021?
If you’ve had enough of the SmartScreen and want to turn it off, you can do so in a few easy steps. First, go into the system settings menu. From there, click App & Browser Control and locate the SmartScreen layer. To turn it off, click OK and close the registry window. Now, you’ll see the SmartScreen settings, and you can disable them as needed.
To turn off the SmartScreen filter, open the Internet Properties dialog in the Control Panel. In the left pane, you should see a tab called Reputation-based protection. Click on this to see the SmartScreen filter settings. You can disable the SmartScreen filter on a per-website basis, or you can turn it off in bulk. Note, however, that this method only works on Windows Pro and Enterprise editions. If you are using a Windows Home edition, you need to manually enable it.
Another way to disable Windows Defender SmartScreen on your PC is to disable the program’s security settings. This is especially important if you’re running a program that isn’t recommended by Windows, or if you want to install a program from a trusted source. However, there’s an easy way to override the SmartScreen and install whatever programs you’d like.
How Do I Turn Off Windows 7 SmartScreen?
If you are tired of constantly being prompted with warnings about security threats, you may want to learn how to disable Windows Defender Smartscreen. If you want to turn off Windows SmartScreen, you can edit the registry to make this change. First, you need to backup your registry database. Once you have done this, navigate to the “smartscreen” key in the registry. Then, type 0 in the Value data field, and hit enter. Next, you can go ahead and restart your system to see the change.
Next, go to Start > Control Panel > Security Center. Click on the App & Browser Control icon. You will find the Windows SmartScreen filter. You can change it to block unrecognized applications, warn you before allowing them to open, or disable it altogether. Using this feature will keep your computer safe from malware infection. It will warn you if it detects an unrecognized file or application.
How Do I Bypass SmartScreen on Windows 10?
If you would like to disable Windows Defender Smartscreen, there are two ways to do it. You can disable it with Windows group policy, or you can open the registry editor from the run-dialog. While the warning messages used by Windows SmartScreen differ from one another, the concept behind them remains the same. By clicking “OK”, you will be notified that the system is protecting your PC.
In some cases, the SmartScreen won’t recognize the app and warn you about it. When this happens, you can disable it in the system settings menu, called App & Browser Control. Once you find it, you can disable it and go back to using your computer. You can also enable it again by reversing the steps above. The process for turning SmartScreen off in Windows 10 is similar to turning off antivirus.
To disable Windows Defender SmartScreen, navigate to the App & Browser Control icon in Windows 10. On the left-hand side, click the “SmartScreen” tab. Click “Configure” next to the SmartScreen option. It will prompt you with a warning if you are installing an unknown application. However, you can disable the SmartScreen entirely by selecting “Disable SmartScreen”. You will need to back up the registry database and navigate to the relevant registry key.
Is Windows Defender SmartScreen Good?
Microsoft Edge includes a feature called “Windows Defender SmartScreen,” which can be used to block malware, phishing sites, and other dangerous software from running on your computer. This feature will warn you of suspicious websites and prevent you from opening them if they aren’t digitally signed. However, it has some drawbacks, too. Here are some reasons why SmartScreen isn’t perfect.
First, it’s important to know how to disable the SmartScreen filter. You can do this through the App & Browser Control menu on Windows 10. There, you’ll see several options for disabling the SmartScreen filter. You can enable or disable this setting by selecting the three dots in the upper-left corner of your screen. Once you’ve enabled SmartScreen, you can disable it and let Windows Defender clean up malware manually.
Next, Microsoft’s SmartScreen filter will scan the files and websites you download in Microsoft Edge and block them. Typically, SmartScreen will block any malware or PUAs on these sites, but that doesn’t mean they’re all malicious. Occasionally, you might accidentally download a dangerous program – which is where SmartScreen comes in handy. While it won’t block any reputable software, it can help protect your PC from viruses and spyware.
Why is Windows Defender SmartScreen Running?
There are several reasons why Windows Defender SmartScreen may be using resources on your PC. One possible cause is that the program has been installed on your PC without your knowledge. This means that Windows SmartScreen is running in the background. However, the process isn’t using much system resources. If you open the Task Manager, you’ll notice that it’s using only a few megabytes of memory and 0% CPU. If this is the case, you may want to temporarily disable the application.
The SmartScreen process uses limited amounts of CPU and memory when it launches. This happens only when you open a file or program, so it doesn’t waste valuable resources. The process also runs when you sign into your PC. During this time, SmartScreen uses zero CPU resources and a few megabytes of memory. You can terminate the process using the Task Manager, but Windows will automatically launch it when you need it.
How Can I Disable Windows Defender in Windows 10?
If you want to disable Windows Defender SmartScreen, you’ll need to know how to do so. The SmartScreen is a malware filter that comes with Windows 10. If you’d like to disable it, visit the Windows Settings panel and look for the SmartScreen settings. Click the Disable button if you want to disable the SmartScreen entirely. However, you must have administrator privileges to do so.
The settings for Microsoft Edge have a built-in option that lets you turn off Microsoft Defender SmartScreen. Click the Privacy, search and services tab. The Security section will have a toggle switch for “Block potentially unwanted apps.” Click Disable SmartScreen. Once disabled, click OK to save the change. If that doesn’t work, you can also disable SmartScreen for Microsoft Edge using the registry.
Once the Windows Security Center opens, open the Advanced settings window. Here, navigate to the Security Center. Click the Disabled radio button. The SmartScreen is now disabled. Make sure that you have the appropriate permissions and access to the system to turn off Windows Defender SmartScreen. In Windows 10, you can also turn off the SmartScreen by enabling the Registry Editor. If you don’t have administrator privileges, you can disable the SmartScreen filter manually.
-
Home
-
News
- How to Enable/Disable SmartScreen on Windows 11? Here Are 3 Ways!
By Daisy | Follow |
Last Updated
SmartScreen can keep your computer safe and many users want to know how to enable/disable SmartScreen on Windows 11. If you are one of them, you can refer to this post from MiniTool. Here are 3 ways.
Microsoft Defender SmartScreen is a part of Windows Security. It helps you protect against common threats by warning against downloading or installing potentially malicious files from other computers. This feature is enabled by default in Windows. However, sometimes you may want to enable or disable SmartScreen on Windows 11 by yourself.
Tips:
Whether using SmartScreen or not, it’s recommended to back up your important data regularly to protect it since downloading malicious apps may cause your data loss. To do that, you can try the free backup software – MiniTool ShadowMaker. It can back up files, folders, systems, and disks.
MiniTool ShadowMaker TrialClick to Download100%Clean & Safe
The following part introduces 3 ways for you to enable or disable SmartScreen on Windows 11.
Way 1: Via Settings
You can go to Windows Security settings to enable or disable SmartScreen on Windows 11. Here is how to do that:
1. Press the Windows + I keys together to open the Settings application.
2. Click Privacy & security > Windows Security > Open Windows Security.
3. Go to the App & browser control part. Under Reputation-based protection, click Reputation-based protection settings.

4. Then, you can enable or disable Check apps and files and Potentially unwanted app blocking. The other two filters are for Microsoft Edge and Microsoft Store apps.

Way 2: Via Local Group Policy Editor
You can turn on or off the Windows Defender SmartScreen using Local Group Policy Editor.
1. Press Windows + R to open Run. Type gpedit.msc and click OK to open Group Policy Editor.
2. Go to the following path:
Computer Configuration > Administrative Templates > Windows Components > File Explorer
3. Find the Configure Windows Defender SmartScreen option in the right panel.

4. Double-click it. Then, you can click Enabled or Disabled and click Apply and OK to save the changes.

Way 3: Via Registry Editor
You can also turn on or off the Windows Defender SmartScreen using Registry Editor. Follow the guide below:
1. Press the Windows logo key and the R key at the same time to open the Run dialog.
2. Type regedit and then press Enter to open Registry Editor. You’ll be prompted for permission and please click Yes to open it.
3. Go to the following path:
HKEY_LOCAL_MACHINE\SOFTWARE\Policies\Microsoft\Windows\System
4. From the left-hand side, right-click the System Registry key and choose New > DWORD (32-bit) value, and name it as EnableSmartScreen.

5. Then, double-click it to change its value data to 0.
Final Words
How to enable or disable SmartScreen on Windows 11? This post provides 3 ways and you can choose one of them based on your needs. I hope that this post can be useful to you.
About The Author

Position: Columnist
Having been an editor at MiniTool since graduating college as an English major, Daisy specializes in writing about data backups, disk cloning, and file syncing as well as general computer knowledge and issues. In her free time, Daisy enjoys running and going with friends to the amusement park.