Top tips to stop the Windows key from interrupting your activities
by Milan Stanojevic
Milan has been enthusiastic about technology ever since his childhood days, and this led him to take interest in all PC-related technologies. He’s a PC enthusiast and he… read more
Updated on
- Have you wondered how to disable the Windows key? Modifying the registry is one solution.
- Instead of modifying the registry, you can download a .reg file and use it to disable the Windows key.
- Usually, gaming keyboards have dedicated software so that you can check the key settings there.
The Windows key is somewhat helpful and is a part of many shortcuts on Windows 10. However, many users use it frequently, and some want to disable it.
The key can sometimes be a problem, especially during intense gaming sessions. By default, pressing the Windows key will open the Start Menu, which can make you lose focus while gaming.
This guide will show you the easy ways to disable the Windows key and prevent any distractions.
Can you disable the Windows key while gaming?
There are limited ways to disable the Windows key in game mode. This is because Microsoft views and has placed much importance on the key.
However, some gaming keyboards have a unique feature to lock and unlock the Windows key. Another option is to disable the Windows key from opening the Start Menu in-game.
This will require you to alter the keyboard configuration and controls in the game.
How we test, review and rate?
We have worked for the past 6 months on building a new review system on how we produce content. Using it, we have subsequently redone most of our articles to provide actual hands-on expertise on the guides we made.
For more details you can read how we test, review, and rate at WindowsReport.
How can I disable the Windows key?
1. Modify your registry
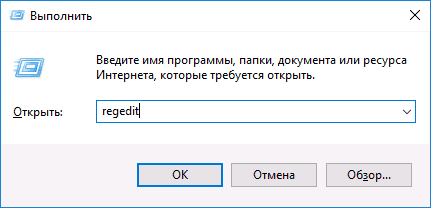
- Press the Windows key + R, type regedit, and click OK.

- To be on the safe side, click File > Export… to create a backup.

- Select All as Export range, choose a safe location, enter the desired file name and click on Save.

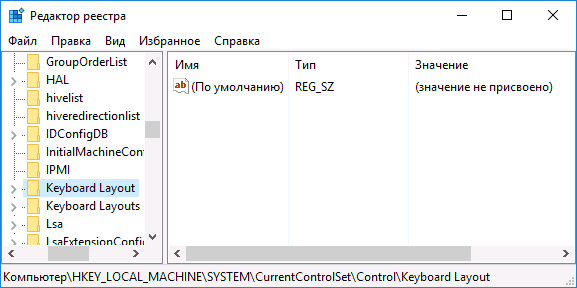
- In the left panel, navigate to:
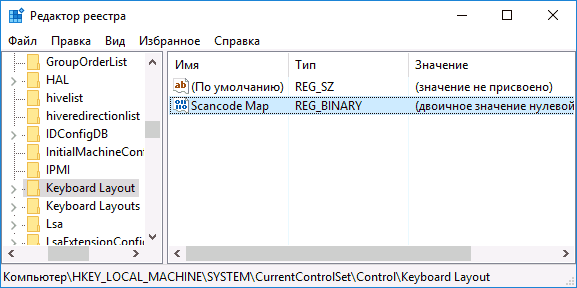
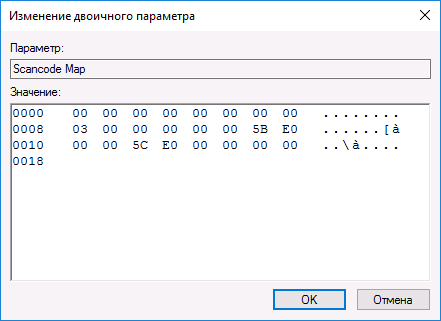
Computer\HKEY_LOCAL_MACHINE\SYSTEM\CurrentControlSet\Control\Keyboard Layout - In the right pane, right-click the space and choose New >Binary Value from the menu.
- Enter Scancode Map as the name of the new value.

- Double-click the Scancode Map value and enter 00000000000000000300000000005BE000005CE000000000 in the Data field.
- Be extra cautious and double-check if the entered value is correct. Now click OK.

- After doing that, close Registry Editor and restart your PC.


Keep in mind that your registry has sensitive information in it. So, if you want to edit it, use extra caution. If you encounter problems with your PC after modifying the registry, restore the backup created.
After your PC restarts, the Scancode Map you created in the registry should disable the Windows key altogether. Therefore, you need to delete the Map from the Registry Editor to enable it later.
Finally, if you are uncomfortable editing your registry manually, download Disable Windows key.reg and run it. This will perform the task for you quickly. To enable the key later, you must download and run Enable Caps Lock and Windows keys.reg.
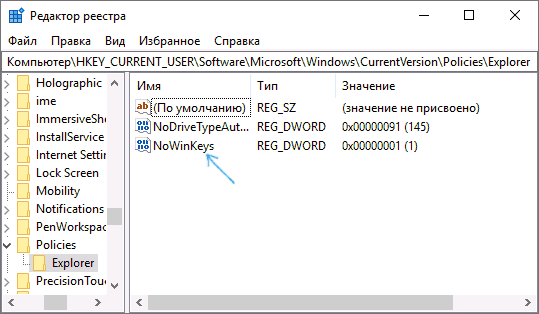
2. Use Registry Editor to block Windows Key hotkeys
- Open Registry Editor.
- When Registry Editor opens, from the left panel, go to:
HKEY_CURRENT_USER\Software\Microsoft\Windows\CurrentVersion\Policies\Explorer - Right-click any space in the right panel and choose New > DWORD (32-bit value).
- Enter NoWinKeys as the name of the new DWORD.

- Double-click NoWinKeys DWORD to open its properties.
- Set Value data to 1 and click OK to save changes.

- After you’re done, close Registry Editor and restart your PC to apply the changes.


This solution is ideal for you if you want to disable the Windows key because of a shortcut affecting games like Razer Huntsman and Apex Legends. It disables all shortcuts related to the Windows key entirely.
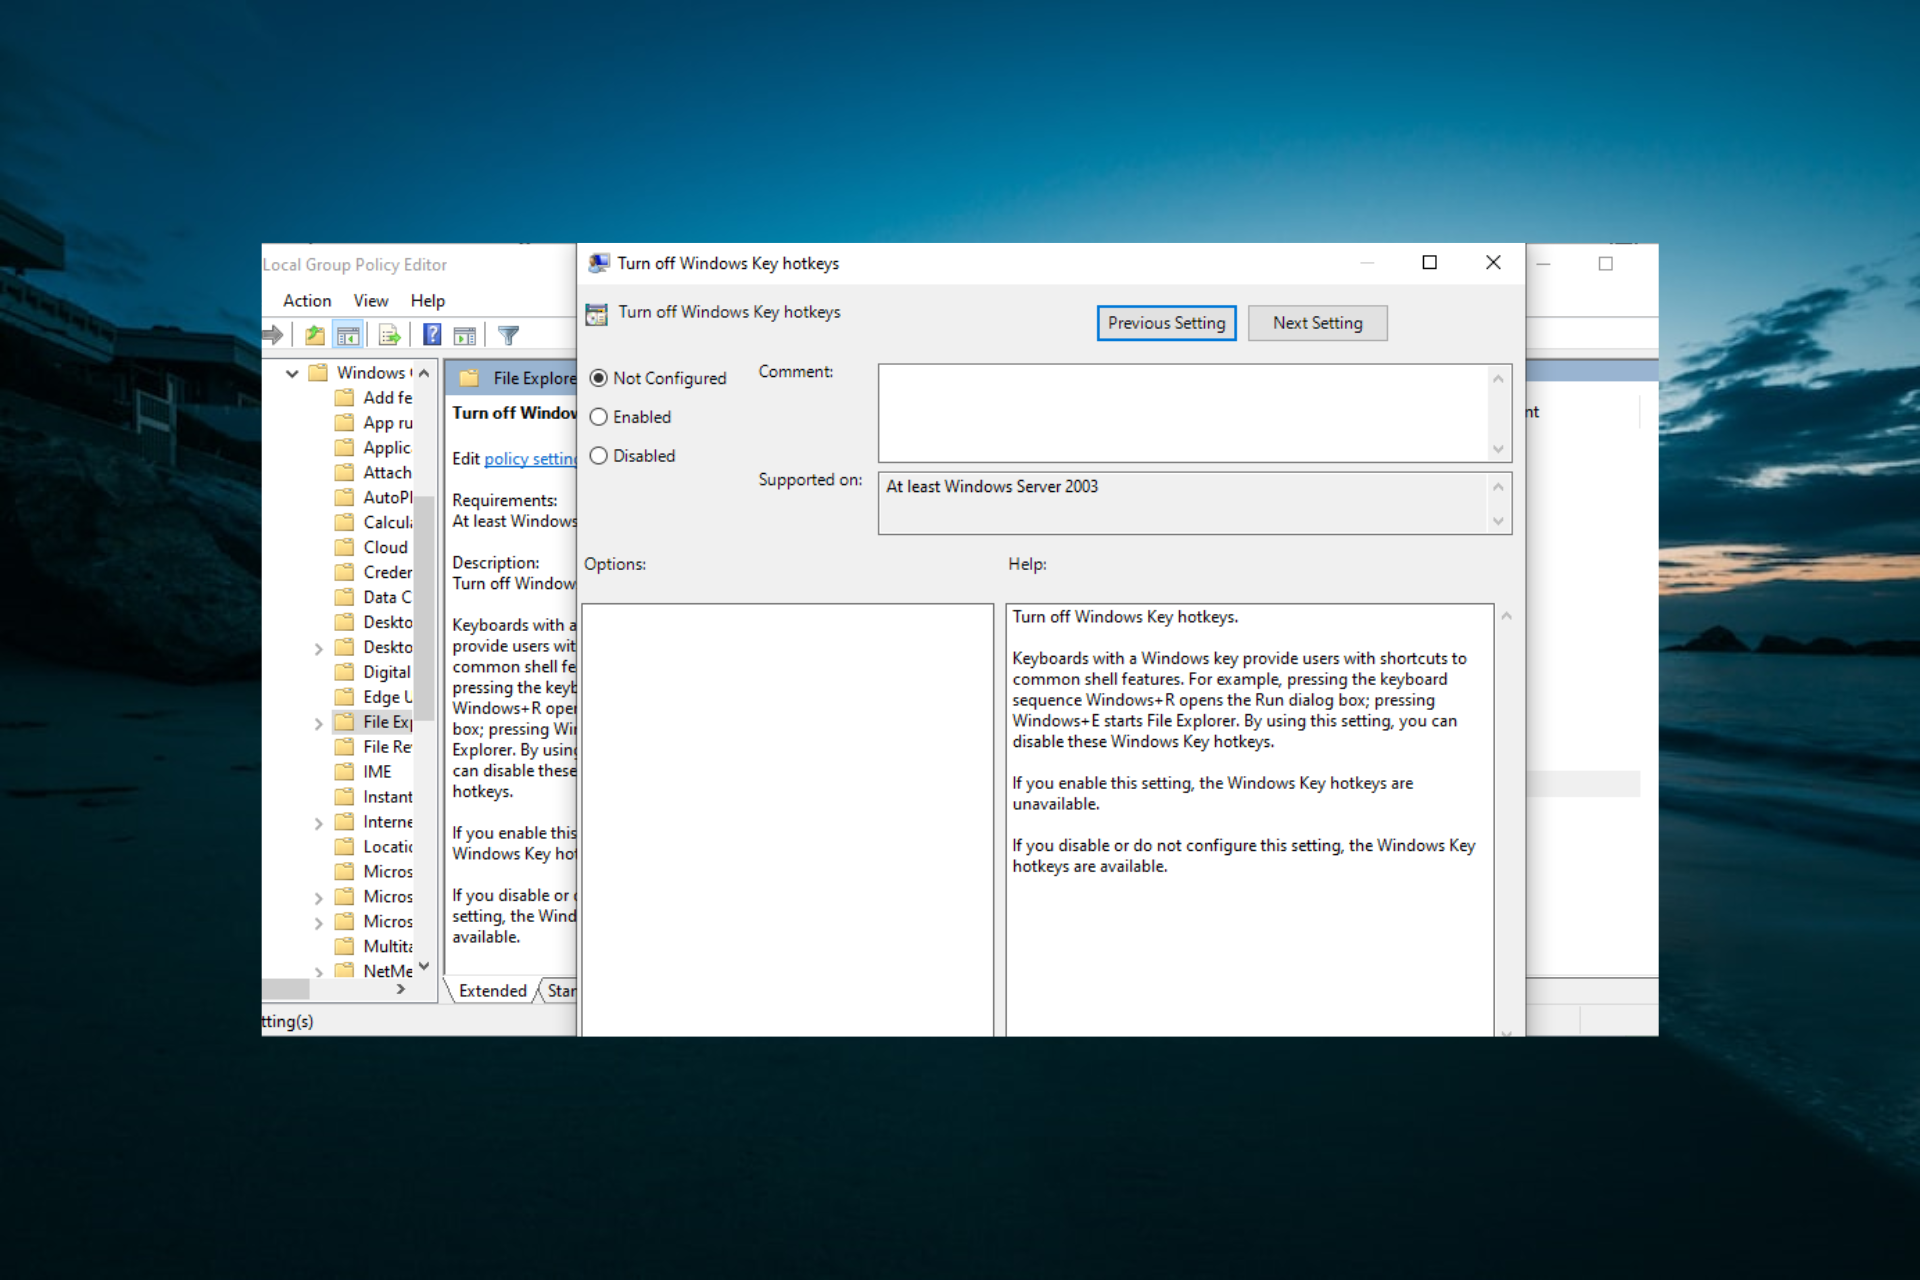
3. Use Group Policy Editor
- Press the Windows key+ R, enter gpedit.msc, and click OK.
- Now navigate to the User Configuration > Administrative Templates > Windows Components > File Explorer in the left pane.
- Locate and double-click the Turn off Windows key hotkeys option in the right pane.

- Select the Enabled option and click on Apply and OK to save changes.

- After that, restart your PC and check if that solves the problem.


This is a simple solution, but like before, it should disable only the Windows key shortcuts. If you need to disable the Windows key entirely, you might want to try a different solution.
4. Use a third-party software
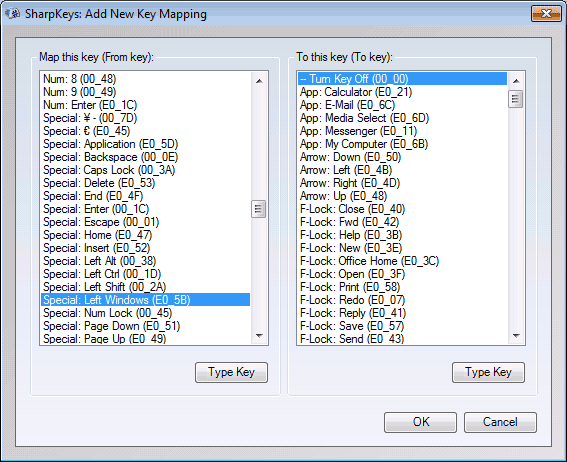
- Download and start SharpKeys.
- Once the application starts, click on Add.

- Now you’ll see two columns. Click on the Type Key in the left pane and press the Windows key.

- Now click on OK to select the pressed key.

- Select Turn Key Off in the right pane and click OK to save changes.

- Now, click on the Write to Registry button.

- From here, restart your PC or log out and log back in to apply the changes.
- Start Sharpkeys, select the desired key from the menu to enable the Windows key again and click on Delete.

- After deleting the key, click on the Write to Registry button.

- Now restart your PC or log off and back on to apply the changes.
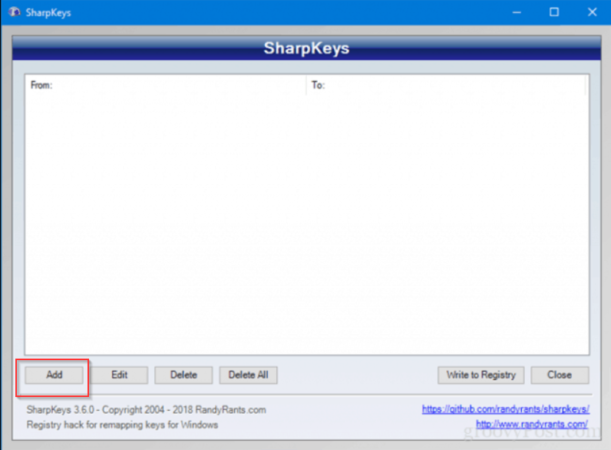


This free and portable tool allows you to remap your keys but can also disable keys or assign them to certain functions. Remember that this is a powerful application, so you’re using it at your own risk.
Other third-party options include the simple-to-use Winkill and creating a script with Autohotkey to disable the Windows key.
- Fix: This Alias Cannot be Added to Your Account Error on Windows 11
- How to fix the Thinkpad if it Won’t Wake Up
5. Use Gaming mode on your keyboard
Many gaming keyboards have a Gaming mode feature that allows you to block the Windows key with ease. However, you usually have to press a particular keyboard shortcut to activate Gaming mode.
Some keyboards even have a controller icon on one of its keys so you can easily find the shortcut key for Gaming mode. However, if you can’t find the shortcut, we advise you to check your keyboard manual for detailed instructions on activating Gaming mode.
Remember that not all keyboards support this feature, so check if your keyboard supports it.
The Windows key is beneficial but can get in your way sometimes. While there are many ways to disable it, the best and safest option is to use a gaming keyboard and set it to Gaming mode.
If you need a list of the best Logitech gaming keyboards, you can buy them today; check our detailed guide for the top picks you can select from.
If you have suggestions or questions, leave them in the comments section below, and we’ll take a look.
![]()
 Если по какой-то причине вам потребовалось отключить клавишу Windows на клавиатуре, сделать это достаточно просто: с помощью редактора реестра Windows 10, 8 или Windows 7, или же используя бесплатную программу для переназначения клавиш — об этих двух способах я и расскажу. Еще один способ — отключение не клавиши Win, а определенной комбинации с этой клавишей, который тоже будет продемонстрирован.
Сразу предупрежу, что если вы, как и я, часто используете комбинации клавиш наподобие Win + R (диалоговое окно «Выполнить») или Win + X (вызов очень полезного меню в Windows 10 и 8.1), то после отключения они вам станут недоступны, как и многие другие полезные сочетания клавиш.
Отключение сочетаний клавиш с использованием клавиши Windows
Первый способ отключает только все сочетания с клавишей Windows, а не саму эту клавишу: она продолжает открывать меню Пуск. Если вам не требуется полное отключение, рекомендую использовать именно этот способ, поскольку он самый безопасный, предусмотрен в системе и легко откатывается.
Реализовать отключение можно двумя способами: с помощью редактора локальной групповой политики (только в Профессиональной, Корпоративной редакциях Windows 10, 8.1 и Windows 7, для последней доступно также в «Максимальная»), или с помощью редактора реестра (доступно во всех редакциях). Рассмотрим оба способа.
Отключение сочетаний с клавишей Win в редакторе локальной групповой политики
- Нажмите клавиши Win+R на клавиатуре, введите gpedit.msc и нажмите Enter. Откроется редактор локальной групповой политики.
- Перейдите к разделу Конфигурация пользователя — Административные шаблоны — Компоненты Windows — Проводник.

- Дважды кликните по параметру «Отключить сочетания клавиш, в которых используется клавиша Windows», установите значение «Включено» (я не ошибся — именно включено) и примените сделанные изменения.

- Закройте редактор локальной групповой политики.
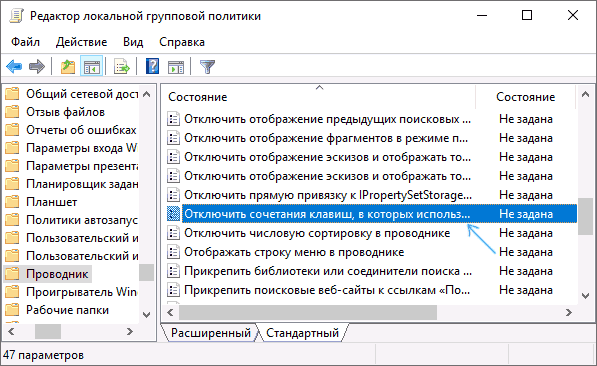
Чтобы изменения вступили в силу потребуется перезапустить проводник или перезагрузить компьютер.
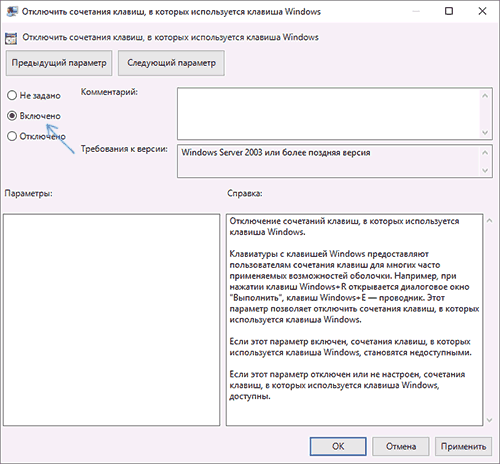
Отключаем сочетания с Windows в редакторе реестра
При использовании редактора реестра шаги будут следующими:
- Нажмите клавиши Win+R на клавиатуре, введите regedit и нажмите Enter.
- В редакторе реестра перейдите к разделу
HKEY_CURRENT_USER\Software\Microsoft\Windows\CurrentVersion\Policies\Explorer
При отсутствии раздела создайте его.

- Создайте параметр DWORD32 (даже для 64-битной Windows) с именем NoWinKeys, кликнув правой кнопкой мыши в правой панели редактора реестра и выбрав нужный пункт. После создания, дважды нажмите по этому параметру и задайте значение 1 для него.
После этого можно закрыть редактор реестра, также, как и в предыдущем случае, сделанные изменения заработают только после перезапуска проводника или перезагрузки Windows.
Как отключить клавишу Windows с помощью редактора реестра
Этот метод отключения также предлагается самой компанией Майкрософт и судя по официальной странице поддержки, работает в Windows 10, 8 и Windows 7, но отключает клавишу полностью.
Шаги по отключению клавиши Windows на клавиатуре компьютера или ноутбука в данном случае будут следующими:
- Запустите редактор реестра, для этого вы можете нажать клавиши Win+R и ввести regedit

- Перейдите к разделу (папки слева) HKEY_LOCAL_MACHINE\ SYSTEM\ CurrentControlSet\ Control\ Keyboard Layout

- Кликните в правой части редактора реестра правой кнопкой мыши и выберите в контекстном меню «Создать» — «Двоичный параметр», а затем введите его имя — Scancode Map
- Дважды кликните по этому параметру и введите значение (или скопируйте отсюда) 00000000000000000300000000005BE000005CE000000000

- Закройте редактор реестра и перезагрузите компьютер.
После перезагрузки клавиша Windows на клавиатуре перестанет работать (только что протестировано на Windows 10 Pro x64, ранее при первом варианте этой статьи, тестировалось в Windows 7). В дальнейшем, если вам снова потребуется включить клавишу Windows, просто удалите параметр Scancode Map в том же разделе реестра и перезагрузите компьютер — клавиша снова будет работать.
Оригинальное описание этого способа на сайте Майкрософт находится здесь: https://support.microsoft.com/en-us/kb/216893 (на этой же странице предлагается две загрузки для автоматического отключения и включения клавиши, но почему-то они не работают).
Использование программы SharpKeys, чтоб отключить клавишу Windows
Несколько дней назад я писал о бесплатной программе SharpKeys, позволяющей легко переназначить клавиши на клавиатуре компьютера. Помимо прочего, с помощью нее можно и отключить клавишу Windows (левую и правую, если у вас их две).
Для этого, в главном окне программы нажмите «Add» (Добавить), в левой колонке выберите пункт «Special: Left Windows», а в правой — «Turn Key Off» (выключить клавишу, выбрано по умолчанию). Нажмите «Ок». Проделайте то же самое, но для правой клавиши — Special: Right Windows.

Вернувшись в главное окно программы, нажмите кнопку «Write to registry» и перезагрузите компьютер. Готово.
Чтобы вернуть работоспособность отключенных клавиш, вы можете снова запустить программу (в ней будут отображаться все сделанные ранее изменения), удалить переназначения и снова записать изменения в реестр.
Подробно о работе с программой и о том, где скачать ее в инструкции Как переназначить клавиши на клавиатуре.
Как отключить комбинации с клавишей Win в программе Simple Disable Key
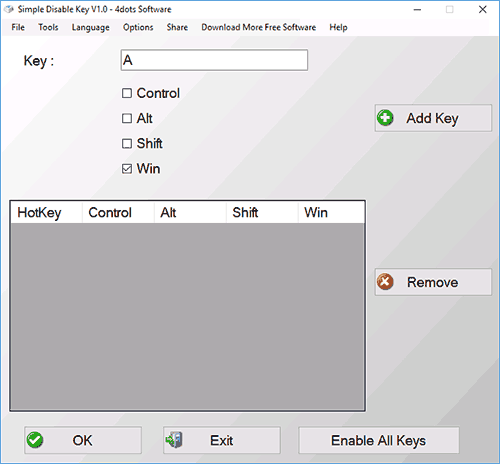
В некоторых случаях необходимым бывает не полностью отключить клавишу Windows, а только её комбинации с определенными клавишами. Недавно мне попалась бесплатная программа Simple Disable Key, которая умеет это делать, причем достаточно удобно (программа работает в Windows 10, 8 и Windows 7):
- Выделив окно «Key», вы нажимаете клавишу, а потом отмечаете «Win» и нажимаете кнопку «Add Key».
- Появится запрос — когда отключать комбинацию клавиш: всегда, в определенной программе или по графику. Выберите желаемый вариант. И нажмите Ок.
- Готово — указанное сочетание Win + клавиша не работают.
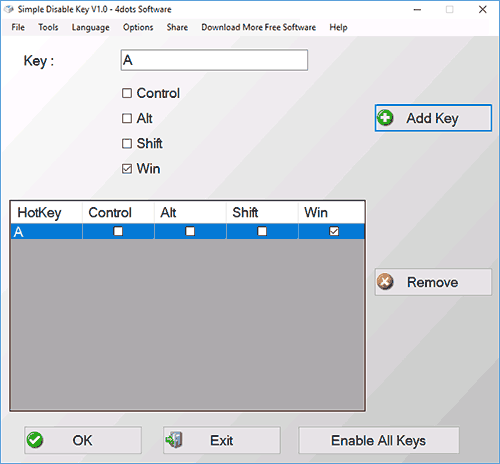
Работает это до тех пор, пока запущена программа (можно поставить ее в автозапуск, в пункте меню Options), а в любой момент, кликнув правой кнопкой по значку программы в области уведомлений, вы можете снова включить все клавиши и их комбинации (Enable All Keys).
Важно: на программу может ругаться фильтр SmartScreen в Windows 10, также VirusTotal показывает два предупреждения. Так что, если решите использовать, то на свой страх и риск. Официальный сайт программы — www.4dots-software.com/simple-disable-key/
If you’re a Windows 10 user, you’ve probably been annoyed at least once by having your game or work interrupted by the Windows key. In this article, we’ll show you how to quickly and easily disable the Windows key on your computer so you can get back to work or play without any interruptions. Read on to learn more about disabling the Windows key on Windows 10.
How to Disable Windows Key in Windows 10?
- Open Settings by pressing Windows+I on your keyboard.
- Go to Ease of Access.
- Go to Keyboard.
- Toggle the “Use the Windows logo key for keyboard shortcuts” option to Off.

How to Turn Off the Windows Key in Windows 10
The Windows key is a powerful tool in Windows 10, allowing users to quickly launch apps, access settings, and more. But it can also be a source of irritation if it’s accidentally pressed, or if you’re trying to play a game that uses the Windows key for shortcuts. Fortunately, it’s easy to disable the Windows key in Windows 10.
The first step is to open the Local Group Policy Editor. To do this, press the Windows key + R to open the Run dialog box. Type “gpedit.msc” and hit enter to launch the editor. Once the editor is open, navigate to the following setting: User Configuration > Administrative Templates > Windows Components > Windows Explorer.
In the right pane of the editor, you’ll see an option called “Prevent users from customizing their Windows Explorer settings.” Double-click on this option to open it. In the window that opens, select the “Enabled” option and then click “OK” to save the changes.
Disabling the Windows Key Through the Registry
If you don’t have access to the Local Group Policy Editor, you can also disable the Windows key through the Windows Registry. To do this, press the Windows key + R to open the Run dialog box. Type “regedit” and hit enter to launch the Registry Editor.
Once the Registry Editor is open, navigate to the following location: HKEY_CURRENT_USER\Software\Microsoft\Windows\CurrentVersion\Policies\Explorer. In the right pane of the editor, you’ll see an option called “NoWinKeys.” Right-click on this option and select “Modify.” In the window that opens, set the value to “1” and then click “OK” to save the changes.
Disabling the Windows Key Through a Shortcut
If you don’t want to mess around with the Registry or Group Policy, you can also disable the Windows key by creating a shortcut. To do this, right-click on the desktop and select “New > Shortcut.” In the window that opens, type the following command:
RunDll32 User32.dll,DisableWineKey
Click “Next” to continue and then give the shortcut a name. Finally, click “Finish” to create the shortcut. Now, when you double-click on the shortcut, the Windows key will be disabled. To re-enable it, simply double-click on the shortcut again.
Disabling the Windows Key Through the Command Prompt
If you don’t want to create a shortcut, you can also disable the Windows key through the Command Prompt. To do this, press the Windows key + R to open the Run dialog box. Type “cmd” and hit enter to launch the Command Prompt.
Once the Command Prompt is open, type the following command and hit enter to execute it:
RunDll32 User32.dll,DisableWineKey
This command will disable the Windows key. To re-enable it, simply run the same command again.
Few Frequently Asked Questions
1. What is the Windows Key?
The Windows key is a key found on most Windows keyboards that can be used to open the Windows Start Menu or bring up the Windows Search bar. It is typically located between the Ctrl and Alt keys on the keyboard and may be labeled with the “Windows logo” or with the word “Windows”.
2. What are the Benefits of Disabling the Windows Key?
Disabling the Windows key can be useful in certain gaming scenarios, as it prevents the user from accidentally pressing the key and interrupting their game. Additionally, disabling the Windows key can help prevent malicious users from accessing the Start Menu or Windows Search bar and potentially accessing private or sensitive information.
3. How to Disable the Windows Key on Windows 10?
To disable the Windows key on Windows 10, users can go to the System Settings, select the “Ease of Access” tab, then select the “Keyboard” section. From there, they can find an option to “Disable the Windows Key” and toggle it to “On”.
4. Is it Possible to Re-enable the Windows Key?
Yes, it is possible to re-enable the Windows Key. To do so, users can simply follow the steps outlined above and toggle the “Disable the Windows Key” option to “Off”.
5. Are there any Alternative Methods for Disabling the Windows Key?
Yes, there are alternative methods for disabling the Windows Key. One method is to use the Windows registry editor to modify the registry key “Scancode Map”, which can be used to disable the Windows Key. Additionally, some users may be able to use third-party software to disable the key.
6. Is Disabling the Windows Key Permanent?
No, disabling the Windows key is not permanent. If users wish to re-enable the Windows Key, they can simply follow the steps outlined above and toggle the “Disable the Windows Key” option to “Off”. Additionally, if users have used the Windows registry editor or third-party software to disable the key, they can use those methods again to re-enable it.
How to disable Windows key or WinKey in Windows 10/8/7
Disabling the Windows key in Windows 10 is an easy process. By following the steps outlined in this article, you can quickly and easily disable the Windows key, ensuring your keyboard is always running optimally. With the Windows key disabled, you’ll be able to use your keyboard more efficiently, and you can rest assured that you won’t accidentally activate the Windows key and interrupt your workflow.
Приветствую вас на классном портале про технологии WiFiGid! В этой статье мы поговорим о том, как можно разблокировать кнопку Windows на клавиатуре (ну или наоборот заблокировать, тут на вкус и цвет). Обычно к нам попадают люди после «работы» детей за компьютером или даже простой протирки клавиатуры. Что-то где-то случайно нажалось, а на выходе клавиша WIN не отвечает. Будем исправлять?
В своей практике я встречал разные причины этого чудесного происшествия. И иногда они были ОЧЕНЬ бредовые. Поэтому если вы нашли свое решение и можете им поделиться – пожалуйста, напишите об этом в комментариях под статьей, другие люди с точно такой же проблемой будут очень сильно благодарны вам (аж заикаете).
Содержание
- Шаг 1 – А может быть приснилось?
- Шаг 2 – Переподключение и перезагрузка
- Шаг 3 – Сочетание клавиш
- Шаг 4 – Драйвера
- Шаг 5 – Игровой режим
- Шаг 6 – Специальный софт
- Шаг 7 – Включение и отключение через групповую политику
- Шаг 8 – Редактор реестра
- Видео по теме
- Задать вопрос автору статьи
Шаг 1 – А может быть приснилось?

Очень важно, чтобы ваша клавиша WIN вообще работала до какого-то события. Т.е. если клавиша WIN никогда не работала, тут может быть все что угодно – может она вообще физически поломана. А вот если вы и правда что-то случайно задели, тогда эта статья как раз об этом.
Ну и самое важное: в настройках Windows нет быстрого способа заблокировать-разблокировать клавишу WIN, так что скорее всего дело все-таки в клавиатуре.
Шаг 2 – Переподключение и перезагрузка
Начнем с самого простого и эффективного метода. Особенно актуально для компьютеров с внешними клавиатурами, но может помочь и ноутбуку:
- Отключаем клавиатуру (актуально для внешних клавиатур).
- Перезагружаем компьютер.
- Подключаем клавиатуру (и можно даже в другой порт).
Исчезла ли проблема так? Работает клавиша теперь? Если нет, едем дальше. Но многим и правда помогает, главное соблюдать правильный порядок.
Шаг 3 – Сочетание клавиш
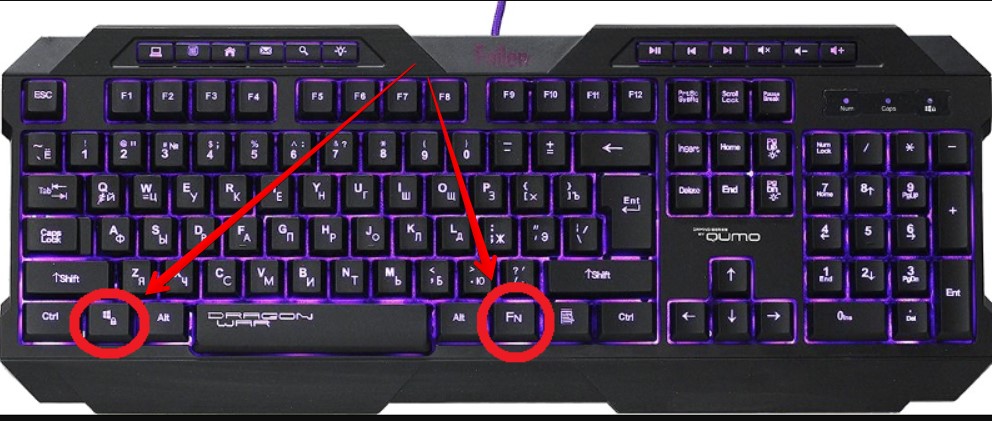
Пришло время приглядеться к своей клавиатуре:
- Может быть на ней есть специальная клавиша WinLock или любая другая, со словом Win в названии? Как раз эта кнопка и делает блокировку. Но встречается далеко не везде.
- Встречается чуть чаще: а есть ли клавиша Fn на вашей клавиатуре? Он почти всегда встречается на ноутбуках. Если есть, проверяем верхний ряд клавиш F1 … F12 и смотрим на их значки. Есть ли на них что-то похожее на значок ? Если есть, используем сочетание клавиш Fn плюс эту клавишу. Из рабочих решений встречал Fn + F6, Fn + F8 и Fn + F Но вслепую не нажимайте их, а то еще отключите экран или чего-то другое, а потом будете искать уже решение другой проблемы
Ну и стоит знать, что наличие клавиши Fn не гарантирует отключение WIN с клавиатуры, на моем текущем ноутбуке такой возможности нет.
- Встречал и такие внешние клавиатуры, где для блокировки или разблокировки нужно использовать сочетание клавиш Fn + :
Шаг 4 – Драйвера
Обычно клавиша WIN работает без проблем на стандартных драйверах Windows, но бывают в природе отдельные клавиатуры, которые для ее функционирования требуют установку своего драйвера. На этом шаге я просто рекомендую зайти на сайт производителя своей клавиатуры (особенно если она из какой-нибудь супер-пупер игровой серии) и проверить наличие каких-то специальных драйверов. Если они существуют, устанавливаем и скорее всего радуемся. Но обычно это пустое дело, хотя упомянуть и стоило.
Шаг 5 – Игровой режим
Если ваша клавиатура поддерживает игровой режим (и для этого есть специальный софт), то есть вариант, что во время игры она просто умышленно отключает клавишу WIN. И это проявляется только при запуске каких-то игр или программ, но в обычной работе Windows все должно работать как надо. Решение – запускаем программу, которая управляет вашей клавиатурой и проверяем все пункты, которые в теории могут отключать WIN.
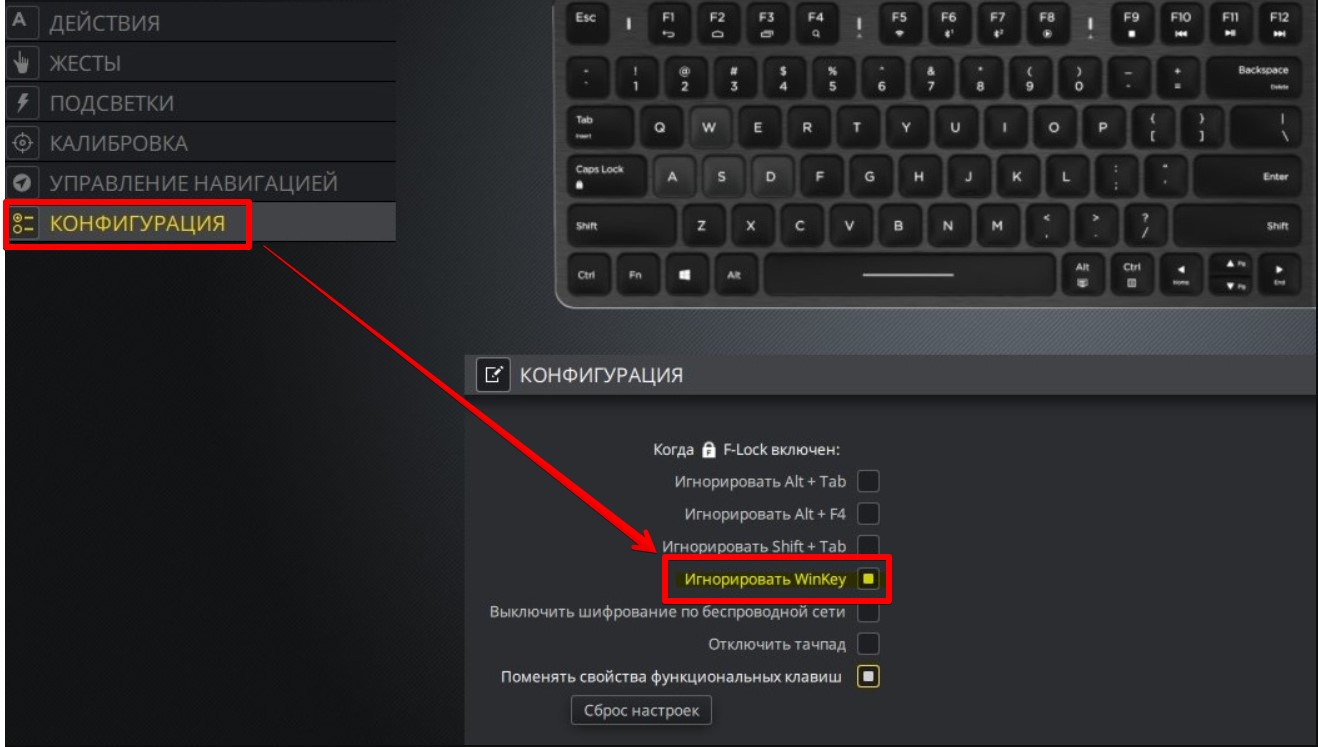
Шаг 6 – Специальный софт
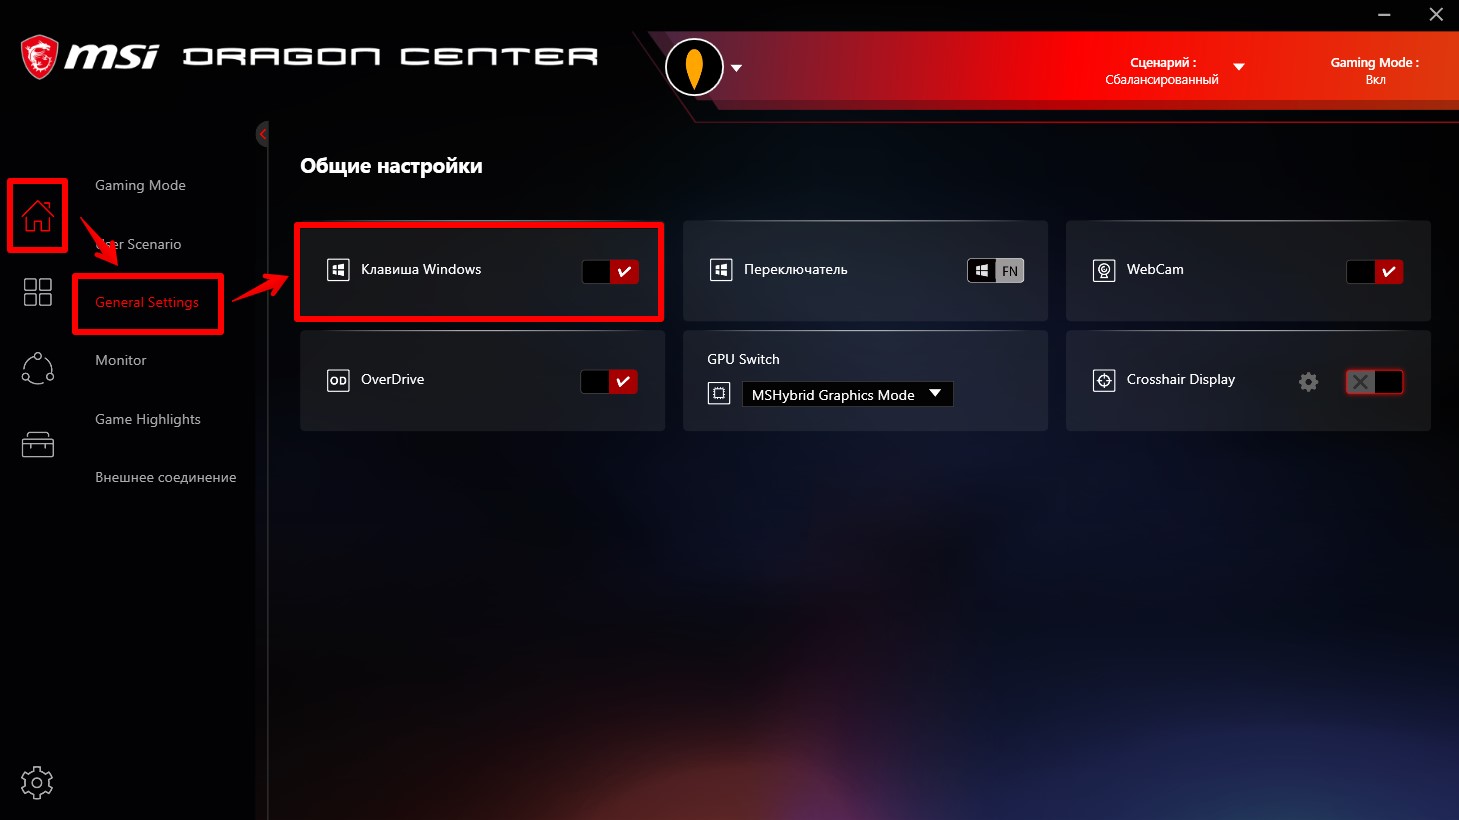
Еще один абстрактный способ, который может кого-то навести на правильную мысль. Многие современные материнские платы располагают отдельным софтом для настройки от производителя. А на ноутбуках так это вообще общепринятая практика. Так вот там тоже может быть настройка выключения клавиши WIN. Показываю на примере моего ноутбука MSI и его утилиты Dragon Center:
Шаг 7 – Включение и отключение через групповую политику
Использование редактора групповой политики вряд ли у кого-то произошло случайно, но тоже упомяну, так как это один из вариантов заблокировать клавишу WIN и ее сочетания с помощью Windows. Но нужно помнить, что редактор групповой политики не доступен в «Домашней» редакции Windows. Подойдет только Windows Pro.
- Открываем редактор групповой политики.
- Переходим в следующую ветку:
Конфигурация пользователя – Административные шаблоны – Компоненты Windows – Проводник
- А справа смотрим на политику «Отключить сочетания клавиш, в которых используется клавиша Windows».
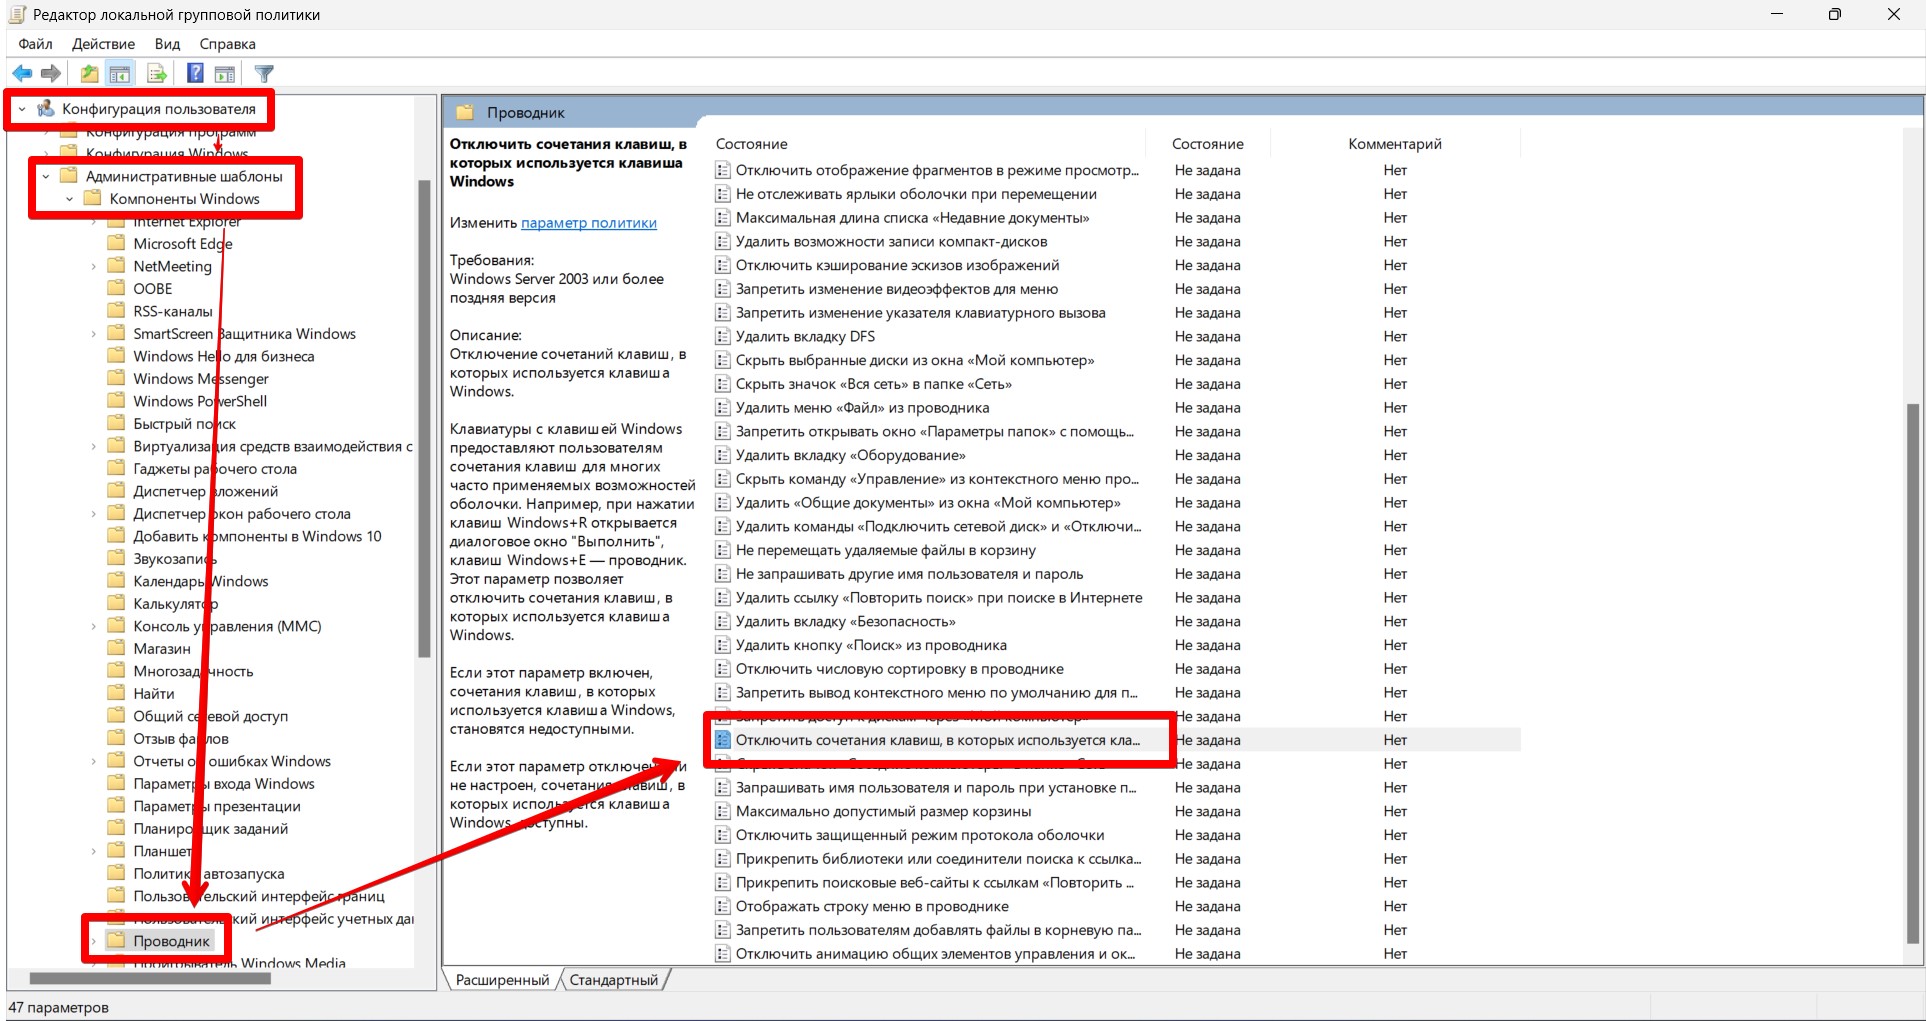
- Раскрываем ее двойным щелчком и включаем или отключаем на свой выбор.
Шаг 8 – Редактор реестра
Ну и куда же без правки реестра. Управлять клавишей можно и оттуда.
- Запускаем редактор реестра (проще всего командной regedit из той же командной строки).
- Переходим в следующую ветку:
HKEY_CURRENT_USER\Software\Microsoft\Windows\CurrentVersion\Policies\
- Если у вас есть еще одна вложенная папка Explorer, открываем и ее. Если же нет – щелкаем справа правой кнопкой мыши и создаем такой раздел. И уже тогда переходим в него.
- Создаем параметр DWORD 32-бита с именем NoWinKeys и устанавливаем ему значение 1 (для отключения – 0).
- Перезагружаем компьютер и смотрим, что сейчас все сочетания клавиш с Windows снова или работают, или не работают.
Второй вариант использования реестра:
- Переходим в ветку:
HKEY_LOCAL_MACHINE\SYSTEM\CurrentControlSet\Control\Keyboard Layout
- Здесь создаем уже «Двоичный параметр» с именем Scancode Map (для отключения достаточно будет его удалить).
- Устанавливаем ему значения (ниже покажу). Помним, что клавиш WIN у нас обычно две, поэтому используем один из вариантов:
Для отключения всех клавиш WIN:
00 00 00 00 00 00 00 00
03 00 00 00 00 00 5B E0
00 00 5C E0 00 00 00 00
Для отключения только левой клавиши:
00 00 00 00 00 00 00 00
02 00 00 00 00 00 5B E0
00 00 00 00
Вот вроде бы и рассмотрел все доступные простому народу варианты разблокировать или заблокировать клавишу WIN на клавиатуре. Еще раз, если нашли какой-то свой уникальный способ, пожалуйста, помогите и другим людям, поделитесь им в комментариях.
Видео по теме
Many gamers want to know how to disable the Windows key on their keyboard. Pressing it accidentally while playing a game on your PC can open the Start menu or trigger a «hotkey» keyboard shortcut that snaps you right out of what you’re doing.
These hotkeys include «Windows key + R» for opening the Run box, «Windows key + D» for showing (and hiding) the desktop, and «Windows key + L» for locking your screen. Sometimes these shortcuts can be very useful, but when you’re involved in something important, be it a game, video call, or intensive work, they can prove very annoying. Worst of all, there are two Windows keys on your keyboard, which doubles your chance of hitting one at an inconvenient moment.
Dedicated gaming keyboards solve this problem by automatically disabling the Windows key when you switch to «Gaming mode,» but on standard keyboards, the key can be a real nuisance.
Fortunately, there are several ways to tweak the Windows key so that it doesn’t interrupt your gaming and other activities. You can either toggle it on or off as required, deactivate hotkeys but keep the Start menu-opening function, or disable it altogether.
In our guide below, we’ll explain three ways to disable the Windows key, so you can use the one that best suits your needs,
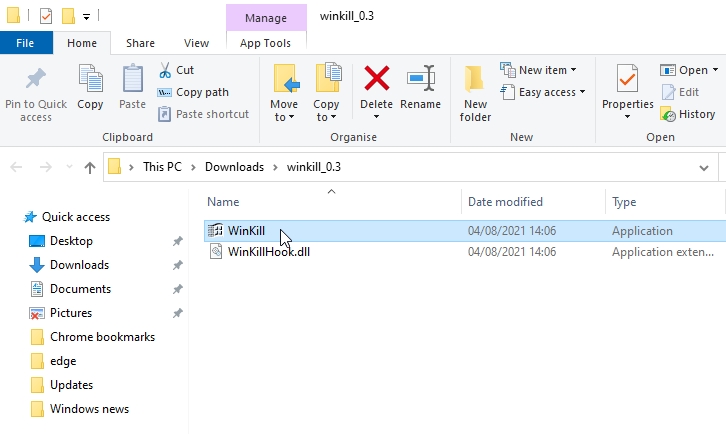
How to disable the Windows key using WinKill
The easiest way to disable the Windows key in Windows 10 is to use a tiny free program called WinKill. This has the advantage over other methods of letting you toggle the Windows key on and off as required. Here’s how to use it.
1. Download WinKill from Major Geeks. The program hasn’t been updated for several years, and was originally designed for Windows XP, Vista, and 7, but it works just fine in Windows 10.
Extract the contents of the zip file, then double-click the WinKill executable file to run the program.
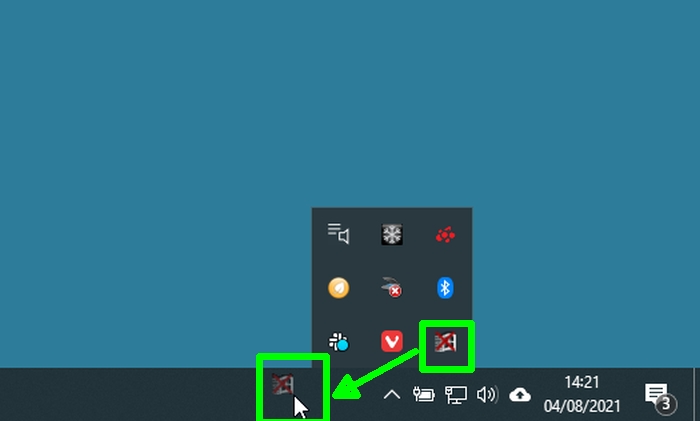
2. WinKill doesn’t require installation and you might think nothing has happened, but you should see its icon appear in the system tray on your taskbar.
If not, click the up arrow in the system tray and look for a Windows logo with a red cross through it. Drag this icon onto your taskbar for easy access.
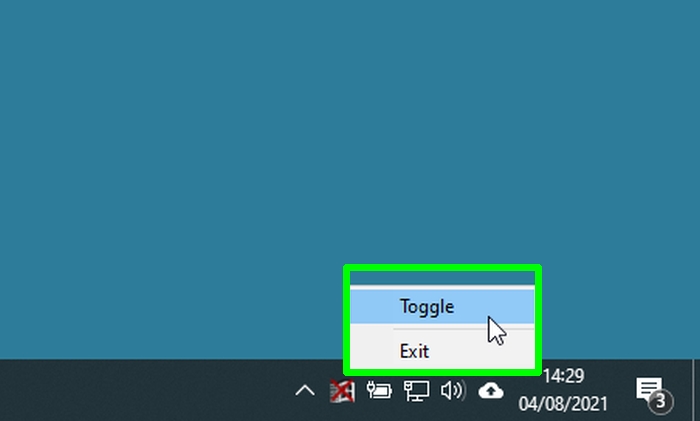
3. Press your Window key and you’ll now find that it doesn’t respond because WinKill has disabled it. To activate the key again, either click the WinKill icon to remove the red cross, or right-click it and choose «Toggle.»
Alternatively, you can close WinKill and restore the Windows key by selecting «Exit.» The program doesn’t run on Windows startup, so you’ll need to run it manually each time you need it.
How to disable the Windows key by editing the Registry
If you never use any Windows key hotkeys, you can tweak the key so you don’t have to worry about triggering them accidentally. You can do this in Windows 10 by editing the registry. This will still let you press the Windows key to open the Start menu.
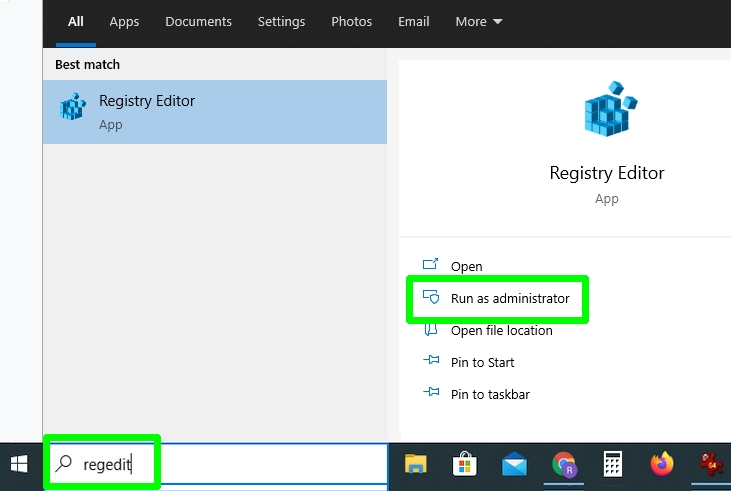
1. Type “regedit” in the Windows search box and click “Run as administrator” next to the Registry Editor result.
2. When the Registry Editor opens, navigate to the following key, or just copy and paste it into the Registry Editor address bar and press Enter:
HKEY_CURRENT_USER\Software\Microsoft\Windows\CurrentVersion\Policies\Explorer
3. You should see a value in the right-hand pane of the window called “NoWinkeys.” If not, right-click an empty space in that pane and choose “New,” then “DWORD (32-bit) Value.” Call the value “NoWinkeys.”
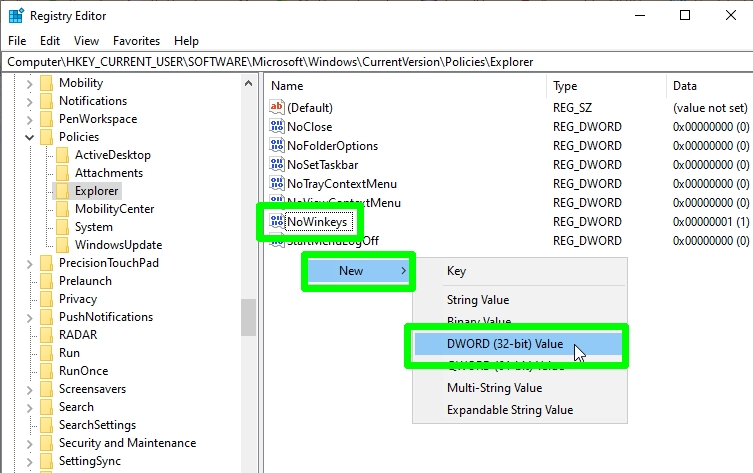
4. Double-click the NoWinkeys value and change its value data from “0” to “1.” Click OK to confirm.

5. Restart your PC and press the Windows key. This will still open the Start menu, but it won’t trigger any hotkeys that interrupt your gameplay and other activities.
To re-enable hotkeys, go back to the same registry key and either change the NoWinkeys value data back to “0” or delete that value.
How to disable the Windows key using PowerToys
If you’d prefer to disable the Windows key completely, so that it doesn’t do anything when pressed, you can “remap” it using Microsoft PowerToys. This set of tools for tweaking Windows 10 is free to download and packed with useful options. Here’s how to use its Keyboard Manager.
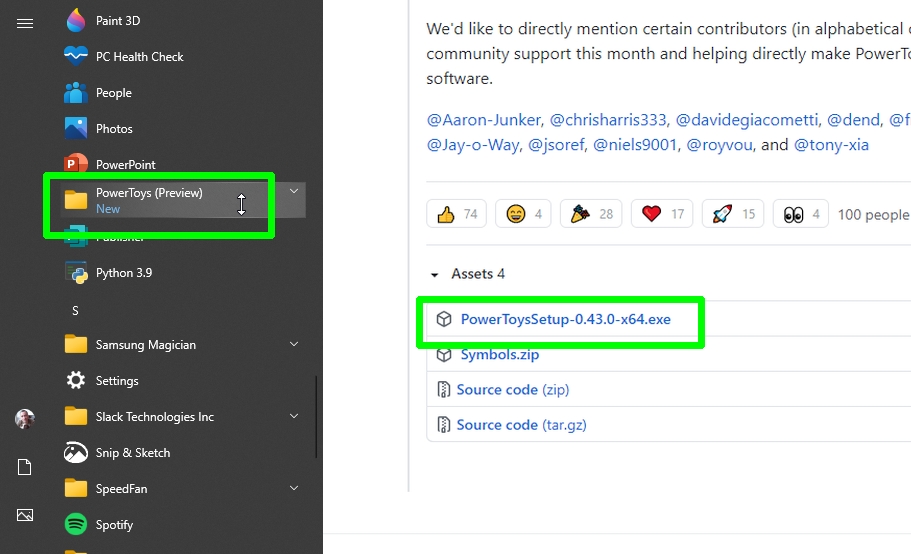
1. Visit the GitHub page for Microsoft PowerToys and download the PowerToysSetup executable file. You’ll find the link at the bottom of the page.
Install the program on your PC and launch it from the Start menu.
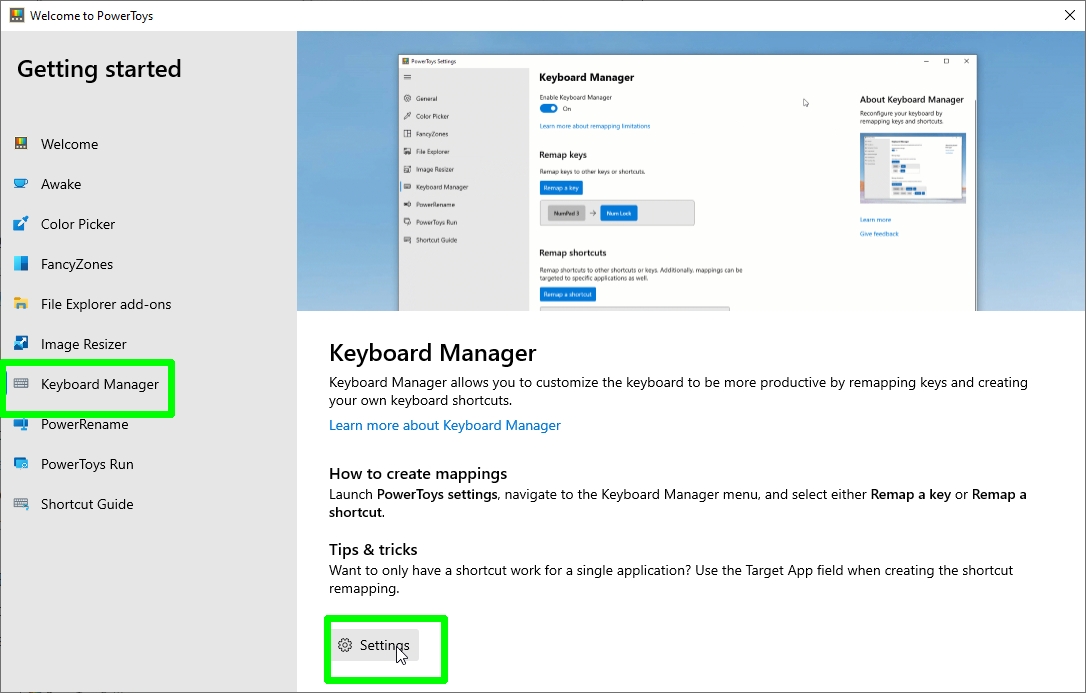
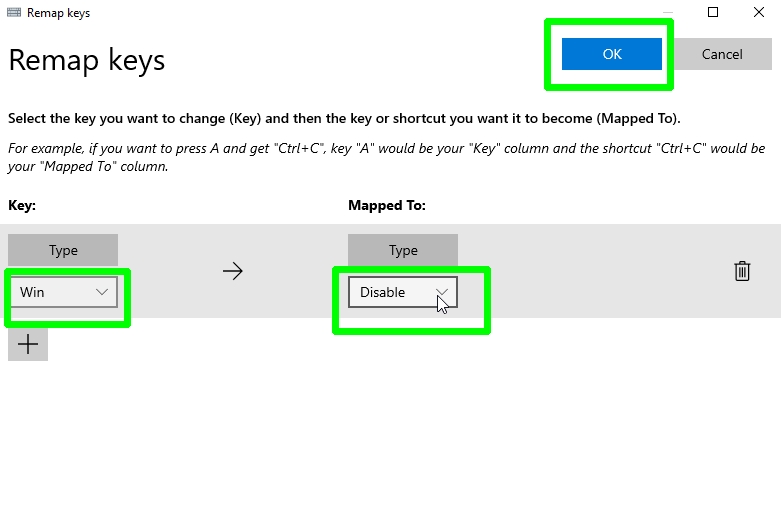
2. When PowerToys opens, click the “Keyboard Manager” option in the left-hand menu and choose Settings.
3. Ensure that “Enable Keyboard Manager” is switched on and click the “Remap a key” button to open the “Remap keys” window.
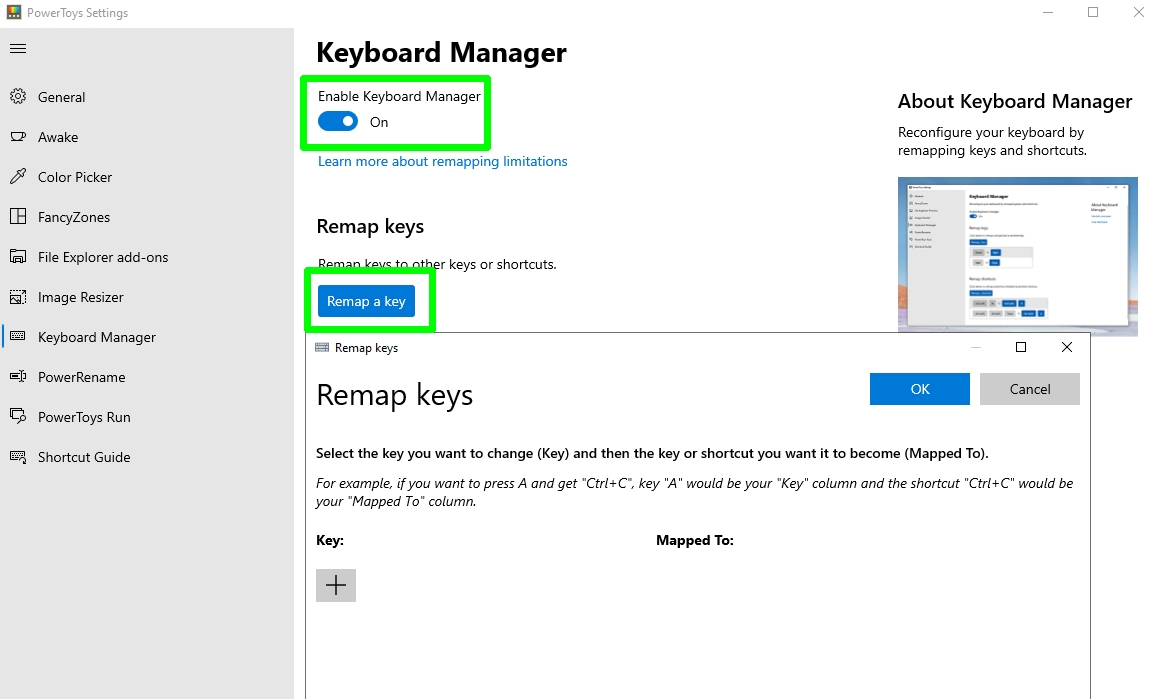
4. Click the plus button, then click the “Key” drop-down menu. Scroll down to “Win” and select that option. Now click the “Mapped To” drop-down menu and choose Disable. Click OK to confirm.
5. Windows will warn you that you won’t be able to use the Win key anymore. As this is what you want, click “Continue Anyway.”
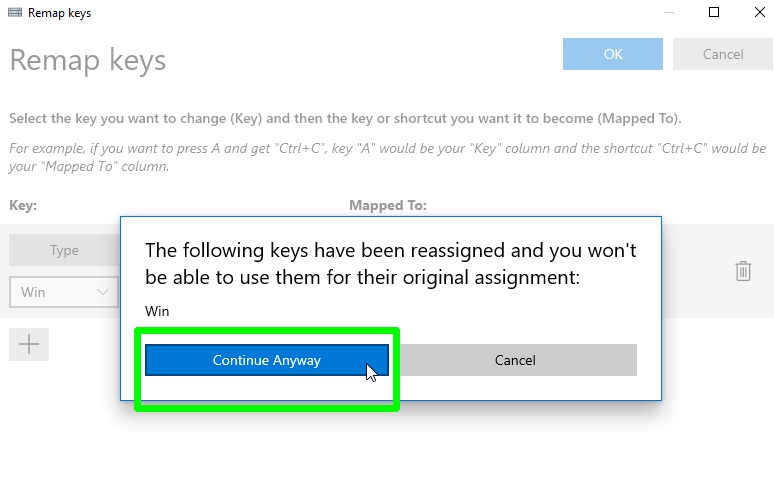
Both Windows keys on your keyboard will be instantly disabled, with no need to restart your PC.
To re-enable the Windows key, simply close PowerTools: right-click its icon in the system tray and choose “Exit.”
- How to remove the Windows 10 news and weather widget
- How to uninstall Cortana from Windows 10
- How to uninstall Microsoft Edge and stop it reinstalling
- How to hide desktop icons in Windows
- How to keep your PC awake without touching it
- How to change keyboard language — in Windows and macOS
- How to type an em dash on Windows and macOS
Instant access to breaking news, the hottest reviews, great deals and helpful tips.