-
Нажмите Пуск и откройте Параметры . В разделе Конфиденциальность и защита выберите Безопасность Windows > Брандмауэр и защита сети. Открыть параметры службы «Безопасность Windows»
-
Выберите профиль сети: Сеть домена, Частная сеть или Общедоступная сеть.
-
В разделе Брандмауэр Microsoft Defender установите для параметра значение Вкл. Если ваше устройство подключено к сети, настройки сетевой политики могут помешать вам выполнить эти шаги. За дополнительными сведениями обратитесь к администратору.
-
Для выключения переключите этот параметр в положение Выкл. Отключение брандмауэра Microsoft Defender может сделать ваше устройство (и сеть, если таковая имеется) более уязвимым для несанкционированного доступа. Если нужно использовать блокируемое приложение, вы можете разрешить его использование через брандмауэр вместо отключения самого брандмауэра.
-
Нажмите кнопку Пуск и выберите Параметры > Обновление и безопасность > Безопасность Windows > Брандмауэр и защита сети. Открыть параметры службы «Безопасность Windows»
-
Выберите профиль сети: Сеть домена, Частная сеть или Общедоступная сеть.
-
В разделе Брандмауэр Microsoft Defender установите для параметра значение Вкл. Если ваше устройство подключено к сети, настройки сетевой политики могут помешать вам выполнить эти шаги. За дополнительными сведениями обратитесь к администратору.
-
Для выключения переключите этот параметр в положение Выкл. Отключение брандмауэра Microsoft Defender может сделать ваше устройство (и сеть, если таковая имеется) более уязвимым для несанкционированного доступа. Если нужно использовать блокируемое приложение, вы можете разрешить его использование через брандмауэр вместо отключения самого брандмауэра.
Windows Firewall is a great feature in modern Windows versions. It was introduced in Windows XP and improved in Windows XP Service Pack 2. For testing purposes, you might want to disable Windows Firewall. For example, if you want to ensure that you have not misconfigured it and it is isn’t blocking some important app that you are trying to use, then disabling it becomes important. Here is how to disable Windows Firewall in Windows 10.
In Windows 10, Windows Firewall is based completely on the Windows Filtering Platform API and has IPsec integrated with it. This is true since Windows Vista where the firewall added outbound connection blocking and also comes with an advanced Control Panel called Windows Firewall with Advanced Security. It gives fine-grained control over configuring the firewall. The Windows Firewall supports multiple active profiles, co-existence with third-party firewalls, and rules based on port ranges and protocols. You can use the built-in Windows Firewall to block telemetry and updates in Windows 10.
If you need to turn it off temporarily or permanently, here is how. It is a good idea to backup your Firewall rules before you continue.
Table of contents.
To disable Firewall in Windows 10, do the following.
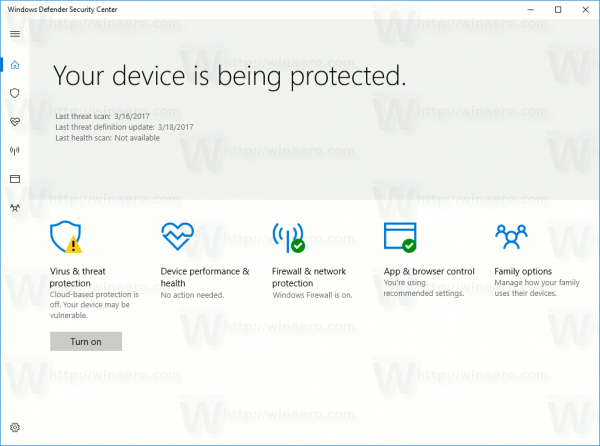
Starting with Windows 10 Creators Update, Windows Defender Security Center can be used to disable Windows Firewall quickly.
- Open it as described in the article: Windows Defender Security Center in Windows 10 Creators Update. Alternatively, you can create a special shortcut to open it.

- In the user interface of Windows Defender Security Center, click the icon Firewall & network protection.
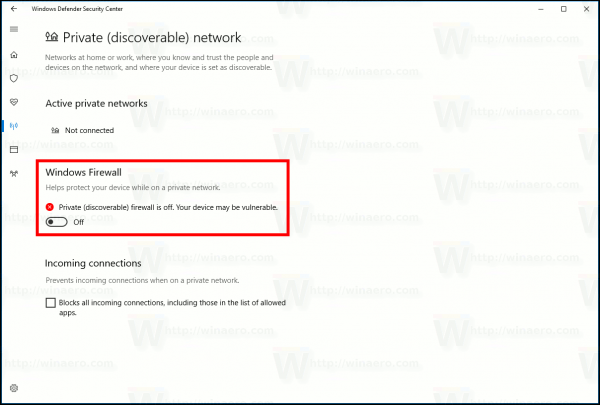
- The following page will be opened.
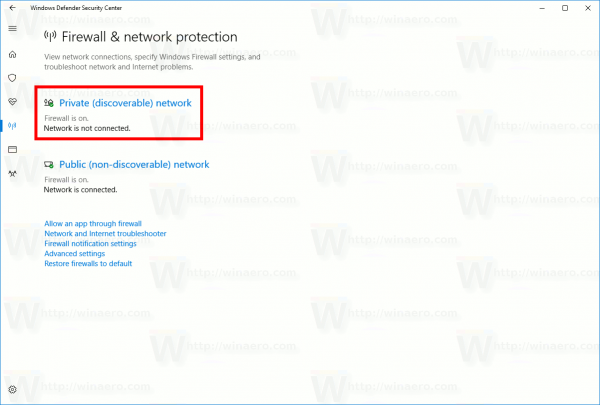
 Click on the link Private (discoverable) network or Public (non-discoverable) network to disable the firewall for the selected type of network.
 - On the next page, disable the option Windows Firewall. When disabled, Windows Firewall won’t block apps running in Windows 10. It will be turned off.
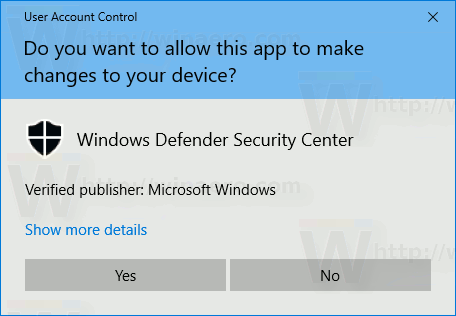
- A UAC confirmation prompt will appear. Click Yes to confirm the operation.

 Click on the link Private (discoverable) network or Public (non-discoverable) network to disable the firewall for the selected type of network.
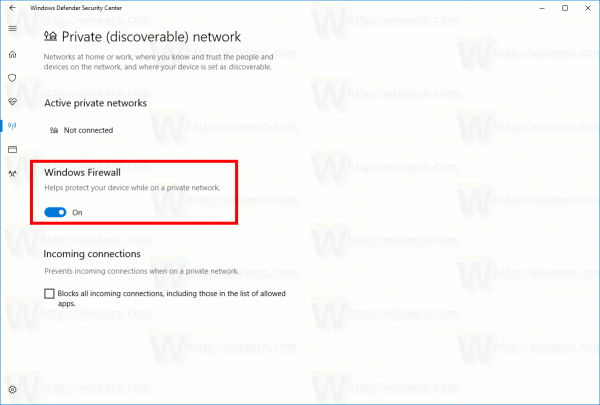
Having Windows Firewall disabled is a security risk. I do not recommend that you keep it disabled permanently. Perform all the required checks and tests and turn it on using the same option.
You can disable Windows Firewall in Control Panel.
Windows Defender Security Center is a new feature of Windows 10 Creators Update. If you are running a previous release of Windows 10 (for example, if you have postponed Windows 10 Creators Update for a while), then you need to do the following to disable the firewall.
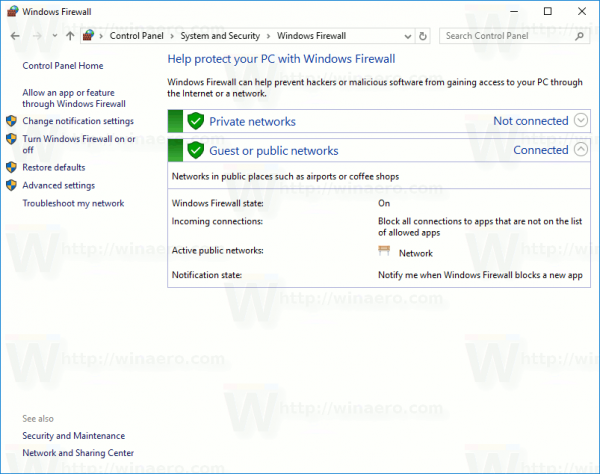
- Open Control Panel.
- Go to the following path:
Control Panel\System and Security\Windows Firewall

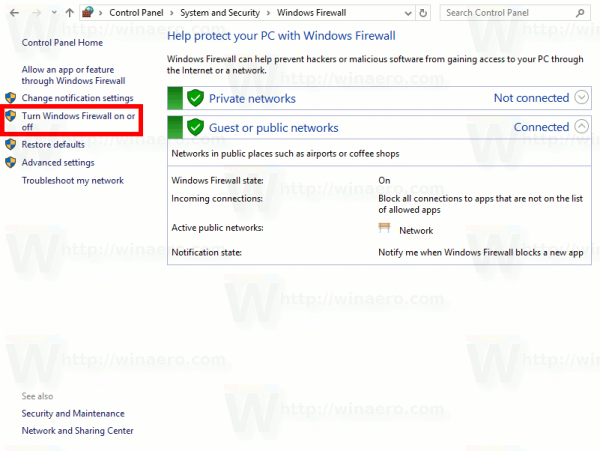
- Click the link Turn Windows Firewall on or off in the left pane.

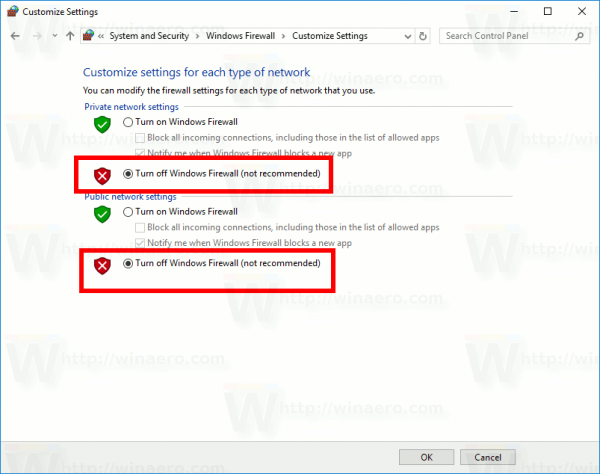
- There, select the option Turn off Windows Firewall for every desired network type.
To enable it later, you can use the same Control Panel applet and set the option Turn on Windows Firewall.
You can disable Windows Firewall in Command Prompt.
Finally, there are a number of console commands which you can use to disable Windows Firewall in Windows 10.
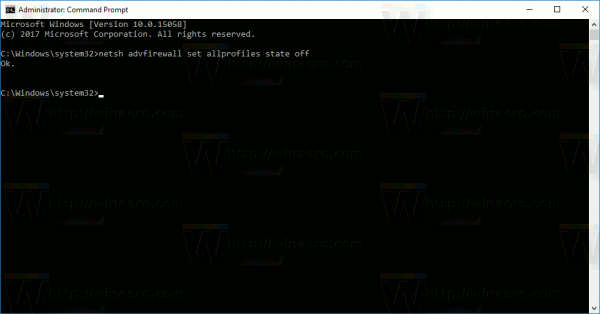
In an elevated command prompt, type one of the commands below.
Disable Windows Firewall for all network types (profiles)
netsh advfirewall set allprofiles state off
Disable Windows Firewall for the active profile only:
netsh advfirewall set currentprofile state off
Disable Windows Firewall for the domain profile:
netsh advfirewall set domainprofile state off
Disable Windows Firewall for the private profile:
netsh advfirewall set privateprofile state off
Disable Windows Firewall for the public profile:
netsh advfirewall set publicprofile state off
To revert any of the commands above and re-enable Windows Firewall, replace the «off» portion at the end of the command with «on», e.g.
netsh advfirewall set allprofiles state off

You can disable Windows Firewall in PowerShell
The next set of commands are available in Windows PowerShell. If you are using PowerShell frequently, you can use them instead of the list above.
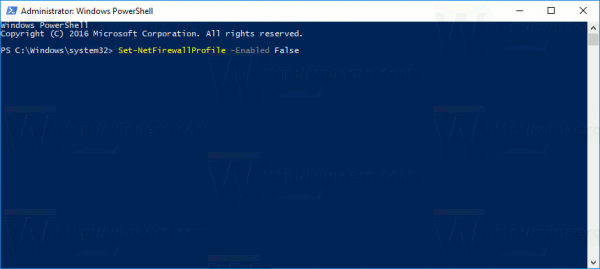
Open a new elevated PowerShell instance and type the following commands:
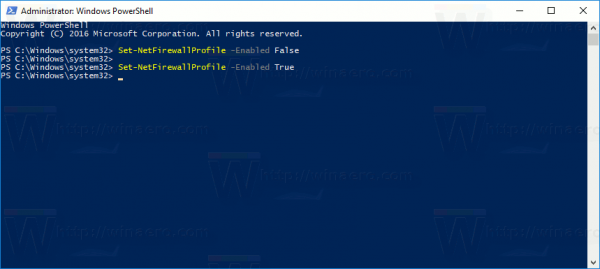
Disable Windows Firewall for all profiles:
Set-NetFirewallProfile -Enabled False
Disable Windows Firewall for the Domain profile.
Set-NetFirewallProfile -Profile Domain -Enabled False
Disable Windows Firewall for the Private network profile only.
Set-NetFirewallProfile -Profile Private -Enabled False
Disable Windows Firewall for the public profile.
Set-NetFirewallProfile -Profile Public -Enabled False
To revert any of the commands above, replace «False» with «True» at the end of the command. For example,
Set-NetFirewallProfile -Enabled True
That’s it.
Support us
Winaero greatly relies on your support. You can help the site keep bringing you interesting and useful content and software by using these options:
If you like this article, please share it using the buttons below. It won’t take a lot from you, but it will help us grow. Thanks for your support!
 В этой инструкции о том, как отключить брандмауэр Windows 10 в параметрах безопасности системы, в панели управления или с помощью командной строки, отключить службу Брандмауэр Защитника Windows и уведомления «Брандмауэр и защита сети», а также информация, как не отключать его полностью, а лишь добавить в исключения брандмауэра программу, в работе которой он вызывает проблемы. Также в конце инструкции имеется видео, где показано все описанное.
Для справки: брандмауэр Windows — встроенный в ОС файрвол, проверяющий входящий и исходящий Интернет-трафик и блокирующий или разрешающий его, в зависимости от настроек. По умолчанию, он запрещает небезопасные входящие подключения и разрешает все исходящие подключения. См. также: Как отключить защитник Windows 10.
- Как отключить брандмауэр Windows 10 в параметрах безопасности
- Отключение с помощью командной строки
- Отключаем брандмауэр в панели управления
- Отключить брандмауэр в режиме повышенной безопасности
- Как отключить службу Брандмауэр Защитника Windows 10
- Как отключить уведомления «Брандмауэр и защита сети» об отключенном брандмауэре
- Видео инструкция
- Как добавить программы в исключения брандмауэра
Отключение брандмауэра Windows 10 в параметрах безопасности Windows 10
Вероятно, самый простой для начинающего пользователя способ отключить брандмауэр Windows 10 — использовать соответствующие параметры в Центре безопасности Windows 10:
- Откройте параметры «Безопасность Windows» двойным нажатием по значку со щитом в области уведомлений или через Пуск — Параметры — Безопасность Windows.
- Нажмите по пункту «Брандмауэр и безопасность сети», а затем выберите профиль сети, брандмауэр для которого требуется отключить: обычно достаточно отключить только для активного профиля, но при желании можете повторить это для всех пунктов.

- Поместите переключатель в положение Выключено для отключения брандмауэра для этого сетевого профиля.

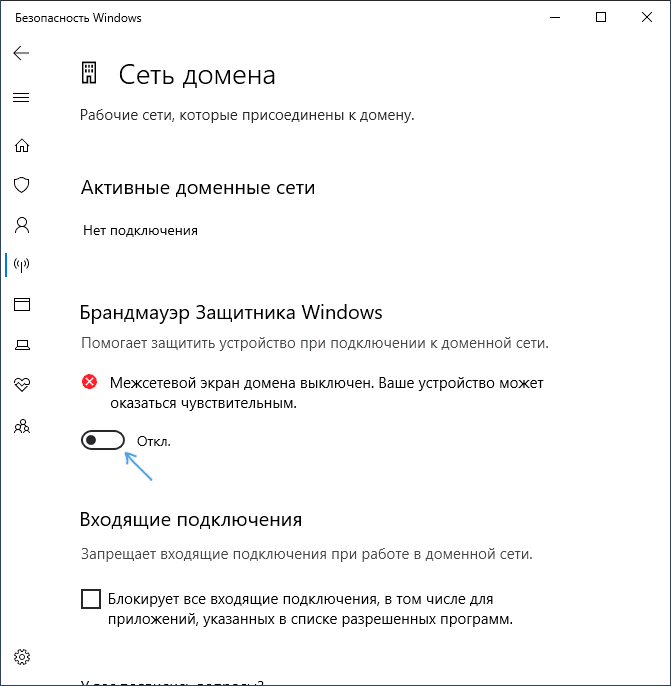
На этом брандмауэр будет отключен, а также вы увидите уведомление с предложением снова его включить, о том, как убрать это уведомление — далее в инструкции.
Также, несмотря на отключение брандмауэра, соответствующая ему служба Windows 10 продолжит работать. О её отключении также можно прочитать в соответствующем разделе инструкции.
Как полностью отключить брандмауэр с помощью командной строки
Если вы знаете, как запустить командную строку от имени администратора, этот способ отключения брандмауэра Windows 10 будет даже проще и быстрее:
- Запустите командную строку от имени администратора — для этого вы можете использовать поиск в панели задач, а затем нажать правой кнопкой мыши по найденному результату и выбрать пункт запуска от администратора.
- Введите команду
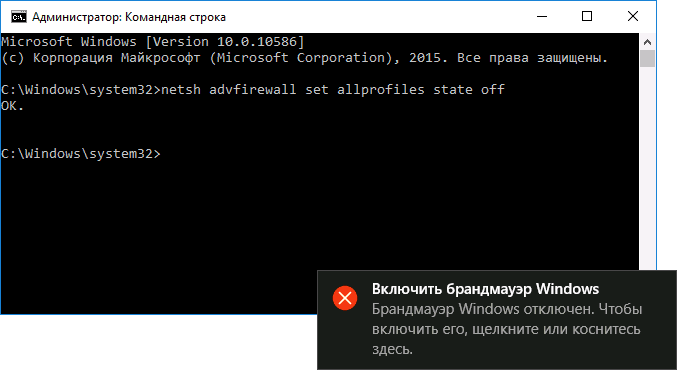
netsh advfirewall set allprofiles state off
- Нажмите Enter.
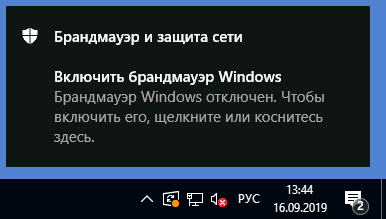
В результате в командной строке вы увидите лаконичное «Ок», а в центре уведомлений — сообщение о том, что «Брандмауэр Windows отключен» с предложением снова включить его. Если вам потребуется вновь включить его, используйте тем же образом команду netsh advfirewall set allprofiles state on
Отключение брандмауэра в панели управления Windows 10
Еще один метод — использовать панель управления: откройте её (для этого можно использовать поиск в панели задач), включите в пункте «Вид» (справа вверху) значки (если сейчас там у вас «Категории») и откройте пункт «Брандмауэр Защитника Windows».
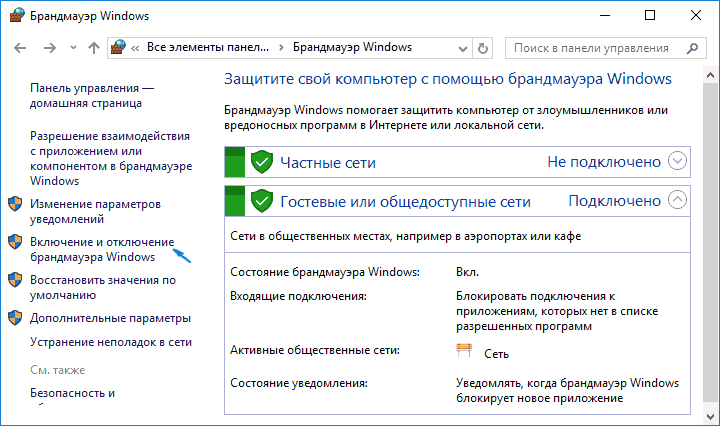
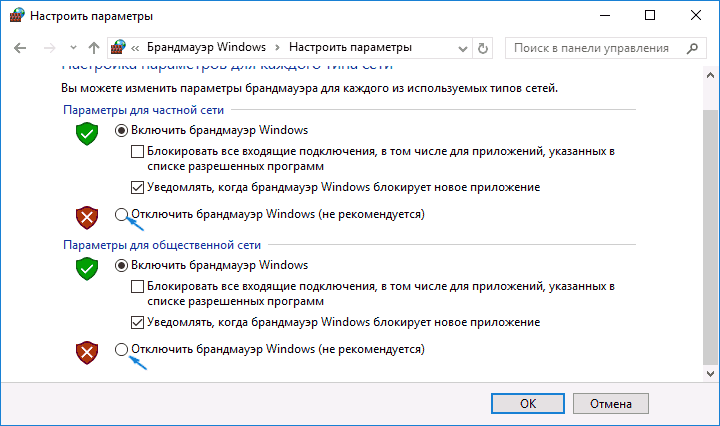
В списке слева выберите пункт «Включение и отключение брандмауэра», а в следующем окне вы сможете отключить брандмауэр Windows 10 отдельно для общественного и частного профиля сетей. Примените сделанные настройки.
Отключение в мониторе брандмауэра Защитника Windows в режиме повышенной безопасности
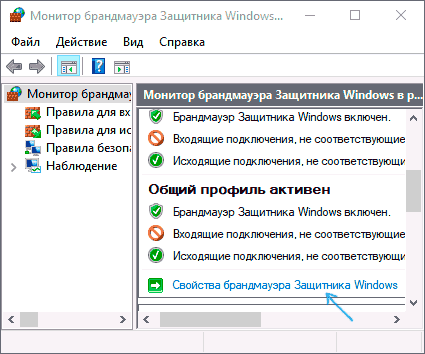
Если в поиске на панели задач вы начнете вводить «монитор брандмауэра», вы сможете открыть отдельную панель управления его параметрами, предоставляющую, помимо прочего, и возможность отключения:
- Нажмите по пункту «Свойства брандмауэра Защитника Windows».

- На вкладках Общий профиль, Частный профиль и Профиль домена в верхнем поле установите «Отключить» и примените настройки.

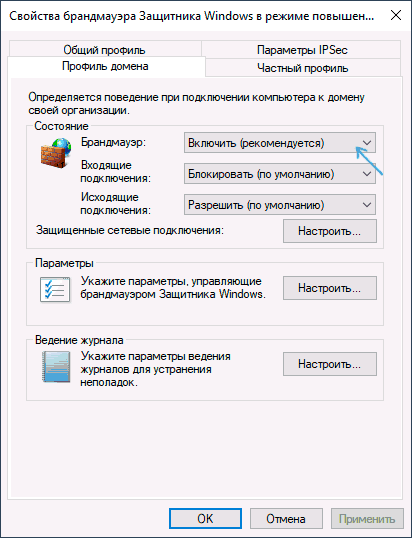
Так же, как и в предыдущих случаях, встроенный файрвол Windows 10 будет отключен.
Как отключить службу Брандмауэр Защитника Windows 10
Даже после отключения брандмауэра Windows 10 описанными выше способами, соответствующая ему служба продолжит работать, причем отключить её в services.msc не получится. Тем не менее, отключение возможно:
- Нажмите клавиши Win+R на клавиатуре, введите regedit и нажмите Enter.
- В открывшемся редакторе реестра перейдите к разделу
HKEY_LOCAL_MACHINE\SYSTEM\CurrentControlSet\Services\mpssvc
- Дважды нажмите по параметру с именем Start в панели справа и задайте значение 4 для него.

- Примените настройки и перезагрузите компьютер.
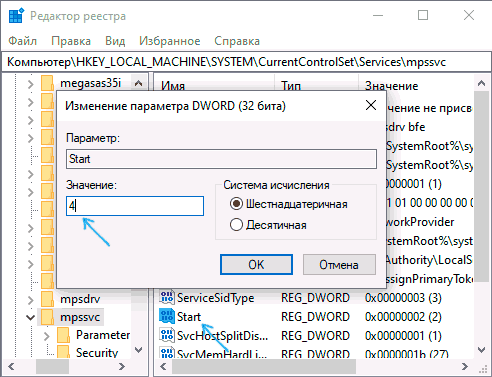
В результате служба будет отключена.
Как убрать уведомление о том, что брандмауэр отключен
После того, как вы отключите брандмауэр, Центр безопасности защитника Windows 10 начнет показывать уведомления о том, что он отключен с предложением снова его включить.
Чтобы убрать такое уведомление, в редакторе реестра в разделе
HKEY_LOCAL_MACHINE\SOFTWARE\Microsoft\Windows Defender Security Center\Notifications
создайте параметр DWORD с именем DisableNotifications и значением 1. Подробнее о том, как это сделать в инструкции Как отключить уведомления защиты Windows 10.
Видео — 4 способа отключить брандмауэр Windows 10
Как добавить программу в исключения брандмауэра Windows 10
Если вы не хотите полностью выключать встроенный файрвол, а требуется лишь предоставить полный доступ к подключениям какой-либо программе, то сделать это вы можете путем добавления ее в исключения брандмауэра. Сделать это можно двумя путями (второй способ позволяет также добавить отдельный порт в исключения брандмауэра).
Первый способ:
- В панели управления, в пункте «Брандмауэр Защитника Windows» слева выберите пункт «Разрешение взаимодействия с приложением или компонентом в брандмауэре Windows».
- Нажмите кнопку «Изменить параметры» (требуются права администратора), а затем внизу нажмите «Разрешить другое приложение».
- Укажите путь к программе для добавления в исключения. После этого также можно указать, каких типов сетей это касается с помощью соответствующей кнопки. Нажмите «Добавить», а затем — Ok.


Второй способ добавления исключения в брандмауэр чуть сложнее (но зато позволяет добавить в исключения не только программу, но и порт):
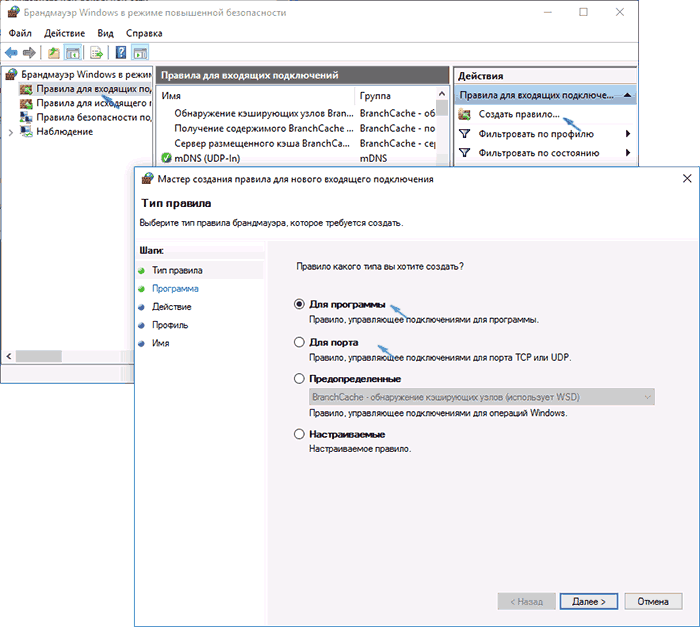
- В пункте «Брандмауэр Windows» панели управления выберите слева «Дополнительные параметры».
- В открывшемся окне расширенных настроек брандмауэра выберите «Исходящие подключения», а затем, в меню справа — создать правило.
- С помощью мастера создайте правило для вашей программы (или порта), разрешающее ей подключение.

- Аналогичным образом создайте правило для этой же программы для входящих подключений.
На этом все. Кстати, если что-то пойдет не так, вы всегда можете сбросить брандмауэр Windows 10 к настройкам по умолчанию с помощью пункта меню «Восстановить значения по умолчанию» в окне его параметров.
Steps on how to disable the firewall in Windows 10, 8, 7, Vista & XP
What to Know
- Windows 10, 8, 7: Go to Control Panel > System and Security > Windows Firewall > Turn Windows Firewall on or off.
- Select the bubble next to Turn off Windows Firewall (not recommended) and then select OK.
- To disable the firewall for private and public networks, select Turn off Windows Firewall (not recommended) in both sections.
The Windows Firewall is designed to keep unauthorized users from accessing files and resources on your computer. Still, the Windows Firewall can sometimes cause more harm than good, especially if there’s another paid or free firewall program installed. Disabling the Windows Firewall is easy and usually takes less than 10 minutes.
There are separate directions below for Windows 10, Windows 8, Windows 7, Windows Vista, and Windows XP. See our article What Version of Windows Do I Have? if you’re not sure which steps to follow along with.
How to Turn Off and Disable the Windows 11 Firewall
Disable the Firewall in Windows 10, 8, and 7
The steps for turning off the Windows Firewall in Windows 7, 8, and 10 is basically the same.
The screenshots in this section apply to Windows 10 only. Your screen will look slightly different if you’re using Windows 8 or Windows 7.
-
Open Control Panel.
You can do this a number of ways, but the easiest method is to search for it or select it from the Start menu in Windows 7.
-
Select System and Security.
That link is only visible if you have the «View by:» option set to «Category.» If you’re viewing the Control Panel applets in icon view, just skip down to the next step.
-
Choose Windows Firewall.
Depending on how your computer is set up, it might instead be called Windows Defender Firewall. If so, treat every instance of «Windows Firewall» below as if it read «Windows Defender Firewall.»
-
Select Turn Windows Firewall on or off on the left side of the screen.
A really quick way to get to this screen is via the control firewall.cpl command line command, which you can execute via the Command Prompt or the Run dialog box.
-
Select the bubble next to Turn off Windows Firewall (not recommended).
You can disable the Windows Firewall for private networks only, just for public networks, or for both. To disable it for both network types, you have to make sure to select Turn off Windows Firewall (not recommended) in both the private and the public section.
-
Select OK to save the changes.
Now that the firewall is disabled, repeat whatever steps caused your problem to see if disabling this option has fixed the issue.
Disable the Firewall in Windows Vista
The Windows Firewall can be turned off in Windows Vista through the Control Panel, similar to how it’s done in other versions of Windows.
-
Select Control Panel from the Start menu.
-
Choose Security from the category list.
If you’re in the «Classic View» of Control Panel, just skip down to the next step.
-
Select Windows Firewall.
-
Choose Turn Windows Firewall on or off on the left side of the window.
If a User Account Control window pops up, go ahead and click/tap through it by either entering an admin password or selecting Continue.
If you need to access this window again more quickly in the future, you can use the control firewall.cpl command in the Run dialog box.
-
Open the General tab and select the bubble next to Off (not recommended).
-
Select OK to apply the changes.
Disable the Firewall in Windows XP
Directions for turning off the Windows XP firewall is significantly different than it is in newer versions of Windows, but it’s still fairly simple.
-
Go to Start and then Control Panel.
-
Select Network and Internet Connections.
If you’re viewing the «Classic View» of Control Panel, open Network Connections and skip to Step 4.
-
Choose Network Connections under the or pick a Control Panel icon section.
-
Right-click or tap-and-hold your network connection and choose Properties.
If you have a «high speed» internet connection like Cable or DSL, or are on a network of some kind, your network connection will likely be titled Local Area Connection.
-
Open the Advanced tab and select Settings.
-
Choose the Off (not recommended) radio button.
Windows Firewall settings can also be opened with a simple shortcut via the Run dialog box or Command Prompt. Just enter this command: control firewall.cpl.
-
Select OK in this window and then OK again in the Properties window of your network connection. You can also close the Network Connections window.
FAQ
-
How do I disable the firewall in Windows 11?
Right-click the Windows icon on the taskbar and select Settings > Privacy & security > Windows Security > Open Windows Security. Select Firewall & network protection > Public Network and turn off the switch under Microsoft Defender Firewall.
-
How do I disable the firewall for Minecraft?
Select Start, search for and select Windows Defender Firewall. Select Allow an app or feature through Windows Defender Firewall. Select Change Settings. Under Allow apps to communicate through Windows Defender Firewall, check the box next to Minecraft.
-
How do I disable the firewall on a Mac?
From the Apple menu, select System Preferences > Security & Privacy. If your firewall is on, select Turn off Firewall or Firewall Options to manage more settings.
Thanks for letting us know!
Get the Latest Tech News Delivered Every Day
Subscribe
Don’t worry we will answer this question in this tutorial. Windows comes with built-in software or program which keeps the laptop or PC secure and safe from external traffic and also protect your PC from external attacks. This built-in program is called Windows Firewall which is a very important part of Windows since Windows XP.
What is the Windows Firewall?
Firewall: A Firewall is a Network Security system that monitors & controls the incoming and outgoing network traffic based on predetermined security rules. A firewall basically acts as a barrier between the incoming network and your computer network that allows only those networks to pass through which according to predetermined rules are considered to be trusted networks and block untrusted networks. The Windows Firewall also helps in keeping unauthorized users away from accessing resources or files of your computer by blocking them. So a Firewall is a very important feature for your computer and it is absolutely necessary if you want your PC to be safe & secure.
Windows Firewall is enabled by default, so you don’t need to do any changes on your PC. But sometimes Windows Firewall causes some issues with internet connectivity or blocks certain programs from running. And if you have any 3rd party Antivirus program installed then it will also enable the third party firewall, in which case you will need to disable your in-built Windows Firewall. So without wasting any time let’s see How to disable Windows 10 Firewall with the help of the below-listed guide.
Make sure to create a restore point just in case something goes wrong.
How to Enable or Disable Windows 10 Firewall Method 1 – Enable Firewall in Windows 10 Settings Method 2 – Disable Windows Firewall using Control Panel Method 3 – Disable Windows 10 Firewall using Command Prompt
Method 1 – Enable Firewall in Windows 10 Settings
To check if the firewall is enabled or disabled, follow the below steps:
1.Press Windows Key + I to open Settings then click on Update & Security.
2.Click on Windows Security from the left window panel.
3.Click on Open Windows Defender Security Center.
4.Below Windows Defender Security Center will open up.
5.Here you will see all the security settings which users have access to. Under Security at a glance, to check the status of the firewall, click on Firewall & network protection.
6.You will see three types of network there.
Domain network Private network Public network
If your firewall is enabled, all the three network option would be enabled:
7.If the Firewall is disabled then click on the Private (discoverable) network or Public (non-discoverable) network to disable the firewall for the selected type of network.
8.On the next page, Enable the option Windows Firewall.
This is how you enable Windows 10 Firewall but if you need to disable it then you need to follow the below methods. Basically, there are two ways via which you can disable Firewall, one is using Control Panel and other is using Command Prompt.
Method 2 – Disable Windows Firewall using Control Panel
To disable the Windows Firewall using Control Panel follow the below steps:
1.Open Control Panel by searching it under Windows search.
Note: Press Windows Key + R then type control and hit Enter to open Control Panel.
2. Click on System and Security tab under Control Panel.
3.Under System and Security, click on Windows Defender Firewall.
4.From the left-window pane click on Turn Windows Defender Firewall on or off.
5.Below screen will open up which shows different radio buttons to either enable or disable Windows Defender Firewall for Private and Public network settings.
6.To turn off Windows Defender Firewall for Private network settings, click on the Radio button to checkmark it next to Turn off Windows Defender Firewall (not recommended) under Private network settings.
7.To turn off Windows Defender Firewall for Public network settings, checkmark “Turn off Windows Defender Firewall (not recommended)” under Public network settings.
Note: If you want to turn off Windows Defender Firewall for both Private and Public network settings, checkmark the radio button next to Turn off Windows Defender Firewall (not recommended) under both Private & Public network settings.
8.Once you have made your choices, click on the OK button to save the changes.
9.Finally, your Windows 10 Firewall will be disabled.
If in future, you need to enable it again then again follow the same step then checkmark “Turn on Windows Defender Firewall” under both Private & Public network settings.
Method 3 – Disable Windows 10 Firewall using Command Prompt
To disable the Windows Firewall using Command prompt follow the below steps:
1.Press Windows Key + X then select Command Prompt (Admin).
2.You can use the following commands to disable Windows 10 Firewall:
Note: To revert any of the above commands and re-enable Windows Firewall: netsh advfirewall set allprofiles state off
3.Alternatively, type the below command in the command prompt:
control firewall.cpl
4.Hit the enter button and below screen will open up.
5.Click on Turn Windows Defender Firewall on or off available under the left window pane.
6.To turn off Windows Defender Firewall for Private network settings, checkmark the Radio button next to Turn off Windows Defender Firewall (not recommended) under Private network settings.
7.To turn off Windows Defender Firewall for Public network settings, checkmark the Radio button next to Turn off Windows Defender Firewall (not recommended) under Public network settings.
Note: If you want to turn off Windows Defender Firewall for both Private and Public network settings, checkmark the radio button next to Turn off Windows Defender Firewall (not recommended) under both Private & Public network settings.
8.Once you have made your choices, click on the OK button to save the changes.
9.After completing the above steps, your Windows 10 Firewall is disabled.
You can enable Windows Firewall again anytime whenever you want, by simply clicking on the radio button next to “Turn on Windows Defender Firewall” for both Private and Public network settings and click on the Ok button to save the changes.
Recommended:
Can’t Connect To WhatsApp Web? Fix WhatsApp Web Not Working! Windows 10 Tip: Save Space By Cleaning WinSxS Folder What Can I Do If I Forgot My Instagram Password? Fix Taskbar Search Not Working in Windows 10
I hope this article was helpful and you can now easily Disable Windows 10 Firewall, but if you still have any questions regarding this tutorial then feel free to ask them in the comment’s section.

![]()


