Windows 11 Windows 10, version 20H2, all editions Windows Server, version 20H2, all editions Windows 10, version 21H1, all editions Windows 10, version 21H2, all editions Еще…Меньше
Сводка
Папка Windows.old содержит предыдущую версию Windows на вашем устройстве. Если вы хотите удалить предыдущую версию после обновления, проще всего использовать служба хранилища в приложении Параметры. Выполните действия, которые приведены ниже для вашей версии Windows операционной системы.
Windows 10
-
Откройте Параметры.
-
Выберите Система.
-
Выберите служба хранилища.
-
В разделе служба хранилища, выберитеИзменить автоматическое освободить место.

-
В разделе Освободить место сейчас, выберите удалить предыдущую версию Windows.
-
Затем выберите кнопку Очистить .


Windows 11
-
Откройте Параметры.
-
Выберите Система.
-
Выберите служба хранилища.
-
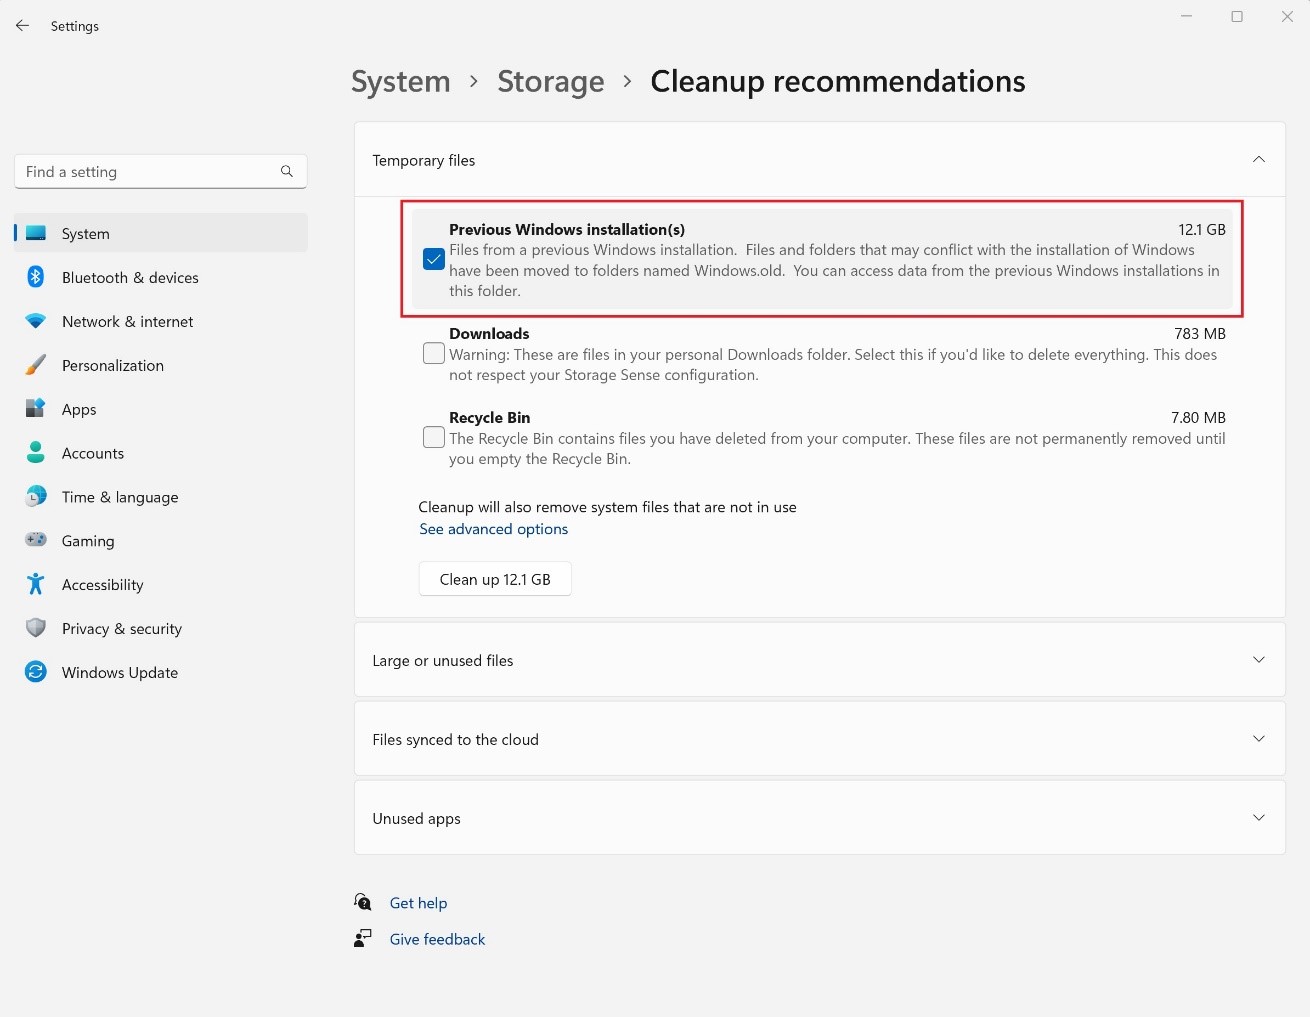
Выберите Рекомендации по очистке.
-
Выберите предыдущий Windows установки.
-
Затем выберите кнопку Очистка, которая отображает размер файла.
Нужна дополнительная помощь?
Нужны дополнительные параметры?
Изучите преимущества подписки, просмотрите учебные курсы, узнайте, как защитить свое устройство и т. д.
В сообществах можно задавать вопросы и отвечать на них, отправлять отзывы и консультироваться с экспертами разных профилей.
 Every now and then, you upgrade your puter.
Let’s say you add an SSD. You copy your old hard drive’s contents to your shiny new SSD, and use your old HDD as a data-only drive. You boot from the new SSD, and poof! You’re done.
Well, sort of…
Your new E: drive is now only a data drive, but alas, there is still an E:\Windows folder, and it’s taking up lots of space.
So, you try to delete E:\Windows… Access Denied, you need permissions, and so on…!
There are a million and one articles out there about how to delete an old, unneeded Windows folder, but they usually involve some piece of software or complicated shenanigans.
Well, forget that! This method is a piece of cake…
So, you might download and try a tool like IOBit’s Unlocker. Well, okay, but that’s kind of unnecessary. And such tools can take a LOOONG time to finish their job.
There are two steps needed to remove old “system” folders like your E:\Windows directory (or whatever drive letter it may have):
- Take ownership of the folder
- Change permissions so you can successfully delete the folder (and its contents) after you own it
Now, normally, this involves much wailing and gnashing of teeth – or special software.
It’s the first step – taking ownership of the old Windows dir – that’s the biggest headache.
Well, fear not!
Step 1 – Take ownership of the old Windows directory
In Windows 10, right-click the Start button, and select Command Prompt (Admin).
In older versions of Windows, click Start, type “cmd“, right-click Command Prompt, and then choose Run as Administrator.
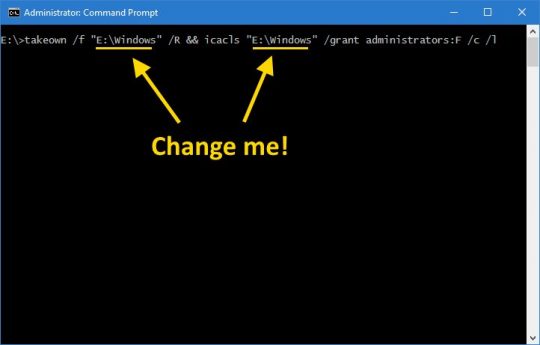
You need to copy/paste this command into the Admin Command Prompt you just opened:
takeown /f "E:\Windows" /R && icacls "E:\Windows" /grant administrators:F /c /l
Note that “E:\Windows” should be changed (twice!) to match the Windows or other folder you wish to remove.
This step won’t delete anything yet. All it does is to recursively zoom through the folder you specify and give Administrator accounts on your puter (and therefore you!) control of the folder and all its contents.
Once it’s done running, you can close the Command Prompt window.
Step 2 – Set Permissions on the old Windows directory
Here, you need to navigate to your old Windows folder in File Explorer (Win-E).
Right-click the old Windows folder, and choose Properties.
Click the Security tab, and the click the Edit button:
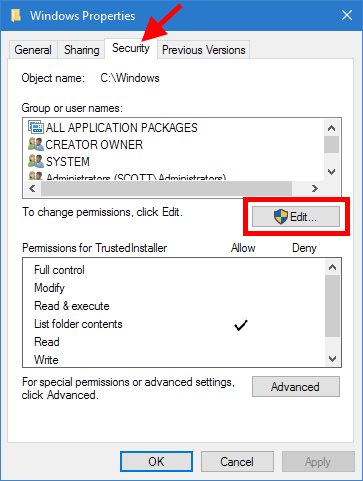
On the Permissions for Windows dialog that appears, you need to select SYSTEM and TrustedInstaller, and click the Remove button for each.
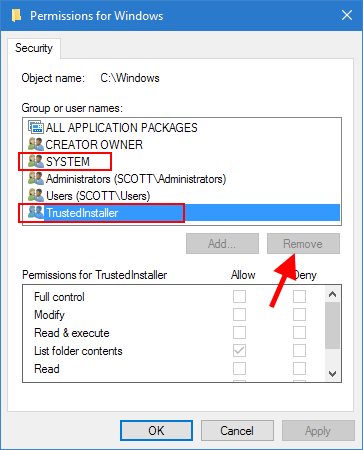
Click OK (twice) to back out of the Properties dialogs when done. If prompted, say yes to applying the changes to all folders, blah blah blah.
Note that if you haven’t done the first step yet, the Remove button will be greyed out. So, take ownership first!
Delete the old Windows folder
Now, just delete the old, now-accessible Windows folder in Explorer. DONE!
If you’d like to be a bit more hardcore, you can open another Admin Command Prompt (as described above), and run the following command:
rmdir /S E:\Windows
Make sure you type the correct drive letter and path!
You can use this same technique to quickly and easily “unlock” other Windows system folders that refuse to be deleted.
Wasn’t that fun?


Contents
- 1 How to Delete Windows.old and $Windows.~BT Folders in Disk Cleanup
- 2 How to Remove Windows.old and $Windows.~BT Folders via Storage Settings
- 3 Removing Old Windows Versions via Elevated Command Prompt
- 4 How to Delete Windows.old Folder via a Command Prompt at Boot
- 5 How to Cleanup the WinSxS Folder and Enable CompactOS
If your PC is low on space, there’s little doubt that at one point or another you’ve been eyeing up your Windows.old folder. This folder can occupy a hefty amount of storage that you can’t afford to lose if your operating system is on a small SSD or micro-SD card. But how to delete Windows.old, and is it even safe? We’ll be answering these questions in today’s tutorial. Let’s start with the most asked question:
Can I delete Windows.old?
Short answer, yes. But you may have gathered that by the fact that this tutorial exists. Removing the Windows.old folder, however, isn’t always as simple as clicking on it and pressing the delete key. This is why there’s often confusion.
The more pertinent question, then, is if Windows.old is safe to delete. The answer to this question really depends on your situation, so it helps to understand what Windows.old is.
Windows.old is typically stored on your C:\ drive, and like the name suggests, stores an old version of Windows. More specifically, your old version of Windows, before you refreshed, upgraded, or performed a custom install of Windows on the same partition as your previous installation.
If you chose to “keep” nothing during your refresh or upgrade, the folder will contain your personal files from the previous installation. As a result, you should only delete it if you’re sure there’s nothing there you need. When you remove Windows.old, you also remove your ability to roll back to your previous version of Windows, so keep that in mind.
After ten days, Microsoft will automatically delete Windows.old from your drive. If you’re patient, then, you don’t need to take any action to remove it. If you need the storage space now, you can follow the steps below. Just make sure you copy across anything you need first:
How to Delete Windows.old and $Windows.~BT Folders in Disk Cleanup
As well as Windows.old, we’ll be showing you how to remove the $Windows.~BT folder, which is used to roll back to earlier versions of Windows. The most user-friendly way to do so is via the Disk Cleanup tool, which provides a handy interface.
- Open Disk Cleanup
Press Start or the search button and type “Disk Cleanup”, then click on the top result.

- Press “Clean up system files”
You’ll have to provide admin approval to continue the process.
- Tick Previous Windows Installation(s) and press “OK”
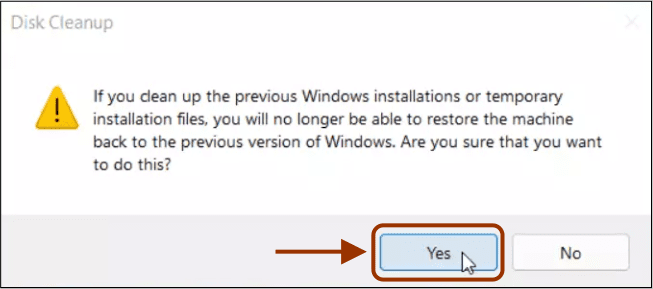
If a confirmation dialog pops up, press “Delete Files”. It will take a minute or two for Disk Cleanup to delete Windows.old and $Windows.~BT from your system.


How to Remove Windows.old and $Windows.~BT Folders via Storage Settings
As you’d expect, the Windows 10 settings app is also quite an intuitive way to remove Windows.old and $Windows.~BT. It does essentially the same thing as above, but looks prettier.
- Open Settings
Press the “Start” button, then click the settings cog, above the power button. Alternatively, press Windows + I.
- Click on “System”
- Open “Storage” settings from the sidebar, then click “Temporary files”
- Tick “Previous Windows installation(s) and press “Remove files”
The process to delete Windows.old will start and should be complete in a few minutes.


Removing Old Windows Versions via Elevated Command Prompt
If you don’t have access to a UI, or just prefer the command line, you can use the trusty Command Prompt to remove WIndows.old and $Windows.~BT.
- Open Command Prompt as an admin
Press the Start button and type “Command Prompt”, then click “Run as administrator” on the right-hand side.
- Take ownership of the Windows.old folder
Before you can delete Windows.old, you need to wrestle control of it from your operating system. This is to avoid accidental deletion and modification. Run the following command to do so:
takeown /F "C:\Windows.old" /A /R /D Y
- Wait for the completion message
It should read something like:
SUCCESS: The file (or folder): "C:\Windows.old\assembly\GAC_MSIL\System.Deployment.Resources..." now owned by the administrators group.
Once complete, you’ll be able to type commands again from the C:\ drive.
- Run the Windows.old delete command
Finally, we can use the icals command to modify the access control list, followed by the folder selection command:
icacls "C:\Windows.old" /grant *S-1-5-32-544:F /T /C /Q
RD /S /Q "C:\Windows.old"
If you’d like to delete the Windows BT folder, repeat the command above but with the file path to BT instead:
takeown /F "C:\$Windows.~BT\*" /A /R /D Y
icacls "C:\$Windows.~BT\*.*" /grant *S-1-5-32-544:F /T /C /Q
icacls "C:\$Windows.~BT\*.*" /grant *S-1-5-32-544:F /T /C /Q
You can close the Command Prompt window when you’re done.


How to Delete Windows.old Folder via a Command Prompt at Boot
If you can’t get take ownership to work, you can also delete Windows.old via Command Prompt at boot. First, boot to Advanced Startup by following our dedicated guide. One advantage of this method is that you won’t need to take ownership of the folder.
- Click on “Troubleshoot”
- Select “Advanced options”
- Click on “Command Prompt”
- Enter diskpart
In your Command Prompt window, type
diskpartand press Enter. - Rum the list volume command
Run the
list volumecommand, then look for the drive letter of your Windows 10 drive under theltrcolumn. For 98% of people, this should be the C drive. Check the size to see if it matches.Note down this drive letter.
- Type “exit” and press Enter
- Run the delete Windows.old command
Run the following command to remove theWindows.old folder, replacing
C:\with your drive letter if necessary:RD /S /Q "C:\Windows.old"Close your Command Prompt Window and click “Continue” to boot into your OS.


How to Cleanup the WinSxS Folder and Enable CompactOS
If you’re still struggling for space, you can follow our guide on how to cleanup the WinSxS folder to free up a little more. If you’re still struggling after that, you may have to take more drastic measures like enabling CompactOS, which may affect performance.

When upgrading Windows versions, it creates a folder called Windows.old, containing all information from the prior installation. If you don’t like the new version of Windows, you may use it to restore your system to the previous version. Explore the Windows.old folder. Find the exact file you need, in case it wasn’t copied correctly to the new Windows installation. For a similar issue, see how to resolve “Error 740: Elevated permissions are required to run DISM“, and how to create a hidden share (Administrative share) folder on Windows devices.
In essence, the Windows.old folder just holds the previous version of Windows. From your installed applications to the Windows system files to the settings and data for each user account. In case you want to revert to that earlier version of Windows or if you need to search around for a file, the current version of Windows retains it around.
In order to save up space, Windows will automatically remove the Windows.old folder after a month. However, if the folder is still present after a month or you need to delete it immediately, follow the instructions below.
Here are other related guides: Folder Access Denied, you require permission from SYSTEM: Unable to delete old windows folder. File Access Denied, You require permission from trusted installer: How to delete or rename files protected by Trusted Installer.
Let’s now look at how to remove the Windows.old folder will help you free up some system space.
How to Delete the Windows.old Folder to Free Up Space in Windows 11
The Windows.old folder can take a lot of disk space. Depending on the size of your prior Windows installation, it may easily use up 15 GB or more of disk space.
See the two methods listed below to remove windows.old folder in Windows 11.
Delete Windows.old from the File Explorer.
You can delete the Windows.old folder from File Explorer like you would any other folder. To do this, open the file explorer and navigate to the C: folder. Then right-click and click delete

You’ll be prompted to provide administrator permission to delete the folder, click Continue.

Once you provide the administrator permission the folder will be deleted.
Note: If the Windows.old folder is for another user, you will need to take ownership of the folder before it can be deleted. See Folder Access Denied, you require permission from SYSTEM: Unable to delete old windows folder.Delete the Windows.old folder using Windows Disk Cleanup tool
Another easy way to delete the Windows.old folder in Windows 11 is through the Windows Disk Cleanup tool.
First, click the Windows Start button, then search for Disk Cleanup, under Best match, click Disk Cleanup app as shown below. You can also right-click the C:\ drive in File Explorer, select Properties, and then click the “Disk Clean-up” button on the “General” tab.

From the Disk Cleanup window, press the “Clean up System Files” button at the bottom.

The Disk Cleanup tool will scan your computer for unused files depending on the speed and size of your hard drive.

Once the tool finishes scanning your drive, it will show items you can safely delete from your drive to free up space. On the list you should see the Previous Windows installation(s) item which is the Windows.old content.
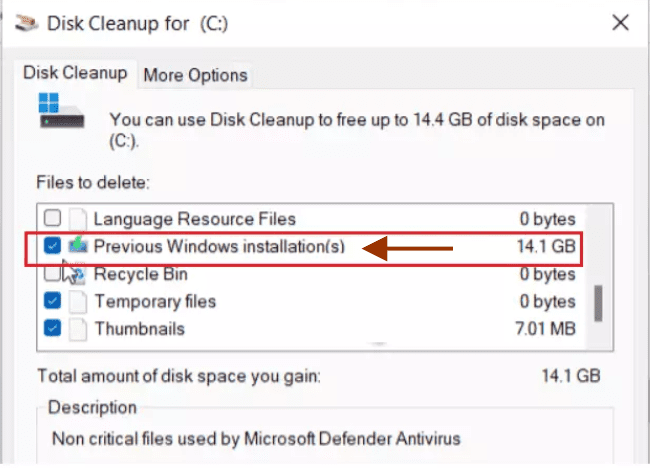
Tick the boxes of the items you want to remove. It safe to check all and click the OK button. You’ll get a prompt to confirm that you want to delete the files.

You may also get a second prompt to confirm that you want to delete Windows installations or temporary installations file. Click Yes to confirm and delete.
Removing the Windows.old directory has no downsides. You can delete the Windows.old folder as long as you’re satisfied with your current Windows setup, don’t want to downgrade, and you are certain that you have all of your necessary files, and don’t need to take any leftovers from there.
I installed a new solid state drive (SSD) pre-loaded with Win 7 Home Edition OS and my program files in the primary bay of my laptop . I plan to use the original HDD in the second bay of my laptop for data files. I had to clean out all the OS-related files and folders from this HDD and leave my existing data files intact.
I installed the HDD in the second bay of my laptop (it could be left outside and connected via a USB port) and tried to delete the OS files with Windows Explorer. The running Windows OS would not let me delete the system files. I tried several ways of changing permissions and none of them worked for me. So, I used a program called «PartedMagic»,. The PM program gets loaded via a CD on power-up, before Windows boots, so Windows cannot invoke it’s rules against deleting System Files.
Here’s the short procedure: Download the PM program, save it, and burn it to a CD. Insert the CD and reboot the computer. Set the BIOS to boot from the CD. Among many other things, PM has a «Windows Explorer» like feature. Open it, navigate to the correct HDD and delete all the files and folders related to the OS. While you are there, delete any other unwanted folders and files. Defrag the HDD and your done.
Details left out of the short procedure:
Insert the CD created above into the CD tray and close it. Restart the pc. When the pc starts to boot up, press the ESC key (or f10 key) repeatedly to enter the BIOS. Set the BIOS to boot from the CD. Select «1», the default setting, on PM. After the program has loaded, click on the «Explorer» icon. Select the HDD you want to work on and start deleting. When you think you have removed all of the «undeletable» files and folders you «might» be done. Restart your computer. It should boot to the installed OS. If not, remove the CD and try again. Take a look at the HDD contents with Windows Explorer. You can delete unwanted non-OS data with WE.
OR,
I used another neat program that runs in Windows called WinDirStat to do a final clean up. Download and run the program. Select the drive you are working on. This program presents a great visual display of the HDD contents. Note: be patient, it takes WinDirStat a few minutes to crunch the contents and display it. Navigate around the colorful display and, when you are done deleting, run a defrag program. You are set go with lot’s of space to store your data.
P.S. Please don’t interpret anything in this procedure as disparaging toward Microsoft products. I like Windows 7.