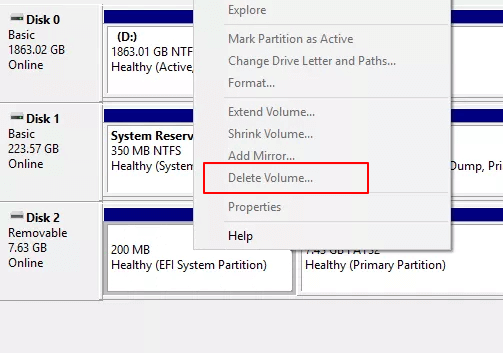
Usually, you can easily delete a partition in Disk Management. But you can’t delete EFI system partition in Windows because the «Delete Volume» feature is grayed out.
The «Delete Volume» may also gray out when you try to delete the OEM partition, recovery, or system reserved partition. This page will talk about how to delete the EFI system partition on Windows, as well as the must-know information about the EFI system partition, including what EFI is and what happens when the partition is deleted.
To efficiently remove EFI partition from your computer, you can fully trust EaseUS Partition Master Professional as shown in Part 3. Keep reading and learn more details.
PAGE CONTENT:
Part 1. What Is EFI System Partition (ESP)
Part 2. What Happens If You Delete EFI System Partition (ESP)
Part 3. How to Remove/Delete EFI Partition in Windows 11/10/8/7 [2 Methods]
Video Guide to Delete EFI System Partition
Part 1. What Is EFI System Partition (ESP)
Let us figure out what is EFI. EFI partition, also known as EFI system partition, short for ESP, is automatically generated when you successfully install Windows OS on a GPT disk in your computer. It takes about 100M or 200MB or so with no drive letter. Normally, you may see more EFI system partition on Windows 10.
According to Wikipedia, «EFI system partition (ESP) is a partition on a data storage device which is used computers adhering to UEFI (Unified Extensible Firmware Interface). When a computer is booted, UEFI firmware loads files stored on the ESP(EFI system partition) to start installed operating system and various utilities.»
It includes 4 main components:
- Boot loaders
- Device drivers
- System utilities
- Data files

Part 2. What Happens If You Delete EFI System Partition (ESP)
According to Part 1, the EFI partition is like an interface for the computer to boot Windows off. It’s a pre-step that must be taken before running the Windows partition. Without the EFI partition, your computer won’t be able to boot into Windows.
In a word, EFI system partition deletion will cause the installed system unbootable. Therefore, EFI system partition is usually protected and locked by the Windows operating systems to prevent and avoid accidental deletion. That’s why you can’t see the EFI partition in Windows File Explorer nor delete it using Windows Disk Management.
- Important
- 1. If you want to keep your Windows OS running smoothly, don’t do anything to the EFI system partition.
- 2. If your hard drive is getting full, follow to learn what is taking up space on the hard drive and use the right ways to free up disk space.
- 3. If you installed two Windows systems on your PC and want to delete the ESP, freeing up disk space and just keeping one OS, follow methods in Part 3 for help.
- 4. If you want to delete the EFI partition and install a new Windows OS, you can directly reinstall the OS. The ESP will be automatically removed.
Part 3. How to Delete EFI Partition in Windows 11/10/8/7 [2 Methods]
For users who want to delete the EFI system, there are two methods available. One is to delete with the Windows built-in tool — Diskpart and the other is to apply a simple third-party tool — EaseUS Partition Master. To avoid unnecessary file loss, make sure you have backed up the ESP files in advance.
Method 1. Delete EFI Partition Using EaseUS Partition Manager
Besides DiskPart, third-party partition manager software works more flexibly and reliable in dealing with this issue. Professional partition manager software — EaseUS Partition Master simplifies the process of deleting EFI partitions in Windows as easy as 1-2-3.
Now download EaseUS Partition Master and learn the detailed guide.
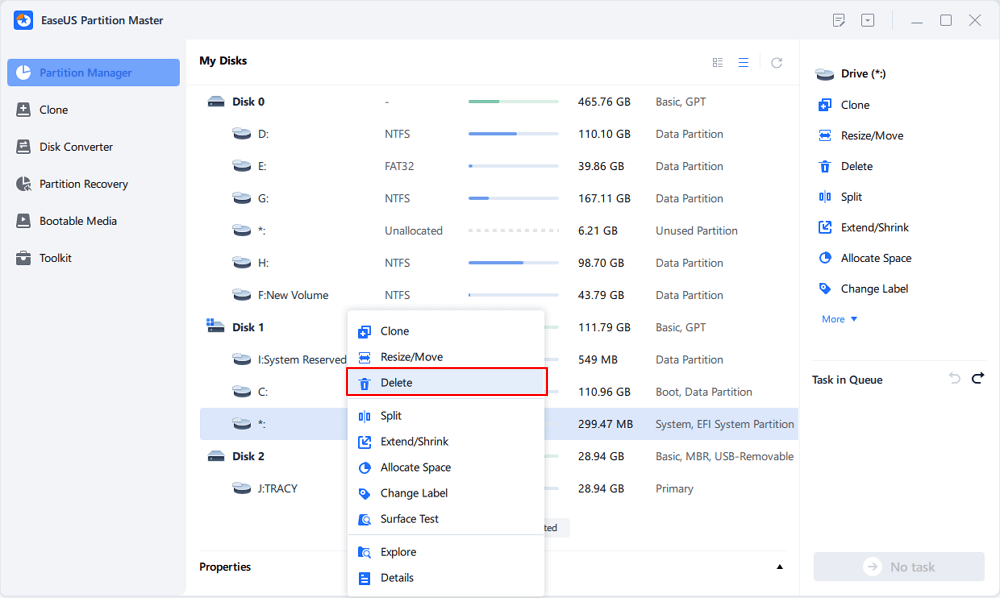
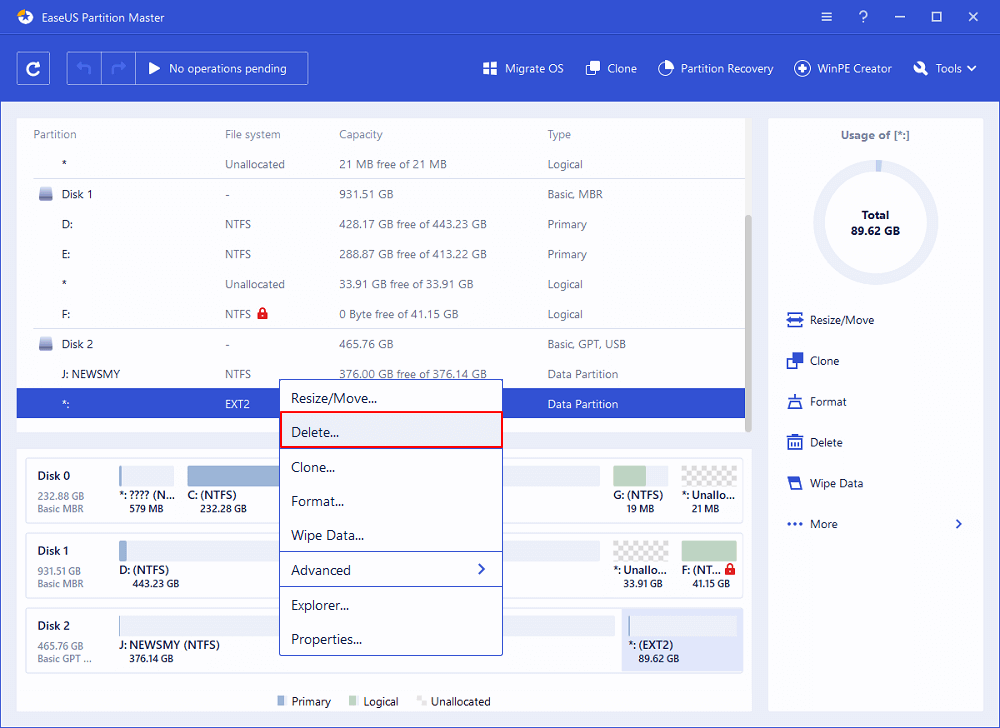
Step 1. Launch EaseUS Partition Master, on the Partition Manager section, right-click on the EFI system partition and choose «Delete«.
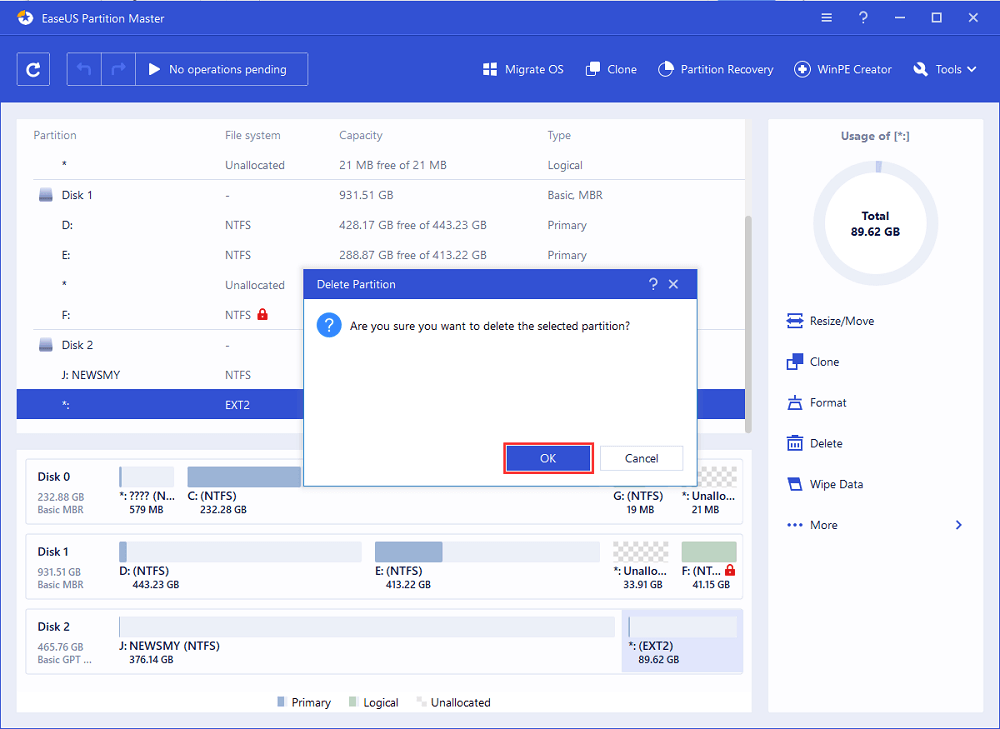
Step 2. Click «Yes» to confirm the message «Do you want to delete the selected partition?».
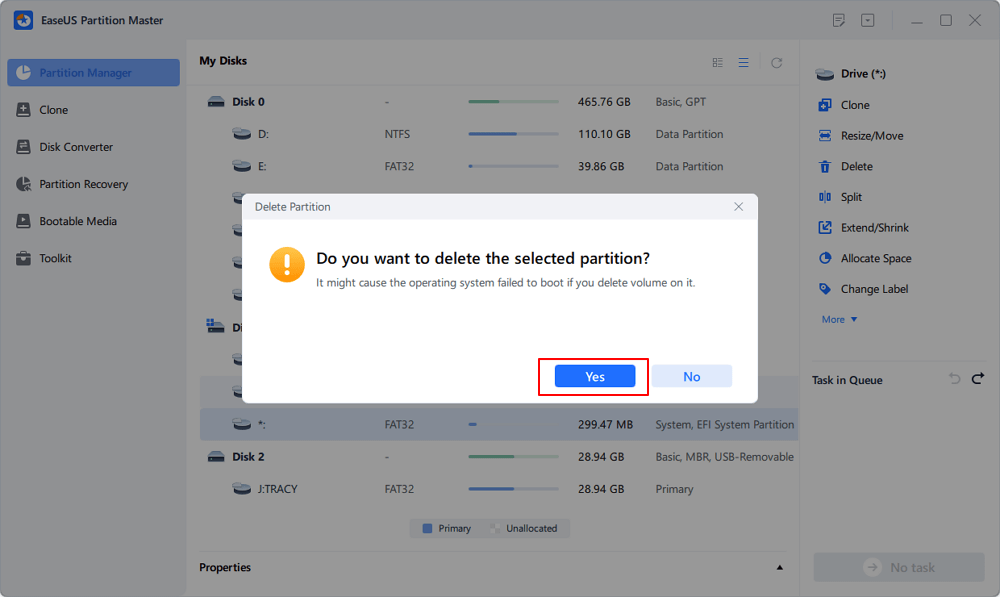
Note that this opertion will delete the EFI/UEFI partition, which may cause OS boot issue. Make sure you want to execute the operation.
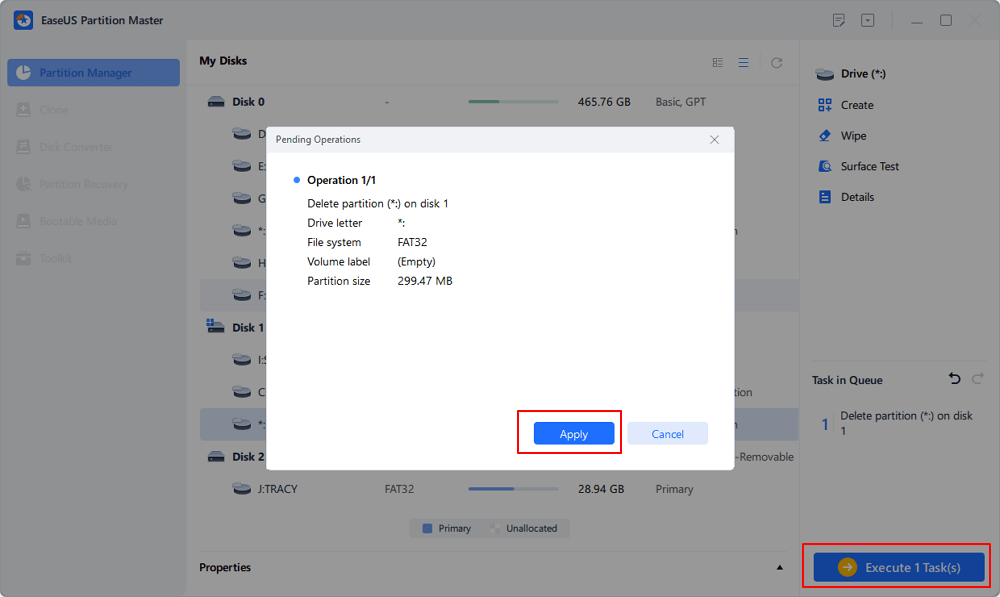
Step 3. Click «Execute 1 Task» and then «Apply» in the new window to completely remove the EFI system partition.
Bonus Features You May Also Like EaseUS Partition Master:
— EaseUS Partition Master —
Your Smart Windows 11 Update Disk Manager
- MBR to GPT Converter, Make Disk Ready for Windows 11.
- Migrate Windows 11 to New SSD in 1-Click.
- Handy to Extend or Combine Partitions in Windows 11.
- Clone and Upgrade Disks without Data Loss.
Method 2. Remove EFI Partition with Diskpart
As a command-line utility, DiskPart is sort of complex for average users to apply. Please be very careful while following the below command lines to delete EFI partition:
Step 1. Open DiskPart on your PC.
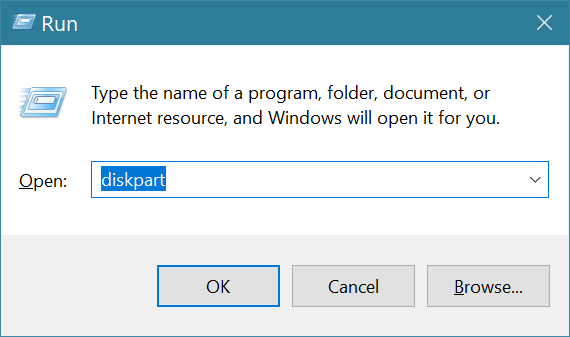
- 1. Hit «Windows Key + R» to open the run dialogue box.
- 2. Enter diskpart and click «OK» to open a black command prompt window.
Step 2. Change EFI system partition ID and set it as a data partition.
Type the below command lines and hit Enter each time:
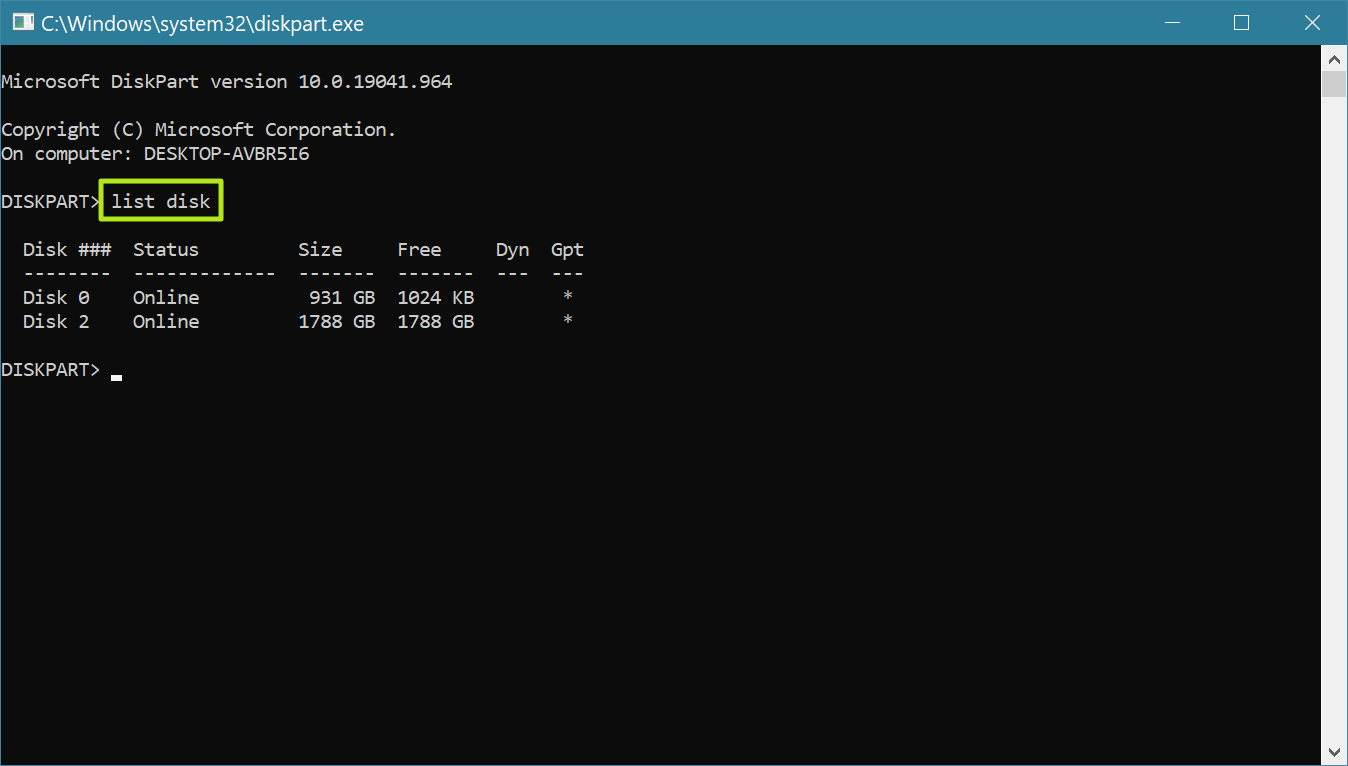
- «list disk» (It displays all the disks of your computer. )
- «sel disk 0» (It identifies which disk you need to work with. Here 0 stands for the disk letter.)
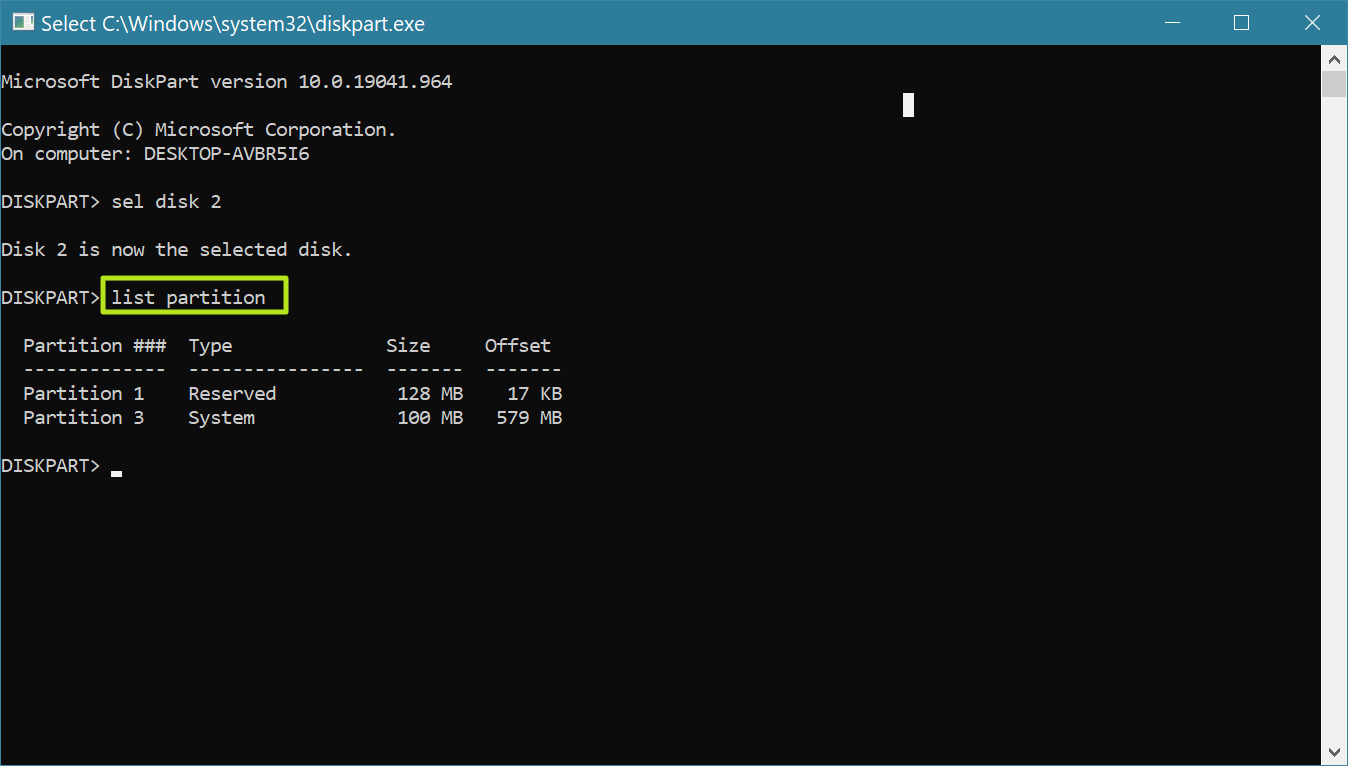
- «list partition» (It displays all partitions and EFI system partitions on the selected disk.)
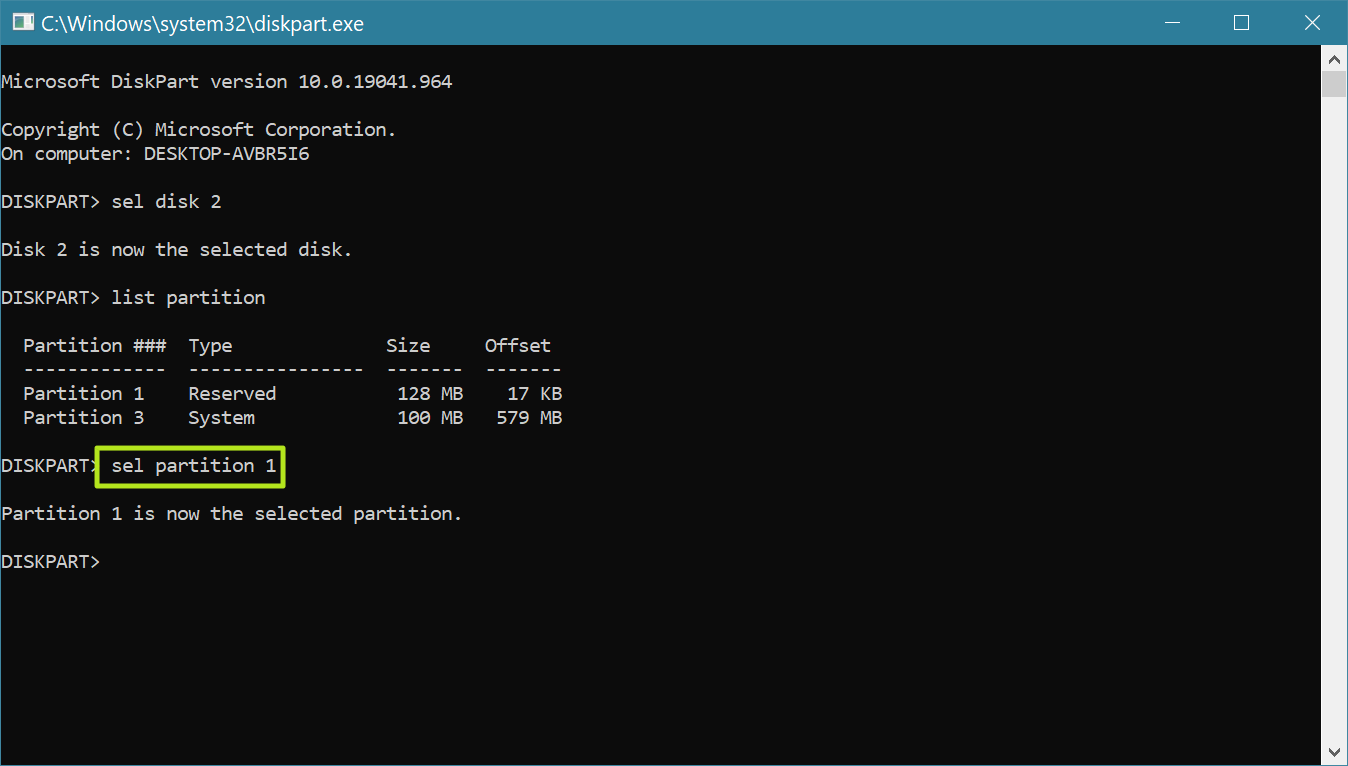
- «sel partition 1» (Select the EFI partition that you want to delete. Here, 1 stands for the volume number of EFI.)
- «SET ID=ebd0a0a2-b9e5-4433-87c0-68b6b72699c7»
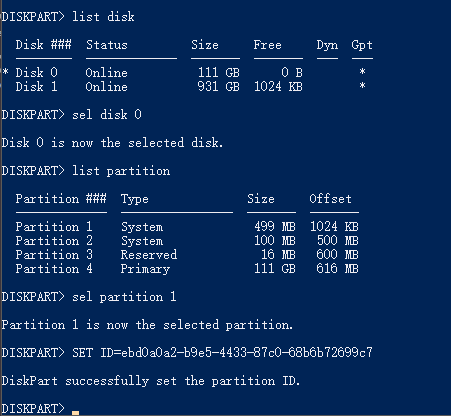
By doing so, it will make the EFI system partition deletable. Continue with the following steps to remove this partition on your hard drive.
Step 3. Delete the EFI partition with the command line.
Type the below command lines and hit Enter each time:
- «list partition» (It displays all the volumes on the hard drive.)
- «sel partition 1» (It identifies which partition you want to remove. Here 1 stands for the volume letter.)
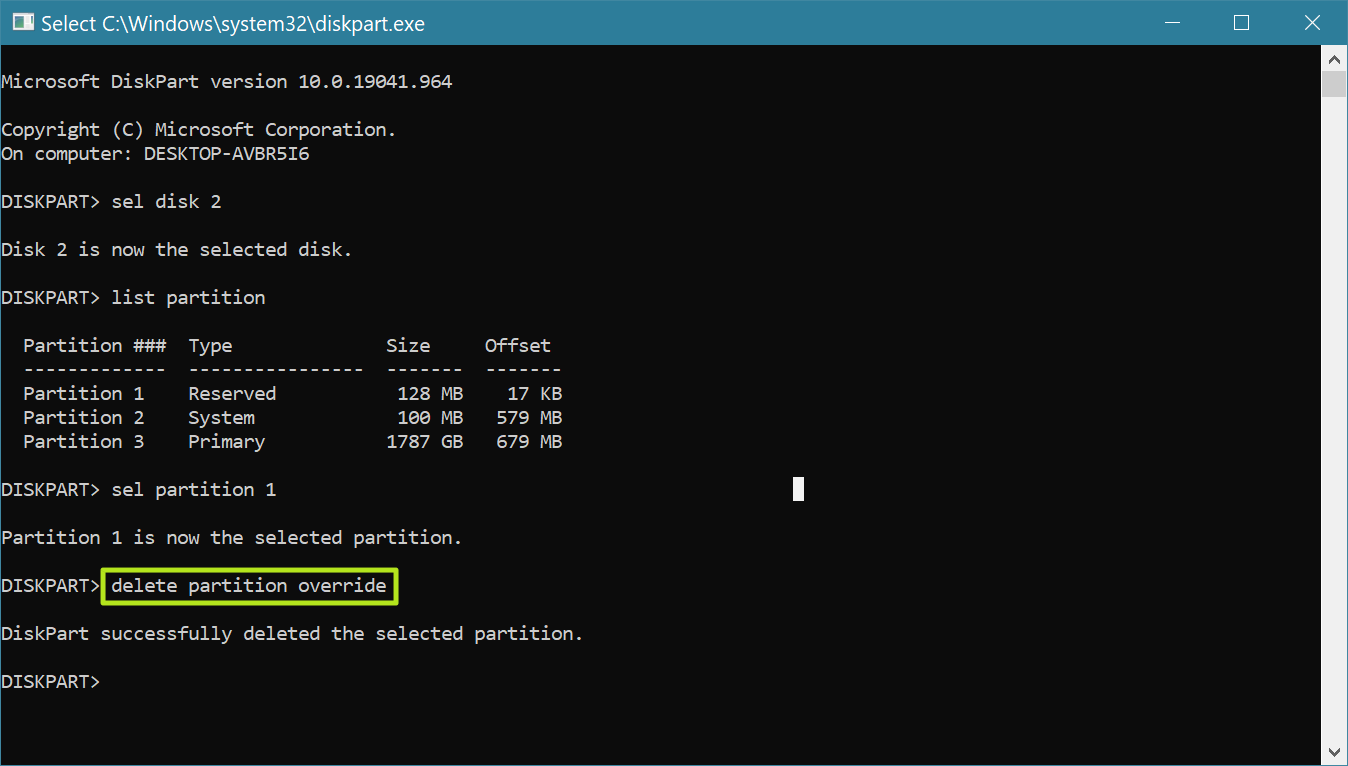
- «delete partition override» (It removes the EFI partition from Windows disk.)
Step 4. Complete EFI deleting process.
Finally, type «exit» to close the windows when you receive the message that says, ‘DiskPart successfully deleted the selected partition’.
Diskpart commands can be helpful in dealing with disk partition issues, so share this way to help more facing the same issues.
Video Tutorial: How to Delete EFI System Partition (ESP) on Windows 10
- This tutorial explains how to remove EFI system partition on your hard drive with Command Prompt.
- How to use Command Prompt to remove EFI partition — 01:15~03:12
Final Word
When you’ve successfully deleted the EFI partition on your PC, you can create a new partition with the unallocated space to use as a data partition or add the free space to other existing partitions.
The following video tutorial shows how to partition a hard drive with EaseUS Partition Master. You can learn how to resize a partition, create a partition, and delete the partition.
If you are having some more questions about EFI partitions, you may refer to the below links for help:
- How to Restore Deleted EFI Boot Partition
- How to Resize EFI System Partition
EFI System Partition FAQs
1. Is it safe to delete an EFI system partition?
If your are using UEFI instead of BIOS Legacy mode, do not delete the EFI partition or your device will not boot. Once you are installing a new OS and boot into Legacy mode, you can decide to delete EFI partition.
2. How to hide my EFI partition from my computer screen?
To hide EFI partition:
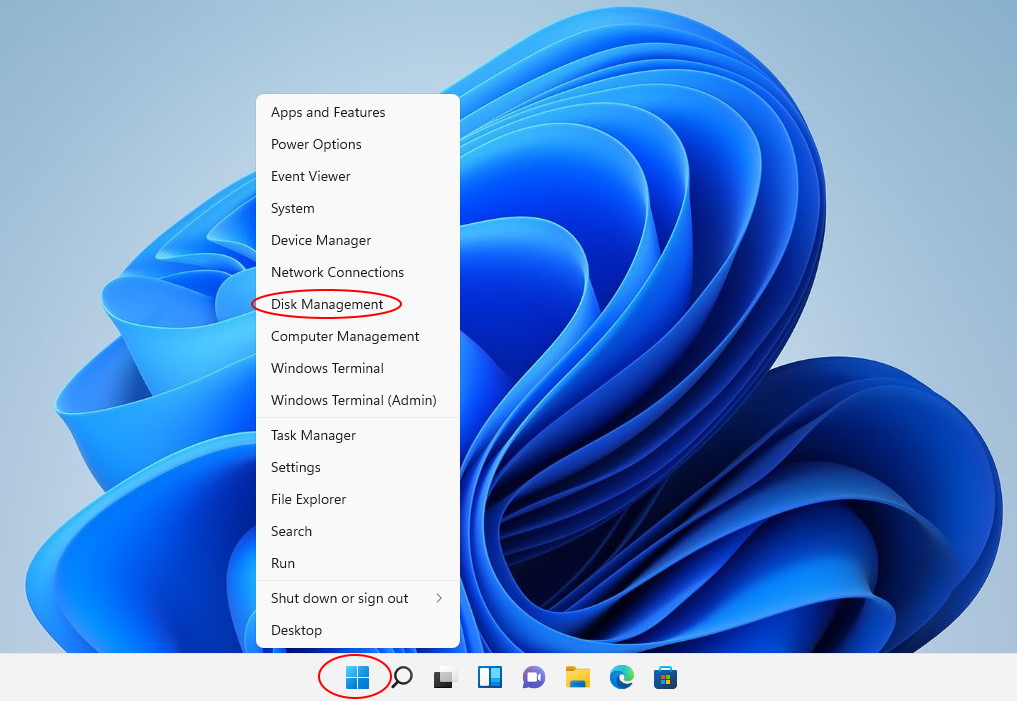
- Right-click Windows icon and click Disk Management.
- Right-click on the partition.
- Select «Change Drive Letter and Paths…».
- Click «Remove» button.
- Click «Yes» if a dialog box appear.
Можно ли Удалить Системный Раздел EFI?
Обычно, раздел диска можно легко удалить через Управление Дисками. Но нельзя удалить системный раздел EFI в Windows, потому что функция ‘Удалить Том’ отображается серым цветом.
«Удалить Том» также может быть серым, если вы попытаетесь удалить ОЕМ раздел, раздел восстановления или системный зарезервированный раздел. На этой странице будет рассказано о том, как удалить системный раздел EFI в Windows, а также будет дана необходимая информация о системном разделе EFI, в том числе о том, что такое EFI и что происходит при удалении раздела. Больше подробностей далее по тексту.

- Часть 1. Что Такое Системный Раздел EFI (ESP)
- Часть 2. Что Произойдет Если Удалить Раздел EFI
- Часть 3. Два Способа Удаления Системного Раздела EFI
Часть 1. Что Такое Системный Раздел EFI (ESP)
Раздел EFI, также известный как системный раздел EFI, сокращённо ESP, автоматически создается при успешной установке ОС Windows на GPT-диск вашего компьютера. Он занимает около 100-200МБ или около того, без буквы диска. Обычно, вы можете увидеть больше системных разделов EFI в Windows 10.
Согласно Википедии, ‘Системный раздел EFI (ESP) — это раздел на устройстве хранения данных, который используется компьютерами с поддержкой UEFI (Unified Extensible Firmware Interface). Когда компьютер загружается, UEFI прошивка загружает файлы, хранящиеся в ESP (системном разделе EFI), для запуска установленной операционной системы и различных утилит.’
Сюда входит 4 основных компонента:
- Загрузчики
- Драйверы устройств
- Системные утилиты
- Файлы данных

Part 2. What Happens If You Delete EFI System Partition (ESP)
Согласно Части 1, раздел EFI похож на интерфейс для компьютера для загрузки Windows. Это предварительный шаг, который необходимо выполнить перед запуском Windows. Без раздела EFI на вашем компьютере не сможет загрузиться Windows.
Одним словом, удаление системного раздела EFI приведет к тому, что установленная система перестанет загружаться. Поэтому системный раздел EFI обычно защищен и заблокирован операционными системами Windows, чтобы предотвратить случайное удаление. Вот почему вы не можете увидеть раздел EFI в Проводнике Windows или удалить его с помощью Управления Дисками Windows.
- Важно
- 1. Если вы хотите, чтобы ОС Windows работала без сбоев, тогда ничего не делайте с системным разделом EFI.
- 2. Если ваш жесткий диск переполнен, посмотрите что занимает место на жестком диске и воспользуйтесь подходящими способами, чтобы освободить место на диске.
- 3. Если вы установили на свой компьютер две ОС Windows и хотите удалить ESP, чтобы освободить место на диске и оставить только одну операционную систему, тогда следуйте инструкциям в Части 3.
- 4. Если вы хотите удалить раздел EFI и установить новую ОС Windows, тогда вы можете просто переустановить ОС. ESP будет удален автоматически.
Часть 3. Как Удалить Раздел EFI (Системный) в Windows 11/10/8/7 [2 Метода]
Для пользователей, которые хотят удалить систему EFI, доступны два метода. Один из них заключается в удалении раздела с помощью встроенного в Windows инструмента — Diskpart, а другой — в применении простого стороннего инструмента — EaseUS Partition Master. Чтобы избежать ненужной потери файлов, убедитесь, что вы заранее создали резервную копию файлов ESP-раздела.
Способ 1. Удаление Системного Раздела EFI с Помощью Diskpart
Так как Diskpart это утилита командной строки, её использование несколько затруднено для обычных пользователей. Пожалуйста, будьте очень осторожны, выполняя приведенные ниже команды, чтобы удалить раздел EFI:
Шаг 1. Откройте DiskPart на своем ПК.
- 1. Нажмите «Windows Key + R», чтобы открыть диалоговое окно «Выполнить».
- 2. Введите diskpart и нажмите «ОК», чтобы открыть черное окно командной строки.
Шаг 2. Измените идентификатор системного раздела EFI и установите его в качестве раздела для данных.
Введите приведенные ниже командные строки и каждый раз нажимайте Enter:
- «list disk» (Показывает все диски этого компьютера.)
- «sel disk 0» (Задаёт с каким диском нужно работать. Здесь 0 означает букву диска.)
- «list partition» (Показывает все разделы и системные разделы EFI на выбранном диске.)
- «sel partition 1‘ (Выбирает раздел EFI, который нужно удалить. Здесь 1 обозначает номер тома EFI.)
- «SET ID=ebd0a0a2-b9e5-4433-87c0-68b6b72699c7»

Таким образом, системный раздел EFI станет удаляемым. Выполните следующие шаги, чтобы удалить этот раздел с жесткого диска.
Шаг 3. Удалите раздел EFI с помощью командной строки.
Введите приведенные ниже командные строки и каждый раз нажимайте Enter:
- «list partition» (Отображает все тома на жестком диске.)
- «sel partition 1» (Определяет, какой раздел вы хотите удалить. Здесь 1 означает букву тома.)
- «delete partition override» (Удаляет раздел EFI с диска Windows.)
Шаг 4. Завершите процедуру удаления EFI.
Наконец, введите «exit», чтобы закрыть окно, когда вы увидите сообщение «DiskPart успешно удалил выбранный раздел».
Способ 2. Удаление Раздела EFI с Помощью EaseUS Partition Manager
Кроме DiskPart, есть стороннее программное обеспечение для управления разделами, которое работает более гибко и надежно при решении обозначенной проблемы. Профессиональная программа для управления разделами — EaseUS Partition Master упрощает процесс удаления раздела EFI в Windows.
Просто скачайте EaseUS Partition Master и ознакомьтесь с подробным руководством.
Шаг 1: в EaseUS Partition Master щелкните правой кнопкой мыши на том разделе жесткого диска, который вы хотите удалить, и выберите «Удалить».
Шаг 2: нажмите «ОК», чтобы подтвердить, что вы хотите удалить выбранный раздел.
Шаг 3: нажмите кнопку «Выполнить операцию» в верхнем углу и сохраните все изменения, нажав «Применить».
Заключительное Слово
После успешного удаления раздела EFI на своем ПК, вы можете создать новый раздел из нераспределенного пространства для использования в качестве раздела данных или добавить свободное пространство к другим существующим разделам.
В следующем видео-уроке показано, как разделить жесткий диск с помощью EaseUS Partition Master. Вы узнаете как изменить размер раздела, создать раздел и удалить раздел.
Если у вас возникли дополнительные вопросы о разделах EFI, вы можете обратиться за помощью по приведенным ниже ссылкам
When you install Windows 11 or 10 on your PC’s boot drive, the process automatically creates a partition called the EFI System Partition, which stores some critical files the computer needs to read at boot time. The EFI System Partition doesn’t take up a lot of space, usually using only a few hundred megabytes (mine was 100MB at the time of writing). Because this partition is needed to boot, Windows doesn’t, by default, allow you to delete it.
However, if you take an SSD or best hard drive that was once a boot drive and want to completely reformat it to use as a data drive, you may want to get rid of the EFI System Partition so you can have one single, big partition for all of your files. Using the simple instructions below, you can delete the EFI System Partition in Windows 10 or 11. Just make sure you don’t do this on your boot drive or you won’t be able to boot!
How to Delete the EFI System Partition in Windows
1. Launch Diskpart.
2. Enter list disk to see a list of all the connected drives. The drive number of the drive you want to delete from should be the same as it appears in the Disk Manager app.
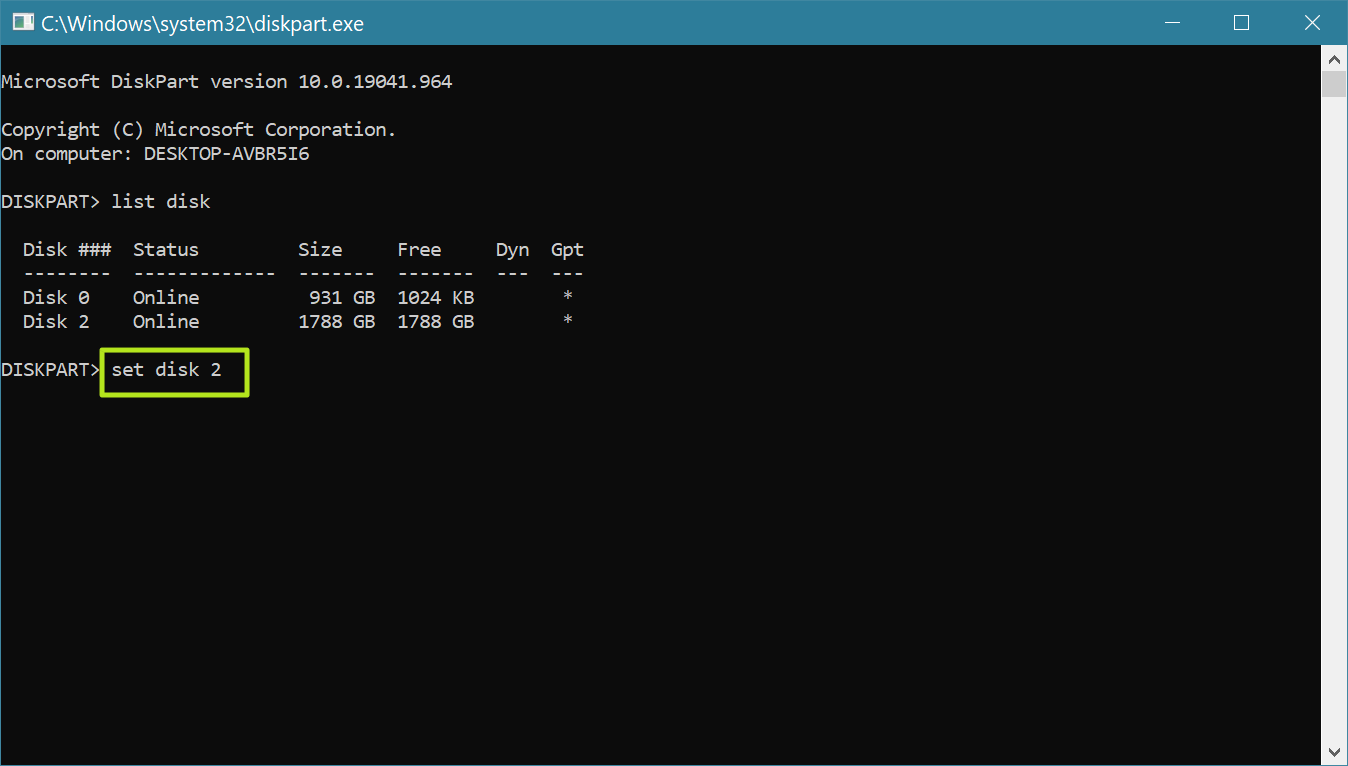
3. Enter set disk [Disk Number] where [Disk Number] is the number of the drive you want to delete from.
4. Enter list partition.
5. Enter sel parition [PARTITION NUMBER] to choose the reserved partition you wish to delete.
6. Enter delete partition override.
At this point, the EFI System Partition should be deleted. However, you should confirm by looking at the disk in the Windows Disk Management app (load it by searching for «disk management.»). If it still appears, reboot and check again.
Join the experts who read Tom’s Hardware for the inside track on enthusiast PC tech news — and have for over 25 years. We’ll send breaking news and in-depth reviews of CPUs, GPUs, AI, maker hardware and more straight to your inbox.
Avram Piltch is Tom’s Hardware’s editor-in-chief. When he’s not playing with the latest gadgets at work or putting on VR helmets at trade shows, you’ll find him rooting his phone, taking apart his PC or coding plugins. With his technical knowledge and passion for testing, Avram developed many real-world benchmarks, including our laptop battery test.
Most Popular
As you probably know, in order to be able to store files on a hard drive, it needs to be prepared first: it needs to be initialized, partitioned, and formatted just the right way. If you’ve bought an external drive in a store, the preparation has probably been already done by the drive manufacturer. However, what if you want the drive to be prepared differently? For example, you may want to re-format the drive, or change the partitions that it has. The way to do such tasks in Windows is to use the Disk Management tool that comes preinstalled with Windows.
It’s easy to open Disk Management, but the procedure is slightly different in different versions of Windows. If you have a newer version of Windows, such as Windows 11 or 10 right-click on the Start Menu, and choose Disk Management from the menu displayed. (If you have Windows 7, run Windows Explorer, right-click on Computer, choose Manage from the menu, then select Disk Management under Storage.)
Before you continue, first things first: Disk Management is a very powerful tool, and with great power comes great responsibility! If you are not very experienced with computers, you can look, but better not touch and let someone more knowledgeable to do the job. Because with Disk Management it’s very easy to destroy your partitions and lose your files, if you don’t know what you are doing.
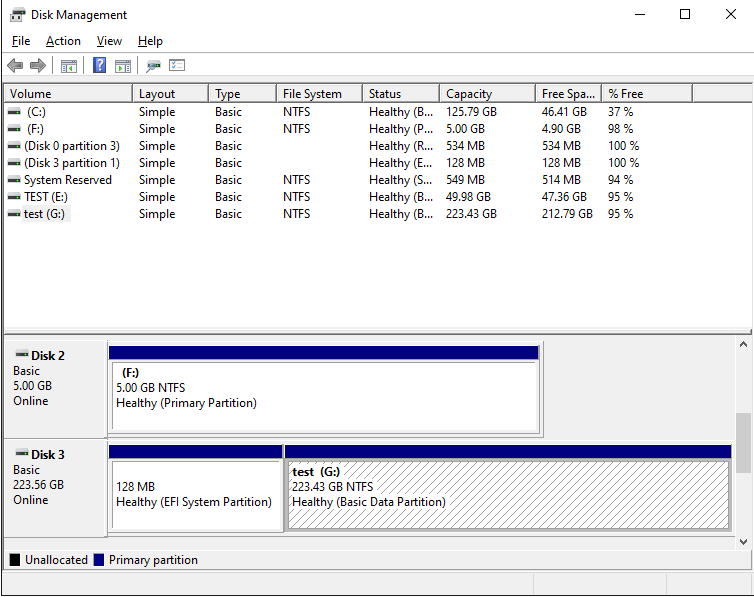
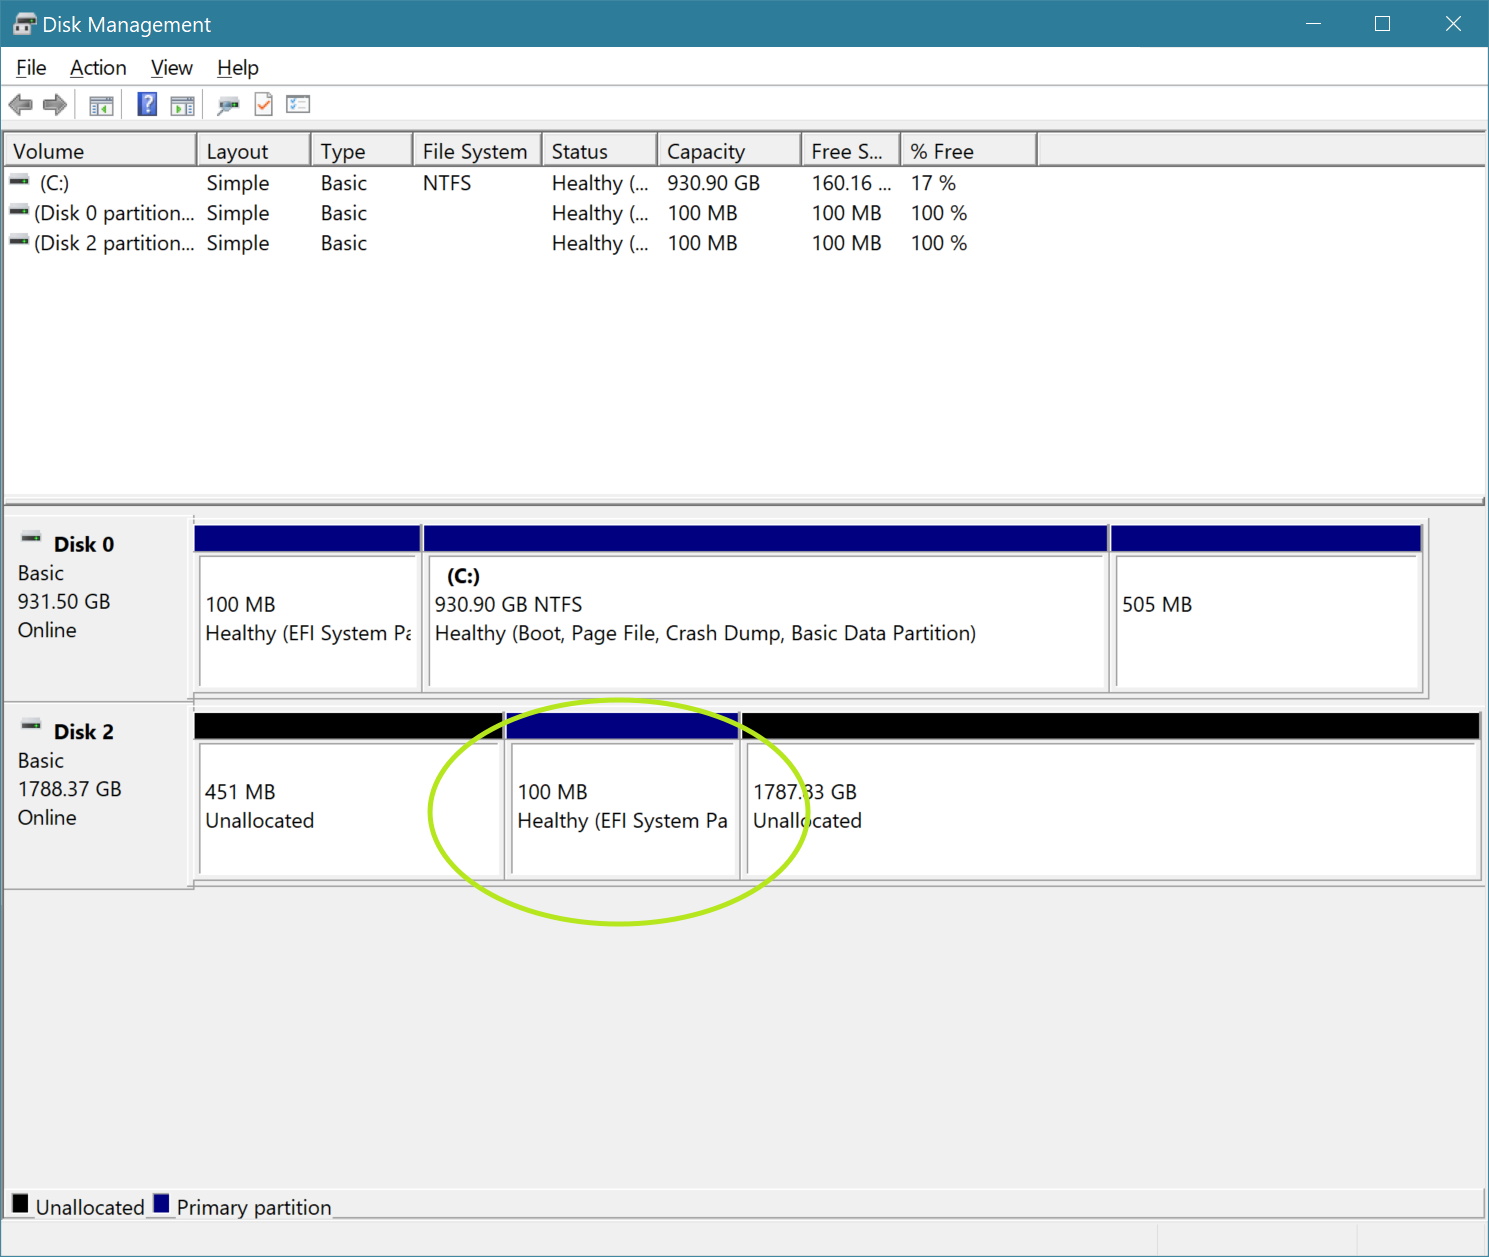
The most important thing when using the Disk Management tool is to make sure you can identify the disk you want to manage in the list. Usually you can do it by the total size of the disk displayed, although it may be confusing. For example, in this example, a hard drive that’s described as a 240 GB drive by the manufacturer, is shown to have only 223.56 GB by Windows. (Apparently, the disk manufacturers and Windows have a different understanding of what a «gigabyte» is.) Also, if you have several disks of the same size attached, it may get even more confusing. If in doubt, better unplug all external drives except for the one you actually want to work with, to make sure you are not accidentally erasing data on a wrong disk!
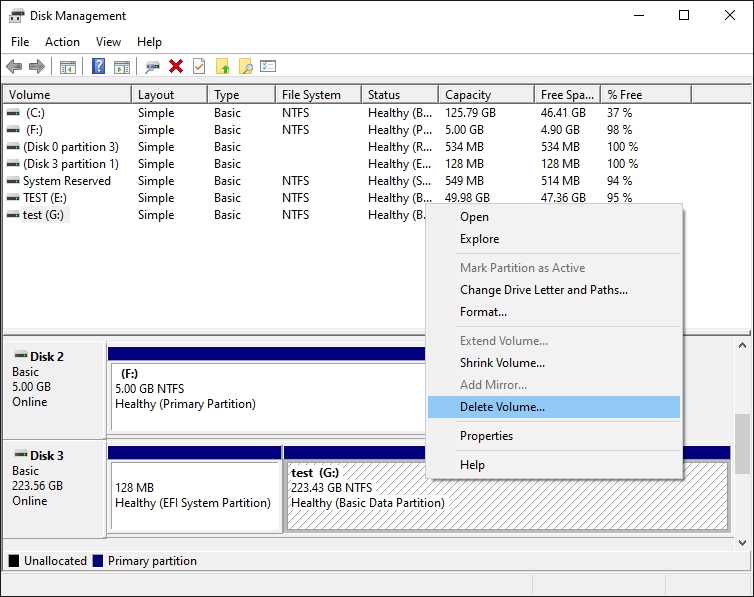
In our case, the 240 GB disk (shown as 223.56 GB disk in the list) is Disk 3 (let’s remember this number, we will need it a bit later.) It has two partitions, one is a 128MB EFI partition that has no drive letter assigned, and another NTFS partition of the size 223.43 GB, that has the label test and the drive letter G:. Although these two partitions looks similar, they are treated very differently by Windows. If you right-click on the normal NTFS partition, you should see the normal menu that lets you perform various tasks on that partition, including the Delete Volume command:
However, if we right-click on the first EFI partition, the menu we get is completely disabled:
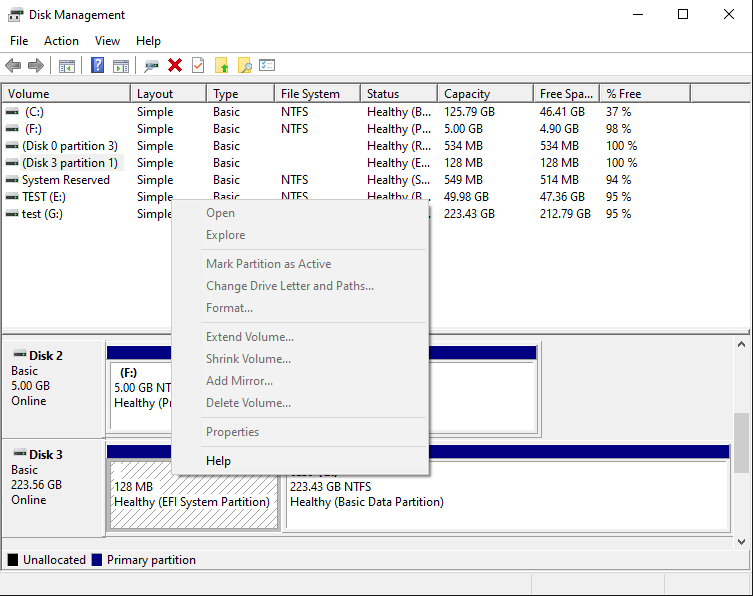
As you can see, the system partition is protected in such a way that even the powerful Disk Management tool cannot do anything to it. Note that it’s not because the partition is EFI, it’s because the tool that created that partition had marked it in a way that prohibits other tools to tamper with it. However, what if we want to delete the EFI system partition and re-initialize the disk from scratch?
While the Disk Management tool is helpless in this situation, fortunately Windows offers another tool, DISKPART, that can do things to the disks that Disk Management can’t. The tricky part is, that DISKPART is a command-line tool, that requires us to type commands into its command prompt to make it do what we want.
The procedure of getting to the DISKPART tool is slightly different in different versions of Windows. First, you need to open Windows command prompt in the «administrator» mode. In the recent versions of Windows you can simply right-click on the Start button and choose one of the command offered:
- Windows Terminal (Admin)
- Power Shell (Admin)
- Command Prompt (Admin)

If you have an older version of Windows such as Windows 7, you can open the command prompt in the administrator mode as follows: click the Start button and enter cmd in the search box; make sure that cmd is highlighted on the menu displayed, but do not press the Enter key yet; instead, press the Ctrl and Shift keys together, and while keeping them depressed, press Enter. The Ctrl+Shift combination should force the command prompt to open in the «administrator» mode.
When the command prompt window opens, start the DISKPART tool by entering the diskpart command into the command prompt window:
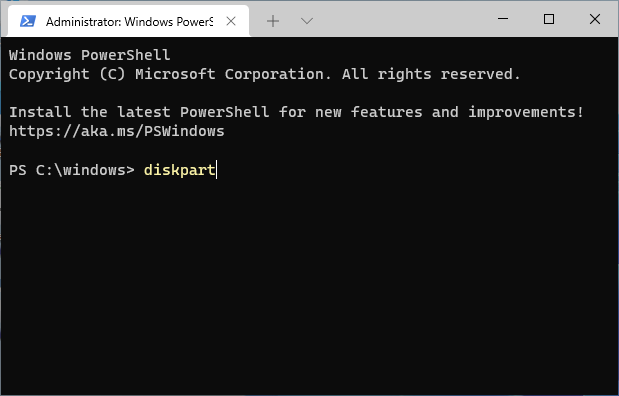
This should display the DISKPART command prompt. The first command we should use is list disk that should display the list of the disks currently connected to the computer:
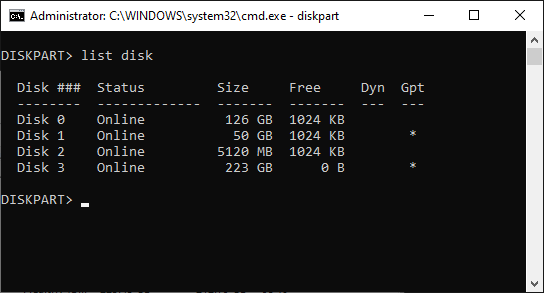
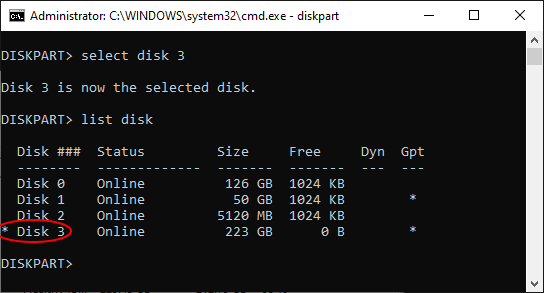
Again, it’s very important to properly identify the disk we want to work with in the list. Our 240 GB disk is still listed as Disk 3 with the capacity 223 GB. (Notice that it is listed as having 0B free. This is because all available disk space is currently allocated for the two partitions we’ve discussed above.) Once we are sure that this is the disk we want to re-initialize, we need to select it, by entering the command select disk 3 (yes, that’s how selection is usually done when using the command line tools!). Then, let’s use the list disk command again, to confirm that the disk in question is indeed now selected:
After double-checking that Disk 3 is now selected (it should have the star character * in front of its label), it’s time to finally issue the command that will erase everything on the disk 3, including the protected partition. The command that does that is clean. Note that this command erases everything on the selected disk, all partitions, protected or not. If you still have files on other partitions of disk 3 that you want to keep, you should exit now and backup those files, because after using the clean command all such files will be erased without a trace!
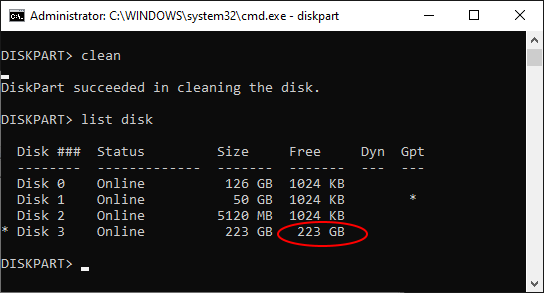
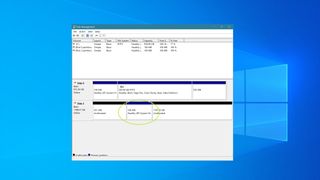
After the clean command is done (it should take no more than a few seconds), we get a fresh disk with all partitions erased. We can exit the DISKPART command prompt (by typing exit into its command line), and go back to the Disk Management tool (see above how to open it.) When it starts, it automatically detects the presence of the clean disk and prompts us to initialize it:
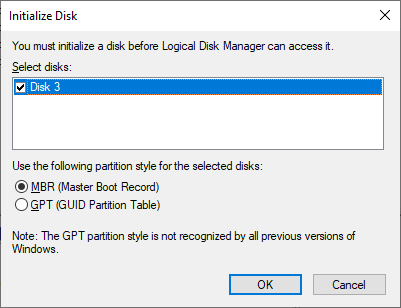
Press OK and the newly cleaned disk will appear in the list. The difference is, the protected EFI partition is gone! (The normal NTFS partition that used to be on the disk 3, is gone, too.) The disk is now ready for you to start creating partitions, formatting them, and do other things as needed:
Note that if you are trying to erase the system disk that hosts the C: drive where Windows itself is installed and running, then even the powerful DISKPART command can’t work: Windows simply refuses to erase the drive from which it is running. To erase such a disk, you need to physically remove it from the computer, attach it to another computer as an external drive, and then use DISKPART on that computer to erase the disk.
Happy disk managing!
If you want to link to this article, you can use this HTML code: <a href=»https://www.winability.com/delete-protected-efi-disk-partition/»>How to delete a protected EFI system partition with Windows 11, 10, 8, or 7</a>
Read more
Whenever you install Windows 11, or for that matter, any operating system on your computer, some of your disk drive’s space is stored by the EFI System Partition. This partition consists of all the important files that are required to boot up your operating system. Its size varies from 100 MBs to 1.0 GB.
One never needs to let go of this system partition unless s/he is using a dual-boot configuration on his/her computer. If you are using two or more operating system(s) on your PC and want to remove any one OS, you definitely require deleting this system partition as well. This post will discuss the right way to find and delete the EFI system partition in Windows.
When does one require deleting the system partition?
Users must delete the system partition when they are performing a clean installation of Windows or any other operating system on their computers. You may also want to get rid of this system partition when you are selling your laptop or desktop to other users.
While deleting primary and unallocated volumes is quite an easy task, the same can’t be said for the EFI system partition. This post covers what you must do in order to get rid of the system partition on Windows 11/10 PC.
Create a System Restore Point using Command Prompt or PowerShell
How to find the EFI System Partition in Windows?
There are two easy ways by which you can open the Disk Management window on your Windows 11/10 PC. The first one is by using Windows Search while the other one is by using the Run dialog.
- Press Windows + S, and search for disk management in the text field.
- Click on the top result i.e. Create and format hard disk partitions.
- When this opens up, you may see all the disks available inside your PC with different partitions.

Note: One may also open the Disk Management window by simply running “diskmgmt.msc” in the Run dialog box.

To delete the EFI system partition in Windows, use these steps –
- Press Windows + R to launch the Run dialog.
- Type CMD on it and press Ctrl + Shift + Enter keys altogether.
- The UAC window will prompt next, hit Yes to authorize accessing Command Prompt as administrator.
- Type the following near the blinking cursor, and press Enter.
diskpart
- The Command Prompt syntax will now change to Diskpart.
- Execute the following code and press Enter to view a list of all the connected drives to your computer.
list disk

- Select the disk number on which you want to delete the EFI System Partition. For this, you need to copy/paste the below command and press Enter.
select disk 0
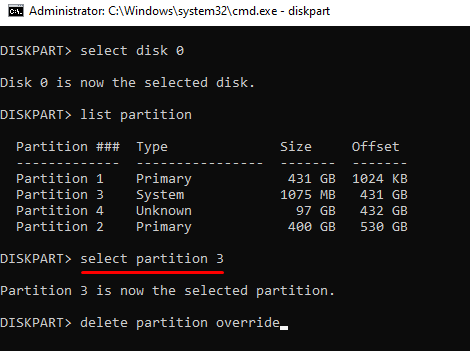
- Now that you have selected the designated disk, run the following code to list out all the partitions available on it.
list partition
- Look out for the partition that is of System type and select that particular partition by running this code.
select partition 3
- Now that you have selected the EFI system partition, execute this command to delete it from the disk.
delete partition override
That’s it, you have successfully deleted the EFI system partition from your disk drive. One may even confirm it by opening the Disk Management app on his/her Windows PC. Though the EFI partition must have gone by now, restart your PC in case it still appears.
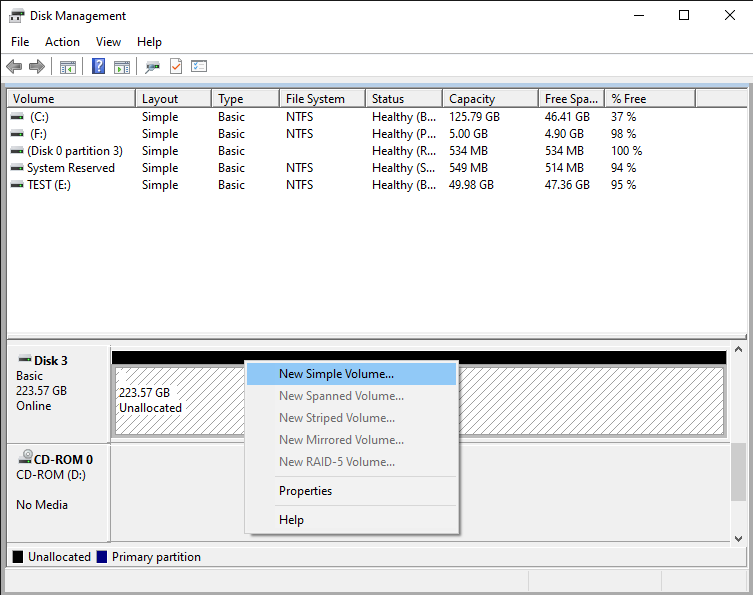
How do I delete any other partition in Windows?
Deleting any other partition in Windows is quite an easy task. For this, you require to launch the Disk Management app, right-click on any partition (primary or unallocated) and choose the “Delete Volume” option.

That’s it, your chosen partition will now delete from your system automatically. In case you would like to create a new partition of this, right-click over it and choose the option – New Simple Volume.