There are many reasons why you might want to uninstall the Nvidia Cuda Toolkit on your Windows 10 system. Your computer may be running slowly or experiencing some other type of performance issue, or you may simply wish to free up some space on your hard drive.
Contents
- 1 Nvidia Cuda Toolkit 2023
- 2 How To Uninstall Nvidia Cuda Toolkit Windows 10 in 2023?
- 2.1 The first way to remove
- 2.2 The second way to kick out
- 2.3 How to check Cuda Toolkit version Windows 10?
- 2.4 How to check if Cuda Toolkit is installed in Windows 10?
| Nvidia CUDA Toolkit Information | Description | External Links |
|---|---|---|
| Developer | Nvidia Corporation | Nvidia CUDA Toolkit website |
| Initial Release Date | February 15, 2007 | Nvidia CUDA Toolkit Release Notes |
| Latest Release Date | November 19, 2021 (version 11.6.5) | Nvidia CUDA Toolkit Release Notes |
| Platforms | Windows, Linux, macOS | Nvidia CUDA Toolkit website |
| Type | Software development kit for parallel computing | Nvidia CUDA Toolkit Overview |
| Features | CUDA C and C++ programming languages, GPU-accelerated libraries for math, signal processing, image and video processing, and more, profiling and debugging tools, support for multiple GPUs and architectures, integration with other development environments | Nvidia CUDA Toolkit Features |
| Pricing | Free | Nvidia CUDA Toolkit Download |
| Reviews | Nvidia CUDA Toolkit is a highly regarded development kit for GPU-accelerated parallel computing, praised for its performance, ease of use, and compatibility with various programming languages and tools. Some users may experience compatibility issues with specific hardware or software configurations. | Nvidia CUDA Toolkit Reviews |
Whatever your reason may be, uninstalling this program is a relatively straightforward process that can be done either manually or with the help of a specialized tool.
When it comes to manually uninstalling the Nvidia Cuda Toolkit from your system, there are several important steps that you will need to follow in the correct order in order to avoid any issues.
- First, you must quit all running applications before proceeding.
- Next, you will need to open the Control Panel and click on Programs and Features.
- From here, you should be able to remove the toolkit by selecting it from the list of installed programs and clicking on Remove or Uninstall.
- If that doesn’t work, however, then you may need to use a third-party uninstaller or registry editor tool in order to fully remove all traces of the software from your system.
If you would prefer a simpler and faster way to uninstall Nvidia Cuda Toolkit on Windows 10, then using a specialized uninstaller application is typically your best option. These tools scan your system for all traces of the program and then completely remove them with just a few clicks.
They also provide other useful features like easy reinstallation if needed in the future as well as optimization recommendations that can make your PC run more smoothly going forward. So whether you choose to go the manual or automated route, uninstalling Nvidia Cuda Toolkit from your Windows 10 system is an easy task with just a little bit of know-how.
It does not matter if you are also a user of Windows 10. You must have a knowledge little bit what is the exact way to remove it from your PC.
Without wasting the time. We should back to the topic.
People also ask: Iobit uninstaller, uninstall Webroot from a PC.
Let’s begin!
How To Uninstall Nvidia Cuda Toolkit Windows 10 in 2023?
Do you know what is CMD? It is a command prompt. Which allows you to install anything by hitting the command.
No worry, there are many ways to remove Nvidia Cuda Toolkit. But here I’ll just share with you two ways.
So, let’s started!
The first way to remove
This way is to use the control panel. How to do it. Let’s see.
- Click to Type here to search.
- Write ” Control Panel “.
- Then go to programs.
- There will see many programs you have installed.
- Now pick the Nvidia Cuda Toolkit up.
- Click on the software. Then click on uninstall button.
- After that, it will ask you to confirm it.
- Then simply confirm to uninstall.
That’s it.
The second way to kick out
This way is to use CMD. What is this, I already described you above. So, without wasting more time in it.
Let’s start!
- Hit Windows + R.
- Write their ” CMD ” capital or small ” cmd “.
- Then a new window will be opened which will be fully black.
- Write this command ” wmic “.
- Then this one: ” product get name “.
- You will see all programs you have installed.
- Now run this command to remove Nvidia Cuda Toolkit in Windows 10: ” product where name=”Nvidia Cuda Toolkit” call uninstall “.
- Then it will ask Yes or No.
- Simply just type there Yes.
- Or you can write Y instead of Yes.
That’s it.
How to check Cuda Toolkit version Windows 10?
There are a few different ways to check your Cuda Toolkit version on Windows 10.
- One way is to open the Control Panel and click System and Security.
- Then, under System, click View installed updates.
If you use the Settings app to check for updates, you’ll see that Cuda Toolkit is listed as an optional update.
To install it, just click the Check for updates button and then select Optional Updates from the list of available updates.
Cuda Toolkit will be listed as an installed update if it’s already been installed on your computer.
You can also check the version number from within Cuda Studio by clicking Help > About CUDA. The version number is displayed in the lower-right corner.
How to check if Cuda Toolkit is installed in Windows 10?
Check if Cuda Toolkit is installed on Windows 10
- Open the Start menu and search for “Command Prompt”.
- Right-click on “Command Prompt” and select “Run as administrator”.
- In the Command Prompt window, type in the following command and press Enter: “cudatoolkit_info.exe”
- If Cuda Toolkit is installed, you’ll see a message that says “Cuda Toolkit is installed and ready to use.” If Cuda Toolkit isn’t installed, you’ll see a message that says “Cuda Toolkit isn’t installed.”

TechsTribe.com is a blog which aims to provide quality guidance to Bloggers, Webmasters, and Web Developers.
Loading
Need Space in PC or only want to remove or uninstall Nvidia Cuda Toolkit On PC ( Windows 7, 8, 10, and Mac )? but how to, after it still having files in C: drive? If the application run on the pc, windows 7, 8, & 10 so you can uninstall using Control Panel or CMD Or If this applicaion run in Mac so you know that how to uninstall in MAC. With the help of this article, you will able to uninstall or remove or kick out all of those files also after uninstalling the Nvidia Cuda Toolkit.
Are you bored, or tired of using Nvidia Cuda Toolkit? Now, wanna remove this software from your PC ( Windows 7, 8, 10, and Mac )? There is no condition to follow up before installing, so, you can remove it without getting any confusion about it.
There are 10 methods that users can adapt if they want to uninstall Nvidia Cuda Toolkit :
Method #1
- Go to Start Menu, then click on the Control Panel.
- In Control Panel, under programs, go through the list of the ones that are installed on your computer
- Right-click on Nvidia Cuda Toolkit, and then click on uninstall a program
- Follow the prompt on the screen, and you will get to see a progress bar that will take you to remove the Nvidia Cuda Toolkit from the computer.


Method #2
The second method involves uninstaller.exe, through which Nvidia Cuda Toolkit can be uninstalled. Just follow the instructions below to execute this step:
- Go to the installation folder of Nvidia Cuda Toolkit.
- Find a file that is named uninstall.exe or unins000.exe
- Double click on the file, and then follow the instructions that appear on the screen.


Method #3
The third method involves System Restore. For those who don’t know, System Restore is a utility, which helps the user restore their system to its previous state. System Restore removes all those programs, which interfere with the operation and performance of the computer.


If you have created a system restore point before you installed Nvidia Cuda Toolkit, then you can use this software to restore the system, and remove such unwanted programs. However, before you do so, make sure that you save all the important data.Follow the steps below to know more from this method:
- Close all the files and programs, which are currently running on your PC
- Open Computer from the desktop, and then select Properties
- System Window will open
- On the left side and click on System Protection
- System Properties will open.
- Then do click on the option of System Restore, and a new window will again open.
- Now, choose the ‘different restore point’ option, and click on Next.
- You have to select a date and time from the given options; when you select a date, the drivers that you installed after the chosen date won’t work.
- Click on Finish and then Confirm the ‘Restore Point’ on the screen.
- When you click Yes to confirm, the Nvidia Cuda Toolkit would be uninstalled.
Method #4
If you have an antivirus, then you can use it to uninstall Nvidia Cuda Toolkit.There is much malware or Nvidia Cuda Toolkit software in the computer applications that we download nowadays. They have become very difficult to remove from the system, like Trojan and spyware.
- If you cannot remove Nvidia Cuda Toolkit with the above methods.
- It means that there is malware or Nvidia Cuda Toolkit in it, and only a good antivirus can be used for removing it.
You can either download Norton Antivirus or AVG antivirus, as these are reputable software and will surely remove the malware, Nvidia Cuda Toolkit on the system. 
Method #5
If you want to uninstall Nvidia Cuda Toolkit, then you can do so using Command Displayed in the Registry. A registry is a place where all the settings of Windows, along with information, are stored. This also includes the command to uninstall a software or program.
You can try this method with Nvidia Cuda Toolkit as well, but it is a very risky method. If you make any mistake and delete the wrong information, then the system is most likely to crash. It would become difficult for you to bring it back from deletion.

To execute this method, To follow the steps given below:
- Hold Windows + R together, and then Run command
- When the command box opens, type Regedit in the box and then click on OK
- You have to navigate and find the registry key for the Nvidia Cuda Toolkit
- You will see an uninstall string on the next window; double click on it, and also copy ‘Value Data’
- Again hold Windows + R keys, and run the Command; paste the value data that you just copy and click on OK
Follow what comes on the screen and then uninstall Nvidia Cuda Toolkit.
Method #6
The seventh method is to uninstall the Nvidia Cuda Toolkit using a third-party uninstaller.
At times, those who don’t have any knowledge of computer language, won’t be able to manually uninstall the software fully.
Many files occupy the hard disk of the computer, so it is best to use third-party software to uninstall them.

Method #7
There are some codes that users can type into the command prompt, and they would be able to uninstall the Nvidia Cuda Toolkit. For example, if they want to remove the package, then just type.
sudo apt-get remove Nvidia Cuda Toolkit
If you want to uninstall Nvidia Cuda Toolkit and its dependencies as well, then type:
sudo apt-get remove –auto-remove Nvidia Cuda Toolkit
For those who don’t know, some of the dependencies of Nvidia Cuda Toolkit are GCC-5, libc6, libgcc1, Nvidia Cuda Toolkit dev, and gc++-5.

Method #8
If the user wants to remove the configuration and data files of Nvidia Cuda Toolkit, then they need to run the following code on the Command Prompt:
sudo apt-get purge Nvidia Cuda Toolkit

Method # 9
It depends on you that are you willing to kick-out the data or you want to remove the configuration data or data files, along with the dependencies, then the following code is most likely to work for you:
sudo apt-get auto-remove -purge Nvidia Cuda Toolkit

To uninstall Nvidia Cuda Toolkit on mac because anytime we need space or only want to remove from pc due to some viruses and also many problems which are needed to remove or uninstall from pc.
So I will show you some steps of uninstalling Nvidia Cuda Toolkit on the mac so follow my this step or method if you have still confusion so you may contact with us for uninstall of Nvidia Cuda Toolkit on pc or mac.
How to Uninstall Nvidia Cuda Toolkit on Mac?
For uninstalling Nvidia Cuda Toolkit on the mac so as I told you that there is a simple method to uninstall apps on mac. As there are installed some apps on your Mac and now you want to remove or uninstall from your pc successfully and want to install some other apps on my mac so follow my these steps to uninstall Nvidia Cuda Toolkit on mac.
Method #1
In method 1, you have to open mac on your pc as I’m showing in the image follow the images to uninstall Nvidia Cuda Toolkit on your mac.

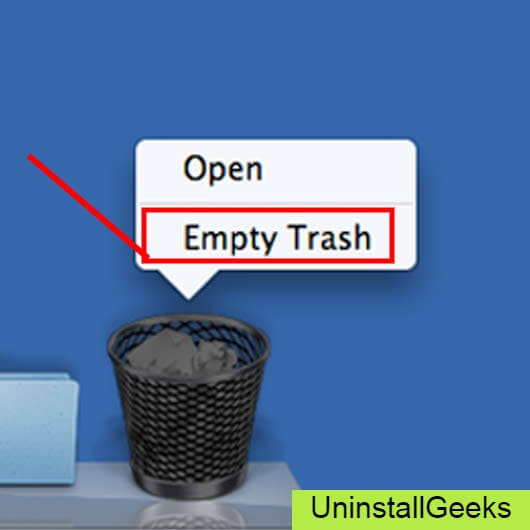
In the image, there is a Nvidia Cuda Toolkit app on your mac dashboard and now we have to uninstall it from our mac we will uninstall this app and will remove it in of mac now double-click-on-app showing in the image.

Now you double-clicked on the app mac will ask that are you sure to uninstall Nvidia Cuda Toolkit click on the Delete button so go to Trash of mac to uninstall completely from mac. Showing in image trash bin click on trash bin and go inside there will be Nvidia Cuda Toolkit which we had to delete before so have to uninstall completely from mac.

Not right-click on trash to remove all data or app which we had uninstalled before seeing in the image. Click on Empty Trash the whole data which is in the trash will auto remove successfully.
Now we uninstalled Nvidia Cuda Toolkit on the mac so as you see that how to uninstall or remove any app on the mac so if you liked this so share once. This method doesn’t require any antivirus or uninstaller software from them we are to uninstall.
I described only a simple method of uninstalling Nvidia Cuda Toolkit on mac. This method more people are using but some people take it is too hard uninstalling in mac but in this step, anyone can understand this simple method.
How To Install?
For those who don’t know much about Nvidia Cuda Toolkit, they might lean more towards uninstalling it. These Nvidia Cuda Toolkit create an environment, where users can create a high GPU-accelerated application. If you want to install this Nvidia Cuda Toolkit, then make sure that your system is compatible with it.
Firstly, verify that the system you are using has a Nvidia Cuda Toolkit capable GPU, and then download the Nvidia Cuda Toolkit. Install it, and then test that the software runs smoothly on the system. If it doesn’t run smoothly, then it could be because its communication with the hardware is corrupted.


Conclusion
There are other methods of uninstalling the Nvidia Cuda Toolkit as well as in pc or windows, but these could be difficult for those, who don’t have much technical expertise. Execute these methods, and they will surely work. These methods don’t require the user to have much knowledge of the technical side of an operating system. They can follow simple steps and uninstall Nvidia Cuda Toolkit.
Is it tough to uninstall Nvidia Cuda Toolkit? I do not think it is but in this post, I am glad to share a simple guide to remove it.
So, guys! From now you will be free totally and out of worrying about this one.
The NVIDIA CUDA® Toolkit provides a development environment for creating high-performance GPU-accelerated applications. With the CUDA Toolkit, you can develop, optimize, and deploy your applications on GPUs. The toolkit includes GPU-accelerated libraries, debugging and optimization tools, a compiler, and a runtime library.
In addition, the toolkit provides an integrated development environment (IDE) that includes a debugger and profiler. The CUDA Toolkit is available for free and can be downloaded from the NVIDIA website.
People also ask: How to Uninstall NVIDIA Drivers?, How to uninstall WPS Office on PC?, How to uninstall packages with Brew?, How to uninstall epic games launcher on Windows 10?, How to uninstall anaconda completely from Windows 10?, How to Uninstall YouTube App in Windows 10?
Nvidia Cuda Toolkit is a product of Nvidia company and it works for Nvidia Graphic cards in pc, laptops, and Linux.
It supplies to development of creating high-speed or performance GPU and runs fast apps and software which we use.
It provides also high speed to pc, laptops, and Linux so the Nvidia company started Cuda tools and made a package for users all tools in the package are usable and beneficial for users who have Nvidia graphic cards.
There you will find more advanced techniques and more improvement ideas.
Let’s have some important ways to uninstall Nvidia Cuda Toolkit.
Uninstall Nvidia Cuda Toolkit
There are many ways to remove the Cuda Toolkit on PC, laptops, and Linux it can also uninstall through CPL and also with CMD but I do not like this way because it is tough for newbies.
There is an alternative way that used to recommend to my friends always.
[ Recommended ] Tip #1:
This way is very hit and easy for both ( newbies and advanced ) so guys! let’s get started.
- Run this [ Windows + R].
- Then write down the control panel.
- Or an alternative way to open it like:
- Click the Windows button and write down there just a control panel and open it.
- Simple! it is available to uninstall it.
- Click on the Nvidia Cuda Toolkit icon and there will be an option to uninstall simple click there will automatically be uninstalled.
- Done!
Tip: The short way for the control panel is the Windows key + R then write appwiz.CPL control panel opens directly.
Tip #2
Most of the software and applications are easy to uninstall from the control panel but by the control panel, there still will have some files in your program files folders.
With the help of third-party software, we can use and uninstall Nvidia Cuda Toolkit.
Some third-party softwares are too high MB rather than the control panel but can’t we can not do the competition with CMD because the developer of CMD is Microsoft Corporation.
By using a third-party uninstall we can easily uninstall the Nvidia Cuda toolkit also with hidden files there is too such as third-party uninstallers. You can uninstall NVIDIA drivers.
How do I enable NVIDIA CUDA?
If you have an NVIDIA graphics card and you want to enable CUDA, you need to install the NVIDIA driver and the CUDA Toolkit. The CUDA Toolkit includes a compiler and other tools you need to develop applications that use CUDA.
To install the NVIDIA driver and the CUDA Toolkit, follow these steps:
- Go to an Official website.
- Download the latest version of the NVIDIA driver for your graphics card.
- Download the latest version of the CUDA Toolkit.
- Run the installer for both the driver and the CUDA Toolkit.
Where is CUDA Toolkit installed in Linux?
The CUDA Toolkit is installed in the /usr/local/cuda directory.
That’s all. I am done! Leave feedback for more updates.
Would you be able to uninstall NVIDIA CUDA Toolkit if you lost important program file? Have you ever wondered how you can be professional in removing any unwanted programs from Windows based PC? Are you trying to get things done but it takes FOREVER to delete anything? Or have you ever wanted to take care of some unknown programs but hardly know how to get started? If you answered to yes, then this place is for you! Learn step by step how to uninstall a Windows program.
Description
This guide is for people new to uninstall NVIDIA CUDA Toolkit from Windows based PC. This is very much a beginner’s uninstall guide! This guide will introduce you to the practical methods and show you how to uninstall and remove a program in person. You will see how to get rid of program within Windows 10, you will see how to uninstall program within Windows 7, you will also see how to uninstall program within other Windows based computers, like Windows 8, Windows 11 and more. The methods explained here are written to provide Windows users with the knowledge and skills required to troubleshoot and uninstall programs from Windows. These skills include understanding Windows built-in uninstaller, how it can be used to uninstall a program, and how to launch it on the different versions of Windows.
This guide will also include a professional method give you more confidence in removing a Windows program. You will get how to utilize a renowned uninstaller software to make the uninstall NVIDIA CUDA Toolkit thing much easier than you ever could. You will get the step-by-step process of Windows program uninstallation. Those who have no basic knowledge of Windows programs’ uninstallation can join the guide. This will be a very complete introduction to uninstall NVIDIA CUDA Toolkit from Windows. It will also be of use to people who have used previous versions of Microsoft Windows. Along with that, you will also can pick up a series of tricks and tips regarding how to tune up and make the most of your Windows computer.
Now, it is real time to make it clear what you can do to uninstall NVIDIA CUDA Toolkit from any Windows PC successfully. We will introduce how to uninstall a program from the two general directions: manual uninstall guide and professional uninstaller software. You will get how to uninstall a program from Windows based PC in the manual way; you will also get how to uninstall a program from Windows based PC through a notable uninstaller software. So you can worry about nothing! I will give you the most used and powerful tool to make sure your any program uninstallation effortless and fast.
Remove NVIDIA CUDA Toolkit Through Manual Way
Get how to use your own hands to uninstall NVIDIA CUDA Toolkit in person. This part involves 3 solutions to uninstall a program manually. You will know how to uninstall a program separately from the Start menu, Control Panel, and the Settings page. Now, let’s figure out how they work.
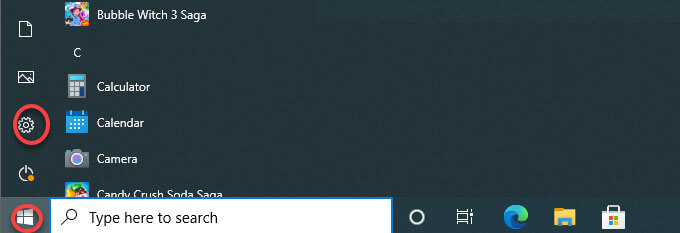
Remove NVIDIA CUDA Toolkit from the Start Menu
1. Open Windows Task Manager and close all process associated with the NVIDIA CUDA Toolkit program.
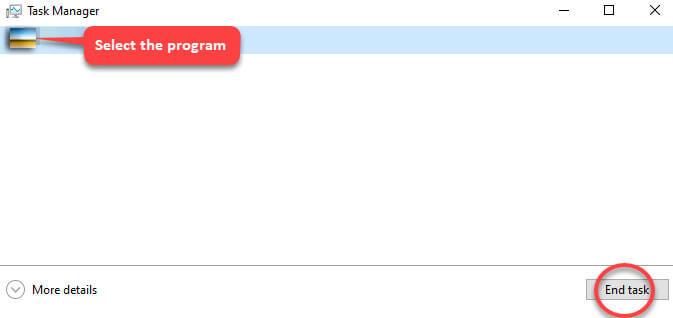
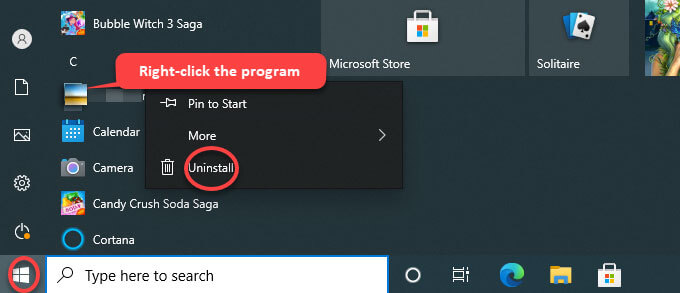
2. Click Start menu > find out the NVIDIA CUDA Toolkit program in the list shown.
3. Right-click NVIDIA CUDA Toolkit > select Uninstall.
4. Click Yes/Uninstall to confirm that you want to uninstall the program from your computer right now.
5. Next, follow the pop-up uninstall wizard to get the program uninstalled from your PC.
Uninstall NVIDIA CUDA Toolkit from the Control Panel
1. Open Windows Task Manager and close all process associated with the NVIDIA CUDA Toolkit program.
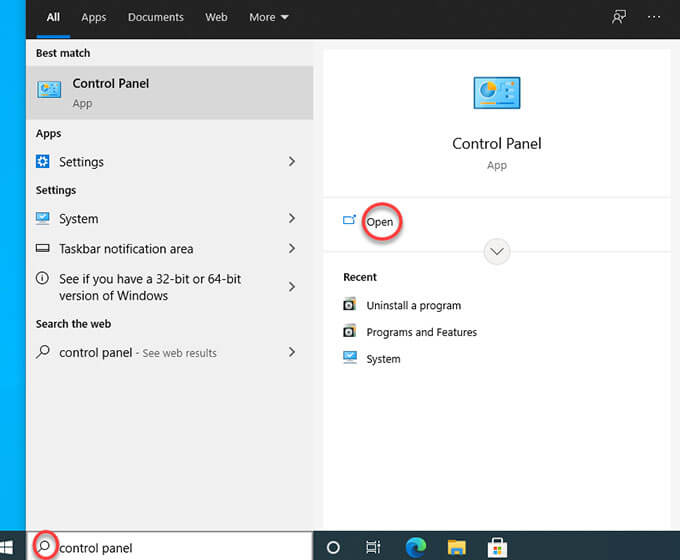
2. Click the Start menu > open Control Panel. If you are on Windows 10, you can take advantage of the Search box on the taskbar. Simply enter ‘control panel’ in the Search box and open it from the results.
3. From the Control Panel window, click Programs > click Uninstall a program.
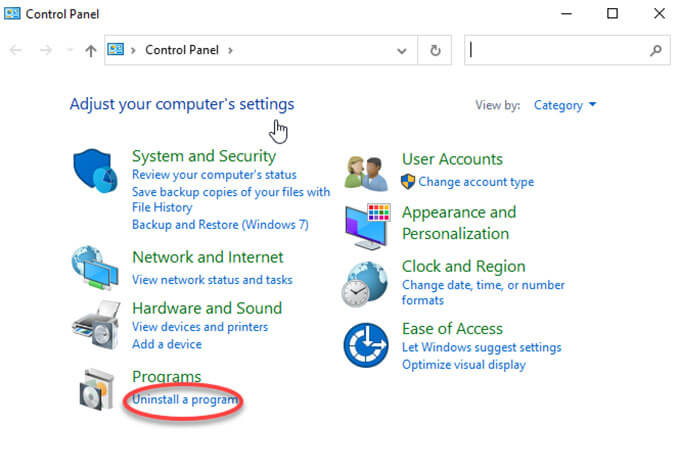
4. Right-click the NVIDIA CUDA Toolkit program that you would like to uninstall > select Uninstall.
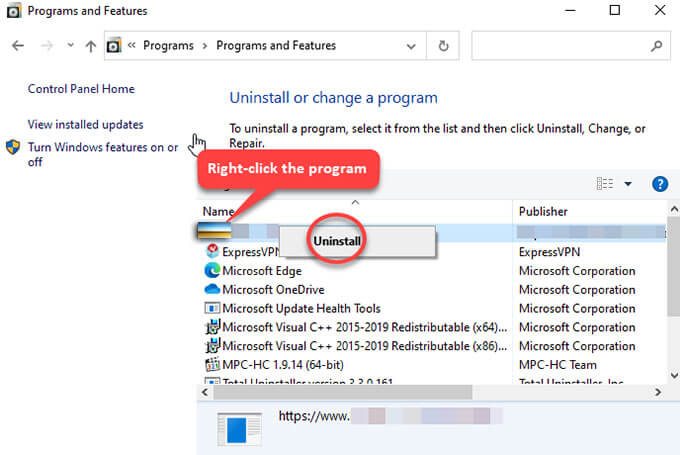
5. Click Yes/Uninstall to make sure that you are ready to uninstall the target program at once.
6 Next, follow the pop-up uninstall wizard to uninstall NVIDIA CUDA Toolkit from your PC.
Remove NVIDIA CUDA Toolkit from the Settings
1. Open Windows Task Manager and close all process associated with the NVIDIA CUDA Toolkit program.
2. Click the Start menu > click Settings.
3. Click Apps > Click Apps & Features.
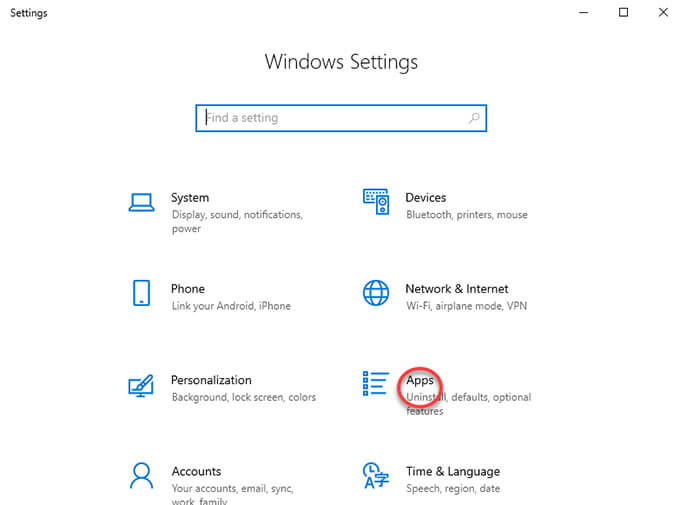
4. From the Apps & Features page, click the NVIDIA CUDA Toolkit program > click Uninstall.
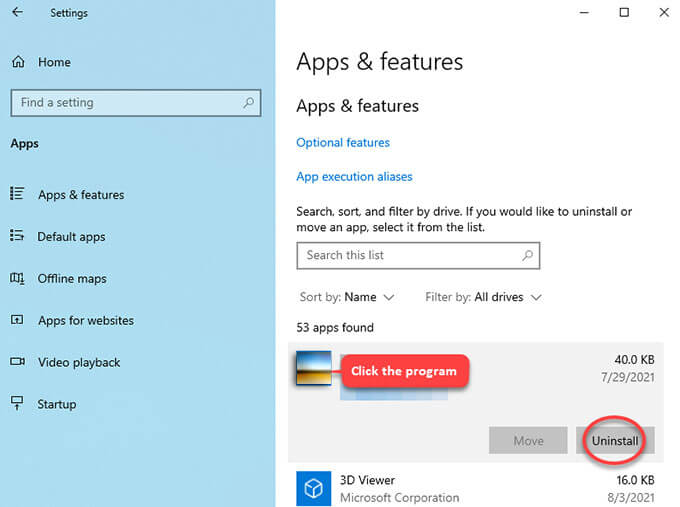
5. Click Yes/Uninstall to be sure that you want to uninstall this program.
6. Next, follow the pop-up uninstall wizard to complete the program removal.
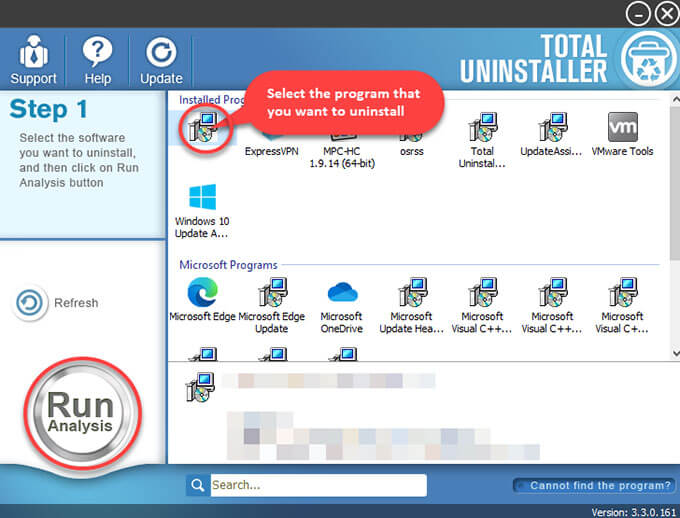
Uninstall NVIDIA CUDA Toolkit Through Total Uninstaller
Get how to utilize the renowned Total Uninstaller tool to uninstall NVIDIA CUDA Toolkit and any other unwanted programs with a few clicks. Before starting to remove this program, make sure it has been quit. You can completely quit the program processes from Task Manager.
Warm tips: You can click the download button below to obtain Total Uninstaller in no time!
1. Launch Total Uninstaller > select NVIDIA CUDA Toolkit > click Run Analysis.
2. Click Complete Uninstall > click Yes to make sure you would like to uninstall the program.
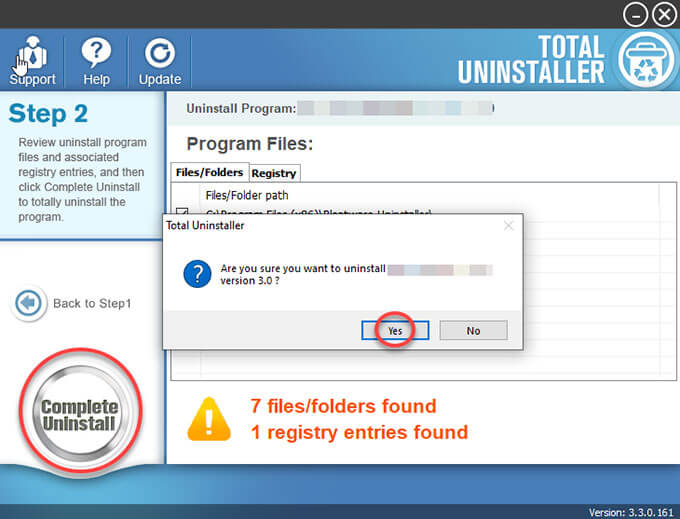
3. Click Yes to make it certain that you need to uninstall this product right now. Follow the pop-ups to get the NVIDIA CUDA Toolkit program removed from your PC.
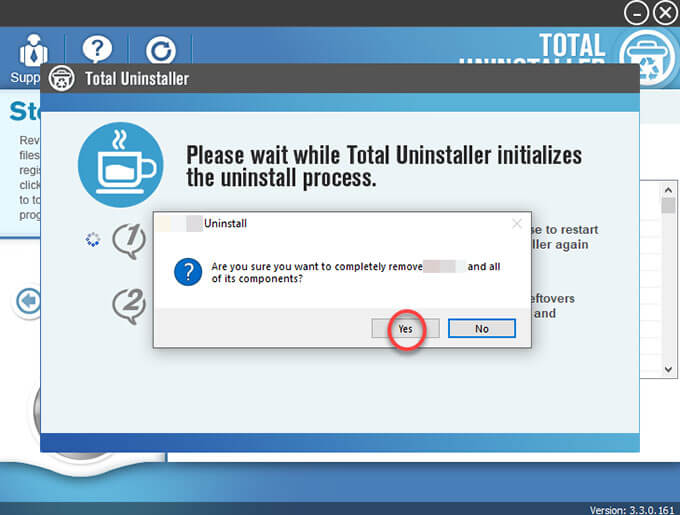
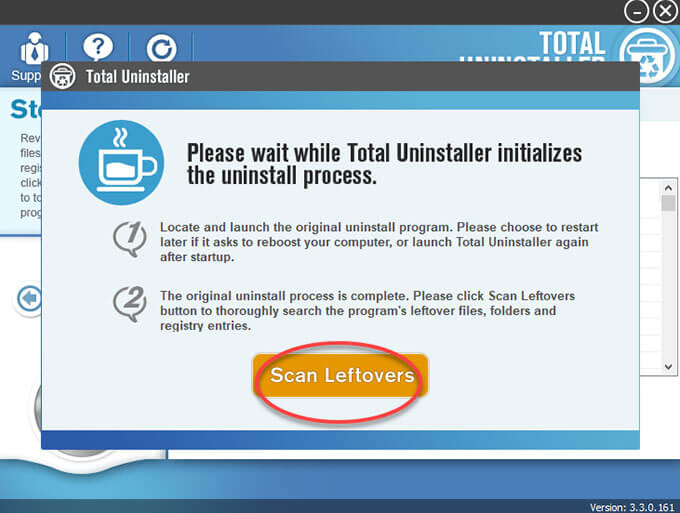
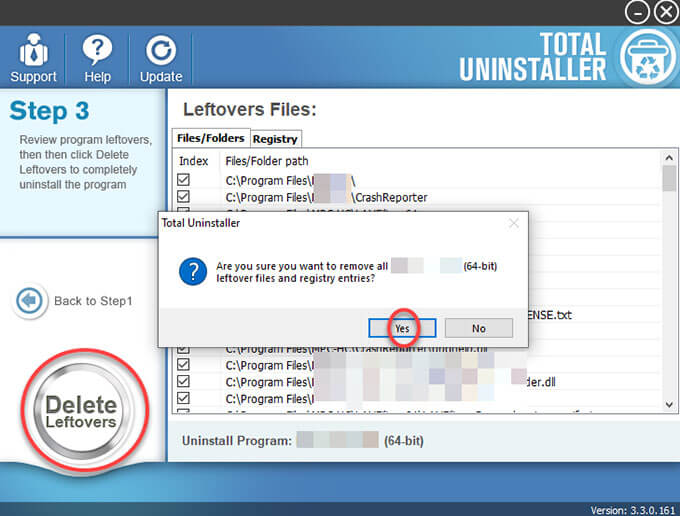
4. Click Scan Leftovers to continue deleting all leftovers associated with the program.
5. Click Delete Leftovers > click Yes to be sure you want to clean out all leftovers. Click OK when the removal is done.
6. Quit Total Uninstaller and Restart your PC.
Part 1: PC Tune Up — Clean and Tune a Windows Based PC
This part aims at telling any PC users how to be able to clean and tune a Window based PC. All tips and tricks are carefully picked in order to help any Windows user be confident in maintaining their PC themselves. So, if you are looking to cleanup and tune your computer without having to pay, don’t miss out on tricks here. Check out these tricks and tips as followed.
① Removing Viruses, Malware, and Bloatware Using Windows Defender
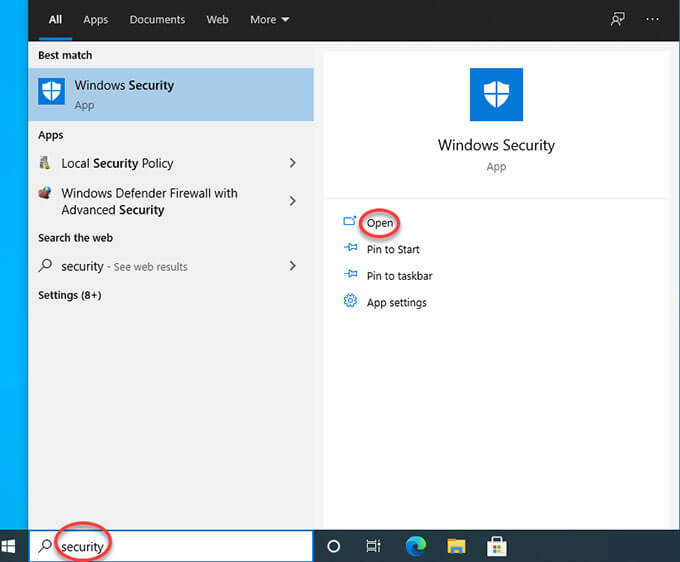
1. When you Windows PC is turned on, click the Start menu, and begin typing Security in Search box. From the search results, click open the Windows Security app.
2. Select Virus & threat protection > Scan options.
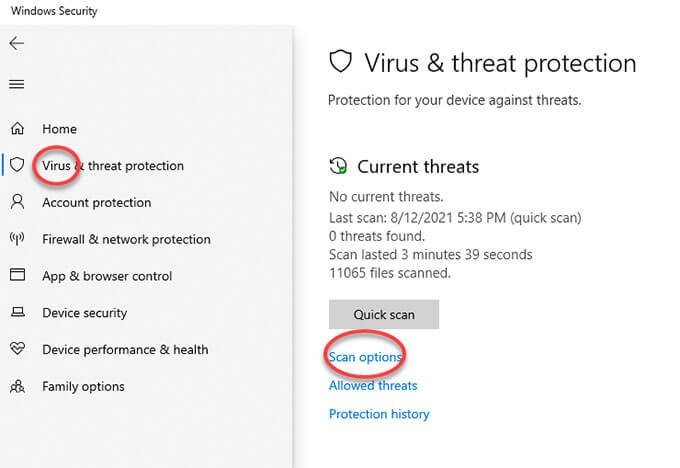
3. Select Windows Defender Offline scan, and then select Scan now.
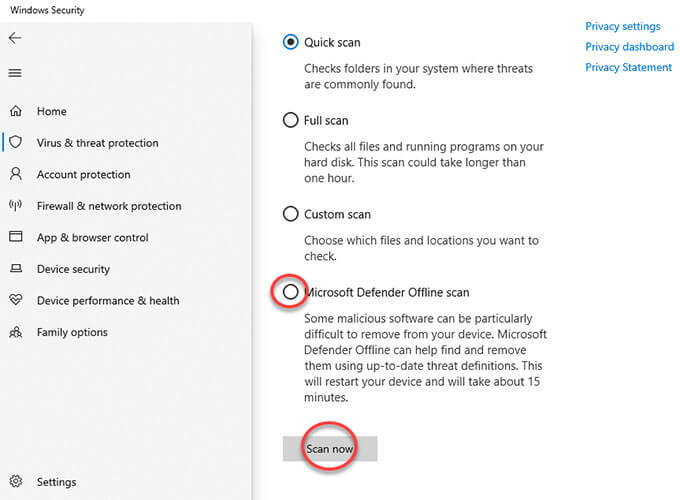
4. Next, the Windows Defender Offline scan is running and this may take a little bit time. Once done, your PC will restart.
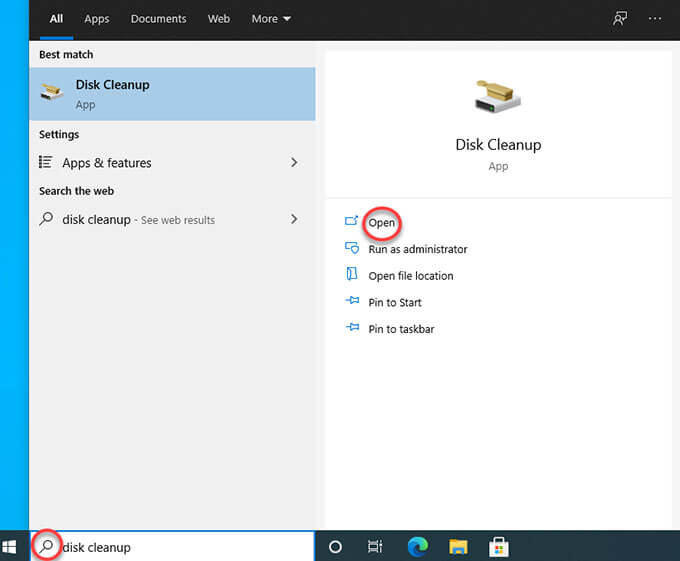
② Cleaning the System Files and Registry Using Disk Cleanup
To clean the useless system files and registry, we will take advantage of the Disk Cleanup tool that is built-in in Windows. Disk Cleanup is an easy-to-use computer maintenance utility, responsible for free up disk space on a Windows computer. So, if you want to clean up your computer’s hard drive, the built-in Disk Cleanup app is a good choice.
1. Locate at the Search box on the taskbar > fill in «disk cleanup» > click Open to launch Disk Cleanup utility from the list of results.
2. Select the drive you want to clean up, and then select OK.
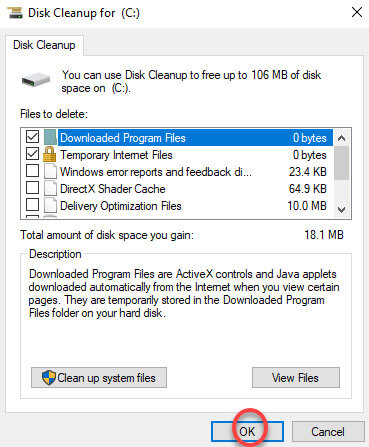
3. Under Files to delete, select the file types to delete. To get a description of the file type, select it. Click OK.
4. If you want to free up more space, you just need to delete system files. So, click Clean up system files in Disk Cleanup.
5. Select the file types to remove. To get a description of the file type, select it.
6. Select OK.
Please note: In Windows 7, open the Start Menu and type the word «disk» in Search box. Then, click on the Disk Cleanup in search result.
③ Deleting Unused / Background Files
1. Right-click Start menu > click File Explorer option from the list.
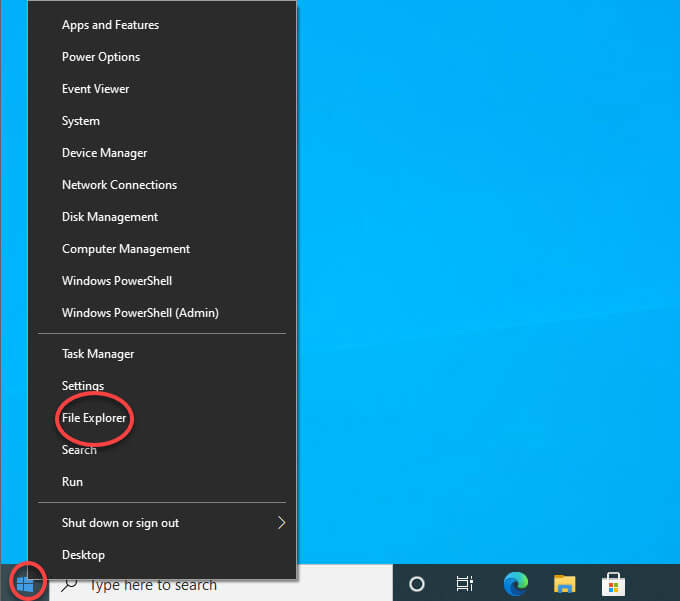
2. File Explore window is opened, navigate to the path: C:\Windows\Web and then open Wallpaper folder.
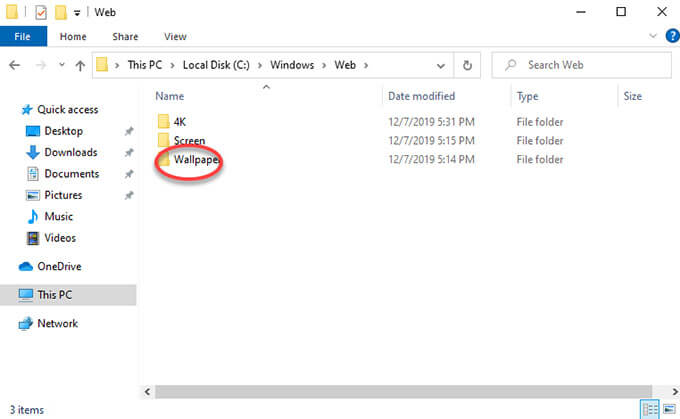
3. In the Wallpaper folder, you can choose to delete those unwanted Desktop Background images.
4. To delete a specific background image, right click the image and click Delete.
④ Optimizing Windows Startup
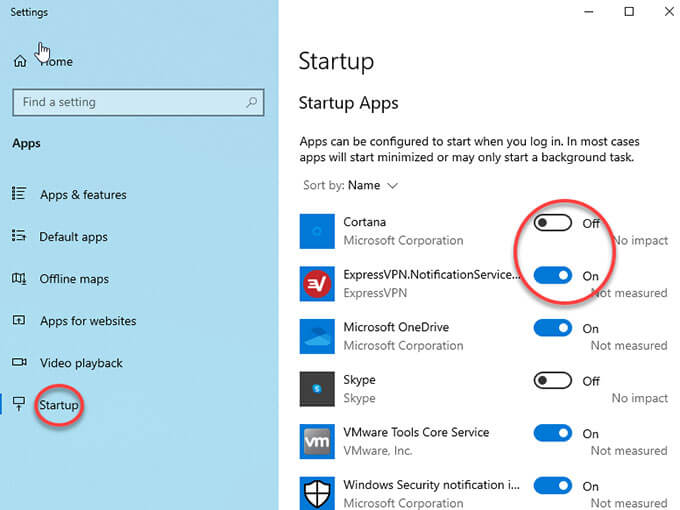
To increase your Windows startup speed, you can disable some programs and stop them from starting up when your computer is booting up.
1. If you are on Windows 10: Click Start menu > click Settings > click Apps from the Settings page.
2. Locate at the Startup option at the left-hand side of the page. On the right-hand side, you can click Off to disable any app that you don’t want to startup.
3. If you are on Windows 7: Click the Start menu > type msconfig in Serch box and press Enter key.
4. In the System Configuration window > click the Startup tab. Uncheck apps to disable them. Click OK to apply the change.
⑤ Keep Your PC up to Date
Like cars, your computer also needs some updates to make sure it is run better. Keeping your PC up to date also is an easy way to maintain it, will automatically solve some bugs and network issues and more. You can refer to the steps below to keep your PC up to date.
1. The first thing is to make sure your Internet is connected. And then open Internet Explorer. Click Start menu, and enter Internet Explorer in Search box. Open Internet Explorer (Desktop app) from the results.
2. On the Tools menu, select Windows Update.
3. If Microsoft Update is not installed, select Microsoft Update.
4. From the Welcome to Microsoft update page, select Check for Updates.
5. From the Keep your computer up-to-date window, select Express to install high priority updates.
6. On the Review and Install Updates page, select Install Updates, and then follow the instructions on the screen to complete the installation.
Pat 2: Hard Drive Maintenance
Maintaining your Windows hard drive will help your PC boot up faster. And the method is very easy, you can take advantage of the Disk Defragmenter tool.
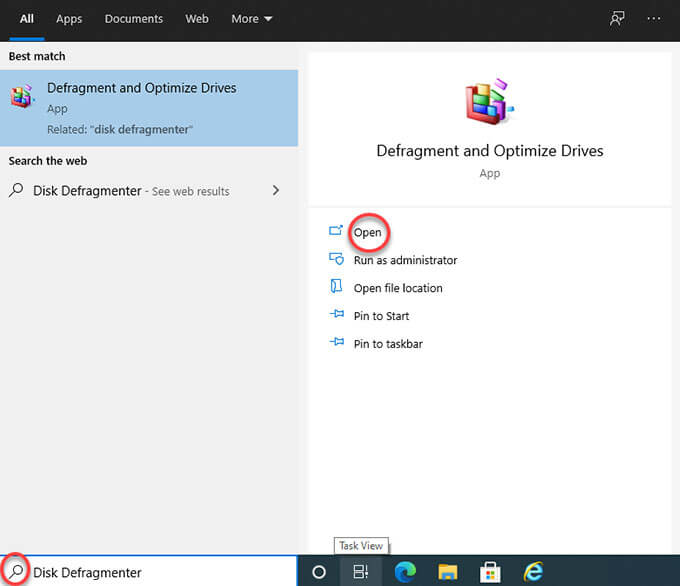
1. Click Start button > enter Disk Defragmenter in the search box > open Disk Defragmenter in the list of result.
2. Under Current status, select the disk you want to defragment. To make sure whether the disk you selected needs to be defragmented or not, you only need to click Analyze disk. If it is necessary, enter your admin password to start this operation.
3. When you get the result, if the percentage is above 10%, it is highly recommended you defragment the disk. Click Defragment disk and enter a password to confirm that you want to perform this defragment.
Along with that, cleaning your computer physical hardware also can make it run faster. Refer to some issues you may encounter due to dust build up upon your hardware.
Issues:
- 1) Cause overheating
- 2) Not run efficiently
- 3) Overall effecting the performance
Solutions:
The first thing you need to clean your hardware is a small to medium paint brush. And then you are going to need compressed a dust can or a compressor. You can choose to use one of them, preferably probably a compressor is actually better to use and it will be more consistent and it is easier to use to set the pressure a bit lower not too hard. Because you don’t really want to lock damage any of the parts in the computer.
Pat 3: Memory Diagnostic
Another thing you may also do is to check your memory. So if you have any memory issues and for that we are going to go to Windows memory diagnostics. Now go to Windows memory diagnostics according to the following steps.
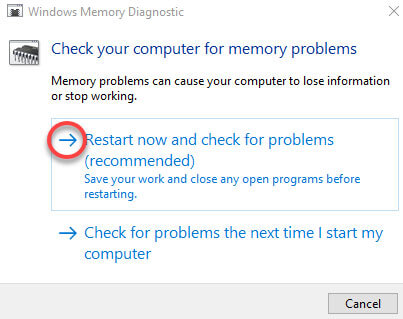
1. Click the Start menu, type «Windows Memory Diagnostic«, and press Enter. Right-click on Windows Memory Diagnostic in the search result and click Run as Administrator.
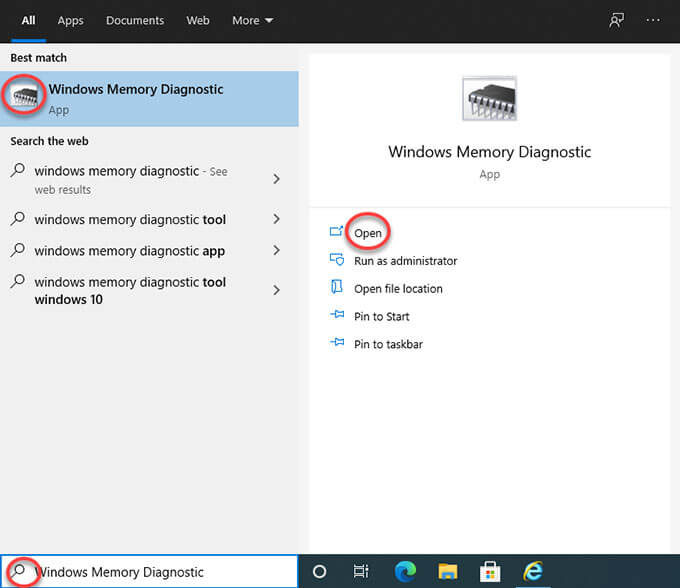
(Or you can press Windows Key + R, type the word «mdsched.exe» into the Run box that appears, and then press Enter key.)
2. Click Restart now and check for problems. Before doing this, save your work and close any open programs.
3. Your computer will restart in the Memory Diagnostic Tool and run a basic memory test.
4. Press F1 to stop the basic test and go into the Options screen.
5. Use the down arrow to select Extended. Press F10
6. Once the Memory Diagnostic Tool completes, make note of any errors reported
7. Hit Esc to exit the tool and boot into Windows
Conclusion
Till now, you may understand how you can tune up your PC and make it run faster. Whether you want to get rid of junk files that left on your PC after a program uninstall, clean up junk registry, maintain hard driver, uninstall and get rid of malware, or more other tips to optimize your PC, you can discover an answer here. As to today’s main topic how to uninstall NVIDIA CUDA Toolkit, you will also get a complete guide to help you succeed in removing any unwanted programs from Window based PC. The goal of this post is to save people time and efforts by allowing them to learn how to uninstall NVIDIA CUDA Toolkit or any other unwanted programs, and tune their computer. And for those users who want to be effortless in removing any program and give this professional Total Uninstaller a try, simply click the download button below to get started with ease.