This article describes how to add or remove accounts on your PC. Having different accounts on a shared PC lets multiple people use the same device, all while giving everyone their own sign-in info, plus access to their own files, browser favorites, and desktop settings.
In addition, if you use the same PC for personal projects and work or school, you may want to add different accounts to your PC.
Note: If you have a new device, you may see an account named «defaultuser0″—this account is inactive and it won’t hurt your device or give anyone else access. If you want to remove it, you can restart your device and then sign in again.
Add people to a home PC
The best way to add someone to your PC is to have them sign in with a Microsoft account. Learn more about Microsoft accounts in Sign in with a Microsoft account.
-
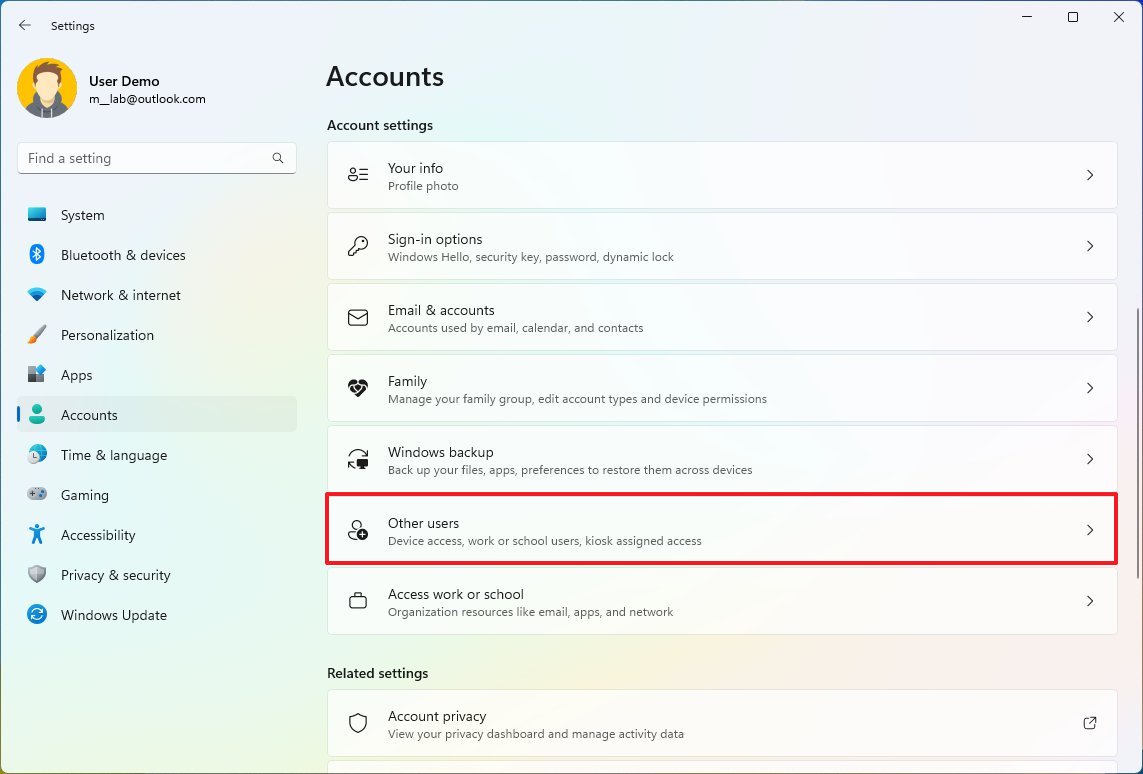
Select Start > Settings > Accounts > Family & other users.
-
Under Other users > Add other user, select Add account.
-
Enter that person’s Microsoft account information and follow the prompts.
If you need to remove that person’s sign-in information from your PC:
-
Select Start > Settings > Accounts > Family & other users.
-
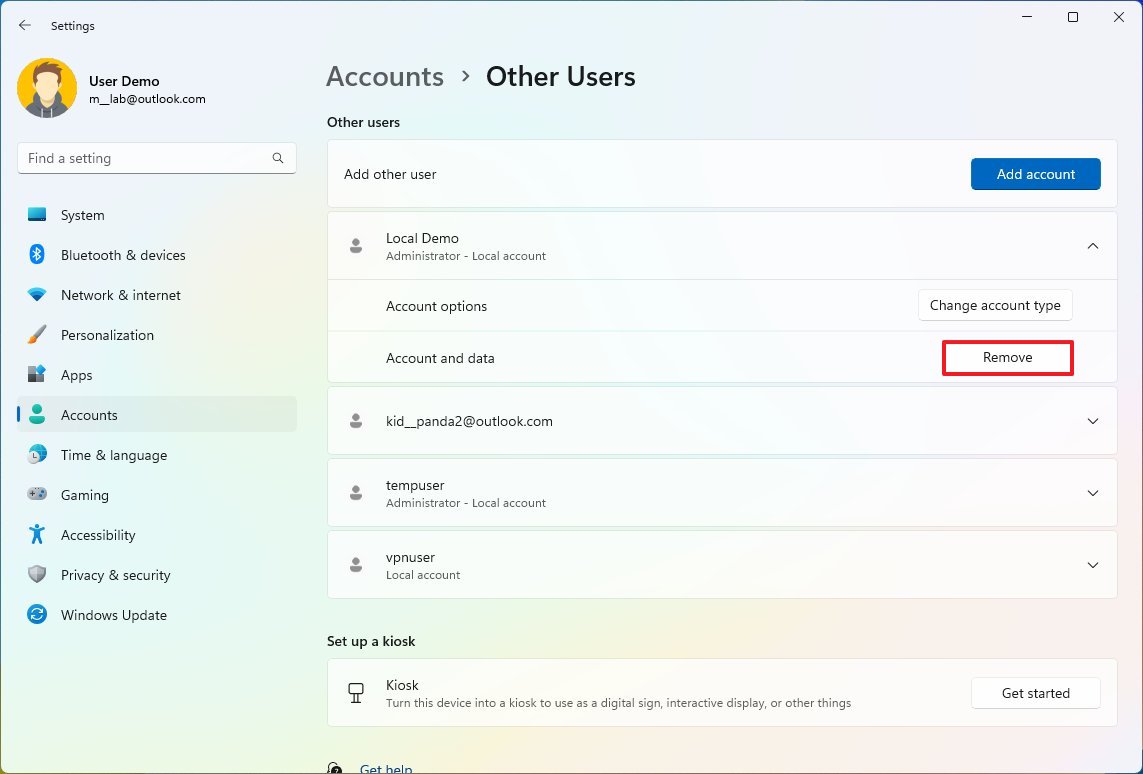
Under Other users, select the flyout for the account you want to remove.
-
Next to Account and data, select Remove. Note that this will not delete the person’s Microsoft account, it will just remove their sign-in info from your PC.
Add people to a work or school PC
The best approach is for everyone who shares a PC at work or school to have their own Microsoft account. Learn more about Microsoft accounts in Sign in with a Microsoft account.
To add someone with an existing Microsoft account:
-
Select Start > Settings > Accounts > Other users (in some Windows editions, it may be labeled as Other people or Family & other users).
-
Under Work or school users > Add a work or school account, select Add account.
-
Enter that person’s user account, select the account type, and then select Add.
If you need to remove that person’s sign-in information from your PC:
-
Select Start > Settings > Accounts > Other users.
-
Select the person’s name or email address, then select Remove.
-
Read the disclosure and select Delete account and data. Note that this will not delete the person’s Microsoft account, but it will remove their sign-in info and account data from your PC.
Add work or school accounts to your PC
If you’re using the same PC for both personal and school or business work, you may want to add various accounts to your PC to make it easier for you to get to the files, apps, and information associated with each account. When you access work or school, you’ll be connected to your organization’s domain and have access to its resources.
To add another account to your PC:
-
Select Start > Settings > Accounts > Access work or school .
-
Next to Add a work or school account, select Connect.
-
Enter that person’s account info, select the account type, and then select Add.
If you need to remove an account from your PC:
-
Select Start > Settings > Accounts > Access work or school .
-
Select the account you wish to remove, then select Disconnect.
-
Select Yes to confirm your actions. Note that this will not delete the account entirely, it will just remove access from your PC
Note: If an account is either the only account on the PC or the primary account on the PC, it can’t be removed.
Add accounts used by apps
To make signing in to your accounts easier and faster, you may want to add accounts for different apps.
To add an account used by apps to your PC:
-
Select Start > Settings > Accounts > Email & accounts .
-
To add an account used by email. calendar, or contacts, select Add an account under Accounts used by email, calendar, and contacts. For other apps, select Add a Microsoft account or Add a work or school account.
-
Follow the prompts to add the account.
To remove an account used by apps from your PC:
-
Select Start > Settings > Accounts > Email & accounts .
-
Select the account you wish to remove, then select Remove.
-
Select Yes to confirm your actions.
Add people to a family group
If you’ve added your family’s Microsoft accounts to your PC, you can set them up as a Microsoft family. It’s a free service that helps families stay connected and keep kids safer on Windows 11 and Xbox One devices, along with Android devices running Microsoft Launcher.
Add people to a home PC
The best way to add someone to your PC is to have them sign in with a Microsoft account. Learn more about Microsoft accounts in Sign in with a Microsoft account.
On Windows 10 Home and Windows 10 Professional editions:
-
Select Start > Settings > Accounts > Family & other users.
-
Under Other users, select Add someone else to this PC.
-
Enter that person’s Microsoft account information and follow the prompts.
If you need to remove that person’s sign-in information from your PC:
-
Select Start > Settings > Accounts > Family & other users.
-
Select the person’s name or email address, then select Remove. Note that this will not delete the person’s Microsoft account, it will just remove their sign-in info from your PC.
Add people to a work or school PC
The best approach is for everyone who shares a PC at work or school to have their own Microsoft account. Learn more about Microsoft accounts in Sign in with a Microsoft account.
To add someone with an existing Microsoft account:
-
Select Start > Settings > Accounts > Other users (in some Windows editions, it may be labeled as Other people or Family & other users).
-
Under Work or school users, select Add a work or school user.
-
Enter that person’s user account, select the account type, and then select Add.
If you need to remove that person’s sign-in information from your PC:
-
Select Start > Settings > Accounts > Other users.
-
Select the person’s name or email address, then select Remove.
-
Read the disclosure and select Delete account and data. Note that this will not delete the person’s Microsoft account, but it will remove their sign-in info and account data from your PC.
Add work or school accounts to your PC
If you’re using the same PC for both personal and school or business work, you may want to add various accounts to your PC to make it easier for you to get to the files, apps, and information associated with each account. When you access work or school, you’ll be connected to your organization’s domain and have access to its resources.
To add another account to your PC:
-
Select Start > Settings > Accounts > Access work or school .
-
Select Connect, then follow the prompts to add the accounts.
If you need to remove an account from your PC:
-
Select Start > Settings > Accounts > Access work or school .
-
Select the account you wish to remove, then select Disconnect.
-
Select Yes to confirm your actions. Note that this will not delete the account entirely, it will just remove access from your PC
Note: If an account is either the only account on the PC or the primary account on the PC, it can’t be removed.
Add accounts used by apps
To make signing in to your accounts easier and faster, you may want to add accounts for different apps.
To add an account used by apps to your PC:
-
Select Start > Settings > Accounts > Email & accounts .
-
To add an account used by email. calendar, or contacts, select Add an account under Accounts used by email, calendar, and contacts. For other apps, select Add a Microsoft account or Add a work or school account.
-
Follow the prompts to add the account.
To remove an account used by apps from your PC:
-
Select Start > Settings > Accounts > Email & accounts .
-
Select the account you wish to remove, then select Remove.
-
Select Yes to confirm your actions.
Add people to a family group
If you’ve added your family’s Microsoft accounts to your PC, you can set them up as a Microsoft family. It’s a free service that helps families stay connected and keep kids safer on Windows 10 and Xbox One devices, along with Android devices running Microsoft Launcher.
Need more help?
Want more options?
Explore subscription benefits, browse training courses, learn how to secure your device, and more.
Communities help you ask and answer questions, give feedback, and hear from experts with rich knowledge.
Find solutions to common problems or get help from a support agent.
В этой статье описано, как добавить и удалить учетные записи на компьютере. Наличие разных учетных записей на общем компьютере позволяет нескольким пользователям работать на одном устройстве, предоставляя каждому из них собственные сведения для входа, а также доступ к их собственным файлам, избранному браузера и параметрам рабочего стола.
Кроме того, если вы используете один компьютер для личных проектов, а также для работы или учебы, вы можете добавить на компьютер разные учетные записи.
Примечание: Если вы используете новое устройство, вы можете увидеть учетную запись «defaultuser0» — эта учетная запись неактивна, она не вредит вашему устройству и не предоставляет другим пользователям доступ. Если вы хотите удалить ее, перезапустите устройство и снова выполните вход.
Добавление пользователей в домашний компьютер
Оптимальный способ добавления пользователя на компьютер — попросить его войти с помощью учетной записи Майкрософт. Подробные сведения об учетных записях Майкрософт см. в разделе Войти с помощью учетной записи Майкрософт.
-
Выберите Пуск > Параметры > Учетные записи > семья & других пользователей.
-
В разделе Другие пользователи > Добавить другого пользователя выберите Добавить учетную запись.
-
Введите сведения учетной записи Майкрософт этого пользователя и следуйте инструкциям.
Если вам требуется удалить данные для входа этого пользователя со своего компьютера, выполните указанные ниже действия.
-
Выберите Пуск > Параметры > Учетные записи > семья & других пользователей.
-
В разделе Другие пользователи выберите всплывающее меню для учетной записи, которую вы хотите удалить.
-
Рядом с полем Учетная запись и данные выберите Удалить. Обратите внимание, что при этом учетная запись Майкрософт пользователя не будет удалена. Будут удалены только его данные для входа с вашего компьютера.
Добавление пользователей в рабочий или учебный компьютер
Всем, кто использует на работе или в учебном заведении общий компьютер, желательно иметь собственную учетную запись Майкрософт. Подробные сведения об учетных записях Майкрософт см. в разделе Войти с помощью учетной записи Майкрософт.
Добавление пользователя с существующей учетной записью Майкрософт:
-
Выберите Пуск > Параметры > Учетные записи > Другие пользователи (в некоторых выпусках Windows он может быть помечен как Другие люди или Семья & других пользователей).
-
В разделе Рабочие или учебные пользователи > Добавить рабочую или учебную учетную запись выберите Добавить учетную запись.
-
Введите учетную запись этого пользователя, выберите тип учетной записи и нажмите Добавить.
Если вам требуется удалить данные для входа этого пользователя со своего компьютера, выполните указанные ниже действия.
-
Выберите Пуск > Параметры > Учетные записи > Другие пользователи.
-
Выберите имя пользователя или адрес электронной почты и нажмите Удалить.
-
Прочтите уведомление и выберите Удалить учетную запись и данные. Обратите внимание, что при этом учетная запись Майкрософт пользователя не будет удалена, но будут удалены его данные для входа и данные учетной записи с вашего компьютера.
Добавление рабочих или учебных учетных записей на компьютер
Если вы используете один компьютер как в личных целях, так и для учебы или работы, вы можете добавить на компьютер разные учетные записи, чтобы упростить доступ к файлам, приложениям и информации, связанным с каждой учетной записью. При доступе к рабочей или учебной учетной записи вы подключаетесь к домену своей организации и получаете доступ к ее ресурсам.
Добавление другой учетной записи на компьютер:
-
Выберите Пуск > Параметры > Учетные записи > Доступ к рабочей или учебной среде.
-
Рядом с полем Добавление рабочей или учебной учетной записи выберите Подключиться.
-
Введите сведения об учетной записи этого пользователя, выберите тип учетной записи и нажмите кнопку Добавить.
Если вам требуется удалить учетную запись с компьютера, выполните указанные ниже действия.
-
Выберите Пуск > Параметры > Учетные записи > Доступ к рабочей или учебной среде.
-
Выберите учетную запись, которую хотите удалить, и выберите Отключиться.
-
Нажмите Да, чтобы подтвердить свои действия. Обратите внимание, что при этом учетная запись не будет удалена целиком. Будет только удален доступ к вашему компьютеру
Примечание: Если учетная запись является единственной или основной учетной записью на компьютере, ее невозможно удалить.
Добавление учетных записей, используемых приложениями
Чтобы облегчить и ускорить вход в учетные записи, вы можете добавить учетные записи для разных приложений.
Добавление на компьютер учетной записи, используемой приложениями:
-
Выберите Пуск > Параметры > Учетные записи > Email & учетные записи .
-
Добавление учетной записи, используемой по электронной почте. календарь или контакты выберите Добавить учетную запись в разделе Учетные записи, используемые электронной почтой, календарем и контактами. Для других приложений выберите Добавить учетную запись Майкрософт или Добавить рабочую или учебную учетную запись.
-
Следуйте инструкциям по добавлению учетной записи.
Удаление с компьютера учетной записи, используемой приложениями:
-
Выберите Пуск > Параметры > Учетные записи > Email & учетные записи .
-
Выберите учетную запись, которую хотите удалить, и выберите Удалить.
-
Нажмите Да, чтобы подтвердить свои действия.
Добавление пользователей в семейную группу
Если вы добавили учетные записи Майкрософт вашей семьи на компьютер, вы можете настроить их как семью майкрософт. Это бесплатная служба, которая помогает семьям оставаться на связи и обеспечить безопасность детей на устройствах Windows 11 и Xbox One, а также устройствах Android под управлением Microsoft Launcher.
Добавление пользователей в домашний компьютер
Оптимальный способ добавления пользователя на компьютер — попросить его войти с помощью учетной записи Майкрософт. Подробные сведения об учетных записях Майкрософт см. в разделе Войти с помощью учетной записи Майкрософт.
В выпусках Windows 10 Домашняя и Windows 10 Профессиональная:
-
Выберите Пуск > Параметры > Учетные записи > семья & других пользователей.
-
В разделе Другие пользователи выберите Добавить другого пользователя на этот компьютер.
-
Введите сведения учетной записи Майкрософт этого пользователя и следуйте инструкциям.
Если вам требуется удалить данные для входа этого пользователя со своего компьютера, выполните указанные ниже действия.
-
Выберите Пуск > Параметры > Учетные записи > семья & других пользователей.
-
Выберите имя пользователя или адрес электронной почты и нажмите Удалить. Обратите внимание, что при этом учетная запись Майкрософт пользователя не будет удалена. Будут удалены только его данные для входа с вашего компьютера.
Добавление пользователей в рабочий или учебный компьютер
Всем, кто использует на работе или в учебном заведении общий компьютер, желательно иметь собственную учетную запись Майкрософт. Подробные сведения об учетных записях Майкрософт см. в разделе Войти с помощью учетной записи Майкрософт.
Добавление пользователя с существующей учетной записью Майкрософт:
-
Выберите Пуск > Параметры > Учетные записи > Другие пользователи (в некоторых выпусках Windows он может быть помечен как Другие люди или Семья & других пользователей).
-
В разделе Пользователи учетной записи компании или учебного заведения выберите Добавить пользователя компании или учебного заведения.
-
Введите учетную запись этого пользователя, выберите тип учетной записи и нажмите Добавить.
Если вам требуется удалить данные для входа этого пользователя со своего компьютера, выполните указанные ниже действия.
-
Выберите Пуск > Параметры > Учетные записи > Другие пользователи.
-
Выберите имя пользователя или адрес электронной почты и нажмите Удалить.
-
Прочтите уведомление и выберите Удалить учетную запись и данные. Обратите внимание, что при этом учетная запись Майкрософт пользователя не будет удалена, но будут удалены его данные для входа и данные учетной записи с вашего компьютера.
Добавление рабочих или учебных учетных записей на компьютер
Если вы используете один компьютер как в личных целях, так и для учебы или работы, вы можете добавить на компьютер разные учетные записи, чтобы упростить доступ к файлам, приложениям и информации, связанным с каждой учетной записью. При доступе к рабочей или учебной учетной записи вы подключаетесь к домену своей организации и получаете доступ к ее ресурсам.
Добавление другой учетной записи на компьютер:
-
Выберите Пуск > Параметры > Учетные записи > Доступ к рабочей или учебной среде.
-
Нажмите Подключиться и следуйте инструкциям по добавлению учетных записей.
Если вам требуется удалить учетную запись с компьютера, выполните указанные ниже действия.
-
Выберите Пуск > Параметры > Учетные записи > Доступ к рабочей или учебной среде.
-
Выберите учетную запись, которую хотите удалить, и выберите Отключиться.
-
Нажмите Да, чтобы подтвердить свои действия. Обратите внимание, что при этом учетная запись не будет удалена целиком. Будет только удален доступ к вашему компьютеру
Примечание: Если учетная запись является единственной или основной учетной записью на компьютере, ее невозможно удалить.
Добавление учетных записей, используемых приложениями
Чтобы облегчить и ускорить вход в учетные записи, вы можете добавить учетные записи для разных приложений.
Добавление на компьютер учетной записи, используемой приложениями:
-
Выберите Пуск > Параметры > Учетные записи > Email & учетные записи .
-
Добавление учетной записи, используемой по электронной почте. календарь или контакты выберите Добавить учетную запись в разделе Учетные записи, используемые электронной почтой, календарем и контактами. Для других приложений выберите Добавить учетную запись Майкрософт или Добавить учетную запись компании или учебного заведения.
-
Следуйте инструкциям по добавлению учетной записи.
Удаление с компьютера учетной записи, используемой приложениями:
-
Выберите Пуск > Параметры > Учетные записи > Email & учетные записи .
-
Выберите учетную запись, которую хотите удалить, и выберите Удалить.
-
Нажмите Да, чтобы подтвердить свои действия.
Добавление пользователей в семейную группу
Если вы добавили учетные записи Майкрософт вашей семьи на компьютер, вы можете настроить их как семью майкрософт. Это бесплатная служба, которая помогает семьям оставаться на связи и защищать детей на устройствах с Windows 10 и консолях Xbox One, а также на устройствах Android с Microsoft Launcher.
Нужна дополнительная помощь?
Нужны дополнительные параметры?
Изучите преимущества подписки, просмотрите учебные курсы, узнайте, как защитить свое устройство и т. д.
В сообществах можно задавать вопросы и отвечать на них, отправлять отзывы и консультироваться с экспертами разных профилей.
Найдите решения распространенных проблем или получите помощь от агента поддержки.
![]()
Download Article
![]()
Download Article
This wikiHow teaches you how to remove a user account from your Windows PC. As long as you are signed in to your PC with an administrator-level account, you will be able to remove any user accounts on the PC. Removing a user account will delete all of that user’s data from your PC.
-

1
Open your Windows Settings
. You can press the Windows key and i simultaneously, or click the Windows Start menu and click the gear icon.
-
2
Click Accounts. This icon looks like a silhouette of a person and says «Your accounts, email, sync, work, family.»
Advertisement
-
3
Click Family & other users. You’ll see this in the vertical menu on the left side of the window.
- If you’re using a work or school PC, you may have to select Other users or Other people instead.[1]
- If you’re using a work or school PC, you may have to select Other users or Other people instead.[1]
-
4
Click the person you want to delete. You’ll see more options appear for that user.
- If you see «Local account» below the user name, this account only exists on the current PC. If not, it’s a Microsoft account, which means that while you’re removing the account from your PC, that user will still be able to log into other Microsoft services like Outlook.com and Office Online.
-
5
Click Remove. A confirmation message will appear, letting you know that all of that user’s data will be removed from the PC if you continue.
-
6
Click Delete account and data. This removes all of the user’s data from the PC.


Advertisement
Ask a Question
200 characters left
Include your email address to get a message when this question is answered.
Submit
Advertisement
Thanks for submitting a tip for review!
About This Article
Article SummaryX
1. Open Settings.
2. Click Accounts.
3. Click Family & other users.
4. Click the user you want to delete.
5. Click Remove and Delete account and data.
Did this summary help you?
Thanks to all authors for creating a page that has been read 135,253 times.
Is this article up to date?
(Image credit: Windows Central)
On Windows 11, having multiple accounts lets you create a separate space for everyone using the computer without interfering with your experience. However, when the account is no longer needed, it’s possible to delete it in several ways, including through the Settings app, Control Panel, User Account, Computer Management, Control Panel, and PowerShell.
If you have to restrict access to a user temporarily, you don’t need to delete the account. Instead, you should disable the user on Windows 11.
This guide will walk you through the different ways to delete accounts on Windows 11.
How to delete an account on Windows 11
To delete an account and data with the Setting app on Windows 11, use these steps:
- Open Settings.
- Click on Accounts.
- Click the Other users page on the right side.
- Select the account and click the Remove button.
- Click the «Delete account and data» button.
Once you complete the steps, the account and data files from the user will be erased from the system.
How to delete an account using Control Panel
To delete account and files with Control Panel, use these steps:
- Open Control Panel.
- Click on User Accounts.

- Click the «Remove user accounts» option.
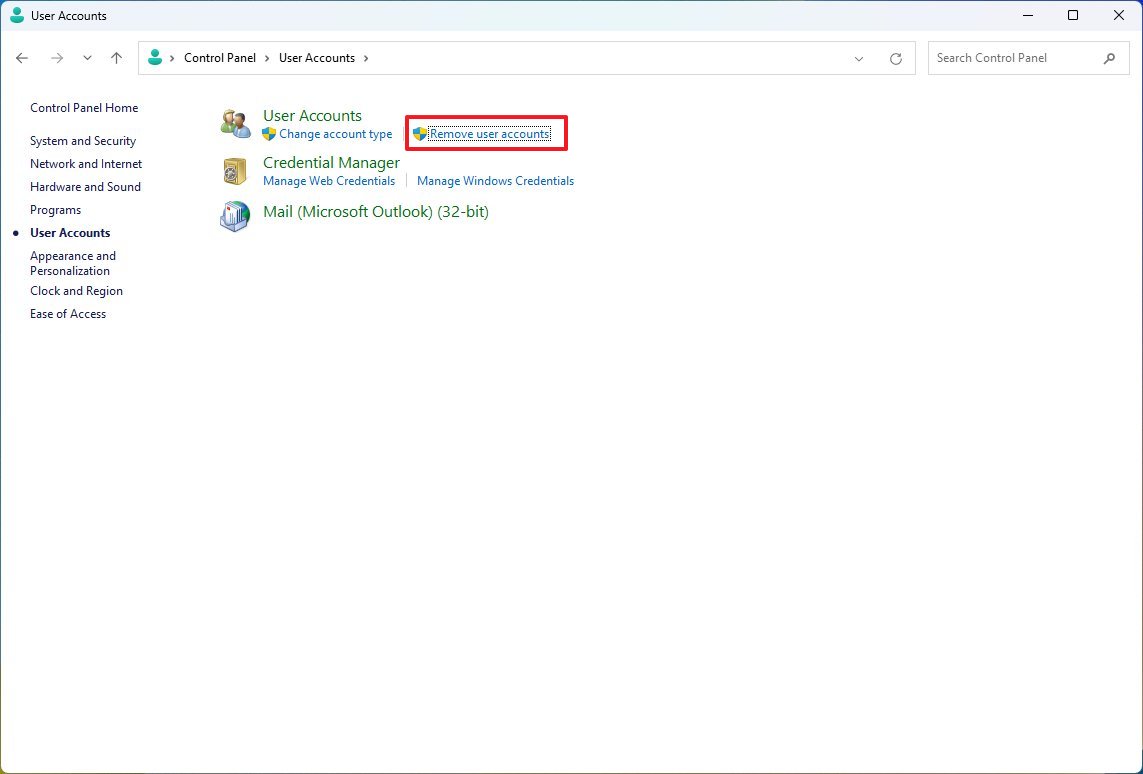
- Select the account to remove.
- Click the «Delete the account» option.
- Click the Delete Files button to delete the account and files.
- Click the Keep files button to delete the account, keeping the files in the profile folder.
- Click the Delete Account button.
After you complete the steps, the account will be removed from Windows 11.
How to delete an account using Computer Management
To remove an account with Computer Management, use these steps:
- Open Start.
- Search for Computer Management and click the top result to open Computer Management.
- Browse the following path: Computer Management > System Tools > Local Users and Groups > Users
- Right-click the user and select the Delete option.
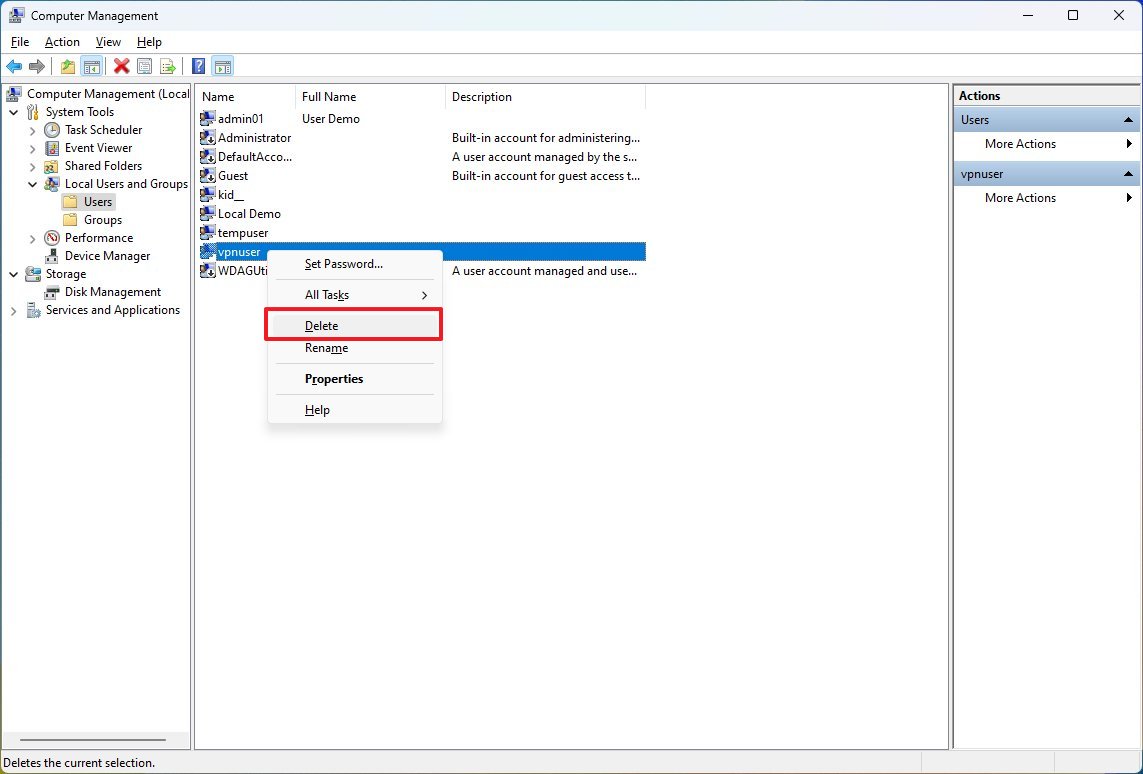
- Click the Yes button.
Once you complete the steps, the account will be removed, but the files will remain in the «Users» folder under the account name folder.
How to delete an account using User Account
To delete an account from the legacy User Account interface, use these steps:
- Open Start.
- Search for netplwiz and click the top result to open the legacy User Account interface.
- Select the account to delete on Windows 11.
- Click the Remove button.
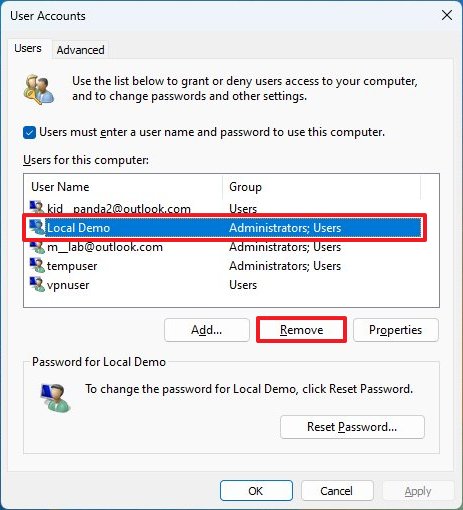
- Click the Yes button.
- Click the Apply button.
- Click the OK button.
After you complete the steps, the Windows 11 account will be removed without deleting the user’s files.
How to delete an account using Command Prompt
To remove an account with Command Prompt on Windows 11, use these steps:
- Open Start.
- Search for Command Prompt, right-click the top result, and select the Run as administrator option.
- Type the following command to note the available user accounts and press Enter: net user
- Type the following command to delete the user account on Windows 11 and press Enter: net user USER-NAME /delete
In the command, replace «USER-NAME» for the name of the account to delete. This example deletes the «JohnSmith» account: net user JohnSmith /delete
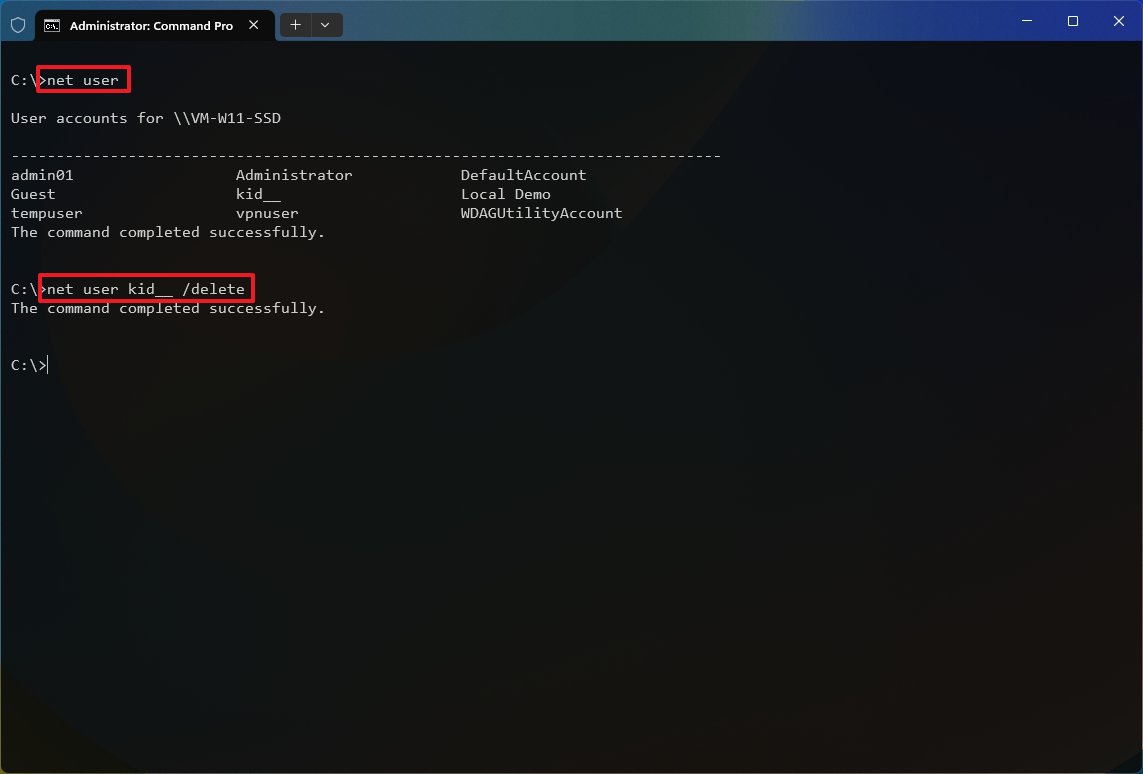
Once you complete the steps, the command will delete the account, and the account files will continue to be available on the computer.
How to delete an account using PowerShell
To delete an account with PowerShell commands on Windows 11, use these steps:
- Open Start.
- Search for PowerShell, right-click the top result, and select the Run as administrator option.
- Type the following command to note the available user accounts and press Enter: Get-LocalUser
- Type the following command to delete the user account on Windows 11 and press Enter: Remove-LocalUser -Name «USER-ACCOUNT»
In the command, replace «USER-ACCOUNT» for the name of the account to delete. This example deletes the «JohnSmith» account: Remove-LocalUser -Name «JohnSmith»

After you complete the steps, PowerShell will delete the account without removing the files on Windows 11.
More resources
For more helpful articles, coverage, and answers to common questions about Windows 10 and Windows 11, visit the following resources:
- Windows 11 on Windows Central — All you need to know
- Windows 10 on Windows Central — All you need to know

Cutting-edge operating system
A refreshed design in Windows 11 enables you to do what you want effortlessly and safely, with biometric logins for encrypted authentication and advanced antivirus defenses.
All the latest news, reviews, and guides for Windows and Xbox diehards.
Mauro Huculak is technical writer for WindowsCentral.com. His primary focus is to write comprehensive how-tos to help users get the most out of Windows 10 and its many related technologies. He has an IT background with professional certifications from Microsoft, Cisco, and CompTIA, and he’s a recognized member of the Microsoft MVP community.
We have previously seen how to disable or block Microsoft account, how to add a password to a local user account, and how to install and use Windows 10 without a Microsoft account. In this guide, we will see how to delete a user account in Windows 10.
NOTE 1: You must have administrator rights in order to delete user accounts.
NOTE 2: These methods can not only be used to delete local user account but also to delete user accounts created using Microsoft accounts.
NOTE 3: When you delete a user account, you will lose all data saved in desktop, documents, photos, music, and video folders of the user account. However, data saved in other user accounts will not be affected.
NOTE 4: You need to sign out of the user account to be able to delete it. That is, you cannot remove the account that you are currently signed in.
Method 1 of 3
Delete a user account via Settings
Step 1: Open the Settings app. To do so, either click the Settings icon in the Start menu or use the Windows logo + I hotkey.
Step 2: Once Settings app is launched, click Accounts (Your accounts, email, sync, work, family) > Family & other users page.
Step 3: Click on a user account that you want to delete and then click the Remove button.
Step 5: Finally, when you see the confirmation dialog, click the Delete account and data button to delete the selected user account.
Method 2 of 3
Delete a user account via Control Panel
Step 1: Open Control Panel by typing its name in the Start menu or taskbar search box and then pressing Enter key. Or type Control.exe in the Run command box (Windows + R) and then press the Enter key.
Step 2: Click User Accounts. Click User Accounts in the following screen as well to open the User Accounts window.
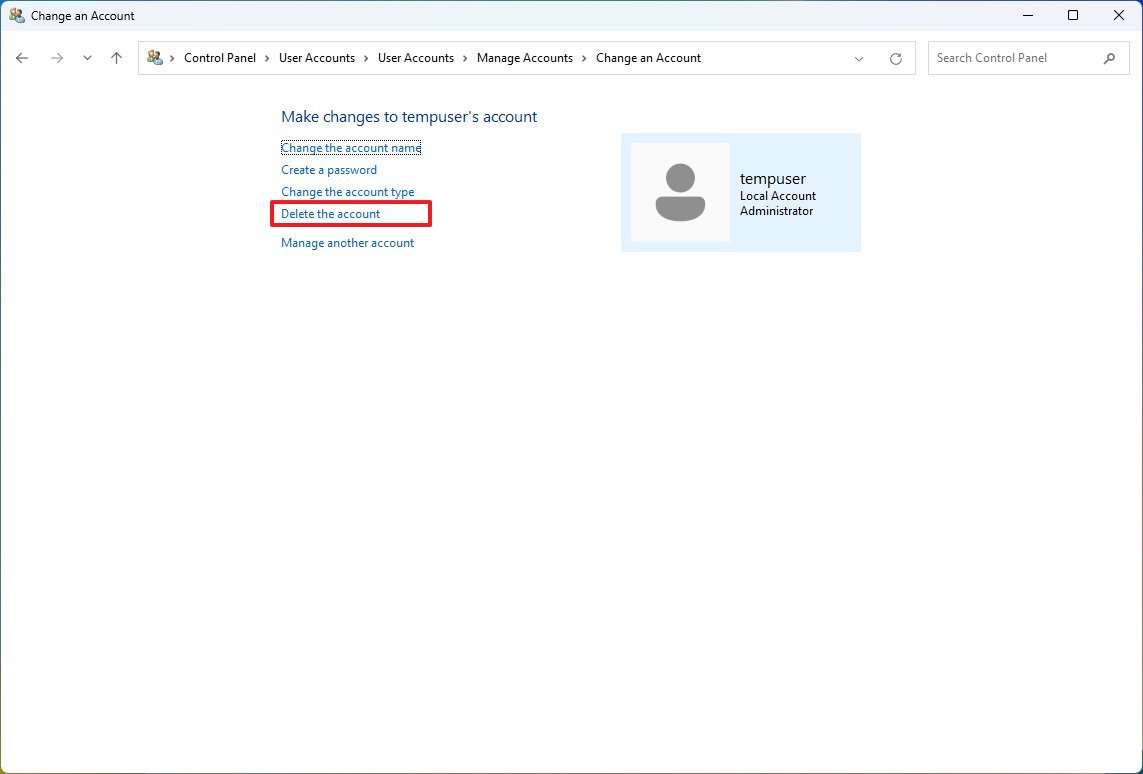
Step 3: Click the link labeled Manage another account to view all user accounts on the PC.
Step 4: Click on the user account that you would like to delete to see Make changes to your account.
Step 5: Here, click the link labeled Delete the account.
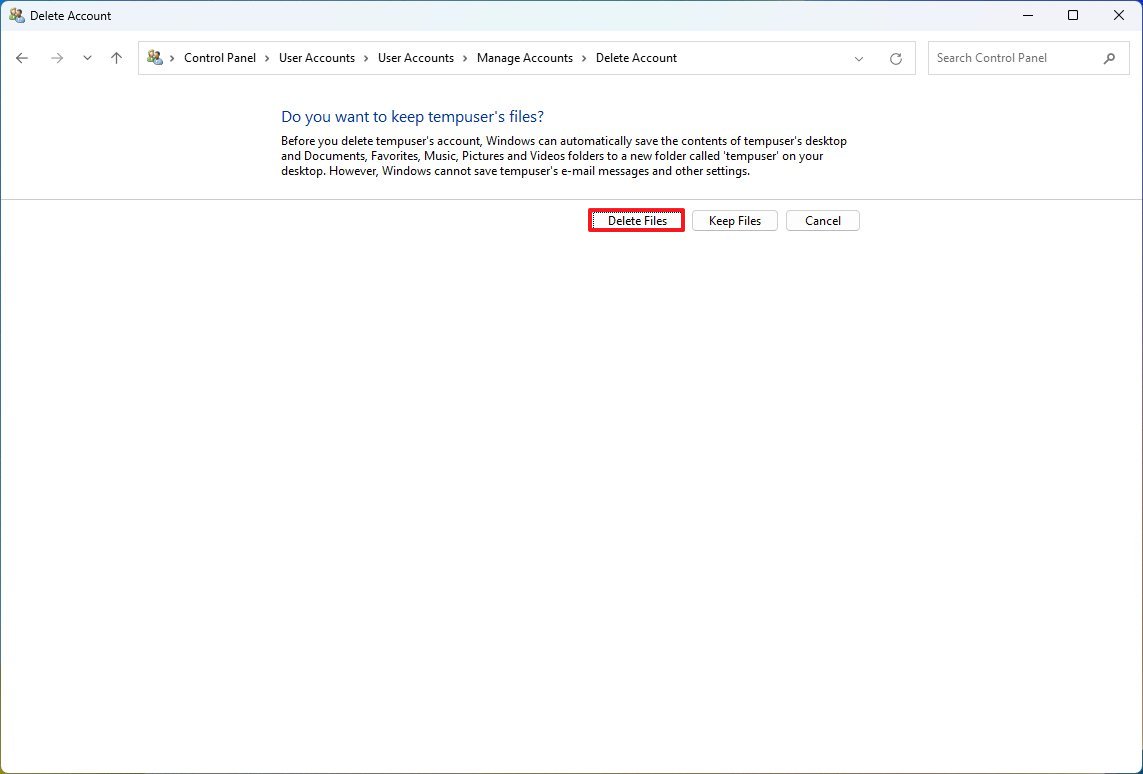
Step 6: When you see “Do you want to keep user’s files?” message, either click the Keep Files button or click the Delete Files button. If you click, Keep Files button Windows 10 will save the contents of the desktop, documents, favorites, videos, music, and pictures to a new folder and will name it after your user account name.
After clicking the Keep Files button to save those files, click the Delete Account button to delete the selected user account.
Method 3 of 3
Delete a user account via Command Prompt
Did you know that you can use the Command Prompt to quickly add or delete a user account in Windows? Here is how to delete a user account via Command Prompt.
Step 1: Open Command Prompt as administrator. To do so, type CMD in Start menu or taskbar search box, right-click on Command Prompt entry, and then click Run as administrator option.
Alternatively, right-click on the Start menu and then click Command Prompt (admin) to open the admin Command Prompt. Click Yes button when you see the User Account Control prompt.
Step 2: You can skip this step if you are sure about the name of the user account that you are going to delete.
In the elevated Command Prompt, type the following command and press Enter key to view all user accounts on your PC.
net users
Step 3: Next, execute the following command to delete a user account.
net user UserAccountName /delete
In the above command, replace UserName with the actual name of the user account that you obtained in Step 2.
For instance, to delete a user account named IntoWindows, you need type net user IntoWindows /delete, and then press Enter key.