-
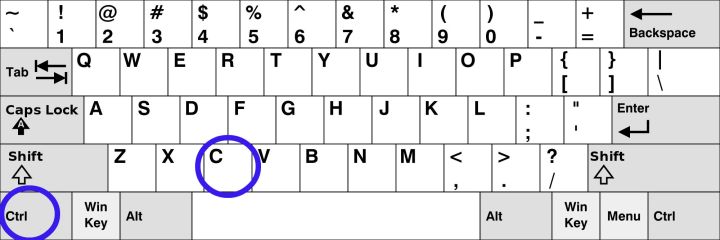
Copy: Ctrl + C
-
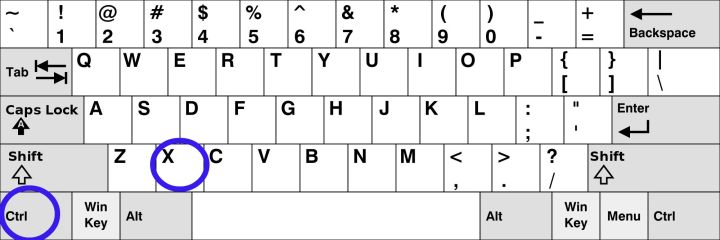
Cut: Ctrl + X
-
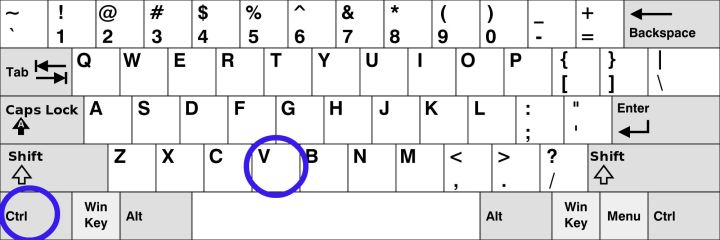
Paste: Ctrl + V
-
Maximize Window: F11 or Windows logo key + Up arrow
-
Open Task View: Windows logo key + Tab
-
Display and hide the desktop: Windows logo key + D
-
Switch between open apps: Alt + Tab
-
Open the Quick Link menu: Windows logo key + X
-
Lock your PC: Windows logo key + L
Depending on your hardware, you can use Windows logo key + PrtScn to take a screenshot, or use Fn + Windows logo key + Spacebar.
See all Windows 11 keyboard shortcuts
-
Copy: Ctrl + C
-
Cut: Ctrl + X
-
Paste: Ctrl + V
-
Maximize Window: F11 or Windows logo key + Up arrow
-
Open Task View: Windows logo key + Tab
-
Display and hide the desktop: Windows logo key + D
-
Switch between open apps: Alt + Tab
-
Open the Quick Link menu: Windows logo key + X
-
Lock your PC: Windows logo key + L
Depending on your hardware, you can use Windows logo key + PrtScn to take a screenshot, or use Fn + Windows logo key + Spacebar.
See all Windows 10 keyboard shortcuts
-
Home
- Computing
- Guides
Are you tired of all the right-clicking just to access simple commands like cut, copy, and paste? Sure, it’s not super labor-intensive, but it can get really annoying after a while when you’re constantly summoning one of these actions using a mechanical rodent.
Contents
- Cut (Ctrl + X)
- Copy (Ctrl + C)
- Paste (Ctrl + V)
- Undo (Ctrl + Z)
- An extra tip on working between apps
If you’re not utilizing shortcut commands, you’re missing out on an easy way to save time and effort. Read on to learn simple commands that combine Control (Ctrl) and other keys to cut, copy, paste, and even undo actions across Windows apps.
Cut (Ctrl + X)
When cutting text using the shortcut, you remove it from the target location while sending it to your clipboard in the system memory. Ctrl + X lets you remove text in one area and paste that same text multiple times in other areas.
Originally, Windows didn’t automatically keep a history of items on your clipboard, meaning text was rewritten in memory each time you typed the keyboard shortcut. That changed with the October 2018 Update, which introduced an extended clipboard with history.
To access this history, you can type the Windows Key + V combination. A pop-up window appears listing a backlog of text you previously cut along with text you copied using a different keyboard shortcut (see the next section). Just select one of the recorded entries, and it will paste to your target document. However, you’ll need to manually enable it the first time you type the Windows Key + V combination.
Overall, this is a great way to rearrange text in a report or take a piece of information from one area and populate multiple forms with that same data. It has no alternative inputs, however. Yes, Shift + Delete was once a thing, but that combo is now used for other commands.
Copy (Ctrl + C)
This keyboard shortcut for copying text is similar to Cut in that text is sent to the clipboard in the system memory. However, unlike Cut, the source text you copied isn’t deleted from the parent document.
If you are using a version of Windows 10 before the October 2018 Update (shame on you), all text copied to the clipboard will be overwritten the next time you use the Ctrl + C keyboard shortcut, just like Cut.
Alternatively, you can use the Ctrl + Ins shortcut. The Insert key is found on full-size keyboards with number pads. It may reside on the Zero key or as a dedicated key near the Home key. This may be a more useful option if you are dealing with a lot of numeric data and your fingers rarely leave the number pad.
Paste (Ctrl + V)
As a recap, both Ctrl + X and Ctrl + C copy text to the clipboard, only the former shortcut removes the copied text from the document; the latter doesn’t. The Ctrl + V keyboard shortcut is the exact opposite: It pastes text from the clipboard into your document wherever your cursor resides.
Remember that formatting and spacing frequently carry over with the text, which may lead to issues when pasting into a new field or form. You can usually copy and paste an unformatted version of the text to help avoid these problems.
Alternatively, you can use the Shift + Ins shortcut, which may be more useful if you spend a lot of time on the numeric keypad. The pasted text will appear wherever your cursor is, so make sure you’ve picked the right spot.
Undo (Ctrl + Z)
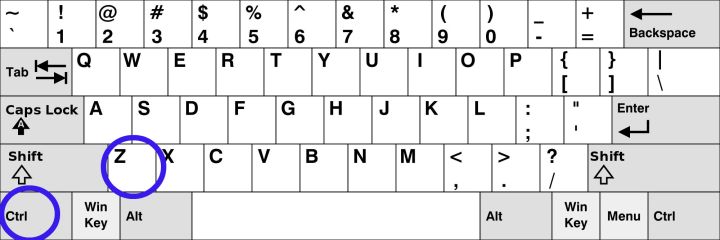
Whoops! Didn’t mean to overwrite that sentence, did you? This handy keyboard shortcut will undo the last action you made. If you were typing, for example, it will remove the last section of text you typed before pausing, which could be fairly long.
Most Windows applications support repeated undo commands, which means you can delete your last action, the one before that, and the one before that, and so on, so long as Windows kept a history of your actions. Adobe Photoshop, for example, lets you do so by pressing Ctrl + Z.
Unfortunately, the functionality isn’t universal with every app. Before trusting it in a higher-stakes scenario, you should confirm that the commands are supported by your app.
An extra tip on working between apps
Every Windows program supports cut, copy, paste, and undo commands. They’re a part of the Windows foundation.
The shortcuts do the same thing every day. The standard Ctrl plus a letter executes a specific task. It works the same while writing spreadsheets, drafting emails, or creating documents.
Online forms and apps aren’t as reliable. Many support the same shortcuts, but there’s no guarantee. Before trusting it, try out the new app. Execute a few commands to make sure it runs reliably.
Editors’ Recommendations
-
The best Windows apps for 2023
-
The best Mac keyboard shortcuts for 2023
-
Windows 11 is about to make RGB peripherals way easier to use
-
Top 10 Windows shortcuts everyone should know
-
6 Google Chrome keyboard shortcuts in Windows you need to try

Jon Martindale is the Evergreen Coordinator for Computing, overseeing a team of writers addressing all the latest how to…
-
Computing
Need to work from the road? Here are the 5 best laptops with LTE

Ever wish your laptop acted — well, more like your phone, especially when it comes to data connections? The answer is LTE, the widely used wireless data transmission standard/broad term for mobile data connections starting with 4G. Laptops that have LTE tech can connect with cellular data signals just like your phone, allowing them to use your carrier plan for more reliable internet, especially in areas where Wi-Fi may not be an option or smart security choice.
The key is that LTE is always evolving (the name literally means Long-Term Evolution). The latest laptops to hit the market are carrying what’s now simply called 5G, the latest high-speed, high-security connection, if your carrier currently offers it. Since the 5G rollout has begun, you will probably want to look for a laptop with technology that will support the 5G standard, which uses a different radio spectrum and requires new components. Here are your best options, plus some choices for saving money with an older version of LTE.
Read more
-
Computing
A fix for slow NVMe SSD speeds in Windows 11 is out — here’s how to get it

An issue has been plaguing some Windows 11 users where NVMe drives might be running slower than expected, but Microsoft has now acknowledged the problem and issued a fix. As part of the latest Windows 11 monthly preview update, Microsoft is now testing a bug patch that should get rid of the issue.
Initially released on November 22, Microsoft mentions that the KB5007262 (OS Build 22000.348) preview has a fix related to write operations. The company also mentions that Windows 11 was performing unnecessary actions each time a write operation occurs. However, the issue only occurs when the NTFS USN journal is enabled. In most cases, this is always enabled on the C: drive, which is the primary system disk for most NVMe SSDs installed on a PC.
Read more
-
Computing
Is Windows 11 a success so far? New report reveals how many PCs have upgraded

Nearly two months since its launch in early October, Microsoft’s Windows 11 has now been installed on nearly 10% of PCs.
According to a report from AdDuplex, Microsoft’s latest operating system has reached 8.6% of “modern PCs.” The figure is boosted by those currently running the Insider build of Windows 11, adding another 0.3% of OS market share for Windows 11.
Read more
Understanding the Clipboard
When you copy or cut something (such as a block of text, an image, or a link), Windows temporarily stores the data in a special memory location called the Clipboard. Think of it as a temporary holding pen. When you Paste the information you copied, Windows retrieves the contents of the Clipboard and puts it where you want it to go.
Typically, the contents of the Clipboard reset when you restart your PC, although it is possible to pin items to the clipboard in Windows 10 and 11 using an opt-in feature called Clipboard History. Then you can recall them as many times as you want quickly by pressing the Windows+V keyboard shortcut.
In Windows, you can even synchronize your Clipboard between devices using the cloud. But that is an optional setting you have to turn on in System Settings.
RELATED: How to Enable and Use Clipboard History on Windows 10
The Difference Between Copy and Cut
When you copy something, Windows makes a copy of the information you want to the Clipboard and also leaves it in its original location. In contrast, when you perform the cut operation, Windows copies the information to the Clipboard but also removes the information from the original location.
That means you typically use copy to duplicate information, and cut to move the information from one location to another. These fundamental concepts apply across almost every application, so let’s go over the various different ways to copy, cut, and paste in Windows.
How to Copy, Cut, and Paste Using Keyboard Shortcuts
It’s important to know the three fundamental keyboard shortcuts for Copy, Cut, and Paste included in Windows for decades. Microsoft borrowed these shortcuts from the Mac, which still uses them with the Mac’s special Command key instead of Ctrl.
Copy: After selecting one or more items using your mouse or keyboard, press Ctrl+C.
The information will be copied to the clipboard.
Cut: After selecting one or more items, press Ctrl+X, and the information will be copied to the clipboard and removed from the original location.
Paste: Select a destination by clicking on an area (or by placing your cursor in the position where you want the information to go), then press Ctrl+V.
These shortcuts now work in Windows 10’s Command Prompt, too.
Alternative Copy, Cut, and Paste Keyboard Shortcuts
If you need to copy in a program that interprets Ctrl+C as a break character (such as a terminal emulator), you can use Ctrl+Insert instead. To cut, use Shift+Delete. To paste, press Shift+Insert. These shortcuts aren’t as commonly used today, but they are still almost universally recognized in Windows.
How to Copy, Cut, and Paste Using Right-Click
In many programs, you can copy, cut, and paste using the right button on your mouse. First, select an element of a document (such as a web page), then right-click, and you’ll likely see a context menu that includes Copy or Cut commands.
You can then right-click in a destination document and select Paste to put the contents of the Clipboard in that location.
The same principle works in File Explorer and on your Desktop. Select a file, folder, or group of files you’d like to Copy or Cut. Right-click on the files, and you’ll see a context menu pop-up. Select “Copy” if you’d like to duplicate the file somewhere else. Select “Cut” if you’d like to move the file to another location.
Then navigate to the new location and right-click where you’d like to put the files. The destination right-click can be inside a folder window, on the desktop, a drive on your computer, or even directly on a folder icon itself.
Select “Paste” in the right-click menu that pops up.
The files you just Cut or Copied will appear in the new location. Very handy!
How to Copy, Cut, and Paste Using Application Menus
You can also Copy, Cut, and Paste by selecting menu items with a mouse or touch screen. In programs with a Ribbon-style interface, you’ll typically see a Clipboard or Edit block that contains Copy, Cut, and Paste buttons.
In programs with compressed or hamburger-style menus (like Chrome and Firefox), you can often find the Copy/Cut/Paste functions in a section labeled Edit.
Also, many older Windows programs include a series of drop-down menus at the top of the application window. Among them, you’ll often find a menu titled Edit (which you can often call up by pressing Alt+E). In that menu, you can usually find Copy, Cut, and Paste commands.
How to Empty Your Clipboard
To erase the contents of your Clipboard, just copy something new. Simply copying any word on a web page or document will replace the contents of the clipboard with whatever you just copied. You might want to do this after copying something sensitive like a password or credit card number, ensuring that you won’t accidentally paste it into another application.
If you’d like to clear the data in your Clipboard History, you can manually erase it yourself. Open System Settings on your Windows 10 or 11 computer, then navigate to System > Clipboard. Find the section called “Clear Clipboard Data” and click on the “Clear” button.
You can also create a custom shortcut that will clear your Windows Clipboard.
RELATED: How to Clear Your Clipboard History on Windows 10
Now that you know more about Copy, Cut, and Paste, we hope you have fun duplicating and moving your data with ease.
Copying files, folders, texts, images, or any other file type is something we do hundreds of times when using a Windows PC. Although the copying, cutting, and pasting functions are a piece of cake, some users don’t know many of the tricks that can enhance overall productivity when using these functions. This tutorial shows how to easily carry out these functions on Windows.
Good to know: copy and paste function not working for you on Windows? Learn how to take care of it.
Content
- How to Copy and Paste Using the Context Menu
- How to Copy and Paste Using Shortcuts (Hotkeys)
- How to Copy and Paste Several Items at Once
- How to Copy and Paste Files Using CMD
- How to Copy Multiple Files to Multiple Directories
- Frequently Asked Questions
The context menu on Windows appears when you select an item and right-click your mouse. Most people use this method to copy and paste files or text.
- Find and right-click the item you want to move to show the context menu that includes the «Copy» and «Cut» options. (In Windows 11, you’ll need to click on «Show more options» first.)

- Selecting «Copy» creates a duplicate of the same file or folder in a different location. «Cut,» on the other hand, moves the file or folder to that spot and removes the original from the initial location after it’s pasted.
- Navigate to the location where you want to move the file or folder and right-click an empty area. Select «Paste.»

- When dealing with text, links, images, or other types of data, select or click what you want to copy or cut first, then right-click and choose the option you need from the context menu. In the case of images, look for «Copy image;» for links, click on «Copy link.»

How to Copy and Paste Using Shortcuts (Hotkeys)
Many users rely on Windows keyboard shortcuts to copy and paste, due to the added convenience. Follow these steps to use hotkeys:
- Locate the file or folder and press Ctrl + C to copy it and Ctrl + X to cut it.

- Navigate wherever you want to move the file or folder and press Ctrl + V.

- There are other helpful shortcuts that you can use, like the Ctrl + A combination, which lets you select all the text or files before copying or cutting them.
Tip: did you know that it’s possible to copy and paste within PDF files as well? We detail various methods of doing so.
How to Undo Copying or Cutting a File
If you mistakenly copied or cut a file or folder, you can undo the action immediately without manually cutting or copying the file back to the previous location.
- Right-click an empty space, and select «Undo Copy» or «Undo Cut.»

- If you right-click the mouse again, you’ll see the option to «Redo Copy.»

- It’s also possible to use shortcuts to do the same operations. To undo pasting a file, press Ctrl + Z, while the Ctrl + Y shortcut will redo whatever you’ve just undone.
How to Copy and Paste Several Items at Once
Windows has a built-in clipboard manager, a tool that collects everything you copy or cut (up to 25 items). It allows you to copy several things at once, then easily paste them anywhere.
Note: this doesn’t work for files or folders on Windows, but it does for text and images.
- Open the Settings app by pressing Win + I, and go to «System -> Clipboard.»

- Ensure that «Clipboard History» is activated, and opt whether you want to sync its content across devices.

- Copy your text or images.

- Navigate to where you want to paste the content – for example, Microsoft Word or Google Docs. Press the Win + V keys, and Windows will instantly display the items you previously copied. Click any of them to paste it.

Note that the clipboard doesn’t delete the items after they are pasted. If you need to easily access a copied item, perhaps multiple times, click on the pin button to have it show at the top of the Clipboard.
Tip: if you’re looking for more advanced options, check out this list of third-party Windows clipboard managers.
How to Copy and Paste Files Using CMD
The Command Prompt (cmd) is one of the most essential tools in Windows, and as it turns out, it also allows you to copy and paste files.
- Type «cmd» in Windows Search, and launch it as administrator.

- Use the following code to copy a file from one location to another. Make sure you replace [File source] with the exact path to the file in question. For instance, «c:\MTE.txt.» As for [Destination], replace it with the path to the folder where you plan to copy the file (such as «d:»).
copy [File source] [Destination]

- You can also use a command like the one below, which will copy ALL the files of a certain type in a specific location. Replace [Source] with the folder path of the folder you are copying from and [Destination] with the destination path of the target folder. Also change [EXTENSION] to any extension, such as «.TXT.»
copy [Source]\*[EXTENSION] [Destination]

- With cmd, it is possible to use Xcopy commands to copy groups of files from one location to another. Type the following command and replace [Source] with the path to the folder you are copying from and [Destination] with the path to the folder that will receive the copies.
Xcopy [Source] [Destination]
- You can also add additional parameters for this command (at the end).
/E– copies all subdirectories, including the empty ones/H– copies files that you’ve hidden or that have system file attributes/C– will continue the progress, even if there are errors/I– always assume that the destination is a folder if unsure
- As an example, the following command will copy the «MTE» folder with all of its hidden files (without subdirectories and empty files), while ignoring errors. The command will also create the folder if it doesn’t exist:
Xcopy C:\MTE D:\MTE /H /C /I
Tip: learn how to enable copy-paste in Command Prompt. It can be really useful when dealing with login commands.
How to Copy Multiple Files to Multiple Directories
We sometimes need to copy various files to multiple directories simultaneously. In such a case, a third-party app like Copywhiz may help finish this task quickly.
- Download and install Copywhiz to your PC. (It offers a seven-day free trial.)
- Select all the files you want to distribute. Right-click the selection, and choose «Copywhiz -> Copy (Add to queue)» from the context menu.

- Launch the app. All files you’ve selected will be listed. You can add more files or folders using the «Add Files» and «Add Folders» options.

- Select the destination from the «Paste» section. Select several folders at once by clicking the «Add» button.

- Opt whether to copy or cut by clicking the drop-down menu.

Tip: explore these useful registry hacks to optimize your Windows experience.
Frequently Asked Questions
How can I copy and paste without formatting?
When you select «Copy» from the context menu (or press Ctrl + C), the text gets copied with its formatting, which includes color, bold and italic attributes, and more. To paste it later without this format, just press Ctrl + Shift + V instead of Ctrl + V. Additionally, you can click the «Paste Without Formatting» option from the context menu.
Can I copy a file from the Recycle Bin?
No, you can only move (cut) files and folders from the Recycle Bin to your desktop or other drives. If you want to copy a file from the Bin, restore it, make a copy, and re-delete it later.
Can I copy and paste from Windows to iOS or Android?
Can I paste a file after deleting it?
No. You need to restore the file, then copy and paste it regularly. To restore a deleted file in Windows, navigate to the Recycle Bin, locate it, right-click it, and select «Restore.»
Image credit: Flaticon & Unsplash. All screenshots by Mustafa Ashour.

Mustafa is a tech content writer who’s a geek at heart. His passion lies in writing about technology, especially software-related topics. He’s also interested in digital marketing, business development, and entrepreneurship. He holds a Bachelor’s degree in Accounting and Finance.
Subscribe to our newsletter!
Our latest tutorials delivered straight to your inbox
After downloading and installing Windows 11 on your computer, you are not allowed to use the Windows 10 methods to directly cut, copy, paste, rename, and delete a file or a folder via the context menu. Well then, how do these things in Windows 11? Now, you can get some useful guides from this MiniTool post.
Microsoft has changed the context menu in Windows 11. So, you should change your Windows 10 habit of using the context menu if you have upgraded your computer to Windows 11. To be specific, the ways to cut, copy, paste, rename, and delete a file or a folder via the context menu are changed.
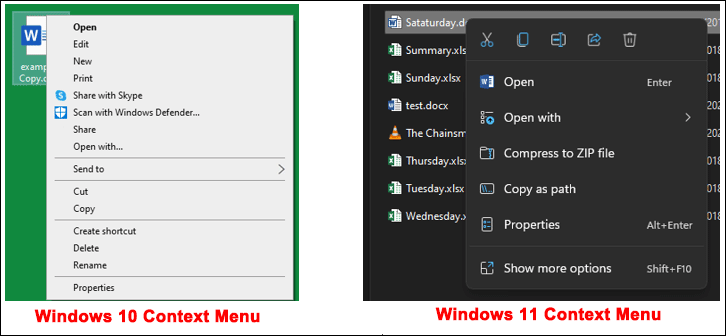
To help you adapt to this change as soon as possible, we show you how to cut, copy, paste, rename, and delete a file or a folder on a Windows 11 computer.
How to Cut and Paste Files in Windows 11?
Way 1: Use the Context Menu or the Top Ribbon Bar
1. Right-click the file/folder you want to cut.
2. Click the cut icon from the context menu to cut the file/folder. You can also select the target item and then click the cut icon from the ribbon bar to do the same job.

3. Go to the location you want to paste the file/folder to.
4. Right-click on the free space and select the paste icon to paste the item to that folder. You can also directly click the paste icon on the tip ribbon to paste the file/folder.

Way 2: Use Keyboard Shortcuts
A faster way to cut and paste a file/folder in Windows is to use the keyboard shortcuts.
- Select the file/folder you want to cut and press Ctrl+X to cut the select item.
- Navigate to the destination folder and press Ctrl+V to paste the item.
How to Copy and Paste Files in Windows 11?
Way 1: Use the Context Menu or the Top Ribbon Bar
1. Right-click the file/folder you want to copy.
2. Click the copy icon from the context menu. You can also select the target file/folder and then click the copy icon from the top ribbon bar to copy it.

3. Open the destination folder you want to save the copied file/folder.
4. Right-click the free space and click the paste icon. You can also directly click the paste button from the top ribbon bar in File Explorer to paste that file/folder.

Way 2: Use Keyboard Shortcuts
- Select the target item and press Ctrl+C to copy it.
- Go to the destination location and press Ctrl+V to paste the file/folder.
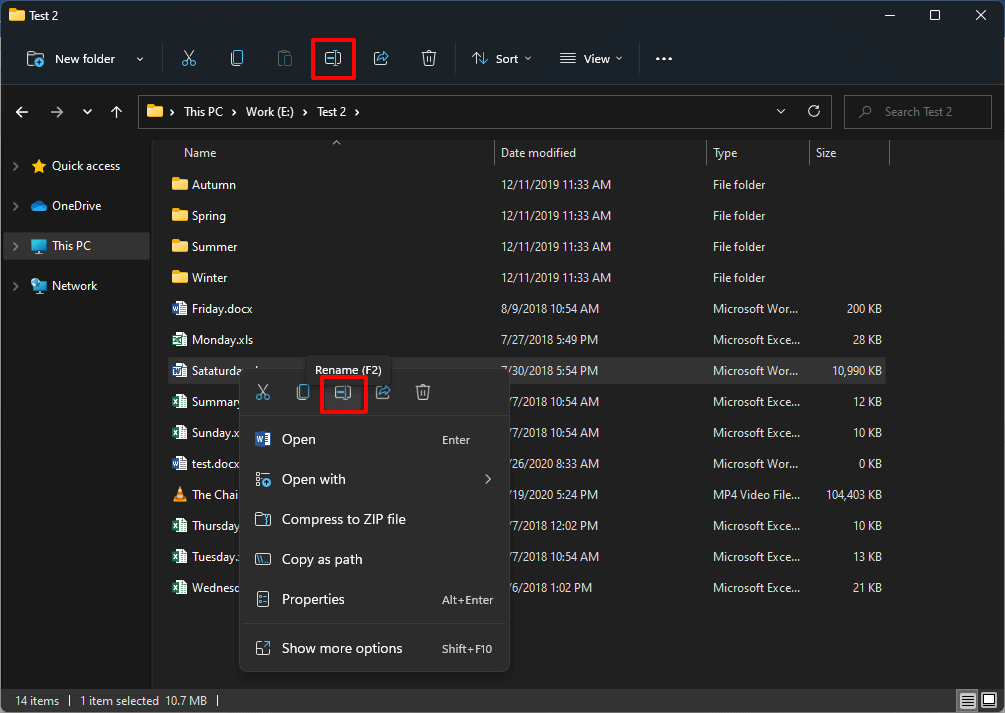
How to Rename Files in Windows 11?
Way 1: Use the Context Menu or the Top Ribbon Bar
- Right-click the file/folder you want to rename and select the rename icon from the context menu. You can also select that item and then click the rename icon from the top ribbon bar.
- Type a new name for the select item.
- Press Enter or click any free space to save the new name.
Way 2: Use the F2 Key
- Select the file/folder you want to rename.
- Press the F2 key.
- You are allowed to type a new name for the selected item. Just do it.
Way 3: Use Your Mouse
You can also use your mouse to rename a file/folder in Windows 11/10/8/7.
- Select the file/folder you want to rename.
- Click again on that file/folder. Then, you can see the name is editable.
- Type a new name and press Enter to save it.
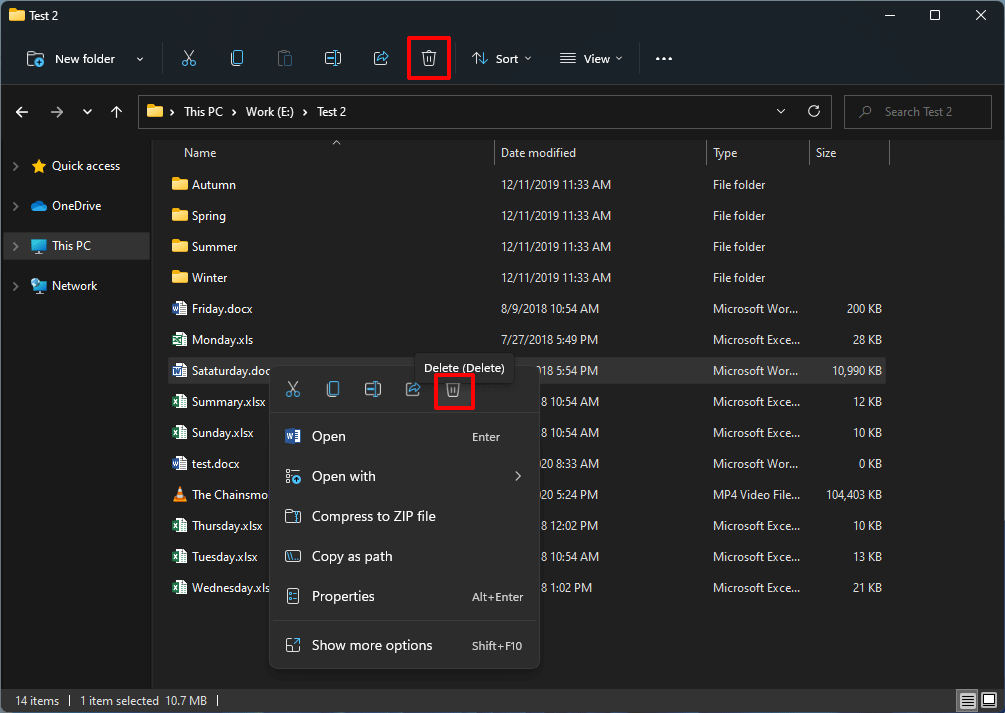
How to Delete Files in Windows 11?
Way 1: Use the Context Menu or the Top Ribbon Bar
- Right-click the target file/folder and select the trash can icon to delete that file.
- You can also select the file/folder you want to delete and click the trash can icon from the top Ribbon bar to perform a file/folder deletion.
Way 2: Use the Delete Key
A faster way to use the Delete key on your keyboard.
You should select the file you want to delete and press the Delete key on our keyboard to move the selected file to Recycle Bin.
Way 3: Permanently Delete a File/Folder in Windows 11
The deleted file/folder will be moved to the Recycle Bin in Windows 11/10/8/7 if you haven’t permanently deleted it. The file still occupies disk space on your computer. That’s why deleting files not freeing up disk space on your PC.
The good news is that you can directly permanently delete files/folders on your Windows computer.
If you only want to permanently delete a certain file/folder
You can press the Shift button when you click the Delete key or select Delete from the right-click menu of the file/folder.
If you want to skip the Recycle Bin when deleting all files
- Right-click the Recycle Bin on the desktop and select Properties.
- Select Don’t move files to the Recycle Bin. Remove files immediately when deleted.
- Click Apply.
- Click OK.

You can select a method according to your requirements.
Tip: If You Want to Recovery the Permanently Deleted Files
If you accidentally important files permanently, you can use a free file recovery tool, MiniTool Power Data Recovery, to get them back. This software is designed to recover the lost and deleted files from different kinds of data storage devices including the computer’s internal hard drives.
MiniTool Power Data Recovery FreeClick to Download100%Clean & Safe
With the free edition of this software, you can recover up to 1GB of files. If you want to use this software to recover more files, you can use an advanced edition.

Bottom Line
Now, you know how to cut, copy, paste, rename, and delete a file/folder in Windows 11. If you delete a file by mistake, you can use MiniTool Power Data Recovery to get them back. Should you have any other related issues, you can let us know in the comments.