OneDrive makes it easy to transfer your files from PC to PC
With internet access and a few clicks, you can back up your files online. When you’re ready, sync them onto a new PC—or you can leave them in the cloud without having to download them. This saves space on your new PC’s hard drive and leaves your files and photos easily accessible from any of your devices, anywhere.1
Copy your files and folders to a secure location in the cloud then get up and running quickly so you can get back to doing what you love.

Set up OneDrive
Install the OneDrive sync app on your Windows 7 PC and get started. If you don’t have a Microsoft account, sign up for one here: https://account.microsoft.com/. It’s free and comes with 5 GB of OneDrive storage.

Bring your files and favorites with you
There’s no need to leave your photos, files, or browser favorites behind when you transfer files from PC to PC or from a Mac to PC. Bring them with you to your new computer.

Install what you love
When you start up your new PC, you may want to install additional apps. The Microsoft Store has many popular apps available to download or you can check with the publisher of your software for more information.
Check the table below to see what makes the most sense for your move.
|
| Solutions | OneDrive | USB/external drive |
|---|---|---|
| Details |
If you’ve been using your PC for a few years, you probably have some files that you want to move to the new PC. By using OneDrive, you can quickly transfer files from PC to PC or Mac to PC, so your files are organized like they were on your old computer and you can get right back to work. |
You can use an external storage device such as a USB drive, SD card, or external hard drive to help you move all your favorite files off a Windows 7 PC and onto a Windows 10 PC. |
| Benefits |
|
|
| Cost |
A Microsoft account comes with 5 GB of OneDrive storage. You can buy more storage if you want it. Compare plans. |
Shop your local retailer for hard drives and USB drives. |
There are a couple of ways to get your files and photos onto a new PC. With OneDrive you can quickly transfer files from PC to PC or Mac to PC, so your files are organized like they were on your old computer and you can get right back to work. Or you can use an external storage device such as a USB drive, SD card, or external hard drive to help you make the move.
OneDrive is a Microsoft cloud storage service that lets you store your personal files in one place, share them with others, and get to them from any device connected to the Internet.
Learn more about OneDrive
A free OneDrive basic account offers 5 GB of storage. Need more space? No problem, see available options.
Yes. If OneDrive is not the best fit for you, there are other options available. For example, you can use an external hard drive along with the Windows Backup & Restore feature. There are also other programs designed to help with backing up your files and data and some retailers have service desks that will do the work for you.
Learn how
If you are upgrading an existing Windows 10 PC to Windows 11, your apps will remain on the PC and they should continue to work. However, if you purchase a new Windows 11 PC, you will need to reinstall your apps on the new PC.
Yes, you can drag whole folders from File Explorer to your OneDrive folder.
With the broadest choice of devices—across style, features, and form factors—we and our ecosystem of partners can help ensure that you will find the right fit with Windows.
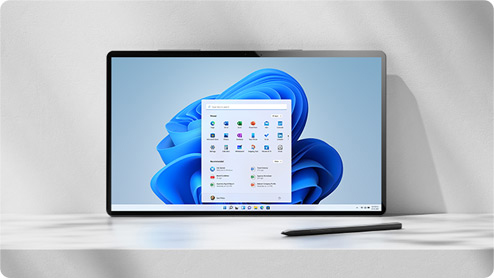
PCs preloaded with Windows 11
Out of the box, get up and running with a new Windows experience that brings you closer to the people and things you love.

Thin, light laptops
It’s everything you love and more—portability, power, and the latest in processors.
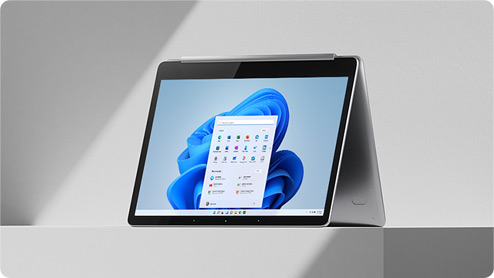
Versatile 2-in-1s
2-in-1s provide power and flexibility. Touch, type, click, or pen—choose whatever fits your style.
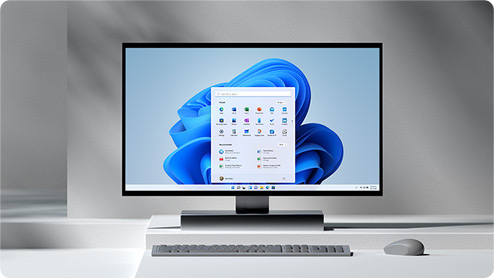
Desktops & All-in-Ones
The power of a desktop computer in a variety of shapes and sizes. Perfect for your home office or a computer for the family to share.
-
Screens simulated. Features and app availability may vary by region.
-
1
Internet access required. Fees may apply. -
2
Windows 11 Home edition requires internet connectivity and a Microsoft Account to complete device setup on first use.
Updated: 11/18/2022 by
To copy computer documents, pictures, or other files from one place to another, follow these instructions.
Note
A file name must be unique. If it’s not, a number is appended to the end of a file name. It may also have «- Copy» appended to the end of the file name, instead of a number. Appending a number to the end of the copied file’s name assures the copied file is unique. For example, if the original file name is abc123.pdf and a copy is created in the same directory or folder, the copied file name could be abc123(1).pdf or abc123 — Copy.pdf.
Select your operating system in the list below to view the instructions that apply to you.
How to copy a file in Microsoft Windows

Below are the steps on how to copy a file or multiple files in Microsoft Windows from one location to another.
- Go to the files or folders you want to copy. If you need help locating the files, use the Windows find feature.
- Highlight the file or files you want to copy by clicking them once with the mouse. If you need to highlight more than one file, hold down the Ctrl or Shift keys on your keyboard, or drag a box around the files you want to copy.
- Once highlighted, right-click one of the highlighted files and select Copy. Users may also press the Ctrl+C keyboard shortcut, or in Windows Explorer, click Edit at the top of the window and select Copy.
- Open the destination folder, right-click an empty space in the folder, and select Paste. Or, in the menu bar at the top, click File, choose Edit, then select Paste.
- How to select or highlight multiple files and folders.
Tip
To copy only a certain type of file, click the Type column in Windows Explorer. This action sorts files by type, rather than by name. Once grouped by type, you can select only the files with the type you want to copy, and then copy those files.
Tip
You can also use the Windows command line to copy files. In some situations, such as copying multiple files of a certain extension or with a certain name, it can be easier.
How to copy a file in MS-DOS and the Windows command line

Below are steps on how to copy a single file from one directory to another directory in MS-DOS or the Windows command line.
Copying a single file
- Using the cd command, move to the directory containing the file you want to copy.
- Type a command similar to the following.
copy myfile.txt c:\my\location
In the example above, substitute «myfile.txt» with the name of the file you want to copy, and «c:\my\location» with the destination directory. To see files available in the current directory, use the dir command.
Copying multiple files to another location
Below are the steps on how to copy multiple files from one directory to another directory.
- Using the cd command, move to the directory containing the files you want to copy.
- Once in the directory containing the files you want to copy, type a command similar to one of the following commands.
copy *.* c:\mydir
In the example above, the command would copy every file in the current directory to the «mydir» directory.
copy *.txt c:\mydir
In the example above, the command would copy every txt, or text file, in the current directory to the «mydir» directory.
Tip
For additional examples of wildcard characters, see our wildcard definition.
xcopy hope example /e
If you need to copy files, directories, and subdirectories, use the xcopy command. In the example above, the xcopy command copies all directories (even empty directories) and files from the «hope» directory to the example directory.
Copying long file name files or files with spaces
Often, you can encounter a file with spaces in the file name. To copy these files, surround the full file name and file extension in quotes.
copy "computer hope.txt" "there is hope.txt"
In the example above, the «computer hope.txt» file is surrounded in quotes to let the command line know the complete file name, thus eliminating the spaces.
How to copy files to another drive
You can also copy files from the current location to any other drive. For example, if you have a USB (universal serial bus) flash drive that is drive letter F:, you can use the following command to copy all JPEG (Joint Photographic Experts Group) image files to the flash drive.
copy *.jpg f:
- How to change drives in MS-DOS and Windows command line.
How to make a copy of a file into the same directory
copy example.txt backup.txt
In the example above, the file «example.txt» is copied to the same directory as «backup.txt,» effectively making a backup copy of the file.
Related pages and help
- See the cd command, dir command, copy command, and xcopy command pages for further information about each MS-DOS command.
- How to use the Windows command line (DOS).
Batch file
To perform any copy command in a batch file, include any of the Windows command line copy commands above in a batch file.
- How to make a batch file.
How to copy files in Linux and Unix

Below are steps on how to copy a single file from one directory to another directory in Linux and Unix.
Copying a single file from one location to another
- Using the cd command, move to the directory containing the file you want to copy.
- Type a command similar to the following.
cp myfile.txt /usr/bin
In the example above, substitute «myfile.txt» with the name of the file you want to copy, and «/usr/bin» with the destination directory. To see files available in the current directory, use the ls command.
Copying multiple files to another location
Below are the steps on how to copy multiple files from one directory to another directory.
- Using the cd command, move to the directory containing the files you want to copy.
- Once in the directory containing the files you want to copy, type a command similar to one of the following commands.
cp *.* /usr/bin
In the example above, the command would copy every file in the current directory to the «/usr/bin» directory.
cp *.txt /usr/bin
In the example above, the command would copy every txt, or text file, in the current directory to the «/usr/bin» directory.
For additional examples of wildcard characters, see our wildcard definition.
Copying files with spaces in the file names
Often, you can encounter a file with spaces in the file name. To copy these files, surround the full file name and file extension in quotes.
cp "computer hope.txt" "there is hope.txt"
In the example above, the «computer hope.txt» file is surrounded in quotes to let the command line know the complete file name. In our example, the destination file name contains whitespace (spaces), so the name is enclosed in quotes.
How to make a copy of a file into the same directory
cp example.txt backup.txt
In the example above, the file «example.txt» is copied to the same directory as «backup.txt,» effectively making a backup copy of the file.
Related pages and help
- See the cd command, cp command, and ls command pages for additional information about these commands.
- For general help using the Linux command line, see our Linux and Unix shell tutorial.
How to copy files in Apple macOS
Drag-and-drop
Highlight the files you want to copy. Then, click the highlighted files with the left mouse button and, while continuing to hold down the mouse button, drag-and-drop the files to where you want to copy them. When you release the mouse button, the files are copied.
Keyboard shortcut
You can also copy files using keyboard shortcuts by following these steps.
- Highlight the files you want to copy.
- Press the keyboard shortcut Command+C.
- Move to the location you want to move the files and press Command+V to copy the files.
Terminal
To copy files in a Terminal session, use the cp command.
Categories
- Transfer Programs from C Drive to D Drive
- Transfer Installed Software to New PC
- Transfer Files from Old PC to New PC
- Transfer Microsoft Office
- Find Office Product Key
- Move User Folder
- Move Google Chrome Bookmarks
User case — «Hi friends, does anybody know how to move the files and folders from one drive to another using the command prompt in windows?»
When compared to the usual method of file copying, using the command prompt has some advantages. It saves time by eliminating the need to copy and paste manually. It also allows you to copy when unattended. That is to say, after entering specific commands, you can leave the computer alone and take a rest. The task will run on its own.
If you are looking for how to copy files using command prompt, then keep reading further. This article also mentions other ways of copying files.
| Workable Solutions | Step-by-step Troubleshooting |
|---|---|
| Copy Files Using Command Prompt Step by Step | Right-click the Start button and choose «Command Prompt (Admin)» to open CMD…Full steps |
| Other Easier GUI (Graphical User Interface) Methods to Copy Files | 1. Use a USB Flash Drive; 2. Use OneDrive; 3. Use PC Data Transfer Software…Full steps |
You can use the Copy and Xcopy command lines to copy files on your computer efficiently.
1. Use the Copy Command to Transfer Specific Files
Right-click the Start button and choose «Command Prompt (Admin)» to open CMD.
To copy files, use the copy command from the command line.
copy c:\myfile.txt e:
The command above will copy «myfile.txt» from the C: drive to the E: drive.
copy *.txt e:
The above command copies all text files in the current directory to the E: drive using a wildcard.
copy d:\example.xls
The command above copies the «example.xls» file from the D: drive to the current directory. We didn’t indicate a destination; by default, the current directory is utilized if the goal isn’t supplied.
2. Using the Xcopy Command to Copy All Files
Xcopy is a command that copies files or groups of files between directories. It’s convenient for copying data to and from a fixed drive.
Step 1. To find cmd, go to Start and type cmd into the search box. From the list, right-click Command Prompt and choose «Run as administrator».
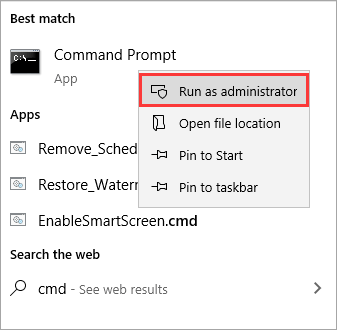
Now, in the command prompt, type the Xcopy command to copy folders and subfolders, including their contents, as shown below. If you want to copy the «test» folder and its subfolders from the C drive to the D disc, use the Xcopy command as follows:
Xcopy C:\test D:\test /E /H /C /I
- /E — Copies all subdirectories, including any that are empty.
- /H – Copies files that are hidden or have system file attributes.
- /C – Even if an error occurs, keep copying.
- /I – Always presume the destination is a folder if in question.
A command-line interface differs from a graphical user interface, considering that it is text-only. A high learning curve, more space for error, a vast number of instructions, and the inability to figure anything out by research are all downsides of the command line interface.
Other Easier GUI (Graphical User Interface) Methods to Copy Files
Here are three easier ways to transfer and copy files from one drive or one computer to another. Check the detailed content.
1. Use Free PC Data Transfer Software – EaseUS Todo PCTrans
EaseUS Todo PCTrans Free, which tool allows you to transfer an unlimited number of files, programs, and settings between two PCs in a user-friendly manner. It’s also a data and application backup software that can keep your files safe as long as you perform regular backups. It’s more than just PC migration software that can transfer files between local disks/drives or between two computers for free. For example, you can transfer programs from C drive to D drive securely.
It does not necessitate extensive computer skills or the acquisition of any additional equipment. With a lifetime license, you can get free upgrades for the rest of your life.
Now, download this PC data transfer software to transfer files from one computer to another in simple clicks.
Step 1. Open EaseUS Todo PCTrans on both of your computers. Choose «PC to PC» to go to the next step.

Step 2. Make sure you have chosen the right transfer direction.
«New» — Move data from old computer to current new computer.
«Old» — Move data from current old n computer to remote new computer.
Step 3. Connect two PCs via the network by entering the password or verification code of the target PC. Besides, make sure you have chosen the right transfer direction and click «Connect» to continue.
The verification code is on the right top of the «PC to PC» main screen on the target computer.

Step 4. Then, choose «Files» to select files to transfer. Select the specific files as you want. What’s more, you can click the Edit icon to customize the storage path for transferred data.
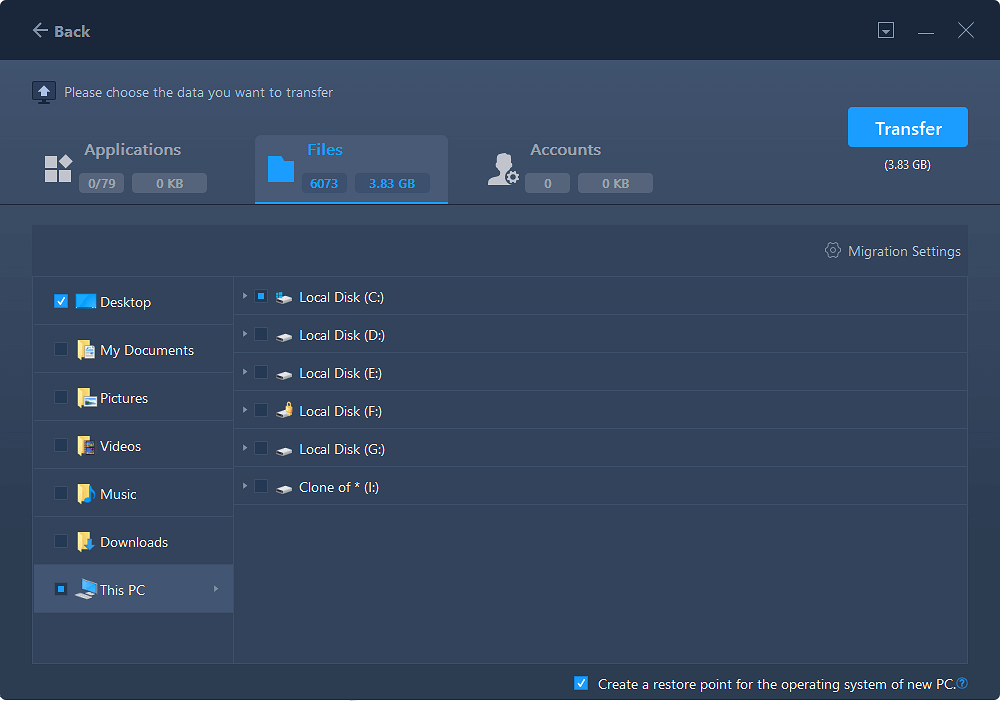
Step 5. Now, click «Transfer» to begin to transfer files from PC to PC. The size of the file determines the transfer time. Wait patiently.

2. Use a USB Flash Drive
Depending on the drive’s capacity, USB flash memory devices, also known as memory keys and memory sticks, can replicate a few files or a large quantity of data.
Step 1. Place the flash drive in one of your computer’s USB ports.
Step 2. Open the File Explorer window and look for the flash drive’s entry in the left pane.
Step 3. Drag and drop the files you want to copy into the drive’s folder.
Step 4. Remove the flash drive and place it in a USB slot on the other PC after you’re finished.
Step 5. By picking and dragging the files into another folder in a File Explorer window, you can copy them to the new PC.
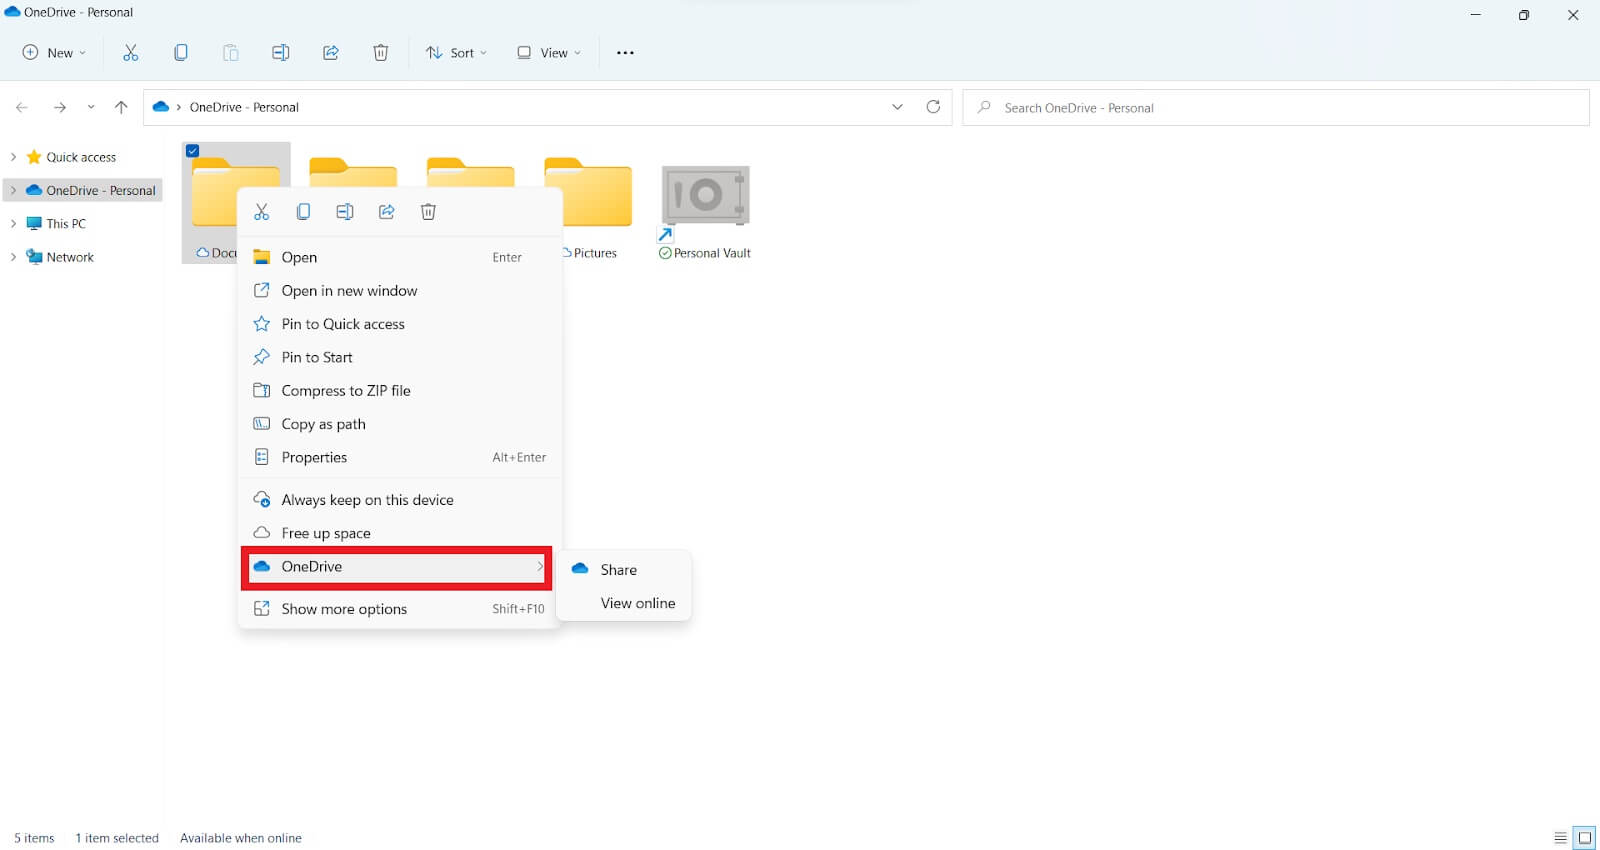
3. Use OneDrive
The cloud drive is another option for transferring files across your Windows devices. It can be accomplished by sharing the file with any Windows app that supports cloud storage services such as OneDrive. The storage space, upload time, and potential expense of this technology are its drawbacks. The method could be a terrific choice for you if you need to move smaller files more frequently.
Step 1. Drag and drop files into OneDrive.
Go to OneDrive and sign in. Add the file to your OneDrive cloud account and simply click «Add» when the app opens. Your OneDrive account will receive the file.
Step 2. Get the files you need.
Open the OneDrive software on the other laptop, right-click the file, and select «Download». The Files It will complete the file transfer from your laptop or computer to the other computer on your network.
Conclusion
There are many ways of copying files from one drive/computer to another. However, all the mentioned methods have their advantages, but they also come with many disadvantages. That’s why it is recommended that you should use EaseUS Todo PCTrans to copy files. This software poses no security threats and is easy to use.
Contents
- Can You Transfer Files to a Windows 11 Computer from a Windows 10 PC?
- How to Transfer Files to a Windows 11 Computer
- 1. Use a Software Program to Transfer Your Files
- How to Transfer Files from One Computer to Another in 2022 Using a Software Program
- 2. Transfer Your Files Using OneDrive
- 3. Send Files Via Email
- 4. Transfer Files Using an External Hard Drive
- 5. How to Use a USB Transfer Cable to Send Files
- 1. Use a Software Program to Transfer Your Files
- What is the Fastest Way to Transfer Files from PC to PC?
- Final Thoughts

You can now use Windows 11 by updating your Windows if your device meets the system requirements. And it’s far easier to update to Windows 11 if you’re still using Windows 10. However, Windows 11 doesn’t have the built-in “Easy Transfer” functionality. Today, we are looking into the best ways to transfer files to a Windows 11 computer.
That means transferring files from Windows 10 to 11 or from one PC to another can be challenging.
Fortunately, there are easy ways to transfer files to Windows 11. And you don’t need a computer expert to help you with it because it’s automatic.
So, this guide will show you how to transfer files from Windows 10 to Windows 11.
Let’s begin.
Can You Transfer Files to a Windows 11 Computer from a Windows 10 PC?
Yes. Microsoft makes it easy to move your files from Windows 10 to Windows 11.
However, you’ll need a fresh installation for Windows 11 for an upgrade or a newly purchased computer. But you can complete this process without a problem with just a few simple actions.
You can also use advanced software to transfer your files with a single mouse click if you’re a tech-savvy user. Other options include transferring files manually with a USB Transfer cable or using a hard drive to transfer your files.
We’ll go through each option in the next section.
How to Transfer Files to a Windows 11 Computer
Ideally, you should be able to upgrade to Windows 11 and safely transfer all your essential files. And if necessary, have a secure backup of all your important data files.
Luckily, there are four ways to accomplish this. Let’s go through them.
1. Use a Software Program to Transfer Your Files
You must have a stable internet connection and the latest software from a reputable company to transfer your files from Windows 10 to 11. That’s why we recommend using standalone software.
However, the free version of this type of software tends to have a few glitches. But the pro version is free from these issues and includes steps to help you transfer your files from one PC to another.
Using a software program, you can transfer documents, files, images, apps, etc., to Windows 11.
However, depending on the size, file transfers can be lengthy and stressful tasks, regardless of the software you use.
But, with the right software, you can quickly move all your files with one click. So it’s better to take a free trial of different software to know their features before purchasing them.
How to Transfer Files from One Computer to Another in 2022 Using a Software Program
- Ensure the software is installed on both computers before beginning the “PC to PC” data transfer.
- Choose which file to transfer, and remember to exercise caution when choosing commands.
- Use the verification code to link two PCs across a local area network. Select the appropriate data transfer action and click “Continue” to proceed. Next, find the verification code displayed on the home screen of the targeted computer. To activate and verify the connection, click the tab.
- Navigate to the ‘Files’ tab and choose the files and folders you want to transfer.
- Click the “Transfer” tab to begin the data transfer process. Large files may take some time to upload, so be patient.
Pros
- Easy to use
- No need for technical skills
- Transfer different files within minutes
Cons
- Free versions are limited
- Users may face problems when moving files over the same LAN network
Remember that you may need a driver updater to check potential driver problems or missing drivers on your new PC.
2. Transfer Your Files Using OneDrive
Another way to transfer your files to a Windows 11 computer is through OneDrive. Microsoft’s cloud service makes it easy to move your data, such as documents, videos, and pictures.
Here’s how the process works:
- Install OneDrive on your current computer. You may want to sign up for a OneDrive subscription to help transfer your files to your new computer.
- Use OneDrive to synchronize all the data you plan to move. You can do it on the OneDrive app or the OneDrive website. Click on “Upload” to add the files you want to transfer.

- The files can be uploaded to OneDrive directly from File Explorer.
- Set up OneDrive on your new Windows 11 computer. Make sure to sign in with the same OneDrive account used on your old PC for the sync.
- Choose the files, and download them to your new Windows 11 computer.
Pros
- It’s scalable and cost-effective
- Accessible anywhere
- Collaborate with several users at the same time
- It’s easy to recover lost files
Cons
- Not strong against attacks
- It may not work on slow internet connections
- Uses lots of bandwidth
3. Send Files Via Email
Transferring via email is an excellent option if you’re not sending massive files from your old PC to the new Windows 11 computer. It’s one of the easiest and safest options to transfer files online.
However, email file transfers come with several issues. For example, email doesn’t provide any means of encrypting the data it sends.
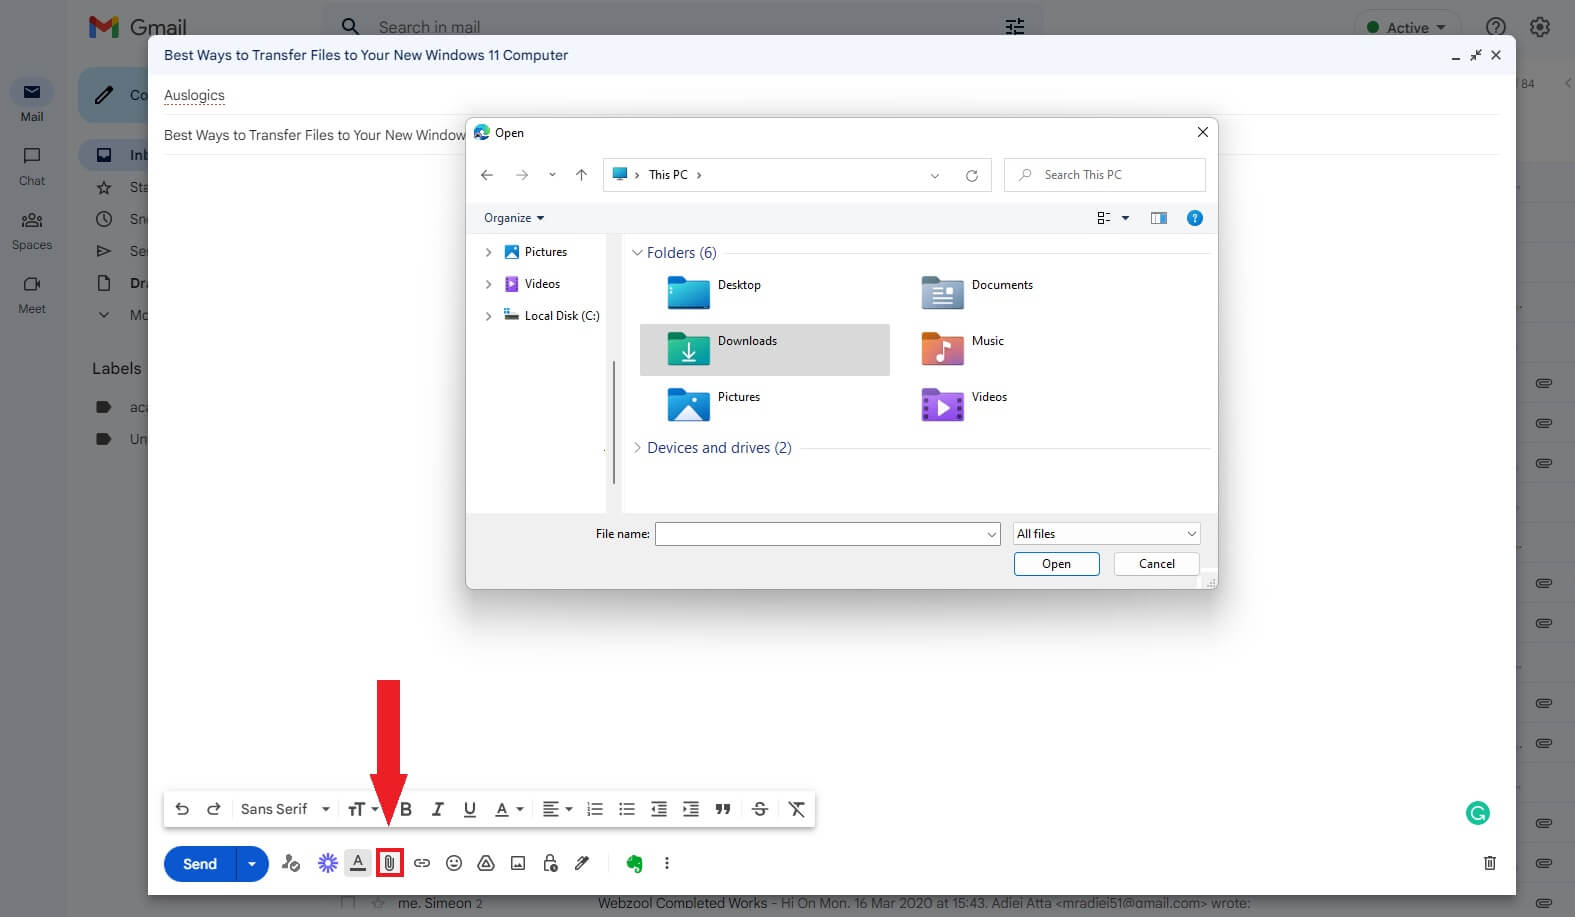
In addition, there are limitations on the total file size that you can attach to an email. The standard size for an email is capped at 10 MB by most email services. This may be the lowest possible cost for transferring files between computers.
So, a PC-to-PC data transfer is the better option if you want to transfer large files.
Pros
- Free to use
- Easy to download
- Fast and easy-to-share files
- Easy to use
Cons
- Requires a stable connection
- Susceptible to viruses
- You can’t transfer large files
4. Transfer Files Using an External Hard Drive
If you don’t know how to transfer files from pc to pc in Windows 11, consider external hard drives and flash drives. It’s one of the best ways to move your files quickly and easily without internet connectivity.
Simply connect an external hard drive or flash drive to your computer. Then, copy all the files you want to transfer to your new Windows 11 PC.
After that, connect the external hard drive to your Windows 11 computer. Then transfer the files to your new computer.
The files you store on an external drive can serve as a backup if your primary storage device fails.
Pros
- It’s portable
- Easy to use
- Transferring files is fast
- No network required
- Massive storage space
Cons
- It can overheat
- External cable or power adapters required
- The device can break easily
5. How to Use a USB Transfer Cable to Send Files
You can also use the USB transfer cable to transfer files from Windows 10 to 11. And you can save lots of time because no additional hardware is involved. Here’s how the process works:
- Download and install the USB bridge cable’s manufacturer-supplied drivers on both computers.
- Plug the USB cable into the corresponding USB ports on the two computers.
- Turn on both computers so they can detect the USB cable. This may start the installation wizard.
- Select the USB Super Link Adapter for the installation.
- Choose the High-Speed Data Bridge.
- Launch Device Manager, enlarge System devices, and double-check that the USB cable is shown as a High-Speed USB Bridge Cable. The cable’s name could be different between vendors.
- Load the USB cable’s installation disc into the CD or DVD-ROM drive. After that, download the necessary data transfer software and run it. Then, repeat the process on the second computer.
- Launch the program on both computers. A window will appear with your PC on the left and the destination PC on the right.
- Pen the drive, choose the files and folders you want to transfer, and then drop them in your preferred location.
Pros
- Easy to use
- Transfer different files within minutes
Cons
- It can be technical for some users
What is the Fastest Way to Transfer Files from PC to PC?
All the points discussed in this guide offer a fast way to transfer your files from one PC to another. However, one method may be better depending on several factors like the internet connection, software purchase, and file size.
For example, if you’re transferring extensive files, consider using a software program or a USB transfer cable to move your files, not via email. However, the USB transfer cable may be ideal if you don’t want to purchase the software.
So what is the fastest way to transfer files from PC to PC? It depends on what works for you. Thus, go through each point, consider the pros and cons, and come up with the type of transfer that works for you.
Final Thoughts
Use this guide to learn how to transfer files from one computer to another in 2022. However, there are pros and cons to each of the file-sharing methods discussed in this guide.
So choose the one that best suits your needs. However, before you begin sharing the file, you should determine whether or not you need a network connection.
You can use a software program, OneDrive, or email if you want to share data over a network. But if you want to share files without a network, consider using external hard drives.
If you’re making the move to a new PC, you can bring your files with you using an external storage device such as a USB drive, SD card, or external hard drive. First, you’ll copy your files onto your drive, then you’ll transfer them to your new PC.
Note: For info on how to move files to a new PC without needing a storage device, see Move files to a new Windows PC using OneDrive. OneDrive can securely store your files, so they’re backed up and protected in the cloud and accessible from any device—including your new PC.
To move files from a Windows 11 PC using an external storage device, follow these instructions.
Back up files from your current PC to an external storage device
-
Connect your external storage device to your current Windows 11 PC.
-
On the taskbar, select File Explorer .
-
Locate the files you wish to copy, or the folders where those files are stored.
-
To copy multiple files, hold CTRL as you select additional files or folders.
-
Once you have files and folders highlighted, select and hold (or right-click) the folders, then select Show more options > Send to. Select your external storage device name from the list of options.
-
Your files and folders will begin copying to your drive. You may need to repeat steps 3 – 5 if you have files stored in multiple locations. Make sure to also move files from locations like your Documents, Desktop, Downloads, Favorites, Music, Podcasts, Pictures, and Videos folders.
Verify your files are correct and remove the storage device
After you have copied or moved your files onto an external storage device, you can verify they’re in the right location by browsing the external drive.
Then you’ll need to safely remove the drive to ensure no files are lost or corrupted. To remove the device, select Eject before you disconnect the drive from your PC.
Once you have moved your files onto your external storage device, you’ll be able to transfer them onto your new Windows 11 PC.
Transfer your files to your new PC
-
Connect your external storage device to your new Windows 11 PC.
-
Select File Explorer from your task bar.
-
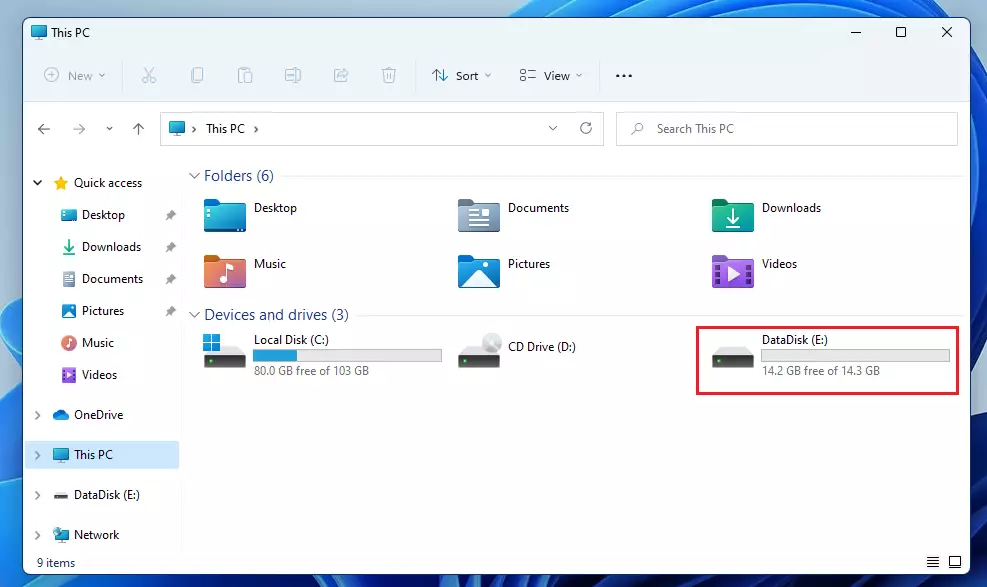
On the left guide bar, select This PC.
-
Locate the external drive and double-click its corresponding icon.
-
Locate the folder where your files are saved, and then double-click that folder’s icon.
-
To select all the files in this location, select See more in the top left and then Select all. All the files in this folder will now be highlighted. To copy only one file, select it by clicking on it once.
-
Once you select a file, you will see Cut and Copy in the toolbar. Select either to cut or copy the selected file(s).
To paste a file, navigate to a location where you want to paste the file, and then select the Paste icon in the toolbar.
-
Your files will begin to transfer to your Windows 11 PC. Note that this may take time depending on the number and size of the files you transfer.
-
After the files are copied, you can navigate to their new location to make sure the files were successfully transferred.

Back up files from your current PC to an external storage device
-
Connect your external storage device to your current Windows 8.1 or Windows 10 PC.
-
On the taskbar, select File Explorer .
-
Locate the files you wish to copy, or the folders where those files are stored.
-
To copy multiple files, hold CTRL as you select additional files or folders.
-
Once you have files and folders highlighted, make sure you’re in the Home tab, then select Organize > Copy to, and select your external storage device name from the list of options.
-
Your files and folders will begin copying to your drive. You may need to repeat steps 3 – 5 if you have files stored in multiple locations. Make sure to also move files from locations like your Documents, Desktop, Downloads, Favorites, Music, Podcasts, Pictures, and Videos folders.
Verify your files are correct and remove the storage device
After you have copied or moved your files onto an external storage device, you can verify they’re in the right location by browsing the external drive.
Then you’ll need to safely remove the drive to ensure no files are lost or corrupted. To remove the device, select Eject before you disconnect the drive from your PC.
Once you have moved your files onto your external storage device, you’ll be able to transfer them onto your new Windows 10 PC.
Transfer your files to your new PC
-
Connect your external storage device to your new Windows 10 PC.
-
Select File Explorer from your task bar.
-
On the left guide bar, select This PC.
-
Locate the external drive and double-click its corresponding icon.
-
Locate the folder where your files are saved, and then double-click that folder’s icon.
-
To select all the files in this location, select the Home tab in the top left and then Select all. All the files in this folder will now be highlighted. To copy only one file, select it by clicking on it once.
-
Select the Home tab in the top left, select Copy to, and then select the folder you’d like the files copied to: Documents, Music, Pictures, or Videos. You can also choose a custom location by selecting Choose location….
-
Your files will begin to transfer to your Windows 10 PC. Note that this may take time depending on the number and size of the files you transfer.
-
After the files are copied, you can navigate to their new location to make sure the files were successfully copied over.
Need more help?
Want more options?
Explore subscription benefits, browse training courses, learn how to secure your device, and more.
Communities help you ask and answer questions, give feedback, and hear from experts with rich knowledge.
Updated: 11/18/2022 by
To copy computer documents, pictures, or other files from one place to another, follow these instructions.
Note
A file name must be unique. If it’s not, a number is appended to the end of a file name. It may also have «- Copy» appended to the end of the file name, instead of a number. Appending a number to the end of the copied file’s name assures the copied file is unique. For example, if the original file name is abc123.pdf and a copy is created in the same directory or folder, the copied file name could be abc123(1).pdf or abc123 — Copy.pdf.
Select your operating system in the list below to view the instructions that apply to you.
How to copy a file in Microsoft Windows
Below are the steps on how to copy a file or multiple files in Microsoft Windows from one location to another.
- Go to the files or folders you want to copy. If you need help locating the files, use the Windows find feature.
- Highlight the file or files you want to copy by clicking them once with the mouse. If you need to highlight more than one file, hold down the Ctrl or Shift keys on your keyboard, or drag a box around the files you want to copy.
- Once highlighted, right-click one of the highlighted files and select Copy. Users may also press the Ctrl+C shortcut key, or in Windows Explorer, click Edit at the top of the window and select Copy.
- Open the destination folder, right-click an empty space in the folder, and select Paste. Or, in the menu bar at the top, click File, choose Edit, then select Paste.
- How to select or highlight multiple files and folders.
Tip
If you want to copy only a certain type of file, click the Type column in Windows Explorer. This action sorts files by type, rather than by name. Once grouped by type, you can select only the files with the type you want to copy, and then copy those files.
Tip
You can also use the Windows command line to copy files. In some situations, such as copying multiple files of a certain extension or with a certain name, it can be easier.
How to copy a file in MS-DOS and the Windows command line
Below are steps on how to copy a single file from one directory to another directory in MS-DOS or the Windows command line.
Copying a single file
- Using the cd command, move to the directory containing the file you want to copy.
- Type a command similar to the following.
copy myfile.txt c:mylocation
In the example above, substitute «myfile.txt» with the name of the file you want to copy, and «c:mylocation» with the destination directory. To see files available in the current directory, use the dir command.
Copying multiple files to another location
Below are the steps on how to copy multiple files from one directory to another directory.
- Using the cd command, move to the directory containing the files you want to copy.
- Once in the directory containing the files you want to copy, type a command similar to one of the following commands.
copy *.* c:mydir
In the example above, the command would copy every file in the current directory to the «mydir» directory.
copy *.txt c:mydir
In the example above, the command would copy every txt, or text file, in the current directory to the «mydir» directory.
Tip
For additional examples of wildcard characters, see our wildcard definition.
xcopy hope example /e
If you need to copy files, directories, and subdirectories, use the xcopy command. In the example above, the xcopy command copies all directories (even empty directories) and files from the «hope» directory to the example directory.
Copying long file name files or files with spaces
Often, you can encounter a file with spaces in the file name. To copy these files, surround the full file name and file extension in quotes.
copy "computer hope.txt" "there is hope.txt"
In the example above, the «computer hope.txt» file is surrounded in quotes to let the command line know the complete file name, thus eliminating the spaces.
How to copy files to another drive
You can also copy files from the current location to any other drive. For example, if you have a USB flash drive that is drive letter F:, you can use the following command to copy all JPEG image files to the flash drive.
copy *.jpg f:
- How to change drives in MS-DOS and Windows command line.
How to make a copy of a file into the same directory
copy example.txt backup.txt
In the example above, the file «example.txt» is copied to the same directory as «backup.txt,» effectively making a backup copy of the file.
Related pages and help
- See the cd command, dir command, copy command, and xcopy command pages for further information about each MS-DOS command.
- How to use the Windows command line (DOS).
Batch file
To perform any copy command in a batch file, include any of the Windows command line copy commands above in a batch file.
- How to make a batch file.
How to copy files in Linux and Unix
Below are steps on how to copy a single file from one directory to another directory in Linux and Unix.
Copying a single file from one location to another
- Using the cd command, move to the directory containing the file you want to copy.
- Type a command similar to the following.
cp myfile.txt /usr/bin
In the example above, substitute «myfile.txt» with the name of the file you want to copy, and «/usr/bin» with the destination directory. To see files available in the current directory, use the ls command.
Copying multiple files to another location
Below are the steps on how to copy multiple files from one directory to another directory.
- Using the cd command, move to the directory containing the files you want to copy.
- Once in the directory containing the files you want to copy, type a command similar to one of the following commands.
cp *.* /usr/bin
In the example above, the command would copy every file in the current directory to the «/usr/bin» directory.
cp *.txt /usr/bin
In the example above, the command would copy every txt, or text file, in the current directory to the «/usr/bin» directory.
For additional examples of wildcard characters, see our wildcard definition.
Copying files with spaces in the file names
Often, you can encounter a file with spaces in the file name. To copy these files, surround the full file name and file extension in quotes.
cp "computer hope.txt" "there is hope.txt"
In the example above, the «computer hope.txt» file is surrounded in quotes to let the command line know the complete file name. In our example, the destination file name contains whitespace (spaces), so the name is enclosed in quotes.
How to make a copy of a file into the same directory
cp example.txt backup.txt
In the example above, the file «example.txt» is copied to the same directory as «backup.txt,» effectively making a backup copy of the file.
Related pages and help
- See the cd command, cp command, and ls command pages for additional information about these commands.
- For general help using the Linux command line, see our Linux and Unix shell tutorial.
How to copy files in Apple macOS
Drag-and-drop
Highlight the files you want to copy. Then, click the highlighted files with the left mouse button and, while continuing to hold down the mouse button, drag-and-drop the files to where you want to copy them. When you release the mouse button, the files are copied.
Keyboard shortcut
You can also copy files using keyboard shortcuts by following these steps.
- Highlight the files you want to copy.
- Press the keyboard shortcut Command+C.
- Move to the location you want to move the files and press Command+V to copy the files.
Terminal
To copy files in a Terminal session, use the cp command.
This post shows students and new users steps to copy or transfer files from a USB flash or thumb drive to a Windows 11 computer. A USB or portable drive is a common way of easily transferring files from one computer to another.
Windows 11 supports many types of USB and portable drives. From USB 2.0/3.0 to USB-C to pen drive and more, depending on if your computer has a port or external USB adapters available.
A lot of computers already have built-in USB ports available. You may purchase an external adapter if your computer lacks enough USB ports. Once a USB drive is connected to your computer, make sure it’s properly plugged in, and working.
To get started transferring your files from a USB drive to Windows 11, follow the steps below.
How to transfer files from a USB flash drive to Windows 11
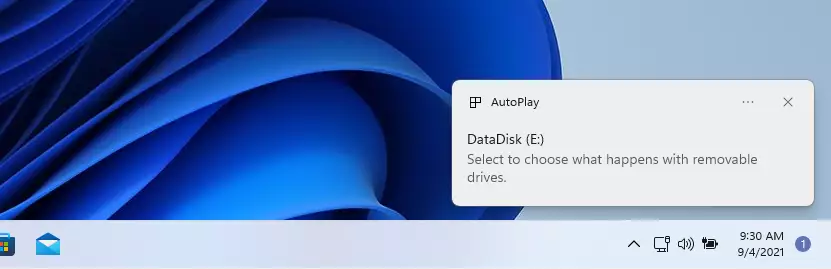
Once you have the correct USB ports available for the thumb drive with your files, insert the drive into the USB port. A USB-C drive goes into the USB-C port and USB 2.0/3.0 goes into the standard USB port.
Depending on your computer settings, Windows 11 will notify you to choose what to do with the files, similar to the notification below.
“Select to choose what happens with removable drives“
The new pop-up should come up with options on what to do with the drive inserted. At this point, click Open folder to view files.
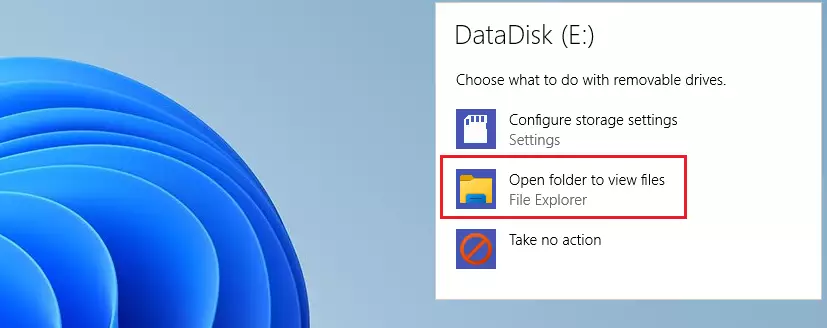
In some cases, you may not get a prompt, and File Explorer will automatically open and show you the content of the drive. If File Explorer doesn’t open the memory card or drive automatically, click on This PC on the left, then double-click a newly attached drive with the letters E, F, G, or H.
At this point, you can either choose to transfer a single file or all the files on the memory card to your computer. If you’re transferring all the files, press CTRL + A on your keyboard to select all the files. You can also read this post to learn how to select files.
Once you’ve selected the file or all the files, press the Windows key and E on your keyboard. A new window of File Explorer will open up. Simply browse to where you want to put the copied files, then press the CTRL + V on your keyboard to paste the file(s).
You may also use the mouse to select and copy/paste files to Windows 11. Read the post below to learn how to select items on Windows 11 to copy and paste.
How Select Files and Folders in Windows 11 – Website for Students
That should do it.
Conclusion:
This post showed you how to transfer files from a USB thumb drive to Windows 11 PC. If you find any error above, please use the comment form below to report.
Categories
- Transfer Programs from C Drive to D Drive
- Transfer Installed Software to New PC
- Transfer Files from Old PC to New PC
- Transfer Microsoft Office
- Find Office Product Key
- Move User Folder
- Move Google Chrome Bookmarks
User case — «Hi friends, does anybody know how to move the files and folders from one drive to another using the command prompt in windows?»
When compared to the usual method of file copying, using the command prompt has some advantages. It saves time by eliminating the need to copy and paste manually. It also allows you to copy when unattended. That is to say, after entering specific commands, you can leave the computer alone and take a rest. The task will run on its own.
If you are looking for how to copy files using command prompt, then keep reading further. This article also mentions other ways of copying files.
| Workable Solutions | Step-by-step Troubleshooting |
|---|---|
| Copy Files Using Command Prompt Step by Step | Right-click the Start button and choose «Command Prompt (Admin)» to open CMD…Full steps |
| Other Easier GUI (Graphical User Interface) Methods to Copy Files | 1. Use a USB Flash Drive; 2. Use OneDrive; 3. Use PC Data Transfer Software…Full steps |
You can use the Copy and Xcopy command lines to copy files on your computer efficiently.
1. Use the Copy Command to Transfer Specific Files
Right-click the Start button and choose «Command Prompt (Admin)» to open CMD.
To copy files, use the copy command from the command line.
copy c:myfile.txt e:
The command above will copy «myfile.txt» from the C: drive to the E: drive.
copy *.txt e:
The above command copies all text files in the current directory to the E: drive using a wildcard.
copy d:example.xls
The command above copies the «example.xls» file from the D: drive to the current directory. We didn’t indicate a destination; by default, the current directory is utilized if the goal isn’t supplied.
2. Using the Xcopy Command to Copy All Files
Xcopy is a command that copies files or groups of files between directories. It’s convenient for copying data to and from a fixed drive.
Step 1. To find cmd, go to Start and type cmd into the search box. From the list, right-click Command Prompt and choose «Run as administrator».
Now, in the command prompt, type the Xcopy command to copy folders and subfolders, including their contents, as shown below. If you want to copy the «test» folder and its subfolders from the C drive to the D disc, use the Xcopy command as follows:
Xcopy C:test D:test /E /H /C /I
- /E — Copies all subdirectories, including any that are empty.
- /H – Copies files that are hidden or have system file attributes.
- /C – Even if an error occurs, keep copying.
- /I – Always presume the destination is a folder if in question.
A command-line interface differs from a graphical user interface, considering that it is text-only. A high learning curve, more space for error, a vast number of instructions, and the inability to figure anything out by research are all downsides of the command line interface.
Other Easier GUI (Graphical User Interface) Methods to Copy Files
Here are three easier ways to transfer and copy files from one drive or one computer to another. Check the detailed content.
1. Use a USB Flash Drive
Depending on the drive’s capacity, USB flash memory devices, also known as memory keys and memory sticks, can replicate a few files or a large quantity of data.
Step 1. Place the flash drive in one of your computer’s USB ports.
Step 2. Open the File Explorer window and look for the flash drive’s entry in the left pane.
Step 3. Drag and drop the files you want to copy into the drive’s folder.
Step 4. Remove the flash drive and place it in a USB slot on the other PC after you’re finished.
Step 5. By picking and dragging the files into another folder in a File Explorer window, you can copy them to the new PC.
2. Use OneDrive
The cloud drive is another option for transferring files across your Windows devices. It can be accomplished by sharing the file with any Windows app that supports cloud storage services such as OneDrive. The storage space, upload time, and potential expense of this technology are its drawbacks. The method could be a terrific choice for you if you need to move smaller files more frequently.
Step 1. Drag and drop files into OneDrive.
Go to OneDrive and sign in. Add the file to your OneDrive cloud account and simply click «Add» when the app opens. Your OneDrive account will receive the file.
Step 2. Get the files you need.
Open the OneDrive software on the other laptop, right-click the file, and select «Download». The Files It will complete the file transfer from your laptop or computer to the other computer on your network.
3. Use Free PC Data Transfer Software – EaseUS Todo PCTrans
EaseUS Todo PCTrans Free, which tool allows you to transfer an unlimited number of files, programs, and settings between two PCs in a user-friendly manner. It’s also a data and application backup software that can keep your files safe as long as you perform regular backups. It’s more than just PC migration software that can transfer files between local disks/drives or between two computers for free. For example, you can transfer programs from C drive to D drive securely.
It does not necessitate extensive computer skills or the acquisition of any additional equipment. With a lifetime license, you can get free upgrades for the rest of your life.
Now, download this PC data transfer software to transfer files from one computer to another in simple clicks.
Step 1. Open EaseUS Todo PCTrans on both of your computers. Choose «PC to PC» to go to the next step.
Step 2. Make sure you have chosen the right transfer direction.
«New» — Move data from old computer to current new computer.
«Old» — Move data from current old n computer to remote new computer.
Step 3. Connect two PCs via the network by entering the password or verification code of the target PC. Besides, make sure you have chosen the right transfer direction and click «Connect» to continue.
The verification code is on the right top of the «PC to PC» main screen on the target computer.
Step 4. Then, choose «Files» to select files to transfer. Select the specific files as you want. What’s more, you can click the Edit icon to customize the storage path for transferred data.
Step 5. Now, click «Transfer» to begin to transfer files from PC to PC. The size of the file determines the transfer time. Wait patiently.
Conclusion
There are many ways of copying files from one drive/computer to another. However, all the mentioned methods have their advantages, but they also come with many disadvantages. That’s why it is recommended that you should use EaseUS Todo PCTrans to copy files. This software poses no security threats and is easy to use.
Using copy command, we can copy files from one directory to another directory. This command is similar to the Linux cp command, but it does not match with the full functionality of cp. Windows copy command can be used to copy files only, we can’t copy directories.
The syntax and usecases of copy command are explained below with examples.
Copy the contents of a file to another file
copy sourceFile destinationFile
Example: To copy a file from c:datafile1.doc to D:backupfile2.doc
copy c:datafile1.doc D:backupfile2.doc
If the destination file already exists you will be prompted for confirmation. To suppress this confirmation you can use /Y switch with copy command. This would be useful if you are executing copy command from a batch file.
c> copy /Y c:dir1subdir1file1.txt c:dir2subdir2file2.txt
If the destination file exists, the above command will overwrite the same without asking the user for confirmation.
Copy file to another directory
When we specify a directory path as the destination, the files will be copied with the same name. We can assign a different name by specifying the new name in the destination path. Example is shown below.
To copy the file 1.doc loated at c:datadocuments to the directory c:datanewdocs
c> copy c:datadocuments1.doc c:datanewdocs
Copy files with white space in name
If the file name has white space within it, we can wrap up the name in double quotes.
Example: To copy file, my resume.doc to another folder
copy "my resume.doc" D:data
Copy multiple files
We can’t specify multiple file names in copy command. However, we can use wildcards to identify a group of files and then copy all of them in a single command.
For example, to copy all excel files from current folder to another folder F:backup
copy *.xls F:backup
To copy all files in current folder to another folder
copy * D:dir1dir2
Use of environment variables
We can use environment variables in the copy command to specify the path of the folders. Like USERPROFILE, SystemRoot, ProgramFiles, TEMP, WINDIR, APPDATA, HOMEPATH.
For example, to copy a file to a user’s documents folder
Copy D:file.pdf %HOMEPATH%Documents
The above command copies the file to the My Documents folder of the current logged in user.
You may also want to read
- Xcopy command syntax and examples
- Robocopy command
There are many, many reasons why you might want to copy files in Windows, especially if you’re trying to fix a problem.
A file copy might be necessary during a troubleshooting process if, for example, you suspect a corrupt or missing system file. On the other hand, sometimes you’ll copy a file to provide a backup while you make changes to an important file that might have a negative impact on your system.
No matter the reason, the file copy process is a standard function of any operating system, including all versions of Windows.
What Does It Mean to Copy a File?
A file copy is just that—an exact copy, or a duplicate. The original file isn’t removed or altered in any way. Copying a file is simply putting the exact same file in some other location, again, without making any changes to the original.
It can be easy to confuse a file copy with a file cut, which is copying the original just like a regular copy, but then deleting the original once the copy has been made. Cutting a file is different because it actually moves the file from one location to another.
A file copy is most easily accomplished from within File Explorer, but there are some other ways you can make file copies (see the section at the very bottom of this page).
It’s really, really easy to copy files from within File Explorer, no matter which Windows operating system you’re using. You might know File Explorer as My PC, Computer, Windows Explorer, or My Computer, but it’s all the same file management interface.
Windows 11, Windows 10, Windows 8, Windows 7, Windows Vista, and Windows XP all have slightly different processes for copying files:
Windows 11
-
Open File Explorer by selecting the Start button, and then searching for and selecting File Explorer.
-
Use the navigation bar at the top, or the folders on the left, to find the folder where the file you want to copy is stored. Double-clicking a folder or subfolder moves you through the file system.
-
Select the file (don’t double-click it).
-
Choose the copy button from the top of the window. It looks like two pieces of paper on top of each other.
The same copy button is accessible in the context menu if you right-click the file you want to copy.
-
Using the same method described earlier to find the file, now locate the folder where you want this file to be copied.
-
Once you’re inside the destination folder, use the paste button at the top of the window. This is the one to the right of the copy button.
You can repeat this step as many times as you want, in other folders, to copy the same file to other destinations.
Windows 10 & Windows 8
-
If you’re using Windows 10, select the Start button and then choose Documents from the left-hand side. It’s the one that looks like a file.
Windows 8 users can search for This PC from the Start screen.
Both versions of Windows also support opening File Explorer or This PC with the WIN+E keyboard shortcut.
-
Find the folder where that the file is located by double-clicking any folders or subfolders necessary until you reach the file.
If your file is located on a different hard drive than your primary one, choose This PC from the left-hand side of the open window and then select the correct hard drive. If you don’t see that option, open the View menu at the top of the window, and then go to Navigation pane > Navigation pane.
If you’re given a permissions prompt that says you need to confirm access to the folder, just continue through.
It’s likely that your file is located deep inside several folders. For example, you might have to first open an external hard drive or disc, and then two or more subfolders before you reach the file that you want to copy.
-
Select the file by clicking or tapping it once. This will highlight it.
To copy more than one file at once from that folder, hold down the Ctrl key and select each additional file that should be copied. The exact same process works for copying folders, too.
-
With the file(s) still highlighted, access the Home menu at the top of the window and select the Copy option.
Anything you just copied is now stored in the clipboard, ready to be duplicated elsewhere.
-
Navigate to the folder where the file should be copied to. Once there, open the folder so that you can see any files or folders that already exist inside (it might even be empty).
The destination folder can be anywhere; on a different internal or external hard drive, DVD, in your Pictures folder or on your Desktop, etc. You can even close out of the window where you copied the file, and the file will remain in your clipboard until you copy something else.
-
From the Home menu at the top of the destination folder, choose Paste.
If you chose the same folder that has the original file, Windows will either automatically make a copy but will append the word «copy» to the end of the file name (just before the file extension) or ask you to either replace/overwrite the files or skip copying them.
If you’re asked to confirm the paste because the folder requires administrator permissions to paste files, go ahead and provide that. This just means the folder is considered important by Windows, and that you should be careful when adding files there.
The file selected from Step 3 is now copied to the location you chose in Step 5. Remember that the original file is still located where it was when you copied it; saving a new duplicate didn’t affect the original in any way.
Windows 7 & Windows Vista
-
Select the Start button and then Computer.
-
Locate the hard drive, network location, or storage device that the original file you want to copy is located on, and double-click to open the contents of the drive.
If you’re planning on copying files from a recent download from the internet, check your Downloads folder, Documents library, and Desktop folders for the downloaded file. Those can be found in the Users folder.
Many downloaded files come in a compressed format like ZIP, so you may need to uncompress the file to locate the individual file or files you’re after.
-
Continue to navigate down through whatever drives and folders are necessary until you find the file you want to copy.
If you’re prompted with a message that says «You don’t currently have permission to access this folder», select Continue to continue to the folder.
-
Highlight the file you want to copy by selecting it once. Do not open the file.
Want to copy more than one file (or folder)? Hold down the Ctrl key on your keyboard and select any files and folders you want to copy. Release the key when you’ve highlighted all the files and folders you want to copy. All of those highlighted files and folders will be copied.
-
Choose Organize and then Copy from the menu at the top of the folder’s window.
-
Navigate to the location where you want to copy the file to. Once you’ve found the folder, click on it once to highlight it.
Just to reiterate, you’re selecting the destination folder that you want the copied file to be contained in. You shouldn’t click any files. The file you’re copying is already in your PC’s clipboard.
-
Choose Organize and then Paste from the folder window’s menu.
If you paste the file in the exact same folder where the original exists, Windows will rename the duplicate to have the word «copy» at the end of the file name. This is because no two files can exist in the same folder with the exact same name.
If you’re prompted to provide administrator permissions to copy to the folder, choose Continue. This means that the folder you’re copying to is considered a system or other important folder by Windows 7.
The file you selected in Step 4 will now be copied to the folder that you chose in Step 6. The original file will be left unchanged and an exact copy will be created in the location you specified.
Windows XP
-
Select Start and then My Computer.
-
Locate the hard drive, network drive, or another storage device that the original file you want to copy is located on, and double-click to open the contents of the drive.
If you’re planning on copying files from a recent download from the internet, check your My Documents and Desktop folders for the downloaded file. These folders are stored within each user’s folder inside the Documents and Settings directory.
Many downloaded files come in a compressed format, so you may need to uncompress the file to locate the individual file or files you’re after.
-
Continue to navigate down through whatever drives and folders are necessary until you find the file you want to copy.
If you’re prompted with a message that says «This folder contains files that keep your system working properly. You should not modify its contents.», choose Show the contents of this folder to continue.
-
Highlight the file you want to copy by selecting it once (don’t double-click or it will open the file).
Want to copy more than one file (or folder)? Hold down the Ctrl key on your keyboard and select any files and folders you want to copy. Release the key when you’re done. All highlighted files and folders will be copied.
-
Choose Edit and then Copy To Folder from the menu at the top of the folder’s window.
-
In the Copy Items window, use the (+) icons to locate the folder you want to copy the file that you selected in Step 4 to.
If the folder doesn’t yet exist that you want to copy the file to, select Make New Folder.
-
Choose the folder you want to copy the file to, and then select Copy.
If you copy the file to the same folder that has the original, Windows will rename the duplicate file to have the words Copy of before the original file name.
The file you selected in Step 4 will be copied to the folder that you chose in Step 7. The original file will be left unchanged and an exact copy will be created in the location you specified.
Tips and Other Ways to Copy Files in Windows
One of the most well-known shortcuts for copying and pasting without a mouse is Ctrl+C and Ctrl+V. It works with not only text, but also files and folders. Just highlight what needs to be copied, execute Ctrl+C to store it in the clipboard, and then use Ctrl+V to paste the contents somewhere else.
Ctrl+A can highlight everything in a folder, but if you don’t want to copy everything you’ve highlighted, and instead want to exclude a few items, you can then use the Ctrl key to deselect any highlighted item. Whatever remains highlighted is what will be copied.
Files can also be copied from the Command Prompt in any version of Windows, with the copy or xcopy command.
You can also open File Explorer by right-clicking the Start button. The option is called File Explorer or Explore, depending on the version of Windows that you’re using.
If you don’t know where the file is located on your computer, or you’d rather not search through lots of folders to find it, you can do a quick system-wide file search with the free Everything tool. You can even copy files directly from that program and avoid using File Explorer. Other file search tools have similar features.
Thanks for letting us know!
Get the Latest Tech News Delivered Every Day
Subscribe

Windows offers many ways to copy and move files. We’ll show you all the tricks for File Explorer, and how to use them in Command Prompt and PowerShell. You can even add “Copy to” and “Move to” to File Explorer’s context menus.
When you copy a file or folder in Windows 10, a duplicate is made of the selected item and saved in a destination folder of your choosing. However, when you move a file or folder, the original item moves to the destination folder instead of sending an identical copy.
How to Copy or Move Files with Drag and Drop
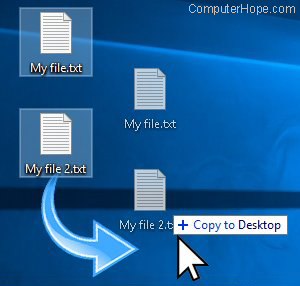
One of the most common methods to copy or move a file or folder is to drag and drop it into the destination folder. By default—depending on the location of the destination folder—File Explorer might move it instead of copying it, or vice versa. However, there’s a hidden method that overrides Windows’ default behavior.
Open File Explorer by pressing Windows+E and navigate to the file you want to copy.

When dragging files from one folder to another, you can use either the pane on the left or open another instance of File Explorer to navigate to the destination folder. For this example, we’re going to use a second File Explorer window to copy files.
Open a second File Explorer window by pressing Windows+E, and navigate to the destination folder.
Windows has two default actions when you drag and drop a file or folder into a new destination: copy or move. Copying happens when you drop the file or folder into a directory on a different drive. Moving occurs when you drop it on the same drive, as we’ll do below. However, there’s a hidden trick that forces Windows to perform a specific action.
To copy files over to a different drive, highlight the file(s) you want to copy, click and drag them over to the second window, and then drop them.
If you’re trying to copy the files to a folder on the same drive, click and drag them over to the second window. Before you drop them, though, press Ctrl to trigger the Copy mode.
To move files to a different directory on the same drive, highlight the file(s) you want to move, click and drag them over to the second window, and then drop them.
If the destination folder is on a different drive, click and drag them over to the second window just like before, but this time press Shift to trigger the Move mode.
How to Copy or Move Files Using Cut, Copy, and Paste
You can also copy and move files with the clipboard, the same way you cut, copy, and paste text.
Open File Explorer by pressing Windows+E and navigate to the file you want to copy.
Highlight the files you want to copy, and then click “Copy” in the File menu or press Ctrl+C on the keyboard to add them to the clipboard.
If you’d rather move items instead, highlight the files you want to move. Then, click “Cut” in the File menu or press Ctrl+X to add the files to the clipboard.
Navigate to the directory to which you want to move the files, and then click “Paste” in the “Home” tab or press Ctrl+V. Depending on whether you click “Copy” or “Cut,” your files will be copied or moved, respectively.
Copying or Moving Files and Folders Using the Context Menu
When you right-click a file or folder, Windows has a couple of hidden context menu functions that let you add two options: Copy to or Move to. Adding these two functions to the context menu gives you a way to either copy or move items in just a few clicks.
RELATED: How to Add «Move to» or «Copy to» to Windows 10’s Context Menu
How to Copy or Move Files Using the Command Prompt
One of the fastest ways to open a Command Prompt in the desired directory is from File Explorer. First, open File Explorer and navigate to the destination. Click the address bar, type “cmd” and press Enter.
RELATED: 10 Ways to Open the Command Prompt in Windows 10
To copy a file, you can use the following command syntax (if you’re copying a folder, just omit the file extension):
copy "file name.ext" "fullpathtodestinationfolder"
The quotes in the command are only important when the file name or folder contains spaces. If they don’t have spaces, you won’t need to include the quotes. In the example below, neither the file name, nor the folder contains a space, so we didn’t need to use them.
You can also use the copy command to duplicate multiple files at the same time. Just separate each file with a comma, and then specify the destination folder as you normally would.
To move a file, you can use the following command syntax (if you’re moving a folder, just omit the file extension):
move "file name.ext" "fullpathtodestinationfolder"
Just as with copying, the quotes in the command are only important when the file name or folder contains spaces. If they don’t, you don’t have to include the quotes. In the example below, neither the file name, nor the folder contains a space, so we didn’t need to use them.
However, if you try to move multiple files, as we did with the copy command, Command Prompt will throw a syntax error.
There are a couple of other ways to move more than one item at a time using Command Prompt without throwing an error. Each method makes use of a wildcard character to move multiple files within one instruction.
First, if you want to move all of a specific file type, you can use the following syntax to relocate the files:
move *.ext "fullpathtodirectory"
The second method involves moving everything inside the source directory, regardless of the file type. You can use the following syntax to complete the move:
move * "fullpathtodirectory"
How to Copy or Move Files Using PowerShell
Windows PowerShell is even more powerful and flexible than Command Prompt when it comes to copying or moving files and folders in a command-line environment. While we’ll only scratch the surface, you can do some really powerful things with cmdlets.
The quickest way to open a PowerShell window at your desired location is to first open the folder in File Explorer. In the “File” menu, click “Open Windows PowerShell,” and then select “Open Windows Powershell.”
RELATED: 9 Ways to Open PowerShell in Windows 10
To copy a file or folder in PowerShell, use the following syntax:
Copy-Item "filename.ext" "pathtodestinationfolder"
Although they aren’t mandatory, the Copy-Item cmdlet only requires quotes around the filename and directory if they contain spaces.
For example, to copy a file from the current directory to another, you would use the following command:
Copy-Item Lex.azw D:Downloads
The real power of PowerShell comes from the ability to pipe cmdlets together. Say, for example, we have a folder with a bunch of subfolders with ebooks in them that we want to copy.
Instead of changing the directory and running the command again, we can get PowerShell to scan through each folder and subfolder, and then copy all of a specific file type to the destination.
We could use the following cmdlet:
Get-ChildItem -Path ".*.azw" -Recurse | Copy-Item -Destination "D:Downloads"
The Get-ChildItem part of the cmdlet lists all the files in the current directory and all of its subfolders (with the -Recurse switch) with the AZW file extension and pipes them (the | symbol) to the Copy-Item cmdlet.
To move files instead, you can use the following syntax to relocate anything you want:
Move-Item Lex.azw D:Downloads
Move-Item follows the same syntax as the Copy-Item cmdlet. So, if you want to move all the specific file types from a folder and all its subfolders—as we did with the Copy-Item cmdlet— it’s almost identical.
Type the following cmdlet to move all files of a specific file type from a directory and its subfolders:
Get-ChildItem -Path ".*.azw" -Recurse | Move-Item -Destination "D:Downloads"
READ NEXT
- › How to Find and Open Files Using Command Prompt
- › The Best SD Cards of 2023
- › How to Fix Error 0x8007045d on Windows
- › How to Read a Zip Disk on a Modern PC or Mac
- › How to Set Default File Drag and Drop Behavior on Windows 10
- › Why Do We Measure Speed in Bits, But Space in Bytes?
- › How to Set a Keyboard Shortcut to Open a Folder on Windows 11
- › Snapdragon 7+ Gen 2 Chip Will Give Budget Phones a Boost