Use Bluetooth to pair Apple’s wireless headphones
Updated on November 20, 2022
What to Know
- Go to Settings > Devices > Bluetooth & other devices > Add Bluetooth or other devices > Bluetooth.
- Select your AirPods. If your AirPods aren’t showing up, open the lid of the charging case.
- Once the pairing process begins, press the setup button on the charging case until the process completes.
This article explains how to connect AirPods to a Windows 10 PC using Bluetooth.
How to Pair Your AirPods to Windows 10 Computers
The method for connecting Apple AirPods is the same as adding any other Bluetooth speaker or headphones to a Windows computer:
-
Select the Action Center icon in the bottom-right corner of the Windows taskbar to open Windows Action Center.
-
Select All settings in the Windows Action Center.
While you have the Action Center open, check to make sure Bluetooth is enabled. The Bluetooth tile should be highlighted; if it’s not, select the tile to turn it on.
-
Select Devices in the Windows Settings.
-
Select the Bluetooth & other devices tab on the left side, then select Add Bluetooth or other devices.
-
Select Bluetooth in the Add a device window.
-
Your Apple AirPods should appear on the list as AirPods. Select AirPods to begin the pairing process.
If your AirPods aren’t showing up, open the lid of their charging case.
-
Press the setup button on the rear of the Apple AirPod charging case while having the lid open. The charging case’s light should change from green to white.
Continue firmly pressing the setup button until the pairing is complete. If you encounter an error message, press the setup button on the charging case before you select the AirPods on the Bluetooth device list.
Apple
-
If paired correctly, you should see a «Your device is ready to go!» message. Select Done to close the message.
How Can AirPods Connect to a Windows PC?
Apple AirPods use Bluetooth to connect to any computer. Once connected, you can use AirPods to listen to audio, input audio via their built-in mic, and control audio volume or pause sound via tap controls.
How to Fix Windows 10 Apple AirPod Sync Problems
If your Apple AirPods stop working on your Windows PC, try these fixes:
- Disable Bluetooth on other devices. If you’ve paired your AirPods with your iPhone, it could interfere with the connection to your PC, so try temporarily turning off Bluetooth on other devices.
- Open the charging case lid. Apple AirPods connect to devices when the charging case’s cover is open and its light turns green. Try opening it for a few seconds before removing the AirPods and putting them in your ears.
If you’re still having problems, follow these troubleshooting steps:
-
Open an app such as Spotify on your Windows 10 PC and begin playing some music.
-
Place your Apple AirPods back in their charging case and close the lid, then wait a few seconds.
Seremin / Getty Images
-
Open the Action Center and select All settings.
-
Select Devices in the Windows Settings.
-
Make sure your AirPods are on the list of paired devices.
-
Open the charging case’s lid, remove the AirPods, and place them in each ear.
John Edelson / Getty Images
-
Select AirPods in the device list, then select Connect. The AirPods should connect, and the audio should being playing through them.
If your Apple AirPods still won’t play sound, open All settings > Devices, then select Remove Device under AirPods and repeat the pairing process.
FAQ
-
How do I connect AirPods to a Mac?
To connect your AirPods to a Mac, go to the Apple menu > System Preferences > Bluetooth and turn on Bluetooth. Place your AirPods in the case, open the lid, and tap the button on the AirPods case until the status light blinks. Select Connect.
-
How do I connect AirPods to an Android?
To connect AirPods to an Android device, go to Settings > Bluetooth and ensure Bluetooth is on. With the AirPods inside, open the charging case and press and hold the button on the case until it flashes. From the Android device, tap the AirPods from the available Bluetooth devices list.
Thanks for letting us know!
Get the Latest Tech News Delivered Every Day
Subscribe
- To connect AirPods to a PC, put your AirPods in the case, open it, and press the button on the back.
- When the status light inside the front of your AirPods case blinks white, you can let go of the button.
- You can then pair the AirPods to a PC by opening Bluetooth settings in the Windows menu.
Apple’s AirPods are completely wireless Bluetooth earbuds, designed primarily for iOS devices like the iPhone and iPad. But AirPods work with all sorts of other devices as well, including a Windows PC.
If you want to use your AirPods with your PC, here’s how to pair and connect them.
How to connect AirPods to a PC
To connect AirPods to a PC, put your AirPods in the case and press and hold the small button on the back until the status light starts blinking white. Your AirPods should then show up in the Add a device window in your PC’s Bluetooth settings, where you can click to pair and connect.
1. Put your AirPods in their case and make sure they are charged.
2. Open Settings on your PC from the Start menu. It’s the gear-shaped icon above the power button. You can also type Settings in the Start menu search box.
Dave Johnson/Business Insider
3. Click Devices.
4. At the top of the Bluetooth & other devices section, make sure Bluetooth is turned on. The switch should be toggled on to the right and colored blue.
5. Click Add Bluetooth or other device.
Dave Johnson/Business Insider
6. In the Add a device window, click Bluetooth.
7. Open the lid of your AirPods case. (Skip this step if you own AirPod Max’s.)
8. Press and hold the small button on the back of the case for several seconds, until the status light on the front of the case starts blinking white.
Dave Johnson/Business Insider
9. The AirPods should appear in the list of devices available for pairing on your PC. They might first appear as Headphones, and then change to AirPods after a few moments.
10. Click AirPods.
Dave Johnson/Business Insider
11. Windows will connect to the AirPods and display a success message. Click Done. You can now listen to your PC audio through the AirPods.
Dave Johnson/Business Insider
Troubleshooting when your AirPods won’t connect to your PC
There are many ways to fix AirPods that won’t connect, including making sure that they’re charged. But if you’re having further trouble, you may want to reset your AirPods. That way, you’ll be able to charge them and get them to sync properly.
It’s also possible that the issue is coming from your PC, rather than your AirPods. If that’s the case, try running the WIndows troubleshooter. That’s accessed via the Start menu’s Settings.
From there, choose Updates & Security (for Windows 10) or System (for Windows 11) followed by Troubleshoot. Finally, click Other troubleshooters and then Bluetooth. After that runs, you may receive recommendations to fix the issue.
Devon Delfino is a Brooklyn-based freelance journalist specializing in personal finance, culture, politics, and identity. Her work has been featured in publications such as The Los Angeles Times, Teen Vogue, Business Insider, and CNBC. Follow her on Twitter at @devondelfino.
Read more
Read less
Dave Johnson
Freelance Writer
Dave Johnson is a technology journalist who writes about consumer tech and how the industry is transforming the speculative world of science fiction into modern-day real life. Dave grew up in New Jersey before entering the Air Force to operate satellites, teach space operations, and do space launch planning. He then spent eight years as a content lead on the Windows team at Microsoft. As a photographer, Dave has photographed wolves in their natural environment; he’s also a scuba instructor and co-host of several podcasts. Dave is the author of more than two dozen books and has contributed to many sites and publications including CNET, Forbes, PC World, How To Geek, and Insider.
Read more
Read less
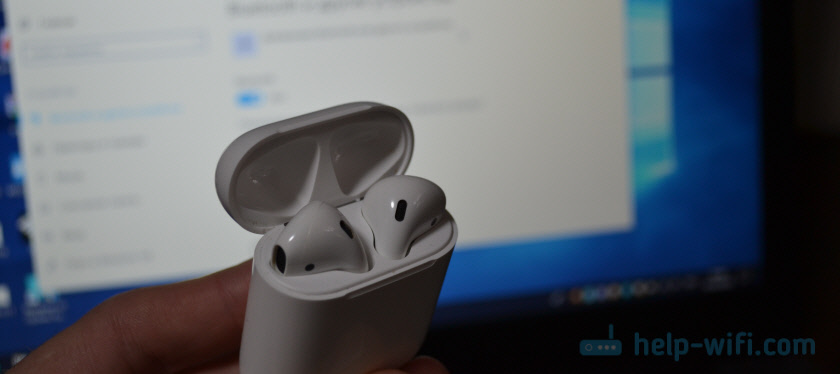
В компании Apple сделали действительно классные и простые наушники AirPods, которые вообще без проблем, за несколько секунд можно подключить к другим устройствам от Apple. Если у вас есть эти наушники, то вы уже наверное убедились, как просто они подключаться к тому же iPhone. Самые новые на рынке – AirPods 2 и AirPods Pro. Но сегодня я хочу рассказать вам не о самих наушниках, а о том, как подключить их к компьютеру, или ноутбуку, который работает на Windows 10, Windows 8, или Windows 7. Так же разберемся, можно ли использовать эти наушники как гарнитуру. Обновление: инструкция по подключению AirPods к Windows 11.
Процесс подключения AirPods к Windows не сложный, но все же не такой простой как к устройствам на iOS и Mac OS. Я иногда использую свои AirPods с ноутбуком на Windows 10. Соединяются они конечно же по Bluetooth. Поэтому, если у вас не ноутбук (где Bluetooth обычно уже есть встроенный), а стационарный компьютер, то для подключения беспроводных наушников от Apple вам понадобится Bluetooth-адаптер.
Если на вашем ноутбуке, или компьютере нет Bluetooth, или он не работает, то подключить AirPods не получится. Поэтому:
- В случае с ноутбуком, где Bluetooth-модуль обычно встроенный, нужно просто установить драйвера. В Windows 10 проблем с этим быть не должно, так как драйвера устанавливаются обычно автоматически. Не важно, какая у вас Windows. Посмотрите, есть ли иконка Bluetooth в трее. Если есть, то все хорошо, можно подключать Аирподсы. Так же можно глянуть, есть ли соответствующий модуль в диспетчере устройств. Если же Bluetooth нигде нет, то попробуйте установить драйвера. Скачайте их с сайта производителя ноутбука для своей модели. Больше информации в статье как включить и настроить Bluetooth на ноутбуке с Windows 10 и как включить Bluetooth на ноутбуке (здесь так же есть информация по Windows 8, 8.1 и Windows 7).
- В случае с ПК, скорее всего понадобится выбрать и купить Bluetooth-адаптер. Затем, его нужно установить и настроить: настройка Bluetooth на компьютере.
Если на компьютере есть Блютуз (иконка в трее, раздел в настройках и т. д.), то можно переходить к подключению наушников.
Подключаем AirPods к Windows 10
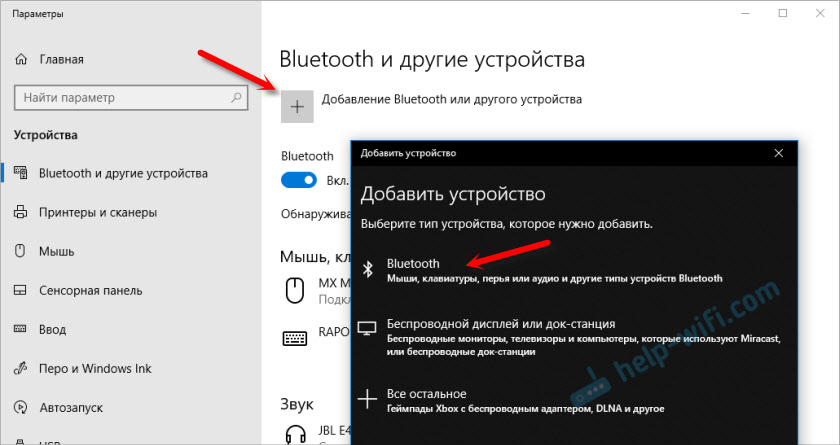
Можно нажать на соответствующую иконку в трее и выбрать «Добавление устройства Bluetooth», либо зайти в «Параметры» – «Устройства» – вкладка «Bluetooth и другие устройства».

Окно с параметрами оставляем открытым, берем наши наушники AirPods, открываем кейс и на задней стороне кейса на секунды три зажимаем круглую кнопку. Держим ее нажатой, пока индикатор внутри кейса не начнет мигать белым цветом.

В параметрах Windows нажмите на «Добавление Bluetooth или другого устройства» и в новом окне выберите «Bluetooth».
Компьютер должен увидеть наши Аирподсы. Нажимаем на них и сразу пойдет процесс подключения. По завершению нужно просто нажать на кнопку «Готово».

Все готово! Windows уже транслирует звук на наши беспроводные наушники. Их статус в настройка: AirPods – «Подключенный голос, музыка». Там же их можно вручную либо отключить, либо удалить. После удаления нужно будет повторить процесс подключения заново.

Достаем их из зарядного кейса, вставляем в уши и наслаждаемся музыкой. Можно использовать только один наушники.
Когда мы прячем оба наушника в кейс и закрываем его, то наушники автоматически отключаются (статус соединения – «Сопряжено») и звук начинает воспроизводится через динамики ноутбука, или акустическую систему. Как только открываем кейс с Аирподсами, то они автоматически подключится к компьютеру и звук идет на наушники.
Настройка микрофона, работа в качестве гарнитуры
В этом плане все так же, как и с другими Bluetooth наушниками. У меня в Windows 10 не получилось настроить AirPods таким образом, чтобы можно было слушать музыку в хорошем качестве (Stereo) и при этом работал микрофон.
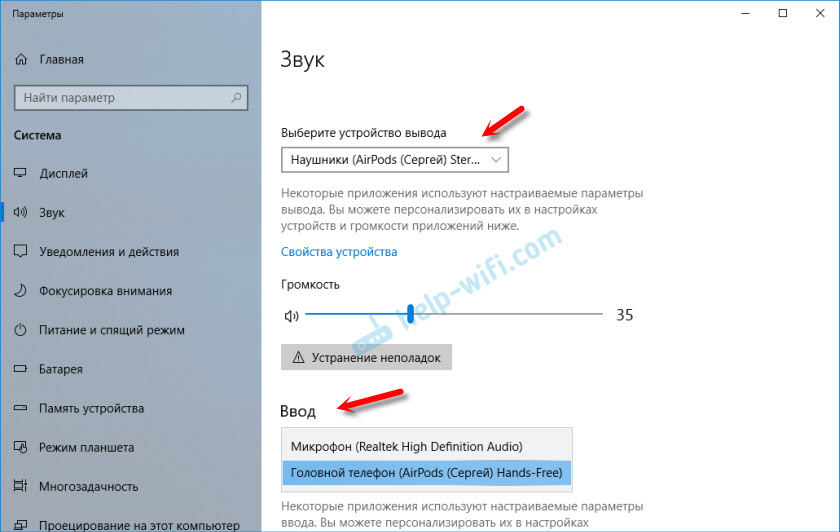
В параметрах звука можно выбирать устройство ввода и вывода. Если выбрать «Головной телефон AirPods», то наушники будут работать в режиме гарнитуры.
Если вы подключили Аирподс для общения через Скайп, то прямо в настройках программы можно задать настройки. Выбрать эти наушники в качестве микрофона и динамиков.
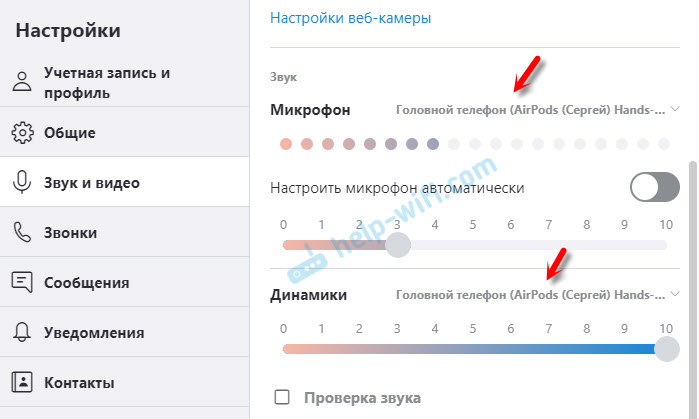
Но тогда система не будет воспроизводить звуки через наушники. Нужно вернуть все настройки обратно. Возможно, у вас получится иначе это все настроить. Можете поделится с нами в комментариях.
Вообще, в этом плане все далеко не идеально. Если просто слушать музыку, смотреть фильмы и т. д., то да, все работает хорошо. Но чтобы настроить микрофон – придется повозится. Да и то не факт, что все получится.
Подключение и настройка Аирподс на компьютере с Windows 7
Так как у меня на ноутбуке рядом с десяткой установлена еще и Windows 7, то я и к ней решил попробовать приконектить AirPods. Так как там с подключением таких новых устройств бывают проблемы.
Все сделал как и в Windows 10. Просто подключаем новое устройство. Не забудьте активировать режим подключения на наушниках. С помощью отдельной кнопки на кейсе.

Но как я и ожидал, Windows 7 не смогла найти драйвера.
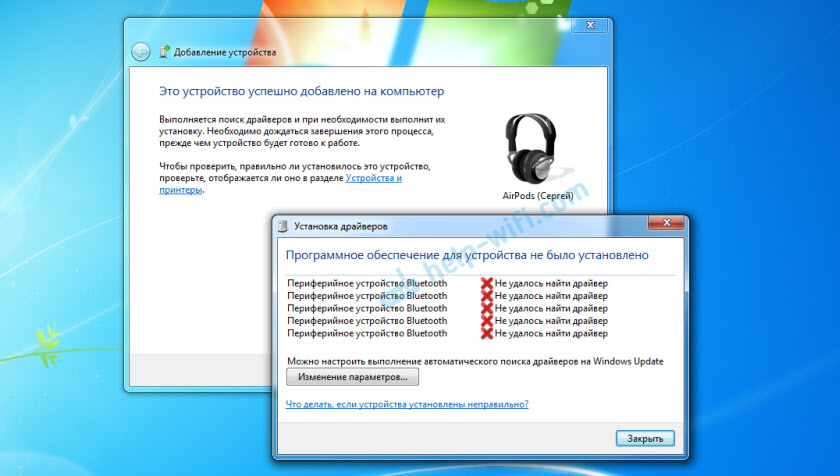
Аирподсы подключились, но с ошибкой (возле них был желтый восклицательный знак) и они просто не работали.
Как я решил эту проблему?
Обновил драйвер Bluetooth модуля. Зашел в диспетчер устройств, открыл свойства Generic Bluetooth Adapter и увидел, что драйвер еще от 2006 года. Который Windows 7 сама установила.

Так как я знаю модель Wi-Fi/Bluetooth модуля, который установлен в моем ноутбуке (я его уже менял), то очень быстро скачал и установил новый драйвер с сайта производителя. Если вы не знаете модель самого модуля, то можете попробовать скачать драйвер с сайта производителя ноутбука. Но строго для своей модели ноутбука. А если у вас USB Bluetooth-адаптер, то качайте драйвер для него.
После обновления драйвера:

Дальше я просто удалил AirPods из списка уже подключенных устройств (так как я уже пробовал их подключить) и установил соединение заново. И уже в этот раз Windows 7 установила практически все драйвера. Кроме «Периферийное устройство Bluetooth». Но наушники без проблем начали работать, несмотря на то, что возле них остался желтый восклицательный знак.

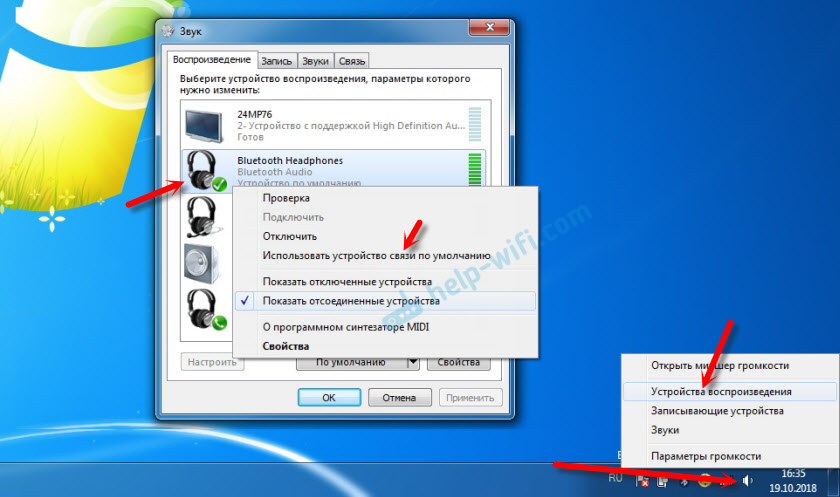
В устройствах воспроизведения нужно присвоить им статус «по умолчанию».
Вот так я подружил новые наушники от Apple с не очень новой операционной системой от Microsoft. В Windows 10 это все подключается и настраивается намного проще. Не так как на iOS и Mac OS устройствах, но все же без таких танцев с бубном.
Разные проблемы, настройки, решения и т. д. по этой теме мы можем обсуждать в комментариях. Оставляйте там свои сообщения.
![]()
Download Article
![]()
Download Article
Are you trying to connect your AirPods to your laptop? AirPods are an Apple device and work best with other Apple devices (like an iPhone or Mac), but you can still use them with your Windows laptop! This wikiHow article guides you through using your AirPods with your Windows laptop or a Macbook and gives you a few troubleshooting steps.
-

1
Open the Action Center. You can do this by clicking the Action Center button in your taskbar (it looks like a chat bubble icon) or you can press Win + A.
- This works with Windows 10 and Windows 11 laptops, although the process to locate the Bluetooth section of Settings is a little different.
-
2
Right-click the Bluetooth tile and click Go to Settings. You’ll find it with the Bluetooth icon, and selecting Go to Settings will open Settings in a new window.
Advertisement
-
3
Click the toggle next to «Bluetooth» to turn it on
(if it’s off). If this switch is already on (to the right and colored in), you can skip this step.
- You should see something like «Now discoverable as (Laptop Name)» under «Bluetooth» when this feature is activated.
-
4
Click Add Bluetooth or other device and select Bluetooth. You’ll see this first option at the top of the window next to +. When prompted to select a device that you’re pairing, click to choose Bluetooth and all the Bluetooth devices within range will appear here.
-
5
Put your AirPods into Pairing Mode. You can do this by opening the AirPods case, then pressing and holding the button on the back of it.
- When the LED flashes white, release the button. This light is either on the front or inside your case.
-
6
Click to select your AirPods. You should see this device under your list of discovered devices.
- Pairing between your AirPods and Dell will begin as soon as you select them from the list.
-
7
Click Done. After your AirPods and laptop pair, you can click Done to close this window.
- If they aren’t automatically switched to the active sound output, click the speaker icon in your taskbar, then select your AirPods from the list.[1]
- You will not have access to Siri on a Windows laptop.
- If they aren’t automatically switched to the active sound output, click the speaker icon in your taskbar, then select your AirPods from the list.[1]


Advertisement
-
1
Open System Preferences. You can do this by clicking the Apple icon in the top left corner of your screen and selecting System Preferences from the menu that drops down.
-
2
Click Bluetooth. It’s near the center of the window next to a Bluetooth symbol.
-
3
Click Turn Bluetooth On (if it’s off). You won’t see this button if Bluetooth is already on.
-
4
Hold the AirPods case near your Mac. The AirPods must be in the case and the lid closed.
-
5
Put your AirPods into Pairing Mode. You can do this by opening the AirPods case, then pressing and holding the button on the back of it.
- When the LED flashes white, release the button. This light is either on the front or inside your case.
-
6
Click Pair next to your AirPods. You’ll see your AirPods listed on the right side of the screen under «Devices.»
- To access your Bluetooth list faster than opening System Preferences, click to check the box «Show Bluetooth in menu bar.» Instead of going through System Preferences, you can click the Bluetooth logo in your Mac’s menu bar.


Advertisement
-
1
Make sure Bluetooth is enabled on your laptop. You won’t see your AirPods in the «Available Devices» list if you have Bluetooth disabled.
- If Bluetooth is already on, try turning it off and back on again while your AirPods case is closed.
-
2
Disable Bluetooth on other devices. This is a problem even if you have a Macbook and an Android phone in your pocket. If your AirPods are connected to your Android phone, they won’t connect with your laptop, so make sure any other connections are disabled.
-
3
Check if your Bluetooth driver is out of date. If it’s out of date, you might have issues connecting to your AirPods including an unreliable connection that randomly disconnects. Update your Bluetooth driver, and try again.
-
4
Try to connect to other Bluetooth headphones. Doing this will test if the Bluetooth on your laptop is the issue or if the problem lies elsewhere. If different headphones connect reliably, the AirPods are most likely the problem.
-
5
Make sure your AirPods are in Pairing Mode. Put them in Pairing Mode by pressing and holding the only button on the AirPods case with the lid open. Release the button when you see the LED flash white (the light is either on the front or inside your case).[2]
-
6
Ensure that your AirPods have a charge. Once you place the case on a charging mat or use a charger, the LED should indicate the charge level of your AirPods (an amber light means they are charging and a green light indicates that they have a full charge).[3]


Advertisement
Ask a Question
200 characters left
Include your email address to get a message when this question is answered.
Submit
Advertisement
Video
Thanks for submitting a tip for review!
References
About This Article
Article SummaryX
1. Open the Action Center.
2. Right-click the Bluetooth tile and click Go to Settings.
3. Click the toggle next to «Bluetooth» to turn it on (if it’s off).
4. Click Add Bluetooth or other device and select Bluetooth.
5. Put your AirPods into Pairing Mode.
6. Click your AirPods.
7. Click Done.
Did this summary help you?
Thanks to all authors for creating a page that has been read 15,888 times.
Is this article up to date?
Airpods have become the staple of True Wireless Airbuds since they were introduced by Apple back in 2016. Unlike many Apple features and accessories, Airpods do indeed work with Windows and Android devices.
There are a few caveats though and these can be pronounced if you are looking to get their true functionality and features working on either of the platforms.
Windows got a recent upgrade with the release of Windows 11 which has brought up many questions about Airpods’ compatibility with the new OS. If you own a pair and would like to connect them to Windows, then here is all you need to know about it.
Are Airpods compatible with Windows?
The true answer would be no, but can you get them working? Yes! Airpods are essentially Bluetooth wireless earbuds and Windows recognizes them as exactly that. This can be a problem or a huge benefit depending on how you see it. You get all the basic functionalities of any generic earbuds but that is as far as it goes.
If you’re looking for your Airpods to be fully compatible with Windows where you can control playback, trigger Cortana, and get the best possible audio input and output quality then sadly you’re out of luck. However, there are many workarounds to overcome these issues and you can refer to them in the guide below when setting up AirPods.
Related: Unknown Accessory Detected iPhone: What does it mean?
The truth about Airpods on Windows
As discussed above, Airpods do not have feature-specific drivers that can help provide further compatibility and functionality with Windows 11. This means that they are recognized as a pair of any other BlueTooth headset which brings along its fair share of issues. The first one would be the jank profile switching that Windows uses with Bluetooth headsets connected to any device. Whether you connect Airpods or any other pair of TWS, it will show up as two different devices: Headphones, and Headset.
These two profiles can be toggled and used based on your use but many Airpods features and mainly its high res audio input and output quality rely on smart switching between these profiles and using different protocols to communicate with the device. This in turn makes Airpods show up as a single device in Macs and other compatible devices where you can enjoy high res audio right out of the box.
This brings us to our next two drawbacks, which stem from this issue where you either have to choose between high audio quality but the loss of mic functionality or use the mic while getting manageable audio quality to say the best. There is a workaround to improve your audio quality with your mic active, but it works only occasionally and won’t give you the high res quality experience that you get with your mic disabled and using Stereo audio. Use the guide below to help you out through the entire process and set up your guide as it might be needed depending on your preferences.
Related: Can you use Airpods with Android? Is it worth it?
You can use the guide below to pair your Airpods to Windows. Once paired, you can use the next section to customize your experience depending on what you plan to use them for. Let’s get started.
Pair Airpods to Windows
Press Windows + i on your keyboard to open the Settings app. Click and select ‘Bluetooth & devices’ from the left.

Now open your Airpods case, wait for the light to flash green or orange, and then press and hold the setup button on the back of your Airpods. Once the light starts flashing white it means you have entered the pairing mode.

Click on ‘Add device’ on your PC now.

Click on ‘Bluetooth’.

Wait for Airpods to show up in the list and click on them once they show up.

Windows will now automatically pair with Airpods. Click on ‘Done’ once the process finishes.

How to get better Audio quality from Airpods on Windows 11
We can now customize your experience depending on the feature you prefer the most. If you’re looking to use both, high res audio quality and mic, then you will need to invest in a Bluetooth adapter. You can find out more about the same in the section below. Let’s get started.
1. For high-quality audio-only (No Mic)
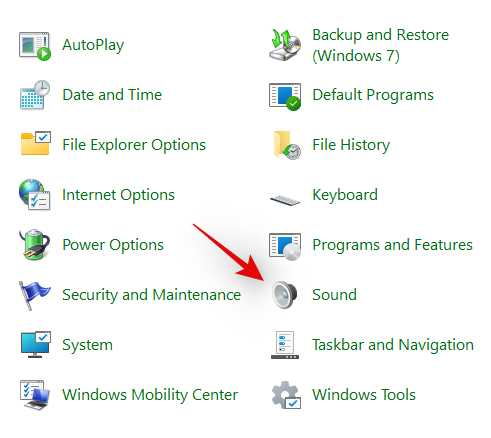
Now that you have paired Airpods with your PC, connect them and wear them for a while so that they appear connected in the Settings. Once done, launch the Start menu, search for ‘Control Panel’ and launch the same from your Search results.

Click on the drop-down menu in the top right corner of your screen and select ‘Large icons’.

Click on ‘Devices and printers’.

Click and select ‘Airpods’ from your devices and press Alt + Enter on your keyboard.

Switch to the ‘Services’ tab by clicking on the same at the top of your screen.

Uncheck the box for ‘Handsfree Telephony’.

Click on ‘Ok’ to save the changes.

The audio should now automatically switch and start using the Stereo audio which should help you get high-quality audio when using Airpods.
2. For Mic and audio (Bad audio)
You do not need to do much to get your mic and audio working in Windows. This is the default profile selected by Windows and if you haven’t disabled your mic within Windows settings then it should work by default. If not, you can use the guide below to set it as your default communications device which should get the mic working on your device.
Note: For some reason, the mic seems to fail the built-in test within Windows settings however it will work as intended in dedicated apps where you need the mic. The mic will also show up in apps like Google Meet and Microsoft Teams where you can select it as your input device.
Launch the Start menu, search for ‘Control Panel’ and launch the same from your search results.
Click on the drop-down menu in the top right corner and then select ‘Large icons’.
Click on ‘Sound’.
Now switch to the ‘Recording’ tab by clicking on the same at the top of your screen.

Click on ‘Airpods’ from the devices list.

Now click on ‘Set default’ at the bottom of the window.

Click on ‘Ok’ to save your changes. Your Airpods should now work as intended with the mic and audio output.
3. For both high res stereo audio and mic functionality
If you wish to have both, high res stereo audio and mic functionality then you will need to invest in a Bluetooth 4.0 or 5.0 adapter. There is a workaround but it doesn’t seem to work for everyone running Windows 11. This might be due to different Bluetooth adapters, and PC specifications but you can try it nonetheless before investing in a Bluetooth adapter.
3.1 Buy a Bluetooth adapter
Bluetooth adapters are external devices that connect with your PC to provide high res Bluetooth connectivity that otherwise isn’t possible with in-built adapters. These adapters show up as a single device when connected to headsets and support high bandwidth connections which helps deliver high res audio output while having enough bandwidth to get your Mic working as well.
We recommend you refer to a few reviews before investing in an adapter to make sure that Airpods work as intended with the adapter that you plan on buying.
3.2 Disable BT service and Wireless iAP functionality
Disabling these two services seems to provide enough bandwidth on some Bluetooth adapters that can get high res audio output and mic working for your Airpods. Use the guide below to get you started.
Launch the Start menu, search for ‘Network connections’ and launch the same from your search results.

Right-click on your BT adapter from the list and select ‘Disable’.

Close the network connections window now and open the control panel instead. Launch the Start menu and search for the same to get you started.
Click on the drop-down menu in the top right corner and select ‘Large icons’.
Click on ‘Devices and printers’.
Select ‘Airpods’ and hit Alt + Enter on your keyboard.
Switch to the ‘Services’ tab by clicking on the same at the top of the window.
Disable ‘Wireless iAP’ service by unchecking the same.

Click on ‘Ok’ once you are done.

And that’s it! Try testing the audio and mic now. If everything is working as intended then you managed to get both high res output and the mic working for Airpods with your PC.
Related: How to Turn Off Message Announce on Airpods [Announce Notifications]
How to reconnect Airpods

As you might have noticed, Airpods now efficiently reconnect to Windows 11 whenever the case is opened, however, this is only until you connect Airpods to another device. Once connected, Airpods will no longer connect with your Windows 11 device even if you have the case open and try to connect manually.
The trick here is that you need to enter pairing mode on your Airpods and then hit ‘Connect’ in the Settings app. Hold down the Setup button at the back of your Airpods with the lid open until you see a flashing white light. This means you have entered the pairing mode and you can now hit ‘Connect’ on your PC.
You won’t have to remove and re-pair Airpods every time on your PC when reconnecting, but you will have to enter pairing mode on Airpods to reconnect. In addition to this, if you do not connect Airpods to another device, then you can simply enjoy an automatic connection when you open the Airpods lid with Bluetooth turned on, on your PC.
Improving AirPods experience on Windows: What to know
Another way in which you can enhance your experience is by using third-party OEM EQs and in-built apps to boost the volume and dynamic space of your audio signal. If you bought a laptop or a pre-built in the past 3 years then you likely have a dedicated audio app to control your audio experience.
This is not the ideal solution by miles but it should help you at least get a manageable experience when using Airpods with their default configuration. For example, if you have an Asus device then you likely have access to Sonic Studio 3. The configuration below helps deliver a fairly decent experience without pushing the Airpods drivers too much.

How to view the battery status for Airpods

This is where you can use third-party apps to view the battery status of your Airpods. We recommend using Magicpods, a paid app that allows you to not only view your battery status but also avail ear detection, beautiful animations, and an onscreen windows tile. Magicpods also has a trial which can be availed at the Microsoft Store using this link.
Can you control playback in Windows 11?
Yes! This is one thing that seems to work right out of the box with Windows 11. We tried to control the playback in Spotify and YouTube (Microsoft Edge) and both seemed to work flawlessly with our pair of Airpods (Gen 1).
However, there is currently no way to customize the behavior of your taps and presses within Windows itself. You can, however, customize your pair of Airpods on an iOS or Mac device and the customizations should work within Windows 11 as well.
How to get the best possible audio quality
If you wish to get the maximum audio quality out of your Airpods, then we recommend you disable the following services using the guide below. You will lose the functionality to use your mic but get the best possible audio quality on your PC. Let’s get started.
Launch the Start menu, search for ‘Control Panel’ and launch the same from your search results.
Click on the drop-down menu in the top right corner and select ‘Large icons’.
Click on ‘Devices and printers’.
Click and select your pair of Airpods from the list and press Alt + Enter on your keyboard.
Click and switch to the ‘Services’ tab at the top of your screen.
Now disable the following services by unchecking the same from the list on your screen.
- Handsfree Telephony
- Wireless iAP

Click on ‘Ok’ to save your changes.

We now recommend you restart your PC. Once restarted, you should be able to enjoy 44Khz – 48KHz audio on your PC.
Problem connecting Airpods to Windows? Reset your Airpods first!
This can be inconvenient as you will have to re-pair your Airpods with every device you own however, this is a known fix for most issues that you might be having with Audio or Connection on Windows. Resetting your Airpods will allow you to start afresh and pairing them first with Windows should help get everything working as intended. Use the guide below to reset your pair and then connect it to Windows using the guide above.
Note: Make sure you remove Airpods from your PC as a device. We recommend you use the guides in this post to remove it from the Control Panel first and then subsequently from the Device Manager (if it shows up).
Resetting Airpods is a fairly simple process, place your Airpods in the case and leave it alone for a few minutes. Now come back, open the lid and hold down the Setup button at the back of your Airpods for around 15 seconds. You should then see the light flash Amber and then white in color. Now close the lid, enter pairing mode and try connecting them to your Windows 11 PC as a fresh device.
If everything goes correctly, you should have audio and connection working on your device. You can now use the guide above to configure your Airpods as intended.
How to use AirPods in video conferencing apps?
This depends on your BT driver version and whether you are using Windows 11 or Windows 10. If you are using Windows 10 then Airpods will show up as two different devices, one called ‘Airpods hands-free’ and the other called ‘Airpods stereo’. If you have the latest PC compatible with Windows 11 running the same, then in most cases Airpods will now show up as one device with smart switching already enabled. However, if you have an older BT adapter or older BT drivers then it will indeed show up as two devices on your system as well.
The trick here is to select ‘Airpods hands-free calling’ when trying to use Airpods in video conferencing apps if you have two devices. If you have one, then you re-enable the Telephony service if you had disabled it earlier. Subsequently, you will have to increase your Mic levels to get manageable audio quality on your system.
Lastly, some apps are notorious for having Audio issues with Airpods, namely, Microsoft Teams. Unfortunately, the only way to get the mic working in Microsoft Teams and other affected apps is to enable ‘Listening’ on the device in Audio properties. This however has the drawback of getting to hear your voice with listening enabled.
Why am I unable to control the volume in some apps?
Some apps that take exclusive control of audio output devices, will prevent you from adjusting your audio or volume when using the app. This is another issue that mainly plagues video conferencing services, especially when using their web apps.
If you are facing this issue then we recommend you either close the app, adjust your volume to the appropriate levels and restart it on your PC. If that is not an option, then you can use the desktop app instead of the web app to control your volume output as intended during the video calls.
We hope this guide helped you get familiar with Airpods on Windows 11. While not completely there, Windows 11 does bring some default connectivity and audio improvements when pairing with Airpods now. How was your experience? Did you face any issues? Feel free to share your thoughts in the comments section below.
RELATED:
- iOS 15 AirPods Not Working Fix
- How to Turn On Spatial Audio on iPhone
- My Airpods Are Connected But No Sound: Fix
- How to Turn Off Head Tracking on iPhone
- What is Wide Spectrum on iPhone?
- How To Get ‘Left Behind’ Alerts on iPhone