![]()
Download Article
The complete guide to compiling C code with GCC on Linux and Windows
![]()
Download Article
- Using Linux
- Using Windows Subsystem for Linux
- Using MinGW for Windows
- Q&A
- Tips
|
|
|
|
Are you ready to turn your C code into an executable program? The GNU C compiler, also known as GCC, is a simple Linux-based C compiler that’s easy to use from the command line. If you’re using Linux, including Ubuntu, Fedora, and Linux Mint, you can install GCC from your distribution’s package manager. On Windows 10 and 11, you can use GCC in a Windows Subsystem for Linux (WSL) shell, or by installing an open source tool called MinGW. This wikiHow guide will teach you the easiest ways to compile a C program from source code using GCC.
Things You Should Know
- To make sure GCC is installed, run the command gcc —version.
- Type gcc source_file.c -o program_name and press Enter to compile your source code.
- Replace source_file with the name of your source code file, and program_name with the name you’d like to give your compiled program.
-

1
Install your distribution’s build tools. Most versions of Linux don’t come with GCC already installed. Fortunately, it’s easy to install GCC and other required tools (including make, G++, and general development libraries) for compiling software on any version of Linux:
-
Ubuntu, Debian, & Linux Mint:
- In a terminal window, type sudo apt update and press Enter.
- Type sudo apt install build-essential and press Enter.[1]
- Type gcc --version and press Enter to verify your installation.
-
CentOS, Fedora, and Red Hat:
- In a terminal window, type sudo dnf group install "Development Tools" and press Enter.[2]
- Type gcc --version and press Enter to verify your installation.
- In a terminal window, type sudo dnf group install "Development Tools" and press Enter.[2]
-
Ubuntu, Debian, & Linux Mint:
-
2
Go to the directory that contains your source code. Use the cd command to change to the directory in which you’ve saved the source code you want to compile.
- For example, if your source code is in a folder called Documents that’s inside your home directory, use cd ~/Documents.
Advertisement
-
3
Type gcc -o [executable_name] [source_file].c and press ↵ Enter. Replace “[source_file].c” with the name of your source code file, and “[executable_name]” with the name you’d like to give your compiled program.
- If you need to compile a program from multiple source files, use the syntax gcc -o [executable_name] sourcefile1.c sourcefile2.c sourcefile3.c.
- If you see errors and want to see more information about them, use gcc -Wall -o errorlog file1.c.[3]
Then, view the “errorlog” file in the current directory with cat errorlog. - To compile multiple programs at once with multiple source code files, use gcc -c file1.c file2.c file3.c.
-
4
Run your newly-compiled program. Type ./[executable_name] but replace “[executable_name]” with the name of your program.


Advertisement
-
1
Open a bash shell in Windows Subsystem for Linux. If you’re using Windows 10 or Windows 11 with Windows Subsystem for Linux installed, you can easily compile software with the GCC compiler. However, you’ll need to install GCC first, as it isn’t installed automatically.
- If you haven’t already enabled Windows Subsystem for Linux (WSL), you can install it with a single command from the command prompt or PowerShell. Start Command Prompt or PowerShell as an administrator, and then run this command to install Ubuntu: wsl --install.[4]
- If you see the WSL help text when running the command, you may have already enabled WSL. Instead, run the command wsl --list –online to see a list of Linux distributions, then use wsl --install -d <DistroName> (e.g., Ubuntu) to install Ubuntu.
- Once installed, you can open an Ubuntu bash shell by typing ubuntu into the Windows Search bar and clicking Ubuntu in the search results.[5]
- If you haven’t already enabled Windows Subsystem for Linux (WSL), you can install it with a single command from the command prompt or PowerShell. Start Command Prompt or PowerShell as an administrator, and then run this command to install Ubuntu: wsl --install.[4]
-
2
Install the build tools for Ubuntu. These tools include the GCC compiler, as well as all of the libraries you’ll need to compile and debug C and C++ code.
- Type sudo apt update and press Enter.
- Type sudo apt-get install build-essential gdb and press Enter.[6]
-
3
Go to the directory that contains your source code. Use the cd commanad to change to the directory in which you’ve saved the source code you want to compile.
-
4
Type gcc -o [executable_name] [source_file].c and press ↵ Enter. Replace “[source_file].c” with the name of your source code file, and “[executable_name]” with the name you’d like to give your compiled program.
- If you need to compile a program from multiple source files, use the syntax gcc -o [executable_name] sourcefile1.c sourcefile2.c sourcefile3.c.
- If you see errors and want to see more information about them, use gcc -Wall -o errorlog file1.c.[7]
Then, view the “errorlog” file in the current directory with cat errorlog. - To compile multiple programs at once with multiple source code files, use gcc -c file1.c file2.c file3.c.
-
5
Run your newly-compiled program. Type ./[executable_name] but replace “[executable_name]” with the name of your program.


Advertisement
-
1
Download Minimalist GNU for Windows (MinGW). This is an easy-to-install version of GCC for Windows. You can download the installer from https://osdn.net/projects/mingw.[8]
- To get the latest version of the installer, click the mingw-get-setup.exe link.
- If the download doesn’t begin automatically, click Save or Download when prompted.
- MinGW can only compile 32-bit versions of software. However, all 32-bit software compiled with MinGW will execute properly on a 64-bit system.[9]
- If you need to compile 64-bit software, try MinGW-w64, a port of MinGW. You can download it from https://www.mingw-w64.org.[10]
Alternatively, you can use Windows Subsystem for Linux.
-
2
Install MinGW. Once you’ve downloaded the installer, double-click it to install MinGW.
-
- MinGW recommends using the default installation folder (C:\MinGW). If you must change the folder, don’t use a folder with spaces in the name (e.g. “Program Files”).
-
-
3
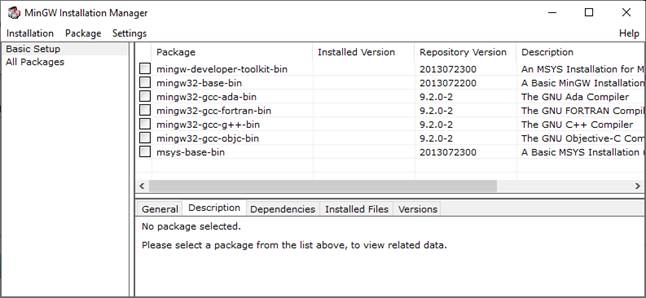
Select Basic Setup to view the basic C compiling tools. If you want more options, you can select All Packages to see all available libraries and build tools.
-
4
Right-click each package and click Mark for Installation. The Basic Setup has about 7 packages listed in the box at the top. Right-click each one of them (or just the ones you want) and click Mark for Installation. This adds an icon with an arrow next to each one and marks it for installation.
- At the very least, you will want to install MinGW32-base and MinGW32-gcc-g++. If you need to compile code written in objective C, you should also mark MinGW32-gcc-objc for installation.
-
5
Install the selected packages. It may take your computer several minutes to install all packages. Use the following steps to install the packages that are marked for installation.
- Click the Installation menu in the upper-left corner.
- Click Apply Changes.
- Click Apply.
- Click Close once the installation is done.
-
6
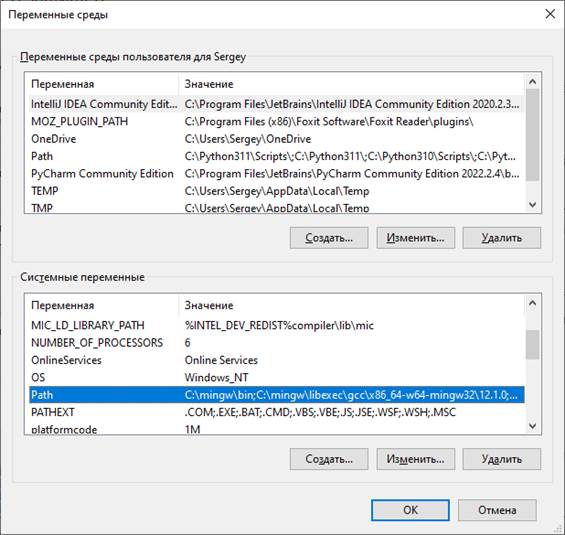
Add the path to MinGW to system environment variables. Use the following steps to add the path to MinGW to system environment variables:
- Type environment in the search bar next to the Start menu.
- Click Edit the system environment variables in the search results.
- Click Environment Variables…
- Select the Path variable in the «System variables» section.
- Click Edit beneath the top box (under “User Variables”)
- Click New.
- Type C:\MinGW\bin in the new space. Note that if you installed MinGW to a different directory, enter C:\path-to-that-directory\bin.
- Click OK, and then OK again. Click the one remaining OK button to close the window.
-
7
Open the command prompt as an administrator. You must be signed in to a Windows account with administrative privileges to open the Command Prompt as an administrator. Use the following steps to open the Command Prompt as an administrator:
- Type cmd in the search bar next to the Start menu.
- Right-click Command Prompt in the search results, then select Run as Administrator.
- Click Yes to allow changes.
-
8
Go to the folder where your source code is saved. For example, if your source code file called helloworld.c is located in C:\Source\Programs, type cd C:\Source\Programs and press Enter.
-
9
Type gcc c –o [program_name].exe [program_name].c and press ↵ Enter. Replace “[program_name]” with the name of your source code and application. Once the program is compiled, you’ll return to the command prompt without errors.
- Any coding errors that appear must be corrected before the program will compile.
-
10
Type the name of your program to run it. If it’s called hello_world.exe, type that in the command prompt and press Enter to start your program.
- If you receive an «Access is denied» or «Permission denied» error message when compiling a program or running the output executable file, check the folder permissions and make sure you have full read/write access to the folder that contains the source code. If that doesn’t work, try temporarily disabling your virus software.[11]
- If you receive an «Access is denied» or «Permission denied» error message when compiling a program or running the output executable file, check the folder permissions and make sure you have full read/write access to the folder that contains the source code. If that doesn’t work, try temporarily disabling your virus software.[11]


Advertisement
Add New Question
-
Question
What do I do if there are two tables in the environmental variables window? In which table and directory should I add an environmental variable?

Use the upper table entitled «User Variables for» and select the «Path» directory.
-
Question
What is a good compiler for C language?
The MinGW GCC compiler will work well.
-
Question
Is the extension .exe necessary in a compiling program?
Theoretically, as long as a file contains the necessary binary machine code, it could be run by a processor. One example is how on Windows, a screensaver is simply a program (just like a .exe) but with the .scr extension. However, as far as I know, most modern operating systems will not attempt to execute a file if it does not identify the file type as being executable, so you would need to somehow trick the operating system into actually starting a new process using the code from the file.
See more answers
Ask a Question
200 characters left
Include your email address to get a message when this question is answered.
Submit
Advertisement
-
Building your code with a -g flag will produce debugging information which the corresponding debugger program, GDB, can use to make debugging work better.
-
Makefiles can be created to make it easier to compile large programs.
-
If you use optimizations heavily, be aware that optimization for speed may come with a trade off in size and sometimes accuracy, and vice versa.
Show More Tips
Thanks for submitting a tip for review!
Advertisement
About This Article
Article SummaryX
1. Open the Terminal in Linux.
2. Type «sudo apt update» and press Enter.
3. Type «sudo apt install build-essential» and press Enter to install GCC and other packages.
4. Type «gcc —version» to verify the GCC installation.
5. Use the «CD» command to navigate to the folder with your source code.
6. Type «gcc [program_name].c –o [executable_name]» to compile the program.
7. Type «»./[executable_name]» to run the newly compiled program.
Did this summary help you?
Thanks to all authors for creating a page that has been read 1,033,299 times.
Is this article up to date?
Для того, чтобы писать программы на C/C++ обычно достаточно установить какую-нибудь интерактивную среду разработки (IDE), например, Visual Studio или Eclipse, однако иногда (обычно в целях обучения студентов) требуется создавать программы в обыкновенном текстовом редакторе и компилировать приложение, используя консоль и компилятор gcc. В Unix системах он обычно установлен прямо «из коробки», а вот на Windows системах такой роскоши не наблюдается. Более того, у многих пользователей возникает множество проблем при установке компилятора. Поэтому нами было принято решение написать данную статью, чтобы помочь всем тем, кому пришлось или приходится мучаться с установкой этого компилятора на Windows.
Кстати, если вдруг на вашей Unix системе не установлен GCC, то поставить его можно командой sudo apt install gcc, введя свой пароль и согласившись на установку.
0. Прежде чем поставить компилятор GCC
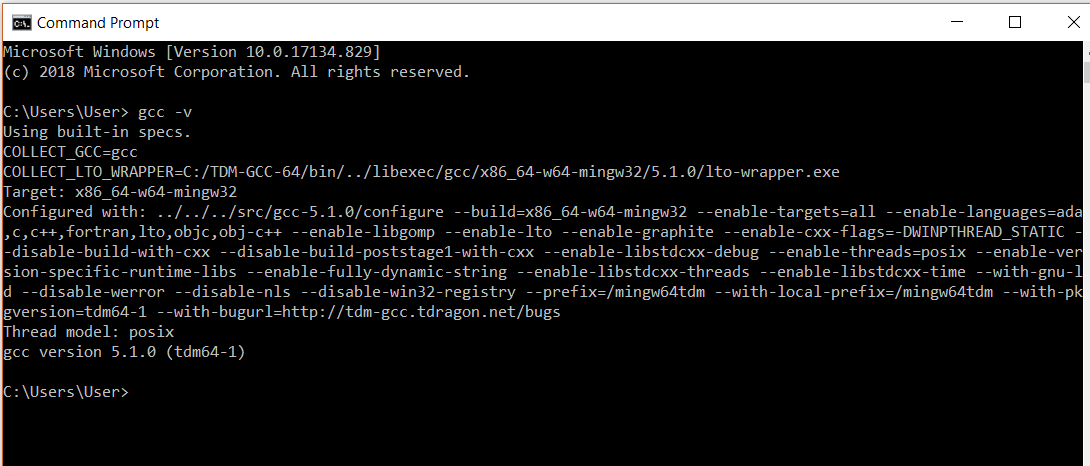
Перед тем как приступить к установке этого компилятора на ваш компьютер, убедитесь в том, что GCC ещё не установлен на нём. Для этого откройте консоль (нажмите Win + R, введите в появившемся окне cmd и нажмите клавишу Enter) и введите следующую команду: gcc --version и нажмите Enter. Если компилятор уже установлен, то выполненная команда выдаст примерно следующую информацию:
gcc (GCC) 8.1.0
Copyright (C) 2018 Free Software Foundation, Inc.
This is free software; see the source for copying conditions.  There is NO
warranty; not even for MERCHANTABILITY or FITNESS FOR A PARTICULAR PURPOSE.
Если в окне консоли появилось сообщение с версией компилятора и другая информация о GCC (второй скриншот), значит компилятор уже установлен и больше дополнительно ничего делать не нужно. А вот если вывод командной строки такой:
"gcc" не является внутренней или внешней
командой, исполняемой программой или пакетным файлом
— значит GCC ещё не установлен в системе, поэтому двигаемся дальше.

Появившееся окно консоли
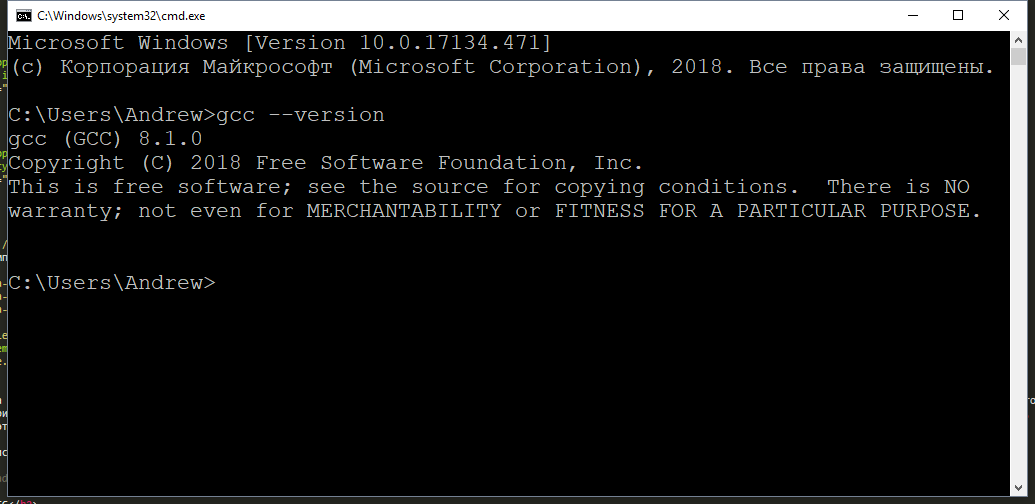
GCC уже установлен
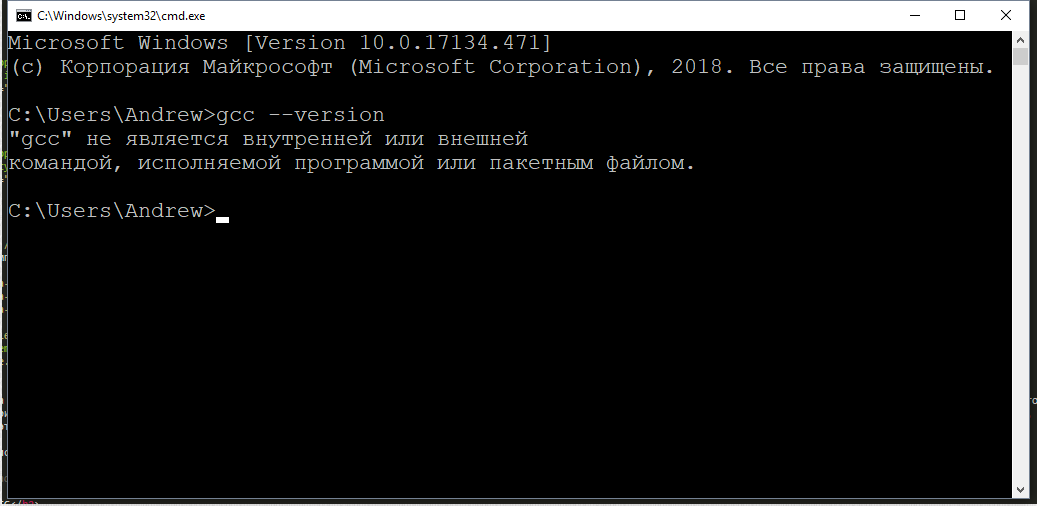
GCC не установлен
1. Скачиваем установщик компилятора
Чтобы поставить GCC на операционную систему Windows, необходимо скачать установочный файл для него. Сделать это можно здесь: equation.com/servlet/equation.cmd?fa=fortran. Найдите в таблице версию компилятора, которая вам больше нравится (мы рекомендуем скачивать самую последнюю, на текущий момент — это версия 8.2.0) и скачайте установщик для вашей системы (32 или 64 бит).
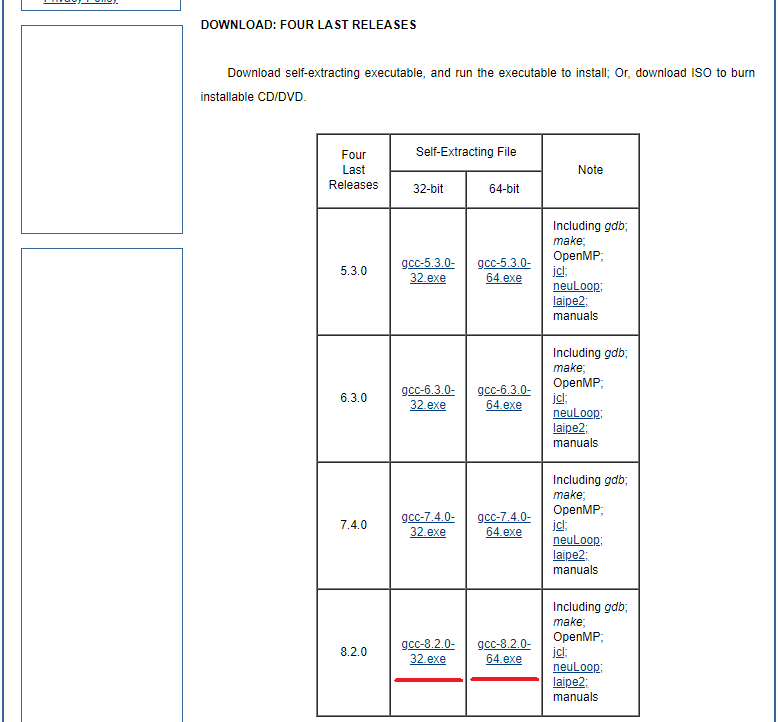
Выбор установочного файла
2. Установка GCC
После того, как файл был скачан, откройте в проводнике папку, в которую был скачан установщик и запустите его, кликнув по файлу дважды левой кнопкой мыши. Появится окно, требующее подтверждения действия. В нём нужно выбрать да (иначе ничего ставиться не будет).
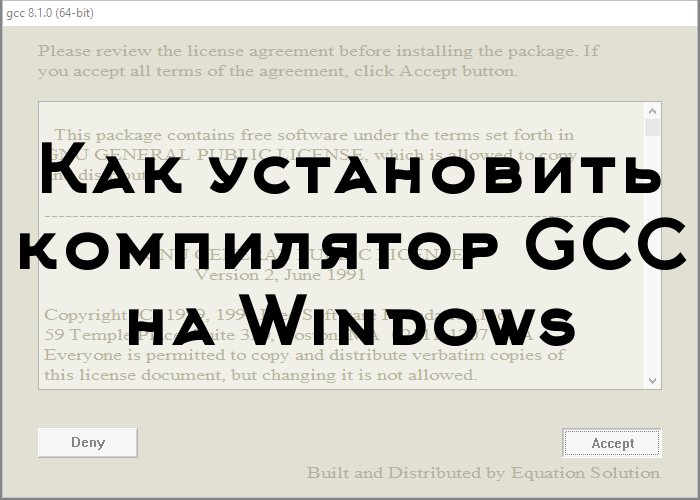
Установщик начнёт работу и отобразит окно с консолью, а также окно с бежевым фоном, в котором попросит прочесть и принять (или отклонить) лицензионное соглашение. Нажимаем Accept.
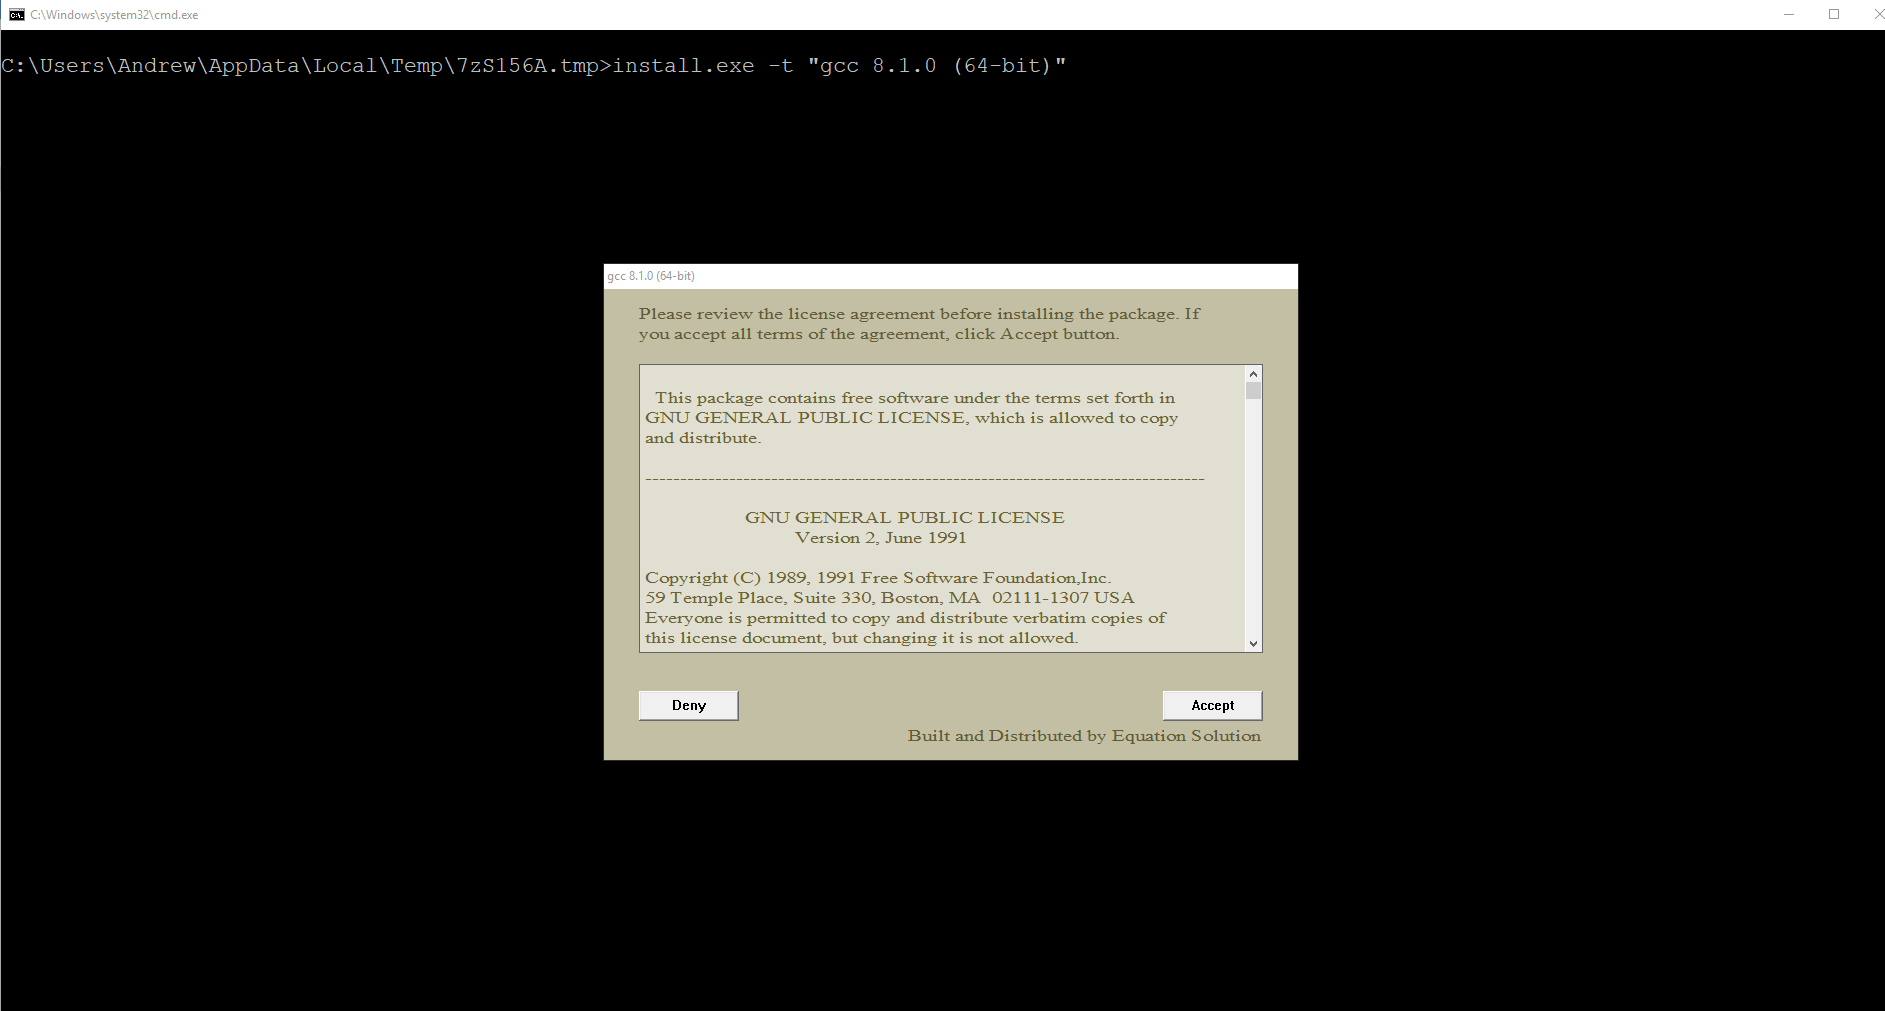
Открывшееся окно с установщиком
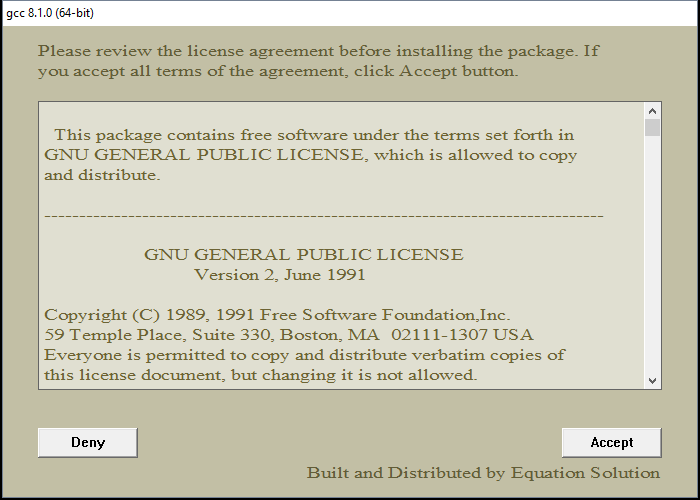
Принимаем лицензионное соглашение
После этого установщик попросит выбрать путь для установки, предложив по умолчанию путь C:\mingw. Если вам категорически не нравится этот путь — измените его на более подходящий на ваш взгляд, в противном же случае просто нажмите Install.
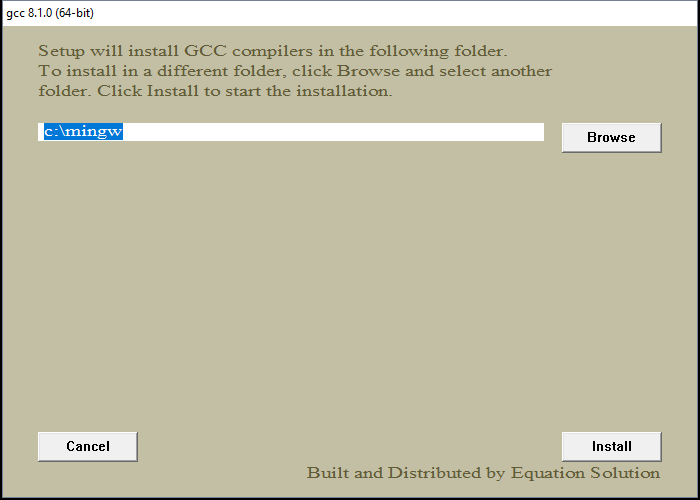
Выбор папки для установки
Теперь остаётся только дождаться окончания распаковки архивов и установки их на компьютер. Как только все файлы будут установлены, инсталятор сообщит об этом, после чего нужно будет нажать на кнопку Finish.
Распаковка файлов и установка
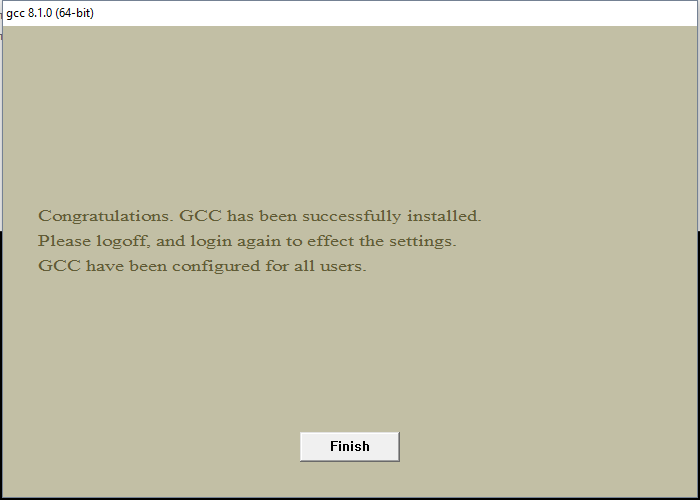
Окончание установки
3. Проверка установки
По завершении работы установщика перезагрузите компьютер и вновь откройте окно командной строки, введите команду gcc --version и нажмите Enter. На этот раз ответ от этой команды должен будет совпадать со вторым скриншотом из пункта 0. Если это не так, то скорее всего работа установщика была некорректно или преждевременно завершена, так что просто начните установку заново.
GCC установлен
Поздравляем! Теперь на вашем компьютере установлен компилятор GCC и вы можете писать программы на языках C и C++, а компилировать их через командную строку!
4. Бонус. Компиляция программ с помощью GCC
Теперь, когда у вас установлен компилятор GCC, вы можете создавать программы на C/C++, используя только текстовый редактор и консоль. Для этого создайте новый файл и назовите его как угодно (например, hello_world). Задайте ему расширение .c вместо .txt. Напишите (или скопируйте) текст программы на С в этот файл. Откройте командную строку (Win + R, cmd) и введите следующую команду gcc hello_world.c и нажмите Enter. Если код не содержит ошибок, то результатом команды будет пустота. В противном же случае вы увидите все ошибки, который нашёл компилятор в программе с указанием места этой ошибки. При этом в проводнике появится файл a.out.exe, который будет являться исполняемым файлом для написанной программы. Чтобы запустить его введите в консоли a.out (для Unix-систем нужно писать ./a.out) и нажмите Enter.
Что ещё за a.out? Непонятно!
По умолчанию при компиляции программ GCC в качестве результата создаём исполняемый файл с именем a.out (если такой уже есть, то b.out и т.д.). Это может быть не очень удобно, если у вас в папке лежит сразу много программ, которые нужно скомпилировать и затем запустить. Неудобно хотя бы тем, что разобраться, что такое a.out, а что такое b.out и c.out может быть непросто. Именно поэтому мы рекомендуем компилировать программы с явным указанием имени выходного файла. делается это так: gcc имя_файла.c -o имя_программы.
В результате выполнения такой программы вместо a.out будет создаваться файл с именем, заданным в имя_программы. Например, если для файла hello_world.c мы хотим получить программу hello, то компилировать нужно такой командой: gcc hello_world.c -o hello.
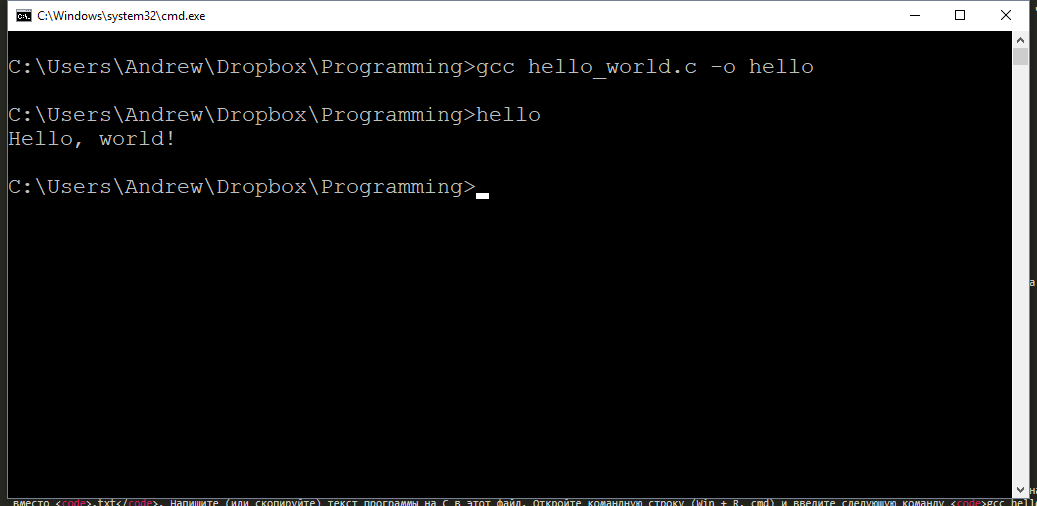
Результат компиляции и запуска программы
Используя понятные имена выходных программ (исполняемых файлов), вы гарантируете себе простоту работы и сокращение времени на разбирательство спустя долгое время.
Возможно, также будет интересно: как установить Sublime Text для работы с C/C++.

Программист, сооснователь programforyou.ru, в постоянном поиске новых задач и алгоритмов
Языки программирования: Python, C, C++, Pascal, C#, Javascript
Выпускник МГУ им. М.В. Ломоносова
We usually use a compiler with a graphical user interface, to compile our C program. This can also be done by using cmd. The command prompt has a set of steps we need to perform in order to execute our program without using a GUI compiler. In this article we would be understanding how to compile C program in command prompt.
So let us get with this article on how to compile C progam in command prompt,
How to Compile C Program in Command Prompt?
STEP 1: Check for Compiler
Run the command ‘gcc -v’ to check if you have a compiler installed. If not you need to download a gcc compiler and install it. You can search for cmd in your windows system to open the command prompt.
STEP 2: Create the Program
Create a c program and store it in your system. I have written a program to find the Armstrong Number and store it in the directory user. We would be using following code.
#include <stdio.h>
int main()
{
int num, original, rem, sum = 0;
printf("Enter a three digit Number: ");
scanf("%d", &num);
original = num;
while (original != 0)
{
rem = original%10;
sum =sum + rem*rem*rem;
original =original/ 10;
}
if(sum == num)
printf("%d is an Armstrong number.",num);
else
printf("%d is not an Armstrong number.",num);
return 0;
}
STEP 3: Change the Directory
Change the working directory to where you have your C program. You can do that by using the command ‘cd’, which changes the directory. We need to pass the name of the directory in which the program is stored.
Example: >cd Desktop
Our program is already in the user directory so, we don’t need to change it.
STEP 4: Compile the program
The next step is to compile the program. To do this we need to use the command gcc followed by the name of the program we are going to execute. In our case, we will use Armstrong.c.
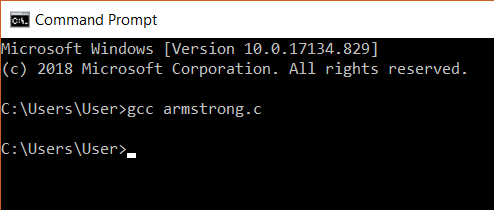
After this, an executable file will be created in the directory that your c file exists in. Eg: Armstrong.exe
STEP 5: Run the Program
In the next step, we can run the program. This is done by simply giving the name of the executable file without any extension. On giving this we will get an output. Here, our Armstrong code is executed and we got output for this code.

But What Happens Inside the Compilation Process?
The term “compile” refers to the procedure by which C language source code is translated into machine code. C is a middle-level programming language, so we need a compiler to turn it into machine code before we can run it.
During the compilation process, the C program goes through the following steps:

With this we come to the end of this blog on ‘How To Compile C program in Command Prompt’. I hope you found this informative and helpful, stay tuned for more tutorials on similar topics.You may also checkout our training program to get in-depth knowledge on jQuery along with its various applications, you can enroll here for live online training with 24/7 support and lifetime access.
Got a question for us? Mention them in the comments section of this blog and we will get back to you.
Recommended videos for you

Nandan Nilekani on Entrepreneurship
Watch Now

Microsoft Azure Certifications – All You Need To Know
Watch Now
Прежде чем
двигаться дальше, нам нужно настроить рабочее место для написания программ на
Си. А, именно, установить (если его еще нет) компилятор и интегрированную среду
разработки для написания, компиляции и отладки программ. Начнем с выбора и
установки компилятора. На сегодняшний день одним из самых популярных является
компилятор gcc. Это сокращение
от:
GNU Compiler Collection
Если вы
работаете под ОС Linux, то, этот компилятор должен быть уже
установлен в системе. Если же вы работаете под ОС Windows, то компилятор
нужно устанавливать самим. Давайте это сделаем.
Так как я
работаю под ОС Windows, то буду показывать порядок установки
всех средств именно на этой ОС. Итак, первым делом нужно перейти на официальный
сайт компилятора gcc, предназначенных для ОС Windows:
https://gcc.gnu.org
Далее, переходим
в раздел Download/Binaries (бинарники) и
видим несколько вариантов способов установки gcc на систему. Наиболее
удобный, на мой взгляд, является использование, так называемого, порта MinGW с установкой
только необходимых (минимального набора) компонент компилятора gcc.
Здесь есть два
варианта MinGW: старый
32-битный и новый – 64-битный. Я рекомендую воспользоваться старым вариантом,
т.к. он хорошо себя зарекомендовал и, что называется, проверен временем. С
новым могут возникать проблемы, да и для языка Си стандарта C99 он явно
избыточен.
Нажимаем на
ссылку MinGW и нас
перенаправляют на страницу:
https://osdn.net/projects/mingw/
и здесь нам
нужно скачать установщик mingw-get-setup.exe.
Запускаем эту
программу. Появится следующее диалоговое окно:
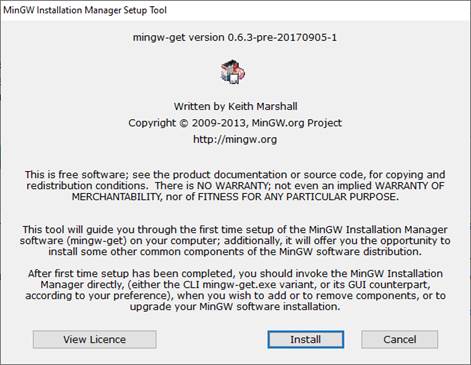
Нажимаем здесь
кнопку «Install». В следующем
окне соглашаемся со всеми настройками по умолчанию, в том числе и с маршрутом
распаковки «C:\MinGW» (если вас он
не устраивает, то можете изменить на свой) и нажимаем на кнопку «Continue». Начнется
скачивание и установка. После установки этот инсталлятор автоматически
запустится:
В диалоговом
окне нам нужно выбрать все необходимые компоненты для установки компилятора gcc для языка Си. Они
следующие:
- mingw32-gcc-bin (после отметки
также дополнительно отмечаются другие компоненты, с которыми mingw32-gcc-bin работает
совместно); - mingw32-gcc-g++-bin (для установки
линкера для компилятора Си); - mingw32-make-bin;
- mingw32-gdb-bin (дебаггер, для
отладки кода).
После этого в
меню «Installation» выбираем пункт
«Apply Changes» и в окне
нажимаем кнопку «Apply»:

Начнется
установка выбранных компонент для компилятора gcc в указанный
каталог.
Далее, нужно
прописать в системе путь к каталогу компилятора gcc. Для этого
нажимаем правую кнопку мыши на кнопке «Пуск» и выбираем «система». В
появившемся диалоговом окне щелкаем на «Дополнительные параметры системы», и
затем «Переменные среды…». Появится еще одно диалоговое окно, в котором нас
будет интересовать системная переменная Path:
Два раза щелкаем
по строчке с переменной Path, появится следующее окно, в котором
следует добавить путь «C:\mingw\bin» в переменную Path.
Все, компилятор gcc установлен в ОС Windows и готов к
работе. Чтобы в этом убедиться, откроем командное окно (комбинация Win+R, набираем cmd и кнопка «OK»), набираем в
нем gcc и должны
увидеть следующие строчки:
Если у вас все
отображается именно так, то компилятор был успешно установлен.
Установка и настройка Visual Studio Code
Следующим шагом
нам нужно установить интегрированную среду для написания, компиляции и отладки
наших программ написанных на языке Си. Для этого, на мой взгляд, удобно
воспользоваться программой Visual Studio Code, доступной на
странице официального сайта:
https://code.visualstudio.com
Именно в ней я
буду писать и показывать все тексты программ данного курса. При желании, вы,
конечно, можете использовать любую другую среду, главное, чтобы в ней было
удобно компилировать и отлаживать программы на Си.
Первым делом,
конечно же, нужно скачать дистрибутив программы Visual Studio Code и установить
себе на компьютер. Ничего сложно в этом нет. Далее, открываем эту программу.
Для начала работы нам нужно определиться, где будут располагаться файлы
текущего проекта. Делается это очень просто. На диске в любом желаемом месте
создается папка, которая, затем, выбирается в программе VS Code. В моем случае
– это путь:
D:\Visual
Studio\Code\course
У вас может быть
любой другой. Сейчас каталог пустой. Поэтому для начала работы в него нужно
поместить файл, в котором будем писать текст программы. Например, его можно
назвать так:
lessons.c
Обратите
внимание, файл с текстом программы на языке Си должен иметь расширение «c». Теперь здесь
можно написать простую программу. Пусть это будет классический «Hello, world!»:
#include <stdio.h>

int main(void)
{
    printf("Hello, world\n");
    return 0;
}
Не беспокойтесь
пока о том, что содержимое этой программы вам, возможно, непонятно. Ее мы
подробно еще будем разбирать. Пока, на этом этапе, нам нужно просто настроить
среду разработки для компиляции и запуска программ на Си.
По идее, мы уже
сейчас можем достаточно просто скомпилировать эту программу. Для этого нажимаем
Ctrl + ~, появится
окно powershell и в нем вручную
можно вызвать компилятор gcc следующим образом:
gcc lessons.c
Если мы все
сделали правильно, то в текущем каталоге появится исполняемый файл a.exe, который
выводит в консоль сообщение «Hello, world!»:
.\a
Конечно,
постоянно выполнять компиляцию через терминал очень неудобно, поэтому нам нужно
настроить редактор VS Code под компиляцию
Си-программ. Для этого необходимо установить некоторые полезные расширения (extensions). Щелкаем слева
на кнопку с квадратиками и в поиске набираем «c lange»:
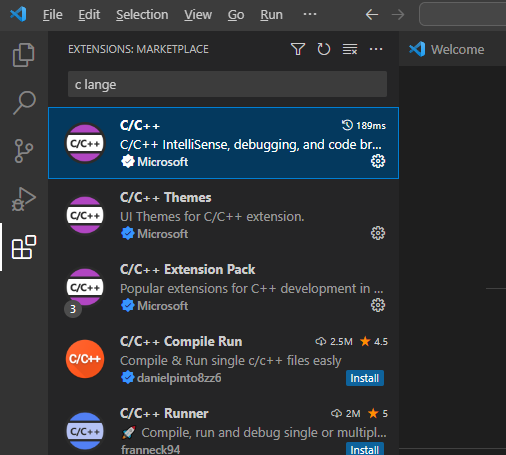
Выбираем первый
компонент C/C++ компании Microsoft, которая
позволяет выполнять разработку программ на языке Си.
После этого,
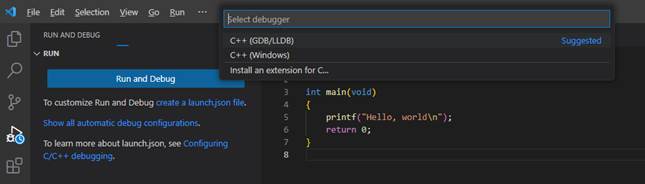
слева щелкаем на кнопку с треугольником (Run and Debug) и нажимаем на
кнопку «Run and Debug». Сверху в
выпадающем списке следует выбрать «C++ (GDB/LLDB)» (это ранее
установленный компилятор gcc), затем, скомпилировать и выполнить
программу в режиме Debug (отладки):
Например, можно
поставить в любом месте программы точку останова, снова запустить, и программа
остановится на выбранной строке. Это, как раз и есть процесс отладки кода.
Далее установим
еще одно расширение, которое будет отвечать за простой процесс запуска кода без
режима отладки. Чтобы можно было быстро и просто запустить программу и
посмотреть, что получается. Для этого переходим на вкладку «extensions» и набираем:
code runner
Это расширение
позволяет с помощью комбинации клавиш Ctrl+Alt+N компилировать и запускать
код. Результат отображается во вкладке «OUTPUT».
Настройка компилятора на стандарт C99
Последнее, что
нам осталось – это настроить компилятор на стандарт C99. Формально,
это делается с помощью специального флага -std следующим
образом:
gcc
-std=c99 -o outputfile sourcefile.c
Такой флаг нам
нужно добавить в настройках компилятора. Первым делом откроем файл tasks.json в
текущем каталоге и пропишем для ключа «args» первым
элементом этот ключ:
«args»: [
«-std=c99»,
…
]
Этот флаг будет
срабатывать при перекомпиляции проекта – комбинация клавиш Ctrl+Shift+B.
Точно такой же
ключ нужно добавить для компилятора, используемого расширением «Code Runner». Для этого переходим в меню File->Preferences->Settings и в строке набираем «code
runner run in terminal». Ставим
галочку.
Затем, в этом же
окне настроек набираем в строке «Run Code Configuration». Находим в настройках
раздел «Code-runner: Executor Map» и нажимаем на редактирование. Для ключа «c» после «gcc» прописываем «-std=c99» и ключ «code-runner.runInTerminal» устанавливаем в
false. Все, теперь
компилятор будет ориентироваться на стандарт c99 при
компиляции наших программ.
Видео по теме
What command does one have to enter at the command line in Windows 7 to compile a basic C program?
Like I am literally wondering what you type in the command prompt, to compile a .c file.
I tried:
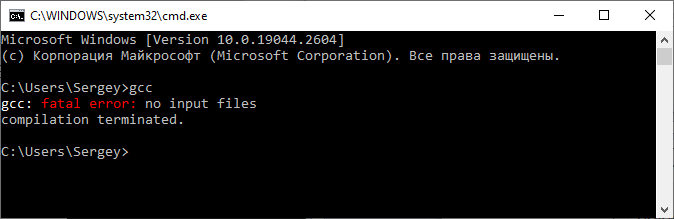
> gcc foo.c
But it says:
'gcc' is not recognized as an internal or external command,
 operable program or batch file.
I also tried:
> minGW foo.c
But I got back:
 'minGW' is not recognized as an internal or external command,
  operable program or batch file.
I have a path environment variable set to where MinGW is installed:
C:\Program Files (x86)\CodeBlocks\MinGW\bin
I can’t really find any information on where I’m going wrong, and can’t find anything in the official MinGW documentation, as it seems like this is something so simple, sort of an embarrassing question, that it’s figured people know what to do?
![]()
asked May 19, 2012 at 1:48
![]()
2
It indicates it couldn’t find gcc.exe.
I have a path environment variable set to where MinGW is installed
Maybe you haven’t set the path correctly?
echo %path%
shows the path to gcc.exe? Otherwise, compilation is similar to Unix:
gcc filename.c -o filename
![]()
answered May 19, 2012 at 2:09
![]()
8
I’ve had this problem and couldn’t find why it kept happening. The reason is simple: Once you have set up the environment paths, you have to close the CMD window, and open it again for it be aware of new environment paths.
![]()
answered Feb 24, 2014 at 11:32
![]()
Herz3hHerz3h
1111 silver badge2 bronze badges
1
First:
Add your minGW’s bin folder directory ( ex: C\mingw64\bin ) in System variables => Path. visual example
Compile:
.c: gcc filename.c -o desire
.cpp: g++ filename.cpp -o desire
Run:
desire/ or ./desire
answered Jan 10, 2019 at 3:52
![]()
AharrFarisAharrFaris
1011 silver badge5 bronze badges
0
Just set the environment variable to the EXACT path to gcc.exe like this:
C:\Program Files (x86)\CodeBlocks\MinGW\bin\gcc.exe
![]()
pb2q
58.8k19 gold badges147 silver badges148 bronze badges
answered Sep 11, 2012 at 7:44
![]()
makmak
1,3841 gold badge13 silver badges21 bronze badges
1
I encountered the same error message after unpacking MinGW archives to C:\MinGW and setting the path to environment variable as C:\MinGW\bin;.
When I try to compile I get this error!
gcc: error: CreateProcess: No such file or directory
I finally figured out that some of the downloaded archives were reported broken while unpaking them to C:\MinGW (yet I ignored this initially).
Once I deleted the broken files and re-downloaded the whole archives again from SourceForge, unpacked them to C:\MinGW successfully the error was gone, and the compiler worked fine and output my desired hello.exe.
I ran this:
gcc hello.c -o hello
The result result was this (a blinking underscore):
_
![]()
answered Oct 9, 2012 at 2:54
![]()
KunleKunle
111 bronze badge
I had the same problem with .c files that contained functions (not main() of my program). For example, my header files were «fact.h» and «fact.c», and my main program was «main.c» so my commands were like this:
E:\proj> gcc -c fact.c
Now I had an object file of fact.c (fact.o). after that:
E:\proj>gcc -o prog.exe fact.o main.c
Then my program (prog.exe) was ready to use and worked properly. I think that -c after gcc was important, because it makes object files that can attach to make the program we need. Without using -c, gcc ties to find main in your program and when it doesn’t find it, it gives you this error.
![]()
answered Jan 19, 2015 at 10:48
![]()
You can permanently include the directory of the MinGW file, by clicking on My Computer, Properties, Advanced system settings, Environment variables, then edit and paste your directory.
![]()
jgillich
71.8k6 gold badges58 silver badges86 bronze badges
answered Apr 7, 2015 at 21:32
![]()
Instead of setting the %PATH% you may enter your msys shell. In standard msys and mingw installation gcc is in path, so you can run gcc or which gcc.
I have a batch file sh.bat on my Windows 7, in %PATH%:
C:\lang\msys\bin\sh.exe --login %*
Whenever I want to use gcc I enter cmd, then sh, then gcc. I find it very convenient.
When working with linux originated software avoid spaced directories like Program Files. Install them rather to Program_Files. The same regards to tools that you may want to run from msys environment.
answered Sep 20, 2012 at 8:58
![]()
JarekczekJarekczek
7,4753 gold badges46 silver badges66 bronze badges
If you pasted your text into the path variable and added a whitespace before the semicolon, you should delete that and add a backslash at the end of the directory (;C:\Program Files (x86)\CodeBlocks\MinGW\bin
answered Jan 4, 2013 at 17:49
![]()
I once had this kind of problem installing MinGW to work in Windows, even after I added the right System PATH in my Environment Variables.
After days of misery, I finally stumbled on a thread that recommended uninstalling the original MinGW compiler and deleting the C:\MinGW folder and installing TDM-GCC MinGW compiler which can be found here.
You have options of choosing a 64/32-bit installer from the download page, and it creates the environment path variables for you too.
answered Oct 7, 2014 at 13:54
![]()
Feyisayo SonubiFeyisayo Sonubi
1,0525 gold badges15 silver badges27 bronze badges
Where is your gcc?
My gcc is in «C:\Program Files\CodeBlocks\MinGW\bin\».
"C:\Program Files\CodeBlocks\MinGW\bin\gcc" -c "foo.c"
"C:\Program Files\CodeBlocks\MinGW\bin\gcc" "foo.o" -o "foo 01.exe"
![]()
answered Jul 10, 2015 at 19:53
![]()
AmirAmir
1,64819 silver badges26 bronze badges
I am quite late answering this question (5 years to be exact) but I hope this helps someone.
I suspect that this error is because of the environment variables instead of GCC. When you set a new environment variable you need to open a new Command Prompt! This is the issue 90% of the time (when I first downloaded GCC I was stuck with this for 3 hours!) If this isn’t the case, you probably haven’t set the environment variables properly or you are in a folder with spaces in the name.
Once you have GCC working, it can be a hassle to compile and delete every time. If you don’t want to install a full ide and already have python installed, try this github project: https://github.com/sophiadm/notepad-is-effort
It is a small IDE written with tkinter in python. You can just copy the source code and save it as a .py file
answered May 21, 2017 at 18:37
![]()
dwmyfrienddwmyfriend
2241 silver badge10 bronze badges
In Windows 10, similar steps can be followed in other versions of windows.
Right Click on «My Computer» select Properties, Goto Advanced System Settings -> Advanced -> Select «Environment Variables..» .
Find «Path» select it and choose edit option -> Click on New and add «C:\MinGW\bin» (or the location of gcc.exe, if you have installed at some other location) -> Save and restart command prompt. Gcc should work.
answered Jan 18, 2018 at 5:15
![]()
On Windows 11, I installed MinGW-w64 using the Scoop package manager.
Then I fired up MSYS2 from the Start Menu and installed the mingw-w64-x86-toolchain package.
After that, the gcc executable could be launched by specifying /mingw64/bin/gcc.
answered Apr 7 at 6:26
![]()