Вы можете заметить ошибки и сбои в работе устройства, данные стали занимать много места на диске вашего ПК, компьютер стал медленнее работать. Это значит, что пользователю необходимо очистить кэш Windows 10 для устранения неполадок в системе, повышения производительности и увеличения свободного места на диске.
Кэш Windows — совокупность различных данных, помогающая компьютеру быстрее выполнять свою работу. Кэшированные файлы могут быть либо результатом более раннего запроса, либо копией существующих данных, хранящихся в других местах.
Содержание:
- Как почистить кэш Windows 10 в параметрах системы
- Удаляем системный кэш Windows 10 с помощью утилиты «Очистка диска»
- Как очистить кэш Windows вручную
- Как почистить кэш Windows в Проводнике
- Как почистить кэш Microsoft Store на компьютере Windows 10
- Как в Windows очистить кэш DNS
- Как очистить кэш расположения на компьютере Windows
- Автоматическая очистка кэша Windows 10 с помощью «Контроля памяти»
- Использование сторонних программ для очистки кэша
- Выводы статьи
- Как очистить кэш Windows 10 (видео)
Операционная система Windows использует файлы кэша для выполнения своих задач. Кэшированные данные в Windows обычно состоят из временных файлов, которые необходимо использовать вашему компьютеру:
- Ресурсы, необходимые приложениям и программам для быстрой загрузки при открытии в следующий раз.
- Информация о предпочтениях использования.
- Последний компонент приложения, который использовался, чтобы он загружался быстрее, когда вы обратитесь к нему позже. Это может быть определенная часть или функция в приложении.
Эти файлы постепенно накапливаются и занимают некоторое место на диске вашего устройства, кэш становится настолько большим, что это влияет на производительность компьютера. Кэш Windows 10 может стать поврежденным или устаревшим, и это приводит к ошибкам и сбоям в работе ПК.
Во многих ситуациях исправить положение поможет очистка кэша Windows. В этом руководстве мы расскажем о нескольких основных методах для очистки кэша на компьютере в операционной системе Windows 10. В этой статье мы не рассматриваем удаление кэша браузеров.
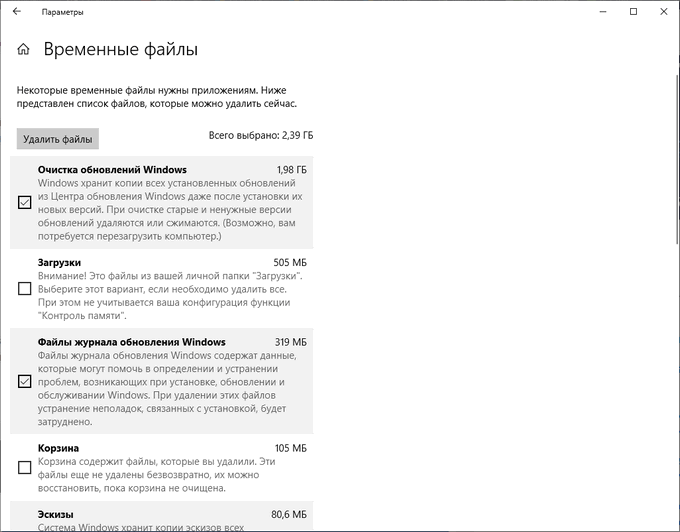
Как почистить кэш Windows 10 в параметрах системы
Вы можете использовать настройки операционной системы, чтобы очистить кэш компьютера Windows 10.
Пройдите несколько шагов:
- Нажмите правой кнопкой мыши на меню «Пуск» в левом углу рабочего стола Windows.
- В окне «Параметры» откройте раздел «Система».
- Перейдите во вкладку «Память».
- Щелкните по опции «Временные файлы», на которой отображена соответствующая информация.

- В окне «Временные файлы» выберите подходящие параметры для удаления данных, а затем нажмите на кнопку «Удалить файлы».
Здесь представлены остаточные файлы из обновлений Windows, временные файлы, файлы эскизов, временные файлы Интернета, диагностические данные и тому подобная информация. Удаление этих данных безопасно и может освободить значительный объем памяти.
Удаляем системный кэш Windows 10 с помощью утилиты «Очистка диска»
В операционную систему встроена программа очистки диска, которая может очищать кэш и удалять временные данные с компьютера.
Выполните следующие действия:
- В поле поиска Windows введите «очистка диска» или запустите приложение, найдя этот инструмент в списке программ меню «Пуск» в папке «Средства администрирования Windows».
- Сразу после запуска приложение подсчитывает место, которое вы сможете освободить на системном диске.
- В окне «Очистка диска (С:)» выберите данные, которые необходимо удалить с компьютера.
- Нажмите на кнопку «Очистить системные файлы».

- Инструмент заново подсчитает объем освобождаемого дискового пространства, и вы снова попадете на эту страницу.
- Выберите файлы, которые вы хотите удалить, а затем нажмите «ОК».
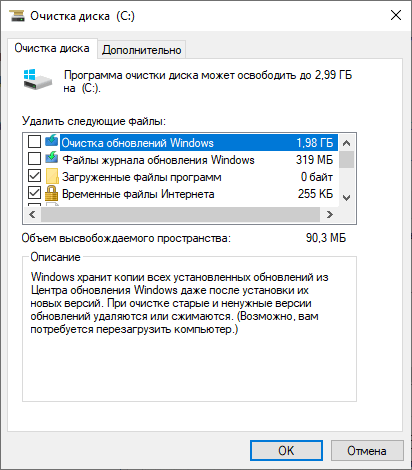
- Появится окно с предупреждением, предлагающее подтвердить, что вы действительно хотите удалить файлы без возможности восстановления. Выберите «Удалить файлы».
- Дождитесь окончания процесса очистки.
Как очистить кэш Windows вручную
Расположение кэша Windows не является фиксированным, наиболее часто он сохраняется в папке «Temp» на диске «C:» и в профиле пользователя. Эти временные файлы можно безопасно удалить.
Временные данные находятся в следующих папках на компьютере:
C:\Windows\Temp

C:\Пользователи (Users)\Имя_пользователя (User)\AppData\Local\Temp
Проделайте следующее, чтобы удалить кэш Windows:
- Закройте запущенные программы на компьютере.
- Нажмите на клавиши «Win» + «R».
- В диалоговом окне «Выполнить» запустите команду «temp».

- На рабочем столе откроется окно Проводника.
- Кликните мышью в открытой папке, а потом нажмите на клавиши «Ctrl» + «A», чтобы выделить все файлы.
- Щелкните правой кнопкой мыши, а в контекстном меню нажмите «Удалить».

- Снова используйте «Выполнить», чтобы открыть другое расположение — «%temp%».

- Выделите и удалите все файлы из временной папки профиля пользователя.

Как почистить кэш Windows в Проводнике
Поскольку большинство кэшированных файлов можно найти в Проводнике, то вы можете оттуда очистить определенные типы данных, например, очистить кэш иконок Windows 10.
Некоторые из этих файлов могут быть скрыты в Проводнике. Перейдите на вкладку «Вид» на панели инструментов Проводника и установите флажок в опции «Скрытые элементы», чтобы отобразить все скрытые файлы.
- Чтобы очистить кэш миниатюр Windows, вы можете перейти в «C:\Users\User\AppData\Local\Microsoft\Windows\Explorer». Удалите из папки «Explorer» все файлы, в именах которых встречается «thumbcache».
- Кэш иконок Windows — скрытый файл с именем «IconCache.db» находится в каталоге «C:\Users\User\AppData\Local». Кроме того, вы также можете найти этот тип кэша в папке «Explorer» с именами включающими «iconcache».
- Из Проводника вы можете удалить кэш обновлений Windows 10. Перейдите в «C:\Windows\SoftwareDistribution\Download» и удалить все содержимое этой папки, чтобы очистить кэш обновлений Windows.
В представленных выше путях до нужных расположений вводите вместо «User» имя пользователя своего компьютера.
Проводник Windows имеет собственный кэш, помимо кэша, созданного системой или другими ресурсами. Удалите эти данные, чтобы повысить производительность или освободить место на диске.
В окне Проводника перейдите во вкладку «Вид» и на ленте нажмите «Параметры». В окне «Параметры папок» во вкладке «Общие» в разделе «Конфиденциальность» в опции «Очистить журнал проводника» нажмите на кнопку «Очистить».

Как почистить кэш Microsoft Store на компьютере Windows 10
Магазин Microsoft Store хранит множество файлов, связанных с установкой приложений и игр, а также ресурсы, используемые для отображения контента в его основном интерфейсе. Вы можете удалить эти файлы кэша, не затрагивая функциональность Microsoft Store или загруженные вами приложения и игры.
Выполните эту инструкцию:
- Щелкните правой кнопкой мыши по меню «Пуск».
- В открытом меню нажмите «Выполнить».
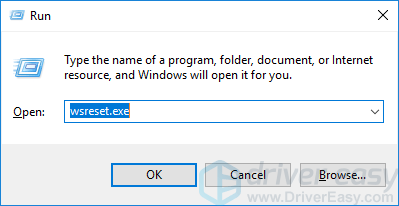
- Введите команду и нажмите на кнопку «ОК»:
wsreset.exe

- На непродолжительное время откроется окно командной строки для очистки данных Магазина Windows, а затем сразу откроется окно Microsoft Store без необходимости предпринимать какие-либо действия.
Как в Windows очистить кэш DNS
В операционной системе Windows постоянно сохраняются данные кэша DNS, чтобы легко подключаться к внешним серверам. Из-за того, что эти данные постоянно накапливаются могут возникать ошибки.
Примерами возможных проблем являются некоторые ошибки: «404 — Страница не найдена» или «Невозможно получить доступ к этой странице, поскольку она была изменена». Очистка кэша DND Windows помогает в решении некоторых проблем с Интернетом.
Сделайте следующее:
- Запустите командную строку от имени администратора.
- В окне интерпретатора командной строки введите команду, а затем нажмите «Enter»:
ipconfig /flushdns

- В результате, кэш DNS будет очищен.
Как очистить кэш расположения на компьютере Windows
Пользователь может очистить кэш расположения в ОС, если там используется эта функция.
Выполните следующее:
- Нажмите на клавиши «Win» + «I».
- В окне приложения «Параметры» откройте «Конфиденциальность».
- В окне «Конфиденциальность» в разделе «Разрешения приложений» выберите «Расположение».
- В следующем окне прокрутите вниз до раздела «Журнал сведений о местоположении». В опции «Очистить историю расположений на этом устройстве:» нажмите на кнопку «Очистить».

Автоматическая очистка кэша Windows 10 с помощью «Контроля памяти»
Контроль памяти — встроенная функция в Windows 10, которая позволяет удалять ненужные данные в случае, если на системном диске компьютера станет недостаточно свободного места. Но, в большинстве случаев этот способ не заменяет описанные выше методы, поскольку эта функция не может найти и удалить все типы файлов кэша.
Измените следующие настройки:
- Щелкните левой кнопкой мыши по меню кнопки «Пуск», а там нажмите на значок «Параметры».
- В приложении «Параметры» сначала перейдите в «Система», а затем в «Память».
- В разделе «Память» нажмите «Настроить контроль памяти и запустить его».
- В опции «Контроль памяти» передвиньте ползунок переключателя в положение «Включено».
- Настройте подходящие интервалы запуска этой функции.

Имейте в виду, что, если вы решите запускать «Контроль памяти» только при нехватке свободного места на диске, это средство может никогда не запуститься. Это ситуация возникает из-за того, что на вашем ПК будет достаточно места.
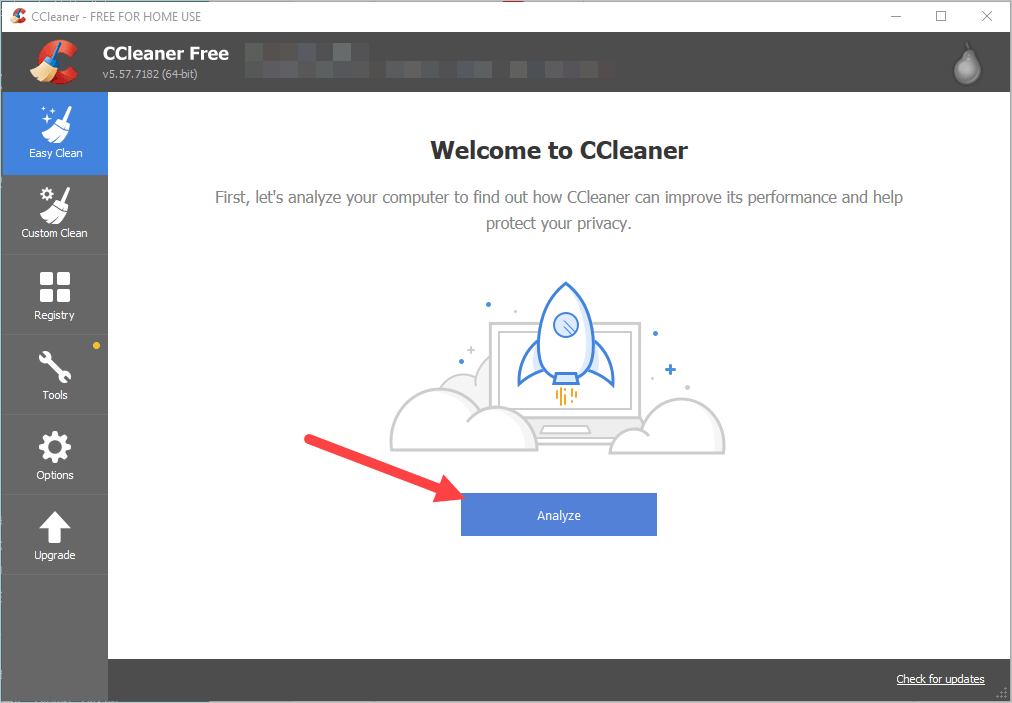
Использование сторонних программ для очистки кэша
Использование стороннего программного обеспечения — самый простой способ очистки кэша на компьютере. Мы покажем вам этот процесс на примере бесплатной версии программы CCleaner. Вы можете использовать другой подобный софт.
Пройдите шаги:
- Запустите программу CCleaner на компьютере.
- Перейдите в раздел «Параметры» и откройте вкладку «Настройки».
- В опции «Домашний экран CCleaner:» установите «Специальная очистка» для того, чтобы самостоятельно определять какую информацию нужно удалять с компьютера.
- В окне CCleaner откройте раздел «Стандартная очистка».
- Во вкладках «Windows» и «Приложения» поставьте или удалите галки с подходящих пунктов настроек.
- Нажмите на кнопку «Анализ».
- После его завершения щелкните по кнопке «Очистка», чтобы удалить ненужные файлы.

Выводы статьи
Некоторым пользователям необходимо знать, как почистить кэш на компьютере Windows. Операционная система сохраняет кэш, чтобы повысить производительность компьютера, но, при переполнении или повреждении, это вызывает проблемы. Помимо замедления работы жесткого диска, файлы кэша могут привести к несовместимости программ, и из-за этого случаются различные сбои.
Очистка кэша — одно из решений, если у вас возникают различные проблемы на ПК с Windows 10. Удалить кэш можно с помощью системных средств и инструментов, или используя сторонние программы.
Как очистить кэш Windows 10 (видео)
Похожие публикации:
- Как удалить временные файлы в Windows 10
- Очистка папки WinSxS: чистим правильно разными способами
- Как узнать размер папки в Windows — 7 способов
- Как ускорить работу ноутбука с Windows
- Как отключить спящий режим в Windows — 5 способов
It’s important to clear the cache on your Windows 10 computer to free up disk space and improve performance. If you don’t know how to do this, just follow the instructions below! They’ll help you clear all types of cache on your Windows 10 computer easily.
To clear cache on your Windows 10 computer
There are a few methods that helps you clear cache of your computer:
- Clean your computer cache with CCleaner
- Clean the temporary files in the settings
- Use Disk Cleanup
- Clear the Windows Store cache
- Clear your browser cache
Method 1: Clean your computer cache with CCleaner
This is the easiest option you can use to clear cache on your Windows 10 computer. CCleaner will help you do this with just only two mouse clicks:
- Download and install CCleaner.
- Run CCleaner, then click Analyze.

- Click Clean All.

This should remove the cached files on your Windows 10 computer.
Method 2: Clean the temporary files in the settings
You can clear cache or remove temporary files in your Windows settings:
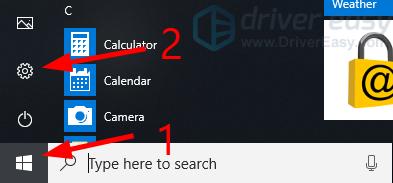
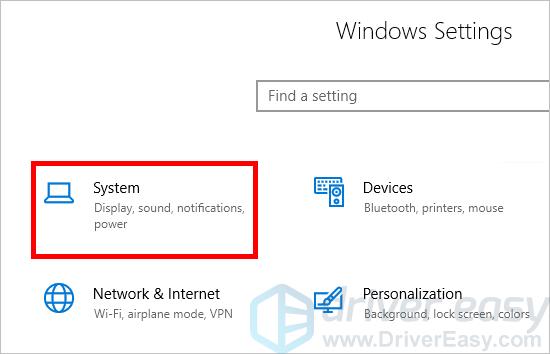
- Click the Start menu (the Windows logo) in the lower left corner of your screen, then click the Settings icon.

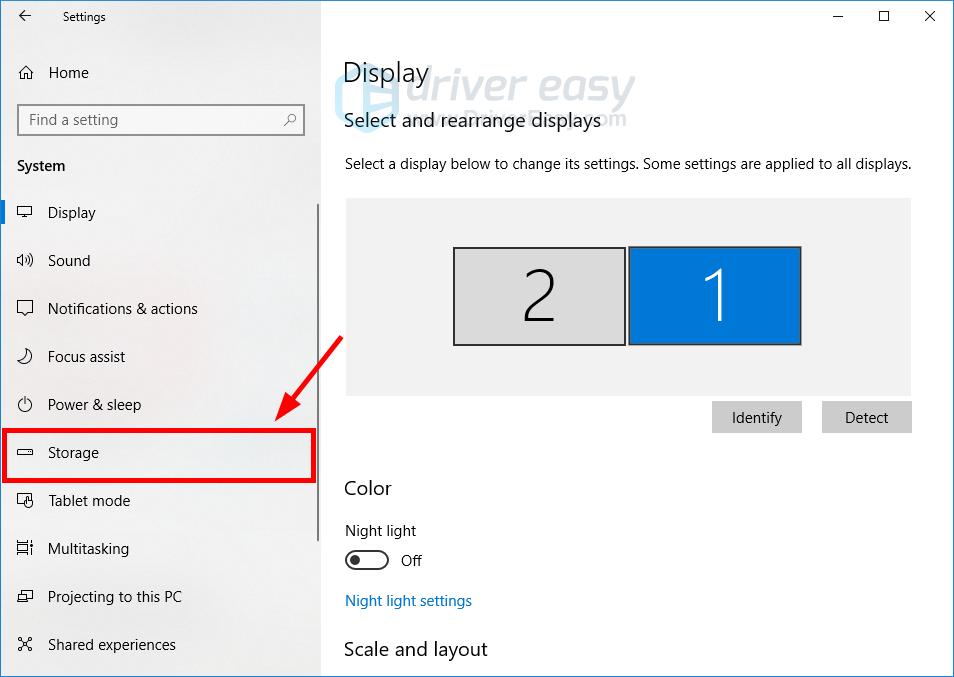
- Click System.

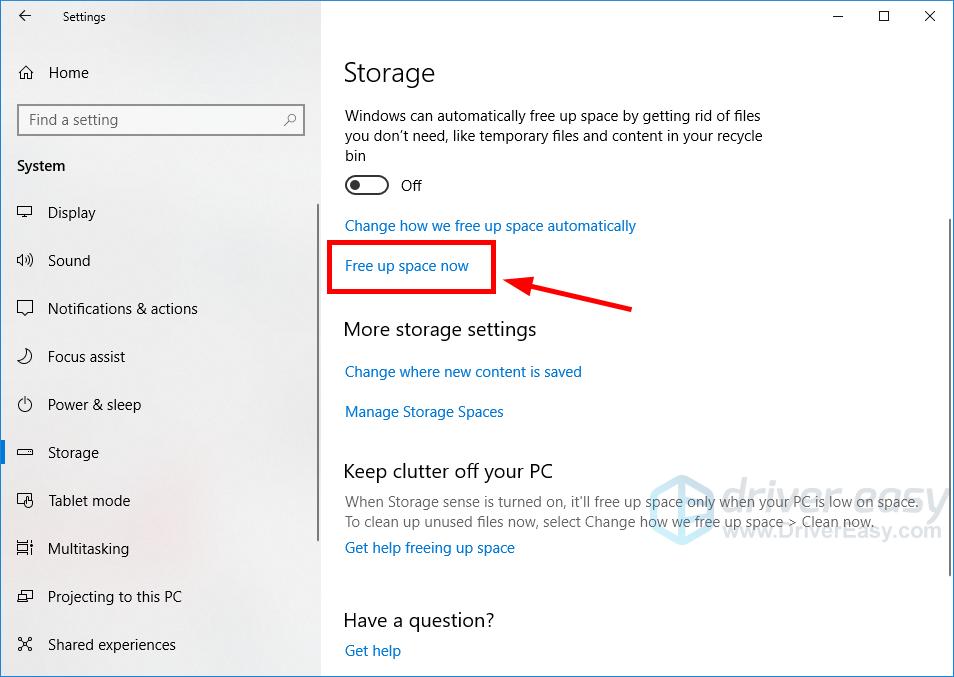
- Click Storage.

- Click Free up space now.
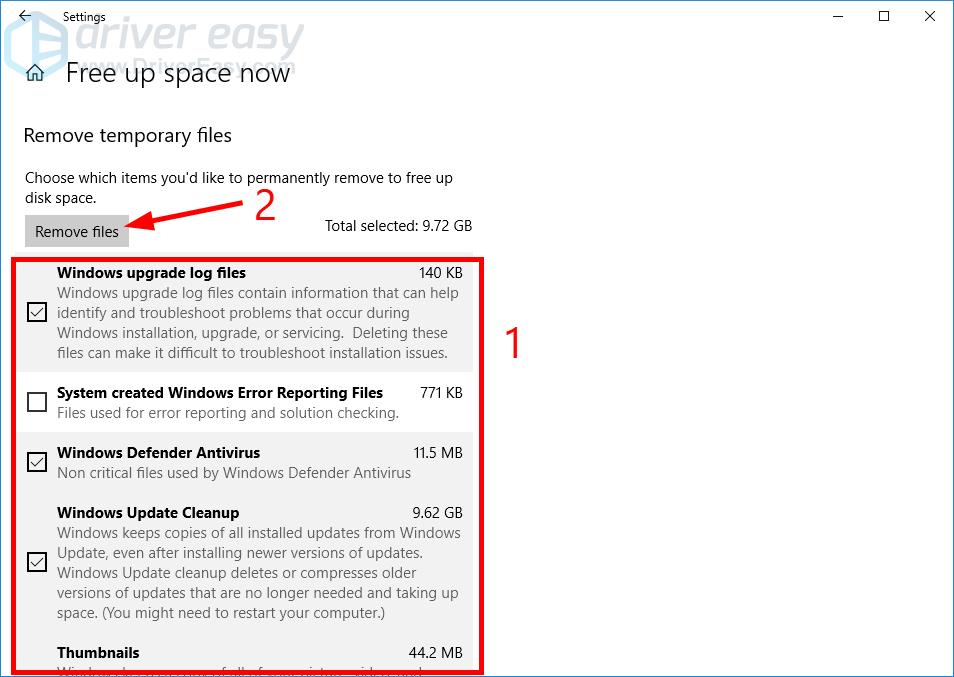
- Wait for the scanning process to be complete.
- Select the files you want to remove, then click Remove files.
Before you select an option, read carefully its description to learn what you’ll remove if doing so.
- Wait for the cleaning process to be complete.
This should purge your computer of temporary files and free up your disk space.
Method 3: Use Disk Cleanup
You can also use the Disk Cleanup utility to remove cache or temporary files. To do so:
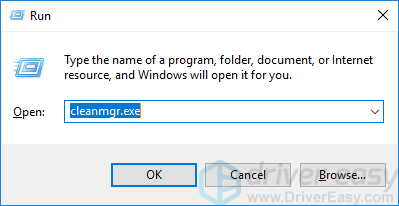
- Press the Windows logo key and R on your keyboard at the same time to invoke the Run box.
- Type “cleanmgr.exe” and press Enter on your keyboard.

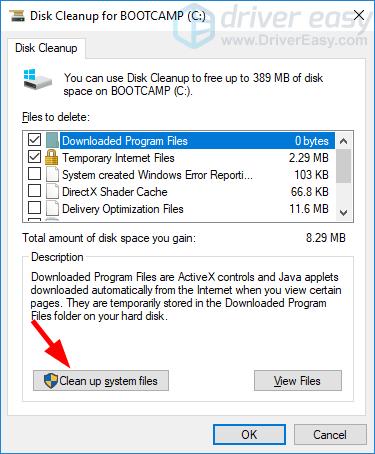
- Click Clean up system files.

- Click Yes when you’re prompted.
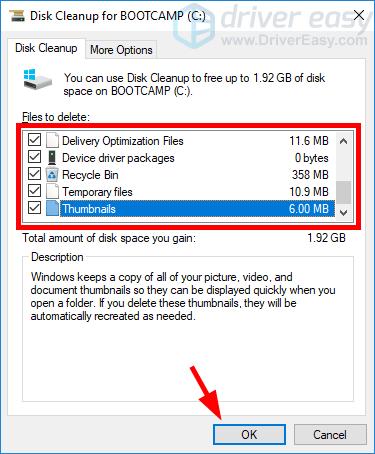
- Check all items, then click OK.
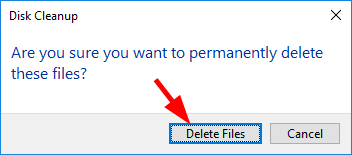
- Click Delete Files.

- Wait for the Disk Cleanup utility to clean the files.
That’s how you can use Disk Cleanup to clear cache on your Windows 10 system.
Method 4: Clear the Windows Store cache
Windows Store create temporary files when you’re downloading apps. To clear the Windows Store cache:
- Press the Windows logo key and R on your keyboard at the same time to invoke the Run box.
- Type “wsreset.exe” and press Enter on your keyboard.
- Wait for the process to be complete. (The Windows Store window will appear when it’s finished.)
That’s how you can clear the Windows Store cache.
Method 5: Clear your browser cache
There are cached files created by your browser when you’re surfing the Internet. To clear the cache:
- Press the Ctrl, Shift and Del/Delete keys on your keyboard at the same time.
- Select All time or Everything for Time range, make sure Cache or Cached images and files is selected, and then click the Clear data button.

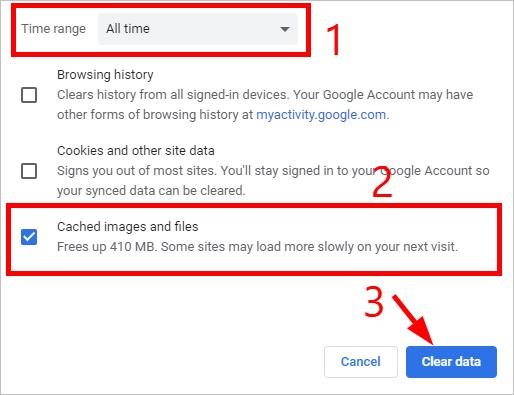
Your cached files will be removed very soon.
Hopefully the methods above help you clear the cache on your Windows 10 computer. If you have any questions or suggestions, feel free to leave us a comment below.
A cache is a collection of files or data stored on your computer so that future requests of the same files or data can be served much faster. Clearing cache on Windows 11 or Windows 10 can improve your computer’s performance and free up storage space. There are three types of caches on Windows:
- Temporary files cache
- Memory (RAM) cache
- Browser cache (e.g. Chrome, Edge, or Firefox)
In this tutorial, we will show you how to quickly clear three types of caches on your Windows 11 or Windows 10 laptop or desktop PC.
Also see: How to Clear RAM Cache in Windows 11
Clearing temporary files cache on Windows 11/10
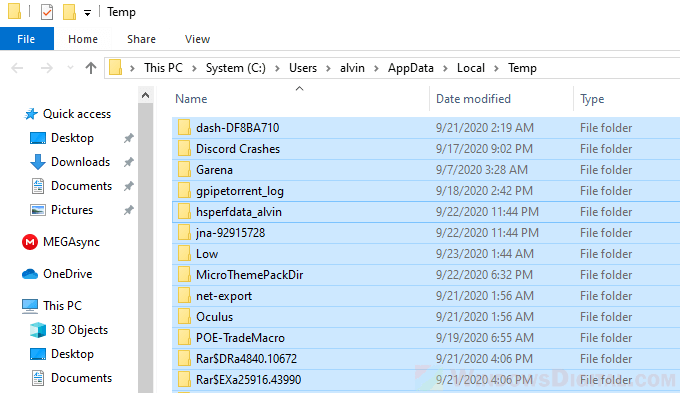
Windows creates temporary files when you create, modify or open a file or program on your computer or from the internet in a folder often known as the “Temp” folder. Most temporary files will be removed when they are no longer needed. However, some temp files tend to stay in the folder indefinitely due to improper handling of temp files in certain apps or programs. Thus, clearing the temp files may often save you a significant amount of disk space.
To clear the temporary files cache on Windows 11/10, follow the steps below:
- Press Win + R keys on your keyboard to open the Run window.
- Type %temp% in the “open” field and click OK. Doing so will open the “Temp” folder.
- To clear all the temporary files cache, press CTRL + A to select all the files and folder in the temp folder.
- Then, press Shift + Delete to permanently delete them.

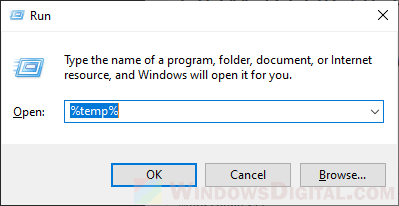
Side note: You can also type %temp% directly on the start menu search box or Cortana to open the temp folder without going through the Run window.
Alternatively, you can clear the temporary files from the Disk Cleanup tool on Windows 10/11. By using the disk cleanup tool, you can also clear other cache that may have been clogging up such as recycle bin, thumbnails, Windows error reports and feedback, etc. To do so, follow the steps below:
- Open “This PC“.
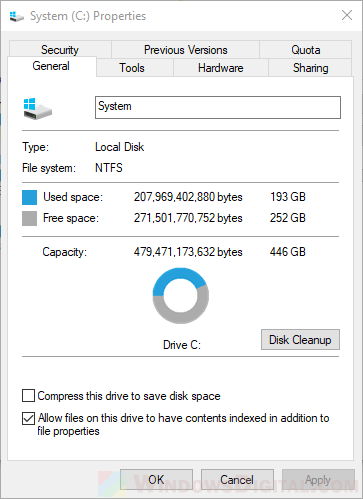
- Right-click on the main HDD where you store your Windows installation (usually the C: drive), then select Properties.
- Under General tab, click on the Disk Cleanup button.

- In the Disk Cleanup window, under files to delete option, select Temporary files and whichever else cache files that you would like to delete, then click OK.
Clearing memory or RAM cache on Windows 11/10
If you notice an obvious slowdown on your computer because the RAM is being used up so much that it’s near to hitting its limit, it could be due to Windows using too much RAM as cache. It will even cause errors such as insufficient RAM or out of memory issue when you run a program.
When you run a program or a game, Windows will use part of your RAM as cache for faster and smoother access to that particular program or game. However, when you close the program, the RAM taken as cache often are not cleared. These cached memory will then become inactive memory or RAM in standby mode until the next time you open the program again.
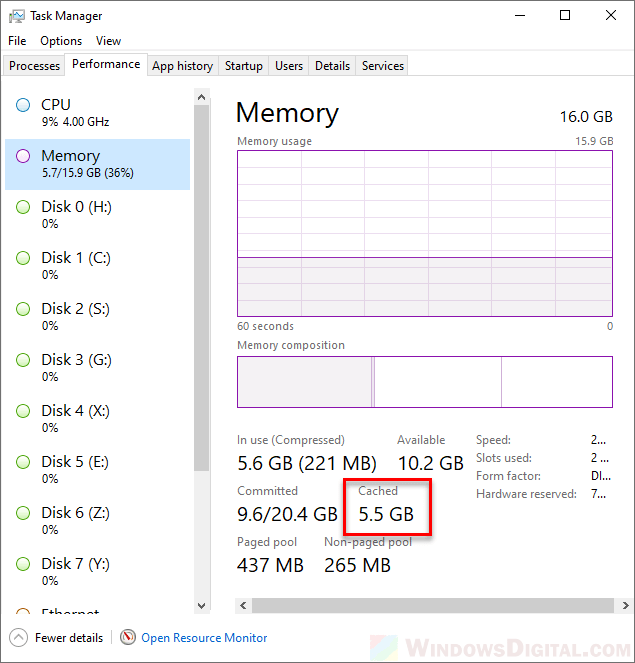
You can have a look at how much RAM are currently in cached from the Task Manager. Simply open Task Manager by pressing CTRL + SHIFT + ESC. Then, click on the Performance tab. You can see the total cached memory under Cached as shown in the screenshot below.
If you’re not happy with how RAM is being cached even after you’ve closed a program or a game, you can use a well-known program called EmptyStandbyList.exe to clear it. This simple program clears the standby lists and therefore clears the RAM cache on Windows 11/10.
However, it’s common to have doubts about downloading an unknown program and running it on your computer, especially when it’s an exe program. It’s important to be cautious when downloading, installing, and running anything on your computer. Although I can assure you that EmptyStandbyList.exe is a safe program as long as you download it from the suggested link below, I recommend doing some research on the program on Reddit or other forums to verify its legitimacy. Nonetheless, you should proceed at your own risk.
- Download EmptyStandbyList.exe from:
https://wj32.org/wp/software/empty-standby-list/
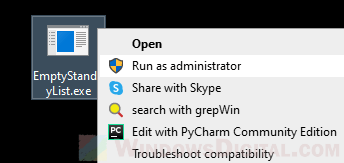
- Once downloaded, place it on your desktop for quick access in the future. To run it, right-click it and then select Run as administrator.

- As soon as it’s run, it will immediately clear all the RAM cache on Windows. Check on the cached RAM value on Task Manager to see how much RAM is cleared now.

- The executable only clear your RAM cache once. You will have to run it again when your RAM cache becomes too much again, or whenever you see fit.

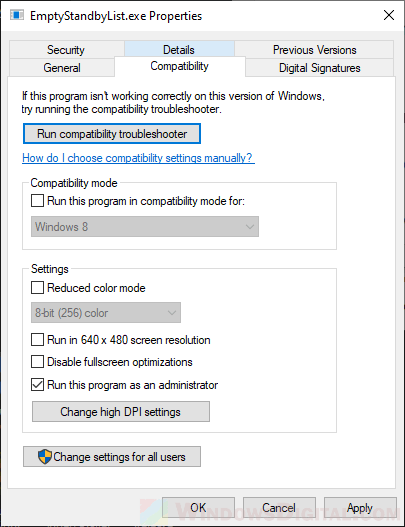
Note: EmptyStandbyList.exe can only work when you run it as administrator. To save you the hassle of having to right-click and select run as admin every time you want to run it, you can set it to run as administrator by default. To do so, right-click it and select Properties. Click on Compatibility tab and then check the checkbox that says “Run this program as an administrator“. Once set, the next time you double left-click to run the executable, it will automatically run as administrator.
 Clearing browser cache for Chrome, Edge or Firefox
 Clearing browser cache for Chrome, Edge or Firefox
When you visit a website, your browser automatically saves cache files such as images and other media you see on the website. The purpose of cache files on your local computer is to be able to serve the same images and media to you much quicker than having to download them again when you visit the same webpage again.
As time goes on, the cached internet files can be so big that it starts to become an issue to your limited hard disk space. It’s wise to clear your browser cache every once in a while. Here’s how to clear the browser cache in different browsers – mainly Google Chrome, Microsoft Edge, and Mozilla Firefox.
Clearing Chrome cache
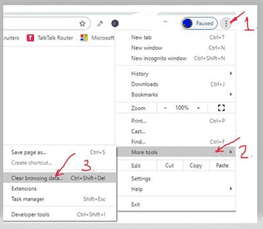
- In Google Chrome, click on the triple-dotted button in the same row as the address bar at the top right corner of Chrome’s window.
- Then, click on Settings. In the settings page, search for “cache”.
- Next, click on Clear browsing data when it shows up as a result.
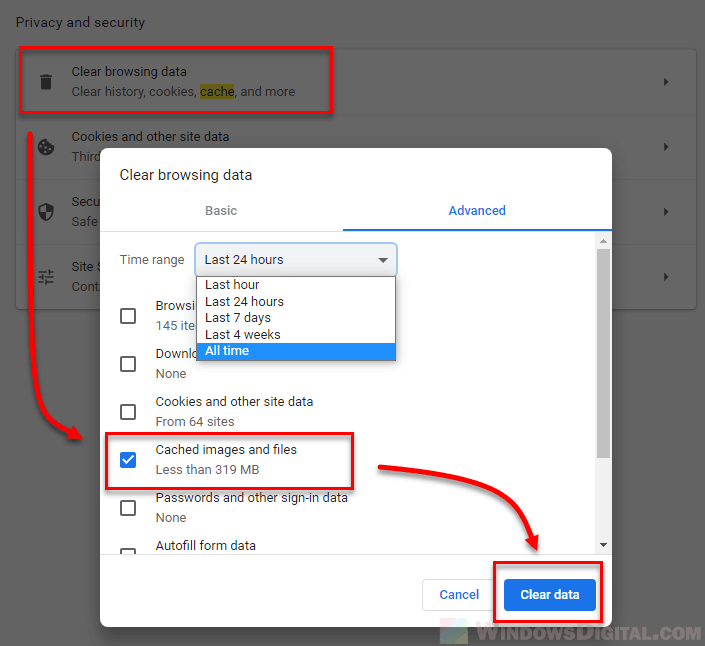
- For the “Time range“, select whichever time range you prefer. If you select “last 24 hours“, it will only clear cached files store in the last 24 hours. If you want to clear all cached files that have ever saved on your PC, select “All time“.
- Select Cached images and files, then click on Clear data to clear them.
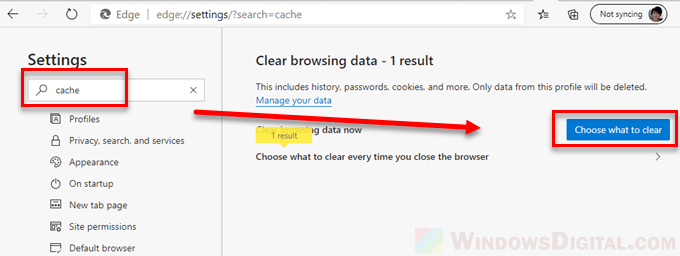
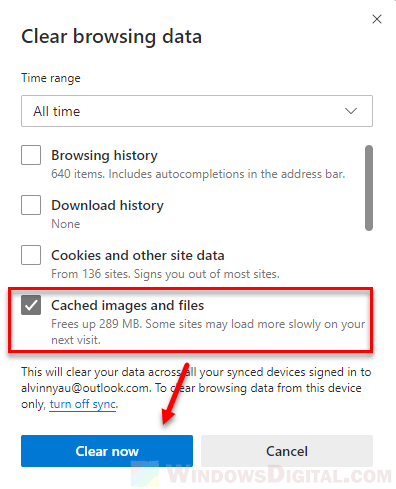
Clearing Edge cache
- In Microsoft Edge, click on the three-dotted icon on the toolbar similar to where the address bar is at the top right corner of the window.
- Then, select Settings.
- In the settings page, search for “cache”.
- When the search results show up, click on the Choose what to clear button besides Clear browsing data now.

- Next, select your preferred “Time range” (usually All time if you want to clear all cache Edge ever saved).
- Slect Cached images and files, then click on Clear now.
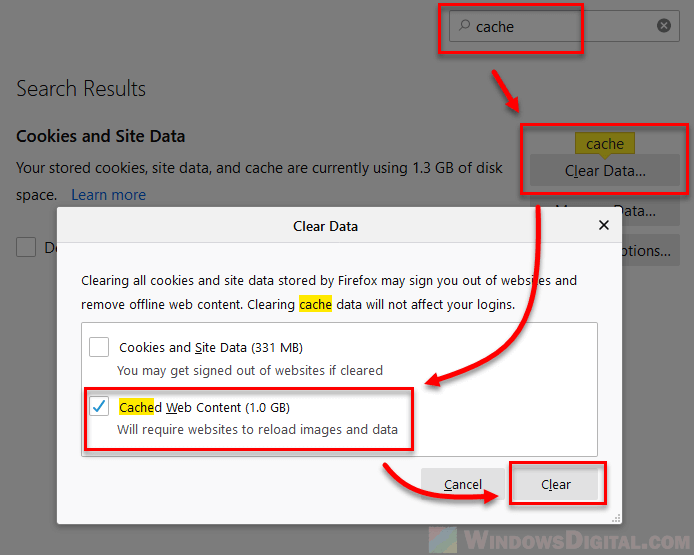
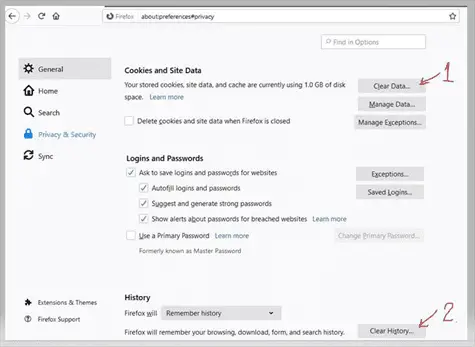
Clearing Firefox cache
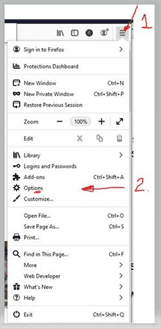
- In Mozilla Firefox, click on the three-lines icon at the top right corner of the window to open Firefox’s menu.
- From the menu, select Options.
- Next, use the search box to search for “cache”.
- Click on Clear Data under Cookies and Site Data.
- Select Cached Web Content, then click on Clear to clear all cache on Firefox.
Follow our step-by-step guide to clear cache in Windows 10 and boost your PC’s performance.
If the following questions are what brings you here, then you are in the right place.
- “How to Clear Cache in Windows 10 PC?”
- “How Do I Clear Cache in Windows 10?”
- “How to clear temp files and How to Clear Browser Cache in Windows 10?”.
These questions and more are answered below.
What is Cache?
Cache is an area or type of computer memory in which information that is often in use can be stored temporarily, so that you can get to it quickly.
https://dictionary.cambridge.org/dictionary/english/cache
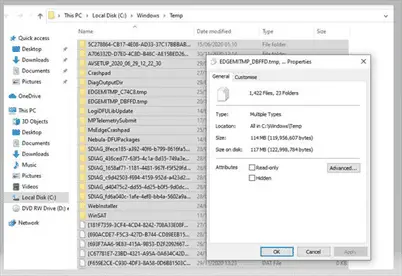
The download folder is where your Windows Update data is kept and it’s located here: “c:\windows\softwaredistribution\download“.
Once the Windows updates have been installed, the data can be got rid of to make more free space on your C drive.
How to Clear Windows Updates Cache in Windows 10 PC – Method 1
One way to get to the Windows SoftwareDistribution Download subfolder is by following the procedure described below.
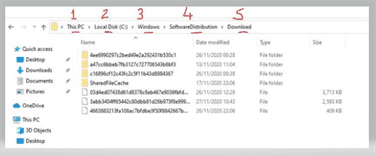
- Click the Windows file Explorer icon located on the taskbar to show the contents of This PC like shown on the picture.
- Double Click C Drive to see contents of C Drive.
- Double Click Windows subfolder to see contents of Windows subfolder.
- Scroll Down to find SoftwareDistribution subfolder.
- Double Click SoftwareDistribution subfolder to see contents of SoftwareDistribution subfolder.
- Double Click Download subfolder to see contents of Download subfolder.
- Select All the files in this download folder.
- Press ” DELETE ” on the keyboard to delete all the selected files.
- Go to your Recycle Bin to EMPTY the contents to free up space.
How to Clear Windows Updates Cache in Windows 10 PC – Method 2
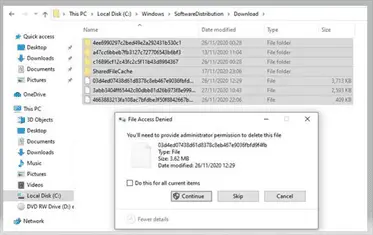
Another way to get to the Windows SoftwareDistribution Download subfolder is as follows:
- Type the following command in the search bar on the left of the taskbar.
- ” c:\windows\softwaredistribution\download ” and press enter on the keyboard
- Select All files by pressing ” Ctrl + A ” simultaneously (at the same time).
- Right Click and select properties to see how much space the files are taking on your hard disk drive.
- While all the files and folders are selected press the DELETE key to delete the files and folders. (Click Continue to proceed).
- Go to your Recycle Bin to EMPTY the contents to free up space.
How to clear app cache in Windows 10
The following procedure shows you how to clear app cache in Windows 10.
Clearing Current user Local AppData temp files – Method 1
- Type ” %temp% ” in the search bar next to the Windows icon (left of the taskbar area).
- Press Enter to go to the Current user Local AppData temp files folder (shown in the picture below).
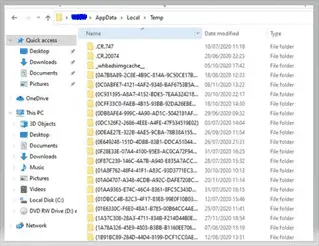
- Select All files by pressing ” Ctrl + A ” simultaneously (at the same time).
- Right Click and select properties to see how much space the files are taking on your hard disk drive.
- While all the files and folders are selected press the DELETE key to delete the files.
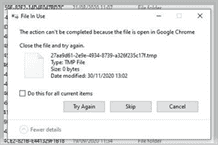
- Files that are open will not be deleted, so select skip (see picture).
- Go to your Recycle Bin to EMPTY the deleted contents to free up space.
How to clear cache in Windows 10 using Run
The following procedure shows you how to clear cache in Windows 10 using run.
Clearing Current user Local AppData temp files – Method 2
Method 2 can be described as ” How to Clear Cache in Windows 10 using Run ” Command
- Right Click on the Windows Start icon on screen and select Run.
- Type ” %temp% ” in the open command bar.
- Press Enter to open Current user Local AppData temp files folder (shown in the picture below).
- Select All files by pressing Ctrl + A simultaneously (at the same time).
- Right Click and select properties to see how much space the files are taking on your hard disk drive.
- While all the files and folders are selected press the DELETE key to delete the files.
- Files that are open will not be deleted, so select skip (see picture).
- Go to your Recycle Bin to EMPTY the deleted contents to free up space.
How to clear temp files in Windows 10 – Clearing Windows temp files Folder
How to clear temp files in Windows 10 – Method 1
- Type ” C:\windows\temp ” in the search bar next to the Windows icon
- Press Enter to open Windows temp files folder (It may say you don’t, have permission, just click continue.)
- Select All files by pressing ” Ctrl + A ” simultaneously (without the ” “).
- Right Click and select properties to see how much space the files are taking on your hard disk drive.
- While all the files and folders are selected press the DELETE key to delete the files.
- Files that are open or in use will not be deleted, so select skip.
- Go to your Recycle Bin to EMPTY the deleted contents to free up space.
How to clear temp files in Windows 10 – Method 2
Method 2 described here falls under ” How to Clear Cache in Windows 10 using Run ” topic
- Press the ” Windows icon key on your Keyboard + R ” simultaneously (without the ” “).
- This opens the Run box.
- Then type ” temp ” in the run box and press Enter key. (It may say you don’t, have permission, just click continue.)
- the C:\windows\temp folder opens and shows the windows temporary files.
- Select All files by pressing ” Ctrl + A ” simultaneously (without the ” “).
- Right Click and select properties to see how much space all the selected files are taking on your hard disk drive.
- While all the files and folders are selected press the DELETE key to delete the files.
- Files that are open or in use will not be deleted, so select skip.
- Go to your Recycle Bin to EMPTY the deleted contents to free up space.
How to Clear files in the Windows Prefetch folder Windows 10
Method 1 – Clearing files in the Windows Prefetch folder
- You can also use ” Windows icon key on your Keyboard + R ” simultaneously (without the ” “).
- This opens the Run box.
- Then type ” Prefetch ” in the run box and press Enter key.
- (It may say you don’t currently have permission to access this folder, just click continue.)
- the ” C:\windows\prefetch ” folder opens and show the windows prefetch files.
- Right Click and select properties to see how much space the files are taking on your hard disk drive.
- While all the files and folders are selected press the DELETE key to delete the files.
- Files that are open or in use will not be deleted, so select skip.
- Go to your Recycle Bin to EMPTY the deleted contents to free up space.
Method 2 – Clearing files in the Windows Prefetch folder
The other way of getting to the Windows Prefetch folder is by
- Type ” C:\windows\prefetch ” in the search bar and press Enter key.
- (It may say you don’t currently have permission to access this folder, just click continue.)
- the ” C:\windows\prefetch ” folder opens and show the windows prefetch files.
- Right Click and select properties to see how much space the files are taking on your hard disk drive.
- While all the files and folders are selected press the DELETE key to delete the files.
- Files that are open or in use will not be deleted, so select skip.
- Go to your Recycle Bin to EMPTY the deleted contents to free up space.
How to Clear Cache in Windows 10 using Command Prompt
Clearing Cache in Windows 10 using Command Prompt, I will show you how to clear DNS Cache and how to clear and reset Microsoft Store cache. Both of these procedures are done in the Command Prompt Window.
How to Clear DNS Cache in Windows 10 if you are having trouble accessing certain websites
Clearing DNS Cache if having trouble accessing certain webpages. If you are having issues accessing some webpages, you best clear your computer DNS cache.
How do you clear your device DNS cache?
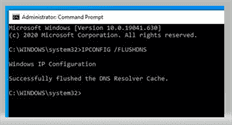
Open Command Prompt as described below:
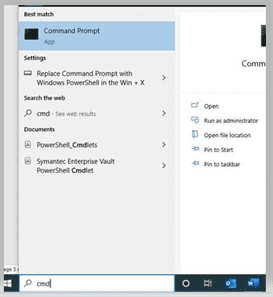
This command “ ipconfig /FlushDNS ” Purges your DNS Resolver Cache. Follow the procedure described below:
- Type ” cmd ” in the search bar.
- Select ” Run as Administrator ” (on the right).
- When the Command Prompt appears type:
- ” ipconfig /FlushDNS “
- Press ” Enter ” on the keyboard.
- You should get the message: Successfully flushed the DNS resolver cache if you have typed in the command as shown above with a space between ipconfig and /flushdns. (See image below)
- Close the command prompt window.
How to Clear and Reset your Microsoft Store Cache in Windows 10
If you are experiencing problems with installing or downloading apps from Microsoft Store or if the Store App itself fails to run, try clearing and resetting your Microsoft Store cache. (Microsoft Store was formerly called Windows Store which is why the command to reset Microsoft Store cache is called WSreset.)
Running this command “ WSreset ” won’t remove any of your installed apps.
Steps to take before Running WSreset Command
- If you have the Microsoft Store App running, please terminate it before running the “ WSreset ” command.
- Type “ WSreset ” in the search bar next to the Windows icon (left of the taskbar area).
- Press Enter to run the command.
- A command box with no text will open. This command box will remain open while Microsoft Store cache is being deleted in the background. When it’s done the command box will close and the MS Store will open.
Be aware that resetting Microsoft Store cache could take a while even for computers that are considered normally fast. You just have to be patient while running the ” WSreset ” command.
This normally solves Microsoft Store issues.
How to Clear Cache in Windows 10 Laptop
All the guides shown in this article work equally well for Windows 10 PC Desktop or Windows 10 Laptop. I have included device location history cache here because you are likely to take a laptop around when you’re on the move.
How to Clear Device location history cache files (laptops)
Navigate to device location history cache file’s location by following steps below:
- Click the Start Button.
- Next click Settings.
- Next click Privacy.
- Next click Location.
- Scroll down to find Location history of this device.
- Press Clear to Clear location history on this device.
How to Clear Activity history cache
- Type ” privacy settings ” in the search bar next to the Windows icon (left of the taskbar area).
- Press Enter to go to Privacy Settings.
- Select ” Activity history ” on the left column.
- Click ” Clear ” to clear activity history.
You’re done Clearing Activity history cache.
See also this article How to Clear Cache in Laptop
How to Clear Cache in Windows 10 PC – Disk Clean-up App
Windows 10 comes with Disk Clean-up App which is a utility app that you can use to delete files from the hard disk that are no longer needed. Deleting these no longer needed files makes more room for other files on your hard drive.
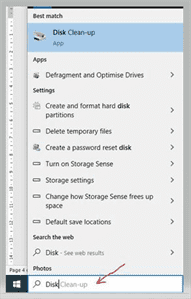
Here is the procedure:
- Type ” Disk Clean-up ” in the search bar.
- Open Disk Clean-up app
- Click ” Clean-up system Files ” ( this will add Windows update category to select for deletion – it is usually a big file so may take some time to complete).
- Select the categories of files you want to delete.
- When you click OK, the selected files will be deleted to free up that space.
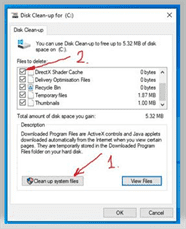
When you open Disk Clean-up App, it scans your disk to identify file categories that can be selected for removal. Common Categories to select for deletion are temporary internet files, thumbnails, downloaded program files, DirectX shader cache, delivery optimization files, temporary files, Recycle Bin, Windows Error reports and feedback, windows update log files.
The amount of disk space you gain is equivalent to amount of space occupied currently by the categories you select on the left.
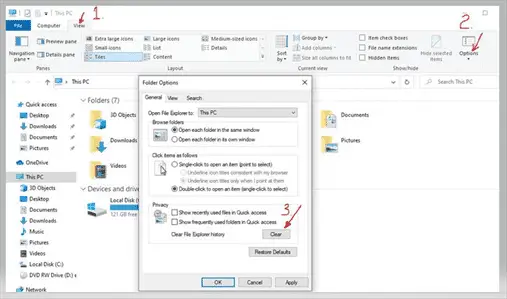
How to Clear File Explorer History Cache?
How do you clear File Explorer History Cache?
- First you open File Explorer by clicking the folder icon in the Taskbar.
- Click on View Tab.
- Click on Options on the far right to select Folder options.
- Under General Tab in Folder Options locate File Explorer History in the Privacy section.
- Click ” Clear ” to clear the File Explorer History Cache.
Why would you want to Clear File Explorer History Cache?
- For Privacy reasons – you may not want others to see how you use your PC.
- Sometimes File Explorer History Cache gets corrupted or too big that files and folder load slowly or not at all. Clearing File Explorer History Cache will fix this issue.
How to Clear Browser Cache and Cookies Windows 10
In this section we will look at “How to Clear Browser Cache and Cookies Windows 10 “. It is good idea to clear browser cache if you see that your internet browser is slowing down or you’re experiencing trouble opening some web pages. The data in the browser cache and cookies maybe overloaded or corrupt so clearing it will correct any issues being caused by corrupt data.
How to Clear Cache in Windows 10 PC Chrome – Google Chrome Browser
Open Google Chrome.
- Click on the 3 vertical dots as shown in the picture.
- Select More Tools.
- Select Clear Browsing Data.
Clearing Browser Cache in Windows 10 PC Chrome – Basic Browsing data Tab
- You can select which data to delete from Browing history, Cookies and other site data, cached images and files.
- Choose your time range.
- To clear selected data, Click “clear data” button.
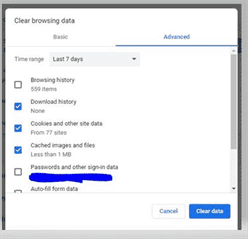
Clearing Browser Cache in Windows 10 PC Chrome – Advanced Browsing data Tab
- You can select which data to delete from browsing history, download history, Cookies and other site data, cached images and files, Passwords and other sign-in data, auto-fill form data, site settings and hosted app data.
- Choose your time range.
- To clear selected data, Click “clear data” button.
Clear Mozilla Firefox Browser Cache.
How do you clear Firefox Browser Cache?
Open Firefox.
- Click the menu icon on the right-hand side.
- Click Options.
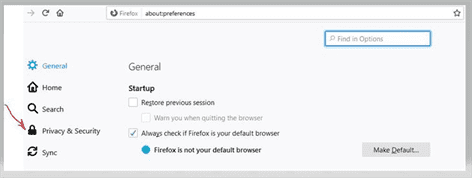
- Click Privacy and Security.
- Scroll down to about the middle to get to Cookies and Site Data.
- Click ” Clear Data ” to clear Cookies and Site Data.
- While you are here you can Click ” Clear History ” to clear your Firefox browsing, download, form, and search history.
Microsoft Edge Browser
How do you clear Microsoft Edge Browser cache data?
Clear Microsoft Edge Browser cache – Method 1
- Open Microsoft Edge Browser.
- Click on the 3 horizontal dots as shown in the picture.
- Click History.
- Click ” Clear Browsing History “.
- then you are presented with the screen as shown below in the picture.
- Choose your time range.
- You can select which data to delete from browsing history, download history, Cookies and other site data, cached images and files, Passwords, Autofill form data (includes forms and cards), Site permissions, hosted app data, and All data from the previous version of Microsoft Edge.
- To clear selected data Click “Clear Now” button.
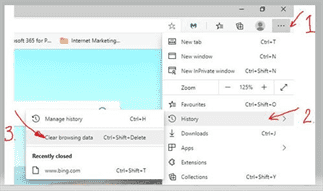
How to Clear Microsoft Edge Browser cache in Windows 10 – Method 2
Shortcut way to get to Microsoft Edge Browser – Clear Browsing History screen
- Open Microsoft Edge Browser.
- Press ” Ctrl + Shift + Delete ” keys on the keyboard simultaneously (at the same time).
- Choose your time range.
- Select which data to delete from browsing history, download history, Cookies and other site data, cached images and files, Passwords, Autofill form data (includes forms and cards), Site permissions, hosted app data, and All data from the previous version of Microsoft Edge.
- To clear selected data, Click “Clear Now” button.
How to Clear Browser Cache Chrome, Microsoft Edge and Firefox Windows 10
How to check cache Windows 10?
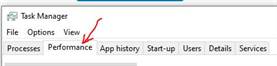
If you want to check Cache on your Windows 10 PC, here is what you do:
- Right-Click in the Taskbar area where it’s blank (normally this is near the system tray where your time and date are – bottom right on the screen.
- Select Task Manager.
- Click on Performance Tab to see what your PC has including CPU Cache (L1 Cache and L2 Cache), Ram being used, CPU utilization etc.
- Under App History you can delete App usage history as well if you want to.
- Close Task Manager after you’re done.
Say YES to a new life of Secure Remote Collaboration with your Employees and Customers?
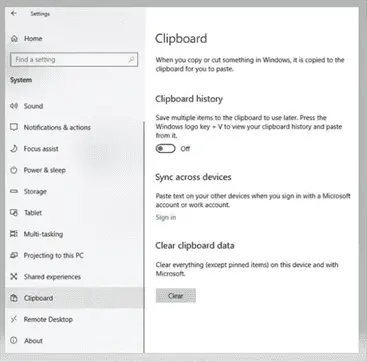
How To Clear Clipboard Cache In Windows 10
- Type ” Settings ” in the Search bar.
- Open Settings App.
- Select System
- Locate Clipboard
Related articles –
- How to clear MS Teams Cache
- How To Make Your Computer Faster Windows 10
- Repair Windows 10 Using Command Prompt
- How to Clear Cache in Laptop
- How to Shut down computer
- How to clear cookies for one website Chrome
Further Reading:
- Disk Cleanup in Windows.
- How to Clear Cache.
You are to learn ‘how to Clear Cache on Computer Windows 10’ and you are in the right place. Windows stores a lot of temporary files to help it perform its functions. Sometimes, these file caches become corrupted and so large that they can slow down your computer’s performance. Clearing the cache is a good first step if you notice strange behavior or are running out of storage space in Windows 10.
What is Computer Cache?
Let’s first define what a cache. The Windows cache is a storage device that includes high-speed data transportation. It could be either a hardware or software component. In some cases, it may even be both.
The Windows cache’s primary function is to save data so that you can access it quickly. The cache is used to save information when a page is first accessed on a website. You’ll find that it is much quicker to return to the page after you have done this.
Windows 10 temporarily stores frequently used data in its cache. The information will most likely be deleted in the end.
The cache can be a great feature for Windows 10, as it speeds up certain areas. The cache is only useful if there’s a lot of space on your hard drive and RAM. A fast CPU is essential for cached files to work properly. If your computer cannot meet these basic criteria, it will slow down. Sometimes, cached data can be corrupted. This can cause your computing experience to deteriorate.
Why is it necessary to clear Windows 10’s System Cache?
You can see that cached data refers to a set of temporary files that are used by your operating system, apps, and programs. Windows can store a lot of cache which allows your system to run more quickly and responds better.
The cached data can cause problems with your computer so you need to clear it on a regular basis. Here are some reasons you should do this.
- A cache can only be useful if you have sufficient storage space, RAM, and a fast CPU. The cache can cause your computer’s performance to slow down if it is not able to meet the criteria.
- Don’t forget to clear your cache regularly and let it accumulate over time. This can lead to serious problems such as the Windows 10 bluescreen of death or other unanticipated issues.
- Sometimes, cache data that is used to aid the operation of your operating systems can become corrupted. Your computer’s performance may suffer if you don’t delete corrupted cache files in a timely fashion.
Windows users should therefore make it a habit of clearing cache on a regular schedule to ensure that their data remains fresh.
1. Delete Temporary files from the cache in Windows 10
- First, clear the Temporary files cache. This is, at least according to us, not a difficult task. Let’s now see what we can do.

- You can open the Run dialog by pressing Windows Key + R. Copy and paste the percent temp percent code into the box, and then press the Enter key.
- The temp folder should now be visible at C:Usersusername>AppDataLocalTemp.
- Remove all files from the folder by selecting the appropriate option.

2. Clear browser cache on Windows 10
These caches are not the only ones you should clear. Clearing cache in web browser may also be necessary if you have trouble opening certain pages online consistently.

Open Google Chrome by clicking the three dots menu in the upper left. Scroll down to History and choose “History” from drop-down menu. Next, select “Clear browsing” and then “Clear data.”
3. Use Disk Cleanup
Disk Cleanup can be used to clear temporary files and cache. Follow these steps to do this:

- To open the Run Box, press the Windows logo key on your keyboard and then R.
- Type “cleanmgr.exe“, and hit Enter.
- From the drop-down menu, select Clean up system files.
- Select Yes when prompted.
- Check that all boxes have been checked and then click OK.
- From the drop-down menu, select Delete Files.
- Wait for Disk Cleanup to clean the files.
This is How to Clear Cache on Computer Windows 10.
4. Clear the Windows Store Cache
Temporary files are created when you download apps from Windows Store. You may encounter problems while using the Windows Store.
Most likely, the Windows Store cache has been corrupted or is malfunctioning. Clearing the Store app cache is one way to resolve issues.
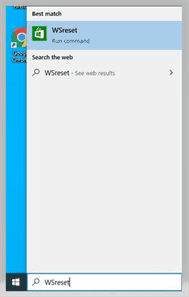
To clear your Windows Store cache, simply type wsreset.exe in the Run dialog box.
Click OK to confirm. You will see the Command Prompt, but it won’t contain any text. It will take some time to clear the Store cache. The Store app will close after it is done.
5. Restore cache by clearing the system
It is a good idea to create a system restore point prior to major events like Windows updates. Certain operations can be dangerous and may cause your computer to crash or cause other problems. To fix many issues, you can use the stem restore point.

System protection can be controlled by you. You may have to delete old restore points if the space allocated for them is exhausted. Follow these steps to clear the system restores cache
- Type restore in the Search field and then click twice to create a restore point.
- Choose your system drive from System Protection and click on the Configure button.
- Click on the Delete button in a new window.
6. Delete DNS cache
Clearing your DNS cache is a great solution if you are having problems connecting to the internet.
7. Use Storage Sense
Storage Sense can also be used to delete temporary files. You can access the Settings app by pressing Windows key + I. You will find the Settings app. Select System from the menu and then select Storage. Next, you will need to decide whether Storage Sense should be configured or run right now.

Continue scrolling until You find Now. The button is called Clean Now. Click on the button to immediately remove unneeded files.
Conclusion
These solutions should help you, how to Clear Cache on Computer Windows 10. If you have any questions or suggestions, please leave a comment below.