To delete temporary files:
-
In the search box on the taskbar, type disk cleanup, and select Disk Cleanup from the list of results.
-
Select the drive you want to clean up, and then select OK.
-
Under Files to delete, select the file types to get rid of. To get a description of the file type, select it.
-
Select OK.
If you need to free up more space, you can also delete system files:
-
In Disk Cleanup, select Clean up system files.
-
Select the file types to get rid of. To get a description of the file type, select it.
-
Select OK.
Note: If you notice that the Temp folder fills up quickly after running Disk Cleanup, see Low Disk Space error due to a full Temp folder.
For more on freeing up space on your PC, see Free up drive space in Windows.
Need more help?
Want more options?
Explore subscription benefits, browse training courses, learn how to secure your device, and more.
Communities help you ask and answer questions, give feedback, and hear from experts with rich knowledge.
 Среди самых частых вопросов пользователей всех версий Windows — как очистить диск от ненужных файлов, особенно если речь идет об SSD. Есть известные сторонние программы для очистки диска Windows, но можно использовать и имеющиеся системные инструменты.
В этой инструкции подробно про встроенные утилиты Windows 11 для очистки диска от временных и других ненужных файлов, позволяющие в том числе, производить автоматическую очистку.
Как очистить диск Windows 11 от ненужных файлов в Параметрах
Первый из способов, а точнее — целый набор инструментов очистки диска в Windows 11 доступен в Параметрах. Шаги для использования:
- Зайдите в Параметры — Система и откройте пункт «Память».

- В открывшемся окне вы сможете увидеть информацию о том, чем занято место на диске, с возможностью удалить ненужные данные.

- Если нажать по любой из категорий — «Приложения и компоненты», «Временные файлы», «Другое», отобразится информация о том, что именно входит в эту категорию и занимает место. В отдельных категориях, например «Временные файлы», доступно их удаление. На эту тему может быть полезным: Как узнать, чем занято место на диске.
- При нажатии «Показать больше категорий» отобразится более полная информация о том, чем именно занято место на системном диске: например, можно оценить место, занятое системными и зарезервированными файлами, а при нажатии — узнать, что именно входит в этот список.

- Раздел «Управление хранилищем» позволяет выполнить очистку диска. Основной пункт здесь — «Контроль памяти». При переходе в раздел вы можете включить и настроить автоматическую очистку диска, и, если требуется — запустить её вручную, нажав кнопку «Запустить Контроль памяти сейчас» внизу окна настроек Контроля памяти.

- При открытии пункта «Рекомендации по очистке» вы получите информацию о временных и неиспользуемых файлах и программах, список больших файлов на диске, информацию о занятом месте в корзине и папке «Загрузки» с возможностью очистки этих данных.


Функции анализа хранилища и очистки диска в Параметрах Windows 11 достаточно базовые, но могут быть полезными, особенно для начинающих пользователей.
Важное преимущество по сравнению с использованием сторонних программ очистки — вы почти гарантированно ничего не сможете испортить в работе системы: удаление любых, предлагаемых к очистке данных безопасно, за исключением, возможно, папки «Загрузки», если вы храните в ней что-то важное.
Утилита «Очистка диска» с возможностью удаления отдельных неиспользуемых системных файлов
Как и в предыдущих версиях системы, в Windows 11 остаётся и исправно работает отдельная встроенная утилита «Очистка диска», во многих случаях позволяющая очистить больше ненужных данных, чем рассмотренный раздел «Память» в параметрах.
Шаги для использования очистки диска будут следующими:
- Нажмите правой кнопкой мыши по кнопке «Пуск» и выберите пункт «Выполнить» или нажмите клавиши Win+R на клавиатуре.
- Введите cleanmgr в диалоговое окно «Выполнить» и нажмите Enter.

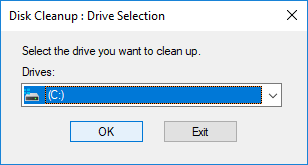
- При появлении запроса выбора диска, выберите нужный диск для очистки.
- Отобразится базовый список файлов, которые не требуются и которые можно удалить, обычно они занимают не слишком много места на диске.

- Если нажать кнопку «Очистить системные файлы», сканирование будет выполнено повторно, но список файлов, которые можно удалить и объем данных окажется больше.

- Для очистки диска от ненужных файлов, отметьте нужные пункты, нажмите Ок и дождитесь завершения удаления файлов (это может занять продолжительное время на отдельных системах).


Интересной может оказаться возможность запуска этой утилиты в расширенном режиме, которая работает и в Windows 11, подробнее: Запуск утилиты Очистка диска в расширенном режиме.
Аналогично функции «Контроль памяти», встроенный инструмент очистки диска Windows 11 безопасен в использовании и вам не нужно опасаться, что будут удалены какие-либо критичные для работы системы данные. Хотите освободить ещё несколько гигабайт места на диске C? — рекомендую ознакомиться со статьёй Как очистить папку DriverStore\FileRepository в System32.
Видео инструкция
Many people encountered low disk space issue in Windows 10 computer. Windows Updates, system log, temp, programs and many other types of files are writing to C drive continuously, so C drive is full sooner or later. If you replace disk with a new one, hard disk manufacturers will be very glad. In this article, I’ll introduce how to clean up C: drive in Windows 10 to reclaim disk space. You may run Disk Cleanup in Windows 10 via command or GUI wizard. If you cannot get enough free space, try additional effective methods.
Content:
- About Windows 10 Disk Cleanup utility
- How to open Disk Cleanup in Windows 10
- How to clean up C drive in Windows 10 with wizard
- How to clean up disk in Windows 10 with command
- Additional options after cleaning up disk
About Windows 10 Disk Cleanup utility
«Disk Cleanup» is a Microsoft Windows computer native included maintenance utility that is used to free up disk space on hard disk drives. This utility is easy to use and runs fast. It analyzes the hard drive and searches for files that are no longer of any use, and then removes the unnecessary files safely. These unnecessary and junk files include Windows Updates, Temporary files, Logs, Cache, files in Recycle Bin, etc.
You can run Disk Cleanup in all Windows versions from XP, however, in some Windows version such as Server 2008 and 2012, Disk Cleanup is not enabled by default, so you need to manually install this component. Starting with Windows 10 version 1803, Disk Cleanup are incorporated into Windows 10’s Settings app, however, the standalone Disk Cleanup utility is still available.
There are 3 common ways to open Disk Cleanup in Windows 10 laptop/desktop/tablet computer:
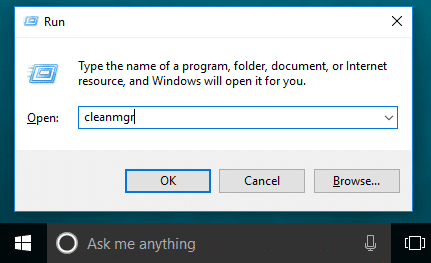
① Press Windows + R key on keyboard, type cleanmgr, and then click OK.
Select C: drive or other one that you want to clean up.
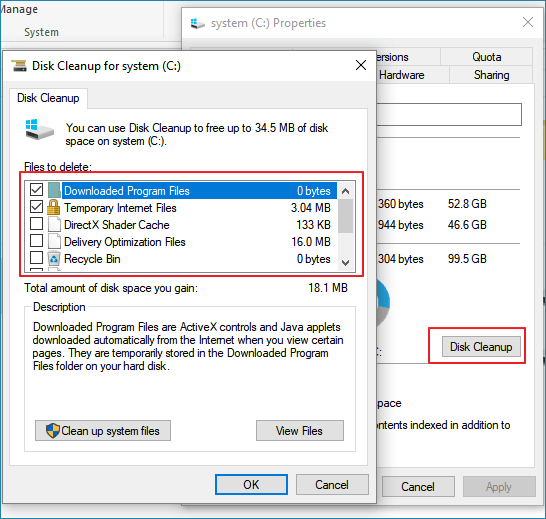
② Open Windows File Explorer, right click C: drive and select Properties.
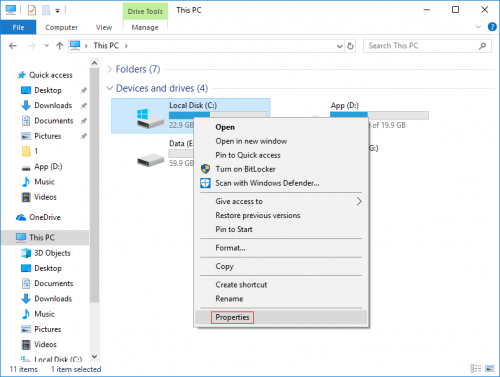
Click Disk Cleanup in the pop-up window.

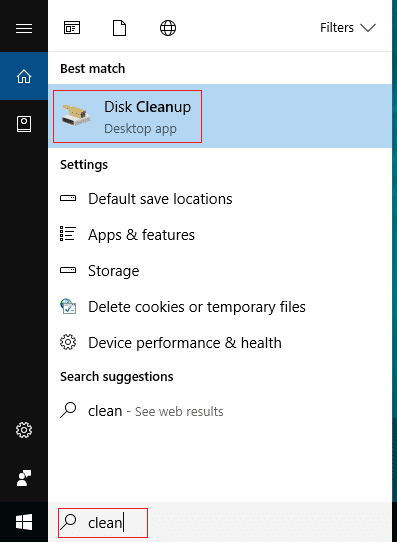
③ Search from task bar at bottom left. Type clean then Disk Cleanup is shown on the top.
How to clean up C drive in Windows 10 with wizard
When the Disk Cleanup window is opened, it is very easy to complete the next steps, only several clicks are needed.
Steps to run Disk Cleanup in Windows 10 to clean up C drive:
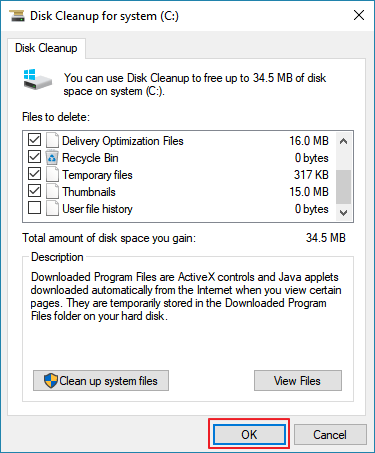
1. Click the check-boxes to select the files that you want to remove and click OK to begin. If you are not sure about the meaning of these files, click it and you’ll see corresponding description on the bottom.

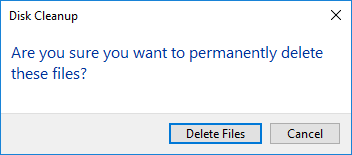
2. Confirm this operation by clicking Delete Files.
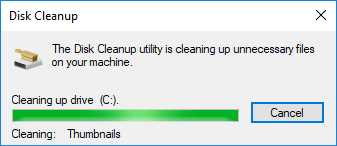
After that, Disk Cleanup will begin deleting the unnecessary and junk files.
3. Repeat to Clean up system files.
How to clean up disk in Windows 10 with command
There are 3 ways to run disk cleanup in Windows 10 via command line, select the one that fit for your needs.
① Command with all files selected
- Press Windows and R together on the keyboard.
- Input cleanmgr /LOWDISK and press Enter.
- Disk Cleanup dialog box will pop up with all types of files selected by default, so you just need to click OK to confirm.
② Clean up all junk files automatically
- Press Windows and R together on the keyboard.
- Input cleanmgr /VERYLOWDISK and press Enter.
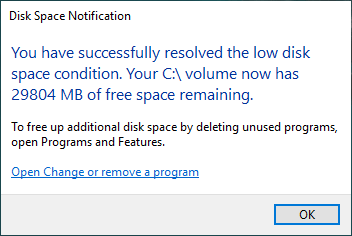
Then Disk Cleanup will delete all junk files automatically and then show you a dialog box with result.
③ Clean up specified junk files automatically
- Press Windows and R together on the keyboard to open Run.
- Input cleanmgr /sageset:1 and press Enter. (You can specify the value from 0 to 65535).
- Disk Cleanup dialog box will pop up, select the files to delete and click OK.
- In the future, you just need to run cleanmgr /sageset:1 and press Enter, the preselected junk files will be deleted automatically. If you want to delete different types of files, input cleanmgr /sageset:2 in step 2 and run cleanmgr /sageset:2 in step 4.
5. Additional options after cleaning up disk
If you did not get plenty of free space after running Disk Cleanup in Windows 10, the 3 methods below are very useful.
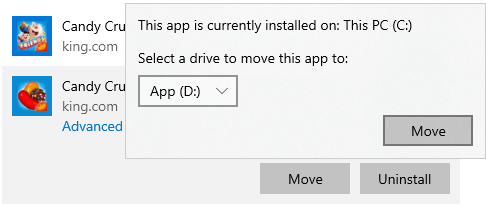
① Move installed apps and games
When installing programs, many people use default settings to C: drive. The more you installed, the less space left. It’s better to install programs to separated partition. Better than previous versions, Windows 10 can move applications installed from Windows Store to other partition without reinstalling.
How to clean C drive in Windows 10 by moving applications:
- Press Windows and X on keyboard, then click Settings > Apps > Apps & features
- Click an app or game.
- Click the Move bottom.
- Select the new location from the drop-down list.
- Click the Move button.
- Repeat the steps to move more items.
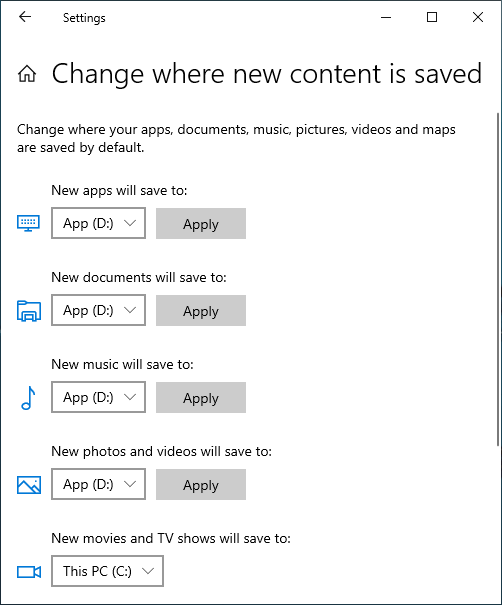
② Save files to new location
Windows 10 has another new option to save new files of apps, documents, music, pictures, and videos to other place, steps:
- Press Windows and X on keyboard, then click Settings
- Click System> Storage.
- Click Change where new content is saved under More storage settings.
- Click the drop-down list to select new location and click Apply.
③ Move more free space to C: drive
If you cannot reclaim large amount of disk space (at least 20GB), C drive will be full again in the near future, so you’d better allocate more space to C drive. In most of computers, there is free space in other partition on the same disk, NIUBI Partition Editor can move these free space to C drive without losing data. Operating System, programs and associated setting keep the same with before. It has free edition for Windows 11/10/8/7/Vista/XP home computer users.
Download this tool and follow the steps in the video to increase C drive space:
Besides shrinking, moving and extending partition, this free tool help you copy, convert, defrag, hide, wipe partition, scan bad sectors, optimize file system and much more.
Windows power user tips
5 steps to a lean, clean Windows machine
Performing a regular disk-cleaning regimen frees up precious storage space and helps keep Windows 10 or 11 operating smoothly. Follow some or all of these steps to get yourself a lean, clean machine.
BrianAJackson / Getty Images 
- Step 1: Run built-in Windows disk cleanup tools
- Step 2: Run UnCleaner to catch what built-in tools miss
- Step 3: Use DriverStore Explorer to dismiss obsolete device drivers
- Step 4: Use DISM to clean the Component Store
- Step 5: Inspect the system drive using WizTree
Show More
These days, a relatively clean and uncomplicated Windows 10 or 11 system disk might be home to more than 250,000 files and 90,000 folders. A more complex, application-heavy system disk might contain between half a million and a million files. My Windows 11 production PC has over 970K files and 275K folders, for example. That’s a lot of stuff!
Indeed, all those files need not necessarily be kept around. That’s why it’s a good idea to practice regular disk hygiene. This is exactly what is explained and explored here, with plenty of examples and screen shots to illustrate the cleanup process. Best of all, the tools that help you tidy up won’t cost you a dime.
Step 1: Run built-in Windows disk cleanup tools
From time immemorial, Windows has included a utility for cleaning up disk space — namely, Disk Cleanup, also known as cleanmgr.exe. In Windows 10, users gained a second method to clean up disk space: the “Free up space now” option is part of its Settings-based “Storage Sense” facility aimed at optimizing storage. In Windows 11, this shows up as “Cleanup recommendations.”
There has been speculation that Disk Cleanup might disappear as Settings takes over Windows management and controls. Even so, the Disk Cleanup utility remains ready, willing, and able to work in Windows 11 22H2 as I write this story. Either the Settings or Disk Cleanup approach provides a great way to excise extraneous and unneeded Windows files (for Windows 10 and 11 versions across the board).
To launch Disk Cleanup, type disk clean or cleanmgr.exe into the Start menu search box. The Disk Cleanup desktop app should appear at the top of those search results. If you can, select Run as administrator from the resulting options menu. Why? Only then does it offer to clean up redundant or outdated OS files (such as old OS files after an upgrade, or old updates) as well as other Windows leftovers.
After Disk Cleanup scans your system, Figure 1 shows a reasonable facsimile of what you’ll see in Windows 11.
Figure 1: When you run Disk Cleanup as an administrator, you can remove “Previous windows installation(s)” and other OS files.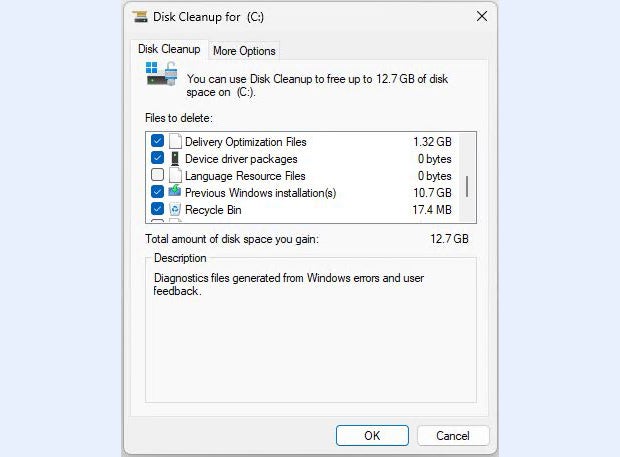 Ed Tittel / IDG
Scroll through the checkbox items in the pane labeled “Files to delete” and pick stuff you’d like to lose. The numbers in the right column indicate how much disk space each item occupies. Don’t delete old OS versions or updates if you think you might want to roll back to an earlier version. Note also that the Downloads item represents the contents of your personal Downloads folder, so don’t delete it unless you’re sure you don’t need anything it holds.
Figure 1 includes a previous Windows 11 installation, for a total recovery of 12.7GB. That’s a sizable chunk of disk space.
In Windows 10, the Settings-based cleanup option is available through Settings > System > Storage > Configure Storage Sense or run it now > Free up space now. On the “Free up space now” pane, click the Clean now button. This cleans up storage in much the same way as if you’d run Disk Cleanup and clicked all available boxes — removing temporary files, update or upgrade files, delivery optimization files (designed for sharing on your local network but seldom used), obsolete device driver packages, and more. It will also empty the recycle bin.
This process can — and often does — take several minutes to complete. While it’s running, it looks like what’s shown in Figure 2.
Figure 2: In Windows 10, you have to click numerous options to get to “Free up space now.” After that, it works silently to clean things up.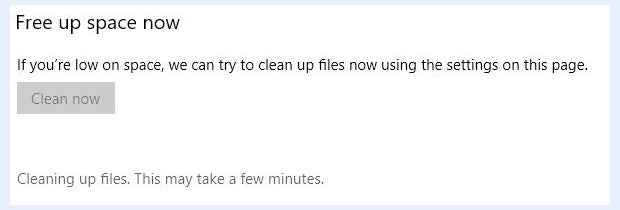 Ed Tittel / IDG
Windows 11’s “Cleanup recommendations” feature is available through Start > Settings > System > Storage > Cleanup recommendations. On the “Cleanup recommendations” pane, click Advanced options. These options appear in Figure 3, with checkboxes to select (or avoid) their contents for deletion.
Figure 3: The following items are checked for cleanup in Windows 11: recycle bin, feedback hub logs, delivery optimization files, upgrade logs, non-critical Defender files, temporary internet files, Windows error reports and diagnostics, temporary files, DirectX Shader cache files, and user file history.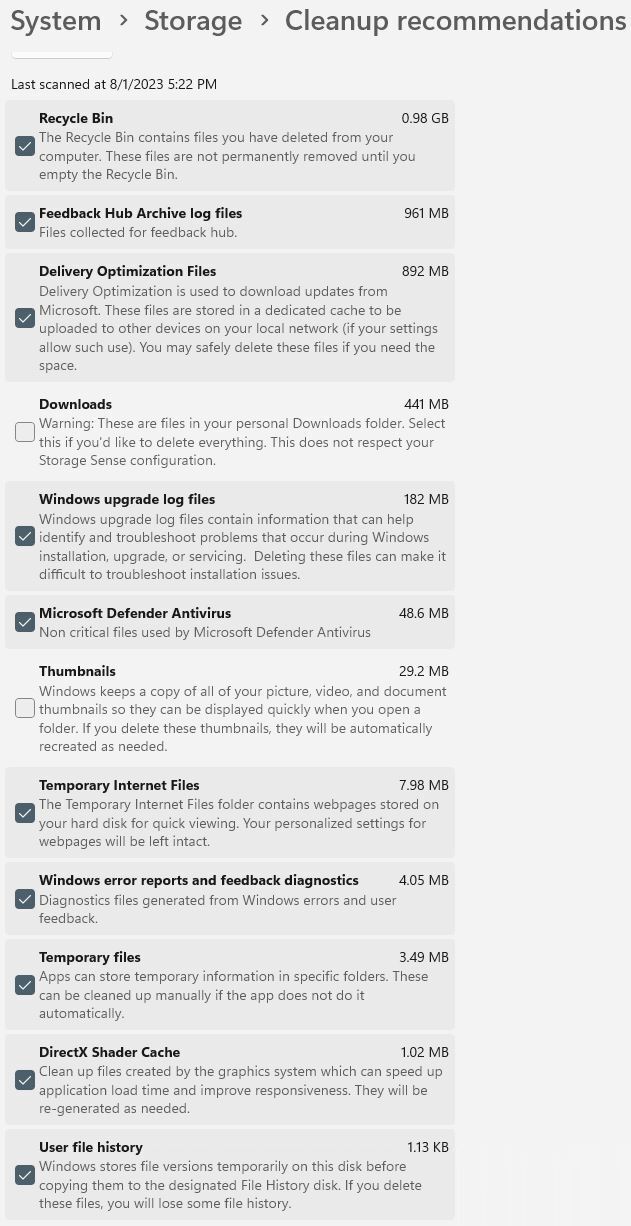 Ed Tittel / IDG
The total disk savings from this particular cleanup selection in Windows 11 come to just under 3.5GB, similar to what you’d get from Disk Cleanup. It takes a bit of time to read through and select what you want, but it’s quite easy to use. Some may find it preferable to Disk Cleanup, in fact.
Step 2: Run UnCleaner to catch what built-in tools miss
Josh Cell is a Francophone developer in Canada who’s built a peachy and free utility called UnCleaner. It can ferret out and remove temporary and obsolete log files that even Windows’ built-in utilities don’t catch and kill. You can download the latest version of UnCleaner (1.7) from Major Geeks. Don’t worry that this tool shows a 2012 date: I can attest it still works fine on Windows 10 and 11 systems in mid-2023.
Running on the same production PC upon which I just ran Disk Cleanup, UnCleaner finds nearly 400MB of files to clean up despite a notionally clean status, as shown in Figure 4.
Figure 4: UnCleaner finds 594 additional files to clean after Disk Cleanup is done.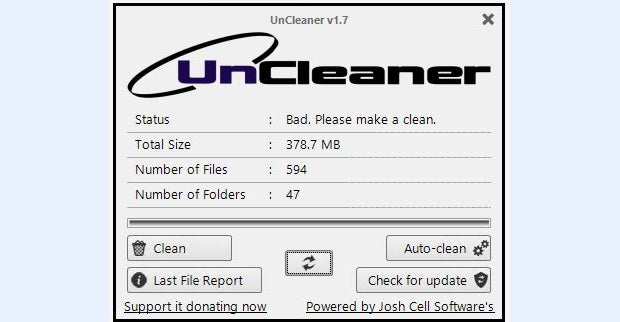 Ed Tittel / IDG
Simply click the Clean button (lower left) to excise those files. You’ll never get this tool to delete everything it reports, because some of those files are locked by Windows runtime constraints. But sometimes you’ll see a message that says, “Good. Your system is very clean.” ‘Nuff said!
Step 3: Use DriverStore Explorer to dismiss obsolete device drivers
DriverStore Explorer (RAPR.exe) is a free, open-source tool that you can download from GitHub. Always be sure to grab the most current release (0.11.92 as of this writing). Unless you’re a real Windows driver wizard, you need only click two buttons to make RAPR do its thing: Select Old Driver(s) and Delete Driver(s).
You must, however, run RAPR in administrator mode (right-click its icon and select Run as administrator). When you start it up, you’ll see a list of installed drivers with checkboxes. Click the Select Old Driver(s) button at the top right of the screen, and the program will automatically check the boxes for the older driver versions it finds. They’re highlighted with blue checkmarks in Figure 5.
Figure 5: Click Select Old Driver(s) to highlight items for deletion, then click Delete Driver(s). (Click image to enlarge it.)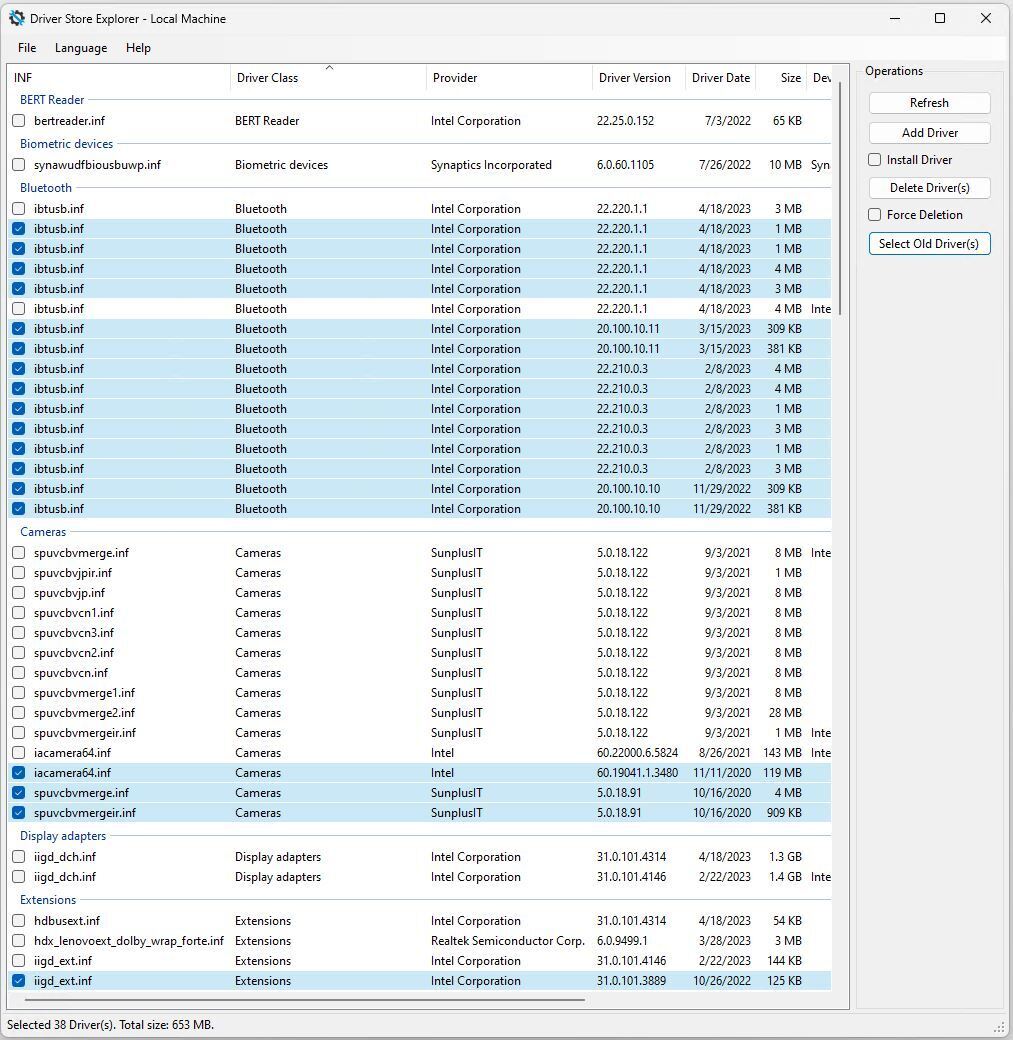 Ed Tittel / IDG
When you click Delete Driver(s), RAPR will attempt to remove all highlighted items. It won’t actually remove any it finds in use, so this is a surprisingly safe operation. Power users and experts can find a lot more for RAPR to do (see “How to reduce Windows driver bloat” for details), but most regular users will simply enjoy its ability to clean up old, outmoded drivers.
Notice in Figure 5 that a raft of Intel Bluetooth drivers is among the items targeted for deletion. That’s because the Intel Driver & Support Assistant keeps on installing Bluetooth drivers (monthly, if not more often). This makes for lots of duplicates. The current selections will recover 635MB of disk space.
I’ve seen some RAPR runs recover multiple gigabytes, but space savings are seldom larger than that. First-time users may recover 3 to 5GB when cleaning up numerous driver files. (Graphics drivers often exceed 1GB in size; those add up quickly.)
Step 4: Use DISM to clean the Component Store
Most Windows OS files reside in the WinSxS folder, also known as the Component Store. After you install a cumulative update, and sometimes after other updates, the Component Store may contain duplicate, obsolete, or orphaned elements. You can use the Deployment Image Servicing and Management (DISM) tool at the command line to check the Component Store from time to time. Such checks will tell you if a cleanup is needed.
To get started, you’ll need to open an elevated PowerShell or Command Prompt window. On the Windows desktop, press the Windows key and X, then select Windows PowerShell (Admin) from the resulting pop-up menu. (Alternatively, you can type powershell into the Start menu search box, then right-click Windows PowerShell and select Run as administrator from that pop-up menu.) In the Administrator: Windows PowerShell window that appears, type this string and hit Enter:
dism /online /cleanup-image /analyzecomponentstore
You’ll see something like what’s shown in Figure 6.
Figure 6: DISM /analyzecomponentstore finds one package for cleanup (reclamation).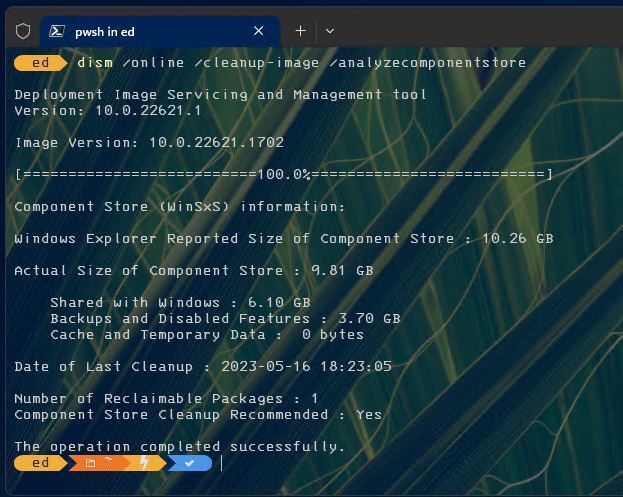 Ed Tittel / IDG
As I wrote this story, I had just installed a Cumulative Update and other update items earlier that week. Sure enough, /analyzecomponentstore reported that there was one reclaimable package ready for cleanup. Notice that the response text reported “Yes” in the field labeled “Component Store Cleanup Recommended.” That’s your clue that DISM has something it can clean up on your behalf.
To make that happen, in the Administrator: Windows PowerShell window, enter this string:
dism /online /cleanup-image /startcomponentcleanup
The results appear in Figure 7, with an extra /analyzecomponentstore to show the results of the cleanup.
Figure 7: The cleanup operation completes. (The first 10% completion line is a known Windows bug.)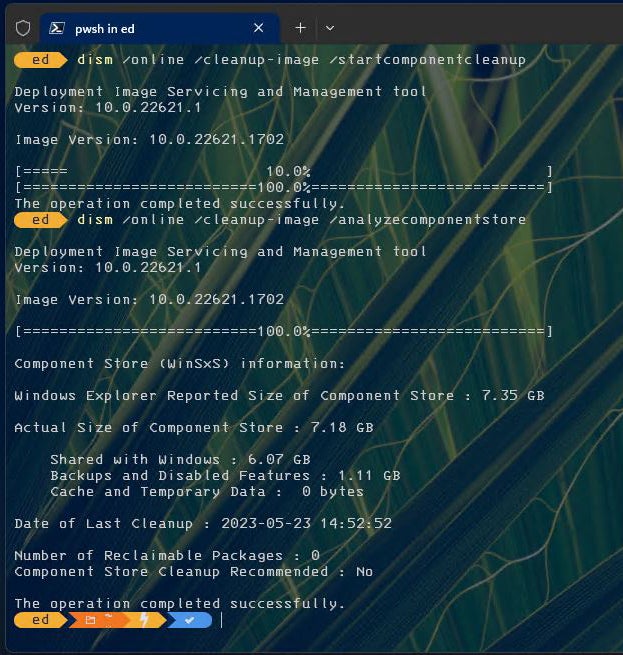 Ed Tittel / IDG
When the numbers for the second /analyzecomponentstore operation get compared to the first, we see the following numbers:
- Size of component store: 10.26GB vs. 7.35GB (diff: 2.91GB)
- Actual size of component store: 9.81GB vs. 7.18GB (diff: 2.63GB)
- Shared with Windows: 6.10GB vs. 6.07GB (diff: 0.03GB)
- Backups and disabled features: 3.70GB vs 1.11GB (diff: 2.59GB)
If you add the savings for “Shared with Windows” and “Backups and disabled features,” you get 2.62GB, which is nearly the savings in the actual size of the component store (2.63GB) — just as it should be. Recently updated systems may recover up to 3 or even 4GB using this technique. (Actual results depend on the number and size of reclaimable packages removed.)
For more incredibly useful things you can do with DISM, see “Why DISM is the Swiss Army knife of Windows maintenance.”
Step 5: Inspect the system drive using WizTree
Once all preceding cleanups are complete, it’s a good idea to inspect the system drive to see where the big files are. I use the free, donation-ware WizTree program, but TreeSize Free is a worthy alternative. Both programs produce treemap diagrams — graphical renderings of disk contents that make it easy to spot big files and folders.
Figure 8 shows the C: drive from my Lenovo X12 Hybrid tablet.
Figure 8: WizTree displays the disk contents in a treemap diagram, where box size shows how file (and folder) sizes compare to one another. (Click image to enlarge it.)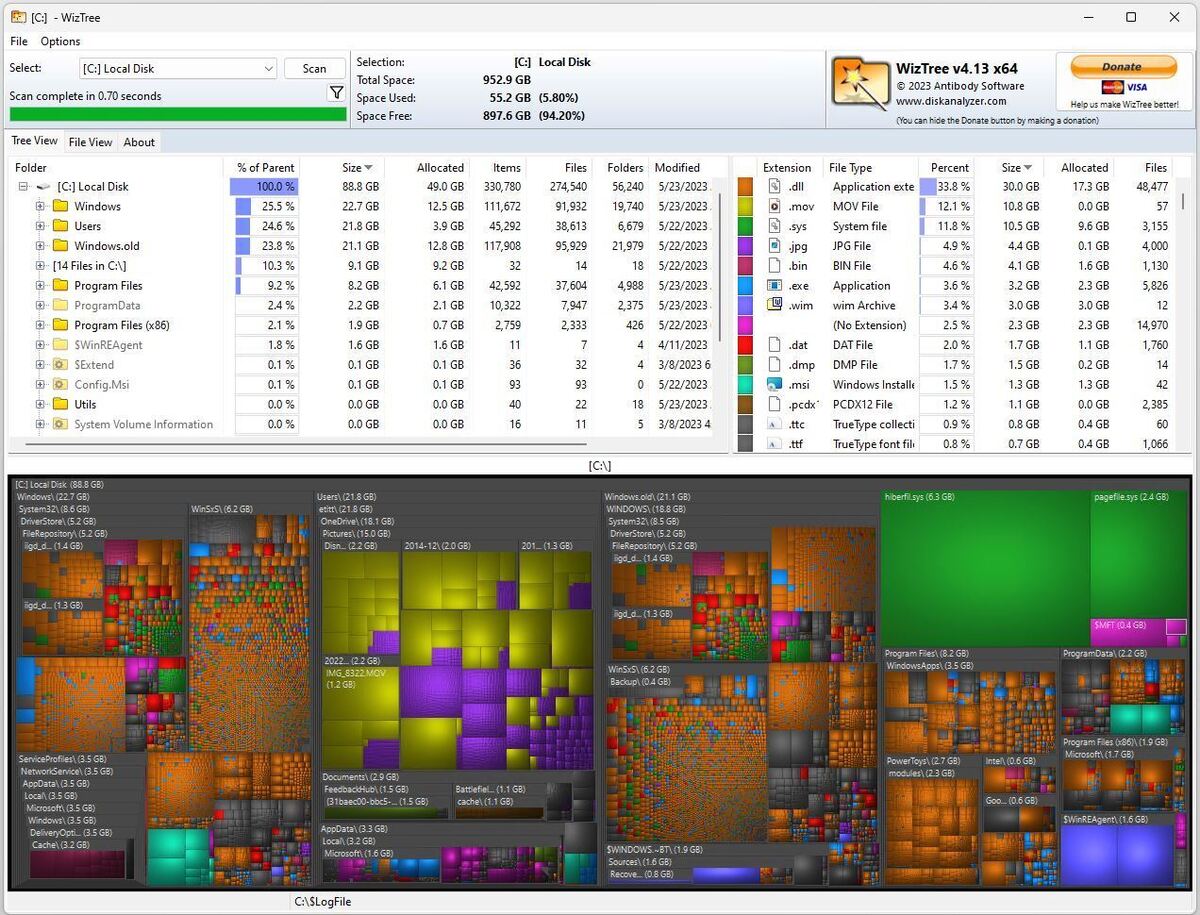 Ed Tittel / IDG
Remember, you’re looking for big files, because getting rid of them provides useful, quick wins in the disk space recovery game. Right here, I see that the largest files are the ones you’d expect to see — namely, the system hibernation file (hiberfile.sys) and the system page file (pagefile.sys), in green at upper right.
After those behemoths (6.3 and 2.4GB, respectively), the next largest files appear in OneDrive (image folders in greenish-yellow and purple, center) and in the Windows Recovery agent ($WinREAgent, royal blue at lower right). All is as I’d expect. If I needed to save space, though, I’d see about pruning the images and videos in OneDrive.
By clicking other “big blocks” in the treemap, you can quickly figure out where your biggest potential space recovery opportunities lie. You won’t be able to get rid of all of them — the paging and hibernation files must stay, for example — but if some of them can go, big space savings can result.
Practice makes perfect
If you perform such cleanups periodically (I shoot for at least once a month), you’ll be able to keep your space consumption under much better control. Try this regimen out for yourself and you’ll soon see what I mean. And don’t forget to slog through the Users folder (especially your account subfolder) from time to time, too, because junk too often tends to accumulate there.
Then, you can blissfully enjoy your clean machine!
This article was originally published in January 2019 and updated in September 2023.
Copyright © 2023 IDG Communications, Inc.
This page provides reliable solutions for you to clean C drive and even delete system C drive, follow to see how can you clean or delete your system C drive in Windows 10/8/7 on your own now:
- Notice:
- In order to avoid unnecessary data loss issue due to cleaning C drive, please create a backup of important files on your C drive in advance. Professional backup software like EaseUS Todo Backup can help you with this job.
How to Clean C Drive without Formatting Windows 10/8/7
When the computer or Windows system has been running for a very long period, many useless junk files will be leftover in the system C drive. With more and more leftover files accumulating, the computer becomes slower and slower.
So how to resolve this problem? The best and most straightforward solution to this issue is to clean the C drive. Some people may come up with the solution to format C drive. But Windows computer won’t allow you to format the system C drive. Huge file loss or even system error would occur if you do so.
Here in the below, we’ve gathered two tested and effective methods for you to apply and clean C drive without formatting in Windows 10, 8 and even 7:
Method 1. Clean Up C Drive Without Formatting
You’ll see that Disk Cleanup utility can only remove some temp files and Recycle Bin files on your computer. If you want to remove more Windows built-in application junk files or large files in Windows 10/8/7, you’ll need to turn on another powerful partition manager software for help.
To remove all useless files and even large files from your C drive, we’d like to recommend you try EaseUS CleanGenius software.
It’s 100% free and risk-free for optimizing computer performance with its Cleanup feature. You may directly download and install it on your PC, following guidelines below to clean up your C drive without formatting now:
Step 1. Download and install EaseUS Partition Master Suite.
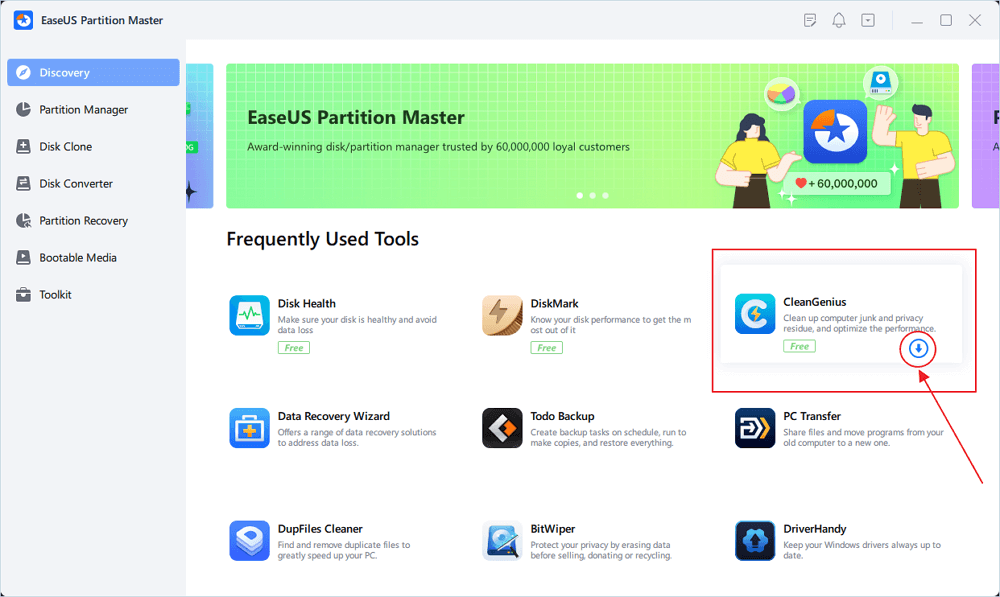
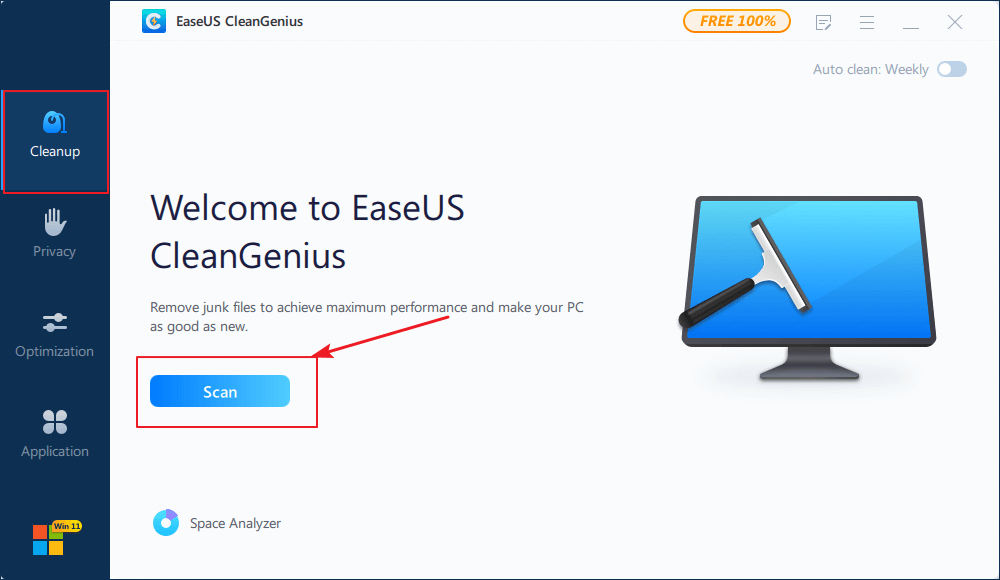
Step 2. Click PC Cleaner and install EaseUS CleanGinus. Then, click «Cleanup» and click «Scan» to start cleaning up the system and make your PC as good as new.
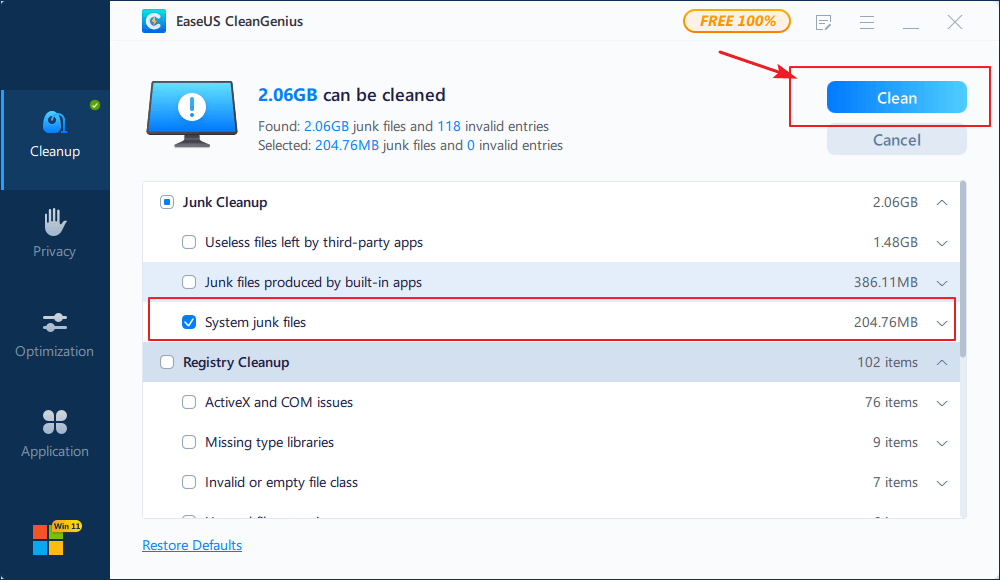
Step 3. The software will scanning all over your computer to find idle data files that take a huge amount of disk space, you can select useless large files, system junk files and Windows invalid entries and click «Clean» to start system cleanup process.
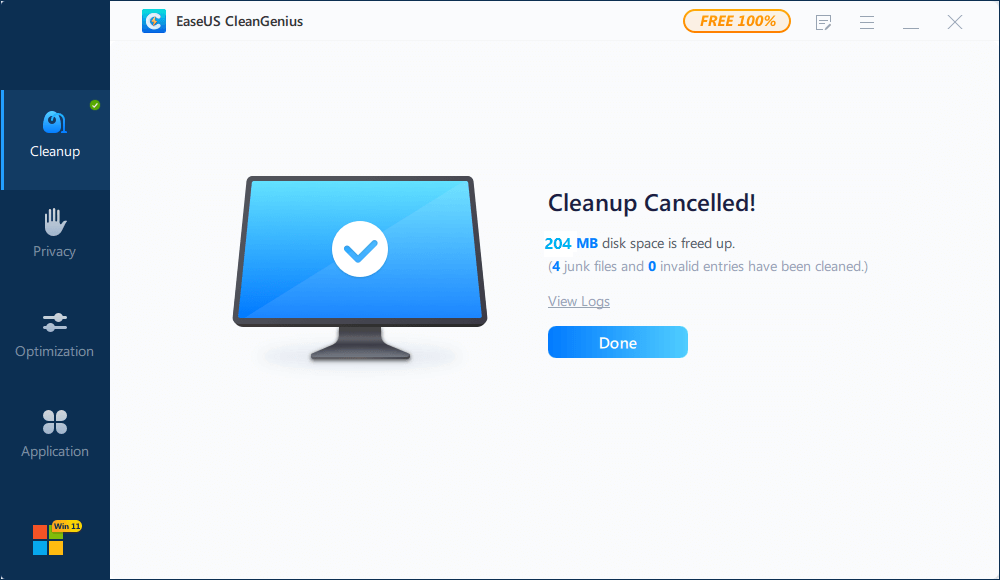
Step 4. When the scan is complete, click «Done» to finish cleaning system junk files.
Method 2. Run Disk Cleanup Utility to Clean C drive
1. Open This PC/My Computer, right-click on C drive and select Properties.
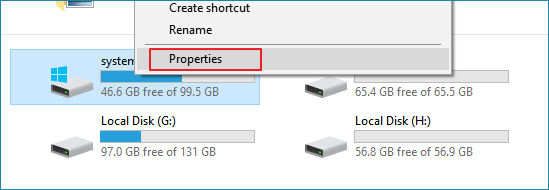
2. Click Disk Cleanup and select files that you want to delete from C drive.
3. Click OK to confirm the operation.
After this, you’ll get a clean but faster-running speed on your computer.
Delete System C Drive (Including OS) Without Formatting
Besides cleaning or clearing the C drive, some other Windows users are even thinking to delete the system C drive (including the OS) from HDD or SSD without formatting. But why do these people want to do so? And how to do it?
Here is a list of reasons why Windows users want to delete a system drive from a Windows computer, and if you are one of them, don’t worry. You’ll find a solution here:
- 1. To perform a clean install of Windows 10/8/7: wiping all data on the system disk is necessary, especially to delete the system drive.
- 2. To delete the system drive on the old HDD after system cloning to a new HDD/SSD.
- 3. To delete system C drive on the target disk when the OS migration process failed or is halted.
How to delete the system C drive without formatting? You can apply professional partition manager software — EaseUS Partition Master Pro for help.
This software can do the job that other Windows built-in tools or third-party software can’t do: to directly delete system C drive and partitions on your Windows disk with a created WinPE bootable disk.
You can directly activate it into a full version and apply it to the below guidelines to delete the system C drive with ease now.
1. Create a WinPE disk
2. Delete the system C drive
Now, insert the bootable USB to your PC, restart it, and press F2/F8/Del to enter BIOS and set the computer to boot from the EaseUS Bootable disk so as enter EaseUS Partition Master.
And now, you can continue with the next steps to fully delete the C drive and clean up it for new usages:
Note that this will delete all existing partitions on the system disk, including the OS. So make sure you’ve backed up all essential content in advance.
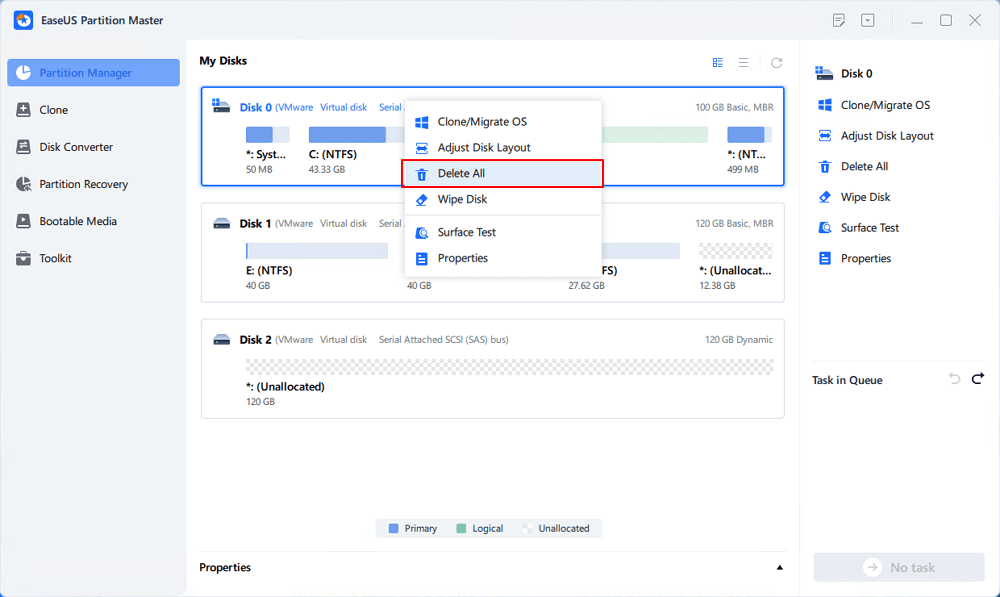
Step 1. Launch EaseUS Partition Master, go to the Partition Manager section, right-click your OS disk and select «Delete All».
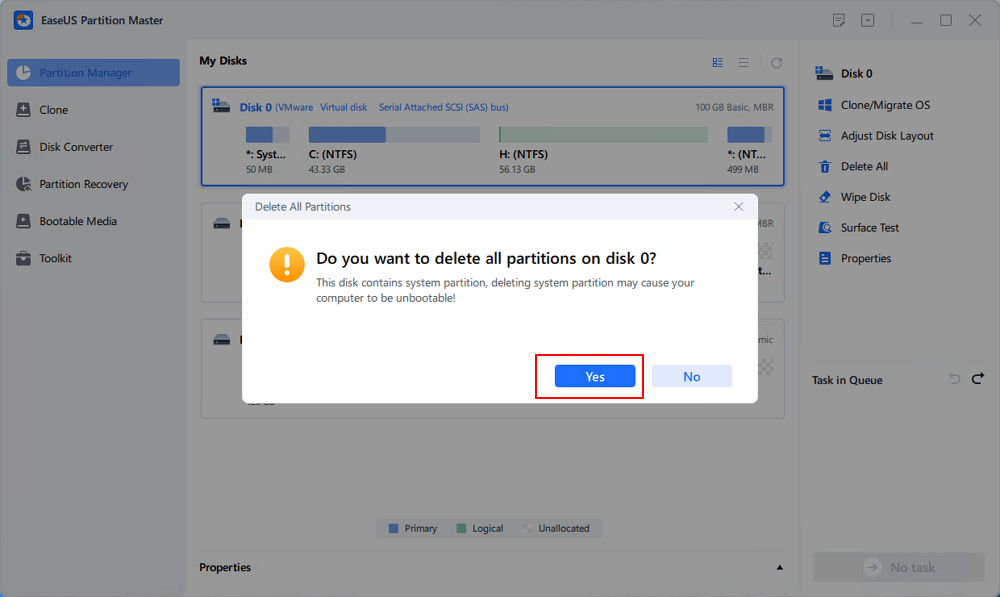
Step 2. Click «Yes» ton confirm that you are sure to delete all partitions on the OS disk.
Step 3. Click «Execute * Task» and click «Apply» to start deleting all partitions with OS on the selected disk.
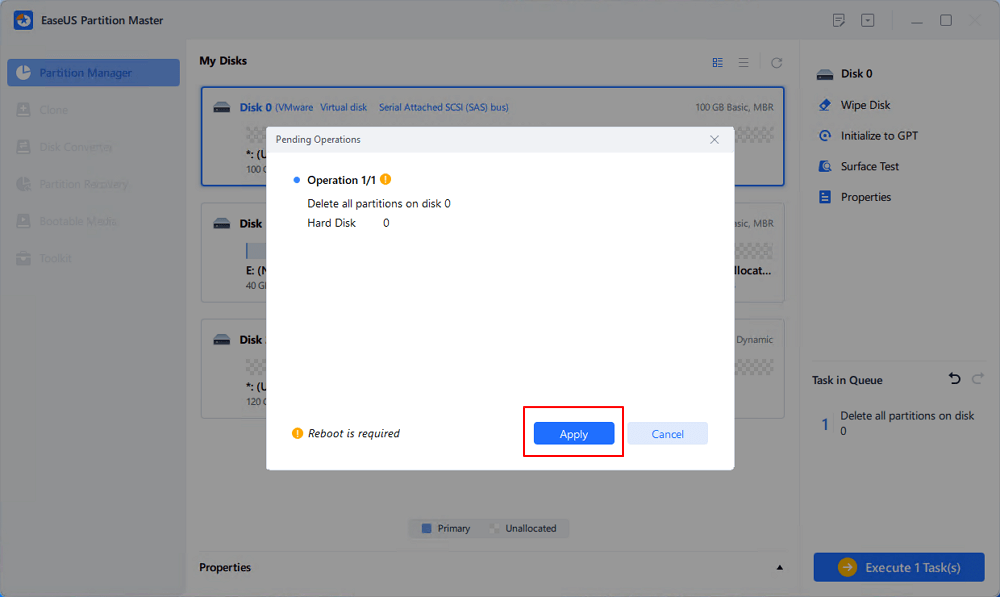
Note: After this, you’ll just need to wait patiently and EaseUS Partition Master will automatically delete the OS drive and other data partition on your disk.
Note: If you’ve deleted the system C drive on your current running computer, you’ll not be able to run or boot up the Windows system anymore. You can refer to clean install Windows 10, 8 or 7 for tutorial help.
Conclusion
Clean up C drive is simple and easy with reliable methods. If you simply want to free up some space in the C drive, you can apply Method 1 with EaseUS WindowsGenius to help you quickly clean up junk files in the system c drive.
If you want to clean and delete the entire OS drive so as to reinstall Windows, you can turn to EaseUS Partition Master with its Bootable Media for help. It’s efficient and quick to execute the operation.
FAQs About Clean C Drive in Windows without Formatting
If you have more questions on how to clean the C drive or clear the C drive without formatting in Windows computers, follow the questions and find answers below:
1. How to clean your computer without deleting files?
Here is a list of tips that you can follow to deep clean your computer without deleting files:
- Back up all valuable files and data to an external hard drive or cloud drive.
- Create a backup of useful installed programs and software to an external hard drive. For a guide, follow this link: Backup Apps Windows 11.
- Then, uninstall installed programs and software.
- Wipe all the existing partitions and volumes.
2. How do I deep clean my C: drive?
- Run the Disk Cleanup utility to remove temporary files, delete Windows.old, and system backup images.
- Uninstall has broken or corrupted programs.
- Empty the recycle bin.
- Delete File History backup.
- Clean junk files with antivirus software.
3. What can I delete to free up space on C drive?
- Uninstall broken or unnecessary programs.
- Clean useless desktop folders and files.
- Empty the recycle bin.
- Find and delete duplicate files.
- Clean up useless downloaded folders and files.
- Discard temporary files.
- Upload files to the cloud drive and delete them from your C drive.