(Image credit: Future)
In computing, the graphics card is an essential component that makes it possible to render every pixel on the screen when navigating the Windows 10 desktop, running an app, and playing a game. Typically, devices can have graphics cards from one of the three leading manufacturers, including NVIDIA, AMD, or Intel.
Although for the most part, you don’t need to worry about the graphics specifications on your computer, it might be something important for users who work with graphics-intensive programs or play games. Usually, if you don’t have a card with a powerful graphics processing unit (GPU), it may not be possible for an application to perform as intended. Or, if you’re a gamer, you may not be able to play games, or you may need to determine the hardware to adjust the settings accordingly to prevent affecting performance.
Whatever your reasons might be, Windows 10 includes multiple ways to quickly find out the graphics card specifications using Settings, Device Manager, System Information, DirectX Diagnostic Tool, Task Manager, and, of course, using the card’s control panel software.
This how-to guide will walk you through the steps to check which graphics card is currently installed on your computer.
How to find out graphics card details using Settings
To find out the graphics card manufacturer and model using the Settings app on Windows 10, use these steps:
- Open Settings.
- Click on System.
- Click on Display.
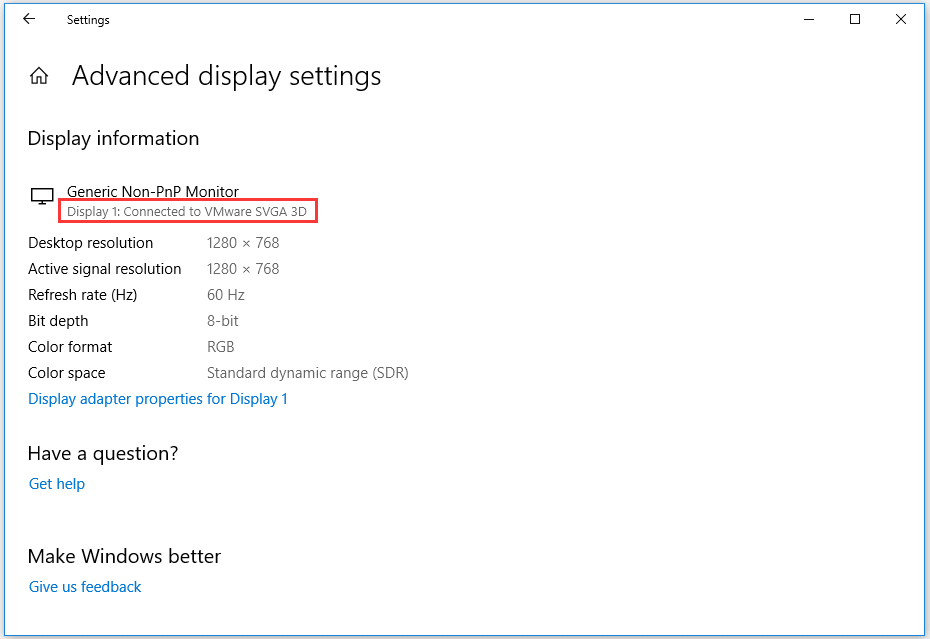
- Under the «Multiple displays» section, click the «Advanced display settings» option.

- Under the «Display information» section, confirm the graphics card vendor and model.
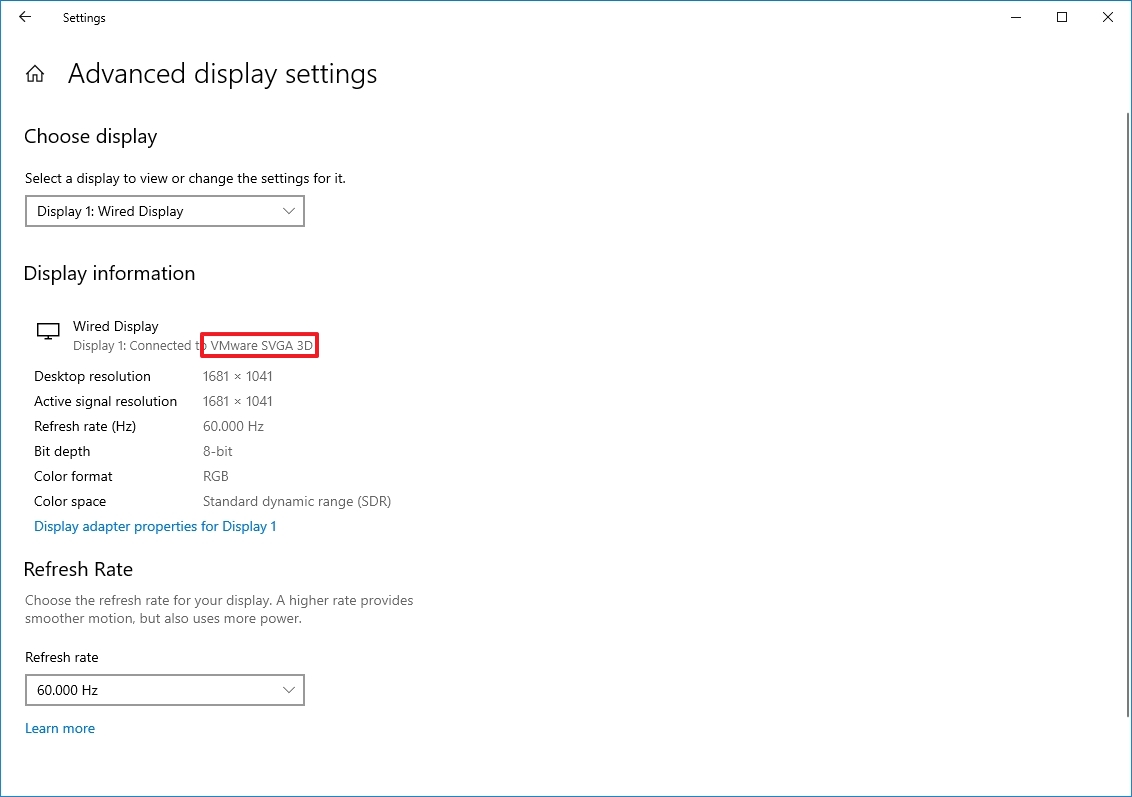
Once you complete the steps, you will understand the video card installed on your device.
How to find out graphics card details using Device Manager
To determine the graphics card installed on the system with Device Manager, use these steps:
- Open Start.
- Search for Device Manager and click the top result to open the tool.
- Expand the Display adapters branch.
- Confirm the manufacturer and model of the video card.
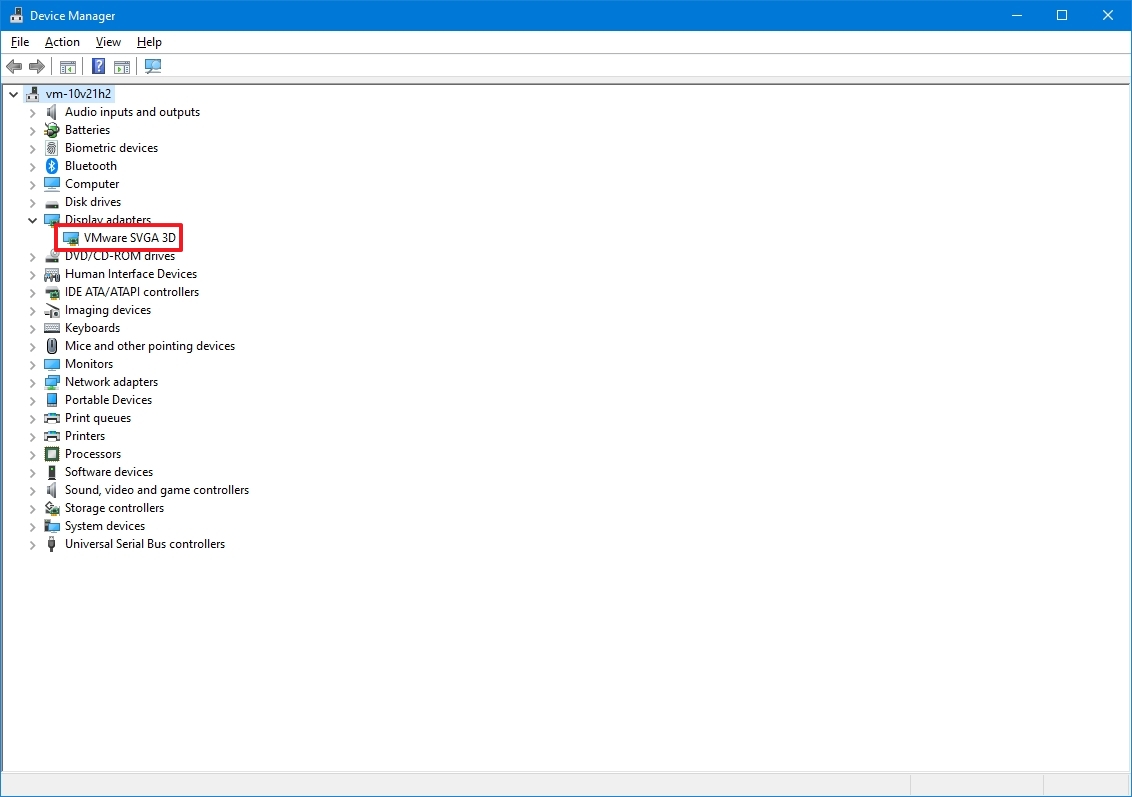
After you complete the steps, the graphics card information will be revealed.
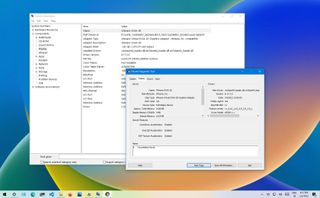
How to find out graphics card details using System Information
To check the graphics card on Windows 10 with System Information, use these steps:
- Open Start.
- Search for System Information and click the top result to open the tool.
- Expand the Components branch.
- Click on Display.
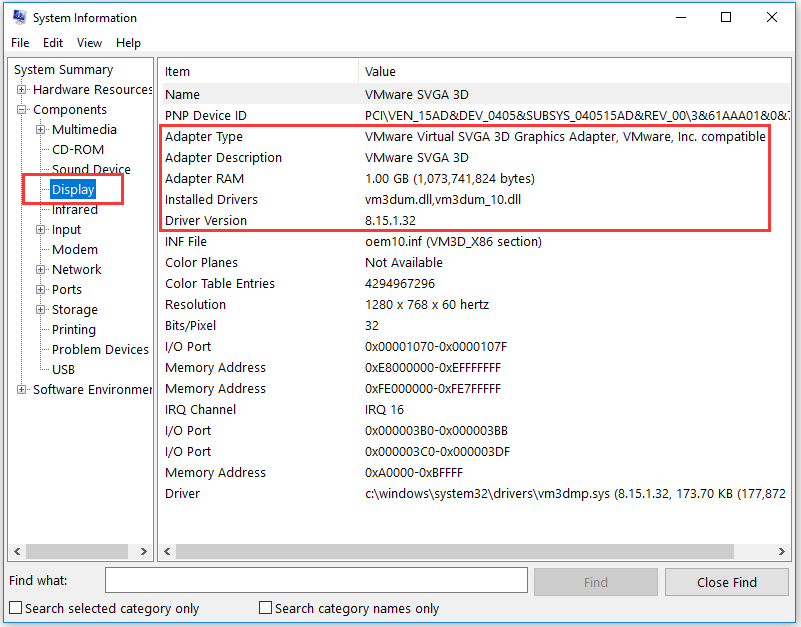
- Under the «Adapter Description» field, determine the graphics card installed on your device.
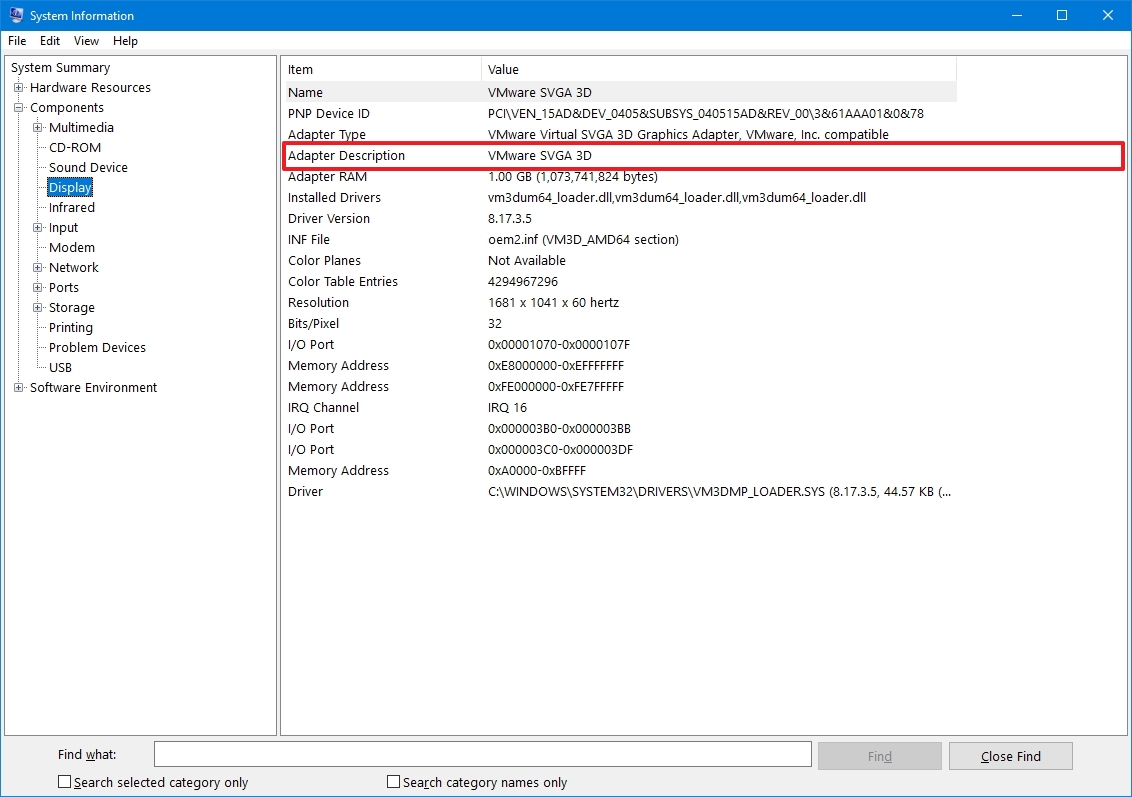
Once you complete the steps, you’ll know the graphics card make and model, driver information, and more.
How to find out graphics card details using DirectX Diagnostic Tool
To find out the video card installed on your PC using DirectX Diagnostic Tool, use these steps:
- Open Start.
- Search for dxdiag and click the top result to open the tool.
- Click the Yes button (if applicable).
- Click the Display tab.
- Under the «Device» section, check the manufacturer and processor type of the graphics card.
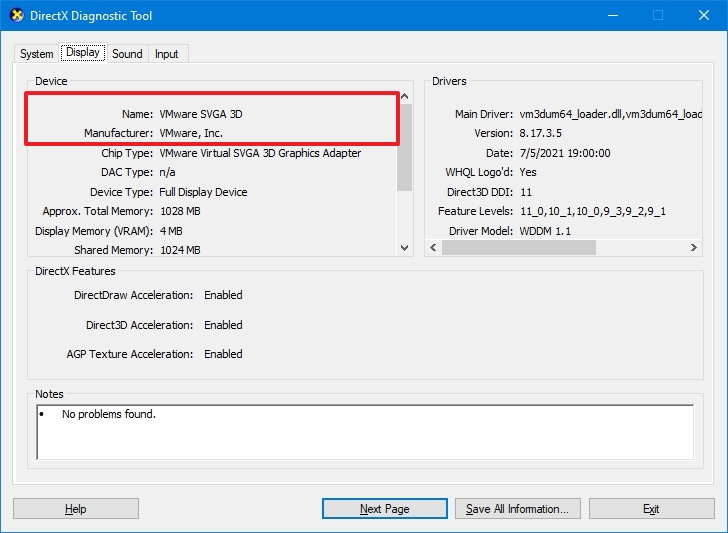
After you complete the steps, you’ll be able to understand the basic information about the video card and other details. For example, the amount of memory built into the device and driver information.
How to find out graphics card details using Task Manager
To figure out the graphics card available on Windows 10 with Task Manager, use these steps:
- Open Start.
- Search for Task Manager and select the top result to open the tool.
- Quick tip: You can also use the «Ctrl + Shift + Esc» keyboard shortcut to open Task Manager.
- Click the Performance tab.
- Click on GPU.
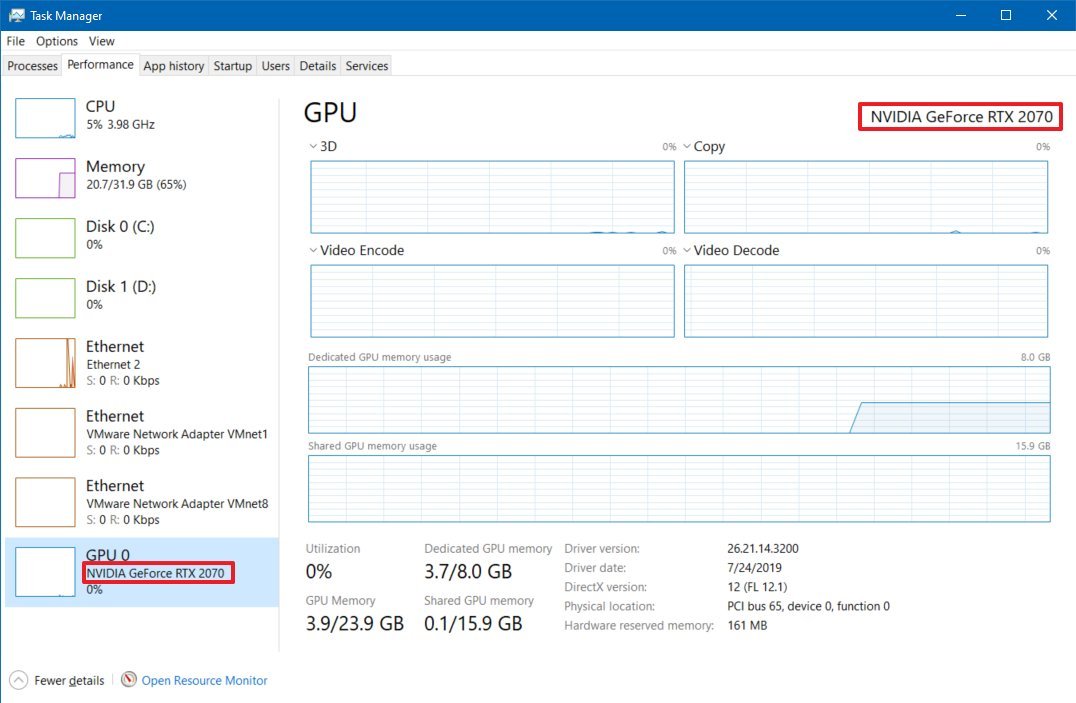
- Confirm the brand and model of the graphics card on the top-right corner.
Once you complete the steps, the Task Manager will display the manufacturer name and model, the dedicated amount of memory, DirectX version, the physical location in the motherboard, and current utilization details.
How to find out graphics card details using Control Panel
Alternatively, if you have a GPU from Intel, NVIDIA, or AMD, you can also use their control panel software to check the graphics card specifications, including settings to adjust many preferences.
To check the specifications using the NVIDIA Control Panel, use these steps:
- Open Control Panel.
- Click on Hardware and Sound.
- Click on NVIDIA Control Panel.
- Click the System Information option from the bottom-left corner.
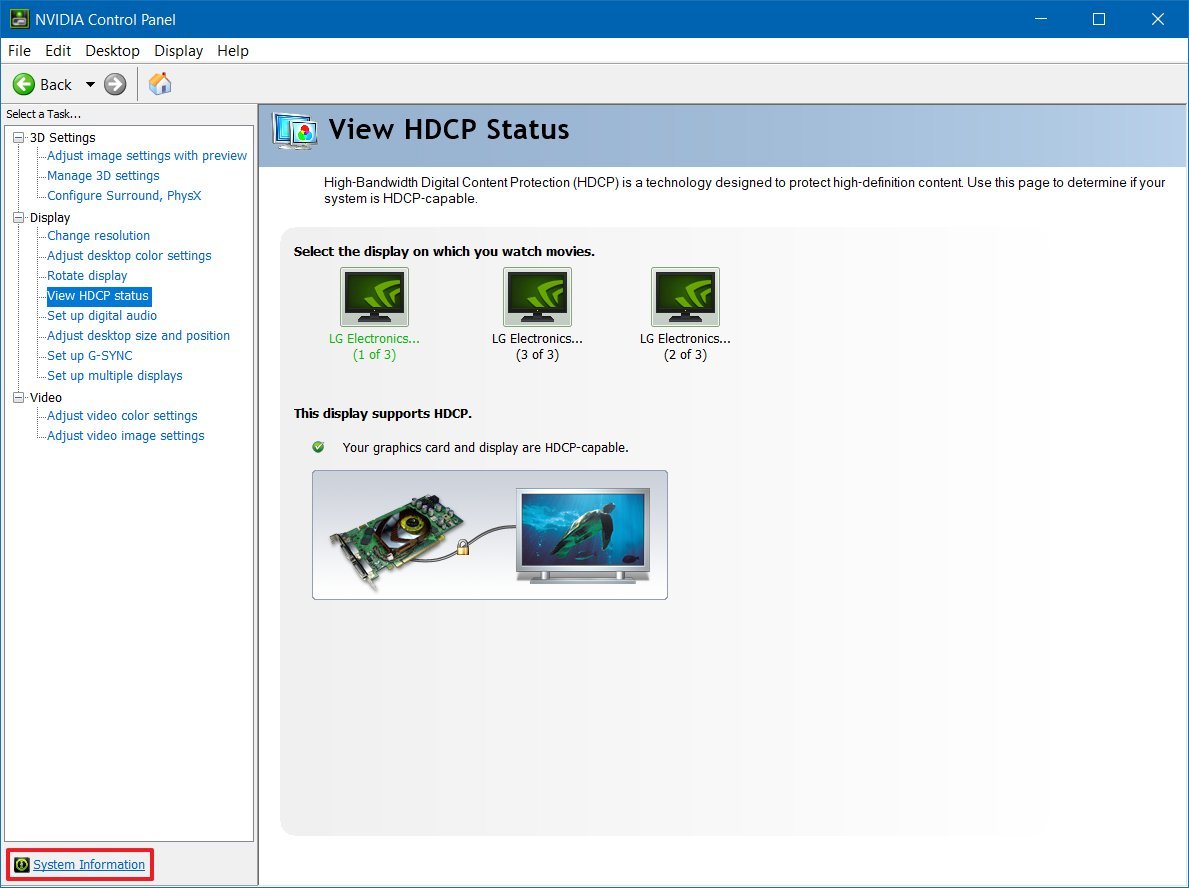
- Click the Display tab.
- Under the «Graphics card information» section, confirm the graphics model on the left side.
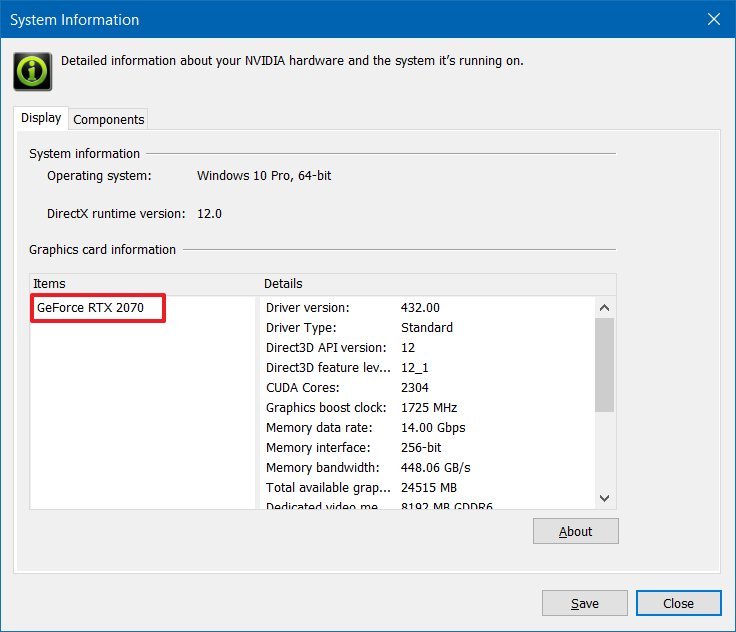
Once you complete the steps, you’ll know the exact graphics card model. On the right side, you’ll also find various other details, such as the number of CUDA cores, processor clock speed, memory data rate, bandwidth, type, amount, and the video BIOS version.
More resources
For more helpful articles, coverage, and answers to common questions about Windows 10 and Windows 11, visit the following resources:
- Windows 11 on Windows Central — All you need to know
- Windows 10 on Windows Central — All you need to know

Cutting-edge operating system
A refreshed design in Windows 11 enables you to do what you want effortlessly and safely, with biometric logins for encrypted authentication and advanced antivirus defenses.
All the latest news, reviews, and guides for Windows and Xbox diehards.
Mauro Huculak is technical writer for WindowsCentral.com. His primary focus is to write comprehensive how-tos to help users get the most out of Windows 10 and its many related technologies. He has an IT background with professional certifications from Microsoft, Cisco, and CompTIA, and he’s a recognized member of the Microsoft MVP community.
How to check graphics card? This post provides 5 ways to help you check the graphics card on Windows 10/8/7 PC or laptop. Detailed step-by-step guides are included.
Wonder what graphics card does the computer have, and how to check graphics card on Windows 10/8/7 PC/laptop? This post provides 5 ways to help you check Windows 10/8/7 computer graphics card easily and quickly. Find out the detailed step-by-step guide.
Tip: MiniTool Power Data Recovery – Professional free data recovery program enables you to easily recover deleted/lost files from Windows 10 computer, memory/SD card, USB flash drive, external hard drive, SSD, etc. 100% clean program.
MiniTool Power Data Recovery FreeClick to Download100%Clean & Safe
You can run Microsoft DirectX Diagnostic Tool to easily check the graphics card on Windows 10/8/7. Check the detailed guide below.
Step 1. You can press Windows + R key on computer keyboard to open Run window. Then type dxdiag and hit Enter to open DirectX Diagnostic Tool.
Step 2. Next you can tap Display tab, then you can check the detailed information of the graphics card on your Windows 10/8/7 PC/laptop, including graphics card name, manufacturer, its driver model/version/date, and more.

Recommended reading: 5 Best Free Photo Recovery Software to Recover Deleted Photos
How to Check Graphics Card on Windows 10/8/7 in Device Manager
You can also easily check graphics card in laptop or PC through Device Manager.
Step 1 – Open Windows Device Manager
You can click Start and type Device Manager. Then click Device Manager under best match result to open Windows Device Manager.
You can also press Windows + X key on the keyboard simultaneously, and click Device Manager to open it.
Step 2 – Check Graphics Card Detailed Info
Then you can find Display adapters, click and expand it. Then you will see the installed graphics card (s) on your Windows 10/8/7 PC/laptop.
Right-click on one graphics card and select Properties. Then it will pop-up a window which includes all the detailed computer graphics card information.
You can then check the general information, the driver information, device status and more of the computer graphics card.

Recommended reading: Top 5 Free Video Recovery Software to Recover Deleted Videos
How to Check Graphics Card on Windows 10/8/7 from Display Settings
Another easy and quick to check graphics card on Windows 10/8/7 laptop or PC is to view display settings. Check the operation below.
Step 1. You can right-click the blank space on the computer screen and choose Display Settings.
Step 2. Then you can scroll down and click Advanced Display Settings to find out what graphics card your computer has and view its detailed parameters.
Recommended reading: How to Use Windows 10 Photos App to Edit Photos and Videos
How to Check Graphics Card on Windows 10/8/7 from Task Manager
You can also find out the computer graphics card info by using Task Manager on Windows 10/8/7 PC.
Step 1. Open Windows Task Manager
You can press Windows + X keys on the keyboard at the same time, and choose Task Manager.
Or you can click Start and type Task Manager. Select Task Manager to open it.
You can also press the shortcut key Ctrl + Shift + Esc at the same time to open Task Manager quickly.
Then click More details to check the detailed information of running tasks in Windows 10/8/7 PC.
Step 2. Find Out Computer Graphics Card Information
Next you can tap Performance tab, and click GPU option to check computer GPU information. You can check the GPU model, current usage rate, the graphics card driver, the version and its performance, etc.

Recommended: How to Open & Use Windows 10 Camera App to Capture Video/Photo
How to Check Graphics Card on Windows 10/8/7 through System Information
The last easy and quick way to allow you to check out the graphics card (GPU) or Windows 10/8/7 laptop or PC is to use System Information.
Step 1. Open Windows System Information
You can also press Windows + R key on the keyboard to open RUN window, then input msinfo32 and hit Enter.
Step 2. Check Windows 10/8/7 Laptop/PC GPU
Next you can expand System Summary -> Components -> Display, to check the detailed computer graphics adapter information incl. adapter model, adapter description, adapter RAM, installed drivers, and more. You can also check full specs of Windows 10/8/7 in this System Information window.
Bottom Line
If you want to find out what the graphics card your computer has, these 5 ways offered in this post can help you easily check graphics card in Windows 10/8/7 laptop or PC.
Video Guide:
Are you having trouble with your Windows 10 computer? Have you noticed that the video card might be having issues? Checking the video card on Windows 10 is an important step in ensuring your computer functions properly. In this article, we’ll provide an easy step-by-step guide on how to check the video card on Windows 10. We’ll also discuss the importance of video card maintenance and how it can help improve the performance of your computer. So, if you’re looking to understand the basics of video card maintenance and how to check it on Windows 10, this article is for you!
To check the video card in Windows 10, follow these steps:
- Open the Device Manager
- Expand the Display Adapters section
- Right-click the video card and select Properties
- Go to the Driver tab
- View the Driver Provider and Driver Version

How to Find Out What Graphics Card You Have in Windows 10?
Windows 10 is the most widely used operating system in the world and is used by millions of users all over the world. It is important to know what kind of graphics card you are running in your computer, especially if you are a gamer or a multimedia enthusiast. Knowing the specifications of your graphics card will help you get the best performance out of your system. In this article, we will discuss how to check the video card Windows 10.
The first step to check the video card on Windows 10 is to open the Device Manager. To do this, simply type “Device Manager” in the Start menu and select it from the list of results. Alternatively, you can press the Windows key + X to open the Power User menu and select Device Manager from there.
Once you have opened the Device Manager, you will be able to view all the installed devices in your system. Expand the “Display adapters” section to view the graphics card installed in your system. You can right-click on the graphics card entry and select “Properties” to view detailed information regarding your graphics card. This includes the model number, manufacturer, driver version, and other technical information.
Using System Information Tool
You can also use the System Information tool to check the video card on Windows 10. To open the System Information tool, simply type “System Information” in the Start menu and select it from the list of results. Alternatively, you can press the Windows key + R to open the Run dialog, type “msinfo32” and press Enter.
Once the System Information tool is open, you will be able to view detailed information about your system. Expand the “Components” section and select “Display”. This will display detailed information about your graphics card such as the model number, manufacturer, driver version, and other technical information.
Using DirectX Diagnostic Tool
The DirectX Diagnostic Tool is another tool that you can use to check the video card on Windows 10. To open the DirectX Diagnostic Tool, press the Windows key + R to open the Run dialog, type “dxdiag” and press Enter.
Once the DirectX Diagnostic Tool is open, you will be able to view detailed information about your system. Expand the “Display” section to view detailed information regarding your graphics card. This includes the model number, manufacturer, driver version, and other technical information.
Using the Settings App
The Settings app is another way to check the video card on Windows 10. To open the Settings app, simply type “Settings” in the Start menu and select it from the list of results. Alternatively, you can press the Windows key + I to open the Settings app directly.
Once the Settings app is open, you can go to “System > Display” to view detailed information about your graphics card. This includes the model number, manufacturer, driver version, and other technical information.
Using Third Party Software
There are also a number of third-party software tools that you can use to check the video card on Windows 10. These tools are designed to provide detailed information about your system and can be used to check the video card as well. Some of the most popular third-party software tools include AIDA64, GPU-Z, and HWiNFO.
Using the Command Prompt
You can also use the Command Prompt to check the video card on Windows 10. To open the Command Prompt, type “Command Prompt” in the Start menu and select it from the list of results. Alternatively, you can press the Windows key + X to open the Power User menu and select “Command Prompt” from there.
Once the Command Prompt is open, you can type the following command to view detailed information about your graphics card:
wmic path win32_videocontroller get description
This will display the model number, manufacturer, driver version, and other technical information about your graphics card.
Top 6 Frequently Asked Questions
Q1: How do I check my video card in Windows 10?
A1: To check your video card in Windows 10, open the Start menu and type “Device Manager” in the search field. After the Device Manager window appears, click on the arrow next to “Display adapters” to expand the list. Here, you will find the name of your video card. Alternatively, you can right-click on the Start menu and select “System”, then click on “Device Manager” in the left pane. From here, the same steps mentioned above can be followed.
Q2: How do I know if my video card is up to date?
A2: To know if your video card is up to date, open the Device Manager and right-click on your video card driver. Select “Properties”, then click on the “Driver” tab. Here, you will find the version number of your driver. Compare this version number to the version number of the latest driver available for your video card. If the version numbers match, then your video card driver is up to date. If they don’t, then you need to update your driver.
Q3: How do I update my video card driver in Windows 10?
A3: To update your video card driver in Windows 10, open the Device Manager and right-click on your video card driver. Select “Update driver”, then choose “Search automatically for updated driver software”. Follow the onscreen instructions to complete the update process. Alternatively, you can manually download the latest driver for your video card from the manufacturer’s website.
Q4: How do I check if my video card meets the requirements of a game?
A4: To check if your video card meets the requirements of a game, you can check the game’s system requirements on the game’s website. Compare the game’s minimum requirements to the specifications of your video card. If your video card meets or exceeds the minimum requirements, then it should be able to run the game.
Q5: What should I do if my video card is not supported?
A5: If your video card is not supported, you may need to upgrade your video card to a newer model that is supported. Alternatively, you can try to install a newer driver for your video card. If neither of these options is possible, then you may need to find a different game that runs on your video card.
Q6: How do I check the temperature of my video card?
A6: To check the temperature of your video card, you can use a third-party utility such as GPU-Z or MSI Afterburner. Once these utilities are installed, simply open them and check the temperature reading. If the temperature is too high, you may need to check the fan on your video card for dust build-up and ensure that the fan is working properly.
How to Check Your Graphics Card Video Memory (VRAM) Size on Windows 10?
The process of how to check video card Windows 10 is a simple yet effective way to ensure your system is running at optimal performance. With just a few clicks, you can quickly check what type of video card is installed in your system and make any necessary adjustments to ensure your system is running at its best. By following the steps outlined in this article, you can easily check your video card and any other components that may be impacting your system’s performance.
If you too are facing the same issue then don’t worry as today in this guide we will cover 3 methods via which you can easily find out the type, model, manufacturer etc of your Graphics Card. Make sure you know that Graphics card is also called a video adapter, video card, or display adapter. Anyway, without wasting any time let’s see How to Check Your Graphics Card in Windows 10 with the help of the below-listed tutorial.
Make sure to create a restore point just in case something goes wrong.
3 Ways to Check Your Graphics Card in Windows 10 Method 1: Check Your Graphics Card in Windows 10 Settings Method 2: Check Your Graphics Card in Windows 10 using DxDiag Method 3: How to Check Your Graphics Card in Windows 10 using Device Manager
Method 1: Check Your Graphics Card in Windows 10 Settings
Note: This will only show the integrated graphics card, to see the dedicated graphics card follow the next method.
1.Press Windows Key + I to open Settings then click on System icon.
2.From the left hand menu make sure to select Display.
3.Scroll down then click on Advanced display settings.
4.In the Advanced display settings, click on the link that says “Display adapter properties“.
5.The graphics properties window will open and here you can see the type, mode, & manufacturer of your graphics card.
Method 2: Check Your Graphics Card in Windows 10 using DxDiag
1.Press Windows Key + R then type dxdiag and hit Enter to open DirectX Diagnostic Tool.
Note: DxDiag (DirectX Diagnostic Tool) is used to view the system information such as the grahics card, sound card etc.
2.Wait for few seconds in order for the DxDiag window to load.
3.On the System tab (in DxDiag window) you will see the following information:
Computer Name Operating System Language System Manufacturer System Model BIOS Processor Memory Page file Direct X Version
4.Now if you have a dedicated graphics card then you will have two Display tabs such as Display 1 and Display 2.
5.Switch to Display 1 and here you will find the Name, Manufacturer, Total Memory, Drivers information etc of the Graphics card.
6.Similarly, switch to Display 2 (which will be your dedicated graphics card) and you will find the following information:
Name of the Graphics Card Manufacturer Chip Type DAC Type Device Type Total Memory Display Memory Shared Memory Drivers DirectX Features
7.The last tab is of sound, where you can find sound card name, manufacturer, drivers etc.
8.Once finished, click Exit to close the DxDiag window.
Method 3: How to Check Your Graphics Card in Windows 10 using Device Manager
1.Press Windows Key + R then type devmgmt.msc and hit Enter.
2.Expand Display adapters and then you will see your graphics card listed. If you have integrated as well as the dedicated graphics card, you will see both of them.
3.Right-click on any one of them and select Properties.
Note: You will need to open Properties window of each graphics card to know more about both of them.
4.In the Properties window, you will see the Graphics card name, manufacturer, device type, etc information.
5.You can also switch to Driver, Details, Events, or Resources tab to know more about your Graphics Card.
6.Once finished, click ok to close the properties window.
Recommended:
Fix Your DNS Server might be unavailable error How to Fix Windows Update Error 80072EE2 Fix ERR_CONNECTION_TIMED_OUT Chrome error Fix IPv6 Connectivity No Internet Access on Windows 10
That’s it you have successfully learned How to Check Your Graphics Card in Windows 10 but if you still have any questions regarding this post then feel free to ask them in the comment’s section.


Introduction
A graphics card, which is also known as a video card, display card, or graphics adapter, is a piece of hardware that is installed in a computer. It is responsible for generating all the text and pictures that are displayed on your screen. Nowadays, every processor has a built-in onboard graphics card.
All computers have a Graphics Card that handles everything from drawing your desktop and decoding videos to rendering demanding PC/laptop games. Most modern PCs have Graphics Processing Units (GPUs) made by Intel and NVIDIA.
The GPU is usually the most critical component when it comes to playing PC games. If you don’t have a powerful enough GPU, you can’t play newer PC games or you may have to play them with lower graphical settings. Some computers have low-power “onboard” or “integrated” graphics, while others have powerful “dedicated” or “discrete” graphics cards and if you want to know what Graphics Card you are using in Windows 10 then you have to follow certain steps:
There are 4 ways to help you check Windows 10 Computer Graphics Card Information easily and quickly.
Method 1 — By using DirectX Diagnostic Tool
Step 1
From the Start menu, open the Run dialog box or you can Press the «Window + R» key to open the RUN window.
Step 2
Then type «dxdiag» and press Enter to open «DirectX Diagnostic» Tool.
Step 3
Click on «Display» tab, then you can check the detailed information of the Graphics Card on your Windows 10, including graphics card name, manufacturer, its driver model/version, and more.
Method 2 — Through Device Manager
You can also easily check graphics cards Information through Device Manager. Follow the below instructions to proceed.
Step 1
You can click Start and type Device Manager. Then click Device Manager to open Windows Device Manager. (Alternatively, you can press the «Windows + X» key, and click Device Manager to open it).
Step 2
Click on «Display adapters», then you will see the installed graphics card(s) on your Windows 10 PC.

Step 3
Right-click on graphic card and select Properties. Then it will pop-up a window, which includes all the detailed Computer Graphics Card Information.

Method 3 — Through Display Settings
You can also easily check the graphics card Information from the Display Settings.
Step 1
You can right-click the blank space on the computer screen and choose «Display» Settings.
Step 2
Click on «Advanced Display Settings».
Step 3
Then you can scroll down and click on «Display adapter properties» option, then you will see the installed graphics card(s) on your Windows 10.
Method 4 — Through System Information
Step 1
From the Start menu, open the Run dialog box or you can Press the «Window + R» key to open the RUN window.
Step 2
Type «msinfo32» and press Enter to open «System Information».
Step 3
Click on System Summary -> Components -> Display, then you will see the installed graphics card(s) and its information on your Windows 10.

Conclusion
By following any of the above methods, you can check the Graphics Card Information in Windows 10.
I hope you enjoyed this article. Follow C# Corner to learn more new and amazing things about Windows 10.
Thanks for reading this article.