Java remains the second-most popular coding language in the world according to the PYPL Index, and it ranks third among skilled professionals to develop high-performance applications across multiple platforms — only C and Python score higher.
As a result, you’ll often find Java running in the background of many Mac or Windows systems. However, if the version of Java you have isn’t up to date, applications may not work as intended — or may refuse to open at all.
In this piece, we’ll walk you through how to check your Java version in Mac and Windows to make sure the Java you’ve got is the one you need.
When it comes to Windows, there are two easy ways to check your Java version:
-
Check the Java Version Using the Control Panel
-
Check the Java Version Using the Command Line
If you’re a Mac user, you’ve also got two simple options:
-
Check the Java Version Using System Preferences
-
Check the Java Version Using the Terminal
Let’s break down each method in more detail.
How to Check Java Version in Windows
1. Check the Java Version Using the Control Panel
If you’re a Windows user, the Control Panel approach is quick and easy.
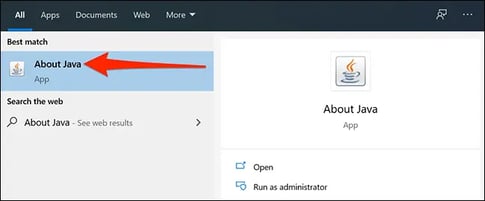
First, click on the magnifying glass icon at the bottom-left of your desktop.
Next, type in “About Java” in the search bar that appears, then click on the “About Java” app that appears. If it doesn’t come up, try “Configure Java”. If you’re still having no luck, you probably don’t have Java installed.
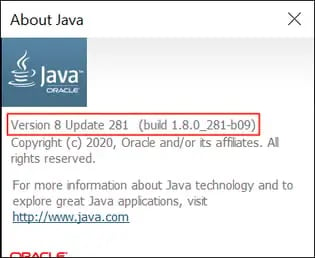
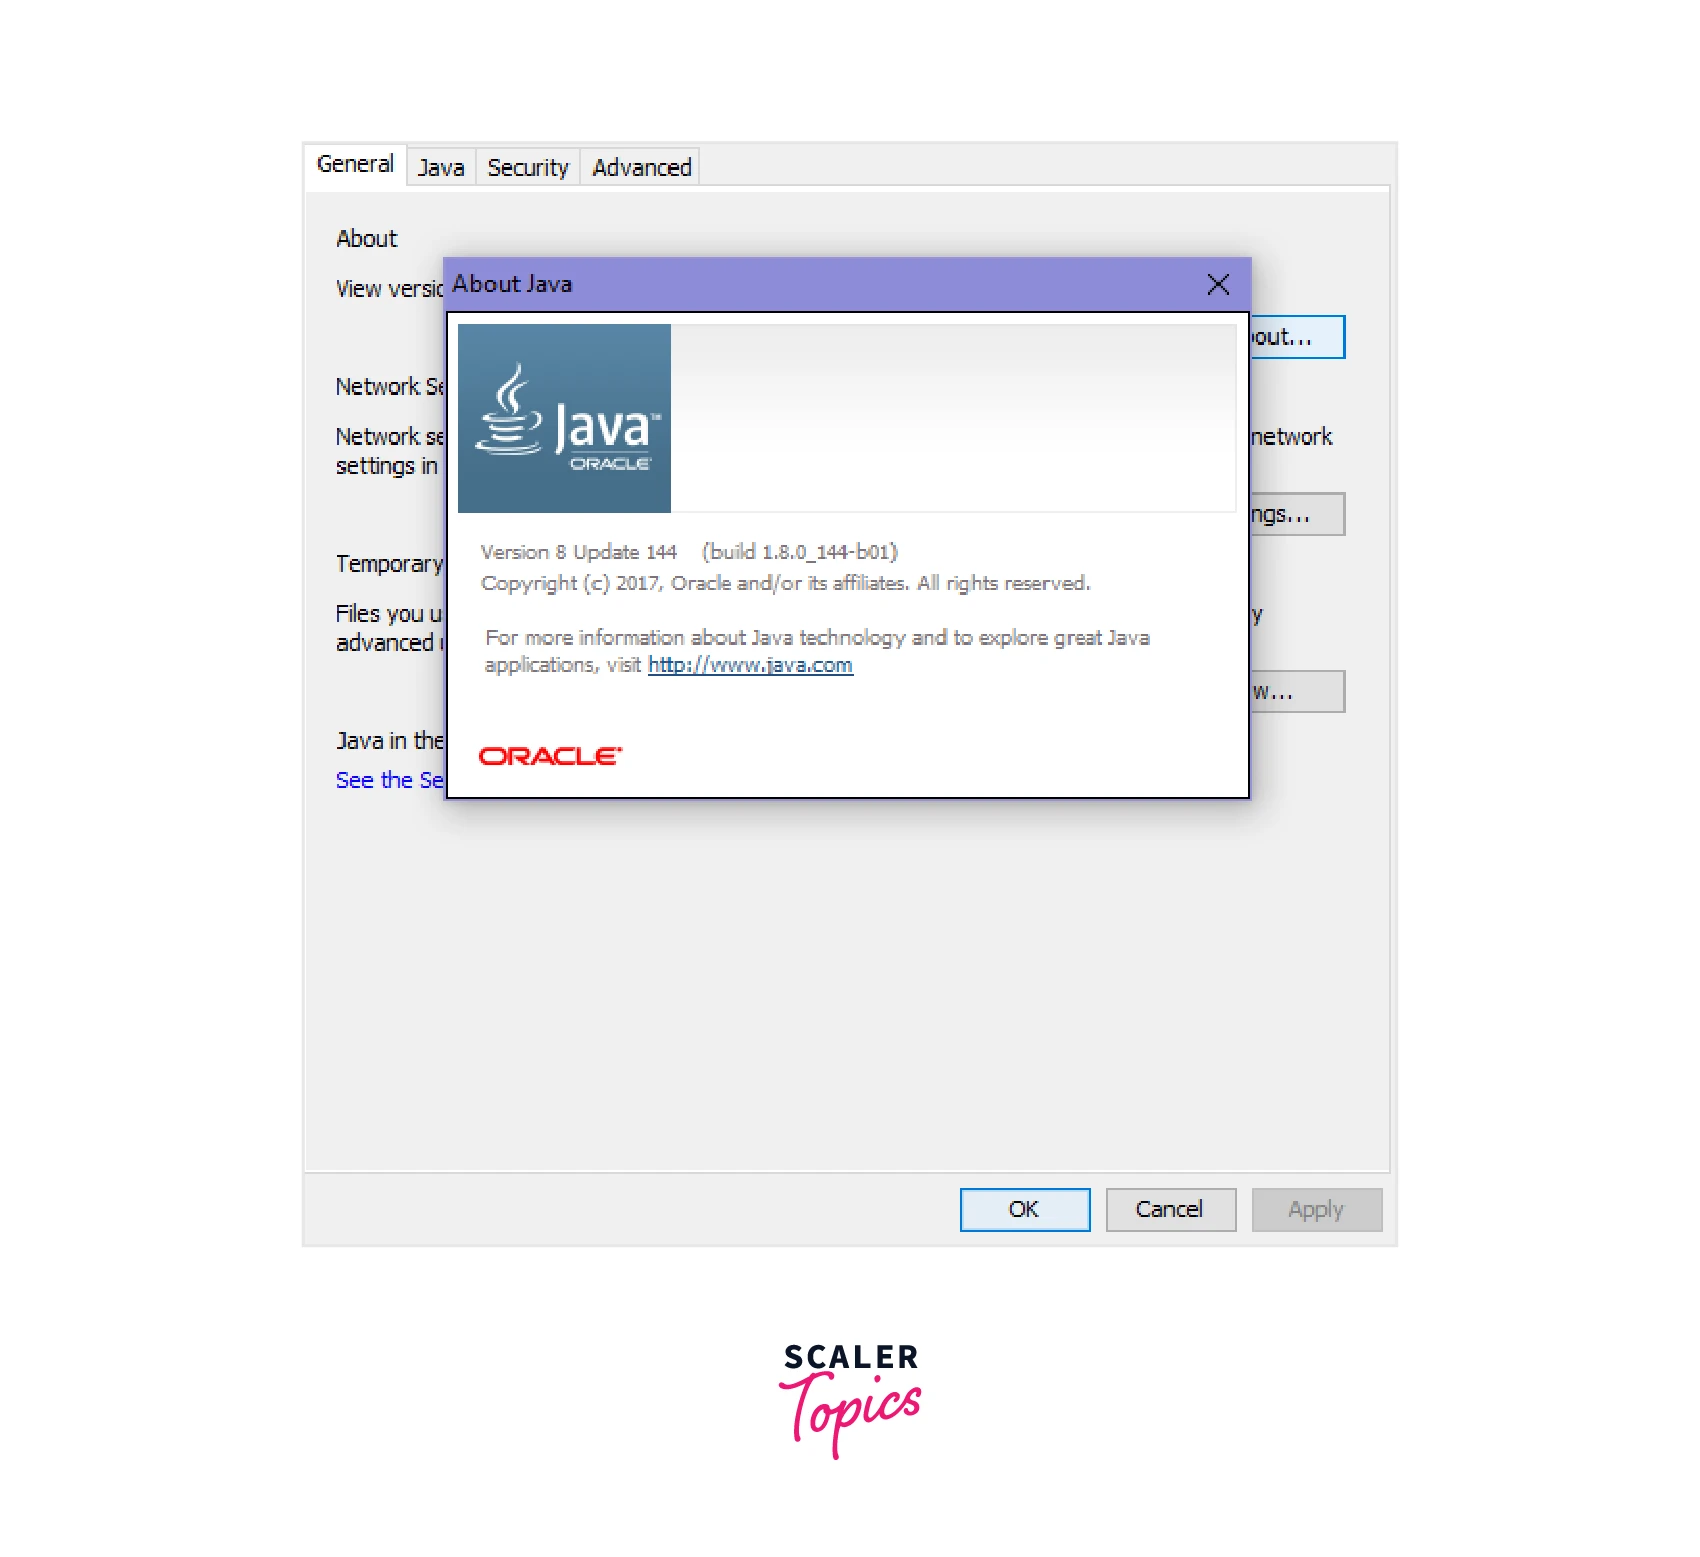
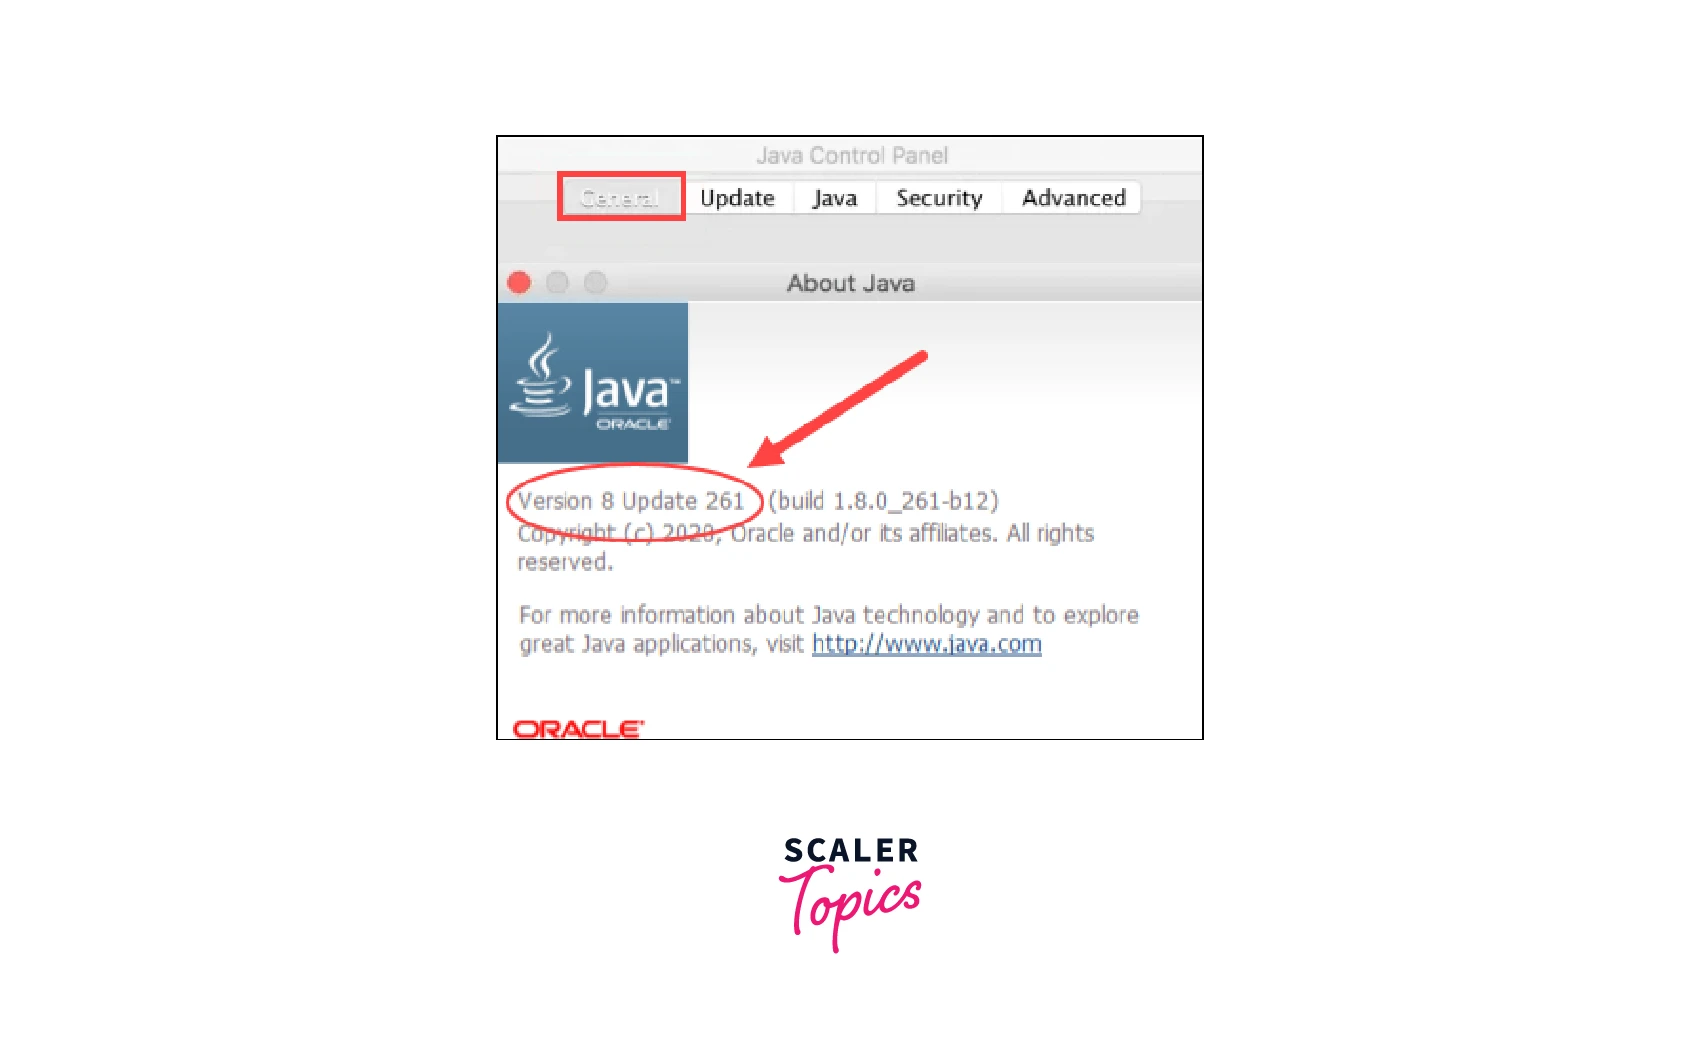
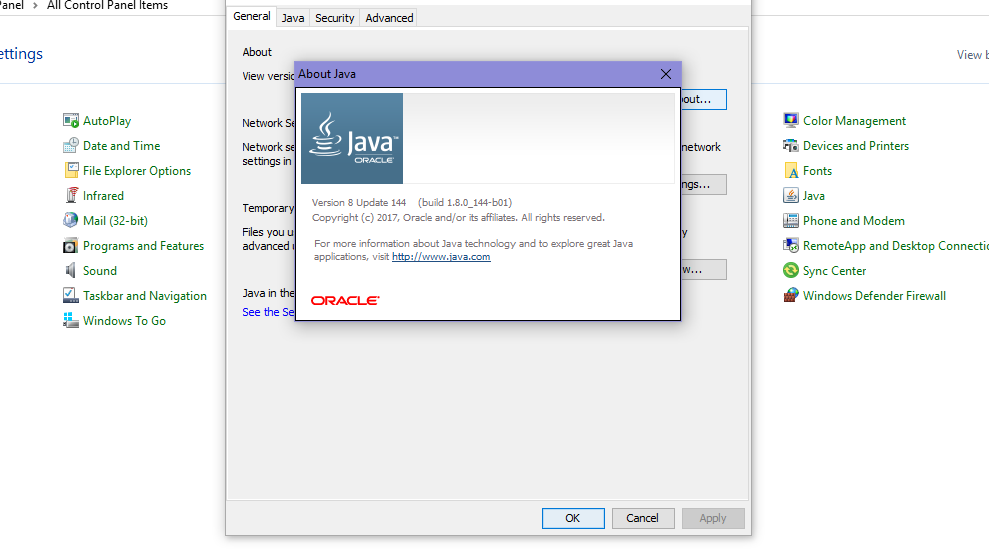
Once you click through on About Java or Configure Java, you’ll see a pop-up window indicating the current version and build number.
2. Check the Java Version Using the Command Line
You can also check your Java version in Windows using the command line.
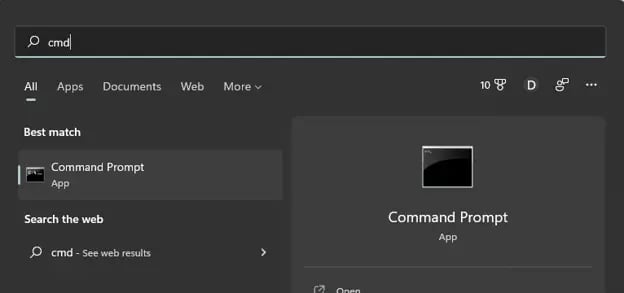
First, click on the magnifying glass and type “cmd”, then click on the Command Line app icon that appears.
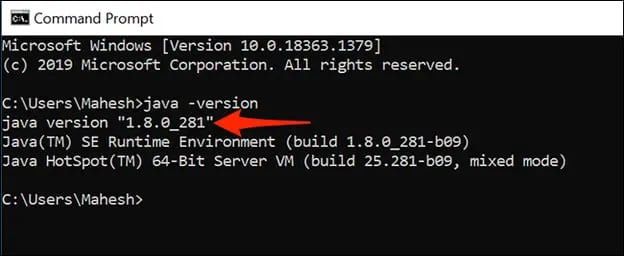
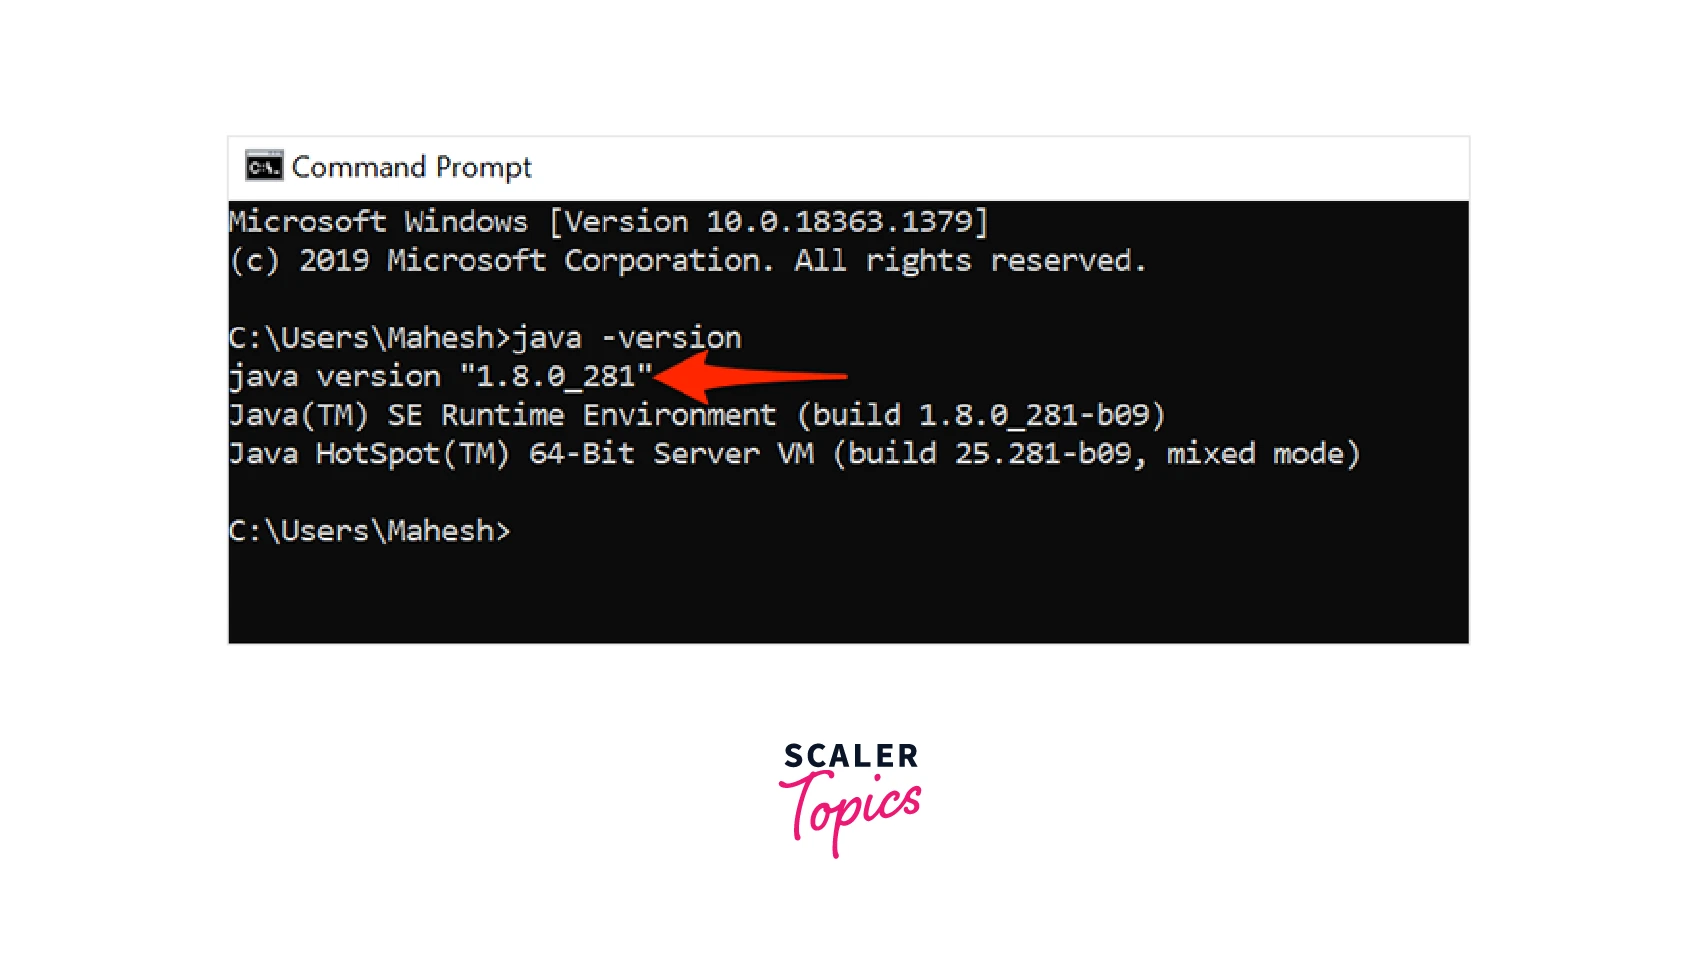
Now, enter the command java -version and you’ll see the version of Java listed.
The video below not only covers these two common methods but an additional third method as well.
How to Check Java Version in Mac
1. Check the Java Version Using System Preferences
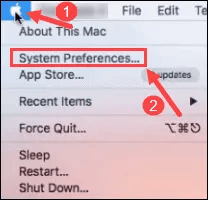
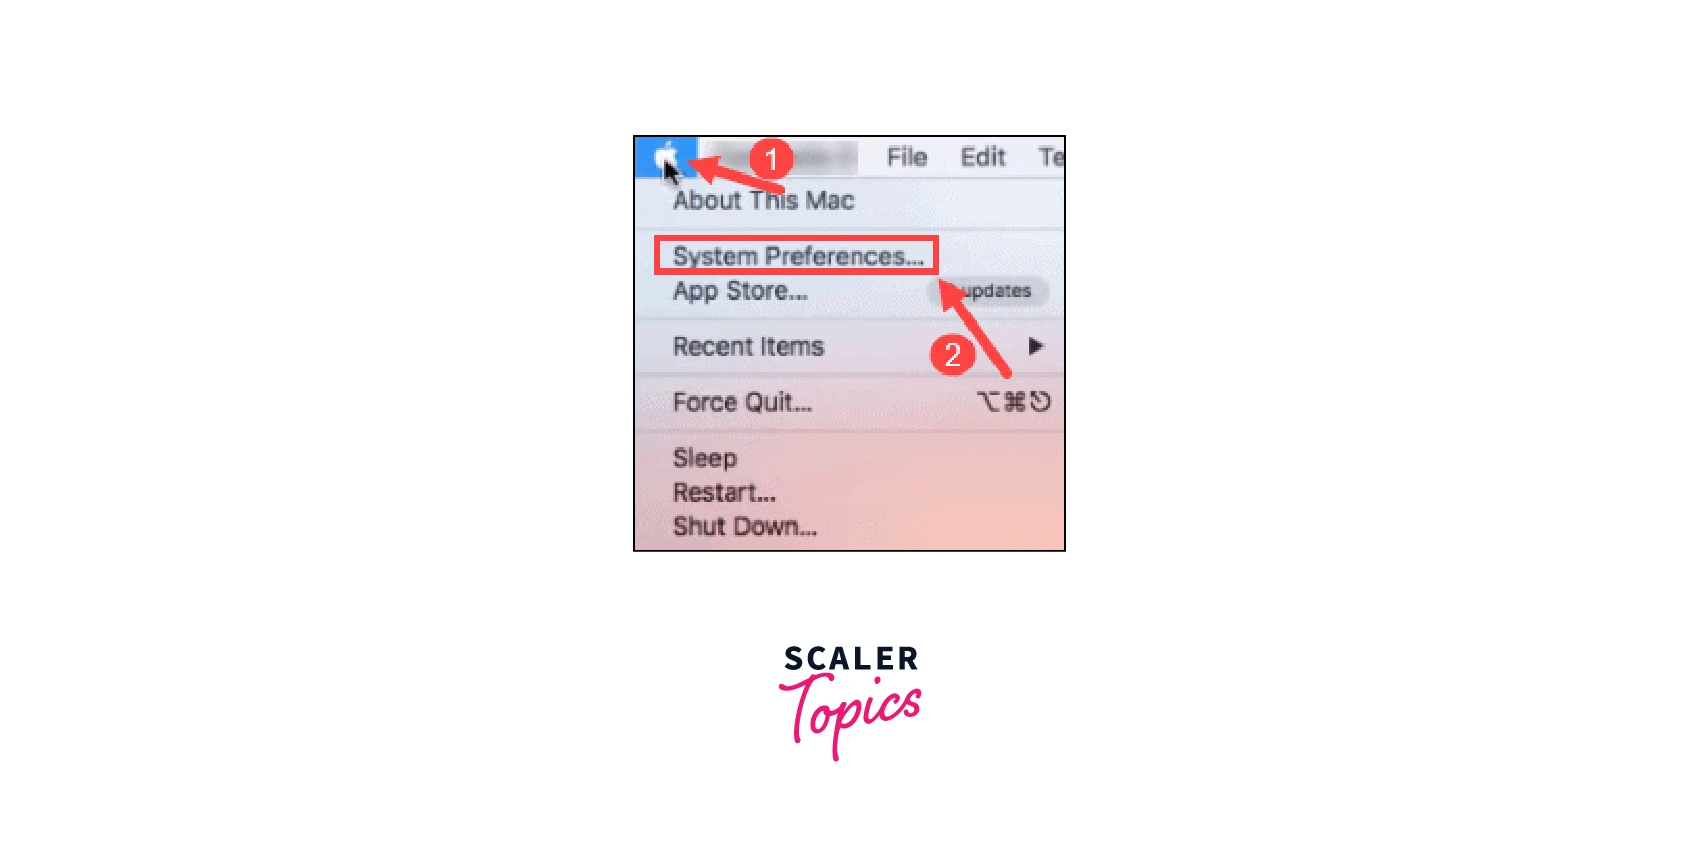
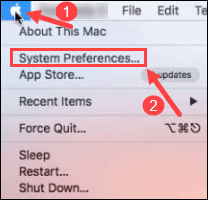
To check your Java version on a Mac without leaving the GUI, start by clicking the Apple icon in the top left-hand corner of your screen, then select “System Preferences.”
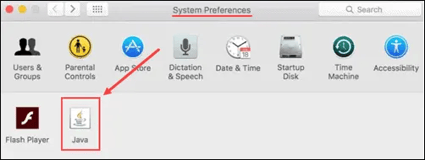
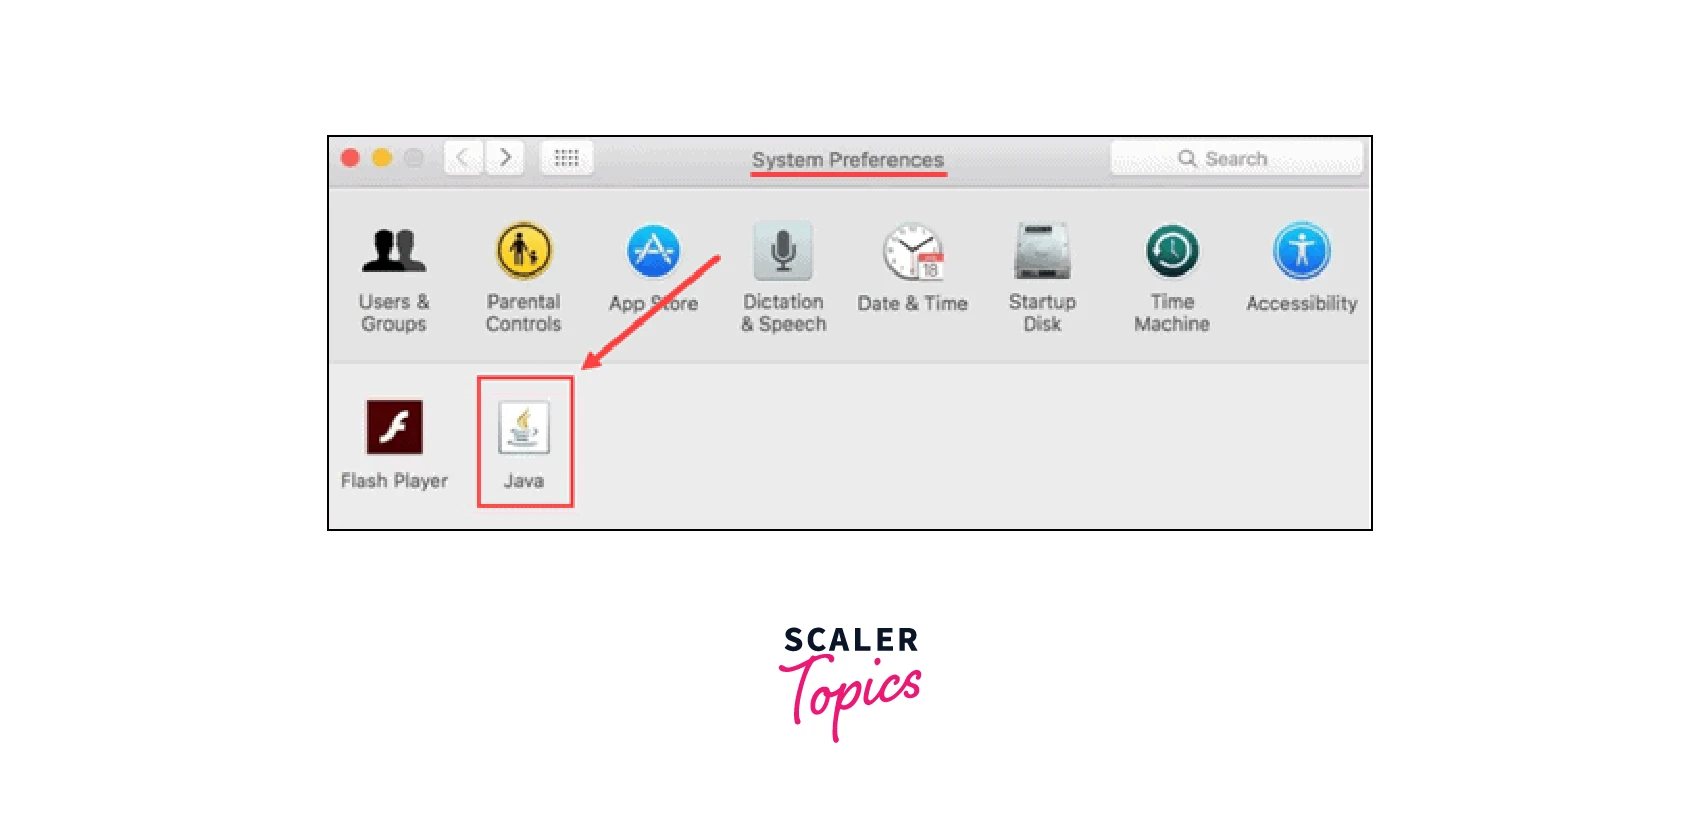
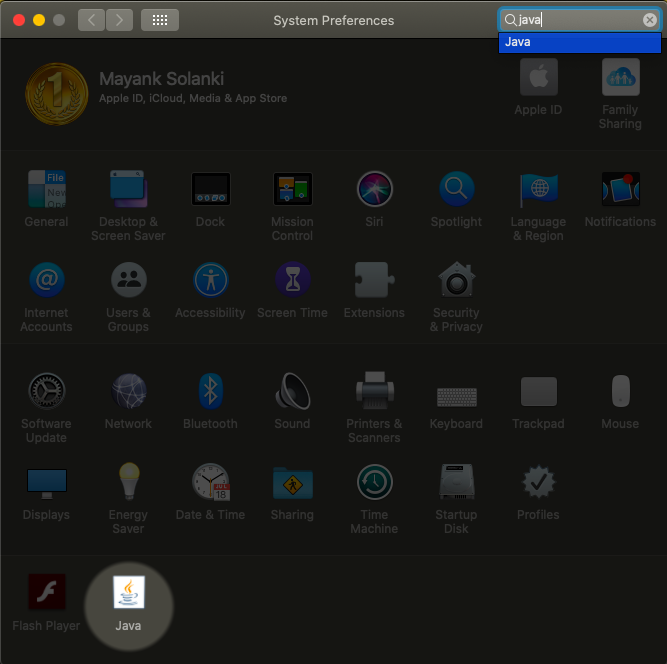
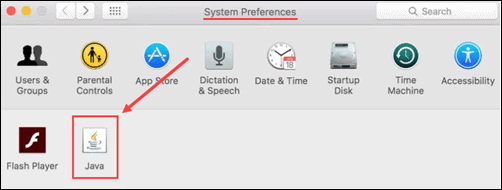
Next, find and click on the Java icon in the list of programs shown.
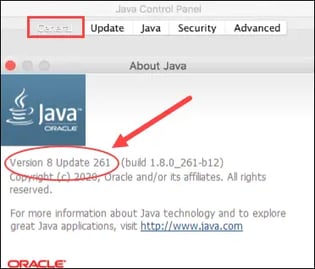
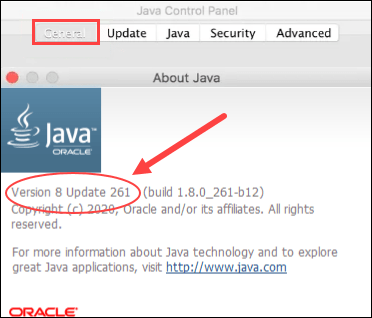
Finally, click on the “About” button to see the version of Java you’re currently running.
2. Check the Java Version Using the Terminal
Checking your Java version on Mac using the terminal is similar to using the Windows command line.
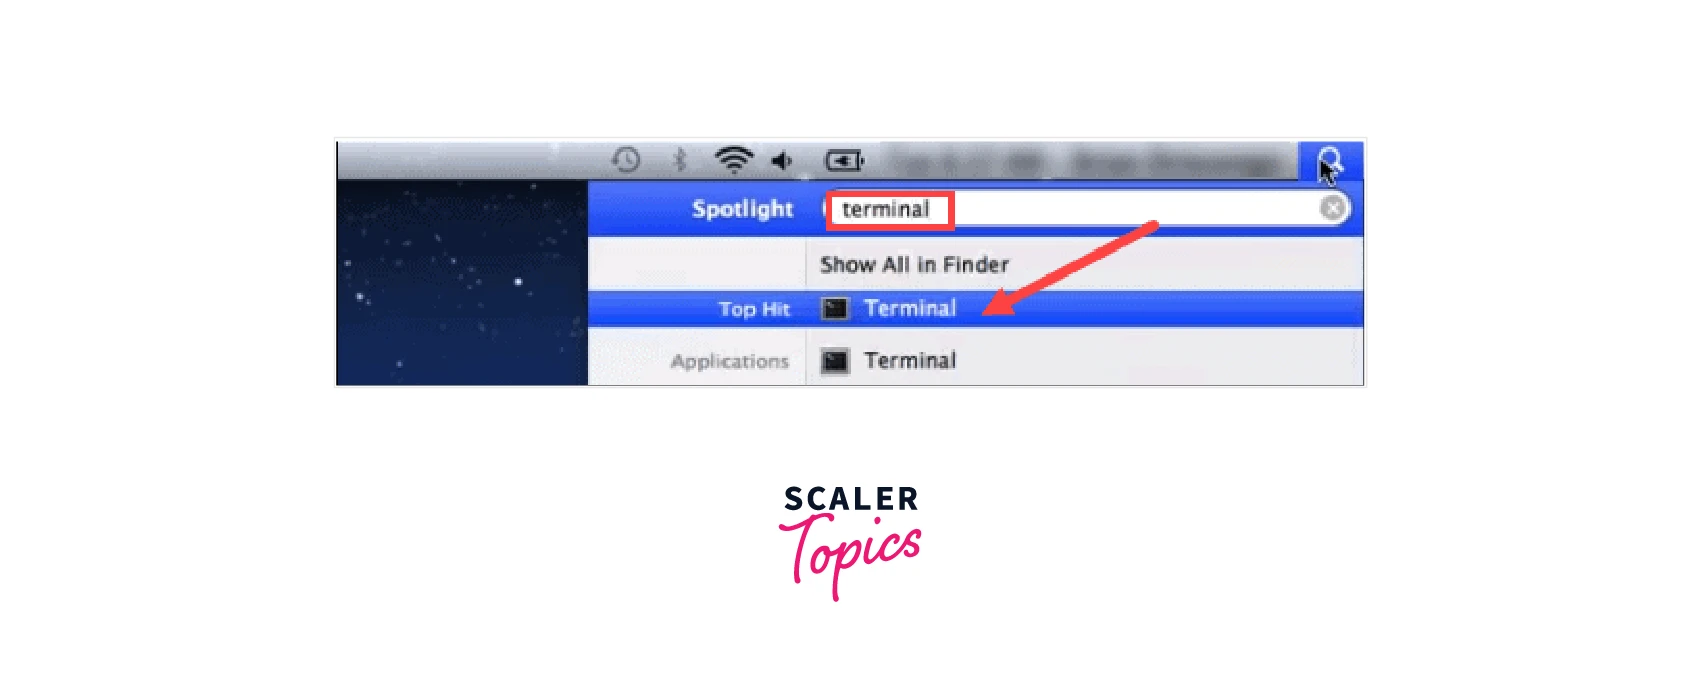
First, find and click on the spotlight search bar in the top-right corner of your screen, then type in “terminal” and click on the terminal icon.
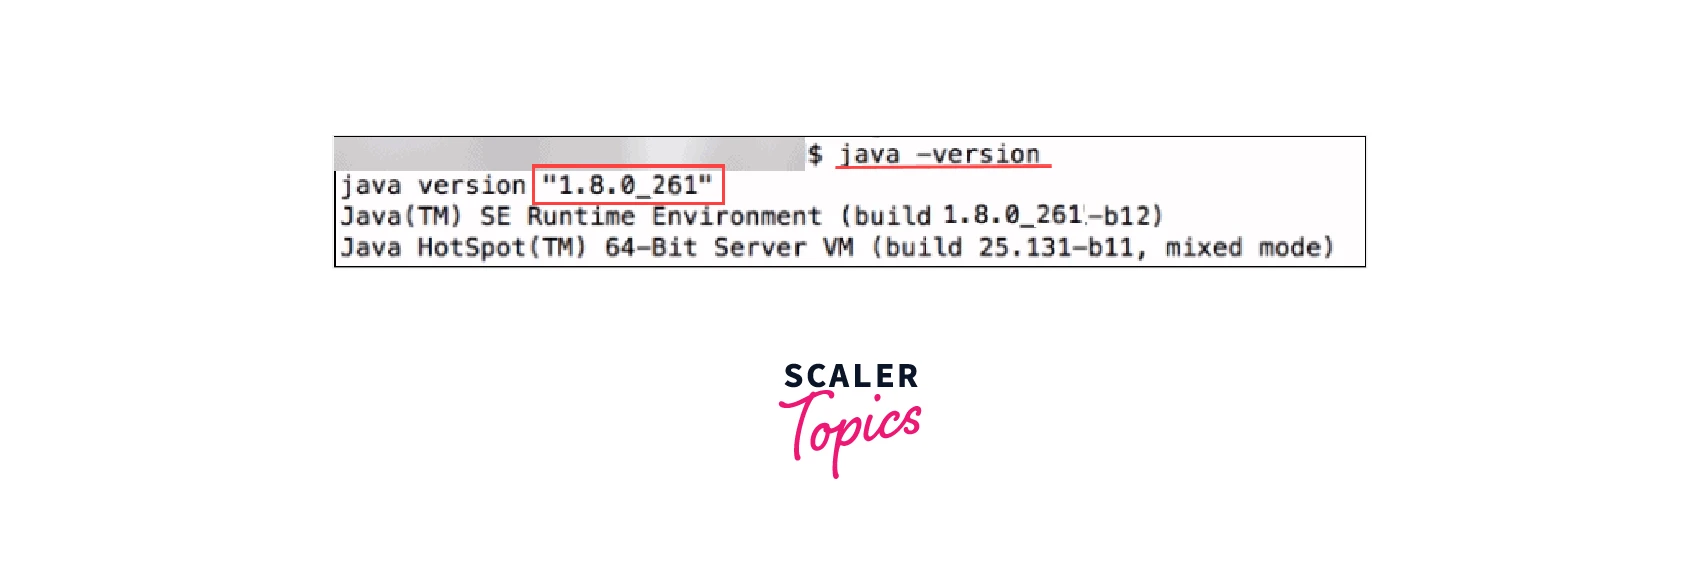
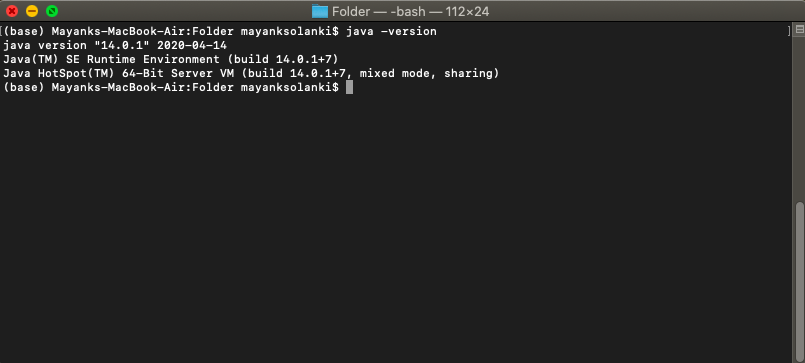
This will bring up the command line. From here, you enter the same command as in Windows, java -version to get your current version details.
Worth noting? On both Windows and Mac devices, you can use the command javac -version to check the version of your primary Java compiler. This video can show you how:
Checking Your Java Version
And there you have it: Four simple ways to quickly check your Java version and make sure you’ve got the newest, freshest Java served up and ready to go.
How to Check Java Version?
Learn via video course
Java Course — Mastering the Fundamentals
Tarun Luthra
Free
Start Learning
Java is one of the most widely used programming languages. To execute code in any programming language, we need to set up required environments like editors, software, and IDEs. JDK (Java Development Kit) is the complete environment required to run java codes on any operating system. Since the introduction of Java, there have been constant developments in its features and these new features have been released for users in form of different versions.
Java uses a specific format while releasing new versions. These versions help to understand which version we are using as some applications need a specific version of Java. As Java can be installed on different OS, there are different methods on how to check Java versions. Production-ready releases of Java are versioned in the following scheme:
MAJOR.MINOR.SECURITY
For example, in Java 11.0.8, 11 is a major version, 0 is a minor version, and 8 is a secure version.
MAJOR — Major releases are bringing new features and functions.
MINOR — Minor releases contain various bug fixes and compatibility improvements.
SECURITY — Security releases provide critical security fixes.
Components of Java Language
Java language has three main components that are:
- Java Development Kit
- Java Runtime Environment
- Java Virtual Machine
Java Development Kit
- JDK is a software development kit required to develop applications in Java.
- JDK consists of development tools like a compiler and debugger in addition to JRE.
- It contains JVM, JRE, and additional development tools like a compiler, interpreter, debugger, and many more things required for application development.
Java Runtime Environment
- Java Runtime Environment (JRE) is an open-source software distribution with a Java class library, specific tools, and a JVM.
- It is the most common environment for devices running Java applications. JRE can be used when a user has to use Java applications but does not do development.
- Java source code is compiled and translated into Java bytecode. If you want to get output from this bytecode, you need JRE.
Java Virtual Machine
- JVM(Java Virtual Machine) is an abstract machine. It is a specification that provides a runtime environment in which java bytecode can be executed.
- When we run any Java program, the Java compiler first compiles your Java code into bytecode. After compilation JVM translates bytecode into machine code, i.e. machine-level instructions.
- Java is known as a platform-independent language because programs written in Java are executed by JVM and not by the physical machine.
Methods to Check Java Version in Different OS
Different OS needs to install different Java Development Kits. Java versions help us understand what are the features being used in the current version of Java. Java version history starts from the JDK Beta version which was the first release of Java in 1995. The latest version of java is Java SE 18.0. 2.1.
Let’s check how to check the java version in Windows OS and how to check the java version on Mac OS. There are three standard methods to check the java version on different Operating systems.
- Command Prompt Method
- Contol Panel Method
- Directories method
How to Check Java Version on Windows
Here we will see how to check the Java version on Windows Operating System using the three standard methods above.
Command Prompt Method
- On the bottom left corner of the search bar type cmd.
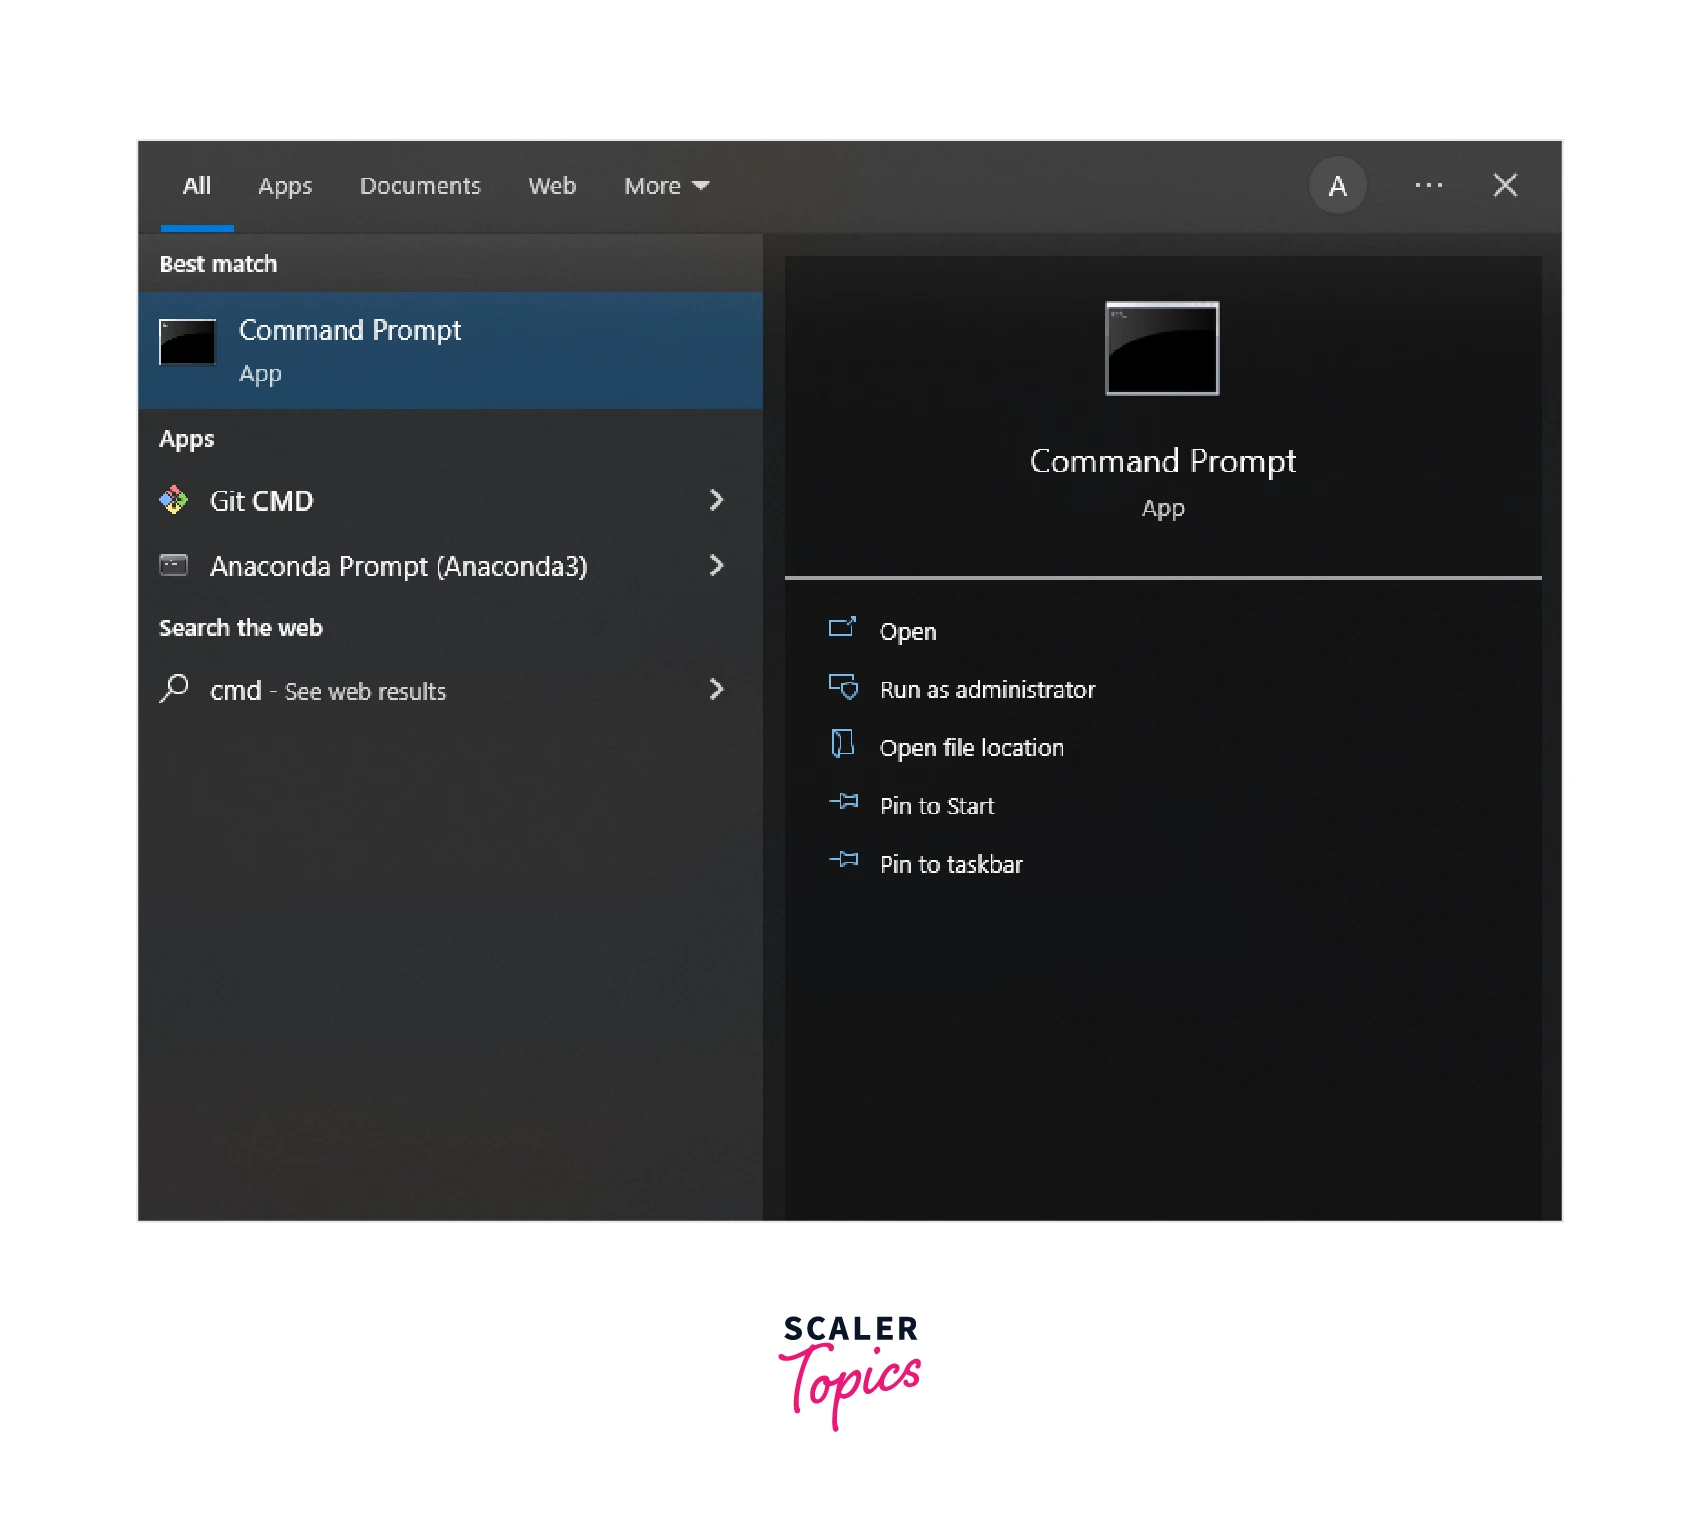
- Open the command prompt
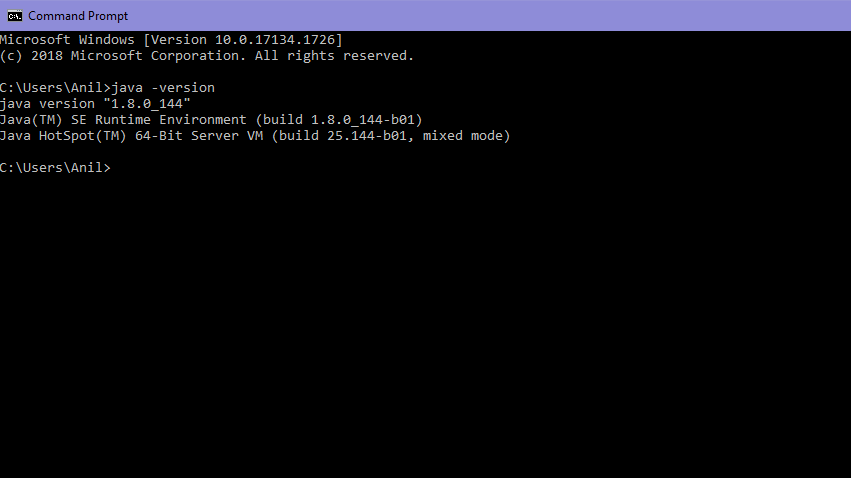
- Once the command prompt is open type Java -version and hit enter. In the output, you will get the java version i.e installed on windows.
As we can see in the above image «1.8.0_21» is the current java version installed in the Windows OS.
Opening Control Panel and Looking for Java
- Search for Control Panel on the search bar present in the bottom left corner.
- Click on the Control Panel in the search panel to open.
- Go to Programs Directory
- Click on the Java icon to open Java Control Panel
- Click on the About button to know the version of java version installed on the machine.
Directories Method
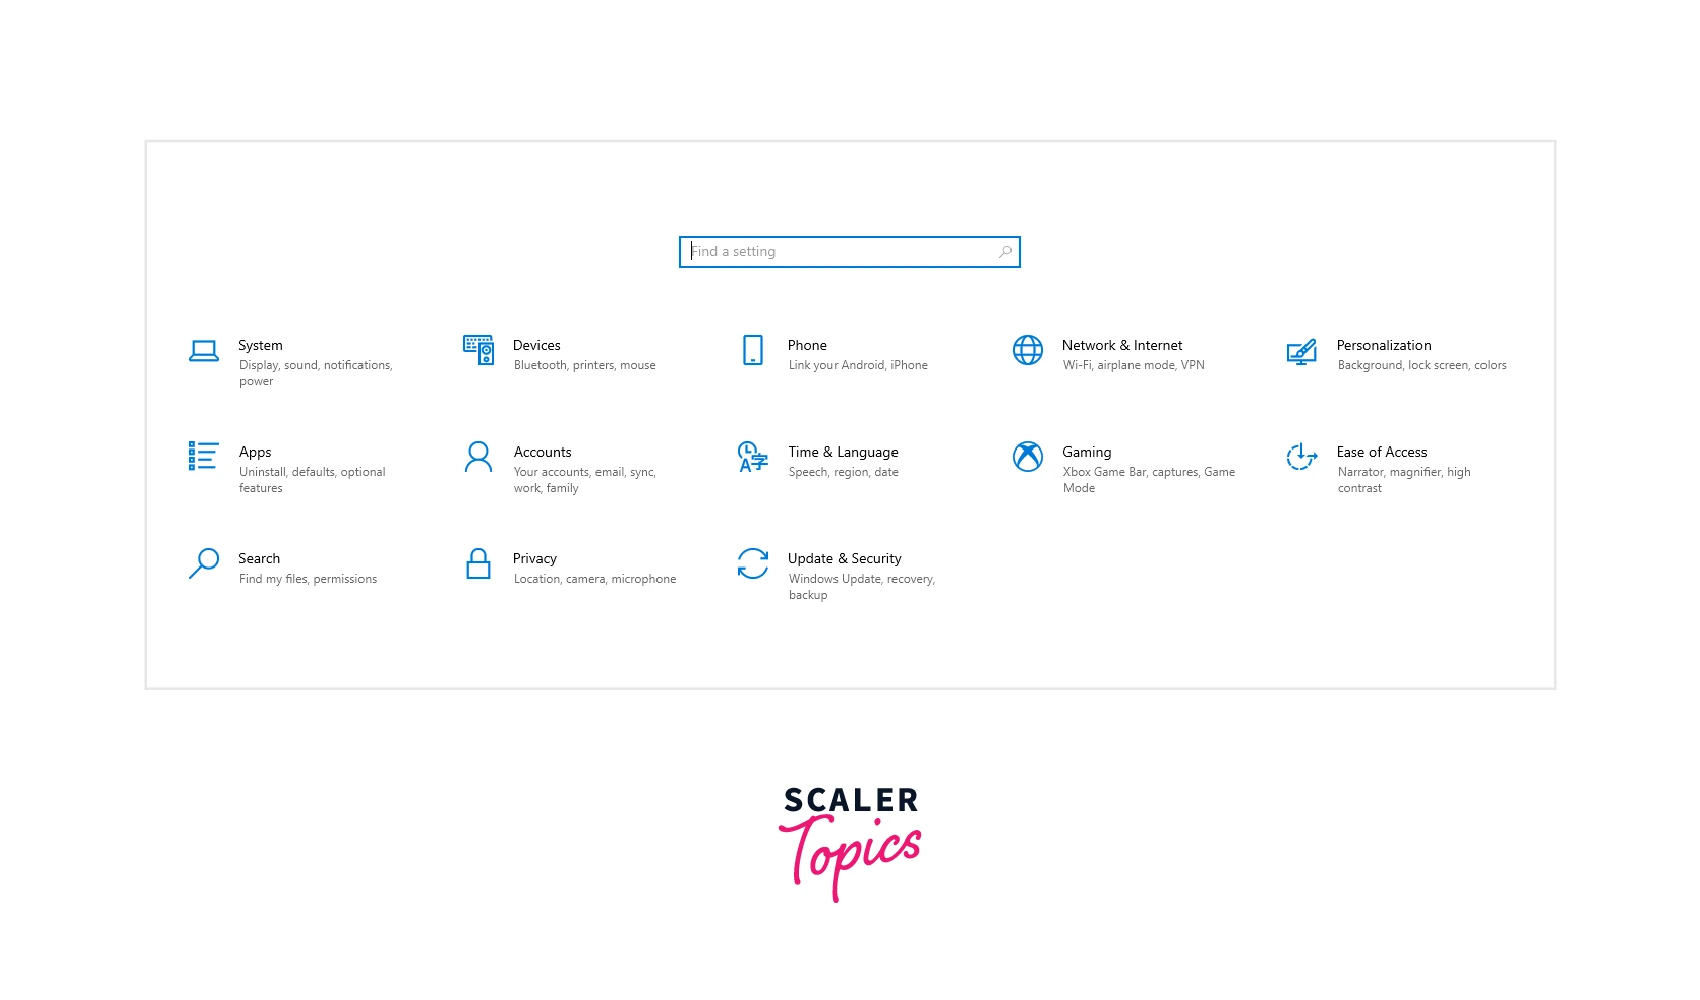
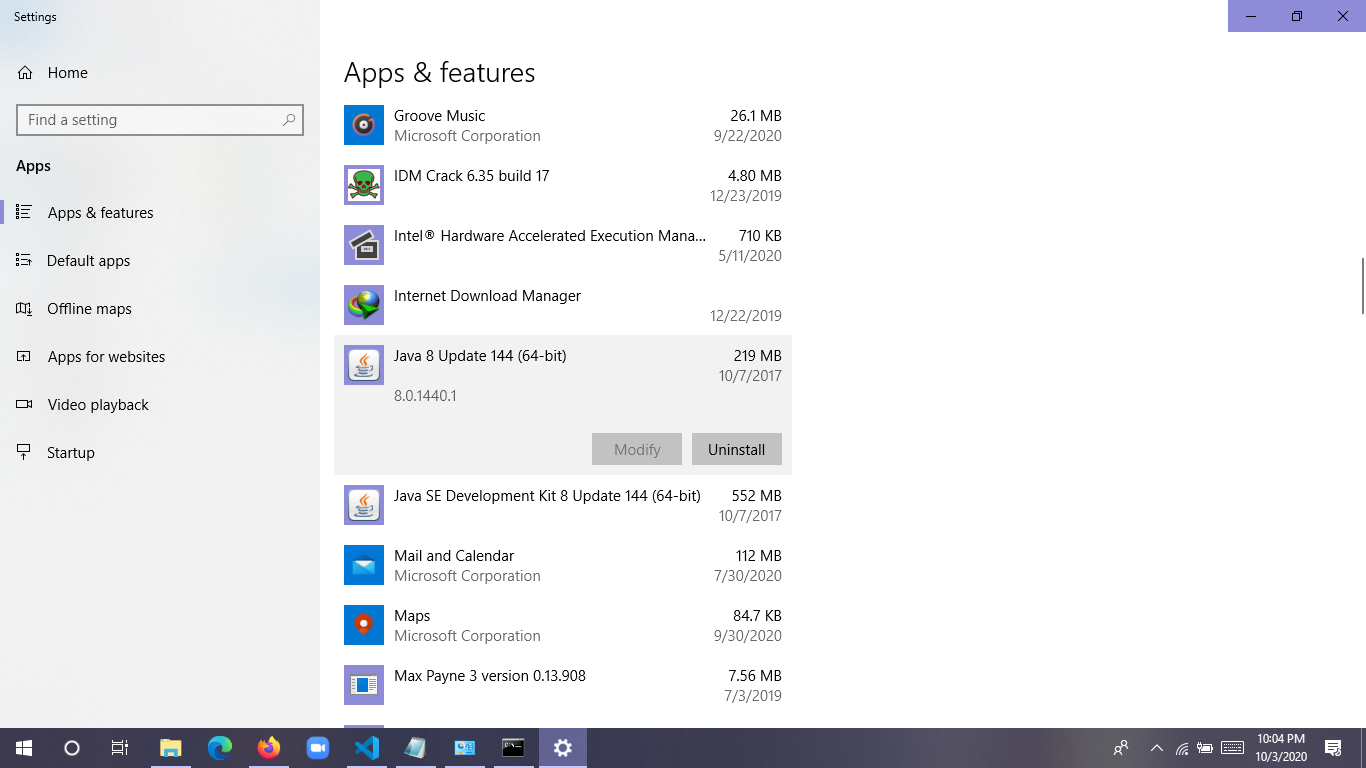
- In this case go to settings.
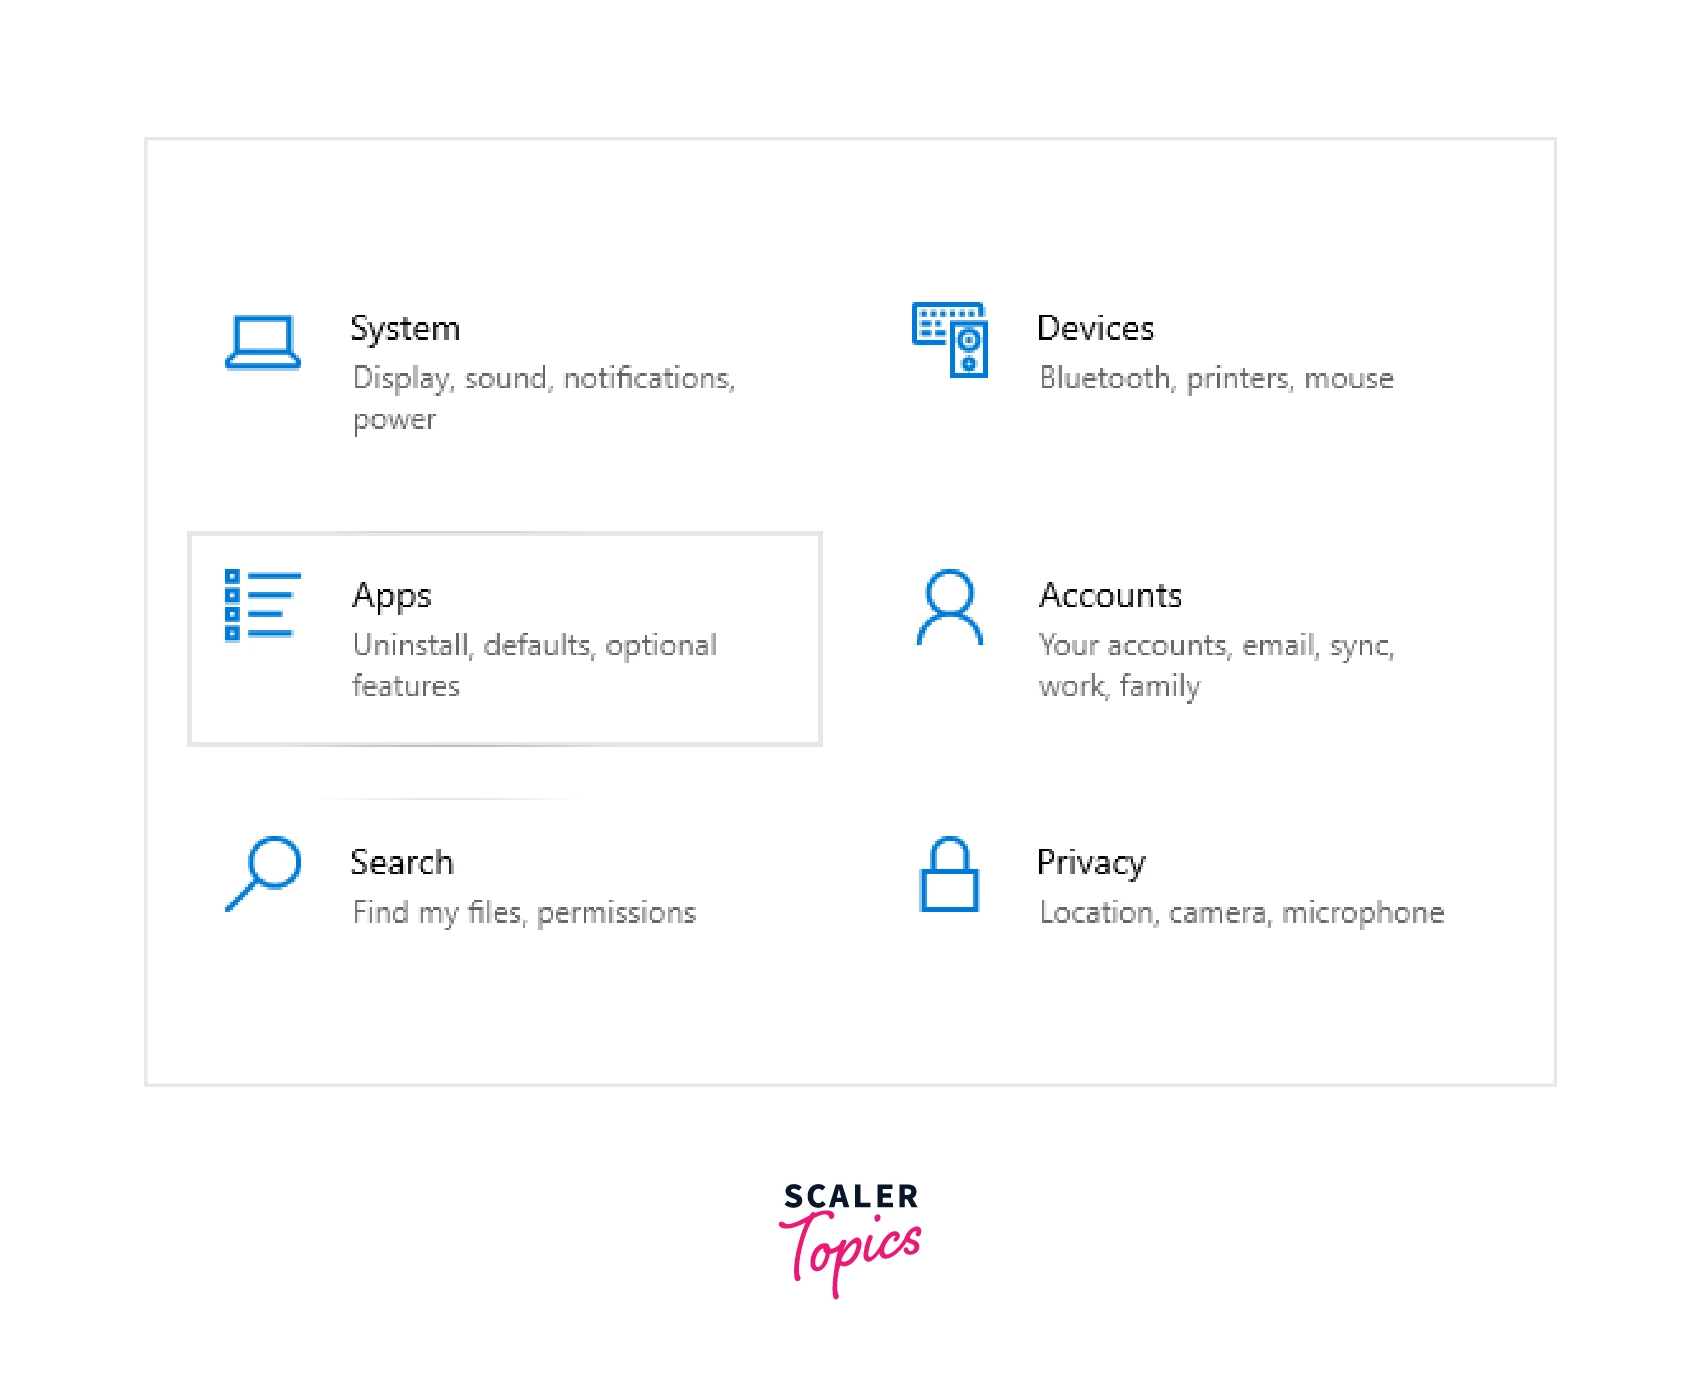
- Click on apps and features.
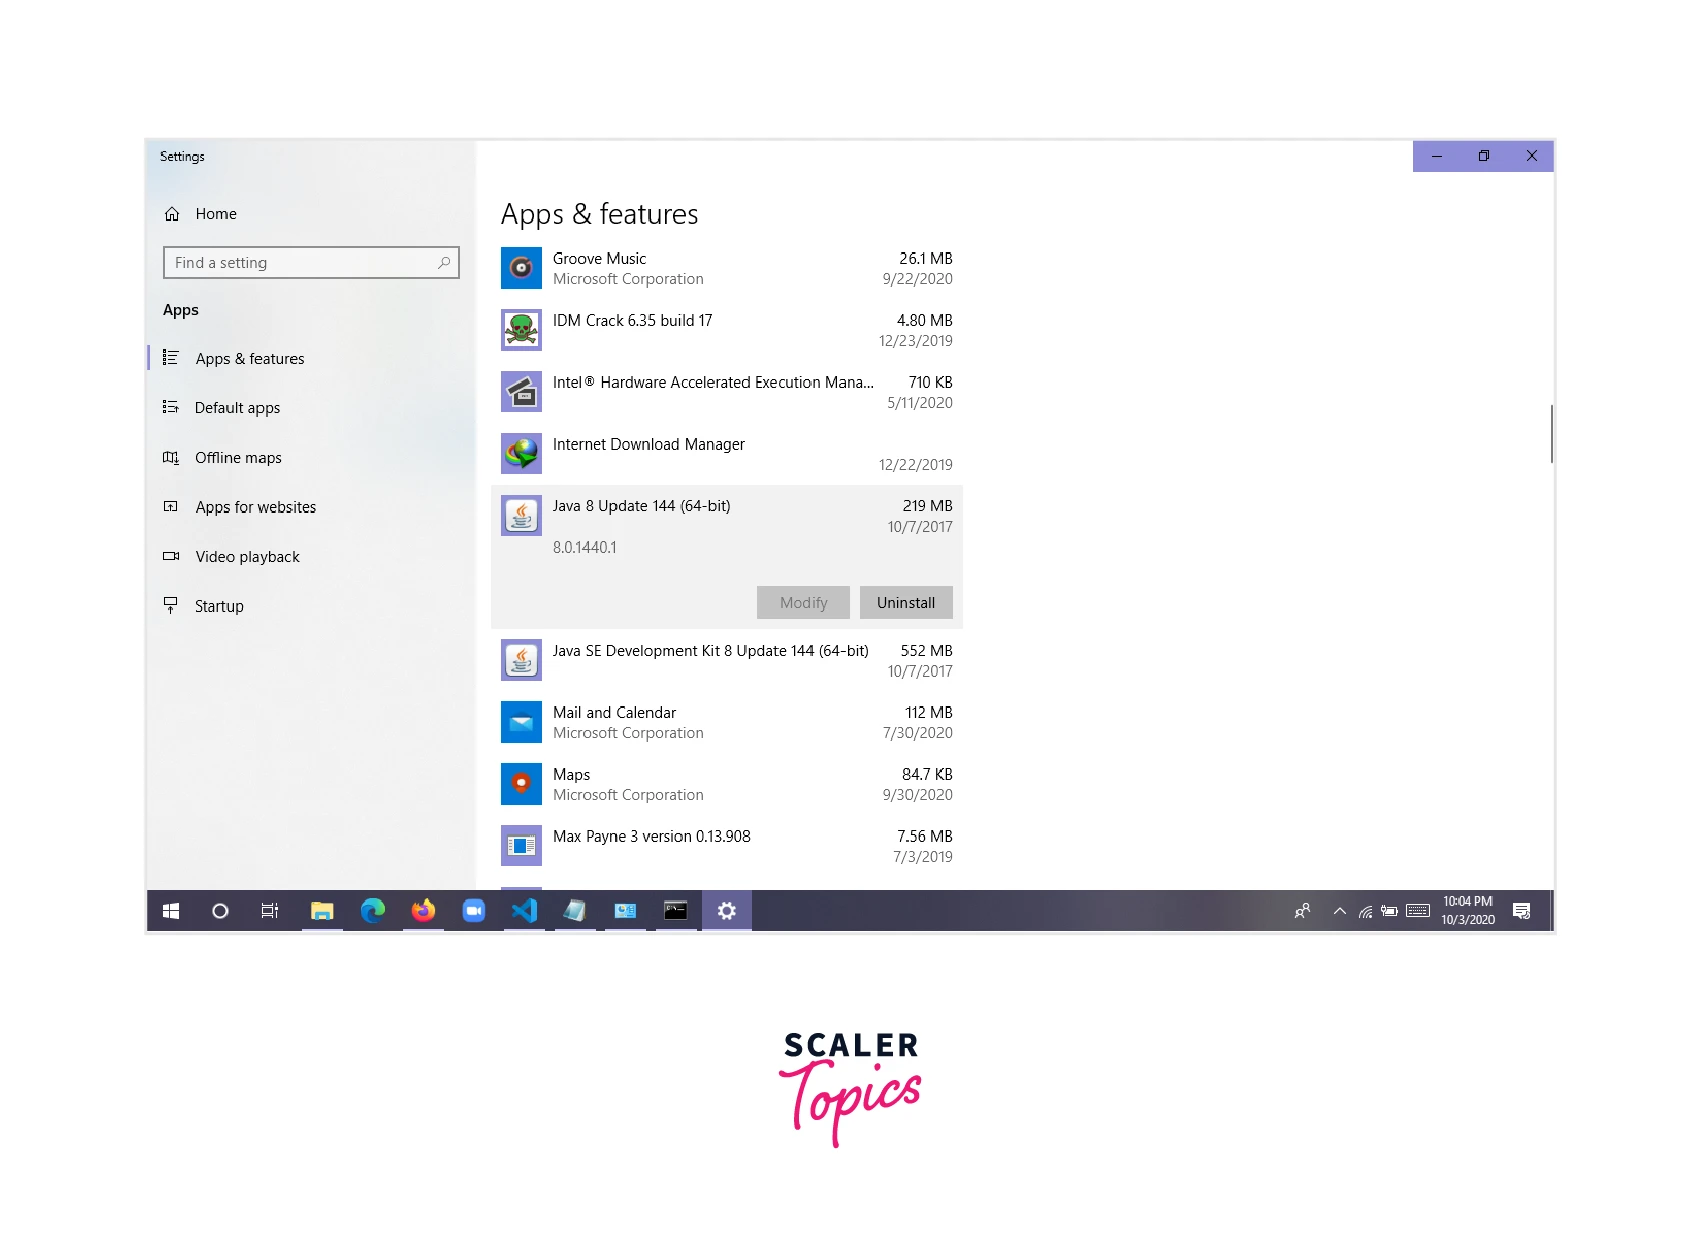
- Search Java in the search bar.
As we can see in the image java version in «8.0.1440.1»
How to Check Java Version on Mac
Here we will see how to check the Java version on Windows Operating System using the three standard methods above.
Command Prompt Method
- Click the Spotlight Search button in the top-right of the screen and search the terminal.
- Once the terminal is open type Java -version in the terminal.
Opening Control Panel and Looking for Java
- Open System Preference and click on the java icon.
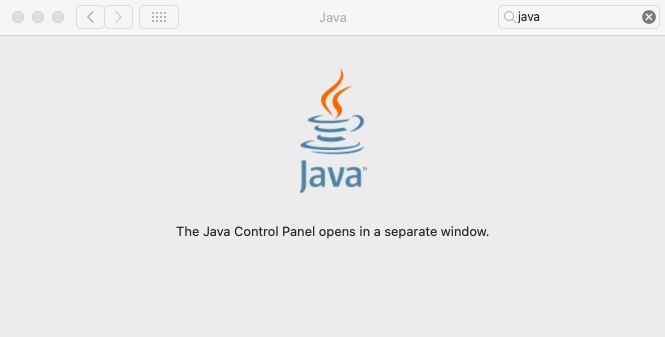
- You will get a small window with the name Java Control Panel.
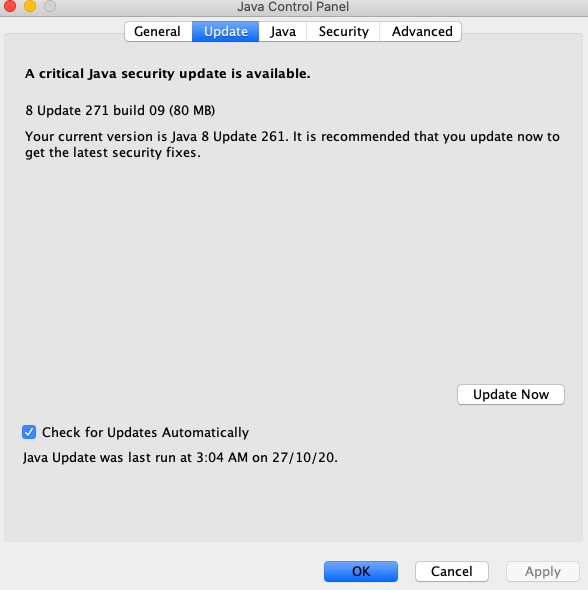
- Go to the Update and you will get the information regarding the installed version.
Directories Method
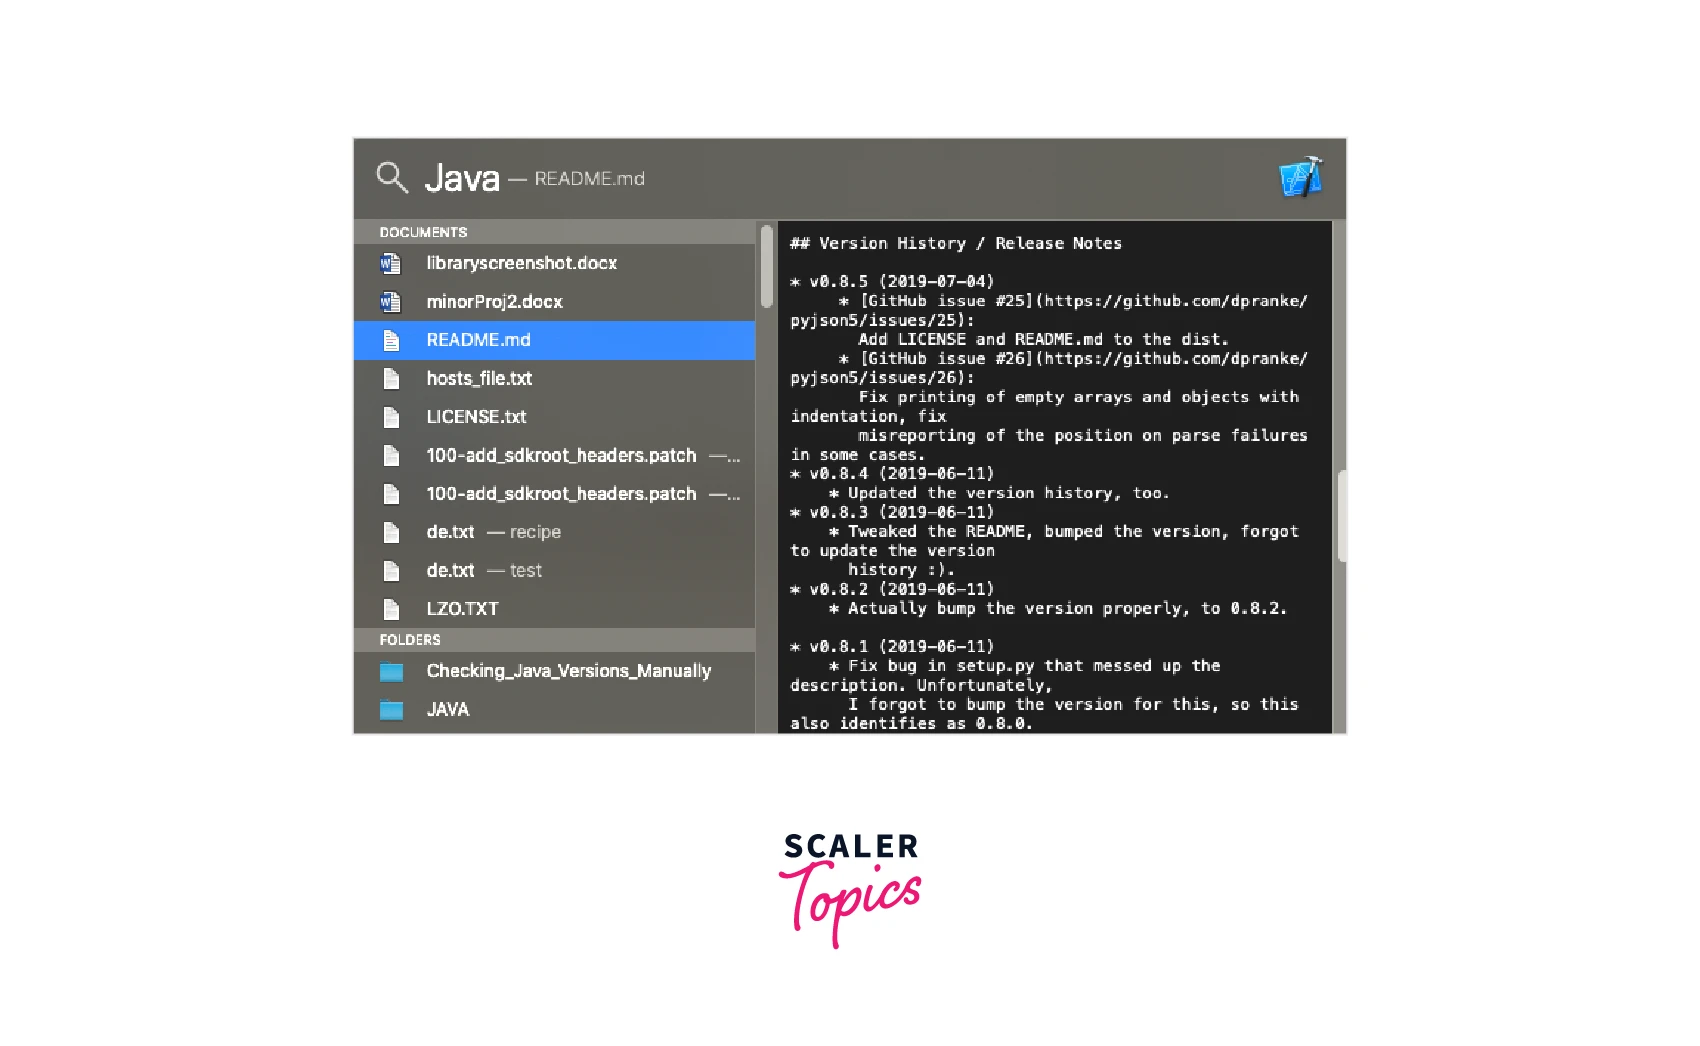
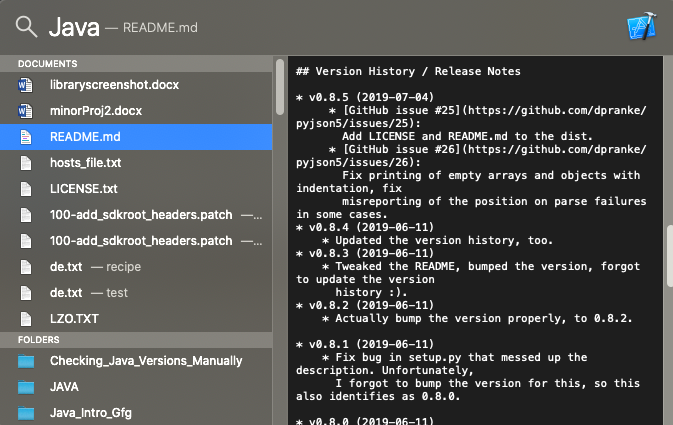
- To check the java version on macOS using the directories method press the command button+spacebar which will open popup boxes.
- This popup box will open a file that shows all the software installed in the MacOs along with their version as shown below:
Conclusion
- Java Development Kit consists of JRE and JVM. JDK can be installed on different OS.
- JDK comes with different versions and Java undergoes new releases after some development.
- We need to install a specific version of java to run some applications. And check the java version.
- In this article we have different methods on how to check the java version on Windows OS and how to check the java version on Mac OS.
Download Article
Download Article
Do you need to check if the latest version of Java is installed on your Windows PC? An easy way to see if Java is up to date is to type a quick command at the Windows command prompt. No matter which version of Windows you’re using, you can type «java -version» into the command prompt (cmd) to see the version number of your Java installation. This wikiHow article will teach you how to use the command prompt to find out which version of Java (or the Java compiler) is installed on Windows 10, 11, and earlier versions.
Things You Should Know
- The java -v command displays the installed version of Java, while javac -v displays the version of the Java compiler.
- If you see the error «Java is not recognized as an internal or external command,» Java is either not installed, or its path is not in the system environment variables.
- You can always download the latest version of JDK and JRE from https://www.oracle.com/java/technologies/downloads.
-
1
Click the Windows Start menu. It’s the icon with Windows logo. By default, it’s in the bottom-left corner of the taskbar.
- You can also press the Windows key to open the Start menu.
-
2
Type cmd. This displays the Command Prompt icon at the top of the search results.
Advertisement
-
3
Click the Command Prompt icon
. It’s the black square icon with a small white «C:\» in the upper-right corner.
-
4
Type java -version and press ↵ Enter. Once you run this command, you’ll see the Java version next to «java version» on the first line.
- To check the version of the Java compiler, use javac -version.
- If you see an error that says «‘java is not recognized as an internal or external command, operable program or batch file,» Java is either not installed or not properly added to your path. Add Java to your system path to fix the error.
Advertisement
-
1
Right-click the Windows Start
icon. It’s the icon with the Windows logo. By default, it’s in the lower-left corner. Right-clicking this icon displays the System menu above the Start button.
-
2
Click Run. It’s the third option from the bottom of the System menu. This opens the «Run» program.
-
3
Type cmd.exe and click OK. Use the space next to «Open» in the Run program to type the command to open the Command Prompt.
-
4
Type java -version and press ↵ Enter. You’ll see the currently installed version of Java next to «java version.»
- To check the version of the Java compiler, use javac -version.
- If you see an error that says «‘java is not recognized as an internal or external command, operable program or batch file,» Java is either not installed or not properly added to your path. Add Java to your system path to fix the error.
Advertisement
-
1
Find out where Java is installed. If you’ve installed Java but you’re unable to check the version from the command line, you might just need to add the Java path to your system environment variables. But first, you’ll need to figure out where Java is installed:
- First, press Windows key + S and type java. If there are no results on your computer, you will need to install Java, which you can download from https://www.oracle.com/java/technologies/downloads.
- If Java is installed, right-click the Start menu and select File Explorer.
- Locate the Java installation directory, which will look something like this (depending on your version): C:\Program Files\Java. If you don’t see a Java installation directory in C:\Program Files, look in C:\Program Files(x86)\Java or C:\Java.
- Open the folder number containing the most recent version number for JRE or the JDK, e.g. C:\Program Files\Java\jdk17.0.4.1 or C:\Program Files\Java\ jdk1.8.X_XXX.
- Highlight the full path to the current folder at the top of File explorer and press Ctrl + C to copy.
-
2
Open your Advanced System Settings.
- On Windows 11, 10, and 8, press Windows key + S, type View advanced system settings, then click Advanced System Settings.
- On Windows 7, right-click My Computer, click Properties, then click Advanced.
-
3
Click the Environment Variables… button. You’ll see this near the bottom-right corner of the window.
-
4
Click New… under «System variables.» This is the bottom section. Adding a new item to System variables instead of User variables ensures that the Java path will be correct for all users on this PC, not just your own user account.
-
5
Type JAVA_HOME (for JDK) or JRE_HOME (for JRE). Create this variable name based on whether you installed the Java Development Kit or the Java Runtime Environment.
-
6
Paste the copied path to Java into the «Variable value» field. You can do this by right-clicking the bottom field and selecting Paste.[1]
-
7
Click OK to save your variable. Now that you’ve added Java to your path, you can successfully check your Java version from the command prompt. Just close the open command prompt window, open a new one, then run java -v to find your version.
Advertisement
Add New Question
-
Question
How do I check my version of Java with the command prompt?
Yaffet Meshesha is a Computer Specialist and the Founder of Techy, a full-service computer pickup, repair, and delivery service. With over eight years of experience, Yaffet specializes in computer repairs and technical support. Techy has been featured on TechCrunch and Time.
Computer Specialist
Expert Answer
Open Command Prompt, type java -version, then press Enter. This will print out the current version of Java that you’re running, as well as the build number.
-
Question
How do I set java path?
Hrithik Nitish
Community Answer
To check version from Windows command prompt, at first you have to download Java and then save the Java bin file address to Windows environment variable and than you have to open Command Prompt and enter Java where you have installed the Java version.
Ask a Question
200 characters left
Include your email address to get a message when this question is answered.
Submit
Advertisement
-
If you want to remove an older version of Java, try the Java Uninstall Tool for Windows.[2]
This simple tool displays all currently installed versions of Java and gives you the option to delete old unneeded versions. Visit https://www.java.com/en/download/uninstalltool.jsp and click I agree to the Terms and Want to Continue to launch the tool. -
You can also check your Java version in the Java Control Panel app, which you’ll find in the Start menu. Just click About in Java Control Panel to view the version number.[3]
-
The easiest way to update Java is to click the Update tab on the Java Control Panel app and select Update Now.
Advertisement
About This Article
Article SummaryX
1. Click the Windows Start icon.
2. Type cmd to display the Command Prompt icon in the Start menu.
3. Click on the Command Prompt icon.
4. Type java -version in the Command Prompt.
5. Press Enter.
Did this summary help you?
Thanks to all authors for creating a page that has been read 489,159 times.
Is this article up to date?
Java is a programming language that is platform-independent, popular, simple, secure, and statically typed. Before discussing let’s clear Java language needs a runtime platform so before going ahead let’s clear how java is present on the machine.
Java language comprises three components mainly:
- Java Development Kit
- Java Runtime Environment
- Java Virtual Machine
Runtime Concepts than only we will check whether Java is there on the Platform (Operating System + Architecture)
1. Java Virtual Machine
This is a machine–specific software which is responsible for byte code on that machine and converts it into machine-specific instructions.
JVM is different for Windows
JVM is different for Linux
JVM is different for Different Platforms
So as a programmer we don’t need to check presence on the machine as it is pre-installed in the machine. It is responsible for running Java code line by line.
2. Java Runtime Environment
It is simply a package that provides an environment to only run our java code on the machine. No development takes place here because of the absence of developmental tools.
3. Java Development Kit
It is also a package that provides an environment to develop and execute where JRE is a part of it along with developmental tools.
- JDK = JRE + Developmental Tools
- JRE = JVM + Library Classes
Now, The first and Foremost step is to check the Java Development Kit in Windows which is also known as JDK. There are lots of versions of Java. Depending upon the operating system methods there are several methods to find the version of Installed JAVA on your Machine:
Let us discuss 3 standard methods in Windows
- User needs to open Command Prompt and enter- ‘java -version’
- Open control panel and lookup for Java
- Directories method- Click the Menu ‘Start’ and typing About.java or readme file
Taking one by one, showcasing in-depth individually
1. Command Prompt
The CMD (Command Interpreter is a command-line Interface. It supports a set of commands and utilities; and has its own programming language for writing batch files. Open CMD and search java -version. First, we have to an environment variable to the installed path location of the java folder. Otherwise, it will show invalid command. It is called ‘Terminal’ in the case of mac operating systems.
java -version // CMD/Terminal command to check java version on the machine
In the case of Windows OS: It is showing java is installed on the machine with version 1.8.0 (See carefully at line number 5)
“1.8.0_144” is the version of the java
In the case of macOS: It is showing java is installed on the machine with version 14.0.1 ( see carefully at line number 2)
Second Method:
- Open Control Panel and there is an option of the java on the interface of the control panel
- Click on the java option and click about a small pop window will appear
In the case of Windows:
In the case of Mac: Click on the Java icon downside. System preferences in mac are the same as the Control panel in Windows.
Third Method:
Search Program and features in the control panel and search JAVA Named option
In the case of Windows: Simply custom search- About Java
In the case of Mac:
Press the command button followed by a spacebar without lifting fingers from the command button.
A popup box will appear for less than a second followed by another pop-up as shown below:
Last Updated :
29 Oct, 2020
Like Article
Save Article
Introduction
Java runs many of the applications that we use daily. Many applications cannot run on older versions of Java. Hence, it is essential to know which version is installed on your system.
In this tutorial, learn how to check the Java version on your Mac or Windows system.
Prerequisites
- A system running macOS or Windows
- Access to the command-line/terminal window
- A version of Java installed
You can find the version of Java on macOS by:
- using the GUI (Mac’s System Preferences)
- prompting for the version in the terminal window
Option 1: Check Java Version on Mac Using the GUI
To check the Java version on Mac without using the terminal by searching for the Java Control Panel in the System Preferences.
1. Click the Apple icon in the menu bar to open the drop-down menu and navigate to System Preferences.
2. A new window opens with various icons and settings. Find and click the Java icon to open the Java Control Panel.
3. Once the Java Control Panel opens, click the About button. A new window with Java version information should appear.
Option 2: Check Java Version on Mac Using the Terminal
If you prefer using the terminal, checking the Java version is a simple one-command process.
1. First, open the terminal. To do so, click the Spotlight Search button in the top-right of the screen.

2. Type terminal in the search bar and open it by clicking on the icon in the search results.

3. Once in the command line, run the command: java -version. The output should display the Java version installed on your MacOS.

To check the version of the primary Java compiler – javac (pronounced “java-see”) use the command:
javac -versionCheck Java Version on Windows
To check the Java version on a Windows computer, you can use:
- the GUI (Windows Control Panel)
- the command line
Option 1: Check Java Version on Windows Using GUI
To find the Java version on your Windows without opening a terminal window, use the Control Panel.
1. Open the Windows menu in the bottom-left corner and type control panel in the search bar.

2. Find the Control Panel in the search results and click the icon to open it.
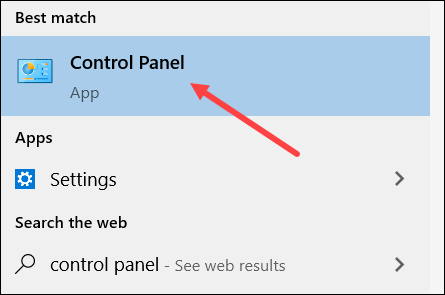
3. Move to the Programs directory.
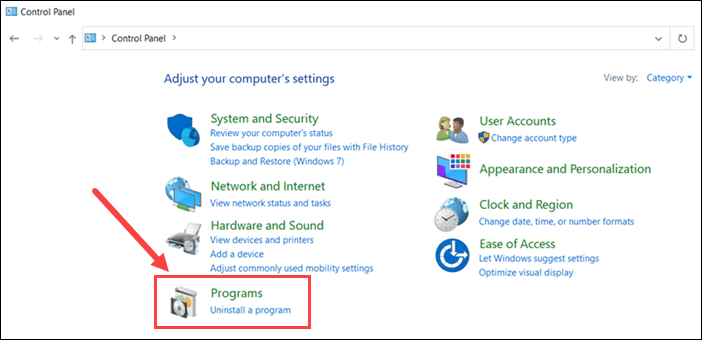
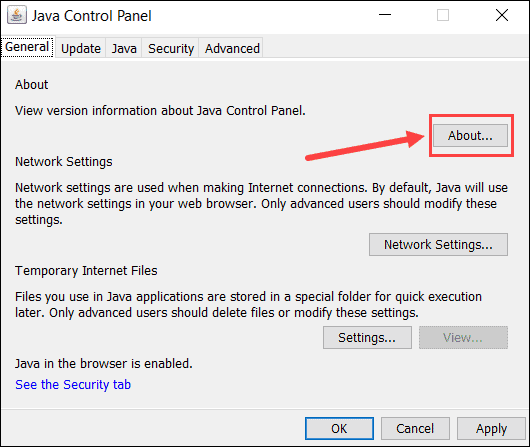
4. Find and click the Java icon to open the Java Control Panel.

5. Once the control panel opens, click the About button.
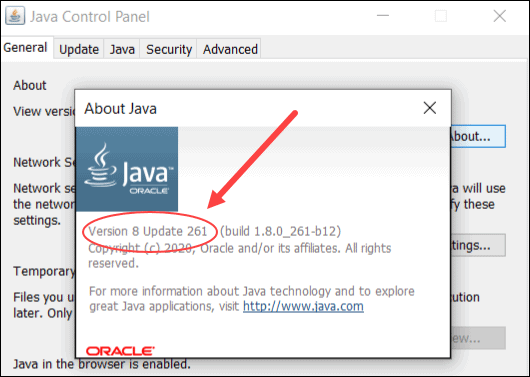
6. The About Java window should appear and display the Java version on your computer.
Option 2: Check Java Version on Windows Using Command Line
Another option to find the Java version on Windows is through the command line.
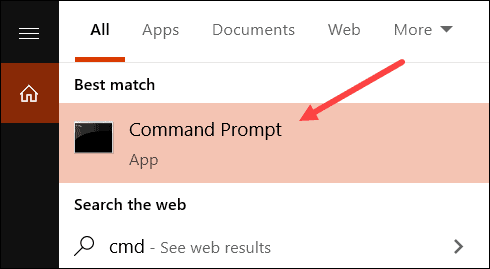
1. Open the Windows Start menu in the bottom-left corner and type cmd in the search bar.
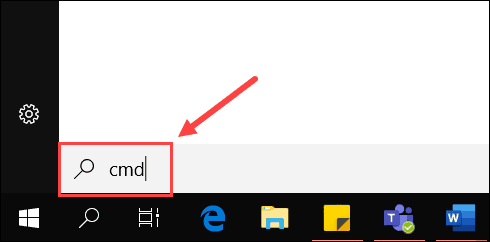
2. Then, open the Command Prompt once it appears in the search results.
3. A new window with the command prompt should appear. In it, type the command java -version and hit Enter. The output should display the Java version installed on your Windows system.

You can also check the version of the Java’s primary compiler, javac, with the command:
javac -versionConclusion
This article showed you how to check the version of Java installed on a macOS or Windows system.


