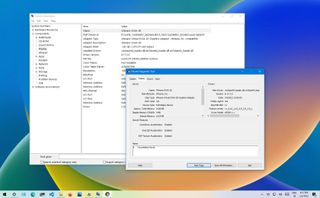
(Image credit: Future)
In computing, the graphics card is an essential component that makes it possible to render every pixel on the screen when navigating the Windows 10 desktop, running an app, and playing a game. Typically, devices can have graphics cards from one of the three leading manufacturers, including NVIDIA, AMD, or Intel.
Although for the most part, you don’t need to worry about the graphics specifications on your computer, it might be something important for users who work with graphics-intensive programs or play games. Usually, if you don’t have a card with a powerful graphics processing unit (GPU), it may not be possible for an application to perform as intended. Or, if you’re a gamer, you may not be able to play games, or you may need to determine the hardware to adjust the settings accordingly to prevent affecting performance.
Whatever your reasons might be, Windows 10 includes multiple ways to quickly find out the graphics card specifications using Settings, Device Manager, System Information, DirectX Diagnostic Tool, Task Manager, and, of course, using the card’s control panel software.
This how-to guide will walk you through the steps to check which graphics card is currently installed on your computer.
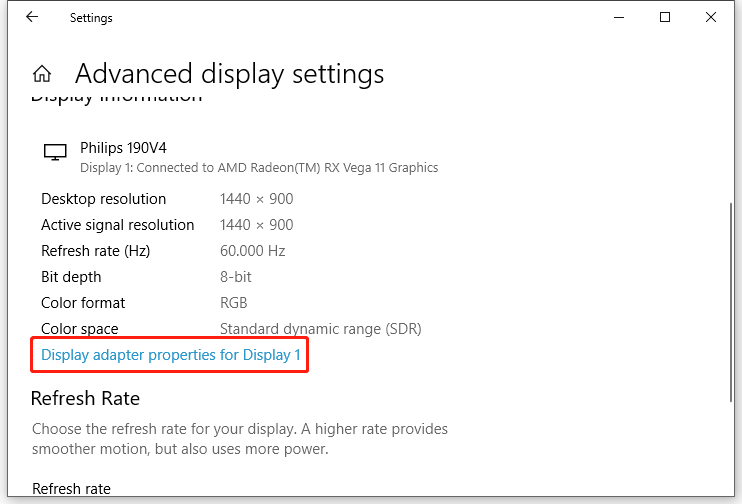
How to find out graphics card details using Settings
To find out the graphics card manufacturer and model using the Settings app on Windows 10, use these steps:
- Open Settings.
- Click on System.
- Click on Display.
- Under the «Multiple displays» section, click the «Advanced display settings» option.

- Under the «Display information» section, confirm the graphics card vendor and model.
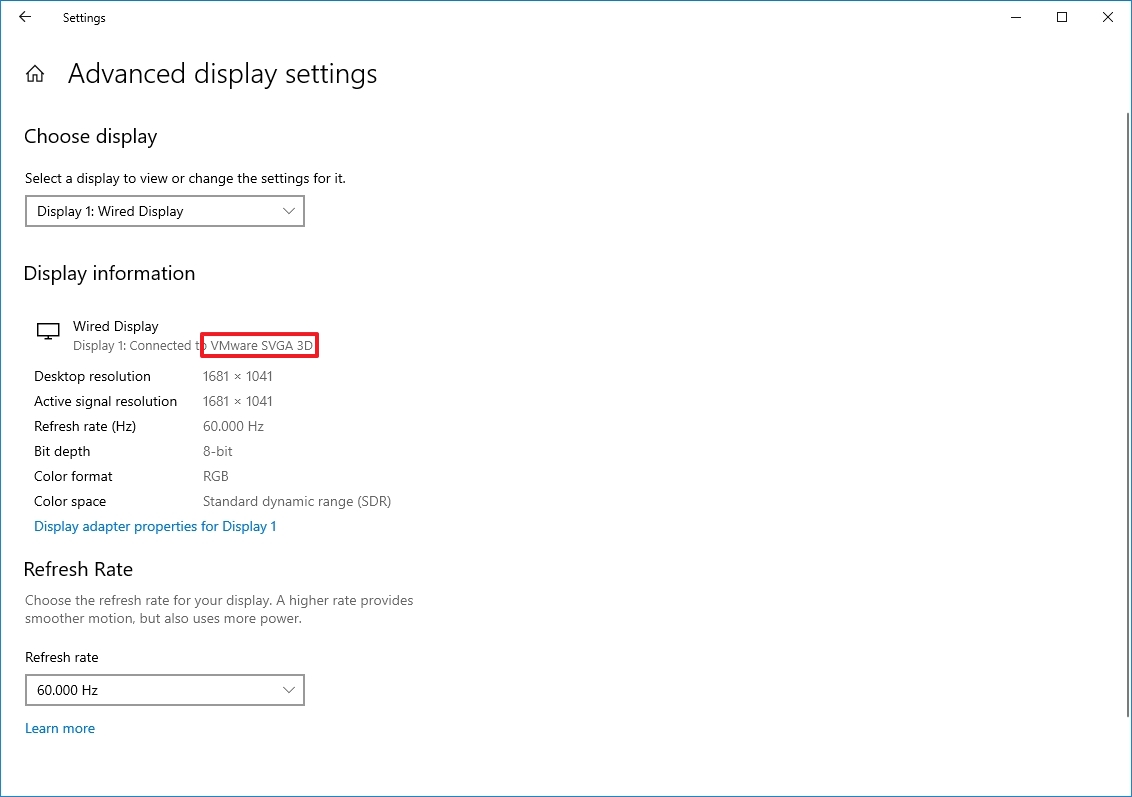
Once you complete the steps, you will understand the video card installed on your device.
How to find out graphics card details using Device Manager
To determine the graphics card installed on the system with Device Manager, use these steps:
- Open Start.
- Search for Device Manager and click the top result to open the tool.
- Expand the Display adapters branch.
- Confirm the manufacturer and model of the video card.
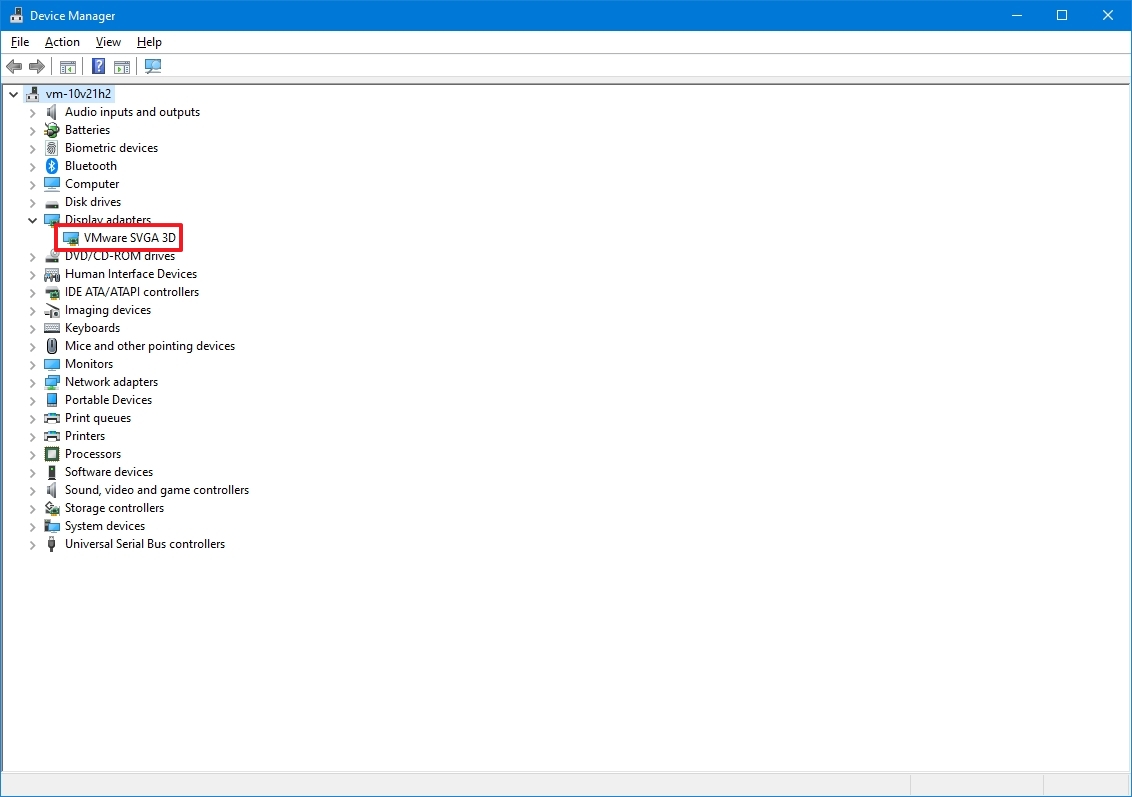
After you complete the steps, the graphics card information will be revealed.
How to find out graphics card details using System Information
To check the graphics card on Windows 10 with System Information, use these steps:
- Open Start.
- Search for System Information and click the top result to open the tool.
- Expand the Components branch.
- Click on Display.
- Under the «Adapter Description» field, determine the graphics card installed on your device.
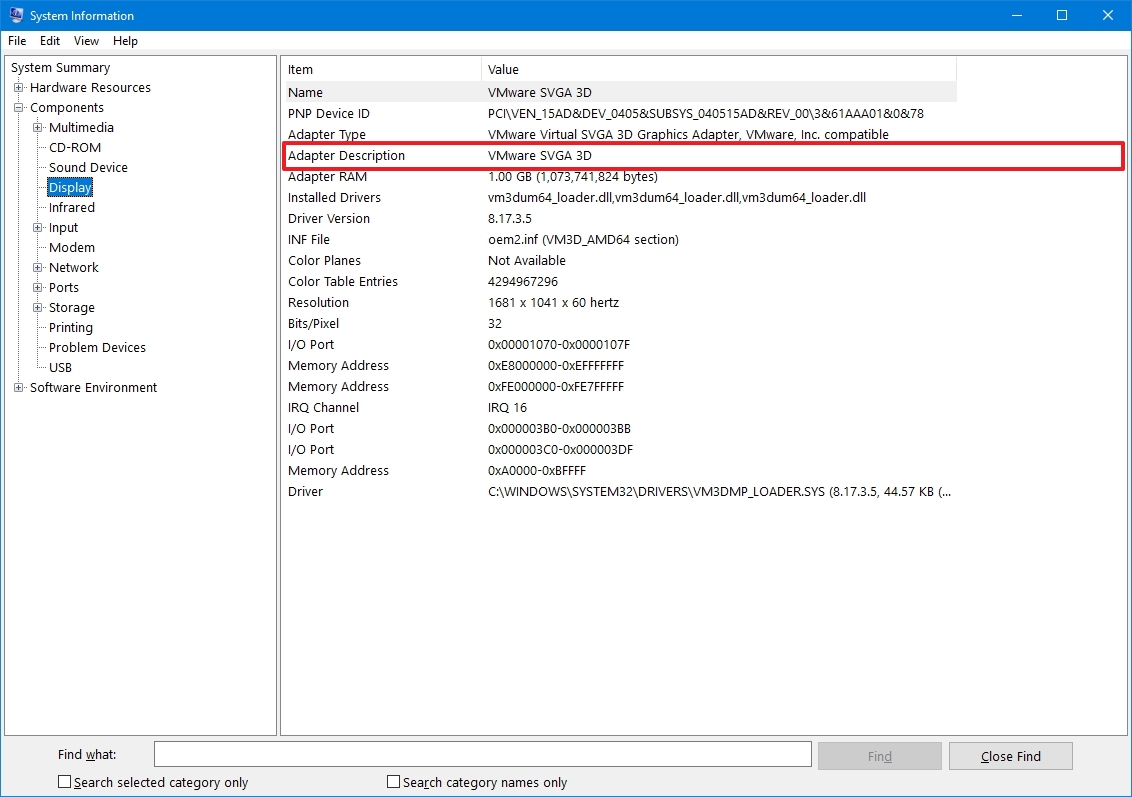
Once you complete the steps, you’ll know the graphics card make and model, driver information, and more.
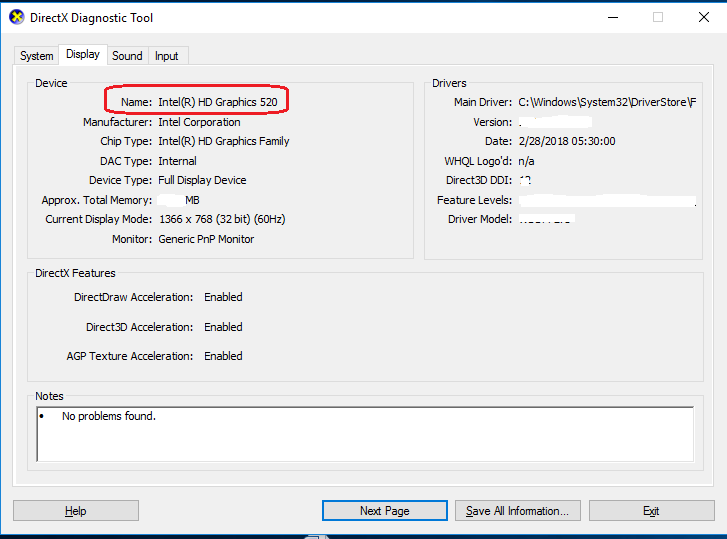
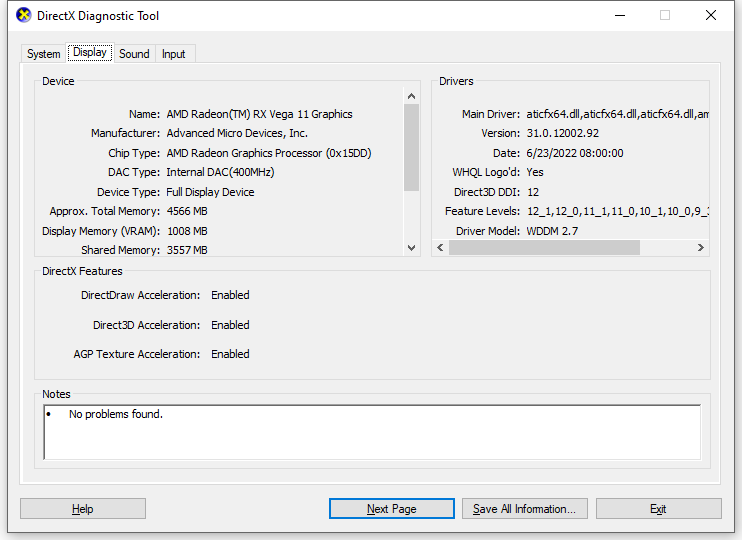
How to find out graphics card details using DirectX Diagnostic Tool
To find out the video card installed on your PC using DirectX Diagnostic Tool, use these steps:
- Open Start.
- Search for dxdiag and click the top result to open the tool.
- Click the Yes button (if applicable).
- Click the Display tab.
- Under the «Device» section, check the manufacturer and processor type of the graphics card.
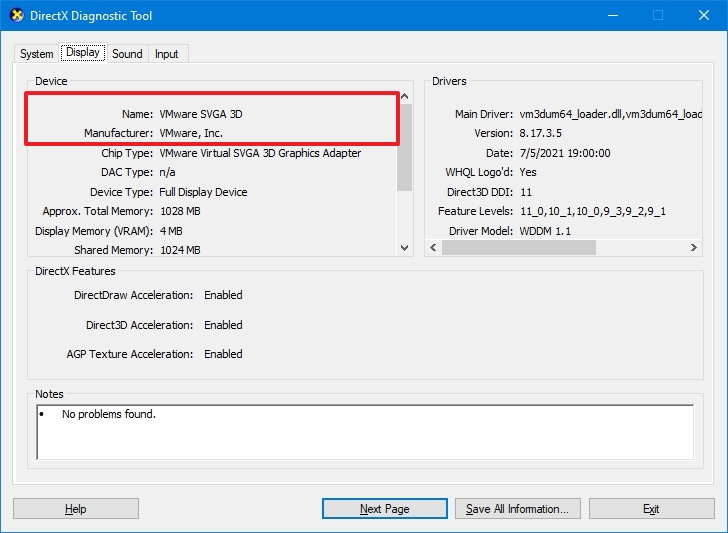
After you complete the steps, you’ll be able to understand the basic information about the video card and other details. For example, the amount of memory built into the device and driver information.
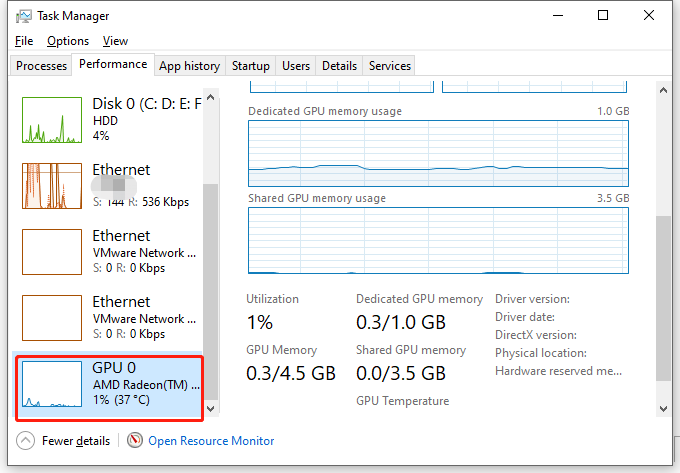
How to find out graphics card details using Task Manager
To figure out the graphics card available on Windows 10 with Task Manager, use these steps:
- Open Start.
- Search for Task Manager and select the top result to open the tool.
- Quick tip: You can also use the «Ctrl + Shift + Esc» keyboard shortcut to open Task Manager.
- Click the Performance tab.
- Click on GPU.
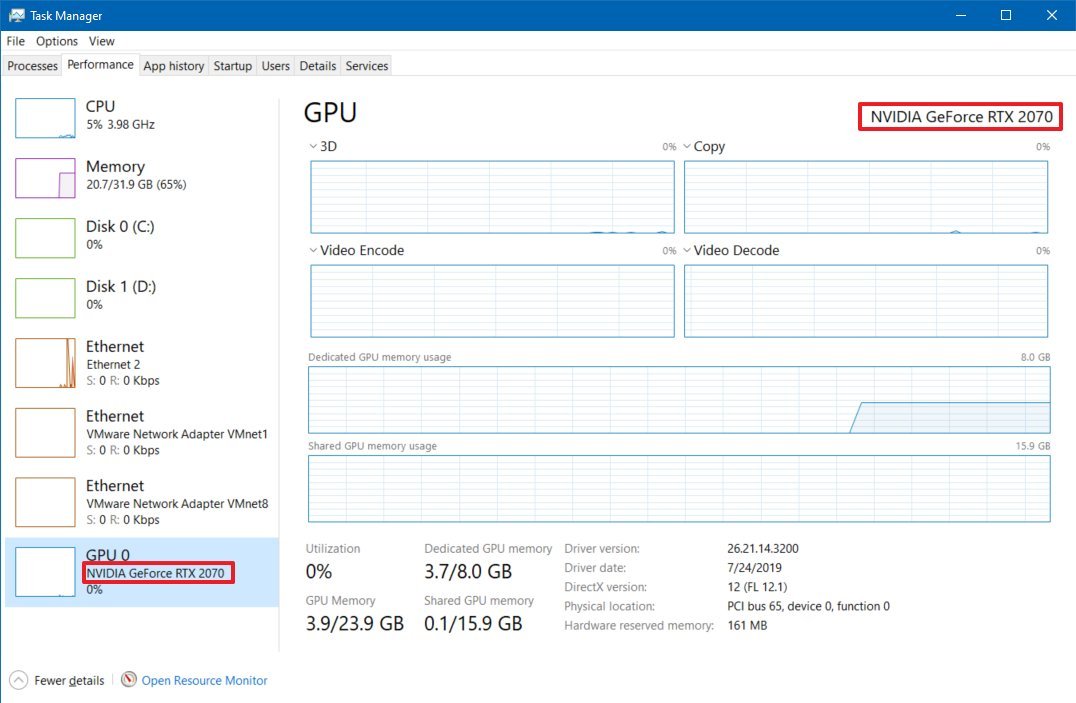
- Confirm the brand and model of the graphics card on the top-right corner.
Once you complete the steps, the Task Manager will display the manufacturer name and model, the dedicated amount of memory, DirectX version, the physical location in the motherboard, and current utilization details.
How to find out graphics card details using Control Panel
Alternatively, if you have a GPU from Intel, NVIDIA, or AMD, you can also use their control panel software to check the graphics card specifications, including settings to adjust many preferences.
To check the specifications using the NVIDIA Control Panel, use these steps:
- Open Control Panel.
- Click on Hardware and Sound.
- Click on NVIDIA Control Panel.
- Click the System Information option from the bottom-left corner.
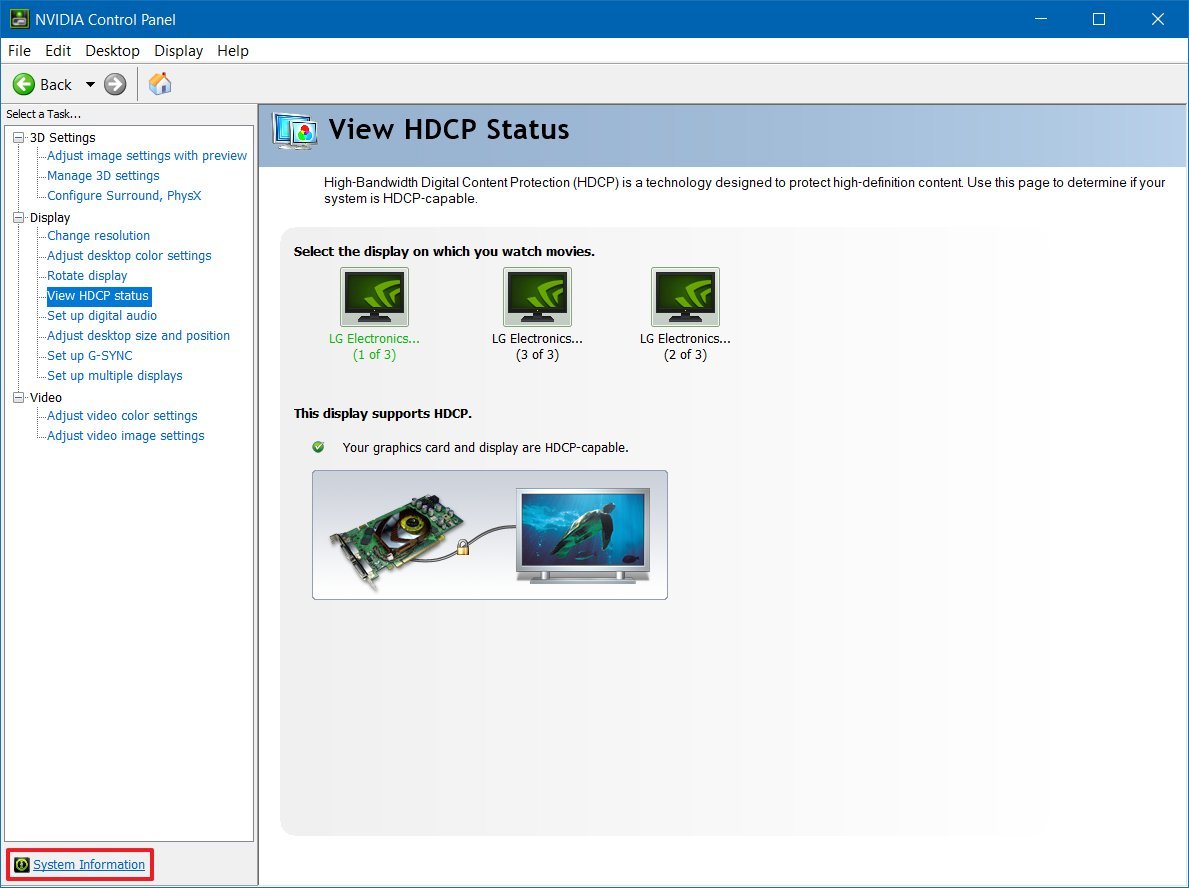
- Click the Display tab.
- Under the «Graphics card information» section, confirm the graphics model on the left side.
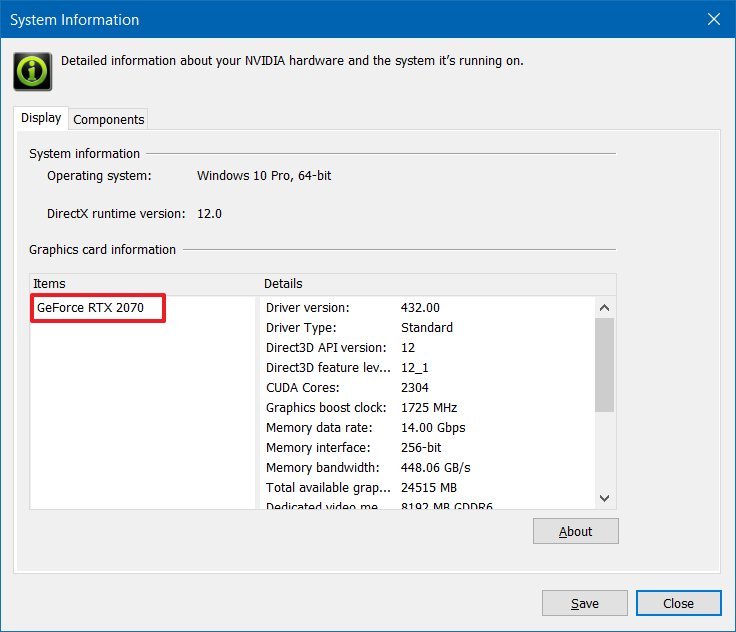
Once you complete the steps, you’ll know the exact graphics card model. On the right side, you’ll also find various other details, such as the number of CUDA cores, processor clock speed, memory data rate, bandwidth, type, amount, and the video BIOS version.
More resources
For more helpful articles, coverage, and answers to common questions about Windows 10 and Windows 11, visit the following resources:
- Windows 11 on Windows Central — All you need to know
- Windows 10 on Windows Central — All you need to know

Cutting-edge operating system
A refreshed design in Windows 11 enables you to do what you want effortlessly and safely, with biometric logins for encrypted authentication and advanced antivirus defenses.
All the latest news, reviews, and guides for Windows and Xbox diehards.
Mauro Huculak is technical writer for WindowsCentral.com. His primary focus is to write comprehensive how-tos to help users get the most out of Windows 10 and its many related technologies. He has an IT background with professional certifications from Microsoft, Cisco, and CompTIA, and he’s a recognized member of the Microsoft MVP community.
Are you looking for a way to check your GPU on Windows 10? If so, you’ve come to the right place. In this article, we’ll walk you through the steps to check your GPU on Windows 10 so you can make sure your graphics card is working properly. We’ll also explain what type of information you can expect to get from the GPU check and how to interpret the results. By the end of this article, you’ll know how to check your graphics card and make sure your system is running at its best.
To check your GPU on Windows 10, follow the steps below:
- Press Windows Key + R to open the Run Command box.
- Type dxdiag into the text field, and then select OK.
- Once the DirectX Diagnostic Tool opens, select the Display tab.
- Under the Drivers section, you will find the name and version of your GPU.

How to Check Graphics Processing Unit (GPU) on Windows 10
Today, computers are equipped with sophisticated graphics capabilities. This is due to the fact that the graphics processing unit (GPU) of a computer is responsible for rendering graphics. If you want to find out what type of GPU your computer is running on Windows 10, you can do so with a few easy steps. In this article, we will discuss how to check the GPU on Windows 10.
The first step to check the GPU on Windows 10 is to open the Task Manager. To do this, press the Ctrl + Alt + Delete keys simultaneously. This will open the Task Manager window. In the Task Manager window, click on the Performance tab. This will give you an overview of how your computer is performing.
The next step is to click on the GPU option. This will open a window that will give you information about the type of GPU your computer is running. In this window, you will find information about the Vendor, name, and version number of the GPU. You can also see the type of memory used by the GPU and the number of cores it has.
Check GPU Performance
Once you have checked the type and specifications of the GPU, you can also check its performance. To do this, click on the GPU tab in the Performance window. This will show you information about the GPU’s performance. It will show you the current temperature, clock speed, memory usage and power consumption. You can also see the frame rate and other performance indicators.
Check GPU Settings
In addition to checking the GPU performance, you can also check the settings of the GPU. To do this, click on the Advanced tab in the Performance window. This will open a window that will give you access to the GPU settings. Here, you can adjust the settings of the GPU such as the clock speed and memory usage.
Check GPU Drivers
The last step to check the GPU on Windows 10 is to check the drivers. To do this, you can use the Device Manager. To open it, press the Windows + X keys simultaneously. This will open the Device Manager window. In this window, you can find the drivers for your GPU and check for any updates.
Conclusion
Checking the GPU on Windows 10 is not difficult. With the steps mentioned above, you can easily check the type, performance, settings and drivers of the GPU. Knowing this information can help you make the most out of your computer’s graphics capabilities.
Frequently Asked Questions
Q1. What is GPU Checking?
GPU checking is the process of determining the type and specifications of the graphics processing unit (GPU) installed in a computer. This is commonly done to assess which games or applications may be compatible with the computer or to identify any potential issues with the GPU itself. With Windows 10, users can perform GPU checks using the DirectX Diagnostic Tool, Device Manager or Task Manager.
Q2. How to Check GPU on Windows 10 Using DirectX Diagnostic Tool?
To check GPU on Windows 10 using the DirectX Diagnostic Tool, go to the Start menu and search for “dxdiag”. Then click the “Run” command. This will open the DirectX Diagnostic Tool window. Go to the “Display” tab and look for the “Name” field under the “Device” section to view the GPU details.
Q3. How to Check GPU on Windows 10 Using Device Manager?
To check GPU on Windows 10 using the Device Manager, go to the Start menu and search for “Device Manager”. Then click the “Run” command. This will open the Device Manager window. Expand the “Display Adapters” section to view the GPU details.
Q4. How to Check GPU on Windows 10 Using Task Manager?
To check GPU on Windows 10 using the Task Manager, press the “Ctrl + Alt + Del” keys simultaneously to open the Task Manager. Go to the “Performance” tab and look for the “GPU” section to view the GPU details.
Q5. Is there any other way to check GPU on Windows 10?
Yes, there are other ways to check GPU on Windows 10. You can use third-party applications such as GPU-Z or HWiNFO to view the GPU information. These applications will provide more detailed information about the GPU than the Windows tools.
Q6. What information can I view from the GPU checking tools?
The information you can view from the GPU checking tools will depend on the application you are using. Generally, you can view the GPU name, model, type, memory size, driver version, temperature, and other details.
Windows 10 – How to Check Which Graphics Card You Have
It is important to check the GPU on Windows 10 to ensure the best performance. With these simple steps, you can easily check your GPU and make sure it is running at its peak performance. Keeping your GPU up to date and in optimal working order is essential to ensuring your computer runs smoothly and efficiently. With the right knowledge, you can easily keep your GPU in check and avoid any potential issues.
If you are a Windows 10 user and want to understand how to check if your GPU (Graphics Processing Unit) is functioning properly, then this is the right article for you. In this article, we will discuss how to check the GPU on Windows 10 and what to do if you find that there is something wrong with it. We will also provide some tips and tricks to help you keep track of the performance of your GPU. So, if you are ready to find out how to check your GPU on Windows 10, let’s get started!
To check GPU on Windows 10:
- Press Windows key + R to open the Run window.
- Type dxdiag and click OK to open the DirectX Diagnostic Tool.
- In the System tab, look for the Display tab.
- Under Device, you can check the name of your graphics card.
Checking Your GPU on Windows 10
Checking the GPU (Graphics Processing Unit) on your computer is an important part of making sure your system is running properly. In Windows 10, there are several ways to check the GPU, including the Task Manager, Device Manager, and Settings. This article will explain the steps for each method.
Using the Task Manager
The Task Manager in Windows 10 is a great tool for viewing and managing running processes and programs. To check the GPU using the Task Manager, open the Task Manager by pressing Ctrl+Shift+Esc. Then, select the Performance tab and click on GPU. This will display information about your GPU, such as the type, manufacturer, driver version, and more.
If you want to view more detailed information about your GPU, you can click on the Details tab. This will display additional information, such as the GPU model, GPU memory, GPU power, and more.
Using the Device Manager
The Device Manager in Windows 10 is a powerful tool for managing hardware devices. To check the GPU using the Device Manager, open the Device Manager by pressing Windows+X and selecting Device Manager from the menu. Then, expand the Display Adapter section and click on the GPU. This will display information about the GPU, such as the type, manufacturer, driver version, and more.
If you want to view more detailed information about your GPU, you can double-click on the GPU to open its properties. This will display additional information, such as the GPU model, GPU memory, GPU power, and more.
Using Settings
The Settings app in Windows 10 is another great tool for managing hardware devices. To check the GPU using the Settings app, open the Settings app by pressing Windows+I and selecting Settings from the menu. Then, select System and then select Display. This will display information about the GPU, such as the type, manufacturer, driver version, and more.
If you want to view more detailed information about your GPU, you can click on the Advanced Display Settings link. This will display additional information, such as the GPU model, GPU memory, GPU power, and more.
Using System Information
The System Information tool in Windows 10 is a great tool for viewing system information. To check the GPU using the System Information tool, open the System Information tool by pressing Windows+R and typing msinfo32 into the Run box. Then, expand the Components section and click on Display. This will display information about the GPU, such as the type, manufacturer, driver version, and more.
If you want to view more detailed information about your GPU, you can click on the Adapter tab. This will display additional information, such as the GPU model, GPU memory, GPU power, and more.
Using the DirectX Diagnostic Tool
The DirectX Diagnostic Tool in Windows 10 is a powerful tool for diagnosing DirectX problems. To check the GPU using the DirectX Diagnostic Tool, open the DirectX Diagnostic Tool by pressing Windows+R and typing dxdiag into the Run box. Then, select the Display tab and click on the GPU. This will display information about the GPU, such as the type, manufacturer, driver version, and more.
If you want to view more detailed information about your GPU, you can click on the More Info button. This will display additional information, such as the GPU model, GPU memory, GPU power, and more.
Using the Graphics Settings
The Graphics Settings in Windows 10 is a great tool for managing the graphics settings of your system. To check the GPU using the Graphics Settings, open the Graphics Settings by pressing Windows+R and typing ms-settings:easeofaccess-display into the Run box. Then, select the Graphics Settings and click on the GPU. This will display information about the GPU, such as the type, manufacturer, driver version, and more.
If you want to view more detailed information about your GPU, you can click on the Advanced Settings link. This will display additional information, such as the GPU model, GPU memory, GPU power, and more.
Related Faq
How to Check Gpu on Windows 10?
Answer: Checking your GPU (graphics processing unit) on Windows 10 is a simple process that can be completed in just a few steps.
What is the First Step for Checking GPU on Windows 10?
Answer: The first step for checking your GPU on Windows 10 is to open the Start menu and type “Device Manager” in the search bar. Once the Device Manager window opens, find “Display adapters” in the list of device categories, and click on it. This will display all the installed graphics cards on your computer. From this list, you can select the card you want to check, and view its properties.
How Can I Verify that My GPU is Working Properly?
Answer: To verify that your GPU is working properly, you can run a GPU benchmark test. There are a number of benchmarking software available online, such as 3DMark, which will give you a detailed analysis of your GPU’s performance. You can also check the GPU manufacturer’s website for recommended settings and performance information.
How Can I Check the Specifications of My GPU?
Answer: To check the specifications of your GPU, you can look up the card’s model number in the device manager window. You can also find the specifications on the manufacturer’s website. Additionally, you can use a third-party application like GPU-Z to view detailed information about the GPU, such as memory size, clock speeds, and other technical specifications.
How Can I Update My GPU Drivers?
Answer: Updating your GPU drivers is important to ensure that your graphics card is running at its best performance. To update the drivers, you can go to the manufacturer’s website and download the latest version of the driver. Alternatively, you can use Windows Update to check for the latest driver updates.
What are the Benefits of Updating My GPU Drivers?
Answer: Updating your GPU drivers can help improve the performance of your graphics card, as well as provide better stability and compatibility with newer versions of Windows. Additionally, updating the drivers can help reduce or eliminate any graphical issues you may be experiencing. Lastly, updating your GPU drivers can help improve the overall performance of your computer.
Windows 10 – How to Check Which Graphics Card You Have
If you want to check your GPU performance on Windows 10, you now have the tools to do that. With the help of the Task Manager, you can easily check the GPU usage, temperature, and other metrics. Additionally, with the help of GPU-Z, you can get detailed information about your GPU such as the memory, driver information, and more. All in all, checking your GPU performance on Windows 10 is now as easy as a few clicks.
-
Home
-
News
- [Easy Guide] How to Check GPU Health Windows 10/11?
By Aurelie | Follow |
Last Updated
To get a longer life span for your graphics card, regular checkups are very necessary. How to check health of GPU? If you have the same need, then this guide on MiniTool Website is for you.
Graphics Processing Unit (GPU) is an important piece of hardware for your computer. For those who play PC video games and use heavy graphics software, they may rely on it. Therefore, it is important to keep it healthy. Like any other component in your computer, you can check the status of your GPU regularly to ensure it keeps offering optimal performance.
Tips:
You never know when and why your system crashes and your data is missing when using your computer, so it is of vital importance to create of backup of your OS and important data. To do so, the Windows backup software – MiniTool ShadowMaker is a good option for you. Click the button below to try this freeware now!
MiniTool ShadowMaker TrialClick to Download100%Clean & Safe
How to Check the Health of Your GPU?
How to Check GPU Health via Windows Settings
To check GPU health on your computer, the easiest and quickest way is via Windows Settings. Here’s how to access the advanced display settings to check that:
Step 1. Press Win + I to open Windows 10 Settings.
Step 2. Go to System > Display > Advanced display settings > Display adapter properties for Display 1.
Step 3. Under the Adapter tab, click on Properties.
Step 4. Under the General tab, you can check your GPU health. If there is no problem with your GPU, you will see the The device is working properly message.
How to Check GPU Health via Task Manager
Under the Performance tab of Task Manager, you can also check your GPU health. Follow these steps:
Step 1. Right-click on taskbar to select Task Manager from the context menu.
Step 2. Under the Performance tab, click on GPU from the left-side pane.
Step 3. If you have more than one GPU, choose the one that you are currently use. At the bottom of the screen, you can see the real-time data of your GPU.
Tips:
Normally, the GPU temperature is a few degrees above or below the room temperature. If it is 20°C to 25°C more than the room temperature in the resting state, there must be some overheating issues with your GPU.
How to Check GPU Health Device Manager
Additionally, you can check the health of GPU Windows 10 in Device Manager. This program lists all the drivers installed on your computer. To do so:
Step 1. Right-click on the Start icon to choose Device Manager from the quick menu.
Step 2. Expand Display adapters and right-click on your graphics card to select Properties.
Step 3. Under the General tab, you can check the status of your GPU.

How to Check GPU Health via DirectX Diagnostic Tool
DirectX Diagnostic Tool can test DirectX functionality and provide valuable information about hardware installed on your computer. You can also check the health of your graphics card via it. To do so:
Step 1. Press Win + R to open the Run dialog box.
Step 2. Type dxdiag and hit Enter to launch DirectX Diagnostic Tool.
Step 3. Go to the Display tab and you can check the GPU status in the Notes section.
Final Words
Now, you get a full picture of how to check the health of your GPU using 4 different Windows tools and you can choose the one you find convenient. Sincerely hope that your GPU will work for a long time!
About The Author

Position: Columnist
Aurelie is a passionate soul who always enjoys researching & writing articles and solutions to help others. Her posts mainly cover topics related to games, data backup & recovery, file sync and so on. Apart from writing, her primary interests include reading novels and poems, travelling and listening to country music.
If you too are facing the same issue then don’t worry as today in this guide we will cover 3 methods via which you can easily find out the type, model, manufacturer etc of your Graphics Card. Make sure you know that Graphics card is also called a video adapter, video card, or display adapter. Anyway, without wasting any time let’s see How to Check Your Graphics Card in Windows 10 with the help of the below-listed tutorial.
Make sure to create a restore point just in case something goes wrong.
3 Ways to Check Your Graphics Card in Windows 10 Method 1: Check Your Graphics Card in Windows 10 Settings Method 2: Check Your Graphics Card in Windows 10 using DxDiag Method 3: How to Check Your Graphics Card in Windows 10 using Device Manager
Method 1: Check Your Graphics Card in Windows 10 Settings
Note: This will only show the integrated graphics card, to see the dedicated graphics card follow the next method.
1.Press Windows Key + I to open Settings then click on System icon.
2.From the left hand menu make sure to select Display.
3.Scroll down then click on Advanced display settings.
4.In the Advanced display settings, click on the link that says “Display adapter properties“.
5.The graphics properties window will open and here you can see the type, mode, & manufacturer of your graphics card.
Method 2: Check Your Graphics Card in Windows 10 using DxDiag
1.Press Windows Key + R then type dxdiag and hit Enter to open DirectX Diagnostic Tool.
Note: DxDiag (DirectX Diagnostic Tool) is used to view the system information such as the grahics card, sound card etc.
2.Wait for few seconds in order for the DxDiag window to load.
3.On the System tab (in DxDiag window) you will see the following information:
Computer Name Operating System Language System Manufacturer System Model BIOS Processor Memory Page file Direct X Version
4.Now if you have a dedicated graphics card then you will have two Display tabs such as Display 1 and Display 2.
5.Switch to Display 1 and here you will find the Name, Manufacturer, Total Memory, Drivers information etc of the Graphics card.
6.Similarly, switch to Display 2 (which will be your dedicated graphics card) and you will find the following information:
Name of the Graphics Card Manufacturer Chip Type DAC Type Device Type Total Memory Display Memory Shared Memory Drivers DirectX Features
7.The last tab is of sound, where you can find sound card name, manufacturer, drivers etc.
8.Once finished, click Exit to close the DxDiag window.
Method 3: How to Check Your Graphics Card in Windows 10 using Device Manager
1.Press Windows Key + R then type devmgmt.msc and hit Enter.
2.Expand Display adapters and then you will see your graphics card listed. If you have integrated as well as the dedicated graphics card, you will see both of them.
3.Right-click on any one of them and select Properties.
Note: You will need to open Properties window of each graphics card to know more about both of them.
4.In the Properties window, you will see the Graphics card name, manufacturer, device type, etc information.
5.You can also switch to Driver, Details, Events, or Resources tab to know more about your Graphics Card.
6.Once finished, click ok to close the properties window.
Recommended:
Fix Your DNS Server might be unavailable error How to Fix Windows Update Error 80072EE2 Fix ERR_CONNECTION_TIMED_OUT Chrome error Fix IPv6 Connectivity No Internet Access on Windows 10
That’s it you have successfully learned How to Check Your Graphics Card in Windows 10 but if you still have any questions regarding this post then feel free to ask them in the comment’s section.


