Sep 17 2022
09:32 PM
— edited
Mar 29 2023
09:56 PM
If you’re using Windows 10, you may want to change your user name for various reasons. Maybe your name has changed, or you want to personalize your account. Whatever the reason, changing your user name on Windows 10 is a simple process that can be done in a few steps.
There are different methods to change your user name on Windows 10, and here we will cover some of the most straightforward ones. You can change your user name from the Settings app, Control Panel, or the Run dialogue box. Each method has its advantages, and you can choose the one that works best for you.
Before you start, it’s essential to note that changing your user name will not change your account’s email address or the name of your user folder. Also, if you’re using a Microsoft account to sign in to Windows, changing your user name will change the name on all Microsoft services associated with your account, such as OneDrive or Outlook.
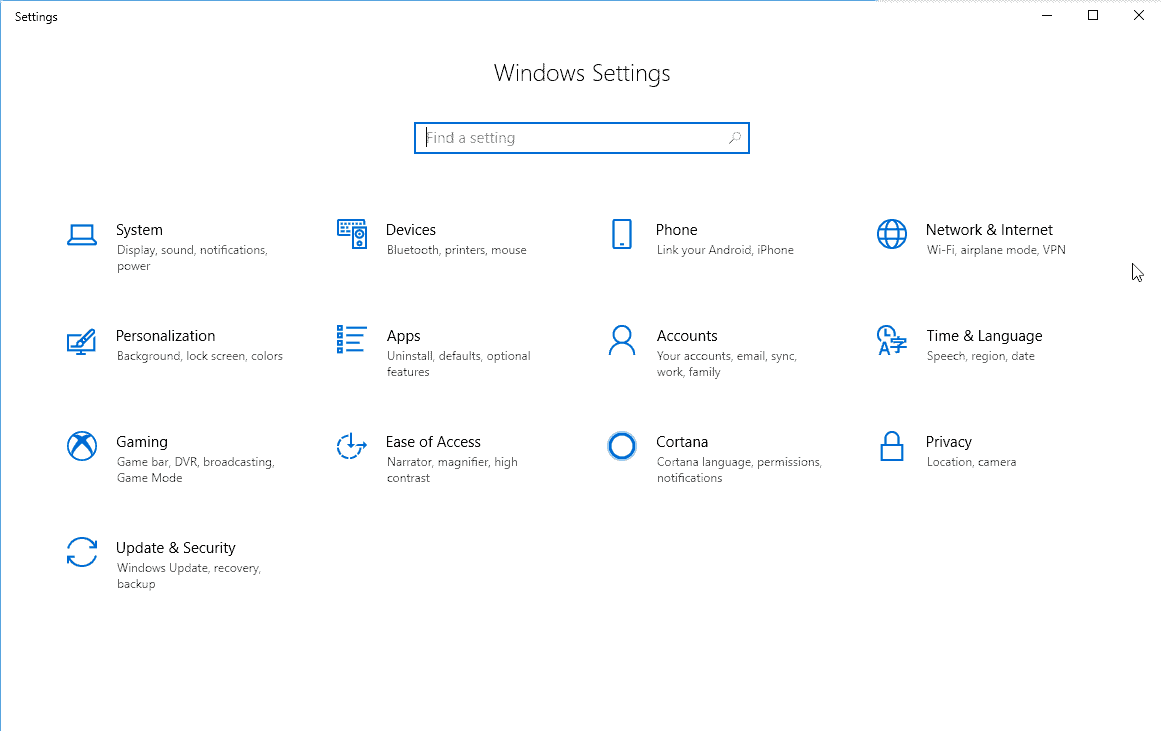
Step 1: Open Settings
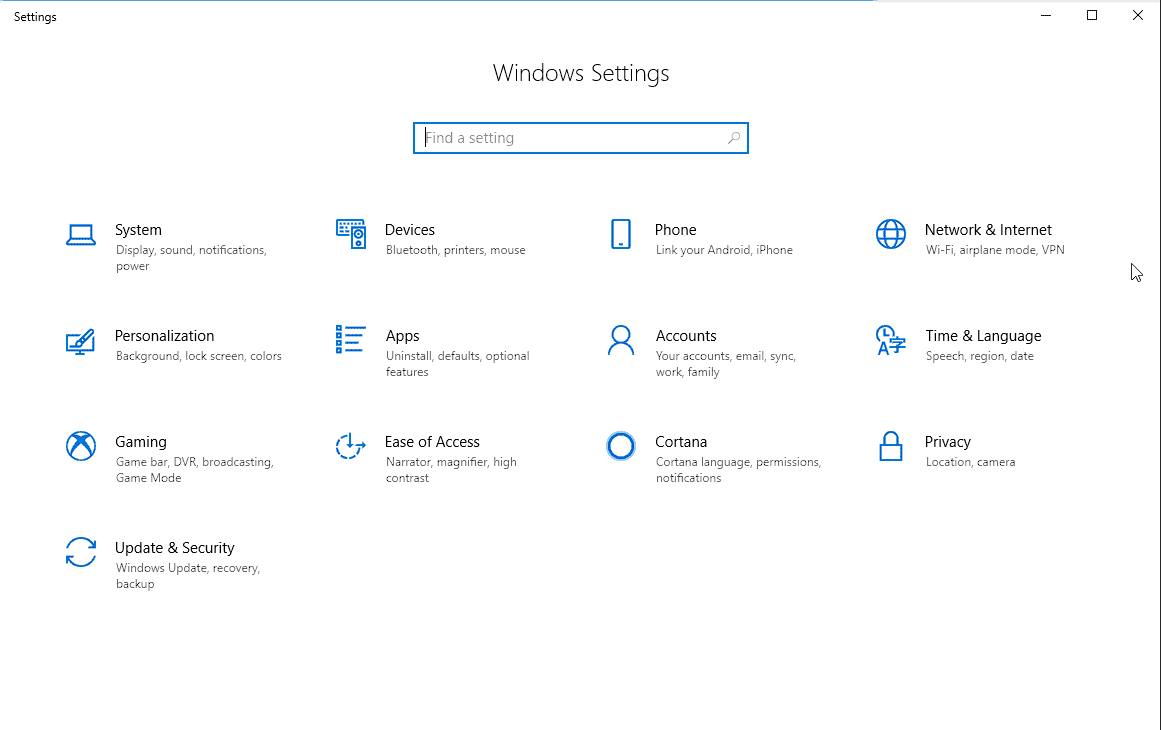
If you want to change your user name on Windows 10, the first step is to open the Settings app. Here’s how:
- Click on the Start menu in the bottom left corner of your screen.
- Click on the gear icon to open the Settings app.
- Alternatively, you can use the keyboard shortcut Windows key + I to open Settings.
Once you have opened the Settings app, you will be able to access the necessary settings to change your user name.
It’s important to note that there are several ways to access the Settings app on Windows 10. In addition to the methods listed above, you can also search for «Settings» in the search bar located next to the Start menu, or right-click on the Start menu and select «Settings» from the context menu.
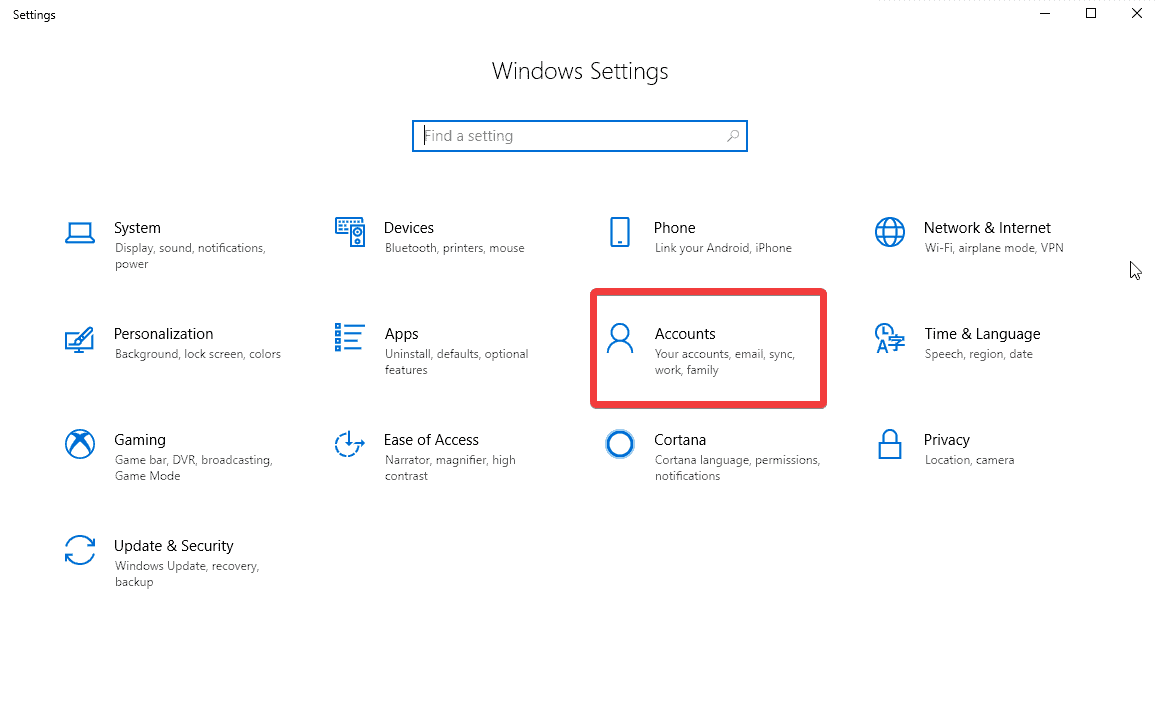
Step 2: Click on Accounts
After opening the Control Panel, you need to click on the «Accounts» option. This will show you all the user accounts that are currently active on your Windows 10 computer.
From here, you can select the account whose name you want to change. You can either choose to change the name of a local account or a Microsoft account, depending on which one you are currently using.
If you are using a Microsoft account, you will need to sign in with your Microsoft credentials to proceed with the name change. Once you have signed in, you can follow the same steps as changing the name of a local account.
If you are unsure whether you are using a local or Microsoft account, you can check by going to the «Settings» app and clicking on the «Accounts» option. Here, you will be able to see which type of account you are currently using.
It is important to note that changing the name of your user account will not affect your files or settings. Your data will remain intact, and you will be able to access it with your new username.
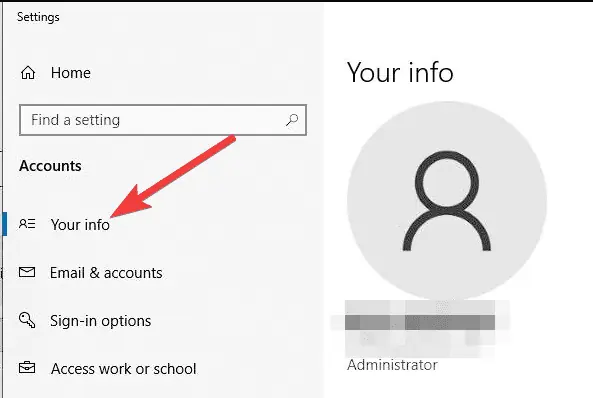
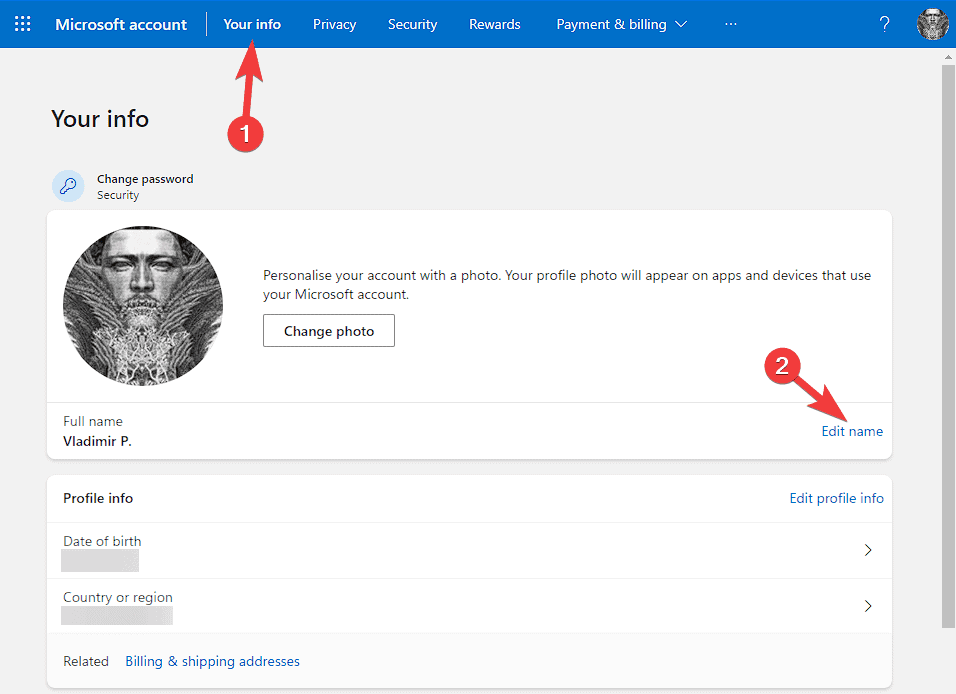
Step 3: Click on Your Info
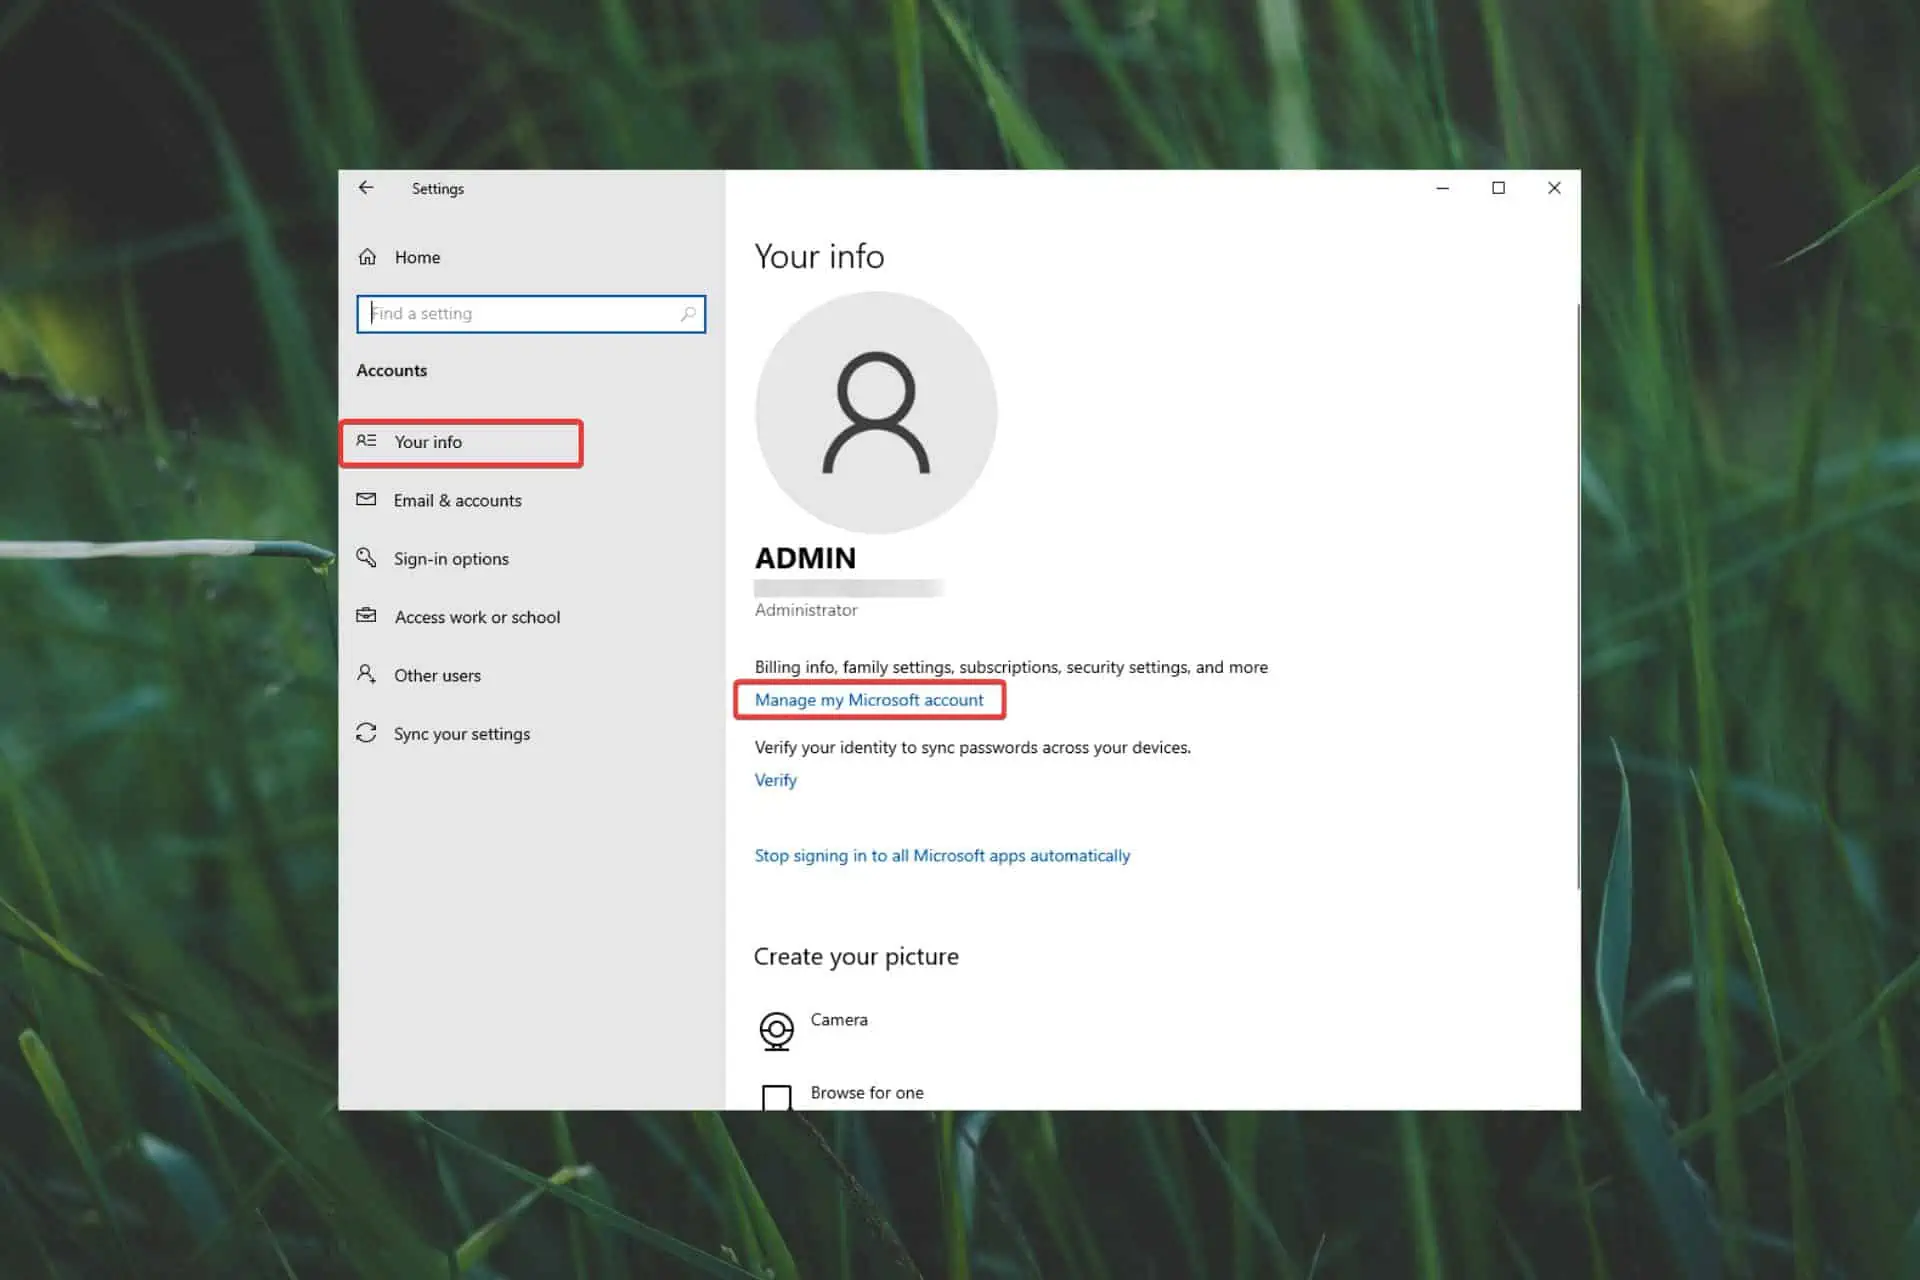
Once you have opened the Settings app, click on the «Accounts» option to access your account settings. Underneath your profile picture and display name, you will see the «Your info» section. Click on it to proceed to the next step.
In the «Your info» section, you will see various options related to your account, including your name, email address, and other details. This is where you can change your account name on Windows 10.
Clicking on «Your info» will take you to a page where you can manage your Microsoft account. If you are not already signed in, you will need to enter your Microsoft account email and password to access this page.
Once you have accessed your Microsoft account page, you can edit your profile details, including your name, profile picture, and other information. You can also manage your account security settings, payment options, and other preferences.
If you want to change your account name, click on the «Edit Profile» option under the «More Actions» dropdown menu. This will take you to a page where you can change your name and other profile details.
Overall, changing your account name on Windows 10 is a simple process that can be done through the Settings app. By following the steps outlined in this article, you can easily change your account name and other profile details to better reflect your personal preferences and identity.
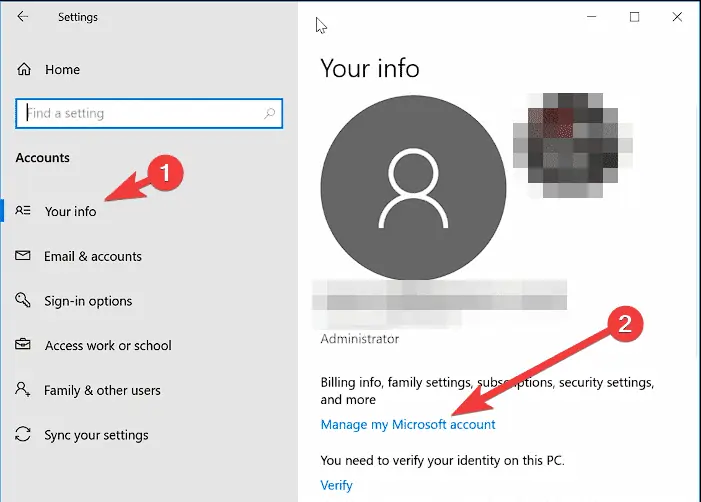
Step 4: Click on Manage my Microsoft Account
After opening the Windows Settings, click on the «Accounts» option. Following that, click on the «Your info» option. Here, you will find an option to manage your Microsoft account. Click on the «Manage my Microsoft account» option to proceed further.
Once you click on it, you will be redirected to the Microsoft account website where you can edit your account details. You can change your account name, email address, phone number, and other details from here. After making the necessary changes, save them and exit the website.
It is important to note that changing your Microsoft account name will also change the name that appears on your Windows 10 login screen. If you prefer to use a different name on your login screen, you will need to change your account name and your Windows 10 username separately.
Changing your Microsoft account name can also affect other Microsoft services that you use, such as OneDrive, Skype, and Xbox Live. It is recommended to check the impact of the name change on these services before proceeding with the change.
Additionally, if you have multiple devices linked to your Microsoft account, the name change will be reflected on all of them. It is important to keep this in mind before making any changes to your Microsoft account.
Step 5: Sign in to your Microsoft account
If you’re using a Microsoft account to sign in to your Windows 10 device, your account name is automatically updated to match the name on your Microsoft account. To change your Microsoft account name:
- Click the Windows logo and the gear icon to open Settings.
- Go to Accounts.
- Select Your account.
- Click the Manage my Microsoft account link.
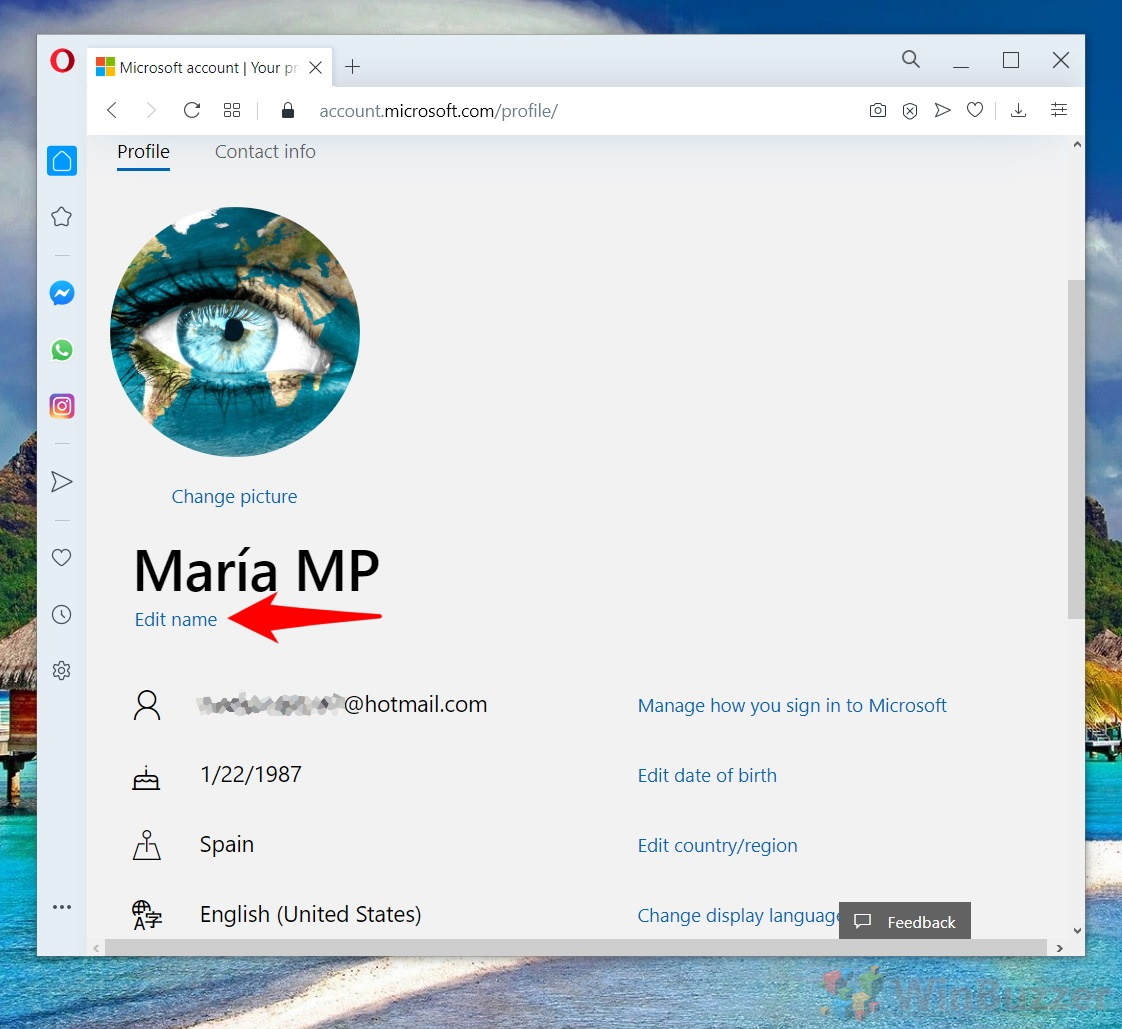
- In your Microsoft account main page, click Edit name below your account picture.
- Enter your preferred name, and click Save.
- Restart your computer for the changes to take effect.
If you’re using a local account to sign in to your Windows 10 device, you can switch to a Microsoft account and then follow the above steps to change your account name. Here’s how to switch to a Microsoft account:
- Click the Windows logo, and click on the gear icon to open Settings.
- Go to Accounts.
- Click on Sign in with a Microsoft account instead.
- Follow the on-screen instructions to sign in with your Microsoft account.
- Once you’re signed in, follow the above steps to change your account name.
Changing your Microsoft account name will also change the name displayed on other Microsoft services, such as Outlook.com and OneDrive.
Step 6: Click on Edit Name
After you have accessed your Microsoft account, you can easily change your name by clicking on the «Edit Name» option. This option allows you to modify your first and last name as they appear on your account.
When you click on the «Edit Name» option, a new page will open where you can enter your new name. Simply type in your new first and last name, and then click on the «Save» button to confirm the changes.
It’s important to note that changing your name on your Microsoft account will also change the name that appears on your Windows 10 sign-in screen, as well as any other Microsoft services that you use, such as Office 365 or OneDrive.
Once you have saved your new name, it may take a few minutes for the changes to take effect. You may need to sign out of your account and then sign back in again for the changes to be fully applied.
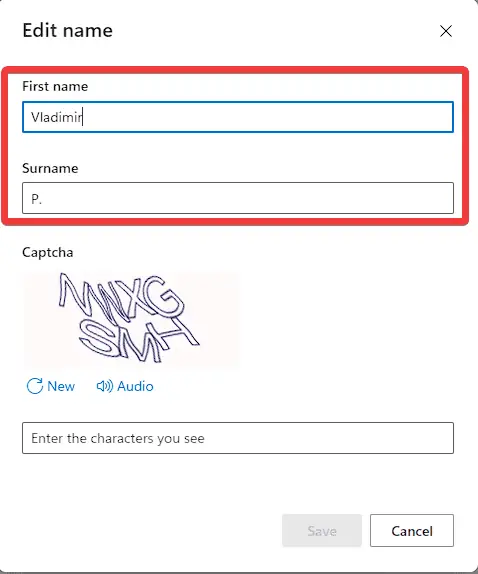
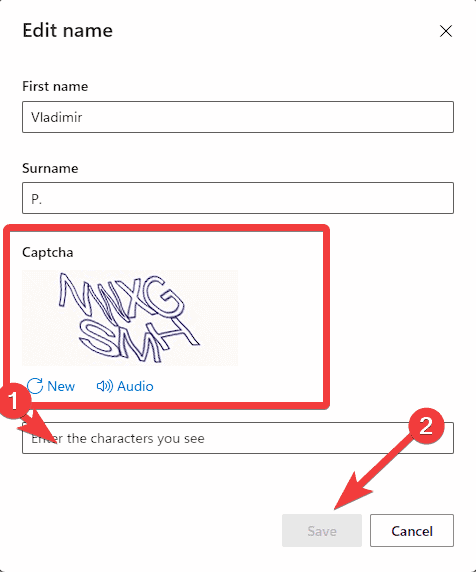
Step 7: Enter a new name and click Save
After opening the account preferences page in a browser, click the «More Actions» drop-down and then click on «Edit Profile» from the options below. This will take you to the «Edit profile» page where you can change your name.
On the «Edit profile» page, click on the «Edit name» button. This will allow you to enter your desired new username in the «First name» and «Last name» fields. Be sure to double-check your spelling and capitalization before clicking «Save.»
Once you click «Save,» wait for a few minutes, and the new username will automatically sync with your Windows 10 device. It’s important to note that this change will only affect your account name and not your account’s email address or login credentials.
If you encounter any issues with changing your username, try logging out of your account and then logging back in to see if the changes have taken effect. If the issue persists, consider contacting Microsoft support for further assistance.
 Если текущее имя пользователя Windows, отображаемое при входе или в меню Пуск вам не по душе, его сравнительно легко можно изменить как для локальной учетной записи, так и для локальной учетной записи Майкрософт. Если вы также хотите поменять имя папки пользователя — здесь сложнее, но и эту тему мы также затронем.
В этой пошаговой инструкции подробно о том, как переименовать пользователя Windows 11 или Windows 10 с локальной учетной записью или учетной записью Майкрософт, а также кратко об изменении имени папки пользователя.
Как переименовать локального пользователя
Если требуется переименование локальной учетной записи пользователя, сделать это можно одним из следующих способов.
Управление учетными записями пользователей
Первый вариант — использование утилиты управления учетными записями пользователей, порядок действий будет следующим:
- Нажмите правой кнопкой мыши по кнопке «Пуск», выберите пункт «Выполнить» (или нажмите клавиши Win+R на клавиатуре), введите
netplwiz
или
control userpasswords2
и нажмите Enter.
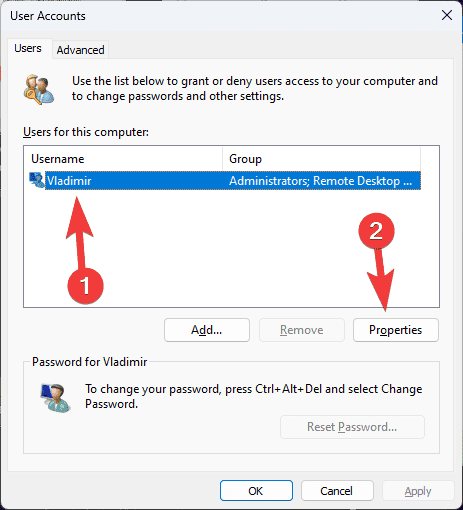
- В открывшемся окне выберите нужного пользователя и нажмите кнопку «Свойства».

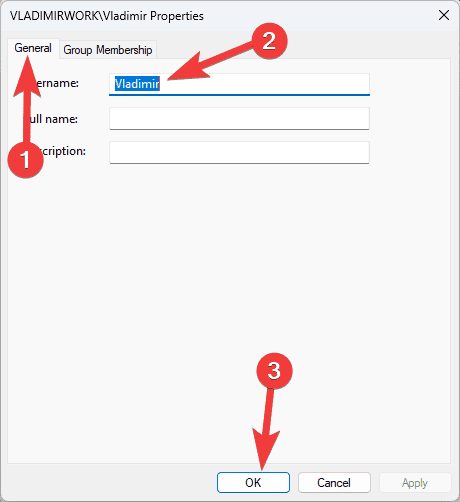
- Задайте новое имя пользователя и нажмите «Ок», затем — «Ок» в окне управления учетными записями.
- Выйдите из системы и снова зайдите — имя вашего пользователя будет изменено.


Учитывайте, что несмотря на то, что имя пользователя изменится, название его папки останется прежним.
Локальные пользователи и группы
Второй способ подойдет только для Pro (Профессиональная) и Enterprise (Корпоративная) версий Windows 11/10. Необходимые шаги:
- Нажмите клавиши Win+R на клавиатуре, введите
lusrmgr.msc
и нажмите Enter.
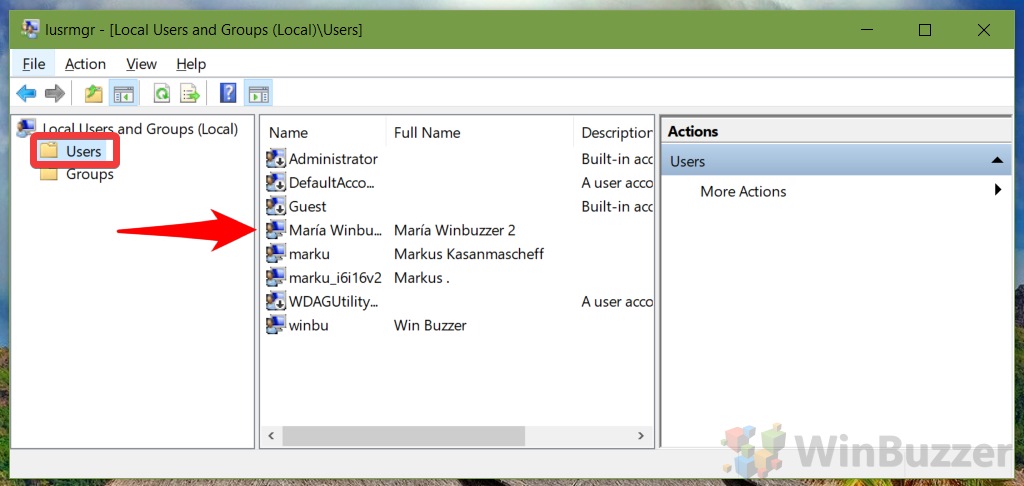
- В окне «Локальные пользователи и группы» перейдите в раздел «Пользователи», нажмите правой кнопкой мыши по имени пользователя, которое нужно изменить и выберите пункт «Переименовать».

- Укажите новое имя пользователя, закройте окно, выйдите из системы и снова зайдите.

Командная строка
Ещё одна возможность — изменение имени пользователя в командной строке Windows:
- Запустите командную строку от имени администратора.
- Введите команду
wmic useraccount where name='старое_имя' rename новое_имя
и нажмите Enter.

- Закройте командную строку, выйдите из системы и вновь зайдите, уже под новым именем.

Изменение имени пользователя для учетной записи Майкрософт
Если вы используете учетную запись Майкрософт, изменение имени выполняется на соответствующем сайте:
- Зайдите на страницу вашей учетной записи Майкрософт https://account.microsoft.com/ с вашими учетными данными.
- Нажмите по вашему имени или перейдите на вкладку «Сведения».

- Нажмите «Изменить имя» и укажите новые имя и фамилию (необязательно).


После применения сделанных настроек они, через некоторое время (не сразу и, возможно, после перезагрузки) будут синхронизированы с вашим устройством, и вы увидите, что имя пользователя в Windows также изменилось.
Изменение имени папки пользователя
Изменить имя папки пользователя, если оно вам не нравится, в принципе, возможно, но часто приводит к неожиданным результатам: от неработоспособности некоторых программ, для которых были прописаны абсолютные пути, до невозможности зайти в Windows из-за ошибок профиля пользователя.
Простой и безопасный способ
Если вам нужен простой и безопасный способ, рекомендую использовать следующий подход:
- Создайте новую локальную учетную запись с нужным именем (рекомендую использовать латиницу), для нее будет создана папка с тем же именем, сделайте нового пользователя администратором. Подробно о том, как это сделать в статьях: Как создать пользователя Windows 11, Как создать пользователя Windows 10.
- Зайдите под вновь созданным пользователем, и, если нужно, прикрепите учетную запись Майкрософт (это можно сделать в Параметрах).
- Убедившись, что всё работает как нужно и перенеся все данные из старого профиля (например, хранящиеся в папках Документы, Изображения, Рабочий стол), удалите старого пользователя и работайте с новой учетной записью и новым именем папки.
Рискованный метод
Способ переименования папки текущего пользователя без создания нового выглядит иначе (и, ещё раз предупреждаю, небезопасный):
- Выйдите из текущей учетной записи и зайдите в систему с другой учетной записью Администратора (не с той, для которой мы изменяем имя папки), можно включить скрытую учетную запись Администратор.
- При желании измените имя пользователя, для которого меняется имя папки одним из способов, описанным ранее.
- Перейдите в папку C:\Пользователи (C:\Users\) и переименуйте папку нужного пользователя тем же способом, которым вы переименовываете другие папки.
- Запустите редактор реестра и перейдите в раздел
HKEY_LOCAL_MACHINE\SOFTWARE\Microsoft\Windows NT\CurrentVersion\ProfileList
- В подразделах этого раздела найдите такой, где для параметра с именем ProfileImagePath задан путь к изменяемой папке, дважды нажмите по этому параметру и измените путь на нужный.

- Закройте редактор реестра, перезагрузите компьютер и попробуйте вновь зайти в учетную запись, для которой менялся путь к папке.

Несмотря на то, что этот метод описан на официальном сайте Майкрософт , он остается крайне ненадежным и, если на почти чистой системе обычно работает, на ОС с множеством установленных программ зачастую вызывает неожиданные проблемы.
Иногда бывает достаточным изменить старые пути на новые в реестре, выполнив поиск по старому имени папки, а иногда даже это не позволяет избежать проблем: от необходимости повторно настраивать OneDrive и проблем с WinGet до, уже упоминавшихся проблем с профилем пользователя. О случаях неудачных попыток вы можете прочесть, например, в комментариях к статье Как изменить имя папки пользователя в Windows 10.

Contents
- 1 How To Change your Windows 10 Account Name for Linked Microsoft Accounts
- 2 How To Change the Account Name of a Local Account via Control Panel
- 3 How To Change a Local Account Name via Local Users and Groups
- 4 How To Change the Name of a Local Account via the Advanced User Accounts Control Panel (Netplwiz.exe)
- 5 How To Change the Name of a Local Account via Command Prompt
- 6 How To Change the Name of a Local Account in PowerShell
- 7 How To Change the Name of the Built-in Administrator account via Local Security Policy
- 8 How to Enable the Hidden Admin-Account, Delete User Accounts and Disable Fast User Switching
If you want a new account name in Windows 10 you can either create an additional user account or change the username of your exisiting account.
Here we show you how to change an account name in Windows 10, which requires different procedures for local accounts that are only present on your drive and linked Microsoft accounts.
There are different reasons why you might want to change a username in Windows 10. Maybe your real name has changed and you need to reflect this change in Windows 10 as well. Or you have been using a nickname and want to do a username change to your real name. You may also want to change the name of the built-in administrator account for security reasons.
Here are all the different methods on how to change a Windows user account name.
How To Change your Windows 10 Account Name for Linked Microsoft Accounts
To change the Windows 10 username of a linked Microsoft account you need to access account options in a webbrowser. After changing your user name there, the effect will be reflected in Windows 10 and other linked products such as Xbox, Skype etc..
- Open your Microsoft account in the web-browser
Head to account.microsoft.com/account and click on “Your info”.

- Click on “Edit name”

- Select a new account name and click “Save”

- Check if the username change has been applied correctly
Your new account name will be changed also on Windows 10 after logging in the next time after Windows 10 synced with your account information in the cloud.


How To Change the Account Name of a Local Account via Control Panel
Local account names can be changed easily via the control panel for normal users and for administrator accounts.
- Open “Control Panel”

- Switch to “Small icons” view or search for “User Accounts”

- Open Windows 10 “User Accounts”

- Select “Manage another account”

- Klick on the user account name you want to change

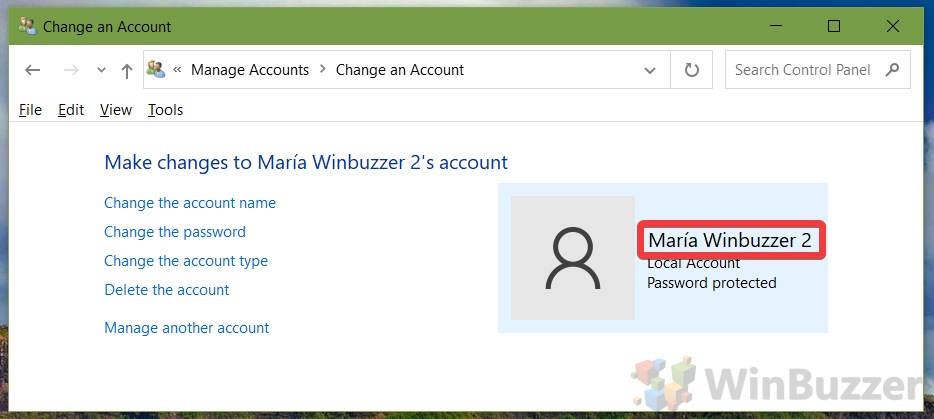
- Select “Change the account name”

- Choose a new Windows username
Write in “New account name” and click “Change Name”.

- Check if your changed account name is correct


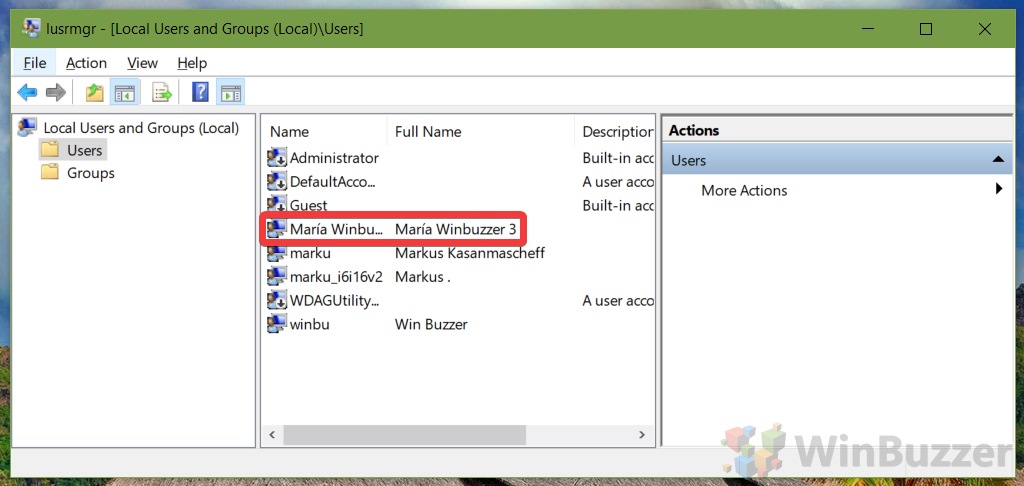
How To Change a Local Account Name via Local Users and Groups
Changing a Windows user name via Local Users and Groups is only available in the Windows 10 Pro, Enterprise, and Education editions.
- Run the “usrmgr.msc”-command
Open the run-dialog via the hotkey “Windows + R” and launch the command “usrmgr.msc”.

- Select the Windows 10 user name you want to change
Click on “Users” on the left side and double click the account name you want to change.

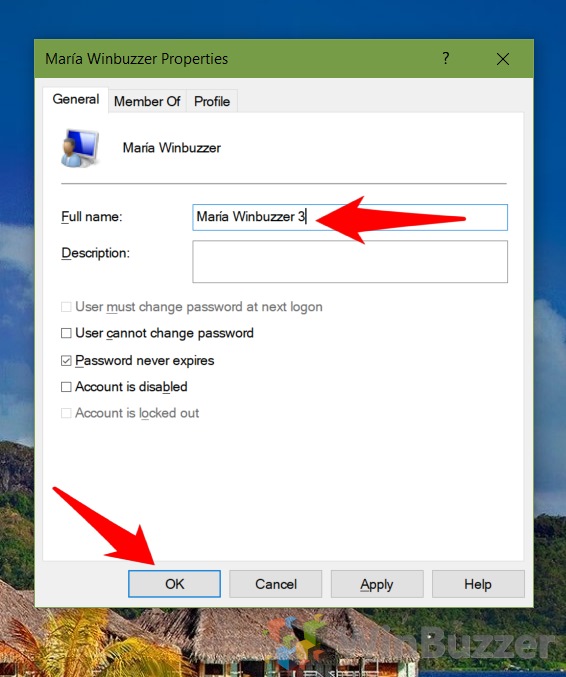
- Add the new account name you want to use and click “OK”

- Check the list if the username has been changed successfully

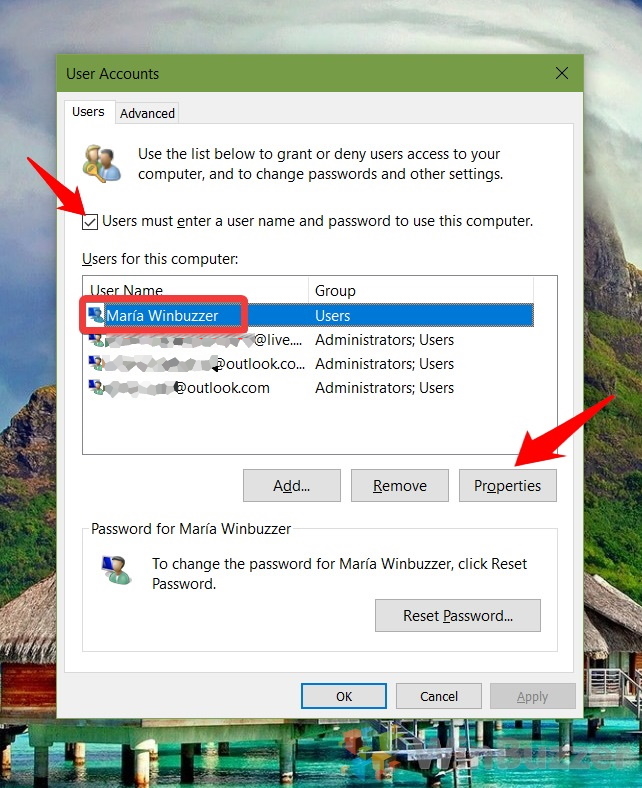
How To Change the Name of a Local Account via the Advanced User Accounts Control Panel (Netplwiz.exe)
The Advanced User Accounts control panel “Netplwiz” lets you perform various user management tasks such as changing the account name of a local user, assigning users to groups, manage passwords and set some security features.
- Run the “netplwiz”-command
Open the run-dialog via the hotkey “Windows + R” and launch the command “netplwiz“.

- Select password-based logon and username
Check “Users must enter a user name and password to use this computer”, select the local account you want to change the name of, and click/tap on “Properties”.

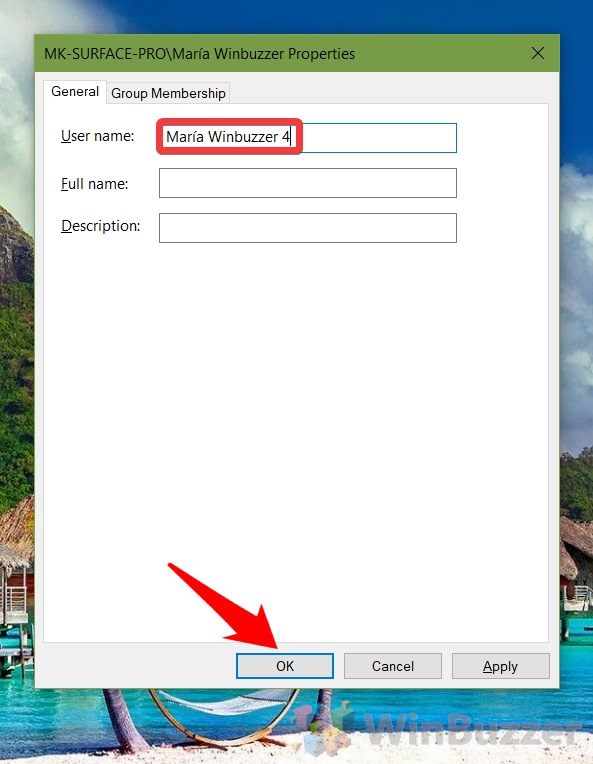
- Put the new account name at “User name” and click “OK”.


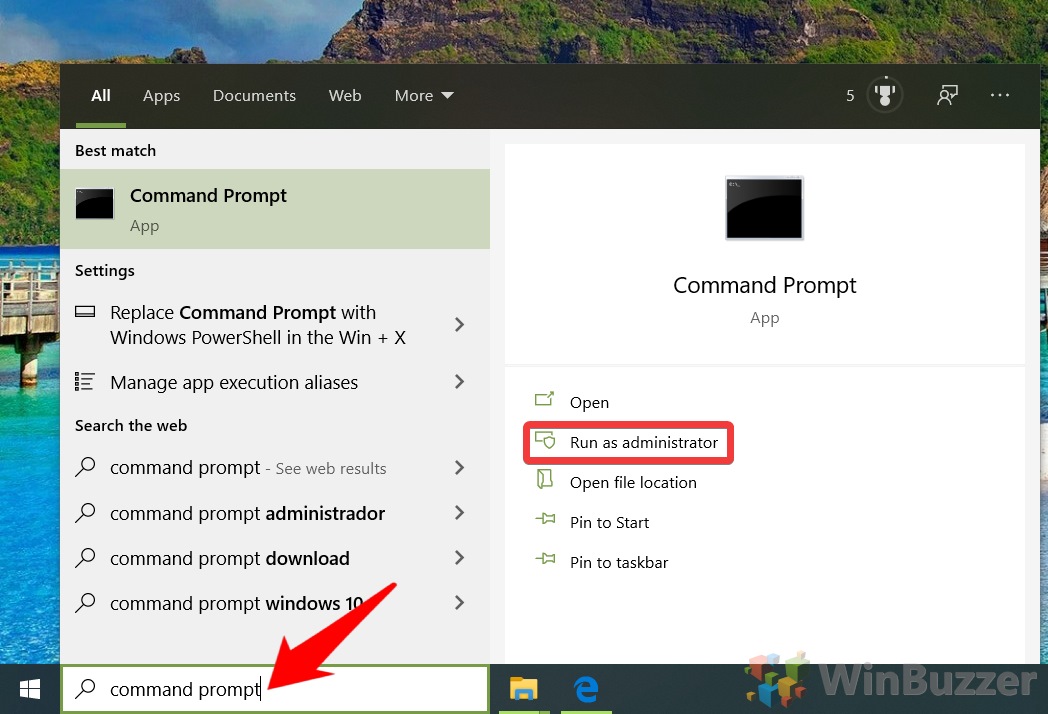
How To Change the Name of a Local Account via Command Prompt
Changing a Windows 10 user name for a local account is also possible via the command prompt.
- Open an elevated command prompt
Search for “CMD” or “Command Prompt” using Windows 10 search and click on “Run as administrator”.

- List existing Windows 10 user names
Run the following command to list all user account names and note the one you want to change.
wmic useraccount get fullname, name

- Set a new account name with
Run the following command to change the account name replacing “Current User Name” and “New Account Name” accordingly:
wmic useraccount where name="Current User Name" rename "New Account Name"


How To Change the Name of a Local Account in PowerShell
As an alternative to the CMD-method, you can also change a Windows 10 user name with PowerShell.
- Open an elevated PowerShell
Right-click the Start-button and select “Windows PowerShell (Admin)”.

- List existing Windows 10 user names
Run the command
Get-LocalUserto list all existing Windows 10 user accounts and note the username you want to change.
- Rename username of local account
Run the following command to change the account name replacing “Current User Name” and “New Account Name” accordingly:
Rename-LocalUser -Name "Current Name" -NewName "New Name"


How To Change the Name of the Built-in Administrator account via Local Security Policy
This option is only available in the Windows 10 Pro and Enterprise editions.
- Open Windows 10 Local Security Policy
Search for “secpol.msc” using Windows 10 search and click on the result.

- Open the “Rename administrator account” policy
Navigate to “Local Policies – Security Options” and open “Accounts: Rename administrator account” via double-click.

- Change the Windows 10 administrator name
Change “Administrator” to any other account name you want to use for the built-in hidden Windows 10 admin account.


How to Enable the Hidden Admin-Account, Delete User Accounts and Disable Fast User Switching
Please also check our tutorials on how to enable the hidden admin-account and about the various available methods to delete user accounts in Windows 10. You might also be interested in how to enable or disable Fast User Switching.
Change your username in Windows 10 with ease! This article will help you through the procedure, whether you wish to customize your user account or have to change it for security concerns.
This article will give you step-by-step instructions on how to modify your Windows 10 username using various tools, such as the Command Prompt and the Local Account settings.
1. Use the Local Account settings
- Press the Win + I keys to open the Settings app.

- Click Your Info from the left sidebar.

- Choose Manage My Microsoft Account.

- Sign in to the Microsoft page that opens with your existing credentials.
- Click Your Info on the Microsoft account page, and choose Edit Name.

- Enter your new username in the First name field, and add a Surname if you want.

- Write the Captcha code, and click Save to apply the changes.

- Sign out of your Windows 10 account and sign back in to see the updated username.
2. Create a new Local User Account
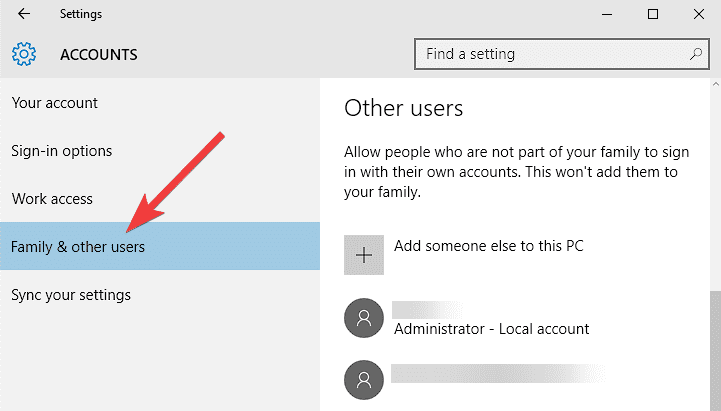
- Press Win + I to open Settings, and click on Accounts.

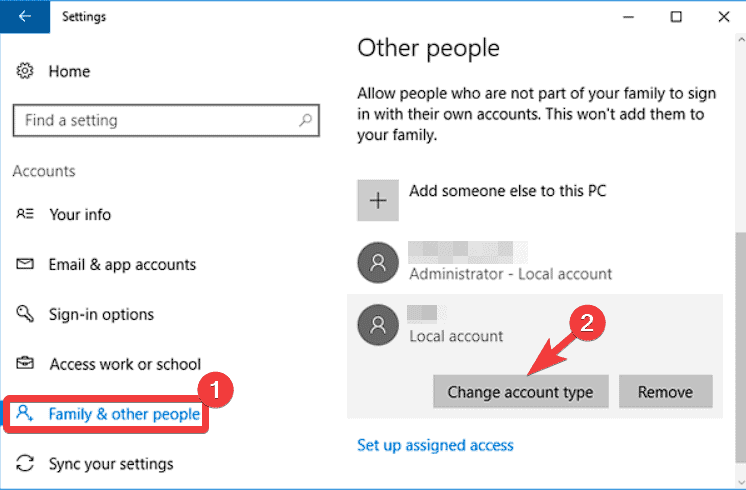
- Choose Family & Other users from the left sidebar.

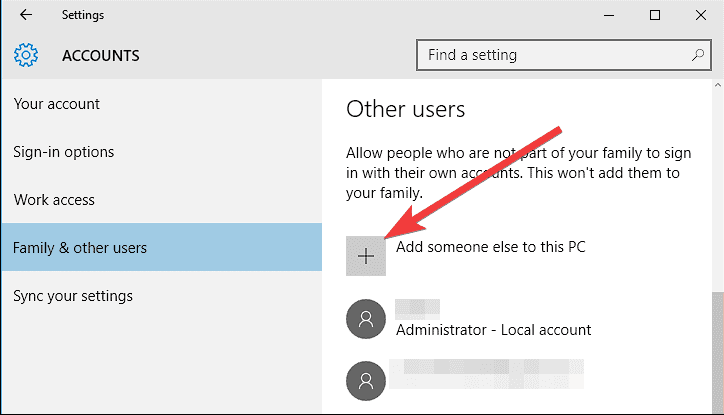
- Click on Add someone else to this PC.

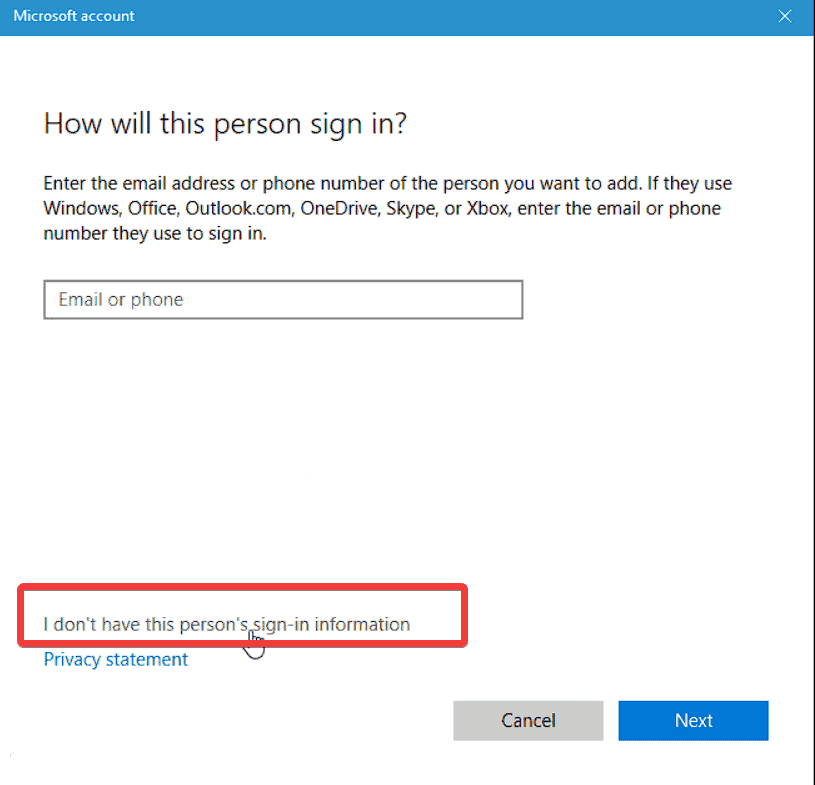
- Choose the I don’t have this person’s sign-in information option.

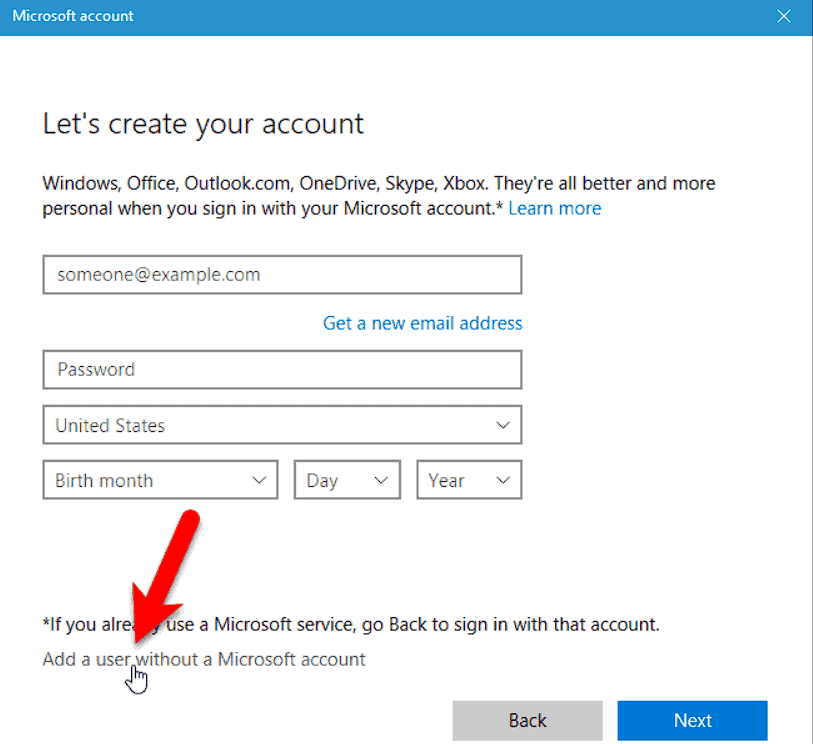
- Select Add a user without a Microsoft account.

- Write the new username and password for the local account, and click Next.
- Follow the on-screen instructions to finish the setup and sign out of the current account to log in to the new one.
3. Use the Control Panel
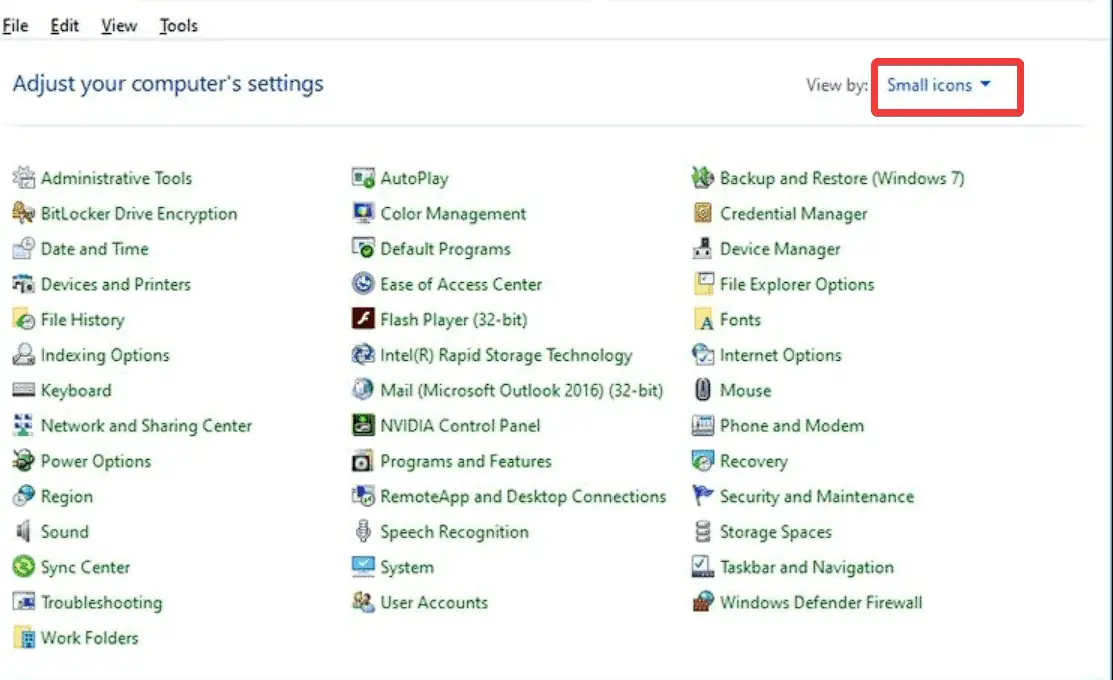
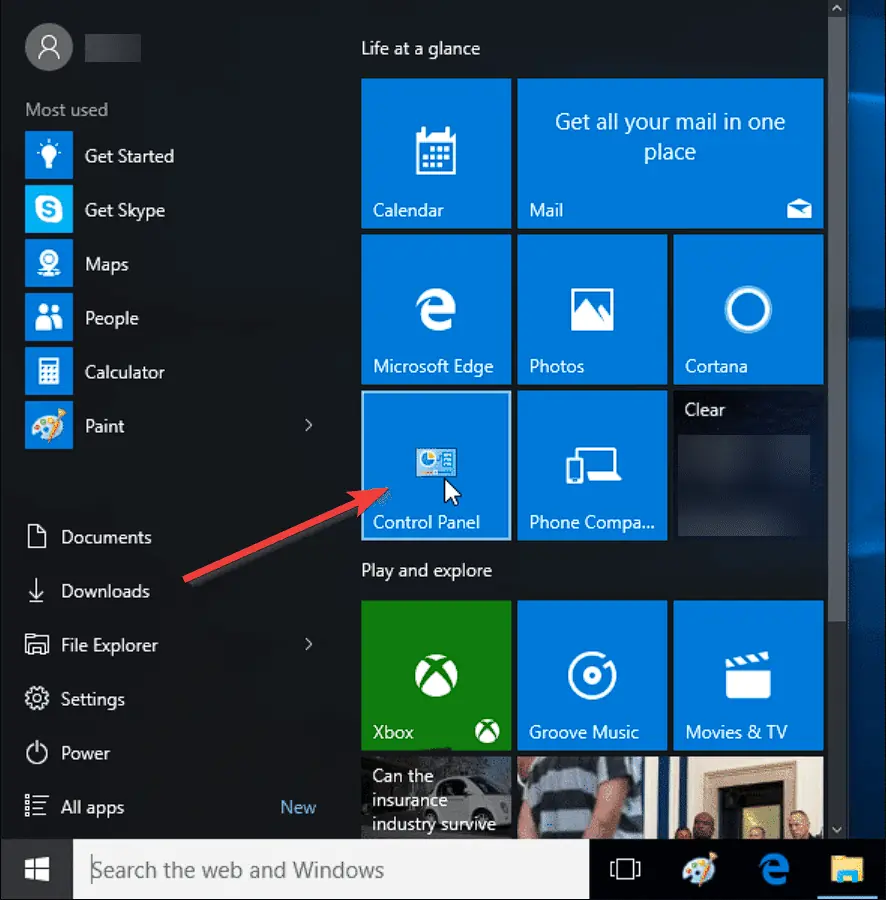
- Press Win + X and select Control Panel.
- Set the View by option to Large icons or Small icons.

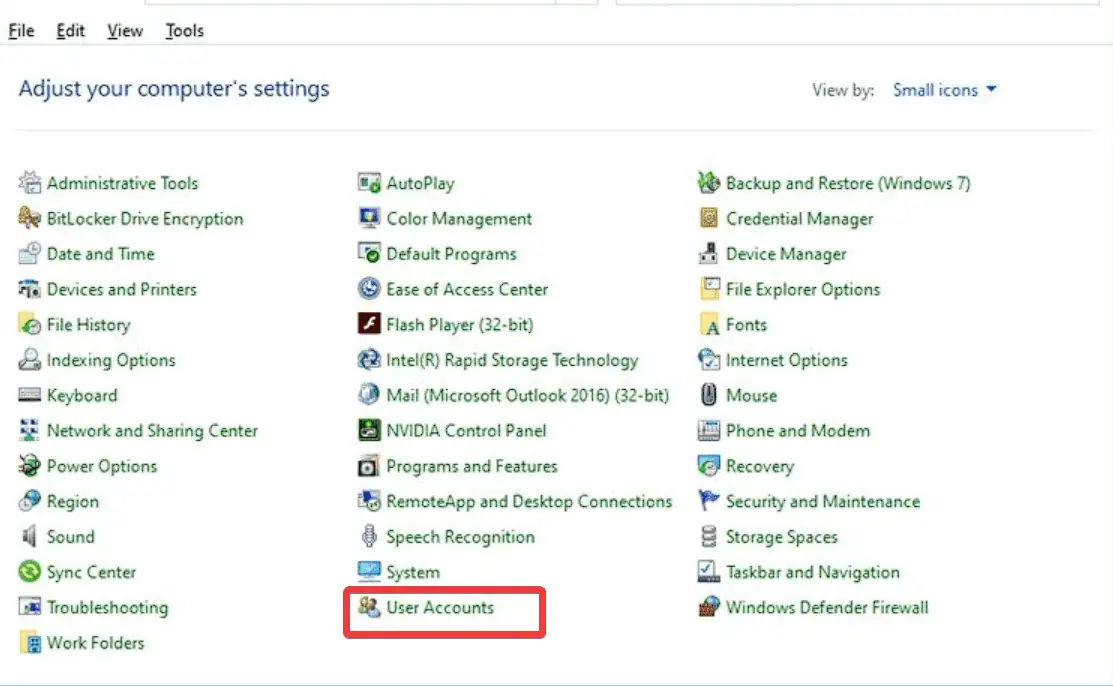
- Click on User Accounts, and select Change your account name.

- Enter the new username, and click Change Name to apply.
- Sign out and log into the new Windows 10 account for the changes to take effect.
4. Rename the Users folder
- Create a system restore point before attempting this method to ensure you can revert any necessary changes.
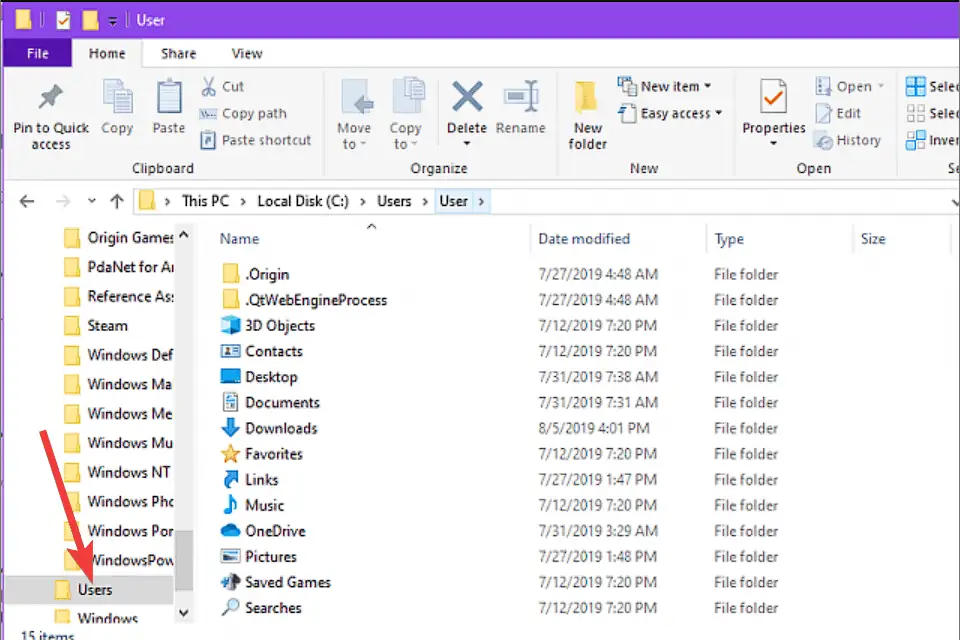
- Press the Win + E keys, and navigate to the following path:
C:\Users
- Find your user folder that matches your current username.
- Right-click the folder and select Rename.
- Enter your new username and press Enter.
- A prompt asking for administrator permission will appear; click Continue.
- To view the changed username, sign out of your Windows 10 account and back in.
5. Use Command Prompt
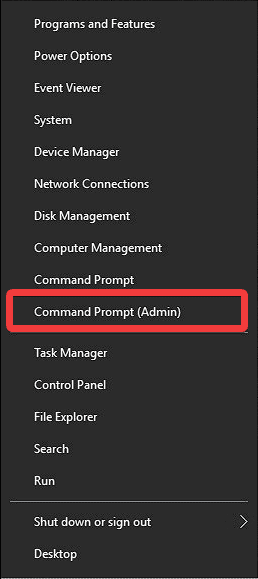
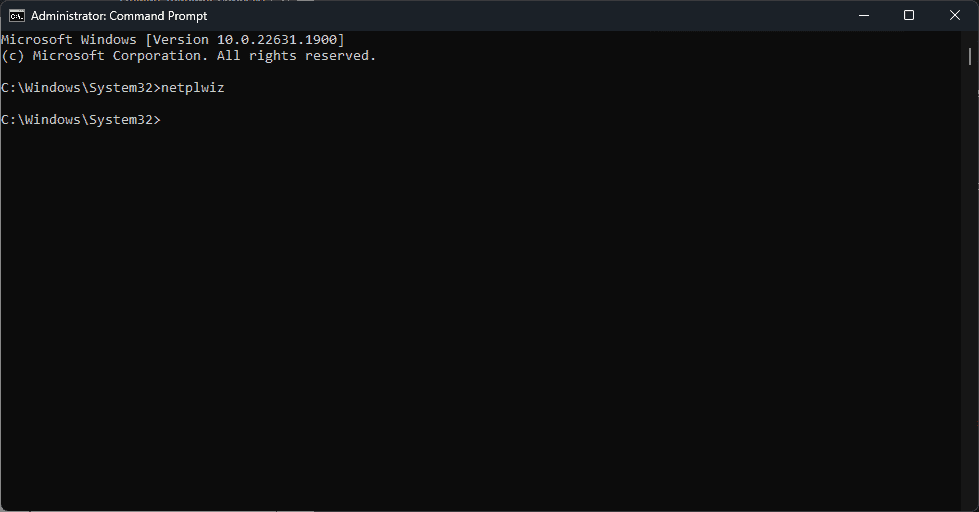
- Press the Win + X keys on your keyboard and choose Command Prompt (Admin).

- Type the following command and press Enter:
netplwiz
- Click on the current username, and select Properties.
- Navigate to the General tab.

- Under the User Name section, enter your new username, and click OK to save the changes.
- Save any ongoing work, and click OK inside the prompt asking you to restart your PC for the changes to take effect.


6. Create a new User Account and transfer files
You can make a new user account and move everything to it if you wish to change your username while keeping all your files and preferences:
- Follow the information from method #2 presented above to create a new local user account with the username you want.
- Sign into the new account, and press the Win + I keys to open Settings.

- Click on Accounts, and choose Family & other users.
- Select your old username, found under the Other Users section.
- Click on the Change account type option, and select Administrator.

- Sign out of the new account and sign back into the old one.
- Open File Explorer and navigate to the following path (where OldUsername will show your previous username):
C:\Users\OldUsername - Copy all the files and folders you want to transfer.
- Navigate to the following path (where NewUsername is the newly-created account’s name):
C:\Users\NewUsername - Paste all the copied files and folders into the new account’s folder.
Note: Before deleting the previous user account, remember to check the transferred files to ensure everything is in place.
How to change a username in Windows 10 without a Microsoft account?
- Click the Start button and search for Control Panel, then open it.

- Find and open the User Accounts option.
- Click the User Accounts link again.
- User Accounts will open a new window, displaying relevant information and settings.
- Click on the Change your account name option.
- Write your new username inside the text box that appears.
- Click on the OK button to save the changes.

In Windows 10, changing your username is a quick and easy process that can be done through the Command Prompt or local account settings.
You can quickly adjust your user account for security purposes or to fit your tastes by carefully following the step-by-step directions in this article.
To see the changes take effect, don’t forget to save your work and restart your computer.
Хотя Windows 10 можно назвать достаточно удобной операционной системой, некоторые вполне базовые вещи в ней реализованы очень нелогично. Например, простую и иногда полезную функцию переименования профиля пользователя найти самостоятельно будет весьма проблематично — но, естественно, выход есть. Сейчас расскажу, как это сделать за две минуты.
Как изменить имя учётной записи встроенной утилитой
На самом деле в операционной системе имеется встроенная утилита, которая позволяет вносить различные изменения в профили пользователей. Например, здесь можно отключить пароль, который запрашивается при входе, да и возможность изменить имя пользователя тоже есть.
Список действий:
- нажмите Win+R на клавиатуре и в открывшемся поле «Выполнить» введите команду netplwiz;
- в открывшемся окне вы увидите список пользователей (если их несколько) — выберите тот, который нужно переименовать, после чего кликните на кнопку «Свойства»;
- в появившемся окне в поле «Полное имя» введите то имя, которое вы хотите;
- нажмите на кнопку «ОК» и закройте окно — сохранения вступят в силу.
Как изменить имя учётной записи через меню локальных пользователей
Кроме того, в системе имеется довольно удобное меню «Локальные пользователи и группы», через которое тоже можно изменить имя пользователя. Нельзя сказать, что этот способ быстрее, так как в нём чуть больше шагов, но кому-то он покажется более удобным.
Список действий:
- нажмите Win+R на клавиатуре и в открывшемся поле «Выполнить» введите команду lusrmgr.msc;
- в открывшемся окне в левой части откройте папку «Пользователи» — вы увидите список всех учётных записей в системе;
- дважды кликните левой клавишей мыши по той учётной записи, которую хотите переименовать;
- в открывшемся окне введите желаемое имя в поле «Полное имя» и нажмите «ОК»;
Изменения в систему будут внесены.
- Теперь не боюсь за Windows: точки восстановления создаются каждый день. Вот как это настроить
- Эта бесплатная утилита от Microsoft в разы ускоряет работу. Она существует ещё с Windows 95
- Эта утилита показывает, где используется выбранный файл в Windows и что мешает удалить его
- Мод Windows 10 для игр: тестирую Atlas OS, из которого вырезали лишнее ради производительности
- 10 приложений, которые нужно сразу установить на новый компьютер