You can customize your lock screen. Try changing the background to a favorite photo or slide show. You can also choose quick status notifications to show you upcoming calendar events, social network updates, or other app and system notifications.
Customize your lock screen image
-
Select Start > Settings .
-
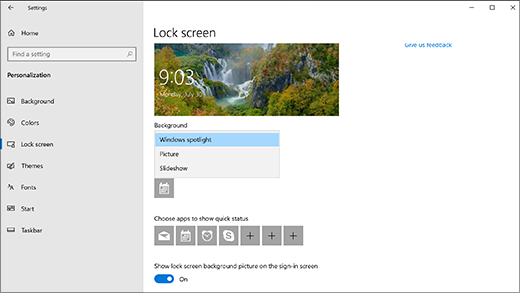
Select Personalization > Lock screen.
-
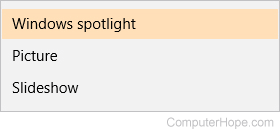
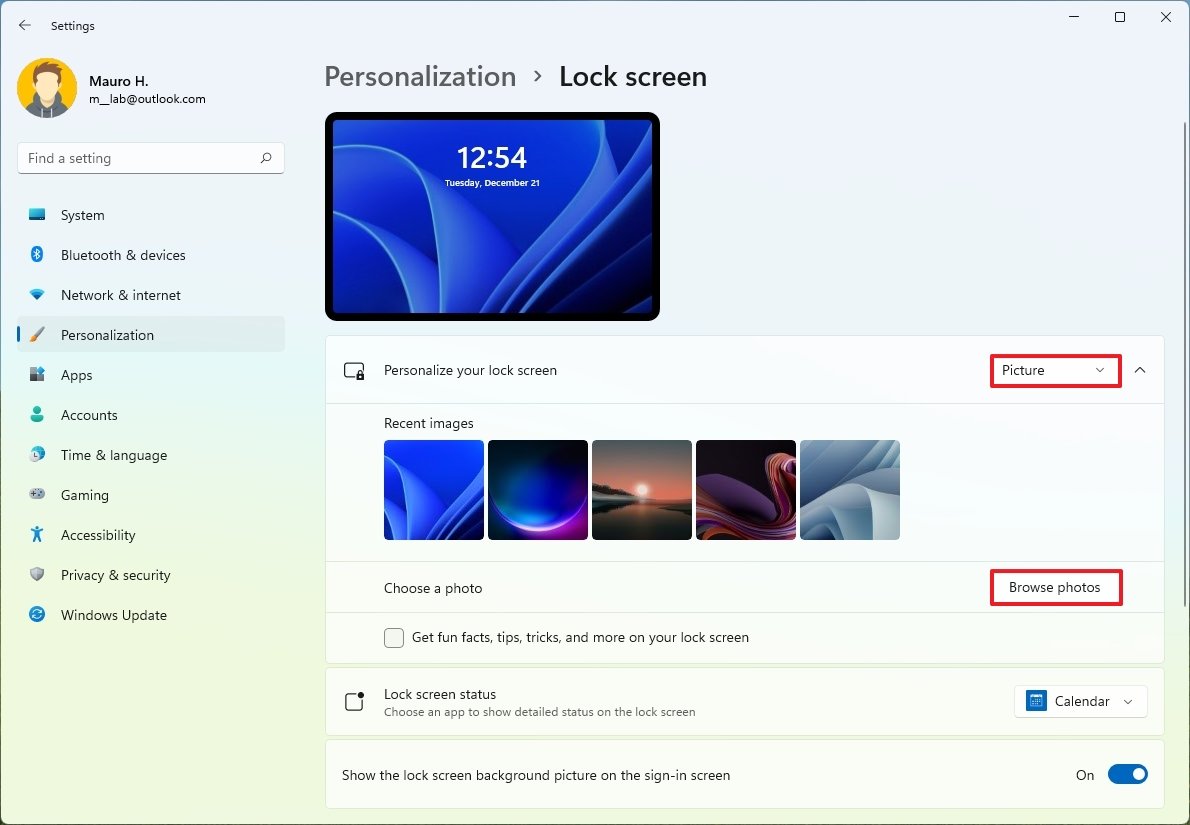
Select the list for Personalize your lock screen, then do one of the following:
-
Select Windows spotlight for beautiful photography that displays automatically. Windows Spotlight updates daily with images from around the globe, and it also shows tips and tricks for getting the most out of Windows.
Note: If you don’t see this option, it might be because it’s managed by your organization. Check with your system administrator for more info.
-
Select Picture, then select a recent image, or select Browse photos, select the photo you want to use, and select Choose picture.
-
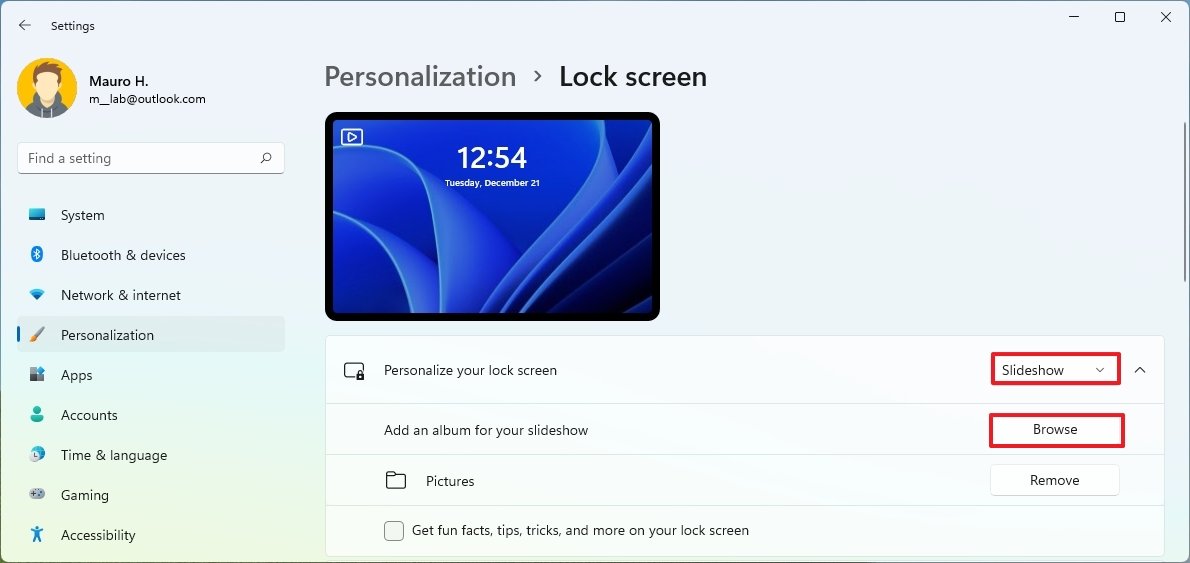
Select Slideshow, then select Browse, select the folder you want to use, and select Choose this folder. If you see folders listed that you don’t want included in the slideshow, select Remove next to that folder.
-
If you chose Windows spotlight for your lock screen, you can test if it’s working correctly. Press Windows logo key + L to lock your device. The Windows spotlight image should appear on the lock screen.
If you don’t see the Windows spotlight image when you’re signing in, select Start > Settings > Personalization > Lock screen. Check that the toggle for Show lock screen background picture on the sign-in screen is turned on.
Customize a lock screen quick notification
-
Select Start > Settings .
-
Select Personalization > Lock screen.
-
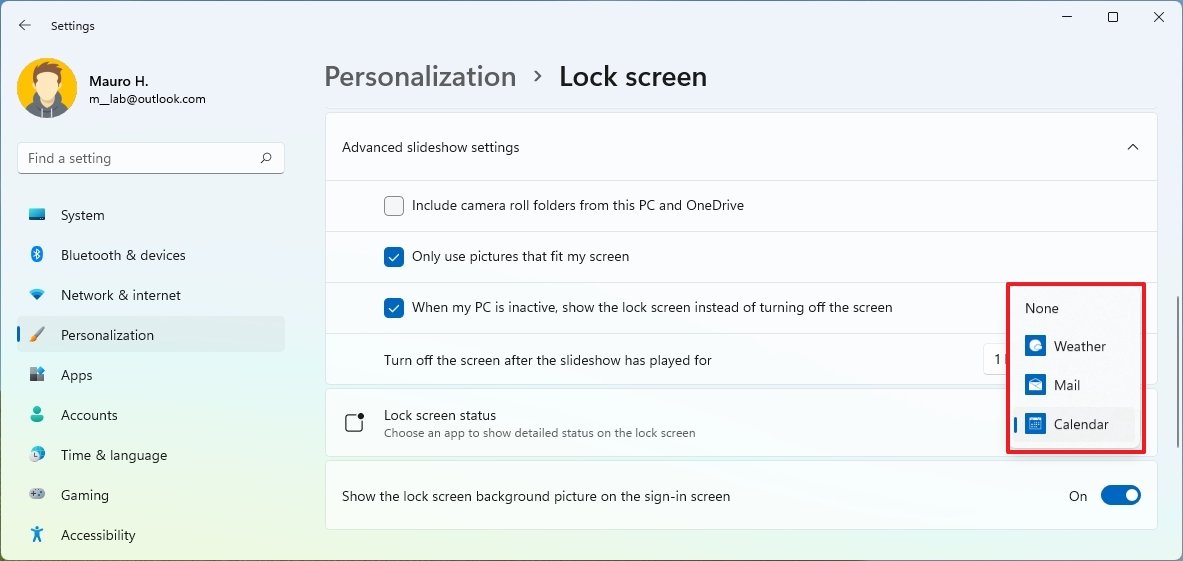
Select the list for Lock screen status, and select an option such as Mail, Weather, or Calendar.
Note: If you choose Calendar, you can easily see your upcoming meetings.
You can customize your lock screen. Try changing the background to a favorite photo or slide show. You can also choose quick status notifications to show you upcoming calendar events, social network updates, or other app and system notifications.
Customize your lock screen image
-
Select Start > Settings .
-
Select Personalization > Lock screen .
-
Select the list for Background, then do one of the following:
-
Select Windows spotlight for beautiful photography that displays automatically. Windows Spotlight updates daily with images from around the globe and it also shows tips and tricks for getting the most out of Windows.

Note: If you don’t see this option, it might be because it’s managed by your organization. Check with your system administrator for more info.
-
Select Picture, then select a recent image, or select Browse photos, select the photo you want to use, and select Choose picture.
-
Select Slideshow, then select Add a folder, select the folder you want to use, and select Choose this folder. If you see folders listed that you don’t want included in the slideshow, select the folder, then select Remove.
-
If you chose Windows spotlight for your lock screen, you can test if it’s working correctly. Press Windows logo key + L to lock your device. The Windows spotlight image should appear on the lock screen.
If you don’t see the Windows spotlight image when you’re signing in, select Start > Settings > Personalization > Lock screen . Then make sure Show lock screen background picture on the sign-in screen is turned on.
Windows 11 has a lock screen that is visible when your computer is idle or when it is restarted. The default choice is straightforward, but you can customize it to your preferences. ..
Microsoft’s iconic lock screen has been around for centuries and is now a necessary piece of the system that works admirably that most of us can’t remember exists. Since we generally ignore this in any case, it’s a good idea to add an individual touch so you can see the value in the feature once again.
How to to customize the lock screen in Windows 11?
- Choose your components
- Choose your customization options
- Select your operating system and install it
- Finish up by configuring your PC ..
Select “New Window” from the menu.
In the “New Window” dialog, click on the “Text Editor” tab.
In the “Text Editor” tab, click on the “Create New Text Document” button.
In the “New Text Document” dialog, enter a name for your document and click on the “Create” button.
Settings on your computer screen. Click “Custom” to change the settings for your computer.
The lock screen will now show a list of your current notifications.
Customize your lock screen to set a custom image as your lock screen background:
- Click Customize your lock screen to open the customize screen.
- In the left pane, select “Lock Screen Status.”
- On the right pane, select “Image.”
- Select a photo or image you want to use as your lock screen background.
How to to change lock screen background in Windows 11?
You can customize the look of your lock screen by selecting Picture or Slideshow from the drop-down menu next to “Customize your lock screen”.
Windows 10 has a new feature called “Slideshow” that lets you select multiple images to be displayed on the lock screen. You can also use “Image” to create a custom image that will be displayed on the lock screen.
Other Customization Options for Windows 11 Lock Screen
You can disable Microsoft recommendations on your lock screen by unchecking the box next to “Get interesting facts, tips, methods, and more on your lock screen.”
You can see detailed information about an app on the lock screen. Just select an app and choose a dropdown menu to see the options.
You can choose to use the lock screen image on the login screen. If you don’t want to do this, you can always uncheck “Show lock screen background image on login screen.” After customizing the lock screen, press Windows shortcut key + L and keep track of the changes you’ve made. ..
Final note
How to Change Lock Screen on Windows 11
If you have a Windows 10 computer, you can change the lock screen wallpaper and background image using the following steps:
- Open the Start menu and type “cmd” (without the quotes) to open the command prompt.
- Type “netstat -an” to see active network connections. If there are no active connections, your computer may be idle.
- Type “netstat -l” to see all active network interfaces in your system. If there are no active connections, your computer may be idle.
- Type “netstat -p” to list all processes on your system (not including background processes). If there are no active connections, your computer may be idle.
Updated: 05/01/2023 by
Securing your computer is good for protecting your data and privacy. One of the ways to do so in Windows is by utilizing a login or lock screen. This feature requires users to input a password on startup, or when resuming from a screensaver or sleep mode (the latter two are optional).
Some users prefer to have a specific image on their lock screen instead of the one displayed by default. To change the lock screen image or select a slideshow of pictures (Windows 10 and Windows 11 only), choose your version of Windows from the following list.
Windows 11
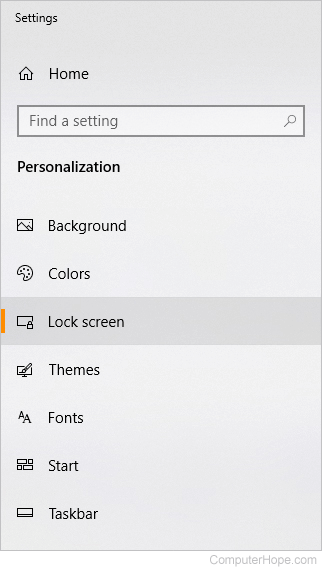
- Press the Windows key, type lock screen settings, and press Enter.
Alternatively, press Windows key+I to open Settings, select Personalization in the left navigation menu, scroll down on the right side, and click the Lock screen option.
- To the right of Personalize your lock screen, click the drop-down menu.
- In the drop-down menu, select Picture or Slideshow.
If you select picture:
- Choose one of the recent images shown, or click the Browse photos button.
- Navigate to the location of the picture file, select the desired picture, then click the
 button.
If you chose slideshow:
- One or more folders are listed as the location of pictures to generate the slideshow. If you don’t want to use a folder, click the Remove button (A) next to the folder you want to remove.
To choose a different folder, click the Browse button (B) next to Add an album for your slideshow.
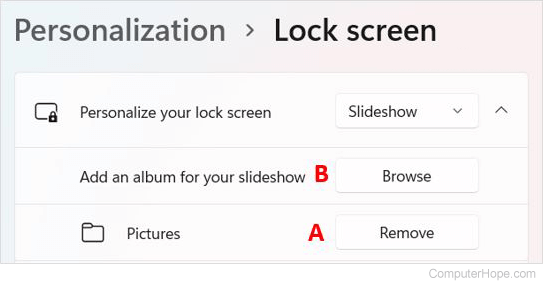
- Navigate to and select the folder containing your pictures, and click the
 button.
Windows 10
- Press the Windows key, type Themes and related settings, and press Enter. Or, press Windows key+I to open Settings, and click Personalization.
- On the left side of the Settings window, click the Lock screen option.
- In the middle of the screen, under Background, click the
 on the right side of the box.
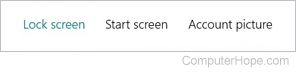
 - A drop-down menu like the one below should appear. Choose Picture or Slideshow.
If you chose picture:
- Choose one of the suggested images, or click the
 button.
 - Navigate to and select the desired picture, and click the button.
If you chose slideshow:
- Choose one of the folders presented to you, or click the
 button next to Add a folder.
 - Navigate to and select the folder containing your pictures, then click the button.
Windows 8 and 8.1
- Press the Windows key, type Change PC settings, and press Enter.
- In the PC settings menu, on the left, select Personalize.
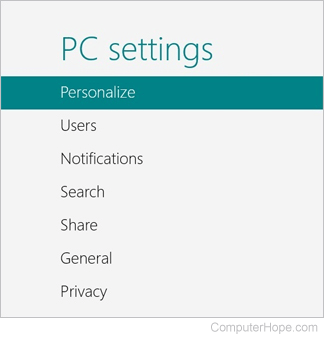
- To the right of the PC settings section, click the Lock Screen option.
- Choose one of the images suggested, or click the button located in the lower-right corner.
- Navigate to and select the desired picture file, and click the button.
Windows 7
Note
To change the Windows login screen in Windows 7, you need to be comfortable with editing the Windows registry. We also highly recommend anyone new to the registry become familiar with the Windows registry basics. Before making any changes, we recommend you back up the registry.
- How to back up and restore the Windows registry.
Note
The lock screen image for Windows 7 may not exceed 256 kB.
- Press the Windows key, type regedit, and press Enter.
- In the Registry Editor, navigate to HKEY_LOCAL_MACHINE\SOFTWARE\Microsoft\Windows\CurrentVersion\Authentication\LogonUI\Background, as shown in the screenshot, highlighted in blue.
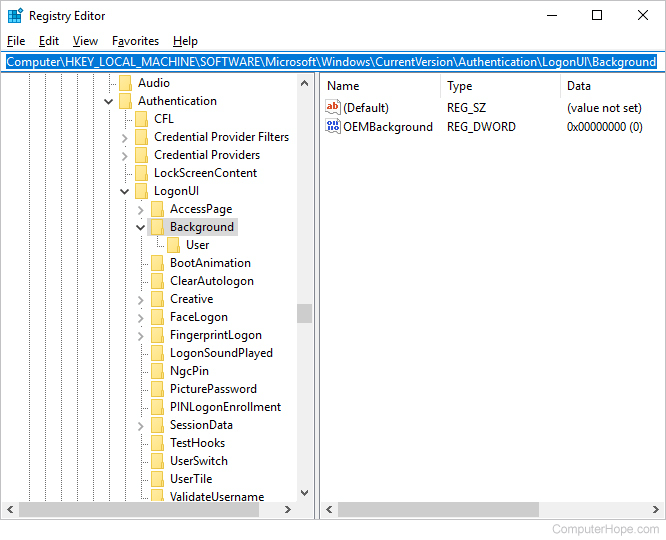
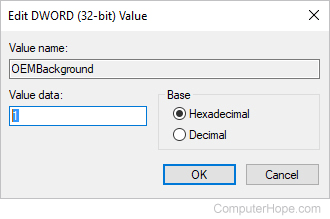
- On the right side of the screen, double click OEMBackground.
- Set the value to 1, then click the
 button.
- Close the Registry Editor window.
- Press the Windows key+E to open Windows Explorer.
- Click your primary drive, then the Windows folder, then the System32 folder.
- Right-click in the blank area to the right of the file list and select New in the pop-up menu.
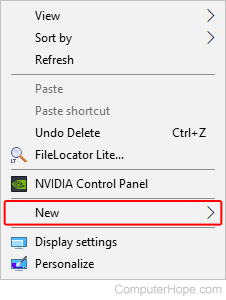
- Select the
 option.
 - Set the name of the newly created folder to be info.
- Open the info folder and create another new folder inside it, setting the name of that new folder to be backgrounds.
- Locate the image you want to put on your lock screen.
- How to find a file on a computer.
- Save that image as backgroundDefault.jpg and then move it into the backgrounds folder you created in step 11 above.

(Image credit: Windows Central)
On Windows 11, when the computer starts, you will stumble upon the Lock screen that includes the date and time, app status, and image background.
Although the default configuration will be enough for most users, it’s also possible to customize various aspects of the feature. For example, you can show personal pictures, choose which app show status, and you can even prevent the Sign-in screen from displaying the Lock screen background if that’s something you want.
In this Windows 11 guide, we will walk you through the steps to customize the Lock screen on your laptop or desktop computer.
- How to customize background for Lock screen
- How to customize app status for Lock screen
- How to enable or disable background image for Sign-in screen
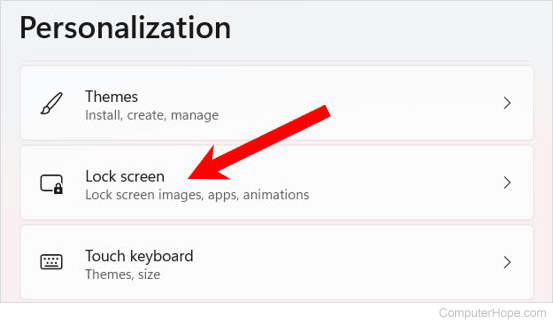
How to customize background for Lock screen
On Windows 11, you can customize the background in at least three different ways, including using Windows Spotlight to sync and show images from the cloud, custom background images, or you can display a collection of personal pictures.
Windows Spotlight
To enable Windows Spotlight in the Lock screen, use these steps:
- Open Settings.
- Click on Personalization.
- Click the Lock screen page on the right side.

- Use the «Personalize your lock screen» setting and select the Windows Spotlight option.
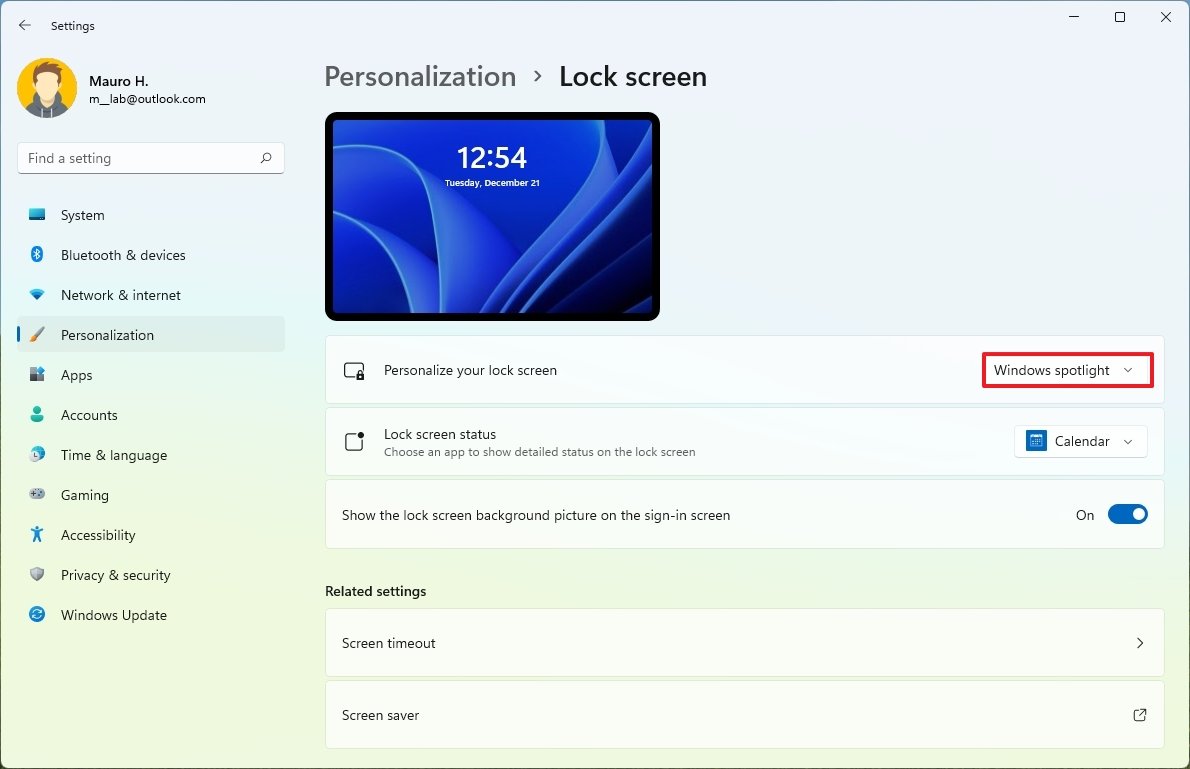
Once you complete the steps, the feature will periodically download and show new background images.
Custom background image
To use a custom background image in the Lock screen, use these steps:
- Open Settings.
- Click on Personalization.
- Click the Lock screen page on the right side.
- Use the «Personalize your lock screen» setting and select the Picture option.
- Click the Browse photos button.
- Select the image to set as the new Lock screen background.
- Click the Choose Picture button.
- Clear the Get fun facts, tips, tricks, and more on your lock screen option.
After you complete the steps, the Lock screen will show the image you selected in the settings.
Collection background images
To show a collection of images in the Windows 11 Lock screen, use these steps:
- Open Settings.
- Click on Personalization.
- Click the Lock screen page on the right side.
- Use the «Personalize your lock screen» setting and select the Slideshow option.
- (Optional) Click the Remove button for the «Pictures» folder.
- Click the Browse button.
- Select the folder with the collection of images to use as a slideshow for the Lock screen.
- Click the Choose this folder button.
- Clear the Get fun facts, tips, tricks, and more on your lock screen option.
- (Optional) Under the «Advanced slide settings» section, check the Include camera roll folder from this PC and OneDrive option.
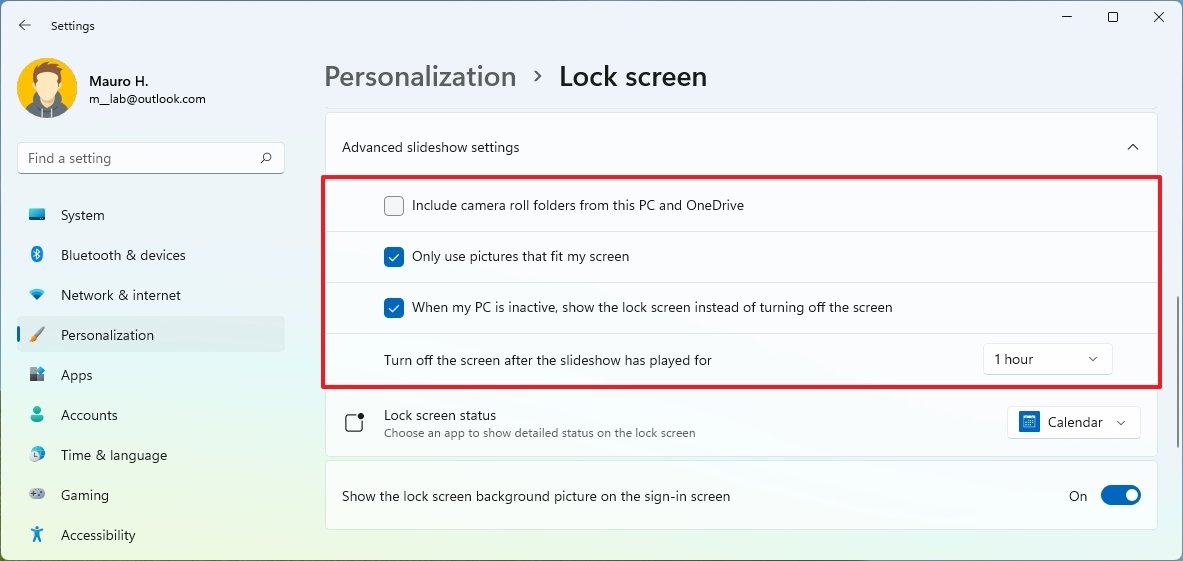
- (Optional) Clear the Only use pictures that fit my screen option to show all the images from a collection.
- (Optional) Check the When my PC is inactive, show the lock screen instead of turning off the screen option.
- (Optional) Use the «Turn off the screen after the slideshow has played for» setting to select the time before turning off the display after playing the slideshow.
Once you complete the steps, the Lock screen will rotate the collection of images in the background, and it’ll turn off the display according to your configuration.
How to customize app status for Lock screen
To decide the apps that can show status in the Lock screen, use these steps:
- Open Settings.
- Click on Personalization.
- Click the Lock screen page on the right side.
- Use the Lock screen status setting and select the app that will show status in the Lock screen, including Weather, Mail, or Calendar.Quick note: The «None» option will disable the feature.
After you complete the steps, the Lock screen will show the status of the app you specified.
How to enable or disable background image for Sign-in screen
To prevent the Sign-in screen from showing a background image, use these steps:
- Open Settings.
- Click on Personalization.
- Click the Lock screen page on the right side.
- Turn on or off the Show the lock screen background picture on the sign-in screen toggle switch.
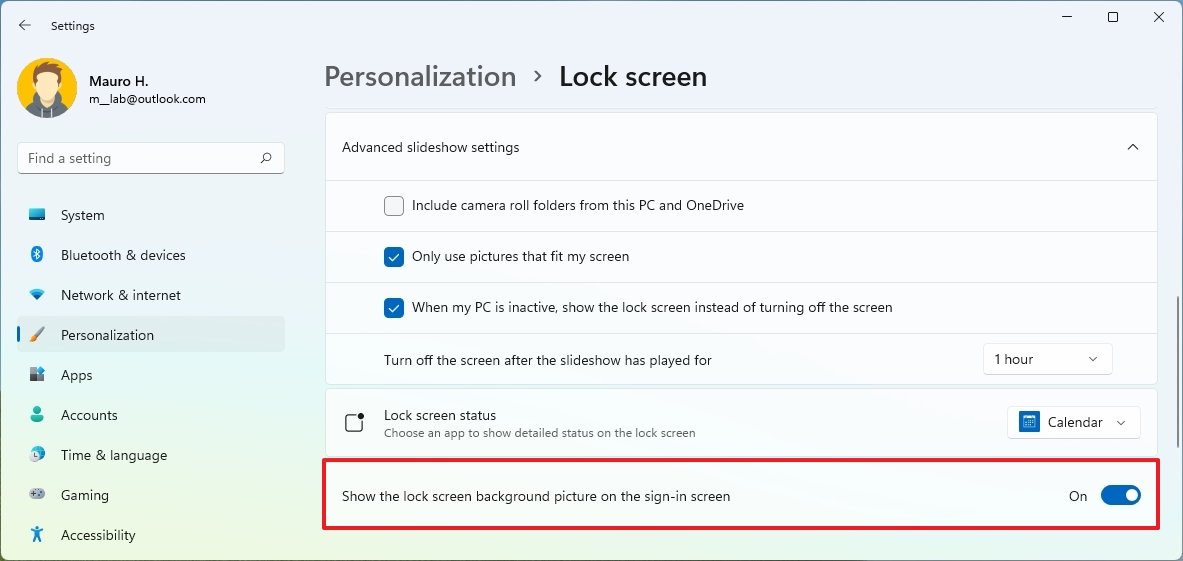
Once you complete the steps, the Sign-in screen will no longer show the same background images as the Lock screen.
More Windows resources
For more helpful articles, coverage, and answers to common questions about Windows 10 and Windows 11, visit the following resources:
- Windows 11 on Windows Central — All you need to know
- Windows 11 help, tips, and tricks
- Windows 10 on Windows Central — All you need to know
All the latest news, reviews, and guides for Windows and Xbox diehards.
Mauro Huculak is technical writer for WindowsCentral.com. His primary focus is to write comprehensive how-tos to help users get the most out of Windows 10 and its many related technologies. He has an IT background with professional certifications from Microsoft, Cisco, and CompTIA, and he’s a recognized member of the Microsoft MVP community.
The lock screen isn’t only a background image or slideshow on Windows 10. It also has the capacity of displaying widgets, notifications, the detailed information of the applications and custom wallpapers.
You can also access Cortana directly from this screen. So, it is necessary for you to know it. Next, I’d like to tell you to learn how to adjust lock screen on Windows 10.
Contents:
How to Set a Custom Lock Screen on Windows 10?
How to Adjust Screen Timeout Settings on windows 10?
How to Setup Cortana Lock Screen?
How to Adjust Screen Saver Settings?
How to Set a Custom Lock Screen on Windows 10?
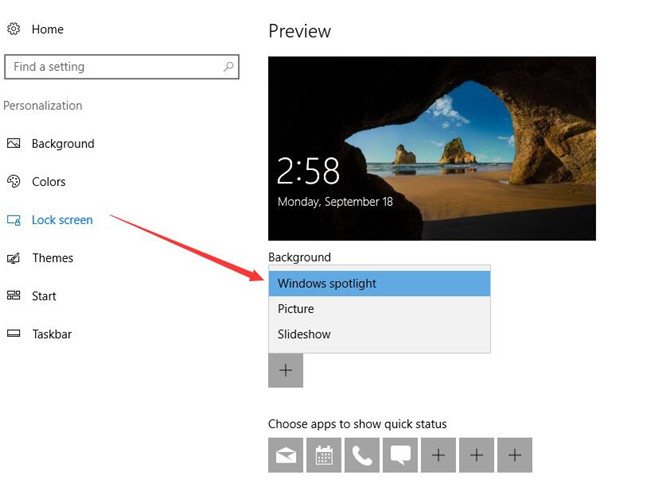
Step 1: Click the Windows key, head to Settings. Then you should select Personalization.
Step 2: On this window, click Lock screen. And you can also click Colors to customize Colors on Windows 10.

Step 3: Open the drop list of the Background.
The default setting of the background is Windows spotlight. It displays different background images and occasionally offers suggestions on the lock screen. If you prefer to various images on your lock screen, you can choose this option.
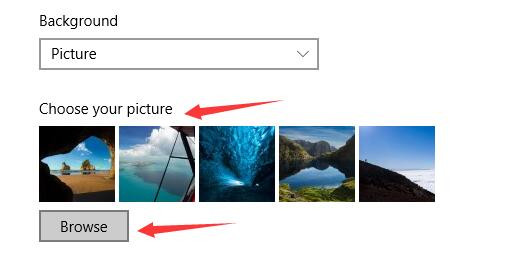
If you’d like to use a picture you want, you can choose the Picture. Then it will give some local pictures. And you can also browse your own picture from your folders. And you can have a personalized lock screen.
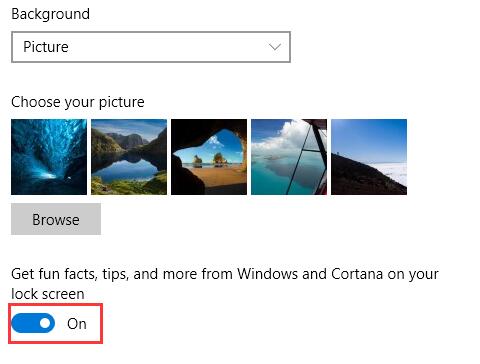
Get fun facts, tips, and more form Windows and Cortana on your lock screen
If you choose Picture under Background, you can set more things on your lock screen. If you turn on it, you can see some notifications on it. This will help you to get some information directly. And if you feel that it is too complex, you can turn off it.
The way to set Slideshow is similar to Picture. And if you do this, it can be changeable on your lock screen. Sometimes, it will give you a good view. But all is up to you.
If your option is Slideshow, you can head to Advanced slideshow settings.
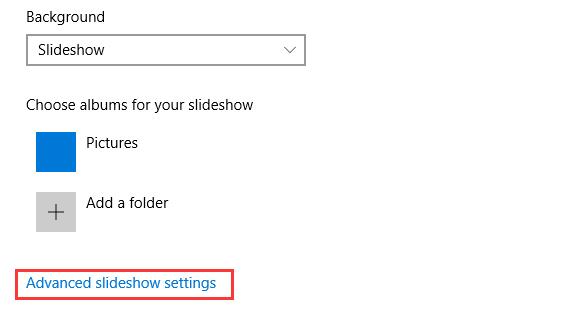
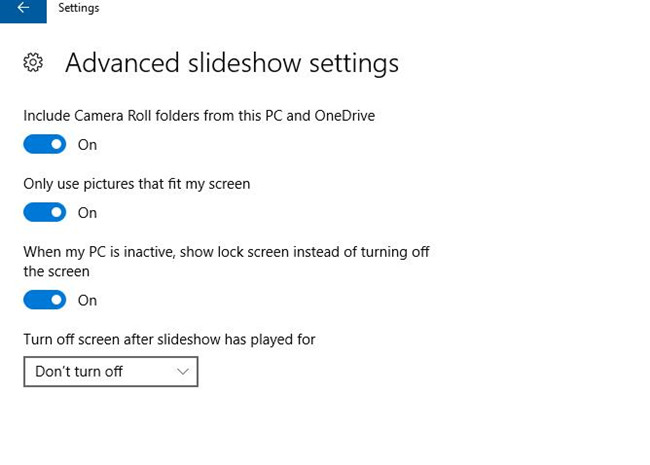
On this window, you can reset other options. You can use your picture that is only fit to your screen. And also you can turn off or open the screen after slideshow has played.
Tips: If you choose the Slideshow, you cannot change the screen timeout settings.
Read More: How to Setup Themes on Windows 10?
Step 4: Then you can customize more on this window.
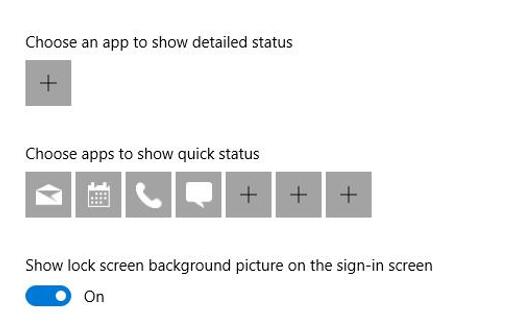
Choose an app to show detailed status
If you want to know the detailed information of one application on your lock screen, you can click the checkbox under choose an app to show detailed status. Then you can choose one, like weather, calendar, email, messaging, and more.
Choose apps to show quick status
If you want to get the status from the applications quickly, then you can add them to here.
Show lock screen background picture on the sign-in screen
This same lock screen background image is displayed on the sign-in screen that appears when you leave your lock screen by default.
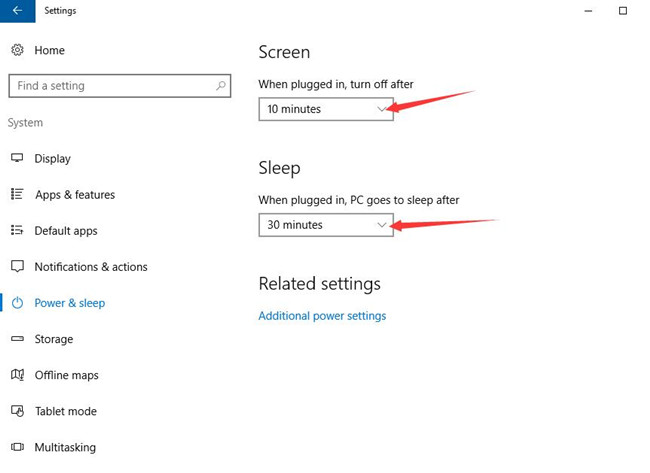
How to Adjust Screen Timeout Settings on windows 10?
The lock screen timeout and switches off your monitor after one minute by default on Windows 10. For your convenience, we need to change the screen timeout settings. Such as, while the Lock screen provides useful information and beautiful pictures, you probably noticed that your computer’s display turns off quickly.
Step 1: Click the Screen timeout settings. It will jump to the Power & Sleep settings.
Step 2: Now, you can change the timeout settings for your screen and sleep.
Screen: You can reset the screen timeout after power supply plugged and the computer does not work for a specific time.
Sleep: You can change the sleep timeout after power supply plugged and the computer does not work for a specific time.
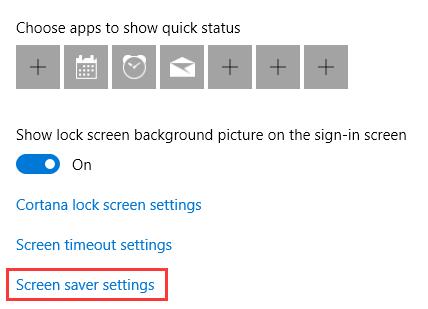
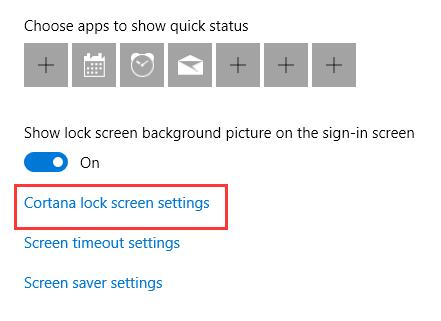
How to Setup Cortana Lock Screen?
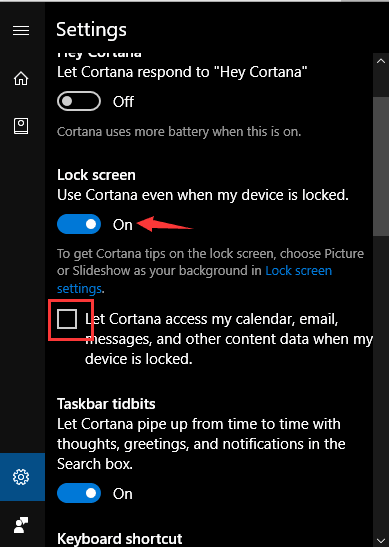
If you want to change the settings of Cortana on the lock screen, you can click Cortana lock screen settings.
You can turn on the option: use Cortana even when my device is locked. And if you need to walk into your calendar, email, messages, and other content data by Cortana under your device is locked, you should select the checkbox here. And here you can also customize basic settings for Cortana.
How to Adjust Screen Saver Settings?
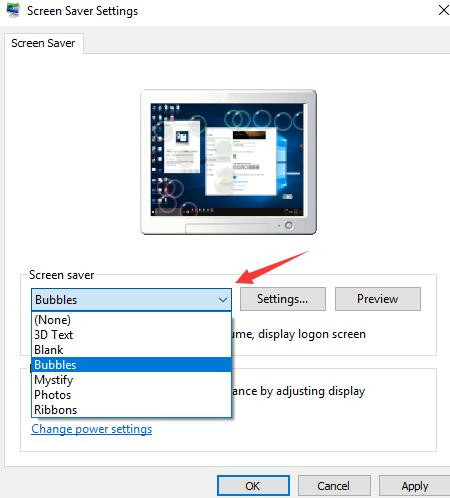
If you want to make your screensaver special, you can click Screen saver settings. Then you can go to this window. Here you can choose the mode of the screen saver.
Open the drop list of the Screen saver, you can select the one you like. If you are not sure, you can click Preview to view the effect. After that, you can make a decision. And you can also set the time of its working.
I think that it is fun to change lock screen on your desktop. And this tutorial will make it possible for you to have an optimized experience on customizing lock screen on Windows 10.
More Articles:
How to Disable Lock Screen on Windows 10?
Solved: Windows 10 Spotlight Lock Screen Not Working
[Solved] Cannot Change Lock Screen Picture on Windows 10