- To change the user folder name on Windows 11, you have to create a new local administrator account using the name as you want the user folder to appear from the “Other users” settings, transfer your files and settings from the old to the new account, delete the old account, and link your new account with your Microsoft account.
- Alternatively, you can also rename the user folder through the Registry by updating the “ProfileImagePath” string with the new name and then changing the account folder name from the “Users” folder. If you want to use this option, you’ll have to use a secondary administrator account.
On Windows 11, when you create a user account, the system also creates a folder to store the user’s data using the part of the account name. Although the folder name for the account is not relevant when using Windows 11 because the system assigns the name automatically, it may not be something everyone likes.
If you have to change the user profile folder name for some reason, Windows 11 includes at least two ways to complete the task. You can create a new local account using the name you want for the folder and transfer your data to the new profile. Or you can use the Registry to modify the settings and change the profile folder name (not recommended).
This guide will teach you the steps to change the user profile folder name on Windows 11.
- Change folder profile name on Windows 11
- Change folder profile name with Registry on Windows 11
Warning: It’s important to note that modifying the Windows Registry can cause serious problems if not used properly. It’s assumed you know what you’re doing and have created a full backup of your system before proceeding.
To rename the user profile folder on Windows 11, use these steps:
-
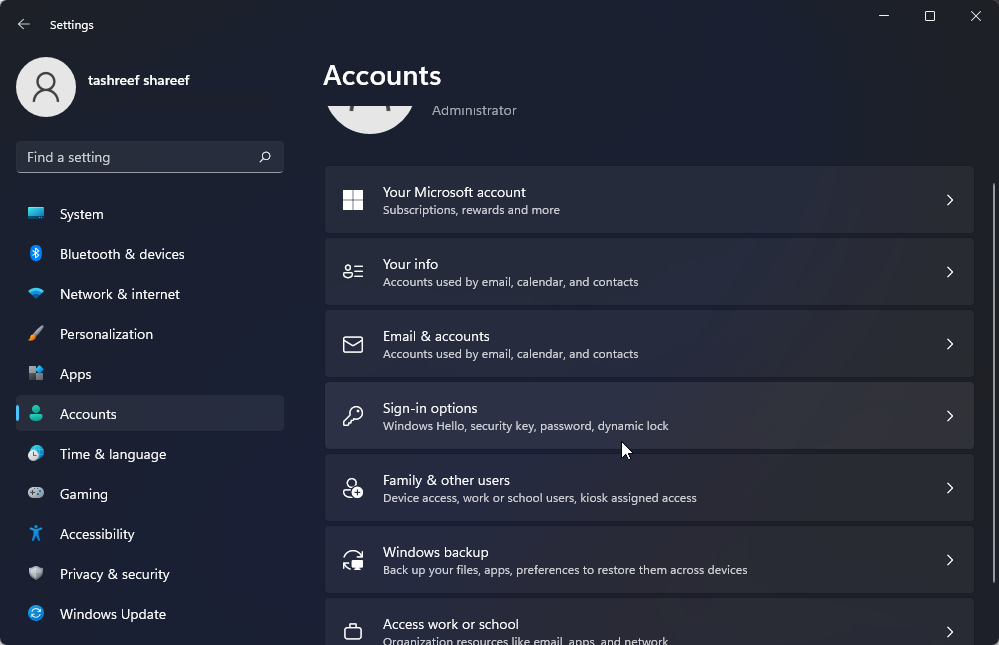
Open Settings on Windows 11.
-
Click on Accounts.
-
Click on the Other users page.
-
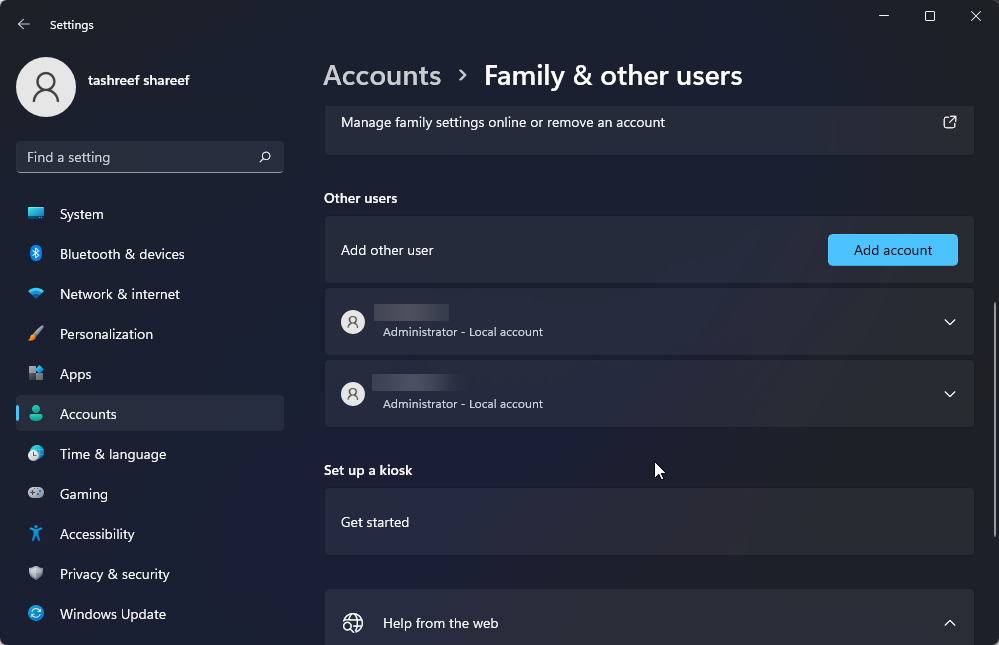
Click the Add account option.

-
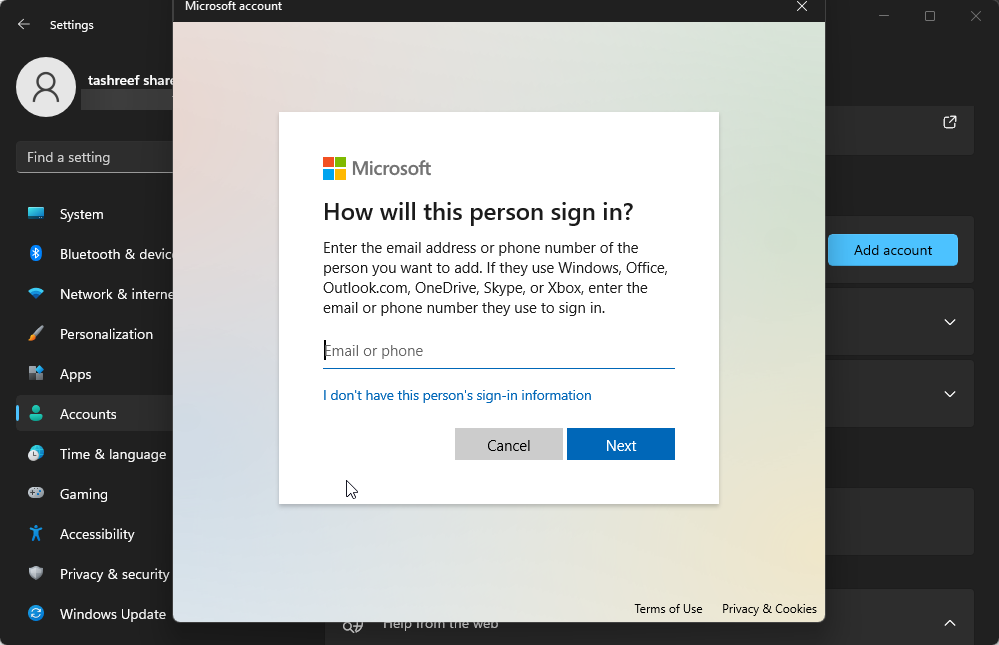
Click the “I don’t have this person’s sign-in information” option.

-
Click the “Add a user without a Microsoft account” option.
-
Confirm the name of the account. (This name will become your new folder name.)
-
(Optional) Skip creating a password.
-
Click the Next button.
-
Select the newly created local account and click the Change account type button.

-
Choose the Administrator option in the “Account type” setting.

-
Click the OK button.
-
Sign out of the account.
-
Sign in to the new account.


Once you complete the steps, you will have an account with a new folder name.
The last thing to do is transfer your files to the new account. You can do this from “Users” using File Explorer. You may also need to reconfigure some of your settings in the new account (as required).
After transferring your files, you want to delete the old account and link your Microsoft account to the new account.
Delete old account
To delete an account on Windows 11, use these steps:
-
Open Settings.
-
Click on Accounts.
-
Click on the Other users page.
-
Select the newly created local account and click the Remove button.

-
Click the “Delete account and data” button.

Once you complete the steps, the old account will be deleted, and you can use the same Microsoft account to link it to the new account.
Link your Microsoft account
To convert the local account to a Microsoft account on Windows 11, use these steps:
-
Open Settings.
-
Click on Accounts.
-
Click the Your info page.
-
Under the “Account settings” section, click the “Sign in with a Microsoft account” option.
-
Confirm your Microsoft account credentials.
Quick note: If you’re prompted to confirm the local account password, leave the field blank since the account doesn’t have a password.

After you complete the steps, you can start using your account with the proper folder name.
Change profile name with Registry on Windows 11
If you want to avoid creating a new account, transferring your files, and making other configurations, you may also be able to use the Registry to change the profile folder name. However, this is not recommended since you may experience unwanted behaviors.
To change the user profile folder name from Registry on Windows 11, use these steps:
-
Open Start.
-
Search for Command Prompt, right-click the top result, and select the Run as administrator option.
-
Type the following command to enable the built-in Administrator account and press Enter:
net user "Administrator" /active:yes

-
Sign out of the account to change the folder name.
-
Sign in with the newly activated built-in Administrator account (you don’t need a password).
-
Open Start.
-
Search for Command Prompt and click the top result to open the app.
-
Type the following command to determine the Security Identifier (SID) of the account to change the profile folder name and press Enter:
wmic useraccount get name,SID
-
Open Start.
-
Search for regedit and click the top result to open the Registry.
-
Browse the following path:
HKEY_LOCAL_MACHINE\SOFTWARE\Microsoft\Windows NT\CurrentVersion\ProfileList
-
Select the key showing the SID for the account to change the folder name.
-
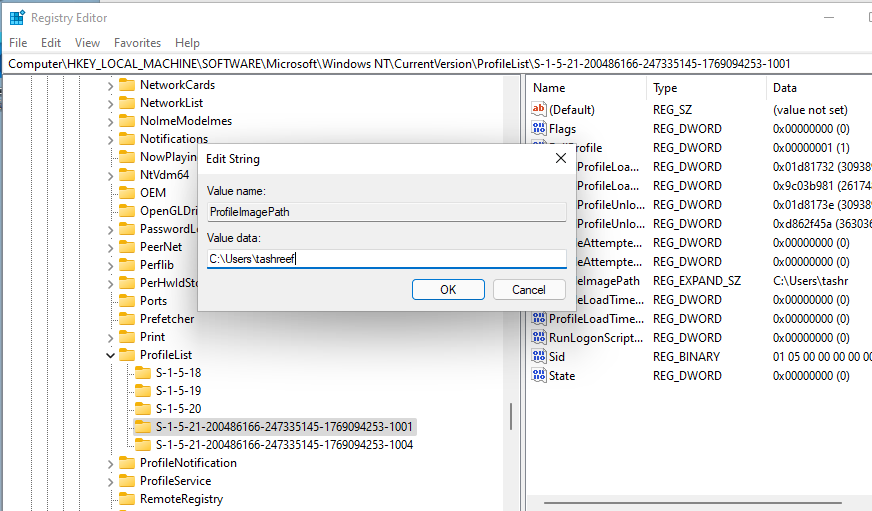
Right-click the ProfileImagePath and select the Modify option.
-
Change the name for the user profile folder without altering the path.

-
Click the OK button.
-
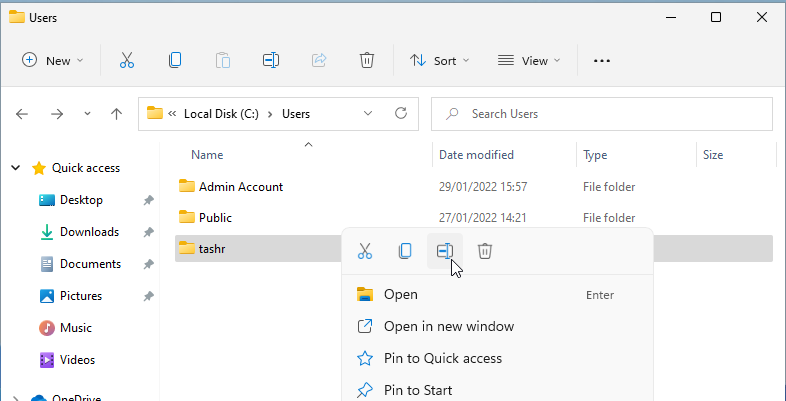
Open File Explorer (Windows key + E).
-
Browse to the following path:
C:\Users
-
Right-click the folder profile and select the Rename option.
-
Confirm the name for the folder exactly as you typed in the Registry key and press Enter.

-
Click the Continue button.
-
Sign out of the built-in Administrator account.
-
Sign in to the modified account.
-
Open Start.
-
Search for Command Prompt, right-click the top result, and select the Run as administrator option.
-
Type the following command to deactivate the built-in Administrator account and press Enter:
net user "Administrator" /active:no


After completing the steps, the account will reflect the new folder name. If applications point to the profile folder, you might need to update their settings with the new path.
If you’re stuck with a crummy user profile folder name on Windows 11, there are ways to change it to your liking.
When you create a new user account in Windows 11, the operating system (OS) automatically creates a new user profile folder in C:\Users\Username. However, this default user profile folder name is not always what you want.
Windows, by default, will use the first five characters of your user account name as the profile folder name. If you don’t like the user profile folder name, you can change it using a registry hack. Here we show you how to change the name of the user profile folder in Windows 11.
But First, Some Potential Issues That May Arise From These Steps
While the registry hack should help you successfully change your user account folder name, it can lead to some complications. For example, some of your Microsoft Store apps, including OneDrive and Outlook, can stop working.
As a quick fix, try to sign out and then sign in to your app. If that does not work, you’ll need to move the existing path and define the new correct path after changing the user folder name.
Also, create a restore point and exercise extreme caution while making changes to your user name folder. Incorrect modification to the Windows Registry can cause serious issues and may require reinstallation of the operating system.
How to Create a New Administrator User Account in Windows 11
To change your current user profile name, you need to log into a different administrator account. You cannot modify an existing user account profile path from the same account.
To do this, you can enable and use the built-in administrator account in Windows 11. If not, follow these steps to create a new administrator account in Windows 11.
To create a new administrator account:
- Press Win + I to open Settings.
- Open the Accounts tab in the left pane.
- Click on Family & other users in the right pane.

- Click on Add account under Other users. This option is useful if you want to create a local user account without Microsoft Account.
- Next, click on I don’t have this person’s sign-in information.
- Click on Add a user without a Microsoft account.
- Type a name for the user account. Leave the password field empty and click Next.
- Click on the new user account and click Change account type.
- Click the drop-down for Account type and select Administrator.
- Click OK to save the changes.
Now you can log in with your new administrator account. To do this, click on Start, click on the user profile name, and select Sign out. Now you can sign in with the new administrator account.
How to Change the User Profile Folder Name Using the Registry Editor
You can modify the registry entries associated with your user account to change the user profile folder name in Windows 11.
This process involves modifying your registry entries, so we recommend you to create a restore point. You can use the restore point to restore your PC if something goes wrong during the process.
To change the user profile folder name:
- Sign-out from your current user account and login with a built-in or newly created administrator account
- Next, press Win + R to open the Run dialog.
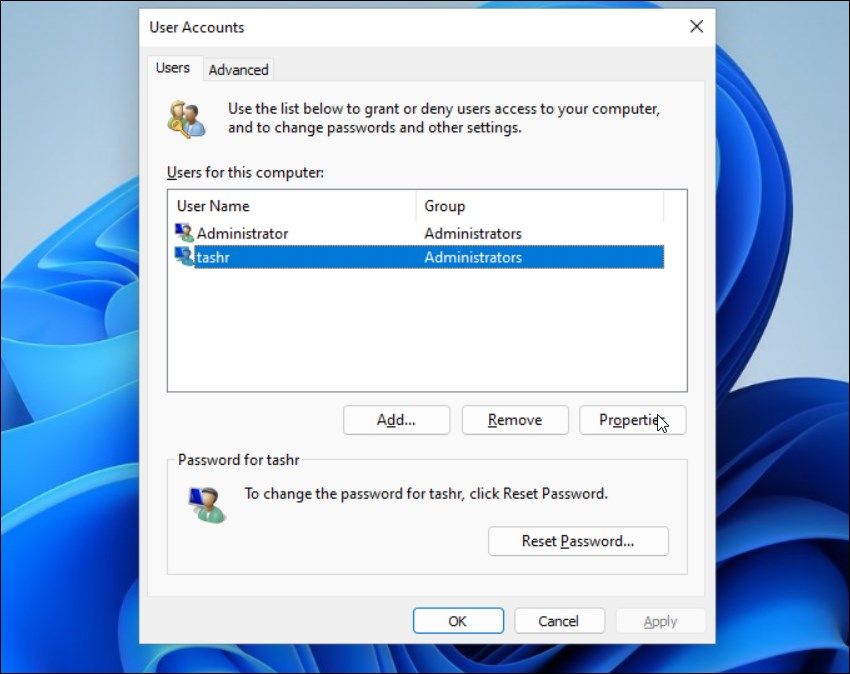
- Type netplwiz and click OK to open the User Accounts dialog.
- Here, select your user account and click on Properties.

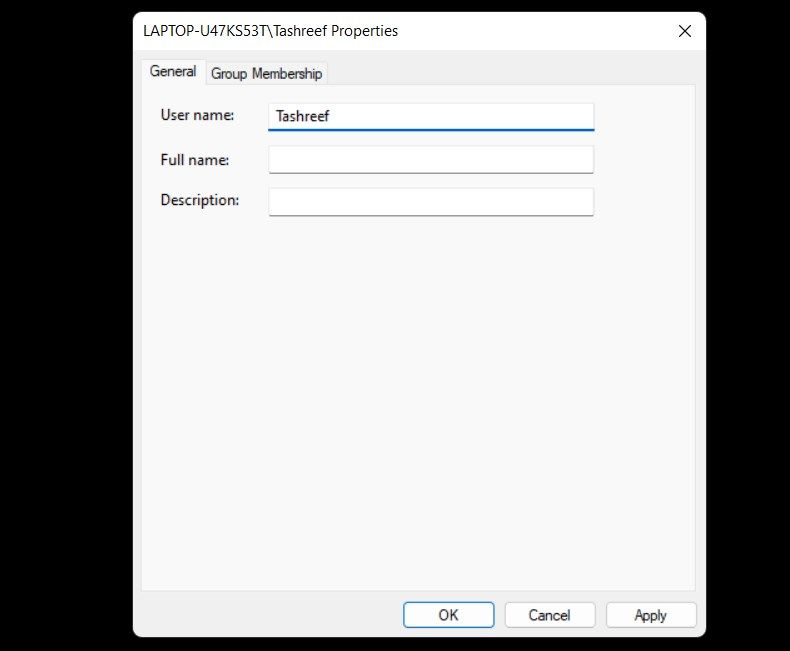
- In the User Properties dialog, you’ll see your User name and Full name.
- Type a name for your user name and click OK and Apply.

- Close the User Account dialog and preform a restart.
- Next, open the Command Prompt. To do this, press Win + R, type cmd and click OK.

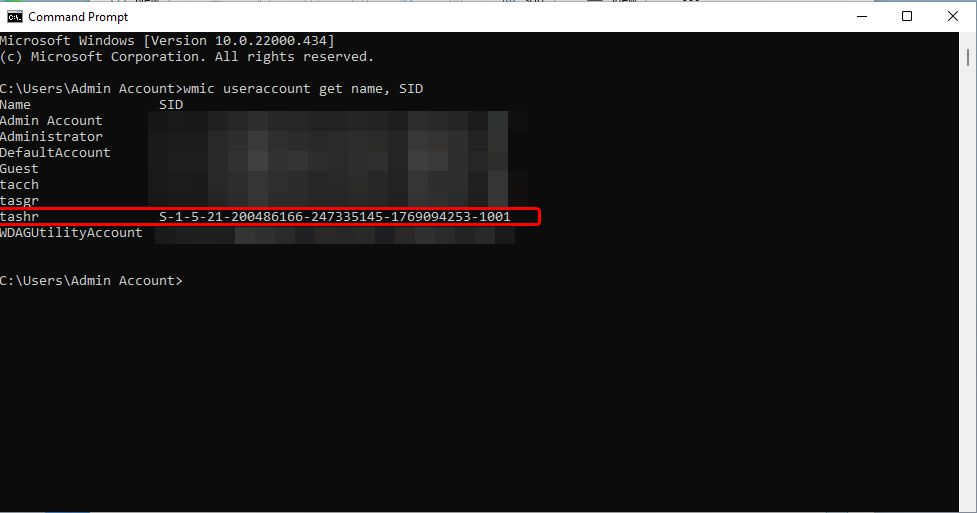
- In the Command Prompt window, type the following command to view SID (Security Identifier) for all user accounts:
wmic useraccount get name,SID - Here, note the SID for the user account you want to change the user profile folder name. In this case, the SID for the username tashr is S-1-5-21-200486166-247335145-1769094253-1001.
Now that we have the SID, we need to enter it into the Registry Editor. To do that, follow these steps:
- Press Win + R, type regedit and click OK to open Registry Editor.
- In the Registry Editor, navigate to the following location:
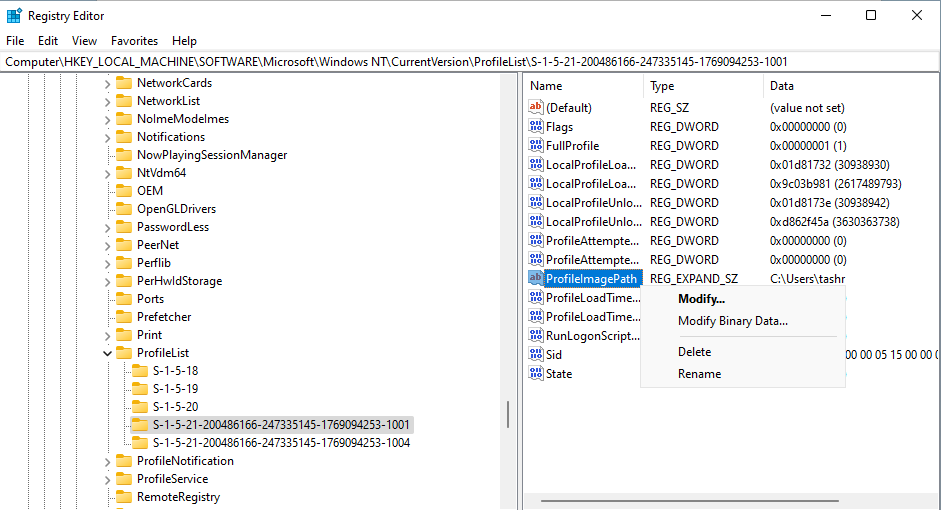
HKEY_LOCAL_MACHINE\SOFTWARE\Microsoft\Windows NT\CurrentVersion\ProfileList - Inside the ProfileList key, locate and click on the key name identical to the SID you made a note of earlier.
- In the right-pane, right-click on ProfileImagePath value and select Modify.

- Enter a name you want for the profile folder and click OK.

- Close the Registry Editor and Command Prompt window if open.
- Next, press Win + E to open File Explorer and navigate to C:\Users\.

- Select your user profile and press F2 to rename. Enter a new name for your user profile (it must match the user name entered in the Registry Editor).
- Click away and then click Continue to save the changes.
You may sometimes encounter the «You can’t perform this action» error when renaming the folder. This error often occurs if you switch to a different administrator account without signing out from the primary user account. Alternatively, restart your PC and repeat the steps to rename the user profile folder without the error.
Next, log out from your current account and sign in to the user account with the new user folder name. Open File Explorer and navigate to C:\Users\, and you should be able to use the previous profile with the new pathname.
Renaming the Default User Profile Folder in Windows 11, Made Easy
While you can rename the user account in Windows 11 using the Control Panel, doing so will not change the user profile folder name. For this, you need to modify the ProfileImagePath value in the Registry Editor with a different administrator account. Once done, you can remove the new administrator user account to declutter your login screen.

If you made a mistake (or you fancy a change), you can rename your Windows 11 user folder name. This guide explains how.
Your user folder name might seem unimportant, but it’s actually a big deal.
Every file path to files in your Documents, Downloads, or Desktop folders references it. If you made a silly username or created a username with a typo, you might want to change it. You might even be looking to change it for privacy reasons, switching to a user folder name that doesn’t reference your name.
Whatever your reasoning is, changing your user folder name on Windows 11 isn’t as straightforward as changing your account name, but it’s still possible.
To change your user folder name in Windows 11, follow the steps below.
Why Should You Change Your User Folder Name in Windows?
Your user folder name is the name of the folder that contains your personal files and settings on Windows 11. It’s usually based on your Microsoft account name or local account name when you first set up your PC. However, changing your account name automatically doesn’t change your user folder name.
This can cause problems if you want to keep your user folder name consistent with your account name. For example, if you share your PC with others, they might see your old user folder name. If you use programs or shortcuts that rely on the user folder path, they might not work correctly if the path changes.
There are two main methods to change your user folder name on Windows 11. The first involves renaming the account via File Explorer, while the second involves changing the Windows Registry.
Both methods contain some level of risk to your system integrity. Ensure you back up your data and create a system restore point before proceeding.
The quickest way to rename your user folder on Windows 11 is to create a new local account and use that account to help you rename your folder. That’s because you cannot rename a user folder for a user profile you’re actively using.
To rename your user folders on Windows 11:
- Open the Settings app via the Start menu.

- In Settings, go to Accounts > Family & other users > Add account.

- Choose I don’t have this person’s sign-in information and then Add a user without a Microsoft account.

- Enter a new username and password for the new local account and click Next.
- Sign out of your current account and sign in to the new local account.
- Open File Explorer and go to C:\Users folder.
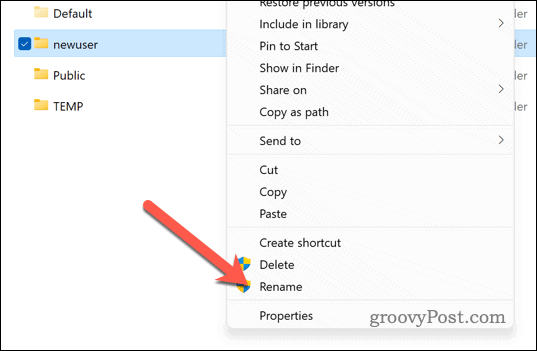
- Right-click on your original user folder and go to Show more options > Rename.

- Enter a new name for your user folder and press Enter.
- Wait for the process to complete. Once done, sign out of the new local account and back into your original account.


Once you’ve renamed your old user profile, you can delete the spare account you created.
How to Change User Folder Name in Windows 11 Using the Registry Editor
If you’d rather avoid setting up a new account to rename your old user folder, you can try and use the Registry Editor instead.
Any steps involving the Registry contain risk, so you should back up your Registry before proceeding.
To change the user folder name in Windows 11 using the Registry Editor:
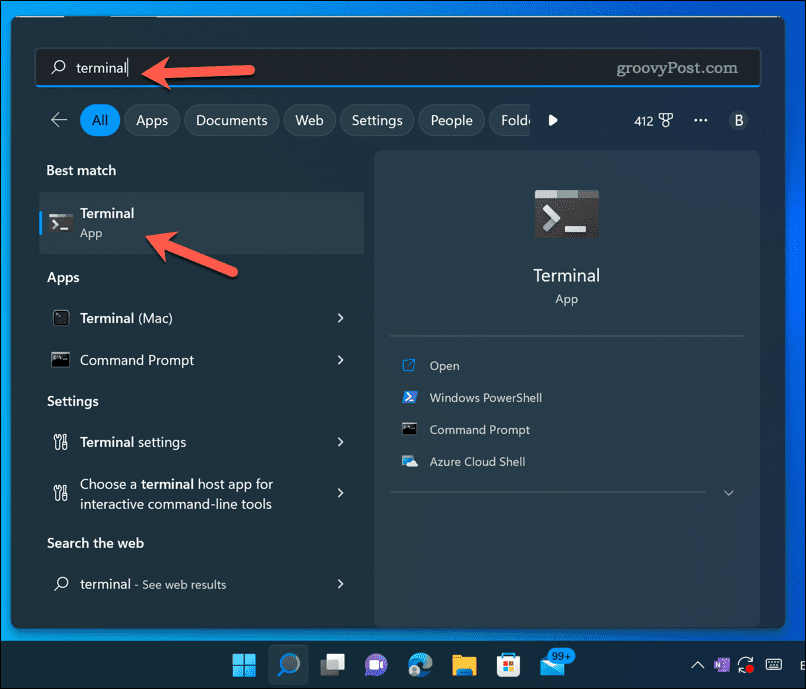
- From the Start menu, type cmd, powershell, or terminal and select the Best Match result.

- In your preferred terminal window, type: net user administrator /active:yes to enable the built-in Administrator account.

- Sign out of your current account and sign in to the Administrator account.
- To open the Registry Editor, press Windows + R, type: regedit, and click Run.

- In the Registry Editor, navigate to HKEY_LOCAL_MACHINE\SOFTWARE\Microsoft\Windows NT\CurrentVersion\ProfileList.
- Find the subkey that matches your original user profile by looking at the ProfileImagePath value on the right pane.
- Double-click ProfileImagePath and change its value data to match the new name of your user folder (for example, C:\Users\NewName).

- Close the Registry Editor and open a new File Explorer window.
- In File Explorer, open the C:\Users folder and rename your original user folder to match the new name you entered in the Registry Editor.
- Sign out of the Administrator account and sign back into your original account.


You may want to disable the built-in Administrator account afterward by opening a new terminal window and typing: net user administrator /active:no.
Managing Your User Profile on Windows 11
Changing or renaming your user folder name on Windows 11 can be tricky, but thanks to the steps above, it isn’t impossible (as long as you follow these methods carefully). Remember to back up your data before making any changes, just in case something goes wrong.
Unsure what accounts are available on your PC? You can check your user accounts on Windows 11 and delete or disable any accounts you aren’t using.
Want to stop other users from changing your PC settings? You can block Windows settings from specific users on Windows 11 to give yourself more control. However, you may need to check those users’ account types before you proceed.
![]()

В этой статье вы узнаете, как изменить имя папки профиля пользователя в Windows 11.
Действительно, изменить имя пользователя или папку профиля пользователя не так просто. Но здесь мы предоставим вам пошаговое руководство для выполнения этой задачи без проблем. Папка профиля пользователя содержит различные настройки, связанные с учетной записью пользователя.
Папка профиля пользователя находится в каталоге C:\Users\. Эта папка содержит и хранит различные Настройки и Предпочтения пользователя.
Изменение имени папки профиля пользователя (Windows 11)
Теперь, не отвлекаясь, давайте начнем.
- Щелкните правой кнопкой мыши значок Пуск на панели задач и выберите в контекстном меню пункт Выполнить.
- Затем введите netplwiz и нажмите OK.

- В разделе Список Пользователи для этого компьютера вы найдете список всех пользователей на вашем компьютере,
- На следующем шаге выберите свое имя пользователя и нажмите на Свойства.
- Если кнопка Свойства отключена, в поле Пользователи необходимо ввести имя пользователя, а пароль для использования этого компьютера должен быть снят. Итак, сначала проверьте его, а затем нажмите кнопку «Свойства».

- Теперь откроется окно свойств. Имя пользователя, которое является именем папки профиля пользователя, появится на экране. Итак, измените имя пользователя и нажмите OK.
- Здесь нам также нужно изменить имя папки пользователя, которое сохраняет данные, связанные с различными настройками. Таким образом, эти действия будут выполняться в реестре Windows, часто известном как Regedit. Для этого нам потребуется встроенная учетная запись администратора Windows 11.
- Встроенная учетная запись администратора в Windows 11 отключена по умолчанию. Итак, вам нужно сначала включить его, чтобы продолжить дальше.
Включение встроенной учетной записи администратора
- Чтобы включить учетную запись администратора в Windows 11, щелкните правой кнопкой мыши значок Пуск и выберите Выполнить в контекстном меню. Теперь снова введите netplwiz и нажмите Ok
- В окнах Учетные записи пользователей выберите Дополнительно в верхней части, а затем нажмите Дополнительно в разделе Расширенное управление пользователями.

- Теперь в окне Локальные пользователи и группы (Локальные) необходимо дважды щелкнуть папку Пользователи слева.
- Дважды щелкните Администратор, как показано ниже.

- Теперь снимите флажок Рядом с пунктом Учетная запись отключена, а затем нажмите OK.

- Теперь можно закрыть окно Локальные пользователи и группы (локальные), так как вы успешно включили встроенную учетную запись администратора.
- Затем откройте меню «Пуск» и щелкните правой кнопкой мыши имя учетной записи в нижней части меню «Пуск».
- Затем, чтобы переключить учетную запись для входа, выберите Администратор. (Если вы еще не вошли в учетную запись администратора, Windows 11 создаст ее для вас. Эта подготовка не имеет никакого отношения к вашему основному счету)

- Теперь, прежде чем продолжить, выйдите из основной учетной записи. Выполните поиск в командной строке в поле поиск. Это приведет к открытию командной строки Windows.

- Чтобы просмотреть идентификатор основной учетной записи, введите сеанс запроса и нажмите Enter.

- Теперь введите команду logoff, за которой следует ваш идентификационный номер. В приведенном ниже примере идентификационный номер пользователя равен 2, поэтому команда будет logoff 2. В результате вы сможете полностью выйти из своей основной учетной записи.

- Перейдите > > каталог в проводнике файлов.
This PCLocal Disk (C:)Users - Теперь выберите папку основной учетной записи и измените ее имя на новое имя пользователя, нажав клавишу F2 на клавиатуре.

- Здесь пользователь изменил свое имя пользователя с muham на Ce7in.
- Перейдите в поле Поиск и введите Редактор реестра. Затем откройте приложение редактора реестра.
- Скопируйте и вставьте этот путь в адресную строку редактора реестра вверху, как показано ниже на рисунке Компьютер\HKEY_LOCAL_MACHINE\SOFTWARE\Microsoft\Windows NT\CurrentVersion\ProfileList. Нажмите клавишу Enter и перейдите в папку Profilelist на левой панели, как показано ниже.

- Выберите папку Profilelist и нажмите комбинацию клавиш SHIFT+F10. Затем выберите «Найти» в контекстном меню. Теперь введите свое старое имя пользователя в поле Найти что. В этом примере старое имя пользователя — muham.

Типа того:

- На экране будет выделен раздел ProfileImagePath в редакторе реестра, содержащий путь к папке пользователя. Кроме того, измените его, щелкнув его правой кнопкой мыши и выбрав Изменить.

- Теперь в разделе «Данные о значении» замените старое имя пользователя новым, как указано ниже, и нажмите «ОК».

- Теперь вам нужно перезагрузить / перезагрузить компьютер. Кроме того, не забудьте закрыть все открытые окна перед перезагрузкой.
- Если вы вошли в систему с помощью встроенной учетной записи администратора, вы можете легко войти в свою основную/основную учетную запись, перейдя в меню «Пуск» и щелкнув правой кнопкой мыши учетную запись администратора.
Поздравляю! Вы успешно изменили имя папки профиля пользователя на компьютере с Windows 11.
Заключение
Действительно, изменение имени папки профиля пользователя в Windows 11 является сложной задачей. Но вы можете сделать это легко, выполнив шаги, упомянутые выше.
Содержание статьи
- Изменение имени папки профиля пользователя (Windows 11)
- Включение встроенной учетной записи администратора
- Заключение
Друзья, предлагаю рассмотреть в этой статье рабочие способы, как переименовать папку пользователя в Windows 11. Настоятельно рекомендую прочитать предисловие к этой статье – сам столкнулся с проблемой и перебрал возможные варианты. Так что есть чем поделиться. А вам останется только все внимательно повторить за мной.
Содержание
- Предисловие
- Способ 1 – Переезд пользователя
- Шаг 1 – Копируем данные
- Шаг 2 – Создаем пользователя
- Шаг 3 – Выдаем права
- Шаг 4 – Переходим в нового пользователя
- Шаг 5 – Восстановление
- Шаг 6 – Удаление старого пользователя
- Способ 2 – Без бубнов с новыми пользователями
- Задать вопрос автору статьи
Предисловие

Недавно переставил человеку новенькую Windows 11 и чего-то отдал ее без предварительной настройки. В итоге пользователь обозвал себя «Владимир Великий» (именно так дословно) и пошел всем радостно показывать свое творение.
Но эта история не о величии, а о том, что пользователей изначально лучше называть латиницей, а уже потом переименовывать как угодно. Суть сюжета – некоторые игры перестали запускаться. Основная причина – папка пользователя написана кириллицей (с использованием русских букв), а для запуска многих игр в пути файлов игры должны быть исключительно латинские буквы.
На деле же оказалось все еще страшнее – просто так переименовать пользователя не получится, папка сохраняет прежнее название. Папку тоже переименовывать просто так нельзя, есть риск получить проблемы в работе операционной системы. Пришлось экспериментировать.
Способ 1 – Переезд пользователя
Суть этого способа – мы создадим нового пользователя в системе с правильным именем (только латинские буквы) и попробуем «переехать» на него. Процесс немного трудоемок (но проще чем переставлять заново всю WIndows 11), поэтом я его разделил на отдельные шаги.
Дописываю уже после публикации. Для создания пользователя понадобятся права администратора. Если у вас их почему-то нет, рекомендую взглянуть Способ 2 – в самом начале там изложен простой способ получения прав администратора. А уже после этого можно вернуться сюда.
Шаг 1 – Копируем данные
Часть данных пользователя хранится в его личных папках. Когда мы создадим нового пользователя, у него не будет доступа к текущему рабочему столу, папке Загрузки, Изображения, Документы. Поэтому рекомендую скопировать все самое необходимое из этих папок и Рабочего стола куда-нибудь в корень диска C или D (если совсем не уверены – на флешку или внешний диск). После завершения операции мы их перенесем обратно.
Можно вообще перейти через Проводник по пути C://Пользователи/имя_вашего_текущего_пользователя и скопировать все содержимое этой папки. Т.к. именно здесь зачастую хранятся какие-то сохранения к играм и настройки программ. Но делаем это с головой.
Шаг 2 – Создаем пользователя
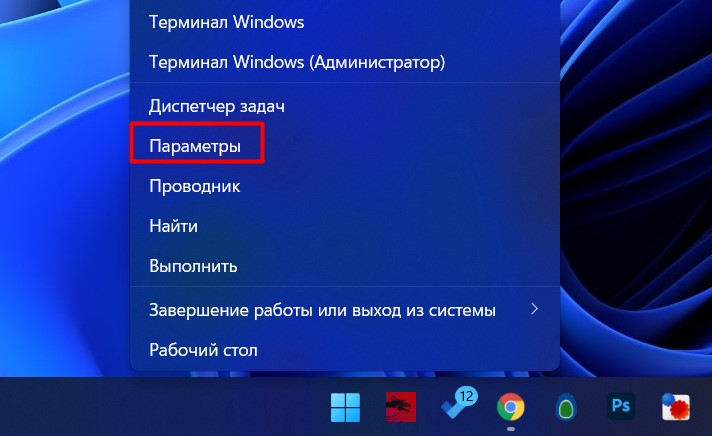
- Переходим в Параметры (можно использовать сочетание клавиш + I или же щелкнуть правой кнопкой по Пуску и выбрать Параметры).
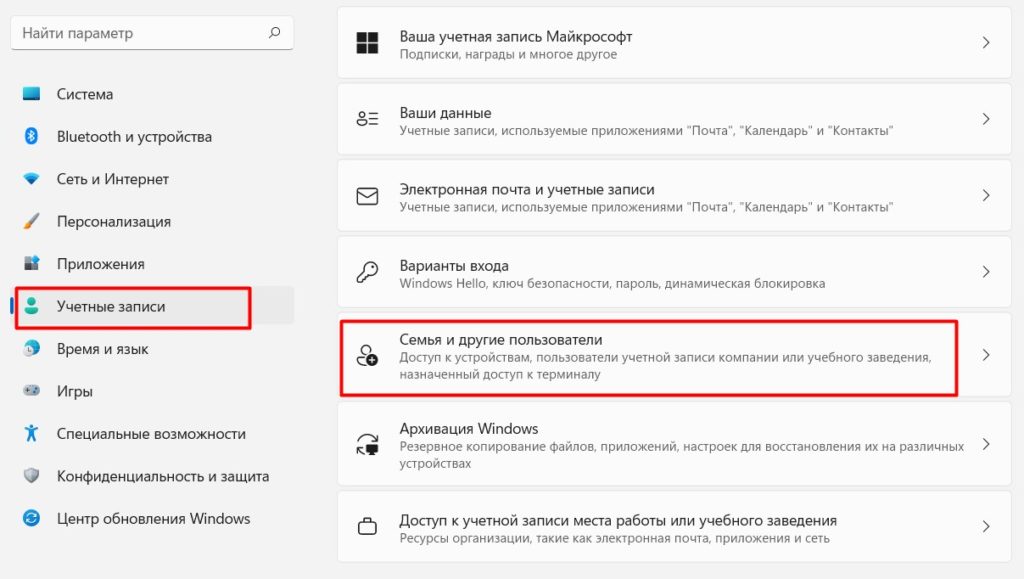
- Учетные записи – Семья и другие пользователи.
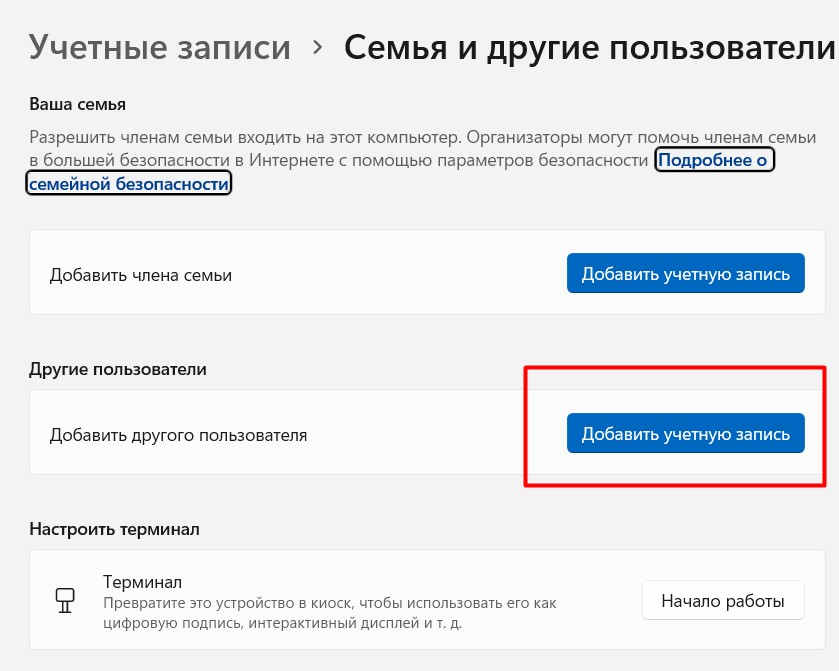
- В разделе Другие пользователи – Добавить учетную запись
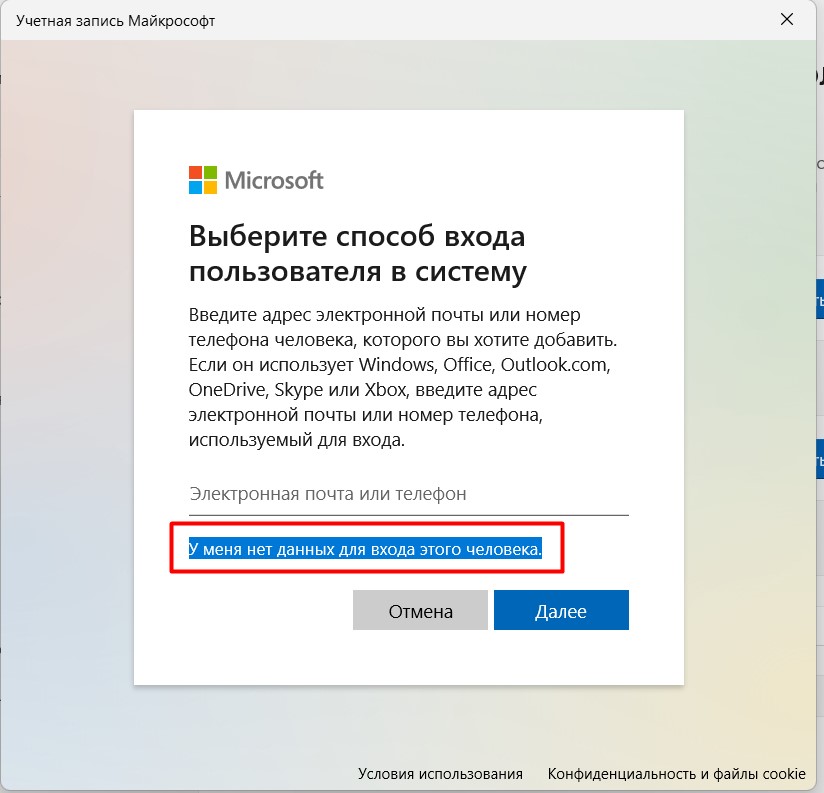
- Нам нужно создать локального пользователя. Поэтому в первом окне выбираем «У меня нет данных для входа этого человека.»
- «Добавить пользователя без учетной записи Майкрософт».
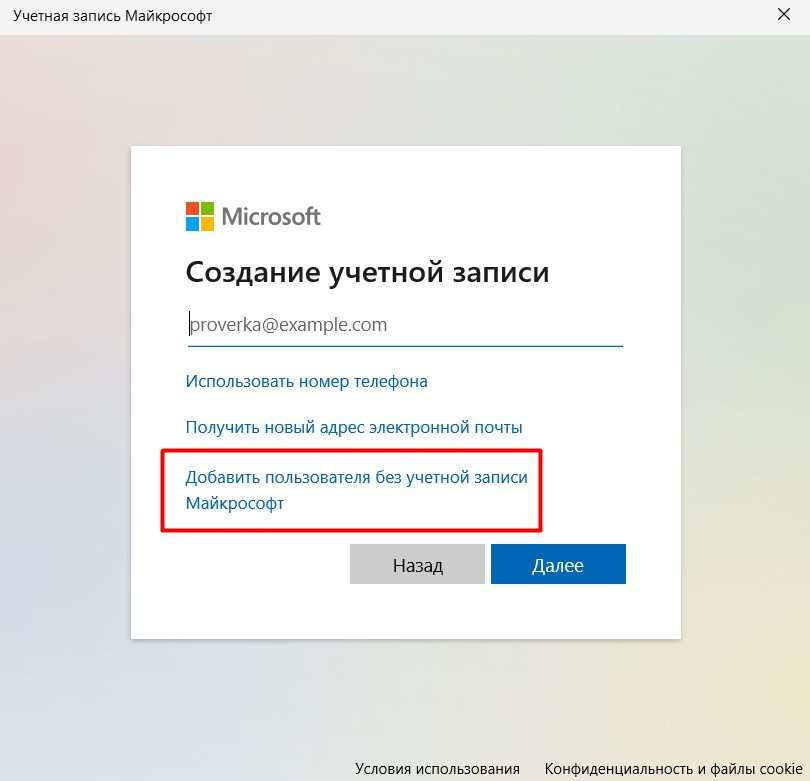
- Создаем пользователя с нужным вам именем будущей папки. Обязательно изначально пишем его имя латинскими буквами, чтобы потом не было проблем.
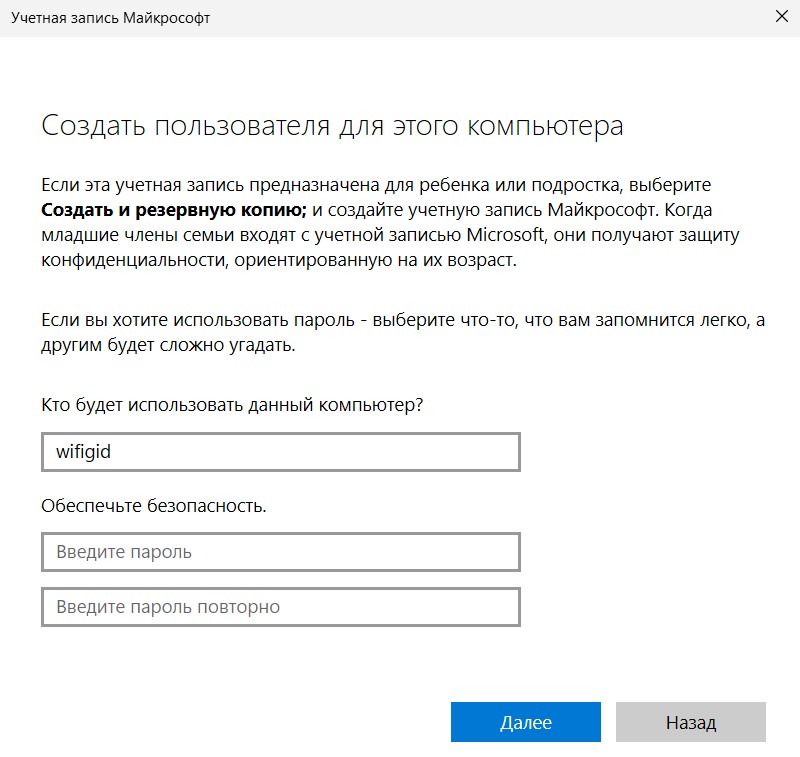
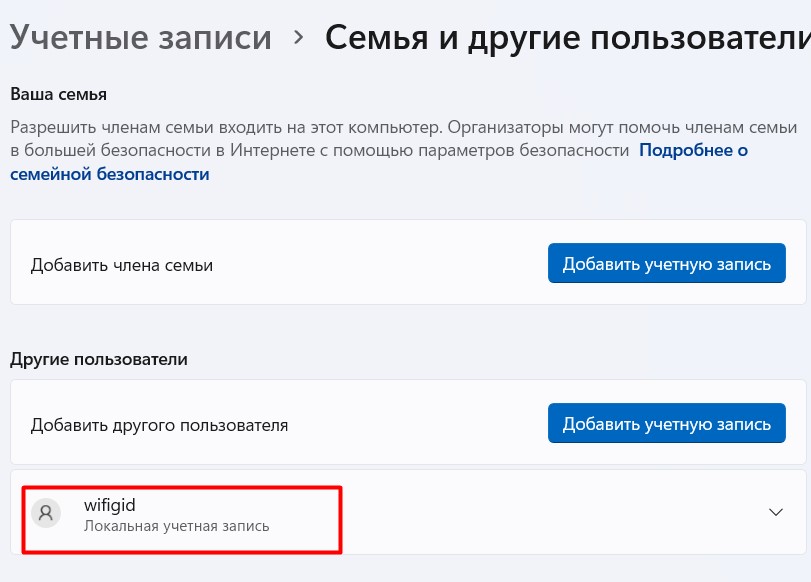
- Пользователь создан.
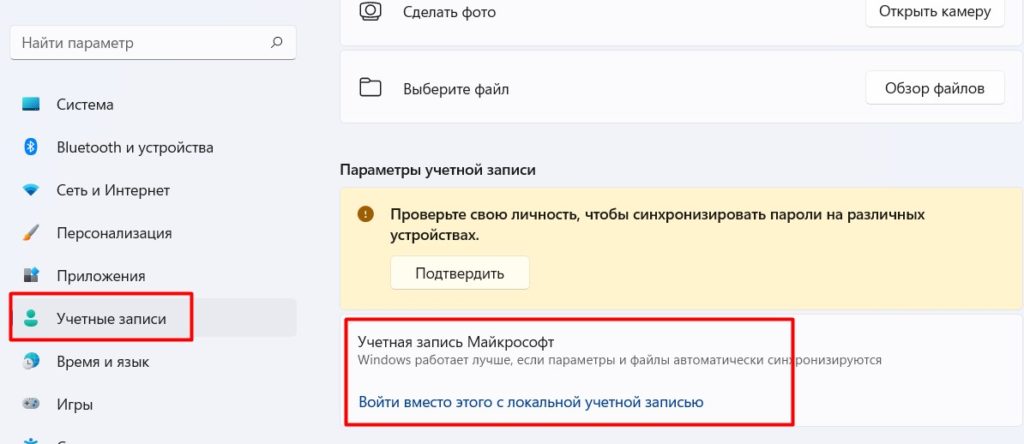
Примечание. На самом деле здесь можно было бы создать пользователя с вашей же учетной записью Microsoft, но предварительно нужно было превратить свой аккаунт в локального пользователя. Делается это в Параметры – Учетные записи – Ваши данные – Учетная запись Майкрософт – Войти вместо этого с локальной учетной записью. Здесь же потом можно будет новому пользователю сделать привязку к аккаунту Майкрософт.
Шаг 3 – Выдаем права
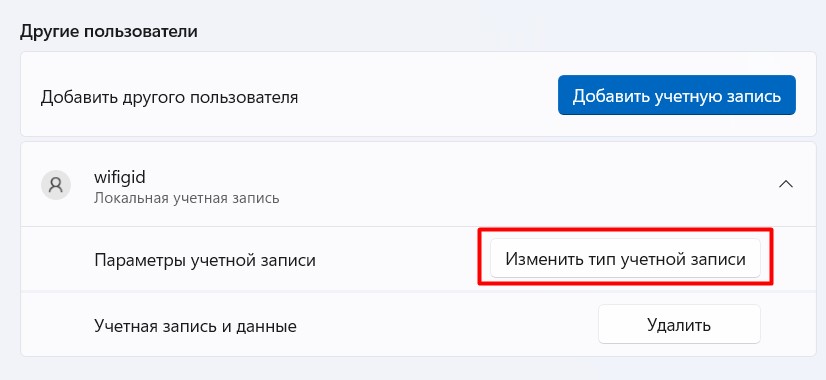
Пользователь создан с правами самого обычного пользователя, но предлагаю дать ему права администратора, чтобы можно было бы потом спокойно удалить текущего пользователя.
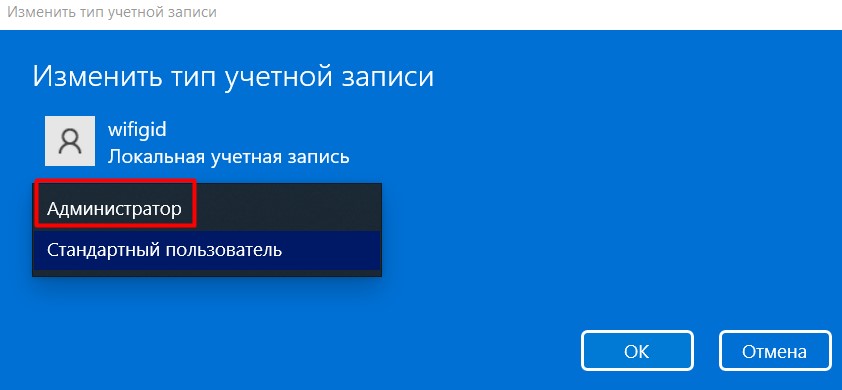
- На прошлом окне выбираем новосозданного пользователя и щелкаем на «Изменить тип учетной записи».
- Меняем «Стандартный пользователь» на «Администратор».
Шаг 4 – Переходим в нового пользователя
- Пуск – Щелкаете по имени текущего пользователя – В раскрывшемся списке находим нового пользователя и щелкаем по нему.
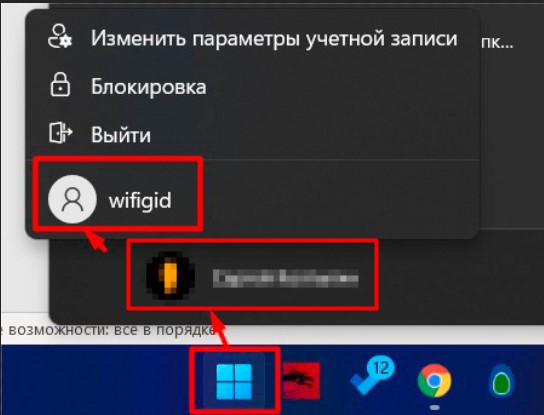
- Попадаем в нового пользователя.
Шаг 5 – Восстановление
Просто несколько замечаний:
- Теперь все сохраненные файлы можно снова раскидать на рабочий стол и по другим папкам пользователя, если это необходимо. С полным переносом папки пользователя будьте аккуратно – лучше переносить аккуратно и по отдельности, есть риск затереть чего-нибудь новое.
- Можно привязать аккаунт Майкрософт от старого пользователя (писал выше).
- Можно переименовать нового пользователя на удобное имя (при этом папка уже не изменится). Делается это в Параметры – Учетные записи – Ваши данные (если пользователь привязан к Майкрософт, изменение имени будет производиться именно там).
Шаг 6 – Удаление старого пользователя
Рекомендую это делать через пару дней после переезда, т.к. есть риск, что что-то забыли перенести.
- Параметры – Учетные записи – Семья и другие пользователи.
- Выбираем нужного пользователя и жмем «Удалить».

Надеюсь, у вас все прошло как по маслу и удалось изменить имя папки пользователя.
Способ 2 – Без бубнов с новыми пользователями
Внимание! Некоторые программы могут хранить путь к папке пользователя в своих отдельных ветках реестра или же конфигах. Этот способ быстр и удобен, но все равно может вызвать конфликт с некоторыми приложениями. Но их всегда можно переустановить.
Лично мне прошлый способ нравится тем, что я его могу воспроизвести на любом компьютере по памяти. Но если есть возможность использовать эту инструкцию или же не хотите заморачиваться с переносом файлов от старого пользователя к новому, можно попробовать и этот способ с переименованием.
Суть метода: меняем все места в Windows, которые отвечают за имя папки текущего пользователя, а в конце просто переименовываем эту папку.
Для метода наш пользователь должен быть администратором. Если вдруг у вас нет таких прав в вашей же системе делаем так:
Как зайти в пользователя с правами администратора
- Открываем командную строку и выполняем команду:
net user Администратор /active:yes
- В случае англоязычной Windows 11 в команде «Администратор» заменяем на «Administrator».
- В списке пользователей должен появиться Администратор. Выходим из текущего пользователя, заходим под ним.
- После завершения всех процедур из этого раздела для скрытия администратора из списка пользователей можно выполнить команду
net user Администратор /active:no
А дальше
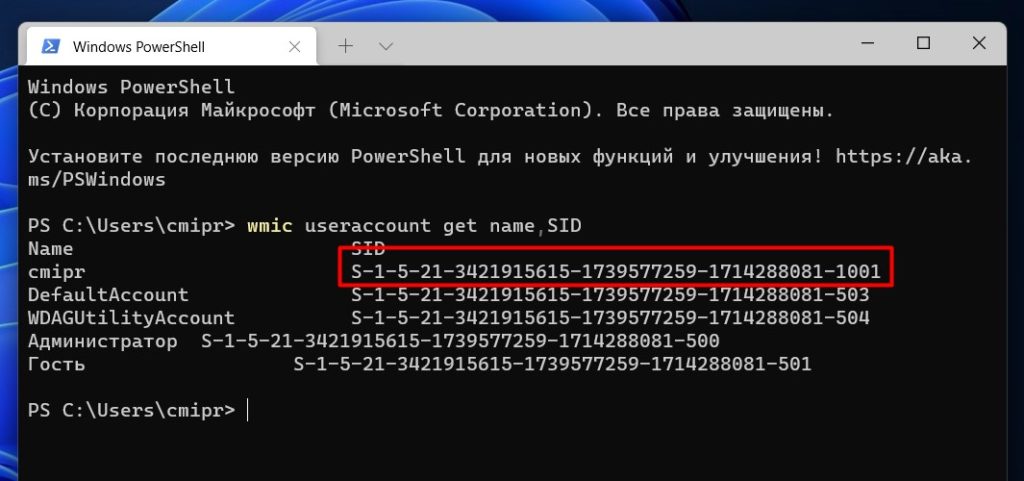
- Открываем командную строку, пишем команду:
wmic useraccount get name,SID
- В выведенном списке запоминаем SID напротив нашего пользователя (на самом деле можете просто не закрывать эту консоль).
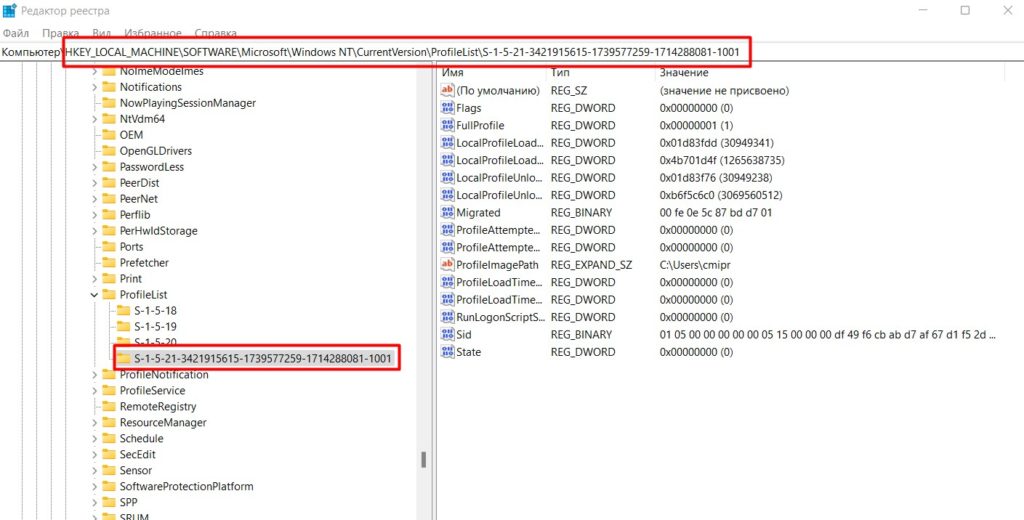
- Переходим в редактор реестра (вызываем выполнить с помощью + R и вводим команду regedit).
- Переходим по следующему пути (можно вставить прямо в редакторе реестра, чтобы не открывать эти папки):
HKEY_LOCAL_MACHINE\SOFTWARE\Microsoft\Windows NT\CurrentVersion\ProfileList\
- Обращаем внимание, что в этой ветке находятся другие папки с SID в названии, которые мы видели выше. Находим SID нашего пользователя.
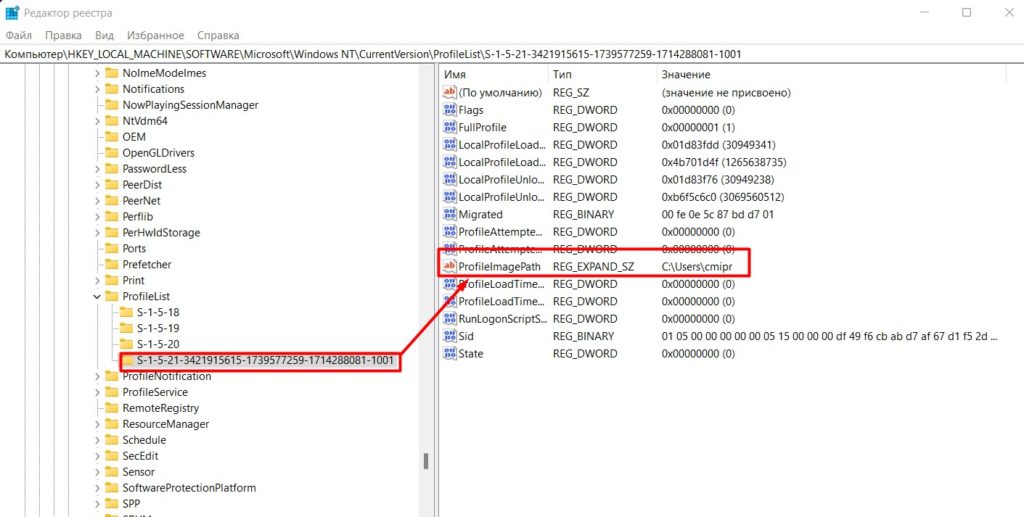
- Справа ищем параметр ProfileImagePath и переименовываем его на нужный (английскими буквами, как мы хотим, так и будет называться новая папка пользователя).
- Переименовали? А теперь просто изменяем название старой папки. Наверняка, вы уже знаете где она находится. Просто напомню: C://Users/ (если заходите через Проводник вместо Users может быть написано Пользователи):

- Просто делаем переименование на то, что мы указали в реестре.
- Если заходили под Администратором, выходим из него, перемещаемся в текущего пользователя.
- Перезагружаем компьютер. Все.
При желании таким методом можно не просто переименовать, но и вообще изменить местоположение папки пользователя. Но лучше такого не делать