 В Windows 11 и 10 встроенных возможностей для изменения звука при старте не предусмотрено: вы можете отключить его и даже добавить скрытый по умолчанию пункт «Вход в Windows» в настройки на вкладке «Звуки» путем редактирования реестра, но его изменение не приведет к какому-либо результату.
Однако, возможность изменить звук запуска Windows 11/10 существует и далее в инструкции будет рассмотрено, как это сделать.
Изменение звука запуска в ресурсах Windows
Для того, чтобы изменить мелодию запуска Windows 11 или Windows 10 потребуется изменить ресурс, представляющий собой WAV-файл в одном из системных файлов. При этом следует учитывать:
- Изменение системных ресурсов — потенциально небезопасное мероприятие, всё выполняется под вашу ответственность. Рекомендую предварительно создать точку восстановления системы.
- При восстановлении системных файлов будут отменены и ваши изменения, звук при включении вернется в состояние по умолчанию.
Шаги для изменения звука запуска будут следующими:
- Станьте владельцем файла
C:\Windows\SystemResources\imageres.dll.mun
в Windows 11 и Windows 10 последних версий. В случае Windows 10 до версии 1903 нужный файл —
C:\Windows\System32\imageres.dll
далее я не будут его указывать, но учитывайте, что в случае старой версии Windows все действия производятся именно с этим файлом. Чтобы стать владельцем файла проще всего добавить соответствующий пункт в контекстное меню и использовать его, либо способы из этой статьи.
- Скачайте утилиту Resource Hacker с официального сайта http://www.angusj.com/resourcehacker/ и запустите её.
- С помощью утилиты откройте файл из 1-го шага. В диалоговом окне в поле выбора типа файлов выберите «All files».

- В левой панели дважды нажмите по разделу «WAVE», затем нажмите по файлу ресурса внутри правой кнопкой мыши и выберите пункт «Replace Resource».

- Укажите путь к файлу WAV с помощью кнопки Select file. Рекомендую короткий звук — продолжительные музыкальные файлы обрываются и не воспроизводятся полностью, если установить их звуком входа в Windows. Также рекомендуется сохранять ваш файл WAV в папку C:\Windows\Media, а если файл скачан из Интернета, предварительно открыть его свойства и посмотреть, нет ли на вкладке «Общие» кнопки «Разблокировать этот файл» — если есть —нажать её. Нажмите кнопку «Replace» для замены ресурса в файле.
- В Resource Hacker используйте меню File — Save As и сохраните файл imageres.dll.mun на рабочий стол.
- Переименуйте изначальный файл в папке
C:\Windows\SystemResources\imageres.dll.mun
как-либо, либо перенесите его в другую папку (для возможности быстрого возврата к исходному состоянию). При появлении ошибок можно перезагрузиться в безопасном режиме, если и в этом случае появляются ошибки переименования, станьте владельцем папки C:\Windows\SystemResources\
- Скопируйте измененный файл imageres.dll.mun с рабочего стола в указанную папку.

- Нажмите клавиши Win+R, введите mmsys.cpl и нажмите Enter.
- Убедитесь, что отметка «Проигрывать мелодию запуска Windows» включена, если это не так — установите отметку и нажмите «Ок».


На этом всё — звук запуска Windows был изменен со стандартного на выбранный вами.
What to Know
- Install Resource Hacker. Go to File > Open, select imageres.dll.mun in Windows\SystemResources.
- Right-click WAVE > 5080 : 1033, select Replace Resource. Pick WAV file. Save edited MUN file to Desktop.
- Boot to the ASO menu and run commands to back up the original MUN file and then copy the edited one in its place.
This article explains how to change the startup sound in Windows 11 and Windows 10. It also describes how to completely disable the Windows startup sound if you’d prefer, and how to pick a startup sound for other actions in Windows.
How to Change the Startup Sound in Windows 11 & 10
It’s easy to change system sounds in Windows 11 or pick different sounds in Windows 10 because Microsoft provides a tool built right into the OS. Changing the startup sound is a different thing entirely.
Fortunately, however, since we know where the Windows startup sound file is located, we can replace it with a different file that we’d rather use instead. To make this change, we’ll use a free program and some simple Command Prompt commands (via Advanced Startup Options).
-
Install Resource Hacker. This program lets you edit the startup WAV sound.
There are two versions of this tool on the download page. Choose the EXE link for a quicker installation.
-
Open Resource Hacker and go to File > Open, and select this file:
C:\Windows\SystemResources\imageres.dll.munIf you’re using Windows 10, and it’s not updated to v1903 or newer, choose this file instead:
C:\Windows\System32\imageres.dllOpen Run and enter winver to see which version of Windows 10 you have. If you’re running Windows 11, just use the first path above.
-
Expand the WAVE folder on the left, and then right-click 5080 : 1033 and select Replace Resource.
-
Choose Select File, select the WAV file you want to use as the startup sound, and then choose Open.
To use one of the audio files that comes with Windows, look in this folder:
C:\Windows\Media -
Select Replace in Resource Hacker.
To preview the file you chose, select Play WAVE. You can always repeat these last two steps to replace it with something else if you don’t like the way it sounds.
-
Save it to the Desktop folder, and don’t change the name.
-
Close out of the program, and then access the Advanced Startup Options menu. To do this in Windows 11, go to Settings > System > Recovery > Restart now (next to Advanced startup).
If you see a prompt about saving your work, take note of what it says, and select Restart now.
-
Go to Troubleshoot > Advanced options > Command Prompt on the ASO menu.
-
When Command Prompt opens, type these commands exactly as they’re written here, pressing Enter after each one. These commands will make a backup of the original imageres file.
Change the working path to the C drive:
C:Change the working path to the SystemResources folder:
cd Windows\SystemResourcesRemember that if you’re using a version of W10 that’s older than v1903, every command in this guide that refers to the above path and the file below should be replaced with this path and this DLL file: C:\Windows\System32\imageres.dll.
Rename the original MUN file so Windows ignores it:
ren imageres.dll.mun imageres.dll.mun.oldBefore Command Prompt shows up, you might be told to enter your user account’s password. Do that now, if so.
-
You can now copy the modified imageres file you made earlier to the right folder so Windows will read from it to understand which WAV file to play at startup. However, before doing this, you need to identify your username.
Get a list of all the users on your computer:
dir C:\UsersFind your username from the list, and then enter this (replace jonfi with your username) to change the working path to your Desktop folder:
cd C:\Users\jonfi\Desktop -
Now that Command Prompt is focused on the Desktop folder, which is where you saved the custom file you created, you can easily copy it to the SystemResources folder:
copy imageres.dll.mun C:\Windows\SystemResourcesIf the command completed successfully, you’ll see the message 1 file(s) copied.
-
Exit Command Prompt, and select Continue to boot into Windows and test the sound.
If you don’t hear it, keep reading. The startup sound might just be disabled.
How to Turn the Windows Startup Sound on or Off
Windows might not make it easy to change the startup sound, but it certainly doesn’t complicate turning it on and off. There’s actually a toggle you can switch off to disable the sound, or switch on to hear the startup sound.
-
Open Settings, and then go to System > Sound.
-
Scroll down and select More sound settings (Windows 11), or select Sound Control Panel (Windows 10) on the right.
-
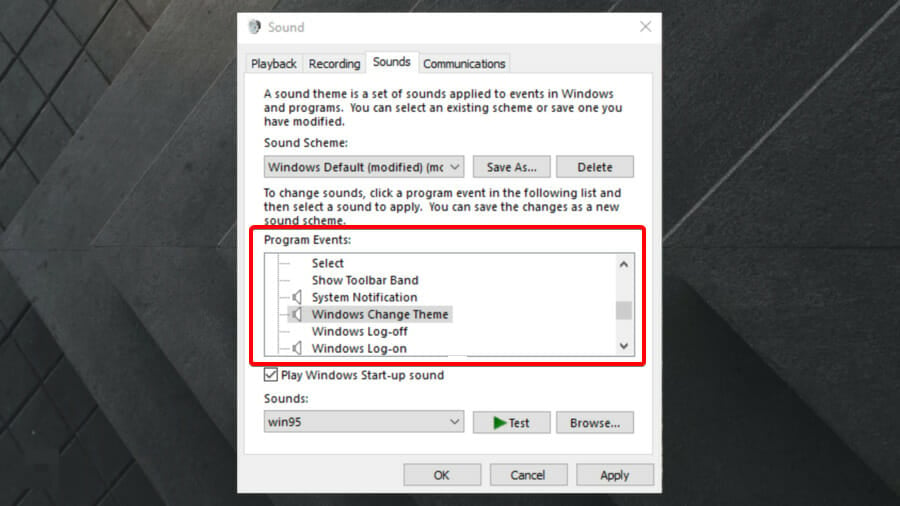
Go into the Sounds tab, and remove the check next to Play Windows Startup sound to turn it off, or place a check there to start hearing the sound.
-
Select OK to save.
Following these steps to turn the startup sound off will not undo the first set of directions above. All it does is prevent that sound file from being used during startup. If you turn the sound back on, it will revert to the custom sound you chose.
How to Restore the Original Windows Startup Sound
There are a few ways to do this. The first method is a reversal of the process described above.
To restore the default startup sound, use the del command to remove the edited MUN file you put in the SystemResources folder, and then rename the backup file so Windows will read from it again, and thus play the original WAV file.
After you get the Command Prompt open from the ASO menu (see the steps above for help), and you enter C: to focus on the local drive, enter these commands:
cd C:\Windows\SystemResources
del imageres.dll.mun
ren imageres.dll.mun.old imageres.dll.mun
If you’d rather not go that route, run the sfc /scannow command to attempt to restore the default imageres file. Some users have noted that updating Windows to a new build might break the edit, too.
Changing Other Startup Sounds
Windows also lets you change the startup sound for other parts of your PC. Unlike the Windows startup sound, which plays when you first land on the lock screen when the computer boots up, there are a few other times you can have a sound file triggered.
From the Sound tool are options like Start Navigation and Open Program. If you choose the latter, for example, you can make Windows play a startup sound each time a program starts. To do this, check out our How to Change Windows 11 System Sounds article.
You can also edit the sound that plays when you log on to Windows, meaning after you type your password and the Desktop first appears. To do that, follow the guide linked above to learn where to go in Control Panel to access the sound editor; you’re looking for Windows Logon.
This is much easier to do in older Windows versions, but still very possible in Windows 11 & 10, though only after a registry edit. To see the logon sound option in the Sound tool in these Windows versions, find this entry in Registry Editor and change the value from 1 to 0:
HKEY_CURRENT_USER\AppEvents\EventLabels\WindowsLogon\ExcludeFromCPL
FAQ
-
How do I get my sound back on Windows 10?
To fix the problem of no sound on Windows 10, check your cables and volume levels, and verify that the current audio device is the system default. If you’re still having issues, restart the computer, try a system restore, and run the Windows 10 Audio Troubleshooter.
-
How do I turn off Windows 10 notification sounds?
To turn off Windows 10 notifications, go to Start > Settings > System and select Notifications & actions. Underneath Notifications, turn off Get notifications from apps and other senders. You can also choose to allow notifications from specific senders.
-
How do I update sound drivers on Windows 10?
To update drivers in Windows to fix an audio problem, locate and download the correct drivers. Open Device Manager and go to the correct device. Right-click or press-and-hold on the hardware and choose Update Driver. The driver-update wizard will launch; follow the instructions.
Thanks for letting us know!
Get the Latest Tech News Delivered Every Day
Subscribe
This step-by-step guide takes you through the process of changing Windows 10 startup sound. The method is simple and needs just a moment of your time.

Windows 10 is a great operating system, but by default, the startup sound can be a bit jarring. If you’d like to change it to something more pleasant or just want to disable the sound altogether, this article will show you how to do it.
The Windows 10 startup sound is one of the most iconic sounds in computing. It’s a sound that’s instantly recognizable, and it’s a sound that many people have grown to love. However, some people find the startup sound annoying or simply want to change it for a more personal touch.
If you’re one of those people, this guide is for you. We’ll show you how to change the Windows 10 startup sound in just a few simple steps.
What Is the Default Windows 10 Startup Sound?
When Windows 10 starts up, the first thing you hear is a cheerful jingle. This sound changes with (almost) every major release, but the concept has been a part of Microsoft’s operating system for years. Many Windows startup sounds have become just as iconic as the start-up chime on Apple computers.
The sound has undergone a few changes over the years, but it remains one of the most recognizable beeps in the tech world. Even though Microsoft considered staying away from startup sounds at one point, it made a return in modern versions of Windows.
So next time you hear that familiar jingle, you’ll know it’s coming from Windows 10 — and you can take pride in knowing that you’re using one of the most popular operating systems in the world. But what if you want to change this tune to something else? Keep reading to find out!
How To Change the Default Windows 10 Startup Sound
We all want our gadgets to be customized and tailored to our needs. This includes little details, like the startup sound in your system. You can pick a tune from an earlier version of Windows — for example, the Windows Vista/7 theme — and use it on Windows 10. Alternatively, you can add an entirely custom sound as well!
If you want to change or modify the sound, here’s a step-by-step guide on how to do it.
Step 1. Disable Fast Startup
The Windows 10 startup sound is disabled whenever Fast Startup is enabled. So, if you want to hear a tune before your system boots up, you must have Fast Startup disabled. Here’s how to do it:
- Click on the Windows icon in your taskbar, and then search for the Control Panel. Launch the application from the search results.

- Click on Power Options. If you can’t see this, switch the view mode to either Large or Small icons.

- Click on the Choose what the power button does link in the left-side pane. You’ll be redirected to a new page.
- Before making changes, you need to click on the “Change settings that are currently unavailable” link. This will unlock your options.
- Make sure to uncheck the Turn on fast startup (recommended) option. Make sure to click the Save changes button to apply the changes.


Step 2. Enable Windows Startup Sound
After you’ve successfully disabled Fast Startup, you need to enable the Windows 10 startup sound in your system. Here’s how to do it:
- Right-click on the Sound icon in your system tray, found in the taskbar, and then choose Sounds from the context menu.

- Switch to the Sounds tab and make sure to enable the Play Windows Startup sound option.

Tip: If you can’t see the sound icon, make sure to check your hidden items by clicking on the up arrow in your tray.
- Click Apply, and then close the window by clicking on OK.


Step 3. Download Startup Sound Changer
The easiest way to modify your startup sound is using a third-party application called Startup Sound Changer. It’s free, safe, and easy to download on your computer. After you’ve enabled the startup sound in Windows 10, follow these steps:
- Open any web browser and navigate to the Startup Sound Changer download page.

- Click on the Free Download button and follow any on-screen instructions to start the download process. This may take a few minutes, depending on your internet connection.
- After the download is complete, double-click on the StartupSoundChanger.exe file you’ve saved on your computer to launch the application.
- When the software launches, click on the Replace button and find your sound file by navigating to the correct location on your system. Note that this application only accepts .wav sound files! If your sound is in a different format (such as .mp3) use CloudConvert to convert it.

- After selecting the audio file you want to use as your startup, you can preview it by clicking Play. If you’re happy with the tune, just close the window to finish the changes.


When you restart your computer, you’ll hear the custom startup sound playing as your system boots up!
How To Disable the Windows 10 Startup Sound
Some users might want to disable the startup sound on their system entirely. This can be done for various reasons, like wanting to use another program that plays sounds during startup, or simply because you find the Windows 10 startup sound annoying.
If you need to disable the startup sound on your system, here’s a quick guide on how to do it.
- Navigate to Start > Settings. You can also use the Windows + I keyboard shortcut to open the interface quickly.
- Click on the System button from the available options. Here’s where you can find many of your sound settings.

- Switch to the Sound tab using the menu on the left side, and then click on the Sound Control panel link from the right-side menu.
- Switch to the Sounds tab, and make sure that the Play Windows Startup sound option is not enabled. If it is, just click on the checkmark to remove it.
- Click the Apply button and then the OK button. You won’t hear any startup sounds when you boot up your system anymore.


Other Ways To Customize Your Windows 10 Experience
Sound isn’t the only thing you can change on your Windows 10 machine. Microsoft provides users with countless ways to customize their experience. Here are some other ways you can make Windows 10 your own:
- Change your wallpaper: You can find a new wallpaper by opening the Settings app and going to Personalization > Background.
- Change your color scheme: If you want to change the colors of your Windows 10 interface, you can go to Settings > Personalization > Colors.
- Change your taskbar settings: The Windows 10 taskbar is highly customizable. To change its settings, go to Settings > Personalization > Taskbar.
- Change your icons: If you want to use different icons for your shortcuts and files, you can do so by going to Settings > Personalization > Themes > Desktop icon settings.
- Change your lock screen: The lock screen is the first thing you see when you start up your computer. To change it, go to Settings > Personalization > Lock screen.
No matter what you want to change on your Windows 10 machine, there’s likely a way to do it. Microsoft gives users endless possibilities for customization, so you can tailor your experience to your own needs.
Conclusion
Changing the Windows 10 startup sound is a quick and easy way to customize your computer and make it your own. Whether you’re looking for a way to annoy your friends or simply want to add a personal touch to your PC, changing the startup sound is a great place to start.
Thanks for reading  And we hope this guide was helpful!
If you have a minute, please share this article on your socials. Someone else will benefit.
One More Thing
Sign up for our newsletter and access our blog posts, promotions, and discount codes early. Plus, you’ll be the first to know about our latest guides, deals, and other exciting updates!
Recommended Articles
» Solved: Volume Icon Missing Windows 10
» How to Fix Slow Startup on Windows 10
» How To Fix When You Have No Sound on YouTube
Feel free to reach out with questions or requests you’d like us to cover.
Manually set shutdown sound from the settings to get it back
by Vlad Turiceanu
Passionate about technology, Windows, and everything that has a power button, he spent most of his time developing new skills and learning more about the tech world. Coming… read more
Updated on
- Earlier Windows versions enabled users to easily change the system sounds, but these are hidden on Windows 10.
- Keep in mind that you’re allowed to enable the startup and shutdown sounds from the Windows Registry.
- If you want to change Windows 10 startup/shutdown sound, do not hesitate to customize the Program Events list.

In earlier Windows editions, users could change Windows 10 shutdown sound easily. However, Microsoft sacrificed the sound settings for faster shutdown and the Fast Startup feature in Windows 10.
In the following section, we’ll walk you through the steps for changing your Windows 10 startup/shutdown sound.
Is there a Windows 10 startup sound?
No, Windows 10 doesn’t have a startup or shutdown sound. This is a design choice by Microsoft, and there are a few reasons for it:
How we test, review and rate?
We have worked for the past 6 months on building a new review system on how we produce content. Using it, we have subsequently redone most of our articles to provide actual hands-on expertise on the guides we made.
For more details you can read how we test, review, and rate at WindowsReport.
- Focus on mobility – Microsoft is focused on developing portable devices, such as Surface Book 3. With devices that you frequently start or wake up, the shutdown or startup sound could become irritating rather quickly.
- Faster startup – In order to optimize startup speed, Microsoft removed certain functionality, including the one in charge of playing sounds.
How do I change the Windows 10 startup & shutdown sound?
1. Disable fast startup
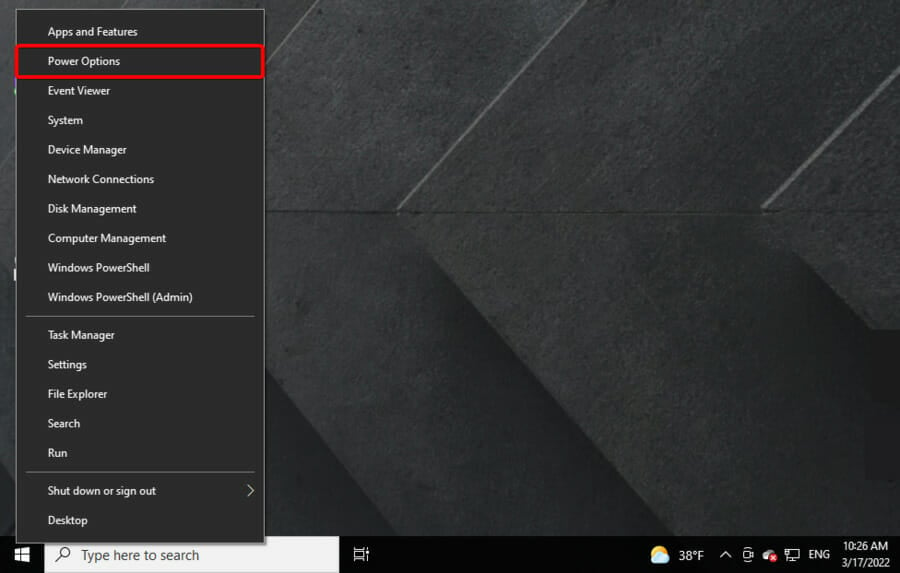
- Right-click on the battery icon on your taskbar and select Power Options.

- Now, from the right window pane, click on Additional power settings.

- Select the Choose what the power button does option on the left.
- Click on Change settings that are currently unavailable.
- In Shutdown settings, unmark the checkbox beside Turn on fast startup (recommended).
- Hit the Save changes button below.

2. Turn on the startup sound
- Press the Windows + I keys combination.
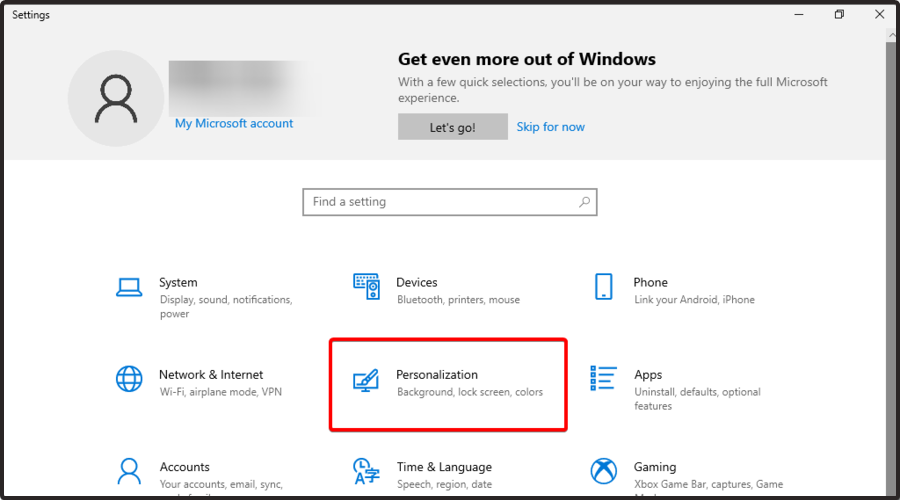
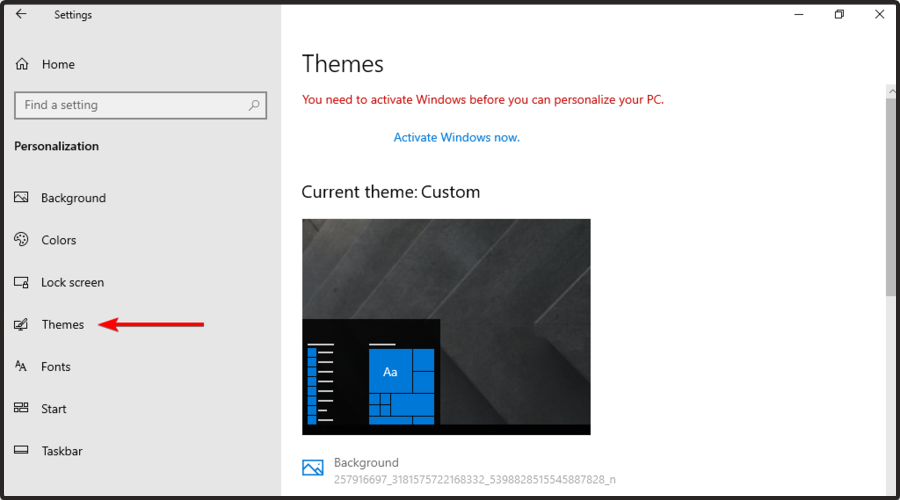
- Go to Personalization.
- Select Themes from the left panel.
- Click on Sounds.
- Check the box beside Play Windows Start-up sound.

- Click on the OK button.

3. Enable the startup and shutdown sounds from Windows Registry
- Press the Windows + R to open the Run dialog box.
- There, type regedit and press Enter.

- Navigate to:
HKEY_CURRENT_USER/AppEvents/EventLabels

At this point, the next step is to activate the startup and shutdown sounds.
3.1 Enable the startup sound
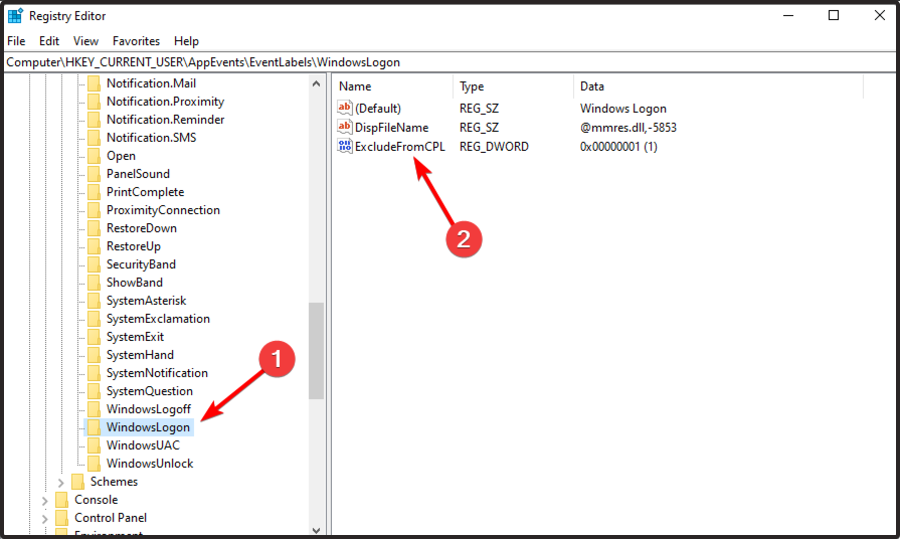
- Find WindowsLogon and double-click on ExcludeFromCPL.

- Modify the Value data from 1 to 0.

- Hit the OK button to save it.

- Microsoft Store Apps vs Desktop Apps: Which Ones to Use?
- How to Open & Use the Emoji Panel on Windows 10
- Windows Software Development Kit: Everything You Need to Know
- Windows 11 Keeps Chiming? Stop it in 8 Steps
3.2 Enable the shutdown sound
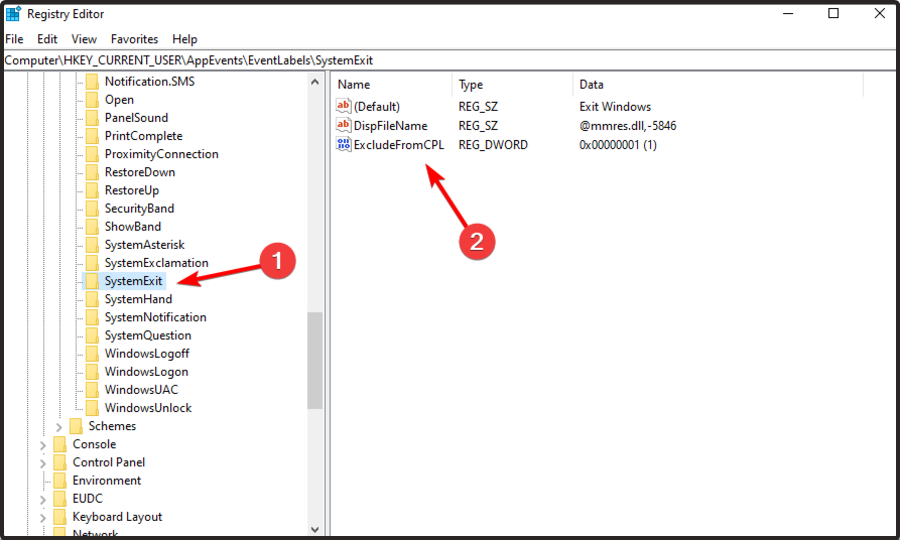
- Return to EventLabels.
- Click on the SystemExit subkey, then double-click on ExcludeFromCPL.

- Change the Value data from 1 to 0.

- Click on OK.

After doing that, check if your sounds are working properly.
4. Change the startup and shutdown sounds
- Press the Windows + I keys combination to open Settings.
- Navigate to Personalization.
- Go to Themes.
- Click on the Sounds option.
- Find the sound you want to customize from the Program Events list.
- For the startup sound, click on Windows Logon.
- If you need the option for the shutdown sound, click on Exit Windows.
- Pick the music that you want to set as your new startup sound.
- Hit Apply and then the OK button.
5. Create a batch file
- Create a new folder on your Desktop or any other location. You can use any name you want for it.
- Locate sndrec32.exe file and copy it to that directory. This file is available on older versions of Windows, such as Windows XP, so you’ll need a Windows XP or a reliable third-party source.
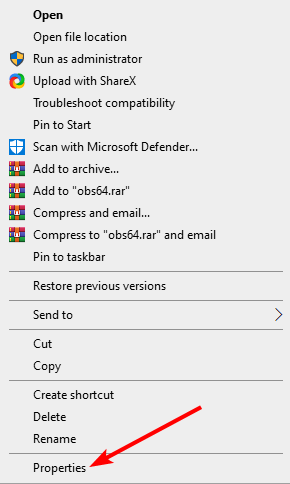
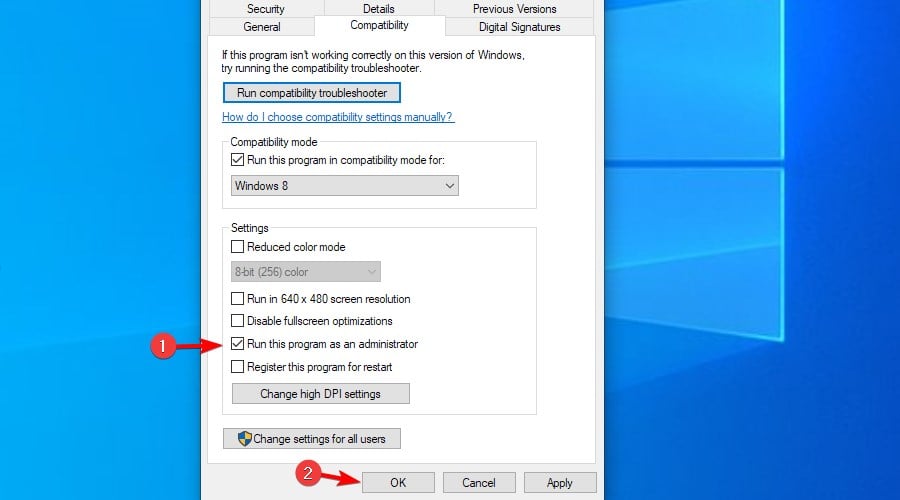
- Right-click the file and choose Properties.

- Go to the Compatibility tab. Check Run this program as an administrator and click OK to save changes.
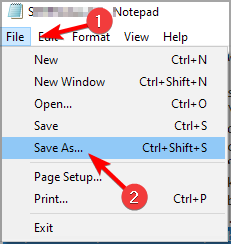
- In the same directory, create a new Notepad file and paste the following lines:
C:\PowerOff\sndrec32.exe /embedding /play /close “C:\Windows\Media\Windows Shutdown.wav”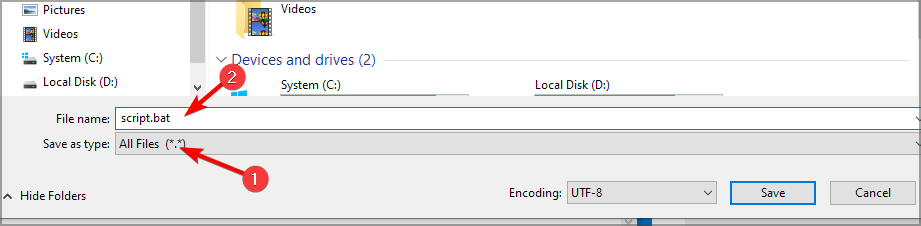
C:\Windows\System32\shutdown.exe /s /t 2 - Go to File and select Save as.

- Choose the save location. Set the Save as type to All files. Next, enter script.bat as the name. Lastly, save the file.

- Use the script.bat file to turn off your PC or create a shortcut on your Desktop for quick access.
So, these are the steps you can use to change the Windows 10 startup sound. Do not hesitate to save them somewhere to access the process whenever you feel like it easily.
Keep in mind that some users reported that sound is not working in Windows 10, and if you ever face the same issue, make sure you check our dedicated fixing guide.
Do you have any related questions? Feel free to share them with us by leaving a comment in the section below.
![]()
In the ever-evolving Windows landscape, certain features that were once staples get modified or streamlined for the sake of efficiency. One such feature is the customization of the Windows startup and shutdown sounds. For many, these sounds evoke a sense of nostalgia, reminiscent of the earlier Windows editions where personalizing these audio cues was just a few clicks away. However, in Windows 10, Microsoft prioritized speedier boot-up and shutdown times, inadvertently sidelining the sound settings.
Though this transition leans towards faster system operations, it doesn’t mean you have to compromise on personal touches like startup sounds. Indeed, while Windows 10 might not play a startup sound by default, there’s a method to reintroduce it – you just need to awaken the dormant setting. The trick lies in disabling the ‘fast boot‘ option, post which you’ll regain the capability to customize and enable the startup sound.
Dive into this risewindows guide to explore a step-by-step walkthrough on tweaking the startup and shutdown sounds in Windows 10, ensuring your system greets you in a tone that resonates with your personal flair.
How to Turn Off Fast Startup on Windows 10?
To disable the Fast Startup on Windows 10, use these steps:-
Step 1. First, open the Settings app by clicking the Start button, followed by the Settings icon.
![]()
Step 2. Click on the System category in the Settings window.

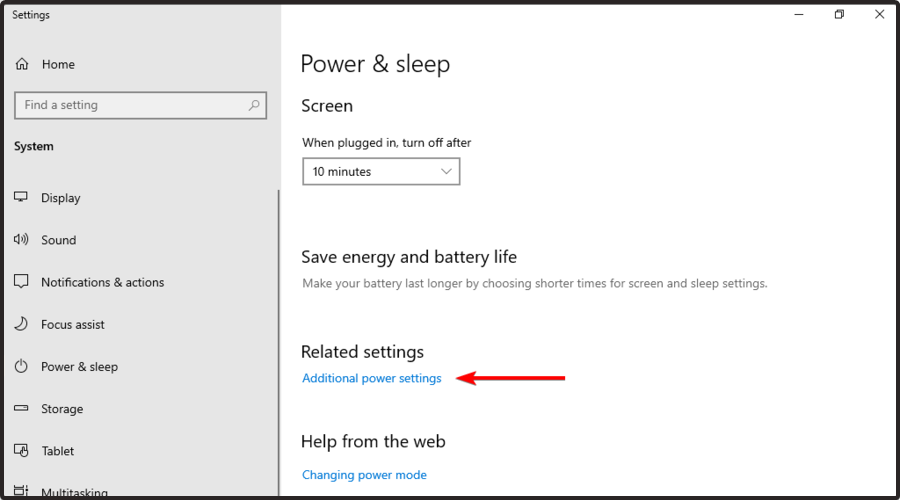
Step 3. Then, under “System,” click the Power & sleep tab.

Step 4. After that, click the Additional power settings link on the right sidebar under the “Related settings” section.

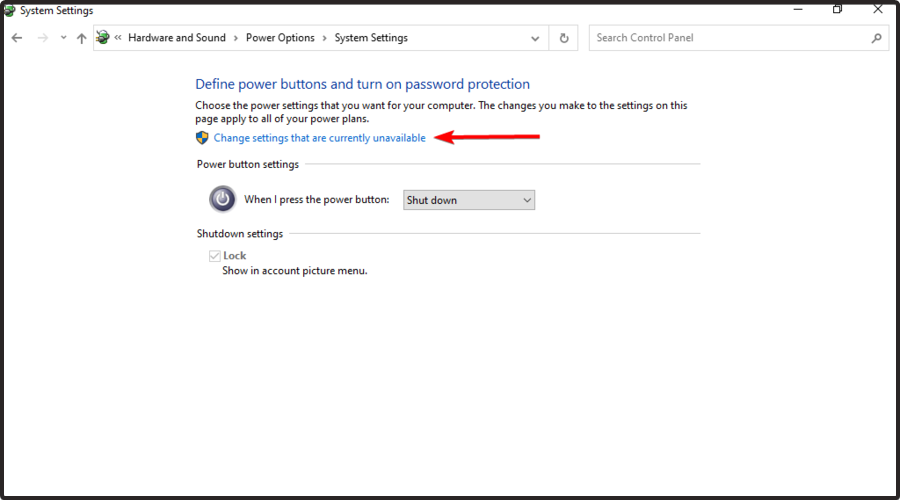
Step 5. Next, click the link “Choose what the power button does in the Power Options window that opens.”

Step 6. Then, click the link “Change settings that are currently unavailable.”

Step 7. Under the “Shutdown settings” section, uncheck the “Turn on fast startup” option.

Step 8. Click the Save changes button.
After completing the above steps, the Fast Startup feature will turn off your Windows 10 machine.
How to Enable Windows 10 Startup Sound?
To turn on the startup sound. The process is as follows:-
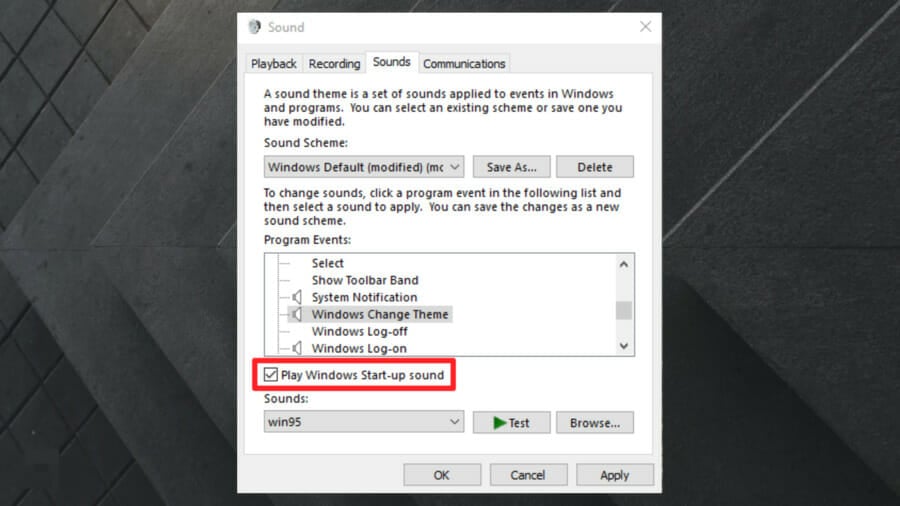
Step 1. First, right-click the speaker icon on Taskbar and select Sounds in the menu to open the Sound window.

Step 2. Now, switch to the Sounds tab under the Sound window.

Step 3. Then, check the Play Windows Startup sound checkbox.
Step 4. After that, click the Apply button.
Step 5. Finally, click the OK button.
Now, you will hear the Windows 10 startup sound whenever you turn on your computer.
How to Change the Windows 10 Startup Sound?
To set a custom sound as your Windows 10 startup sound, you’ll need to install a third-party app or edit the Registry file.
The Startup Sound Changer is a freeware program that allows you to change the default Windows startup sound. With a simple and convenient interface, you can easily apply any WAV file and customize it.
To modify or change the Windows 10 Startup sound, perform these steps:-
Step 1. Download Startup Sound Changer.
Step 2. Now, double-click on the downloaded portable executable file to open it.

Step 3. Then, click on the Replace button.
Step 4. After that, select a custom “.wav” file from your PC. If you don’t have one, choose one from the “C:\Windows\Media” folder.

Step 5. Finally, click the Open button.
Once you restart your Windows 10 machine, you will hear the new sound.
Quick Note: Sounds file must store in “C:/Windows/Media.” If you put them in another folder, Windows won’t find them.
How to Modify Startup and Shutdown Sound Registry Files?
If the Windows Logon (Startup) and Windows Logoff (Shutdown) options are missing in the Sound window, you need to enable the same from Registry Editor.
These steps will guide you through editing the Startup Sound registry files:-
Step 1. First, open Registry Editor.
Step 2. Then, in the left sidebar of the Registry Editor, click the following key:-
Computer\HKEY_CURRENT_USER\AppEvents\EventLabels\WindowsLogon

Step 3. Double-click on the right sidebar on the REG_DWORD named ExcludefromCPL.

Step 4. Then, change the “Value data” from 1 to 0.
Step 5. After that, Click the OK button to enable the Windows Logon option in the Sound setting.
Step 6. Similarly, if you want to enable the Shutdown or Windows Logoff sound setting, navigate to the following Registry key:-
omputer\HKEY_CURRENT_USER\AppEvents\EventLabels\WindowsLogoff

Step 7. Double-click on the right sidebar on the REG_DWORD named ExcludefromCPL.

Step 8. Set its “Value data” to 0 to enable the Windows Logoff option.
Step 9. Finally, click the OK button.
There is no need to restart your Windows 10 machine. Windows Logon and Windows Logoff options will now appear in the Sound window.
As soon as you have enabled the Windows Logon and Windows Logoff options in Sound settings for your Windows 10 machine, you can apply a custom sound from the Sound dialog. Perform the following steps:-
Step 1. First, right-click the speaker icon on Taskbar and select Sounds in the menu to open the Sound window.
Step 2. Now, switch to the Sounds tab under the Sound window.
Step 3. Then, check the Play Windows Startup sound checkbox.
Step 4. After that, select either Windows Logoff or Windows Logon option you want to change the sound for.

Step 5. Next, select the preferred sound from the Sounds drop-down menu. Alternatively, click the Browse button and select the sound file (.wav) from the “C:\Windows\Media” folder you want to set.
Step 6. After that, if you want to choose to listen to the sound before applying it by clicking the Test button.
Step 7. Then, click the Apply button.
Step 8. Finally, click the OK button.
Here, the maximum length of a startup or shutdown sound is between 4 – 6 seconds for Windows 10. If you change your computer’s startup or shutdown sound but still play the default jingle, it’s most likely due to its length.
Use an online audio cutter or trimmer (such as Clideo.com) to trim the audio file (in WAV format) to 4 to 6 seconds and try it again.
Conclusion
Windows 10, with its array of features, offers numerous avenues for customization, ensuring that users can make the OS truly their own. While certain functionalities, like the startup and shutdown sounds, may initially seem sidelined, with a bit of tweaking, they can be revived and personalized. Whether you hold nostalgia for the auditory cues of past Windows editions or just seek a unique touch for your system, adjusting these sounds is a testament to the flexibility Windows 10 provides. By following the steps outlined in this guide, you can infuse your system with a familiar or novel audio backdrop, creating a more personal computing experience every time you power on or shut down your device.