To manage all aspects of the input and display language settings on your Windows 11 PC, use the following methods.
To switch the keyboard layout you’re using, press and hold the Windows key and then repeatedly press the Spacebar to cycle through all your installed keyboards. (If this doesn’t do anything, it means you have only one installed.)
You can also select the language abbreviation in your taskbar then choose the language or input method you want to use.
Note: In the input field, press the Windows logo key + period (.) to access the Emoji & more keyboard, if your language supports it.
If you can’t find the keyboard layout you want, you may have to add a new keyboard.
Adding an input language lets you set a language-preference order for websites and apps, as well as change your keyboard language.
-
Select the Start > Settings > Time & language > Language & region.
-
Select the language that has the keyboard you want, then select Options.
-
Select Add a keyboard and choose the keyboard you want to add. If you don’t see the keyboard you want, you may have to add a new language to get additional options. If this is the case, go on to step 4.
-
Return to the Language settings page, go to Preferred languages, then select Add a language.
-
Choose the language you want to use from the list, then select Next.
-
Review any language features you want to set up or install, and select Install.
«Add a keyboard» shortcut
The display language you select changes the default language used by Windows features like Settings and File Explorer.
-
Select Start > Settings > Time & language > Language & region.
-
Choose a language from the Windows display language menu.
«Change your display language» shortcut
If a language is listed under Preferred languages but doesn’t appear on the Windows display language list, you’ll first need to install its language pack (if it’s available).
-
Select Start > Settings > Time & language > Language & region.
-
In Preferred languages, select Add a language, enter the language you want, then select Next.
-
Select Download from the Download language pack option.
-
After the language pack is installed, select Back.
-
Choose a language from the Windows display language menu.
«Install a language pack» shortcut
If you receive an «Only one language pack allowed» or «Your Windows license supports only one display language» message, you have a single language edition of Windows 10. Here’s how to check your Windows 10 language edition:
-
Select Start > Settings > About, and then go to the Windows specification section.
-
If you see Windows 11 Home Single Language next to Edition, you have a single language edition of Window 11, and you can’t add a new language unless you purchase an upgrade to either Windows 11 Home or Windows 11 Pro.
Upgrade to Windows 11 Home or Windows 11 Pro
-
Select Start > Settings > Time & language > Language & region.
-
Under Preferred languages, select the language you want to remove, and then select Remove.
-
To remove an individual keyboard, select the language (see step 2), select Options, scroll down to the Keyboards section, select the keyboard you want to remove, and select Remove.
To manage all aspects of the input and display language settings on your Windows 10 device, use the following methods.
To switch the keyboard layout you’re using in Windows 10, press and hold the Windows key and then repeatedly press the Spacebar to cycle through all your installed keyboards. (If this doesn’t do anything, it means you have only one installed.)
You can also select the language abbreviation on the far right of the taskbar and then choose the language or input method you want to use.
Note: In the input field, press Windows +period (.) to access the emoji keyboard, if your language supports this.
If you can’t find the keyboard layout you want, you may have to add a new keyboard.
Adding an input language lets you set a language-preference order for websites and apps, as well as change your keyboard language.
-
Select the Start button, then select Settings > Time & Language > Language.
-
Under Preferred languages, select the language that contains the keyboard you want, and then select Options.
-
Select Add a keyboard and choose the keyboard you want to add. If you don’t see the keyboard you want, you may have to add a new language to get additional options. If this is the case, go on to step 4.
-
Return to the Language settings page, and select Add a language.
-
Choose the language you want to use from the list, and then select Next.
-
Review any language features you want to set up or install, and select Install.
«Add a keyboard» shortcut
Some languages require additional language features
For some languages to work properly, you need an admin on your PC to install the language features. Here’s a list of the languages that are affected:
-
Microsoft IME – Primary keyboard of Japanese
-
Microsoft Pinyin – Primary keyboard of Chinese (Simplified, China), Primary keyboard of Chinese (Simplified, Singapore)
-
Microsoft Wubi – Secondary keyboard of Chinese (Simplified, China), Secondary keyboard of Chinese (Simplified, Singapore)
-
Microsoft Bopomofo – Primary keyboard of Chinese (Traditional, Taiwan), Secondary keyboard of Chinese (Traditional, Hong Kong SAR), Secondary keyboard of Chinese (Traditional, Macao SAR)
-
Microsoft ChangJie – Secondary keyboard of Chinese (Traditional, Taiwan), Secondary keyboard of Chinese (Traditional, Hong Kong SAR), Secondary keyboard of Chinese (Traditional, Macao SAR)
-
Microsoft Quick – Secondary keyboard of Chinese (Traditional, Taiwan), Primary keyboard of Chinese (Traditional, Hong Kong SAR), Primary keyboard of Chinese (Traditional, Macao SAR)
-
Bangla Phonetic – Secondary keyboard of Bengali (India)
-
Gujarati Phonetic – Secondary keyboard of Gujarati
-
Hindi Phonetic – Secondary keyboard of Hindi
-
Kannada Phonetic – Secondary keyboard of Kannada
-
Malayalam Phonetic – Secondary keyboard of Malayalam
-
Marathi Phonetic – Secondary keyboard of Marathi
-
Odia Phonetic – Secondary keyboard of Odia
-
Punjabi Phonetic – Secondary keyboard of Punjabi (Gurmukhi)
-
Tamil Phonetic – Secondary keyboard of Tamil (India)
-
Telugu Phonetic – Secondary keyboard of Telugu
The display language you select changes the default language used by Windows features like Settings and File Explorer.
-
Select the Start button, then select Settings > Time & Language > Language.
-
Choose a language from the Windows display language menu.
«Change your display language» shortcut
If a language is listed under Preferred languages but doesn’t appear on the Windows display language list, you’ll first need to install its language pack (if it’s available).
-
Select the Start button, then select Settings > Time & Language > Language.
-
Choose a language from the Add a language list under Preferred languages, and then select Options.
-
Select Download from the Download language pack option.
-
After the language pack is installed, select Back .
-
Choose a language from the Windows display language menu.
«Install a language pack» shortcut
If you receive an «Only one language pack allowed» or «Your Windows license supports only one display language» message, you have a single language edition of Windows 10. Here’s how to check your Windows 10 language edition:
-
Select the Start button, select Settings > About, and then scroll down to the Windows specification section.
-
If you see Windows 10 Home Single Language next to Edition, you have a single language edition of Window 10, and you can’t add a new language unless you purchase an upgrade to either Windows 10 Home or Windows 10 Pro.
Upgrade to Windows 10 Home or Windows 10 Pro
-
Select the Start button, then select Settings > Time & Language > Language.
-
Under Preferred languages, select the language you want to remove, and then click Remove.
-
To remove an individual keyboard, select the language in question (see step 2), select Options, scroll down to the Keyboards section, select the keyboard you want to remove, and click Remove.
Need more help?
Want more options?
Explore subscription benefits, browse training courses, learn how to secure your device, and more.
Communities help you ask and answer questions, give feedback, and hear from experts with rich knowledge.
Find solutions to common problems or get help from a support agent.
- You can change the keyboard language on a Windows computer by going through the «Time & Language» menu.
- After you change the keyboard language once, you’ll be able to switch between languages quickly using a button in your taskbar.
- You can also change the language that Windows uses for everything, not just the keyboard.
- Visit Business Insider’s Tech Reference library for more stories.
Windows gives you a lot of control over the language it uses — so much control, in fact, that it can be confusing to set it up the way you want.
For example, you can change the language that Windows uses for every menu, or just the language used for the keyboard.
Check out the products mentioned in this article:
HP Wireless Elite Keyboard V2 (From $51.70 at Amazon)
Windows 10 (From $139.99 at Best Buy)
Acer Chromebook 15 (From $179.99 at Walmart)
How to change the keyboard language on Windows 10
You can change your keyboard’s language without changing the language that Windows is using on the screen — this is handy for gaining access to accent marks and other specialized characters, or for typing on a keyboard with a different language layout.
1. Click Start and then click the Settings icon (which is shaped like a gear).
2. Click «Time & Language.»
Dave Johnson/Business Insider
3. In the navigation pane on the left, click «Language.»
4. In the «Preferred languages section,» click your language (i.e., «English») and then click «Options.»
Dave Johnson/Business Insider
5. Scroll down to «Keyboards» and then click «Add a keyboard.» In the pop-up menu, click the keyboard language you want to add.
Dave Johnson/Business Insider
6. Close Settings. Once you add a second keyboard language to Windows, a language control button will appear in the taskbar, in the lower-right corner of the screen. Click it, and in the pop-up menu that appears, choose the language you want to use with your keyboard.
Dave Johnson/Business Insider
You can always return to the taskbar to switch back to your original keyboard language.
Related coverage from Tech Reference:
-
7 easy ways to speed up your Windows 10 computer, from disabling unneeded effects to upgrading your hardware
-
How to take a screenshot on Windows 10 computers in several different ways
-
How to change the size of your desktop icons on a Windows 10 computer
-
How to create a guest account on your Windows 10 computer in 6 steps
-
5 ways to save battery on any Windows laptop and keep your computer running longer
Dave Johnson
Freelance Writer
Dave Johnson is a technology journalist who writes about consumer tech and how the industry is transforming the speculative world of science fiction into modern-day real life. Dave grew up in New Jersey before entering the Air Force to operate satellites, teach space operations, and do space launch planning. He then spent eight years as a content lead on the Windows team at Microsoft. As a photographer, Dave has photographed wolves in their natural environment; he’s also a scuba instructor and co-host of several podcasts. Dave is the author of more than two dozen books and has contributed to many sites and publications including CNET, Forbes, PC World, How To Geek, and Insider.
Read more
Read less
Insider Inc. receives a commission when you buy through our links.
Sometimes special characters are required when writing text, especially if the text is written in a foreign language. For example, some languages may use characters that are not included in your currently selected keyboard layout. In this case, the characters must then be integrated into the document using the tedious Insert Special Characters option called the “Character Map”. This can be quite inconvenient and time consuming, especially with longer texts. It is much easier to change the keyboard language in Windows 10.
Contents
- Windows 10 makes changing your keyboard layout easy
- Installing keyboard languages in Windows 10
- Changing the keyboard layout in Windows 10
- Using the taskbar to change the keyboard layout in Windows 10
- Changing your keyboard language in Windows 10 using keyboard shortcuts
$1 Domain Names
Register great TLDs for less than $1 for the first year.
Why wait? Grab your favorite domain name today!
Matching email
SSL certificate
24/7/365 support
Windows 10 makes changing your keyboard layout easy
Naturally, you can only change your Windows 10 keyboard language if the respective language is installed. Depending on which country you bought your Windows version in, the local language may sometimes be the only one installed. If you want to use other languages, you will need to install them manually. Language packs are available for download from Microsoft.
Installing keyboard languages in Windows 10
Windows 10 does not have every keyboard language preinstalled. If you need a new keyboard language, you can easily add it by following the steps below.
- Open Windows Settings. To do this, click on the Windows icon and then select the gear icon from the Start menu. The gear icon is located in the bar that appears above the Windows icon on the far left of the screen.
- Then, you need to select the Time & Language option.

- In the menu on the left-hand side, click “Language”. Then, select the default language in the menu on the right under the heading “Preferred languages”.
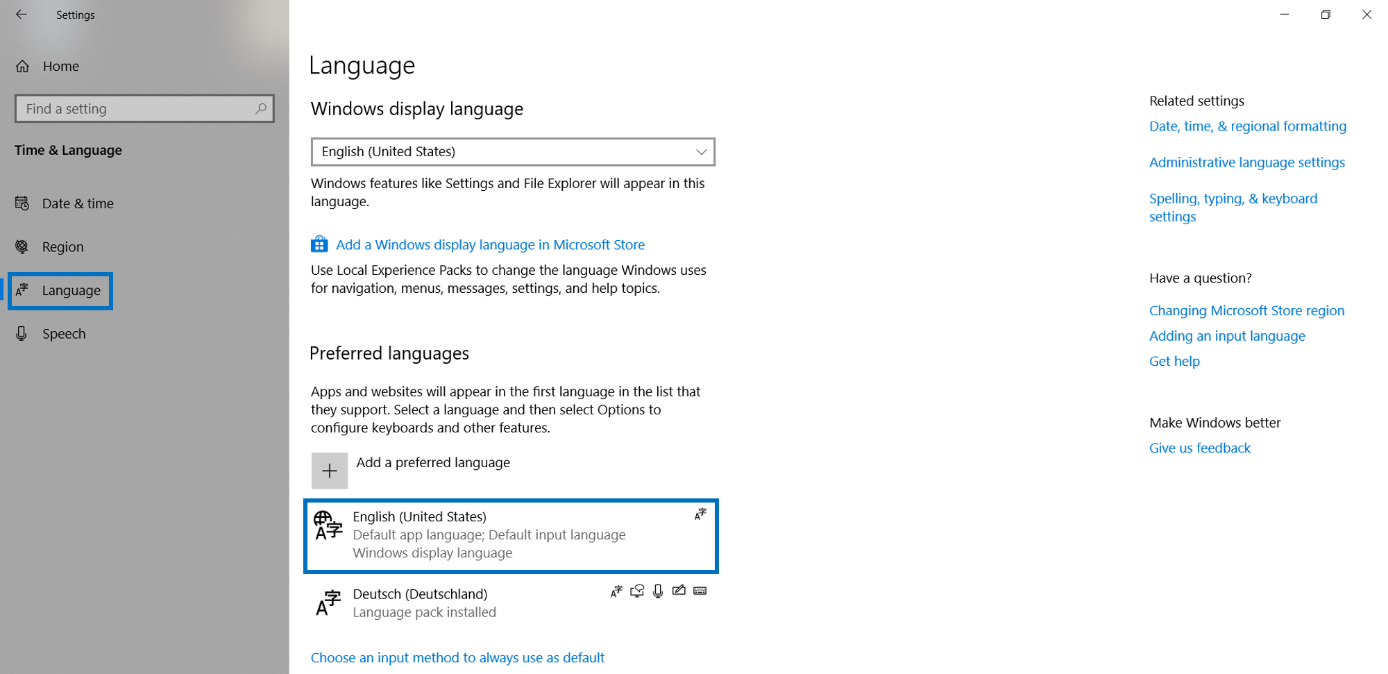
- Now, click options.
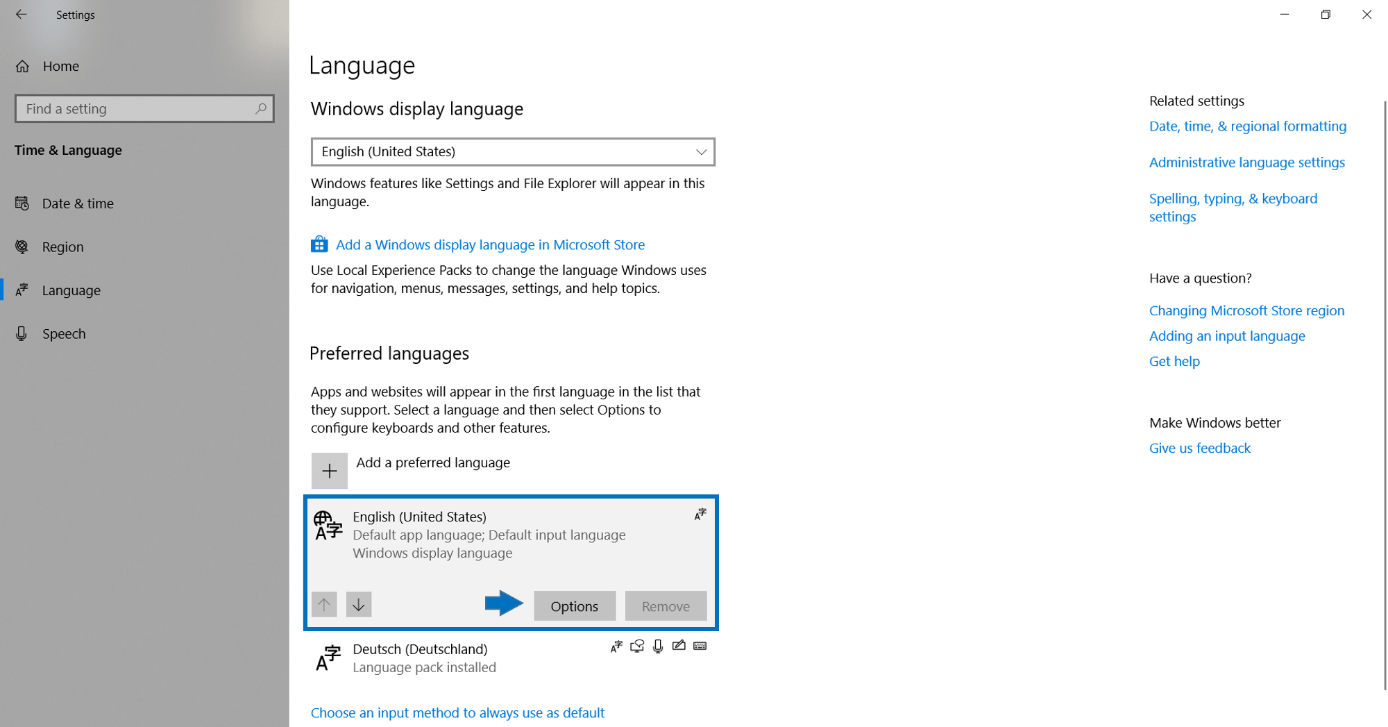
- All keyboards installed so far will appear under the heading “Keyboards”. You can add additional keyboards using “Add a keyboard”.
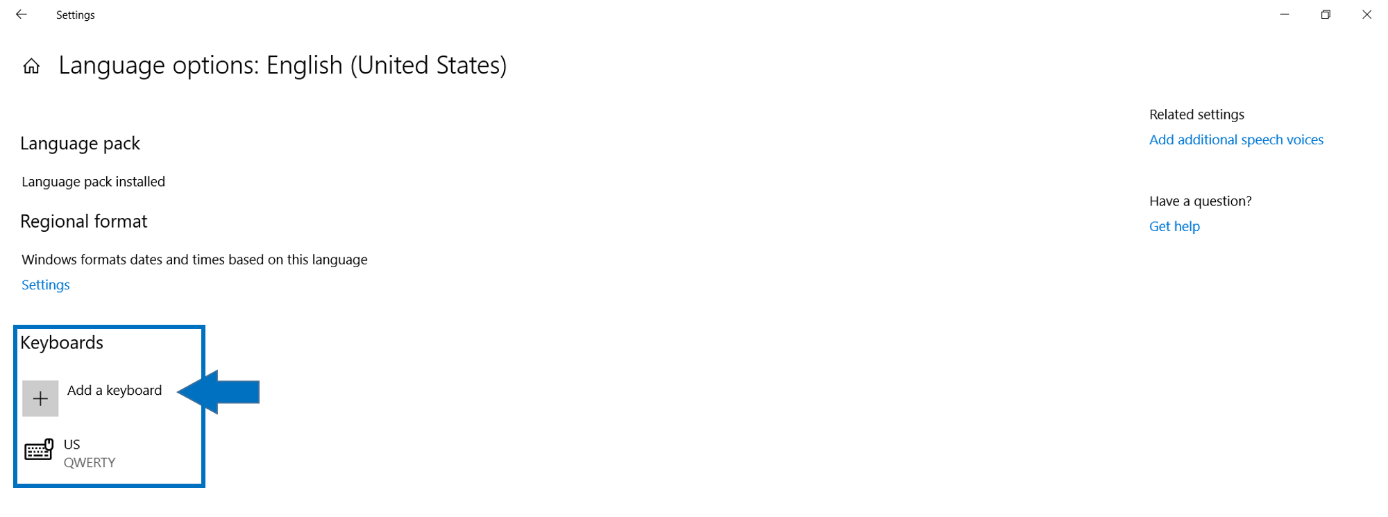
- When you click on “Add a keyboard”, another dialog window will open. In this window, scroll to your desired language and click on it.
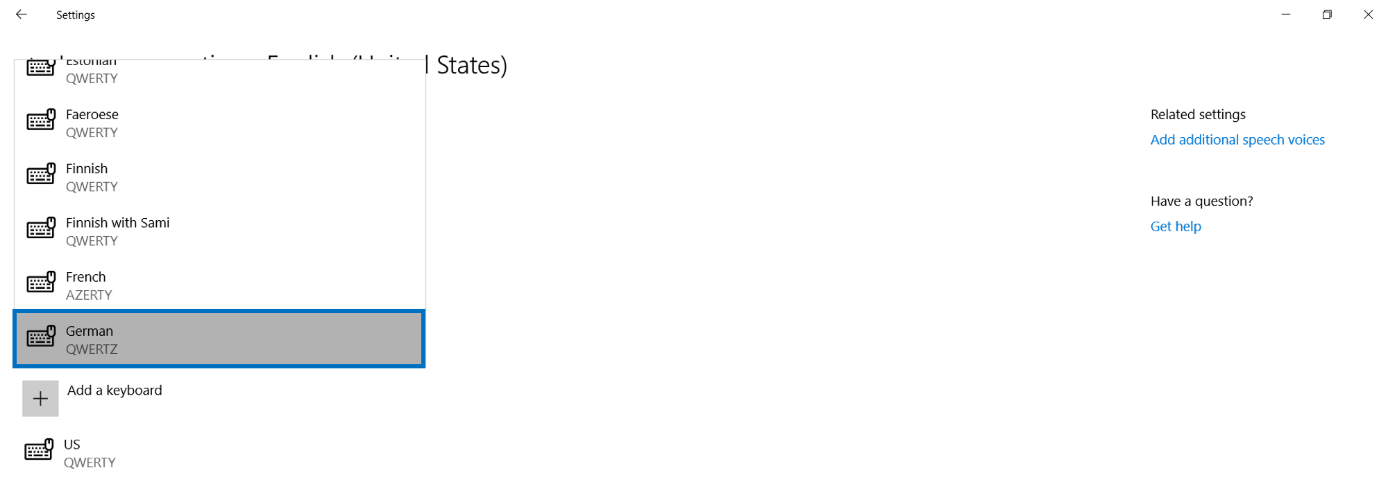
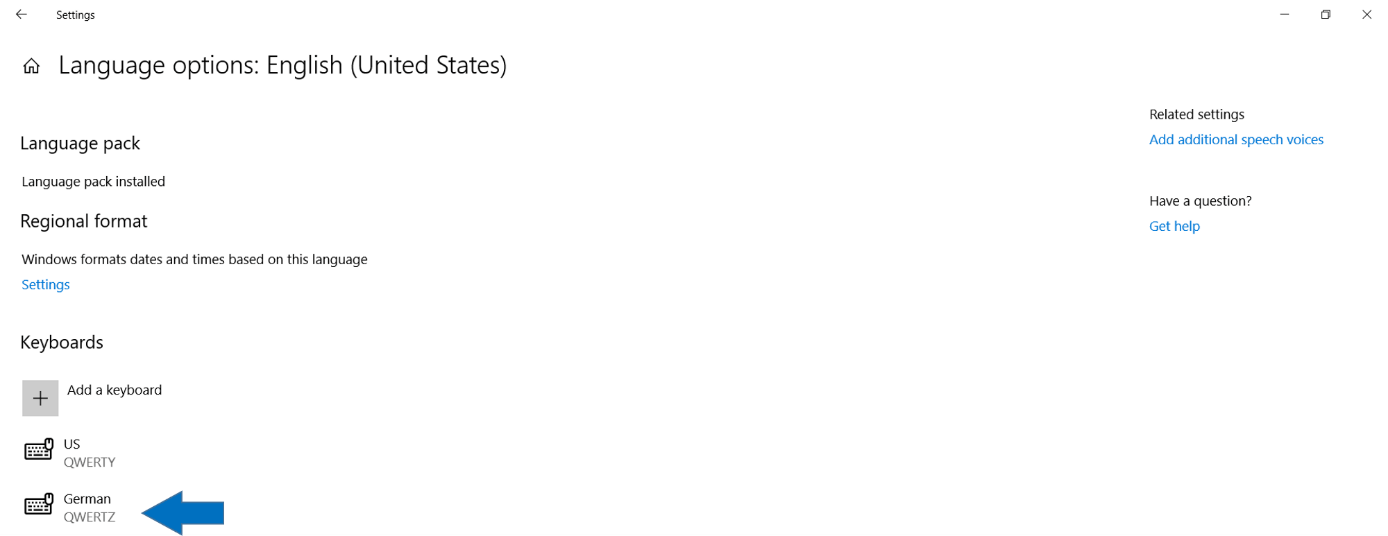
- The new option is now included in your list of keyboards. Now, if you want to change your Windows 10 keyboard layout, you can easily select the language.
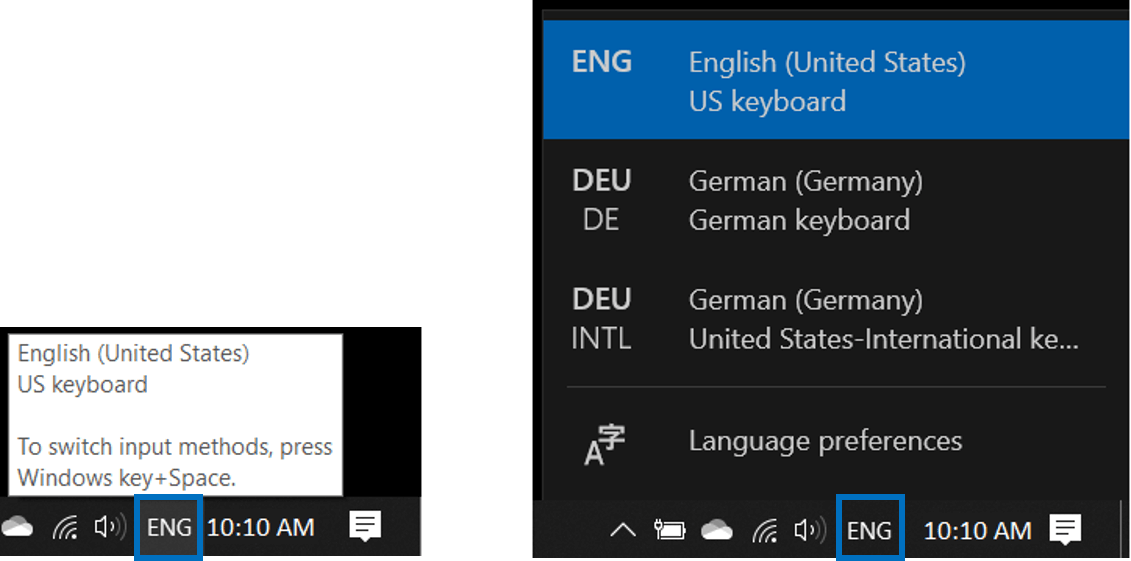
In the taskbar, the abbreviation for the currently used keyboard is displayed next to the time. For example, if the English keyboard is currently selected, it will say “ENG”. If you click on this abbreviation, a window will appear with a list of all the available keyboard layouts. The last item on the list is the “Language preferences”. If you click this, you will automatically be taken to the Windows language settings menu.
If you also want to install additional language features, you can add another preferred language after step three instead of just installing the keyboard. To do this, select “Add a preferred language” in the “Language” menu.
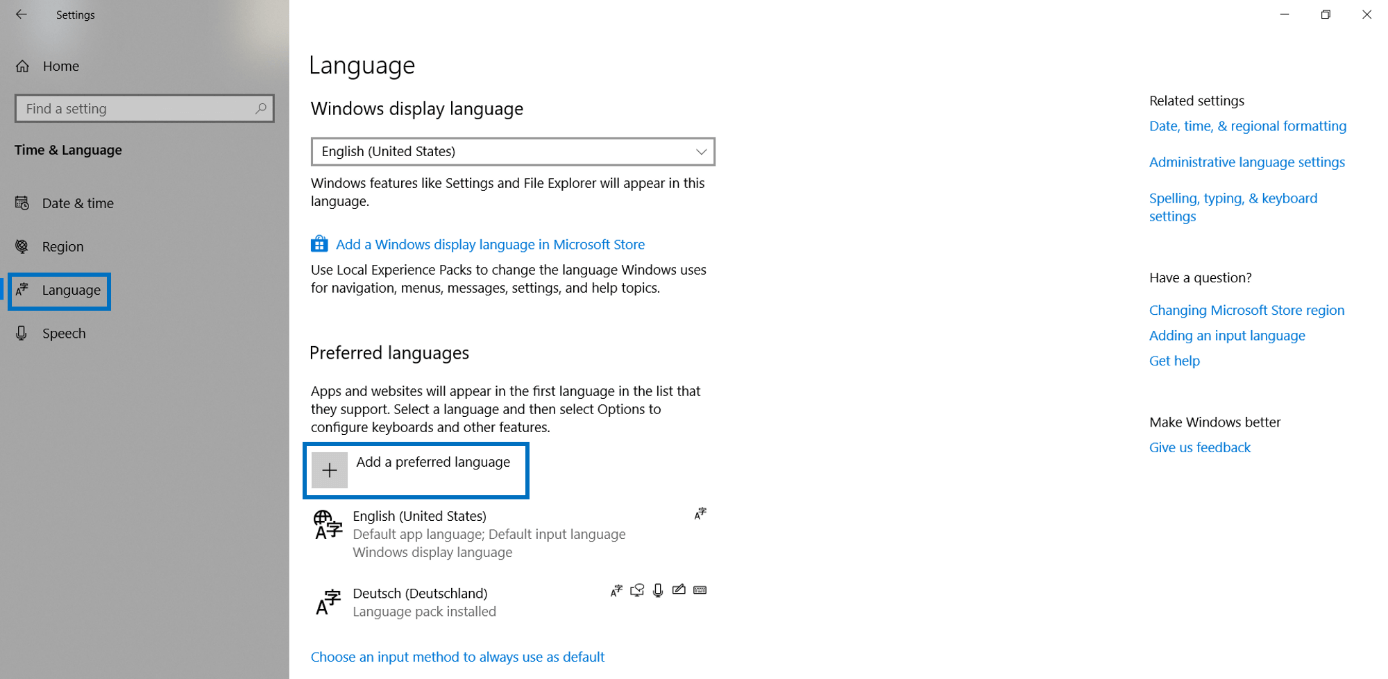
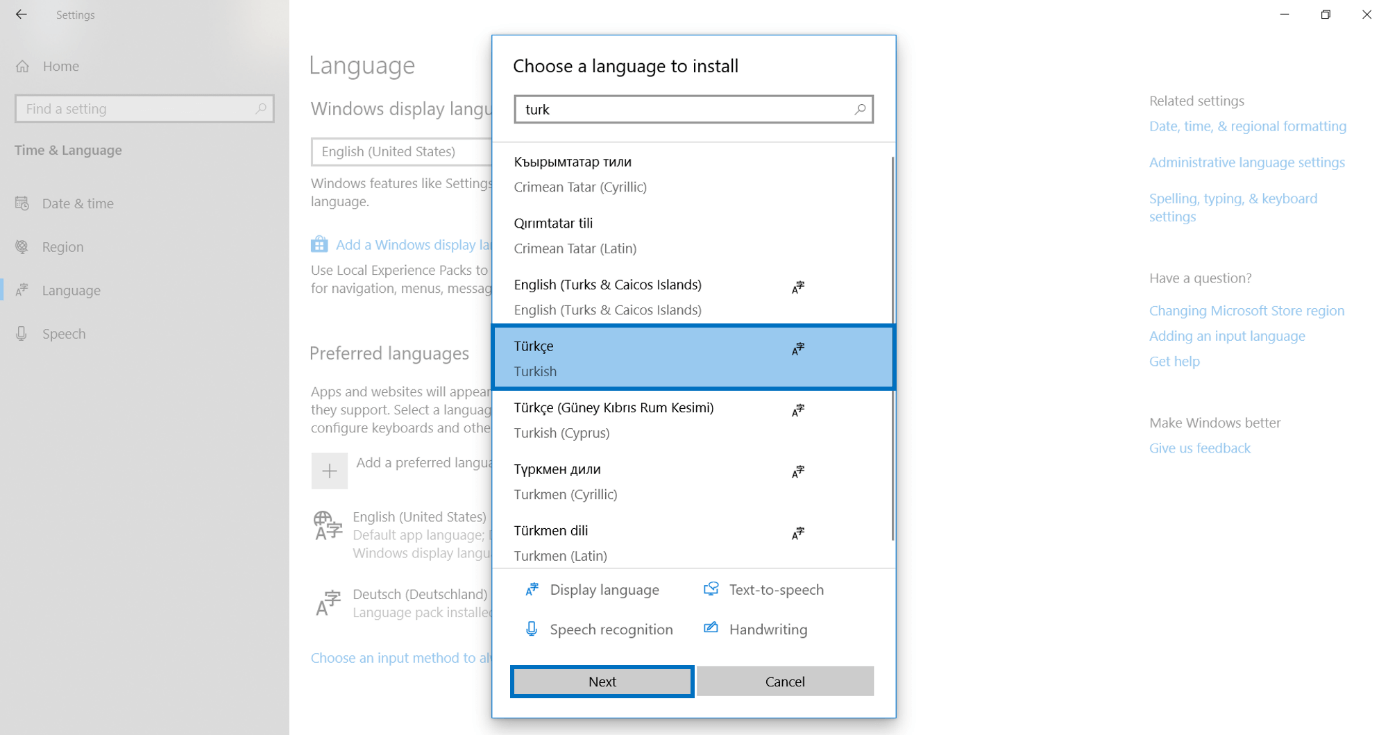
Select your desired language and click “Next”.
You can also set the corresponding language as the display language.
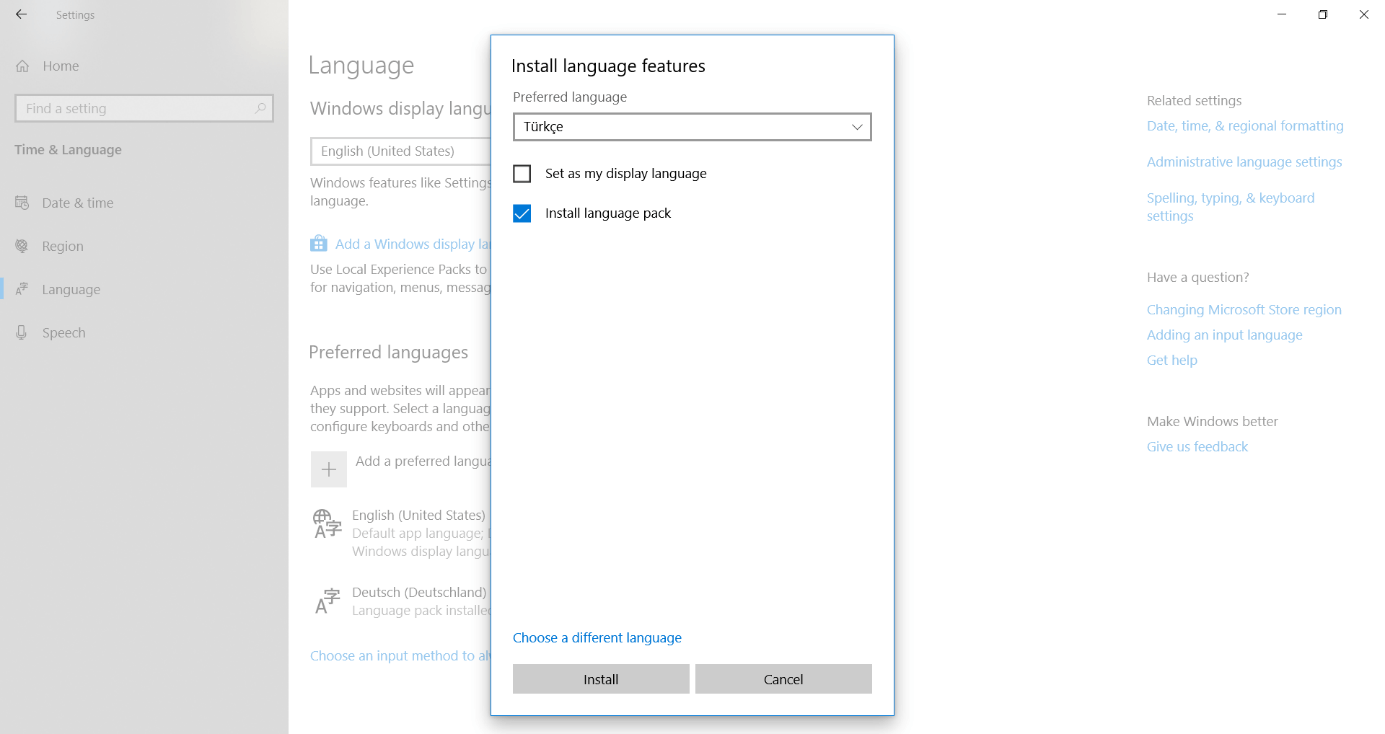
Note: Changing the display language changes the system language. This means that all menus, options and descriptions will be displayed in the new language. For example, if you select English as the display language, Windows 10 will interact with you in English. However, if you just select the keyboard or language pack without checking “Set as my display language”, only your keyboard layout will change.
Tip
It is also possible to change your keyboard layout in Word. Go to the “Language” option located under the “Review” section to access the language preferences. From there you can select the keyboard layout from the installed proofing languages. The current version of Word is part of Microsoft 365 which is available with a setup service from IONOS.
Changing the keyboard layout in Windows 10
When you have more than one layout installed, you can easily change the keyboard language. Windows 10 provides multiple ways to do this.
Using the taskbar to change the keyboard layout in Windows 10
Using the button with the language abbreviation located in the information area of the taskbar next to the time, you can change the keyboard in Windows 10 with just two clicks. For example, “ENG” stands for the English keyboard. If you hover your mouse over the language abbreviation, additional information about the currently active keyboard will be displayed. If you left-click on it, a list of all the available keyboards will be displayed. You can set your desired keyboard language with a single click. Each entry has two lines. The top line contains the display language, while the bottom line is the keyboard layout.
Changing your keyboard language in Windows 10 using keyboard shortcuts
There are several shortcuts which can be used to change your keyboard. If you hover your mouse over the language option in the taskbar, you will see a keyboard shortcut. However, there are generally three ways to switch between keyboard languages at lightning speed using shortcuts.
Windows key + spacebar: This is the new Windows 10 keyboard shortcut for changing between keyboard layouts. It should always work if there is more than one keyboard installed. Hold down the Windows key and then press the spacebar. You can choose between the different keyboard languages displayed by repeatedly pressing the spacebar.
ALT + SHIFT: This is the classic keyboard shortcut for changing keyboards. However, in some versions of Windows 10, this shortcut will now only give you information about which keyboard is currently active.
CTRL + SHIFT: This shortcut is an alternative to ALT + SHIFT.
If you have changed your keyboard layout, the keys may no longer correspond to the characters on your keyboard. A good example of this is the placement of the Z and Y keys on the German and English keyboards. In the German keyboard layout, the Z key is located in the middle of the top row of letters, while that is the location of the Y key on the English keyboard. This can lead to typos when entering passwords.
Related articles

How to change startup programs in Windows 10
Like all modern Microsoft operating systems, Windows 10 has a built-in feature that allows you to automatically run system programs, user-defined programs, service applications and processes. In this tutorial, you’ll learn how the startup folder works in Windows 10 and how to add or remove specific applications.
How to change startup programs in Windows 10
How to fix a Blue Screen of Death (BSOD)
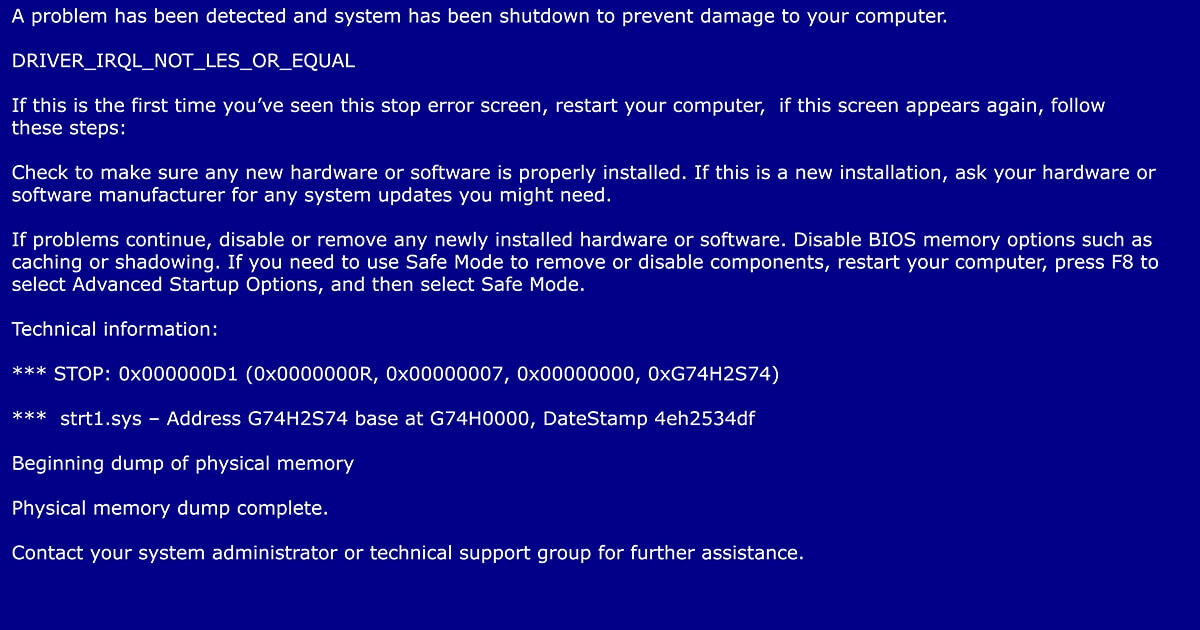
The infamous blue screen of death usually shows up without any warning. It’s an important indicator of internal problems with hardware, software, or drivers. If Windows can no longer be run as a result of such a problem, then the forced shutdown takes place in the form of a blue screen containing an error message. This may cause unsaved files and documents to be lost. The most important thing with…
How to fix a Blue Screen of Death (BSOD)

How to take a screenshot in Windows 10
Many third-party providers offer tools for taking screenshots in Microsoft’s latest operating system. However, there is already a variety of standard options for taking screenshots in Windows 10. You can simply use the established keyboard shortcuts for taking screenshots or the Snipping Tool which has been included in Windows for quite some time.
How to take a screenshot in Windows 10

The Windows shortcuts you should know
Windows shortcuts can help you save a lot of time when working on a computer. With a simple hand gesture, you can use shortcuts to perform recurring tasks. In this article, you will find a practical overview of the most important Windows keyboard shortcuts which will make your everyday life easier and working with Windows more convenient.
The Windows shortcuts you should know

How to split a screen in Windows 10
When you use two or more programs at the same time, the back and forth between them can be tiresome and ineffective. Luckily, there’s a practical solution to this in Windows 10: split screen mode. With split screen, two windows can be presented in one half of the monitor (or four programs for a quarter of the monitor). We’ll show you how to split your screen in Windows 10 using your mouse or…
How to split a screen in Windows 10
FAQ
[Windows 11/10] How to add/change Keyboard Language
Please go to the corresponding instruction based on the current Windows operating system on your computer:
- Windows 11
- Windows 10
Windows 11 operating system
Table of Contents:
- Add a keyboard
- Set up the default input method
Add a keyboard
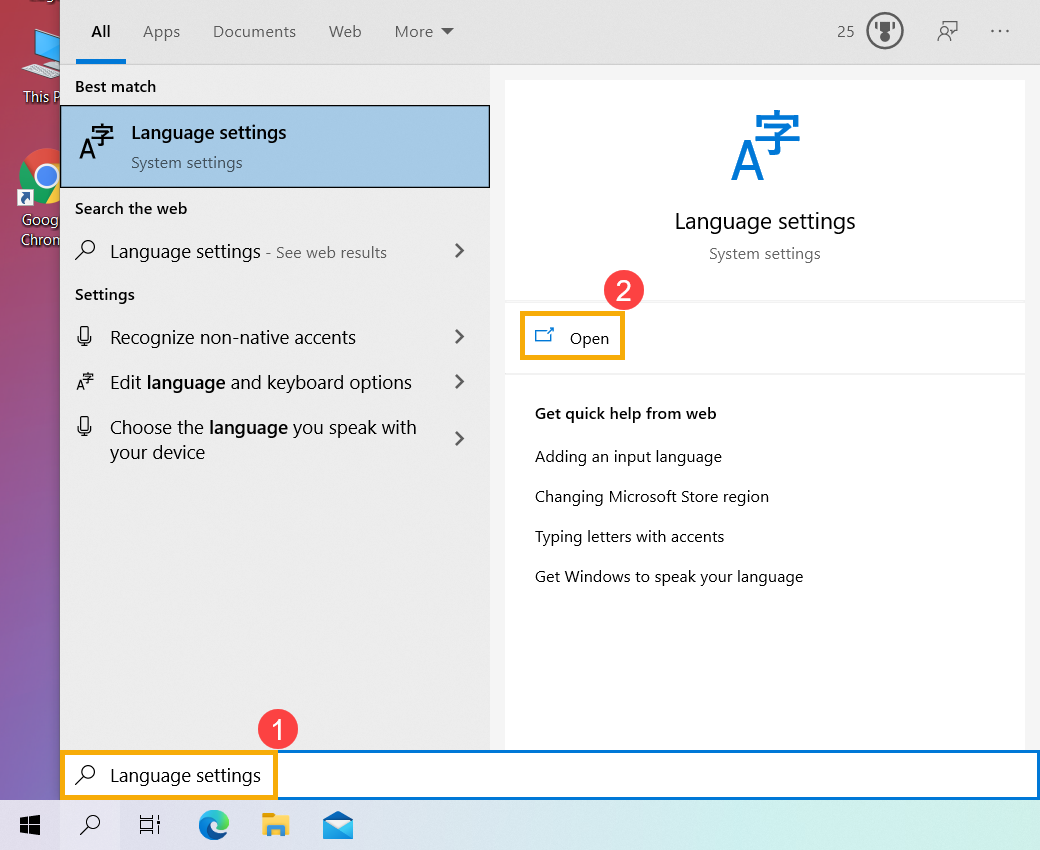
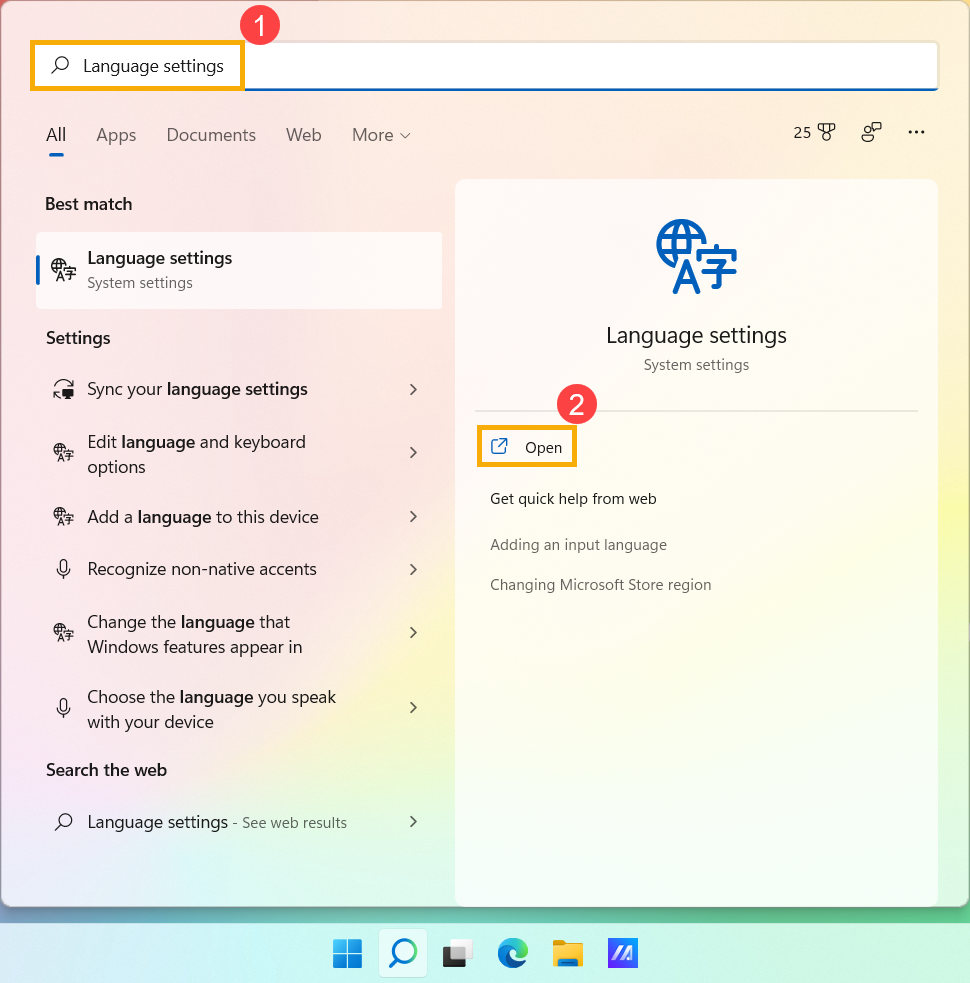
- Type and search [Language settings] in the Windows search bar①, and then click [Open]②.
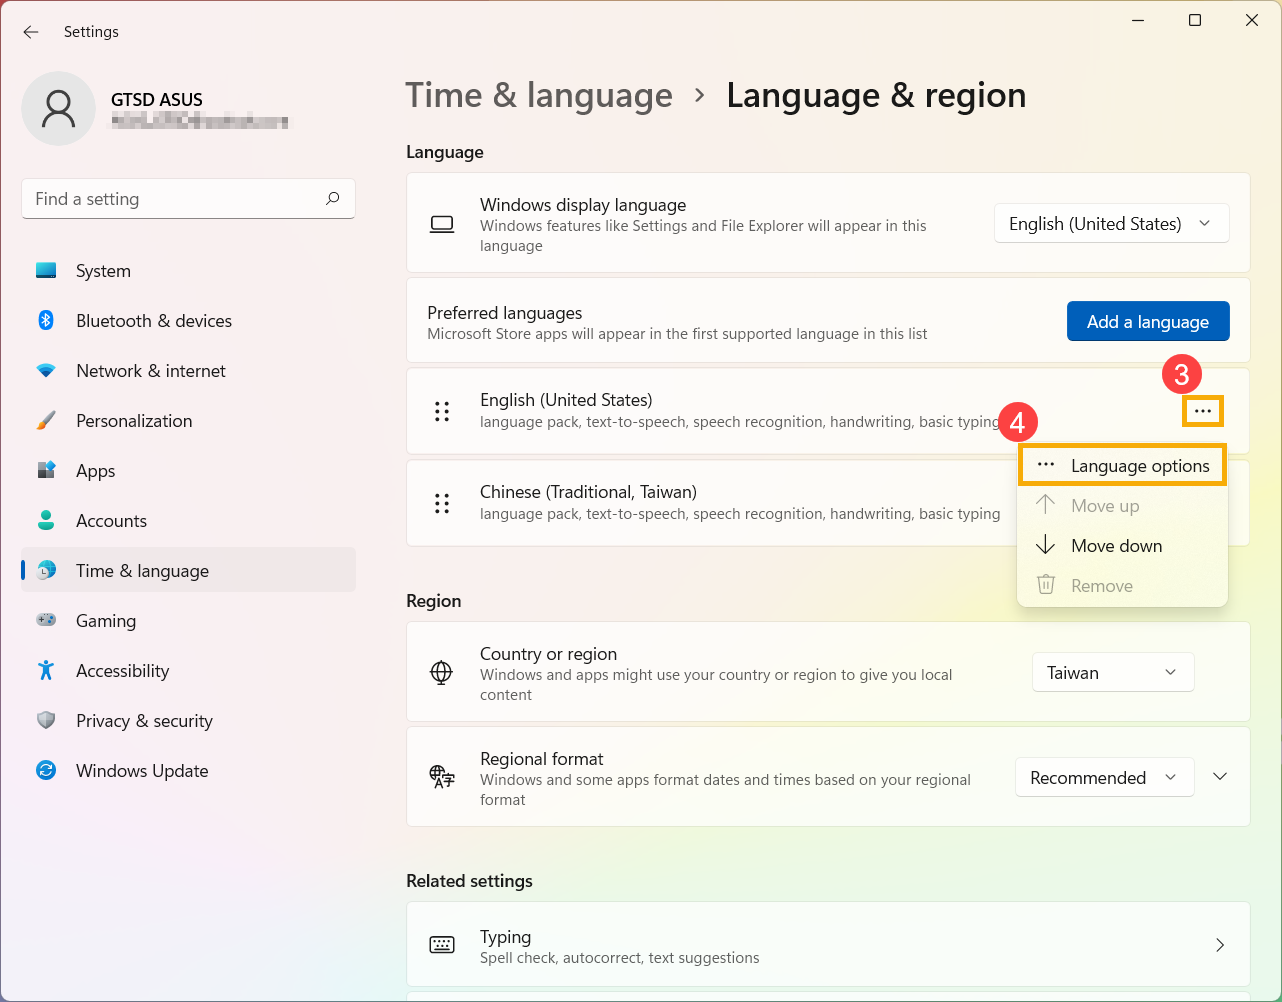
- In Preferred languages, Select the [More]
icon③ next to the language you want to add a new keyboard, and then select [Language options]④.
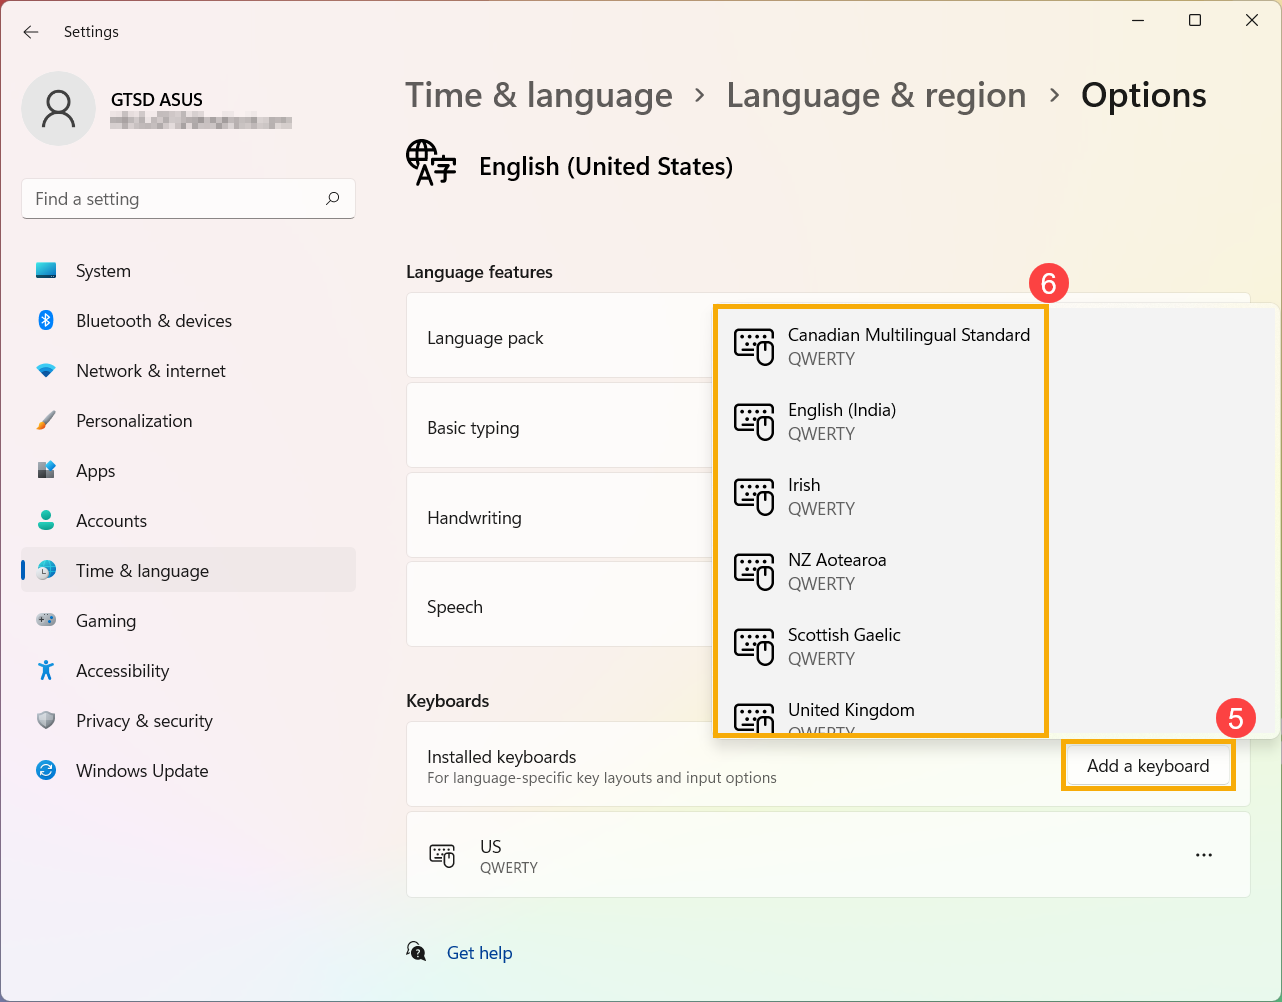
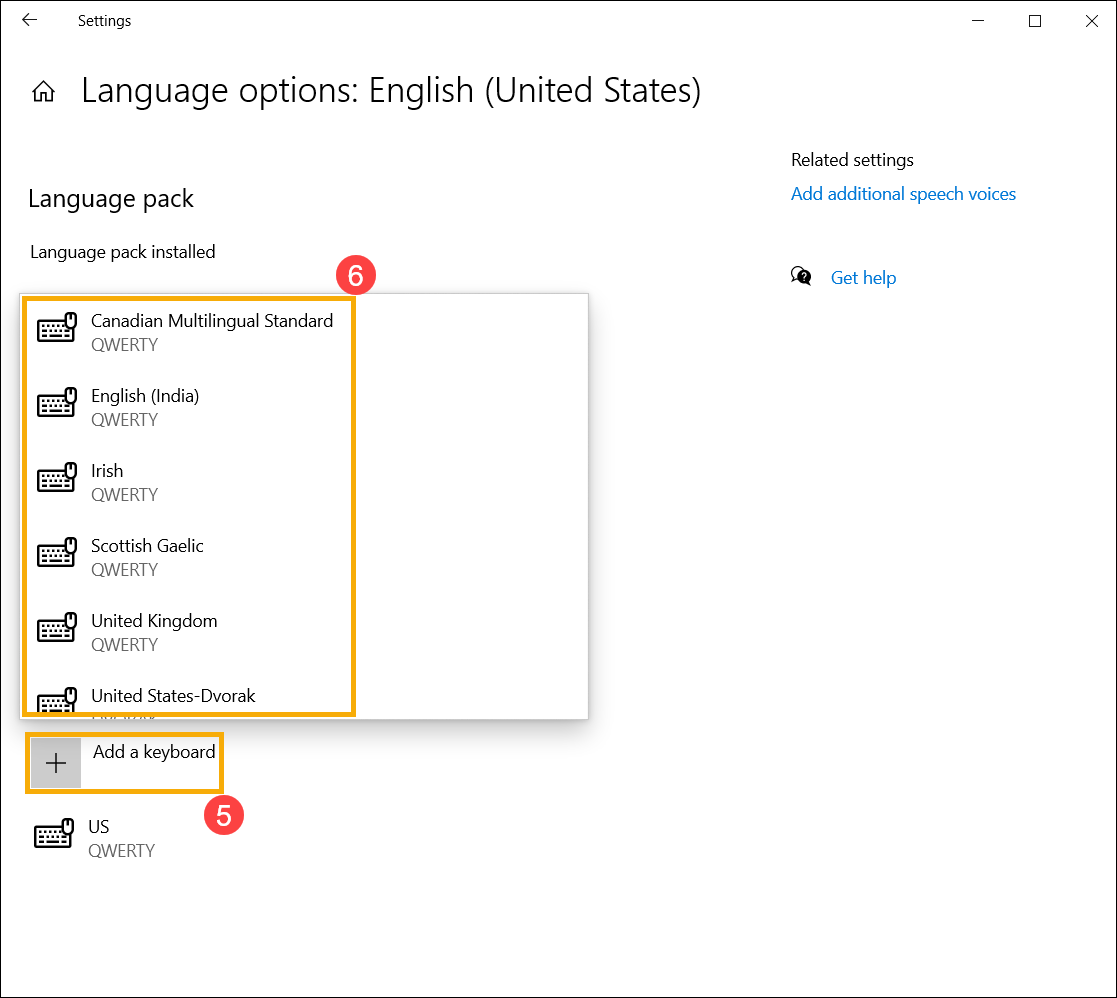
- Click [Add a keyboard]⑤, and then select the keyboard you want to add from the list⑥. If you do not find the keyboard you want, maybe you need to add a new language pack to get the other keyboard options.
Only when Windows may not provide the keyboard you want, please contact the keyboard language manufacturer.
Back to Table of Contents
Set up the default input method
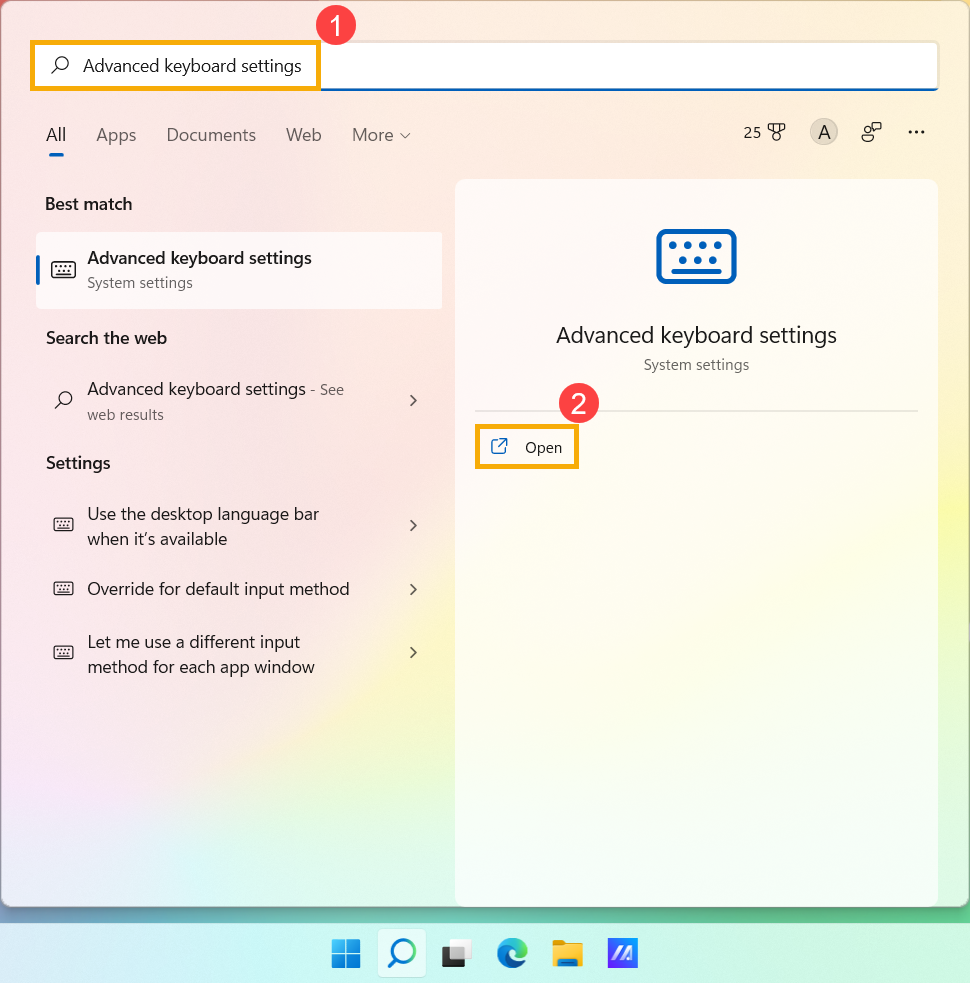
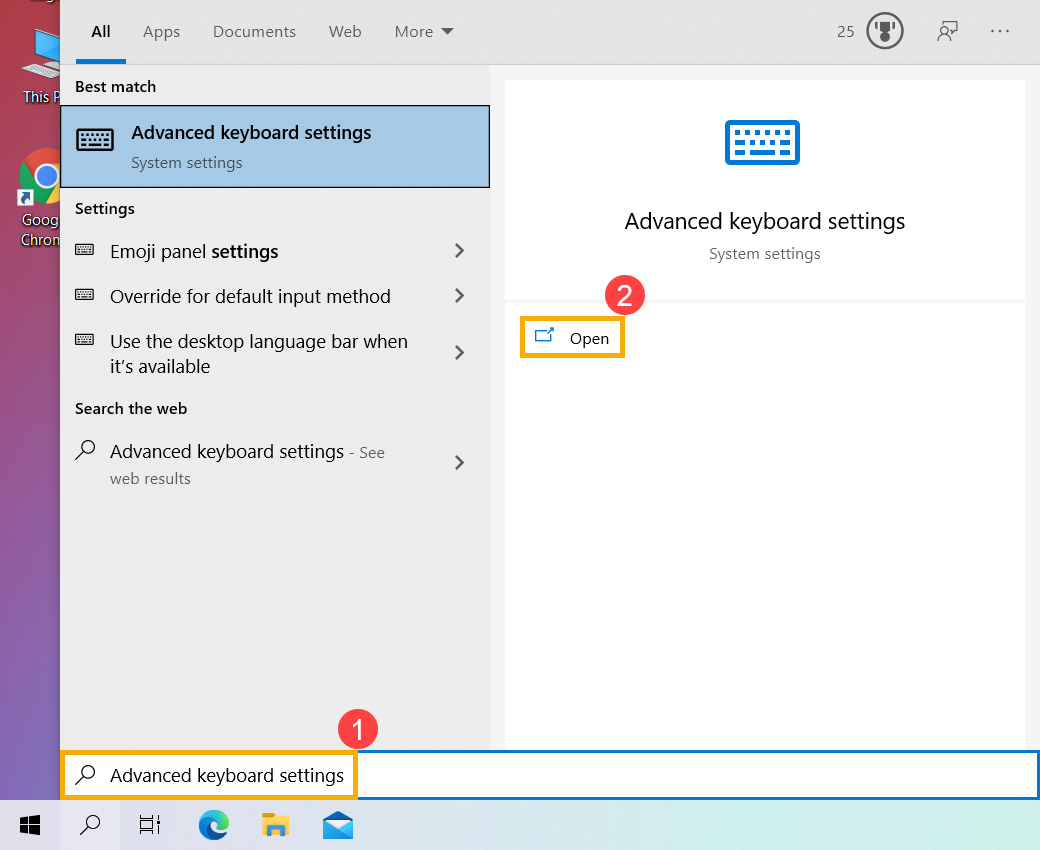
- Type and search [Advanced keyboard settings] in the Windows search bar①, and then click [Open]②.
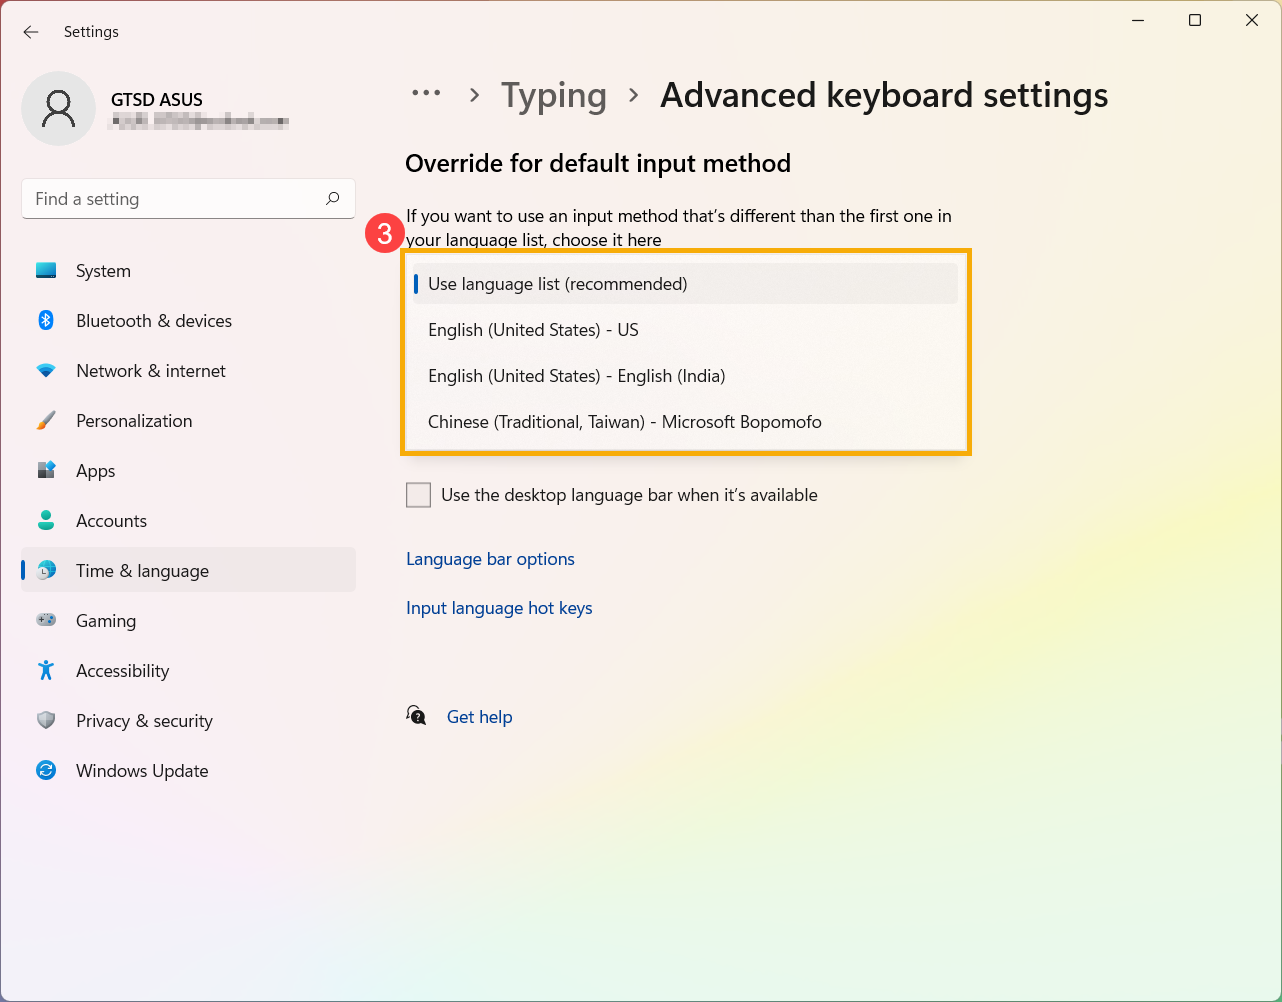
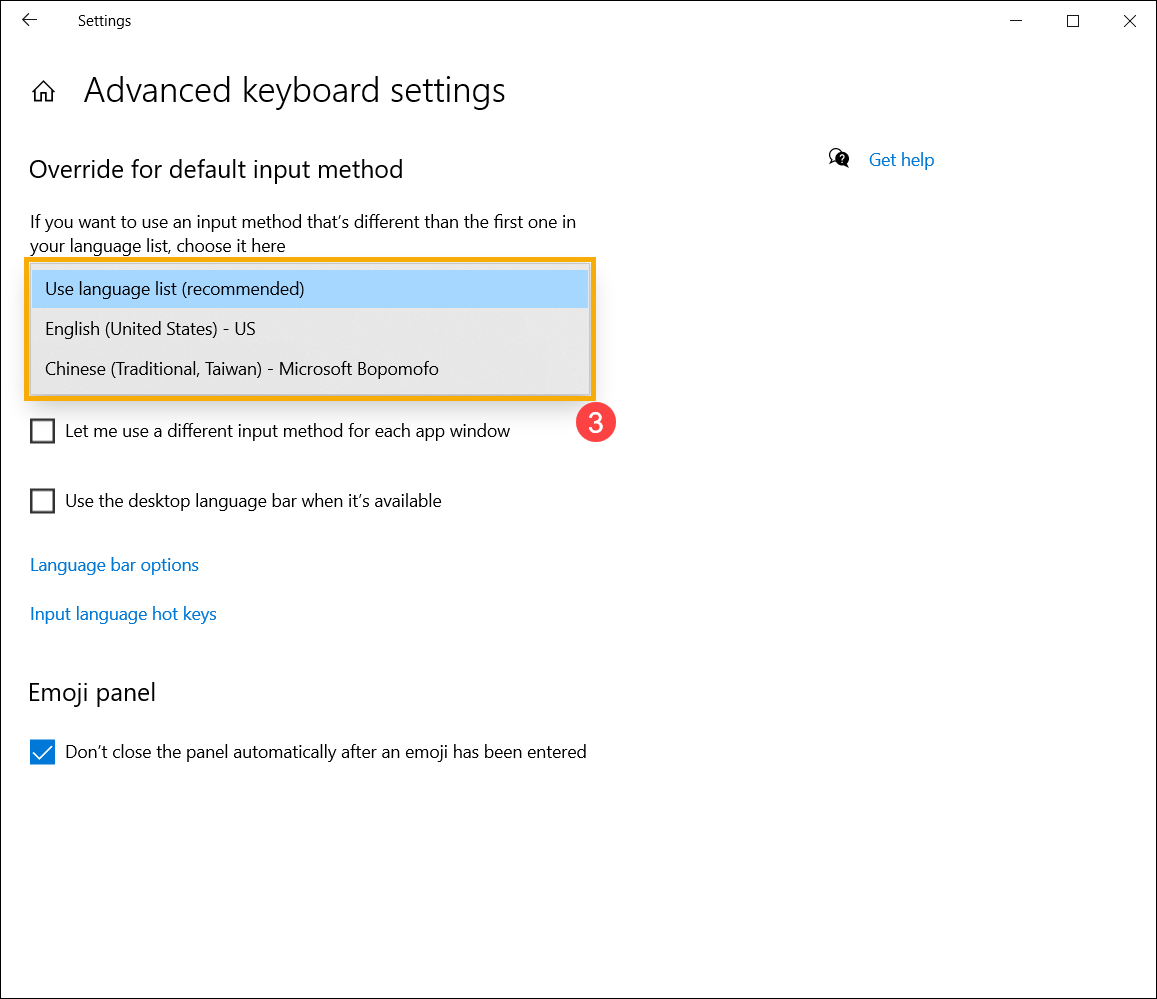
- In Override for default input method, select the keyboard you want from the drop-down list③.
Note: The list may display keyboards Windows only provides.
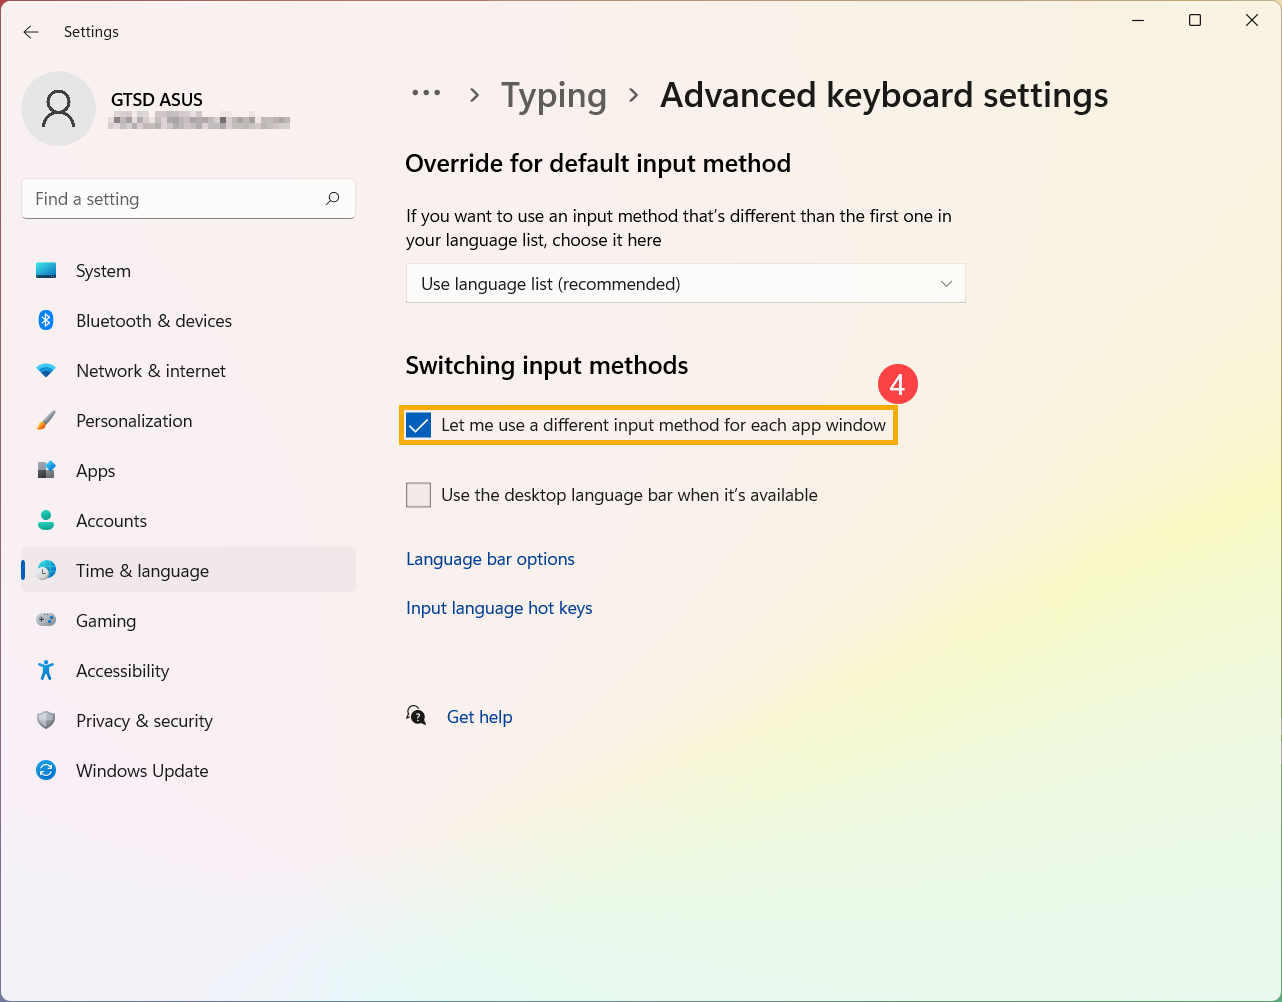
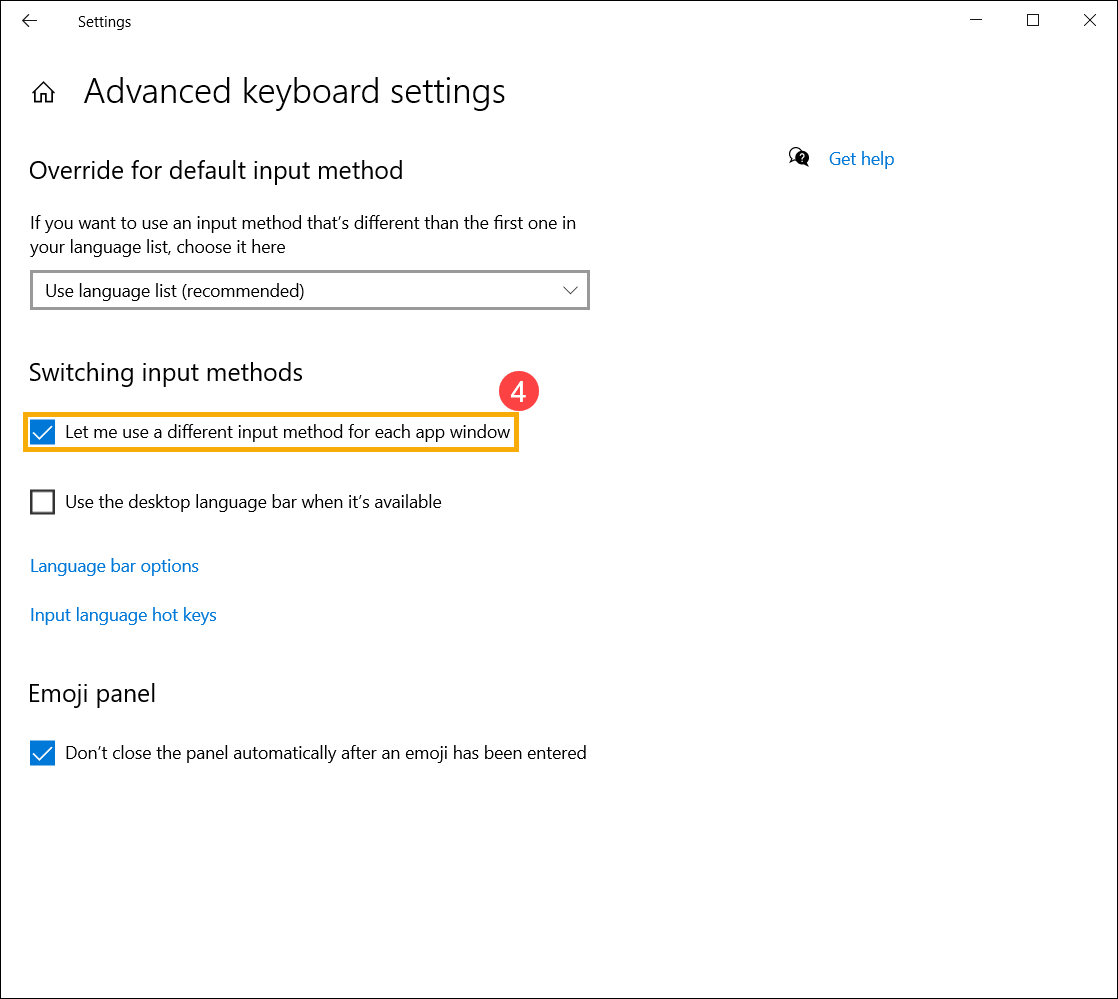
- If you would like each app to utilize a different keyboard, you can select the box to [Let me use a different input method for each app window]④.
Back to Table of Contents
Windows 10 operating system
Table of Contents:
- Add a keyboard
- Set up the default input method
Add a keyboard
- Type and search [Language settings] in the Windows search bar①, and then click [Open]②.
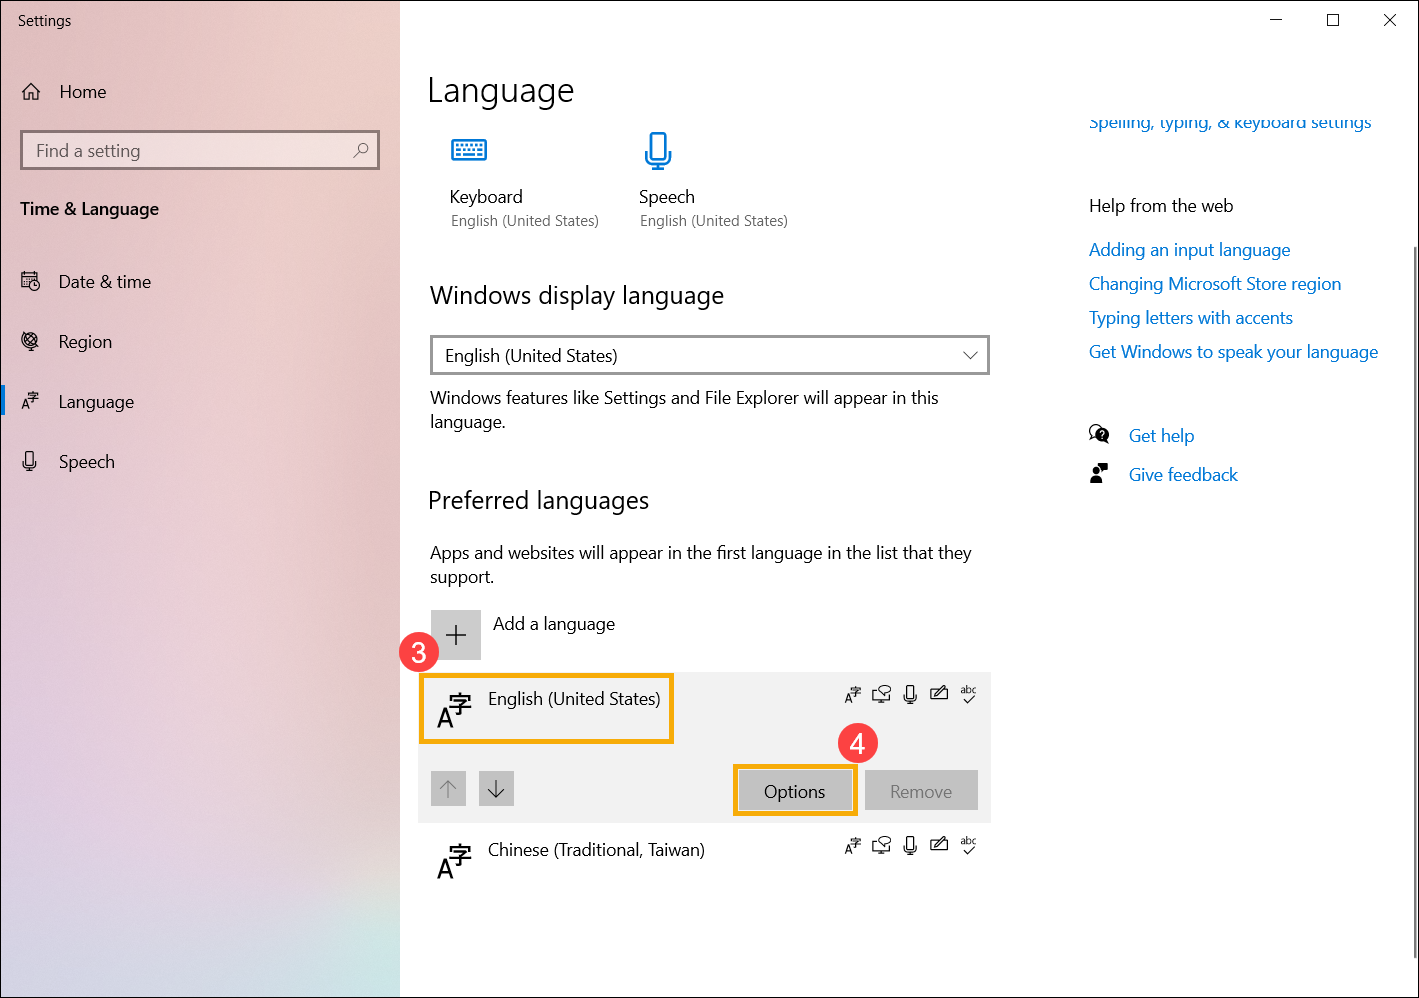
- In Preferred languages, select the language that you want to add a new keyboard③, and then select [Options]④.
- Select [add a keyboard]⑤, and then select the keyboard you want to add from the list⑥. If you do not find the keyboard you want, maybe you need to add a new language pack to get the other keyboard options.
Only when Windows may not provide the keyboard you want, please contact the keyboard language manufacturer.
Back to Table of Contents
Set up the default input method
- Type and search [Advanced keyboard settings] in the Windows search bar①, and then click [Open]②.
- In Override for default input method, select the keyboard you want from the drop-down list③.
Note: The list may display keyboards Windows only provides.
- If you would like each app to utilize a different keyboard, you can select the box to [Let me use a different input method for each app window]④.
Back to Table of Contents
Was this information helpful?
Yes
No
- Above information might be partly or entirely quoted from exterior websites or sources. please refer to the information based on the source that we noted. Please directly contact or inquire the sources if there is any further question and note that ASUS is neither relevant nor responsible for its content/service
- This information may not suitable for all the products from the same category/series. Some of the screen shots and operations could be different from the software versions.
- ASUS provides the above information for reference only. If you have any questions about the content, please contact the above product vendor directly. Please note that ASUS is not responsible for the content or service provided by the above product vendor.
- Brand and product names mentioned are trademarks of their respective companies.
Introduction
Windows 10 allows you to add one or multiple keyboard languages/layouts. The language of your keyboard layout controls the characters that appear on your screen when you type. By using the different layouts, you can type all the characters for the language, including diacritics such as the umlaut (ä) in German and the tilde (ñ) in Spanish.
When you need to type something in a different(foreign) languages instead of English, you can add and change your keyboard language at any time from English to Urdu, English to Punjabi, US to Hindi, and US to UK, etc. by modifying a few settings in the Windows Control Panel or Windows Settings.
There are two methods to help you add the Keyboard Language in Windows 10 easily and quickly.
Method 1 — Through Control Panel
With the help of Control Panel, users can add multiple keyboard languages/layouts in Windows 10 PC. Follow the below instructions to proceed.
Step 1
Press the «Windows + X» key, and click on Control Panel to open it.
Step 2
Select «Add a language» option.
Step 3
After clicking on the ‘Add a language’ option, the ‘Language’ window will appear on the screen and then you can add a language by selecting the ‘Add a language’ Button.
Step 4
Choose the language you wish to add and then click on Add Button.
Method 2 — Through System Settings
With the help of System Settings, users can add one or more keyboard layouts in Windows 10 PC. Follow the below instructions to proceed.
Step 1
From the Start menu, select Settings.
Step 2
Select Time & Language.
Step 3
Click on «Add a language» and choose the language that you wish to add.
Step 4
Click on the «Options» button to proceed.
Step 5
Under the «Keyboards» section, click the «Add a keyboard» button to proceed.
Step 6
Select the new keyboard that you want to add.
How to change the keyboard layout in Windows 10
There are 2 ways to help you change the Keyboard Layout in Windows 10 easily and quickly.
Step 1
Click the keyboard layout button on the notification area of the taskbar.
Step 2
Select the layout/language that you want to use.
Note:
Alternatively, you can also use the «Windows key + Spacebar» keyboard shortcut to quickly change between the available keyboard layouts.
By following the above steps, the Keyboard Language(Layout) can be changed in Windows 10 PC.
Conclusion
By following any of the above methods, users can add or change the keyboard layouts in Windows 10.
I hope you have enjoyed this article. Follow C# Corner to learn more new and amazing things about Windows 10.
Thanks for reading.
 icon
icon