Стандартно в операционной системе Windows 10 для всех элементов используется шрифт Segoe UI. К сожалению, изменить его в настройках параметров ОС нельзя — такой возможности просто нет. Для изменения системного шрифта придётся прибегнуть к работе с реестром или запуску сторонних приложений, созданных специально для этих целей. Эта статья поможет изменить шрифт на компьютере с Windows 10 тремя способами разной степени сложности, плюс имеется отдельный пункт о том, как вернуть шрифт по умолчанию.
Изменение шрифта в Windows 10 с помощью редактора реестра
Заменить стандартный шрифт в операционной системе можно при помощи редактора реестра — преимущество данного способа в том, что пользователю не нужно загружать дополнительный софт.
Перед тем, как приступить к процессу замены, пользователю нужно найти название нужного ему шрифта:
- откройте проводник;
- введите в адресную строку C:\Windows\Fonts;
- просмотрите варианты, выбрав подходящий шрифт;
- запишите его название в блокнот (например, Times New Roman).
Теперь можно приступать к процессу замены стандартного системного шрифта.
Пошаговая инструкция:
- нажмите клавиши Windows + R на клавиатуре;
- в появившемся окне введите команду regedit, после чего нажмите на кнопку «ОК»;
- перейдите по адресу HKEY_LOCAL_MACHINE\SOFTWARE\Microsoft\Windows NT\CurrentVersion\Fonts (можно скопировать и вставить в адресную строку, либо открыть нужный раздел в ручном режиме);
- найдите в списке шрифт Segoe UI и все его вариации;
- нажмите два раза левой клавишей мыши на Segoe UI;
- в открывшемся окне удалите всё содержимое из поля «Значение», нажмите «ОК»;
- повторите процедуру для всех вариаций шрифта Segoe UI, кроме Segoe UI Emoji;
- перейдите по адресу HKEY_LOCAL_MACHINE\SOFTWARE\Microsoft\Windows NT\CurrentVersion\FontSubstitutes (можно скопировать и вставить в адресную строку этого же окна);
- в правом окне нажмите правой клавишей мыши, после чего выберите пункт меню «Создать» и кликните по «Строковый параметр»;
- введите название параметра «Segoe UI»;
- введите в поле «Значение» название необходимого для замены шрифта, которое было записано на этапе подготовки (с учётом заглавных букв);
- нажмите «ОК»;
- закройте редактор реестра, после чего перезагрузите компьютер.
Важное уточнение: шрифт в меню «Пуск» и «Параметры» не меняется, он останется стандартным.
Изменение шрифта в Windows 10 с помощью программы Winaero Tweaker
Если пользователь по каким-то причинам не желает работать с редактором реестра, можно воспользоваться специальной полностью бесплатной программой Winaero Tweaker, которая позволяет настраивать внешний вид операционной системы Windows 10. Важно уточнить, что если предыдущий способ заменял все системные шрифты ОС на один выбранный вариант, то настройка при помощи ПО более гибкая.
Пошаговая инструкция:
- перейдите на официальный сайт Winaero Tweaker;
- пролистайте вниз до ссылки Download Winaero Tweaker, кликните по ней;
- вновь пролистайте до ссылки Click here to download the file, кликните по ней;
- извлеките файлы из загруженного архива;
- установите приложение на свой компьютер;
- нажмите правой клавишей мыши на ярлык, выберите пункт меню «Запустить от имени администратора»;
- в окне приложения в меню слева выберите пункт «Advanced Appearance Settings»;
- кликните по одному из пунктов данного меню, например, «Icons»;
- в окне справа кликните по кнопке «Change font»;
- в появившемся окне выберите тот шрифт, который вам нравится;
- нажмите «ОК»;
- повторите данную процедуру со всеми пунктами меню «Advanced Appearance Settings»;
- закройте программу;
- перезагрузите компьютер.
Пункт меню «Advanced Appearance Settings» позволяет настраивать шрифты отдельно для определённых элементов системы. То есть, пользователь может выбрать один шрифт для иконок, другой — для заголовков окон, а третий в качестве системного шрифта.
Список доступных для настройки элементов:
- Icons — подписи иконок;
- Menus — меню программ;
- Message Font — шрифт для сообщений программ;
- Statusbar Font — шрифт для строки состояния;
- System Font — системный шрифт (заменяет Segoe UI на любой другой);
- Window Title Bars — шрифт для заголовка окон.
В случае, если пользователь захочет отказаться от изменённых шрифтов, нужно лишь открыть меню «Advanced Appearance Settings», кликнуть по пункту «Reset Advanced Appearance» и в окне справа нажать на единственную кнопку «Reset Advanced Appearance settings». После этого нужно перезагрузить компьютер.
Изменение шрифта в Windows 10 с помощью программы Advanced System Font Changer
Если предыдущее приложение обладает целой россыпью функций для кастомизации операционной системы Windows 10, то программа Advanced System Font Changer создана специально для изменения системных шрифтов. Соответственно, интерфейс и сам процесс работы в данном случае немного проще.
Пошаговая инструкция:
- скачайте программу Advanced System Font Changer с официального сайта разработчика;
- запустите загруженный exe-файл от имени администратора;
- в первом появившемся окне нажмите «Да» и сохраните файл в любое удобное для вас место (программа спросит, хотите ли вы сохранить стандартные настройки системы, чтобы потом, при необходимости, восстановить их);
- после этого на экране появится главное меню приложения со списком доступных элементов для настройки;
- кликните по одному из пунктов, например, «Menu»;
- откроется меню выбора шрифта;
- выберите тот вариант, который необходим;
- нажмите «ОК»;
- повторите процедуру для всех элементов, которые необходимо настроить;
- закройте приложение;
- перезагрузите компьютер.
Список доступных для настройки элементов:
- Title bar — шрифт для заголовка окон;
- Menu — меню программ;
- Message box — шрифт для сообщений программ;
- Palette title — шрифт для заголовков панелей в окнах;
- Icon — подписи иконок;
- Tooltip — шрифт для строки состояния.
В случае, если пользователь захочет отказаться от изменённых шрифтов, ему нужно нажать на кнопку «Default» в правом верхнем углу приложения.
Восстановление до стандартных шрифтов
В случае, если после проделанных манипуляций пользователь захочет восстановить стандартный шрифт, нужно будет выполнить лишь несколько простых команд:
- откройте проводник;
- введите в адресную строку C:\Windows\Fonts;
- слева в меню кликните по пункту «Параметры шрифтов»;
- нажмите на кнопку «Восстановить параметры шрифтов по умолчанию»;
- перезагрузите компьютер.
- Теперь не боюсь за Windows: точки восстановления создаются каждый день. Вот как это настроить
- Эта бесплатная утилита от Microsoft в разы ускоряет работу. Она существует ещё с Windows 95
- Эта утилита показывает, где используется выбранный файл в Windows и что мешает удалить его
- Мод Windows 10 для игр: тестирую Atlas OS, из которого вырезали лишнее ради производительности
- 10 приложений, которые нужно сразу установить на новый компьютер
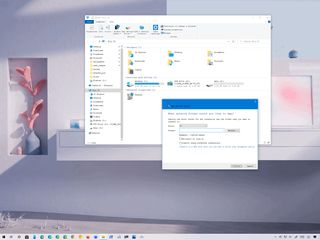
(Image credit: Windows Central)
On Windows 10, you can change the default system font, but you now have to make changes to the Registry to complete this task.
In older versions like Windows 7, the Control Panel included personalization settings to change the system font for many visual elements on the desktop, such as File Explorer, icons, title bars, menus, message boxes, and more. However, for some reason, Windows 10 removed these settings, and you are now stuck with the default system font.
However, it is possible to change the «Segoe UI» default font on Windows 10, if that is something you want to do. Now, it just takes a few more steps using the Registry.
In this Windows 10 guide, we will walk you through the steps to change the default system font for most desktop elements.
- How to change default font on Windows 10
- How to restore default system font on Windows 10
How to change default font on Windows 10
To change the system font on Windows 10, use these steps:
Warning: This is a friendly reminder that editing the Registry is risky and can cause irreversible damage to your installation if you don’t do it correctly. It’s recommended to make a full backup of your PC before proceeding. Alternatively, you can create a system restore point, which will also help you revert the changes.
- Open Start.
- Search for Notepad and click the top result to open the text editor.
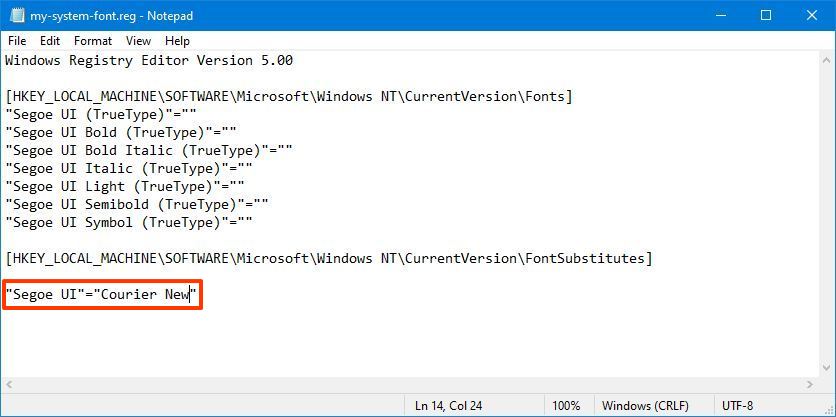
- Copy and paste the following Registry code onto the file:Windows Registry Editor Version 5.00[HKEY_LOCAL_MACHINE\SOFTWARE\Microsoft\Windows NT\CurrentVersion\Fonts]»Segoe UI (TrueType)»=»»»Segoe UI Bold (TrueType)»=»»»Segoe UI Bold Italic (TrueType)»=»»»Segoe UI Italic (TrueType)»=»»»Segoe UI Light (TrueType)»=»»»Segoe UI Semibold (TrueType)»=»»»Segoe UI Symbol (TrueType)»=»»[HKEY_LOCAL_MACHINE\SOFTWARE\Microsoft\Windows NT\CurrentVersion\FontSubstitutes]»Segoe UI»=»NEW-FONT-NAME»
- Open Settings.
- Click on Personalization.
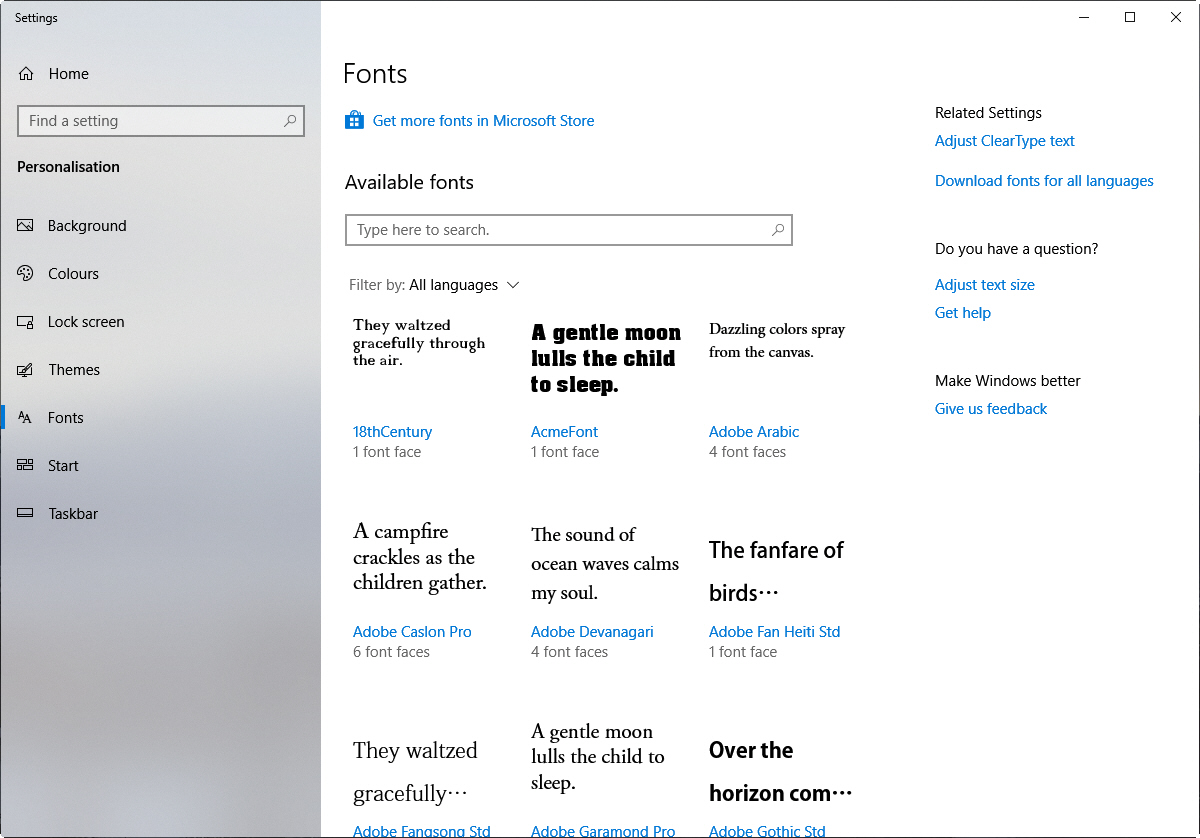
- Click on Fonts.
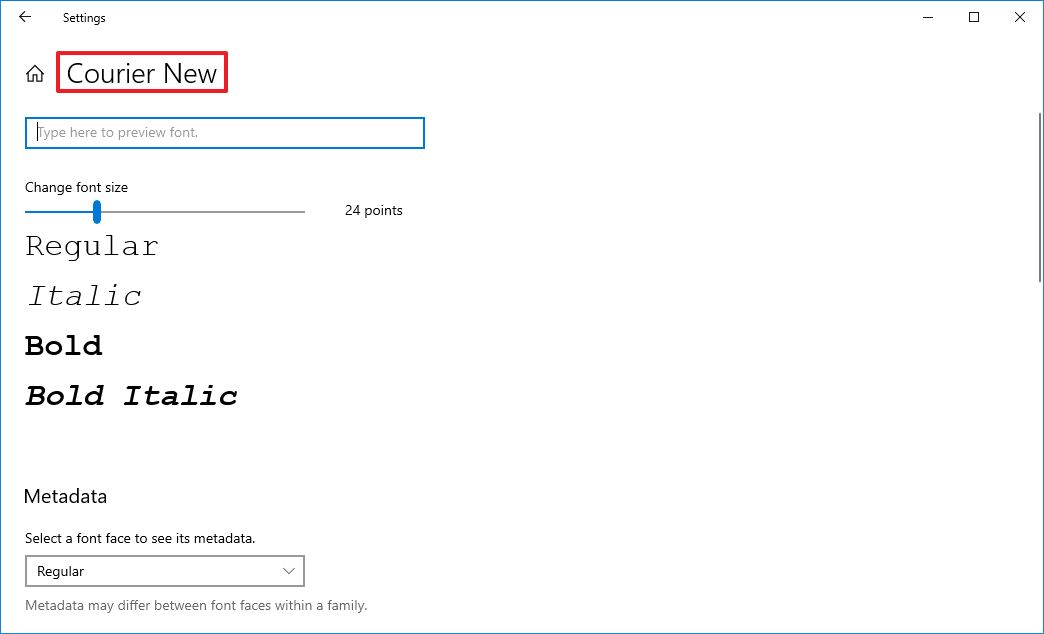
- Select the font family you want to use.
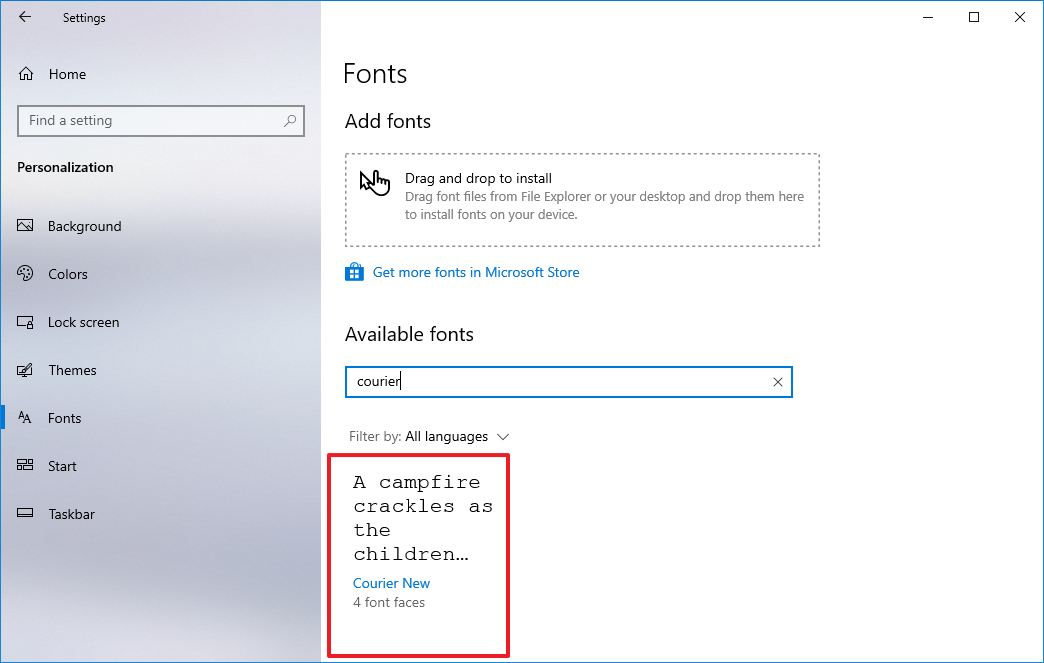
- Note the official name of the font family – for example, Courier New.
- In the Notepad text with the Registry code, replace «NEW-FONT-NAME» with the name of the font you want to use in the entire system – for example, Courier New.
- Click the File menu.
- Select the Save as option.
- Use the «Save as type» drop-down menu and select the All Files option.
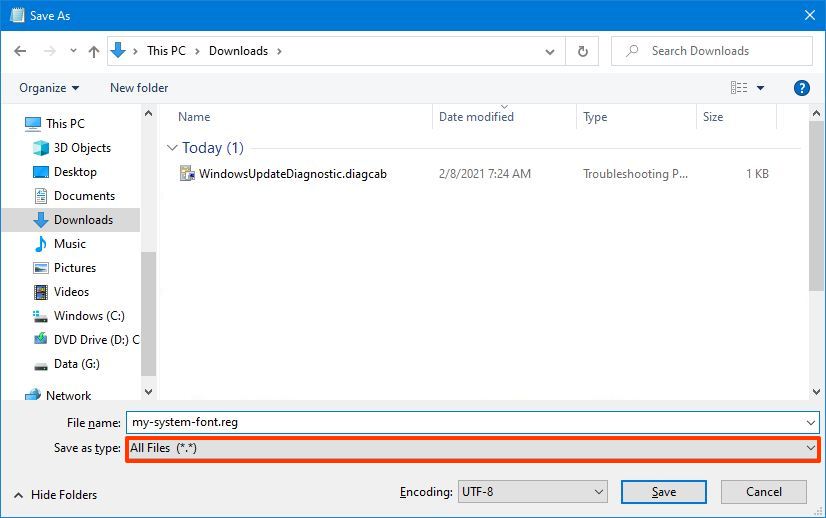
- Confirm a descriptive name for the file, such as «my-system-font,» and use the «.reg» as the extension – for example, my-system-font.reg.
- Click the Save button.
- Right-click the newly created «.reg» file and select the Merge option.
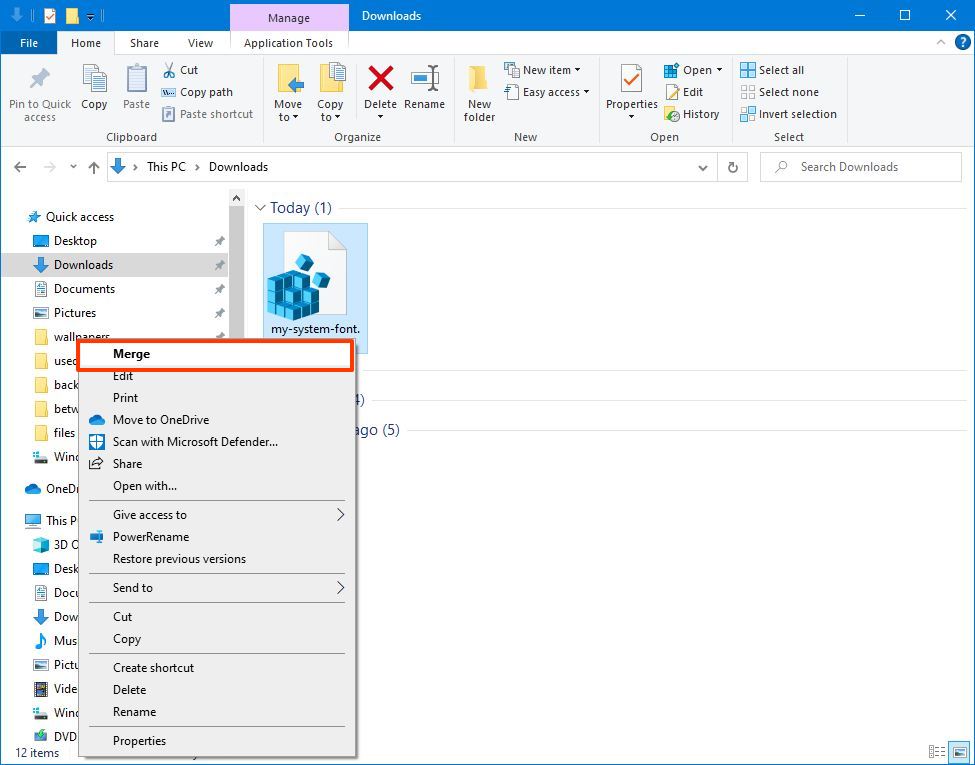
- Click the Yes button.
- Click the OK button.
- Restart the computer.
Once you complete the steps, the new font should be available throughout the desktop visual elements, including File Explorer, message box, taskbar, and apps that use the system default font settings.
Although you can select from a lot of different fonts, it is recommended to choose a style that is easy to understand since fonts like Webdings or Wingdings use symbols, and they can cause issues to the installation.
How to restore default system font on Windows 10
If you change your mind, you can always restore the previous settings using the Registry or using a restore point.
Undo settings with Registry
To restore the default font settings on Windows 10, use these steps:
- Open Start.
- Search for Notepad and click the top result to open the text editor.
- Copy and paste the following Registry code onto the file:Windows Registry Editor Version 5.00[HKEY_LOCAL_MACHINE\SOFTWARE\Microsoft\Windows NT\CurrentVersion\Fonts]»Segoe UI (TrueType)»=»segoeui.ttf»»Segoe UI Black (TrueType)»=»seguibl.ttf»»Segoe UI Black Italic (TrueType)»=»seguibli.ttf»»Segoe UI Bold (TrueType)»=»segoeuib.ttf»»Segoe UI Bold Italic (TrueType)»=»segoeuiz.ttf»»Segoe UI Emoji (TrueType)»=»seguiemj.ttf»»Segoe UI Historic (TrueType)»=»seguihis.ttf»»Segoe UI Italic (TrueType)»=»segoeuii.ttf»»Segoe UI Light (TrueType)»=»segoeuil.ttf»»Segoe UI Light Italic (TrueType)»=»seguili.ttf»»Segoe UI Semibold (TrueType)»=»seguisb.ttf»»Segoe UI Semibold Italic (TrueType)»=»seguisbi.ttf»»Segoe UI Semilight (TrueType)»=»segoeuisl.ttf»»Segoe UI Semilight Italic (TrueType)»=»seguisli.ttf»»Segoe UI Symbol (TrueType)»=»seguisym.ttf»»Segoe MDL2 Assets (TrueType)»=»segmdl2.ttf»»Segoe Print (TrueType)»=»segoepr.ttf»»Segoe Print Bold (TrueType)»=»segoeprb.ttf»»Segoe Script (TrueType)»=»segoesc.ttf»»Segoe Script Bold (TrueType)»=»segoescb.ttf»[HKEY_LOCAL_MACHINE\SOFTWARE\Microsoft\Windows NT\CurrentVersion\FontSubstitutes]»Segoe UI»=-
- Click the File menu.
- Select the Save as option.
- Use the «Save as type» drop-down menu and select the All Files option.
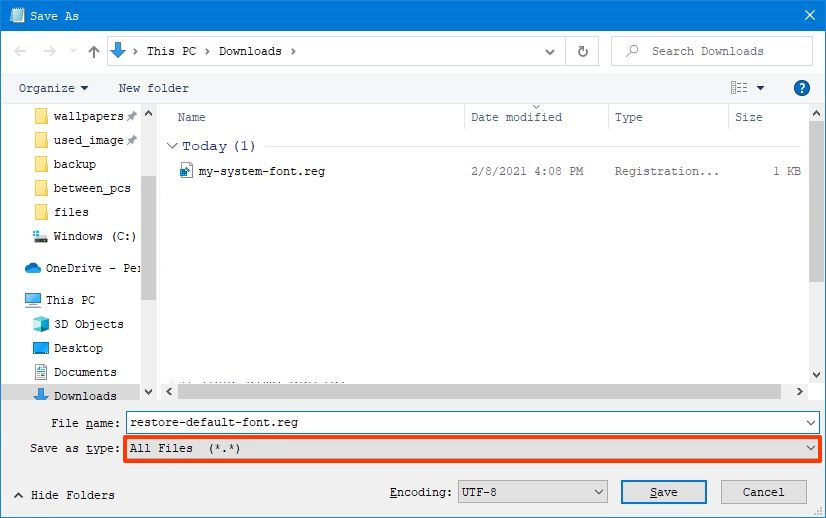
- Confirm a descriptive name for the file, such as «restore-default-font,» and use the «.reg» as the extension – for example, restore-default-font.reg.
- Click the Save button.
- Right-click the newly created «.reg» file and select the Merge option.
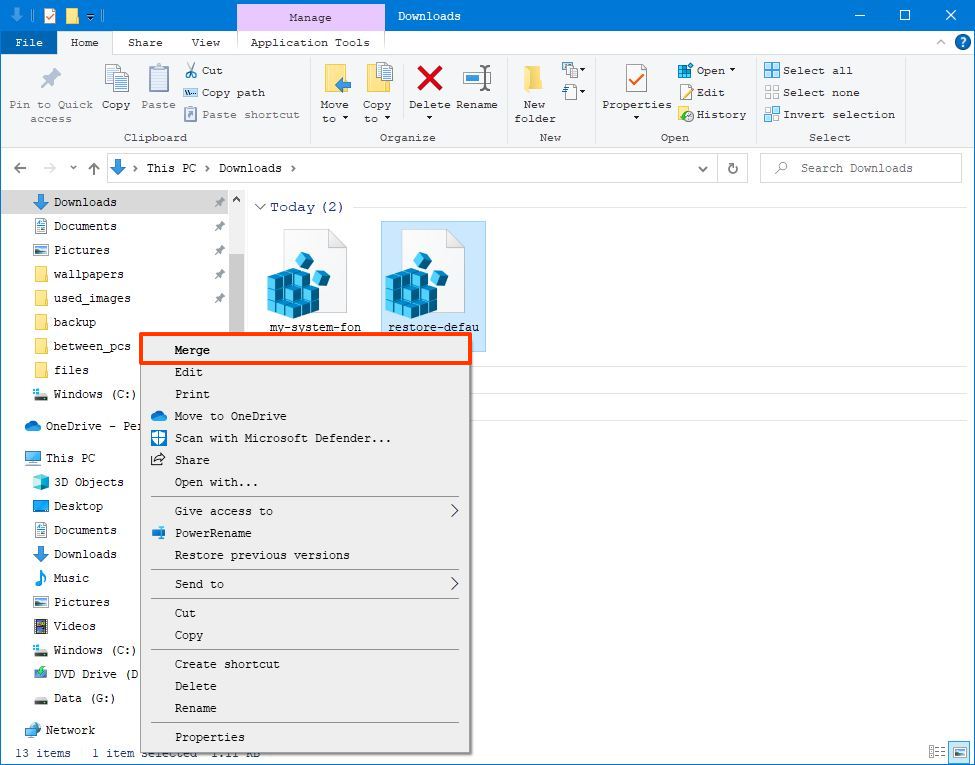
- Click the Yes button.
- Click the OK button.
After you complete the steps, the Windows 10 default font should rollback to the previous configuration.
Undo settings with Restore point
Alternatively, you could also use a previous restore point created before modifying the font settings to undo the changes. However, use this option as a last resort, since depending on when you are restoring the system, the feature may also undo other system changes you may have configured after the restore point was created.
To undo system changes, use these steps:
- Open Start.
- Search for Create a restore point and select the top result to open the app.
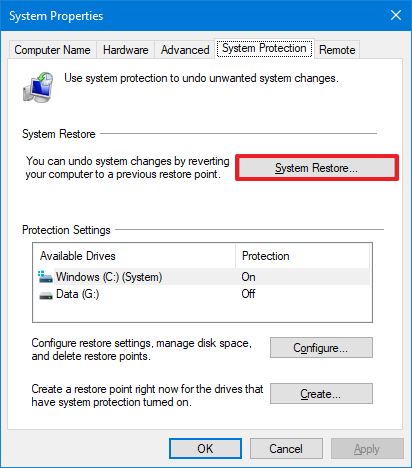
- Click the System Protection tab.
- Click the System Restore button.
- Click the Next button.
- Select the restore point you created before applying the settings.
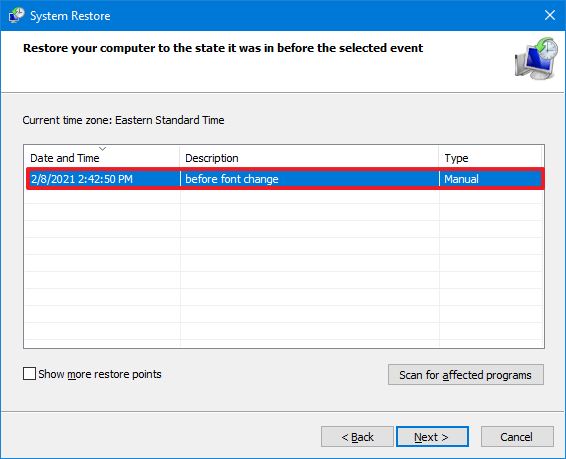
- Click the Next button.
- Click the Finish button.
Once you complete the steps, the system will need to be restarted to finish the process.
All the latest news, reviews, and guides for Windows and Xbox diehards.
Mauro Huculak is technical writer for WindowsCentral.com. His primary focus is to write comprehensive how-tos to help users get the most out of Windows 10 and its many related technologies. He has an IT background with professional certifications from Microsoft, Cisco, and CompTIA, and he’s a recognized member of the Microsoft MVP community.
We have all started converting to digital modes of data registry; that is, most of our work is stored on computers, tablets, and laptops. While the frequency of using these devices has become relatively high, it is naturally conducive for users to customise their devices’ settings to suit their needs and requirements. One such important setting is the ‘font’ setting.
Some people like large fonts so they can read easily. Some people like small fonts so that their PC looks organized and snug, and some retain the default settings—even the font style matters. There might be some styles that look jarring to the eye, but some that look pleasing.
On Windows 10, you can change the default framework font style, yet to play out this errand, you currently need to alter the Registry.
In past versions, for example, on Windows 7, you can readily access the personalization settings to change the framework textual style for different work area components, including the textual style for File Explorer, symbols, title bars, menus, message box, and then some. Yet, beginning with Windows 10, the choice has been eliminated. You’re currently stuck with the default in-built textual style.
Today we will look at the different ways how to change the font on Windows 10.
1. Downloading From the Microsoft Store
Without much of a stretch, you can do this by going to Settings. Click on Personalisation and afterwards Fonts. You will see Get more fonts in the Microsoft Store at the top; click on it, and it will take you to the store, where you will see a lot of text styles to browse.
2. Downloading From a Website
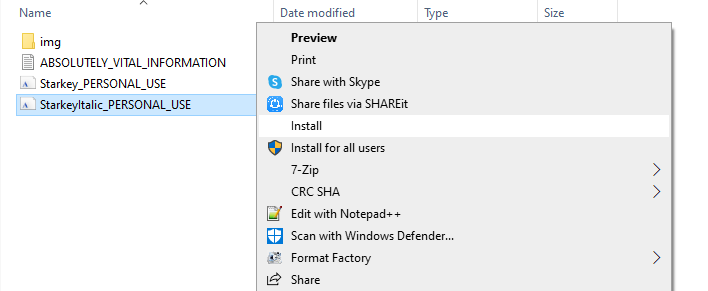
You can download different fonts from the internet; however, you can install them in two different ways. To start with, you may need to unzip the download file on the off chance that it was zipped. From that point onward, you can download it by right-tapping the unzipped file and clicking Install.
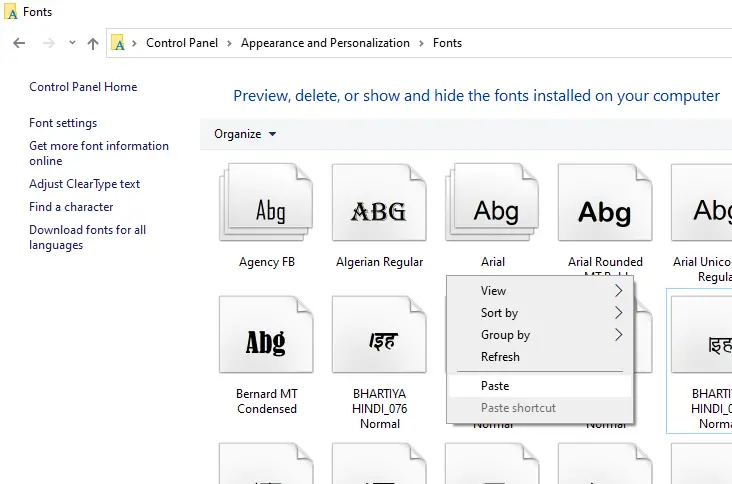
Another approach to things will be to open up the Control Panel. At that point, click on Appearance and Personalization and, from that point, select Fonts. Now simply copy the font file that you downloaded and paste into the Fonts folder.
Trust that installation will finish, and you can begin using it.
Related: Change date format in Windows 10 to dd-mm-yyyy
3. To Change Font Without Any Downloads
There is another approach to changing the text styles in Windows 10, yet it is advised that you make a re-establish point before you proceed. This is because irreversible harm is probable if you don’t do it appropriately.
First of all, open Control Panel from Start Menu. Now click on the Appearance and Personalization option and then the Font option.
There you can see various fonts available in your system. Just note down the font name that you like.
Open Notepad and paste the following registry code into it.
Windows Registry Editor Version 5.00

[HKEY_LOCAL_MACHINE\SOFTWARE\Microsoft\Windows NT\CurrentVersion\Fonts]
"Segoe UI (TrueType)"=""
"Segoe UI Bold (TrueType)"=""
"Segoe UI Bold Italic (TrueType)"=""
"Segoe UI Italic (TrueType)"=""
"Segoe UI Light (TrueType)"=""
"Segoe UI Semibold (TrueType)"=""
"Segoe UI Symbol (TrueType)"=""

[HKEY_LOCAL_MACHINE\SOFTWARE\Microsoft\Windows NT\CurrentVersion\FontSubstitutes]

"Segoe UI"="FontName"
Replace FontName with the name of the font that you selected in the previous steps.
In notepad, go to File and then Save As option. Select All Files from the drop-down and save the file with any name having a .reg extension.
Now double click on the saved file and then Yes to add info to the registry.
Finally, restart your system for changes to take place.
In conclusion, there is one final piece of advice. Make sure that the selected font style is easy on the eyes and legible, as fonts like ‘Webdings’ or ‘Wingdings’ involve the use of symbols, and they can cause difficulties in your installation.
21
21 people found this article helpful
A slick new font is just a registry edit away
Updated on November 11, 2021
This article will teach you how to change your font in Windows 10. The OS doesn’t have a setting to change the system-wide font, but you can still change the font by editing the Windows Registry. The registry edit is quick, and you can do it with the Windows Notepad app.
Editing the Windows Registry
Here’s how to change the font in Windows 10.
-
Use Windows Search to search for and then open Font Settings. You will now see a list of the installed fonts.
-
Carefully note the name of the font you want to use as default for Windows 10.
Precision is important. The registry edit may not work if the font name isn’t exactly as shown in the Font Settings menu, including spaces and capitalization.
-
Open the Notepad app.
-
Copy and paste the following text into Notepad.
Windows Registry Editor Version 5.00
[HKEY_LOCAL_MACHINE\SOFTWARE\Microsoft\Windows NT\CurrentVersion\Fonts]
"Segoe UI (TrueType)"=""
"Segoe UI Bold (TrueType)"=""
"Segoe UI Bold Italic (TrueType)"=""
"Segoe UI Italic (TrueType)"=""
"Segoe UI Light (TrueType)"=""
"Segoe UI Semibold (TrueType)"=""
"Segoe UI Symbol (TrueType)"=""
[HKEY_LOCAL_MACHINE\SOFTWARE\Microsoft\Windows NT\CurrentVersion\FontSubstitutes]"Segoe UI"="Name of new font"
Editing the Windows Registry can cause instability. It’s a good idea to make sure you have a recent Windows backup available before editing the registry.
-
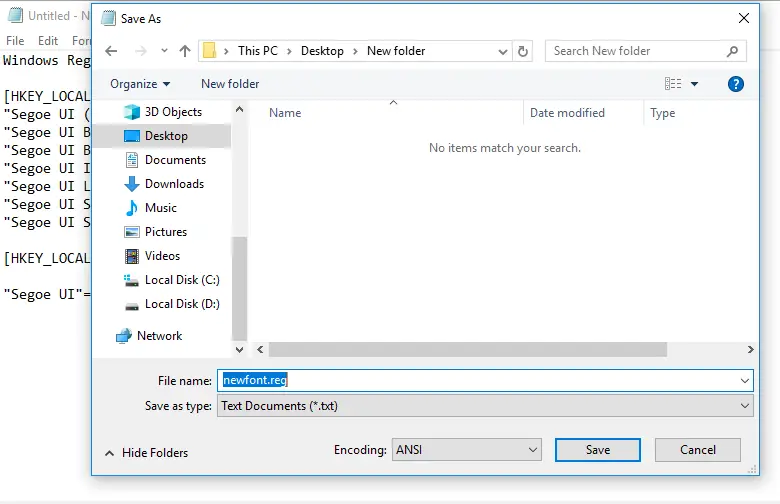
Change «Name of new font» in the last line of the text pasted into Notepad to the name of the font you want to use. The quotation marks should remain. In the screenshot below, the font is changed to Californian FB.
-
Click File > Save as. A File Explorer window appears to let you save the file.
-
Select the dropdown next to Save as type and change the selection from Text Documents (*.txt) to All Files.
-
Enter a file name in the File Name field. The filename itself can be whatever you want, but it must end with a .reg extension. In the screenshot below, for example, we named the file californian-fb-font-change.reg.
-
Click Save.
-
Open File Explorer and navigate to the .reg file you just saved.
-
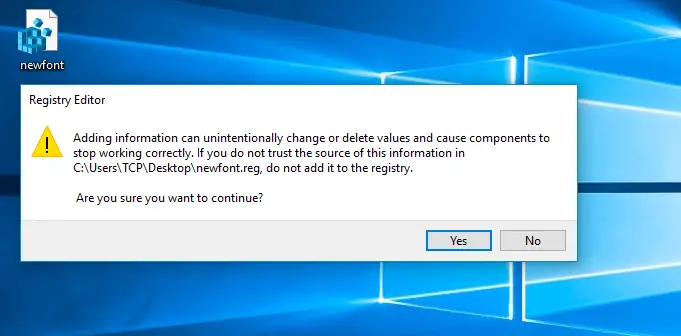
Double-click the .reg file.
-
A warning will appear to remind you that editing the registry may cause errors. Click Yes.
-
A confirmation message will appear. Click Ok.
-
Restart your computer.
The font change will take effect after you restart Windows.
Windows 10 Font Limitations
This method will change most fonts in Windows 10 but won’t adjust all of them. You may notice elements of the interface that don’t change, such as the Windows Start Menu font. It’s not possible to change these types of fonts in this version of Windows.
You may notice errors in text formatting after performing this change. The good news is these errors are infrequent. The bad news is they’re not fixable.
How to Restore the Default Windows 10 Font
Want to restore your font to its default settings? You can also do this by editing the registry. Follow the steps above, starting at step 3. Place the text below into Notepad instead of the text found in step 4.
Windows Registry Editor Version 5.00[HKEY_LOCAL_MACHINE\SOFTWARE\Microsoft\Windows NT\CurrentVersion\Fonts]
"Segoe UI (TrueType)"="segoeui.ttf"
"Segoe UI Black (TrueType)"="seguibl.ttf"
"Segoe UI Black Italic (TrueType)"="seguibli.ttf"
"Segoe UI Bold (TrueType)"="segoeuib.ttf"
"Segoe UI Bold Italic (TrueType)"="segoeuiz.ttf"
"Segoe UI Emoji (TrueType)"="seguiemj.ttf"
"Segoe UI Historic (TrueType)"="seguihis.ttf"
"Segoe UI Italic (TrueType)"="segoeuii.ttf"
"Segoe UI Light (TrueType)"="segoeuil.ttf"
"Segoe UI Light Italic (TrueType)"="seguili.ttf"
"Segoe UI Semibold (TrueType)"="seguisb.ttf"
"Segoe UI Semibold Italic (TrueType)"="seguisbi.ttf"
"Segoe UI Semilight (TrueType)"="segoeuisl.ttf"
"Segoe UI Semilight Italic (TrueType)"="seguisli.ttf"
"Segoe UI Symbol (TrueType)"="seguisym.ttf"
"Segoe MDL2 Assets (TrueType)"="segmdl2.ttf"
"Segoe Print (TrueType)"="segoepr.ttf"
"Segoe Print Bold (TrueType)"="segoeprb.ttf"
"Segoe Script (TrueType)"="segoesc.ttf"
"Segoe Script Bold (TrueType)"="segoescb.ttf"[HKEY_LOCAL_MACHINE\SOFTWARE\Microsoft\Windows NT\CurrentVersion\FontSubstitutes]
"Segoe UI"=-
This text will restore the default Segoe UI font across Windows 10 after you run the registry file.
How to Change the Font in Windows 11
Thanks for letting us know!
Get the Latest Tech News Delivered Every Day
Subscribe
You are here: Home / Windows / How To Change System Font On Windows 10 – Complete Guide
Have you grown tired of the default font in Windows 10? The same old looking letters and words can make your experience of Windows 10 dull. It is refreshing to change the system fonts once in a while. However, there is no option in Windows 10 GUI for changing the system font.
After Windows 7, the option to personalize the system font has been removed by Microsoft. But that won’t stop us from changing the system fonts. To change system font on Windows 10, a little modification in the registry is necessary.
In this article, we have discussed how to change system font by modifying the registry. As you would have to modify the registry, we advise that you take read the method below carefully before executing it. A slight mistake with the registry can cause serious problems.
You can also check out this article on what to do when Chrome tab’s font size becomes too small.
We have shown a VIDEO walk through at the end of the post for restoring default system font on Windows 10.
Before we proceed with the steps, we advise that you create a system restore point and backup your registry. In Windows 10 change system font by following the steps given below:
- Right-click on the Windows icon and select the Settings option from the pop-up menu.
- Click on the Personalization option.
- Next, select the Fonts option.
- Search for the font that you like the most and open it. Like we have chosen Berlin Sans FB.
- Press the Windows key and type Notepad in the search bar. When the Notepad option appears, click on it.
- Now, copy the code given below and paste it in the empty Notepad page.
Windows Registry Editor Version 5.00
[HKEY_LOCAL_MACHINE\SOFTWARE\Microsoft\Windows NT\CurrentVersion\Fonts]
“Segoe UI (TrueType)”=””
“Segoe UI Bold (TrueType)”=””
“Segoe UI Bold Italic (TrueType)”=””
“Segoe UI Italic (TrueType)”=””
“Segoe UI Light (TrueType)”=””
“Segoe UI Semibold (TrueType)”=””
“Segoe UI Symbol (TrueType)”=””
[HKEY_LOCAL_MACHINE\SOFTWARE\Microsoft\Windows NT\CurrentVersion\FontSubstitutes]“Segoe UI”=”ENTER-NEW-FONT-NAME“
In the last entry of the code, in place of ENTER-NEW-FONT-NAME, type the actual name of the font. For us, it would be “Segoe UI”=“Berlin Sans FB”
- Now, click on the File tab and select the Save As option.
- Write any name for the file but with the .reg extension and change the Save as type to All files.
- Click on the Save option.
- Now, navigate to the .reg file you just saved and right-click on it.
- Select the Merge option. Click on Yes and OK.
- Finally, restart the PC.
After the computer restarts the system font changer code will be applied. Everything from the message box to the taskbar and apps will have the new font.
If you want to revert to the old font, then you can use the system restore point you made earlier. Or follow the method given below to do it.
How To Revert To The Default System Font?
- Open Notepad again and copy-paste the code given below:
Windows Registry Editor Version 5.00
[HKEY_LOCAL_MACHINE\SOFTWARE\Microsoft\Windows NT\CurrentVersion\Fonts]
“Segoe UI (TrueType)”=”segoeui.ttf”
“Segoe UI Black (TrueType)”=”seguibl.ttf”
“Segoe UI Black Italic (TrueType)”=”seguibli.ttf”
“Segoe UI Bold (TrueType)”=”segoeuib.ttf”
“Segoe UI Bold Italic (TrueType)”=”segoeuiz.ttf”
“Segoe UI Emoji (TrueType)”=”seguiemj.ttf”
“Segoe UI Historic (TrueType)”=”seguihis.ttf”
“Segoe UI Italic (TrueType)”=”segoeuii.ttf”
“Segoe UI Light (TrueType)”=”segoeuil.ttf”
“Segoe UI Light Italic (TrueType)”=”seguili.ttf”
“Segoe UI Semibold (TrueType)”=”seguisb.ttf”
“Segoe UI Semibold Italic (TrueType)”=”seguisbi.ttf”
“Segoe UI Semilight (TrueType)”=”segoeuisl.ttf”
“Segoe UI Semilight Italic (TrueType)”=”seguisli.ttf”
“Segoe UI Symbol (TrueType)”=”seguisym.ttf”
“Segoe MDL2 Assets (TrueType)”=”segmdl2.ttf”
“Segoe Print (TrueType)”=”segoepr.ttf”
“Segoe Print Bold (TrueType)”=”segoeprb.ttf”
“Segoe Script (TrueType)”=”segoesc.ttf”
“Segoe Script Bold (TrueType)”=”segoescb.ttf”
[HKEY_LOCAL_MACHINE\SOFTWARE\Microsoft\Windows NT\CurrentVersion\FontSubstitutes]“Segoe UI”=-
- Save the file similar to the method used earlier, with .reg extension and Save as type to All files.
- Next, navigate the reg file and right-click on it.
- Select the Merge option and click on Yes and OK.
- Finally, restart the PC.
After the PC restarts, the system font should be back to the default one.
Wrapping Up
So, there you have it. Now you know how to change system font on Windows 10. Be extremely cautious while writing the codes given above, as even a slight mistake can be harmful to your PC. If you have any doubts or questions, then write it in the comment section.