(Image credit: Windows Central)
As part of your internet access subscription, the internet service provider (ISP) also supplies the local network with the necessary settings, including the domain name system (DNS) addresses, enabling access to your favorite websites and online services and download files.
The only caveat is that the ISP’s DNS servers are usually not very private, slower than other services, and sometimes unreliable. However, you can always use different resolvers from third-party companies to improve your internet experience on Windows 10.
Related: How to configure Cloudflare 1.1.1.1 DNS service on Windows 10 or router
What’s DNS?
A domain name system is an internet service (usually at no cost to you) that allows you to type a friendly domain name in the web browser to load a website. And without it, it’d be a nightmare to surf the web.
The issue is that every device requires an IP address (example, 104.18.189.55) to communicate with other devices. However, these addresses are not easy for humans to remember, and DNS servers are the ones that provide the mechanism to translate friendly domain names (example: WindowsCentral.com) into an IP address that computers can understand.
Although you can type https://windowscentral.com to get to our website, in the background, the browser first sends a request to the DNS servers to resolve the website name into an IP address. When the address is found, it returns, and then the browser connects to the site and downloads the page’s contents.
Typically, you won’t notice this process because everything happens in milliseconds. However, if your resolvers are not reliable, they slow down your internet, or you want to use faster and more private servers, Windows 10 allows you to change these settings using Control Panel, Command Prompt, and Settings app.
In this Windows 10 guide, we will walk you through the steps to change the DNS settings on your laptop or desktop computer.
- How to change DNS settings using Control Panel on Windows 10
- How to change DNS settings using Settings on Windows 10
- How to change DNS settings using Command Prompt on Windows 10
How to change DNS settings using Control Panel on Windows 11
To change the DNS settings with Control Panel, use these steps:
- Open Control Panel.
- Click on Network and Internet.
- Click on Network and Sharing Center.
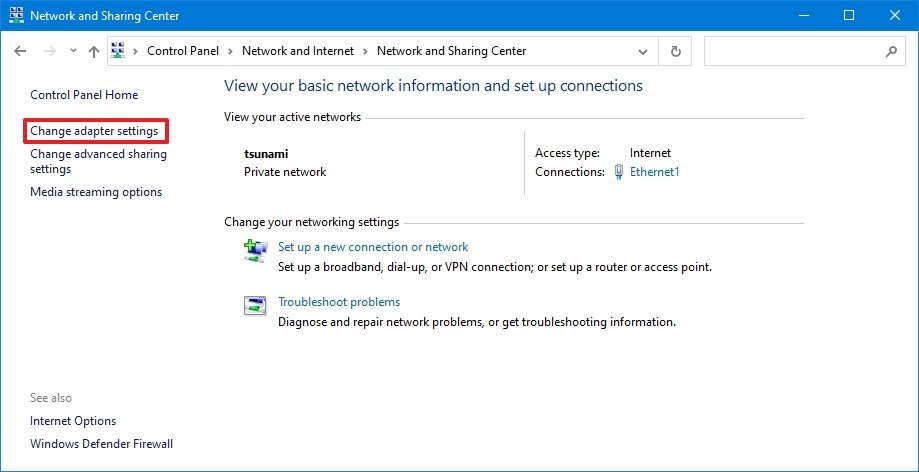
- Click the Change adapter settings option in the left pane.
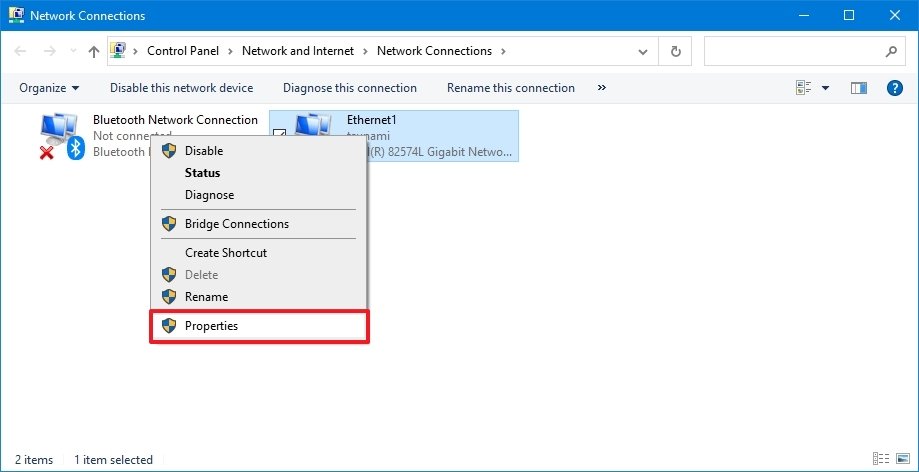
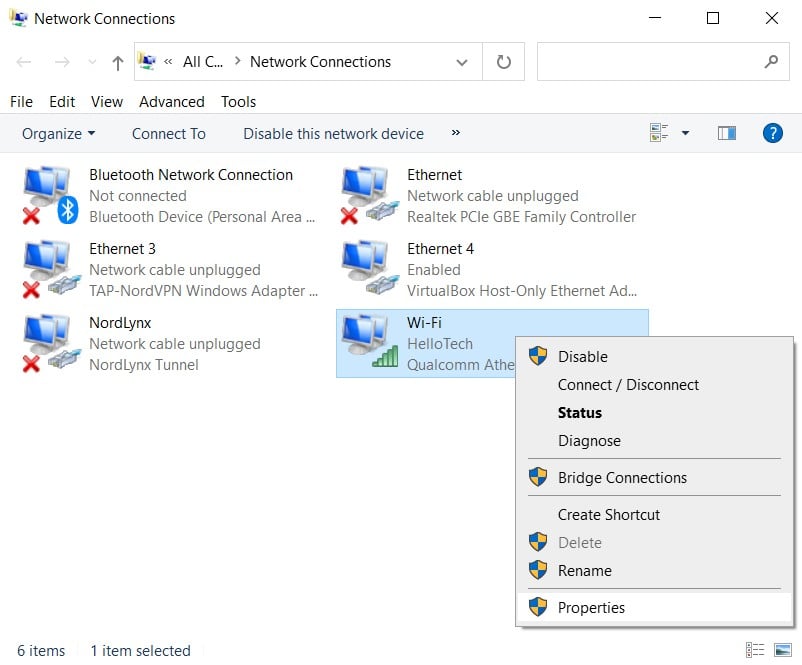
- Right-click the active network interface and select the Properties option.Quick tip: You’ll know which adapter is connected to the network because it won’t have a «Disabled» or «Network cable unplugged» label.
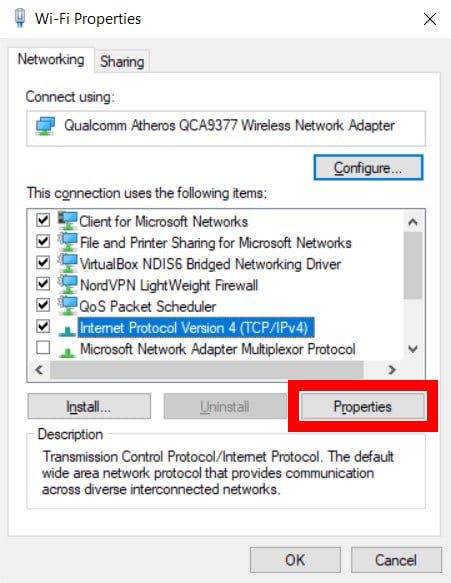
- Select and check the Internet Protocol Version 4 (TCP/IPv4) option.

- Click the Properties button.
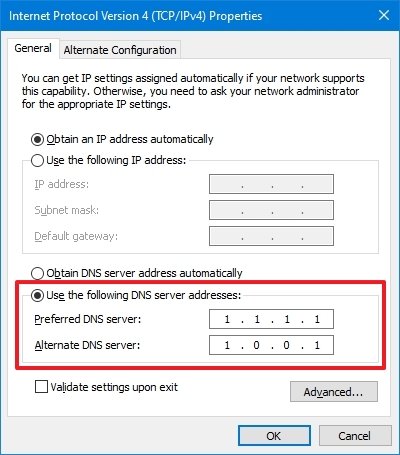
- Select the Use the following DNS server addresses option.Quick note: When you select the option to specify the DNS settings manually, the computer will continue to receive the TCP/IP address from the DHCP server (router).
- Under the «Preferred DNS server» section, confirm the primary DNS address.If you want to use Cloudflare, Google Public DNS, or Cisco OpenDNS, you can use these settings:
- Cloudflare: 1.1.1.1
- Google Public DNS: 8.8.8.8
- OpenDNS: 208.67.222.222
- Under the «Alternate DNS server» section, confirm the secondary DNS address the system will use if the primary is not reachable.You can use one of the secondary addresses from these companies:
- Cloudflare: 1.0.0.1
- Google Public DNS: 8.8.4.4
- OpenDNS: 208.67.220.220
- (Optional) Click the Advanced button.
- Click the DNS tab.
- Click the Add button.
- Specify additional alternate DNS server addresses.
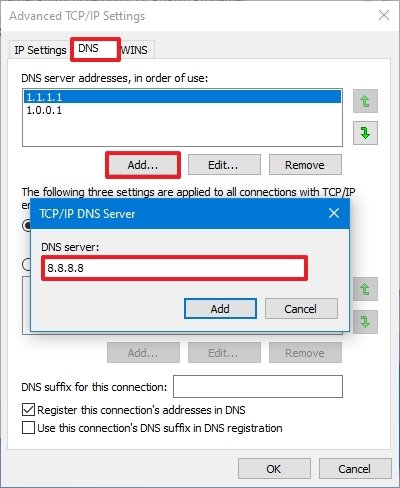
- Click the Add button.Quick tip: In addition to adding more addresses, you can also edit and remove resolvers, and you have an option on the side to change their priority.
- Click the OK button.
- Click the Close button.
Once you complete the steps, the computer will immediately start using the specified DNS settings.
How to change DNS settings using Settings on Windows 10
To change the DNS addresses through the Settings app, use these steps:
- Open Settings.
- Click on Network & Internet.
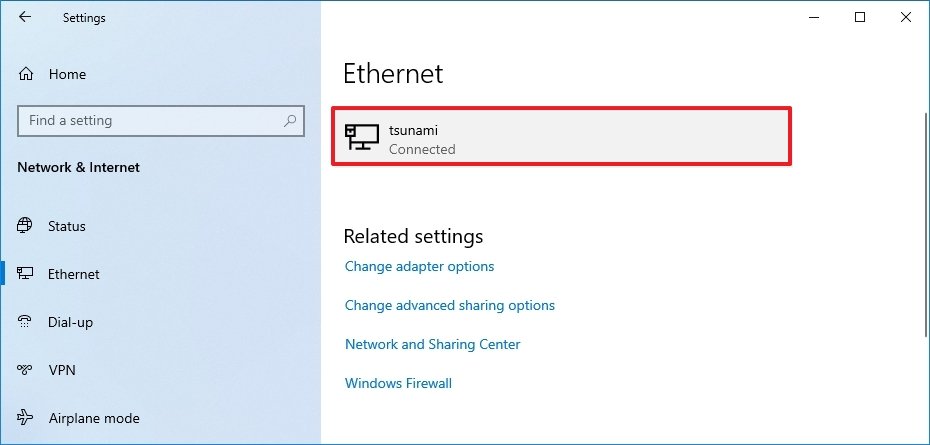
- Click on Ethernet or Wi-Fi.
- Select the connection that connects Windows 10 to the network.
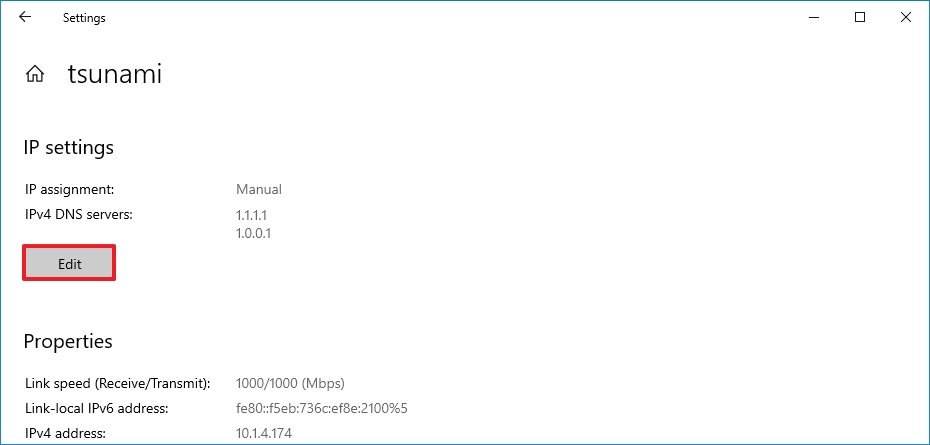
- Under the «IP settings» section, click the Edit button.
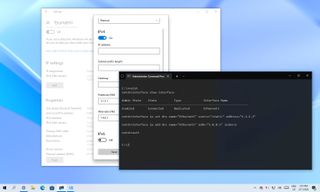
- Use the «Edit IP settings» drop-down menu and select the Manual option.
- Turn on the IPv4 toggle switch.
- Under the «Preferred DNS server» section, confirm the primary DNS address.To use Cloudflare, Google Public DNS, or Cisco OpenDNS, use these settings:
- Cloudflare: 1.1.1.1
- Google Public DNS: 8.8.8.8
- OpenDNS: 208.67.222.222
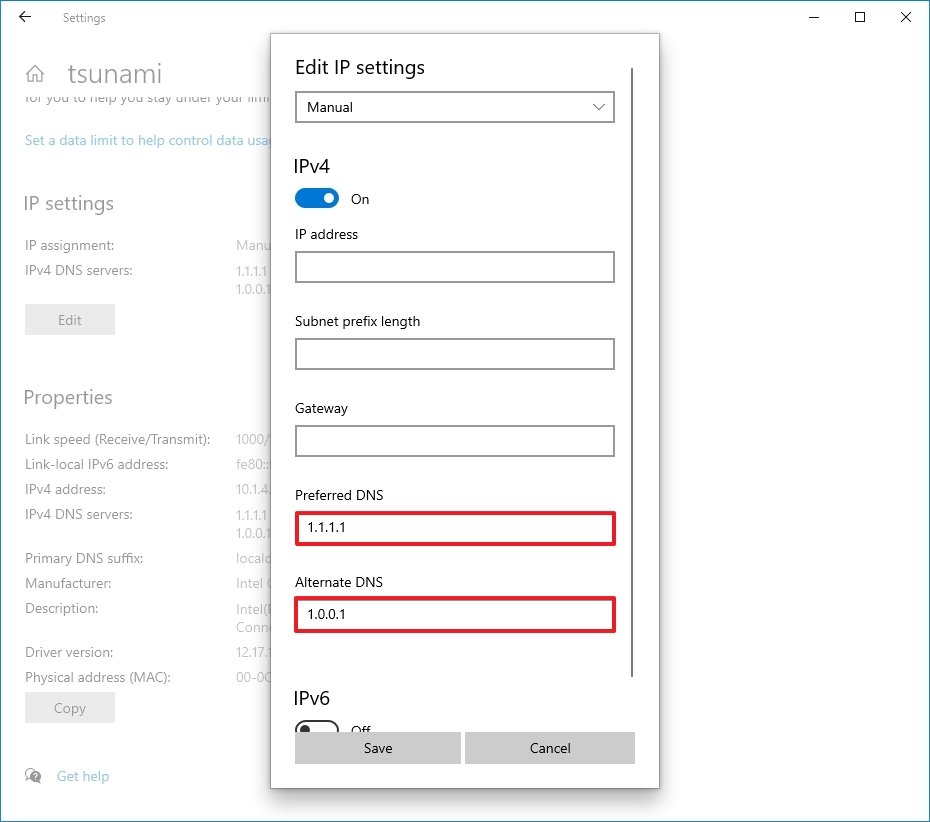
- Under the «Alternate DNS server» section, confirm the secondary DNS address.You can use one of the secondary addresses from these companies:
- Cloudflare: 1.0.0.1
- Google Public DNS: 8.8.4.4
- OpenDNS: 208.67.220.220
- Click the Save button.
- Restart the device.
After you complete the steps, you should now be able to connect to the internet using the new resolvers. The restart may be necessary to regain an IP address configuration for the device.
Although the Settings app should be the recommended option to change the DNS settings on your computer, we’re not listing this option first because it can be confusing for some people.
How to change DNS settings using Command Prompt on Windows 10
Alternatively, it’s also possible to change the DNS configuration using Command Prompt on Windows 10.
To use Command Prompt to change the computer DNS settings, use these steps:
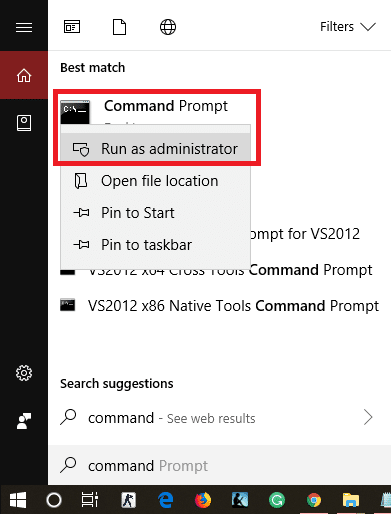
- Open Start.
- Search for Command Prompt, right-click the top result, and select the Run as administrator option.
- Type the following command to launch the tool to change the networking settings and press Enter:
netsh - Type the following command to identify the names of the network adapters and press Enter:
interface show interface - Type the following command to set the primary DNS IP address and press Enter:
interface ip set dns name="ADAPTER-NAME" source="static" address="X.X.X.X"In the command, change «ADAPTER-NAME» with the name of the network adapter you identified on step 4, and change «X.X.X.X» with the IP address you want to use.To use Cloudflare, Google Public DNS, or Cisco OpenDNS, you can use these settings:- Cloudflare: 1.1.1.1 and 1.0.0.1
- Google Public DNS: 8.8.8.8 and 8.8.4.4
- OpenDNS: 208.67.222.222 and 208.67.220.220
This example sets the primary DNS address to 1.1.1.1:
interface ip set dns name="Ethernet1" source="static" address="1.1.1.1"
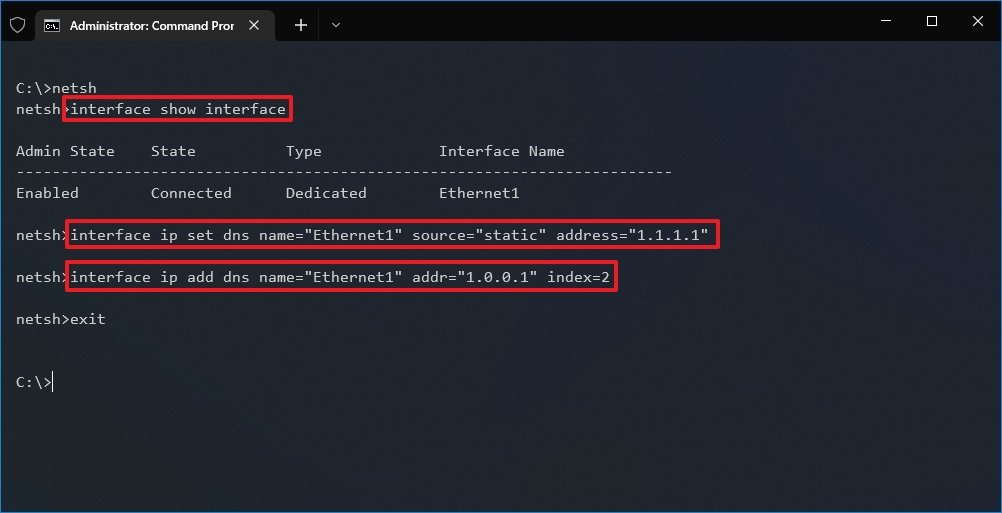
- Type the following command to add an alternative DNS IP address and press Enter:
interface ip add dns name="ADAPTER-NAME" addr="X.X.X.X" index=2In the command, change «ADAPTER-NAME» with the name of your network adapter you queried on step 4, and change «X.X.X.X» with the secondary address.This example sets the secondary DNS address to 1.0.0.1:interface ip add dns name="Ethernet1" addr="1.0.0.1" index=2Quick tip: You can repeat the above steps to add more addresses if necessary. However, in the command, you must increase the number of the index option by 1. For instance, interfaceip add dns name="Ethernet1" addr="8.8.8.8" index=3
Once you complete the steps, Windows 10 will start using the new DNS server addresses to resolve domain names to numeric addresses that your device can understand.
More Windows resources
For more helpful articles, coverage, and answers to common questions about Windows 10 and Windows 11, visit the following resources:
- Windows 11 on Windows Central — All you need to know
- Windows 11 help, tips, and tricks
- Windows 10 on Windows Central — All you need to know
All the latest news, reviews, and guides for Windows and Xbox diehards.
Mauro Huculak is technical writer for WindowsCentral.com. His primary focus is to write comprehensive how-tos to help users get the most out of Windows 10 and its many related technologies. He has an IT background with professional certifications from Microsoft, Cisco, and CompTIA, and he’s a recognized member of the Microsoft MVP community.
Changing the default DNS settings on your computer can improve your online privacy, security, and browsing speed. If you’re a parent, changing your DNS server can also block your children from seeing any inappropriate content. Plus, changing your DNS will allow you to access content that is blocked in your country. Here’s how to change your DNS server on a Windows 10 or Mac computer, and which DNS addresses you should use.
What Is DNS?
DNS (Domain Name System) is like the phone book of the internet. If you want to visit a website, you will usually type in a domain name like google.com. A DNS will convert that into an IP address, which your web browser can understand.
An IP address is a string of characters separated by periods and comas. For example, one IP address for Google.com is http://173.194.203.106/. However, a DNS address is only one part of the equation these days. So, you won’t always be able to access a website using its IP address anymore.
Your internet service provider (such as Comcast, Verizon, and Spectrum) will assign you a default DNS. However, you can always change your DNS setting on a Mac or Windows 10 PC.
How to Change Your DNS Server on a Windows 10 Computer
To change your DNS server on a Windows 10 computer, go to Settings > Network & Internet > Change Adapter Settings. Then right-click a connection and select Properties > IPv4 > Properties. Finally,select Use the following DNS server address.
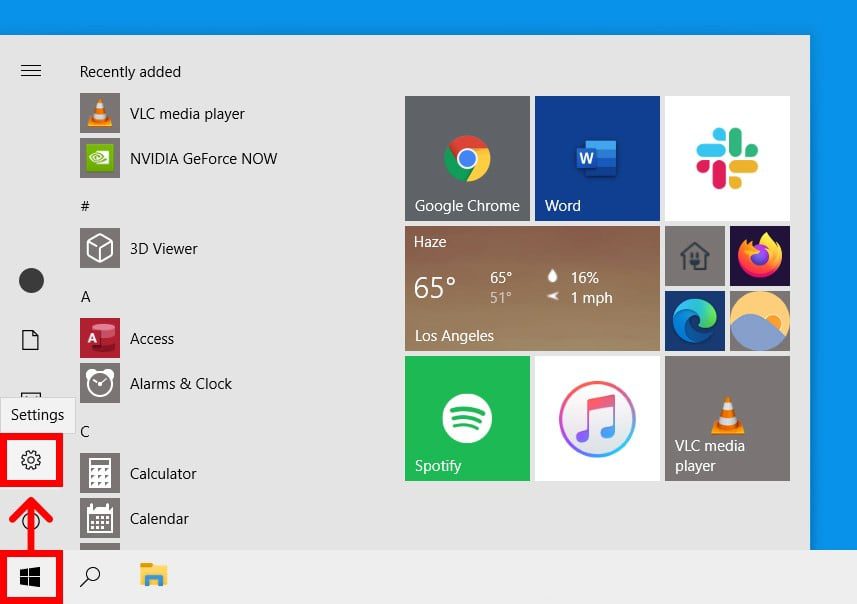
- Open the Windows Start Menu. You can do this by clicking the button with the Windows logo in the bottom-left corner of your screen.
- Then click Settings. This is the gear-shaped icon just above the power button.

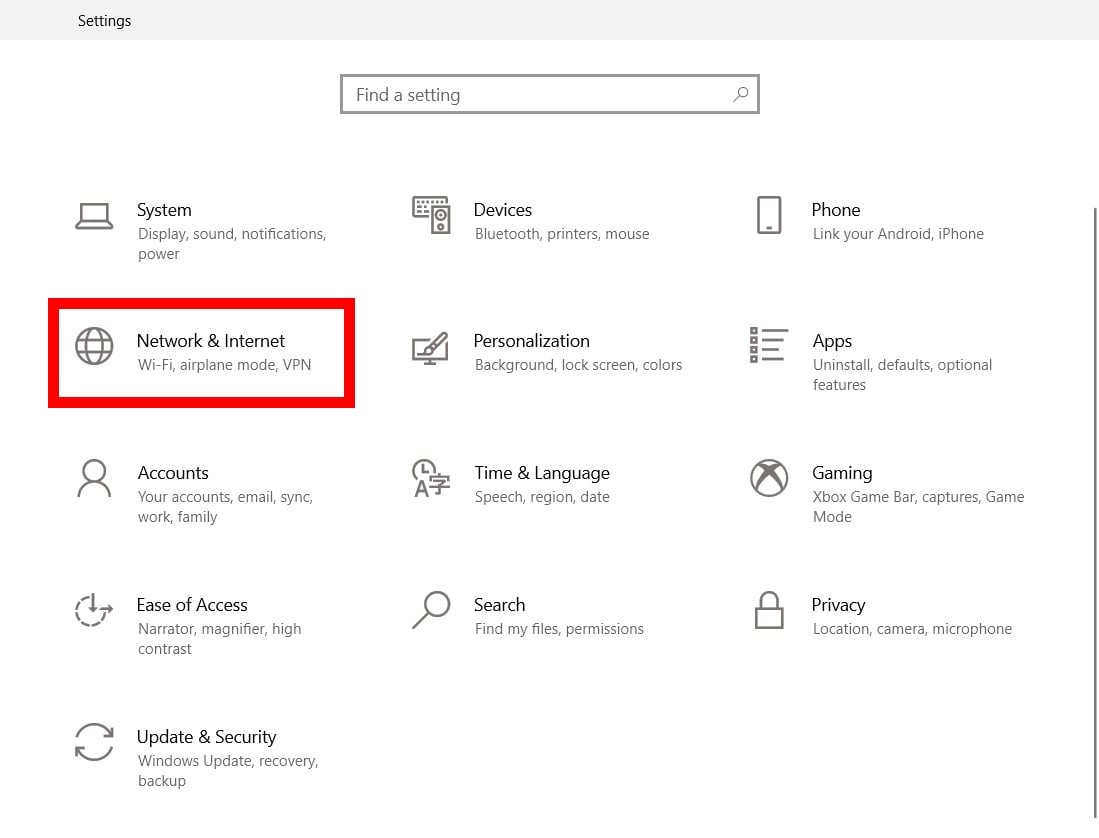
- Next, select Network & Internet.
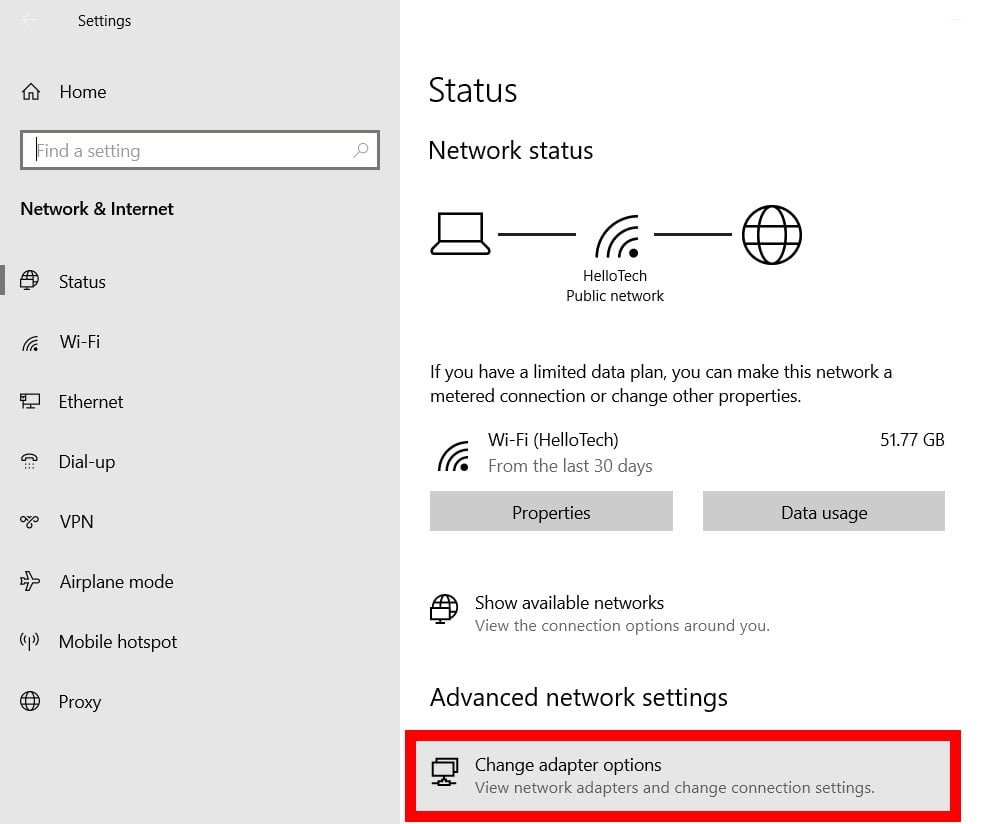
- Then click Change adapter options. You will see this under Advanced network settings.
Note: If you don’t see this option, click Status in the left sidebar. If you don’t see Status in the left sidebar, expand the Settings window or make the window full screen.
- Right-click on the connection you want to change the DNS server for. If you are connected via WiFi, select that. If you are connected via Ethernet, select that. You will know which connections you are currently using because they will have green bars, while the connections that are not in use will have a red X.
- Then select Properties. This will be the last option in the pop-up menu.
- Next, select Internet Protocol Version 4 (TCP/IPv4). If you don’t see this option, use your mouse to scroll up and down the selection.
- Then click Properties.
- Next, click the radius next to Use the following DNS server addresses. You will see this in the bottom half of the window.
- Then enter a new DNS address. You will also want to add a secondary DNS server address in the following line.
Note: If you don’t know what to add, see the section on which DNS server addresses to use below.
- Finally, click OK. You will see this at the bottom of the window. Your changes won’t go into effect until you click OK.

How to Change Your DNS Server on a Mac
To change your DNS server on a Mac, go to System Preferences > Network. Then select a connection and click Advanced. Next, select the DNS tab and click the plus sign. Finally, enter a DNS address and click OK > Apply.
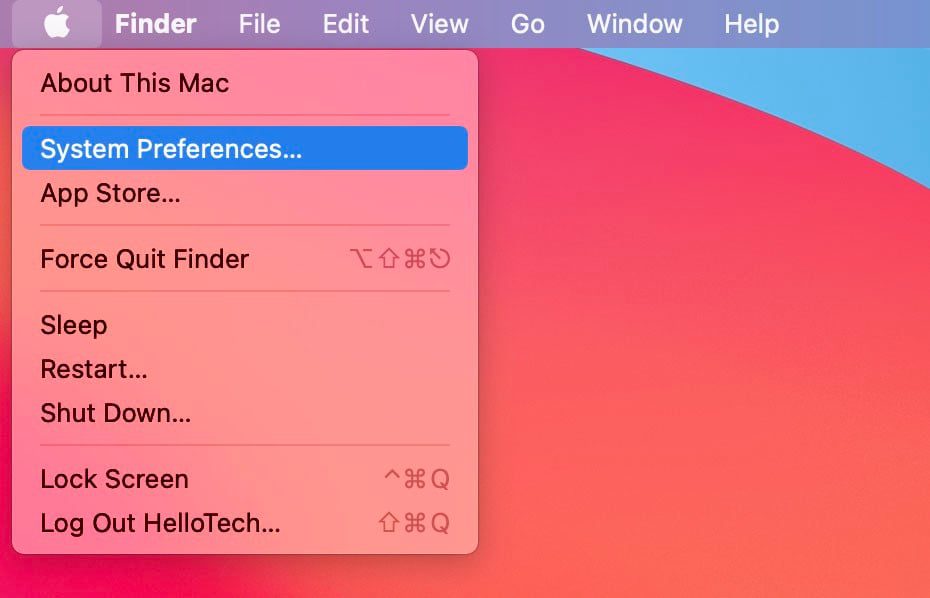
- Click the Apple icon in the top-left corner of your Mac’s screen.
- Then select System Preferences.
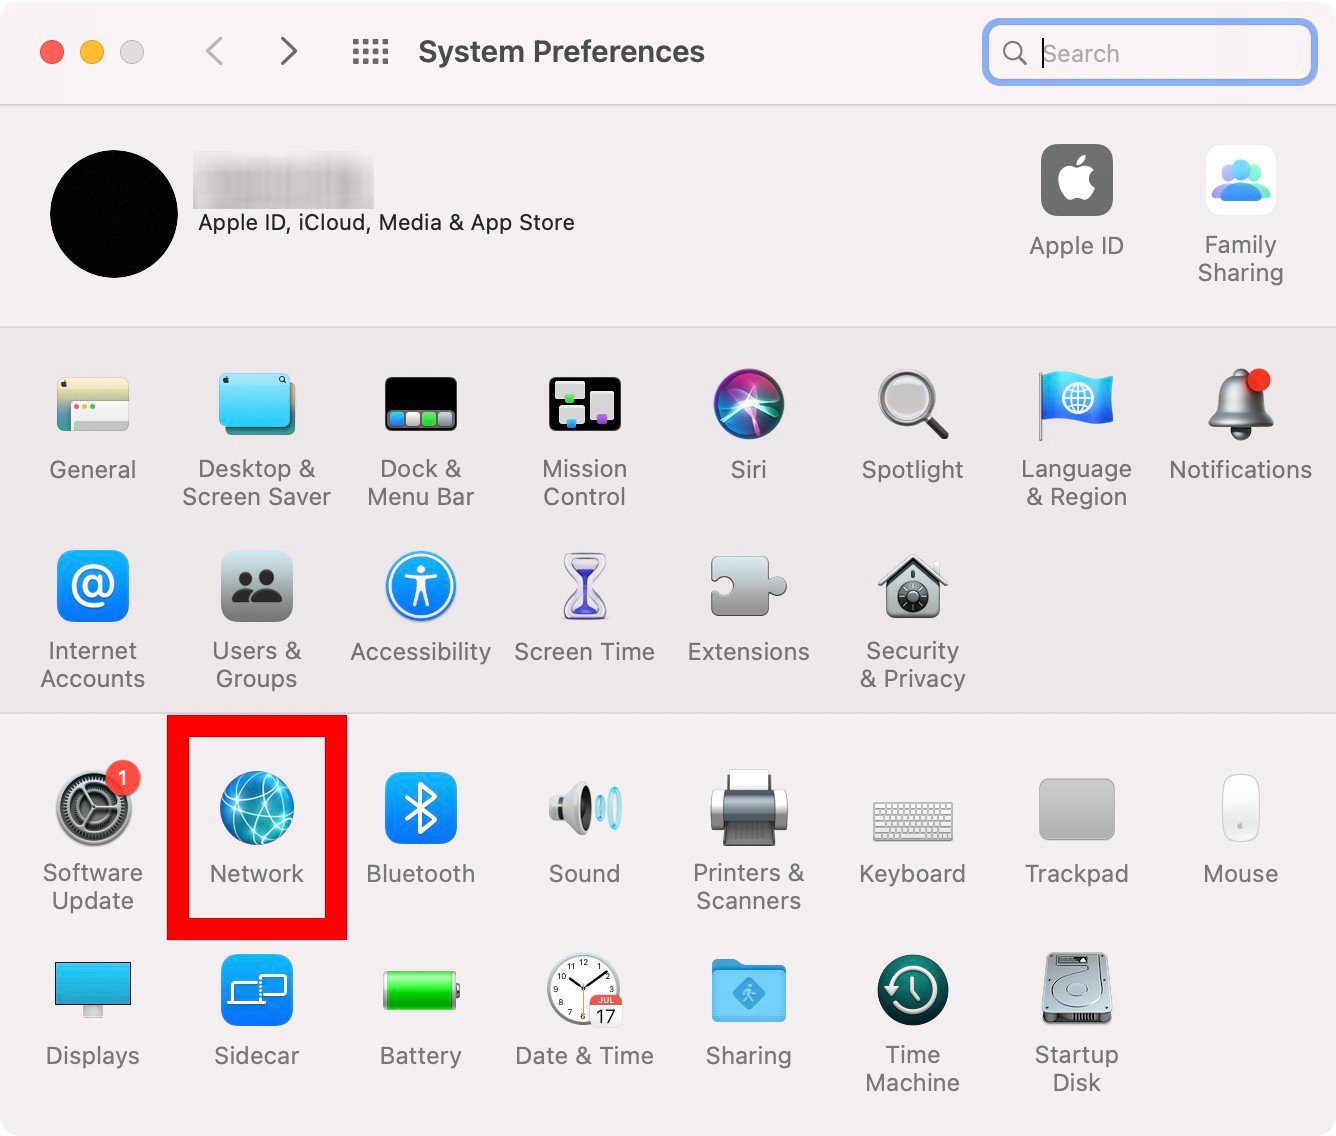
- Next, select Network.
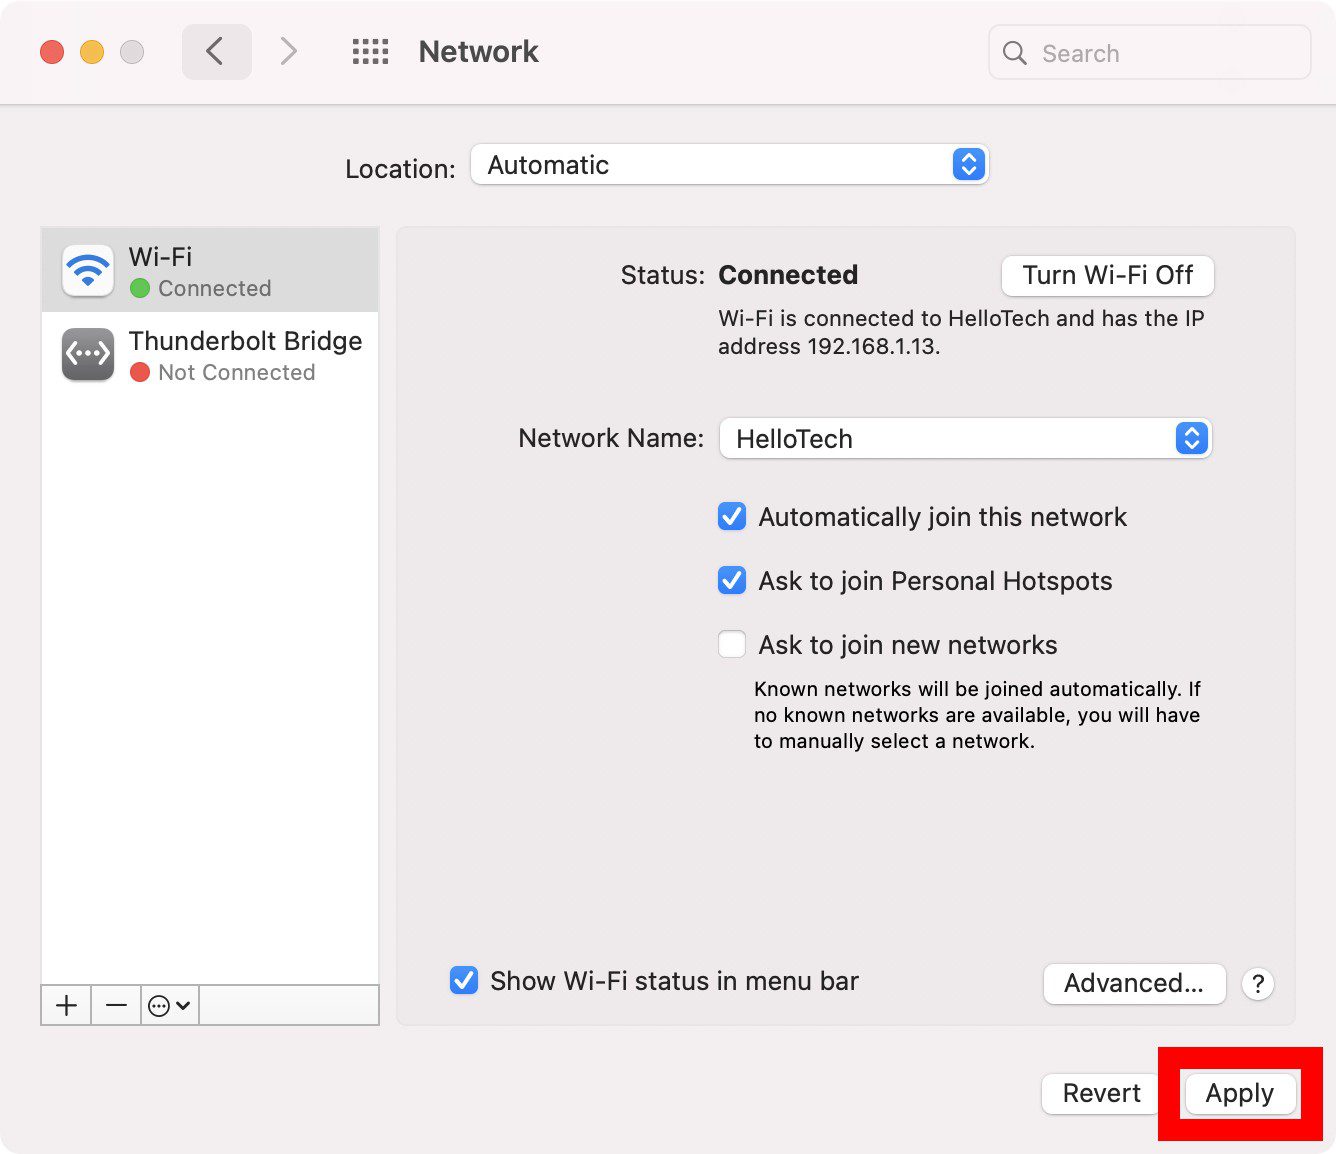
- Then select the connection that you want to change DNS server for. You will see all your different network connections in the left sidebar. You will know which connections you are currently using because they will have a green circle, while the connections you are not using will have a red circle.
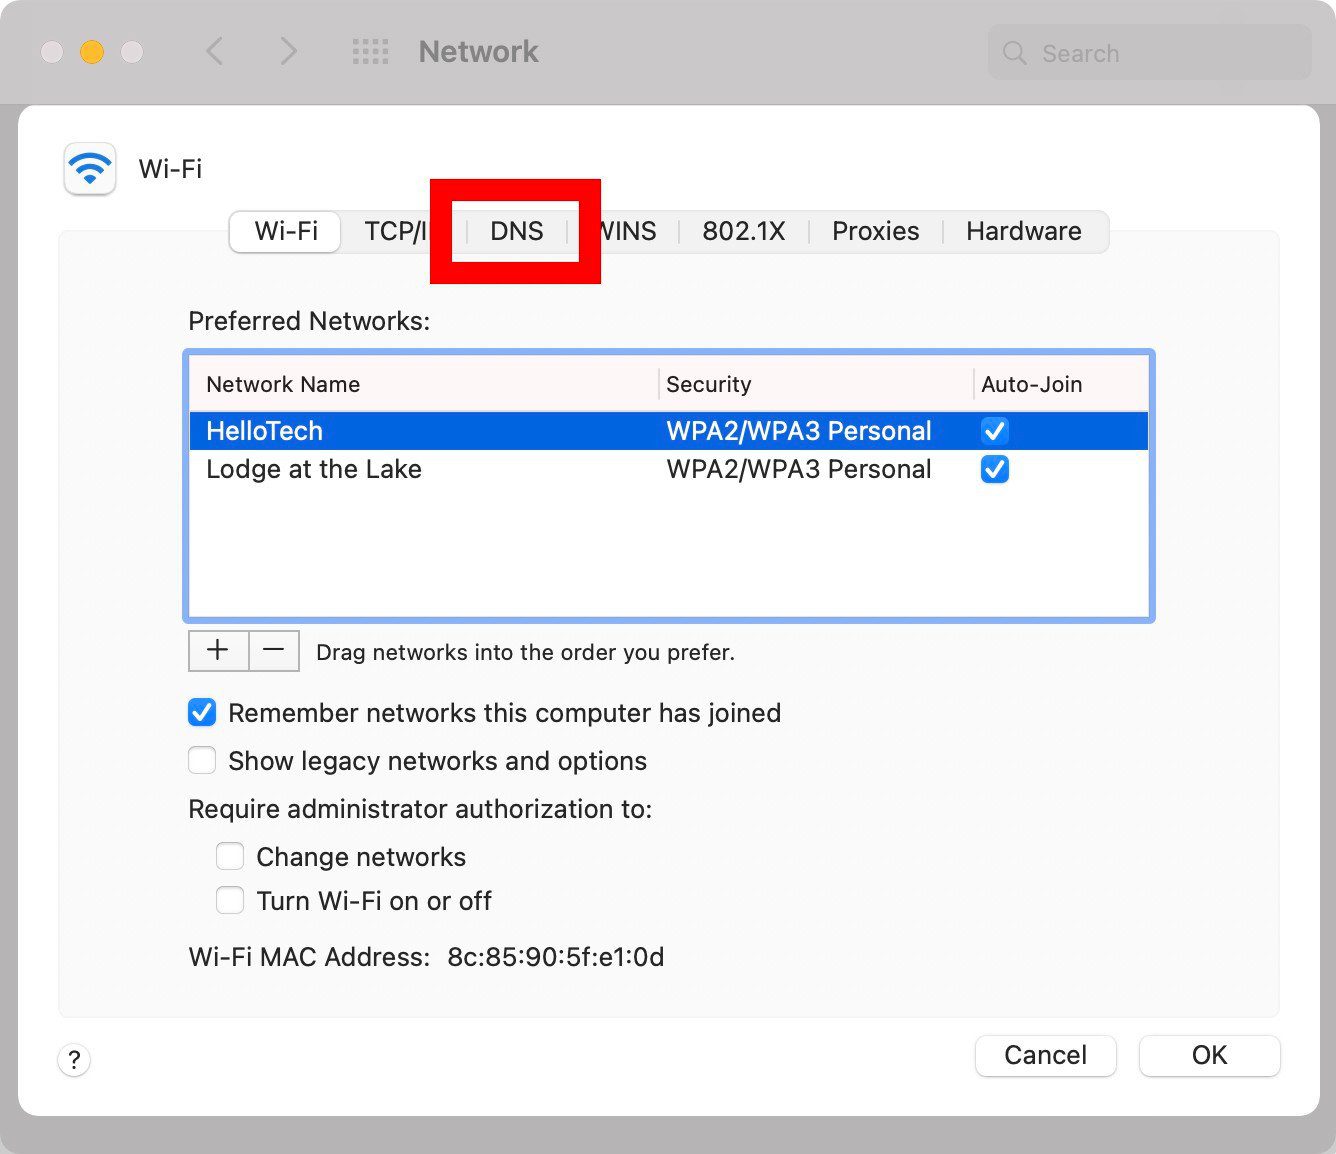
- Then click on Advanced. You will see this in the bottom-right corner of the window.
- Next, click on the DNS tab. You will see this at the top of the window.
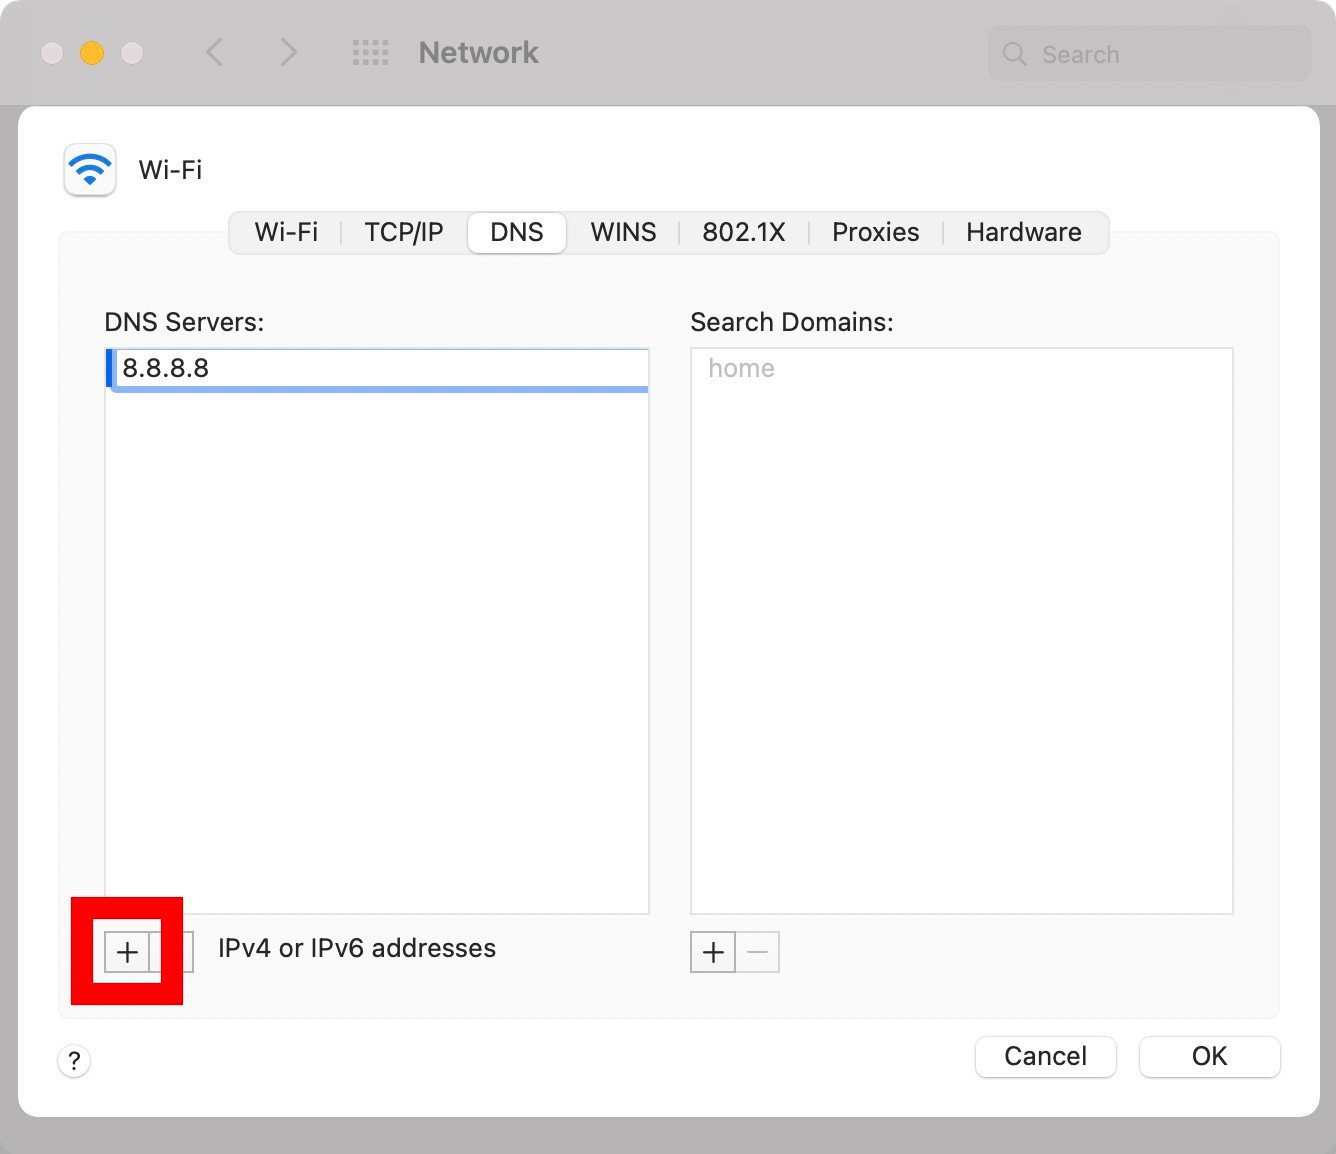
- Then click on the plus icon (+). You will see this at the bottom of the DNS Servers pane.
Note: If you see any grayed-out entries already entered in the DNS Servers box, they are assigned to another device, such as your router. You cannot delete the grayed-out entries, but when you add in new entries, the grayed-out ones will be replaced.
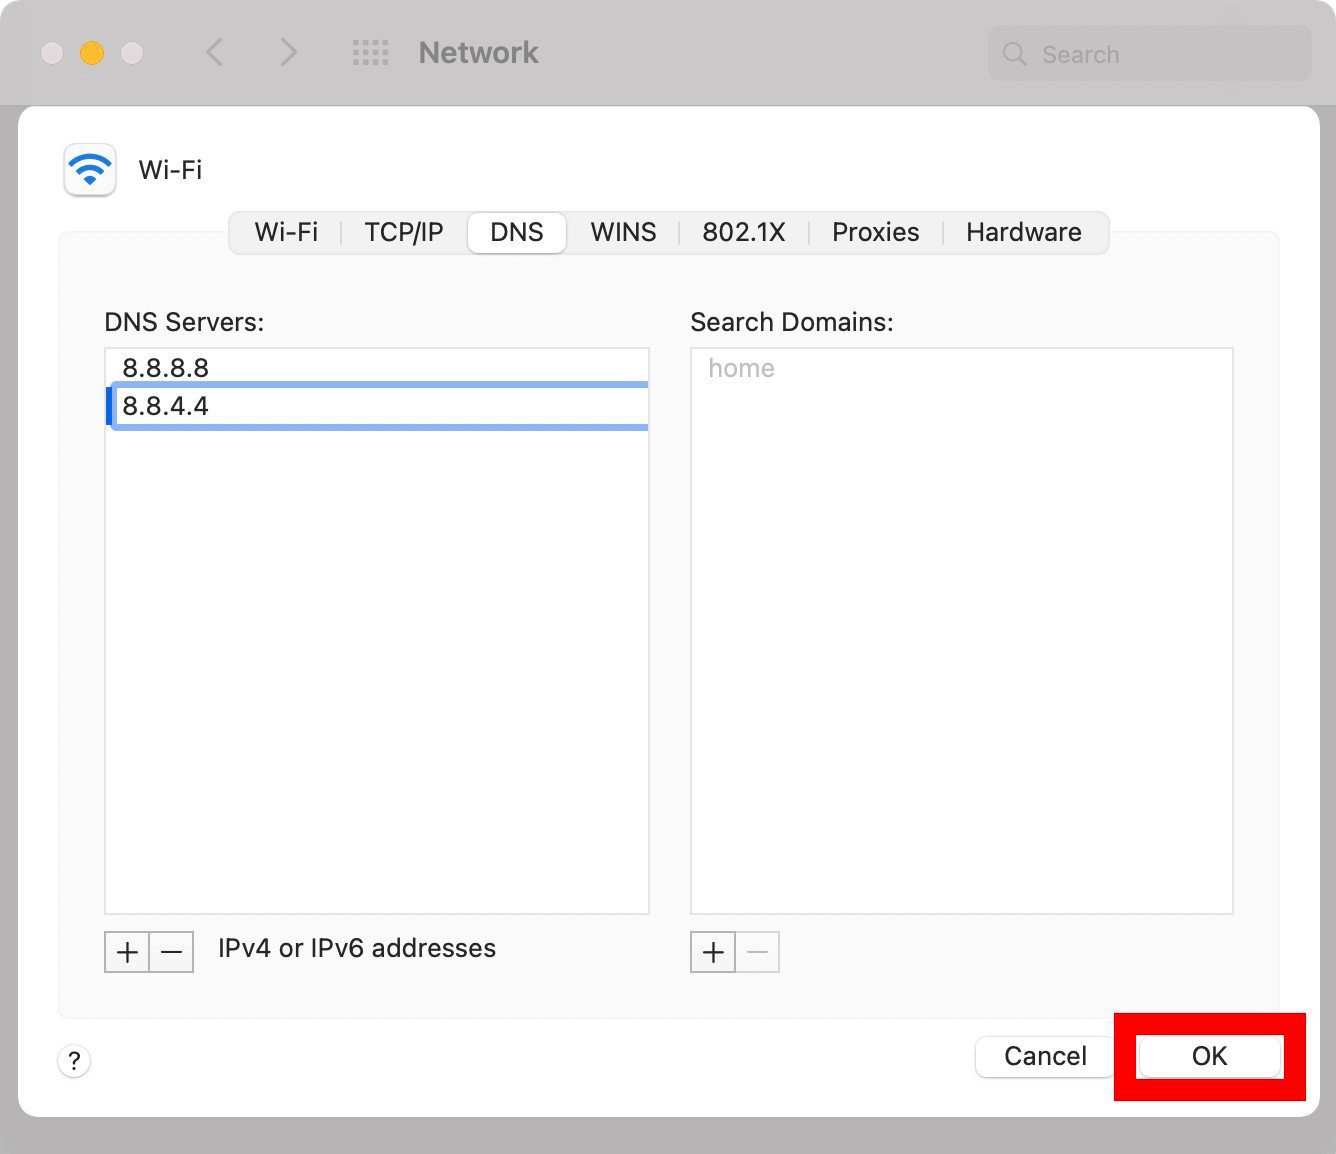
- Then enter new DNS addresses. You will want to enter a primary and secondary DNS address. When a URL needs to be resolved, your Mac will query the first entry on your DNS server list. If no response is received, it will move on to the next entry. This will go on and on until a response is received or when all servers have been queried.
Note: You can also change the order of your DNS addresses by dragging them or clicking the minus button at the bottom of the DNS Servers box to delete any entries.
- Next, click OK. The Advanced window will close, and you will be brought back to the Network window.
- Finally, click on Apply. Your changes won’t go into effect until you click Apply in the Network window.

Now that you know how to change your DNS address on a Windows 10 and Mac computer, here are the best third-party DNS addresses you can use.
Which Third-Party DNS Server Should You Use?
If you want to use a third-party DNS server, some of the best options are the Google Public DNS, Cloudflare, and OpenDNS. Each of these providers has a primary and secondary DNS address that you can use.
- Google Public DNS: 8.8.8.8 and 8.8.4.4
- Cloudflare: 1.1.1.1 and 1.0.0.1
- OpenDNS: 208.67.222.123 and 208.67.220.123
Google’s Public DNS is one of the most popular addresses because it is so easy to remember. However, it is important to note that Google does keep a log of the IP addresses that use its servers for one to two days to help with diagnostics and troubleshooting. There could also be some long-lasting logs, but Google claims that it doesn’t store any personal information. So, if you care about privacy, you might want to use another DNS address.
Cloudflare is also a popular choice because of the speed and privacy it offers. Cloudflare promises that it won’t use your data or log your IP address. There’s also a 24-hour deletion system wherein data gets removed on a daily basis. Cloudflare also has an active community forum that you can rely on any time you have questions about its services.
OpenDNS is a fine choice if you want an experienced DNS provider. It blocks phishing sites by default, and you can configure parental controls for free by visiting its website. OpenDNS also offers commercial plans that come with a bunch of other great perks, such as access to up to one year of your internet activity history.
Since all of these DNS servers are in the US, they all let you access content that might be blocked in another country. If you want a more reliable way to access blocked content and protect your privacy online, check out our list of the best VPN services.
Содержание
- Очистка кеша DNS
- Способ 1: Системные «Параметры»
- Способ 2: Свойства сетевого подключения
- Способ 3: «Командная строка»
- Способ 4: Сторонний софт
- Вопросы и ответы
Перед тем как вы решите изменить DNS-сервер в Windows 10, рекомендуем очистить его кеш, чтобы избежать возможных неполадок с подключением:
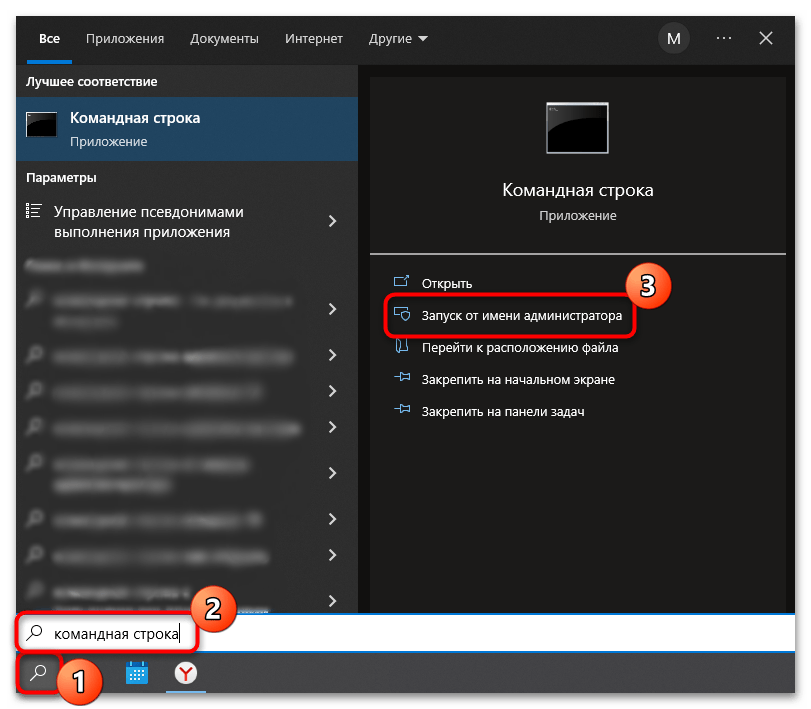
- Запустите «Командную строку» с расширенными правами. Для этого введите соответствующий запрос в строке системного поиска и выберите пункт «Запуск от имени администратора».
- Вставьте команду
ipconfig /flushdnsи нажмите на клавишу «Enter».

На этом очистка кеша сервера DNS завершена. В окне терминала отобразится уведомление об успешном завершении процедуры.
Способ 1: Системные «Параметры»
В операционной системе Windows 10 изменить DNS-сервер можно через приложение «Параметры» и раздел с настройками сети:
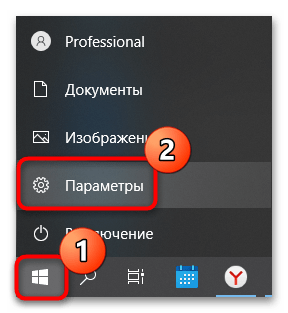
- Запустите «Параметры» через главное меню, нажав по кнопке «Пуск» на нижней рабочей панели.
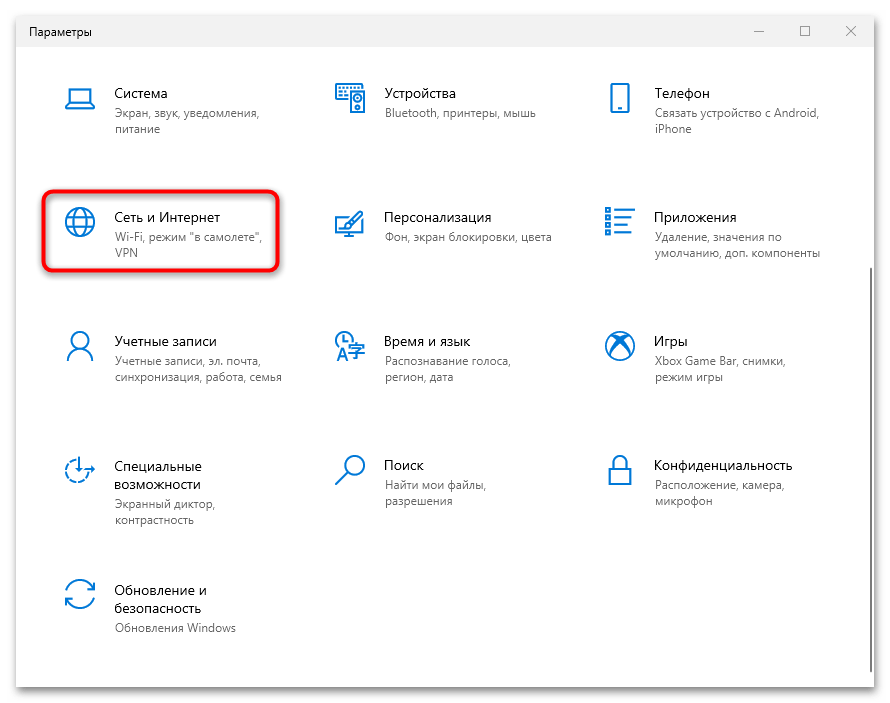
- В открывшемся окне перейдите в раздел «Сеть и Интернет».
- Слева выберите ту вкладку, название которой соответствует типу вашего интернет-соединения. Если это беспроводное подключение, то «Wi-Fi», а если проводное – «Ethernet». Кликните по названию соединения.
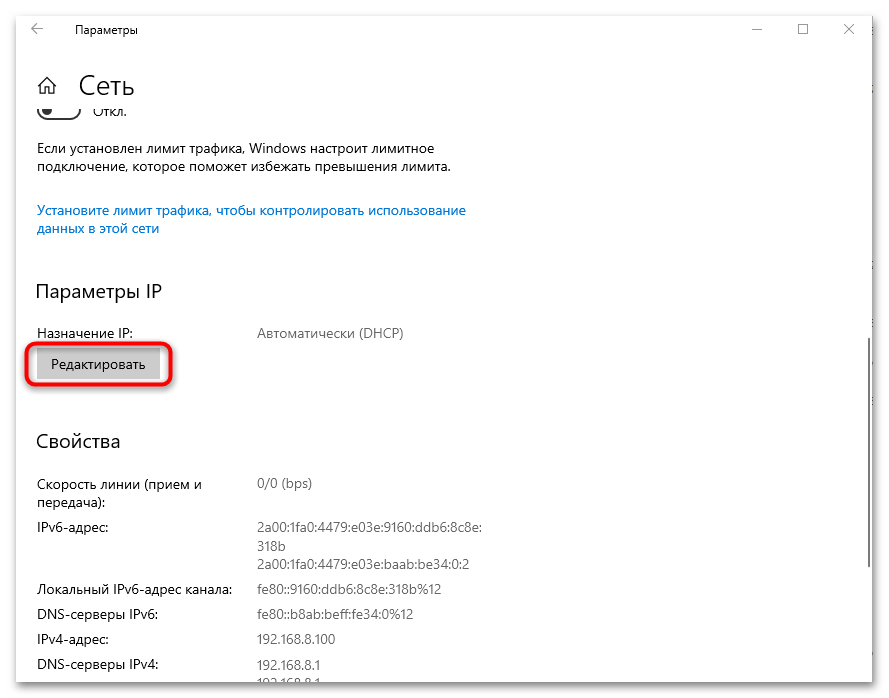
- Пролистайте до блока «Параметры IP» и нажмите на кнопку редактирования.
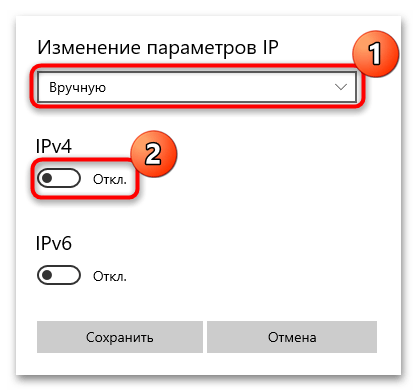
- В новом окошке разверните меню и выберите пункт «Вручную». С помощью тумблера активируйте соединение IPv4.
- В строках «Предпочтительный DNS-сервер» и «Дополнительный DNS-сервер» пропишите нужные значения. Сохраните настройки.


При необходимости можно изменить DNS-сервер и для IPv6, проделав то же самое при его выборе на Шаге 6.
Способ 2: Свойства сетевого подключения
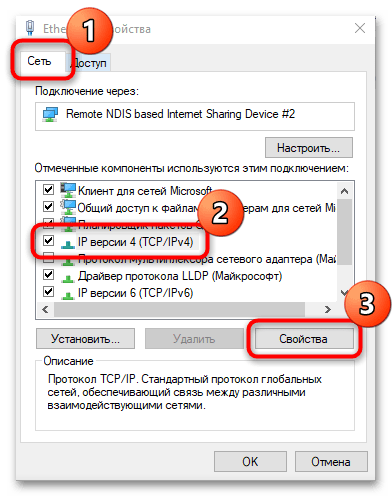
В окне со свойствами текущего интернет-соединения тонко настраиваются его параметры. Чтобы изменить настройки протокола TCP, где прописывается сервер DNS, откройте раздел «Сетевые подключения» в классической «Панели управления»:
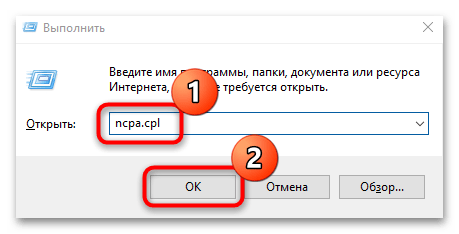
- Самый быстрый способ переход в окно с сетевыми подключениями – это диалоговое окно «Выполнить». Вызовите его одновременным нажатием на клавиши «Win + R».
- В строке введите команду
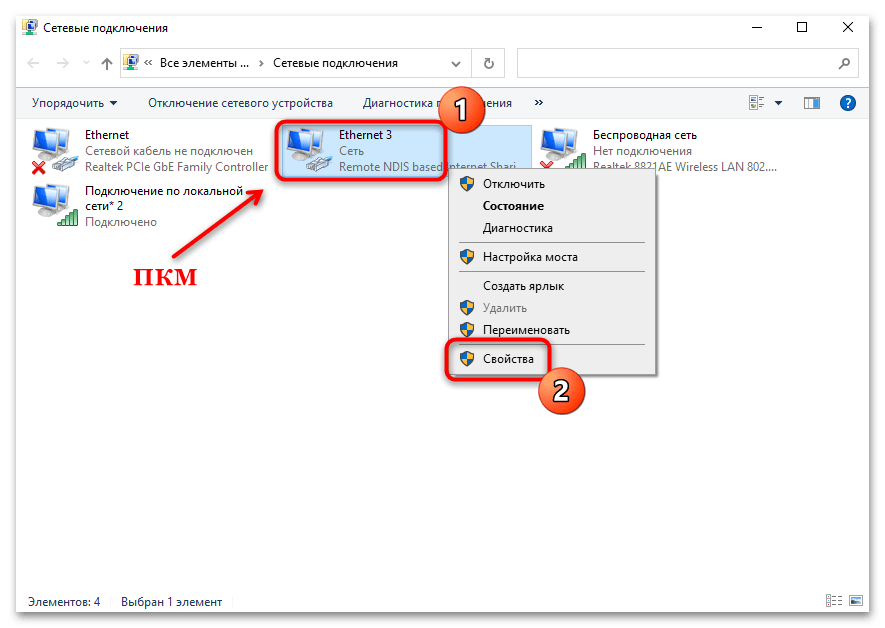
ncpa.cplи кликните по кнопке «ОК». - Откроется раздел с сетевыми подключениями. Найдите текущее соединение, щелкните по его названию правой кнопкой мыши и из контекстного меню выберите пункт «Свойства».
- На вкладке «Общие» в списке компонентов отыщите строку «IP версии 4 (TCP/IPv4)», выделите ее нажатием левой кнопкой мыши и щелкните по «Свойства».
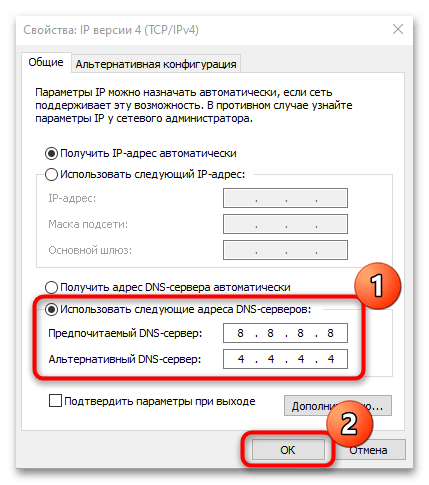
- В новом окне отметьте пункт «Использовать следующие адреса DNS-серверов». В строках через точку пропишите нужные значения. Подтвердите внесение изменений кнопкой «ОК».

По такому же принципу нужно действовать, если требуется сменить адрес DNS в протоколе IPv6.
Способ 3: «Командная строка»
Множество операций в системе Windows 10 можно проделать через терминал «Командная строка», если знать определенные команды. Например, через консоль легко меняются DNS-серверы:
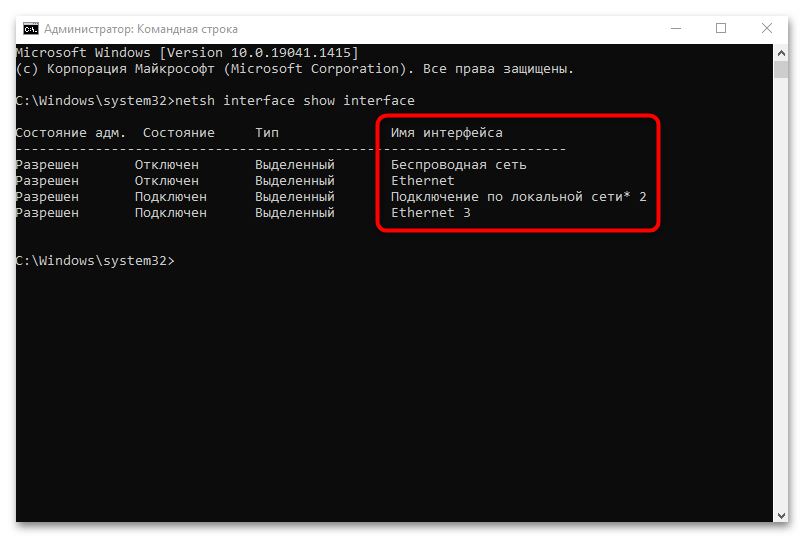
- Запустите «Командную строку» от имени администратора способом, описанном в самом начале статьи. Чтобы посмотреть список всех подключений, введите команду
netsh interface show interface. Нажмите на клавишу «Enter». - В столбце «Имя интерфейса» отыщите то подключение, DNS-сервер которого нужно изменить. В следующем шаге его название будет использоваться в команде.
- Для смены постоянного адреса на следующей строке консоли вставьте
netsh interface ip set dns name="Имя интерфейса" source="static" address="DNS-сервер". На нашем примере это будет выглядеть так:netsh interface ip set dns name="Ethernet 3" source="static" address="8.8.8.8". Нажмите на клавишу ввода, чтобы настройки немедленно вступили в силу. - Если нужно изменить альтернативный DNS-адрес, то введите команду
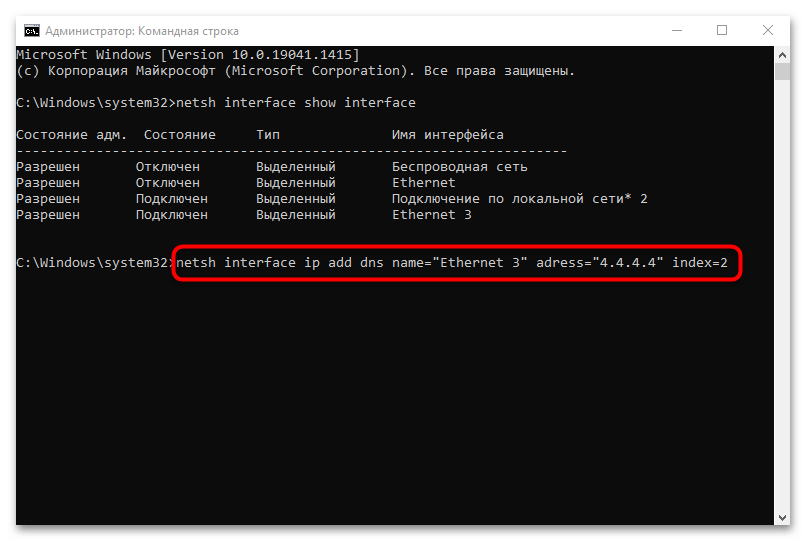
netsh interface ip add dns name="Имя интерфейса" address="DNS-сервер" index=2, заменив примеры в кавычках собственными данными (кавычки надо оставить). Подтвердите действие команды.


После смены адресов DNS-серверов можно очистить кеш протокола командой из начала статьи.
Способ 4: Сторонний софт
Для экономии времени пользователей разработаны специальные утилиты, с помощью которых можно изменить DNS-сервер несколькими кликами мышки. Алгоритм работы такого софта прост: возможности в интерфейсе взаимодействуют с системными параметрами, поэтому не нужно копаться в настройках или вводить специальные команды в консоли Windows.
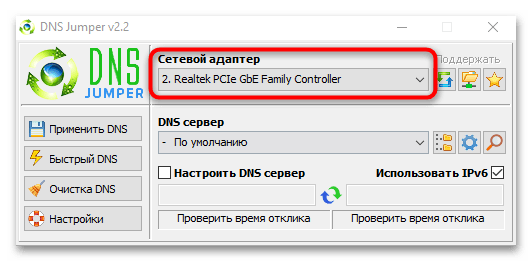
Одна из самых простых и эффективных утилит – это DNS Jumper. Интерфейс простой и интуитивно понятный, а сама программа не требует установки. С помощью ее инструментов можно быстро переключаться между DNS-серверами.
Скачать DNS Jumper с официального сайта
- Запустите скачанный файл. В меню «Сетевой адаптер» выберите компонент, чтобы настроить параметры для него.
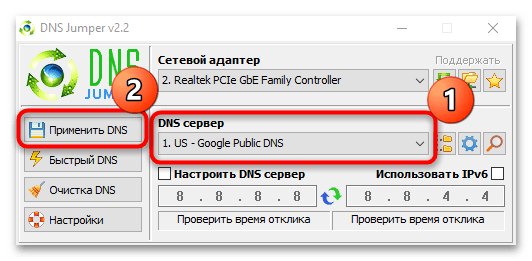
- В списке «DNS-сервер» можно выбрать один из популярных адресов, например от Google. Ниже отобразится постоянный и альтернативный адрес. Для смены значения нажмите на кнопку «Применить DNS», чтобы настройки вступили в силу.
Также через интерфейс утилиты можно вручную прописать значение адресов DNS, отметив пункт «Настроить DNS сервер».
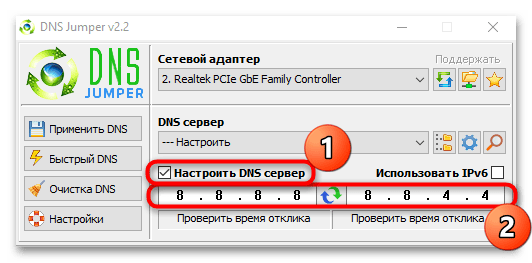
В DNS Jumper доступна автоматическая и ручная настройка протокола TCP/IPv6.
Еще статьи по данной теме:
Помогла ли Вам статья?
What is DNS and how does it work? DNS stands for Domain Name System or Domain Name Server or Domain Name Service. DNS is the backbone of modern-day networking. In today’s world, we are surrounded by a huge network of computers. The Internet is a network of millions of computers which are connected to one another in some or other ways. This network is very helpful for efficient communication and transmission of the information. Every computer communicates with another computer over an IP address. This IP address is a unique number that is assigned to everything which is present in the network.
Every device whether it is a mobile phone, a computer system or a laptop each has its own unique IP address which is used to connect with that device in the network. Similarly, when we surf the internet, each and every website has its own unique IP address which is assigned to it to be uniquely identified. We see the name of websites like Google.com, Facebook.com but they are just masked which are hiding these unique IP addresses behind them. As humans, we have the tendency to remember the names more efficiently as compared to numbers that is the reason why each website has a name that is hiding the IP address of the website behind them.

Now, what DNS server do is that it brings the IP address of the website you requested to your system so that your system can connect to the website. As a user, we just type the name of the website we like to visit and it is the responsibility of the DNS server to fetch out the IP address corresponding to that website name so that we can communicate with that website on our system. When our system gets the required IP address it sends the request to the ISP regarding that IP address and then the rest of the procedure follows.
The above process happens in milliseconds and this is the reason we don’t usually notice this process. But if the DNS server that we are using is slowing down your internet or they aren’t reliable then you can easily change the DNS servers on Windows 10. Any problem in the DNS server or changing the DNS server can be done with the help of these methods.
Table of Contents
Make sure to create a restore point just in case something goes wrong.
Method 1: Change DNS Settings by configuring IPv4 settings in Control Panel
1.Open the Start menu by clicking on the start button in the bottom left corner of the screen on the taskbar or press the Windows Key.
2.Type Control Panel and hit Enter to open it.

3.Click on Network and Internet in the Control Panel.

4.Click on Network and Sharing Center in Network and Internet.

5.On the upper left side of the Network and Sharing Center click on Change Adapter Settings.

6.A Network Connections window will open, from there select the connection that is connected to the internet.
7.Right-click on that connection and select Properties.

8.Under the heading “This connection uses the following items” select Internet Protocol Version 4 (TCP/IPv4) and click on the Properties button.

9.In IPv4 Properties window, checkmark “Use the following DNS server addresses“.

10.Type the preferred and alternate DNS servers.
11.If you want to add a public DNS server then you can use Google public DNS server:
Preferred DNS Server: 8.8.8.8
Alternate DNS Server box: 8.8.4.4

12.In case you want to use OpenDNS then use the following:
Preferred DNS Server: 208.67.222.222
Alternate DNS Server box: 208.67.220.220
13.In case you want to add more than two DNS servers then click on Advanced.

14.In the Advanced TCP/IP properties window switch to the DNS tab.
15.Click on the Add button and you can add all the DNS server addresses you want.


16.The priority of the DNS servers that you will add will be given from top to bottom.

17.Finally, click OK then again click OK for all the open windows to save changes.
18.Select OK to apply changes.
This is how you can change DNS settings by configuring IPV4 settings via the control panel.
Method 2: Change DNS Servers using Windows 10 Settings
1.Press Windows Key + I to open Settings then click on Network & Internet.
2.From the left-hand menu, click on WiFi or Ethernet depending on your connection.
3.Now click on your connected network connection i.e. WiFi or Ethernet.

4.Next, scroll down until you see the IP settings section, click on the Edit button under it.

5.Select ‘Manual’ from the drop-down menu and toggle the IPv4 switch to ON.

6.Type your “Preferred DNS” and “Alternate DNS” addresses.
7.Once done, click on the Save button.
Method 3: Change DNS IP Settings using Command Prompt
As we all know that every instruction which you perform manually can also be performed with the help of Command Prompt. You can give every instruction to Windows using cmd. So, in order to deal with DNS settings, the command prompt can also be helpful. To change the DNS settings on Windows 10 through the command prompt, follow these steps:
1.Open the Start menu by clicking on the start button in the bottom left corner of the screen on the taskbar or press the Windows Key.
2.Type Command Prompt, then right-click on it and Run as Administrator.
3.Type wmic nic get NetConnectionID in Command Prompt to get the names of Network adapters.

4.To change the network settings type netsh.
5.To add the primary DNS IP address, type the following command & hit Enter:
interface ip set dns name= “Adapter-Name” source= “static” address= “Y.Y.Y.Y”
Note: Remember to replace the adapter name as the name of the network adapter you have viewed in step 3 and change X.X.X.X with the DNS server address that you want to use, for example, in case of Google Public DNS instead of X.X.X.X. use 8.8.8.8.

5.To add an alternative DNS IP address to your system type the following command & hit Enter:
interface ip add dns name= “Adapter-Name” addr= “Y.Y.Y.Y” index=2.
Note: Remember to put the adapter name as the name of the network adapter you have and viewed in step 4 and change Y.Y.Y.Y with the secondary DNS server address that you want to use, for example, in case of Google Public DNS instead of Y.Y.Y.Y use 8.8.4.4.

6.This is how you can change the DNS settings in Windows 10 with the help of the command prompt.
These were three methods to change the DNS settings on Windows 10. Many third-party applications such as QuickSetDNS & Public DNS Server Tool are useful to change the DNS settings. Do not change these settings when your computer is at the workplace as the change in these settings can cause connectivity problems.
As the DNS servers provided by the ISP’s are quite slow so you can use the public DNS servers that are fast and more responsive. Some of the good public DNS servers are offered by Google and the rest you can check out here.
Recommended:
- Fix Faulty Hardware corrupted page error on Windows 10
- How to install Internet Explorer on Windows 10
- Fix Printer Driver is unavailable on Windows 10
- Fix Logitech Wireless Mouse Not Working
I hope the above steps were helpful and now you can easily change DNS settings on Windows 10 but if you still have any questions regarding this post then feel free to ask them in the comment section.
-
Home
-
News
- How To Change DNS On Windows 10: 3 Ways Available
By Sarah |
Last Updated
Most of the common users don’t know what DNS is exactly; let alone how to change it on Windows. In the following content, I’ll introduce the DNS to you and tell you 3 different ways to change DNS in Windows 10 easily.
Please resort to MiniTool if you have any data & disk problems and backup needs.
DNS Settings Windows 10
What Is DNS
First of all, I’ll tell you what does the word DNS mean. DNS, short for Domain Name System, can be regarded as the phonebook of the internet. This is actually a hierarchical and decentralized naming system designed for any resources connected to the internet/private network, such as computers and services.
What’s the exact function of DNS?
In general, people can get access to the information on the internet through domain names (such as apple.com and microsoft.com). Well, all the browsers can interact via Internet Protocol (IP) addresses. What DNS does is translating the domain names to corresponding IP addresses so that the internet resources can be loaded correctly.
How to fix if you encountered a 404 not found error after entering the URL to address bar:
In order to make the information access process more secure and reliable, people desire to know how to change DNS on Windows 10. That’s what I will talk about in the new few paragraphs.
How to Change DNS on Windows 10
In addition to better security and reliability, there are also some benefits that explain why people want to change DNS in Windows 10.
- Go to enjoy the parental control features.
- Make use of the web filtering business features.
- Make browsing faster and get better browsing experience.
Method 1: Change DNS in Windows 10 via Settings App
- Press Win and I buttons on the keyboard to open Settings app (there are other ways to open Settings in Windows 10).
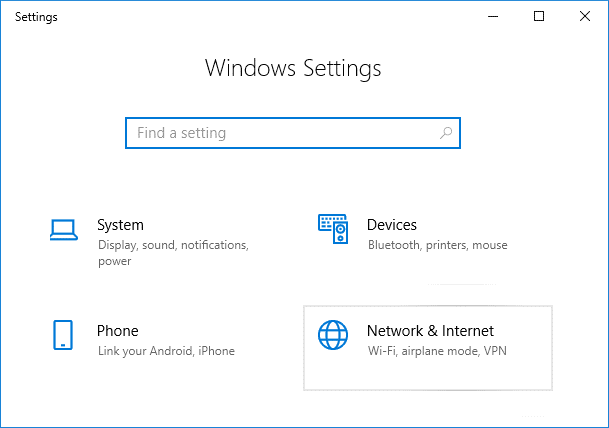
- Look for Network & Internet (Wi-Fi, airplane mode, VPN) and click on it.
- Select Ethernet (in some devices, it is displayed as Wi-Fi) from the left sidebar.
- Look for the Related settings area on the right panel.
- Click Network and Sharing Center link under it.
- Select Change adapter settings from the left sidebar.
- Your network connections will be listed in order.
- Right click on the certain network and choose Properties.
- Keep Networking tab selected and choose Internet Protocol Version 4 (TCP/IPv4) under This connection uses the following items.
- Click on the Properties button below.
- Check Use the following DNS server address, instead of Obtain DNS server address automatically.
- Enter the preferred DNS server and Alternate DNS server you want to use.
- Click on the OK button at the bottom to confirm changes.

Method 2: Change DNS Settings through Control Panel
- Click on the Windows logo button in the lower left corner.
- Scroll down to find Windows System Then, expand it.
- Select Control Panel under it.
- View by Category and click Network and Internet.
- Click Network and Sharing Center on the right pane.
- Select Change adapter settings from the left sidebar and repeat step 7 ~ step 13 mentioned in method 1.

Method 3: Change DNS Settings Windows 10 by Using Command Prompt
- Open Windows 10 search box and type cmd into it.
- Right click on Command Prompt app from the search result.
- Choose the first option – Run as administrator – from the context menu.
- Type netsch and press Enter.
- Type interface show interface and press Enter.
- Type interface ip set dns name=”ADAPTER-NAME” source=”static” address=”X.X.X.X” (ADAPTER-NAME is the name of the certain network adapter while X.X.X.X is the IP address of the DNS you want to use) and press Enter.
- Type interface ip add dns name=”ADAPTER-NAME” addr=”X.X.X.X” index=2 and press Enter.
- Wait a few seconds for the operations to complete.

By the way, the built-in Command Prompt utility can also be used as a wonderful tool to recover lost files on your PC. Please click here to know how to retrieve files in different cases.
That’s all about how to change DNS settings on Windows 10 device.
About The Author
Position: Columnist
Sarah has been working as an editor at MiniTool since she graduated from university. Sarah aims at helping users with their computer problems such as disk errors and data loss. She feels a sense of accomplishment to see that users get their issues fixed relying on her articles. Besides, she likes to make friends and listen to music after work.