Setting up a Windows and Linux dual boot on your machine is as easy as setting up Windows on a new machine or hard disk.
You need to create two partitions that you use to install the two operating systems. Windows resides inside a primary partition, while Linux will reside on a newly-created partition. As an additional step after installing Kali Linux, you need to update GRUB to record the two operating systems.
I have always wanted to test new operating systems other than Windows 10.
Not to say that Windows has a bad user experience or is terrible. Windows can be great for a number of reasons that may include using the Microsoft Office suite and games.
However, I experienced a “should-I-really-remove-windows” dread to testing a new operating system.
I researched a couple of ways to install other operating systems without removing Windows.
One of the options was to use Linux OS on a virtual machine. But the performance was not always great.
That’s why I opted to choose a new way of installing other operating systems alongside my “never-leaving-you” Windows.
The approach was setting up a Windows and Kali Linux dual boot.
Pre-requisites
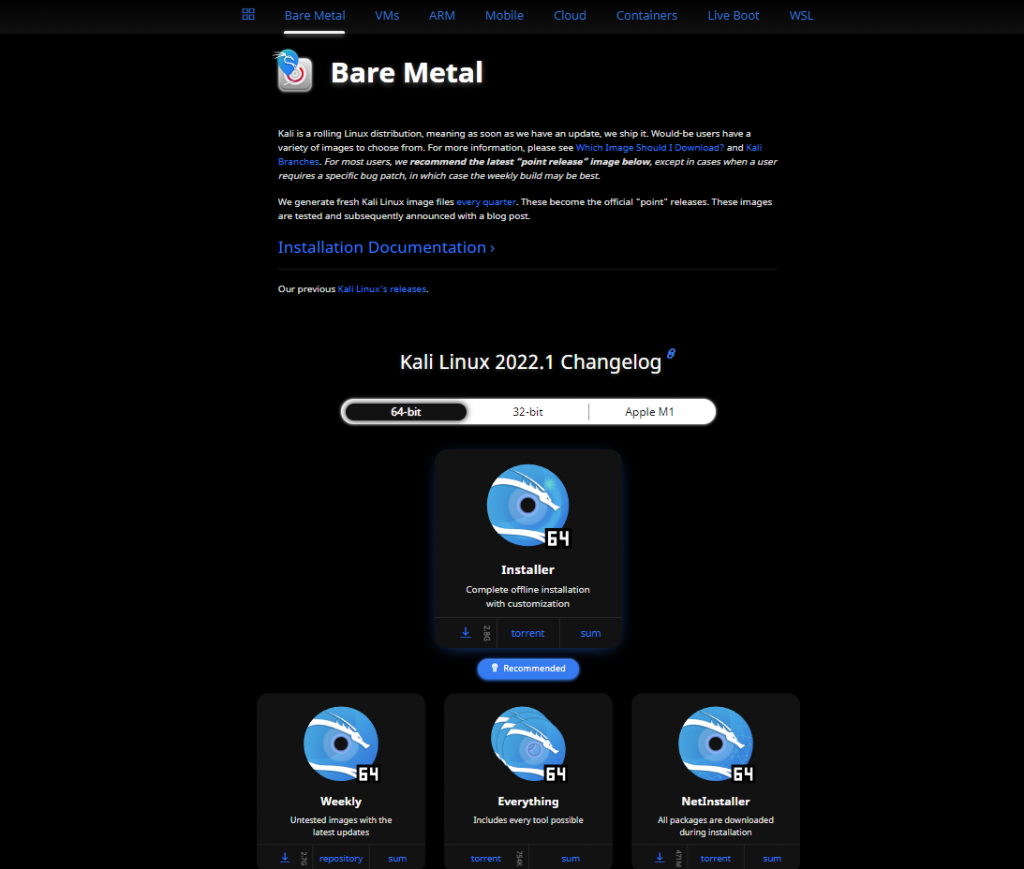
- Download the Kali Linux ISO image here. Choose the bare metal release.
- Download the latest version of the Rufus tool here.
- 8 GB or more USB drive
Here are the steps that you will follow to set up a dual boot for Windows and Kali Linux
- Create a Kali Linux OS bootable USB
- Set up a separate partition using the Disk Manager on Windows 10
- Configure your BIOS to disable fast boot and enable legacy boot options
- Boot using the newly-created bootable USB
- Install Kali Linux and GRUB
- Boot into your new Kali installation
Step 1: Create Kali Linux Bootable USB
This step requires the pre-requisite of having downloaded the Linux image and the Rufus tool.
You use the Rufus tool to set up a bootable USB drive.
The setup process involves writing all the essential system booting information and files that the computer hardware will use.
Follow these steps to set up your USB:
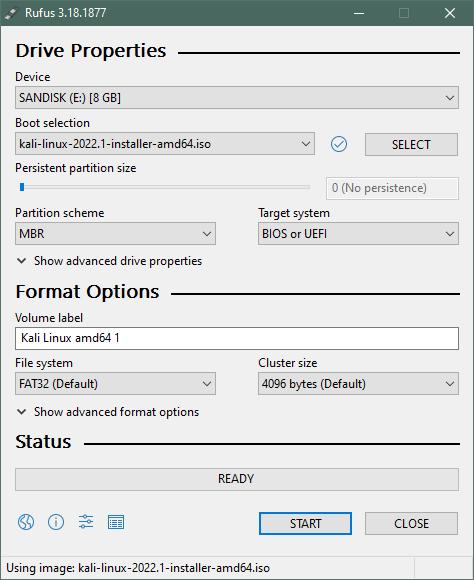
- Run the Rufus tool as an Administrator on your Windows 10 machine
- Under the Device tab, select your USB device
- Under the Boot Selection tab, click the SELECT button and choose the Kali Linux image you downloaded.
- Choose Partition scheme as MBR and leave everything else as default.
- Click on START
- If you are prompted to download some files, click yes and let the files download.
- Additionally, you can be prompted to write the Linux image in DD image mode or ISO image mode. I find that the DD image mode works all the time. You try either option and see which one works for you. If during the installation you get a message that the installation media cannot be detected and you used the ISO image mode, abort the installation, reboot again to Windows, and use the DD write method.
- After the setup has been completed, you can now set up a new partition to install Kali Linux.
Step 2: Perform a Manual Disk Partition for Kali Linux Dual Boot
A partition is responsible for separating the Windows and Kali Linux files on the same drive.
Another reason for creating a separate partition is that Windows uses a different filesystem compared to Linux. Linux uses EXT4 filesystem and Windows uses NTFS filesystem.
To set up a separate partition follow these steps:
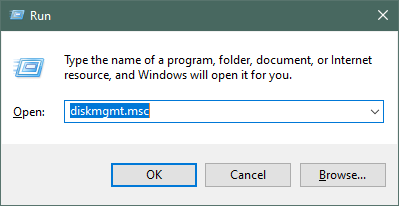
- Open the Disk Manager by pressing the Windows key + R. Then type diskmgmt.msc and press Enter.
- Select the partition where you have your Windows installed. In this case, the partition will be labelled Local Disk C.
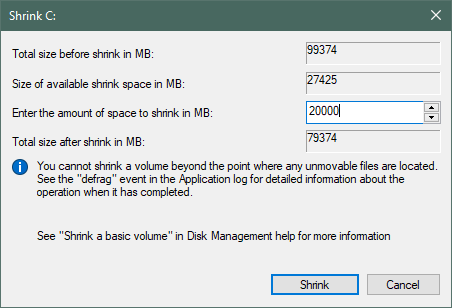
- Right-click on the partition and select the Shrink Volume option.
- Set the size to 51200 MB, which is equivalent to 50 GB, or any size greater than 20 GB that you prefer. The rule to figure out the actual size in MBs is to multiply the number of GBs by 1024. For example, 20 GB will be (20 x 1024 = 20480) MB.
- After setting the size, click on Shrink and let the process complete.
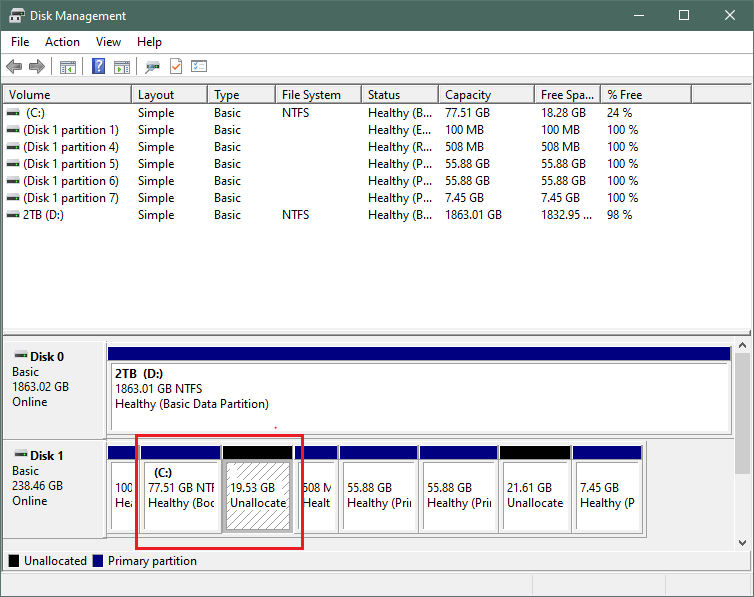
- A new Unallocated partition will be created.
- Close the Disk Manager and switch your computer.
ALTERNATIVELY, you can skip this step and set it up later when installing your Kali Linux. See the Step:
Step 3: Configure your BIOS to disable fast boot and enable legacy boot options
Press and power button and repeatedly press the F1 key on your keyboard to boot into BIOS. Booting into BIOS will probably be the option associated with the F9 key.
Most computer manufacturers configure the PC to boot only using trusted firmware.
However, you find that most of the firmware on most devices supports Microsoft operating systems such as Windows 10.
Therefore, it is necessary to disable Secure boot to be able to boot into Kali Linux operating system.
Remember how we chose the partition scheme to be MBR.
This step was necessary to define a disk partitioning scheme that conforms with all operating systems.
All operating systems can be installed on an MBR–partitioned scheme.
Other operating systems such as some 64-bit windows versions only use the GPT.
Setting the partition scheme to MBR ensures that Windows 10 and Kali Linux operating systems are supported.
To disable secure boot:
Navigate to the Security tab and check whether Secure Boot is enabled. Choose the Disabled option to disable it.
To set up the boot sequence, navigate to boot options and select Legacy boot from the list of options.
Beware that these options can be located under different tabs for different devices.
You may search how to boot into bios, how to set up legacy boot, and how to disable secure boot.
After you have completed the steps, click on save and exit. Your device should restart.
Switch off your computer.
Step 4: Boot using the newly-created bootable USB
Insert your thumb drive into your machine.
Press the power button and repeatedly press the ESC key until you are prompted with various options that include booting from the primary drive or USB, booting into BIOS, e.t.c
How to install Kali Linux
Kali Linux is a great option for web development, as it comes pre-installed with many tools and packages that can be useful for building and testing websites.
Installing Kali Linux is a very straightforward process, but it does require some knowledge and preparation.
After, booting into your Kali bootable USB drive, here are the basic steps you will need to take to get started.
Step I: Install Kali Linux and GRUB
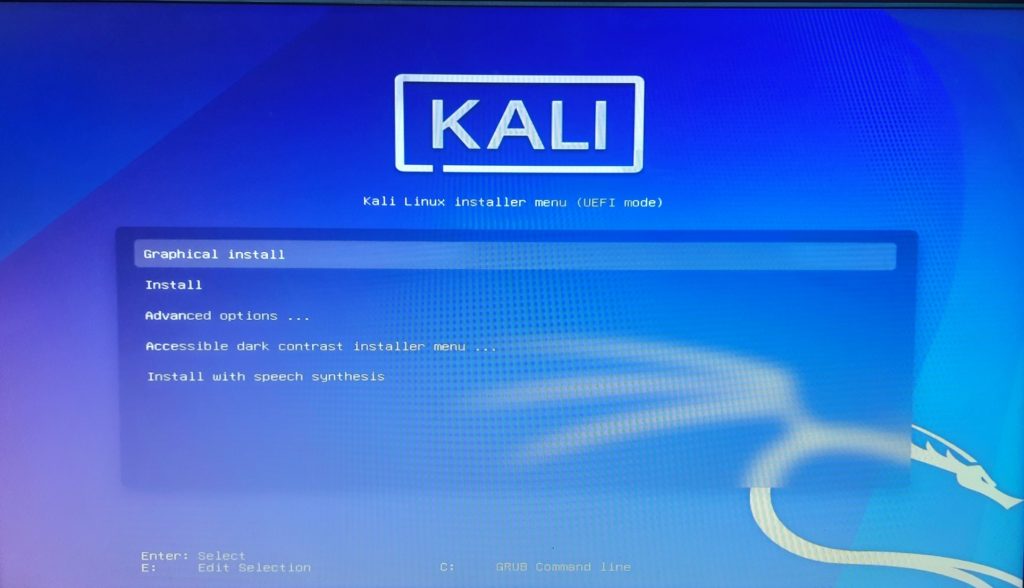
Choose boot using USB and the screen should display the following image.
Choose Graphical install to start installing Kali Linux.
If you have reached this point, installing Kali Linux should be easy. Follow the steps prompted, fill in the required information appropriately, and keep clicking continue.
You may use the settings in the screenshots below:
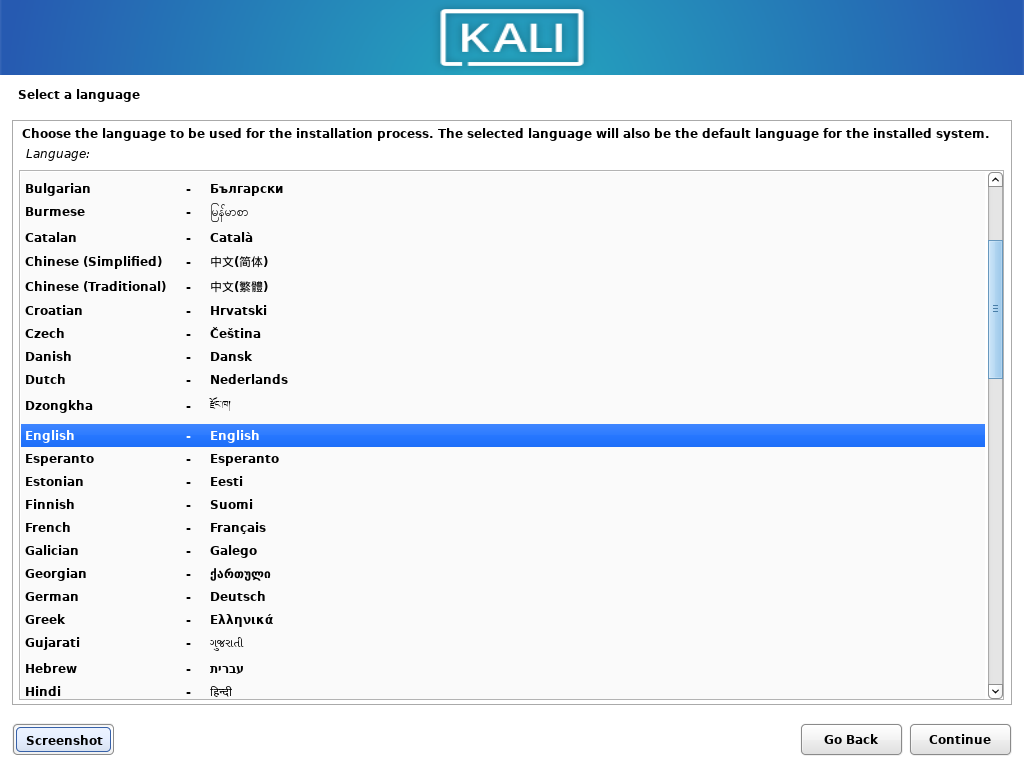
Select language

Select your location

Configure the keyboard layout

Select either WIFI or LAN network connection
Alternatively, you can choose to set up the network later if the connection fails. Choose “Do not configure network at this time and click on continue”.

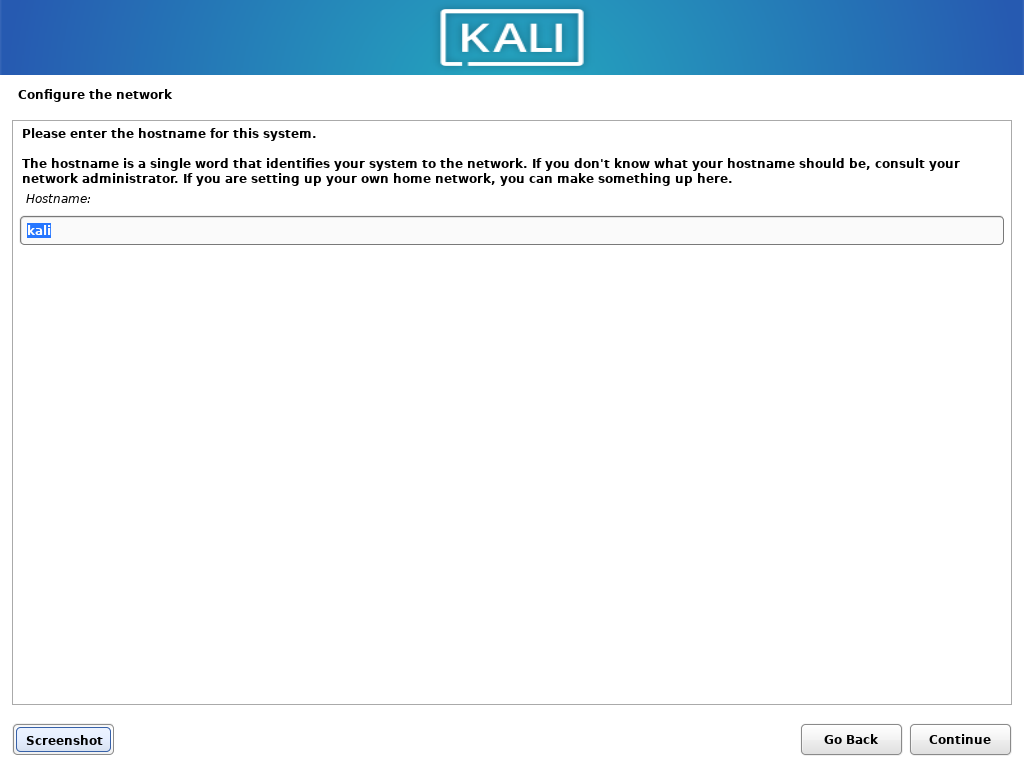
Select the hostname to use for the system. You can also use any name.

Skip the domain name part
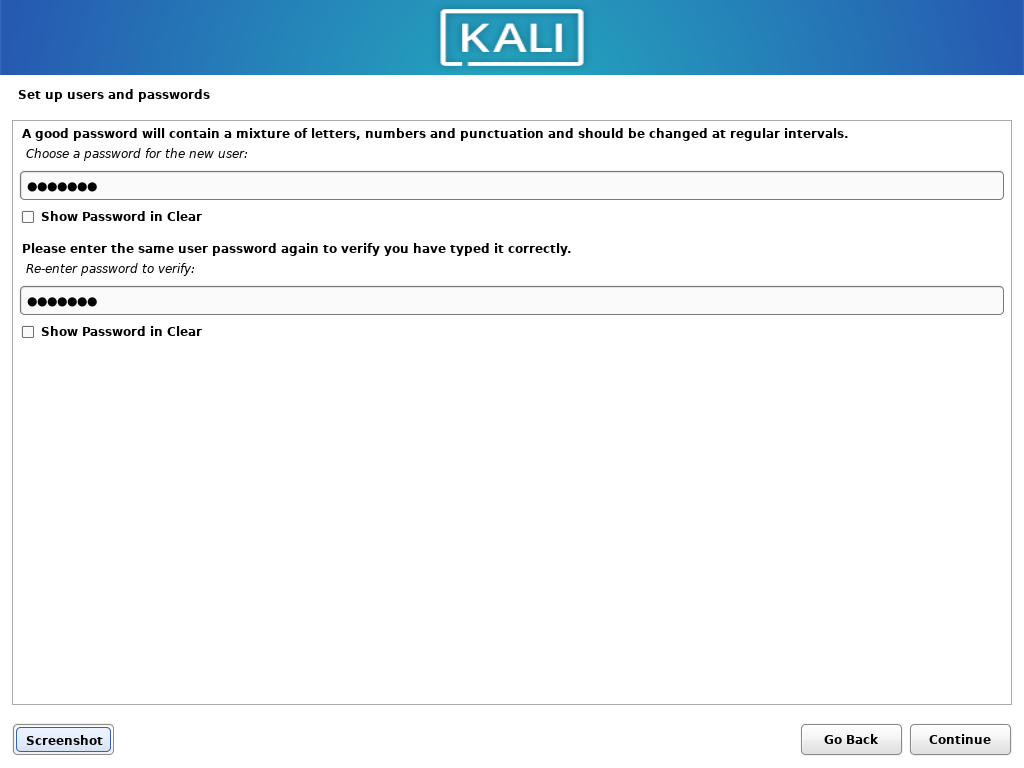
Setup your Full name, username, and password that you will use on your machine.

Set up the clock and proceed to partition disks
Select Manual in the Partition disks section and click continue

Choose the “All files in one partition …” option and click on continue
In the partition disks section, you will see the free space that you created as a partition in step 2. Select the partition and click continue.

You are good to proceed if you had created a partition earlier.
How to create a partition for Kali Linux
However, if you had not set up your partition, I will show you how to use the installer to set up a new partition that is separate from that of your Windows. Follow these steps:
- Choose the partition where you have installed Windows
- Double click on the partition, click on the “Resize the partition …” option and click continue.
- Choose Yes when prompted to write the previous change to disk and continue
- Set the size that you want to have for your Linux and click continue
- Choose the newly created free space and click on continue
- Choose “Automatically partition the free space”


Wait for the system to complete installation and you will be ready to boot into your new Kali machine.
When prompted to install GRUB, click the partition where your Windows operating system resides and click continue.
When the setup has been completed, remove the installation and reboot the device.
Boot into your new Kali OS
The system will boot automatically to Kali Linux. If you need to boot into your Windows system, choose it on the GRUB bootloader screen. You may also need to set up a printing service on a new installation if you are ever gonna need it.
FAQs
What is the recommended partition size for Kali Linux?
The recommended partition size for Kali Linux depends on your specific use case and storage requirements. However, a general recommendation is to allocate at least 20-30 GB for the root partition and a separate partition for the home directory.
A space of 20-30 GB will provide enough space for the operating system and additional software, as well as user files and data. Keep in mind that the partition sizes may vary depending on the number and size of installed packages, as well as the amount of data you plan to store.
Additionally, you may want to create a separate partition for your home directory to store your personal files and data. The partition sizes may vary depending on your usage, but it’s generally a good practice to allocate enough space to avoid running out of disk space.
Kali Linux Boot Windows 10 Not Working? Try these…
- Disable Secure Boot: Secure Boot is a security feature in Windows 10 that prevents unsigned operating systems from booting. You may need to disable it in your system’s UEFI/BIOS settings to allow Kali Linux to boot.
- Repair the boot loader: If your boot loader is corrupted, you may need to repair it. This can typically be done using the Kali Linux live USB or CD and boot-repair.
How to repair the boot loader using a Kali Linux live USB
Follow these steps to repair a boot loader that is making your Kali Linux or Windows 10 not reboot:
- Insert the Kali Linux live USB and boot from it. Refer to the section to do this: Boot into your newly-created live USB drive.
- Once you have booted into the live environment, open a terminal window. You can do that by pressing CTRL + ALT + T or finding the Terminal app in the Apps list.
- In your Terminal window, type
sudo grub-install /dev/sdaand press enter. Replacedev/sdawith the partition name of your Kali Linux you created earlier. - Execute the second command:
sudo update-grub - Restart your computer and remove the Kali Linux live USB. Your boot loader should now be repaired and you should be able to boot into Kali Linux or Windows 10 as expected.
And that’s it for this guide and I hope to see you guys in my next tutorial. If it is your first time using Kali Linux, I recommend that you check this article:
How can beginners learn to code on Linux?
It has a guided introduction to using Linux and installing common applications.
OR: Why not take a course that introduces you to the ins and outs of Kali Linux? Follow this link: Kali Linux Tutorial for Beginners

In this article, we are going to shows how to Install Kali Linux on Windows 10 WSL. If you are interested to Install Kali Linux on Windows 10 WSL then this post is ideal for you.
Kali Linux is very popular operating system. It is a Debian derived Linux distribution that is maintained and funded by Offensive Security. It is developed for information security tasks such as Penetration Testing, Security research, Reverse Engineering and digital forensics. The official website of kali Linux is Kali.org.
If you know that how to use Linux and it’s terminal commands, architecture system and file management then you can go with Kali Linux. And if you are not good in Linux, then you will go first start with ubuntu distribution and after sufficient practice, you could try for Kali Linux.
The Windows Subsystem for Linux (WSL) allows you to run a GNU/Linux environment including most command-line tools, utilities, and applications directly on Windows system.
WSL2 is an improvement version of WSL. It comes with features such as file system performance boost, full system call compatibility, Managed VM, built with a new architecture, full Linux Kernel and many more.
Requirements to install WSL 2 on Windows 10:
- Windows 10 May 2020 (2004), Windows 10 May 2019 (1903), or Windows 10 November 2019 (1909) or later
- A computer with Hyper-V Virtualization support
With the help of WSL, you can easily install full Linux operating system in your Windows 10. You just need to enable WSL (Windows Subsystem for Linux) in your Windows 10 system.
How to Install Kali Linux on Windows 10 WSL
Simply follow below steps to install Kali Linux on Windows 10 WSL:
Step 1 : Enable WSL in Windows 10
First of all, you will need to enable WSL in your Windows system. To enable it, simply open PowerShell terminal as administrator.
Click on Start icon -> search for PowerShell -> right-click Windows PowerShell app -> choose to run as administrator.

Next, run the command below in the Windows PowerShell console as show below:
dism.exe /online /enable-feature /featurename:Microsoft-Windows-Subsystem-Linux /all /norestartThe command above will display a successful message similar as below:
Deployment Image Servicing and Management tool
Version: 10.0.19041.844Image Version: 10.0.19042.985
Enabling feature(s)
[==========================100.0%==========================]
The operation completed successfully.
Step 2 : Enable Virtual Machine Platform
Run the commands below from the same PowerShell console to enable the Virtual Machine platform in your Windows system:
dism.exe /online /enable-feature /featurename:VirtualMachinePlatform /all /norestartIf you have Windows 10 version lower than 2004 in your system, use the commands below:
Enable-WindowsOptionalFeature -Online -FeatureName VirtualMachinePlatform -NoRestartNext, restart your computer for changes to apply. If you forget to start then the below command doesn’t work.
After restart of your computer, launch the PowerShell as administrator again and run the commands below to set WSL 2 as the default version of WSL:
wsl --set-default-version 2If you get an error, download and install it manually from the link below:
https://wslstorestorage.blob.core.windows.net/wslblob/wsl_update_x64.msi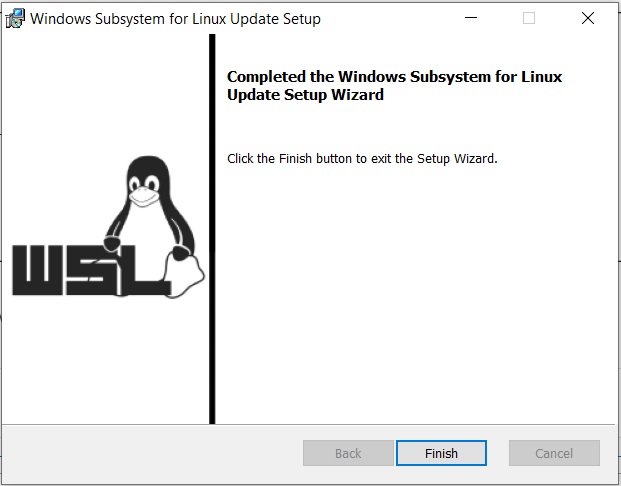
Now, run the command above again to set WSL 2 as the default version of WSL:
wsl --set-default-version 2Step 3 : Install Kali Linux in Windows 10
At this stage, WSL 2 is installed and ready to be used. So now you can easily install Linux operating system in your Windows 10 system.
Click on the below button to download and install Kali Linux from Microsoft Windows store.
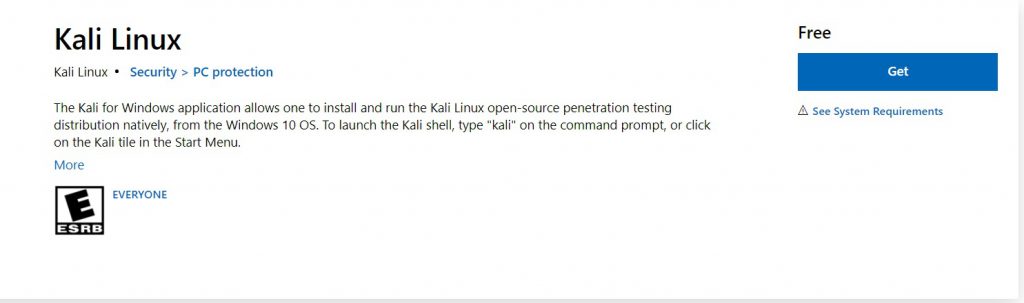
Next, click on the Get button to Download and Install kali Linux. After downloading and installing, you will get a Launch button.
Simply click on Launch Button and when prompt, create your account as show below :
Installing, this may take a few minutes…
Please create a default UNIX user account. The username does not need to match your Windows username.
For more information visit: https://aka.ms/wslusers
Enter new UNIX username: studiesonline
New password:
Retype new password:
passwd: password updated successfully
Installation successful!
Use some troubleshooting commands when you get issues above. Run the below troubleshooting commands and launch kali Linux again:
wsl --set-default-version 1
bcdedit /set hypervisorlaunchtype auto start
Step 4 : Launch Kali Linux in Windows 10
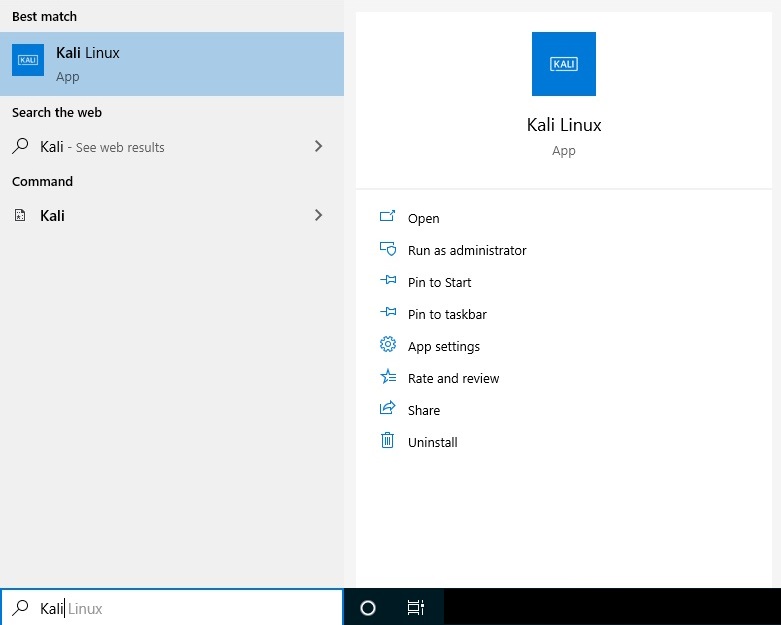
To launch Kali Linux in Windows system, simply search it in windows search bar and launch it.
That’s all
If you face any error and issue in above steps , please use comment box below to report.
If our tutorials helped you, please consider buying us a coffee. We appreciate your support!
Thank you for your support.
Hello folks, In this article, We will discuss how to dual boot Kali Linux with Windows 10. If you have windows pre-installed and want to install Kali Linux, You can install it on a virtual machine as explained in the following article: Install Kali Linux on Virtualbox in 3 Easy Steps.
Another option is to install it next to windows. Dual-booting means you can choose at the startup which operating system to use. It will open one operating system at a time. Here, We will discuss how to dual boot Kali Linux with windows.
Before the installation procedure, we will see system requirements, installation pre-requisites, and some basic options needed for the dual boot.
Also read: Create Custom Wordlists Using Crunch in Kali Linux
System Requirements
Kali Linux can be installed with a requirement of as low as 512 MB of RAM but only with an SSH server and no desktop.
To install kali with a desktop, You will need at least 4 GB of RAM and 20 GB of space.
Installation Pre-requisites
- A PC/Laptop with Windows pre-installed
- 4 GB USB device( 8GB recommended)
- Intel or AMD dual-core processor
- Rufus software for flashing the USB
- Disable secure boot in the BIOS menu
- Disable Fast startup from the power option(in the control panel)
1. Free up Space From Hard Disk
For installing Kali Linux, You need to free up some space from your hard disk. I assume your windows is taking 100% of your space, so, we need to resize the windows partitions and shrink the volume.
Open Disk Management through search or press Windows+R. Type diskmgmt.msc and press Enter.
Now, Right-click on the disk partition you want to shrink. Click on Shrink volume. Here the disk partition with a size 97GB is the Windows partition.

Now, Enter the amount of space to shrink. Here, We are freeing up 20GB of space from the windows partition by shrinking the volume. IT also shows the size of available shrink space.
20GB of unallocated space is created and the windows partition size is reduced to 77GB as shown below.
2. Installing the Pre-requisites
To download the Kali Linux iso file, Go to the official website of Kali Linux or click here to directly install the amd-64 image file. Wait till the download completes. There are other options like weekly( weekly release), everything( contains every tool possible).
Now, Install Rufus software to create a bootable USB flash drive. Click here to directly download the software for windows from the official website. Now Open Rufus and select the USB drive and the ISO file. Click on Start and wait till it completes.
3. Create a Bootable USB
After flashing the USB drive, Shut down the system and boot into the installation media from the boot menu. Press F12 ( or F11) for the boot menu. Select the installation media(USB drive) and press Enter. Select Graphical installer and press Enter.
Select a language, location, and keyboard layout and click Continue.
Now, Enter the hostname, full name, Username and choose a password.
This password will also be your root password. Choose a password and click on Continue.
After setting up your username and password, Choose your preferred timezone. Then, You will be provided with a partition disk menu.
Setting Up Partitions (Critical)
This is the most important step. Perform this step carefully without overwriting any partition of windows. It may corrupt your windows partition. So, Choose Manual from the partition disk menu and Click on Continue.

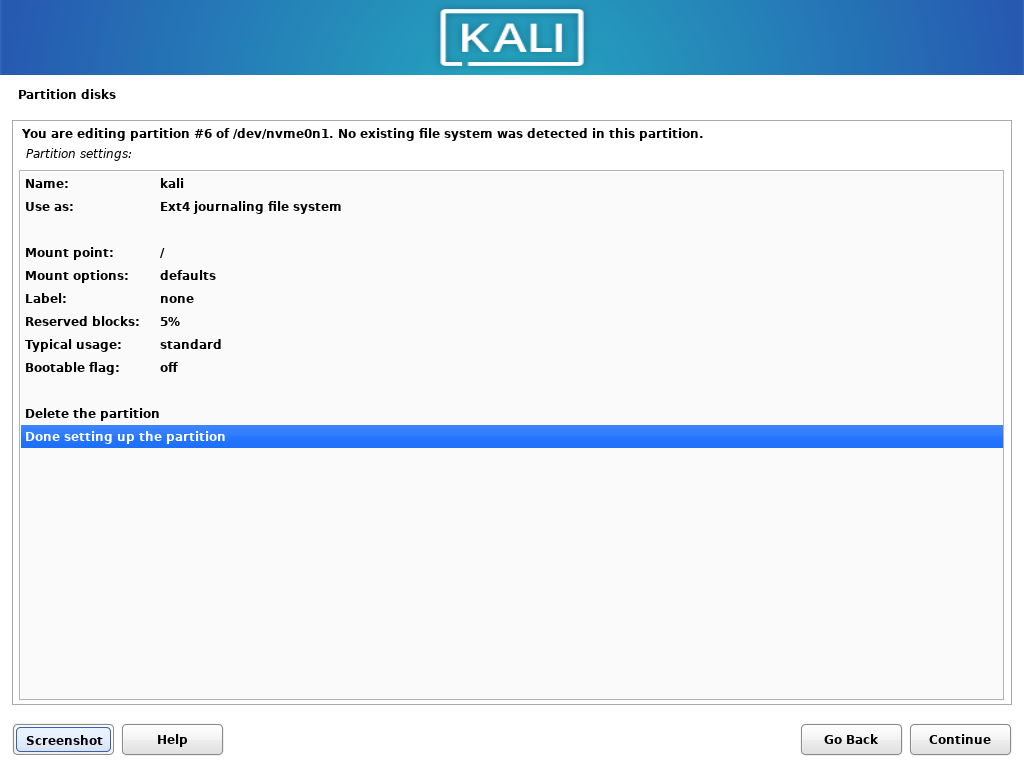
Now, Select the unallocated free space(83GB in my system) and press Enter. Click on Create new partition and press Enter. Choose your disk partition size(minimum of 20GB) and press Enter. Then choose whether you want this partition at the beginning or end of the free space. Choose beginning and press Enter.
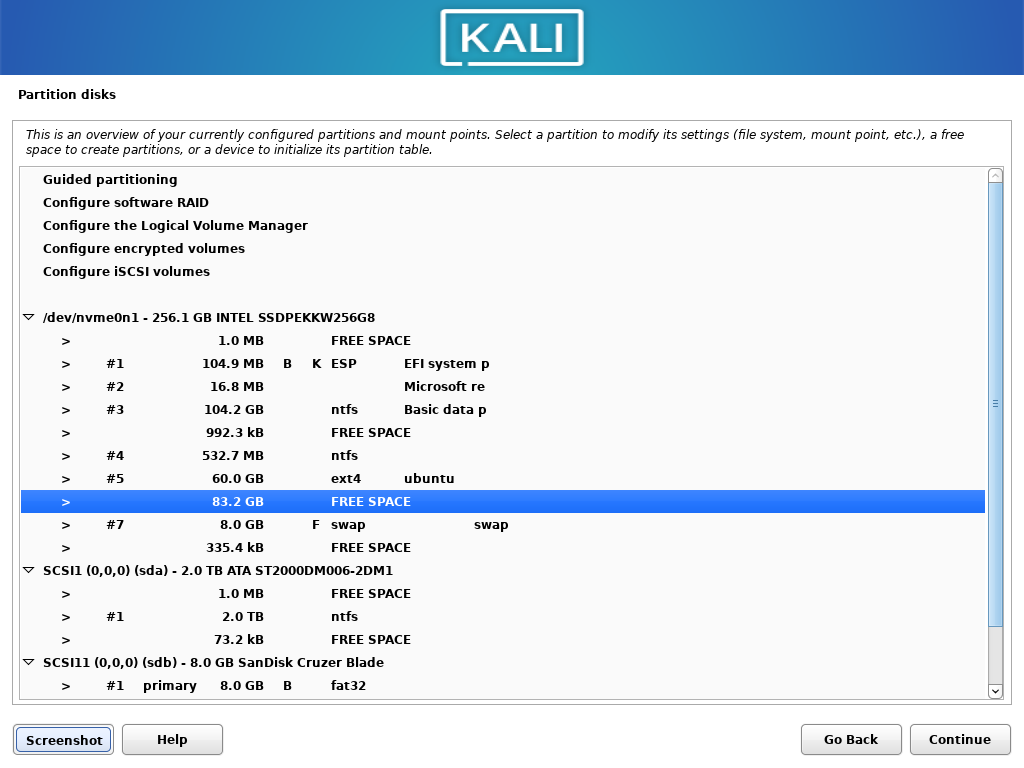
After choosing all the appropriate options, The partition will be shown like this. Double- Click on Done setting up the partition.
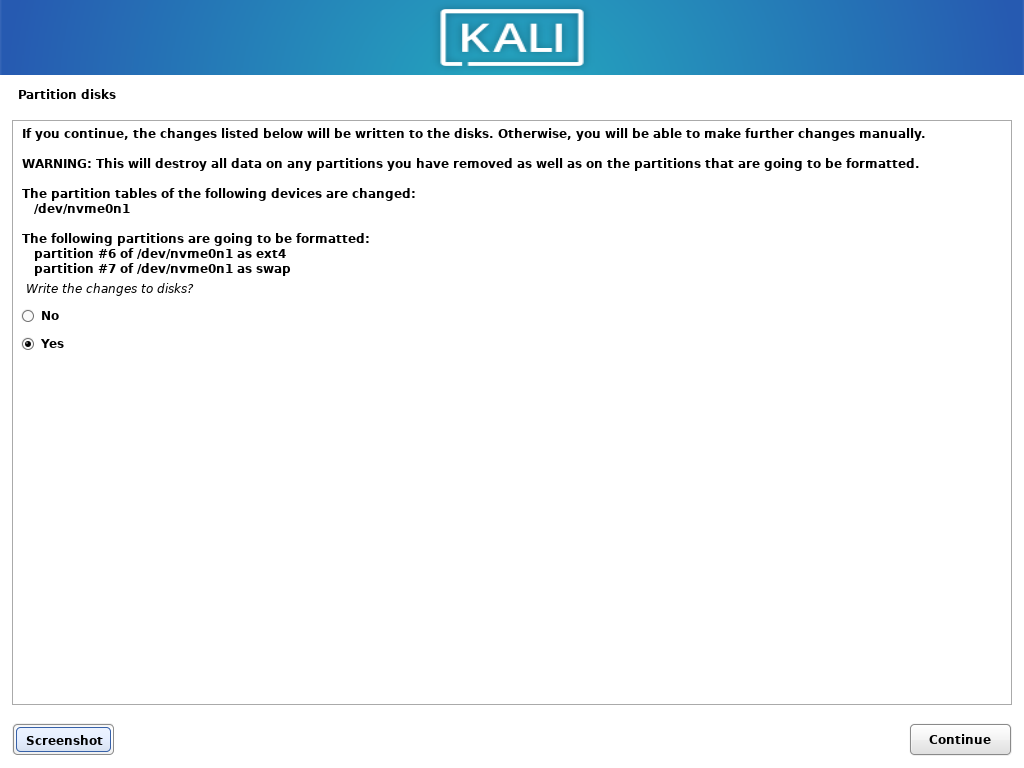
From the free space available, create another partition of 8GB and mount point as swap. After creating the partitions, Double-Click on Finish partitioning and write changes to the disk. On the next option, Click on Yes to confirm writing changes to the disk and click on Continue.

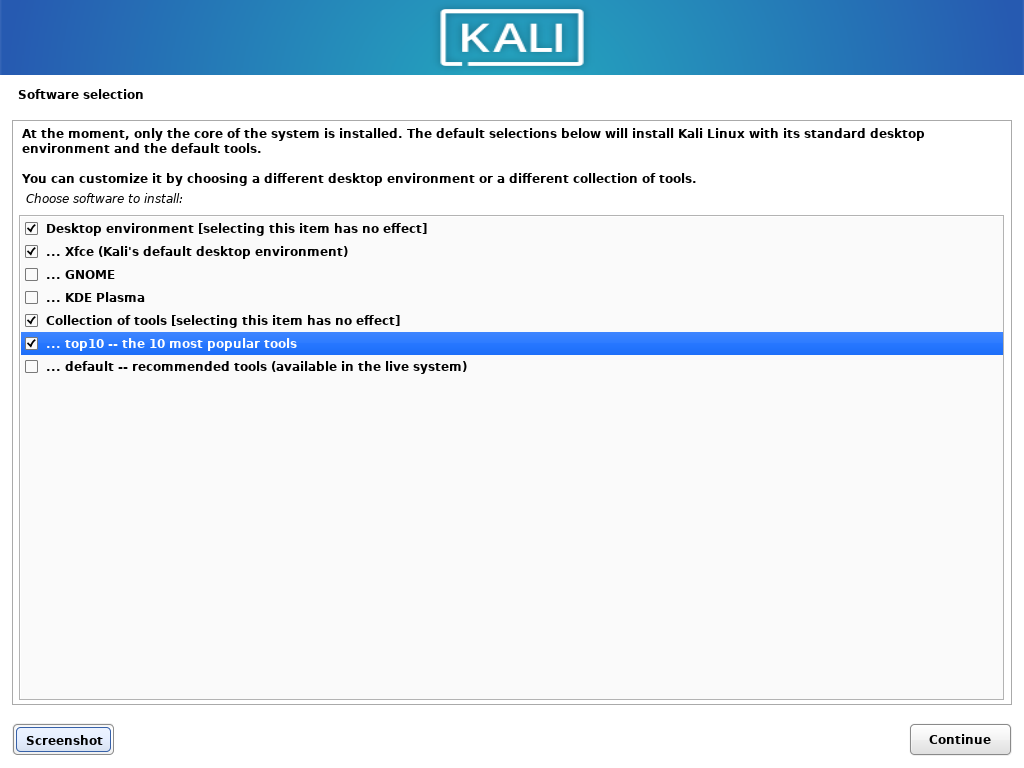
After Disk partitioning, in the Software selection menu, You can choose to install a different desktop environment (default is Xfce) and choose a different collection of tools. Click on Continue.
Wait till the installation completes.

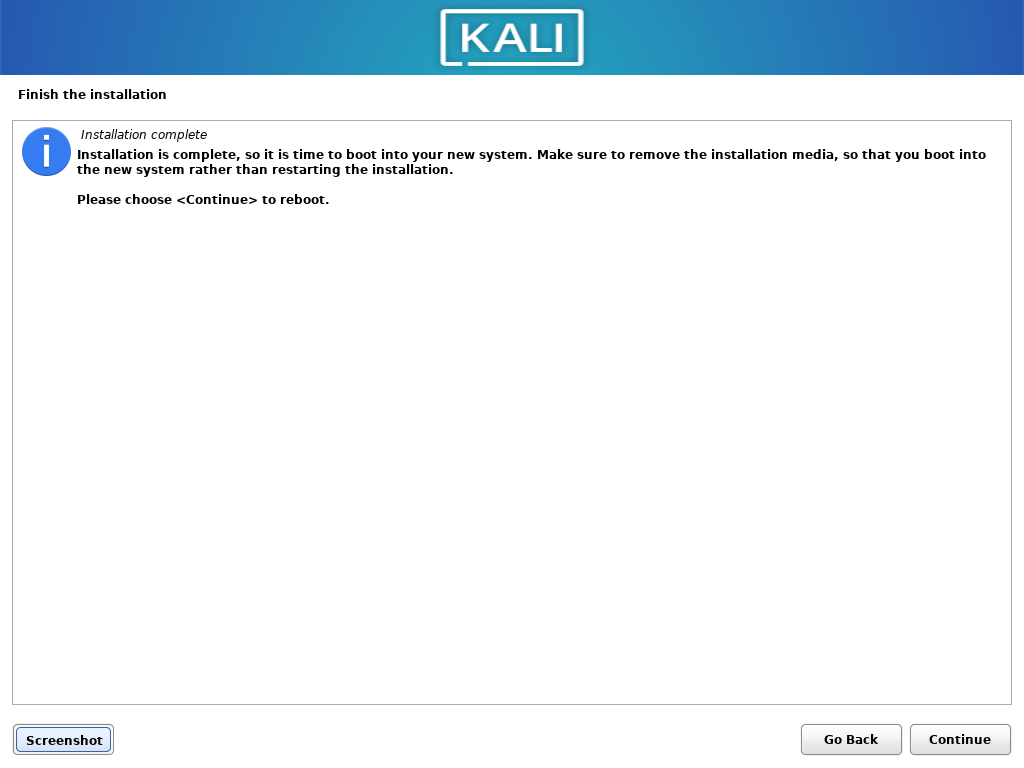
After the installation is completed, click on Continue to reboot to your newly installed kali Linux. Make sure you remove the installation media after clicking on Continue.
Now boot into Kali Linux from the boot menu. You can also change the desktop environment when you are logging in.
Conclusion
So, We discussed how to install Kali Linux along with windows by creating a dual boot environment. Thank you for reading!
Thinking about run the Linux distro on Windows PC? Ya, it’s possible with the latest Windows 10 Microsoft has introduced Windows Subsystem for Linux, or WSL, where users run their favorite Linux distributions directly from Windows 10 without dual-booting or using a virtual machine. It’s worth noting that there are some limitations. Such as not all the inherent Linux commands work, and you won’t be able to run a desktop environment from within the app. You can still install the desktop environment, such as Xfce, and then install a remote desktop service that allows you to connect to the Linux-driven desktop environment from within the app and all from Windows 10. Interested? Here, we have steps to install kali Linux (one of the best distros for security) on windows 10.
Contents
- 1 Install WSL on Windows 10
- 1.1 Enable the Virtual Machine Platform
- 1.2 Download the Kali Linux app
- 1.3 Install Xfce Desktop Environment
With Windows 10 creators update Microsoft introduced Windows Subsystem for Linux (WSL) as an optional feature that provides a compatibility layer for running Linux binary executables natively on Windows 10 PC. That means Enable WSL service provides a Linux-compatible kernel for running different Linux distros, such as Ubuntu, OpenSUSE, Debian and Kali on Windows 10.
- Let’s navigate the control panel.
- Go to apps and features, then select programs and features.
- Click ‘Turn Windows features on or off’ from the left menu.
- Now Select WSL and click ok to allow the download and install required files from the Microsoft server.
- Restart your PC to apply the changes

Alternatively, you can run the command Enable-WindowsOptionalFeature -Online -FeatureName Microsoft-Windows-Subsystem-Linux on the administrative PowerShell window to install WSL on Windows 10.
Enable the Virtual Machine Platform
Next, we need to enable virtualization in the computer’s BIOS Setup by following the steps below.
- Power on the machine and open the BIOS (Press Del key).
- Move to system configuration using arrow keys on the keyboard,
- Enable Intel Virtualization Technology (also known as Intel VT) or AMD-V, depending on the processor’s brand.
- Press F10 to make save changes and let Windows start normally.

- Now Open PowerShell as an administrator, and perform the following command.
Enable-WindowsOptionalFeature -Online -FeatureName VirtualMachinePlatform
- Once done, restart your PC to apply the changes.
Download the Kali Linux app
- Open Microsoft Store, and click on the Search option.
- Here type Linux and select the option Run Linux on Windows.
- This will present the Store’s Linux front end displaying the currently available Linux distros that you can run from within the app.
- We’re going to install kali Linux on windows 10, then pick Kali Linux from this list,

Once the installation is complete, you get a notification and the option to Launch, which you should do.
The rest of the Kali Linux installation then continues from within the app and eventually, you are asked to create a new user account and password. When you’ve created your account, you are presented with the familiar Linux command line setup.

The next thing you have to ensure that the core Kali Linux system is up to date. To do so, go to the command line and enter sudo apt-get update && sudo apt-get upgrade.

Install Xfce Desktop Environment
Now, let’s set up the XFCE desktop manager. It’s fast, and lightweight, and doesn’t take much to get it installed and working.
Run sudo apt-get install xfce4 to Install xfce.
Note: It will take some time to download and install xfce4 it depends on PC hardware configuration and Internet speed.

Next, run sudo apt-get install xrdp then sudo apt install kali-desktop-xfce xorg xrdp to install xrdp.
Once the installation is complete, you will need to start xrdp by running sudo service xrdp start.
We recommend to refer this video to change the port number from 3389 to 3390
Once the xrdp server has started its time to connect to Kali,
Open up Remote Desktop (mstsc) on your PC
As the machine is running on localhost, so the IP to connect to is localhost:3390 (with port 3390), or you can use 127.0.0.1:3390.
You should now see a new login window. Ensure the Session is set to Xorg and enter your Kali Linux username and password, then click the OK button.

That’s all your Kali is ready. You’re using a Desktop Environment installed in Kali Linux, which is in itself an app installed on Windows 10.
For more, you can read the Kali Linux site’s documentation, found at https://www.kali.org/
Also read:
- How to Run Ubuntu on Windows 10
- 7 Tips To Maximize Battery Life on Windows 10 Laptops !!!
- How To Clear Windows Update Cache on Windows 10, 8.1 and 7
- Windows 10 Laptop Overheating While Playing Game? Here how to cool it down
- Solved: Windows 10 Slow Shutdown after 21H2 Update
Думаете про установку linux рядом с windows 10? С последней версией Windows 10 Microsoft представила подсистему Windows для Linux или WSL, где пользователи запускают свои дистрибутивы Linux напрямую из Windows 10 без двойной загрузки или использования виртуальной машины.
Стоит отметить, что есть некоторые ограничения. Например, если не все встроенные команды Linux работают, вы не сможете запустить среду рабочего стола из приложения, но вы можете установить среду рабочего стола, такую как Xfce, а затем установить службу удаленного рабочего стола, которая позволяет подключаться к среда рабочего стола под управлением Linux из приложения.
Microsoft представила подсистему Windows wsl для Linux в качестве дополнительной функции, которая обеспечивает уровень совместимости для непосредственного запуска двоичных исполняемых файлов Linux на ПК с Windows 10.
Служба Enable WSL предоставляет совместимое с Linux ядро для запуска различных дистрибутивов Linux, таких как Ubuntu, openSUSE, Debian и Kali в Windows 10.
- Давайте перейдем к панели управления
- Перейдите в Программы, затем выберите Включение или отключение компонентов Windows
- Теперь поставьте галочку рядом с Подсистема Windows для Linux и нажмите кнопку ОК
- Перезагрузите компьютер, чтобы применить изменения.


Кроме того, вы можете запустить команду в окне PowerShell , чтобы установить WSL в Windows 10.
Enable-WindowsOptionalFeature -Online -FeatureName Microsoft-Windows-Subsystem-LinuxВключить платформу виртуальной машины
Затем нам нужно включить виртуализацию в настройке BIOS компьютера, выполнив следующие действия.
- Откройте BIOS.
- Перейти к конфигурации системы с помощью клавиш со стрелками на клавиатуре,
- Включите технологию виртуализации Intel (также известную как Intel VT) или AMD-V в зависимости от процессора.
- Нажмите F10, чтобы сохранить изменения и запустить Windows в обычном режиме.

- Теперь откройте PowerShell от имени администратора и выполните следующую команду
Enable-WindowsOptionalFeature -Online -FeatureName VirtualMachinePlatform- После этого перезагрузите компьютер, чтобы применить изменения.
Скачать приложение Kali Linux
- Откройте Microsoft Store и нажмите на опцию поиска
- Здесь введите Linux и выберите опцию Запустить Linux в Windows
- Это будет отображаться в интерфейсе Linux Store, отображающем доступные на данный момент дистрибутивы Linux, которые вы можете запускать из приложения для установки linux рядом с windows 10.
- Мы собираемся установить Kali Linux на Windows 10, а затем выбрать Kali Linux из этого списка.

Далее установка Kali Linux продолжается из приложения, и в конце концов вас попросят создать новую учетную запись пользователя и пароль. Когда вы создали свою учетную запись, вам предоставляется знакомая настройка командной строки Linux.

Следующее, вы должны убедиться, что ядро системы Kali Linux обновлено. Для этого перейдите в командную строку и введите
sudo apt-get update && sudo apt-get upgrade
Установка Xfce в Windows 10
Теперь давайте настроим менеджер рабочего стола XFCE. Он быстрый, легкий и не требует много времени для его установки и работы.
Запустите sudo apt-get install xfce4 для установки xfce.
[stextbox id=»profi»]Примечание: загрузка и установка xfce4 займет некоторое время, это зависит от конфигурации оборудования ПК и скорости интернета.[/stextbox]

Затем запустите sudo apt-get install xrdp и sudo apt install kali-desktop-xfce xorg xrdp для установки xrdp.
После завершения установки вам нужно запустить xrdp, запустив sudo service xrdp start
Мы рекомендуем обратиться к этому видео, чтобы изменить номер порта с 3389 на 3390
Как только сервер xrdp начал подключаться к Kali
Откройте «Подключение к удаленному рабочему столу» (mstsc) на вашем ПК
Поскольку машина работает на локальном хосте, IP-адрес для подключения — localhost: 3390 (с портом 3390), или вы можете использовать 127.0.0.1:3390.
Теперь вы должны увидеть новое окно входа в систему. Убедитесь, что для сеанса установлено значение Xorg, введите имя пользователя и пароль Kali Linux, затем нажмите кнопку OK.

Вот и все, вы используете среду рабочего стола, установленную в Kali Linux, который сам по себе является приложением, установленным в Windows 10.