 Всем даровчик. Сегодня мы будем узнавать что такое Host Process for Setting Synchronization, и эта штука как я понимаю работает под процессом SettingSyncHost.exe, пока мне ничего не понятно.. Но я должен узнать что это, вот должен и все. Так ребята, я нашел тему на форуме Microsoft, тут чел пишет, что у него процесс Host Process for Setting Synchronization постоянно грузит жесткий диск. Пишет что если процесс завершить, то все приходит в норму. Так, ну и вот ему отвечают, что это синхронизация настроек, можно отключить в параметрах, для этого зажмите кнопки Win + C, потом пойдите в параметры, изменение параметров компьютера, OneDrive, синхронизация параметров. В общем там где-то можно отключить эту синхронизацию
Хотя вот другой чел пишет, что ему отключение синхронизации не помогло, процесс SettingSyncHost.exe все равно иногда появляется и грузит жесткий диск так, что работать просто нереально.
Так, а вот еще один совет есть. Вот пишут, что попробуйте зажать кнопки Win + R, потом вставьте в окошко Выполнить такую команду:
%LocalAppData%\Microsoft\Windows\SettingSync
Нажали ОК? Отлично. Теперь в диспетчере задач быстро завершаете процесс SettingSyncHost.exe и все в папке SettingSync удаляете!
Ага, есть еще новости. Короче ребята, данный процесс отвечает за синхронизацию настроек компа, метро-приложений, данных веб-браузера и еще чего-то и все это между устройствами, где стоит одна и та же учетная запись OneDrive.
Еще один чел пишет, что он посмотрел свойства папки SettingSync и был в ужасе, что она весит два гига. Он убил процесс SettingSyncHost.exe и потом почистил папку и все пришло в норму. То есть ребята, я думаю вам нужно это попробовать, надеюсь поможет.
Так, еще раз, если вам эта синхронизация OneDrive не нужна, то ее нужно отключить. Как это сделать я писал вначале. Если синхронизация нужна, то нужно очистить папку SettingSync, как это сделать я тоже писал уже. Ну это так типа подводя итоги.
Вот еще нашел такую картинку, а ну посмотрите:

РЕКЛАМА
Эта картинка, это антивирус Касперского, компонент Мониторинг сети. Видите, как тут процесс Host Process for Setting Synchronization активно себя ведет? Прилично накачал данных. Ребята, это нормально. Это означает что на другом устройстве, на котором был выполнен вход в такую же учетную запись, то там кто-то скачал что-то на 16 гигов. И это синхронизировалось сюда, так как учетная запись одна. Вот такие дела, ничего криминального нет.
В общем ребята, такие дела. Извините если что не так, но я реально вообще больше инфы не нашел. Удачи вам, приходите еще в гости!
 Diversant
29.05.2022
Нагружает ЦП на 50% файл SyncHost.exe снять задачу нельзя. Пробывал удалить все файлы в %LOCALAPPDATA%\Microsoft\Windows\SettingSync. Что делать?
 elon musk
29.05.2022
Чел… ЦП это плохо… Ппц конечно…
- Host process for windows sync нагружает ЦП Где-то неделю назад у меня пк начал сильно шуметь, я полез в диспетчер задач, а там появился процесс host process for windows sync который нагружает сильно ЦП. Я пытался снять задачу он опять запускается. Искал в интернете решение, ничего не нашёл. (этот процесс находится в C/Windows/system32)
- G-sync пропал после переустановки винды? Переустановил винду, теперь в настройках nvidia пропал пункт «дисплей» ну и g-sync соответственно не настроить, проблвал разные версии драйверов, ставил 11 винду, обратно 10, не появился, кто сталкивался?
- Появляется ошибка при загрузке Windows — Critical process died Крч, я Винду переусьанавливаЛ уже 5 раз за день, после установки, качал DriverPack solution, потом Стим, пубг, все дела. Вчера вечером выключил компьютер, сегодня включал и опять вылезла эта ошибка, в чем может быть проблема? Хелп
- Ошибка CRITICAL PROCESS DIED Windows 10 причина вроде как ntoskrnl.exe+7132cf. Что делать? Собрал новый ПК и сразу решил гнать карту (RX 460 4gb) Зашёл в MSI afterburner скачал FurMark и начал гнать. Поставил на 50 MHz выше и тут же розовый экран и ничего не происходит. Перезапустил ПК зашёл в BlueScreenView там ошибка ntoskrnl.exe+7132cf Что делать?
Host process for setting synchronization (svchost.exe) — это системный процесс в операционной системе Windows 10, который отвечает за синхронизацию настроек между различными устройствами. Он автоматически запускается при запуске системы и работает в фоновом режиме.
Однако, некоторым пользователям может быть необходимо отключить этот процесс, поскольку он может замедлять работу компьютера или использовать лишние ресурсы системы. В этой статье мы рассмотрим несколько способов, как отключить host process for setting synchronization в Windows 10.
Первый способ — отключение службы связанной с этим процессом. Для этого нужно открыть «Панель управления», выбрать «Административные инструменты» и открыть «Службы». В списке служб нужно найти «Защищенный процесс host выполняющий функции настройки» или «Sync Host», щелкнуть правой кнопкой мыши и выбрать «Свойства». Затем нужно выбрать «Отключить» в разделе «Состояние службы» и нажать «ОК».
Другой способ — изменение реестра. Для этого нужно нажать комбинацию клавиш «Win + R», ввести «regedit» и нажать «ОК». Откроется редактор реестра, где нужно найти следующий ключ: «HKEY_LOCAL_MACHINE\SOFTWARE\Policies\Microsoft\Windows\SettingSync». Если ключа нет, его нужно создать. В этом ключе нужно создать параметр «DisableSettingSync» типа DWORD со значением «1». После этого нужно перезагрузить компьютер, чтобы изменения вступили в силу.
Важно помнить, что отключение host process for setting synchronization может привести к некорректной работе некоторых приложений или функций операционной системы, особенно связанных с синхронизацией между различными устройствами. Поэтому перед отключением рекомендуется создать точку восстановления системы или резервную копию данных.
Содержание
- Что такое host process for setting synchronization в Windows 10?
- Пояснение и описание
- Подробная инструкция
Что такое host process for setting synchronization в Windows 10?
Когда включена функция синхронизации настроек в Windows 10, host process for setting synchronization отслеживает изменения в настройках и сохраняет их в облаке Microsoft. Затем при входе на другое устройство с тем же аккаунтом пользователя, настройки автоматически синхронизируются, обеспечивая единое пользовательское опыт и сохранение персональных предпочтений.
Host process for setting synchronization работает в фоновом режиме и не требует пользовательского взаимодействия. Он может использовать определенное количество системных ресурсов, но обычно не вызывает значительных задержек или проблем с производительностью компьютера.
Тем не менее, в некоторых случаях пользователь может желать отключить host process for setting synchronization. Это может быть полезно, например, если пользователь не планирует использовать функцию синхронизации настроек или если хочет сэкономить ресурсы системы. Подробнее о том, как отключить host process for setting synchronization можно узнать из соответствующего раздела статьи.
Пояснение и описание
Некоторым пользователям может показаться, что процесс hsm.exe потребляет слишком много ресурсов системы или вызывает задержки в работе компьютера. В таких случаях пользователи могут захотеть отключить этот процесс для повышения производительности системы.
Однако, отключение процесса hsm.exe может привести к нежелательным последствиям, таким как потеря некоторых настроек или возможность синхронизации между устройствами, подключенными к одной учетной записи Microsoft.
Если вы все-таки решите отключить процесс hsm.exe, можно воспользоваться различными методами, такими как использование групповой политики Windows, редактирование реестра или использование сторонних инструментов. Однако, рекомендуется быть осторожным при внесении изменений в системные настройки и регулярно создавать резервные копии данных, чтобы в случае проблем можно было вернуть систему в рабочее состояние.
Подробная инструкция
Host Process for Setting Synchronization (Хост-процесс для синхронизации настроек) представляет собой службу операционной системы Windows, которая отвечает за синхронизацию настроек между устройствами. Она работает в фоновом режиме и может потреблять значительное количество ресурсов компьютера.
Если вам необходимо отключить Host Process for Setting Synchronization, вот подробная инструкция:
- Щелкните правой кнопкой мыши на кнопке «Пуск» в левом нижнем углу экрана и выберите «Панель управления».
- В окне «Панель управления» найдите и выберите «Система и безопасность».
- Далее выберите «Административные инструменты».
- Найдите и выберите «Службы».
- В списке служб найдите «Хост-процесс для синхронизации настроек».
- Щелкните правой кнопкой мыши на этой службе и выберите «Свойства».
- В открывшемся окне «Свойства: Хост-процесс для синхронизации настроек» выберите вкладку «Общие».
- В разделе «Состояние службы» нажмите кнопку «Остановить», чтобы остановить службу.
- В выпадающем меню «Тип запуска» выберите «Отключено».
- Нажмите кнопку «ОК», чтобы сохранить изменения.
Теперь Host Process for Setting Synchronization будет отключен, и он больше не будет работать на вашем компьютере. Обратите внимание, что отключение этой службы может повлиять на некоторые функции синхронизации между устройствами. Если в будущем вам понадобится снова включить эту службу, повторите указанные выше шаги и выберите «Автоматически» вместо «Отключено» в выпадающем меню «Тип запуска».
What is the Host Process for Setting Synchronization?
Popularly known as SettingSyncHost.exe, the file is used to sync system settings with other devices.
Therefore, when changes are made to one PC, they are reflected on other devices too. Windows Host Process can sync mail, wallpaper, scheduled services, Xbox, OneDrive, and other useful applications.
This process is found in the System32 folder and is known to be an important process on Windows. However, it causes various problems like High CPU Usage.

Many Windows users have reported facing this problem. Therefore, to resolve this problem, we explain how to fix 100% CPU usage caused due to settingsynchost.exe.
How to Fix the Host Process for Setting Synchronization with High CPU Usage Error?
Here, we explain the best methods to fix host processes for settings synchronization CPU usage.
Before we learn how to fix the Windows Host Process, let’s know about a tool that helps fix common Windows errors. This tool is called Advanced PC Cleanup. Using this best PC cleaning and optimization tool, you can fix PC problems and prevent various other problems from happening on the system. To use it, follow the steps below:
Step 1: Download and install Advanced PC Cleanup.

Step 2: Click “Start Scan Now” to start scanning the Windows registry system and other issues that could be causing PC problems.
Step 3: Click “Clean Now” to fix all issues.
That’s it. By following these 3 simple steps, you can fix most Windows-related problems. In addition to this, you will be able to recover space and speed up system performance.
To know more about Advanced PC Cleanup read the complete review.
Now, let’s come to the point and learn how to fix the host process for setting synchronization that has stopped working.
Method 1: Update Windows
To fix the Host Process for Setting Synchronization with high CPU usage error, we will try updating Windows. To do so, follow the steps below:
Note: When updating Windows, make sure you are connected to the Internet. If you are not online, you may not be able to update Windows.
Step 1: Press the Windows key + I and click Update & Security.

Step 2: Click Windows Update > Check for updates.

Step 3: If there are any pending updates, Windows will start downloading them. Once done, reboot the system to apply updates.
Now check the system and see if the settingsynchost.exe problem is resolved or not. If it still consumes High CPU resources move to the next step.
Method 2: Add Ownership for a Registry Key
When changes are made to Windows Registry Settings, the Host Process for Setting Synchronization problem occurs. To fix this problem, add ownership for a registry key. To do so, follow the steps below:
Step 1: Press the Win + R
Step 2: In Run Window, type regedit.exe and click OK. This will open the Registry Editor window.

Step 3: Now head to: HKEY_CURRENT_USER\Software\Microsoft\InputPersonalization\TrainedDataStore.

Step 4: Right-click TrainedDataStore > Permissions….
Step 5: Check the box next to Full Control > Apply > OK.

Step 6: Restart Windows and see if the Host Process for Setting Synchronization problem is resolved.
 Additional Tip
 Additional Tip
PRO TIP: If you face High CPU Usage due to some problems with the system, try using Advanced PC Cleanup. You can download it by clicking here. This top PC cleaning tool will help fix most of the PC related errors in no time.
Method 3: Run Windows in Clean Boot
Running Windows in Clean Boot means only the essential services and drivers will run. To do so, follow the steps below:
1. Press Windows + R > type msconfig click on the OK. This will open the System Configuration window.

2. Click Services tab > check Hide All Microsoft Services option > Disable all.

Note: We recommend hiding Microsoft services because differentiating between essential and third party services is not easy for a novice.
3. Click Apply > OK to save settings.
4. Restart PC to apply changes. However, if you are doing something important, you can select Exit without restart.

5. After this, press the Ctrl+Shift+Esc key, and this will open the Task Manager window. Here click the Startup Tab.

6. Select apps and disable all startup items as there is no option to do this at once. You will have to disable them one by one.
7. Reboot your Windows 10 computer.
Your computer will now start with essential services. Now see if Host Process For Setting Synchronization High CPU is resolved or not.
If this too doesn’t work, you can try using PowerShell Script.
If you are a beginner, don’t try following this step. This is for only Advanced Users.
Method 4 – Run a PowerShell Script
The following script will kill the ‘SettingSyncHost.exe’ service from your computer every five minutes.
Note: You need to have admin rights to run PowerShell
1. Press Windows + X and select Windows PowerShell (Admin).

2. Paste the following code:
Get-ScheduledJob |? Name -eq “Kill SettingSyncHost” | Unregister-ScheduledJob

Register-ScheduledJob -Name “Kill SettingSyncHost” -RunNow -RunEvery “00:05:00” -Credential (Get-Credential) -ScheduledJobOption (New-ScheduledJobOption -StartIfOnBattery -ContinueIfGoingOnBattery) -ScriptBlock {

Get-Process | ?{ $_.Name -eq “SettingSyncHost” -and $_.StartTime -lt (::Now).AddMinutes(-5) } | Stop-Process -Force

}

3. When asked, enter admin account credentials.

4. After entering the details, check if SettingSyncHost is terminated. If it is still running, try restarting the PC.
5. Now check Host Process For Setting Synchronization should be stopped.
In addition to this, we suggest closing the host process to define synchronization. To do so, follow the steps below:
1. Press Windows key + I
2. Click Accounts
3. Select Sync your settings from left pane > disable synchronization settings.

Restart Windows and see settingsynchost.exe or Host Process For Setting Synchronization should now not be running.
Final Words
Using these simple steps, you can easily fix the Host Process for Setting Synchronization High CPU Usage. To fix other Windows-related errors, try using Advanced PC Cleanup. This excellent PC Cleaning tool can do wonders. You just need to give it a try.
Frequently Asked Questions-
Q1. How do I stop the host process for setting synchronization?
If you wish to stop the host process for Synchronization on your computer, follow the steps. Go to Start Menu>Settings>Accounts>Sync Your Settings. Here turn off the Sync Settings by clicking on the toggle button.
Q2. What is the host process for setting Synchronisation?
The host process for setting Synchronisation on your computer is located as SettingSyncHost.exe. It is used for syncing all the settings on your computer to all other devices.
Q3. What is SettingSyncHost EXE?
SettingSyncHost.exe is a system process that is required to synchronize the settings on your computer with other devices. Settings such as wallpaper, browsers, OneDrive, Xbox, Mail app services.
Q4. How do I disable Host Process for Windows Services?
If you see Windows Host Process consuming high CPU usage, you must not disable it as it is one of the important processes running for Windows.
A lot of users upon seeing the Host Process for Setting Synchronization or SettingSyncHost.exe inside their task manager get confused as to what the process is and what it does on your computer. In this article, we have explained this in detail and have listed and fixed some issues associated with this process as well.

The SettingSyncHost.exe is present inside the System32 folder on your computer and the process is very essential for the operating system. Basically, it is responsible for syncing settings on the device that you are currently using and on the other devices that you are using with the Microsoft account. This includes the Wallpaper, Onedrive, Xbox, Internet Explorer and other Windows-related settings.
However, sometimes, users have complained about High CPU Usage issues with the SettingSyncHost.exe process and in this article, we have explained in detail some steps that you can undertake to fix the issue completely.
Before you Start:
- If the issue arises while running or using a specific application, we suggest that you try to make sure that you update that app to the latest available version because outdated apps can sometimes cause the issue.
- Press “Windows + R” to launch the Run prompt, type in “services.msc” and press “Enter”. From here, make sure to right-click on the “Background Intelligent Transfer Service (BITS)” and select the “Disable” button to prevent it from running on your computer. Later on, you can try to enable this service again in an attempt to fix the Host Process for Setting Synchronization High CPU Usage issue.

Typing in “services.msc” -
If you are getting this issue while trying to transfer your camera photos from your SD card to your PC, we recommend that you try connecting the camera directly with the computer using a data cable and try transferring through that.
- Moreover, a faulty RAM stick might also be responsible for the Host Process for Setting Synchronization High CPU Usage error. You might want to check your RAM by running the Windows own Diagnostic tool. (Can be run by pressing “Window + S”, typing in “Windows Memory Diagnostic” and pressing Enter OR by using an app named “Memtest86”) and you will have to replace the RAM sticks if the memory issue is confirmed.

Fixing the Host Process for Setting Synchronization (Settingsynchost.Exe) High CPU Usage:
Fix 1: Reconfiguring Registry Key Permissions
- Press “Window + R”, type in “Regedit” and press Enter on your keyboard.

Typing “regedit” - In the Registry Editor, navigate to through to the following address.
HKEY_CURRENT_USER\Software\Microsoft\InputPersonalization\TrainedDataStore
- Right-click on the “TrainedDataStore” folder and click “Permissions…”.

Selecting “Trained Data Store” permissions - Tick the checkbox for “Full Control” under “Allow” and click on “Apply”.
- Restart your PC and see if the Host Process for Setting Synchronization High CPU Usage issue is resolved.


Fix 2: Updating Windows
- Press “Window + S”, type in “Check for updates” and press Enter on your keyboard.

Check For Updates - Windows will automatically start downloading and installing updates if available or you can click “Download and Install”.
- Once the updates are finished installing, restart your PC and see if the Host Process for Setting Synchronization High CPU Usage issue is resolved.

Fix 3: Reconfigure Internet Properties
- Press “Window + S”, type in “Internet Options” and press Enter on your keyboard.

Internet Options - Go to the “Security” tab and click on “Trusted Sites”.
- Select “Sites” and type in the following websites in the field “Add this website to the zone” and click “Add”. each time:
https://www.live.com
https://www.microsoft.com
- Restart your PC, and see if the issue is resolved

Fix 4: Using PowerShell to End Process
- At the bottom-left corner of the screen, right-click the “Start” icon and select the “Windows PowerShell (Admin)”.

Windows PowerShell (Admin) - Type in the following command in PowerShell and press Enter afterwards.
Register-ScheduledJob -Name "Kill SettingSyncHost" -RunNow -RunEvery "00:05:00" -Credential (Get-Credential) -ScheduledJobOption (New-ScheduledJobOption -StartIfOnBattery -ContinueIfGoingOnBattery) -ScriptBlock { Get-Process | ?{ $_.Name -eq "SettingSyncHost" -and $_.StartTime -lt ([System.DateTime]::Now).AddMinutes(-5) } | Stop-Process -Force} - Input your credentials to complete the process. Restart your PC and see if the process now terminates automatically and the issue is resolved.
- If you want to reverse the above procedure then type in the following in the PowerShell and press Enter.
Get-ScheduledJob | ? Name -eq "Kill SettingSyncHost" | Unregister-ScheduledJob
- Restart your PC and check to see if you have been able to get rid of the issue

Fix 5: Booting in Safe Mode
- Press “Window + S”, type in “Recovery options” and press Enter on your keyboard.
- Under “Advanced startup”, click on the “Restart now” option.

Advanced Startup - Once your PC restarts, select the “Troubleshoot” button and then select “Advanced options”. Click “Startup Settings”.
- Now, click “Restart”. Once restarted, different options will appear, press “F4” and your PC will restart into safe mode.
- If the issue is resolved in this safe mode state, it means that it was being caused due to a background app or service.
- Therefore, we suggest that you try to isolate the app/service that was causing this issue by using the method below.

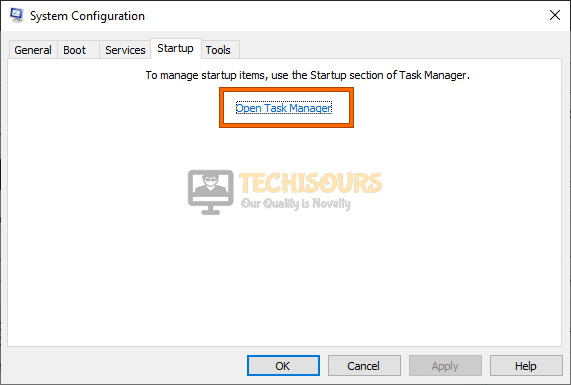
Fix 6: Performing Clean Boot
- Press “Window + R”, type in “msconfig” and press Enter on your keyboard.

Typing in “Msconfig” - Go to the “Services” tab and tick the checkbox “Hide all Microsoft services”.
- Select “Disable all” and move on to the “Startup” startup and click on the “Open Task Manager” option.

Open Task Manager - Right-click all the programs one by one and select “Disable” each time.
- Restart your PC and see if the Host Process for Setting Synchronization High CPU Usage issue is resolved. If it is, then you need to repeat all the steps except that this time you need to enable groups of programs/services and perform a restart every time in an attempt to identify the culprit.

Fix 7: Reconfigure Sync Settings
- Press “Window + I” and click on “Accounts”.
- From the options on the left, select “Sync your settings” and disable “Sync settings”.

Selecting the “Sync Settings” option - Restart your PC and see if the issue is resolved now.

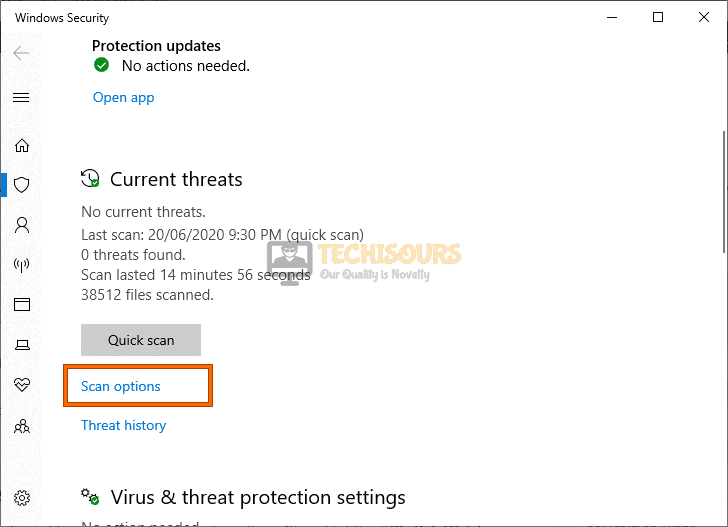
Fix 8: Checking for Malware
- Press “Window + S”, type in “Windows Security” and press Enter on your keyboard.
- Click “Virus & threat protection” and select “Scan options“.

Scan options - Choose “Full Scan” and click “Scan now”.
- Once the scan is complete, perform the necessary actions, restart your PC and see if the issue is resolved.
Fix 9: Running Windows built-in Troubleshooters
- Press “Window + S”, type in “Troubleshoot settings” and press Enter on your keyboard.
- Click on “Additional troubleshooters” and from here, make sure to run the troubleshooter.

Clicking on Additional Troubleshooters - From here, make sure to run the troubleshooter for different things that have been listed here.
- Check to see if doing so fixes the Host Process for Setting Synchronization High CPU Usage issue.

If the issue is still occurring on your computer, contact us for further troubleshooting.

Alan is a hardcore tech enthusiast that lives and breathes tech. When he is not indulged in playing the latest video games, he helps users with technical problems that they might run into. Alan is a Computer Science Graduate with a Masters in Data Science.
Back to top button