Are you looking to run Home Assistant Supervised on Windows? In this step-by-step guide, we will walk you through the process of installing Home Assistant Supervised on your Windows PC. Whether you’ve been searching for answers on forums or want to use your old PC hardware for running Home Assistant, this guide has got you covered. We’ll provide you with all the information you need to successfully install and set up Home Assistant Supervised on your Windows operating system.
If you prefer visual instructions, you can also check out this YouTube video for a visual walkthrough of the installation process:
https://youtube.com/watch?v=kYZipQ-00lI%3Ffeature%3Doembed%23__hrp%3DeyJtdXRlciI6ZmFsc2UsIndhaXRGb3JEb2N1bWVudEJvZHkiOnRydWUsIndhaXRGb3JEb2N1bWVudFJlYWR5IjpmYWxzZSwibm9QYXRjaGVzIjp0cnVlLCJ3aWR0aCI6IjEwMCUiLCJoZWlnaHQiOiIxMDAlIiwiZW5naW5lTmFtZSI6ImVuZ2luZS0wLjEuMCIsImZyYW1lTmFtZSI6ImVuZ2luZS0wLjEuMDoxNDc1MjA1OTQyIn0%3D
Before we begin, there are a few things you’ll need:
- A Windows PC (Windows 10 or Windows 11)
- An internet connection
- Virtualization enabled in your computer’s BIOS settings
Now, let’s get started with the installation process.
Step 1: Get Your Tools
The first step is to download the necessary tools for installing Debian Linux in a virtual machine on your Windows PC. Make sure you download the correct version for your system (ARM or AMD/Intel x64).
- Debian: https://www.debian.org
- Visual C++: https://learn.microsoft.com/
- VirtualBox: https://www.virtualbox.org
Once downloaded, install “Visual C++”

followed by “VirtualBox”.

The Debian ISO file will be used in the next step.
Step 2: Install Debian
Now it’s time to install Debian on the virtual machine created in VirtualBox.
Open VirtualBox and select “New”.

Give your VM a name (e.g., “homeassistant”).
Select “Other” as the ISO image.
Browse and select the downloaded Debian ISO file.
Click on “Skip Unattended Installation” to avoid setting up a desktop environment.

Set the base memory (4GB recommended).
Set the number of processors (ideally 2).

Configure the virtual hard disk size (120GB recommended).
Click “Finish”.
In the VM settings, change the Network Adaptor from “NAT” to “Bridged Adapter”.

Start the VM and follow the installation process inside the VM window.

Set the hostname and domain name as desired.
Configure the root and user passwords.
Choose the partitioning method and scheme.
Finish the partitioning and write changes to the disk.
Continue with the installation process, selecting the necessary options.
Once the installation is complete, shut down the VM by selecting “Send the shutdown signal”.
Step 3: Get Ready to Install Home Assistant
Before installing Home Assistant, you’ll need to obtain the IP address of your Debian system.
- Login using your username and password created during the installation process.
- Run the command:
“` ip a “`
Locate your system’s IP address under the “BROADCAST” section (e.g., 192.168.1.186).
Switch to root by running the command:
“` su “`
Install sudo by running the command:
“` apt install sudo “`
Edit the sudoers file using the command:
“` nano /etc/sudoers “`
Add the following line under the “root ALL=(ALL:ALL) ALL” line:
“` smlp ALL=(ALL:ALL) ALL “`
Replace “smlp” with your username. Save the file and exit the text editor.
Step 4: Install Dependencies and Home Assistant
Now it’s time to install the dependencies and Home Assistant itself.
Open the command prompt in Windows by searching for “CMD” in the search bar.
Connect to your Debian system via SSH using the following command:
“` ssh smlp@192.168.1.186 “`
Replace “smlp” with your username and “192.168.1.186” with your Debian system’s IP address. Enter your user password when prompted.
Run the following commands in the SSH session:
“` sudo su – apt-get update apt-get upgrade -y apt-get dist-upgrade -y apt-get install apparmor jq wget curl udisks2 libglib2.0-bin network-manager dbus lsb-release systemd-journal-remote -y curl -fsSL get.docker.com | sh wget https://github.com/home-assistant/os-agent/releases/latest/download/os-agent_1.4.1_linux_x86_64.deb dpkg -i os-agent_1.4.1_linux_x86_64.deb wget https://github.com/home-assistant/supervised-installer/releases/latest/download/homeassistant-supervised.deb dpkg -i homeassistant-supervised.deb “`
If the version number “1.4.1” is outdated, check the latest version on the Home Assistant GitHub page and update the commands accordingly.
Once Home Assistant Supervised is installed, close the Virtual Machine Window and select “send the shutdown signal”.
Step 5: Additional Setup
Here are some optional additional steps you can take to enhance your Home Assistant setup:
- Create a shortcut for your Home Assistant VM on the desktop.
- Configure USB passthrough in VirtualBox for Zigbee USB Dongles.
- Enable Windows Remote Desktop to connect to your Windows PC from other devices.
- Configure Windows to automatically start VirtualBox without entering your username and password.
- Create a clone of your Home Assistant VM for backup purposes.
If everything went smoothly, you’re ready to start your Home Assistant VM and access Home Assistant using its IP address and the Home Assistant Port (e.g., http://192.168.1.186:8123).

Congratulations! You have successfully installed Home Assistant Supervised on your Windows PC. Enjoy exploring the features and capabilities of Home Assistant for your smart home!
Frequently Asked Questions
Can I install Home Assistant Supervised on Windows?
Yes, you can install Home Assistant Supervised on a Windows PC. By following our step-by-step guide, you’ll be able to set up Home Assistant and enjoy its benefits on your Windows operating system.
What are the system requirements for running Home Assistant Supervised on Windows?
To run Home Assistant Supervised on Windows, you’ll need a Windows PC (Windows 10 or Windows 11) with virtualization enabled in the BIOS settings. A stable internet connection is also required.
Do I need any special hardware to run Home Assistant on Windows?
No, you don’t need any special hardware to run Home Assistant on Windows. However, if you want to connect Zigbee USB dongles to your Home Assistant VM, you may need to configure USB passthrough in VirtualBox.
Can I access Home Assistant remotely after installing it on Windows?
Yes, you can access Home Assistant remotely after installing it on Windows. You can set up Windows Remote Desktop to connect to your Windows PC from other devices on your home network.
Is it possible to create a backup of my Home Assistant VM?
Yes, you can create a backup of your Home Assistant VM by cloning it in VirtualBox. This way, you’ll have a fallback in case something goes wrong with your Home Assistant installation.
In this article, you will discover how to perform a Home Assistant installation on the Windows Desktop operating system, which includes the supervisor and add-ons store.
This tutorial is tailored for Windows Desktop users who desire to run Home Assistant Supervised directly from their desktop.
If you want to test drive Home Assistant on your Windows PC, or you want to build a Home Assistant server based on Windows so that it can perform other Windows-specific tasks, then this tutorial will guide you through the process step-by-step.
If you’re interested in setting up a dedicated server for Home Assistant, such as one without a monitor or in a “headless” configuration, it is recommended to use Debian Linux directly instead.
You can refer to this tutorial to learn how to install Debian directly on a dedicated PC and run Home Home Assistant Supervised without the need for a virtual machine, however the process is more complicated so if you are looking for an easier method, you are in the right place!
Table Of Contents
- Can Home Assistant Supervised Run on Windows?
- Can I run Home Assistant Core Natively on Windows?
- Prerequisite
- Installing VirtualBox on Windows
- Downloading the Microsoft C++ Redistributable Package
- Create a New VirtualBox Virtual Machine for Home Assistant
- Download Home the Assistant OS Drive Image
- Create a new VirtualBox VM
- Configure the VirtualBox VM
- How to Use the Home Assistant Virtual Machine
- Conclusion
Home Assistant Supervised cannot be run natively on Windows. However, it is possible to run Home Assistant Supervised using freely available virtualization software like VirtualBox.
The solution involves creating a virtual machine that can run one of the supported operating systems within Windows. Home Assistant can then be installed on the virtual machine.
In this configuration we refer to Windows as the host operating system and the virtual machine operating system as the guest operating system.
The virtualization software when provides a link between the host and guest, allowing the guest to access resources on the host such as it’s USB ports and network connection.
The end result provides a seamless experience no different to running Home Assistant natively on supported hardware.
Can I run Home Assistant Core Natively on Windows?
Yes it is possible to run the Home Assistant Core natively on Windows, without using a virtual machine. However this method of running Home Assistant will not give you the full set of features.
Running the Home Assistant Core without the Supervisor element will leave you without the add-ons store and without the ability to easily manage essential add-on tools such as the File Editor.
For further information about the key components of Home Assistant, including the Core and Supervisor, take a look at this article.
Therefore it is recommended to follow the method in this article instead as it will be the right method for mostly all users.
Prerequisite
To run Home Assistant Supervised on Windows, we will utilize a pre-installed disk image that contains the Home Assistant Operating System (OS). This OS is a streamlined version of Linux specifically designed for running Home Assistant.
In this setup, your primary operating system, Windows, will act as the host OS, while Home Assistant will function as the guest OS.
To proceed with the installation, you will need a computer running Windows 8, 10 or 11.
Your system should meet the following minimum requirements:
- 4GB of RAM or more: It is recommended to allocate at least 2GB of RAM to the virtual machine to match the minimum requirement for the Home Assistant. Additionally, it is advised to have double that amount on the host system to accommodate both the host and guest operating systems.
- 32GB of disk storage space or more.
- At least 2 processor cores.
If you are using a relatively modern computer from the past decade, it is highly likely that you won’t encounter any issues meeting the system requirements. However, these requirements may become more significant when running Home Assistant on hardware such as a single board computer (SBC).
You will also need to have your Windows computer connected to your network and with internet access, which is required for downloading the necessary files.
Can I Use WiFi to Connect my Home Assistant Virtual Machine to the Network?
Yes, you can connect your Home Assistant Virtual machine to your external network using WiFi when using VirtualBox.
There is some confusion surrounding this topic, as the official website states that VirtualBox does not support WiFi.
However my own tests show that WiFi does in fact work with bridged networking, therefore it is possible that the information on the official site is out of date at the time of writing.
Installing VirtualBox on Windows
The first thing we need to do is download and install VirtualBox. You can download VirtualBox for Windows directly from the official site. Make sure you choose the correct version, the one for Windows hosts.
Once VirtualBox has downloaded, double-click the downloaded file and follow the installation procedure.
Downloading the Microsoft C++ Redistributable Package
Upon loading the installer, you may encounter an error that states that the Microsoft C++ Redistributable package is required. These packages are grouped by year.
If you encounter this error, make a note of the year required (at the time of writing, the 2019 package is required), head on over to the Microsoft website and download the package.
Once the package has downloaded, double click the file and install the package. Once complete, run the VirtualBox installer again and complete the installation.
Create a New VirtualBox Virtual Machine for Home Assistant
Before we can create a new virtual machine to run Home Assistant, we need to download the Home Assistant OS disk image. This image contains Home Assistant Core and Home Assistant Supervisor pre-installed within the Home Assistant Operating System.
Download Home the Assistant OS Drive Image
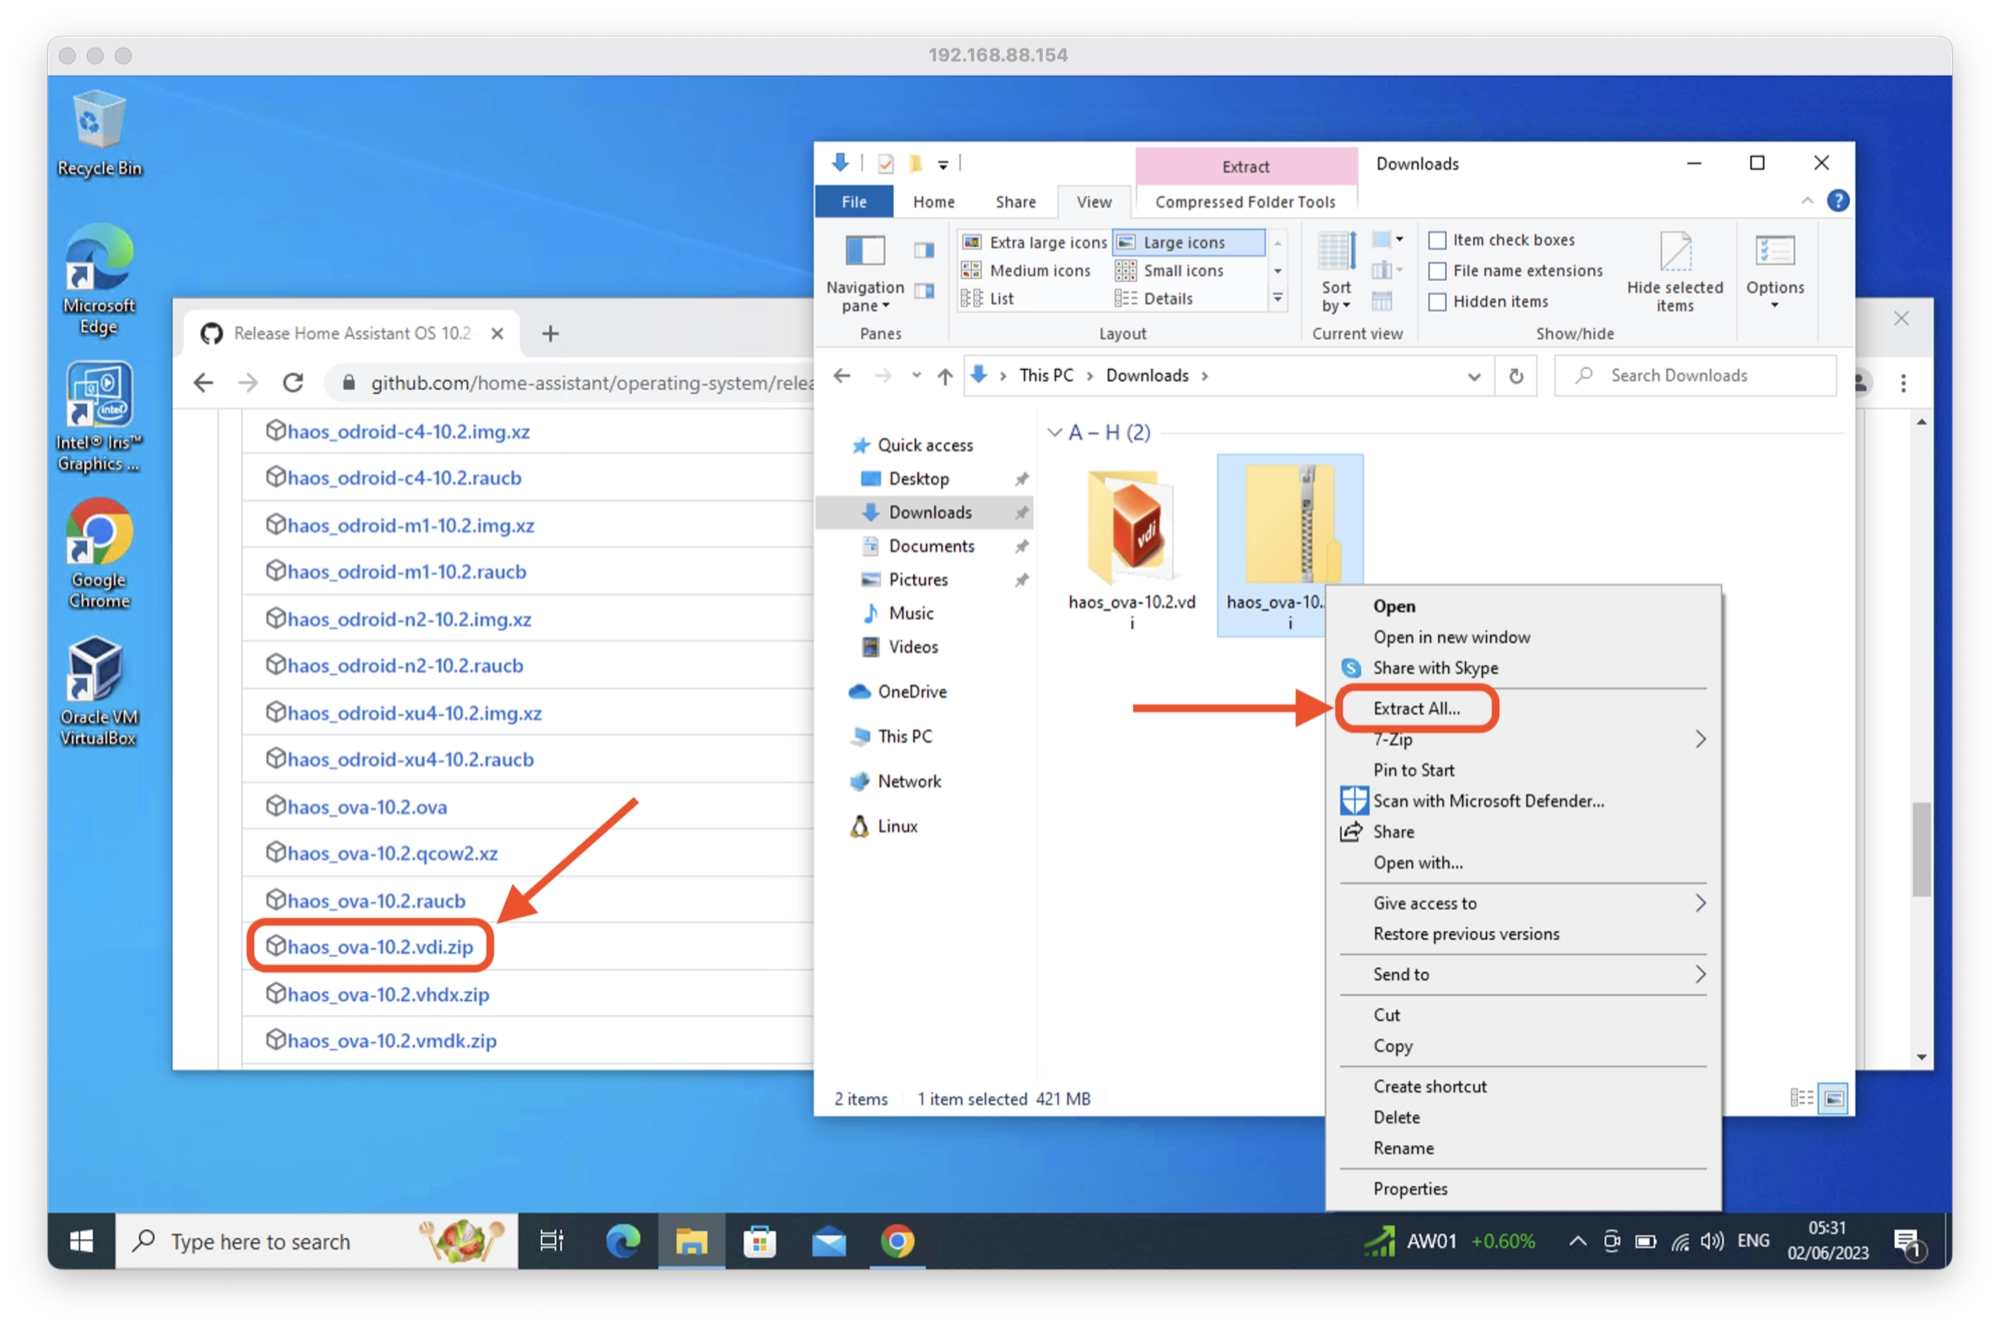
- Navigate to the latest releases page for Home Assistant OS: https://github.com/home-assistant/operating-system/releases/latest
- Scroll down and locate the file haos_ova-x.x.vdi.zip, where x.x is the number of the current latest release. Click the file to download it.
- Once downloaded, navigate to the download folder and double-click the file to extract the disk image haos_ova-x.x.vdi.
Create a new VirtualBox VM
Next, we can create a new virtual machine for running Home Assistant:
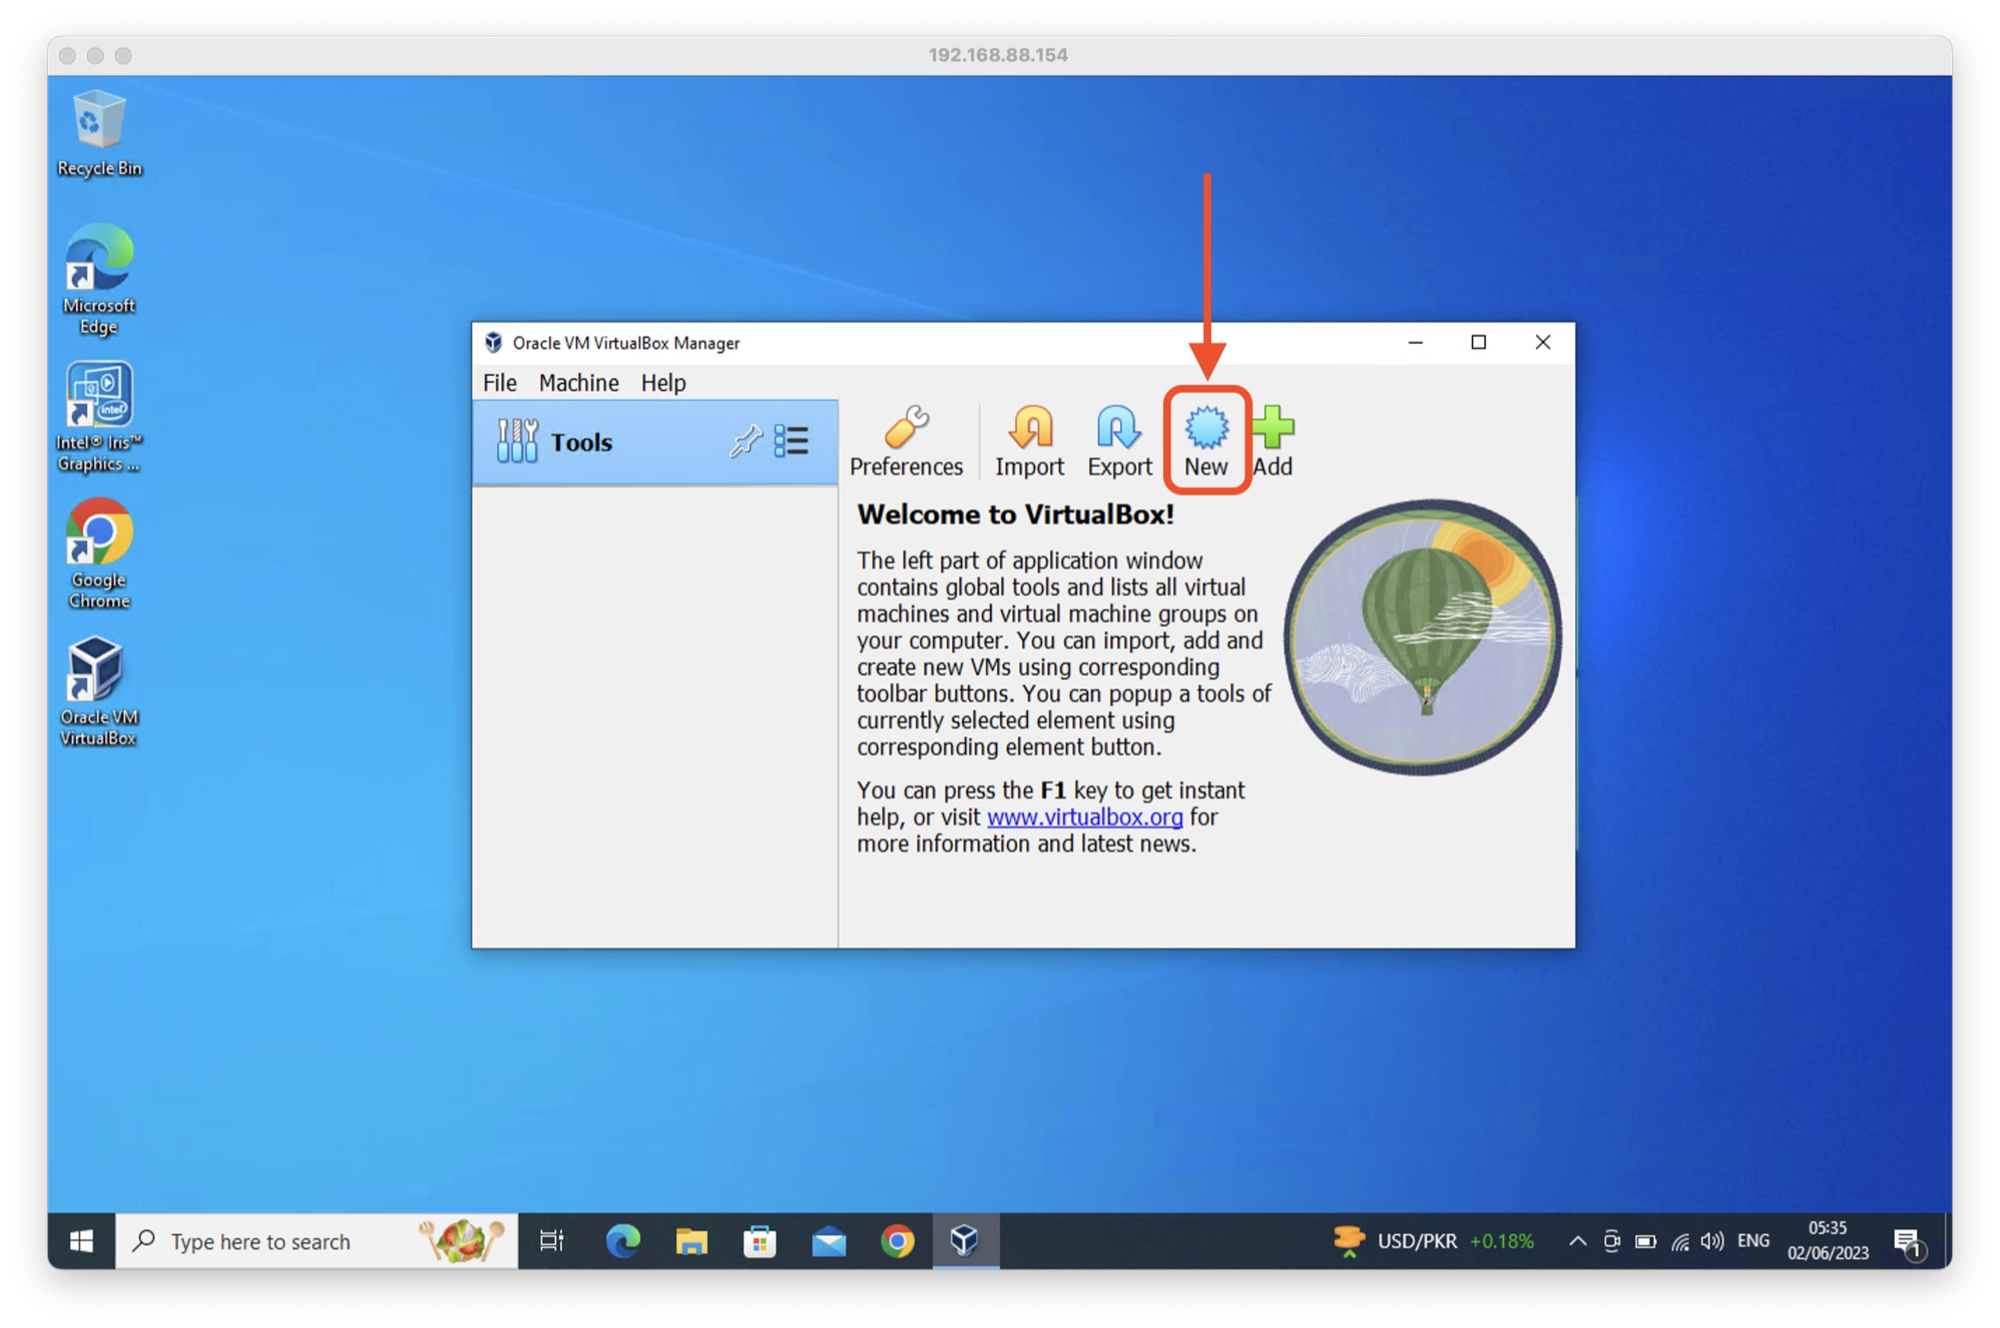
- Open VirtualBox
- Click the new button in order to create a new virtual machine
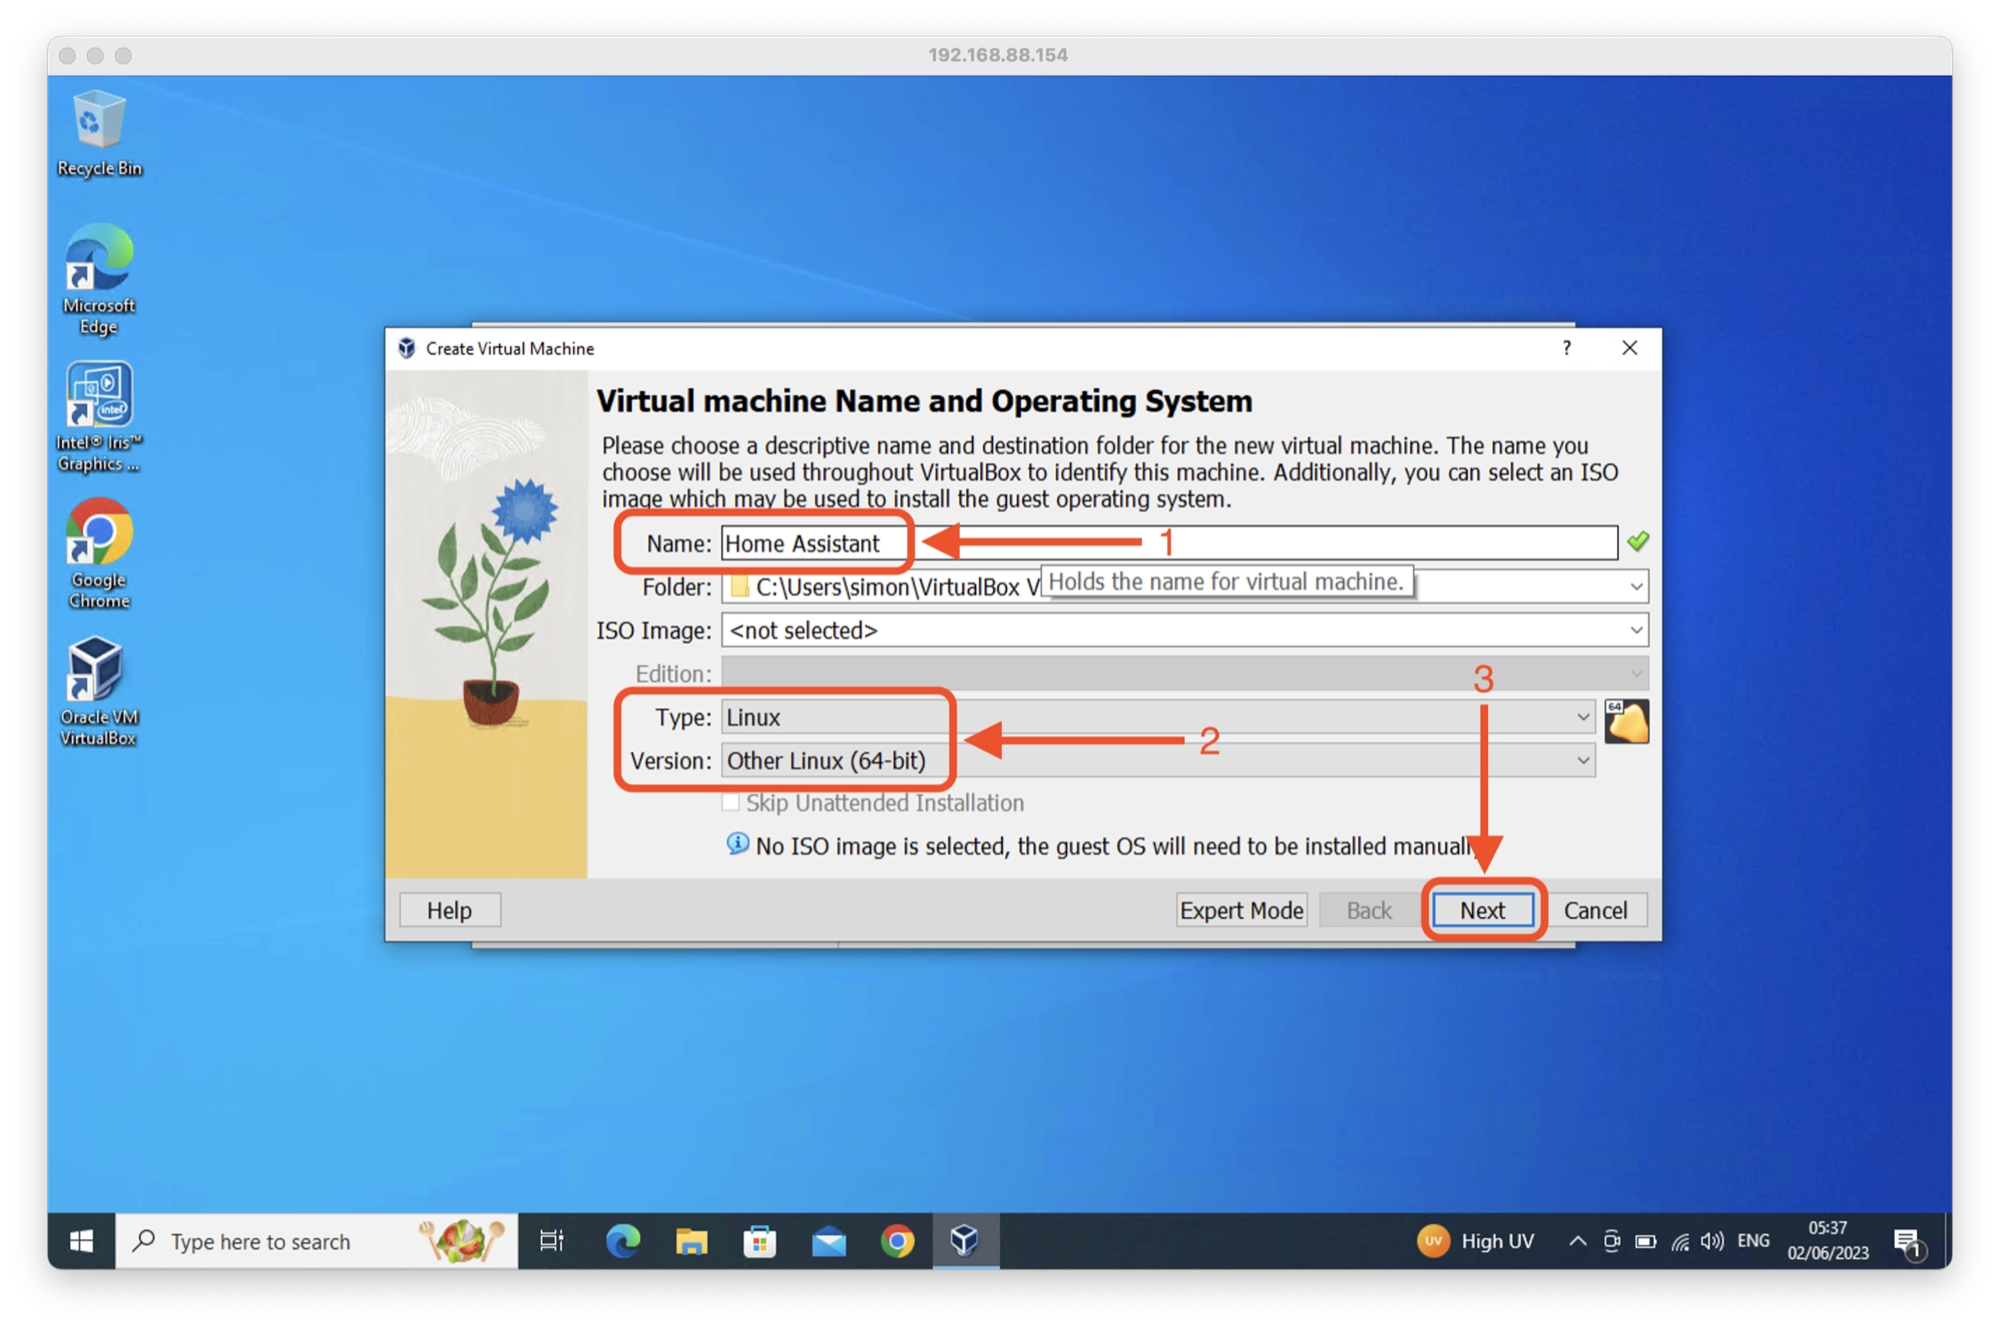
- Name the new VM something like Home Assistant.
- Choose Other Linux (64-bit) for the version.
- Click Next to continue.
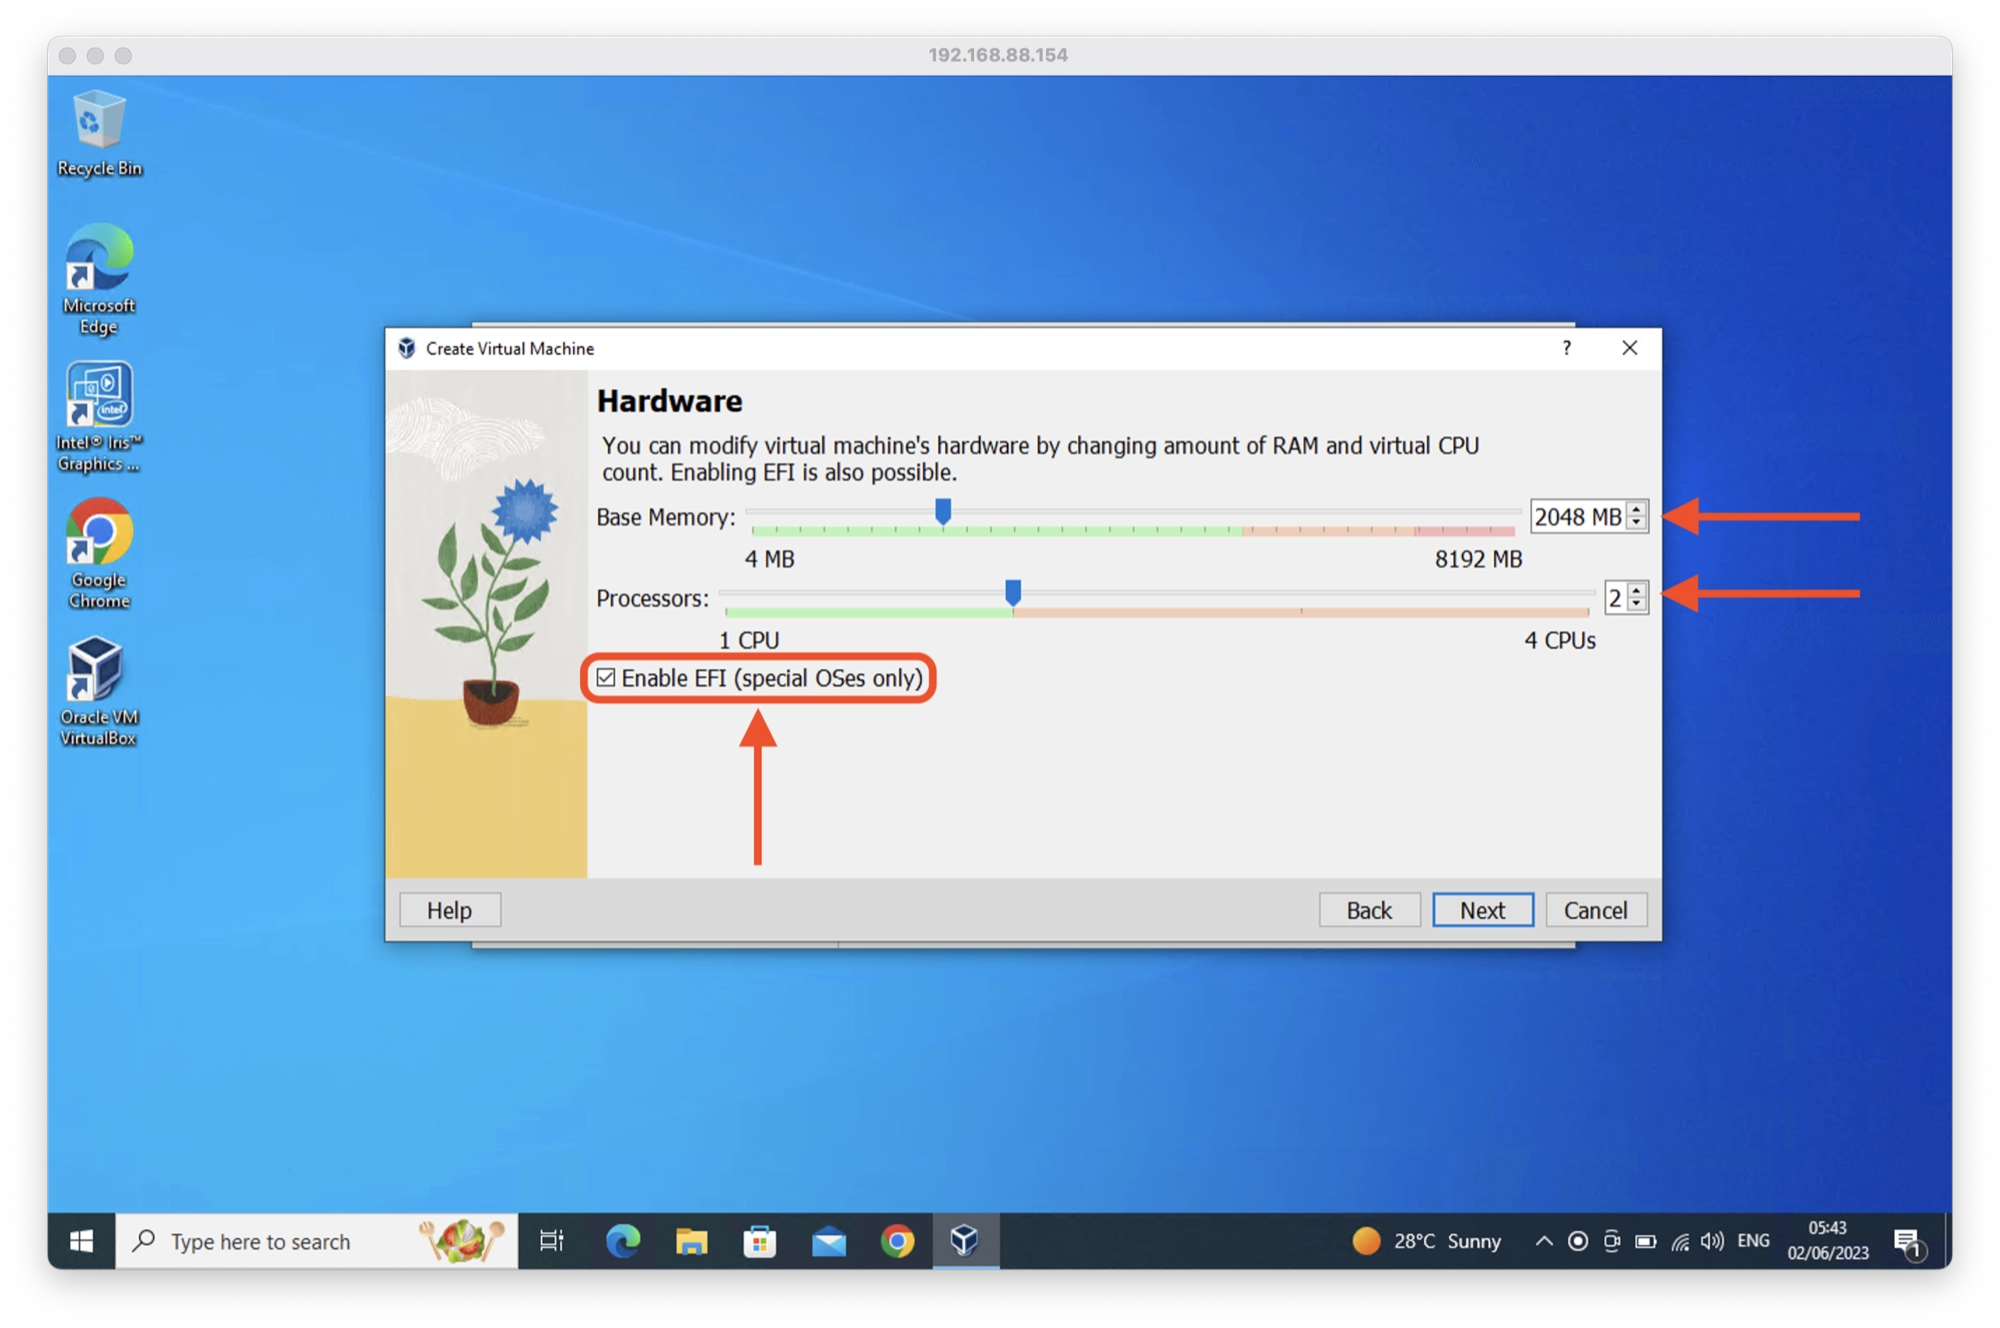
- Choose a minimum of 2GB RAM to meet the Home Assistant OS minimum requirement.
- Choose a minimum of 2 processor cores to meet the Home Assistant OS minimum requirement.
- Make sure Enable EFI (special OSes only) is checked.
- Click Next to continue.
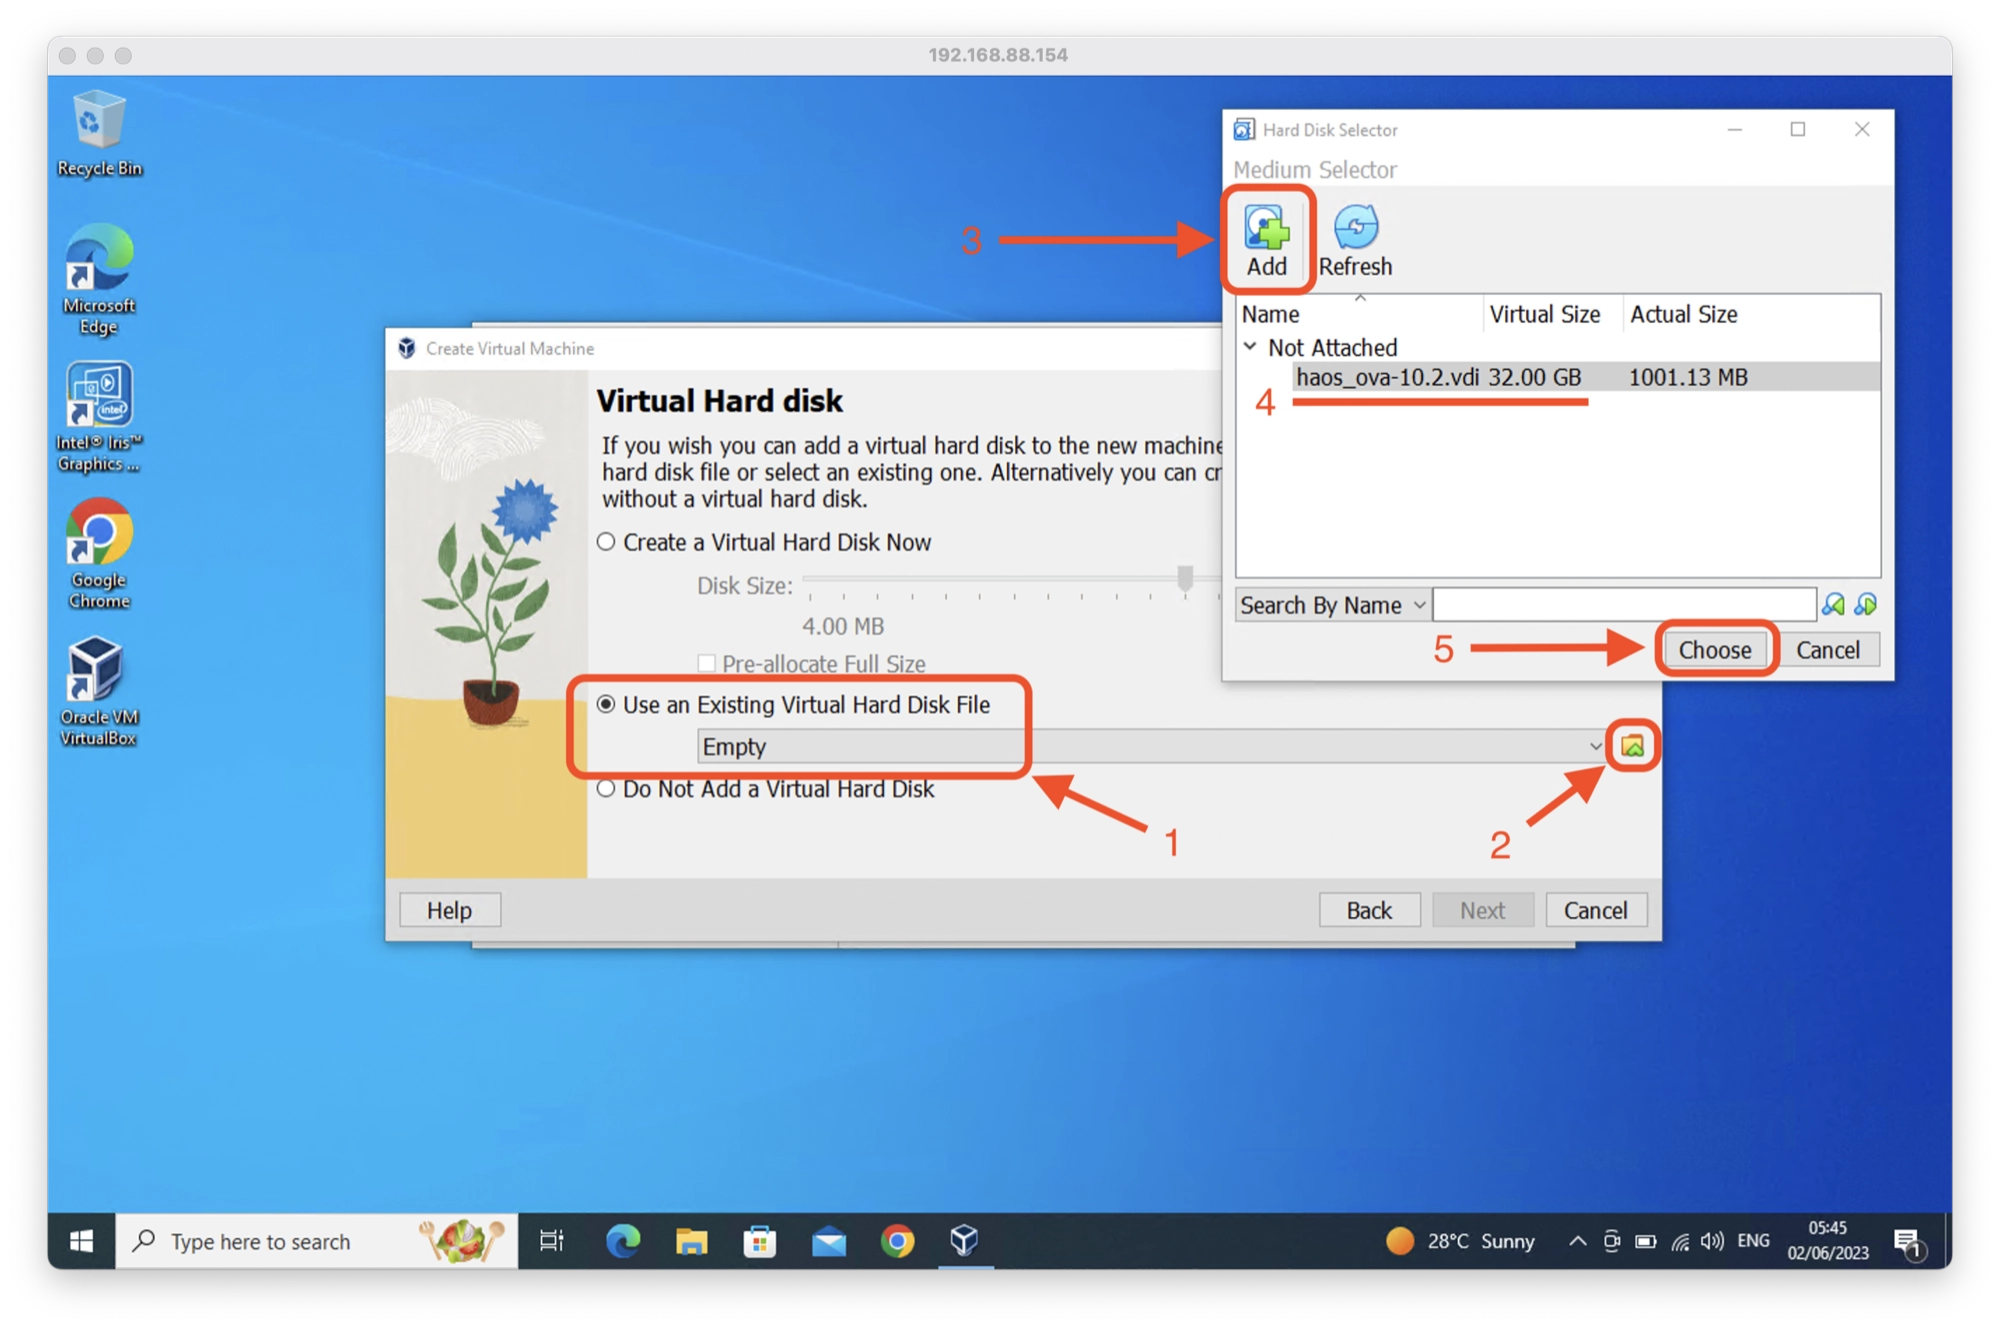
- Choose the option to Use an Existing Virtual Hard Disk File.
- Select the haos_ova-x.x.vdi file that you downloaded and extracted earlier.
- Click Next to continue.
- On the summary page, click Finish to complete the setup.
Configure the VirtualBox VM
Once you have finished the setup wizard, you should see a new VM in the left-hand sidebar. Next, we need to complete some further configuration:
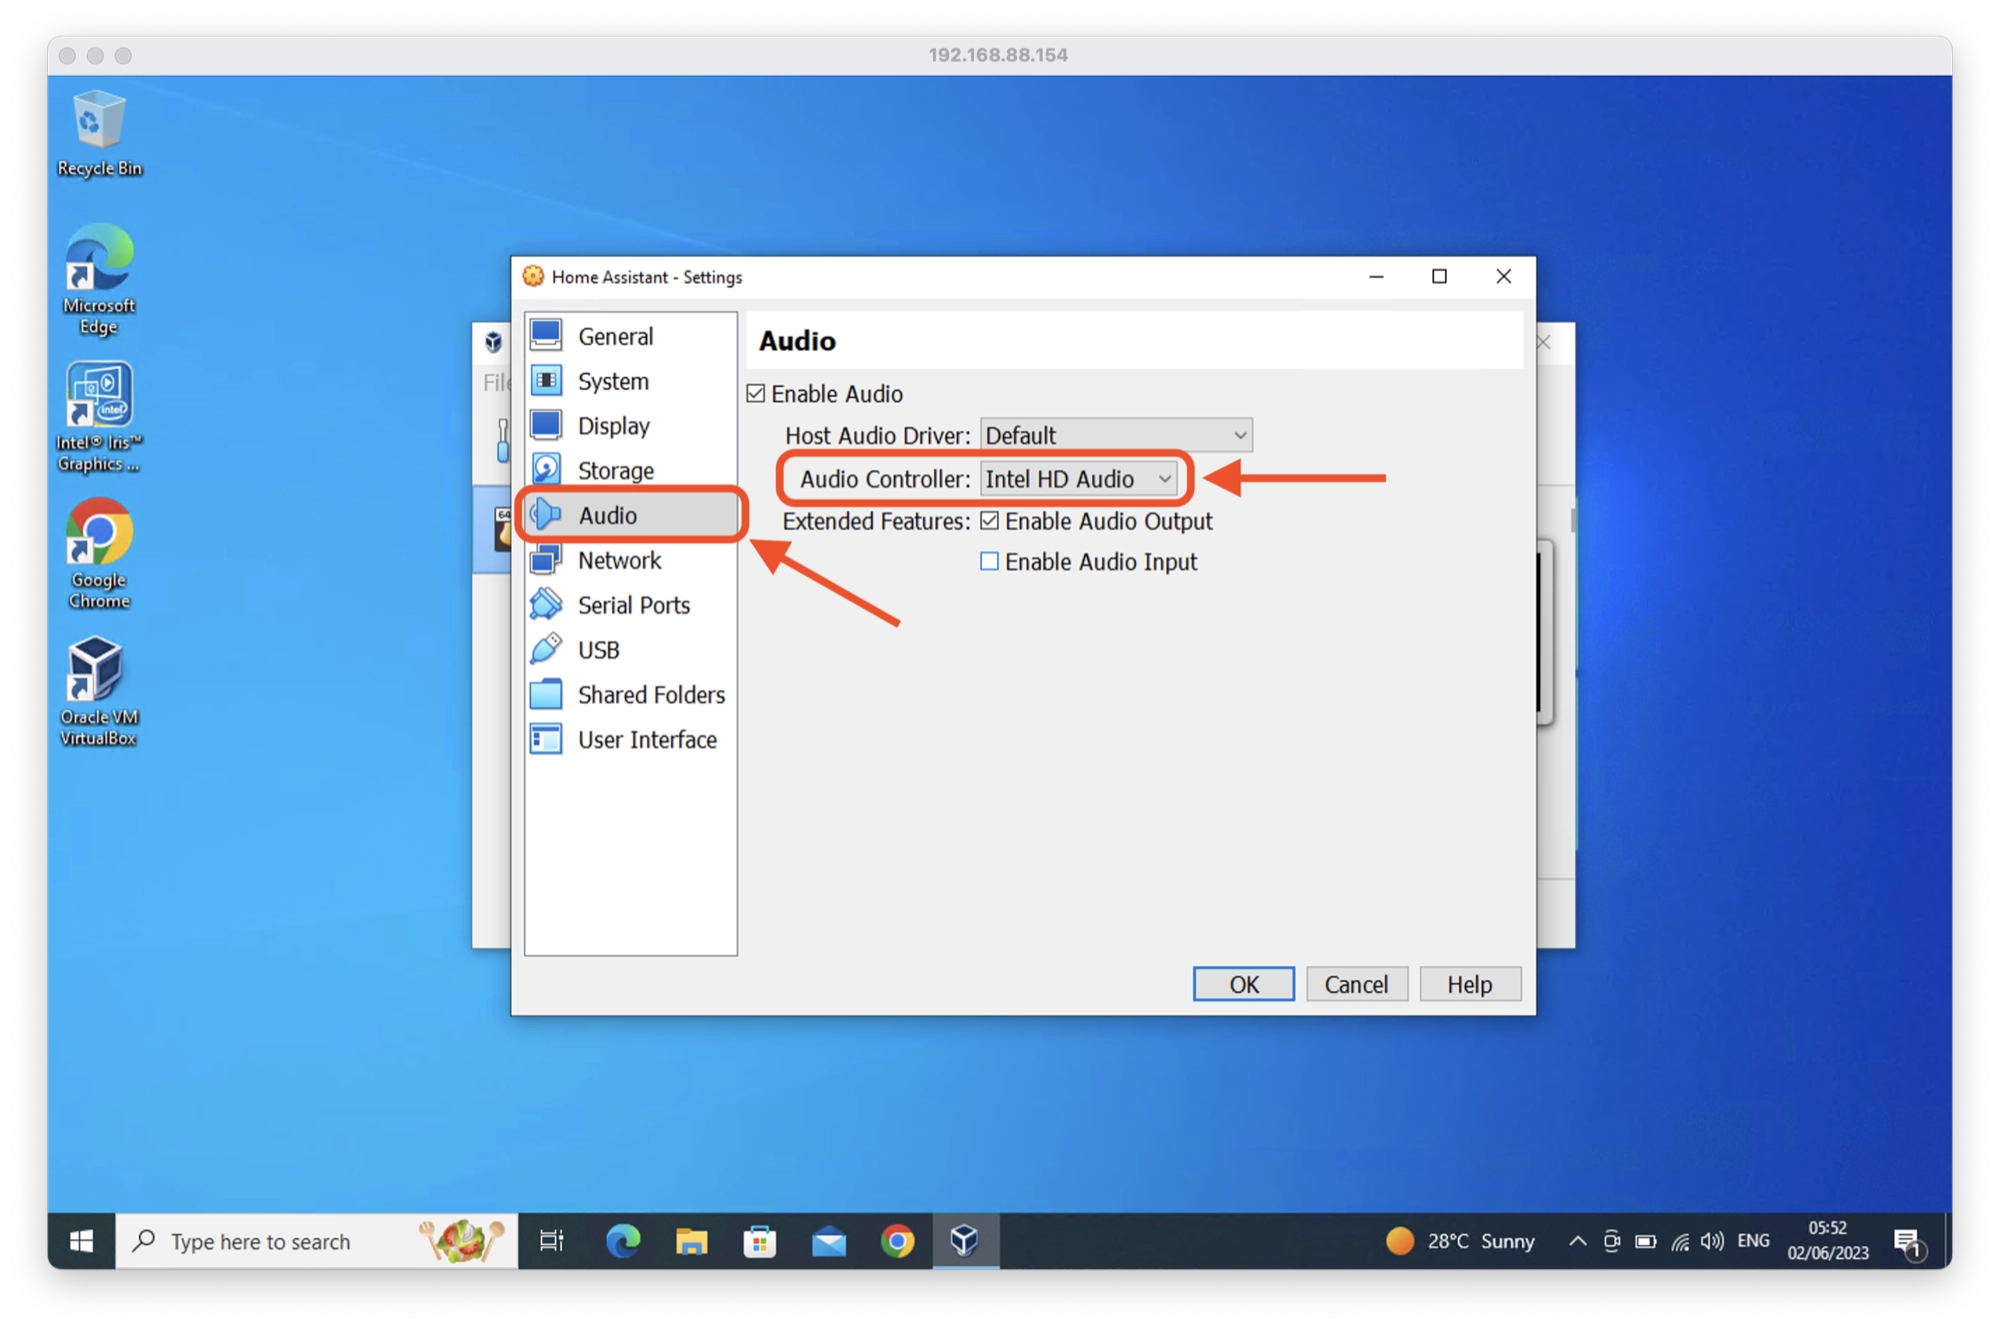
- Right-click the new VM and click settings.
- In the Audio section, change the Audio Controller to Intel HD Audio.
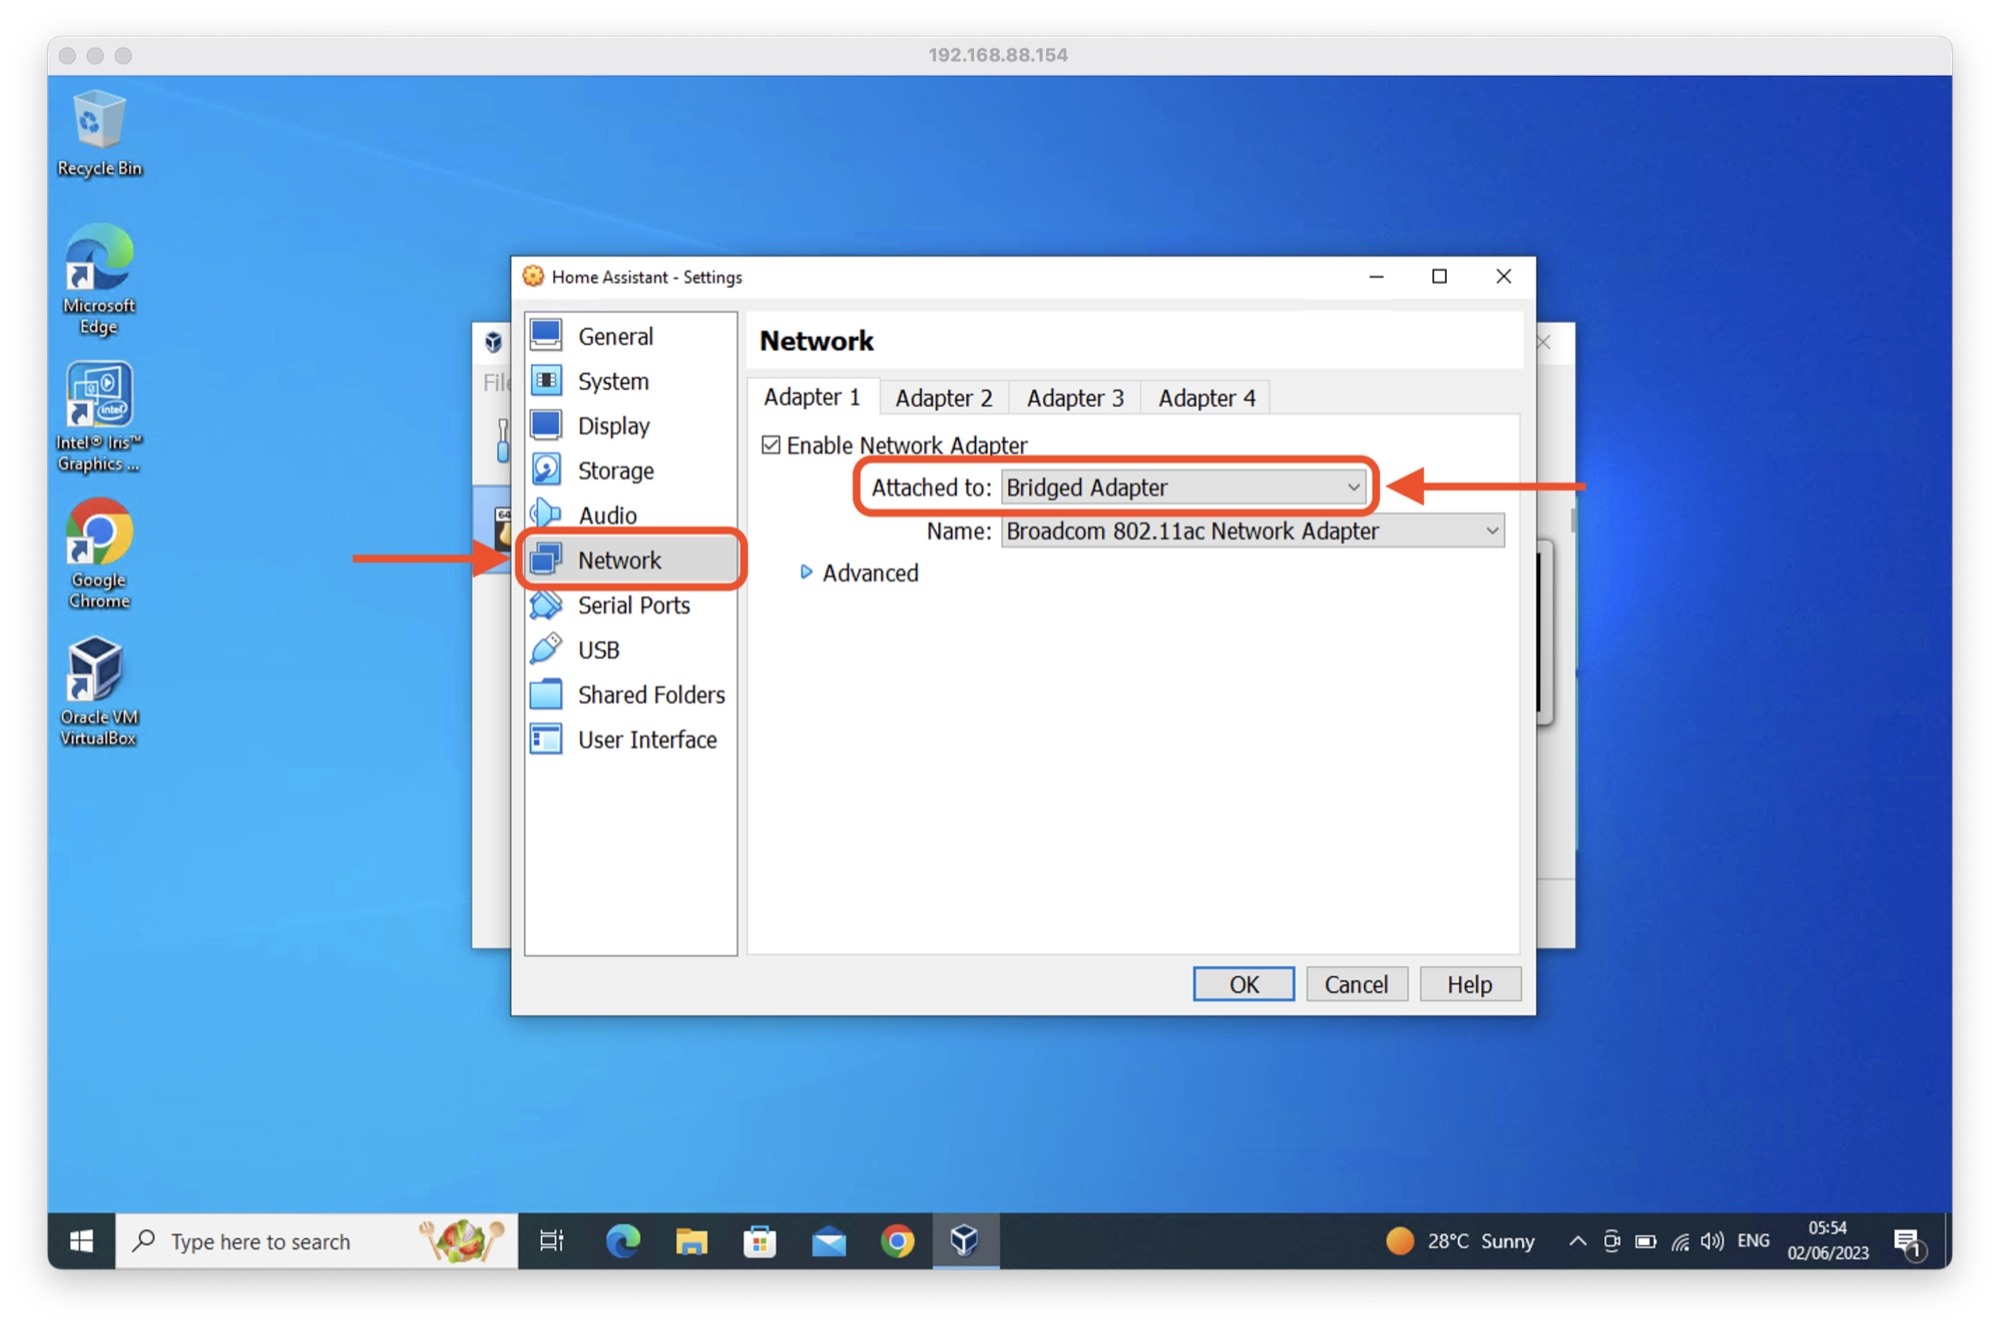
- If you are using a wired network connection (ethernet), in the Network section, change the attachment to Bridged Adapter. If you are using WiFi to connect your computer to the network, leave the setting as default and follow the steps in this section before continuing.
- Click OK to accept the changes.
How to Use the Home Assistant Virtual Machine
Now that we have completed the virtual machine configuration, we are ready to launch the virtual machine.
- With the Home Assistant VM selected in the left-hand sidebar, click the Start button.
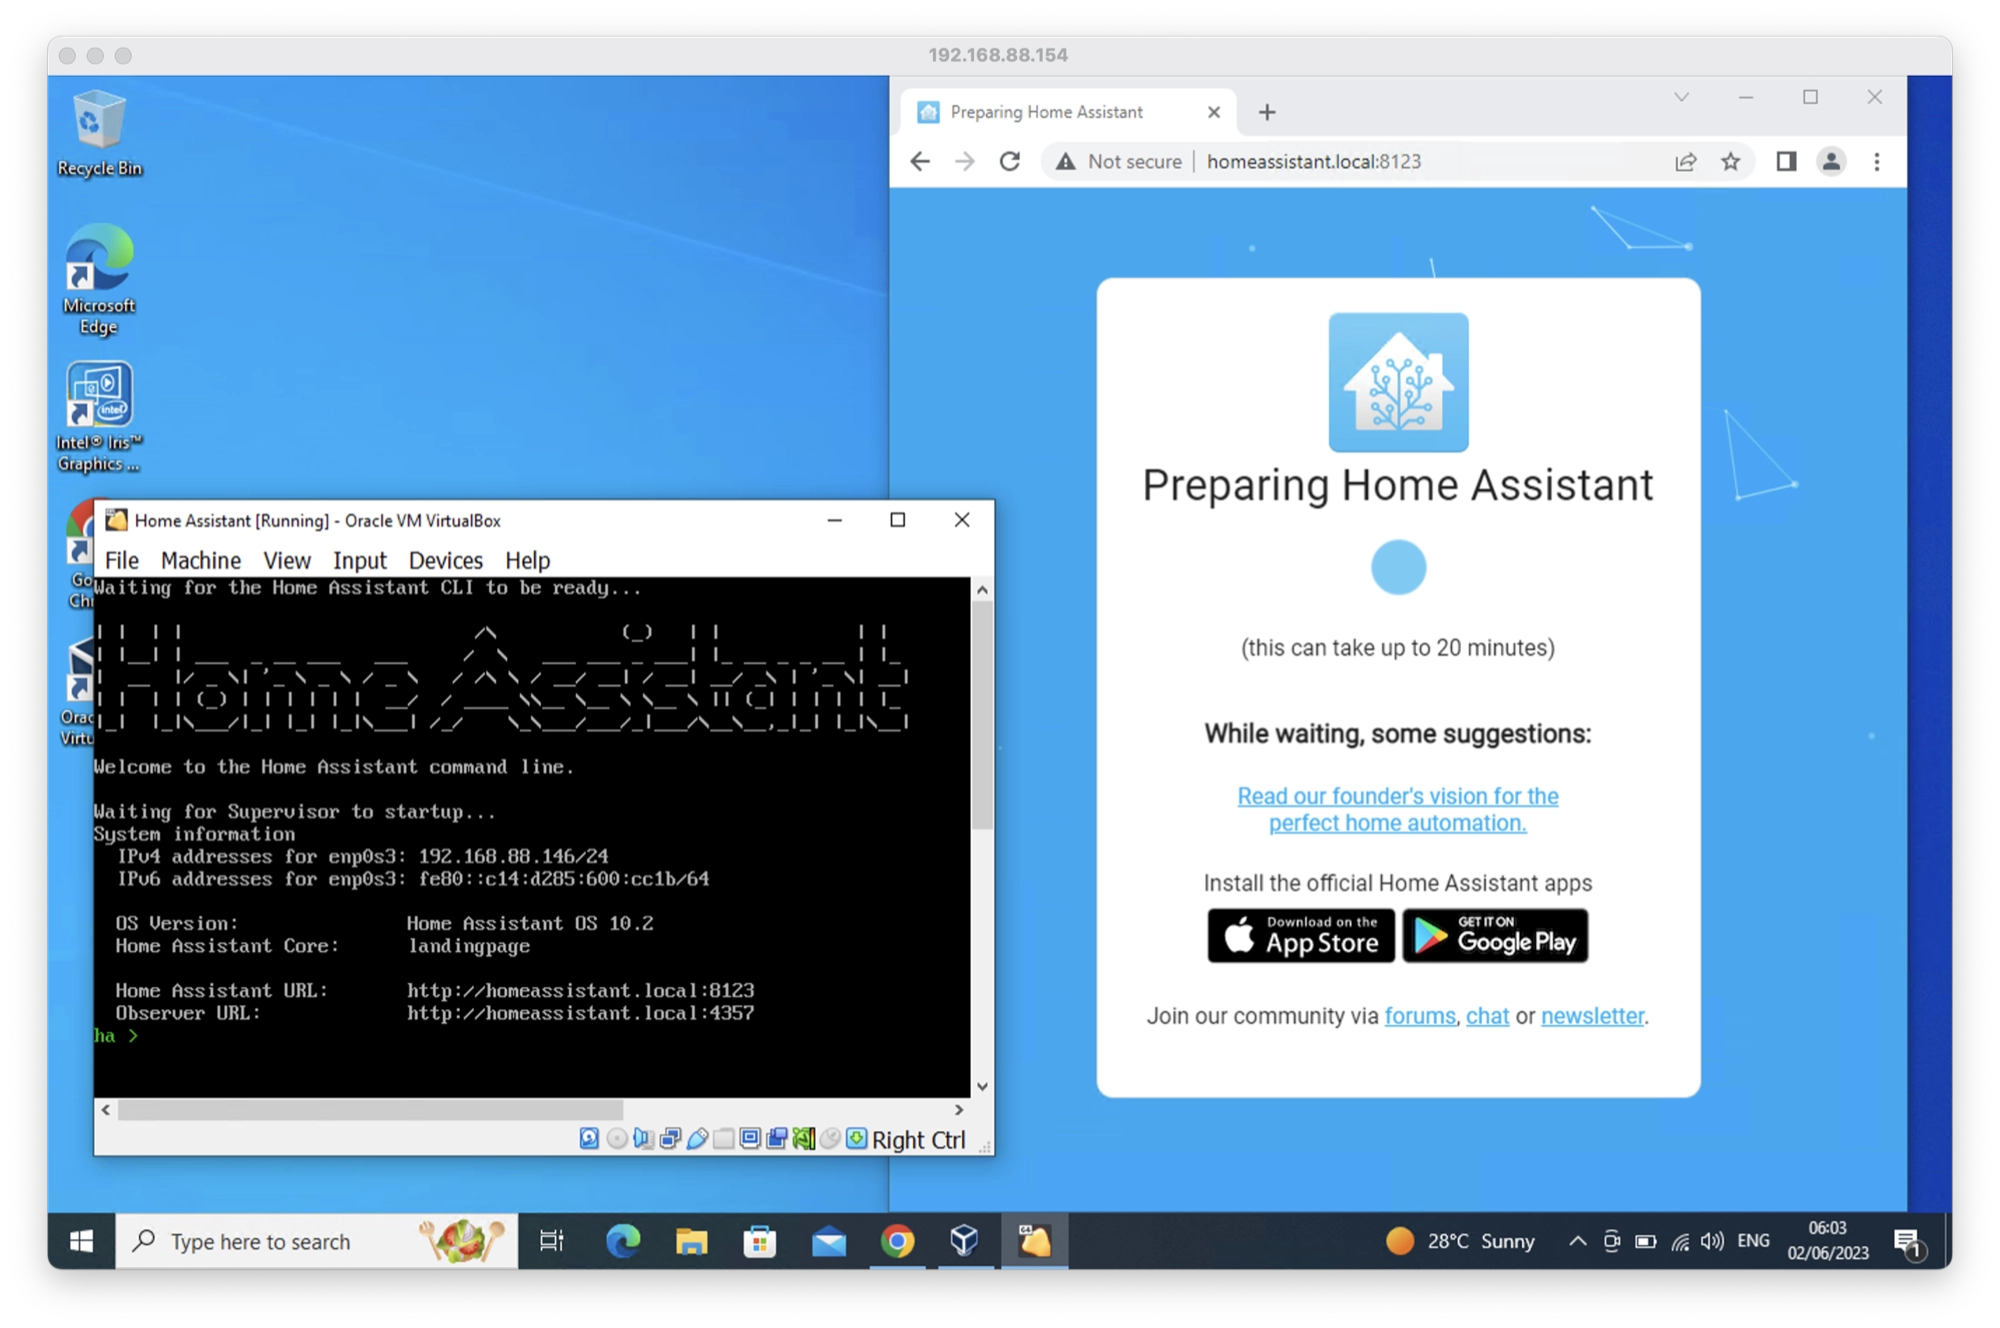
- A new window will open and Home Assistant OS will begin the boot process. Once complete, you will arrive at the
ha>command prompt.
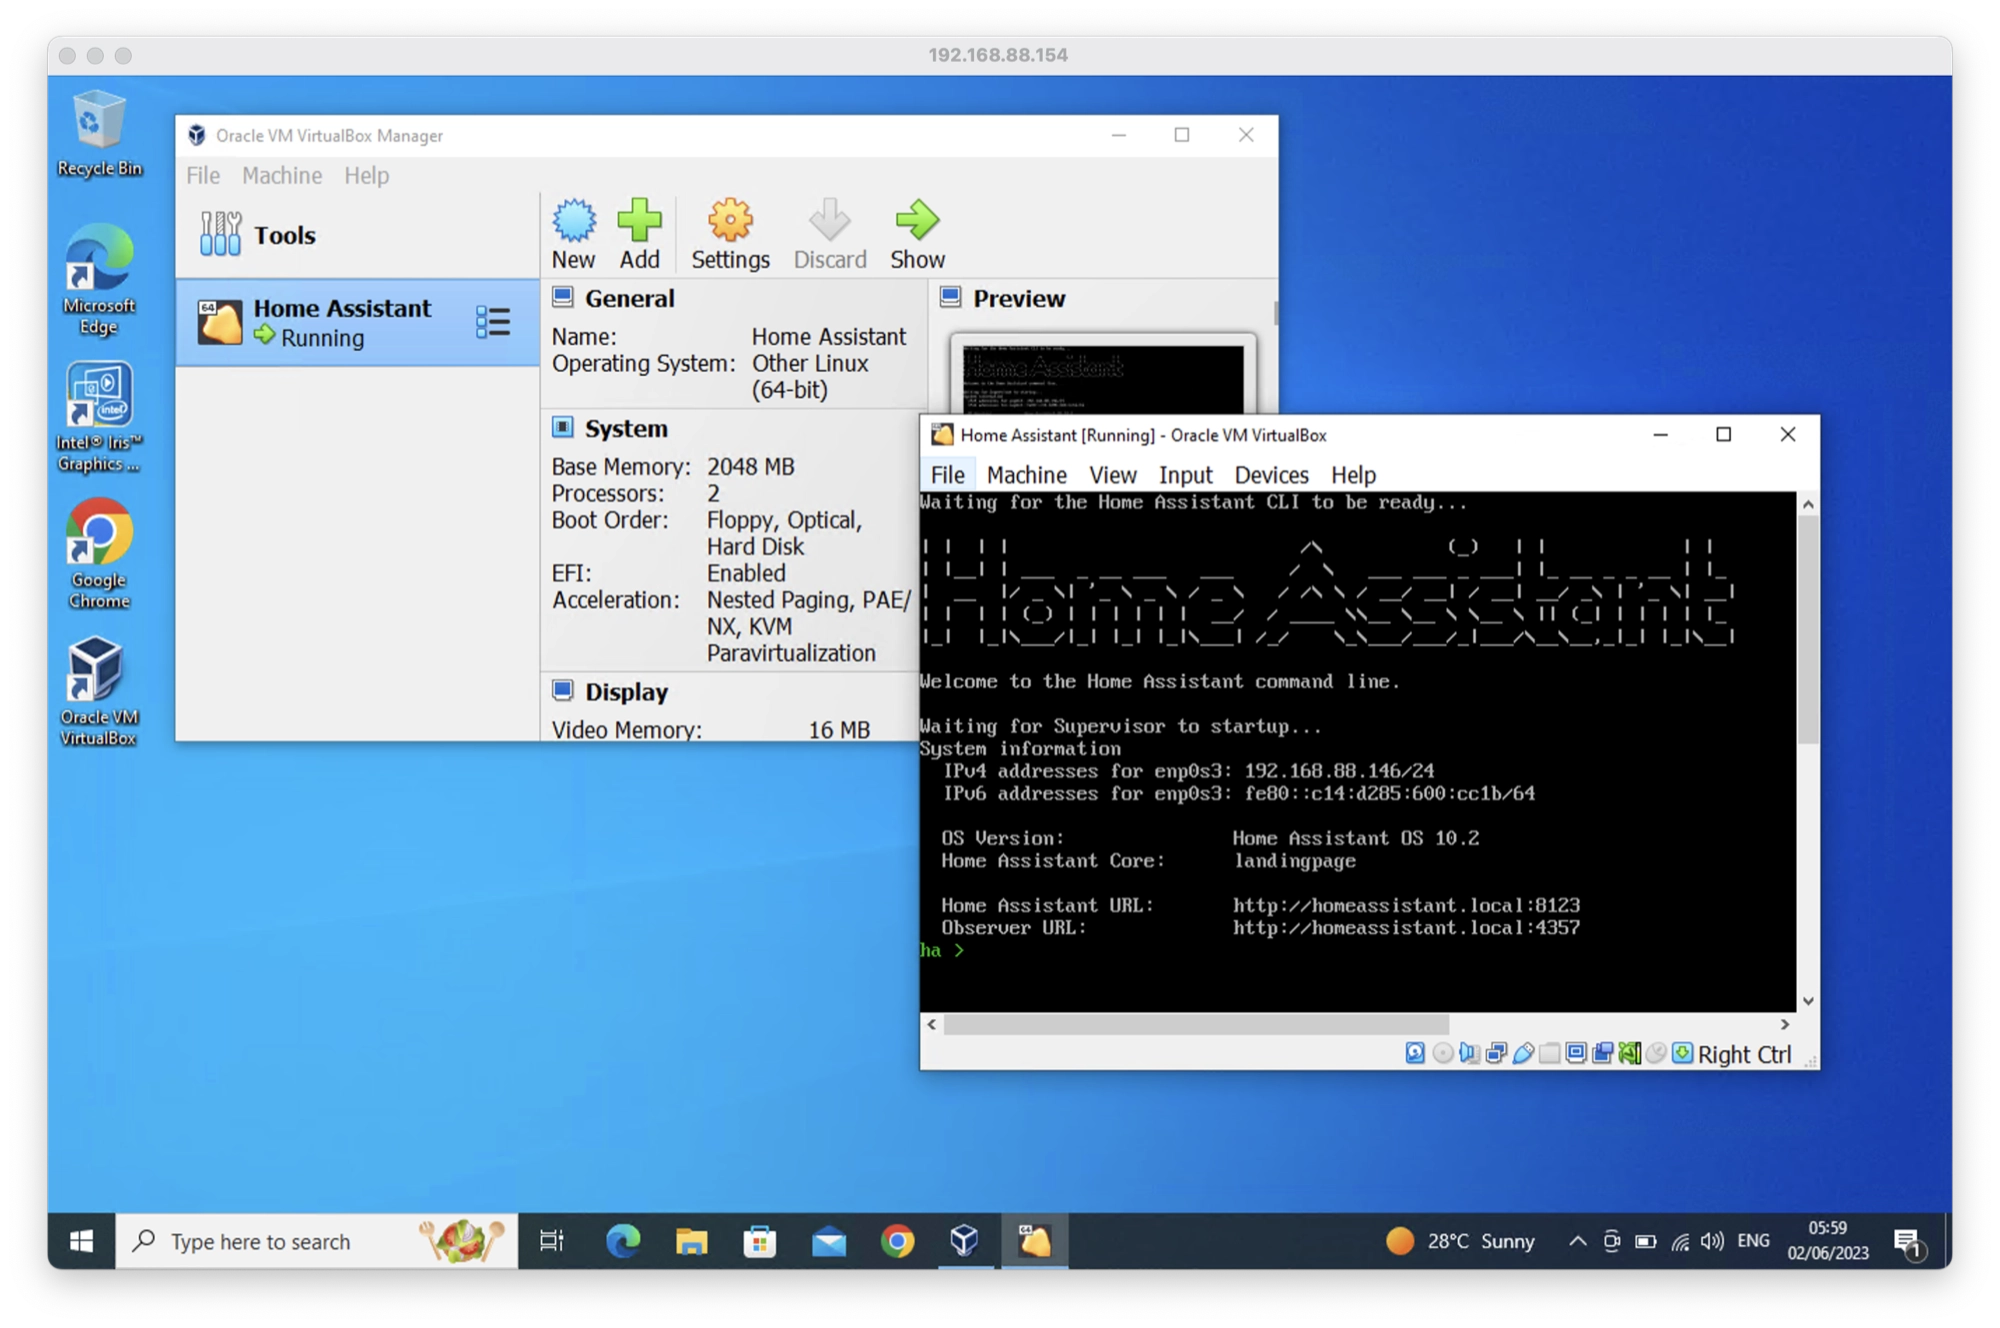
- In order to access Home Assistant, open a new browser window and navigate to http://homeassistant.local:8123
- In some cases this does not work, so you can use the IP address given instead. Your IP address is given in the system information (under the large “Home Assistant” text, for example http://192.168.88.146:8123 for my system shown here.
Note that you must use HTTP and not HTTPS as Home Assistant does not support SSL out of the box. You can learn more about how to set securely access Home Assistant in this tutorial.
Conclusion
The Home Assistant Operating System disk image simplifies the setup process of Home Assistant on various systems. In this tutorial, we have configured VirtualBox to enable the running of Home Assistant Supervised on Windows Desktop.
Please keep in mind that Windows may not be the most optimal choice of operating system for a dedicated Home Assistant server. If you intend to build a Home Assistant server, it is recommended to use Debian Linux instead.
Thanks so much for visiting my site! If this article helped you achieve your goal and you want to say thanks, you can now support my work by buying me a coffee. I promise I won’t spend it on beer instead… 😏
Install Home Assistant Operating System
Download the appropriate image
-
VirtualBox (.vdi)
-
KVM (.qcow2)
-
Vmware Workstation (.vmdk)
-
Hyper-V (.vhdx)
After downloading, decompress the image. If the image comes in a ZIP file, for example, unzip it.
Follow this guide if you already are running a supported virtual machine hypervisor. If you are not familiar with virtual machines, we recommend installing Home Assistant OS directly on a Home Assistant Yellow, a Raspberry Pi, or an ODROID.
Create the virtual machine
Load the appliance image into your virtual machine hypervisor. (Note: You are free to assign as much resources as you wish to the VM, please assign enough based on your add-on needs).
Minimum recommended assignments:
- 2 GB RAM
- 32 GB Storage
- 2vCPU
All these can be extended if your usage calls for more resources.
Hypervisor specific configuration
VirtualBox
KVM (virt-manager)
KVM (virt-install)
Vmware Workstation
Hyper-V
- Create a new virtual machine.
- Select type Linux and version Linux 2.6 / 3.x / 4.x (64-bit).
- Select Use an existing virtual hard disk file, select the unzipped VDI file from above.
- Edit the Settings of the VM and go to System > Motherboard. Select Enable EFI.
- Then go to Network > Adapter 1. Choose Bridged Adapter and choose your network adapter.
Please keep in mind that the bridged adapter only functions over a hardwired Ethernet connection.
Using Wi-Fi on your VirtualBox host is unsupported.
6. Then go to **Audio** and choose **Intel HD Audio** as audio controller.
By default, VirtualBox does not free up unused disk space. To automatically shrink the vdi disk image
the discard option must be enabled using your host machine’s terminal:
VBoxManage storageattach <VM name> --storagectl "SATA" --port 0 --device 0 --nonrotational on --discard on
More details can be found about the command can be found here.
- Create a new virtual machine in
virt-manager. - Select Import existing disk image, provide the path to the QCOW2 image above.
- Choose Generic Default for the operating system.
- Check the box for Customize configuration before install.
- Under Network Selection, select your bridge.
- Under customization select Overview > Firmware > UEFI x86_64: …. Make sure to select a non-secureboot version of OVMF (does not contain the word
secure,secboot, etc.), e.g.,/usr/share/edk2/ovmf/OVMF_CODE.fd. - Click Add Hardware (bottom left), and select Channel.
- Select device type: unix.
- Select name: org.qemu.guest_agent.0.
- Finally, select Begin Installation (upper left corner).
virt-install --name hass --description "Home Assistant OS" --os-variant=generic --ram=2048 --vcpus=2 --disk <PATH TO QCOW2 FILE>,bus=sata --import --graphics none --boot uefi
If you have a USB dongle to attach, you need to add the option `—hostdev busID.deviceId`. You can discover these IDs via the `lsusb` command.
As example, if `lsusb` output is:
   Bus 004 Device 001: ID 1d6b:0003 Linux Foundation 3.0 root hub
   Bus 003 Device 004: ID 30c9:0052 Luxvisions Innotech Limited Integrated RGB Camera
   Bus 003 Device 003: ID 1a86:55d4 QinHeng Electronics SONOFF Zigbee 3.0 USB Dongle Plus V2
   Bus 003 Device 002: ID 06cb:00fc Synaptics, Inc.
   Bus 003 Device 005: ID 8087:0033 Intel Corp.
   Bus 003 Device 001: ID 1d6b:0002 Linux Foundation 2.0 root hub
   Bus 002 Device 001: ID 1d6b:0003 Linux Foundation 3.0 root hub
   Bus 001 Device 001: ID 1d6b:0002 Linux Foundation 2.0 root hub
You can recognize the Sonoff dongle at Bus 003 Device 003. So the command to install the VM will become:
virt-install --name hass --description "Home Assistant OS" --os-variant=generic --ram=2048 --vcpus=2 --disk <PATH TO QCOW2 FILE>,bus=sata --import --graphics none --boot uefi --hostdev 003.003
Note that this configuration (bus 003, device 003) is just an example, your dongle could be on another bus and/or with another device ID.
Please check the correct IDs of your USB dongle with lsusb.
- Create a new virtual machine.
- Select Custom, make it compatible with the default of Workstation and ESX.
- Choose I will install the operating system later, select Linux > Other Linux 5.x or later kernel 64-bit.
- Select Use Bridged Networking.
- Select Use an existing virtual disk and select the VMDK file above.
After the VM has been created, go to Settings > Options > Advanced. Under Firmware type select UEFI.
Hyper-V does not have USB support
- Create a new virtual machine.
- Select Generation 2.
- Select Connection > Your Virtual Switch that is bridged.
- Select Use an existing virtual hard disk and select the VHDX file from above.
After creation, go to Settings > Security and deselect Enable Secure Boot.
Start up your virtual machine
- Start the virtual machine.
- Observe the boot process of the Home Assistant Operating System.
- Once completed, you will be able to reach Home Assistant on homeassistant.local:8123. If you are running an older Windows version or have a stricter network configuration, you might need to access Home Assistant at homeassistant:8123 or
http://X.X.X.X:8123(replace X.X.X.X with your ’s IP address).
Help us improve Home Assistant
Have you just installed Home Assistant? The Home Assistant team is looking to talk to you to understand how the installation went.
With the Home Assistant Operating System installed and accessible, you can continue with onboarding.
Install Home Assistant Core
Install WSL
To install Home Assistant Core on Windows, you will need to use the Windows Subsystem for Linux (WSL). Follow the WSL installation instructions and install Ubuntu from the Windows Store.
As an alternative, Home Assistant OS can be installed in a Linux guest VM. Running Home Assistant Core directly on Windows is not supported.
This is an advanced installation process, and some steps might differ on your system. Considering the nature of this installation type, we assume you can handle subtle differences between this document and the system configuration you are using. When in doubt, please consider one of the other installation methods, as they might be a better fit instead.
Prerequisites
This guide assumes that you already have an operating system setup and have installed Python 3.11 (including the package python3-dev) or newer.
Install dependencies
Before you start, make sure your system is fully updated, all packages in this guide are installed with apt, if your OS does not have that, look for alternatives.
sudo apt-get update
sudo apt-get upgrade -y
Install the dependencies:
sudo apt-get install -y python3 python3-dev python3-venv python3-pip bluez libffi-dev libssl-dev libjpeg-dev zlib1g-dev autoconf build-essential libopenjp2-7 libtiff5 libturbojpeg0-dev tzdata ffmpeg liblapack3 liblapack-dev libatlas-base-dev
The above-listed dependencies might differ or missing, depending on your system or personal use of Home Assistant.
Create an account
Add an account for Home Assistant Core called homeassistant.
Since this account is only for running Home Assistant Core the extra arguments of -rm is added to create a system account and create a home directory.
sudo useradd -rm homeassistant
Create the virtual environment
First we will create a directory for the installation of Home Assistant Core and change the owner to the homeassistant account.
sudo mkdir /srv/homeassistant
sudo chown homeassistant:homeassistant /srv/homeassistant
Next up is to create and change to a virtual environment for Home Assistant Core. This will be done as the homeassistant account.
sudo -u homeassistant -H -s
cd /srv/homeassistant
python3 -m venv .
source bin/activate
Once you have activated the virtual environment (notice the prompt change to (homeassistant) homeassistant@raspberrypi:/srv/homeassistant $) you will need to run the following command to install a required Python package.
python3 -m pip install wheel
Once you have installed the required Python package, it is now time to install Home Assistant Core!
pip3 install homeassistant==2023.10.1
Start Home Assistant Core for the first time. This will complete the installation for you, automatically creating the .homeassistant configuration directory in the /home/homeassistant directory, and installing any basic dependencies.
You can now reach your installation via the web interface on http://homeassistant.local:8123.
If this address doesn’t work you may also try http://localhost:8123 or http://X.X.X.X:8123 (replace X.X.X.X with your machines’ IP address).
When you run the hass command for the first time, it will download, install and cache the necessary libraries/dependencies. This procedure may take anywhere between 5 to 10 minutes. During that time, you may get a site cannot be reached error when accessing the web interface. This will only happen the first time. Subsequent restarts will be much faster.
Help us to improve our documentation
Suggest an edit to this page, or provide/view feedback for this page.
Install Home Assistant Operating System
Download the appropriate image
-
VirtualBox (.vdi)
-
KVM (.qcow2)
-
Vmware Workstation (.vmdk)
-
Hyper-V (.vhdx)
Follow this guide if you already are running a supported virtual machine hypervisor. If you are not familiar with virtual machines we recommend installation Home Assistant OS directly on a Raspberry Pi or an ODROID.
Create the Virtual Machine
Load the appliance image into your virtual machine hypervisor. (Note: You are free to assign as much resources as you wish to the VM, please assign enough based on your add-on needs).
Minimum recommended assignments:
- 2 GB RAM
- 32 GB Storage
- 2vCPU
All these can be extended if your usage calls for more resources.
Hypervisor specific configuration
VirtualBox
KVM (virt-manager)
KVM (virt-install)
Vmware Workstation
Hyper-V
- Create a new virtual machine
- Select Type “Linux” and Version “Linux 2.6 / 3.x / 4.x (64-bit)”
- Select “Use an existing virtual hard disk file”, select the unzipped VDI file from above
- Edit the “Settings” of the VM and go “System” then “Motherboard” and select “Enable EFI”
- Then go to “Network” “Adapter 1” choose “Bridged Adapter” and choose your Network adapter
Please keep in mind that the bridged adapter only functions over a hardwired Ethernet connection.
Using Wi-Fi on your VirtualBox host is unsupported.
6. Then go to «Audio» and choose «Intel HD Audio» as Audio Controller.
By default VirtualBox does not free up unused disk space. To automatically shrink the vdi disk image
the discard option must be enabled:
VBoxManage storageattach <VM name> --storagectl "SATA" --port 0 --device 0 --nonrotational on --discard on
- Create a new virtual machine in
virt-manager - Select “Import existing disk image”, provide the path to the QCOW2 image above
- Choose “Generic Default” for the operating system
- Check the box for “Customize configuration before install”
- Select your bridge under “Network Selection”
- Under customization select “Overview” -> “Firmware” -> “UEFI x86_64: …”. Make sure to select a non-secureboot version of OVMF (does not contain the word
secure,secboot, etc.), e.g.,/usr/share/edk2/ovmf/OVMF_CODE.fd. - Click “Add Hardware” (bottom left), and select “Channel”
- Select device type: “unix”
- Select name: “org.qemu.guest_agent.0”
- Finally select “Begin Installation” (upper left corner)
virt-install --name hass --description "Home Assistant OS" --os-variant=generic --ram=2048 --vcpus=2 --disk <PATH TO QCOW2 FILE>,bus=sata --graphics none --boot uefi
- Create a new virtual machine
- Select “Custom”, make it compatible with the default of Workstation and ESX
- Choose “I will install the operating system later”, select “Linux” -> “Other Linux 5.x or later kernel 64-bit”
- Select “Use Bridged Networking”
- Select “Use an existing virtual disk” and select the VMDK file above,
After creation of VM go to “Settings” and “Options” then “Advanced” and select “Firmware type” to “UEFI”.
Hyper-V does not have USB support
- Create a new virtual machine
- Select “Generation 2”
- Select “Connection -> “Your Virtual Switch that is bridged”
- Select “Use an existing virtual hard disk” and select the VHDX file from above
After creation go to “Settings” -> “Security” and deselect “Enable Secure Boot”.
Start up your Virtual Machine
- Start the Virtual Machine
- Observe the boot process of Home Assistant Operating System
- Once completed you will be able to reach Home Assistant on homeassistant.local:8123. If you are running an older Windows version or have a stricter network configuration, you might need to access Home Assistant at homeassistant:8123 or
http://X.X.X.X:8123(replace X.X.X.X with your ’s IP address).
With the Home Assistant Operating System installed and accessible you can continue with onboarding.
Install Home Assistant Core
Install WSL
To install Home Assistant Core on Windows, you will need to use the Windows Subsystem for Linux (WSL). Follow the WSL installation instructions and install Ubuntu from the Windows Store.
As an alternative, Home Assistant OS can be installed in a Linux guest VM. Running Home Assistant Core directly on Windows is not supported.
This is an advanced installation process, and some steps might differ on your system. Considering the nature of this installation type, we assume you can handle subtle differences between this document and the system configuration you are using. When in doubt, please consider one of the other installation methods, as they might be a better fit instead.
Prerequisites
This guide assumes that you already have an operating system setup and have installed Python 3.10 (including the package python3-dev) or newer.
Install dependencies
Before you start, make sure your system is fully updated, all packages in this guide are installed with apt, if your OS does not have that, look for alternatives.
sudo apt-get update
sudo apt-get upgrade -y
Install the dependencies:
sudo apt-get install -y python3 python3-dev python3-venv python3-pip bluez libffi-dev libssl-dev libjpeg-dev zlib1g-dev autoconf build-essential libopenjp2-7 libtiff5 libturbojpeg0-dev tzdata
The above-listed dependencies might differ or missing, depending on your system or personal use of Home Assistant.
Create an account
Add an account for Home Assistant Core called homeassistant.
Since this account is only for running Home Assistant Core the extra arguments of -rm is added to create a system account and create a home directory.
sudo useradd -rm homeassistant
Create the virtual environment
First we will create a directory for the installation of Home Assistant Core and change the owner to the homeassistant account.
sudo mkdir /srv/homeassistant
sudo chown homeassistant:homeassistant /srv/homeassistant
Next up is to create and change to a virtual environment for Home Assistant Core. This will be done as the homeassistant account.
sudo -u homeassistant -H -s
cd /srv/homeassistant
python3 -m venv .
source bin/activate
Once you have activated the virtual environment (notice the prompt change to (homeassistant) [email protected]:/srv/homeassistant $) you will need to run the following command to install a required Python package.
python3 -m pip install wheel
Once you have installed the required Python package, it is now time to install Home Assistant Core!
pip3 install homeassistant==2023.3.5
Start Home Assistant Core for the first time. This will complete the installation for you, automatically creating the .homeassistant configuration directory in the /home/homeassistant directory, and installing any basic dependencies.
You can now reach your installation via the web interface on http://homeassistant.local:8123.
If this address doesn’t work you may also try http://localhost:8123 or http://X.X.X.X:8123 (replace X.X.X.X with your machines’ IP address).
When you run the hass command for the first time, it will download, install and cache the necessary libraries/dependencies. This procedure may take anywhere between 5 to 10 minutes. During that time, you may get “site cannot be reached” error when accessing the web interface. This will only happen for the first time, and subsequent restarts will be much faster.
Help us to improve our documentation
Suggest an edit to this page, or provide/view feedback for this page.
Update: новая статья
У новых пользователей часто возникает вопрос — можно ли установить Home Assistant на Windows?
Конечно можно! Проблема заключается в том, что не все зависимости Home Assistant легко установятся на любую сборку Windows. Об этом можно почитать тут.
На портале уже была статья о подобной установке. В своей версии я чуть подробнее опишу детали.
Идём на сайт python и скачиваем последнюю на момент написания статьи версию. Можно скачать как обычную, так и 64-битную версию.


В процессе установки Python я встречал следующие проблемы:
- установка не стартовала на «голой» Windows 7 без важных обновлений — нужно обновить систему стандартным способом
- установка не завершалась с недоступным сайтом python (из-за РКН) — нужно отключить опции download debug…
Вот у вас и установлен Python.
Далее нажимаем на клавиатуре win R и запускаем cmd
В запустившейся консоли вводим :
pip install homeassistant
Вот у вас и установлен последний Home Assistant.
На этом этапе у вас не должно возникнуть особых проблем. Python и HA должны установиться в практически любую систему.
В той же консоли, что и ранее, просто вводим — hass.
Начнётся первый запуск HA. Он может быть достаточно долгим. HA будет скачивать и устанавливать разные библиотеки python, которые требуются конфигурации по умолчанию. А их не мало.
Плюс, если в процессе установки в вашей локальной сети обнаружатся поддерживаемые устройства — начнётся установка и их библиотек. В логе это отображается примерно так:
INFO (SyncWorker_1) [homeassistant.util.package] Attempting install of pychromecast==4.0.1
Вот на этом этапе вполне возможны проблемы и разные ошибки в консоли.
Терпеливо ждите пока HA делает свои дела. В идеале в конце лога вы должны увидеть строчку:
INFO (MainThread) [homeassistant.core] Starting Home Assistant
Далее попытайтесь открыть в любом браузере страницу:
http://localhost:8123/Вполне возможно у вас ничего не откроется. Это нормально.
План 2
Нажимайте в консоли Ctrl C, это принудительно остановит HA. Если не получится — закрывайте консоль и запускайте её заново.
И снова вводите в консоли — hass. И снова ждём строчку Starting Home Assistant и пробуем открыть в браузере:
http://localhost:8123/
План 3
Если со второй попытки страница так и не открылась — останавливаем HA и открываем папку с конфигами. Путь до неё показывается сразу после ввода команды hass. Это должно быть что-то вроде:
C:UsersAlexeyAppDataRoaming.homeassistant
Только с именем вашего пользователя. Проще вбить этот адрес сразу в проводнике Windows.
Теперь правим файл configuration.yaml.
Заменяем всё его содержимое на 3 простые строки:
config: frontend: system_health:
Это минимальный набор модулей, необходимый для старта HA и отображения главной страницы. Сильно сократит перечень зависимостей и повысит шансы старта.
Снова запускаем hass и пробуем открыть страницу.
PS
Это не все проблемы с которыми можно столкнуться. Но, надеюсь, вам хватит советов, описанных в статье.
На данный момент инструкция неактуальна. Текущие варианты установки можете посмотреть на официальном сайте HA.
В данной статье будет пошагово описан процесс установки home assistant на ПК под управлением Windows 10.
Важно отметить, что операционная система Windows не является основной для HA, что проявляется в неполной работоспособности программного обеспечения, в связи с чем установку HA на Win10 рекомендуется производить только для ознакомления с возможностями ПО.
Итак, приступим.
-
-
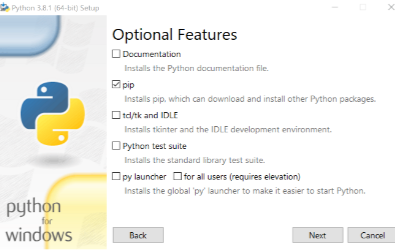
- Первым делом нам нужно установить Python. Идем на официальный сайт, выбираем последнюю версию, проматываем страницу вниз и выбираем нужный нам файл (например Windows x86-64 executable installer). Скачиваем и запускаем.
- При установке выбираем Customize installation -> на второй вкладке оставляем только pip -> на третьей выбираем Add Python to environment variables.

- После того, как Python установится запускаем командную строку: нажимаем Win и R, в появившемся поле вводим cmd и нажимаем Ок.
- Вводим в командной строке pip install homeassistant, нажимаем Enter и ждем пока все установится. В случае ошибок внимательно читаем и делаем что там будет написано. В моем случае не было Visual C++ 14.0. Для исправления – скачиваем Build Tools для Visual Studio с официального сайта, устанавливаем и перезагружаем ПК.

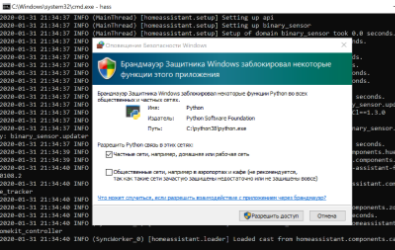
- Программа установлена и для запуска осталось ввести команду hass в командной строке. На данном этапе может появляться много ошибок, возможно придется прервать запуск (Ctrl+C) и запустить заново. Также брандмауэр может попросить разрешить доступ. Разрешаем. В самом конце запуска в консоли должна появиться строчка со следующим содержанием: INFO (MainThread) [homeassistant.core] Starting Home Assistant.
- Далее запускаем браузер и вводим localhost:8123. Если все сделано правильно, то откроется окно регистрации учетной записи. Если ничего не получилось, то попробуйте еще раз выполнить пятый пункт.
- Поздравляю, мы установили Home Assistant на ПК под управлением Windows 10.

-


Ссылки на другие уроки по настройке Home Assistant.
Hi all, I need your help with something. I’ve been running Home Assistant on a RasPi v3 for many months, and now I am looking to upgrade the hardware to running on Docker on a spare Windows 10 desktop (which I already have running for other purposes).
I went through the process of installing Docker and Home Assistant container already, but realized afterwards that this does not have the Supervisor section. I read up on various websites, since no single website seems to explain this clearly for intermediate techies like myself (I’m not familiar with the depth of linux, but I was able to set up Docker).
What I gather is that the Supervisor is a separate Docker container, that manages Home Assistant container, and any addons that you install and their containers.
———-
My question: How do I go about installing the Supervisor on Windows 10? I am not able to switch to Linux as a primary OS, but I am willing to try virtualizing (not a full VM, my system resources are tight) if need be.
I either need to know if it is not possible at all, or if it is, a good step by step guide that I can follow for setting up and configuring the Supervisor part of it (since I already have the core container installed).
———-
Update: I’ve decided to skip this entire headache, and upgrade to a RaspPi4 instead. Thanks all for the tips.
В последнее время, мне как-то надоедает включать свою домашнюю виртуализацию, базирующуюся на Debian 10 + Proxmox 6 и работать с VM из-под браузера. Может конечно если что-то масштабное, то да. А вот с целью побыстрее обкатать то можно на рабочем месте использовать Virtualbox (я против использования Hyper-V)
Итак, рабочая Windows 10 Pro (Version 10.0.18363.592)
Железо:
Intel® Core™ i3-2120 CPU @ 3.30GHzRAM: 8GbHDD: 250 SSD SamsungMotherboard: Asus P8H61-M LX3 R2.0
Шаг №1: На рабочую Windows 10 Pro устанавливаю VirtualBox 6.1.12 (VirtualBox-6.1.12-139181-Win.exe)
Шаг №2: Скачиваю с официального сайта Home Assistant на момент (05.08.2020) написания данной заметки vmdk файл hassos_ova-4.11.vmdk.gz (его вес 243 395 КБ), распаковываю получается файл hassos_ova-4.11.vmdk (его вес 752 128 КБ)
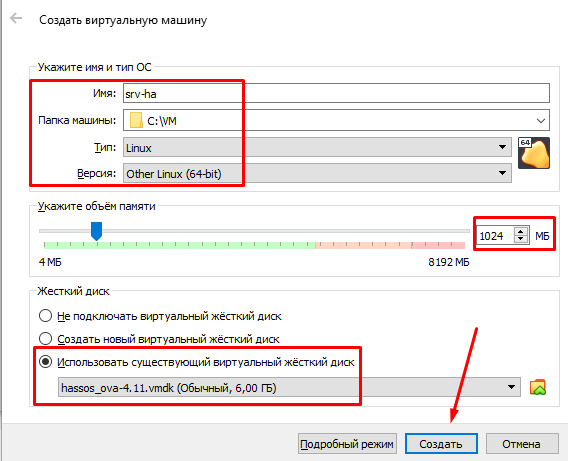
Шаг №3: Создаю VM через Virtualbox
Virtualbox – Машина – Создать
Имя: srv-haПапка машины: C:VMТип: LinuxВерсия: Other Linux (64-bit)
И нажимаю "Экспертный режим", указываю количество выделяемой данной VM оперативной памяти, к примеру 1024 и Жесткий диск выбираю "Использовать существующий виртуальный жесткий диск" — "Выбрать образ виртуального жесткого диска" – Добавить – выбираю распакованный в C:VMhassos_ova-4.11.vmdk и нажимаю "Открыть" — "Выбрать" — и нажимаю "Создать"
После пока VM еще выключена изменять (через меню "Настроить" на VM) тип сетевого адаптера с
Адаптер 1: Intel PRO/1000 MT Desktop (NAT)
На "Сетевой мост".
После запускаю VM путем нажатия на кнопку "Запустить"
На заметку: Если после запуска идет надпись в консоли VM "FATAL: No bootable medium found! System halted", то это значит нужно выключить VM: Машина – Завершить работу, открыть опять "Настроить" и в меню "Система" — вкладка "Материнская плата" и отменить галочкой
Включить EFI (только специальные ОС): включить галочкой
И нажимаю ОК, а затем нажимаю "Запустить". Вижу, как бегут строки загрузки VM
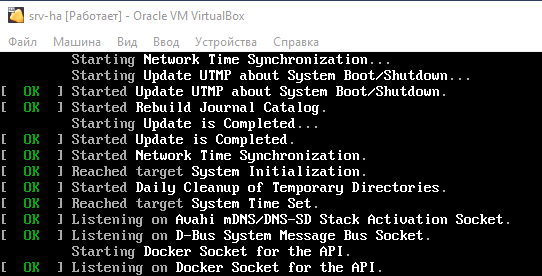
После в консоли нажимаю клавишу Enter и вижу приглашение на авторизацию:
homeassistant login: указываю учетную запись root
И нажимаю клавишу Enter
После вижу приглашение:
Welcome on Home Assistant command line
ha > В этой консоли нужно ввести слово "login":
# набираю команду nmcli и вижу свой IP адрес, полученный от моего DHCP-сервиса в локальной сети
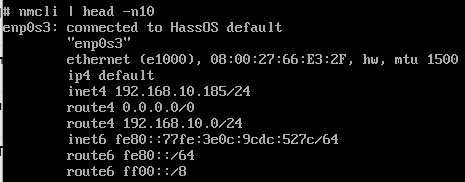
Шаг №4: Теперь зная этот адрес я могу в своей локальной сети обратиться к сервису Home Assistant посредством браузера через URL строку: http://IP&DNS:8123 (http://192.168.10.185:8123)
http://192.168.10.185:8123/onboarding.html — создаю первый раз учетную запись пользователя
Имя: ekzorchikЛогин: ekzorchikПароль: 712mbddr@Подтвердите пароль: 712mbddr@
И нажимаю "Создать учетную запись"
Именую свой Home Assistant: к примеру, как ekzhome
Часовой пояс: Europe/Moscow
И нажимаю "Далее" - "Готово"
После чего передо мной развернутый из заводского образа разработчиков система домашней автоматизации под Virtualbox операционной системы Windows 10 Pro. Когда у меня выдается свободные минуты я разбираю на работе что-то полезное для себя, как процесс самообразования:
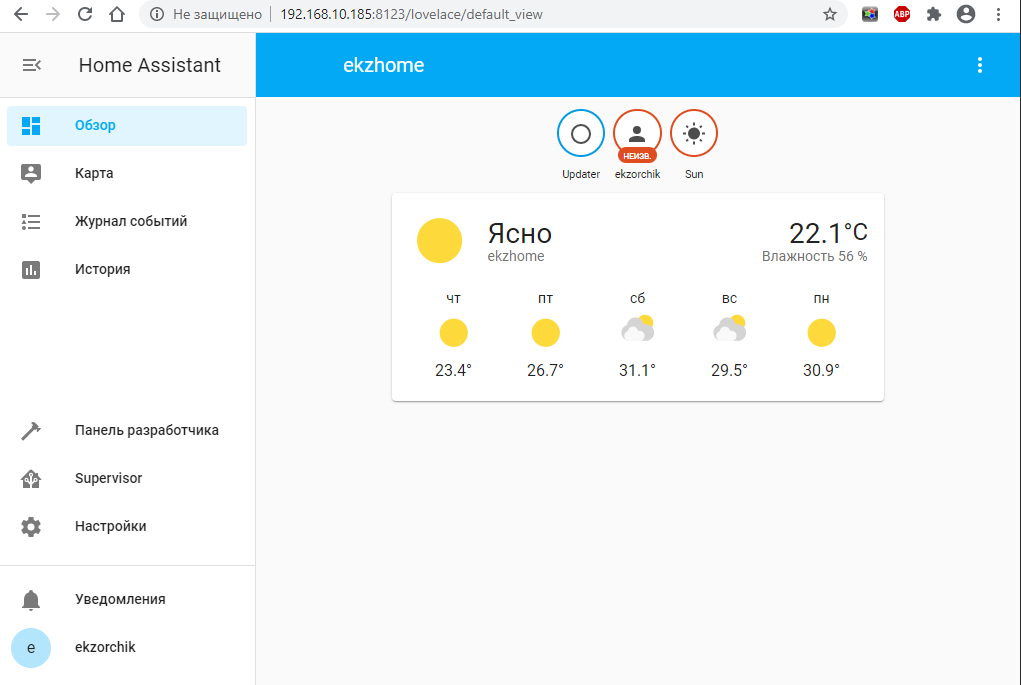
Итого я в шагах задокументировал для себя, как под Virtualbox быстро и легко развернуть Home Assistant дабы иметь тестовый полигон настройки чтобы в последствии переносить только реально работающие решения и не засорять боевую систему. Так делаю я, да это почти двойная работа, но что в эксплуатации не должно страдать от тестов. На этом моя заметка завершена, с уважением автор блога Олло Александр aka ekzorchik.
You can install Home Assistant using several different methods. I tried them all, for months, so you don’t have to do the same. Finally, I decided to stay with Home Assistant Supervised method as one of the easiest and probably the best one in my personal opinion.
Let me show it to you!
What will you find in the article?
In today’s article we will talk about some Pros and Cons of all of the Official Home Assistant installation methods. After that I will install Home Assistant Supervised on a Raspberry Pi 4 as example.
Home Assistant Supervised can be also run on Intel-NUC, Odroid, and x86 PCs. Supervisor menu and Add-Ons are also working.
So stay tuned for the Pros and Cons of all of the official Home Assistant Installation methods or skip directly to the Home Assistant Supervised.
Let’s go…
What are the official ways to install Home Assistant?
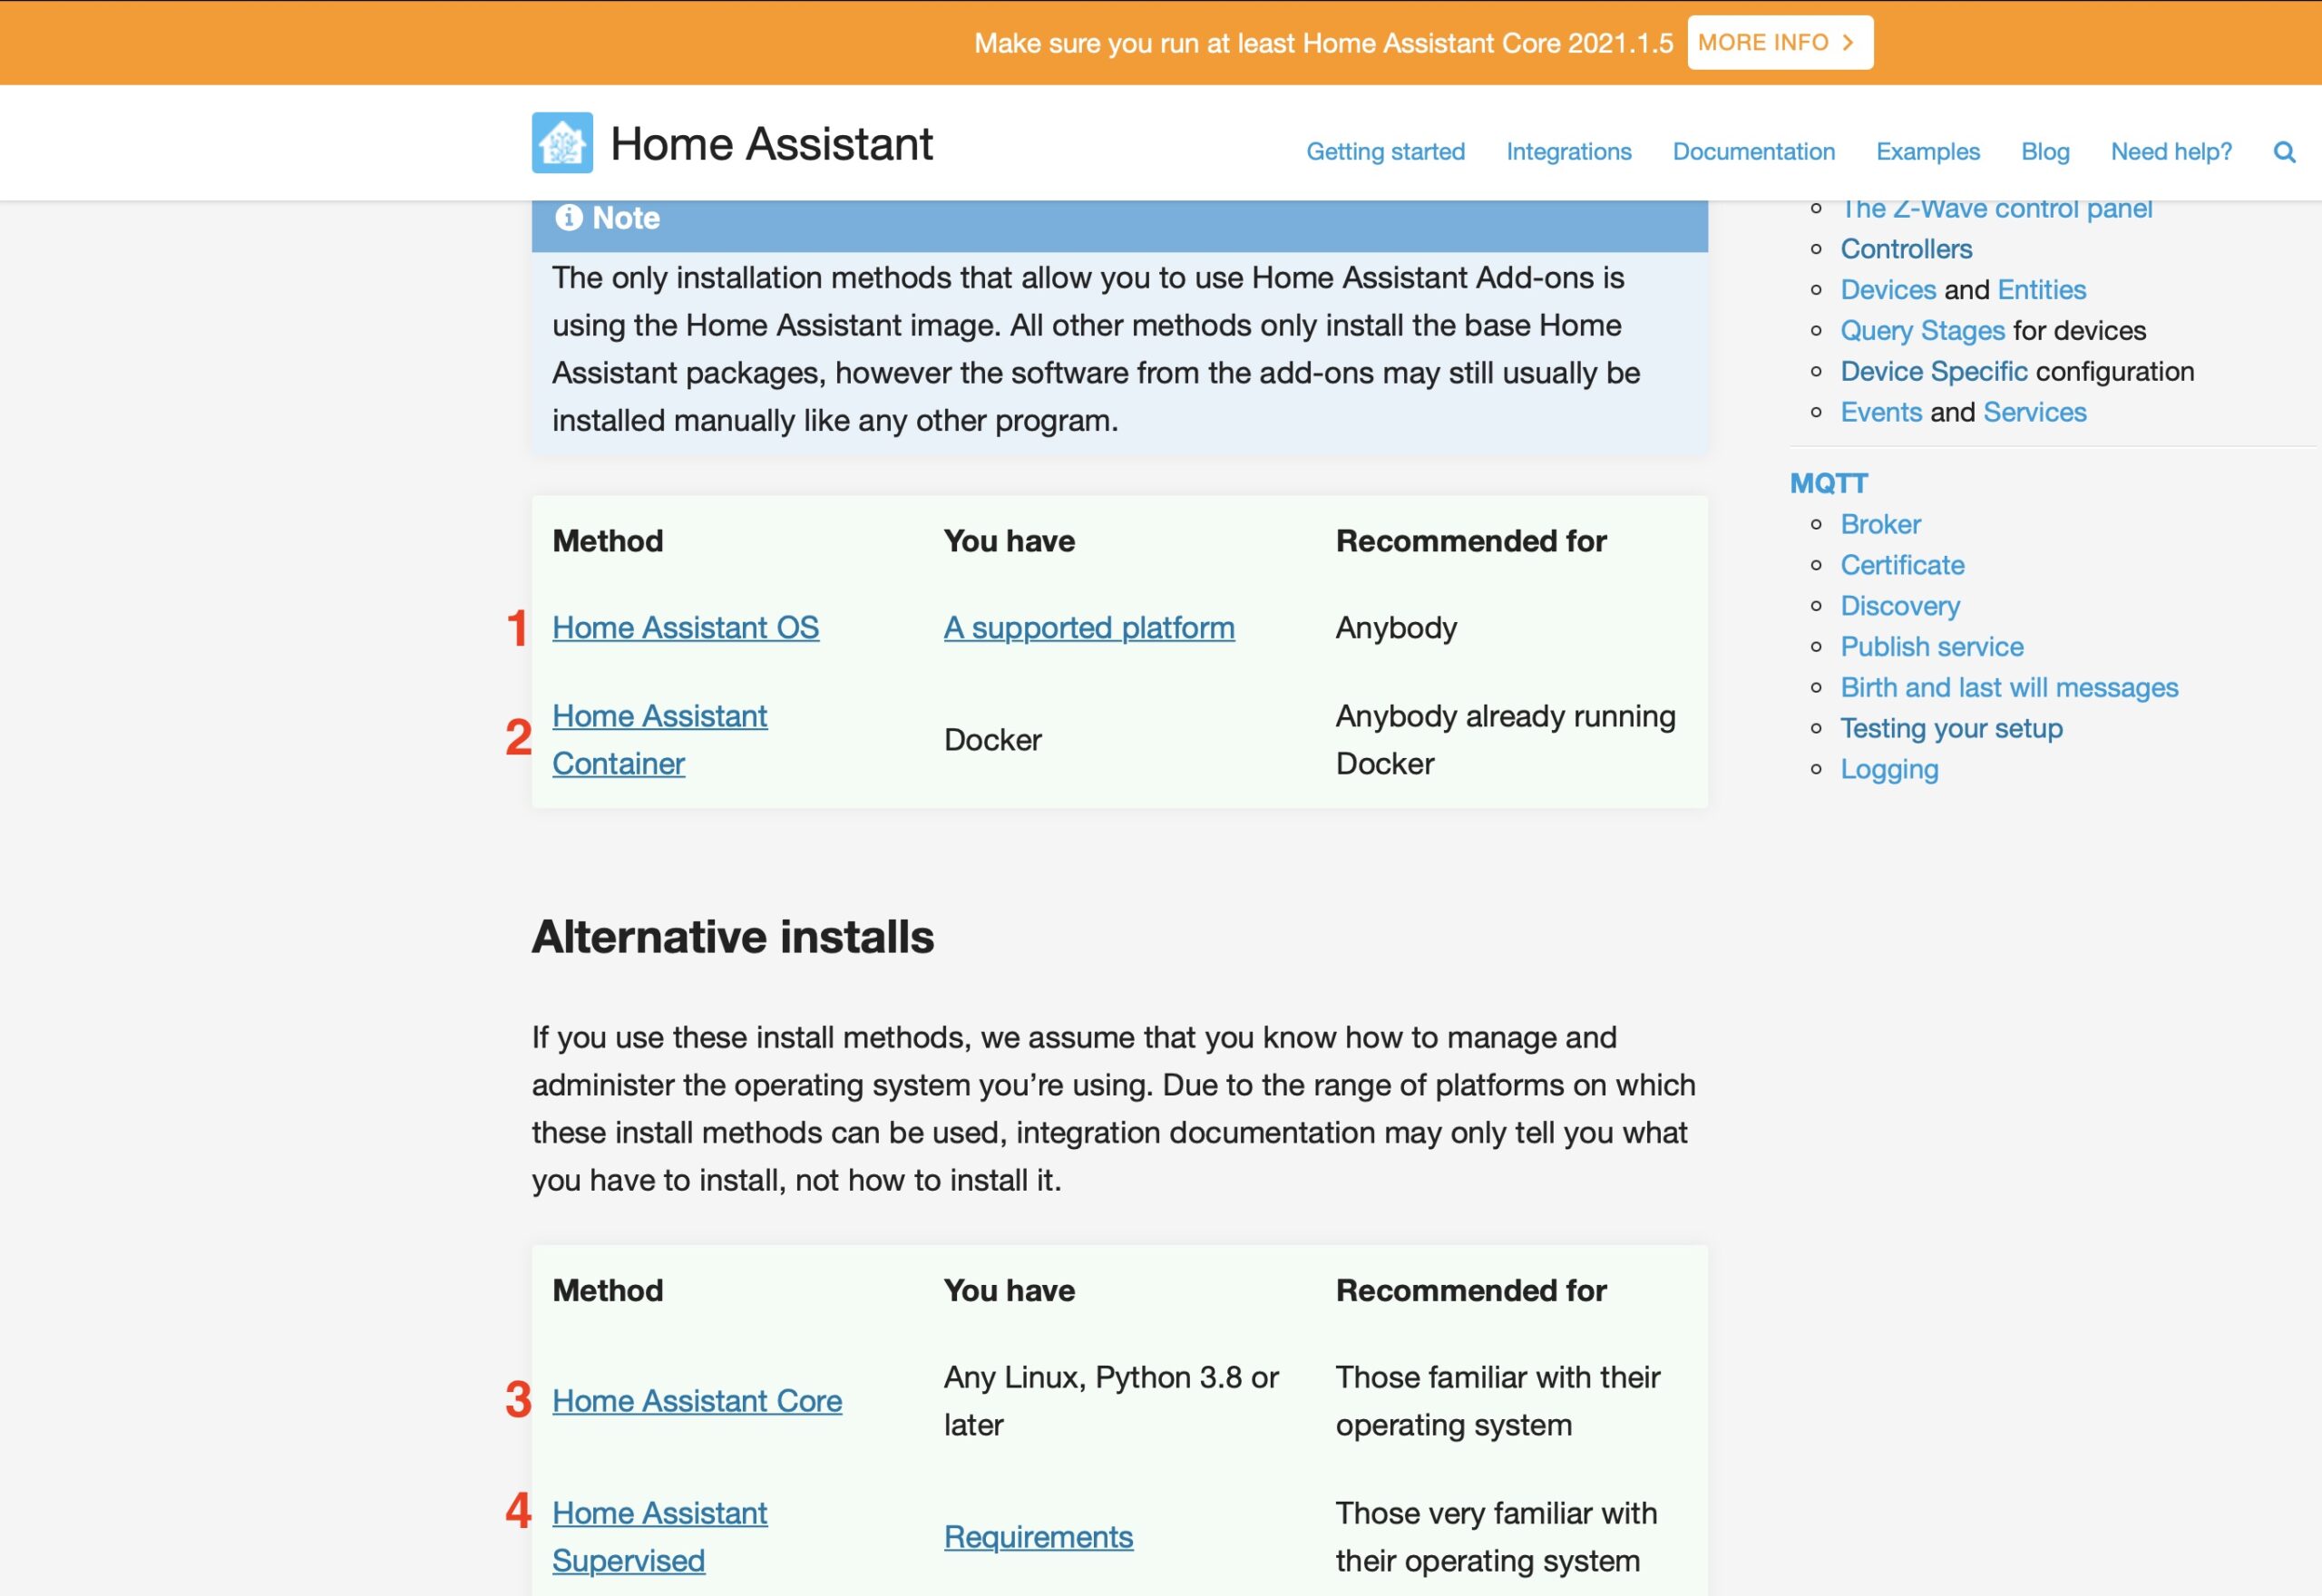
At the moment there are 4 official and supported ways to install Home Assistant:
- Home Assistant OS,
- Home Assistant Container,
- Home Assistant Core,
- Home Assistant Supervised.
All of them have some Pros and Cons.
Home Assistant OS method
The first official and supported installation method is called Home Assistant OS.
Home Assistant OS comes in a form of a ready to use images, that could be used on a Raspberry Pi, Intel-NUC, Odroid and so on. Or you can use this Home Assistant OS image to create a new Virtual Machine with VirtualBox or other similar software, exactly as I’m showing in this article 👇
The Pros here are a lot:
You’ll get fully functional Home Assistant with Supervisor menu and Add-ons, everything is supported and regularly updated.
As cons imagine the following scenario: If you boot the Home Assistant OS image let’s say on a Raspberry Pi or Odroid – you cannot use that device for almost anything else!
You get Home Assistant and that’s it!
Additionally you can install only the available Add-ons in the Supervisor store and nothing more.
If you want to have a Home Assistant dedicated device, then Home Assistant OS is probably the best installation method for you! Otherwise keep reading.
Home Assistant Container method
The second official and supported method to install Home Assistant is called Home Assistant Container.
Just like the Home Assistant OS I have a detailed tutorial about it that you can check right here👇
Home Assistant Container is really easy to install, everything is supported and regularly updated. The only requirement is to have up and running Docker client and Internet connection for the initial part.
If you want to quickly spin a new Home Assistant instance and remove it later without any complications this is the best way. I’m constantly using the Home Assistant Container method for my YouTube videos and the articles here, where I usually test something and then wipe everything and start all over again.
The big cons in Home Assistant Container is that you won’t get the Supervisor menu and Add-ons when using this method of Home Assistant installation.
Home Assistant Core method
Third method of the official and supported Home Assistant installations is called Home Assistant Core.
It is somehow similar to the Home Assistant Container, but this time Python virtual environment is used instead of Docker.
Again you will not have the Supervisor store and Add-ons. Also few more steps are needed for installing and updating in comparison to the Home Assistant Container method.
This method is the origin of the Home Assistant. I started with Home Assistant Core when I was a Home Assistant noob (back then it was called differently). I did my first steps using Home Assistant Core and this is how I got hooked to Home Assistant.
Later, I switched to the other methods and never looked back, but this Python based Home Assistant will always have a special place in my RAM ❤️
Home Assistant Supervised method
And the Forth and final method is called Home Assistant Supervised.
We have Supervisor menu and Add-ons here and we have the freedom to install Home Assistant Supervised on a lot of devices, without the requirement to dedicate them for Home Assistant only.
For example you can have a Raspberry Pi with Raspberry Pi OS on which you can watch YouTube videos and to have Home Assistant working in the background simultaneously.
But let’s see a real Home Assistant Supervisor installation on a Raspberry Pi right now.
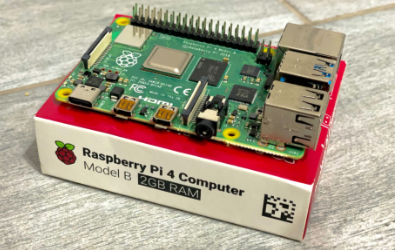
I will use Raspberry Pi 4 with 4GB of RAM with Raspberry PI OS running on a microSD card. You can use the same or you can use a SSD instead – exactly as described in this article👇
Of course you can use totally different device like Odroid, Intel NUC or even x86 or x86-64 desktop PC with Intel or AMD CPUs. As long as the device is having Debian or Debian based Linux distribution installed.
Home Assistant Supervised dependencies
These are dependencies needed to install Home Assistant Supervised. Do not worry that they are too much, we will install them all with several simple commands in a minute.
- jq
- wget
- curl
- avahi-daemon
- AppArmor
- udisk2
- libglib2.0-bin
- network-manager
- dbus
- Docker
- Debian Linux 11 aka Bullseye (no derivatives) or Debian Linux 10 aka Buster (Buster will be deprecated soon)
Quick examination on some of the dependencies:
- Docker – we will cover this in details in a minute.
- Debian linux – We will not meet this in this article! We will use Raspberry Pi OS, which is Debian based linux, just like Ubuntu, Linux Mint and tens or even hundreds of others. As a result we will se the following label inside our Home Assistant ⬇️
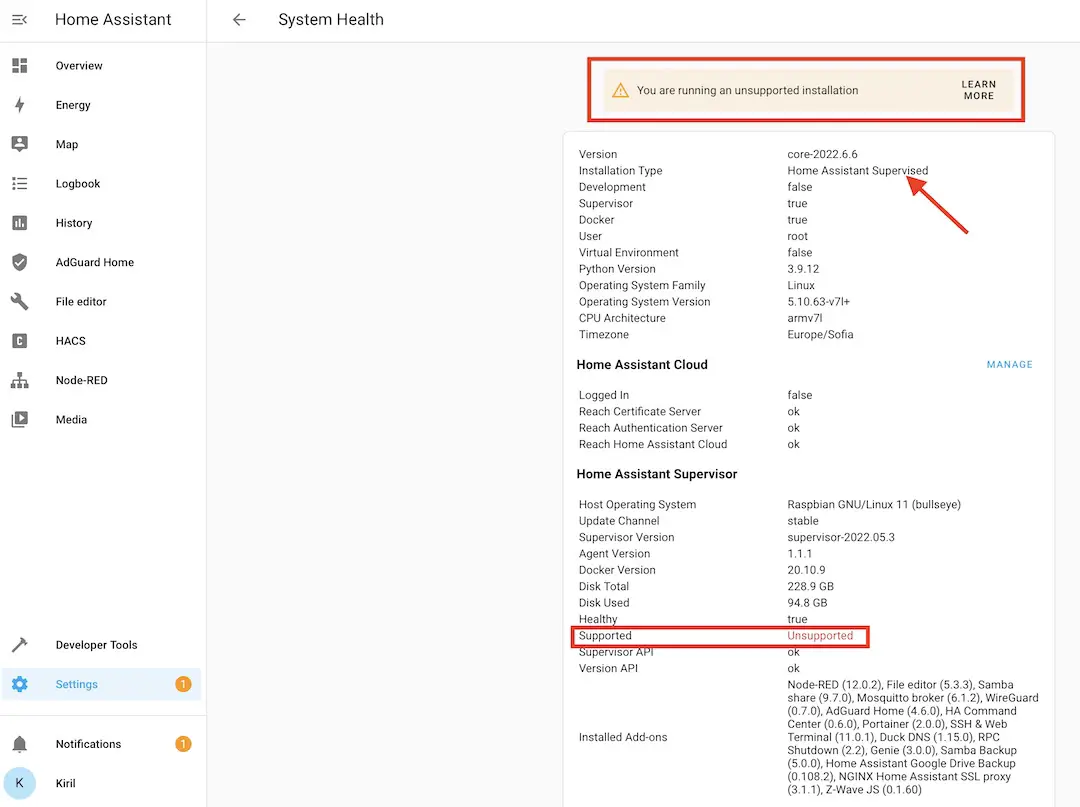
Don’t worry too much about that label. I’m having my production / main Home Assistant installed that way with the same label for years now and I can assure you that nothing bad happened to me or my Smart Home.
Of course, if you wish you can install Home Assistant Supervised on Debian with exact the same commands as I will use below and you won’t have that unsupported label. The choice is yours.
Let’s install the dependencies now.
Use LAN Cable or Disable Wi-Fi randomization during the Home Assistant Supervised installation
Before you continue further I highly recommend to either plug the ethernet cable in your Raspberry Pi or to Disable Wi-Fi randomization. This is because the Raspberry Pi constantly change its IP when you are on Wi-Fi and you are messing with the network or rebooting.
Choose either of the following options and do it:
- Connect your device to your local network with Ethernet cable. Ethernet cable is only needed during the Home Assistant supervised installation and you can go wireless again afterwards.
- The other option is to Disable WiFi MAC randomization. This options is suggested from JH in the comments below, so all the credits goes to him 👍. To disable the WiFi MAC randomization, create the following file using the this command:
sudo nano /etc/NetworkManager/conf.d/100-disable-wifi-mac-randomization.confand paste the following content inside:
[connection]
wifi.mac-address-randomization=1
[device]
wifi.scan-rand-mac-address=no
Save the changes and continue.
Install Home Assistant Supervised dependencies
Connect to the device where Home Assistant Supervised will be installed or open a Terminal there and execute the following to update your Operating System:
sudo apt-get update && sudo apt-get upgrade -yThen, Install AppArmor, Network Manager, jq and the other dependencies:
sudo apt-get install jq wget curl avahi-daemon udisks2 libglib2.0-bin network-manager dbus apparmor -y
There is a chance to to receive some errors for missing dependencies. If that is the case try the following command:
sudo apt --fix-broken installAnd reboot your device:
sudo rebootWhen everything is fine with the above installation of the needed Home Assistant Supervised dependencies, you can continue with the Docker installation.
Install Docker
Docker is the next thing that is needed for Home Assistant Supervised.
I will show you how to install it on a Raspberry Pi. If you have different device go to docker.com and check which is the best way to install it for your setup.
For the Raspberry Pi, execute the following to get the official Docker installation script:
curl -fsSL https://get.docker.com -o get-docker.shAfter that, start the script and enjoy the ride:
sudo sh get-docker.shWe have to add our linux user to the Docker group, but that is easy. If your user is not pi as in the example below, just change the last part of the command by replacing pi with your username:
sudo usermod -aG docker piAlternative way to install Docker on other than Raspberry Pi OS
If you are not on Raspberry PI, try the following command which will download and install Docker on your Linux.
curl -fsSL get.docker.com | shHow to check if Docker is installed correctly?
When everything above is finished, you can check if Docker is working by typing the following command:
docker --versionIf you see some digits showing your Docker version, then you can continue forward as Mel Gibson in Brave Heart movie (but without the unhappy end).

Install Agent for Home Assistant OS
This Home Assistant Agent was introduced by the HA crew not so long ago. The Home Assistant OS Agent is used for better communication between the host OS and the Supervisor and can enable new features. So, just install it and benefit later when there is something to benefit…
Download the latest Debian package from the Home Assistant OS Agent GitHub page at:
https://github.com/home-assistant/os-agent/releases/latest
For Raspberry Pi 4 the needed package and the commands to download and install this package are the following.
wget https://github.com/home-assistant/os-agent/releases/download/1.2.2/os-agent_1.2.2_linux_armv7.debsudo dpkg -i os-agent_1.2.2_linux_armv7.debTIP!: Have in mind that when you are doing this the current version may be higher (not 1.2.2 as stated above). Just get the latest version from the first link in this section..
Another example, if you are using regular 64bit desktop you have to execute the following command. And before that you have to get the respective package (os-agent_1.2.2_linux_x86_64.deb):
sudo dpkg -i os-agent_1.2.2_linux_x86_64.debNo matter are you using Raspberry Pi OS or not you can check if the Agent for Home Assistant OS is installed correctly by executing this:
gdbus introspect --system --dest io.hass.os --object-path /io/hass/osif you receive answer (in my case it was a lot of text starting with node /io/hass/os…) you are just fine.
Official Home Assistant Supervised installer
Finally, it is time to install Home Assistant Supervised.
We will use the official installer coming from the Home Assistant developers. That means this script will most probably stay around for more than a minute.
At the end of the day everything is official here. Including my newsletter, where you can receive articles like this one on a weekly basis.
Now Let’s go:
Get the official Home Assistant Supervised installer script:
wget https://github.com/home-assistant/supervised-installer/releases/latest/download/homeassistant-supervised.debThen install the package:
sudo dpkg -i homeassistant-supervised.deb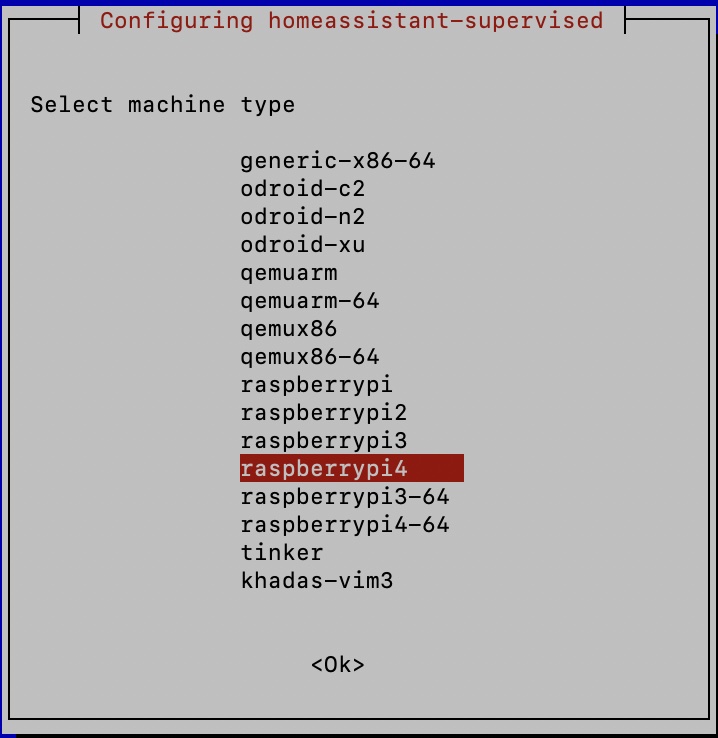
You will see a dialog asking you to select machine type:
These are the Home Assistant installer supported machine types:
| generic-x86-64 | qemux86-64 |
| odroid-c2 | raspberrypi |
| odroid-n2 | raspberrypi2 |
| odroid-xu | raspberrypi3 |
| qemuarm | raspberrypi4 |
| qemuarm-64 | raspberrypi3-64 |
| qemux86 | raspberrypi4-64 |
| tinker | khadas-vim3 |
TIP!: For example if you have x86-64 computer (these are most of the modern Intel or AMD CPUs) you have to select generic-x86-64.
After installation of the homeassistant-supervised.deb has finished you should see something similar:
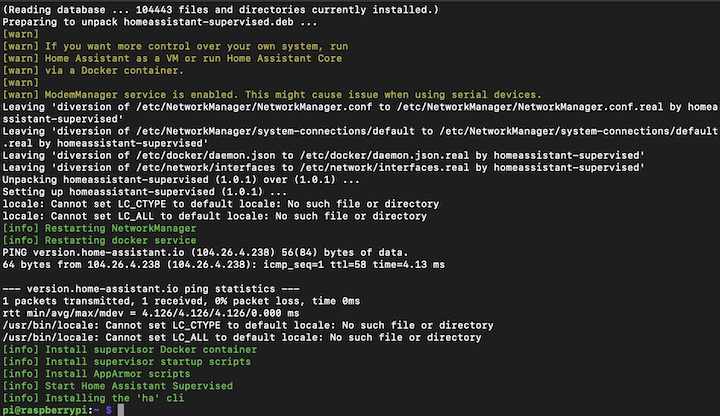
First start of the Home Assistant supervised will take some time. After a minute or 5 or even 10 (be patient here) you can try to open a new browser/tab and type your device IP on port 8123 (default Home Assistant port). Example: 192.168.0.2:8123
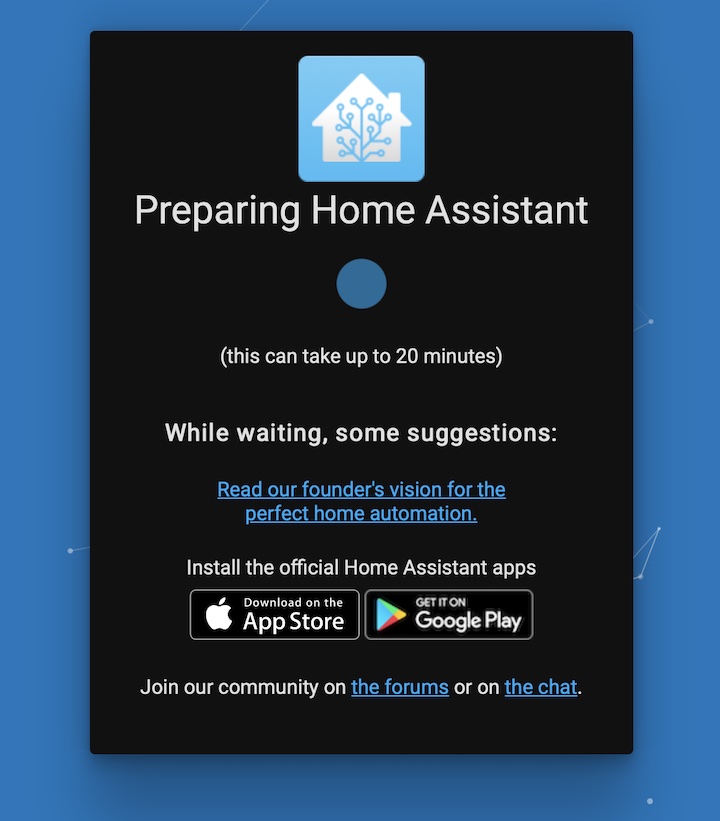
If everything is successful, you should see the following screen:
That means everything is fine and you just have to wait some more 🤣 (around 20 minutes) for everything to finish.
At the end you will see the Home Assistant welcome screen and initial wizard where you can create a Home Assistant user, set a location, add discovered devices and so on.

Home Assistant is running now what?
Now, when you have your Home Assistant up and running it is possible and pretty normal to don’t know what to do next. Don’t worry, I’m here to help. You can check:
- My YouTube Home Assistant Playlist – LINK
- Or my Home Assistant category here in my website – LINK
Choose something from the above links and try to implement it. If you face any difficulties you can always reach out in the comments or in my Discord server or in Twitter.
What is the best Home Assistant installation?
While you are still waiting for the Home Assistant Supervisor installation to finish. Can you tell me which of the official Home Assistant installation is best for you and why in the comments section below.
I promise to respond you back.
Home Assistant Supervised Final Thoughts
As every other method Home Assistant Supervised is having some Cons.
If you don’t want to see the unsupported label in Home Assistant you have to use exactly Debian Linux and nothing else. Although, I didn’t find any differences between running Home Assistant on Debian and Raspberry Pi OS for example.
Also as you have full control over your OS you could easily break your Home Assistant installation by installing or removing some software. So you have to be a little bit more careful with that.
And pretty much that’s it, I didn’t find any other major cons of Home Assistant Supervised till now. If you know about some, let me know in the comments it will be very interesting to see them.
By the way, if you want to join a free Home Assistant webinar where I’m discussing the 4 official ways + 1 super easy and quick way to have Home Assistant – go to the link below and register to get instant access!

Stay safe and don’t forget – Home Smart, But Not Hard!
Thank you for reading, and I will see you in the next article.
Содержание
- Windows
- Install Home Assistant Operating System
- Download the appropriate image
- Create the Virtual Machine
- Hypervisor specific configuration
- Start up your Virtual Machine
- Install Home Assistant Core
- Install dependencies
- Create an account
- Create the virtual environment
- Home Assistant. Обновление Python
- Исходные данные
- Обновление Python
- Переустановка Home Assistant
- 6 комментария на «Home Assistant. Обновление Python»
- Home Assistant перфекциониста. Часть 1: знакомство, железо, установка
- Знакомство
- Железо
- Установка
Windows
Install Home Assistant Operating System
Follow this guide if you want to get started with Home Assistant easily or if you have little to no Linux experience
Download the appropriate image
Create the Virtual Machine
Load the appliance image into your virtual machine software. (Note: You are free to assign as much resources as you wish to the VM, please assign enough based on your add-on needs)
Minimum recommended assignments:
All these can be extended if your usage calls for more resources.
Hypervisor specific configuration
- Create a new virtual machine
- Select “Other Linux (64Bit)
- Select “Use an existing virtual hard disk file”, select the VDI file from above
- Edit the “Settings” of the VM and go “System” then Motherboard and Enable EFI
- Then “Network” “Adapter 1” Bridged and your adapter.
- Create a new virtual machine in virt-manager
- Select “Import existing disk image”, provide the path to the QCOW2 image above
- Choose “Generic Default” for the operating system
- Check the box for “Customize configuration before install”
- Select your bridge under “Network Selection”
- Under customization select “Overview” -> “Firmware” -> “UEFI x86_64: …”.****
- Create a new virtual machine
- Select “Custom”, make it compatible with the default of Workstation and ESX
- Choose “I will install the operating system later”, select “Linux” -> “Other Linux 5.x or later kernel 64-bit”
- Select “Use Bridged Networking”
- Select “Use an existing virtual disk” and select the VMDK file above,
After creation of VM go to “Settings” and “Options” then “Advanced” and select “Firmware type” to “UEFI”.
- Create a new virtual machine
- Select “Generation 2”
- Select “Connection -> “Your Virtual Switch that is bridged”
- Select “Use an existing virtual hard disk” and select the VHDX file from above
After creation go to “Settings” -> “Security” and deselect “Enable Secure Boot”.
Start up your Virtual Machine
- Start the Virtual Machine
- Observe the boot process of Home Assistant Operating System
- Once completed you will be able to reach Home Assistant on homeassistant.local:8123. If you are running an older Windows version or have a stricter network configuration, you might need to access Home Assistant at homeassistant:8123 or http://X.X.X.X:8123 (replace X.X.X.X with your ’s IP address).
With the Home Assistant Operating System installed and accessible you can continue with onboarding.
Install Home Assistant Core
This guide assumes that you already have an operating system setup and have installed Python 3.8 (including the package python3-dev ) or newer.
Install dependencies
Before you start make sure your system is fully updated, all packages in this guide are installed with apt , if your OS does not have that, look for alternatives.
Install the dependencies:
Create an account
Add an account for Home Assistant Core called homeassistant . Since this account is only for running Home Assistant Core the extra arguments of -rm is added to create a system account and create a home directory.
Create the virtual environment
First we will create a directory for the installation of Home Assistant Core and change the owner to the homeassistant account.
Next up is to create and change to a virtual environment for Home Assistant Core. This will be done as the homeassistant account.
Once you have activated the virtual environment (notice the prompt change to (homeassistant) [email protected]:/srv/homeassistant $ ) you will need to run the following command to install a required Python package.
Once you have installed the required Python package it is now time to install Home Assistant Core!
Start Home Assistant Core for the first time. This will complete the installation for you, automatically creating the .homeassistant configuration directory in the /home/homeassistant directory, and installing any basic dependencies.
You can now reach your installation via the web interface on http://homeassistant.local:8123 .
When you run the hass command for the first time, it will download, install and cache the necessary libraries/dependencies. This procedure may take anywhere between 5 to 10 minutes. During that time, you may get “site cannot be reached” error when accessing the web interface. This will only happen for the first time, and subsequent restarts will be much faster.
Home Assistant. Обновление Python
Если вы пользуетесь Home Assistant, то после очередного обновления могли заметить на появившееся уведомление о том, что «Support for the running Python version 3.7.3 is deprecated and will be removed in the first release after December 7, 2020. Please upgrade Python to 3.8.0 or higher».
В стандартных системных репозиториях обычно содержатся стабильные и надежные версии пакетов, а не самые свежие и актуальные. И по состоянию на середину января 2021 года Python в репозиториях Debian и Ubuntu так и не спешат обновлять до версии 3.8.x.
Поэтому единственный вариант убрать назойливое уведомление и избавить себя от возможных проблем с совместимостью грядущих обновлений Home Assistant – это установить новую версию Python вручную, предварительно собрав ее из исходников.
Исходные данные
В этой статье я буду исходить из того, что:
- У вас уже установлен Home Assistant
- Он установлен в виртуальное окружение Python
- Используется операционнная система на базе Debian или Ubuntu
Если вы пользуетесь Docker-контейнерами или дистрибутивом Hass.io, то обновлять пакеты вручную вам не придется.
Обновление Python
Установим нужные для сборки из исходников пакеты:
Скачаем и распакуем архив с Python 3.9.1:
Соберем его из исходников и запустим установку:
Процесс сборки занимает около 12 минут на Raspberry Pi 4, поэтому придется запастись терпением.
После завершения установки можно проверить, что Python действительно обновился путем выполнения двух команд:
И если в консоли появится такие ответы, то процесс обновления прошел успешно:
 Теперь обновим менеджер пакетов pip:
Переустановка Home Assistant
Теперь переустановим Home Assistant. Для этого сохраним в файл список используемых им пакетов Python:
Удалим директорию с установленным Home Assistant и создадим ее заново:
Запустим процесс установки по сохраненному ранее списку пакетов:
И, наконец, перезапустим сервис Home Assistant:
На этом процесс обновления завершен окончательно, и после перезапуска из панели уведомлений должно исчезнуть сообщение о неподдерживаемой версии Python.
6 комментария на «Home Assistant. Обновление Python»
Эта переустановка не сбросит настроенные автоматизации и прочие настройки, в том числе панели отображения?
Нет, настройки хранятся в /home/homeassistant/.homeassistant, а тут затрагивается только /srv/homeassistant.
Но резервную копию все равно сделать стоит.
Видимо часть
sudo ln -s /usr/local/bin/python3.9 /usr/bin/python3.9
echo “alias python=/usr/local/bin/python3.9” >>
/.bashrc
echo “alias python3=/usr/local/bin/python3.9” >>
/.bashrc
важна для изменения системных параметров версии.
И в вашем туториале по обновлению hass не сработала строка:
sudo /srv/homeassistant/bin/python3.9 -m pip install –upgrade pip
пока не поменял ее на:
sudo /srv/homeassistant/bin/python3 -m pip install –upgrade pip
В дальнейшем при использовании
pip3 freeze –local > requirements.txt
Usage:
pip3 freeze [options]
no such option: -o
и на месте requirements.txt получаю пустой текстовый файл, что соответственно при попытке установить hass заново с помощью этого списка пакетов не приводит ни к чему.
Устанавливал заново по предыдущему вашему туториалу. Вроде бы всё заработало со старыми настройками. Версия hass 2021.2.3
N
Все сделал по Вашим рекомендациям
В конце просит ввести пароль .Перепробовал все -не подходят
Какой пароль нужно вводить
“В конце” – это при выполнении команды “sudo systemctl restart home-assistant@homeassistant”?
Нужно ввести пароль от суперпользователя. Возможно он не задан у вас в системе. В таком случае задайте его, выполнив команду “sudo passwd”.
Проверил инструкцию на свежеустановленной Raspberry Pi OS (Raspbian) – все по-прежнему актуально. Разве что сам Python обновился с 3.9.1 до 3.9.2.
Home Assistant перфекциониста. Часть 1: знакомство, железо, установка


Знакомство
Добавляя очередное, только что приобретенное, устройство в HA, я понял, что так дальше продолжаться не может и архитектура моего проекта должна быть переписана с чистого листа. Мой зоопарк устройств насчитывает не так много жителей, всего около 30 различных лампочек, кнопочек, датчиков и прочих вещей, которых, раз вы читаете эту статью , и в вашем доме не меньше. Home Assistant дает огромные, если не безграничные, возможности для реализации управления своим умным домом, но в этом и кроется проблема, так как нет единых стандартов, даже нет примеров как «хорошо» и как «плохо», и вы вольны творить то, что вашей душе угодно, пока весь ваш проект превращается в одну большую свалку, где все автоматизации и компоненты живут своей жизнью, а не являются частью однородной системы.
Железо
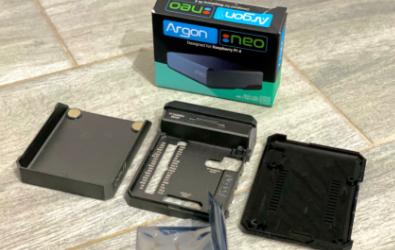
Конечно же, не забудем про корпус, ибо внешний вид никто не отменял. На KickStarter представили еще один очень крутой корпус от Cooler Master, но пока он только едет и не известно, когда придет. Поэтому пока воспользуемся Argon Neo, один из самых красивых, как по мне, и подходящих под наши задачи корпус (потому как Argon One, например, больше предназначен как компьютерный корпус, а не серверный).
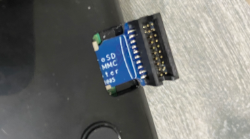
Собираем это все в единую кучу и немного огорчаемся, потому как переходник не влезает в корпус, но быстро находим кусок наждачной бумаги, подсточим края и все влезает (возможно, позже перепаяю это соединение, либо заверну в термоусадочную трубку, но на время тестов оставим так).


Установка
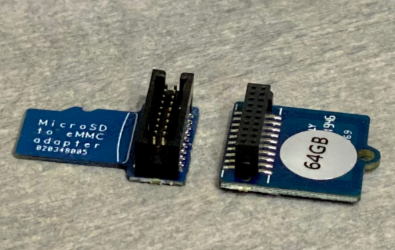
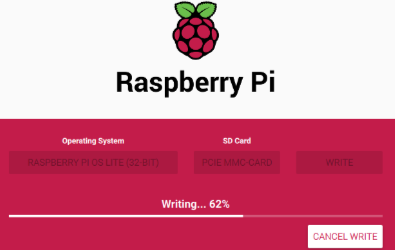
Первая проблема, с которой вы столкнетесь, если будете использовать eMMC память — ее поддержку добавили только с недавним обновлением bootloader’а, так что для начала необходимо будет обновить его. Есть несколько вариантов как это сделать, я выбрал самый простой и воспользовался утилитой Raspberry Pi Imager. Берем обычную карту памяти (которая работает в raspberry без танцев с бубном), подключаем к компьютеру, устанавливаем и открываем утилиту, там идем по пути » Choose OS -> Misc utility images -> Raspberry Pi 4 EEPROM boot recovery » и записываем образ на карту памяти. После этого вставляем в вашу малинку, подключаем питание, ждем пока зеленый светодиод не начнет мигать (около 10 секунд) — все, загрузчик обновлен, можно двигаться дальше.
Наконец подготовительные работы закончены и мы перейдем к пункту, который охватит большую часть читателей. Установка Home Assistant. Перепробовав разные способы за длительное время — от HassOS до голой установки HA Core, я сделал следующие выводы по каждому из способов.
- Home Assistant OS — должен использоваться тем, кто впервые сталкивается с HA, так как иначе справиться с наплывом информации весьма проблематично. По сути, единственный минус, который вы получаете при таком варианте установки — у вас нет возможности пользоваться операционной системой как линуксом, от слова совсем, нельзя установить никакие дополнительные программы, пакеты, надстройки напрямую в ОС.
- Home Assistant Container — лучший вариант, если вы хотите абсолютного контроля над каждым программным компонентом на вашем сервере. Вы всегда контролируете к каким данным, интерфейсам, портам имеет доступ любой из контейнеров. Но это так же и главный минус, так как вы очень сильно теряете в удобстве, у вас больше нет вкладки Hassio и вы один в поле, любой addon (к примеру, zigbee2mqtt, node-red, mosquitto и тд) вам придется устанавливать, настраивать и интегрировать это все в контейнер Home Assistant вручную. Лично мне этот вариант нравится идеей, но сам я не смог протянуть, слишком много времени необходимо уделять на то, что при обычном раскладе делается одной кнопкой.
- Home Assistant Core — самый странный вариант из всех. Произведя установку данным способом, вы лишаетесь все того же пресловутого hassio со своим магазином (все те минусы, что были описаны выше), так еще и полностью засорите вашу основную систему (в отличии от варианта с докер контейнером, где система остается первозданно чистая).
- Home Assistant Supervised — вариант, если мы хотим удобства базовой Home Assistant OS, но при этом нужен доступ к операционной системе. Магазин Hassio доступен только при установке этим и базовым способами. К минусам можно отнести то, что нужно соблюдать некоторые требования и быть весьма аккуратным при работе в основной операционной системе, так как supervised решение устанавливает все пакеты прямо внутрь вашей ОС.
Мой выбор остановился на Supervised вариации, хотя концептуально очень нравится контейнерное решение, может однажды я решусь и перейду на него, но пока что удобство берет верх.
Хорошо, с вариацией мы определились. Теперь приступим к самой установке. Для начала определимся с дистрибутивом. Мне лично больше нравится Ubuntu, по разным причинам, это дело каждого, и на Ubuntu есть возможность поставить HA Supervised. Но я столкнулся с большим количеством проблем уже после установки, в виде неработающего network manager и некоторыми незначительными, но вплоть до сегодняшнего дня я пользовался именно такой версией. Сегодня мы попробуем максимально приблизиться к официально поддерживаемой установке, хотя и осознанно будем нарушать правила. Информацию о том, как сделать установку официально поддерживаемой, можно найти тут. Если вы прочитаете требования, которые там предоставлены, то увидите пункт » Debian Linux Debian 10 aka Buster (no derivatives) «, то есть Raspbian не является поддерживаемой ОС. Подумав, я принял решение все же ставить Raspbian, так как в ней заложено и настроено много софта для работы с Raspberry Pi (обновления загрузчика, настройки, управление внутренними регистрами, конфигами и тп), при этом Lite версия ничем не отличается от голой установки Debian 10.
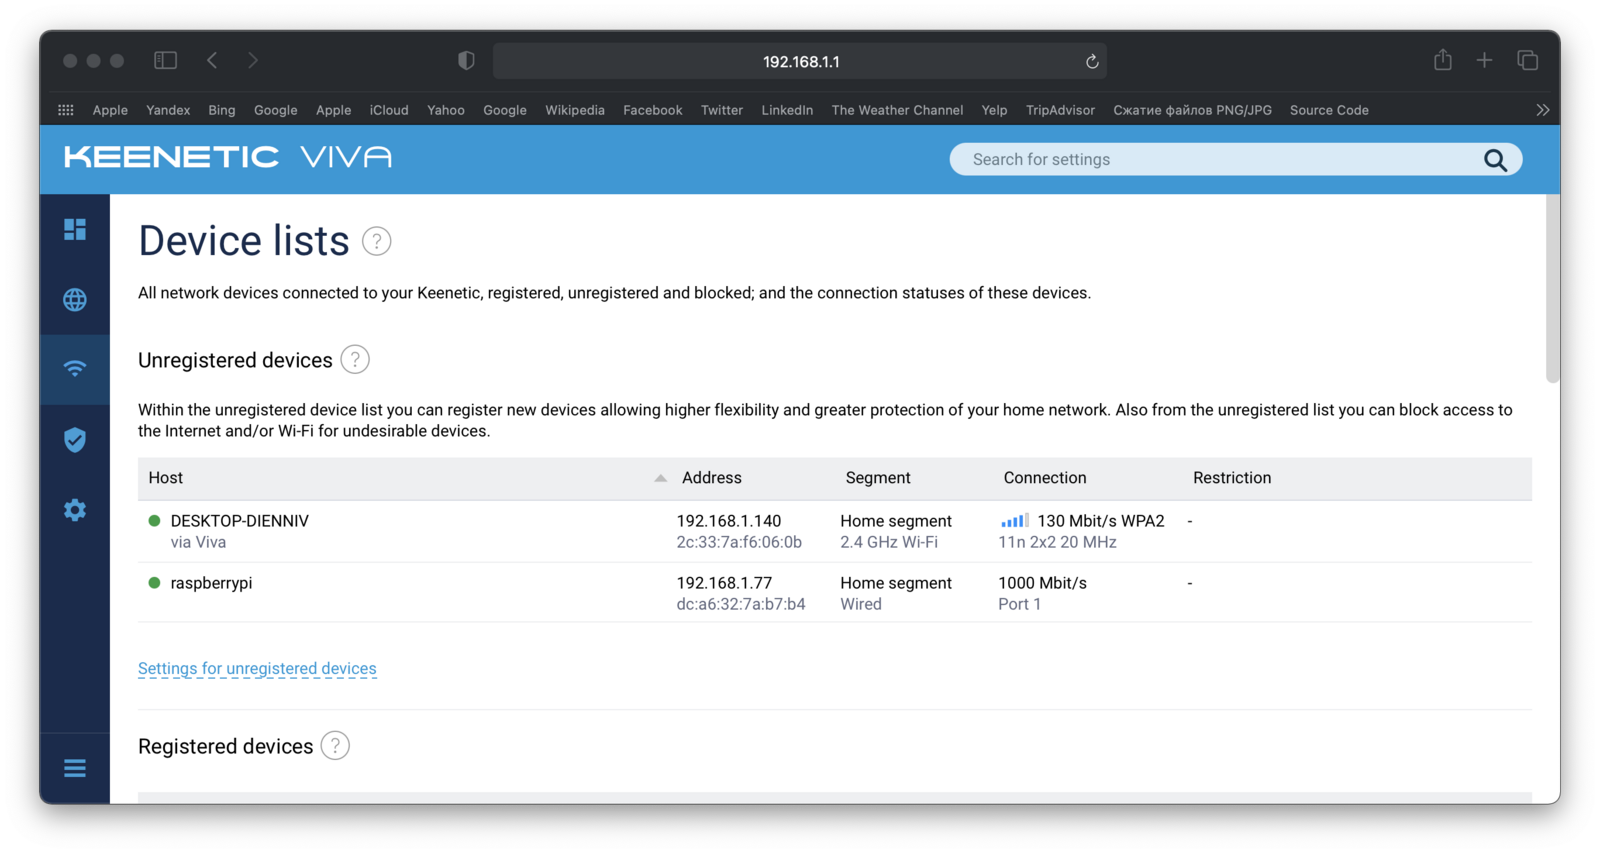
Вставляем карточку в малинку, подключаем по ethernet к роутеру/маршрутизатору (да, никакого wifi не будет, лично мне дополнительные задержки в связи устройств абсолютно не нужны). Смотрим, какой присвоился локальный ip адрес. Открываем консоль и пишем ssh pi@ip.ip.ip.ip, подтверждаем обмен ключами и далее вводим стандартный пароль raspberry.
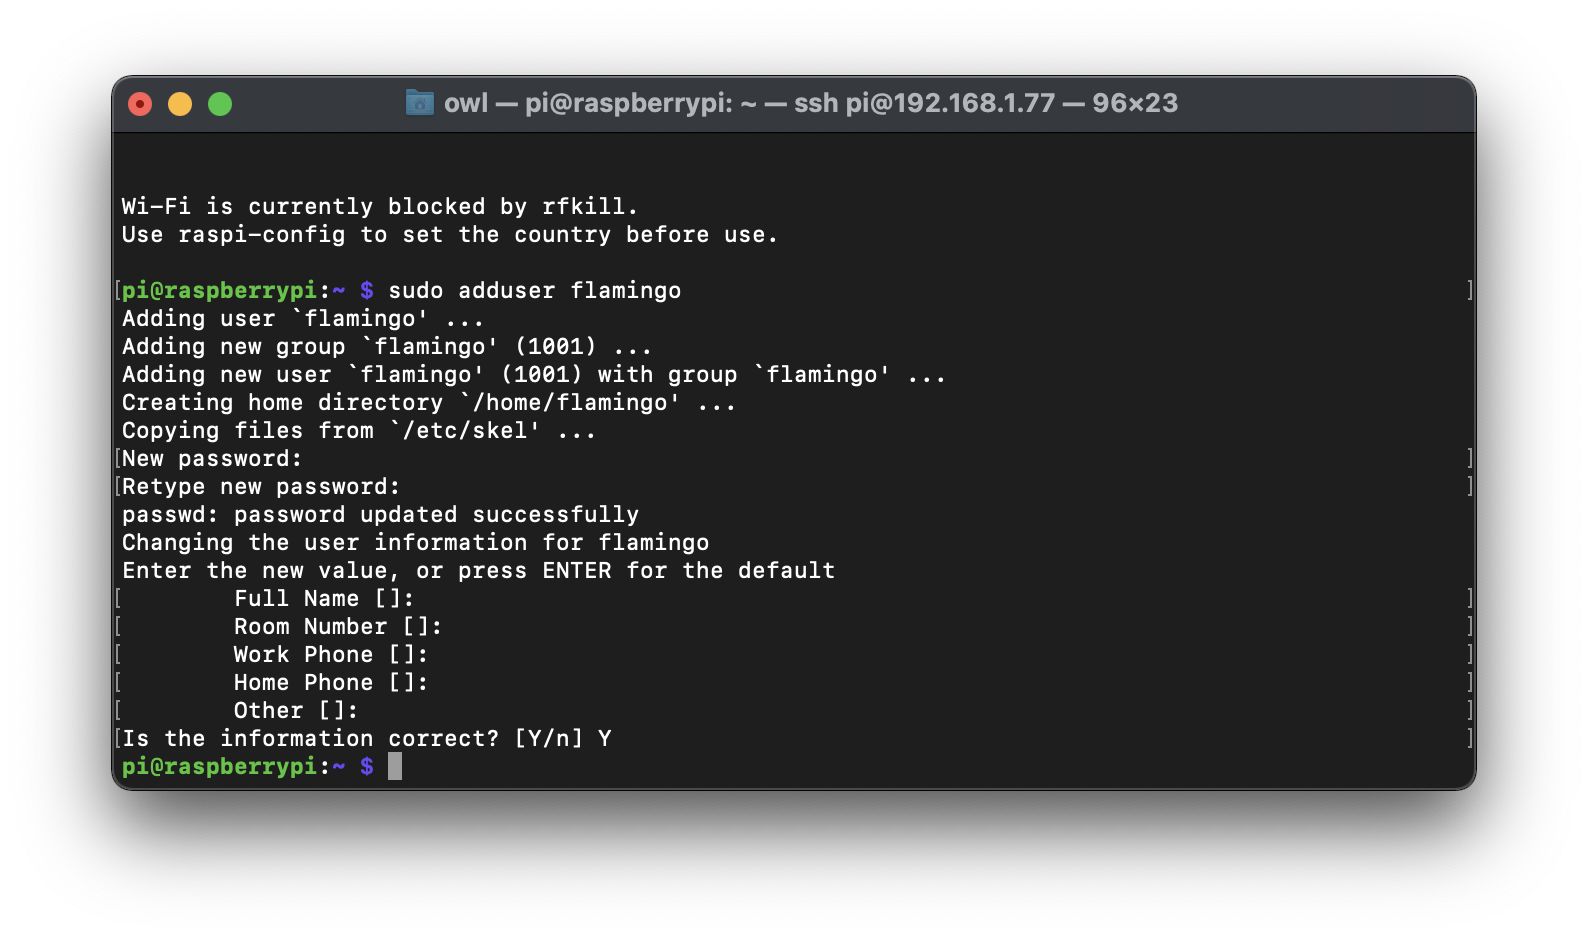
Теперь открываем конфигуратор Raspberry, командой
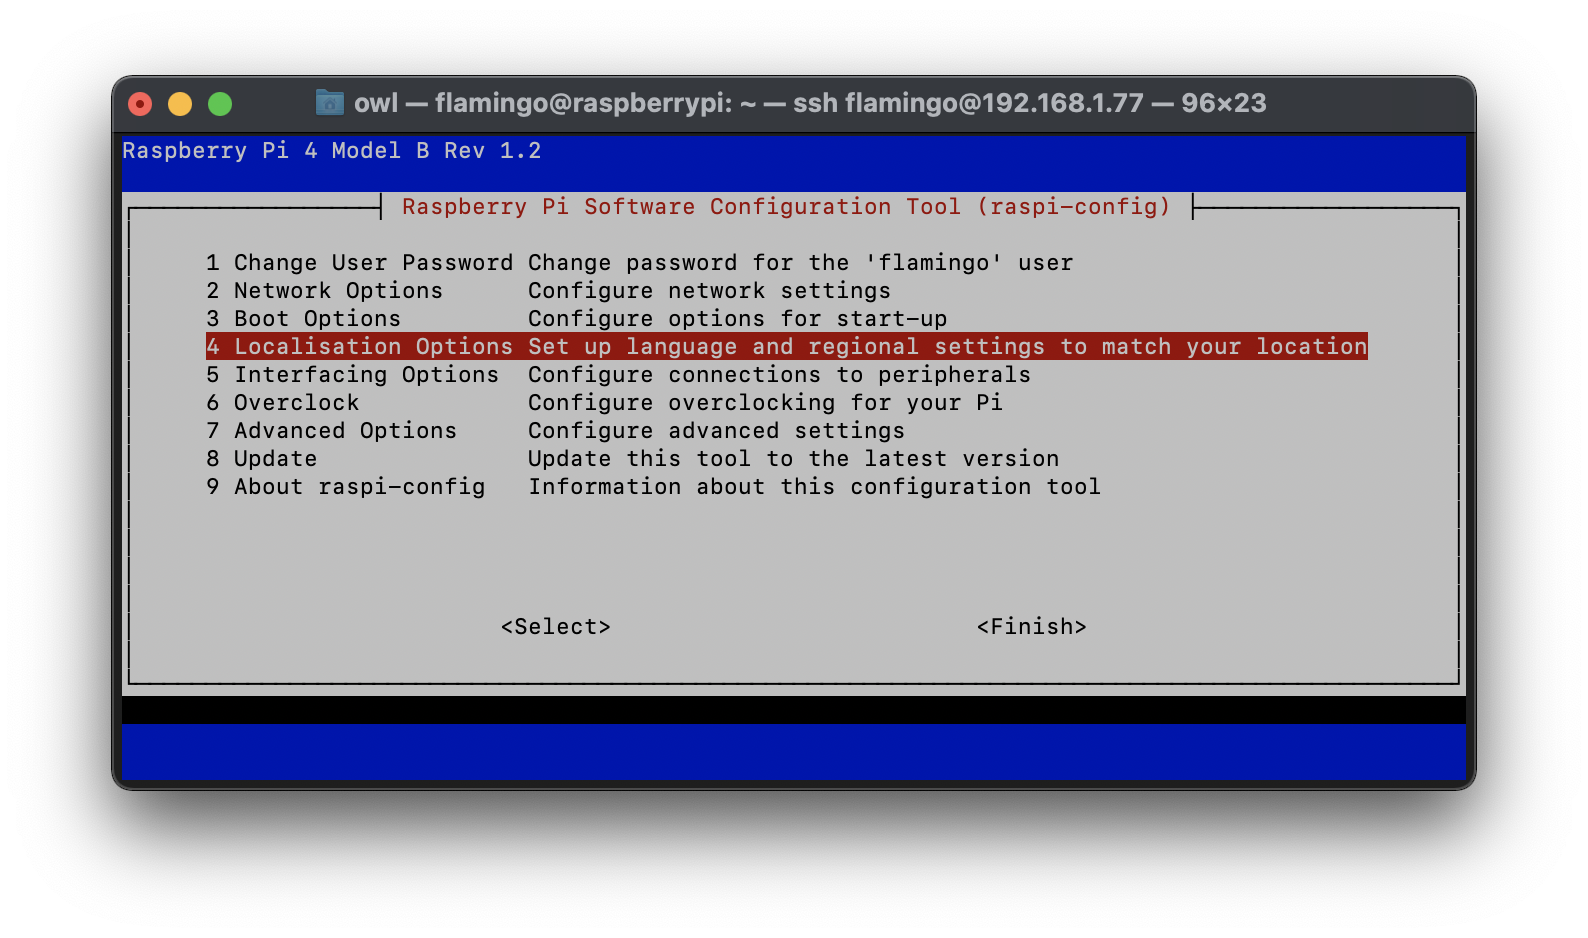

Теперь непосредственно установка Home Assistant Supervised.
Update: новая статья
У новых пользователей часто возникает вопрос — можно ли установить Home Assistant на Windows?
Конечно можно! Проблема заключается в том, что не все зависимости Home Assistant легко установятся на любую сборку Windows. Об этом можно почитать тут.
На портале уже была статья о подобной установке. В своей версии я чуть подробнее опишу детали.
Идём на сайт python и скачиваем последнюю на момент написания статьи версию. Можно скачать как обычную, так и 64-битную версию.
В процессе установки Python я встречал следующие проблемы:
- установка не стартовала на «голой» Windows 7 без важных обновлений — нужно обновить систему стандартным способом
- установка не завершалась с недоступным сайтом python (из-за РКН) — нужно отключить опции download debug…
Вот у вас и установлен Python.
Далее нажимаем на клавиатуре win R и запускаем cmd
В запустившейся консоли вводим :
pip install homeassistant
Вот у вас и установлен последний Home Assistant.
На этом этапе у вас не должно возникнуть особых проблем. Python и HA должны установиться в практически любую систему.
Первый запуск Home Assistant
В той же консоли, что и ранее, просто вводим — hass.
Начнётся первый запуск HA. Он может быть достаточно долгим. HA будет скачивать и устанавливать разные библиотеки python, которые требуются конфигурации по умолчанию. А их не мало.
Плюс, если в процессе установки в вашей локальной сети обнаружатся поддерживаемые устройства — начнётся установка и их библиотек. В логе это отображается примерно так:
INFO (SyncWorker_1) [homeassistant.util.package] Attempting install of pychromecast==4.0.1
Вот на этом этапе вполне возможны проблемы и разные ошибки в консоли.
Терпеливо ждите пока HA делает свои дела. В идеале в конце лога вы должны увидеть строчку:
INFO (MainThread) [homeassistant.core] Starting Home Assistant
Далее попытайтесь открыть в любом браузере страницу:
http://localhost:8123/Вполне возможно у вас ничего не откроется. Это нормально.
План 2
Нажимайте в консоли Ctrl C, это принудительно остановит HA. Если не получится — закрывайте консоль и запускайте её заново.
И снова вводите в консоли — hass. И снова ждём строчку Starting Home Assistant и пробуем открыть в браузере:
http://localhost:8123/
План 3
Если со второй попытки страница так и не открылась — останавливаем HA и открываем папку с конфигами. Путь до неё показывается сразу после ввода команды hass. Это должно быть что-то вроде:
C:\Users\Alexey\AppData\Roaming\.homeassistant
Только с именем вашего пользователя. Проще вбить этот адрес сразу в проводнике Windows.
Теперь правим файл configuration.yaml.
Заменяем всё его содержимое на 3 простые строки:
config: frontend: system_health:
Это минимальный набор модулей, необходимый для старта HA и отображения главной страницы. Сильно сократит перечень зависимостей и повысит шансы старта.
Снова запускаем hass и пробуем открыть страницу.
PS
Это не все проблемы с которыми можно столкнуться. Но, надеюсь, вам хватит советов, описанных в статье.