Install Home Assistant Operating System
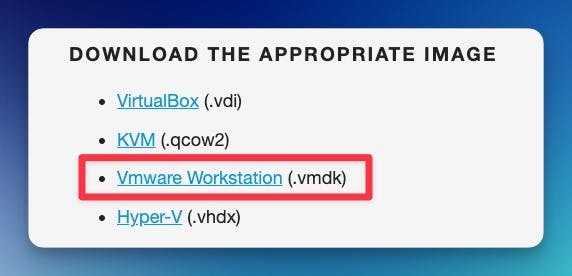
Download the appropriate image
-
VirtualBox (.vdi)
-
KVM (.qcow2)
-
Vmware Workstation (.vmdk)
-
Hyper-V (.vhdx)
After downloading, decompress the image. If the image comes in a ZIP file, for example, unzip it.
Follow this guide if you already are running a supported virtual machine hypervisor. If you are not familiar with virtual machines, we recommend installing Home Assistant OS directly on a Home Assistant Yellow, a Raspberry Pi, or an ODROID.
Create the virtual machine
Load the appliance image into your virtual machine hypervisor. (Note: You are free to assign as much resources as you wish to the VM, please assign enough based on your add-on needs).
Minimum recommended assignments:
- 2 GB RAM
- 32 GB Storage
- 2vCPU
All these can be extended if your usage calls for more resources.
Hypervisor specific configuration
VirtualBox
KVM (virt-manager)
KVM (virt-install)
Vmware Workstation
Hyper-V
- Create a new virtual machine.
- Select type Linux and version Linux 2.6 / 3.x / 4.x (64-bit).
- Select Use an existing virtual hard disk file, select the unzipped VDI file from above.
- Edit the Settings of the VM and go to System > Motherboard. Select Enable EFI.
- Then go to Network > Adapter 1. Choose Bridged Adapter and choose your network adapter.
Please keep in mind that the bridged adapter only functions over a hardwired Ethernet connection.
Using Wi-Fi on your VirtualBox host is unsupported.
6. Then go to **Audio** and choose **Intel HD Audio** as audio controller.
By default, VirtualBox does not free up unused disk space. To automatically shrink the vdi disk image
the discard option must be enabled using your host machine’s terminal:
VBoxManage storageattach <VM name> --storagectl "SATA" --port 0 --device 0 --nonrotational on --discard on
More details can be found about the command can be found here.
- Create a new virtual machine in
virt-manager. - Select Import existing disk image, provide the path to the QCOW2 image above.
- Choose Generic Default for the operating system.
- Check the box for Customize configuration before install.
- Under Network Selection, select your bridge.
- Under customization select Overview > Firmware > UEFI x86_64: …. Make sure to select a non-secureboot version of OVMF (does not contain the word
secure,secboot, etc.), e.g.,/usr/share/edk2/ovmf/OVMF_CODE.fd. - Click Add Hardware (bottom left), and select Channel.
- Select device type: unix.
- Select name: org.qemu.guest_agent.0.
- Finally, select Begin Installation (upper left corner).
virt-install --name hass --description "Home Assistant OS" --os-variant=generic --ram=2048 --vcpus=2 --disk <PATH TO QCOW2 FILE>,bus=sata --import --graphics none --boot uefi
If you have a USB dongle to attach, you need to add the option `—hostdev busID.deviceId`. You can discover these IDs via the `lsusb` command.
As example, if `lsusb` output is:
   Bus 004 Device 001: ID 1d6b:0003 Linux Foundation 3.0 root hub
   Bus 003 Device 004: ID 30c9:0052 Luxvisions Innotech Limited Integrated RGB Camera
   Bus 003 Device 003: ID 1a86:55d4 QinHeng Electronics SONOFF Zigbee 3.0 USB Dongle Plus V2
   Bus 003 Device 002: ID 06cb:00fc Synaptics, Inc.
   Bus 003 Device 005: ID 8087:0033 Intel Corp.
   Bus 003 Device 001: ID 1d6b:0002 Linux Foundation 2.0 root hub
   Bus 002 Device 001: ID 1d6b:0003 Linux Foundation 3.0 root hub
   Bus 001 Device 001: ID 1d6b:0002 Linux Foundation 2.0 root hub
You can recognize the Sonoff dongle at Bus 003 Device 003. So the command to install the VM will become:
virt-install --name hass --description "Home Assistant OS" --os-variant=generic --ram=2048 --vcpus=2 --disk <PATH TO QCOW2 FILE>,bus=sata --import --graphics none --boot uefi --hostdev 003.003
Note that this configuration (bus 003, device 003) is just an example, your dongle could be on another bus and/or with another device ID.
Please check the correct IDs of your USB dongle with lsusb.
- Create a new virtual machine.
- Select Custom, make it compatible with the default of Workstation and ESX.
- Choose I will install the operating system later, select Linux > Other Linux 5.x or later kernel 64-bit.
- Select Use Bridged Networking.
- Select Use an existing virtual disk and select the VMDK file above.
After the VM has been created, go to Settings > Options > Advanced. Under Firmware type select UEFI.
Hyper-V does not have USB support
- Create a new virtual machine.
- Select Generation 2.
- Select Connection > Your Virtual Switch that is bridged.
- Select Use an existing virtual hard disk and select the VHDX file from above.
After creation, go to Settings > Security and deselect Enable Secure Boot.
Start up your virtual machine
- Start the virtual machine.
- Observe the boot process of the Home Assistant Operating System.
- Once completed, you will be able to reach Home Assistant on homeassistant.local:8123. If you are running an older Windows version or have a stricter network configuration, you might need to access Home Assistant at homeassistant:8123 or
http://X.X.X.X:8123(replace X.X.X.X with your ’s IP address).
Help us improve Home Assistant
Have you just installed Home Assistant? The Home Assistant team is looking to talk to you to understand how the installation went.
With the Home Assistant Operating System installed and accessible, you can continue with onboarding.
Install Home Assistant Core
Install WSL
To install Home Assistant Core on Windows, you will need to use the Windows Subsystem for Linux (WSL). Follow the WSL installation instructions and install Ubuntu from the Windows Store.
As an alternative, Home Assistant OS can be installed in a Linux guest VM. Running Home Assistant Core directly on Windows is not supported.
This is an advanced installation process, and some steps might differ on your system. Considering the nature of this installation type, we assume you can handle subtle differences between this document and the system configuration you are using. When in doubt, please consider one of the other installation methods, as they might be a better fit instead.
Prerequisites
This guide assumes that you already have an operating system setup and have installed Python 3.11 (including the package python3-dev) or newer.
Install dependencies
Before you start, make sure your system is fully updated, all packages in this guide are installed with apt, if your OS does not have that, look for alternatives.
sudo apt-get update
sudo apt-get upgrade -y
Install the dependencies:
sudo apt-get install -y python3 python3-dev python3-venv python3-pip bluez libffi-dev libssl-dev libjpeg-dev zlib1g-dev autoconf build-essential libopenjp2-7 libtiff5 libturbojpeg0-dev tzdata ffmpeg liblapack3 liblapack-dev libatlas-base-dev
The above-listed dependencies might differ or missing, depending on your system or personal use of Home Assistant.
Create an account
Add an account for Home Assistant Core called homeassistant.
Since this account is only for running Home Assistant Core the extra arguments of -rm is added to create a system account and create a home directory.
sudo useradd -rm homeassistant
Create the virtual environment
First we will create a directory for the installation of Home Assistant Core and change the owner to the homeassistant account.
sudo mkdir /srv/homeassistant
sudo chown homeassistant:homeassistant /srv/homeassistant
Next up is to create and change to a virtual environment for Home Assistant Core. This will be done as the homeassistant account.
sudo -u homeassistant -H -s
cd /srv/homeassistant
python3 -m venv .
source bin/activate
Once you have activated the virtual environment (notice the prompt change to (homeassistant) homeassistant@raspberrypi:/srv/homeassistant $) you will need to run the following command to install a required Python package.
python3 -m pip install wheel
Once you have installed the required Python package, it is now time to install Home Assistant Core!
pip3 install homeassistant==2023.10.1
Start Home Assistant Core for the first time. This will complete the installation for you, automatically creating the .homeassistant configuration directory in the /home/homeassistant directory, and installing any basic dependencies.
You can now reach your installation via the web interface on http://homeassistant.local:8123.
If this address doesn’t work you may also try http://localhost:8123 or http://X.X.X.X:8123 (replace X.X.X.X with your machines’ IP address).
When you run the hass command for the first time, it will download, install and cache the necessary libraries/dependencies. This procedure may take anywhere between 5 to 10 minutes. During that time, you may get a site cannot be reached error when accessing the web interface. This will only happen the first time. Subsequent restarts will be much faster.
Help us to improve our documentation
Suggest an edit to this page, or provide/view feedback for this page.
v2023.9.3 — 2023-10-04
v2023.5.3 — 2023-05-15
v2023.3.6 — 2023-04-06
v2023.1.7 — 2023-02-03
v2022.12.8 — 2023-01-01
v2022.11.4 — 2022-11-27
v2022.8.6 — 2022-08-23
v2022.5.3 — 2022-05-11
For Windows 8+ 64-bit download
- Home Assistant v2022.5.3
- WinPython v3.9.10 64-bit
For Windows 7 or 32-bit download
- Home Assistant v2021.12.10
- WinPython v3.8.10 32-bit
Changelog
- Better support cameras, snapshots, records #30
- Better support files encoding
- Support
ffmpeg(download it manually) #19 - Support
turbojpegfor cameras and HomeKit - Supports manual creation of your own version HassWP (install
hass_winfrom pip) - Move
depsfolder content to python folder (delete it manually) - Fix timezone support #35 #37 #48
- Fix
radio_browser
v2022.2.3 — 2022-02-08
v2021.12.10 — 2022-02-08
Update: новая статья
У новых пользователей часто возникает вопрос — можно ли установить Home Assistant на Windows?
Конечно можно! Проблема заключается в том, что не все зависимости Home Assistant легко установятся на любую сборку Windows. Об этом можно почитать тут.
На портале уже была статья о подобной установке. В своей версии я чуть подробнее опишу детали.
Идём на сайт python и скачиваем последнюю на момент написания статьи версию. Можно скачать как обычную, так и 64-битную версию.


В процессе установки Python я встречал следующие проблемы:
- установка не стартовала на «голой» Windows 7 без важных обновлений — нужно обновить систему стандартным способом
- установка не завершалась с недоступным сайтом python (из-за РКН) — нужно отключить опции download debug…
Вот у вас и установлен Python.
Далее нажимаем на клавиатуре win R и запускаем cmd
В запустившейся консоли вводим :
pip install homeassistant
Вот у вас и установлен последний Home Assistant.
На этом этапе у вас не должно возникнуть особых проблем. Python и HA должны установиться в практически любую систему.
Первый запуск Home Assistant
В той же консоли, что и ранее, просто вводим — hass.
Начнётся первый запуск HA. Он может быть достаточно долгим. HA будет скачивать и устанавливать разные библиотеки python, которые требуются конфигурации по умолчанию. А их не мало.
Плюс, если в процессе установки в вашей локальной сети обнаружатся поддерживаемые устройства — начнётся установка и их библиотек. В логе это отображается примерно так:
INFO (SyncWorker_1) [homeassistant.util.package] Attempting install of pychromecast==4.0.1
Вот на этом этапе вполне возможны проблемы и разные ошибки в консоли.
Терпеливо ждите пока HA делает свои дела. В идеале в конце лога вы должны увидеть строчку:
INFO (MainThread) [homeassistant.core] Starting Home Assistant
Далее попытайтесь открыть в любом браузере страницу:
http://localhost:8123/Вполне возможно у вас ничего не откроется. Это нормально.
План 2
Нажимайте в консоли Ctrl C, это принудительно остановит HA. Если не получится — закрывайте консоль и запускайте её заново.
И снова вводите в консоли — hass. И снова ждём строчку Starting Home Assistant и пробуем открыть в браузере:
http://localhost:8123/
План 3
Если со второй попытки страница так и не открылась — останавливаем HA и открываем папку с конфигами. Путь до неё показывается сразу после ввода команды hass. Это должно быть что-то вроде:
C:\Users\Alexey\AppData\Roaming\.homeassistant
Только с именем вашего пользователя. Проще вбить этот адрес сразу в проводнике Windows.
Теперь правим файл configuration.yaml.
Заменяем всё его содержимое на 3 простые строки:
config: frontend: system_health:
Это минимальный набор модулей, необходимый для старта HA и отображения главной страницы. Сильно сократит перечень зависимостей и повысит шансы старта.
Снова запускаем hass и пробуем открыть страницу.
PS
Это не все проблемы с которыми можно столкнуться. Но, надеюсь, вам хватит советов, описанных в статье.
На данный момент инструкция неактуальна. Текущие варианты установки можете посмотреть на официальном сайте HA.
В данной статье будет пошагово описан процесс установки home assistant на ПК под управлением Windows 10.
Важно отметить, что операционная система Windows не является основной для HA, что проявляется в неполной работоспособности программного обеспечения, в связи с чем установку HA на Win10 рекомендуется производить только для ознакомления с возможностями ПО.
Итак, приступим.
-
-
- Первым делом нам нужно установить Python. Идем на официальный сайт, выбираем последнюю версию, проматываем страницу вниз и выбираем нужный нам файл (например Windows x86-64 executable installer). Скачиваем и запускаем.
- При установке выбираем Customize installation -> на второй вкладке оставляем только pip -> на третьей выбираем Add Python to environment variables.

- После того, как Python установится запускаем командную строку: нажимаем Win и R, в появившемся поле вводим cmd и нажимаем Ок.
- Вводим в командной строке pip install homeassistant, нажимаем Enter и ждем пока все установится. В случае ошибок внимательно читаем и делаем что там будет написано. В моем случае не было Visual C++ 14.0. Для исправления – скачиваем Build Tools для Visual Studio с официального сайта, устанавливаем и перезагружаем ПК.

- Программа установлена и для запуска осталось ввести команду hass в командной строке. На данном этапе может появляться много ошибок, возможно придется прервать запуск (Ctrl+C) и запустить заново. Также брандмауэр может попросить разрешить доступ. Разрешаем. В самом конце запуска в консоли должна появиться строчка со следующим содержанием: INFO (MainThread) [homeassistant.core] Starting Home Assistant.
- Далее запускаем браузер и вводим localhost:8123. Если все сделано правильно, то откроется окно регистрации учетной записи. Если ничего не получилось, то попробуйте еще раз выполнить пятый пункт.
- Поздравляю, мы установили Home Assistant на ПК под управлением Windows 10.

-


Ссылки на другие уроки по настройке Home Assistant.
- Download VM Workstation Player
- Download Home Assistant Image
- Launch VMware Workstation 17 Player
- Edit VM Settings
- Start the Virtual Machine
- Onboarding Home Assistant
- How To Add Zigbee Support
- How To Add Bluetooth Support
How To Install Home Assistant using VMware Workstation
In this guide, we’ll show you how to install Home Assistant using VMWare Workstation Player.
VMWare Workstation Player is a free virtualization software that allows you to run multiple operating systems on a single host machine. This means you can create a virtual machine (VM) for Home Assistant, which is an efficient and safe way to run the software.
Download VM Workstation Player
Download VMplayer for Windows from here

Then, install VMware Workstation 17 Player with all defaults.
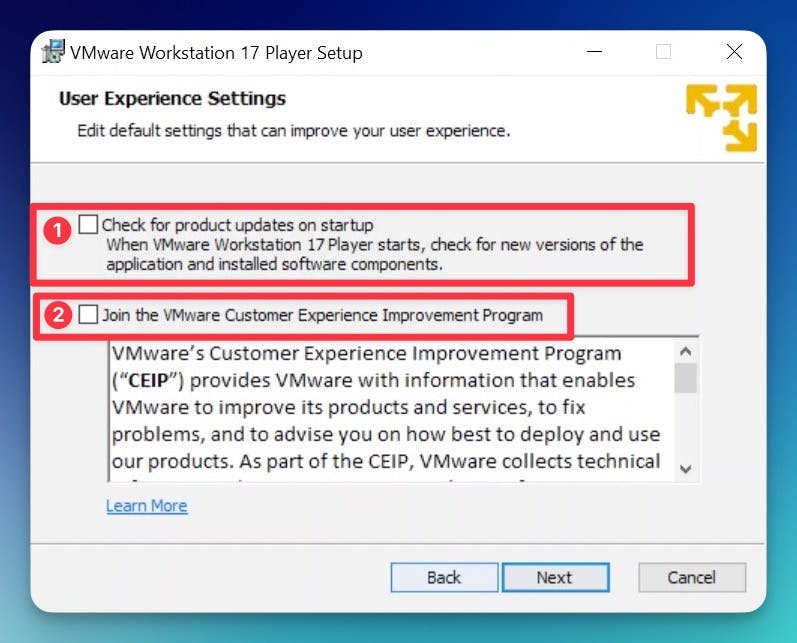
On the User Experience screen, you can uncheck both options:
Continue with the install until complete.
Download Home Assistant Image
Download the Vmware Workstation (.vmdk) image from here
Extract the file, and place it into a directory where your VM will live (C:\Home Assistant)
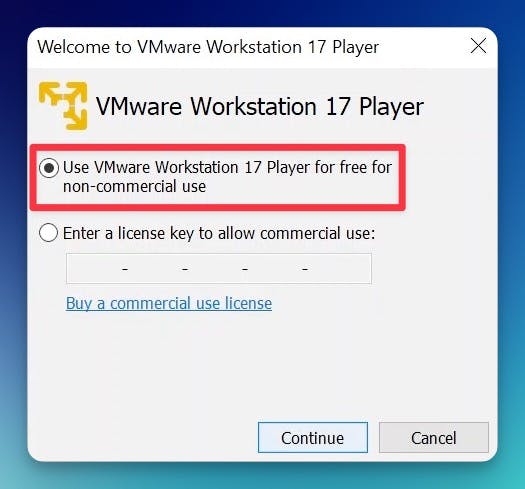
Launch VMware Workstation 17 Player
Launch VMware Workstation 17 Player. Select the free for non-commercial use option.
Click Create a New Virtual Machine
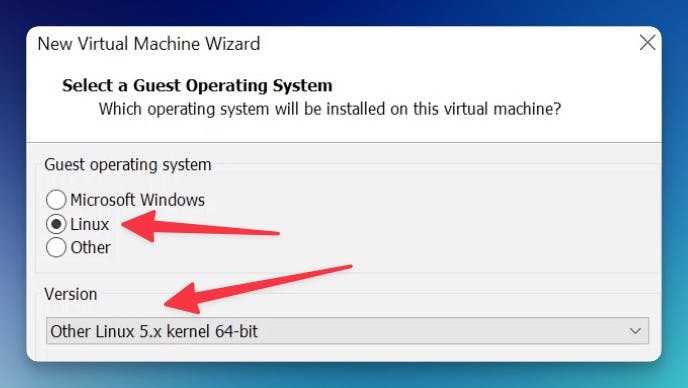
Click I will install the operating system later.
Select Linux. For the version, you would use Other Linux 5.x and later kernel 64-bit.
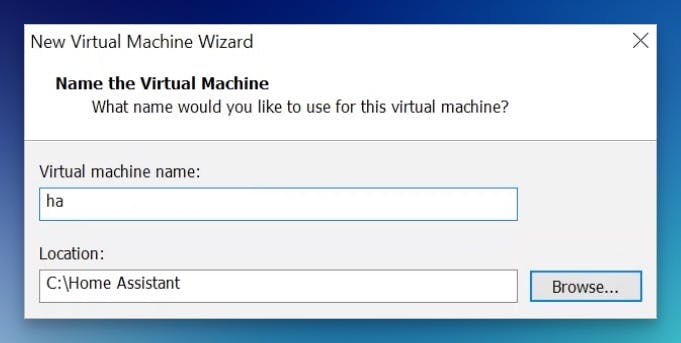
Give your VM a name (for example: ha) and select the folder you created in the previous step.
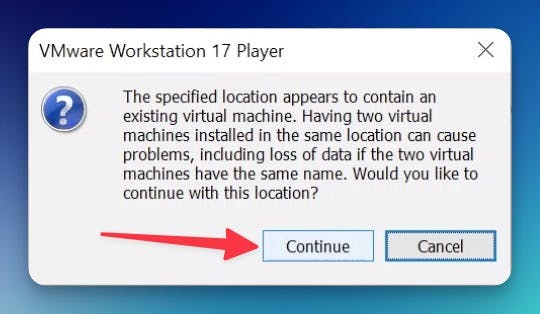
Confirm the popup. Select Continue.
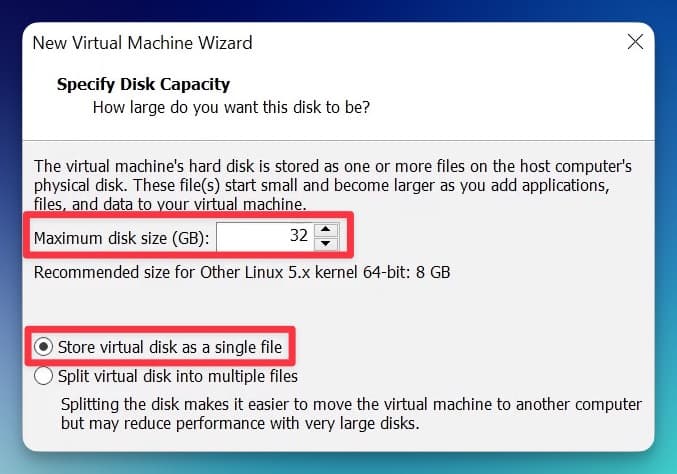
Store it as a single file, and set your storage size to 32GB as recommended by Home Assistant documentation.
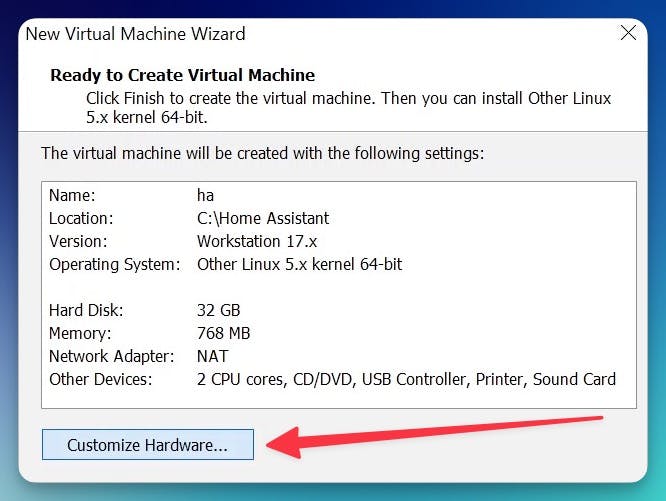
On the next screen, click Customize Hardware.
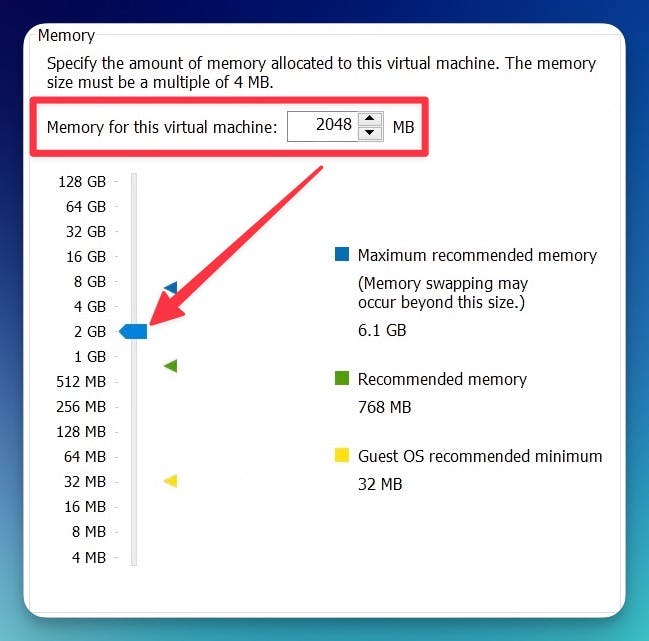
Set memory to at least 2GB
Make sure that Processors are set to at least 2

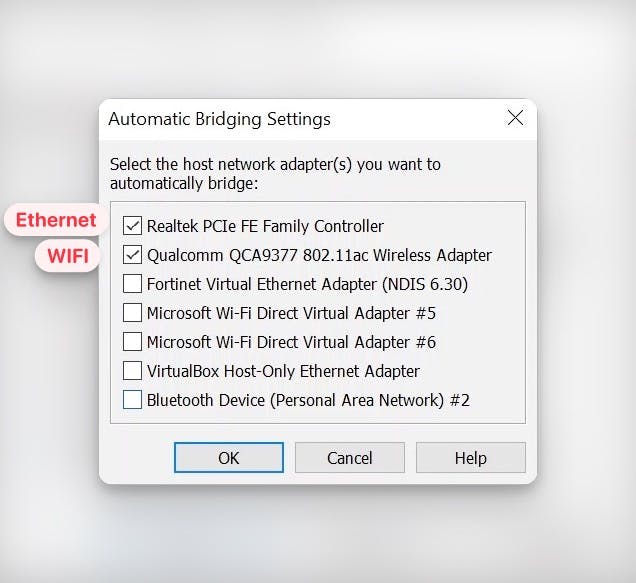
Set the network adapter needs to “bridged” mode. Then go to Configure Adapters
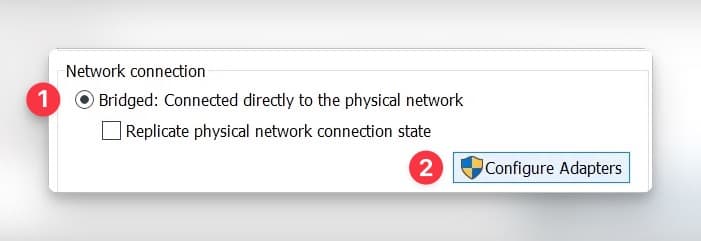
Make sure to select only your Ethernet and WIFI adapters (if you’re going to use WIFI)
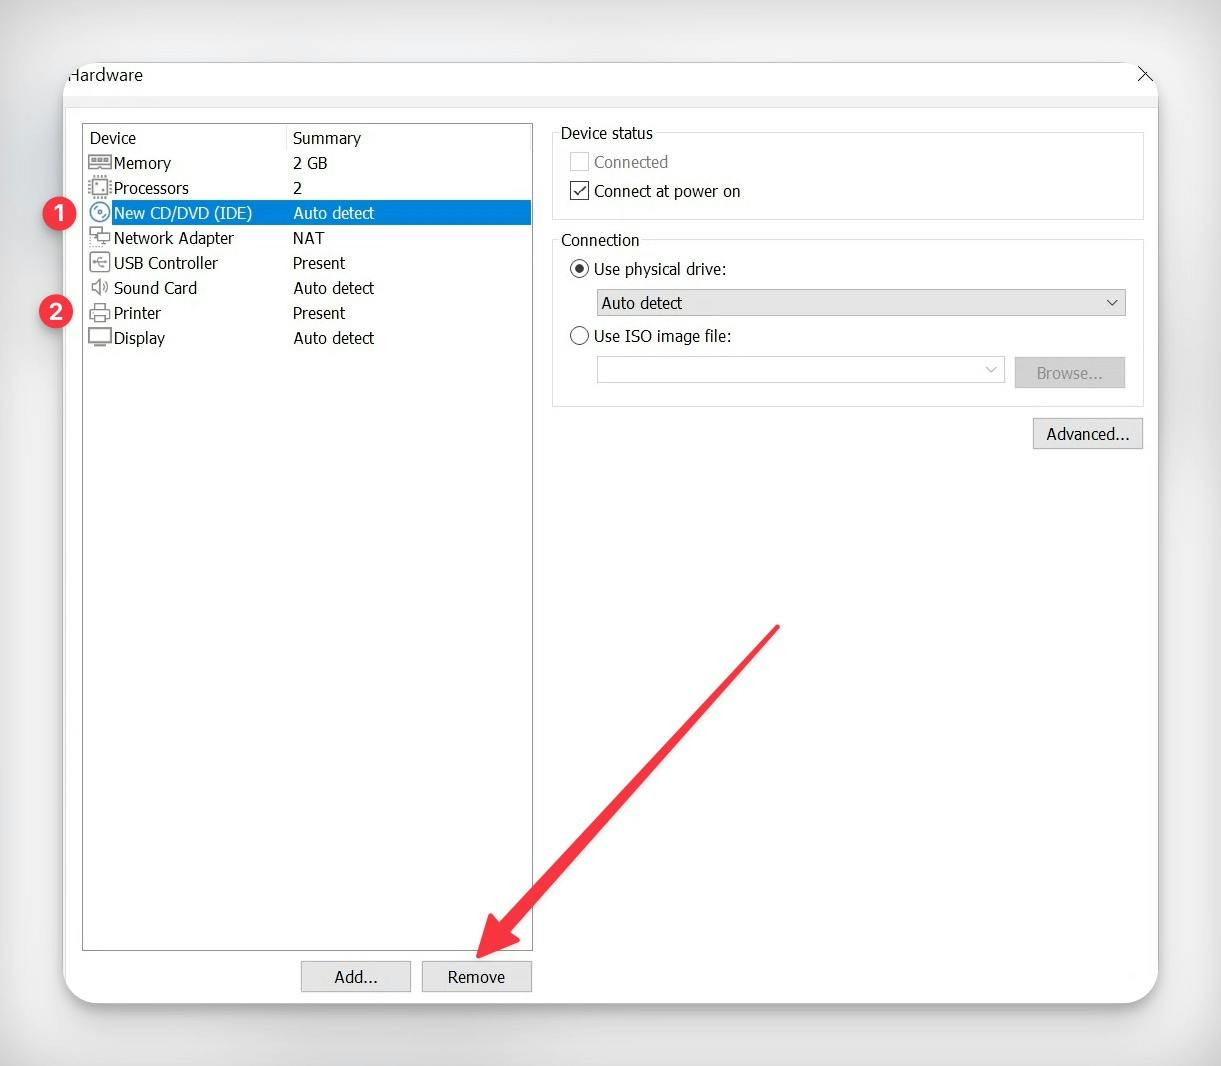
Remove both New CD/DVD (IDE) and Printer as they will not be used.
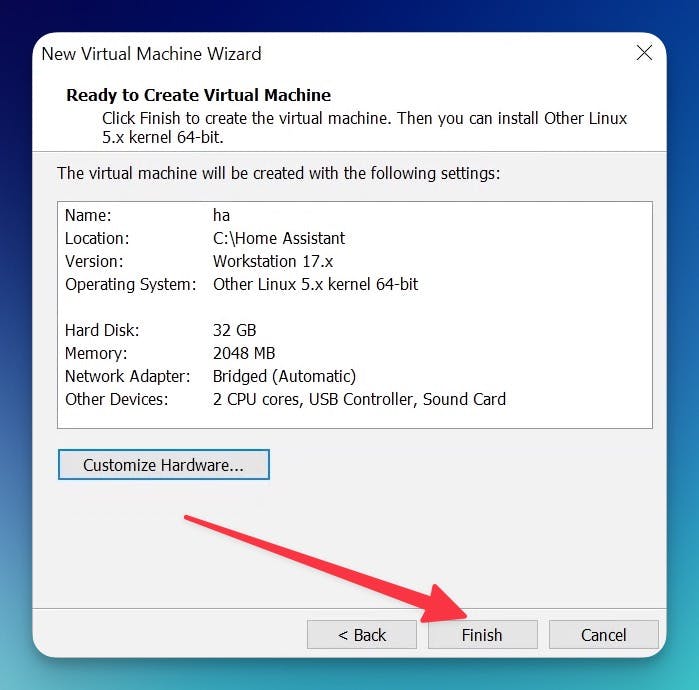
This is how your hardware should look go to Finish to create your Virtual Machine.
Edit VM Settings
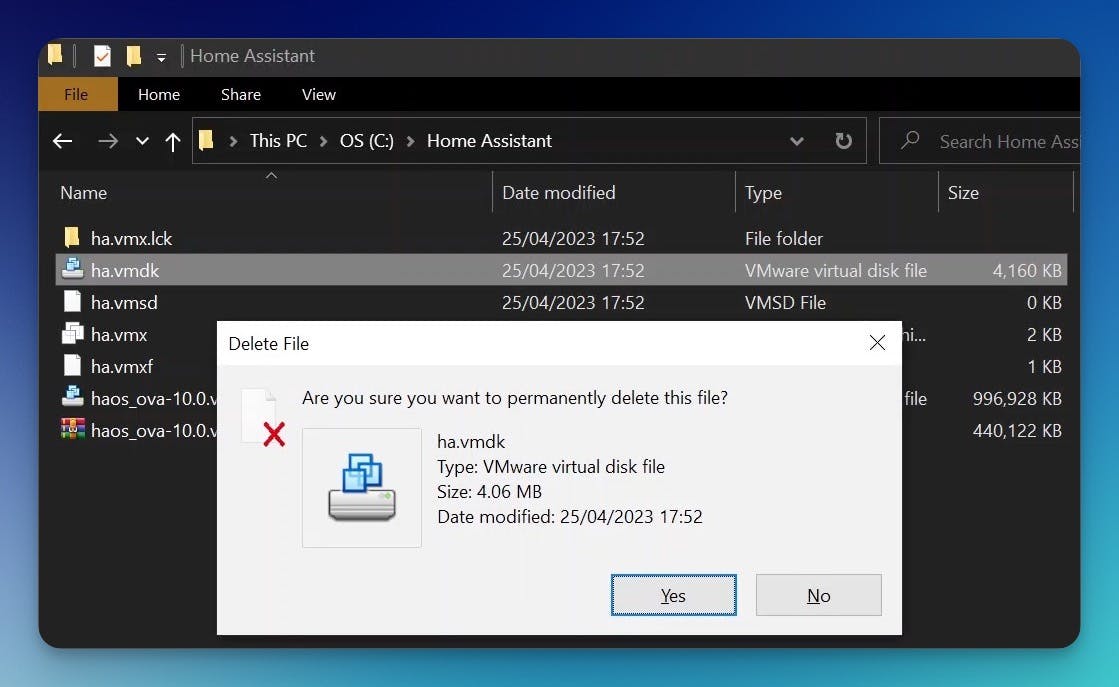
Navigate back to the C:\Home Assistant folder. Delete the ha.vmdk file.
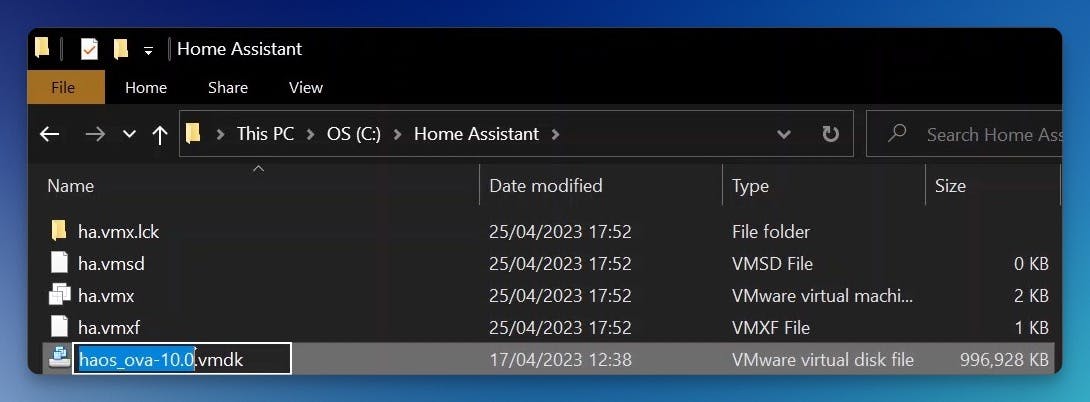
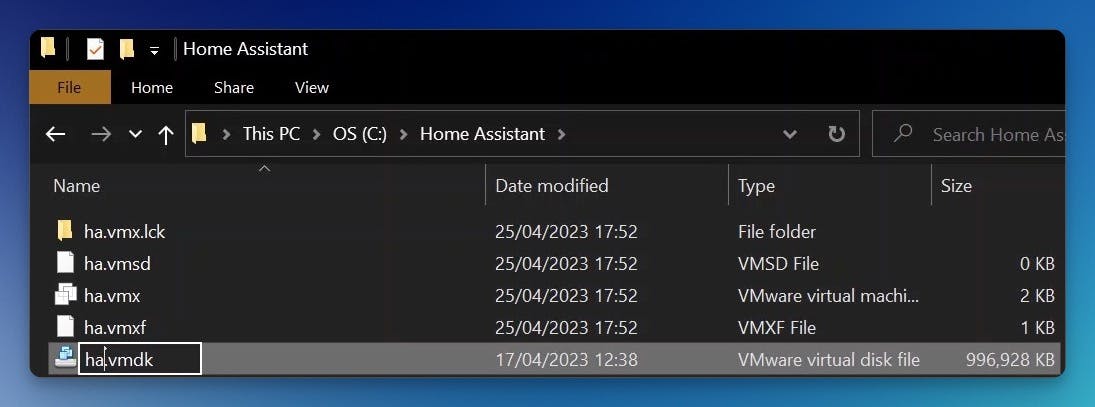
Then rename the haos _ova- 10.0.vmdk to ha.vmdk (or the Virtual Machine name you created in the previous step).
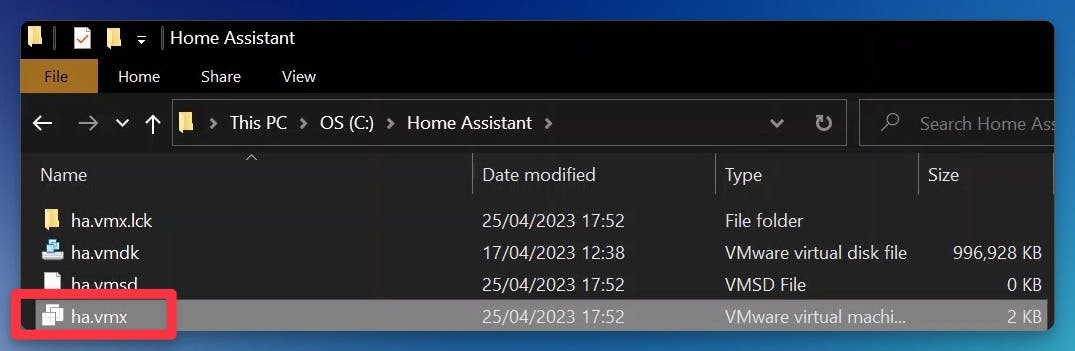
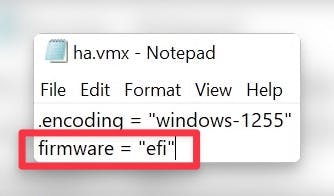
Then, locate the homeassistant VMware virtual machine configuration file (.vmx). Right-click > Open With > notepad.

Under the .encoding line, add the following code and save the file.
firmware="efi"
Start the Virtual Machine
Select your VMThen, click Play Virtual machine or click the green triangle at the top of the window.

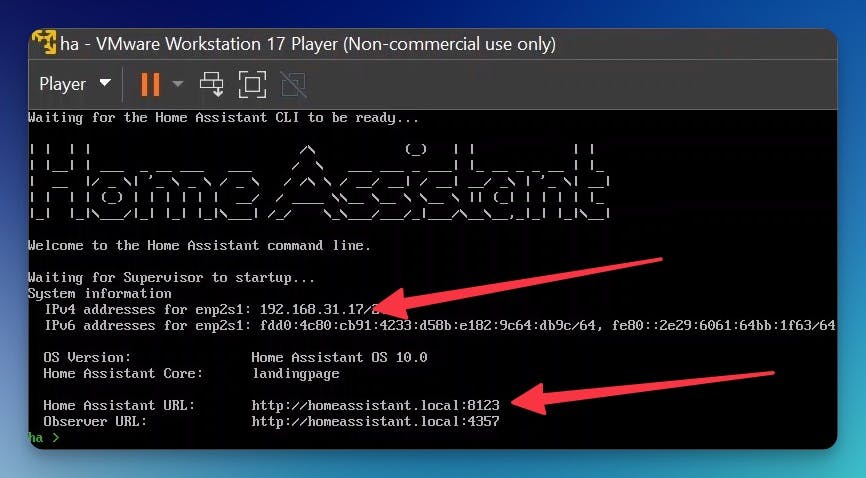
If you see this message, click OK.

If everything is successful up until this point, you should see the Home Assistant login screen with some IP addresses.
Onboarding Home Assistant
Once completed, you will be able to reach Home Assistant on homeassistant.local:8123. If you are running an older Windows version or have a stricter network configuration, you might need to access Home Assistant at homeassistant:8123 or http://X.X.X.X:8123 (replace X.X.X.X with your’s IP address as shown for IPv4 Addresses in the image above).
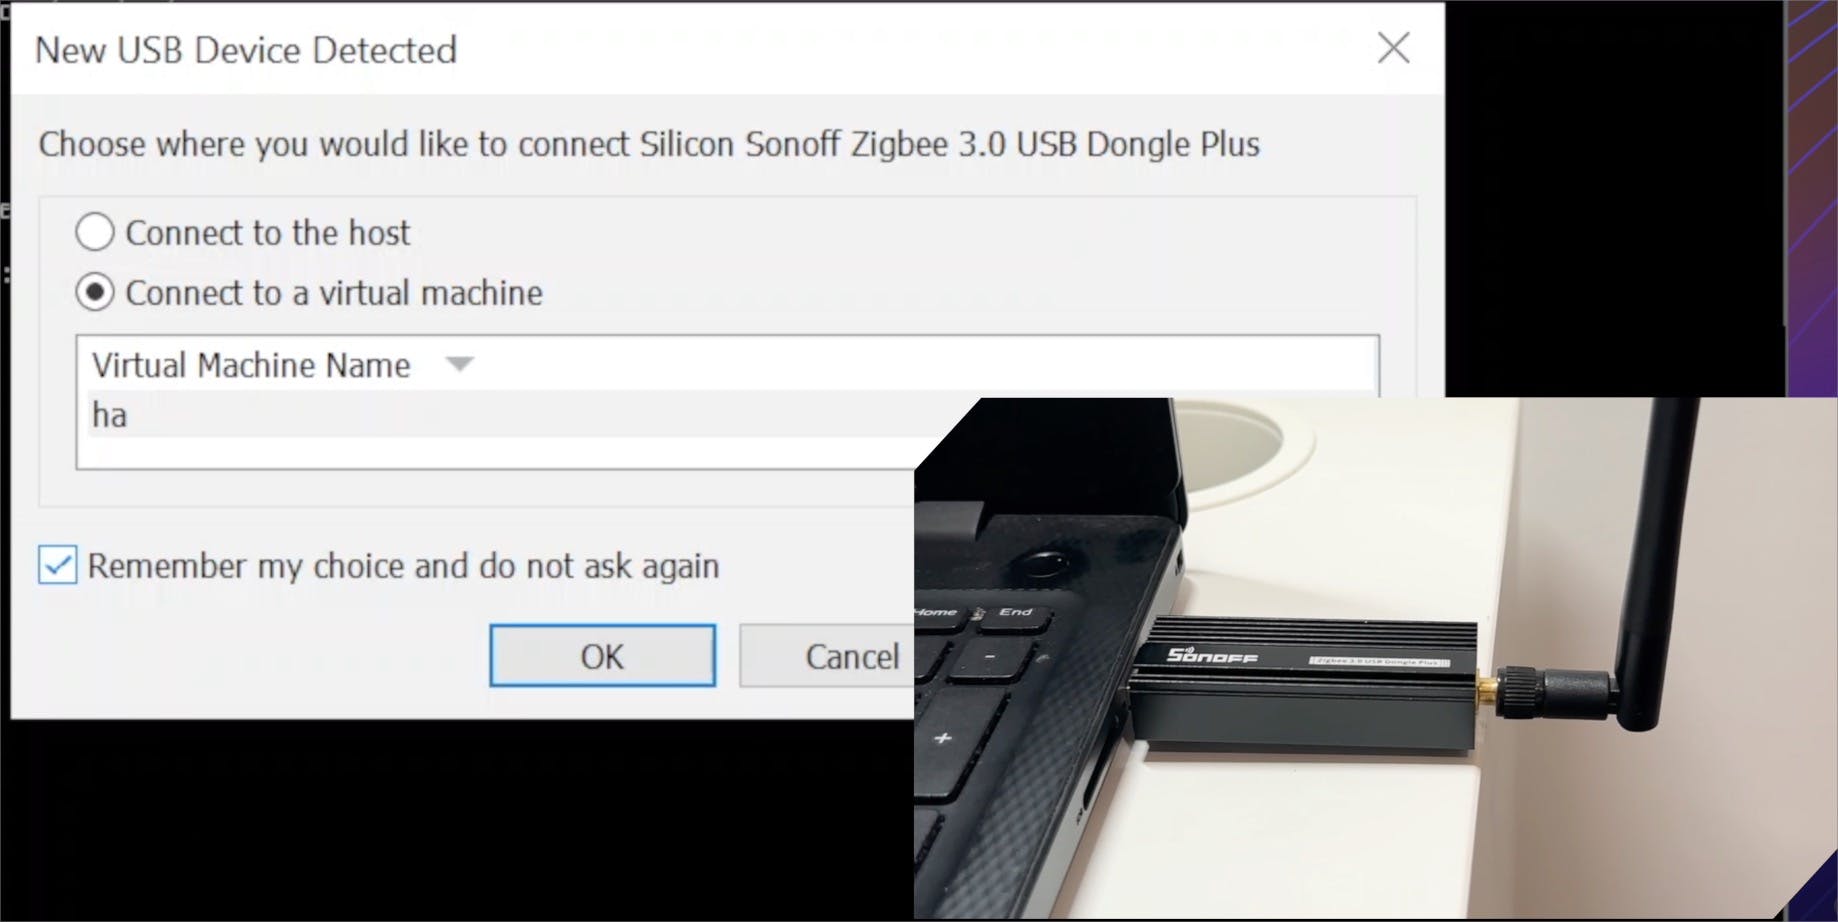
How To Add Zigbee Support
You can just connect your zigbee stick to your PC, and it should be detected like so:
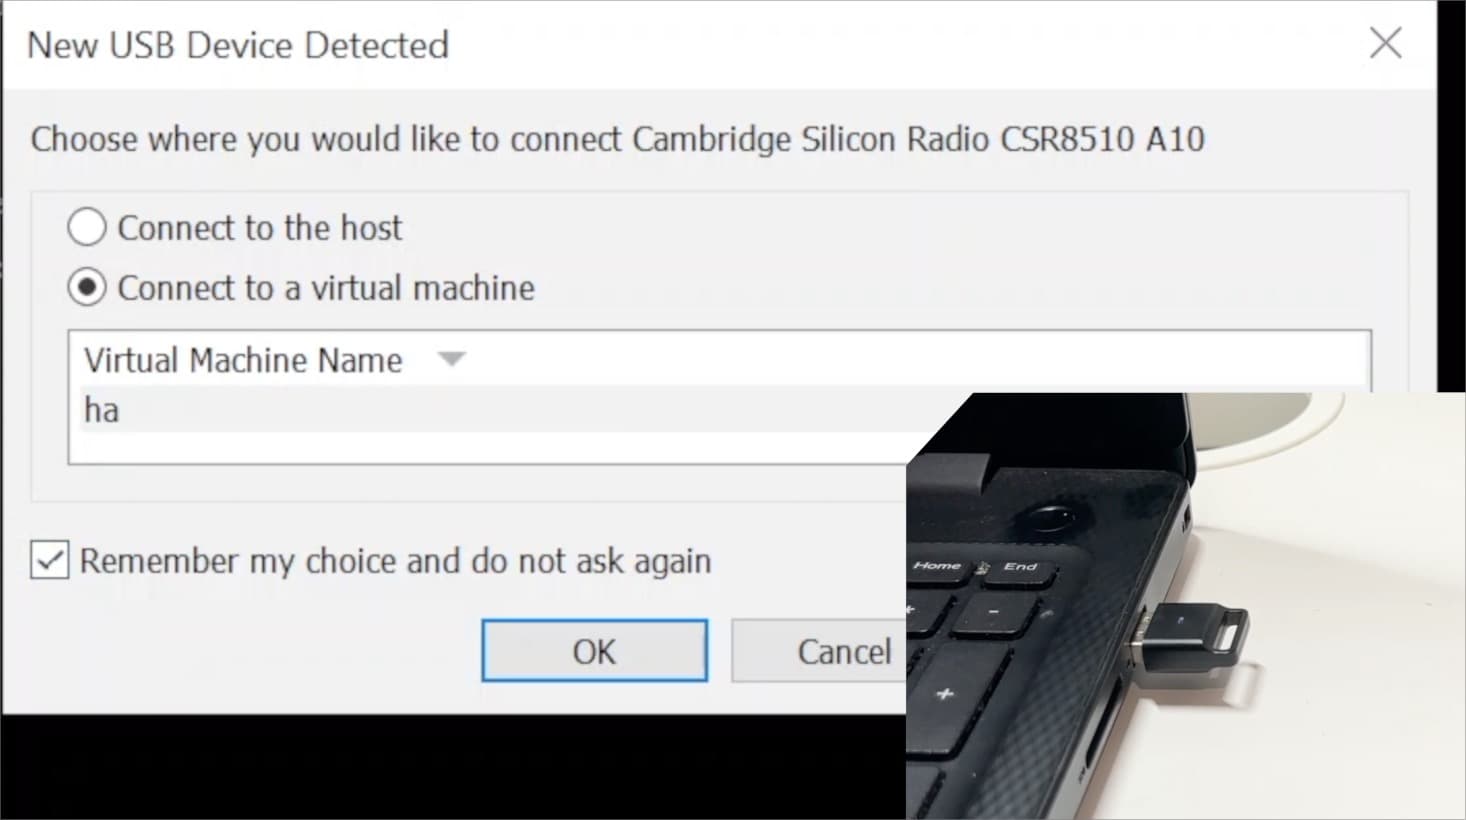
How To Add Bluetooth Support
You can just connect your Bluetooth dongle to your PC, and it should be detected like so: