The ASUSWRT integration can connect Home Assistant to a ASUS router that runs on ASUSWRT firmware.
There is currently support for the following device types within Home Assistant:
- Presence Detection — The ASUSWRT platform offers presence detection by looking at connected devices to a ASUSWRT based router.
- Sensor — The ASUSWRT sensors platform allows you to get information from your ASUS router within Home Assistant.
Configuration
To add the ASUSWRT integration to your Home Assistant instance, use this My button:

You need to enable telnet on your router if you choose to use protocol: telnet.
Sensors Configuration
These sensors are automatically created and associated to the router device:
- Connected devices sensor
- Download sensor (unit_of_measurement: Gigabyte — Daily accumulation)
- Download Speed sensor (unit_of_measurement: Mbit/s)
- Upload sensor (unit_of_measurement: Gigabyte — Daily accumulation)
- Upload Speed sensor (unit_of_measurement: Mbit/s)
- Load average sensors (1min, 5min, 15min)
- Temperature sensors (2ghz, 5ghz, cpu). NB: only temperature sensors available on your router will be created
Only Connected devices sensor is created in status enabled, all other sensors are created in status disabled. To use them, simply enable on the devices page.
Options
Options for ASUSWRT can be set via the user interface, by taking the following steps:
- Browse to your Home Assistant instance.
- Go to Settings > Devices & Services.
- If multiple instances of ASUSWRT are configured, choose the instance you want to configure.
- Select the integration, then select Configure.
Consider home
Number of seconds that must elapse before considering a disconnected device not at home.
Track unknown
Enable this option to track also devices that do not have a name. Name will be replaced by mac address.
Interface
The interface that you want statistics from (e.g. eth0,eth1 etc).
Dnsmasq
The location in the router of the dnsmasq.leases file.
Require IP
If devices must have IP (this option is available only for access point mode).
If you don’t want to automatically track new detected device, disable the integration system option Enable new added entities
Padavan custom firmware (The rt-n56u project)
The rt-n56u project does not store dnsmasq.leases which is used to track devices at /var/lib/misc/ as asuswrt do. However this integration can still be used for the rt-n56u project by changing the dnsmasq location using the dnsmasq variable to dnsmasq: '/tmp'
Also, to get the statistics for the WAN port, specify interface: 'eth3' as this is the interface used in the rt-n56u project
Help us to improve our documentation
Suggest an edit to this page, or provide/view feedback for this page.
[Wireless Router] How to manage smart home devices with Home Assistant® ?
This article will show you how to easily install Home Assistant®on NAS and configure port forwarding on router.
What is Home Assistant®?
Home Assistant® is a powerful open-source software for home automation and is designed to be the center control system for smart home devices.
And also, Home Assistant® can operate in many systems, such as Raspberry Pi®, Windows®, Linux.
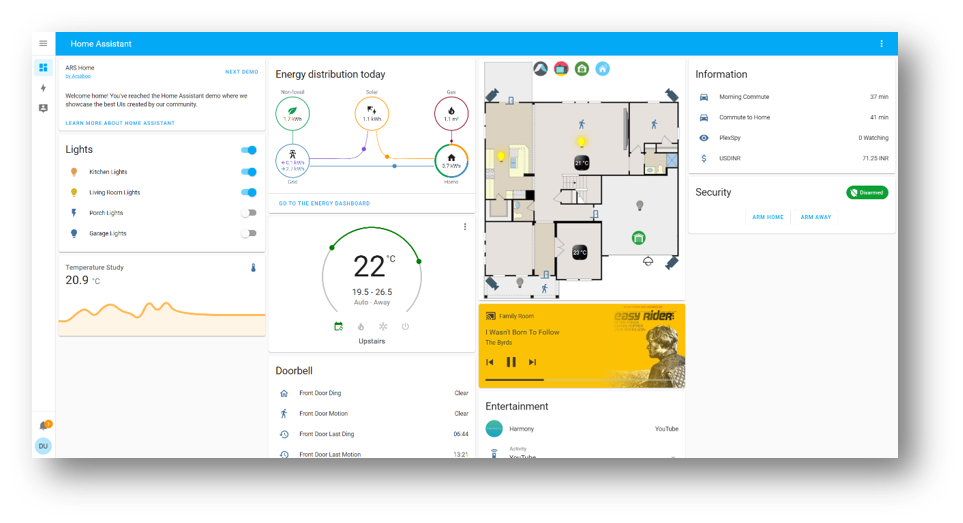
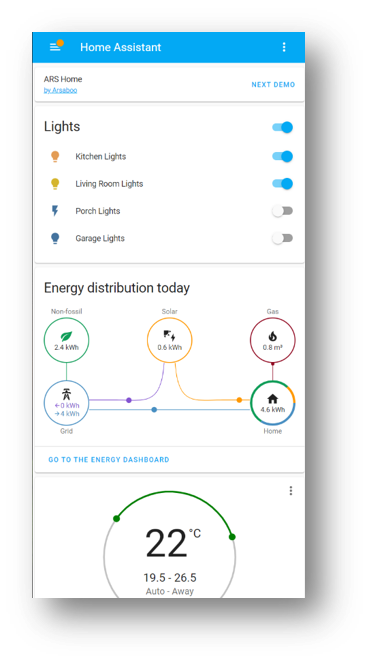
It support both web and app interface. The below two screenshots are the example.
ASUSTOR AS66 series’ App Central supports Home Assistant®, so we take AS6602T as an example to build the system.
Please refer to Home Assistant – ASUSTOR NAS to find the supported NAS.
Step 1. Select the NAS and its application center that supports Home Assistant®
Step 2. Find the NAS’IP address
You can use the NAS tool or router’s network map to find the IP address.
*NAS tool (As you can see the NAS IP address in this picture is 192.168.50.146.)
Go to NAS App: Select [Settings] -> [Network] -> [Network Interface] and then select either the [LAN 1], [LAN 2] or [LAN n] depending on your connection.

*Router’s network map
Log in to ASUS Router Setting page.

Note: Please refer to [Wireless Router] How to enter the router’s GUI to learn more.
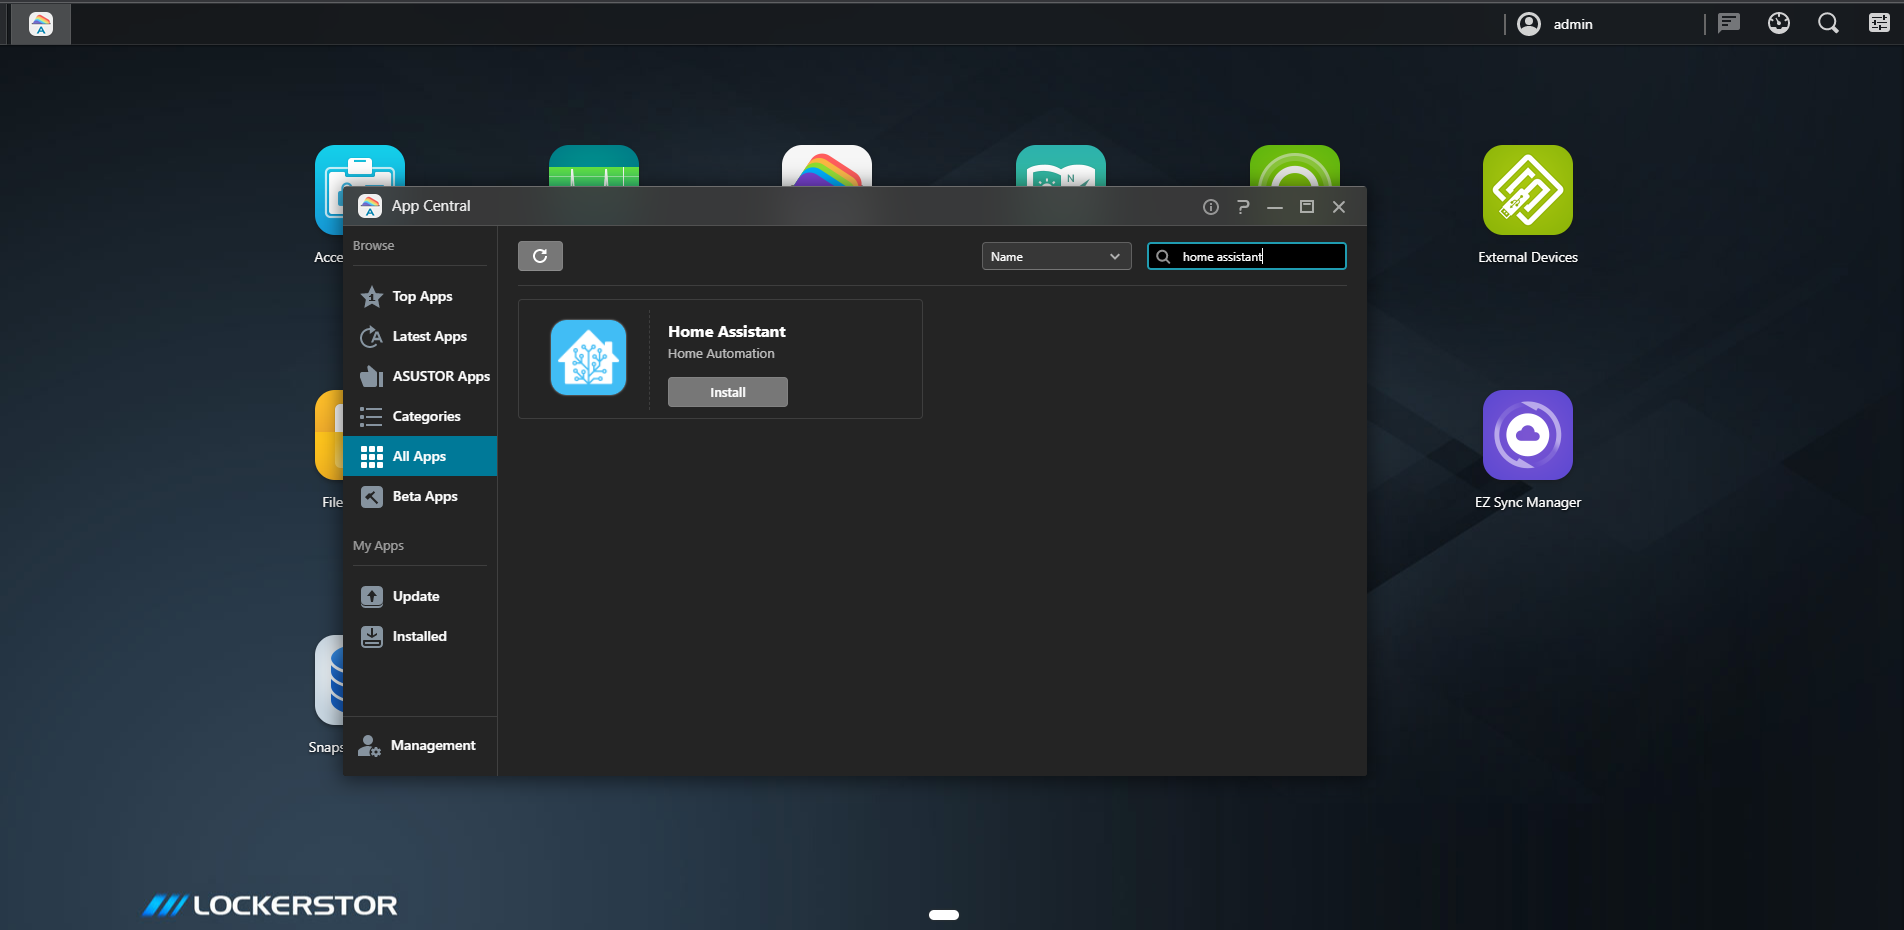
Step 3. Install Home Assistant in ASUSTOR App Central
3-1 Log in to ADM using an administrator account.
3-2 Click [App Central].
3-3 Search «Home Assistant».
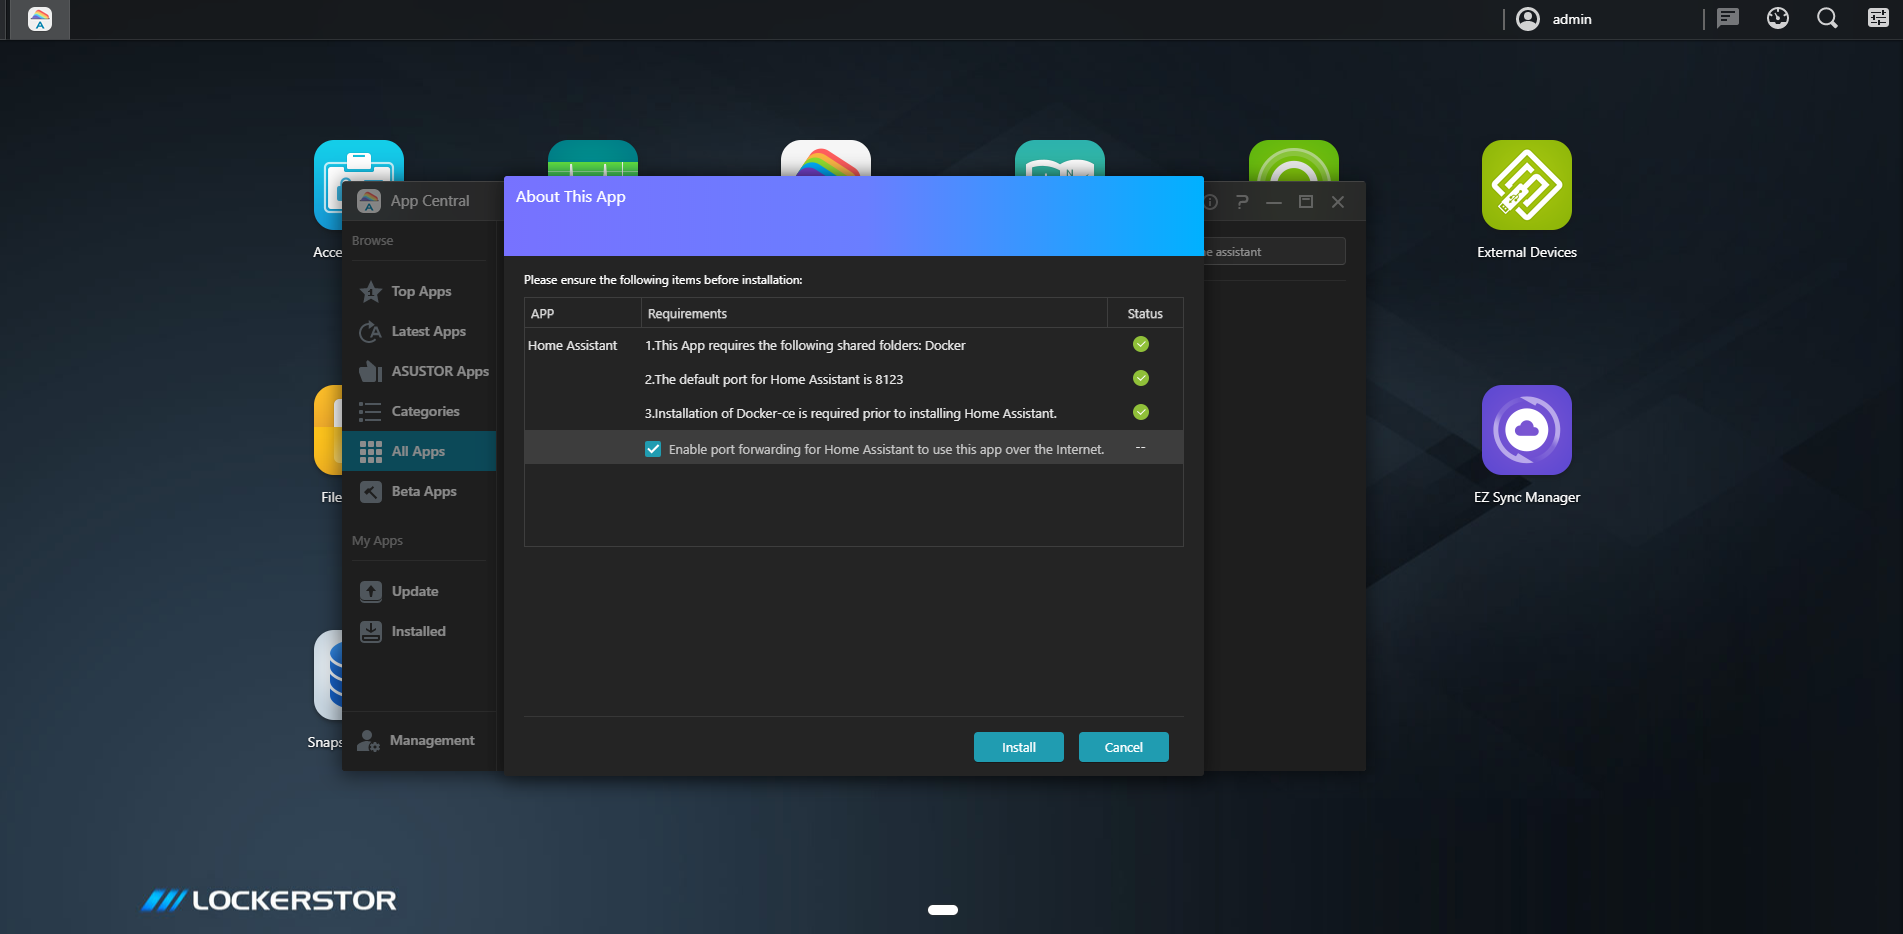
3-4 Click [Install] button to install Home Assistant App.
3-5 Click [Enable port forwarding…], if you want to use Home Assistant outside of home.
Step 4. Setup the username and password for Home Assistant on NAS.
Remember to use the long and more complex password to make the system more secure.
Use passwords with more than 8 characters mixed with capitalized letters, numbers, and special characters to increase the security level of your devices.
Note : Do not use passwords with consecutive numbers or letters, such as 12345678, abcdefgh, or qwertyuiop.

Step 5. If you want to control the Home Assistant® out of home and your router has a public IP.
You can go to the router setting page(WebGUI) > WAN > DDNS to assign router’s DDNS . In this example, we use HomeAssistant-test as router DDNS name.
If you only use Home Assistant in home, skip Step 5 and Step 6.
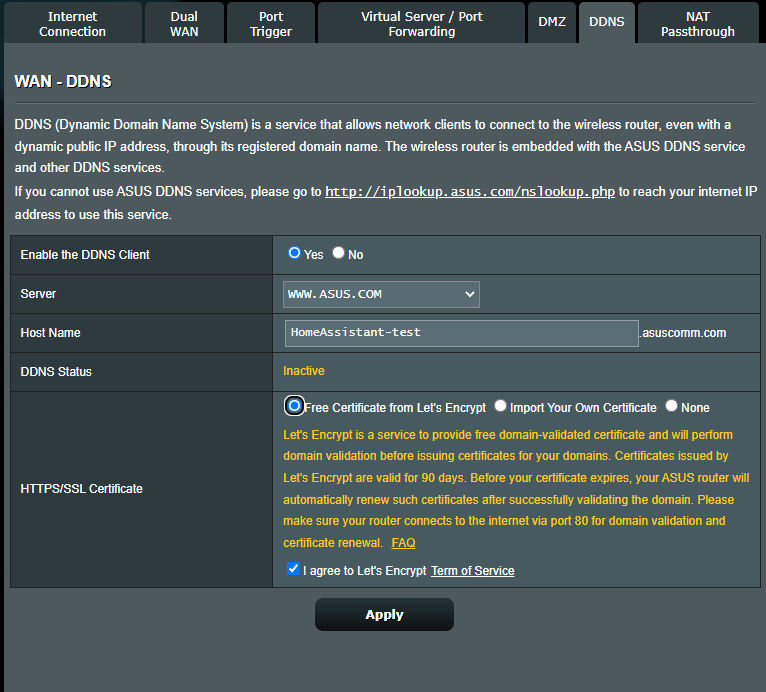
Note: Please refer to [Wireless Router] DDNS introduction and set up to learn more.
Step 6. Setup port forwarding on Router
Go to the router setting page(WebGUI) > WAN > Virtual Server/ Port Forwarding and add a port forwarding rule for Home Assistant.
*192.168.50.146 is NAS IP.
*8123 is the port used by Home Assistant.
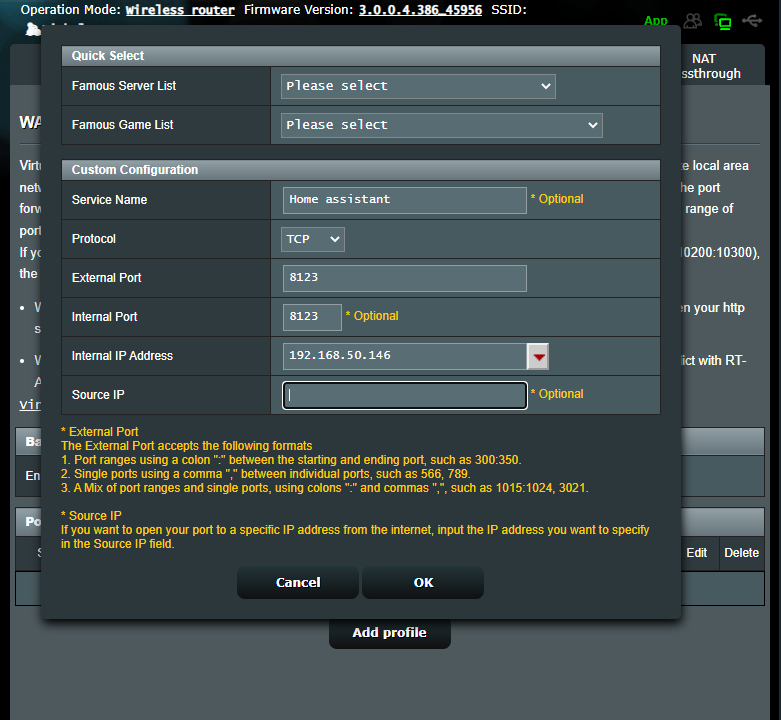
Note: Please refer to [Router] How to set up Virtual Server/Port Forwarding Rules? to learn more.
Step 6. Install the App on your Smart Phone.
Search «home assistant» in app store or google play. After launched the app, it will scan the server in local network. If you want to use the app out of home, click «Enter Address Manually».
Key in the http://<YOUR DDNS NAME>:8123 in the URL field.
For example. We assign the HomeAssistant-test as ASUS DDNS name and the URL is http:://HomeAssistant-test.asuscomm.com
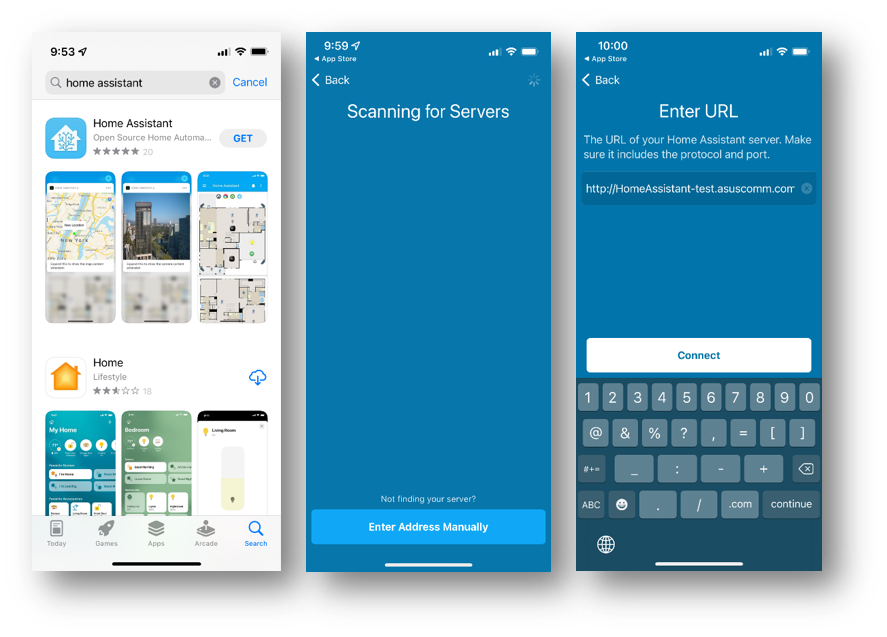
Enjoy it.
There are many information on the Home Assistant® interface. For more information, please refer to https://www.home-assistant.io/
How to get the (Utility / Firmware)?
You can download the latest drivers, software, firmware and user manuals in the ASUS Download Center.
If you need more information about the ASUS Download Center, please refer this link.

Monitor and control your AsusWRT-powered router from Home Assistant
AsusRouter is a custom integration for Home Assistant to monitor and control your AsusWRT (and AsusWRT-Merlin)-powered router using the AsusRouter python library.
The integration uses the native HTTP(S) API (the same way as WebUI) and relies on direct communication with your device.
Full documentation
You can find the full documentation on the official webpage.
📢 Do you want to add AsusRouter to the default HA Core integrations?
👍 Vote for the feature request!
Add AsusRouter integration to HA Core — Feature Requests — Home Assistant Community (home-assistant.io)
Firmware limitations
Firmware versions 3.0.0.4.x are fully supported (older versions might have a limited amount of sensors available). When talking about the FW, 3.0.0.4 might be missed since it is the same all the time. Important is only the last part, e.g. 386.48631 for the stock or 386.7 for Merlin FW.
Firmware 5.x.x (some DSL models) is NOT supported (not AsusWRT).
More about firmware versions
Installation
HACS
You can add this repository to your HACS:
HACS -> Integrations -> Explore & Download Repositories -> AsusRouter
Manual
Copy content of the stable branch custom_components/asusrouter/ to custom_components/asusrouter/ in your Home Assistant folder.
Usage
After AsusRouter is installed, you can add your device from Home Assistant UI.
To connect to the device you need to provide the following data:
- IP address or hostname
- Username (the one you use to log into the WebUI)
- Password
- Whether to use an SSL connection
Almost all the integration settings can be reconfigured later via the Configure button on the Integrations page without the need to remove your device and add it again.
Features
AsusRouter supports 14+ groups of features, including monitoring of:
- connected device, CPU, guest WLAN, LED, load average, network, OpenVPN, parental control, ports, RAM, temperature, WAN, WLAN.
and control of:
- gues WLAN, LED, OpenVPN, parental control, WLAN.
as well as the following HA platrorms:
binary_sensor,button,device_tracker,light,sensor,switch,update
and HA events and services.
Full list of features
Supported devices
AsusRouter supports virtually every AsusWRT-powered device.
WiFi 7 | 802.11be
| Model | Status | Tested firmware | Find it on Amazon1 |
|---|---|---|---|
| GT-BE98 | 💛 Expected to work | find it | |
| RT-BE96U | 💛 Expected to work | find it |
WiFi 6e | 802.11axe
| Model | Status | Tested firmware | Find it on Amazon1 |
|---|---|---|---|
| GT-AXE11000 | 💛 Expected to work | find it | |
| GT-AXE16000 | 💚 Confirmed | Stock:
388.21617 |
find it |
| RT-AXE7800 | 💛 Expected to work | find it | |
| ZenWiFi ET8 | 💛 Expected to work | find it | |
| ZenWiFi Pro ET12 | 💛 Expected to work | find it |
WiFi 6 | 802.11ax
| Model | Status | Tested firmware | Find it on Amazon1 |
|---|---|---|---|
| DSL-AX82U | 💚 Confirmed | Merlin:
386.07_0-gnuton0_beta2 |
find it |
| GT-AX11000 | 💚 Confirmed | Merlin:
386.7_2388.1_0 |
find it |
| GT-AX11000 Pro | 💛 Expected to work | find it | |
| GT-AX6000 | 💛 Expected to work | find it | |
| GT6 | 💛 Expected to work | find it | |
| RT-AX55 | 💚 Confirmed | Stock:
386.50410 |
find it |
| RT-AX56U | 💚 Confirmed | Merlin:
386.7_2 |
find it |
| RT-AX57 | 💛 Expected to work | find it | |
| RT-AX58U | 💚 Confirmed | Stock:
386.49674388.22237Merlin: 386.7_2388.1_0 |
find it |
| RT-AX59U | 💛 Expected to work | find it | |
| RT-AX68U | 💚 Confirmed | Stock:
388.21732 |
find it |
| RT-AX82U | 💚 Confirmed | Stock:
386.48664386.49674 |
find it |
| RT-AX86S | 💚 Confirmed | Stock:
386.46061386.48260386.49447388.22525Merlin: 386.7_2 |
find it |
| RT-AX86U | 💚 Confirmed | Stock:
386.46061386.48260386.49447388.22525Merlin: 386.7_2 |
find it |
| RT-AX86U Pro | 💛 Expected to work | find it | |
| RT-AX88U | 💚 Confirmed | Stock:
386.45934386.48631Merlin: 386.5_2386.8_0388.1_0 |
find it |
| RT-AX88U Pro | 💛 Expected to work | find it | |
| RT-AX89X | 💚 Confirmed | find it | |
| RT-AX92U | 💚 Confirmed | Stock:
386.46061 |
find it |
| TUF-AX4200 | 💛 Expected to work | find it | |
| TUF-AX5400 | 💚 Confirmed | Stock:
386.50224388.21224388_22525 |
find it |
| TUF-AX6000 | 💛 Expected to work | find it | |
| ZenWiFi AX (XT8) | 💚 Confirmed | Stock:
386.48706Merlin: 386.7_2-gnuton1 |
find it |
| ZenWiFi AX Hybrid (XP4) | 💛 Expected to work | find it | |
| ZenWiFi AX Mini (XD4) | 💚 Confirmed | Stock:
386.48790386.49599 |
find it |
| ZenWiFi Pro XT12 | 💚 Confirmed | Stock:
388.22127 |
find it |
| ZenWiFi XD4 Plus | 💛 Expected to work | find it | |
| ZenWiFi XD4S | 💛 Expected to work | find it | |
| ZenWiFi XD5 | 💛 Expected to work | find it | |
| ZenWiFi XD6 | 💚 Confirmed | Stock:
388.21380 |
find it |
| ZenWiFi XD6S | 💚 Confirmed | Stock:
388.21380 |
find it |
| ZenWiFi XT9 | 💛 Expected to work | find it |
WiFi 5 | 802.11ac
| Model | Status | Tested firmware | Find it on Amazon1 |
|---|---|---|---|
| 4G-AC55U | 💚 Confirmed | find it | |
| DSL-AC68U | 💚 Confirmed | Stock:
386.47534386.50117Merlin: 386.4-gnuton2386.7_2-gnuton1 |
find it |
| RT-AC51U | 💚 Confirmed | Stock:
380.8591 |
find it |
| RT-AC52U B1 | 💚 Confirmed | find it | |
| RT-AC5300 | 💚 Confirmed | Merlin:
386.7_2 |
find it |
| RT-AC57U V3 | 💚 Confirmed | Stock:
386.21649 |
find it |
| RT-AC58U | 💚 Confirmed | find it | |
| RT-AC66U | 💚 Confirmed | Merlin:
380.70_0 |
find it |
| RT-AC66U B1 | 💚 Confirmed | Stock:
386.51255 |
find it |
| RT-AC68U | 💚 Confirmed | Stock:
386.49703Merlin: 386.5_2386.7_0 |
find it |
| RT-AC85P | 💚 Confirmed | Stock:
382.52516 |
find it |
| RT-AC86U | 💚 Confirmed | Stock:
386.48260386.49709Merlin: 386.7_0386.7_2386.9_0 |
find it |
| RT-AC87U | 💚 Confirmed | Merlin:
384.13_10 |
find it |
| RT-AC88U | 💚 Confirmed | Stock:
386.48260Merlin: 386.7_beta1 |
find it |
| RT-ACRH17 | 💚 Confirmed | Stock:
382.52517 |
find it |
| ZenWiFi AC Mini(CD6) | 💛 Expected to work | find it |
WiFi 4 | 802.11n
| Model | Status | Tested firmware | Find it on Amazon1 |
|---|---|---|---|
| RT-N66U | 💚 Confirmed | find it |
New features development
Here is the list of features being in process of development or considered for the future development. If you cannot find the feature you would like to have in the integration, please, open a new feature request.
| Group | Feature | Status |
|---|---|---|
| Aura RGB |
|
on hold (a device with Aura RGB support is required for development and testing) |
| Connected device |
|
considered |
Support the integration
Issues and Pull requests
If you have found an issue working with the integration or just want to ask for a new feature, please fill in a new issue.
You are also welcome to submit pull requests to the repository!
Other support
This integration is a free-time project. If you like it, you can support me by buying a coffee.
Thanks to
The initial codebase for this integration is highly based on Home Assistant core integration AsusWRT and ollo69/ha_asuswrt_custom.
-
As an Amazon Associate I earn from qualifying purchases. Not like I ever got anything yet (: ↩ ↩2 ↩3 ↩4 ↩5
The asuswrt platform offers presence detection by looking at connected devices to a ASUSWRT based router.
This platform is NOT available for Microsoft Windows installations.
To use an ASUSWRT router in your installation, add the following to your configuration.yaml file:
# Example configuration.yaml entry
device_tracker:
  - platform: asuswrt
    host: YOUR_ROUTER_IP
    username: YOUR_ADMIN_USERNAME
Configuration variables:
- host (Required): The IP address of your router, eg.
192.168.1.1. - username (Required: The username of an user with administrative privileges, usually
admin. - password (Optional): The password for your given admin account (use this if no SSH key is given).
- protocol (Optional): The protocol (
sshortelnet) to use. Defaults tossh. - port (Optional): SSH port to use. Defaults to
22. - mode (Optional): The operating mode of the router (
routerorap). Defaults torouter. - ssh_key (Optional): The path to your SSH private key file associated with your given admin account (instead of password).
You need to enable telnet on your router if you choose to use protocol: telnet.
See the device tracker component page for instructions how to configure the people to be tracked.
Современные технологии позволяют нам сделать нашу жизнь более комфортной и удобной. Одним из таких революционных открытий стало появление умного дома. Управление бытовой техникой и устройствами можно осуществлять с помощью мобильного телефона или голосовых команд. Home Assistant – один из самых популярных инструментов для создания умного дома.
Настройка Home Assistant может быть сложной задачей, но если ваш роутер – ASUS, то у вас есть большие шансы на успех. ASUS имеет встроенную поддержку Home Assistant, что значительно упрощает процесс настройки и управления умным домом. В этой статье мы расскажем вам, как установить и настроить Home Assistant на роутере ASUS, а также предоставим несколько полезных советов для оптимальной работы.
Для начала, убедитесь, что ваш роутер ASUS поддерживает функцию Home Assistant. Это можно проверить на официальном сайте производителя или в руководстве пользователя. Если ваш роутер поддерживает Home Assistant, то следуйте нашей пошаговой инструкции для его установки. После этого вы сможете подключить различные устройства, такие как умные лампы, датчики движения и другие, и управлять ими через приложение на вашем мобильном устройстве.
Содержание
- Умный дом с home assistant на роутере Asus
- Инструкция по созданию умного дома
- Настройка home assistant на роутере asus
- Использование home assistant в повседневной жизни
- Советы по установке и настройке умного дома
- Расширение возможностей home assistant с помощью дополнительных устройств
Умный дом с home assistant на роутере Asus
Установка Home Assistant на роутер Asus имеет несколько преимуществ. Во-первых, это удобно, так как роутер Asus уже имеет Wi-Fi и Ethernet-порты, что позволяет легко подключить различные устройства к сети. Во-вторых, роутер Asus обладает достаточной вычислительной мощностью для работы с Home Assistant и его дополнительными модулями.
Для установки Home Assistant на роутер Asus необходимо выполнить несколько шагов. Во-первых, необходимо обновить прошивку роутера до последней версии. Затем нужно скачать и установить пакет Home Assistant из официального репозитория. После установки необходимо настроить Home Assistant, добавив необходимые устройства и настройки.
Роутер Asus также поддерживает интеграцию с другими устройствами и сервисами, такими как Google Assistant, Amazon Alexa и многими другими. Это позволяет дополнительно автоматизировать умный дом и управлять им с помощью голосовых команд.
Если вы уже используете умные устройства в своем доме, то Home Assistant на роутере Asus поможет объединить их в одну систему управления. Вы сможете контролировать умные лампы, термостаты, замки и другие устройства, а также создавать различные автоматизированные сценарии.
Устанавливать Home Assistant на роутер Asus можно самостоятельно, следуя инструкции от разработчиков или обращаясь за помощью к специалистам. В любом случае, вы получите удобную и гибкую систему умного дома, которая упростит вашу жизнь и сделает ее более комфортной.
Инструкция по созданию умного дома
Создание умного дома с использованием home assistant на роутере asus может показаться сложной задачей, но со следующими шагами вы сможете успешно реализовать свою систему умного дома.
| Шаг | Действие |
|---|---|
| Шаг 1 | Выберите подходящий роутер asus с поддержкой home assistant. |
| Шаг 2 | Подключите роутер к вашей домашней сети и установите все необходимые драйверы и программное обеспечение. |
| Шаг 3 | Зайдите в настройки роутера и настройте Wi-Fi сеть, добавьте все необходимые устройства и настройки безопасности. |
| Шаг 4 | Установите home assistant на роутер и настройте его в соответствии с вашими требованиями. |
| Шаг 5 | Подключите все устройства умного дома к роутеру и настройте их в приложении home assistant. |
| Шаг 6 | Настройте автоматизации и расписания для удобного управления вашим умным домом. |
Следуя этой инструкции, вы сможете создать умный дом, который будет удовлетворять вашим потребностям и обеспечивать комфорт и безопасность для вас и вашей семьи.
Настройка home assistant на роутере asus
Для настройки home assistant на роутере asus вам потребуется выполнить несколько шагов.
1. Установите home assistant на ваш роутер asus. Это можно сделать, следуя инструкциям на сайте home assistant.
2. После установки откройте веб-интерфейс роутера asus и найдите раздел «Настройки сети». Вам понадобится IP-адрес вашего роутера.
3. В настройках home assistant найдите раздел «Коммуникации» или «Соединение» и введите IP-адрес роутера asus.
4. Если ваш роутер имеет возможность перенаправления портов, найдите эту функцию и откройте порт 8123 для входящего и исходящего соединения.
5. После внесения всех настроек сохраните изменения и перезапустите home assistant.
Теперь вы сможете управлять вашим умным домом через home assistant, используя роутер asus. Убедитесь, что ваш роутер всегда включен и подключен к интернету для надежной работы home assistant.
Использование home assistant в повседневной жизни
1. Управление освещением. С помощью home assistant можно настроить автоматическое включение и выключение света в определенное время, при определенных условиях или на основе вашего местоположения. Также можно создать сценарии освещения для разных ситуаций, например, романтическую атмосферу или рабочее освещение.
2. Контроль температуры и климата. Home assistant может интегрироваться с устройствами отопления, кондиционирования и вентиляции. Это позволяет настраивать температуру в доме автоматически или удаленно управлять ей с помощью мобильного приложения.
3. Безопасность и видеонаблюдение. Home assistant может быть интегрирован с системой видеонаблюдения и домофоном. Вы сможете контролировать доступ к дому, просматривать видеофайлы и получать уведомления о движении или взломе.
4. Управление бытовой техникой. Home assistant позволяет подключать и управлять бытовыми устройствами, такими как стиральные и посудомоечные машины или кофеварки. Вы сможете настраивать их работу по расписанию или управлять ими удаленно.
5. Расширение функционала с помощью интеграций и плагинов. Home assistant имеет большое количество интеграций с устройствами и сервисами разных производителей. Это позволяет вам расширить функционал системы, добавив поддержку новых устройств или сервисов.
Home assistant — идеальное решение для тех, кто хочет сделать свой дом умным и удобным. С его помощью вы сможете значительно упростить и автоматизировать множество повседневных задач, что позволит вам сэкономить время и энергию.
Советы по установке и настройке умного дома
Установка и настройка умного дома может быть сложной задачей, но с правильным подходом и советами она может стать гораздо проще. Вот несколько советов, которые помогут вам успешно установить и настроить ваш умный дом:
1. Планирование и подготовка: Прежде чем приступать к установке, важно провести тщательное планирование. Решите, какие устройства и системы вы хотите включить в свой умный дом, и сделайте список необходимого оборудования. Также убедитесь, что ваш дом имеет надежное и стабильное подключение к Интернету.
2. Выбор платформы: Выберите подходящую платформу для управления вашим умным домом. Одним из самых популярных вариантов является home assistant, который предлагает широкие возможности по настройке и управлению устройствами.
3. Установка и настройка home assistant: Следуйте инструкциям для установки home assistant на ваш роутер ASUS. Убедитесь, что вы полностью понимаете процесс установки и следуйте указанным шагам. После установки настройте систему, добавив необходимые компоненты или устройства, и настройте правила автоматизации.
4. Интеграция устройств: Умный дом включает в себя различные устройства, такие как умные лампы, датчики движения, термостаты и многое другое. Приобретите совместимые устройства, следуйте инструкциям по их установке и настройке, а затем интегрируйте их с home assistant.
5. Настройка автоматизации: Home assistant позволяет настраивать различные автоматические действия, которые могут происходить по определенным сценариям. Например, вы можете настроить свет включаться автоматически при входе в комнату или температуру регулироваться в зависимости от времени суток. Используйте возможности автоматизации, чтобы упростить свою жизнь и сделать ваш умный дом более удобным.
6. Определение уровня безопасности: Обеспечьте уровень безопасности вашего умного дома, чтобы защитить его от потенциальных угроз. Используйте сильные пароли, обновляйте программное обеспечение и проверяйте наличие обновлений для своих устройств.
Следуя этим советам, вы сможете успешно установить и настроить умный дом с помощью home assistant на роутере ASUS. Не бойтесь экспериментировать и настраивать устройства согласно вашим потребностям и предпочтениям. Умный дом может превратить вашу жизнь в более комфортную и удобную с минимальными усилиями.
Расширение возможностей home assistant с помощью дополнительных устройств
Home assistant предоставляет широкие возможности для автоматизации управления домом. Однако, вы можете расширить его функциональность еще больше, добавив дополнительные устройства. Это поможет вам создать настоящий умный дом, который будет полностью соответствовать вашим потребностям и желаниям.
Одним из самых популярных способов расширения возможностей home assistant является добавление устройств на основе протокола Zigbee. Zigbee — это беспроводной протокол, который позволяет управлять различными устройствами в доме, такими как освещение, термостаты, датчики и многое другое. Чтобы добавить устройства на основе Zigbee в home assistant, вам потребуется Zigbee-контроллер, который можно подключить к роутеру asus.
Также вы можете расширить функциональность home assistant, добавив устройства на основе протокола Z-Wave. Z-Wave — это еще один беспроводной протокол для управления устройствами в доме. Он позволяет контролировать освещение, управлять устройствами безопасности, создавать сценарии и многое другое. Для добавления устройств на основе Z-Wave в home assistant, вам потребуется Z-Wave контроллер, который также можно подключить к роутеру asus.
Кроме того, вы можете добавить устройства на основе других протоколов, таких как Wi-Fi, Bluetooth или даже устройства с поддержкой инфракрасного управления. Например, вы можете добавить различные умные колонки, устройства безопасности, умные замки, системы видеонаблюдения и многое другое.
Важно отметить, что перед добавлением дополнительных устройств в home assistant, необходимо убедиться, что они совместимы с вашей установкой home assistant и поддерживаются необходимыми интеграциями. Вы также должны быть готовы к настройке и интеграции этих устройств в систему home assistant.
В итоге, расширение возможностей home assistant с помощью дополнительных устройств позволит вам создать настоящий умный дом, где вы сможете контролировать и автоматизировать все аспекты вашей жизни. Благодаря разнообразию устройств и протоколов, вы сможете создать собственную уникальную систему управления, которая полностью отвечает вашим потребностям и желаниям.