Homeassistant on OpenWrt
This repo provides tools to install the latest version of Home Assistant. (2022.12.x)
on a system with OpenWrt 21.02+ installed. It provides the reduced version of HA with only minimal list of components
included. Additionally, it keeps MQTT, ESPHome, and ZHA components as they are
widely used with smart home solutions.
It is distributed with a shell script that downloads and installs everything that required for a clean start.
Requirements:
- 256 MB storage space
- 128 MB RAM
- OpenWrt 21.02.0 or newer installed
Generic installation
Then, download the installer and run it.
wget https://raw.githubusercontent.com/openlumi/homeassistant_on_openwrt/21.02/ha_install.sh -O - | sh
After script prints Done. you have Home Assistant installed.
Start the service or reboot the device to get it start automatically.
The web interface will be on 8123 port after all components load.

The only components with flows included are MQTT and ZHA.
After adding a component in the interface or via the config
HA could install dependencies and fails on finding them after installation.
In this case restarting HA could work.
Other components are not tested and may require additional changed in
requirement versions or python libraries.
ZHA usage on Xiaomi Gateway
The component uses internal UART to communicate with ZigBee chip.
The chip has to be flashed with a proper firmware to be able to
communicate with the HA. The recommended firmware is v3.23:
https://github.com/openlumi/ZiGate/releases/download/55f8—20230114-1835/ZigbeeNodeControlBridge_JN5169_COORDINATOR_115200.bin
You could try another Zigate firmwares for JN5169 chip. The baud rate
must be 115200 as it is hardcoded in zigpy-zigate.
Use /dev/ttymxc1 port for ZHA configuration, it is connected to the zigbee chip.
It is REQUIRED to erase Persistent Data Manager (PDM) before adding new devices.
Otherwise, device adding fails.
Use luci zigbee tools submenu to send erase PDM command with the button or
erase PDM in console:
Zigbee port must not be locked with any program, like ZHA or zigbee2mqtt.
NOTE: It may require restarting Home Assistant after adding a new
component via the UI to let it see newly installed requirements.
E.g. ZHA installs paho-mqtt and will not allow configuring it unless HA is
restarted.
Enabling other components and installing custom
You may want to add more components to your HA installation.
In this case you have to download tar.gz from PyPI:
https://pypi.org/project/homeassistant/2022.12.0/#files
Then extract the content and copy the required components to
/usr/lib/python3.9/site-packages/homeassistant/components
If the component uses the frontend wizard, you may want to uncomment the
corresponding line in
/usr/lib/python3.9/site-packages/homeassistant/generated/config_flows.py
also.
Or you can create custom_components directory in /etc/homeassistant and
copy it there.
Try to install requirements from manifest.json with pip3 manually
to check it installs and doesn’t require pre-compiled C libraries.
Otherwise, you have to cross-compile python3 dependencies and install
them as ipk packages.
If the dependency is already installed via opkg or via pip3 you may want
to fix the strict dependency in manifest.json to a weaker one or remove
versions at all.
Уровень сложности
Средний
Время на прочтение
7 мин
Количество просмотров 5K
Предыстория
Имелся у меня машрутизатор на Raspberry Pi4 и на таком-же работал Home Assistant. В какой-то момент понадобился дополнительный UpLink в маршрутезаторе, по что был задействован USB-2-Ethernet адаптер. И всё бы было хорошо, но на ядрах 5.15 и выше, USB сетевой адаптер начал сбрасываться под нагрузкой. Некоторое время повозившись в попытках решить проблему, пришёл к выводу, что пора перетянуть маршрутизатор на что-то с большим количеством и не тратить время на решение проблем USB на RPi. Раз уж решил перевозить маршрутизатор, то и Home Assistant стоило разместить на одном устройстве с маршрутизатором.
Железо
Поиски адекватных вариантов на ARM с количеством независимых Eth портов не увенчался успехом, поэтому остановился на покупке мини пк на Алиэкспрес, вот такой вариант:
-
CPU: Intel Celeron N5105
-
Ethernet: 5xi226V 2.5Gb
-
Memory: 16Gb
-
SSD: 256Gb
В общем, железо с большим запасом и вполне приемлемой ценой, мне обошлось чуть менее $250 вместе с доставкой.
Установка OpenWRT
С этим всё по уже имеющимся докам, ни каких заморочек не возникло. Использовал образ, собранный самостоятельно при помощи openwrt-imagebuilder-22.03.3-x86-64. Пересобирал, с целью получить требуемые компоненты непосредственно в образе и не заниматься доустановкой ручками. Скрипт для сборки со списком компонентов:
#!/bin/sh
# Update imagebuilder from https://downloads.openwrt.org/snapshots/targets/x86/64/

# Be shure, to save /root /home and additional config files from /etc


# rpi-eeprom-update -a  --- eeprom firmware update

if [ -d ../files ]; then
        [ -d ./files ] && rm -rf ./files
        cp -a ../files ./
fi

# Set CONFIG_TARGET_ROOTFS_PARTSIZE=4096 in .config file
KERNEL_PARTSIZE=32
ROOTFS_SIZE=4096
sed -i -re "s/^(CONFIG_TARGET_KERNEL_PARTSIZE=).*$/\\1$KERNEL_PARTSIZE/" .config
sed -i -re "s/^(CONFIG_TARGET_ROOTFS_PARTSIZE=).*$/\\1$ROOTFS_SIZE/" .config

sed -i -re "s/256/1024/" target/linux/x86/image/Makefile

PACKAGES='\
        -dnsmasq        \
\
        kmod-usb-net-rtl8152    kmod-ipt-nat            kmod-crypto-sha256      kmod-i2c-core           kmod-scsi-generic       kmod-scsi-core          \
        kmod-i2c-smbus          kmod-i2c-gpio           kmod-mii                kmod-usb-net            kmod-usb-wdm            kmod-usb-net-qmi-wwan   \
        kmod-usb-net-cdc-mbim   kmod-usb-serial-option  kmod-usb-serial         kmod-usb-serial-wwan    kmod-usb-net-cdc-ether  kmod-usb-storage        \
        kmod-usb-xhci-hcd       kmod-ipt-nat-extra      kmod-inet-diag          kmod-bonding            kmod-kvm-intel          kmod-usb-storage-uas    \
        kmod-ipt-checksum       \
\
        screen                  sudo                    dmesg                   htop                    mc              \
        usbutils                bash                    zsh                     owfs                    openvpn-wolfssl         openssh-server  \
        openssh-client          nmap                    tcpdump                 umbim                   ethtool-full            uhubctl         \
        bind-client             bind-host               bind-nslookup           bind-server             bind-tools              bind-dig        \
        udpxy                   zabbix-agentd           i2c-tools               gcc                     make                    ntpd            \
        nginx-ssl               bwm-ng                  nmap                    lynx                    usb-modeswitch          uqmi            \
        procps-ng-sysctl        procps-ng-watch         procps-ng-uptime        procps-ng-top           procps-ng-tload         procps-ng-ps    \
        python3                 python3-setuptools      fdisk                   iptables-mod-checksum   \
        lua                     luasocket               luasec                  luabitop                iconv                   idn             \
        dnsmasq-full            block-mount             agetty                  mwan3                   bmon                    \
        qemu-firmware-efi       qemu-x86_64-softmmu     qemu-bridge-helper      qemu-img                \
        python3-paho-mqtt       \
\
        luci                    luci-base                       luci-nginx              luci-ssl-nginx                          \
        luci-proto-qmi          luci-proto-3g                   luci-proto-ipv6         luci-proto-ppp  luci-proto-ncm          \
        luci-theme-bootstrap    luci-theme-openwrt-2020         luci-proto-bonding      \
\
        luci-app-udpxy          luci-app-advanced-reboot        luci-app-acme                   luci-app-adblock        luci-app-acl            \
        luci-app-aria2          luci-app-bcp38                  luci-app-attendedsysupgrade     luci-app-clamav         luci-app-commands       \
        luci-app-transmission           luci-app-dcwapd                 luci-app-ddns           luci-app-diag-core      \
        luci-app-dnscrypt-proxy luci-app-firewall               luci-app-frpc                   luci-app-frps           luci-app-fwknopd        \
        luci-app-hd-idle        luci-app-https-dns-proxy        luci-app-ksmbd                  luci-app-lxc            luci-app-minidlna       \
        luci-app-mwan3          luci-app-nextdns                luci-app-nft-qos                luci-app-nlbwmon        luci-app-nut            \
        luci-app-openvpn        luci-app-vnstat                 luci-app-opkg                   luci-app-qos            luci-app-squid          \
        luci-app-statistics     luci-app-upnp                   luci-app-mwan3\
\
        luci-mod-admin-full     luci-mod-network                luci-mod-status         luci-mod-system                 luci-mod-rpc            \
\
        luci-i18n-acl-ru                luci-i18n-acme-ru       luci-i18n-adblock-ru    luci-i18n-advanced-reboot-ru    luci-i18n-aria2-ru              \
        luci-i18n-attendedsysupgrade-ru luci-i18n-base-ru       luci-i18n-qos-ru        luci-i18n-bcp38-ru              luci-i18n-bmx7-ru               \
        luci-i18n-clamav-ru             luci-i18n-commands-ru   luci-i18n-dcwapd-ru             luci-i18n-ddns-ru               \
        luci-i18n-diag-core-ru          luci-i18n-firewall-ru   luci-i18n-frpc-ru       luci-i18n-frps-ru               luci-i18n-dnscrypt-proxy-ru     \
        luci-i18n-fwknopd-ru            luci-i18n-hd-idle-ru    luci-i18n-ksmbd-ru      luci-i18n-https-dns-proxy-ru    luci-i18n-lxc-ru                \
        luci-i18n-minidlna-ru           luci-i18n-mwan3-ru      luci-i18n-nextdns-ru    luci-i18n-nft-qos-ru            luci-i18n-nlbwmon-ru            \
        luci-i18n-nut-ru                luci-i18n-openvpn-ru    luci-i18n-opkg-ru       luci-i18n-pbr-ru                luci-i18n-mwan3-ru              \
'
#       -wpad-basic-mbedtls -libustream-mbedtls -libmbedtls     -cshark

FILES="files/"

make -j $(nproc) image PROFILE=generic ADD_LOCAL_KEY=1 BIN_DIR=$(pwd)/../images/ PACKAGES="$PACKAGES" FILES="$FILES"
Собираем образ, заливаем на USB Flash, загружаемся с него и далее заливаем образ на строенный ssd.
Далее, рекомендую создать дополнительный раздел, такого-же размера, как и rootfs. Это упростит дальнейшее обновление OpenWRT, т.к. стандартные механизмы для x86 не работают. Имея доп раздел, можно на него разворачивать новый rootfs, перекидывать конфиги и после этого переключать загрузку на использование второго rootfs. Первый, в это время, будет резервным старой версии. На этом, с OpenWRT всё. Все остальные его настройки у каждого свои 
Установка Home Assistant
С этим у меня возникли некоторые сложности — предлагаемый вариант OVA образа работает в QEMU, но со сбоями — то перезагрузится, а то и вовсе — зависнет. Естественно, такой вариант для системы автоматизации ни как не годится. Посему, используем haos_generic-x86-64. Я остановился на пер релизе 10.0.rc3. Первым делом нам потребуется увеличить размер самого образа, что бы при первом запуске, автоматически, подстроился размер раздела (умолчательный в районе 6Гб, что маловато). Я свой образ растянул на 48Гб:
dd if=/dev/zero of=haos_generic-x86-64-10.0.rc3.img seek=HAsize bs=4k count=ResultSize
Здесь, HAsize — указываем размер образа в блоках (6442450944/4096=1572864), ResultSize = желаемый размер образа в блоках, в моём случае, для 48Гб: 12582912.
Далее, создаём скрип для запуска образа в qemu. Тут основная сложность в том, что большинство используют его через libvirt, а его нет собранного для OpenWRT, поэтому привожу сразу свой скрипт для запуска/завершения работы вирт.машины. Самое сложное в нём, это корректное выключение виртуальной машины. Располагаем скрипт в /etc/init.d/qemu-ha
#!/bin/sh /etc/rc.common

START=99
STOP=1

HA_DIR='/Path_where_your_HAOS_image_stored'
IMG='haos_generic-x86-64-10.0.rc3-48Gb.img'

QEMU_OPTS="-enable-kvm -cpu host -smp 2 -m 8G \
    -hda $HA_DIR/$IMG  \
    -device e1000,mac=E2:F2:6A:01:9D:C9,netdev=br0 \
    -netdev bridge,br=br-lan,id=br0 \
    -smbios type=0,uefi=on \
    -bios $HA_DIR/OVMF_CODE.fd \
    -action shutdown=poweroff \
    -qmp tcp:127.0.0.1:4444,server,nowait \
    -vnc :0 "

qemu_pidfile="/var/run/qemu.pid"

start() {
    /usr/bin/qemu-system-x86_64 $QEMU_OPTS \
        -daemonize &> /var/log/qemu.log

    /usr/bin/pgrep qemu-system-x86_64 > $qemu_pidfile
    echo "QEMU: Started VM with PID $(cat $qemu_pidfile)."
}

stop() {
    echo "QEMU: Sending 'system_powerdown' to VM with PID $(cat $qemu_pidfile)."

    nc 127.0.0.1 4444 <<QMP
{ "execute": "qmp_capabilities" }
{ "execute": "input-send-event",
     "arguments": { "events": [
        { "type": "key", "data" : { "down": true,
          "key": {"type": "qcode", "data": "power" } } } ] } }
QMP

    if [ "$?" == "0" ]; then
        if [ -e $qemu_pidfile ]; then
                if [ -e /proc/$(cat $qemu_pidfile) ]; then
                        echo "QEMU: Waiting for VM shutdown."
                        while [ -e /proc/$(cat $qemu_pidfile) ]; do sleep 1s; done
                        echo "QEMU: VM Process $(cat $qemu_pidfile) finished."
                else
                        echo "QEMU: Error: No VM with PID $(cat $qemu_pidfile) running."
                fi
            rm -f $qemu_pidfile
        else
                echo "QEMU: Error: $qemu_pidfile doesn't exist."
        fi
    else
        echo "QEMU: Error: QMP interface can't accept connections or unavailable."
    fi
}
Для автоматического запуска, выполняем: /etc/init.d/qemu-ha enable
Ну и запускаем машину: /etc/init.d/qemu-ha start
Для отладки, к машине можно подключиться по VNC, на пример, используя krdc.
И на последок — скрипт, для мониторинга температуры процессора в HA через mqtt:
#!/usr/bin/env python3
# coding=utf-8
# -*- coding: utf-8 -*-

import paho.mqtt.client as mqtt
import time
import json
import os, random

pid=os.getpid()
with open('/var/run/host_mon_mqtt.pid', "w") as f: f.write(str(pid))

broker_address="192.168.1.4"
topic = "Router state"
sensor_data = {'temperature_cpu': 0, 'temperature_board': 0}

########################################
#broker_address="iot.eclipse.org"
print("Creating new instance")
client = mqtt.Client(topic) #create new instance

print("connecting to broker")
client.connect(broker_address) #connect to broker

while not client.is_connected():
    client.loop()

client.loop_start() #start the loop

try:
    while True:
        with open('/sys/class/thermal/thermal_zone1/temp', "r") as f: temp1 = f.read().strip()
        with open('/sys/class/thermal/thermal_zone0/temp', "r") as f: temp2 = f.read().strip()
        if temp1: temp1 = round(int(temp1)/1000, 2)
        if temp2: temp2 = round(int(temp2)/1000, 2)
        if (temp1 != sensor_data['temperature_cpu'] or temp2 != sensor_data['temperature_board']):
                sensor_data['temperature_cpu'] = temp1
                sensor_data['temperature_board'] = temp2
                print("Temp is: ", temp1, temp2)
                client.publish('zigbee2mqtt/'+topic, json.dumps(sensor_data), 1)
        time.sleep(5)

except KeyboardInterrupt:
    pass

client.loop_stop()
client.disconnect()
И инит скрипт для него, располагаем /etc/init.d/host_mon_mqtt
#!/bin/sh /etc/rc.common

START=99
STOP=1

prog_name="mqtt-temp.py"
prog="/mnt/Storage/HomeAssistant/tools/${prog_name}"
pidfile="/var/run/host_mon_mqtt.pid"

start() {
    $prog > /var/log/${prog_name}.log 2>&1 &
    echo "Host monitoring to MQTT: Started with PID $(cat $pidfile)."
}

stop() {
    pid=$(cat $pidfile)
    echo "Host monitoring to MQTT: PID ${pid} shutdown."
    kill $pid
}
Заключение
На данный момент, система работает без сбоев. Запас производительности огромный. Всё стабильно. По завершению обкатки и после первых обновление OpenWRT, постараюсь дополнить.
По факту испытаний, выяснилось, что падения qemu были связаны с ошибками в microcode для kvm на процессорах Intel N5105. Версии микрокода до 0x24000024 (2022-09-02) падают. Лечится очень просто, скачиваем firmware вот тут. В каталог /lib/firmware/intel-ucode и будет стабильно работать.
Introduction
This blog will talk about how you can control your smart home appliances using Home Assistant running on the OpenWrt System by Seeed. Here I will explain how you can set up everything step-be-step. Also, I will use the reTerminal LCD to view the Home Assistant dashboard to visualize the connected devices.
What is OpenWrt?
OpenWrt is an open-source Linux operating system which runs on embedded devices/ routers. It offers more features, performance and security than a traditional router. It has a filesystem that’s fully writable and includes a package management system. You can make use of these packages to suit your applications in various ways.
By using OpenWrt you can have various features such as:
- Increase overall network performance when multiple devices are connected
- Share files between devices via an external storage drive connected directly to the router
- Increase network security
- Run a BitTorrent client from the router
- Connect a printer directly to the router to create a networked printer
- Limit bandwidth usage of a particular device in the network
- Active queue management
- Real time network monitoring
- Create Dynamic DNS
- Set Up a VPN client or server
What is OpenWrt System by Seeed?
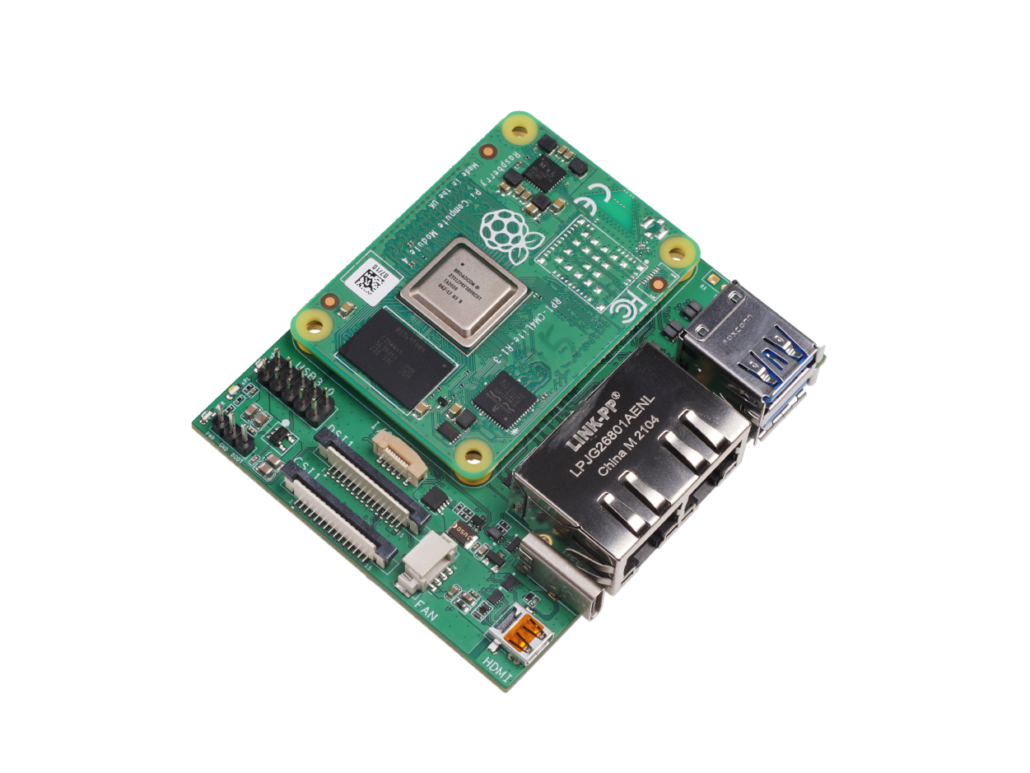
Openwrt System by Seeed is a great way to add some great Luci applications to the latest version of OpenWrt. It provides a stable, flexible, and easy-to-use OpenWrt system for CM4 and x86 based hardware devices.

ODYSSEY – X86J4125 
Dual Gigabit Ethernet Carrier Board for RPi CM4
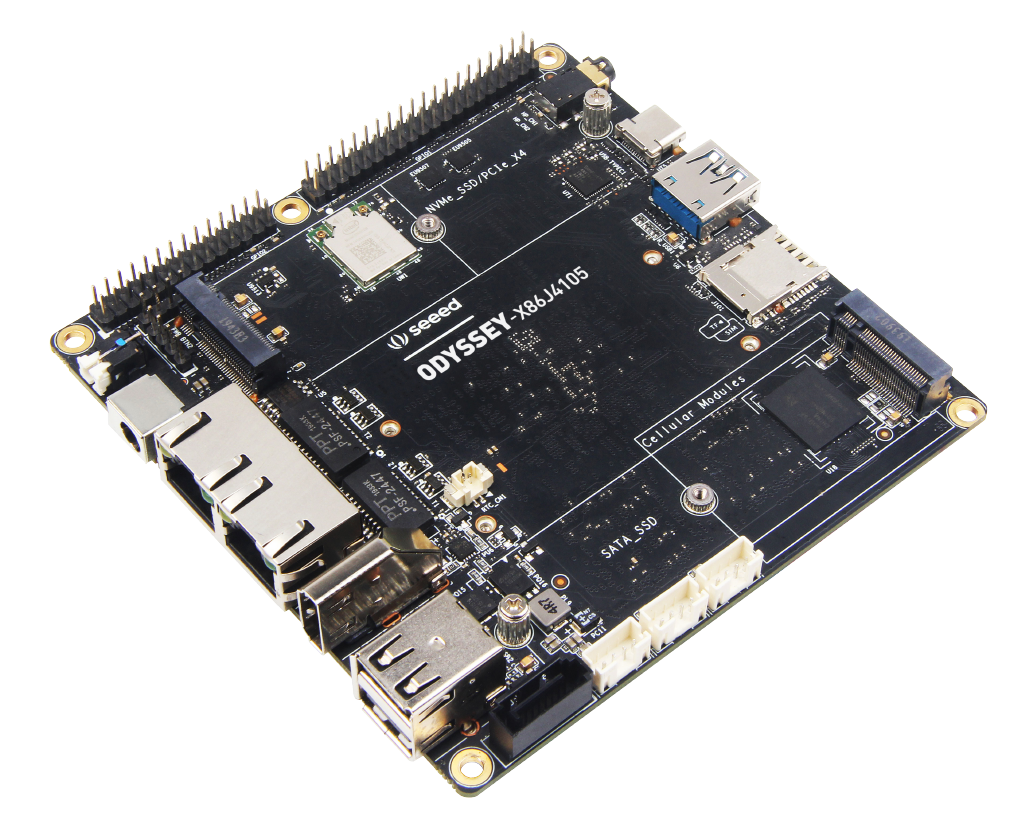
Seeed’s OpenWrt system provides not only basic routing functions but also platform software for HomeLab, AIoT, allowing users to quickly implement different scenarios.
What is Home Assistant?
Home Assistant is a free and open-source software for home automation that is designed to be the central control system for smart home devices. It can be accessed via a web-based user interface, via companion apps for Android and iOS, or using voice commands via a supported virtual assistant like Google Assistant or Amazon Alexa.
Home assistant enables the local control of smart home devices, offering better security, greater reliability, and more flexibility than many cloud-connected devices.
Home Assistant can be installed using various methods on various different hardware. You can compare the installation methods by visiting this table.
In this guide, I will show you how you can install Home Assistant as a Docker container on the OpenWrt System by Seeed!
What is Docker?
Docker is an open platform for developing, shipping, and running applications. Docker provides the ability to package and run an application in a loosely isolated environment called a container. The isolation and security allow you to run many containers simultaneously on a given host. Containers are lightweight and contain everything needed to run the application, so you do not need to rely on what is currently installed on the host. You can easily share containers while you work, and be sure that everyone you share with gets the same container that works in the same way.
So now, let’s start building our Home Assistant application!
Smart Home Dashboard with Home Assistant on OpenWrt
In this guide, I will control Xiaomi Yeelight Smart Bulbs, visualize the statistics of the Host and display current date/ time using Home Assistant. However, if you have other smart devices you can control them as well using Home Assistant. But the setting up process will be a little different for other different smart devices and therefore this guide can be used as a reference. First let’s look at the hardware we will be using
Hardware Needed
- Xiaomi Yeelight Smart Bulbs (or any other smart bulb)
- ODYSSEY – X86/ CM4 Dual Gigabit Ethernet Carrier Board
Install Home Assistant as a Docker Container on OpenWrt
Step 1: Prepare an ODYSSEY – X86 board or the CM4 Dual Gigabit Ethernet Carrier Board with the OpenWrt System by Seeed. Follow this guide for an initial getting started
Step 2: Open a web browser on your PC and type 192.168.2.1 to access the OpenWrt Luci web UI
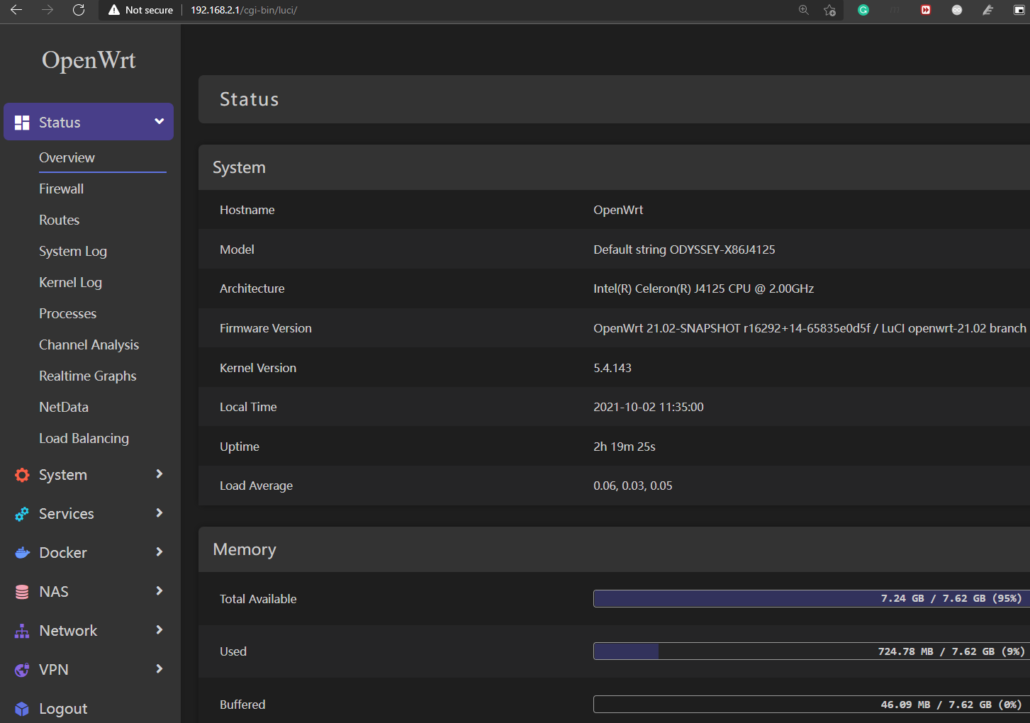
Note: If your OpenWrt router has different IP address from 192.168.2.1, please replace it with your router’s IP address
Step 3: Navigate to Docker > Images and type homeassistant/ home-assistant:stable under “Pull Image”
Step 4: Click “Pull” to download the image
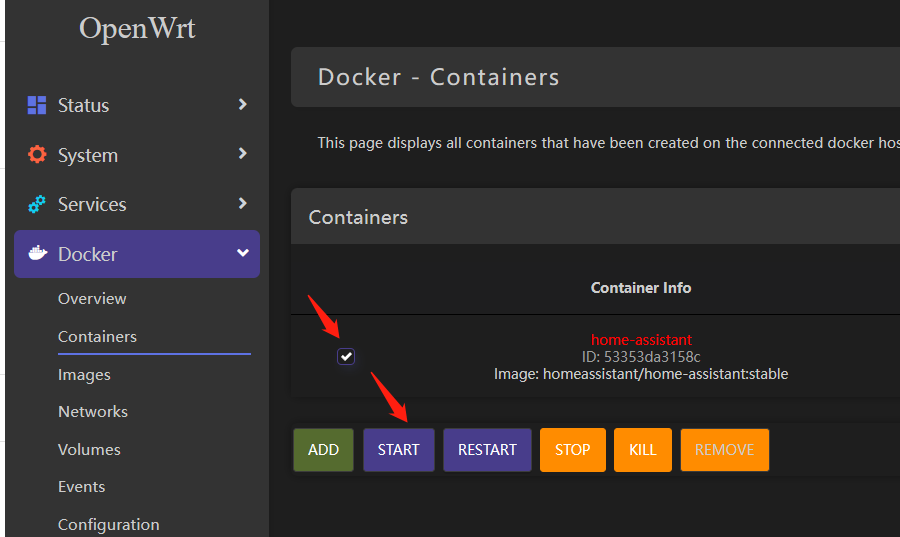
Step 5: Navigate to Docker > Containers and click “Add” to create a new container
Step 6: Fill the columns according to the following:
- Container Name: home-assistant
- Docker Image: homeassistant/home-assistant:stable
- Restart Policy: Unless stopped
- Networks: host | host
- Environmental Variable (-e): TZ= (you can find a list of the TZ names here- https://en.wikipedia.org/wiki/List_of_tz_database_time_zones)
- Bind Mount(-v): /root/hassio:/config
Note: Here we create a new directory (/root/hassio) inside the OpenWrt system and then we link that directory to the /config directory which is present inside the Docker container. In this way, even though we close the container, all our data will remain inside the (/root/hassio) in the OpenWrt System and once we start the container again, the /config directory will sync with (/root/hassio) directory again.
Step 7: Finally click “Submit”
Step 8: Under the “Containers” tab, tick the checkbox beside the container that we created and click “Start” to run the container
Home Assistant Initial Set Up
Now that we have started home assistant, let’s dive into the initial setup
Step 1: Type http://192.168.2.1:8123 to enter the Home Assistant Dashboard
Note: The IP address is according to the IP address of the OpenWrt device
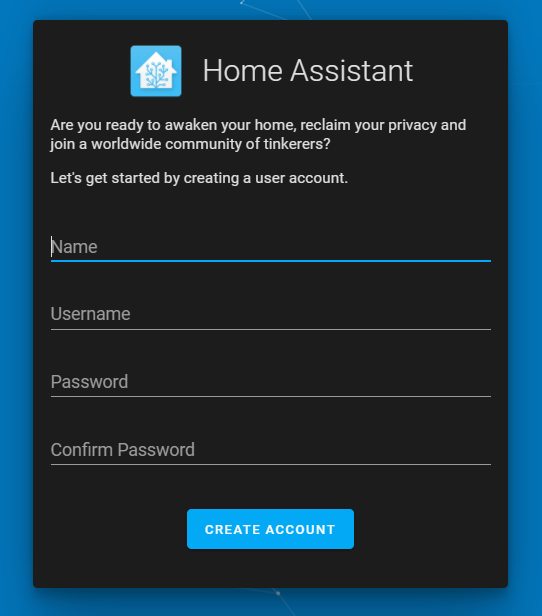
Step 2: Go through the initial set up such as filling out a username, password, setting home location, etc.
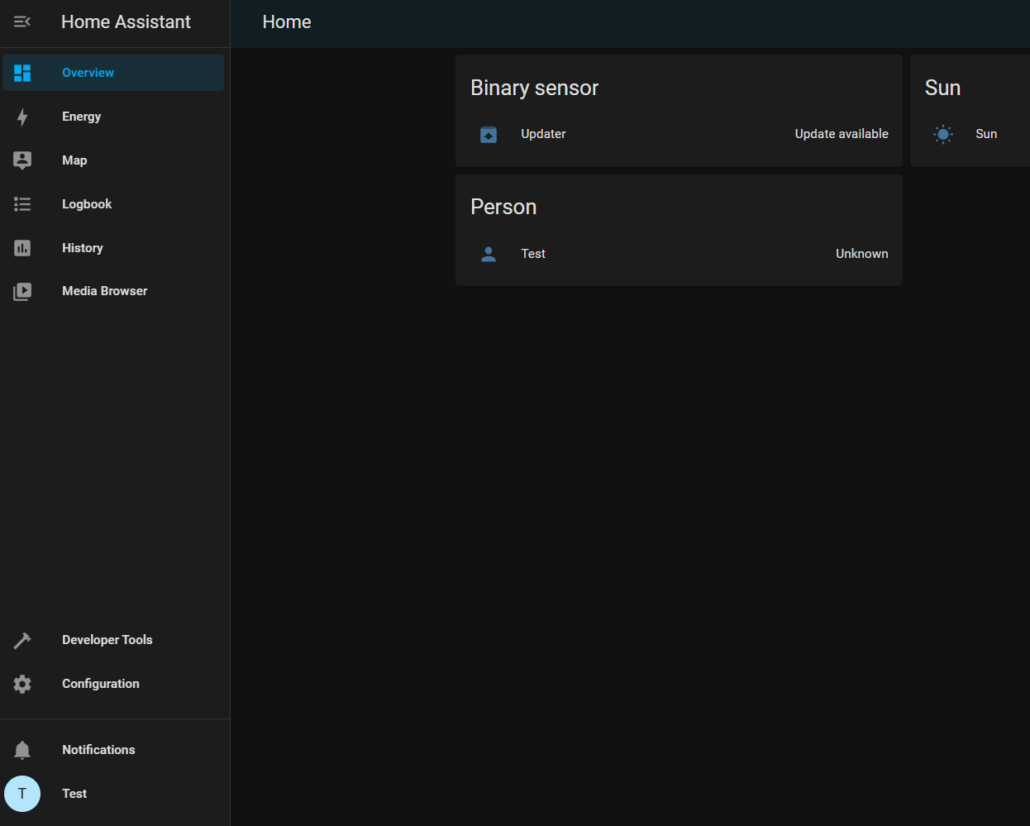
Once you have finished the initial setup, you will be presented with this interface
Add Smart Lamps to the Dashboard
Now let’s add a few smart lamps to this dashboard, so that we can control them. Here I will be using Xiaomi Yeelight Smart Bulbs. If you use other smart bulbs, the set up will be a little different and you can check online resources for setting up the smart bulbs you have. We will start fresh with a blank dashboard
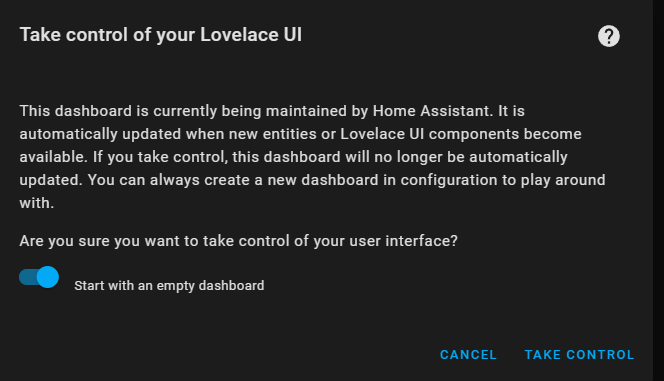
Step 1: Click on the 3 dots on the top right corner and click “Edit Dashboard”

Step 2: Turn on the switch that says, “Start with an empty dashboard” and then click “TAKE CONTROL”
Now let’s add one bulb to start.
Step 3: Turn on the Yeelight Smart bulb
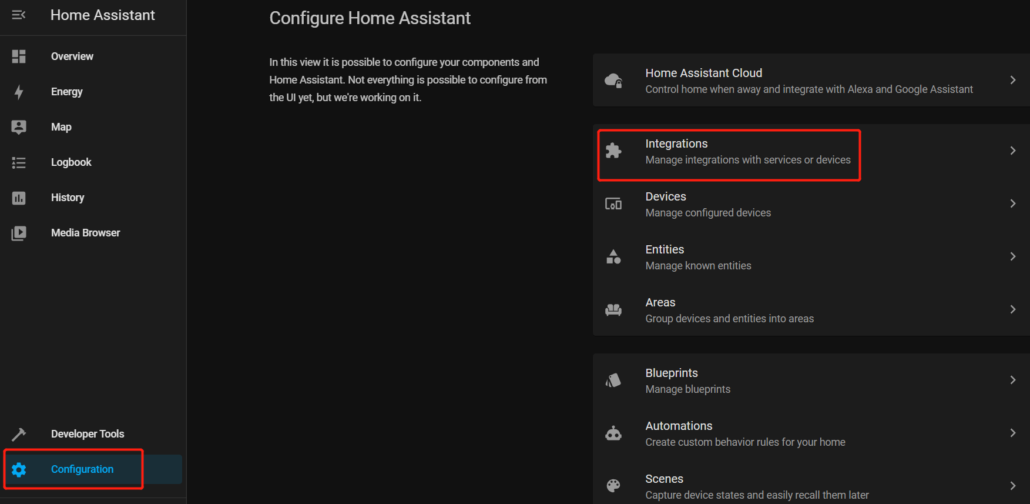
Step 4: Navigate to Configuration > Integrations
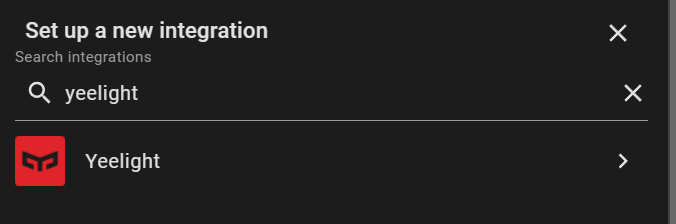
Step 5: Click on “+ ADD INTEGRATION” and type “Yeelight” and click on it
If the device is automatically discovered, you will see the following
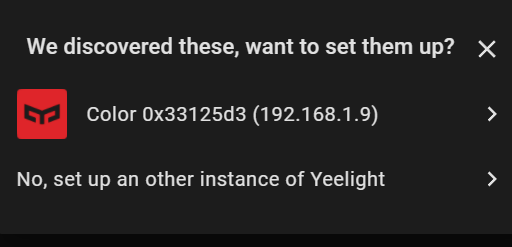
If it is not automatically discovered, you will have to add the IP address the device manually. You can find the IP address by logging into your router and checking the connected devices
Step 6: After you add the integration, go back to “Overview”
Step 7: Click on the 3 dots on the top right corner as before and click “Edit Dashboard”
Step 8: Click “+ ADD CARD”
Step 9: Search for Light Card and click on it
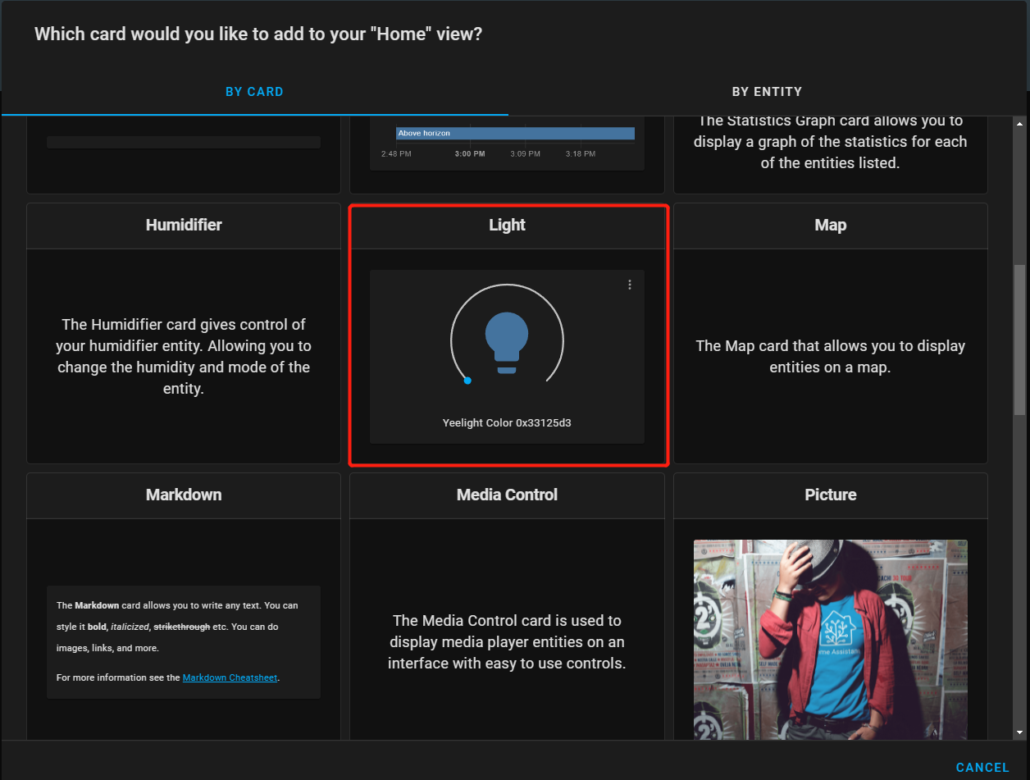
Step 10: Change the name and click Save

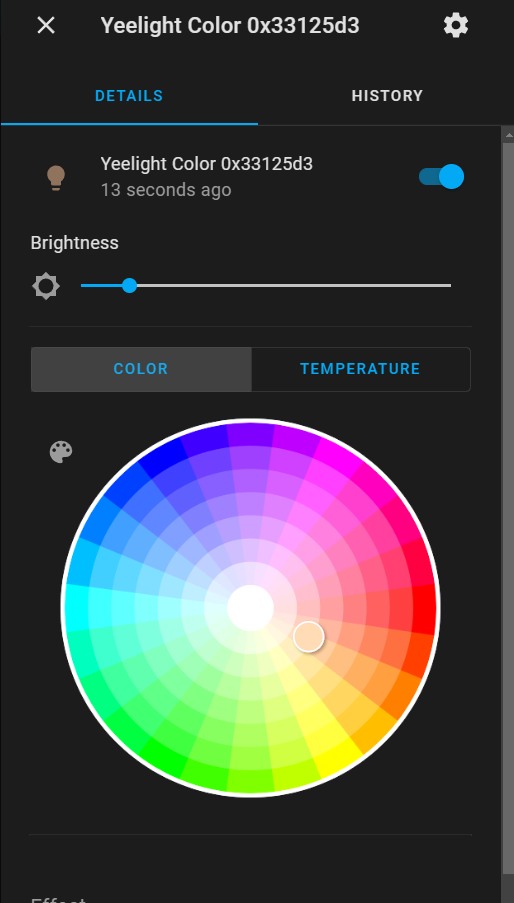
You will now see the created Light Card on the Home Assistant Dashboard
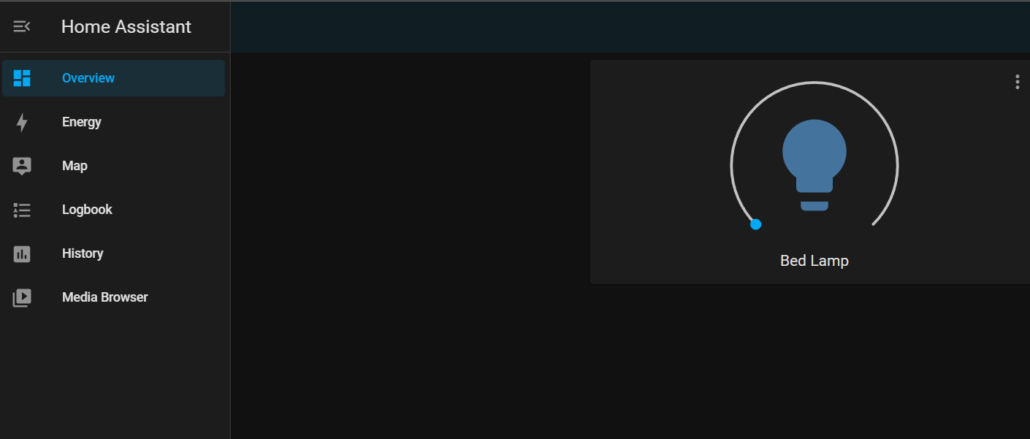
Here you will be able to turn on/ off the lamp by pressing on the lamp icon and also use the slider to control the brightness. You can click on the “3 dots” to change the color and the color temperature as well.
Step 11: Repeat step 5 and step 6 to add more smart bulbs
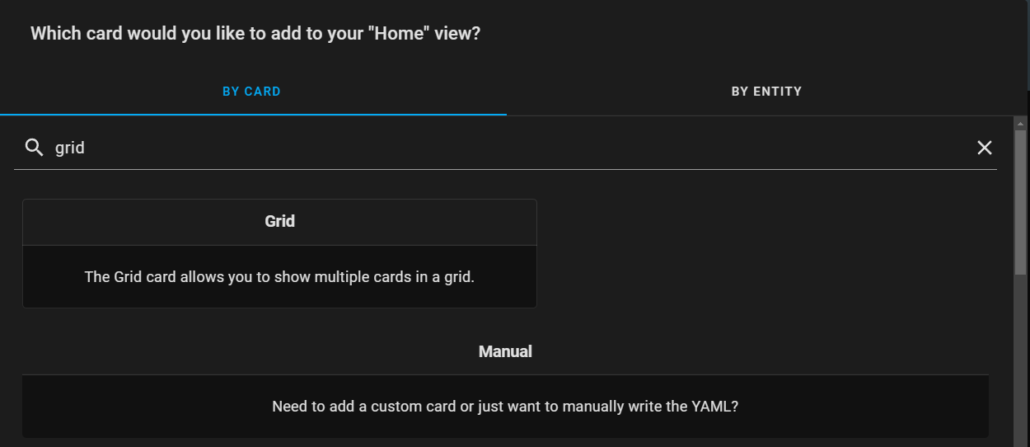
Now let’s add 4 bulbs into the home assistant dashboard
Step 12: Go to the “+ ADD CARD” window and search for “grid”, which is the grid card
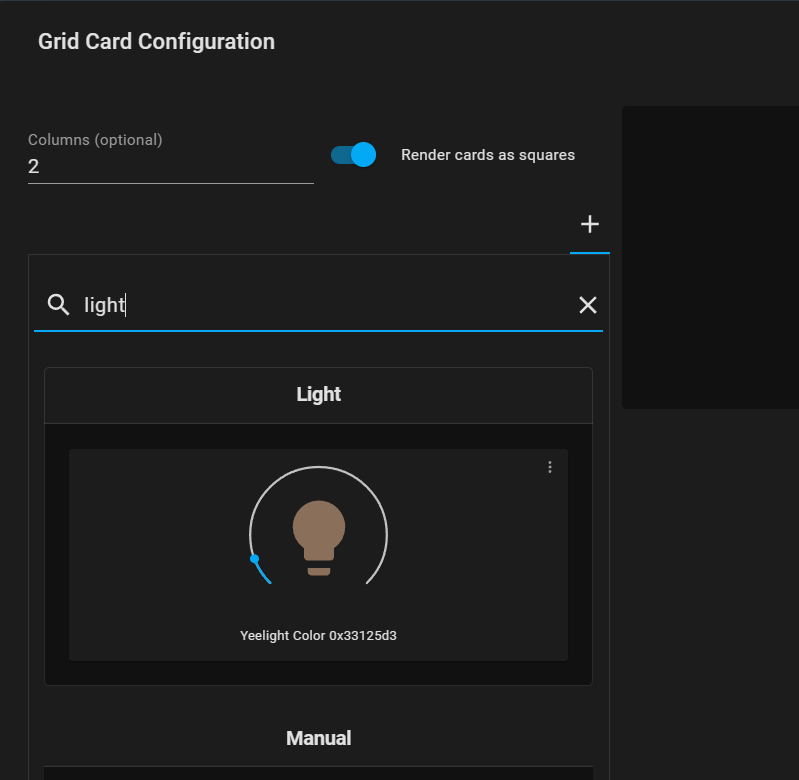
Step 13: Set the Columns to “2” and check “Render cards as square”
Step 14: Search for “Light” card and click on it
Step 15: Change the Name as before
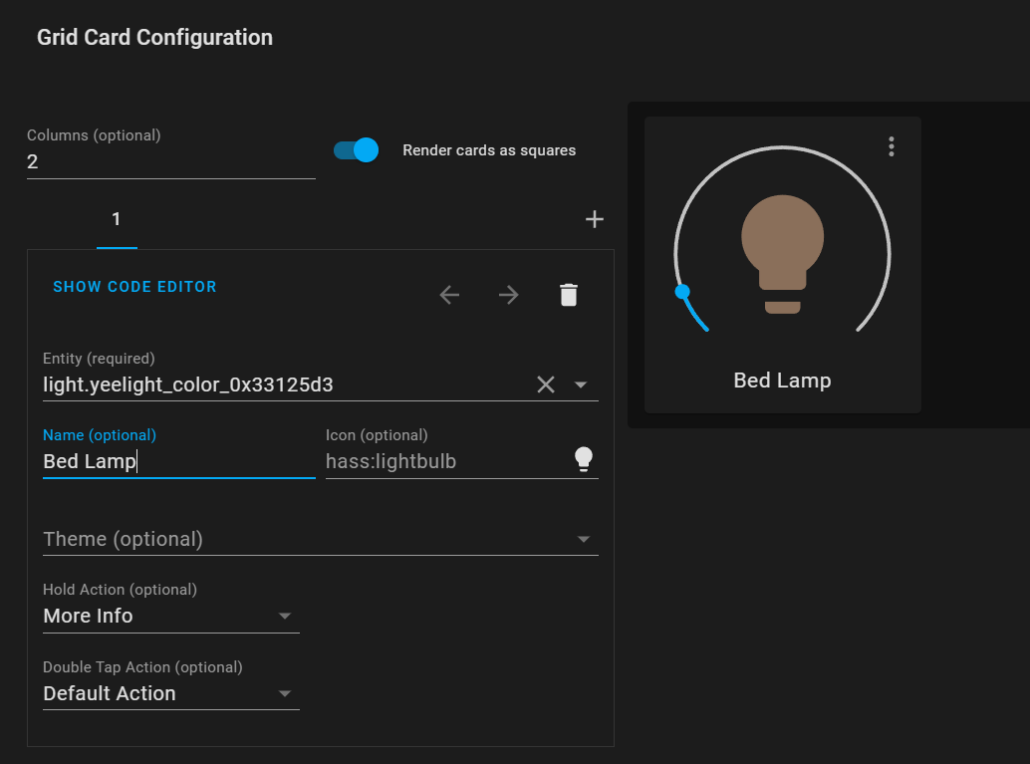
Step 16: Click on the “+” button and repeat the same for the remaining 3 bulbs
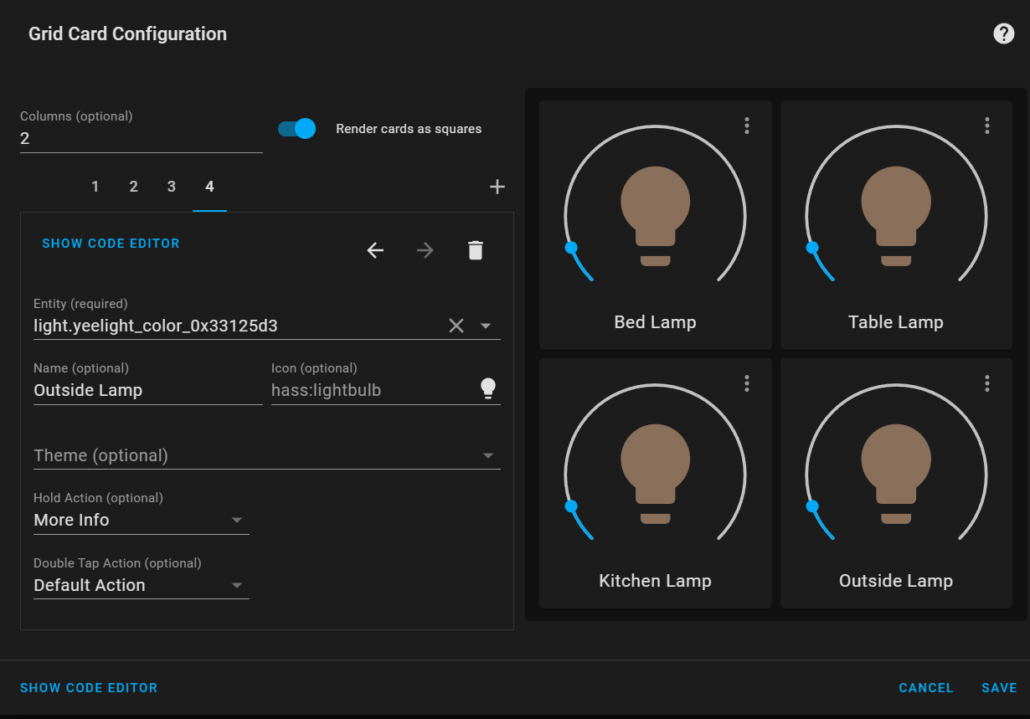
Step 17: Make sure to select the correct bulb from this drop-down list
Step 18: Finally Click Save
Step 19: Delete the light card that we created in the very beginning
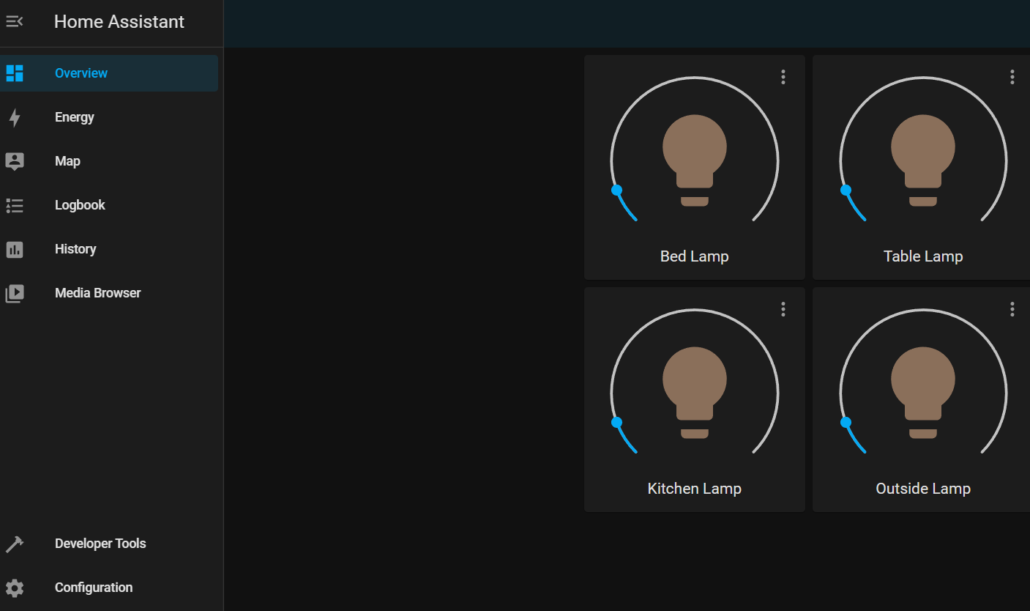
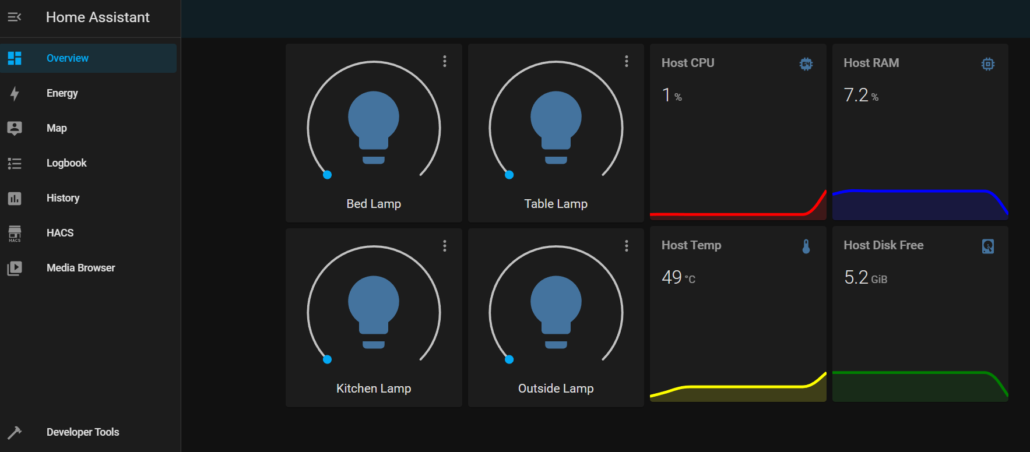
Now the dashboard will look like this, and you can control all 4 lamps easily!
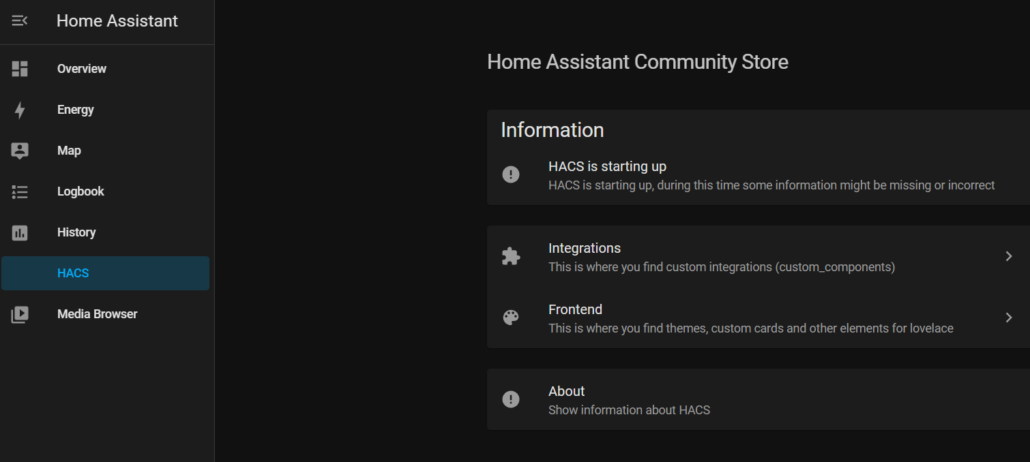
Install HACS (Home Assistant Community Store)
Now we will install HACS which is the Home Assistant Community Store. After installing HACS, we will be able to change the theme, and add custom elements such as much better-looking cards.
Step 1: Go to OpenWrt Luci Web UI
Step 2: Navigate to Docker > Containers
Step 3: Click on the running Home Assistant container
Step 4: Click the Console tab and click CONNECT
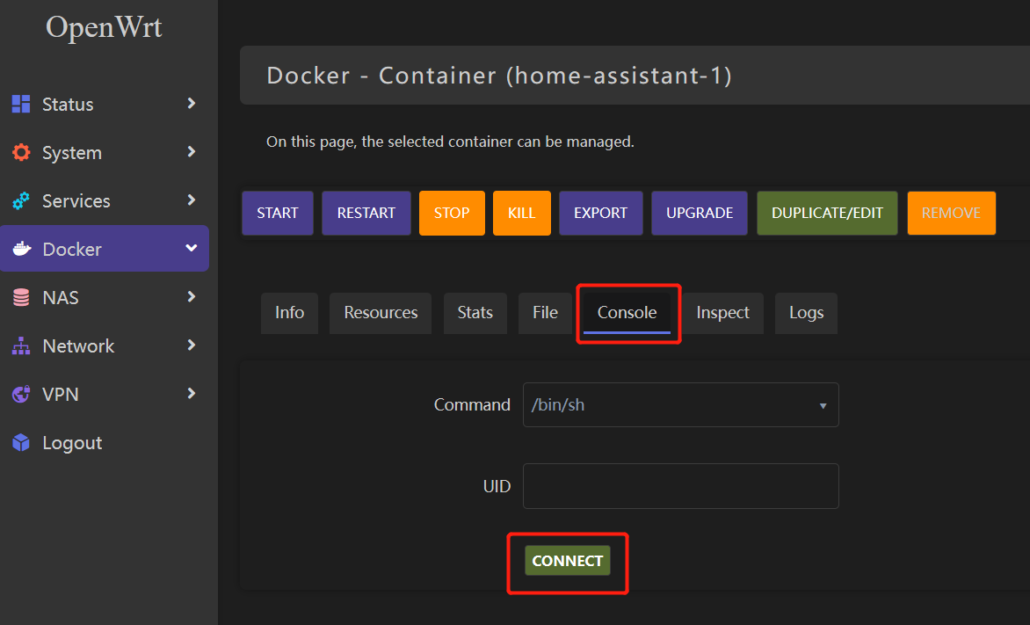
Step 5: Execute the following:
wget -O - https://get.hacs.xyz | bash –Step 6: Finally, go back to Docker > Containers, select the container and RESTART it
Step 7: Open Home Assistant dashboard and navigate to Configuration > Integrations
Step 8: Search for “HACS” and install it
Note: You will be prompted to authorize HACS with your GitHub. Please login to your GitHub, authorize HACS and finish the setup
Finally you will see HACS on your Home Assistant sidebar
Add Host statistics to the Dashboard
Now let’s add cards to show different statistics of the host such as CPU usage, RAM usage, CPU Temperature and HDD free space.
Step 1: First of all, we need to edit a file called “configuration.yaml”, so that the hardware usage stats entries will be available for us
Step 2: Go back to OpenWrt Luci web UI
Step 3: Navigate to Service > Terminal and login with your OpenWrt device credentials
Step 4: Navigate to /root/hassio
cd /root/hassioStep 5: Type the following to open the configuration.yaml file
nano configuration.yamlStep 6: Add the following
sensor:
  - platform: systemmonitor
    resources:
      - type: processor_use
      - type: disk_use_percent
        arg: "/"
      - type: disk_free
        arg: "/"
      - type: memory_use_percent
      - type: network_in
        arg: eth0
      - type: throughput_network_in
        arg: eth0
      - type: network_out
        arg: eth0
      - type: throughput_network_out
        arg: eth0
      - type: processor_temperature
      - type: last_boot
Step 7: Press Ctrl+X to exit and finally Press “Y” to save it
Step 8: Go back to Docker > Containers and restart the container
Step 9: Open Home Assistant Dashboard again and go to HACS
Step 10: Click “Frontend”
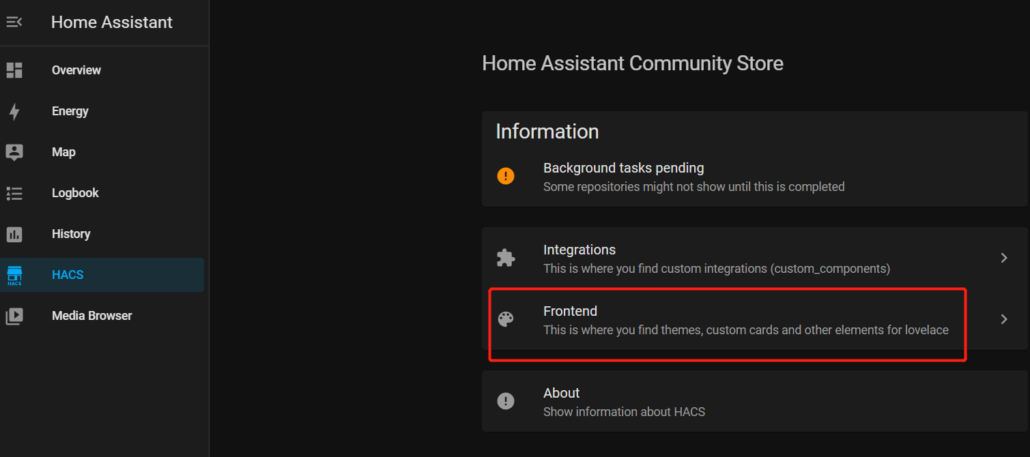
Step 11: Click “+ EXPLORE & ADD REPOSITORIES” and type “mini-graph”
Step 12: Click on the search result, and install it

Step 13: Restart Home Assistant
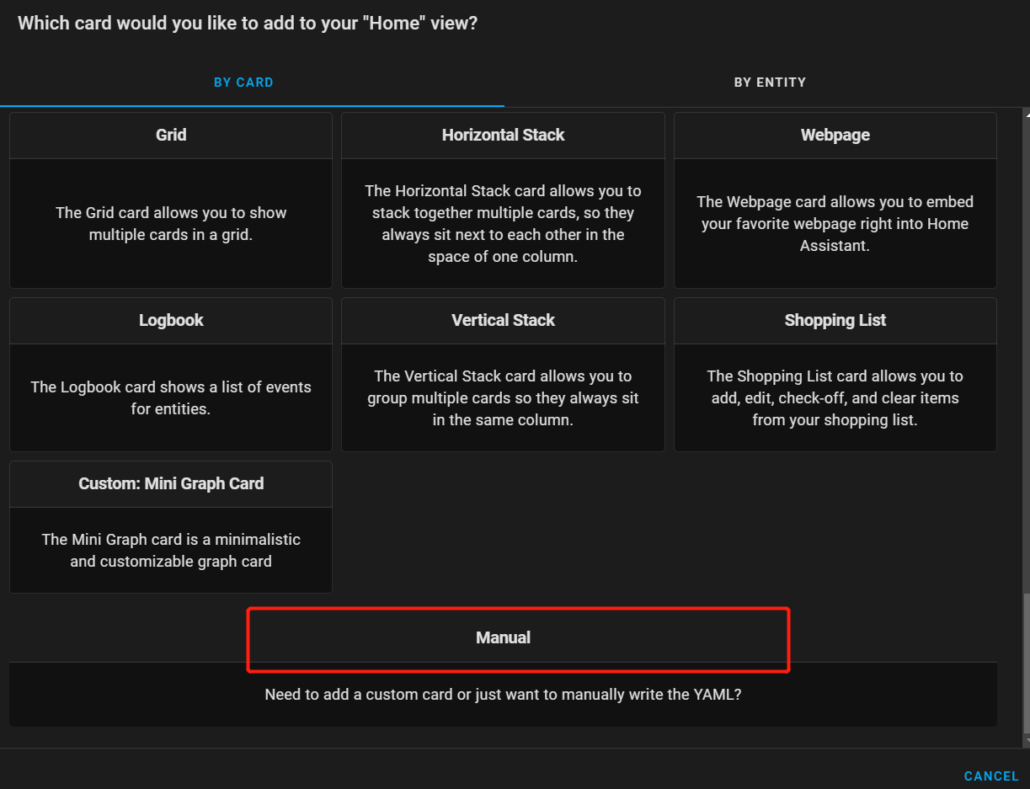
Step 14: Open the “+ ADD CARD” window within the dashboard
Step 15: Select to manually write the YMAL
Step 16: Copy and paste the following code inside the code editor
type: grid
cards:
  - type: custom:mini-graph-card
    entities:
      - sensor.processor_use
    line_color: red
    line_width: 8
    font_size: 75
    name: Host CPU
  - type: custom:mini-graph-card
    entities:
      - sensor.memory_use_percent
    line_color: blue
    line_width: 8
    font_size: 75
    name: Host RAM
  - type: custom:mini-graph-card
    entities:
      - sensor.processor_temperature
    line_color: yellow
    line_width: 8
    font_size: 75
    name: Host Temp
  - type: custom:mini-graph-card
    entities:
      - sensor.disk_free
    line_color: green
    line_width: 8
    font_size: 75
    name: Host Disk Free
columns: 2
square: true
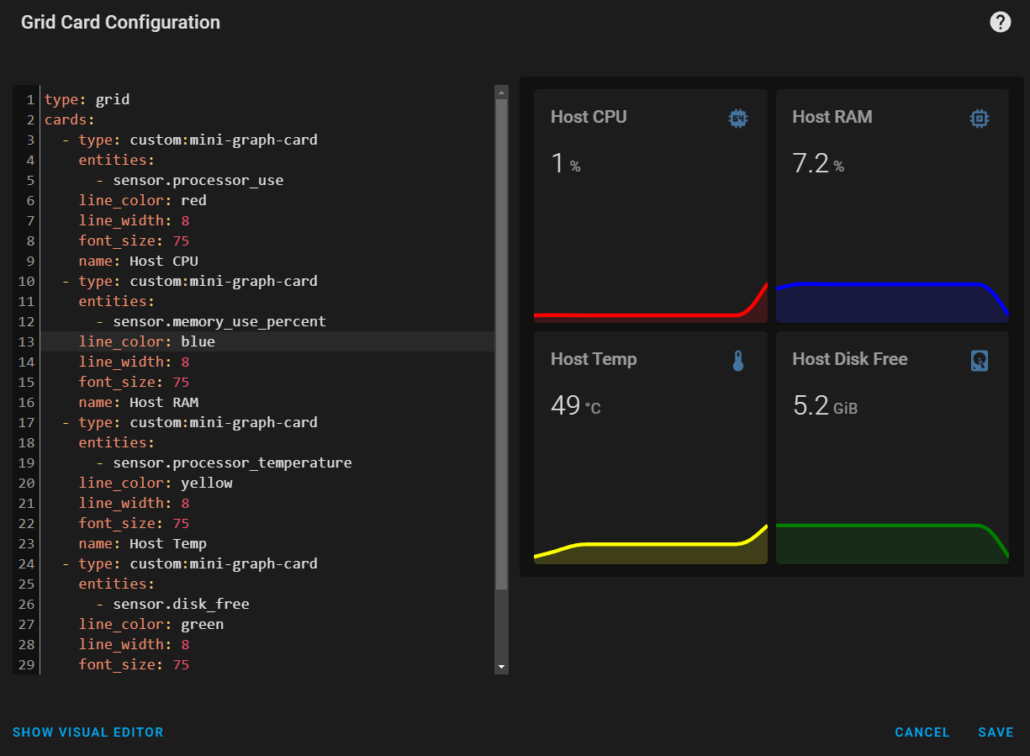
Step 17: Click Save and exit from the config window
Now our dashboard looks as follows:
Add Date/ Time Card to the Dashboard
Now let’s add a date/ time card to the dashboard
Step 1: Open configuration.yaml inside terminal as before
Step 2: Add the following under “sensor:“ and save the file
  - platform: time_date
    display_options:
      - "time"
      - "date"
      - "date_time"
      - "date_time_utc"
      - "date_time_iso"
      - "time_date"
      - "time_utc"
      - "beat"
Now we need a small background image for the date/ time card. Here I have prepared a blue color image as below

Step 3: Navigate to Services > File Assistant
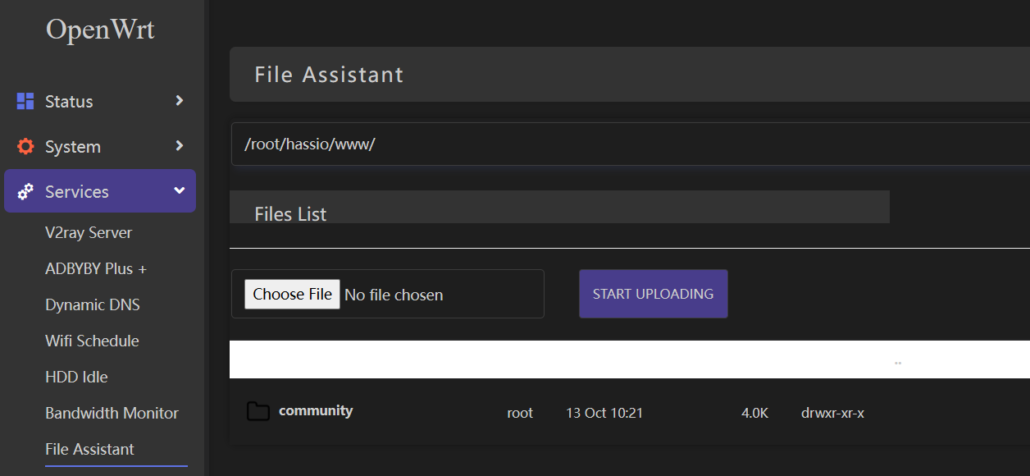
Step 4: Find /root/hassio/www/ and click UPLOAD
Step 5: Find your background image for the date/ time card and upload it
Step 6: Restart the Home Assistant container
Step 7: Go back to Home Assistant dashboard and open the “+ ADD CARD” window
Step 8: Choose to add manual card like before and enter the following
elements:
  - entity: sensor.time
    style:
      color: var(--secondary-text-color)
      font-size: 600%
      left: 50%
      top: 35%
    type: state-label
  - entity: sensor.date
    style:
      color: var(--primary-text-color)
      font-size: 200%
      left: 50%
      top: 85%
    type: state-label
image: /local/blue.jpg
type: picture-elements
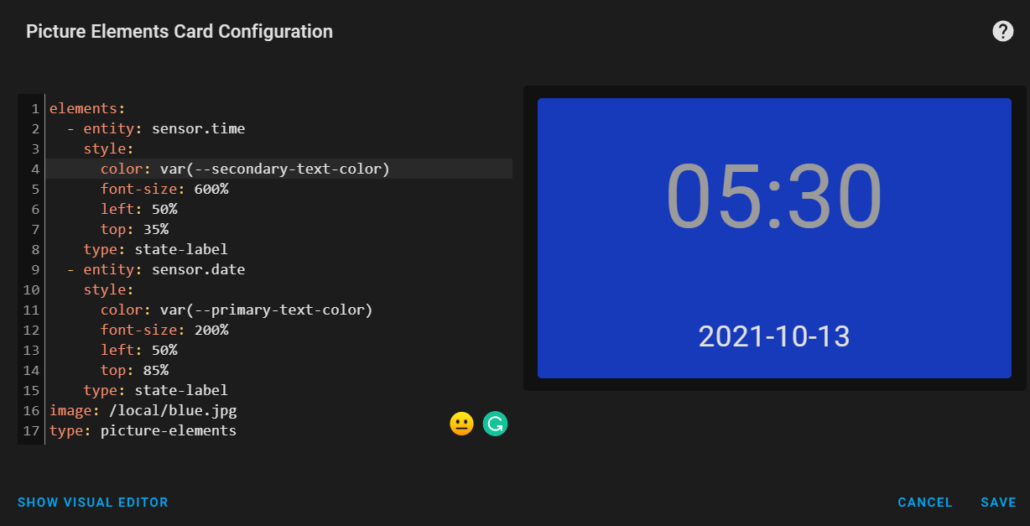
Step 9: Save the card and exit from configuration
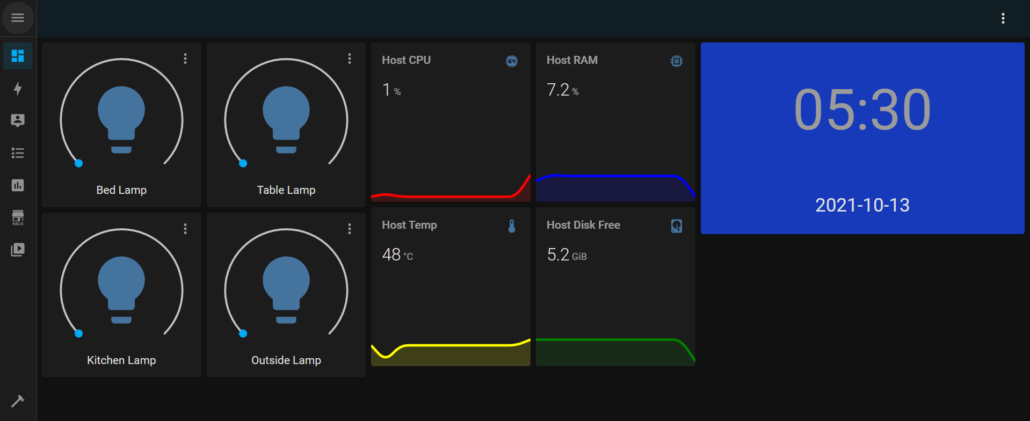
So far our Home Assistant Dashboard looks like this
Change Dashboard Theme
Now we will move on to changing the overall theme of our Home Assistant UI
Step 1: Go to HACS > Frontend
Step 2: Click “+ EXPLORE & ADD REPOSITORIES”
Step 3: Check the box “Theme” only and you will find a lot of themes available
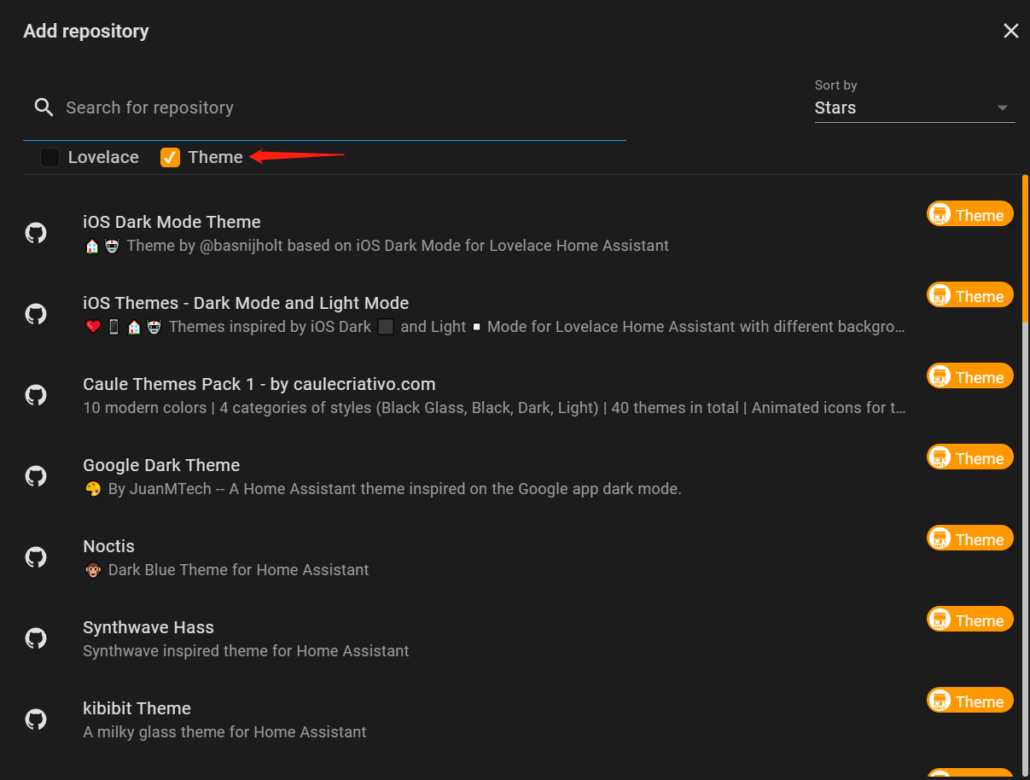
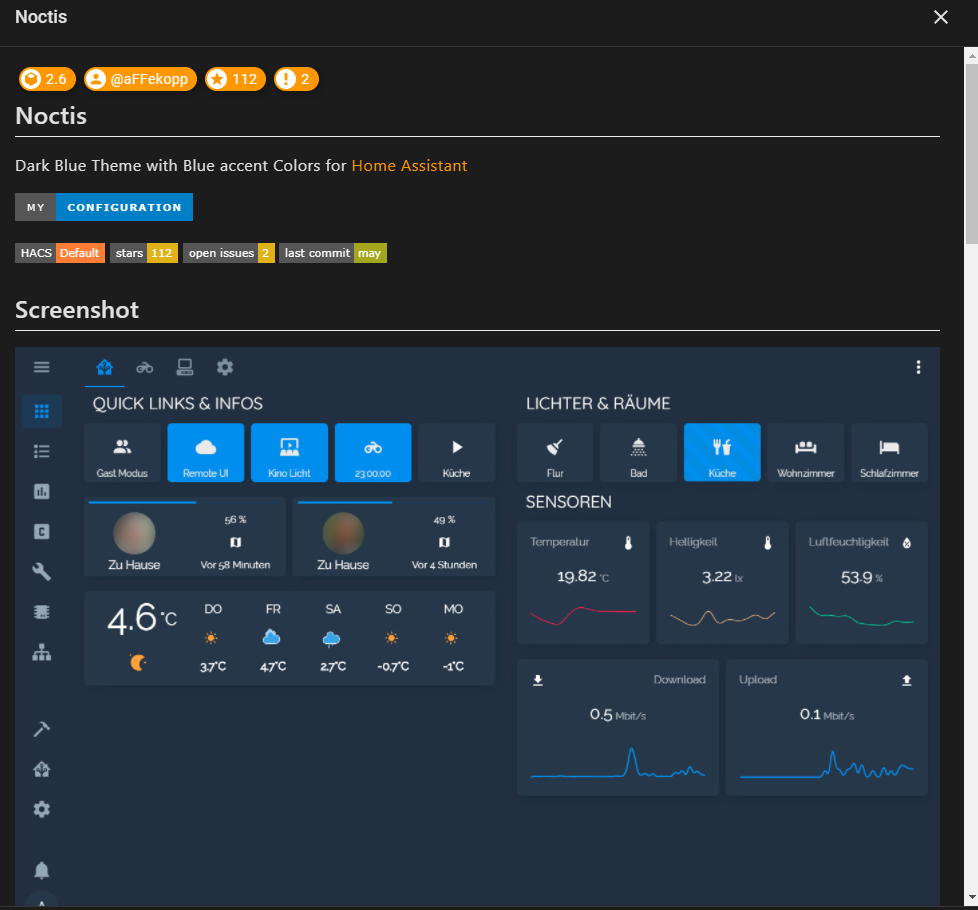
Step 4: You can install your favorite theme from here. Here I will install the “Noctis theme”
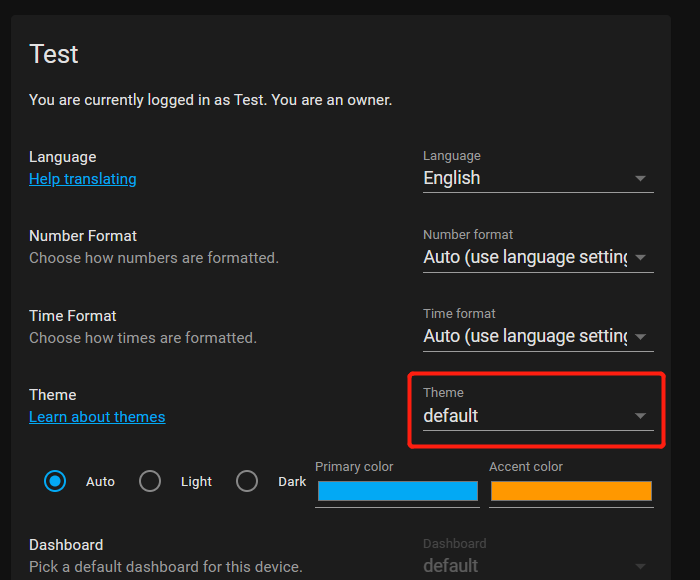
Step 5: Open your profile

Step 6: Under “Themes” choose the theme that you installed before
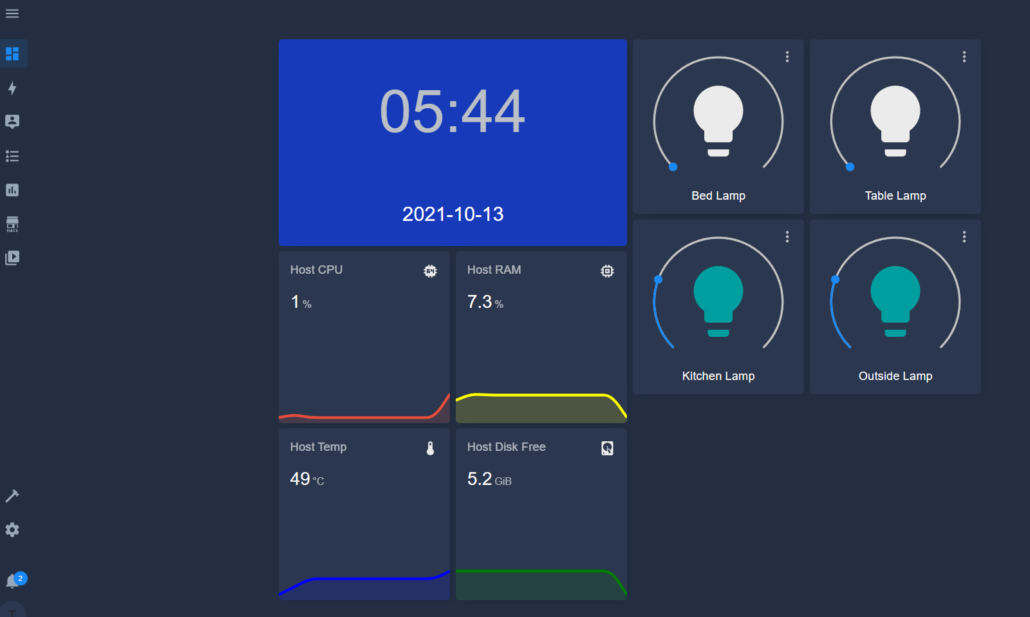
Since I have installed the “Noctis” theme, the final Home Assistant dashboard looks like below
Bonus – Temperature and Humidity Sensor Gauges
I have connected a DHT11 temperature and humidity sensor to an ESP8266 and flashed the ESPHome firmware to the board. After that I have connected ESPHome with my Home Assistant.
Learn more about ESPHome here.
Here I will show you how you can visualize the temperature and humidity sensor data on gauges
Step 1: Open the ADD CARD configuration window
Step 2: Search for “Vertical Stack” and open the card configuration
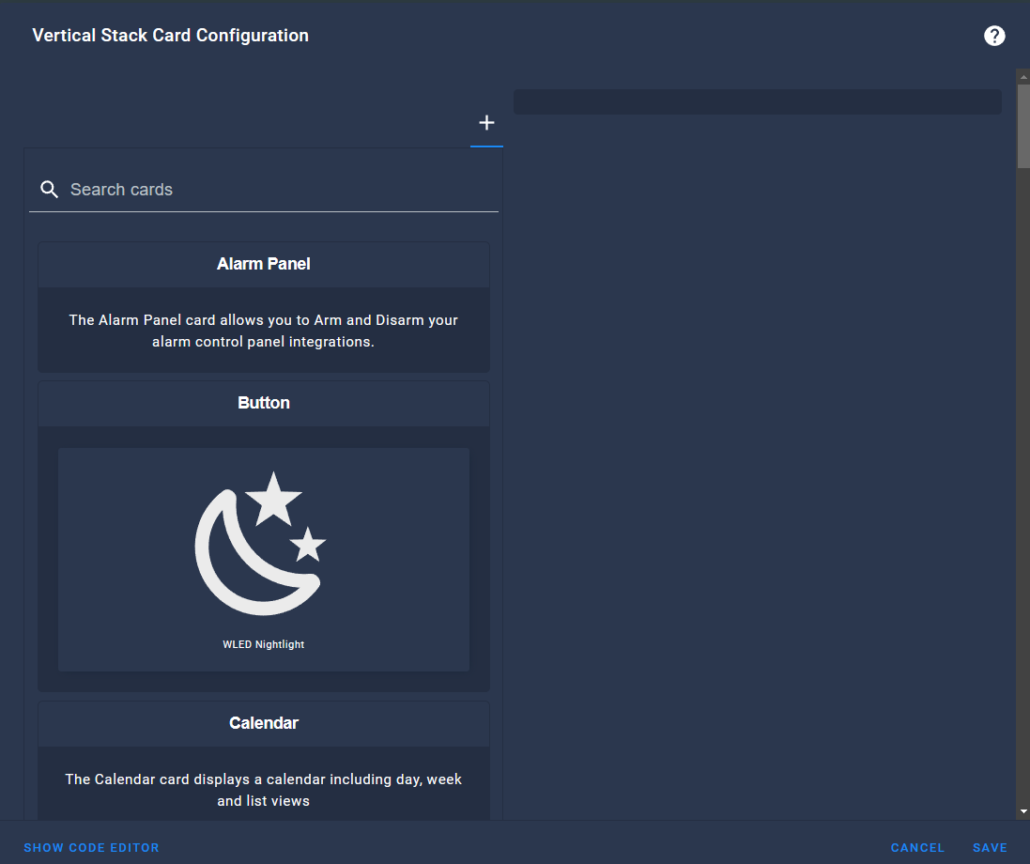
Step 3: Choose Gauge for the first card and choose the correct Entity for Temperature
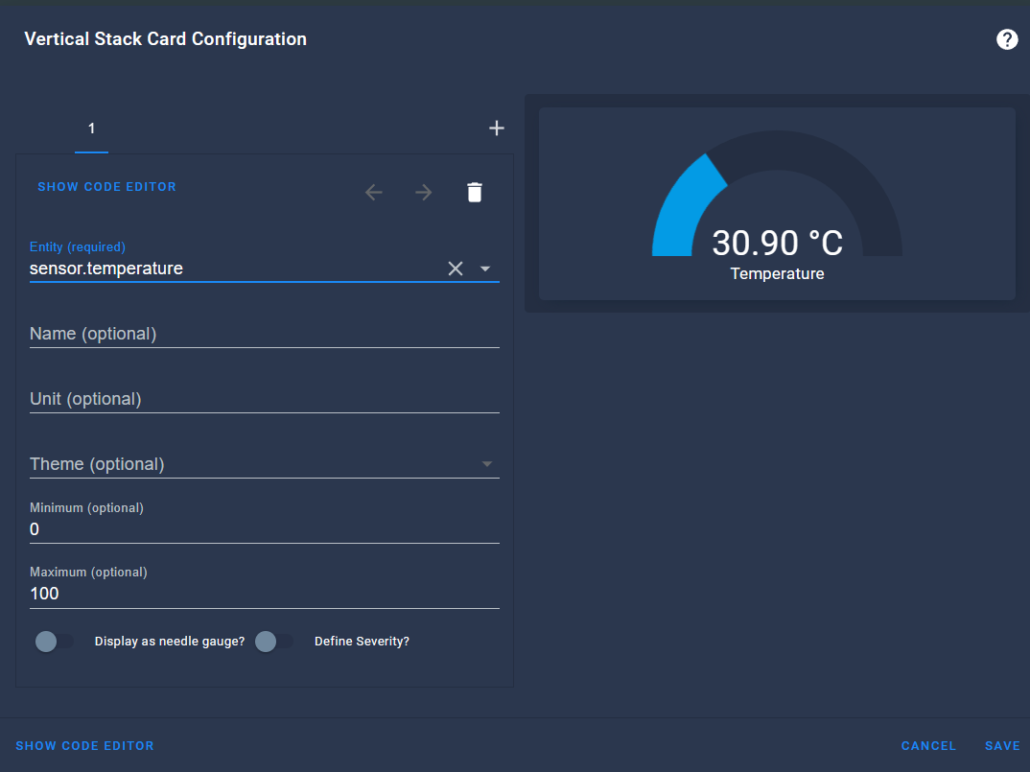
Step 4: Click “+” to add another Gauge card and choose the correct Entity for humidity
Step 5: Open the Code Editor and configure as follows to set colors according to different ranges
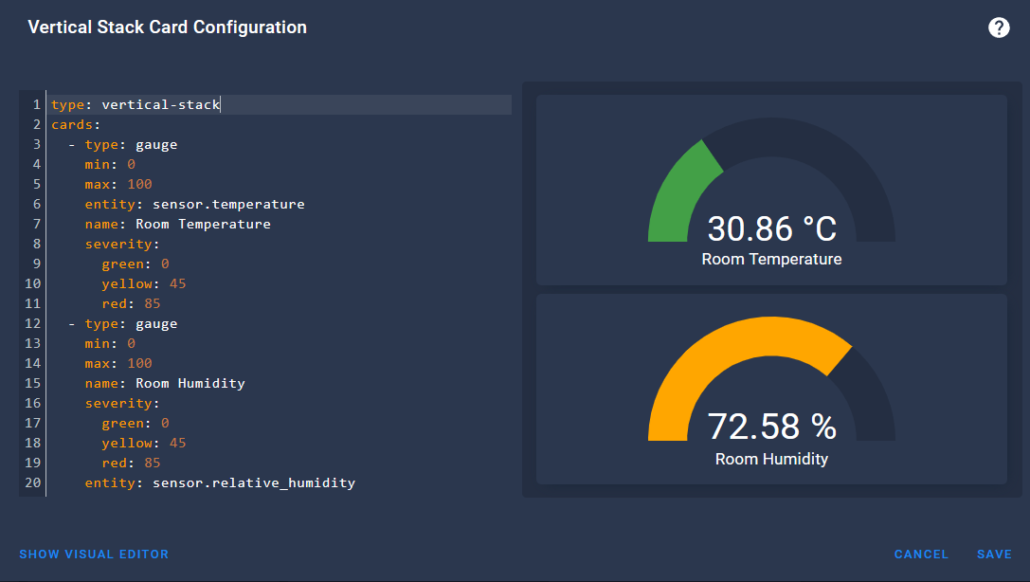
Step 6: Finally click save and exit from configuration window
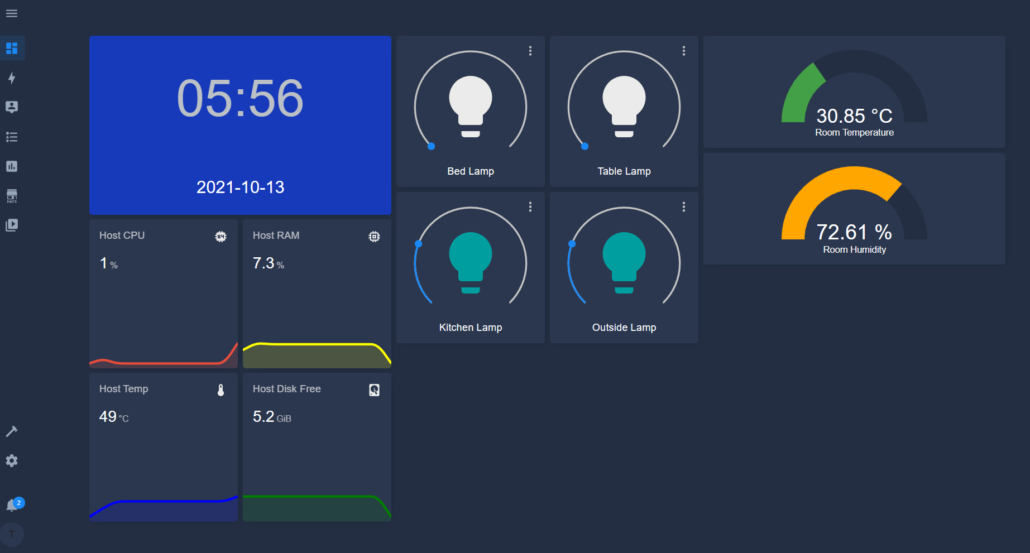
Now our final dashboard looks like below!
Home Assistant Dashboard on reTerminal
You can also display the above dashboard on the reTerminal LCD. Let’s walk through the process
Step 1: Follow this guide to get started with the reTerminal for the first time
Step 2: Type the following inside a terminal window of reTerminal
chromium-browser --start-fullscreen http://192.168.2.1:8123Make sure the reTerminal is connected to the OpenWrt router
Now you will be able to control the Smart Devices using reTerminal as well!
Demo Showcase
Conclusion
I hope this blog was helpful to everyone to understand the basic usage of Home Assistant and how it can be used to control a smart bulbs, view temperature and humidity information, view host statistics and more. However, it can be extended to control many other smart appliances as well right from Home Assistant dashboard!
About Author
Script to install Home Assistant on OpenWRT
Home Assistant is an open source home automation platform. It is able to track and control thousands of smart devices and offer a platform for automating control. Details on https://github.com/home-assistant/home-assistant.
Home Assistant supports only Windows, Linux, Mac and Raspberry offically. While this project is to install the Home Assistant on OpenWRT OS. So that you can run a Home Assistant on a router without having to run a 24-hours PC or Raspberry.
Note that OpenWRT is not an officially supported platform by Home Assistant and so not all integrations (e.g. Zigbee binaries) will work in this system.
Hardware Requirements
A complete installation of Home Assistant will take nearly 350 MB Flash and 130 MB RAM. More components require more storage.
Recommend device is GL-S1300. It has a 8 GB emmc, 512 MB RAM and a Quad-core CPU. It is enough for running Home Assistant and its routing function is also completely unaffected.
Software Requirements
Firmware version 3.023 for GL-S1300 or above.
Install using our scripts
We recommend strongly that using our gl-homeassistant.ipk to install the Home Assistant. It provides an one-click installation script and has add Home Assistant into the system boot program.
You can install «gl-homeassistant» easily through the web. Just search «gl-homeassistant» in the «plug-ins» and click «install».
Or you can manually install it in the SSH terminal typing this:
opkg update
opkg install gl-homeassistant
After finished installing gl-homeassistant. You can using command in the SSH terminal to start the installation of Home Assistant.
hass-install
Wait for the installation finished. Usually it takes 20~30 minutes.
Install Manually
If you didn’t install gl-homeassistant. There is no command named «hass-install». You have to clone this project and excute it manually.
Clone this project
Open the OpenWRT interface through SSH. Using putty or xshell or some other tools.
And then get into the root path and clone this project.
cd /root/
git clone https://github.com/gl-inet/home-assistant-on-openwrt.git
Note that maybe you’d install the git, use command like this:
opkg install git git-http
Start installation
Get into the project folder and start the installation. Make sure your device has connected to the Internet.
cd home-assistant-on-openwrt
./install.sh
It will take 20~30 minutes. After finished, it will print «HomeAssistant installation finished. Use command «hass -c /data/.homeassistant» to start the HA.»
Start Home Assistant for The First Time
After installation finished, use command hass -c /data/.homeassistant to start.
Note that firstly start will download and install some Python modules. Make sure the network is connected while first starting. It will take about 20 minutes. If it stuck or print some error messages, don’t worry, interupt it and retry hass -c /data/.homeassistant usually works.
It has fully started when print messages like:
Starting Home Assistant
Timer:starting
Enjoy Home Assistant on The Router
Connect to the S1300 through LAN ports or Wifi using your PC or phone. Visit the address 192.168.8.1:8123 , that’s the web page for Home Assistant.
Now you can link your smart devices together with Home Assistant.
Questions and discussion about HA on https://community.home-assistant.io/
Open Source Agenda is not affiliated with «Home Assistant On Openwrt» Project. README Source: gl-inet/home-assistant-on-openwrt
This is one of the two ways we support OpenWRT. If you encounter problems, try luci.
This is a presence detection scanner for OpenWRT using ubus. It scans for changes in hostapd.*, which will detect and report changes in devices connected to the access point on the router.
Before this scanner can be used you have to install the ubus RPC package on OpenWRT:
opkg install rpcd-mod-file
And create a read-only user to be used by setting up the ACL file /usr/share/rpcd/acl.d/user.json.
{
  "user": {
    "description": "Read only user access role",
    "read": {
      "ubus": {
        "*": [ "*" ]
      },
      "uci": [ "*" ]
    },
    "write": {}
  }
}
Restart the services.
# /etc/init.d/rpcd restart && /etc/init.d/uhttpd restart
Check if the file namespaces is registered with the RPC server.
# ubus list | grep file
file
After this is done, add the following to your configuration.yaml file:
# Example configuration.yaml entry
device_tracker:
  - platform: ubus
    host: ROUTER_IP_ADDRESS
    username: YOUR_ADMIN_USERNAME
    password: YOUR_ADMIN_PASSWORD
Configuration variables:
- host (Required): The IP address of your router, eg. 192.168.1.1.
- username (Required): The username of an user with administrative privileges, usually root.
- password (Required): The password for your given account.
- dhcp_software (Optional): The DHCP software used in your router:
dnsmasq,dhcpd, ornone. Defaults todnsmasq.
See the device tracker component page for instructions how to configure the people to be tracked.
Troubleshooting
If you find that this never creates known_devices.yaml, or if you need more information on the communication chain between Home Assistant and OpenWRT, follow these steps to grab the packet stream and gain insight into what’s happening.
Increase Log Level
- On your Home Assistant device, stop Home Assistant
- Adjust
configuration.yamlto log more detail for thedevice_trackercomponentlogger: default: warn logs: homeassistant.components.device_tracker: debug - In another window, tail the logfile in the configuration directory:
$ tail -f home-assistant.log | grep device_tracker - If you see a python stack trace like the following, check your configuration for correct username/password.
17-04-28 10:43:30 INFO (MainThread) [homeassistant.loader] Loaded device_tracker from homeassistant.components.device_tracker 17-04-28 10:43:30 INFO (MainThread) [homeassistant.loader] Loaded device_tracker.ubus from homeassistant.components.device_tracker.ubus 17-04-28 10:43:30 INFO (MainThread) [homeassistant.setup] Setting up device_tracker 17-04-28 10:43:31 INFO (MainThread) [homeassistant.components.device_tracker] Setting up device_tracker.ubus 17-04-28 10:43:31 ERROR (MainThread) [homeassistant.components.device_tracker] Error setting up platform ubus File "/opt/homeassistant/venv/lib/python3.4/site-packages/homeassistant/components/device_tracker/__init__.py", line 152, in async_setup_platform File "/opt/homeassistant/venv/lib/python3.4/site-packages/homeassistant/components/device_tracker/ubus.py", line 36, in get_scanner File "/opt/homeassistant/venv/lib/python3.4/site-packages/homeassistant/components/device_tracker/ubus.py", line 58, in __init__ File "/opt/homeassistant/venv/lib/python3.4/site-packages/homeassistant/components/device_tracker/ubus.py", line 156, in _get_session_id File "/opt/homeassistant/venv/lib/python3.4/site-packages/homeassistant/components/device_tracker/ubus.py", line 147, in _req_json_rpc 17-04-28 10:43:31 INFO (MainThread) [homeassistant.core] Bus:Handling <Event service_registered[L]: domain=device_tracker, service=see> 17-04-28 10:43:31 INFO (MainThread) [homeassistant.core] Bus:Handling <Event component_loaded[L]: component=device_tracker> - If you see lines like the following repeated at intervals that correspond to the check interval from the config (12 seconds by default), then Home Assistant is correctly polling the router, and you’ll need to look at what the router is sending back.
17-04-28 10:50:34 INFO (Thread-7) [homeassistant.components.device_tracker.ubus] Checking ARP
Inspect Packets With TCPDump
These steps require that tcpdump is installed on your Home Assistant device, and that you have a utility such as Wireshark for viewing the packets. It also assumes that Home Assistant is communicating with your router over HTTP and not HTTPS.
- On your Home Assistant device, stop Home Assistant
- In another shell on your Home Assistant device, start tcpdump
$ sudo tcpdump -nnvXSs 0 -w /var/tmp/dt.out 'host <router_ip> and port 80'- In this example we are only looking for traffic to or from port 80, and we are writing the packet stream out to
/var/tmp/dt.out
- In this example we are only looking for traffic to or from port 80, and we are writing the packet stream out to
- Start Home Assistant
- After a few seconds you should see a line like
Got xxwherexxis an incrementing number. This indicates that it has captured packets that match our filter. After you see this number increment a few times (>20), you can hitCtrl-Cto cancel the capture. - Transfer
/var/tmp/dt.outto the machine where you’re running Wireshark and either drag/drop it onto the Wireshark window or use File/Open to open the capture file. - In the window that opens, look for the first line that reads
POST /ubus. Right click on this line, choose Follow and then HTTP Stream to view just the HTTP stream for this connection. - The first
POSTwill show Home Assistant logging into ubus and receiving a session identifier back. It will look something like this:
«`
POST /ubus HTTP/1.1
Host: 10.68.0.1
Accept: /
User-Agent: python-requests/2.13.0
Connection: keep-alive
Accept-Encoding: gzip, deflate
Content-Length: 161
{“jsonrpc”: “2.0”, “params”: [“00000000000000000000000000000000”, “session”, “login”, {“password”: “», «username»: «root»}], «method»: «call», «id»: 1}
HTTP/1.1 200 OK
Date: Fri, 28 Apr 2017 12:04:46 GMT
Content-Type: application/json
Transfer-Encoding: chunked
Connection: keep-alive
{“jsonrpc”:”2.0”,”id”:1,”result”:[0,{“ubus_rpc_session”:”8b4e1632389fcfd09e96a792e01c332c”,”timeout”:300,”expires”:300,”acls”:{“access-group”:{“unauthenticated”:[“read”],”user”:[“read”]},”ubus”:{“”:[“”],”session”:[“access”,”login”]},”uci”:{“*”:[“read”]}},”data”:{“username”:”root”}}]}
9. In the response above, the portion that reads `"result":[0,` indicates that ubus accepted the login without issue. If this is not `0`, search online for what ubus status corresponds to the number you're receiving and address any issues that it brings to light.
10. Otherwise, back in the main Wireshark window click the `x` in the right side of the filter bar where it reads `tcp.stream eq 0`. Scroll down until you find the next `POST /ubus` line and view the HTTP stream again. This request is Home Assistant actually requesting information and will look something like the following:
POST /ubus HTTP/1.1
Host: 10.68.0.1
Accept: /
User-Agent: python-requests/2.13.0
Connection: keep-alive
Accept-Encoding: gzip, deflate
Content-Length: 114
{“jsonrpc”: “2.0”, “params”: [“8b4e1632389fcfd09e96a792e01c332c”, “hostapd.*”, “”, {}], “method”: “list”, “id”: 1}
HTTP/1.1 200 OK
Date: Fri, 28 Apr 2017 12:04:46 GMT
Content-Type: application/json
Transfer-Encoding: chunked
Connection: keep-alive
{“jsonrpc”:”2.0”,”id”:1,”result”:{}}
«`
- In this case we are actually receiving a valid response with no data. The request says that we are looking for ARP information from
hostapd.*, which is the access point on the router. In my environment I don’t use the AP on the router, and so it was correctly returning no data. Armed with this information, I know that I cannot use this component for device tracking or presence.
Cleanup
When you’re done troubleshooting, remember to reset your logging configuration and delete any capture files that contain sensitive information.