Home Assistant Container on Windows using Docker is possible! This article will be complication of super easy, step-by-step instructions on how to start Home Assistant on Windows machine using Docker. In other words, how to run Home Assistant Container, but there is more.
Table of Contents
What else is included in this Home Assistant Container on Windows article?
Here is what you can expect:
- I will show you how to update your Home Assistant when there is a new release and how to implement an automatic health check mechanism.
- If you don’t have Home Assistant yet this is a great way to finally get one and join in one of the fastest growing communities in the Smart Home world.
- On the other hand, if you already have Home Assistant, you can use this method to quickly spin a new test installation where you can start experimenting safely.
- I will also share which is the one and only drawback of this method in my humble opinion.
Just to mention that everything is free and it should work on any Windows version that is still in support and on any recent Intel or AMD Processor from the last 5 to even 10 years that support virtualization instructions.
Installing the Docker Application
First thing that is needed is a working Docker application. To achieve that:
- I will go to docker.com website where I can download the Docker application.
- I’m using a standard Docker installation and I’m accepting everything that is recommended (default installation).
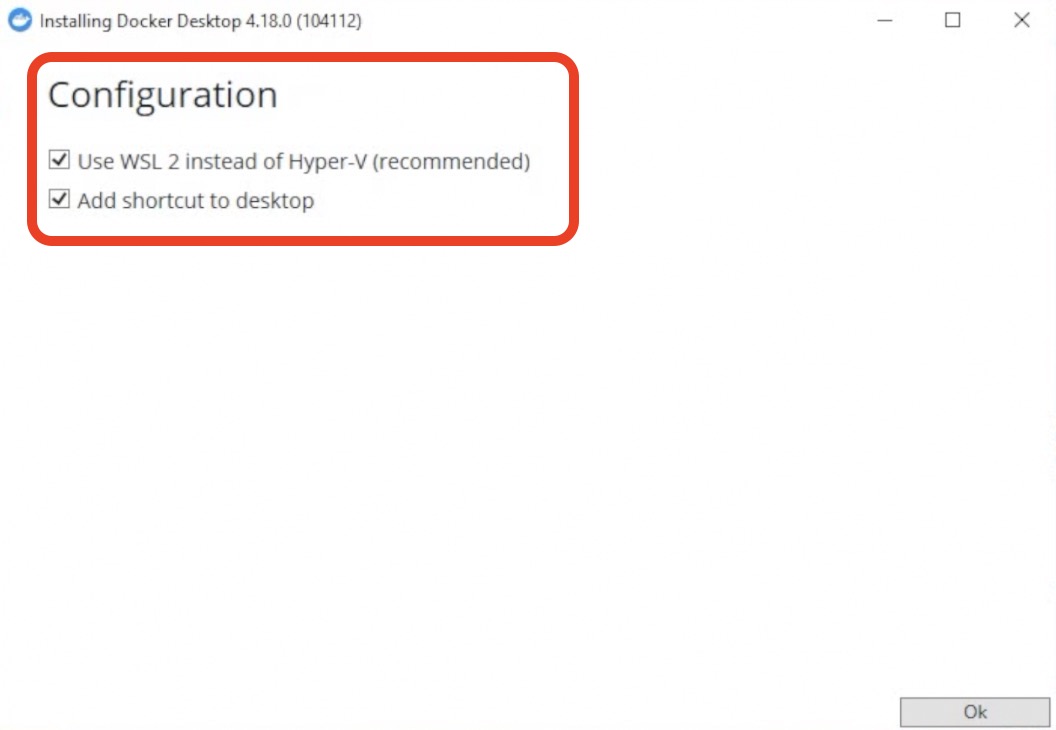
- Basically, I’m just clicking on the Next button until the installation is finished.
- After that, I will click on the Windows Start button I will search for Docker and I will click on it to start it.
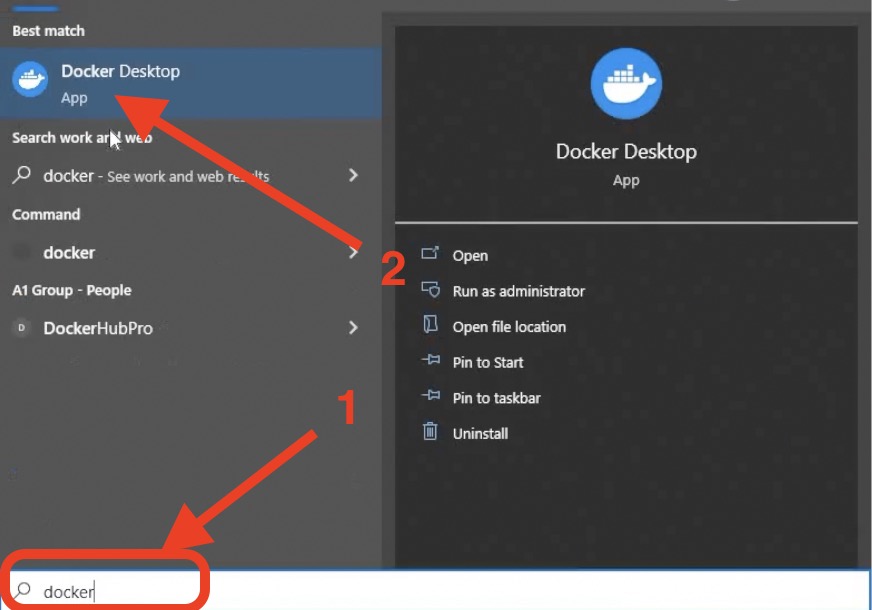
- At the end I would like to see a Green Whale saying that Docker engine is running. This means that everything is fine with the Docker installation.

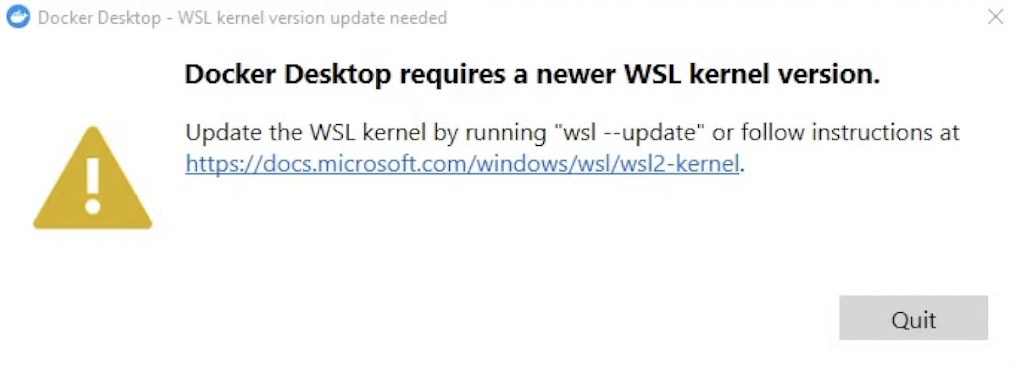
- By the way, If you get any warnings about WSL2 that is Windows Subsystem for Linux that Docker is using. Just follow the official Microsoft instructions to resolve the issue and you can find the link here – LINK
Start Home Assistant using docker-compose method
We finished with the Docker installation and it is time to move to the next steps.
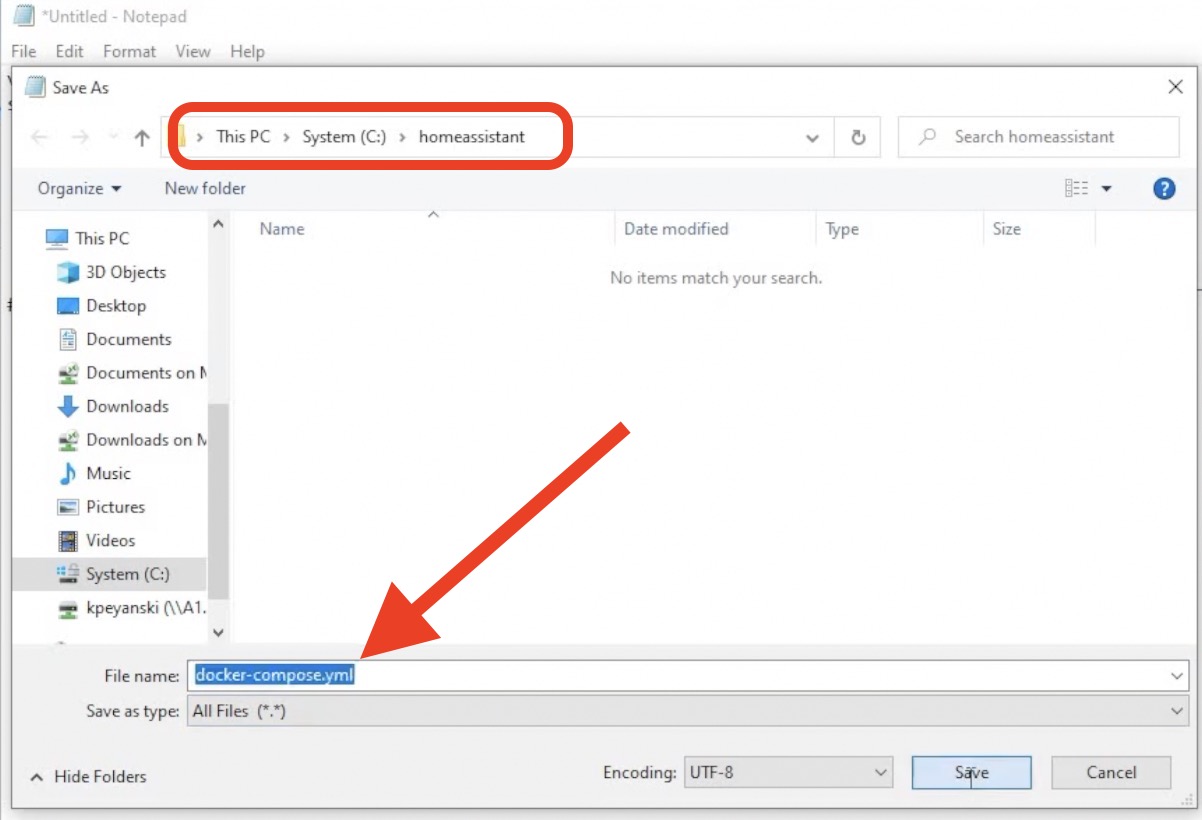
Next, I will create a new empty folder named homeassistant in my C:\ drive on my Windows machine.
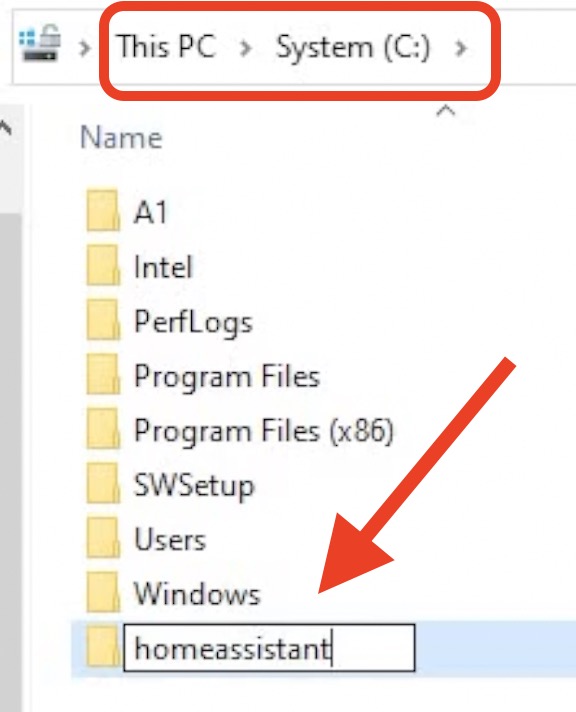
Quick Tip: I’m going to use this folder for the Home Assistant configuration. Be careful here if you want to replicate the steps that follows without any modification. Make the same folder inside your C drive and name it homeassistant exactly the same way all lowercase character without space or other special characters.
- After that, go to this GitHub link and either download the file as ZIP and unzip it or copy its contents and paste it in an empty Notepad.
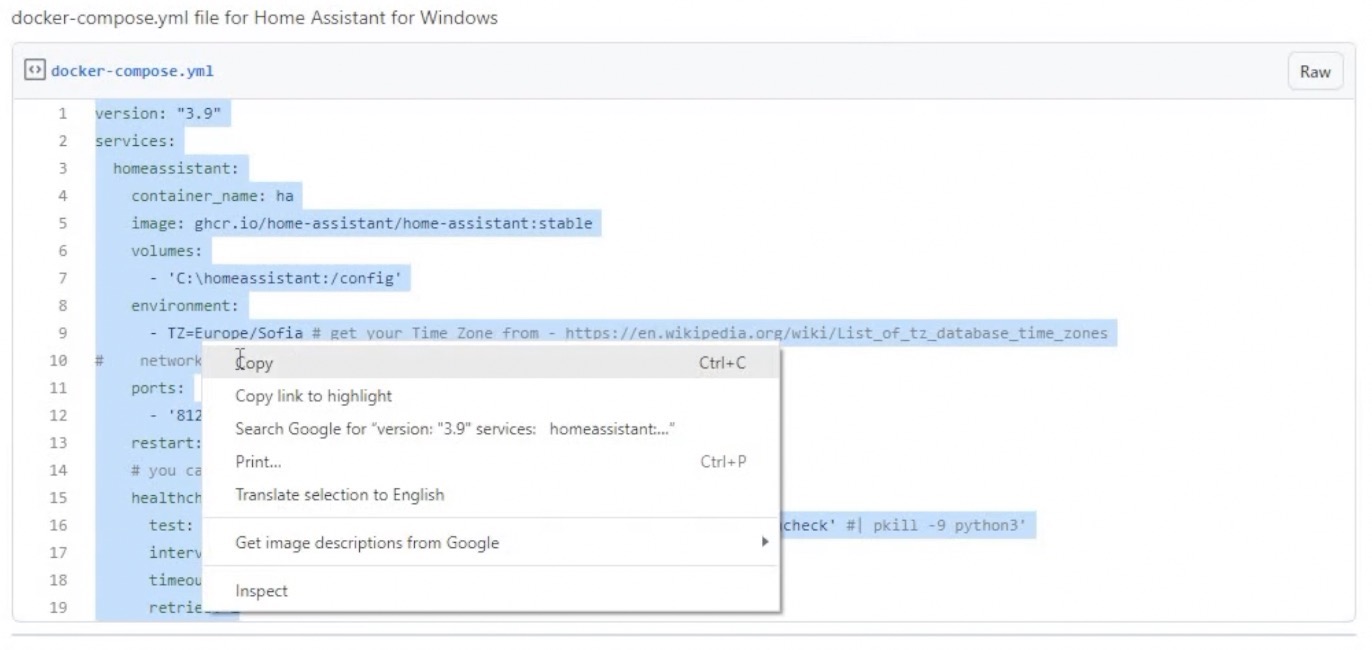
- Then name that file docker-compose.yml and save it in your homeassistant folder in drive C:\.
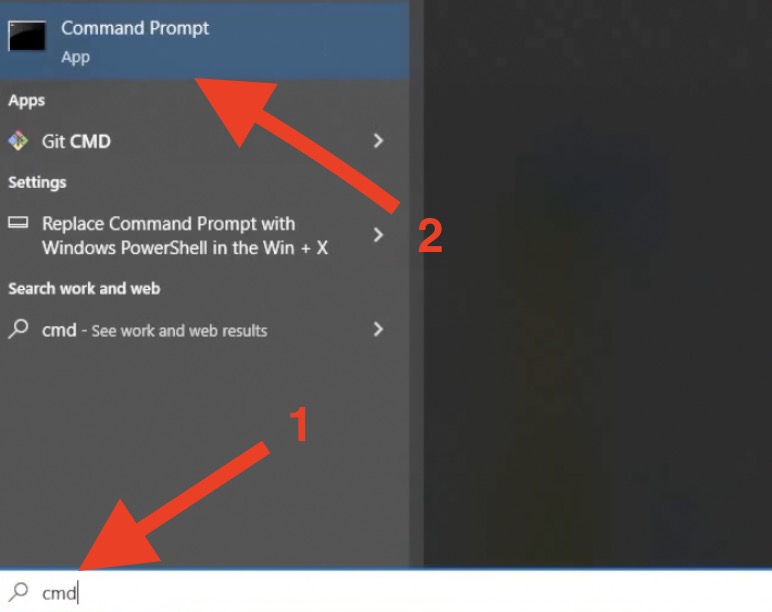
- Then click on the Windows Start button and type
cmdto run the Windows Command Prompt.
- Enter inside the homeassistant folder that we created earlier and in which we saved the docker-compose.yml file and type:
docker-compose up
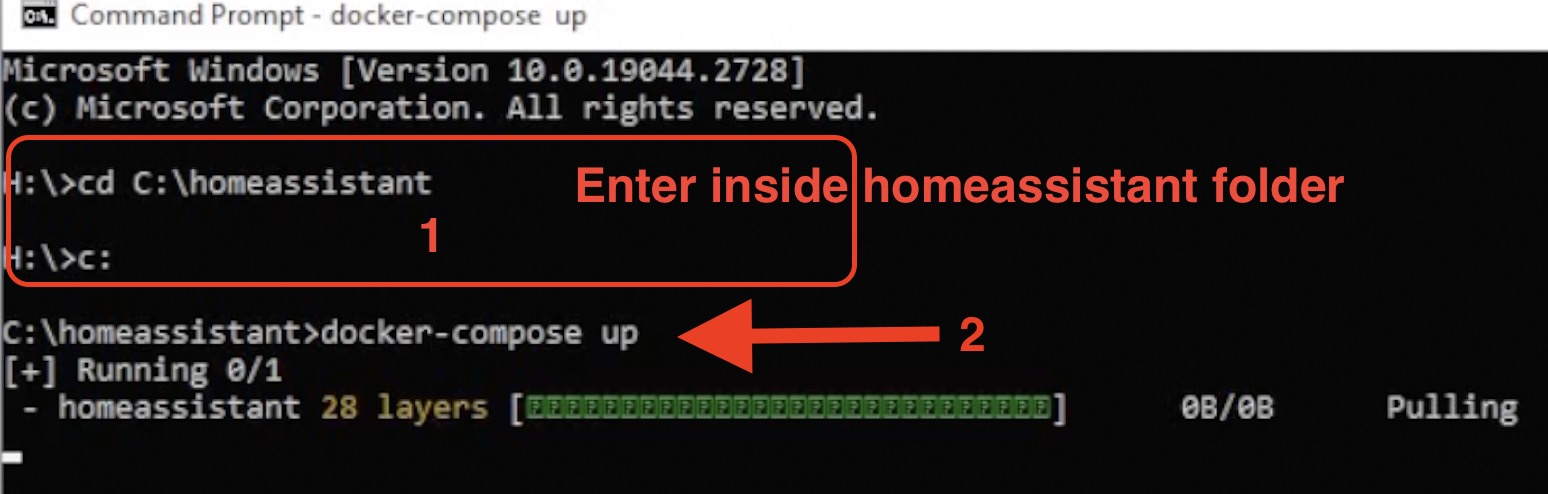
The above command will read the docker-compose.yml file and will execute the instructions inside:
- It will download Home Assistant Image,
- it will create a Docker container,
- it will map the Home Assistant config folder to the C:\homeassistant folder,
- it will set the time zone,
- it will expose the port 8123 where Home Assistant is running,
- and it will implement the health check mechanism.
At the end you will have a fully working Home Assistant.
How to check if Home Assistant is working
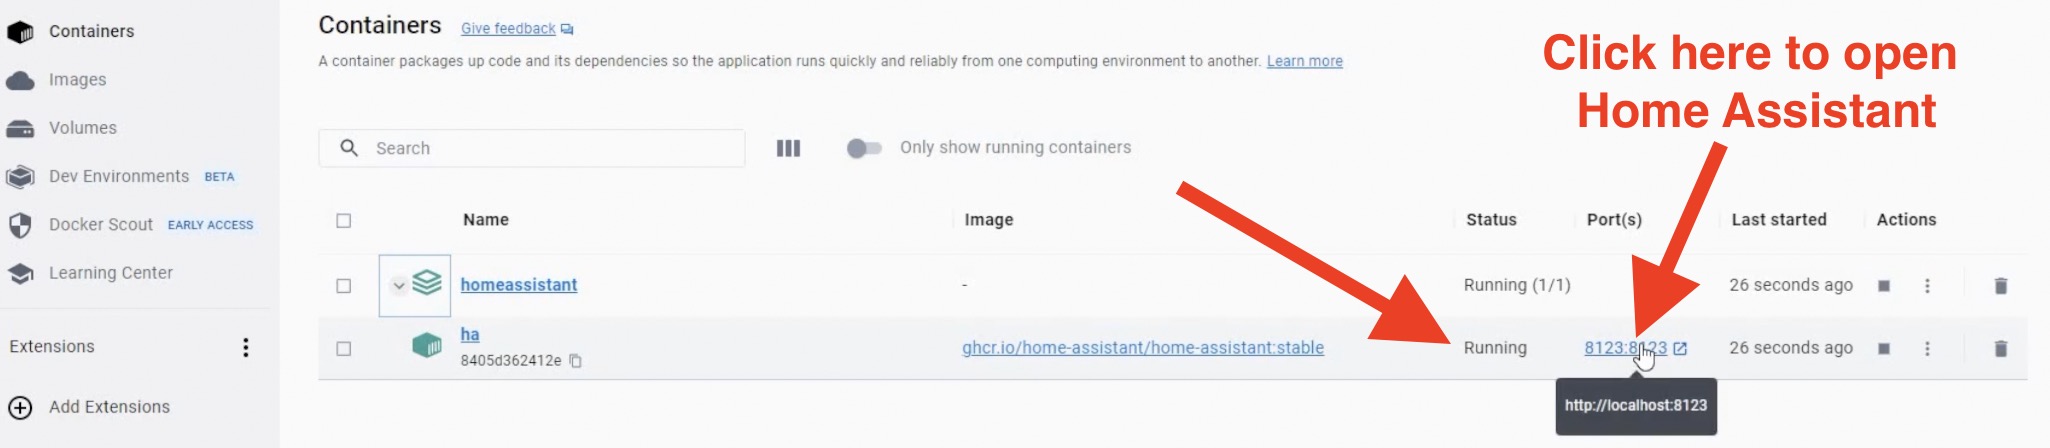
To check that everything is working you can open the Docker app where you can see that ha container is running and you can open the Web interface.
How to see the health check?
After 90 seconds, because we set that time in our docker-compose.yml file you can open a new Command Prompt and you can type the following command.:
docker container lsYou will see that that our automatic health check is running and the Home Assistant container is healthy.
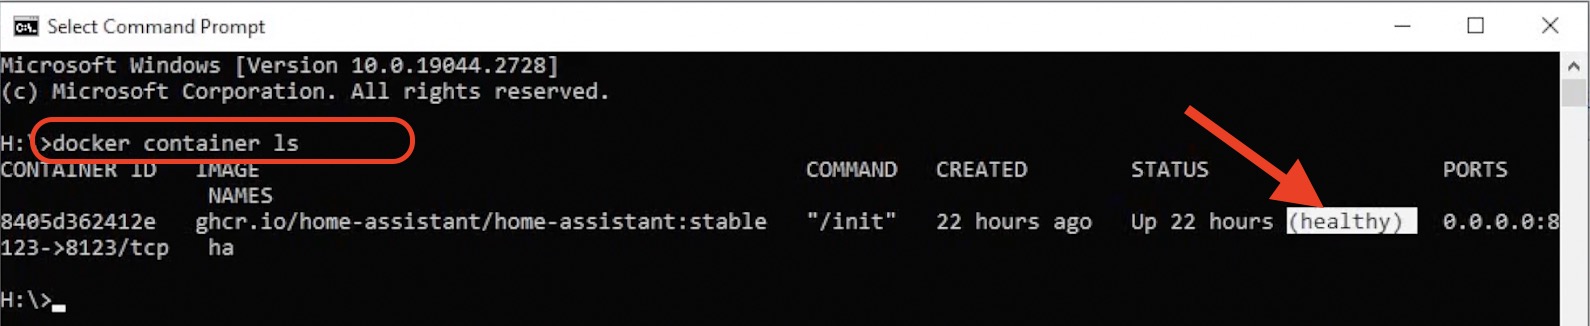
If for some reason localhost on port 8123 is not accessible this healthy status will not be shown.
Quick Tip: Don’t delete the docker-compose.yml file as we are going to use it for the future updates.
Start Home Assistant using docker run method
Instead of using docker-compose.yml method you can achieve the same result, but without the health check by using a docker run command.
To demonstrate you that I will stop & delete the ha container that docker-compose up created from the Docker app. Of course, this can be done from the Command Prompt, but using the Docker app is more visual friendly.

docker-compose up createdYou can get this command from the section below. You just have to paste it in the Command Prompt instead of docker-compose up command.
docker run -d --name="ha" -e "TZ=Europe/Sofia" -v "C:\homeassistant:/config" -p 8123:8123 ghcr.io/home-assistant/home-assistant:stable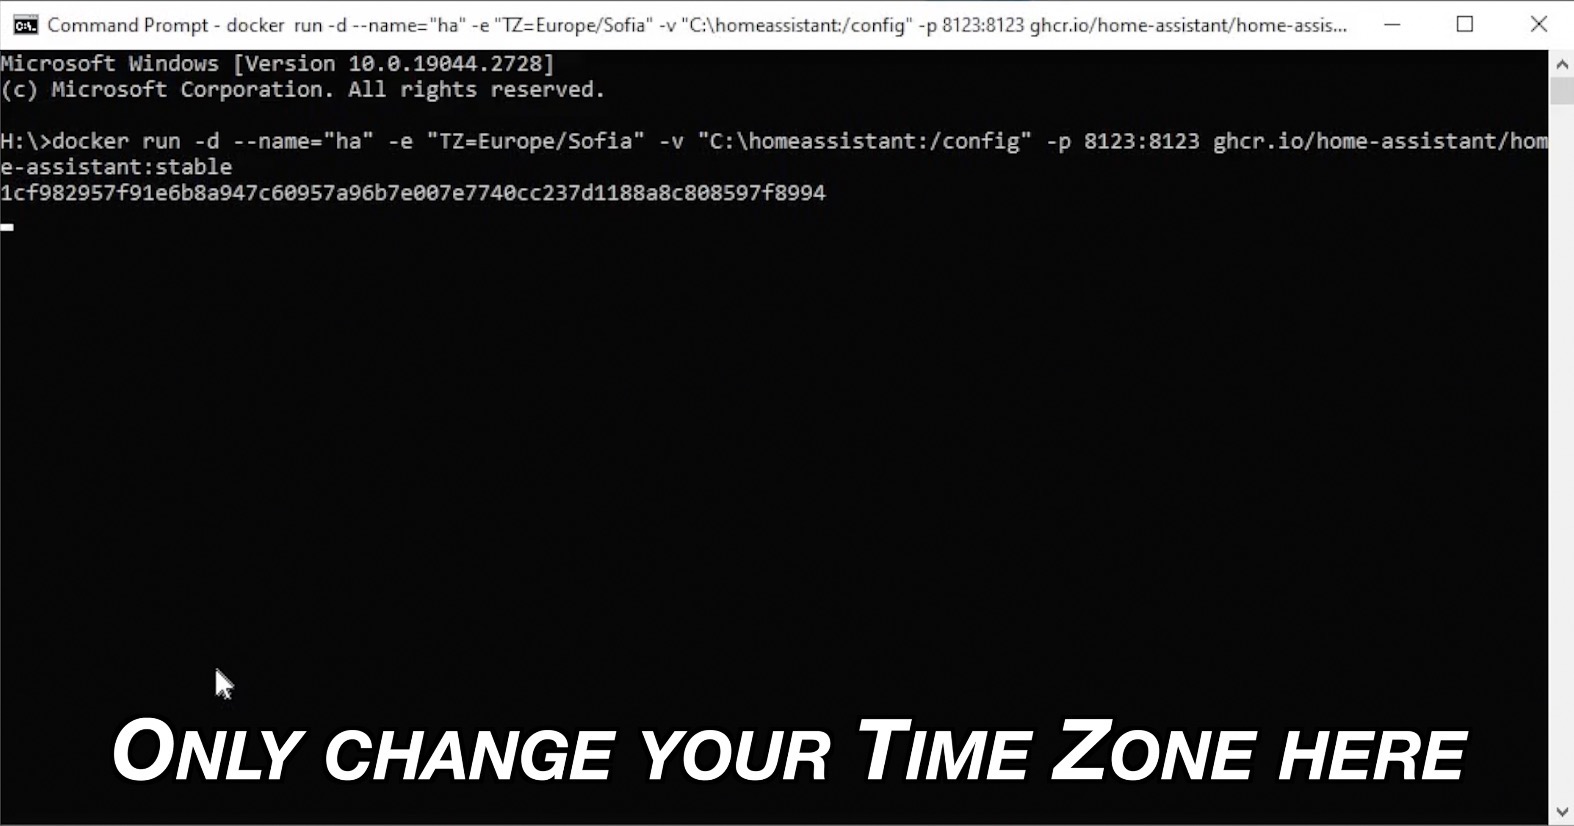
So, this is another method which may be even easier.
Home Assistant Onboarding
We now know two ways to start Home Assistant on Windows. And when Home Assistant is started it is time for onboarding which is super easy process:
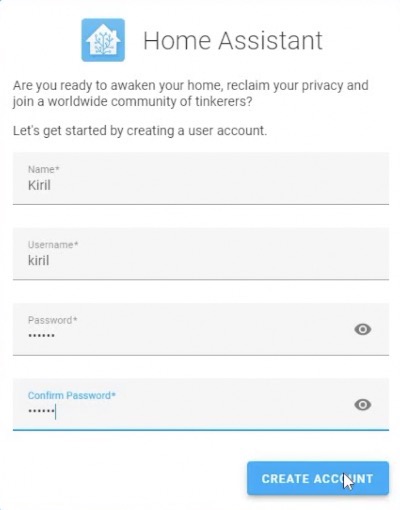
- You just have to type a Username and Password,
- you can then name your Home Assistant installation,
- set a location, country, language, currency and stuff like that,
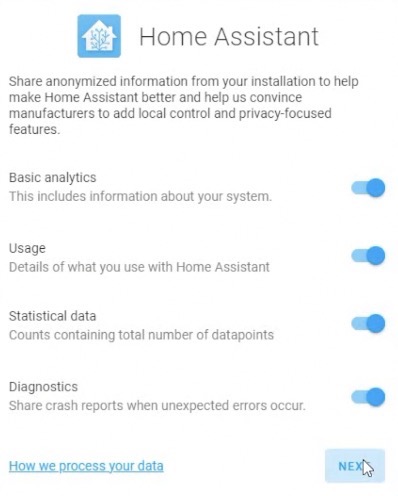
- then you can optionally opt-in for the anonymous Home Assistant statistics,
- the system will also try to auto-discover some devices and integrations nearby,
- and finally you are in.
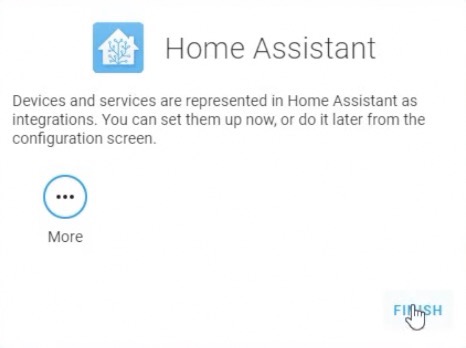
You can start using Home Assistant.
What if you want to update Home Assistant? Every month there is one major new release and during that month usually more than 5 minor versions are released.
So, updating your Home Assistant is an important and regular task. With Home Assistant running on Docker or Home Assistant Container which is the official name of this kind of installation, the update process is easy.
# if this returns "Image is up to date" then you can stop here
docker pull ghcr.io/home-assistant/home-assistant:stable

# stop the running container
docker stop ha

# remove existing ha container
docker rm ha

# create a new ha container with docker-compose up
docker-compose up

# or you can create a new ha container with docker run
docker run -d --name="ha" -e "TZ=Europe/Sofia" -v "C:\homeassistant:/config" -p 8123:8123 ghcr.io/home-assistant/home-assistant:stable
Running Home Assistant container on other OSes?
The Home Assistant Container installation on Windows that we just did can be executed almost the same way on Mac and Linux Operating systems.
Just few minor modifications in the config folder mapping are needed.
docker run -d --name="ha" -e "TZ=Europe/Sofia" -v "/homeassistant:/config" -p 8123:8123 ghcr.io/home-assistant/home-assistant:stableFor whom Home Assistant Container installation type is?
This type of installation have almost everything and it is suitable for everyone from just testing type of installation to serious production environment where you can lose money if Home Assistant is down.
What is the Home Assistant Container biggest drawback?
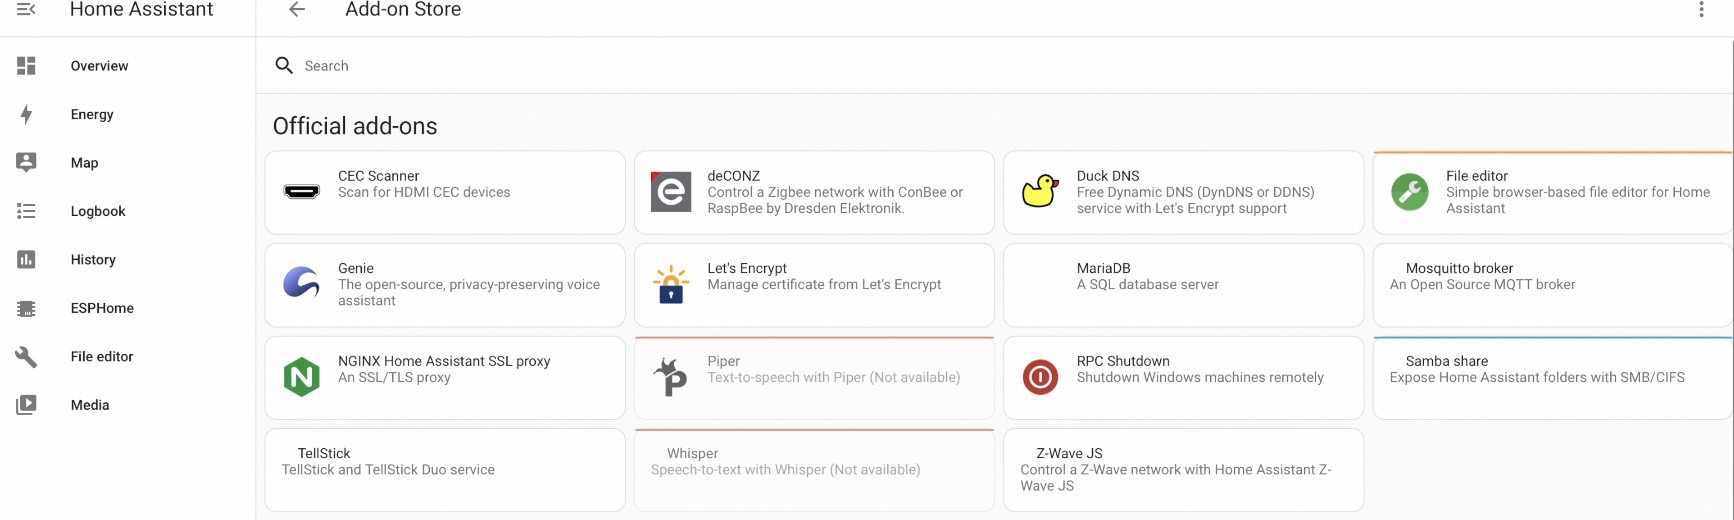
The only thing that is missing in the Home Assistant Container is the Home Assistant Add-on store from where you can install some useful add-ons with just 1 click. Most of these add-ons are coming preconfigured and ready to use, so they are great if you are looking for convenience and functionality.
On the other hand, you may never need these Apps in the Home Assistant Add-ons store or you can manually install them.
So, that can be considered as a plus or minus depending of the point of view.
Free Home Assistant Webinar?
To understand more about the different installation types of Home Assistant, you can register for my Webinar where I’m talking exactly about that. Which Home Assistant installation types have Add-ons store, and what are their other pros and cons. It will help you find a method to start Home Assistant that is best for you.
The webinar is completely free and you can register from the link – https://automatelike.pro/webinar
How to uninstall Home Assistant Container?
Back to the current installation type. If for some reason Home Assistant Container is not your thing and you want to remove and clean everything. That can be easily done:
- Just delete the Home Assistant container from the Docker Application.

- Then delete the Home Assistant Image from the Docker app.
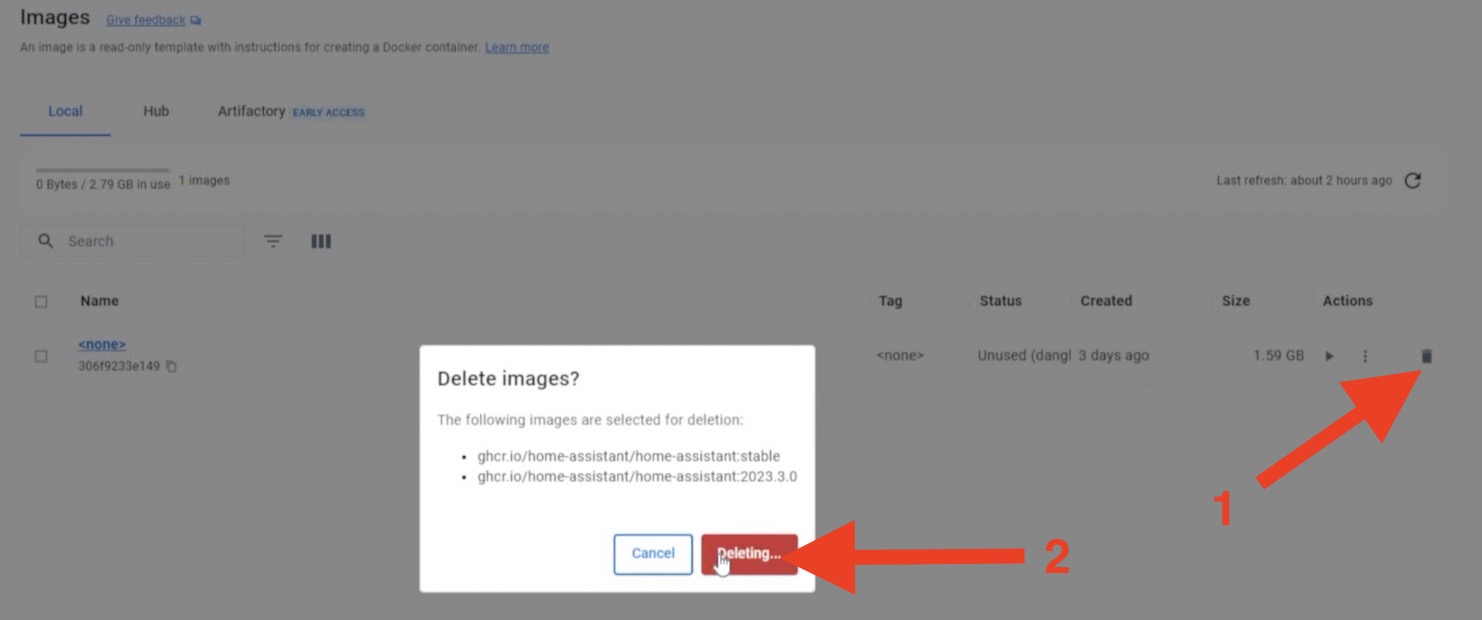
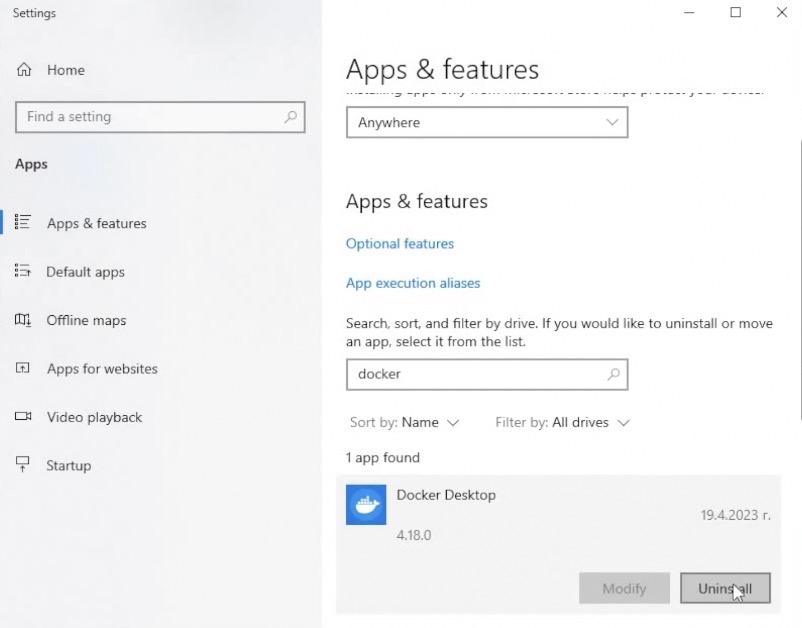
- You can even remove Docker from the Windows Add/Remove Programs.
Smart Home Glossary
With Home Assistant Container or not you can download my Smart Home Glossary if some of the Smart Home terms and abbreviations are not so clear to you. It will help you, because it is full of simple but useful explanations of these terms.
The Glossary is completely free and it is in a form of a PDF document, so you can use it offline on any device you wish.
Link to the Glossary – https://automatelike.pro/glossary
If you want to see more Home Assistant articles from me check this link – https://peyanski.com/category/smart-home/home-assistant/
Thank you for reading, I’m Kiril see you next week. Bye!
Installation with Docker is straightforward. Adjust the following command so that /path/to/your/config/ points at the folder where you want to store your config and run it:
Linux
$ docker run -d --name="home-assistant" -v /path/to/your/config:/config -v /etc/localtime:/etc/localtime:ro --net=host homeassistant/home-assistant
macOS
When using docker-ce (or boot2docker) on macOS, you are unable to map the local timezone to your Docker container (Docker issue). Instead of -v /etc/localtime:/etc/localtime:ro, just pass in the timezone environment variable when you launch the container, ex: -e "TZ=America/Los_Angeles". Replace “America/Los_Angeles” with your timezone.
If you wish to browse directly to http://localhost:8123 from your macOS host, meaning forward ports directly to the container, replace the --net=host switch with -p 8123:8123. More detail can be found in the docker forums.
$ docker run -d --name="home-assistant" -v /path/to/your/config:/config -e "TZ=America/Los_Angeles" -p 8123:8123 homeassistant/home-assistant
Alternatively, docker-compose works with any recent release of docker-ce on macOS. Note that (further down this page) we provide an example docker-compose.yml however it differs from the docker run example above. To make the .yml directives match, you would need to make two changes: first add the equivalent ports: directive, then remove the network_mode: host section. This is because Port mapping is incompatible with network_mode: host:. More details can be found at [Docker networking docs] (https://docs.docker.com/engine/userguide/networking/#default-networks). Note also the /dev/tty* device name used by your Arduino etc. devices will differ from the Linux example, so the compose mount: may require updates.
Windows
When running Home Assistant in Docker on Windows, you may have some difficulty getting ports to map for routing (since the --net=host switch actually applies to the hypervisor’s network interface). To get around this, you will need to add port proxy ipv4 rules to your local Windows machine, like so (Replacing ‘192.168.1.10’ with whatever your Windows IP is, and ‘10.0.50.2’ with whatever your Docker container’s IP is):
netsh interface portproxy add v4tov4 listenaddress=192.168.1.10 listenport=8123 connectaddress=10.0.50.2 connectport=8123
netsh interface portproxy add v4tov4 listenaddress=0.0.0.0 listenport=8123 connectaddress=10.0.50.2 connectport=8123
This will let you access your Home Assistant portal from http://localhost:8123, and if you forward port 8123 on your router to your machine IP, the traffic will be forwarded on through to the docker container.
Synology NAS
As Synology within DSM now supports Docker (with a neat UI), you can simply install Home Assistant using docker without the need for command-line. For details about the package (including compatibility-information, if your NAS is supported), see https://www.synology.com/en-us/dsm/app_packages/Docker
The steps would be:
- Install “Docker” package on your Synology NAS
- Launch Docker-app and move to “Registry”-section
- Find “homeassistant/home-assistant” with registry and click on “Download”
- Wait for some time until your NAS has pulled the image
- Move to the “Image”-section of the Docker-app
- Click on “Launch”
- Choose a container-name you want (e.g. “homeassistant”)
- Click on “Advanced Settings”
- Set “Enable auto-restart” if you like
- Within “Volume” click on “Add Folder” and choose either an existing folder or add a new folder. The “mount point” has to be “/config”, so that Home Assistant will use it for the configs and logs.
- Within “Network” select “Use same network as Docker Host”
- To ensure that Home Assistant displays the correct timezone go to the “Environment” tab and click the plus sign then add
variable=TZ&value=Europe/Londonchoosing your correct timezone - Confirm the “Advanced Settings”
- Click on “Next” and then “Apply”
- Your Home Assistant within Docker should now run and will serve the web interface from port 8123 on your Docker host (this will be your Synology NAS IP address — for example
http://192.168.1.10:8123)
Remark: to update your Home Assistant on your Docker within Synology NAS, you just have to do the following:
- Go to the Docker-app and move to “Image”-section
- Download the “homeassistant/home-assistant” image — don’t care, that it is already there
- wait until the system-message/-notification comes up, that the download is finished (there is no progress bar)
- Move to “Container”-section
- Stop your container if it’s running
- Right-click on it and select “Action”->”Clear”. You won’t lose any data, as all files are stored in your config-directory
- Start the container again — it will then boot up with the new Home Assistant image
Remark: to restart your Home Assistant within Synology NAS, you just have to do the following:
- Go to the Docker-app and move to “Container”-section
- Right-click on it and select “Action”->”Restart”.
If you want to use a USB Bluetooth adapter or Z-Wave USB Stick with Home Assistant on Synology Docker these instructions do not correctly configure the container to access the USB devices. To configure these devices on your Synology Docker Home Assistant you can follow the instructions provided here by Phil Hawthorne.
QNAP NAS
As QNAP within QTS now supports Docker (with a neat UI), you can simply install Home Assistant using docker without the need for command-line. For details about the package (including compatability-information, if your NAS is supported), see https://www.qnap.com/solution/container_station/en/index.php
The steps would be:
- Install “Container Station” package on your Qnap NAS
- Launch Container Station and move to “Create Container”-section
- Search image “homeassistant/home-assistant” with
docker hub and click on “Install” - Choose “latest” version and click next
- Choose a container-name you want (e.g.
“homeassistant”) - Click on “Advanced Settings”
- Within “Shared Folders” click on “Volume from host” > “Add” and
choose either an existing folder or add a new folder. The “mount
point” has to be “/config”, so that Home Assistant will use it for
the configs and logs. - Within “Network” and select Network Mode to “Host”
- To ensure that Home Assistant displays the correct
timezone go to the “Environment” tab and click the plus sign then add
variable=TZ&value=Europe/Londonchoosing your correct timezone - Click on “Create”
- Wait for some time until your NAS has created the container
- Your Home Assistant within Docker should now run and will serve the web interface from port 8123 on your Docker host (this will be your Qnap NAS IP address — for example
http://192.xxx.xxx.xxx:8123)
Remark: to update your Home Assistant on your Docker within Qnap NAS, you just remove container and image and do steps again (Don’t remove “config” folder)
If you want to use a USB Bluetooth adapter or Z-Wave USB Stick with Home Assistant on Qnap Docker, Fallow this step:
Z-wave:
- Connect to your NAS over SSH
- Load cdc-acm kernel module(when nas restart need to run this command)
insmod /usr/local/modules/cdc-acm.ko -
Find USB devices attached. Type command:
ls /dev/tty*
The above command should show you any USB devices plugged into your NAS. If you have more than one, you may get multiple items returned. Like :ttyACM0 -
Run Docker command:
docker run --name home-assistant --net=host --privileged -itd -v /share/CACHEDEV1_DATA/Public/homeassistant/config:/config -e variable=TZ -e value=Europe/London --device /dev/ttyACM0 homeassistant/home-assistant-vis your config path
-eis set timezone - Edit configuration.yaml
zwave:
  usb_path: /dev/ttyACM0
That will tell Home Assistant where to look for our Z-wave radio.
Bluetooth:
- Connect to your NAS over SSH
-
Run Docker command:
docker run --name home-assistant --net=host --privileged -itd -v /share/CACHEDEV1_DATA/Public/homeassistant/config:/config -e variable=TZ -e value=Europe/London -v /dev/bus/usb:/dev/bus/usb -v /var/run/dbus:/var/run/dbus homeassistant/home-assistantFirst
-vis your config path
-eis set timezone - Edit configuration.yaml
device_tracker:
  - platform: bluetooth_tracker
Restart
If you change the configuration you have to restart the server. To do that you have 2 options.
- You can go to the
 service developer tools, select the service
 homeassistant/restartand click “Call Service”. - Or you can restart it from a terminal by running
docker restart home-assistant
Docker Compose
As the docker command becomes more complex, switching to docker-compose can be preferable and support automatically restarting on failure or system restart. Create a docker-compose.yml file:
  version: '3'
  services:
    homeassistant:
      container_name: home-assistant
      image: homeassistant/home-assistant
      volumes:
        - /path/to/your/config:/config
        - /etc/localtime:/etc/localtime:ro
      restart: always
      network_mode: host
Then start the container with:
Exposing Devices
In order to use z-wave, zigbee or other components that require access to devices, you need to map the appropriate device into the container. Ensure the user that is running the container has the correct privileges to access the /dev/tty* file, then add the device mapping to your docker command:
$ docker run -d --name="home-assistant" -v /path/to/your/config:/config -v /etc/localtime:/etc/localtime:ro --device /dev/ttyUSB0:/dev/ttyUSB0 --net=host homeassistant/home-assistant
or in a docker-compose.yml file:
  version: '3'
  services:
    homeassistant:
      container_name: home-assistant
      image: homeassistant/home-assistant
      volumes:
        - /path/to/your/config:/config
        - /etc/localtime:/etc/localtime:ro
      devices:
        - /dev/ttyUSB0:/dev/ttyUSB0
        - /dev/ttyUSB1:/dev/ttyUSB1
        - /dev/ttyACM0:/dev/ttyACM0
      restart: always
      network_mode: host
This article goes through setting up Portainer, and using Portainer to install Home Assistant Container. Using Home Assistant Container, we are able to integrate Agent DVR and an MQTT Broker, and use CodeProject.AI to detect a person and send this as an MQTT message to Home Assistant.
Introduction — The Many Ways of Installing Home Assistant
There are a lot of ways to install Home Assistant on Windows. You could install it using a Virtual Machine (via VirtualBox, VMware, Linux KVM, or Hyper-V), you could install it using Windows Subsystem for Linux (WSL), or you could install it in a Docker container.
When I started the process, I began installing it using VirtualBox, but I was unable to get an IP address for Home Assistant, or connect it to the internet. Some very kind, very patient people tried to help me for several days, but ultimately it became a question of, does my Network Interface Card support Promiscuous Mode? I emailed the manufacturer to find out — I’m still waiting for a response.
I tried installing Wireshark to force my NIC to use Promiscuous Mode, but that didn’t work. I tried using VMware to set up Home Assistant, but same problem; when I created the virtual machine, Home Assistant CLI did not generate an IP address. Unless you’re a network administrator, or have a lot of experience with networking, I wouldn’t recommend trying to install Home Assistant on Windows using a virtual machine.
This led me to installing Home Assistant Container, using Docker and Portainer. I wouldn’t say this is necessarily the ideal setup either. If you’re just starting with Home Assistant and you’re not a technical person, this won’t make sense to you, but Home Assistant Container does not come with Home Assistant Supervisor, which is an integration that allows you to easily install Add-ons. Without Supervisor, you may have to install separate containers and try to figure out how to access them / Home Assistant Container using an SSH command line. I’ll admit, I still haven’t figured that out yet.
Part of me wants to install successfully install Home Assistant every possible way to show you how to do it, but I don’t know if I hate myself that much. I suspect installing Home Assistant using WSL might be the ideal setup, so I might try that next.
But in this article, I will show you how to install Home Assistant Container on Windows, using Docker and Portainer, get it working with Agent DVR, and send an MQTT message from Agent DVR using CodeProject.AI Server to detect a person.
- Introduction — The Many Ways of Installing Home Assisstant
- The Tools We Use and How They Fit Together
- My Setup
- Setting Up Portainer
- Setting Up Home Assistant Container
- Setting Up an MQTT Broker — Eclipse Mosquitto
- Setting Up MQTT in Home Assistant Container
- Setting Up Agent DVR to Send an MQTT Notification to Home Assistant
- Setting Up Home Assistant Container to Receive MQTT Messages
My Setup
In this article, I am using:
- CodeProject.AI Server. If you need help setting up CodeProject.AI Server, please see my guide to Installing CodeProject.AI Server.
- A Wyze Cam v3. If you need help installing a Wyze Cam v3, please see my guide to Setting up your Wyze Cam.
- Agent DVR. If you need help setting up Agent DVR, please see my article How to Setup Agent DVR and CodeProject.AI Server on Windows Using a Wyze Cam
- Docker Desktop. If you need help setting up Docker, please see my article How to Run CodeProject.AI Server in Docker.
There’s a lot of tools used in this article. It may seem a little confusing, but here’s the basic layout of how all this works together.
)
- Docker houses everything we need for Home Assistant. It allows us to create a Portainer container, and through Portainer, create a Home Assistant Container, and creates an Eclipse Mosquitto container.
- Portainer helps manage and create container systems. Here, we use it to create the Home Assistant container.
- Home Assistant Container. This is the containerized version of Home Assistant. Everything else we have here in some way is set up to interact with Home Assistant, in some way.
- Mosquitto Eclipse. This is an MQTT Broker that we wrap in a container so that we can send MQTT messages from Agent DVR to Home Assistant.
- Agent DVR is the camera security software that gives us a shortcut to using a Wyze Cam with Home Assistant, as well as is what ties in with CodeProject.AI Server in order to do object detection. Agent DVR also allows us to create an action that sends an MQTT message to Home Assistant.
- CodeProject.AI Server handles the AI detection. Here, we use CodeProject.AI Server to detect a person, and send this detection through Agent DVR as an MQTT message to Home Assistant.
Setting Up Portainer
When I started messing around with installing Home Assistant Container, I incorrectly assumed that everything would have to be installed through Portainer, but this assumption was incorrect. Nevertheless, Portainer is a common tool that gets used to install Home Assistant. If you’re installing Home Assistant Container, I’m guessing one possible reason is because you don’t want to install everything from a command line. Portainer has a lot of functionality to avoid the command line, and is a great visual interface to look in and out of containers, check the formatting of YAML files, or if you were using Docker Compose, copy the contents into the Stack page. So let’s get started.
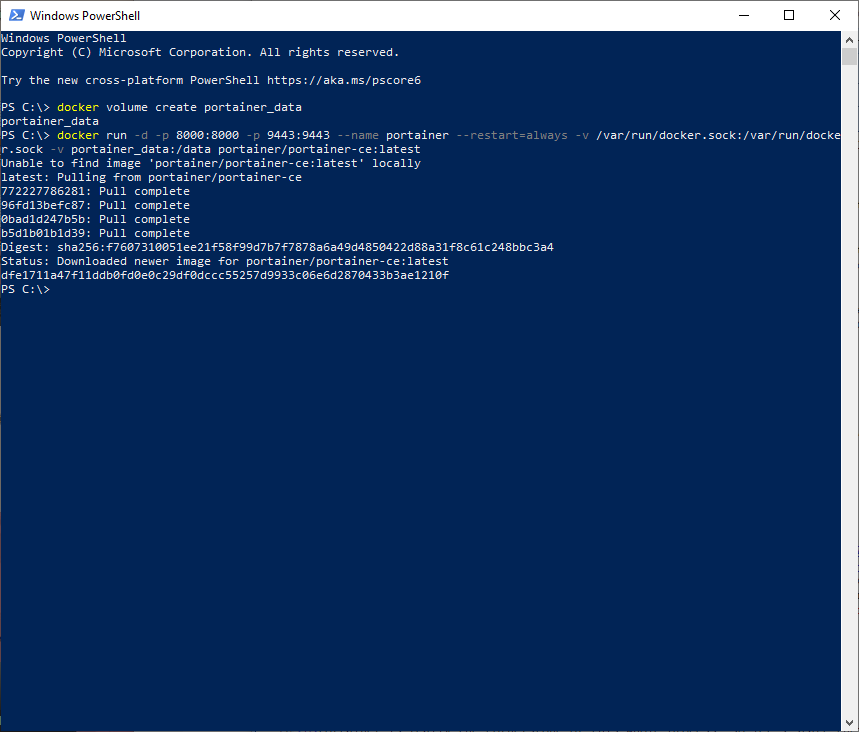
Go to the Start button on Windows and starting typing «PowerShell». Click on Windows PowerShell. Input the following:
docker volume create portainer_data
This creates a volume for Portainer which will be used to store its database. Next, run:
docker run -d -p 9443:9443 --name portainer
--restart=always -v /var/run/docker.sock:/var/run/docker.sock
-v portainer_data:/data portainer/portainer-ce:latest
This installs Portainer on Windows Subsystem for Linux (WSL).
Now, place https://localhost:9443/ in your browser. You can also (and may have to) use https://youripaddress:9443. If you do not know your IP address, go to the Start button in Windows and start to type «CMD» then select Command Prompt. Then, type ipconfig. The address you want is the IPv4 Address.
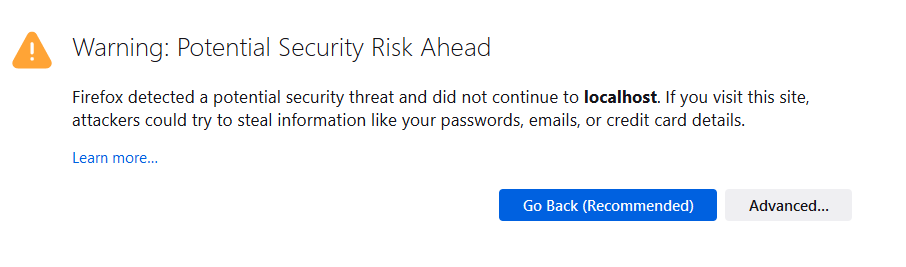
A scary warning. I’m going to say, «don’t worry about it.» If you really want to, you can install an SSL certificate later, but I don’t cover that here. Click Go Back, then Advanced…, then Accept the Risk and Continue.
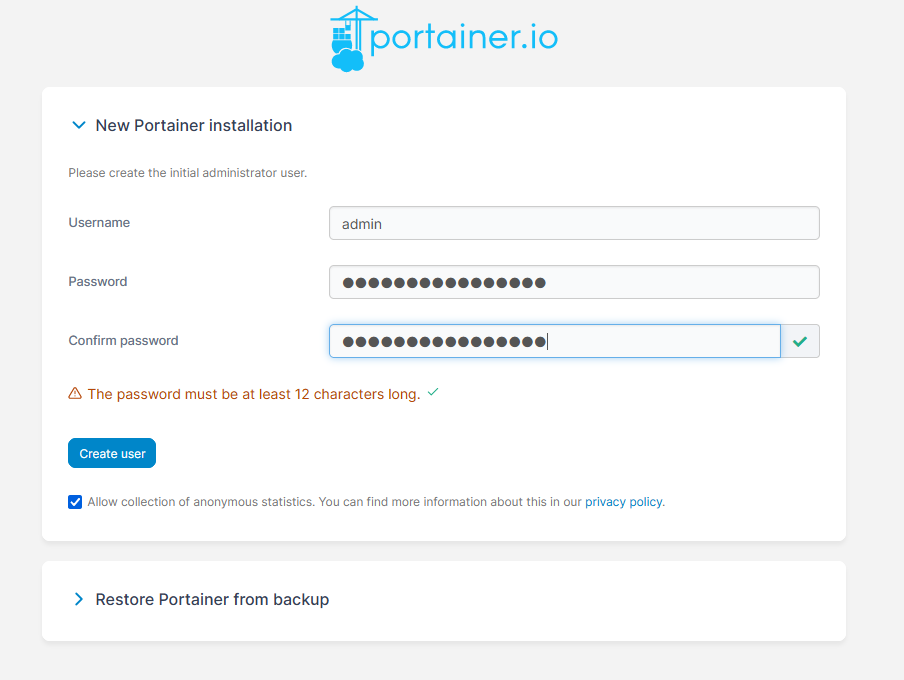
Now it’s time to create a Username and password for Portainer. I’m leaving the Username as admin. Input a password that’s at least twelve characters long, and make sure you save it somewhere. Click Create user.
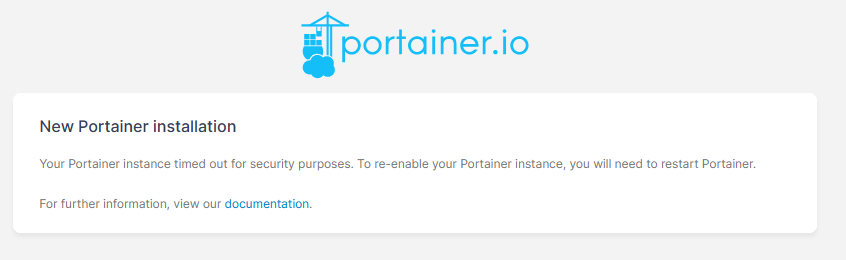
This actually made me start and stop the service again, and re-enter the password, but after that, I got to the Portainer.io home page.

Click Get Started.

Then click local to get into our Portainer container.
Setting Up Home Assistant Container
Now it’s time to use Portainer to install Home Assistant Container.
Click on the Volumes tab on the left. Then click + Add Volume.

This is similar to what we just did in Windows PowerShell. In the Name field, input something like «homeassistant_data» and hit Create the volume.
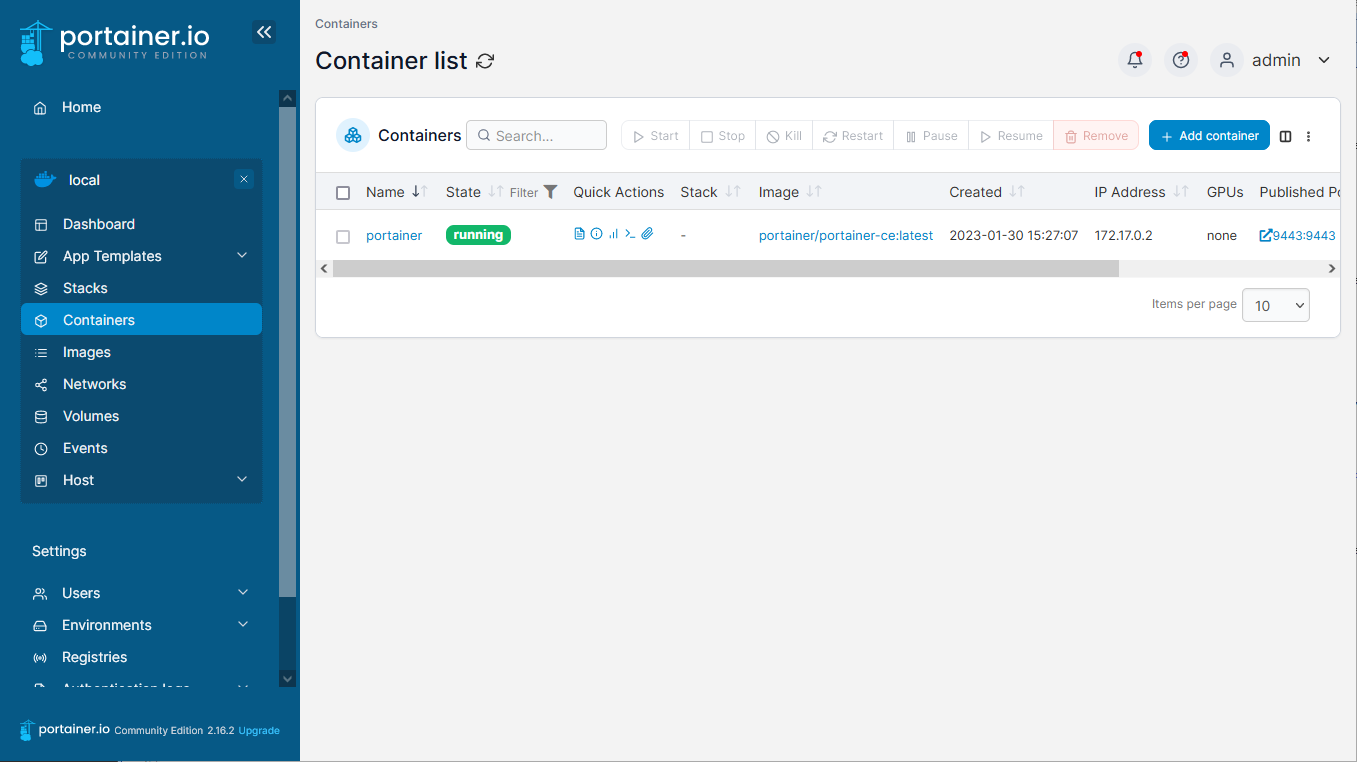
Next, click on the Containers tab on the left-hand panel, which takes you to the Containers page. Here the Portainer container is happily running. Click + Add Container.
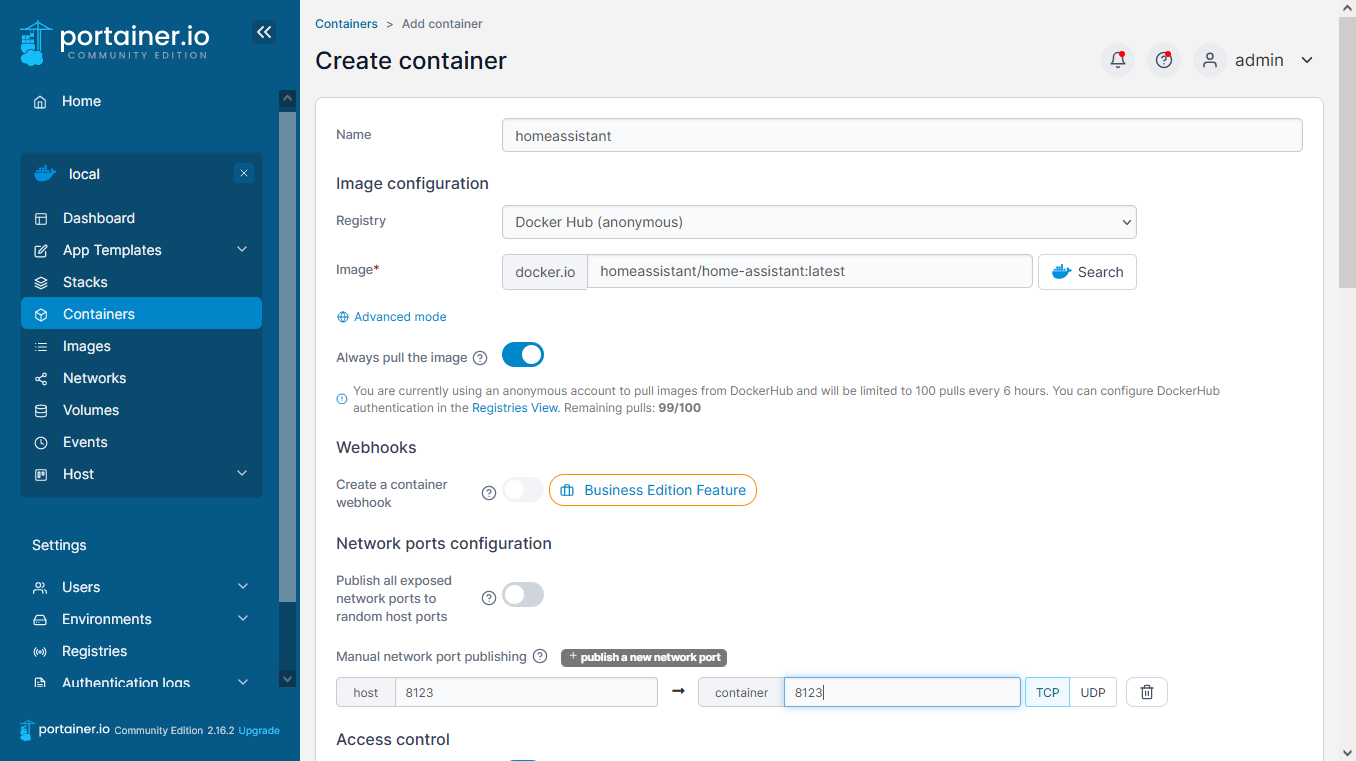
Give the container a name in the Name field. I think «homeassistant» is a pretty good name. Then, in the Image field, put «homeassistant/home-assistant:latest». Next, click + publish a new network port and put in «8123» to both the host and container field.
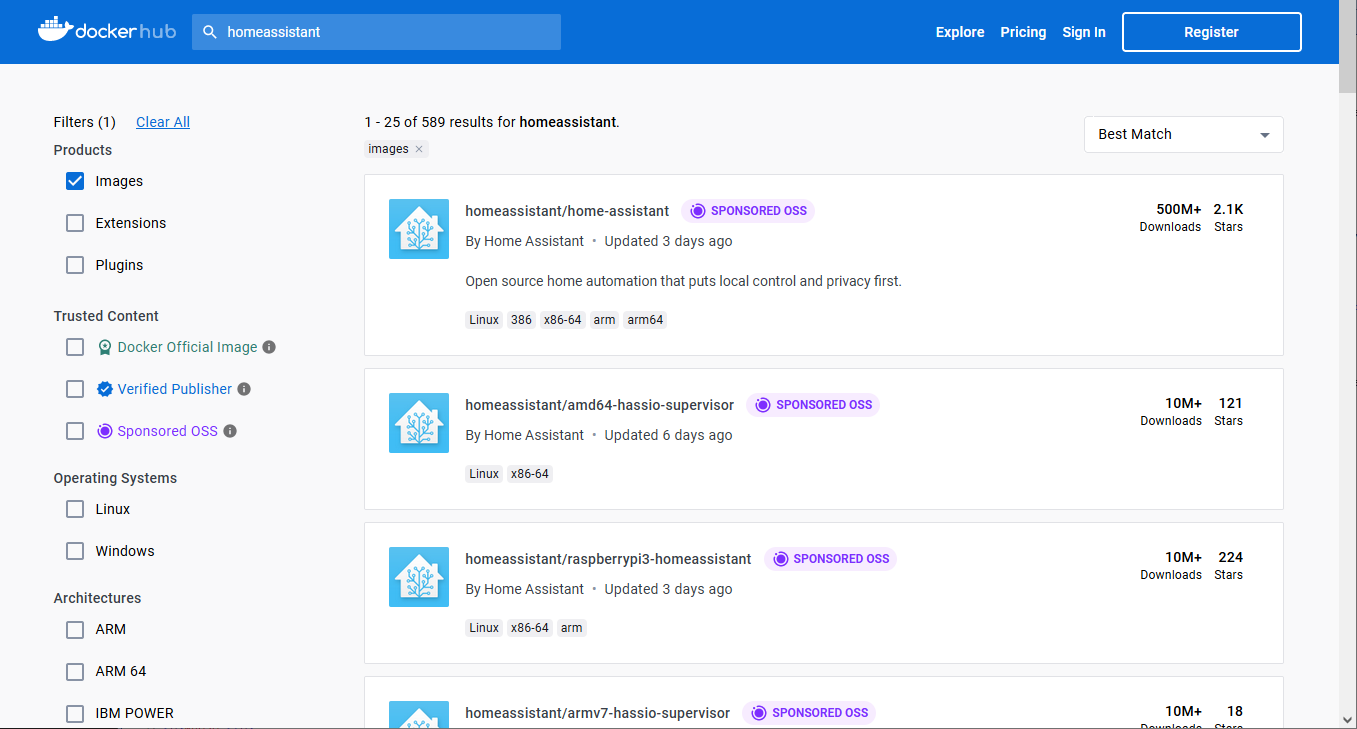
There’s actually a pretty handy search button next to the Image field that allows you to search through Docker Hub for all available images, extensions, and plugins. When you find the image you’re looking for, the heading in bold is what you put into the Image field in Portainer.
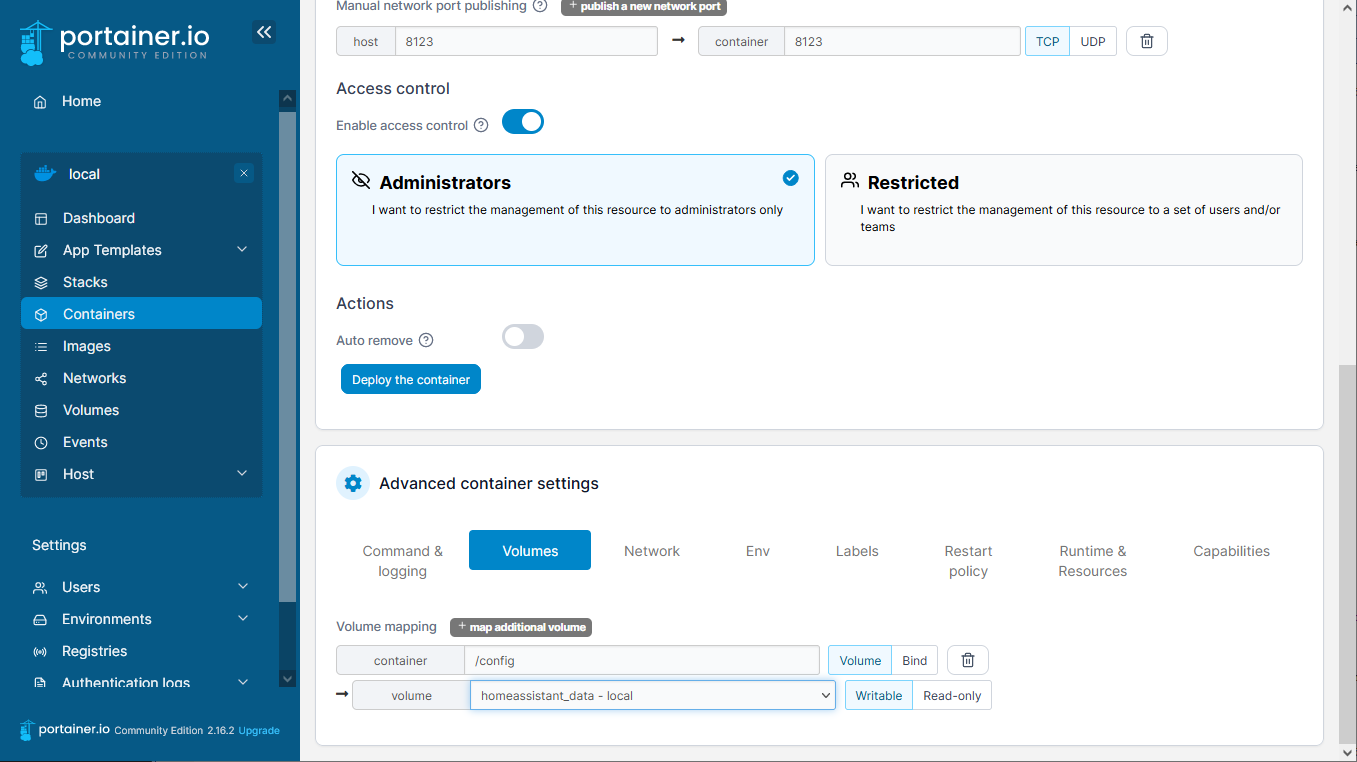
Now it’s time to enter the Advanced container settings. First, click on the Volumes heading, then + map additional volume. In the container field, put /config, and in the volume dropdown, select the homeassistant_data volume we just created.
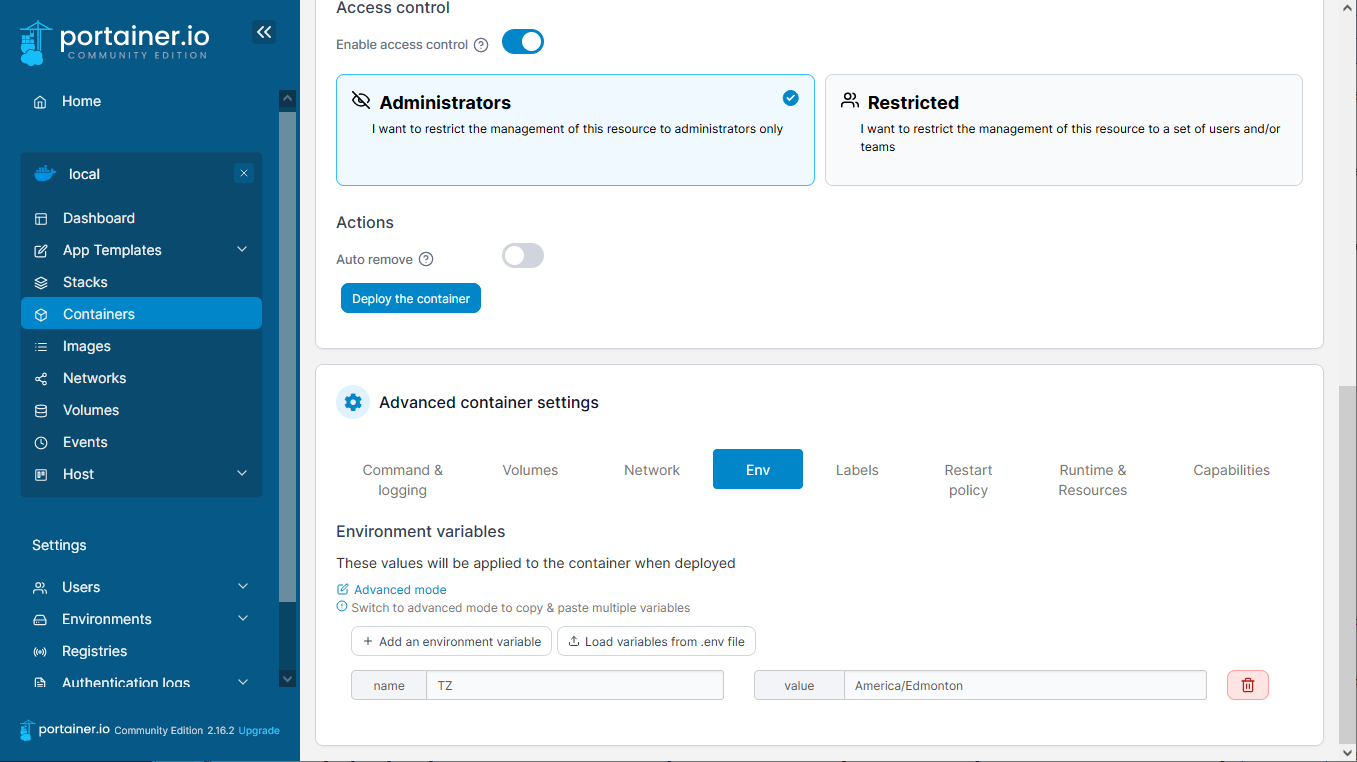
Then hit the Env tab and click + Add an environment variable. Put «TZ» into the name field, and then your Country/Timezone. I tried putting in Canada/Edmonton, but it was saved as «America/Edmonton» so I’ll just put that in the value field.
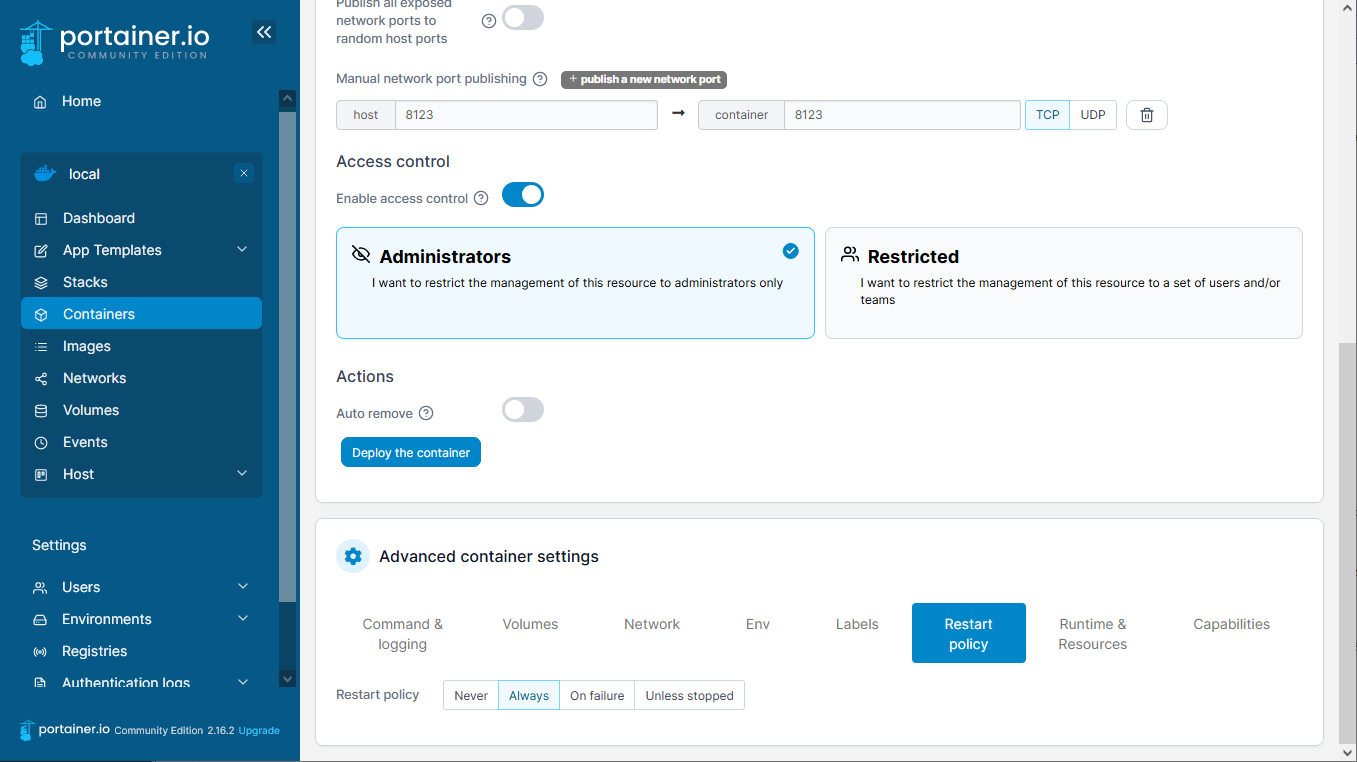
The next tab we need is the Restart policy tab. Simply click Always here.
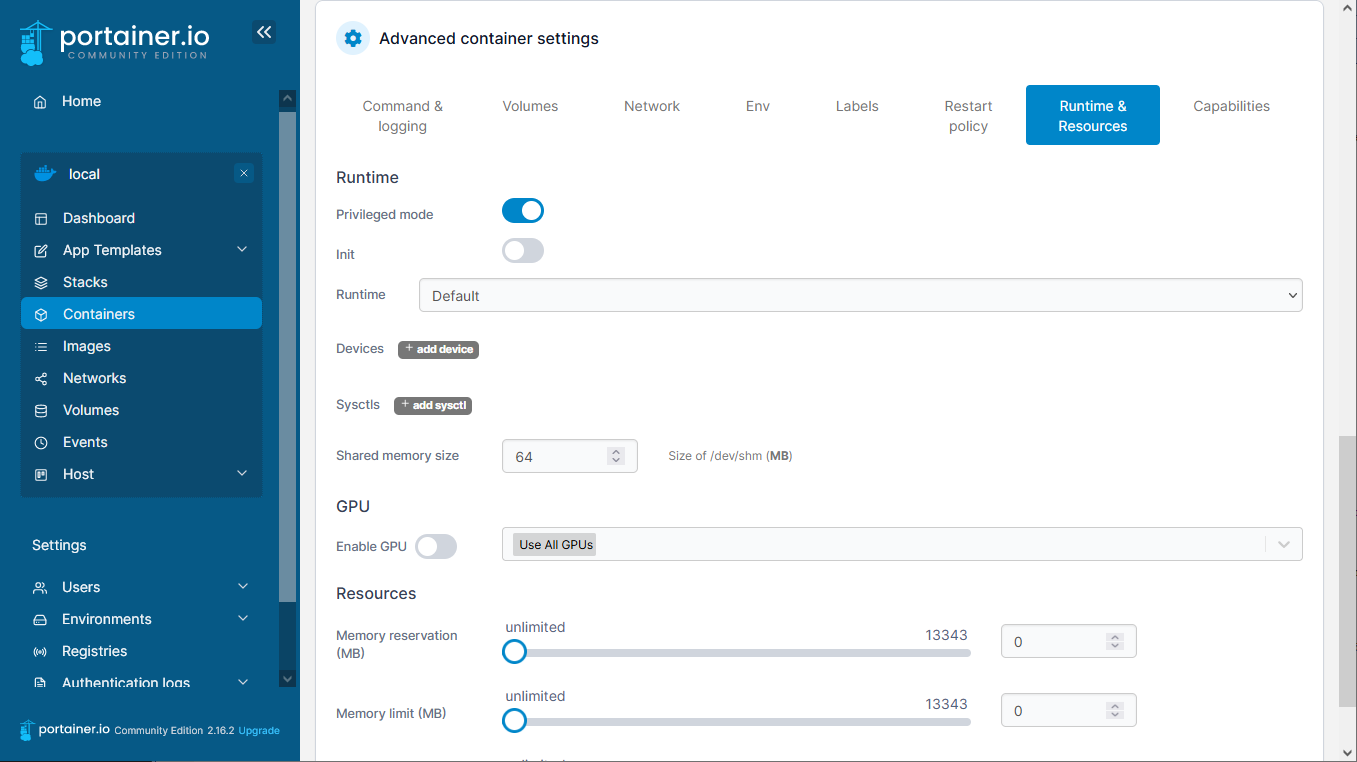
Finally, click the Runtime and Resources tab and toggle Privileged mode into the on position. Now scroll up and hit Deploy the container.

If you input everything correctly, there is a little pop-up that says «Success Container successfully created» and Home Assistant Container now runs and is visible in the Container list.
You’ll probably notice how similar this is like a visual version of a docker command to pull Home Assistant. If you were to run the docker command to do this, it would look something like this:
docker run -d --name homeassistant --privileged
--restart=unless-stopped -e TZ=MY_TIME_ZONE
-v /PATH_TO_YOUR_CONFIG:/config -p 8123:8123 home-assistant/home-assistant:stable
Where MY_TIME_ZONE is your time zone (America/Edmonton for me) and PATH_TO_YOUR_CONFIG is the path to an empty folder you create on your computer. But you can see how each element in this line matches up with what we just did in Portainer: the name of the container, privileged mode, restart, host and container ports, and image. You could skip setting up Portainer and install it this way, it’s simply a different process.
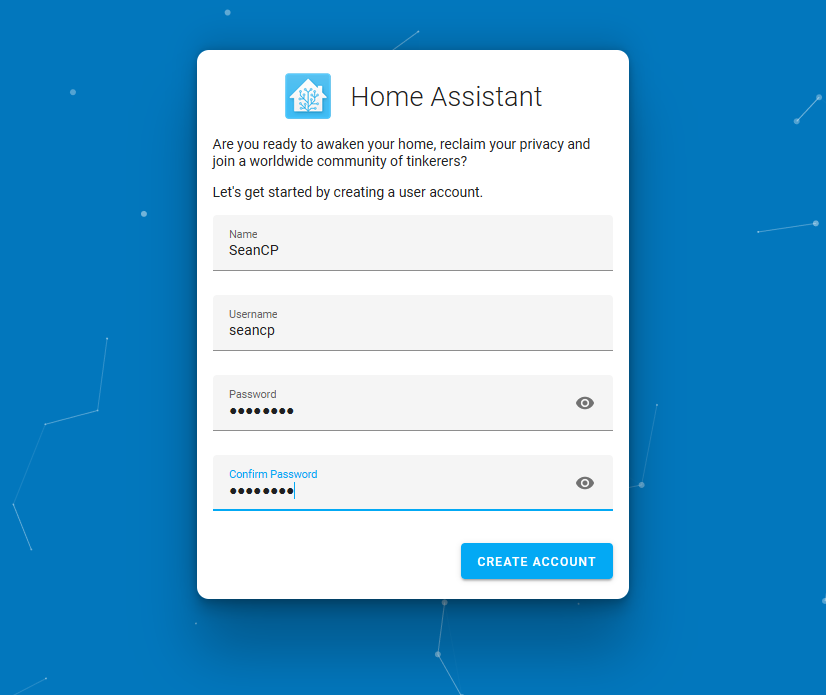
All right, let’s log into Home Assistant. In the browser, put http://localhost:8123. This was the screen that eluded me for days when trying to install Home Assistant from a virtual machine, so when I saw this screen, I got a little excited.
Input your Name (which automatically starts entering that as your Username in lower case), then choose a password. Make sure you write this password down somewhere, you’re going to need it a lot. Hit Create Account.
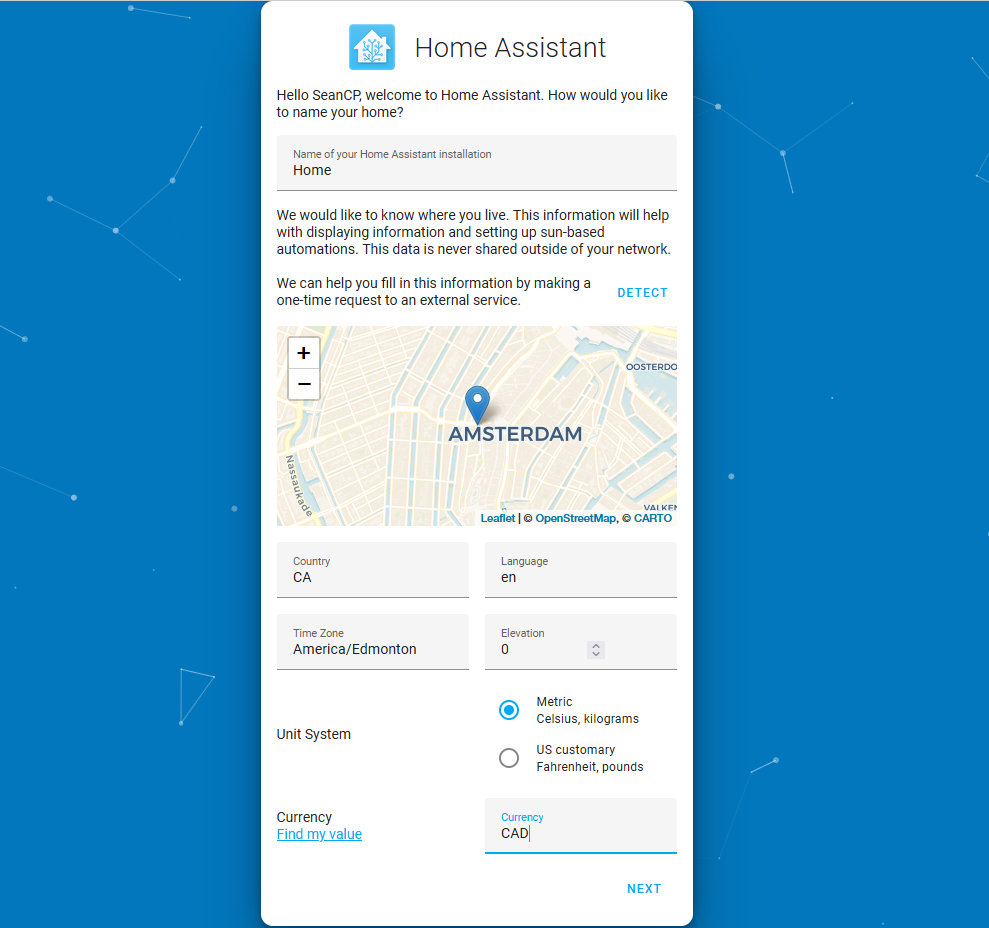
Next input more specific details for Home Assistant. You can give Home Assistant a name (I’m very creative and call mine «Home«), then select a Country, Language, Time Zone, and Currency. Hit Next.

Then is a screen about sharing data. I’m not interested in sharing so I click Next.
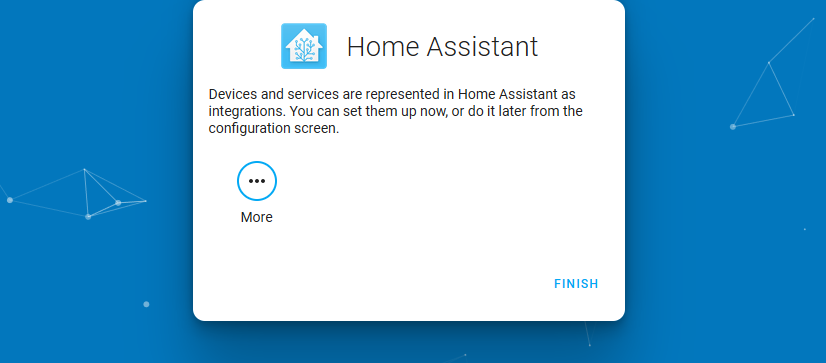
This next page is where all your IoT devices would show up if have them. Nothing shows up for me. Click Finish.

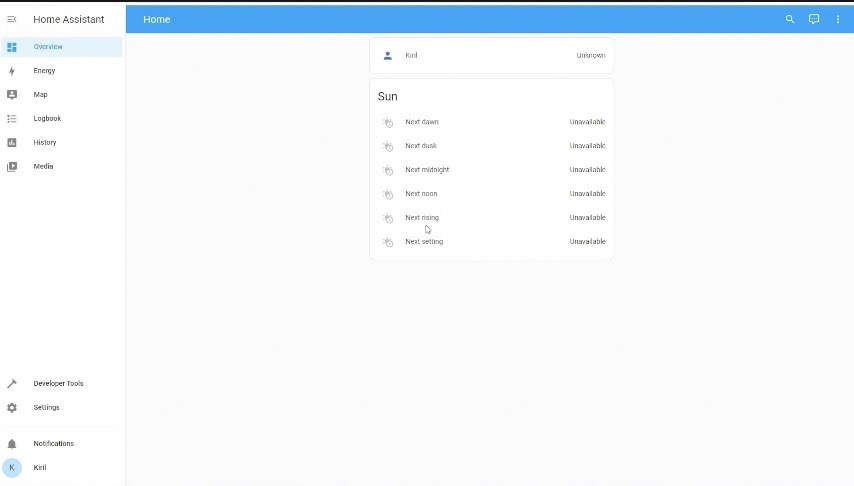
This is it. This is the Home Assistant Container Overview page. Isn’t it beautiful? Let’s add our Wyze cam and Agent DVR. First, launch Agent DVR. Go to your browser and put in http://localhost:8090/.
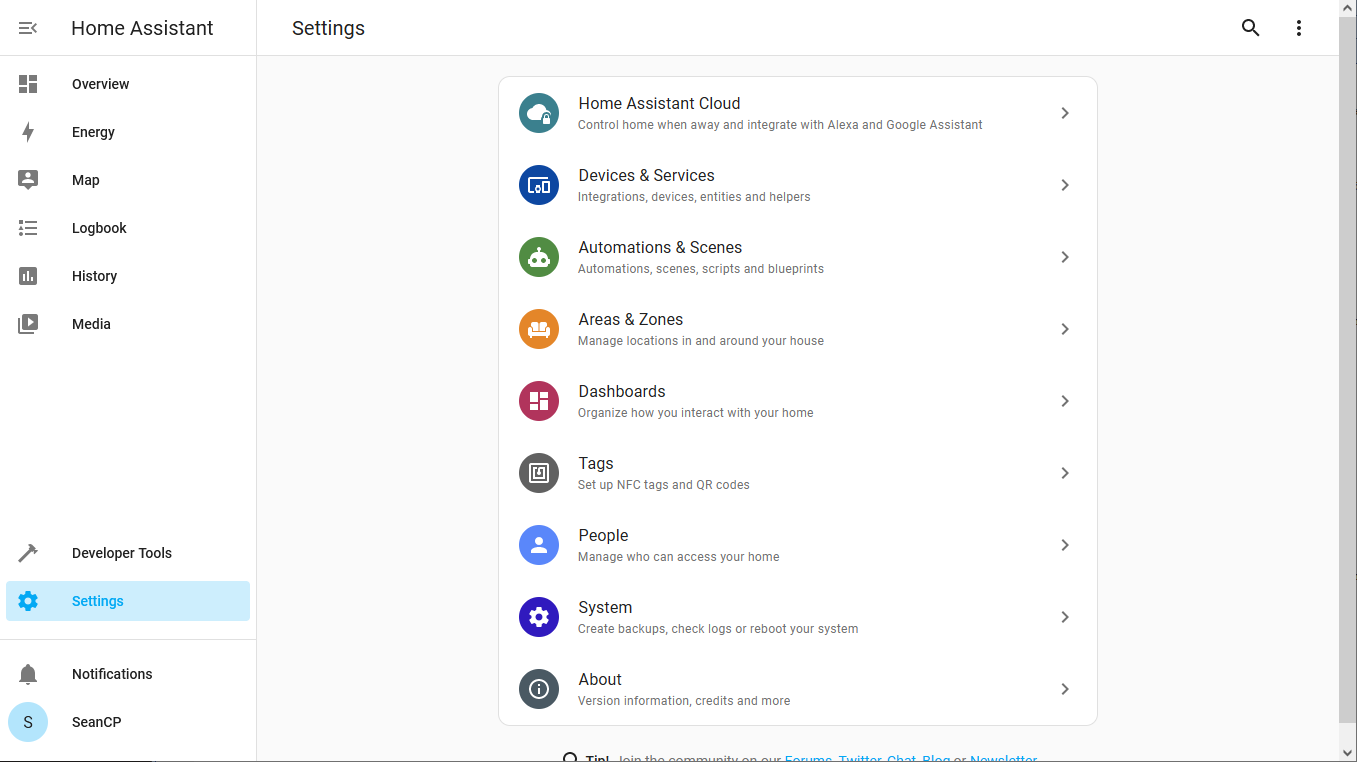
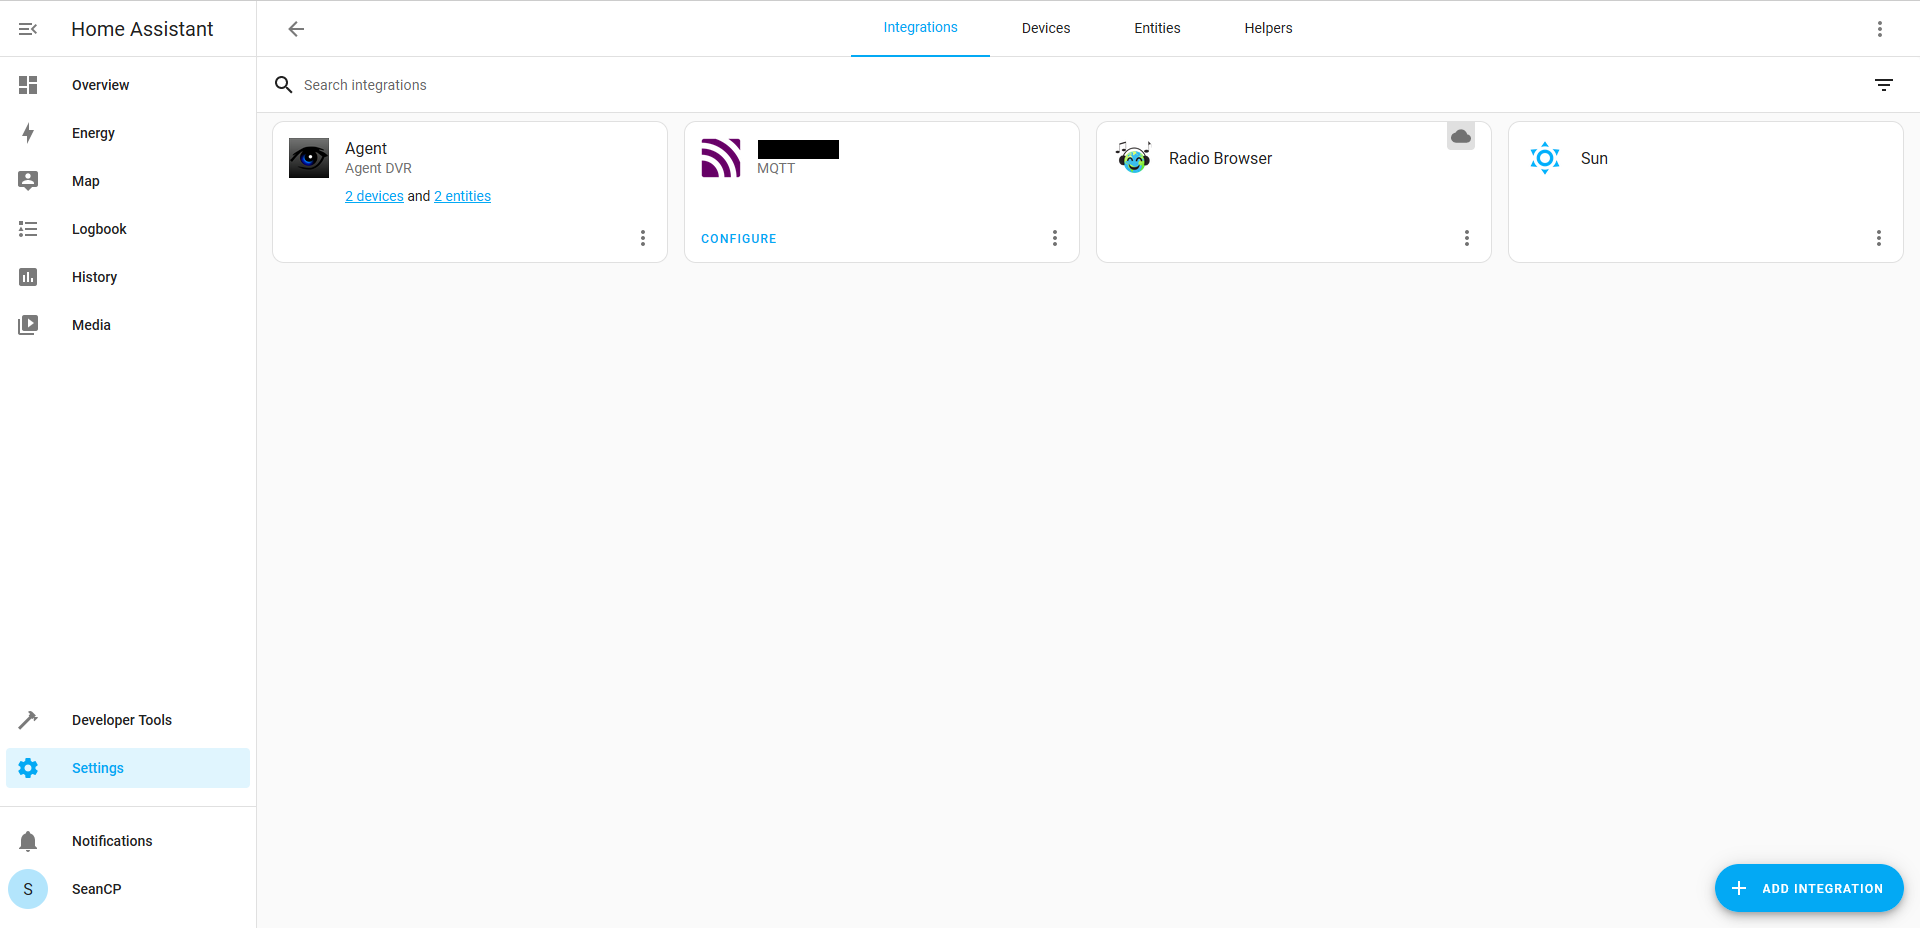
Back in Home Assistant, click the Settings tab on the left. Then click Devices & Services.

From here, hit + Add Integration.
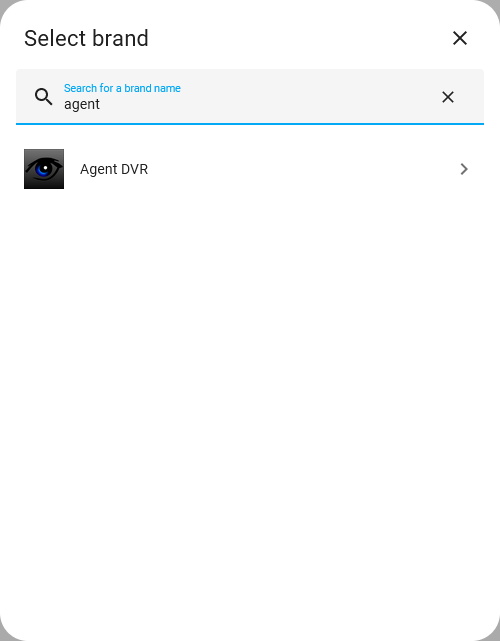
Start typing «Agent» and then select Agent DVR.
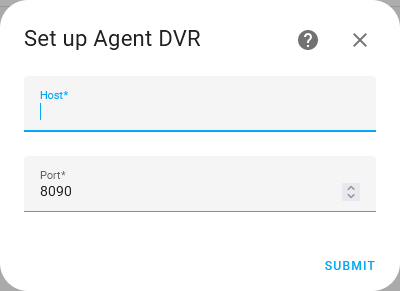
Here, for the Host, you need to put in your IP address. If you don’t know it, go to the Start button in Windows and start to type «CMD» then select Command Prompt. Then, type ipconfig. The address you want is the IPv4 Address. Leave the Port as 8090 and hit Submit.
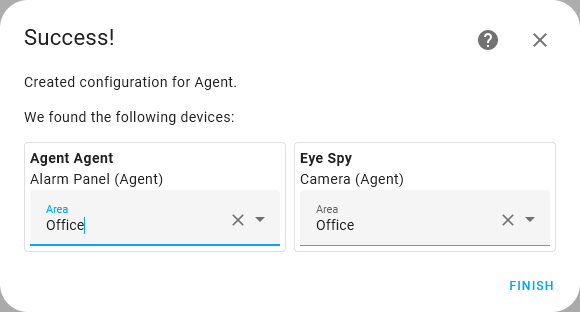
When you integrate Agent DVR to Home Assistant, it comes with two entities (depending on your camera setup). The first is an Alarm Panel. I presume you could use this to arm an alarm system if it were integrated with Agent DVR. For me, it’s just a camera in my office, so I click the dropdown and select Add new area, input «Office» and hit Add. I select Office for both the Alarm Panel and the camera (I call my camera Eye Spy), and hit Finish.
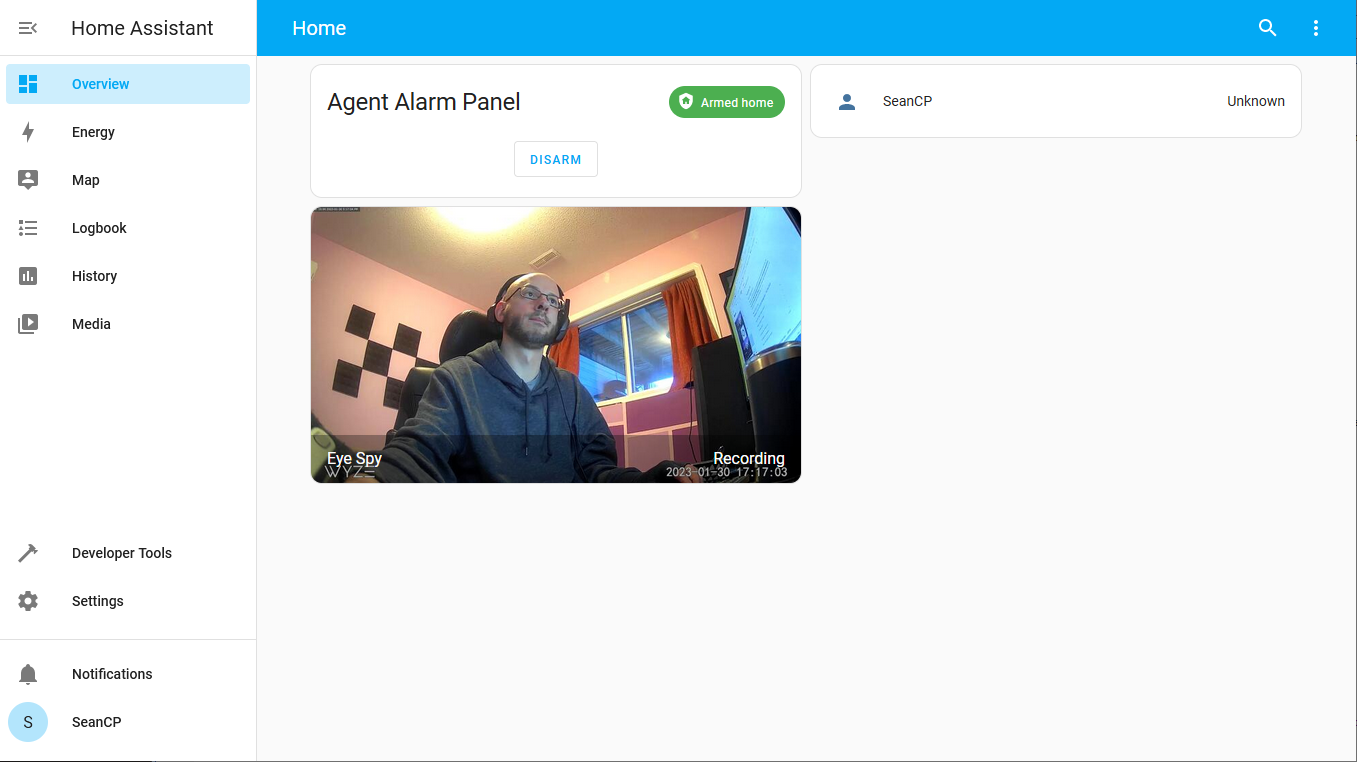
Now if you go back to Overview, boop! There I am.
Setting Up an MQTT Broker — Eclipse Mosquitto
Now let’s set up our MQTT Broker. I actually tried to set up Mosquitto using Portainer, but when I tried to do this, I couldn’t get Mosquitto set up in Home Assistant Container. I got an error: «Address not available».
There are a few ways to address this error. If you did install Mosquitto with Portainer, from Portainer you could command line into Mosquitto and alter the mosquitto.conf file to change the listener to 1883, persistance set to true, and allow_anonymous set to true. But I didn’t go that route. Instead, I installed Mosquitto using a Docker command that used the no authentication configuration.
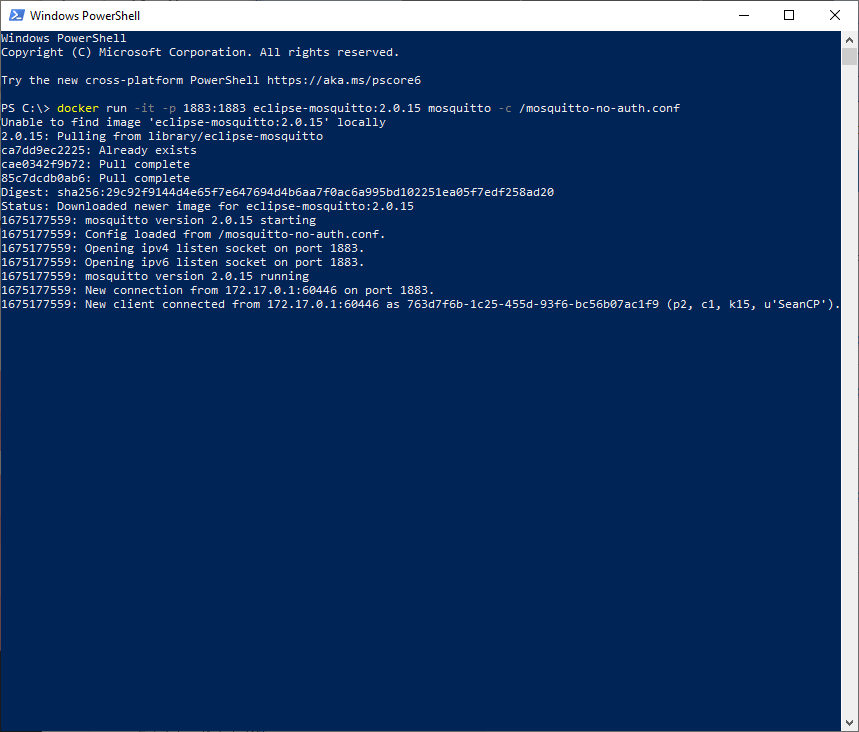
Open Windows PowerShell, and type:
docker run -it --name mosquitto
-p 1883:1883 eclipse-mosquitto:2.0.15 mosquitto -c /mosquitto-no-auth.conf
It’s important to note that at the time of reading this article, Mosquitto is on version 2.0.15. That’s why the line reads eclipse-mosquitto:2.0.15, but simply replace 2.0.15 with whatever version of Mosquiotto you desire (eclipse-mosquitto:<version>).
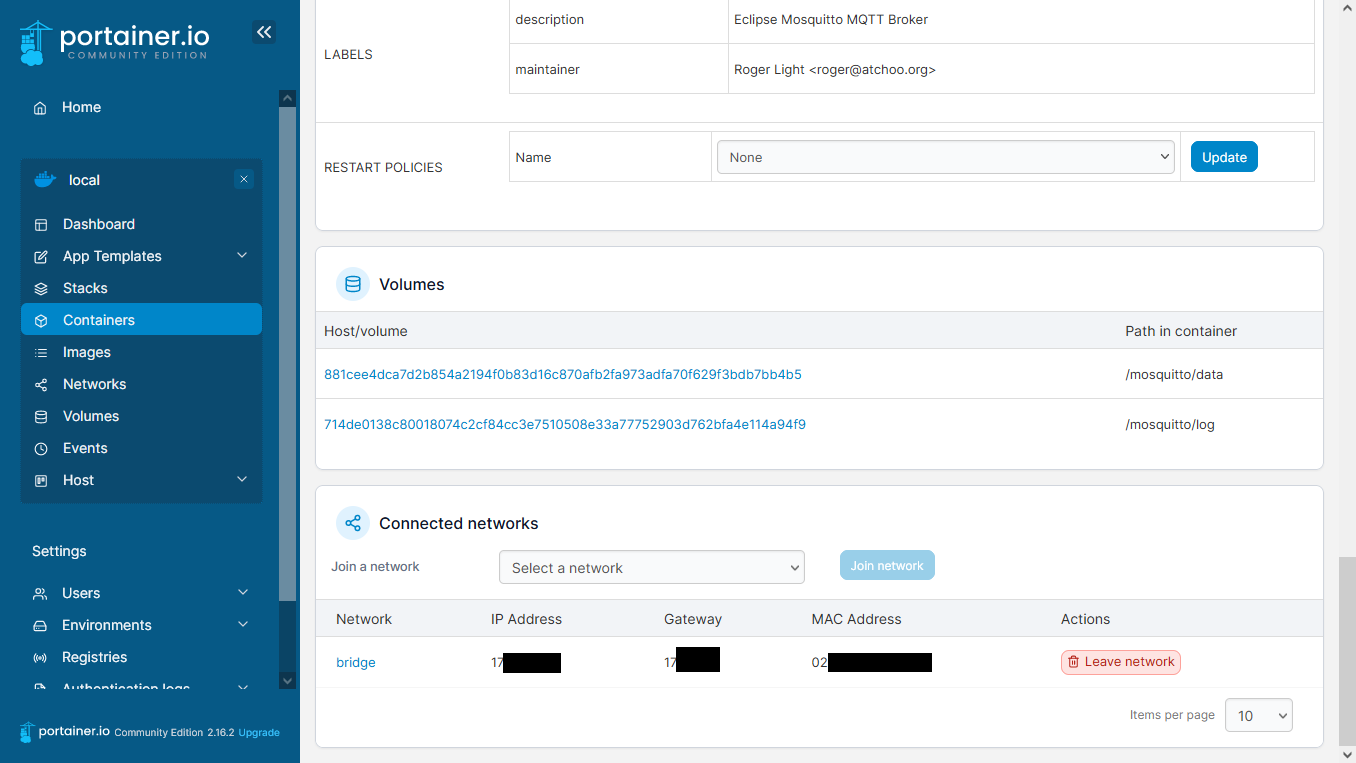
Because we did not install Mosquitto through Portainer, the most important thing is to make sure that this mosquitto container is on the same network as Portainer and Home Assistant. To check, go back to Portainer and go to the Containers heading on the left. Then click on mosquitto in the Name field, then scroll down to Connected Networks. Underneath Network, you can see it says «bridge». If we go back to the Containers tab and click on homeassistant, then scroll down to the Connected Networks section, we can see that Home Assistant is also on the bridge network.
This process may be helpful in case you need to install other containers for your own use.
Setting Up MQTT in Home Assistant Container
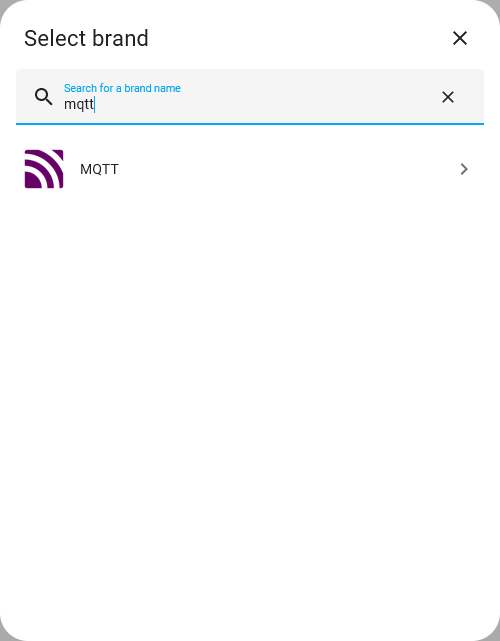
Now it’s time to go back to Home Assistant. Go back to Settings -> Devices & Services and click + Add Integration. Then start typing MQTT, and click MQTT.
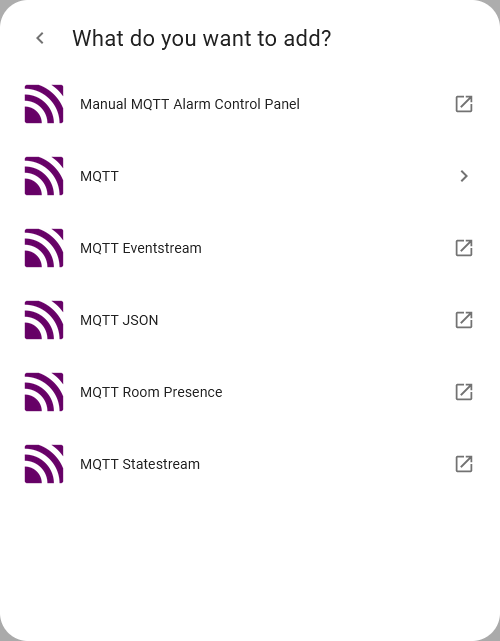
A dialog appears asking which MQTT integration you would like to add. Click just plain MQTT.
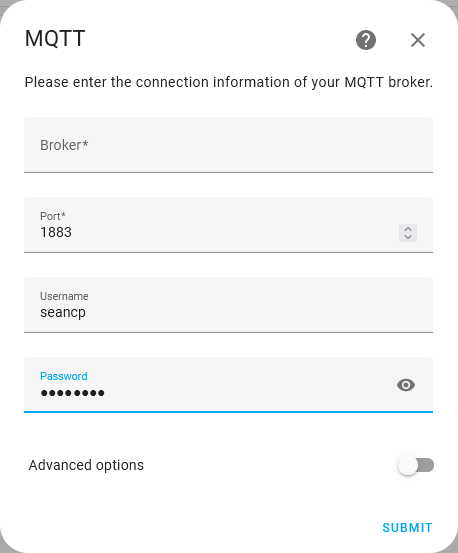
In the Broker field, input your IP Address. If you do not know your IP address, go to the Start button in Windows and start to type «CMD» then select Command Prompt. Then, type ipconfig. The address you want is the IPv4 Address. Leave the port as 1883, then for Username put your Home Assistant user name, which for me is «seancp», and then the password for Home Assistant. Then hit Submit. A little Success window pops up, then hit Finish.
Setting Up Agent DVR to Send an MQTT Notification to Home Assistant
Now let’s do a practical application of MQTT. Agent DVR has great integration with Home Assistant, so launch Agent DVR by putting http://localhost:8090/ in your browser.

In order to use Agent DVR for an MQTT message, you must have a business license. Head to the subscriptions page for Agent DVR and choose the desired license. For this, I only need the Basic plan. Click Choose this. This brings you to an Agent DVR tab. If you already have an account, click Login, if not click New Account.
Then navigate through the payment method (like PayPal) and there you go! You’re set up to send MQTT messages.
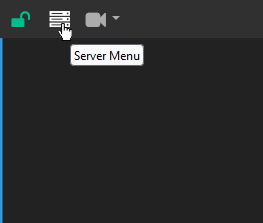
The first step is to set up MQTT in the Server Menu. Click the Server Menu button in the upper-left corner.
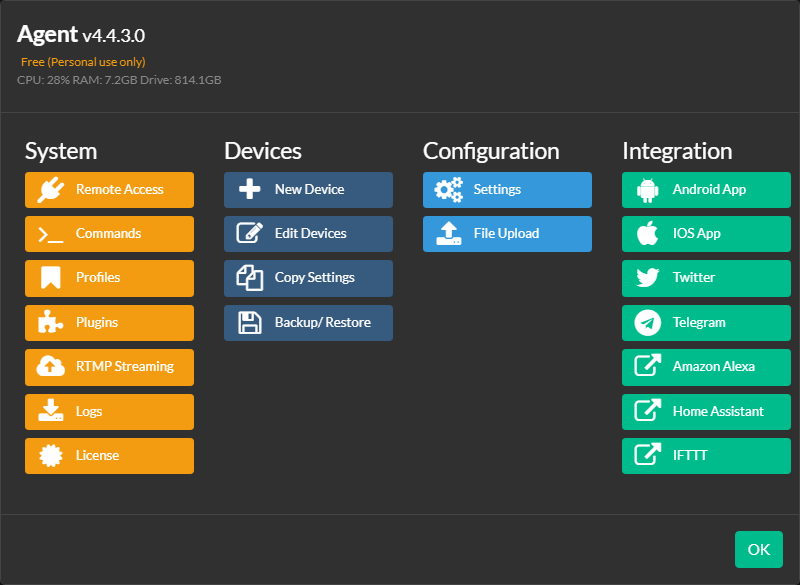
Then from the Configuration column, select Settings.

From the General dropdown, select MQTT. Here, we enter in all the settings for MQTT and make sure it is Enabled. Under Server, you want to put in your IP Address again. If you do not know your IP address, go to the Start button in Windows and start to type «CMD» then select Command Prompt. Then, type ipconfig. The address you want is the IPv4 Address. In the Port field, you want to put 1883. Then in the Username and Password fields, you again want to put in your Home Assistant username and password. Hit OK to accept the MQTT settings, then OK again to exit the Server Settings.
We’re going to be detecting a person, so let’s make sure Agent DVR is set up to detect a person.
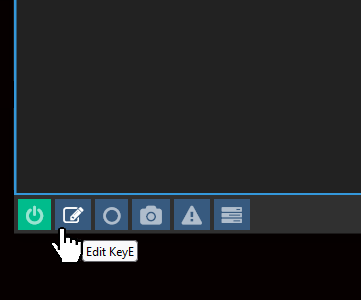
Go to the Camera Settings.
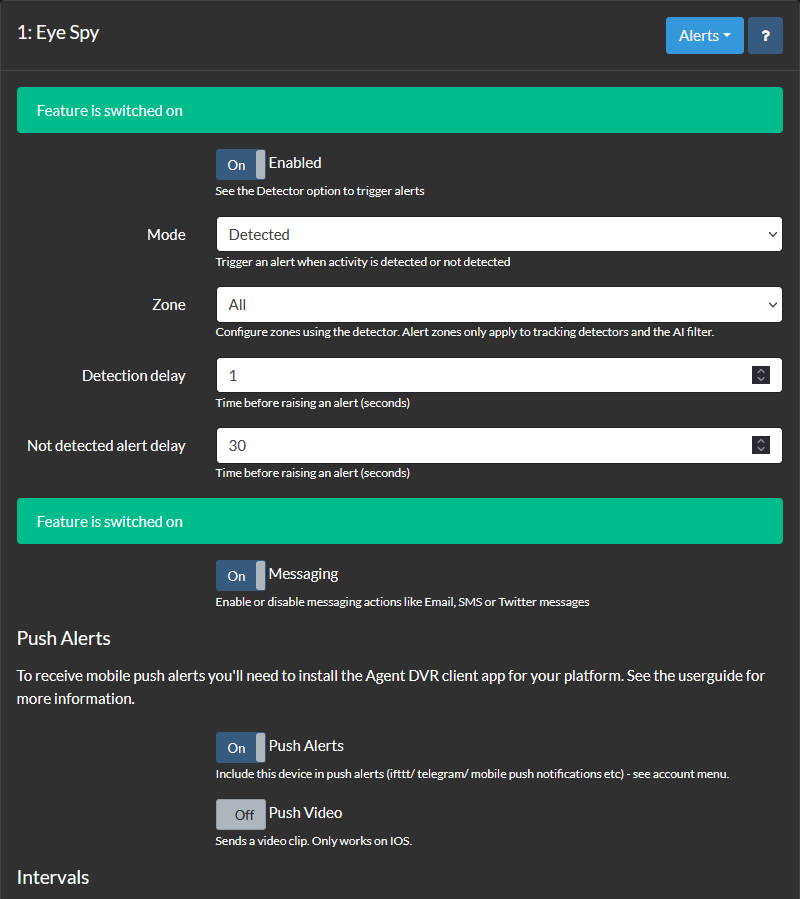
Then from the General dropdown, select Alerts. And make sure Alerts are enabled.
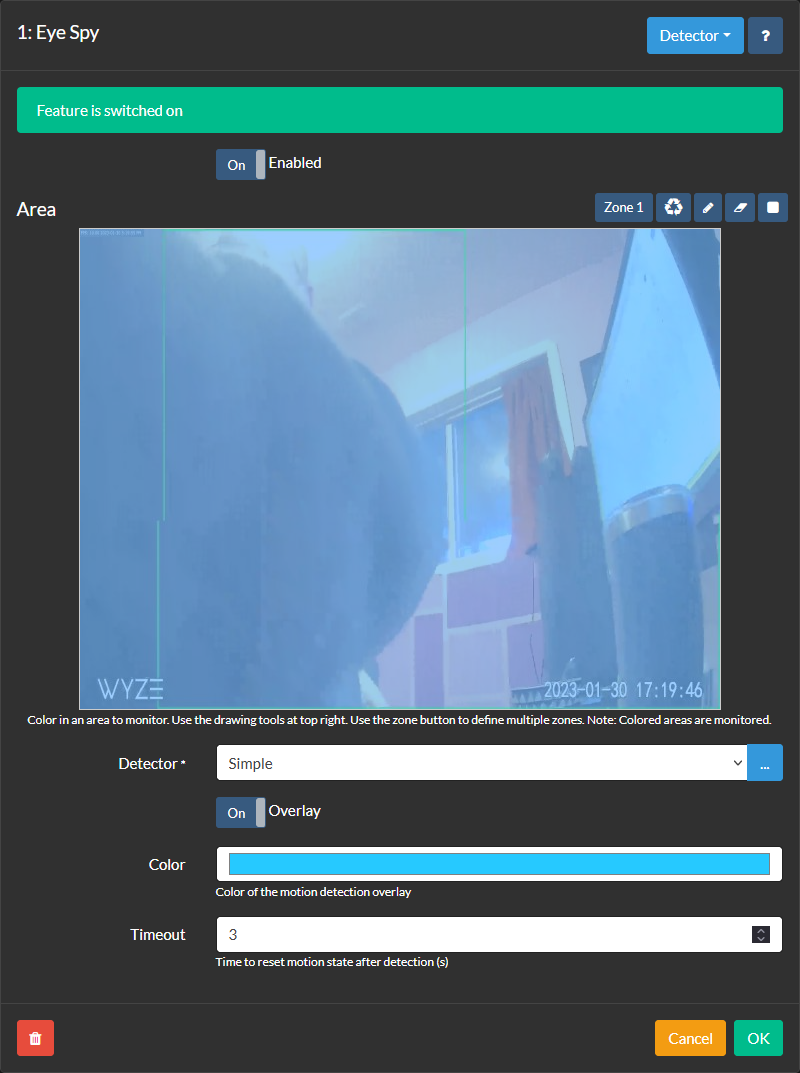
Now go back to the Camera settings, and from the General dropdown, and select Detector. I want it to be really easy to detect a person, so change the Detector to Simple. The Simple detector means that the AI detection will be triggered on motion. Hit OK.
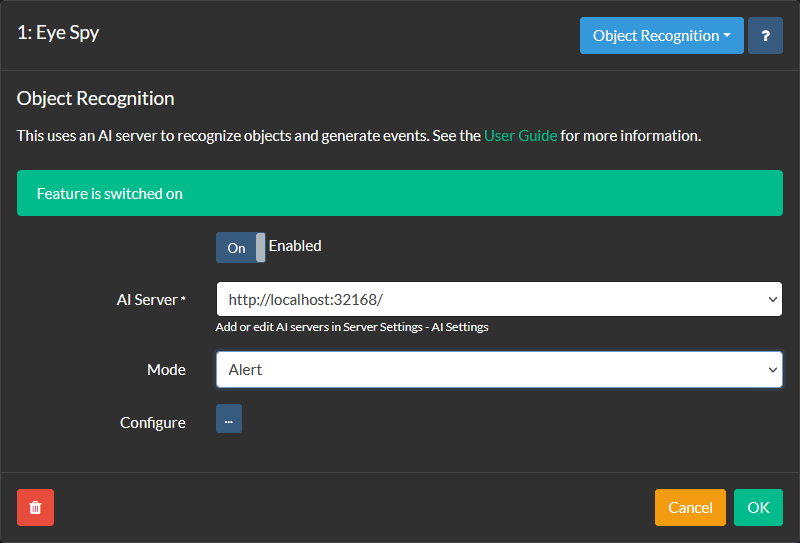
Now go back to the Camera settings, and from the General dropdown, and select Object Recognition. Make sure it is Enabled, that the AI Server is set to http://localhost:32168/. Then hit the … button to get to the Configure settings.

Make sure in the Find field it says «person» and set the Confidence to 50. Hit OK to accept the Configure settings, and OK again to accept the Object Recognition Settings.

Now go back to the Camera settings, and from the General dropdown, and select Actions. We actually want to create two actions, one action so we can confirm that within Agent DVR, a person is being detected, and the other to send the MQTT notification to Home Assistant. Hit Add.
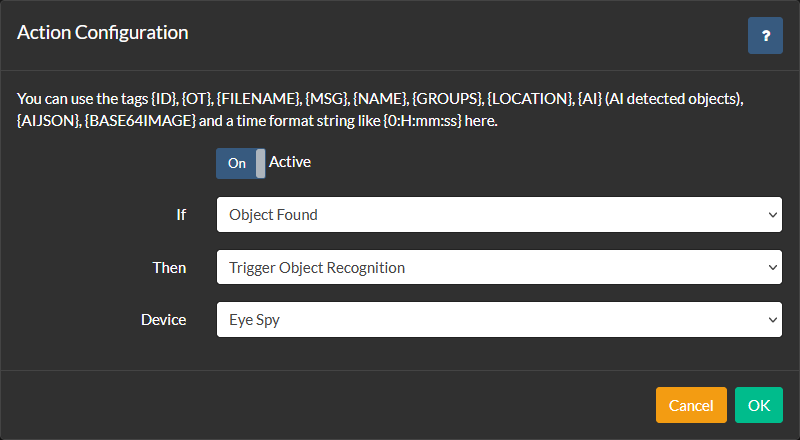
In the If dropdown, select Object Found. In the Then dropdown, select Trigger Object Recognition, which should automatically select your Device, which for my is my Wyze Cam v3 that I’ve named «Eye Spy». Hit OK to create the action.

Now for the action, we set this whole thing up to create. Hit Add to create another action. In the If dropdown, select Object Found. In the Then dropdown, select MQTT. This next bit is interesting and important. In the Topic field, you need to input a Topic and a Sub-topic. My Topic is «Agent» and my sub-topic is «alerts». You can name these whatever you want, but make sure to remember what these are. Input them as «Topic/Sub-topic». So in my case, «Agent/alerts». In the Post field, I want the MQTT message to contain what was detected, so I put «{AI}». Hit OK to create the action. Hit OK again to accept the action settings.
Setting Up Home Assistant Container to Receive MQTT Messages
Now let’s see if we can use CodeProject.AI Server through Agent DVR to detect a person, and send an MQTT message from Agent DVR to Home Assistant.
Go back to Home Assistant by putting http://localhost:8123 in your browser and enter your username and password. Then go the Settings panel from the left-hand side, then click Devices & Services.
From here, we can see our MQTT integration. Click Configure.
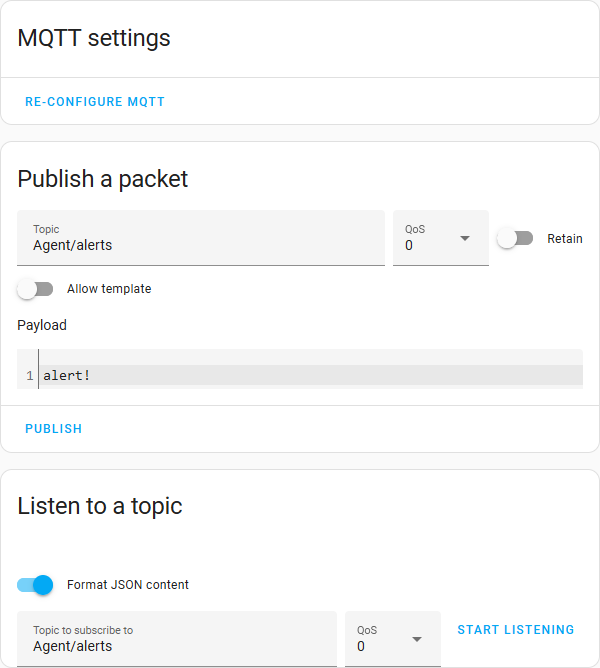
This is where we need the Topic and Sub-topic from Agent DVR. In the Topic field, put your Topic/Sub-topic. For me, this is «Agent/alerts». In the Payload setting, you can put in a message here to test to see if your MQTT Broker can share a packet. If you hit Publish, it will do a test and display «alert!» I’m deliberately leaving this as «alert!» to demonstrate that when the MQTT message comes in, it’s coming from Agent DVR. Now go down to Listen to a topic and put «Agent/alerts» in the Topic to subscribe to field.
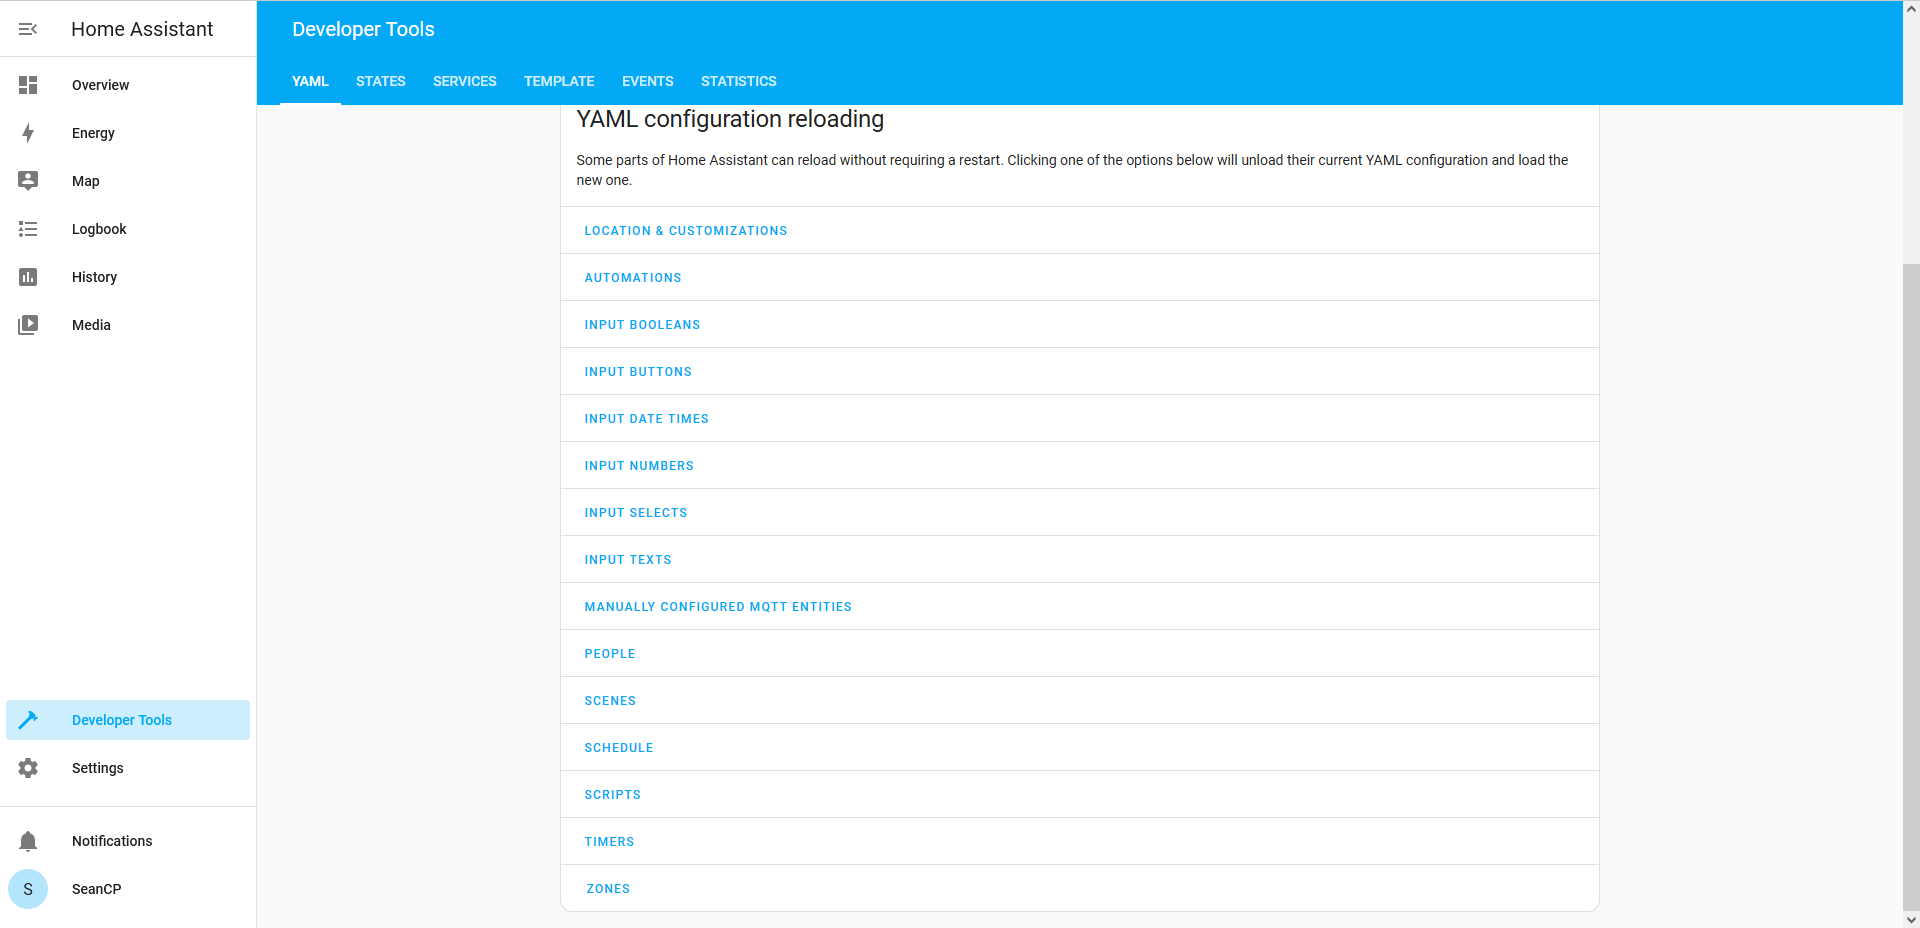
Because we just configured this MQTT settings, we need to reload it in Home Assistant. Click on the Developer Tools, and in the YAML tab click Manually Configured MQTT Entities. A green button flashes, indicating that MQTT Entities have been reloaded.

Now launch CodeProject.AI Server by putting http://localhost:32168/ in your browser. I’ve previously installed a bunch of modules like Face Processing, and License Plate Reader, but for this, all we really need is Object Detection (YOLOv5 6.2), so I click the … next to all the other services, and select Stop.
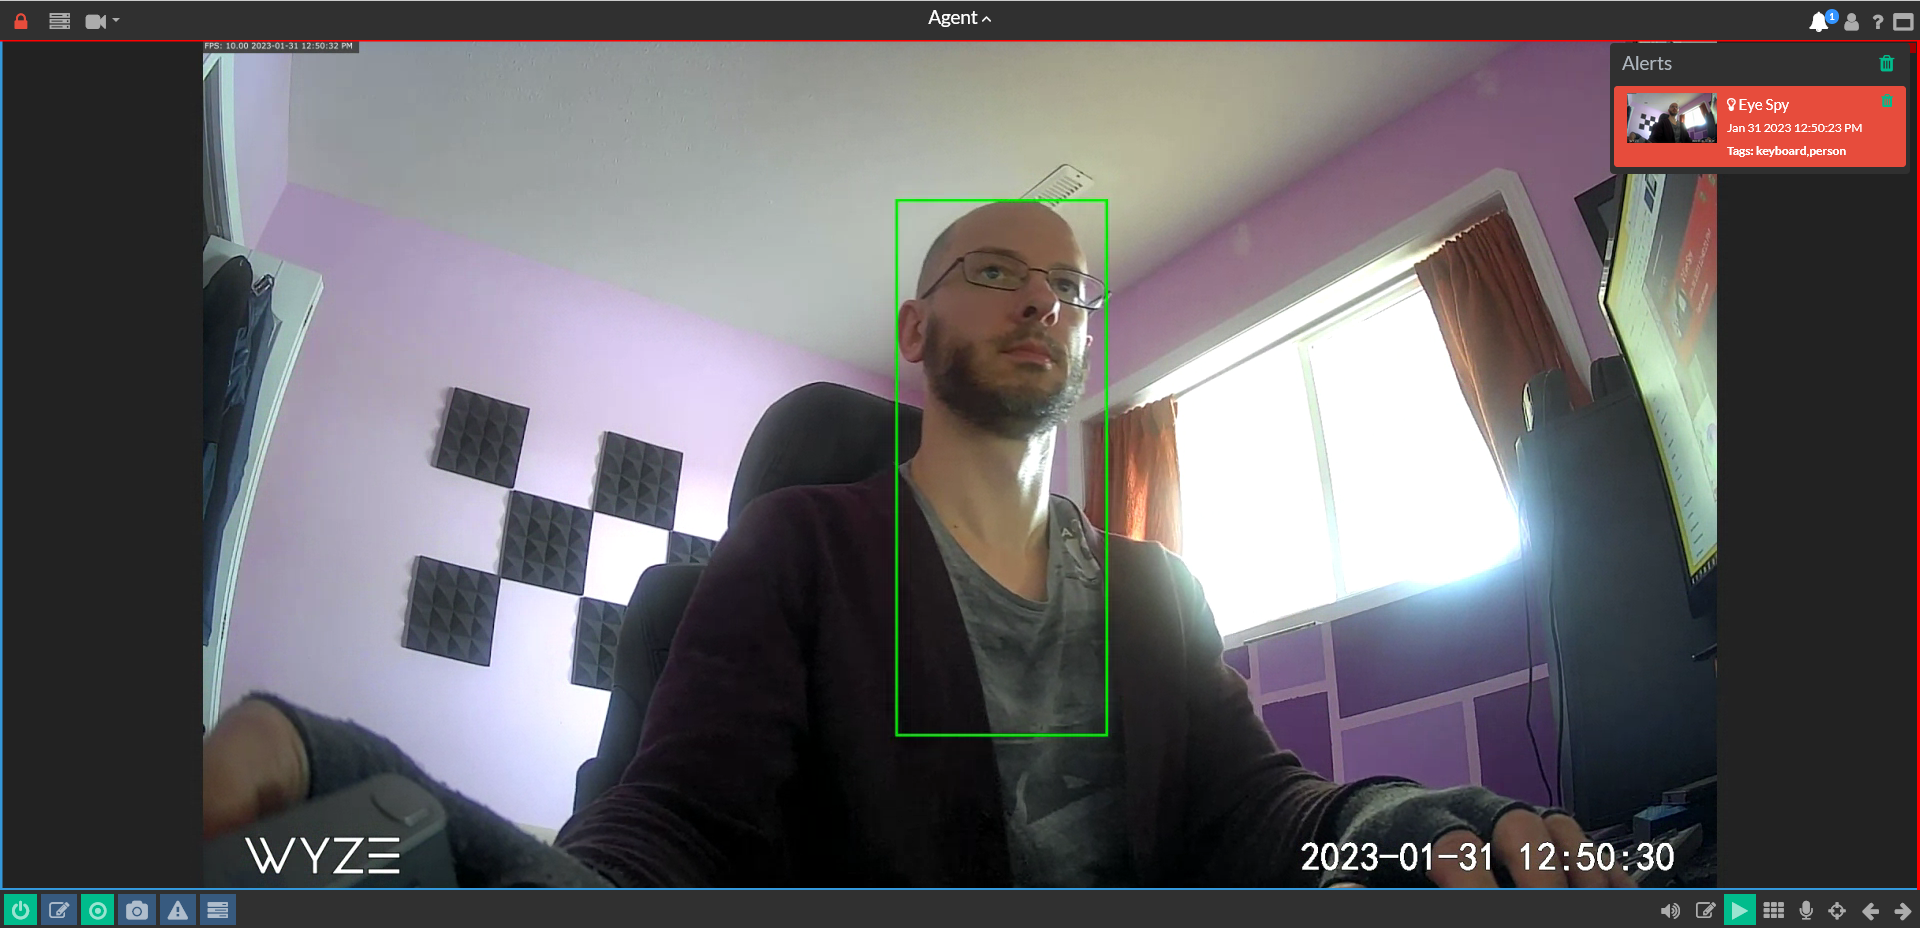
Now let’s go to Agent DVR and see if we can get a notification of a person detected. Look at that! In the tag in the top right-hand corner, it says «person». That’s me!
Finally, it’s time to go to Home Assistant to see if our MQTT actions are firing. Go back to the MQTT settings page from within the Settings -> Devices & Services menu and click Configure on the MQTT integration. Hit Start Listening.
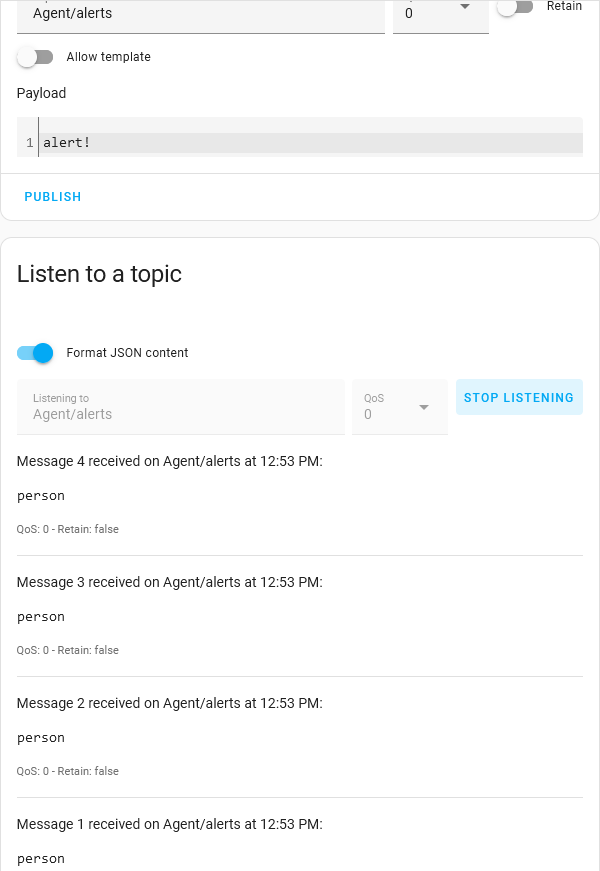
As you can see, MQTT is spitting out the AI Object detected, which is «person». There is a stream of messages that start coming through, because if you go to the CodeProject.AI Server Server logs

You can see that an object is being detected every 512 ms or less.
And that’s it! In this article, we’ve gone through how to set up Portainer, and use Portainer to install Home Assistant Container. Using Home Assistant Container, we were able to integrate Agent DVR and an MQTT Broker, and use CodeProject.AI to detect a person and send this as an MQTT message to Home Assistant. It’s not a very pretty result, but it is a proof of concept.
There are ways to use Home Assistant Container without the Home Assistant Supervisor and all its add-ons, it just requires more work. If for whatever reason you ‘had to’ install Home Assistant Container using Windows, this is how you would do it. The ideal is to install Home Assistant OS on a dedicated Linux device, or a Raspberry Pi. We’ll demonstrate that later.
Thanks for reading and if you have any questions, please feel free to ask them in the article forum below.
In this article, we will show you how to set up Home Assistant with Docker. Docker is a containerization platform that allows you to package and deploy applications in a consistent way. This makes it easy to install and manage Home Assistant, regardless of the underlying hardware.
- Prerequisites
- Instructions
- Code Breakdown
- Troubleshooting
- Conclusion
Prerequisites
Before you can start, you will need the following:
- A computer with Docker installed
- A web browser
Instructions
- Create a directory for your Home Assistant configuration.
Copy the following contents into a file called docker-compose.yml in the home-assistant directory. This code snippet is provided by home-assistant.
version: '3'
services:
  homeassistant:
    container_name: homeassistant
    image: 'ghcr.io/home-assistant/home-assistant:stable'
    volumes:
      - /PATH_TO_YOUR_CONFIG:/config
      - /etc/localtime:/etc/localtime:ro
    restart: unless-stopped
    privileged: true
    network_mode: host
We need update the above code snippet to specify the directory /PATH_TO_YOUR_CONFIG is ./config and network_mode: host is not supported in Windows, so we need to replace it with ports: "8123:8123"
version: '3'
services:
  homeassistant:
    container_name: homeassistant
    image: 'ghcr.io/home-assistant/home-assistant:stable'
    volumes:
      - ./config:/config
      - /etc/localtime:/etc/localtime:ro
    restart: unless-stopped
    privileged: true
    ports:
      - '8123:8123'
- Run the following command to start Home Assistant.
Open a web browser and navigate to http://localhost:8123 or http://<your-ip>:8123
Follow the instructions on the screen to complete the setup process.
Once you have completed the setup process, you will be able to control your smart home devices from the Home Assistant web interface.
Code Breakdown
version: '3'specifies that the Docker Compose file is using the Docker Compose version 3 format.services:defines a service called homeassistant.container_name:homeassistant specifies the name of the container that will be created for the homeassistant service.image:«ghcr.io/home-assistant/home-assistant:stable» specifies the image that will be used to create the container for the homeassistant service. The image is located at ghcr.io/home-assistant/home-assistant:stable.volumes:specifies the volumes that will be mounted into the container for the homeassistant service. The first volume mounts the directory ./config into the container’s /config directory. The second volume mounts the directory /etc/localtime into the container’s /etc/localtime directory, and makes it read-only.restart:unless-stopped specifies that the container for the homeassistant service should be restarted if it is ever stopped.privileged:true specifies that the container for the homeassistant service should have all privileges. This is necessary for Home Assistant to function properly.ports:specifies that the port 8123 on the host machine should be forwarded to port 8123 on the container for the homeassistant service. This allows you to access Home Assistant from your web browser by navigating to http://localhost:8123
Troubleshooting
If you encounter any problems, you can check the logs for the Home Assistant container. To do this, run the following command:
docker logs home-assistant
This will show you the output of the Home Assistant container, which may contain clues as to what is causing the problem.
You can also get help from the Home Assistant community. There is a forum where you can ask questions and get help from other users. To access the forum, go to the Home Assistant website and click on the «Community» tab.
Conclusion
Setting up Home Assistant with Docker is a simple process. By following the instructions in this article, you can have Home Assistant up and running in minutes.
I hope that you’ve landed here before spending hours/days trying to find a solution as to why you can’t forward the Home Assistant port in Docker. The solution is frustratingly easy.
Problem
The install Home Assistant in docker on Windows instructions are great, with one exception. It explains the required prerequisites to make sure docker has access to a host disk. However, those instructions have outdated instructions to setup the port-forward rules, which ultimately makes it a waste of time.
They share this command (don’t use):
docker run --init -d --name="home-assistant" -e "TZ=America/Los_Angeles" -v //c/Users/[USER]/homeassistant:/config --net=host homeassistant/home-assistant:stable
It installs fine and spins up the container. The docs say to next use netsh and manually add port-forward rules, but it doesn’t work (and you can seriously mess stuff up with netsh).
Solution
Instead, you can just tell docker to port forward it for you when you initially create the container by using the -p switch. Since Home Assistant uses port 8123, you use -p 8123:8123 in the command.
Here’s the one-liner that does both the install, and the port forward, at the same time:
docker run -p 8123:8123 --name="home-assistant" -e "TZ=America/Los_Angeles" -v //c/Users/lance/homeassistant:/config homeassistant/home-assistant:stable
After that, you’re ready to go! Open a browser on the host PC and navigate to http://localhost:8123.
Important -p 8123:8123 parameter must be used before --name. Otherwise, it gets used in the container instead of Docker, which results in a broken install because the container doesn’t know what -p is. I wasted two days before discovering this, thanks to help from Alex Sorokoletov and Martin Sundhaug. I owe them some 🍻.
Please follow and like us: