В отличие от своих предшественников, Windows 10 не позволяет вам легко отключить автоматическое обновление Windows. Классическая панель обновления Windows, которая позволяет пользователям отключить автоматическое обновление, было исключено из Windows 10, и нет никакой возможности в настройках системы отключить автоматическое обновление.
Отключить автоматическое обновление в Windows 10 с помощью реестра.
Хорошей новостью является то, что можно изменить настройки по умолчанию Windows Update, с помощью редактирования реестра. Кроме того, все настройки обновления Windows которые есть в групповой политике имеются также в реестре.
Есть способ, чтобы полностью отключить автоматическое обновление (не проверять наличие обновлений), в Windows 10 с помощью реестра.
В этом руководстве, мы увидим, как отключить или настроить автоматическое обновление Windows, отредактировав реестр.
- Способ 1 — отключить автоматическое обновление
- Способ 2 — расширенные настройки -настроить автоматическое обновление
Способ 1 из 2 — Полностью отключить автоматическое обновление.
Важно: Мы рекомендуем Вам создать точку восстановления системы перед редактированием реестра в случае, если что-то пойдет не так!
Шаг 1: Win+R в строке наберем Regedit, нажимаем клавишу Enter
Шаг 2: В редакторе реестра перейдите к следующему разделу:
HKEY_LOCAL_MACHINE\SOFTWARE\Policies\Microsoft\Windows
Шаг 3: Кликните правой кнопкой мыши на разделе Windows (как показано на рисунке), выберете Создать/ Раздел.
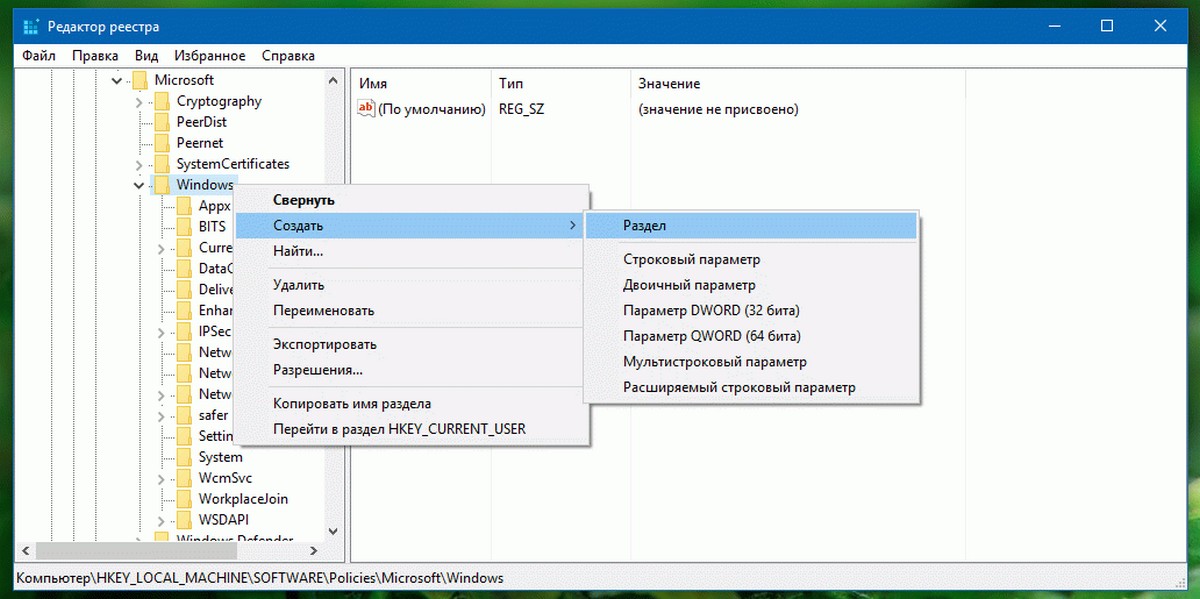
Введите имя как WindowsUpdate (без пробела). Обратите внимание, что после создания нового раздела, нажмите правой кнопкой мыши на нем, а затем выберите пункт — Переименовать, чтобы переименовать его в WindowsUpdate.
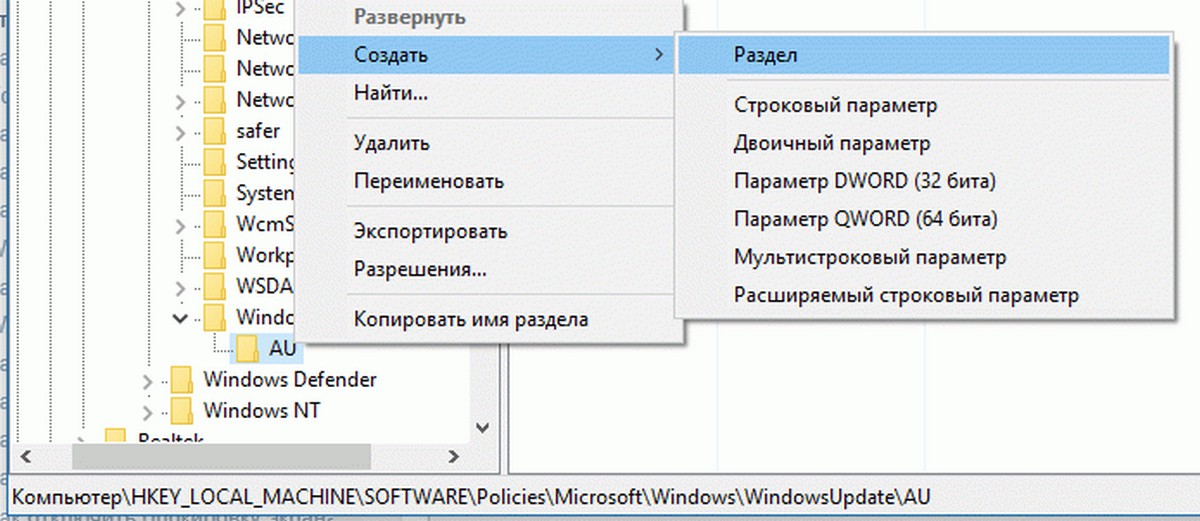
Шаг 4: Теперь, когда вы создали раздел WindowsUpdate, кликните правой кнопкой мыши на разделе WindowsUpdate, и выберите Создать \ Раздел и установите его имя как AU.
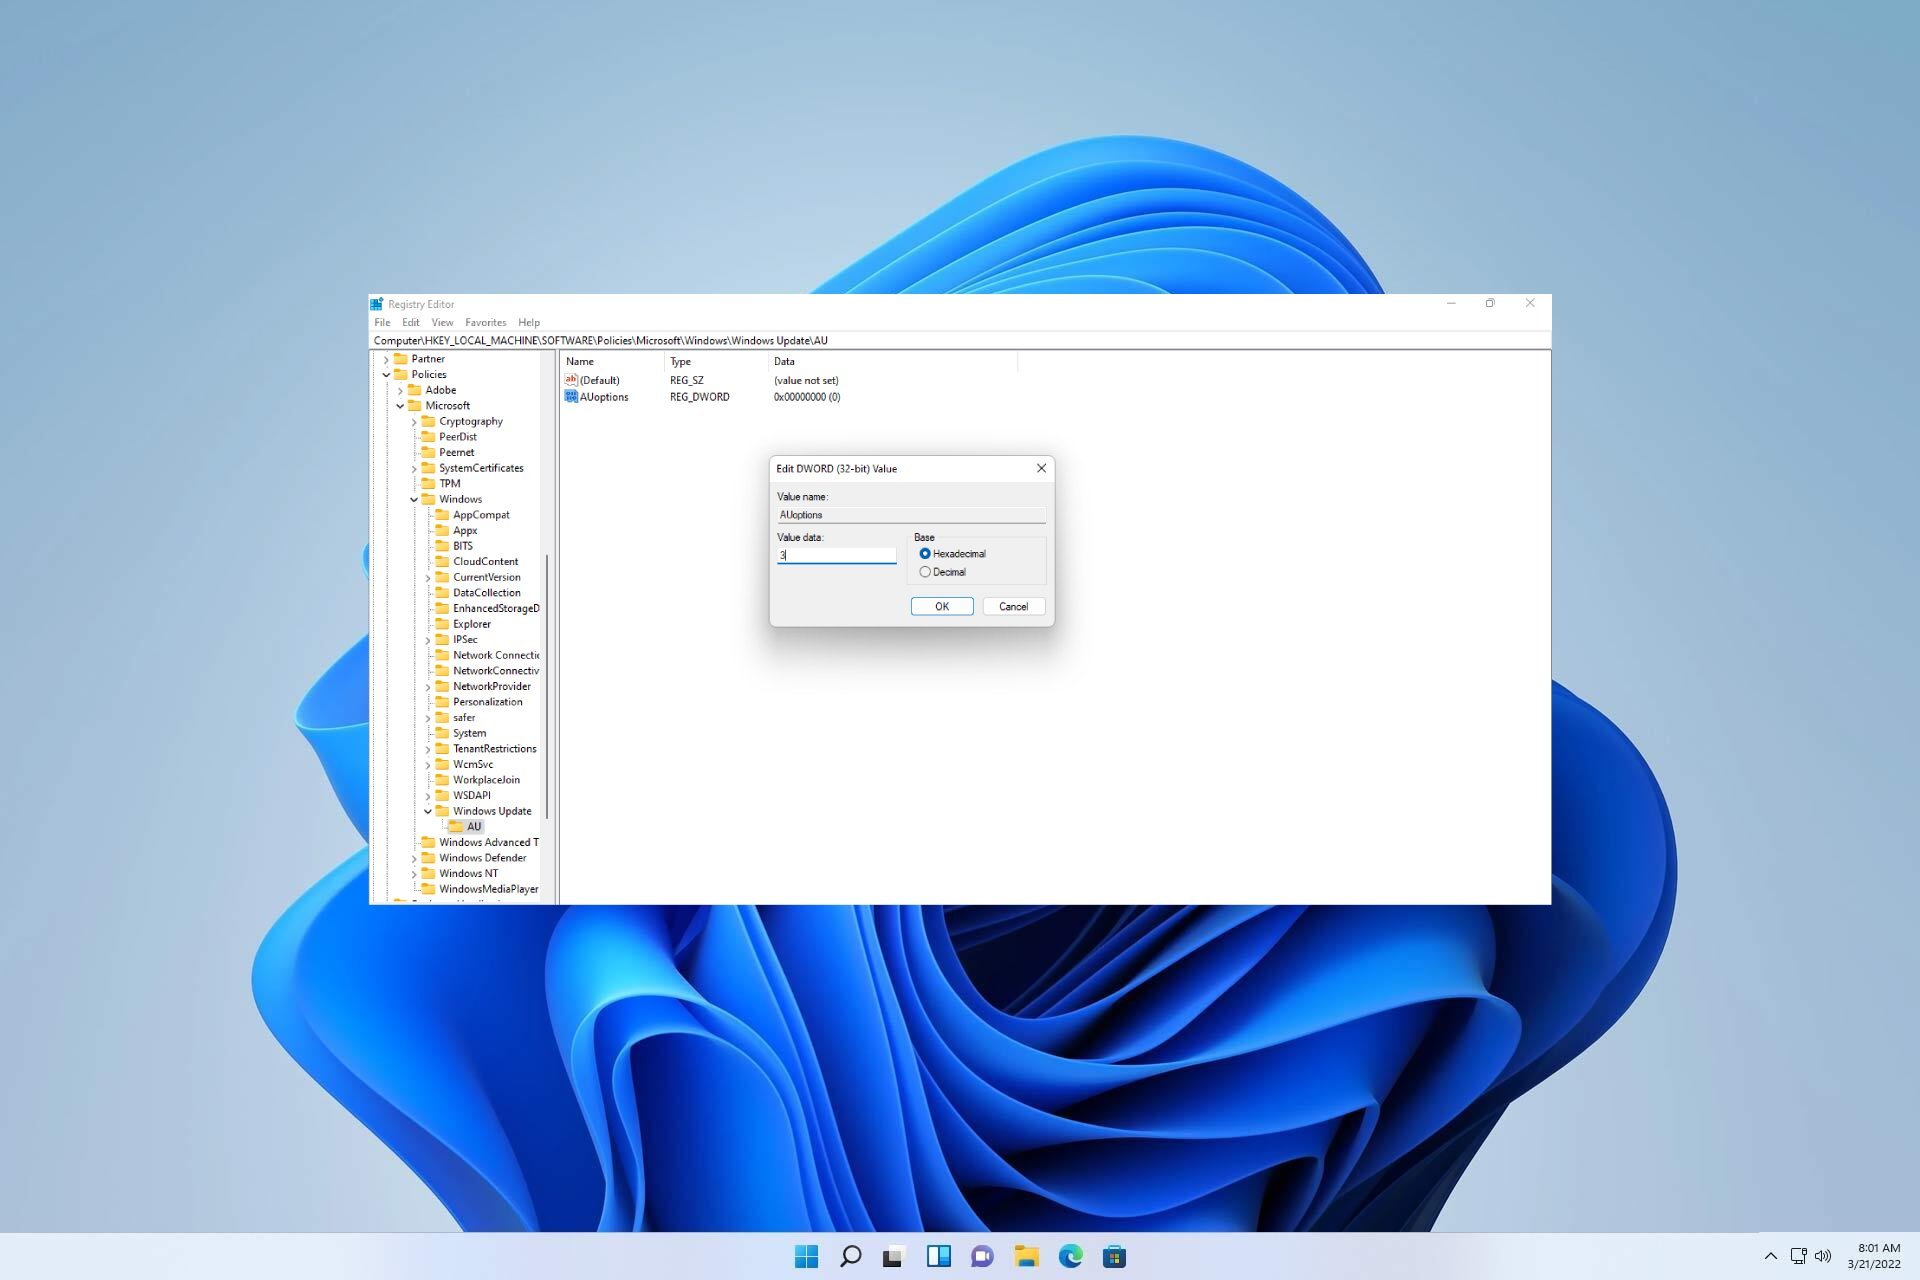
Шаг 5: С правой стороны нажмите на раздел AU, правой кнопкой мыши, в контекстном меню выберите Создать, Параметр DWORD (32 бита), с именем NoAutoUpdate.
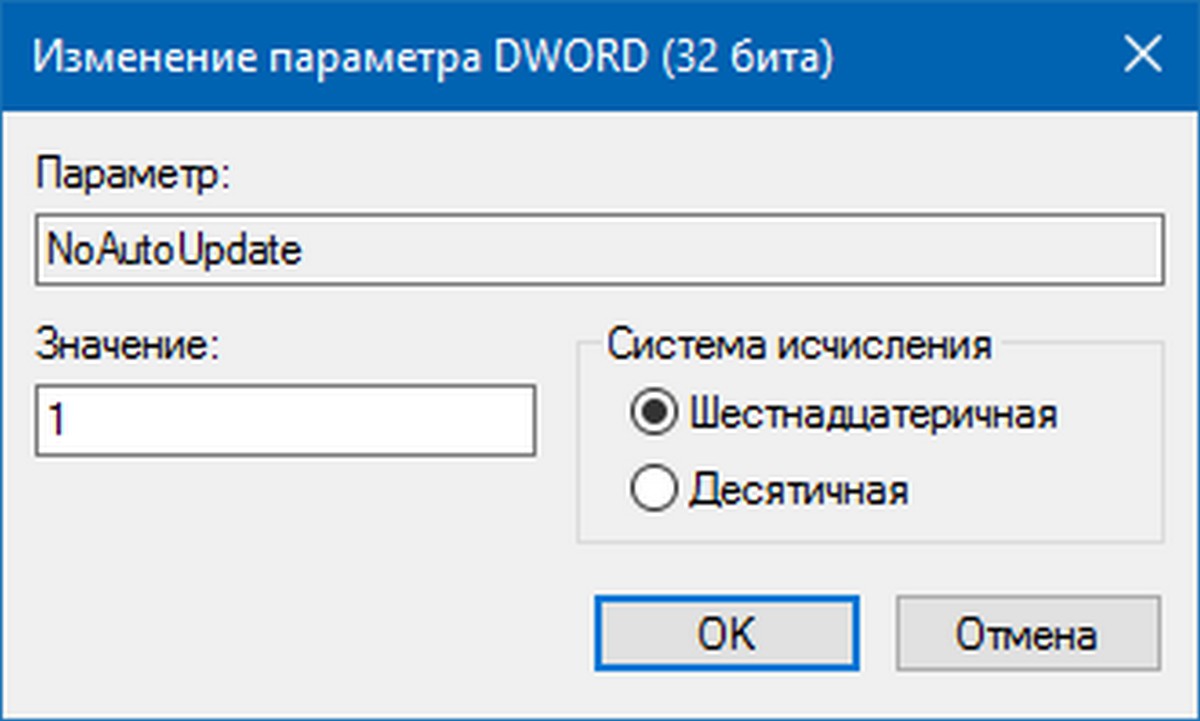
Шаг 6: И, наконец, дважды кликните на NoAutoUpdate, и установите его значение: 1
0 — включить автоматическое обновление
1 — отключить автоматические обновления
При выключении автоматического обновления, Windows никогда не будет проверять наличие обновлений. Если вы перейдете в настройки Windows, вы увидите Никогда не проверять наличие обновлений.
Способ 2 из 2 — Расширенные настройки — обновления Windows 10.
Если вы не хотите, полностью отключить автоматическое обновление, но хотите контролировать, как будут установлены обновления, вы можете сделать это с помощью приведённых ниже шагов.
Шаг 1: Следуйте инструкциям указанным в 1 способе для создания WindowsUpdate и AU разделов по следующему пути:
HKEY_LOCAL_MACHINE\SOFTWARE\Policies\Microsoft\Windows
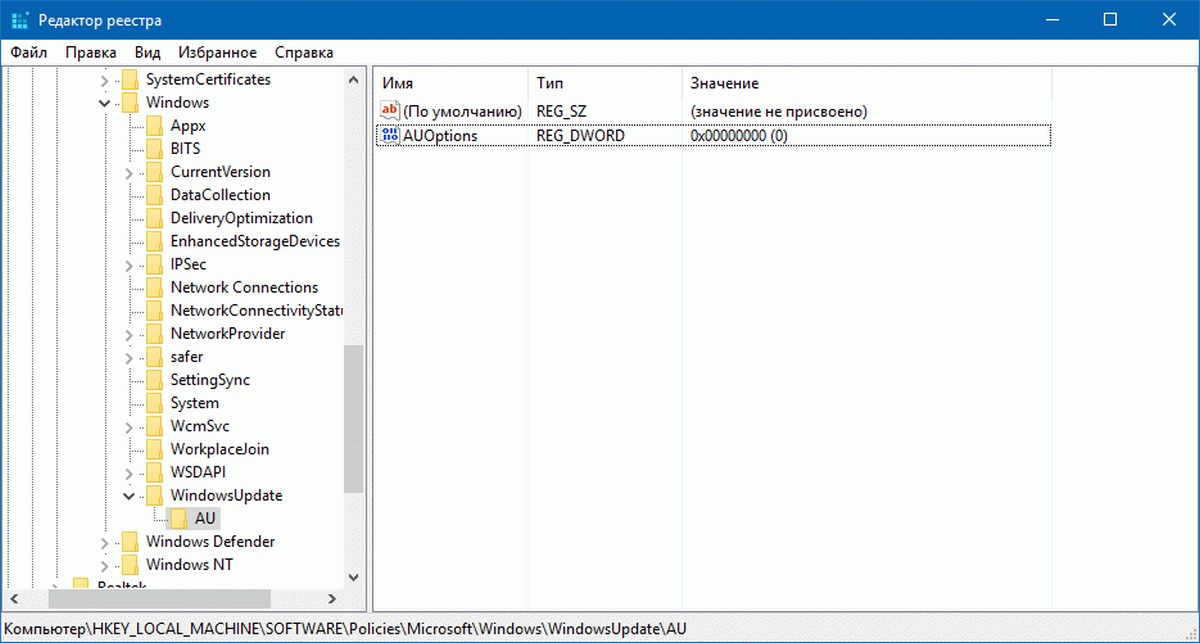
Шаг 2: Выберите раздел AU, в правой части редактора реестра, и создайте в нем новый параметр DWORD (32 бита) и назовите его AUOptions, установите для него одно из следующих значений:
0 – Уведомление о загрузке и установке
3 – Автоматическая загрузка и уведомление об установке
4 — Автоматическая загрузка и установка по расписанию
5 — Разрешить локальному администратору выбирать параметры
Если вы хотите, чтобы Windows 10 всегда уведомляла вас о доступном обновлении, необходимо установить значение — 2.
ПРИМЕЧАНИЕ: Если вы используете 64-разрядную версию Windows, вам также необходимо выполнить эти шаги для следующего раздела реестра:
HKEY_LOCAL_MACHINE\SOFTWARE\Wow6432Node\Policies\Microsoft\Windows
Если вам лень возится с реестром Windows 10, я подготовил готовые reg файлы NoAutoUpdate.zip и AUOptions.zip
Activate Windows Update through registry with a single change
by Loredana Harsana
Loredana is a passionate writer with a keen interest in PC software and technology. She started off writing about mobile phones back when Samsung Galaxy S II was… read more
Updated on
- You can easily enable Windows Update via registry simply by making few adjustments.
- Use cation since improper alterations to registry can lead to other issues..
XINSTALL BY CLICKING THE DOWNLOAD
FILE
Failure to install Windows updates can lead to various issues, so many users wonder how to enable Windows updates through the registry.
In a previous article, we explored the complexities of the Windows 11 update error, and as you know, such errors can occur if Windows Update isn’t enabled.
Therefore, keep reading to learn more about proper ways to enable this essential feature.
What is the registry key for disabling Windows Update?
To disable Windows Update through the registry, you need to modify the following key:
HKEY\LOCAL\MACHINE\SOFTWARE\Policies\Microsoft\Windows\WindowsUpdate\AU
Once you enter this key, you need to make changes to AUOptions DWORD to disable Windows Update through the registry.
How can I enable Windows Update in the registry?
Configuring Windows Updates by altering the registry
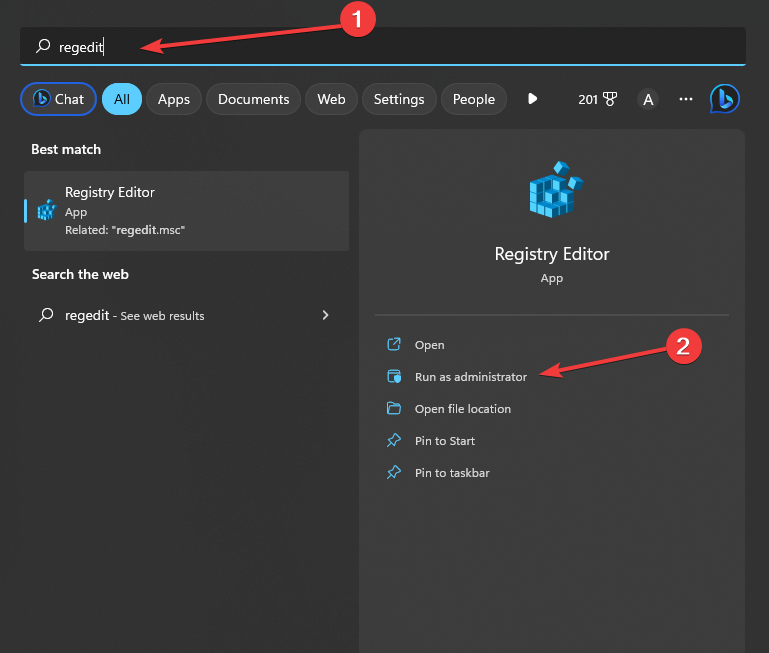
- On your home screen type in regedit in the search bar and Run as Administrator.

- Once the UAC appears, select Yes.
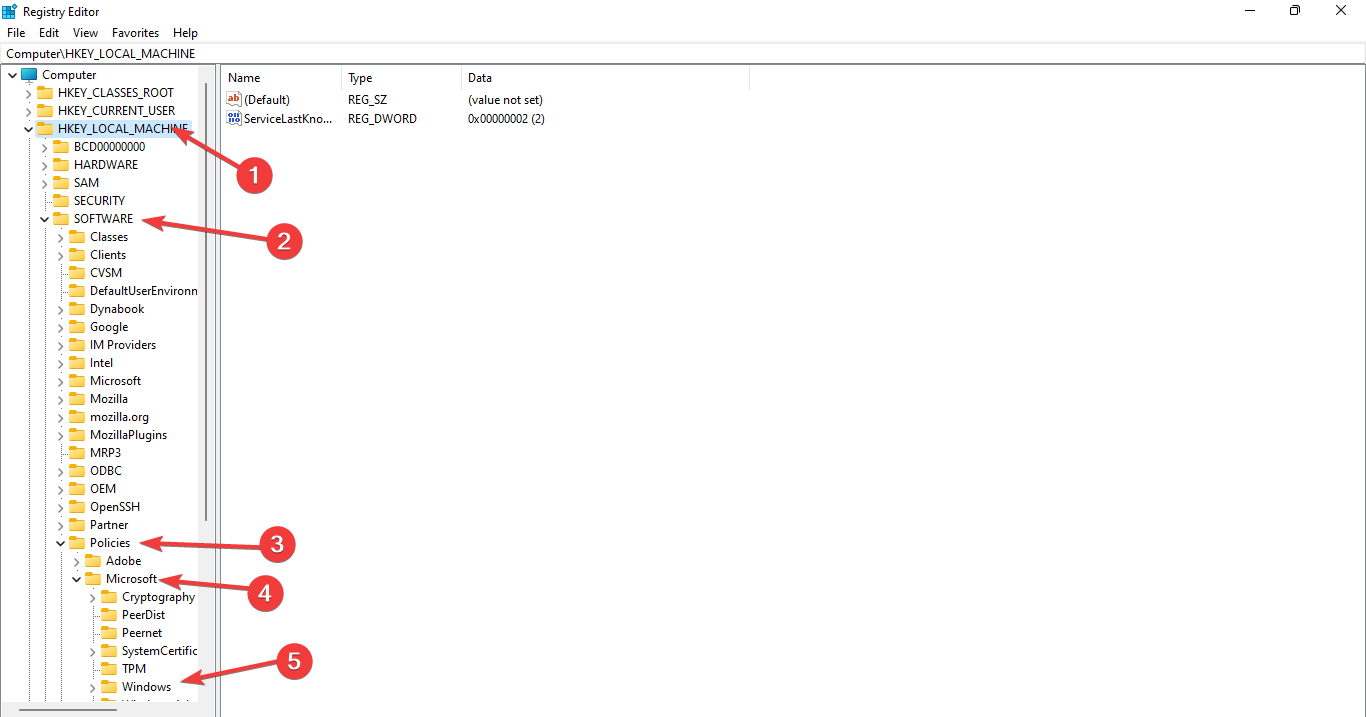
- Once the Registry has opened, Navigate the following path:
HKEY_LOCAL_MACHINE/SOFTWARE/Policies/Microsoft/Windows
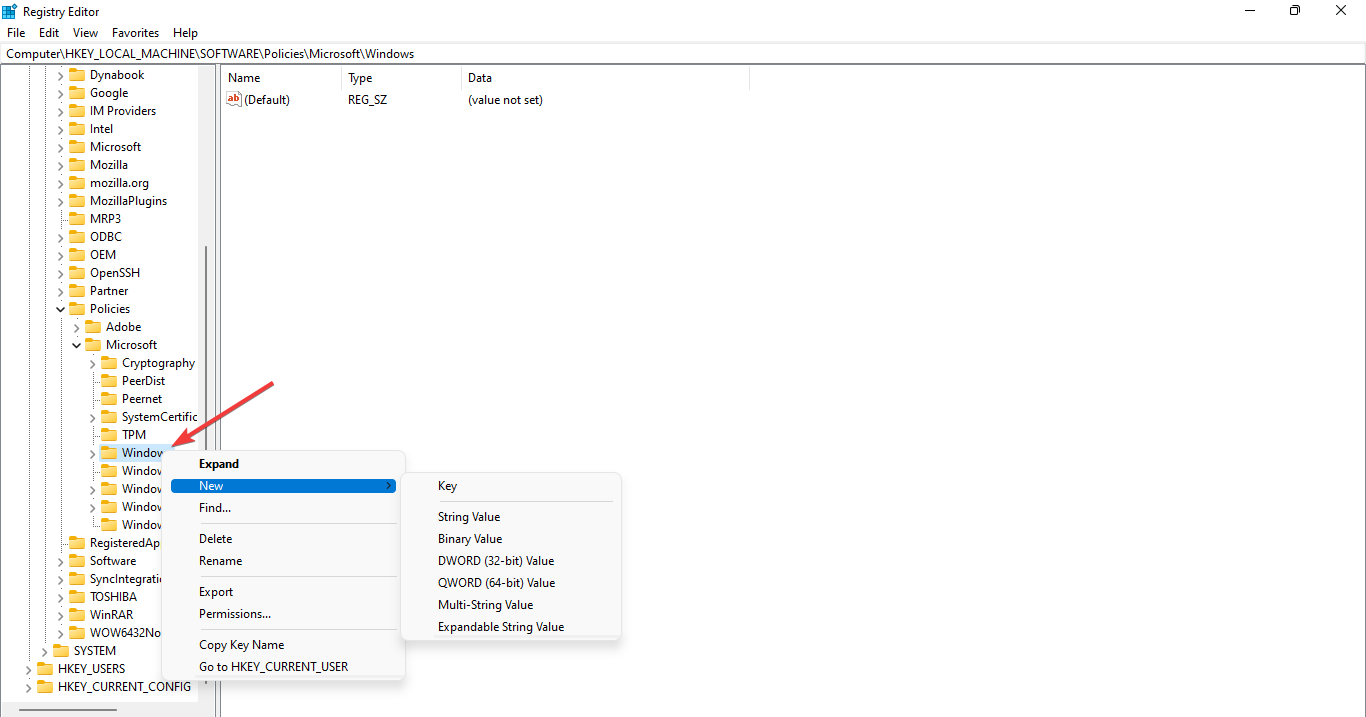
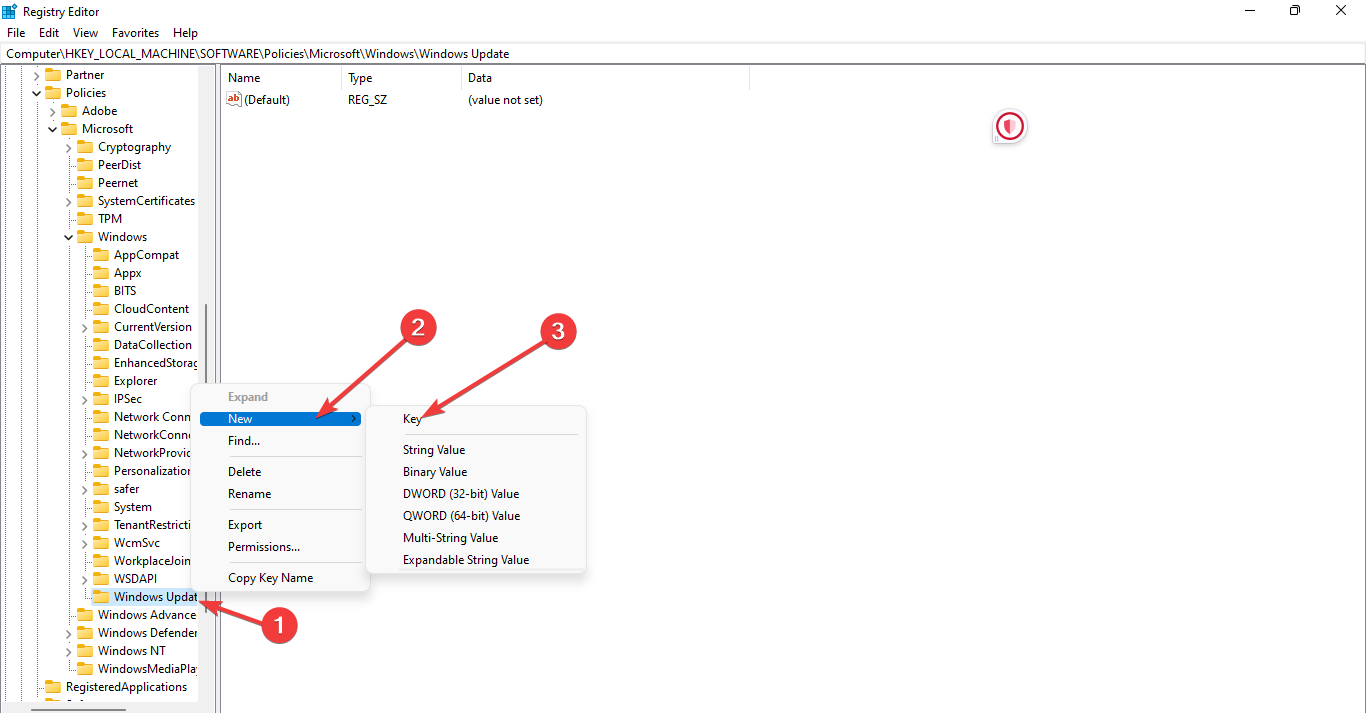
- Now right-click on the Windows directory.
- Click on the New and select Key, and next create a new folder named Windows Update.
- Next right-click on the Windows Update. Choose New and then Key and create a new directory named AU.

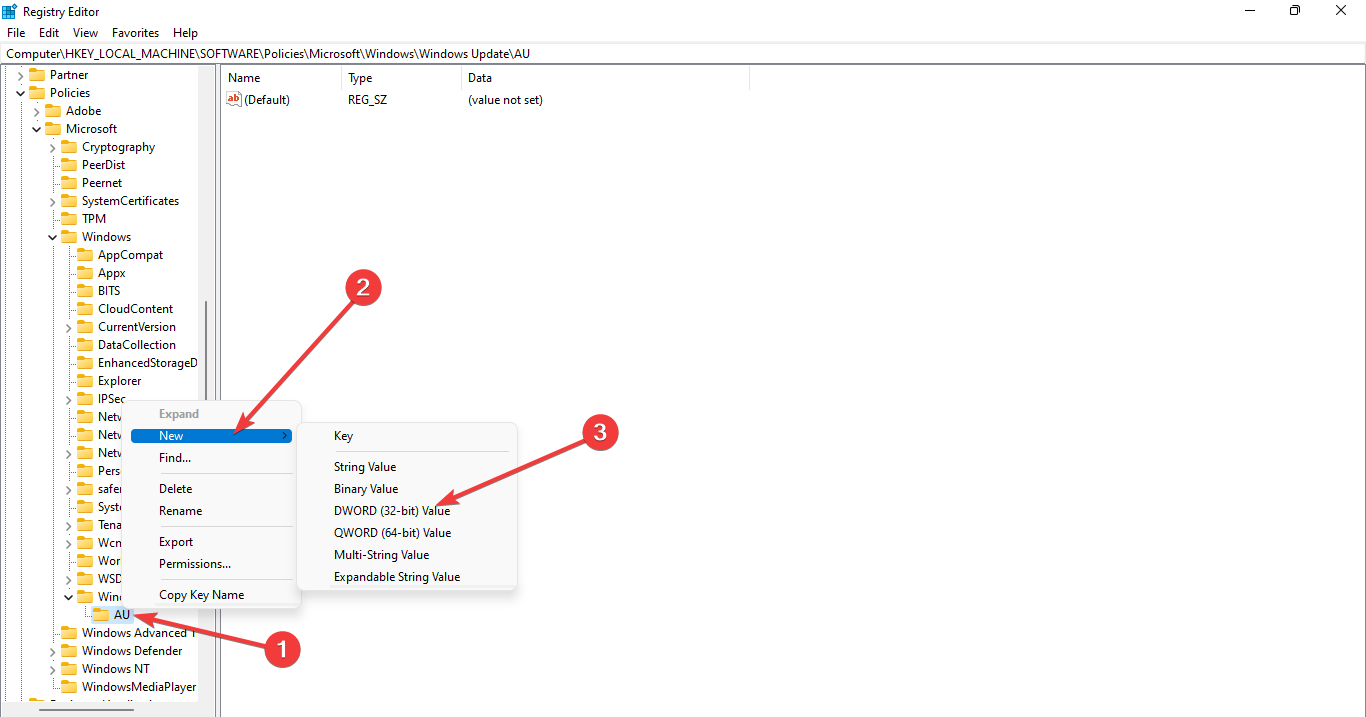
- Again right-click on the AU directory.
- Next action is to click on the New and select DWORD.
- Now, define your key name as AUOptions and double-click on the AUOptions to edit the DWORD value.
- Kindly input a number between 2-5 as value data, and next click OK to save the setting.

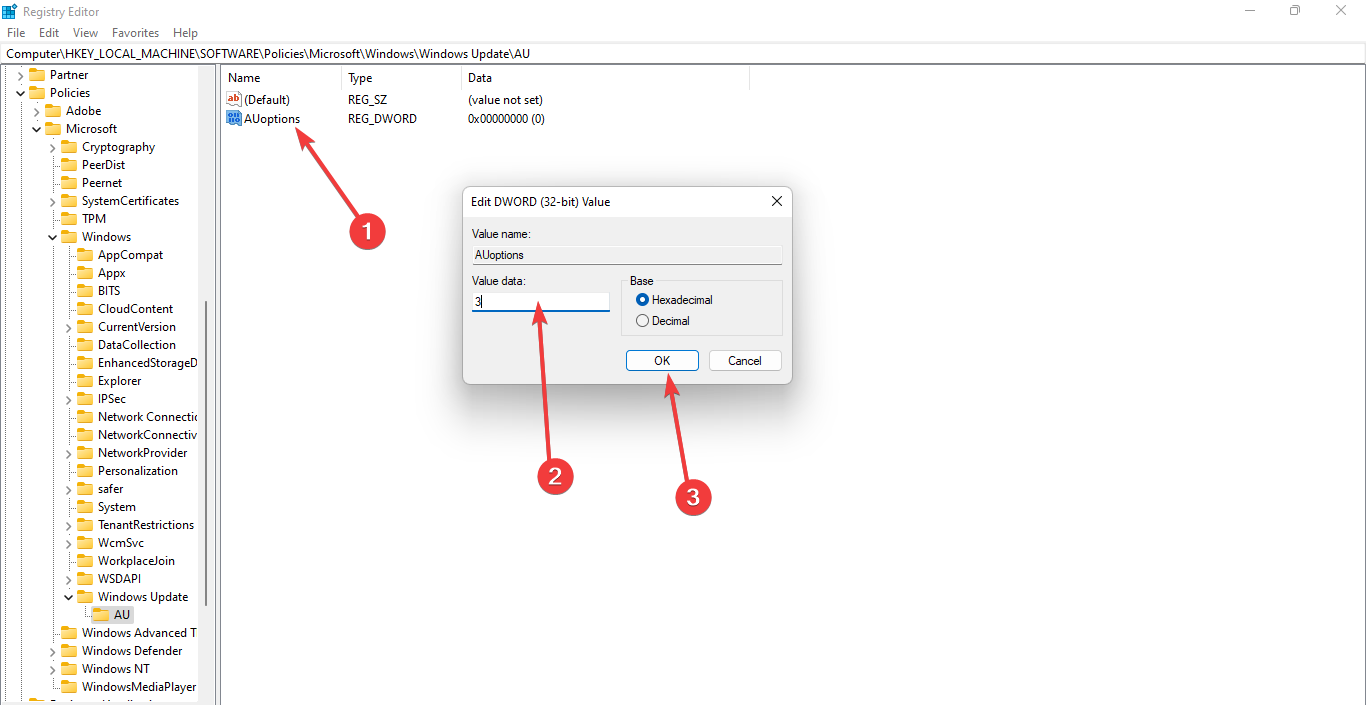
An explanation of each number value is shown below:
- 2 – This setting will alert you before downloading and installing updates on your system.
- 3 – All the updates will download automatically and notify you before installation.
- 4 – This setting will automatically download and automatically set the time to install it.
- 5 – Allow access to the local system admin to choose the update status.
This is how you can enable Windows Update through the registry. As you can see, it’s not complicated, as long as you carefully follow our instructions.
- Windows 11 adds more apps to the share links feature
- How to Make a Program Available to All Users on Windows 11
- How to Download & Install Microsoft LifeCam Drivers on Windows 11
In case you encounter any other problems, we suggest referring to our extensive guide on Windows Update not working or loading. This guide offers similar remedies that can assist you in finding a solution to your issue.
We value your input and would love to hear your views. Kindly share your thoughts by leaving a comment below and giving us your perspective on the matter.
![]()
В статье приведены лишь некоторые параметры реестра выбранного раздела, отобранные из базы данных программы KEYROLL.
Полное описание ключей можно просмотреть или скачать по ссылки ниже.
Центр обновления Windows
• Не отображать параметр «Установить обновления и завершить работу» в диалоговом окне «Завершение работы Windows»: dword 1
HKLM\Software\Policies\Microsoft\Windows\WindowsUpdate\AU /NoAUShutdownOption
• Всегда автоматически перезагружаться в запланированное время, таймер перезагрузки всегда запускается сразу после установки важных обновлений: dword 1 и 1 пар.., ниже
HKLM\Software\Policies\Microsoft\Windows\WindowsUpdate\AU /AlwaysAutoRebootAtScheduledTime
Задать в пределах от 15 до 180 минут: dword
HKLM\Software\Policies\Microsoft\Windows\WindowsUpdate\AU /AlwaysAutoRebootAtScheduledTimeMinutes
• Указать размещение службы обновлений Майкрософт в интрасети: dword 1 и 2 параметра ниже
HKLM\Software\Policies\Microsoft\Windows\WindowsUpdate\AU /UseWUServer
Клиент автоматического обновления использует для обнаружения и загрузки обновлений: sz
HKLM\Software\Policies\Microsoft\Windows\WindowsUpdate /WUServer
Имя сервера, на который обновленные рабочие станции будут отправлять статистику, пример http://intranetupd01: sz
HKLM\Software\Policies\Microsoft\Windows\WindowsUpdate /WUStatusServer
• Время в часах , пример 22: dword
HKLM\Software\Policies\Microsoft\Windows\WindowsUpdate\AU /DetectionFrequency
• Разрешать пользователям, не являющимся администраторами, получать уведомления об политики Настройка автоматического обновления: dword 1
HKLM\Software\Policies\Microsoft\Windows\WindowsUpdate /ElevateNonAdmins
• Повторный запрос для перезагрузки при запланированных установках, используется стандартный интервал 10 минут: dword 1 и ниже
HKLM\Software\Policies\Microsoft\Windows\WindowsUpdate\AU /RebootRelaunchTimeoutEnabled
Период ожидания перед выводом нового приглашения на перезагрузку по расписанию: dword в минутах
HKLM\Software\Policies\Microsoft\Windows\WindowsUpdate\AU /RebootRelaunchTimeout
• Пропущенная ранее установка по расписанию выполняется через указанное число минут после запуска компьютера, в минутах: dword число
HKLM\Software\Policies\Microsoft\Windows\WindowsUpdate\AU /RescheduleWaitTime
• Разрешить прием обновлений с подписью из службы обновления Майкрософт в интрасети, подписанные сторонними компаниями: dword 1
HKLM\Software\Policies\Microsoft\Windows\WindowsUpdate /AcceptTrustedPublisherCerts
Скачать все параметры Компоненты Системы
При использовании материалов сайта на другом ресурсе активная ссылка на источник обязательна «XakevSoft».
- HKEY_LOCAL_MACHINE\Software\Policies\Microsoft\Windows\WindowsUpdate\AU
- Specify deadlines for automatic updates and restarts
- HKEY_LOCAL_MACHINE\Software\Policies\Microsoft\Windows\WindowsUpdate\SetComplianceDeadline
- HKEY_LOCAL_MACHINE\Software\Policies\Microsoft\Windows\WindowsUpdate\ConfigureDeadlineForQualityUpdates
- HKEY_LOCAL_MACHINE\Software\Policies\Microsoft\Windows\WindowsUpdate\ConfigureDeadlineForFeatureUpdates
- HKEY_LOCAL_MACHINE\Software\Policies\Microsoft\Windows\WindowsUpdate\ConfigureDeadlineGracePeriod
- HKEY_LOCAL_MACHINE\Software\Policies\Microsoft\Windows\WindowsUpdate\ConfigureDeadlineGracePeriodForFeatureUpdates
- HKEY_LOCAL_MACHINE\Software\Policies\Microsoft\Windows\WindowsUpdate\ConfigureDeadlineNoAutoReboot
- Display options for update notifications
- HKEY_LOCAL_MACHINE\Software\Policies\Microsoft\Windows\WindowsUpdate\SetUpdateNotificationLevel
- HKEY_LOCAL_MACHINE\Software\Policies\Microsoft\Windows\WindowsUpdate\UpdateNotificationLevel
- Do not allow update deferral policies to cause scans against Windows Update
- HKEY_LOCAL_MACHINE\Software\Policies\Microsoft\Windows\WindowsUpdate\DisableDualScan
- Allow updates to be downloaded automatically over metered connections
- HKEY_LOCAL_MACHINE\Software\Policies\Microsoft\Windows\WindowsUpdate\AllowAutoWindowsUpdateDownloadOverMeteredNetwork
- Update Power Policy for Cart Restarts
- HKEY_LOCAL_MACHINE\Software\Policies\Microsoft\Windows\WindowsUpdate\SetEDURestart
- Specify Engaged restart transition and notification schedule for updates
- HKEY_LOCAL_MACHINE\Software\Policies\Microsoft\Windows\WindowsUpdate\SetEngagedRestartTransitionSchedule
- HKEY_LOCAL_MACHINE\Software\Policies\Microsoft\Windows\WindowsUpdate\EngagedRestartTransitionSchedule
- HKEY_LOCAL_MACHINE\Software\Policies\Microsoft\Windows\WindowsUpdate\EngagedRestartSnoozeSchedule
- HKEY_LOCAL_MACHINE\Software\Policies\Microsoft\Windows\WindowsUpdate\EngagedRestartDeadline
- HKEY_LOCAL_MACHINE\Software\Policies\Microsoft\Windows\WindowsUpdate\EngagedRestartTransitionScheduleForFeatureUpdates
- HKEY_LOCAL_MACHINE\Software\Policies\Microsoft\Windows\WindowsUpdate\EngagedRestartSnoozeScheduleForFeatureUpdates
- HKEY_LOCAL_MACHINE\Software\Policies\Microsoft\Windows\WindowsUpdate\EngagedRestartDeadlineForFeatureUpdates
- Configure auto-restart warning notifications schedule for updates
- HKEY_LOCAL_MACHINE\Software\Policies\Microsoft\Windows\WindowsUpdate\SetRestartWarningSchd
- HKEY_LOCAL_MACHINE\Software\Policies\Microsoft\Windows\WindowsUpdate\ScheduleRestartWarning
- HKEY_LOCAL_MACHINE\Software\Policies\Microsoft\Windows\WindowsUpdate\ScheduleImminentRestartWarning
- Turn off auto-restart notifications for update installations
- HKEY_LOCAL_MACHINE\Software\Policies\Microsoft\Windows\WindowsUpdate\SetAutoRestartNotificationDisable
- Configure auto-restart reminder notifications for updates
- HKEY_LOCAL_MACHINE\Software\Policies\Microsoft\Windows\WindowsUpdate\SetAutoRestartNotificationConfig
- HKEY_LOCAL_MACHINE\Software\Policies\Microsoft\Windows\WindowsUpdate\AutoRestartNotificationSchedule
- HKEY_LOCAL_MACHINE\Software\Policies\Microsoft\Windows\WindowsUpdate\AutoRestartNotificationStyle
- Configure auto-restart required notification for updates
- HKEY_LOCAL_MACHINE\Software\Policies\Microsoft\Windows\WindowsUpdate\SetAutoRestartRequiredNotificationDismissal
- HKEY_LOCAL_MACHINE\Software\Policies\Microsoft\Windows\WindowsUpdate\AutoRestartRequiredNotificationDismissal
- Specify active hours range for auto-restarts
- HKEY_LOCAL_MACHINE\Software\Policies\Microsoft\Windows\WindowsUpdate\SetActiveHoursMaxRange
- HKEY_LOCAL_MACHINE\Software\Policies\Microsoft\Windows\WindowsUpdate\ActiveHoursMaxRange
- Remove access to «Pause updates» feature
- HKEY_LOCAL_MACHINE\Software\Policies\Microsoft\Windows\WindowsUpdate\SetDisablePauseUXAccess
- Remove access to use all Windows Update features
- HKEY_LOCAL_MACHINE\Software\Policies\Microsoft\Windows\WindowsUpdate\SetDisableUXWUAccess
- Specify deadline before auto-restart for update installation
- HKEY_LOCAL_MACHINE\Software\Policies\Microsoft\Windows\WindowsUpdate\SetAutoRestartDeadline
- HKEY_LOCAL_MACHINE\Software\Policies\Microsoft\Windows\WindowsUpdate\AutoRestartDeadlinePeriodInDays
- HKEY_LOCAL_MACHINE\Software\Policies\Microsoft\Windows\WindowsUpdate\AutoRestartDeadlinePeriodInDaysForFeatureUpdates
- Turn off auto-restart for updates during active hours
- HKEY_LOCAL_MACHINE\Software\Policies\Microsoft\Windows\WindowsUpdate\SetActiveHours
- HKEY_LOCAL_MACHINE\Software\Policies\Microsoft\Windows\WindowsUpdate\ActiveHoursStart
- HKEY_LOCAL_MACHINE\Software\Policies\Microsoft\Windows\WindowsUpdate\ActiveHoursEnd
- Do not include drivers with Windows Updates
- HKEY_LOCAL_MACHINE\Software\Policies\Microsoft\Windows\WindowsUpdate\ExcludeWUDriversInQualityUpdate
- Select when Quality Updates are received
- HKEY_LOCAL_MACHINE\Software\Policies\Microsoft\Windows\WindowsUpdate\DeferQualityUpdates
- HKEY_LOCAL_MACHINE\Software\Policies\Microsoft\Windows\WindowsUpdate\DeferQualityUpdatesPeriodInDays
- HKEY_LOCAL_MACHINE\Software\Policies\Microsoft\Windows\WindowsUpdate\PauseQualityUpdatesStartTime
- HKEY_LOCAL_MACHINE\Software\Policies\Microsoft\Windows\WindowsUpdate\PauseQualityUpdates
- Select when Preview Builds and Feature Updates are received
- HKEY_LOCAL_MACHINE\Software\Policies\Microsoft\Windows\WindowsUpdate\DeferFeatureUpdates
- HKEY_LOCAL_MACHINE\Software\Policies\Microsoft\Windows\WindowsUpdate\DeferFeatureUpdatesPeriodInDays
- HKEY_LOCAL_MACHINE\Software\Policies\Microsoft\Windows\WindowsUpdate\PauseFeatureUpdatesStartTime
- HKEY_LOCAL_MACHINE\Software\Policies\Microsoft\Windows\WindowsUpdate\BranchReadinessLevel
- HKEY_LOCAL_MACHINE\Software\Policies\Microsoft\Windows\WindowsUpdate\PauseFeatureUpdates
- Manage preview builds
- HKEY_LOCAL_MACHINE\Software\Policies\Microsoft\Windows\WindowsUpdate\ManagePreviewBuildsPolicyValue
- HKEY_LOCAL_MACHINE\Software\Policies\Microsoft\Windows\WindowsUpdate\BranchReadinessLevel
- HKEY_LOCAL_MACHINE\Software\Policies\Microsoft\Windows\WindowsUpdate\ManagePreviewBuilds
- Disable safeguards for Feature Updates
- HKEY_LOCAL_MACHINE\Software\Policies\Microsoft\Windows\WindowsUpdate\DisableWUfBSafeguards
- Select the target Feature Update version
- HKEY_LOCAL_MACHINE\Software\Policies\Microsoft\Windows\WindowsUpdate\TargetReleaseVersion
- HKEY_LOCAL_MACHINE\Software\Policies\Microsoft\Windows\WindowsUpdate\TargetReleaseVersionInfo
- HKEY_LOCAL_MACHINE\Software\Policies\Microsoft\Windows\WindowsUpdate\ProductVersion
- Do not connect to any Windows Update Internet locations
- HKEY_LOCAL_MACHINE\Software\Policies\Microsoft\Windows\WindowsUpdate\DoNotConnectToWindowsUpdateInternetLocations
- Allow signed updates from an intranet Microsoft update service location
- HKEY_LOCAL_MACHINE\Software\Policies\Microsoft\Windows\WindowsUpdate\AcceptTrustedPublisherCerts
- Enable client-side targeting
- HKEY_LOCAL_MACHINE\Software\Policies\Microsoft\Windows\WindowsUpdate\TargetGroupEnabled
- HKEY_LOCAL_MACHINE\Software\Policies\Microsoft\Windows\WindowsUpdate\TargetGroup
- Enabling Windows Update Power Management to automatically wake up the system to install scheduled updates
- HKEY_LOCAL_MACHINE\Software\Policies\Microsoft\Windows\WindowsUpdate\AUPowerManagement
- Allow non-administrators to receive update notifications
- HKEY_LOCAL_MACHINE\Software\Policies\Microsoft\Windows\WindowsUpdate\ElevateNonAdmins
- Defer Upgrades and Updates
- HKEY_LOCAL_MACHINE\Software\Policies\Microsoft\Windows\WindowsUpdate\DeferUpgrade
- HKEY_LOCAL_MACHINE\Software\Policies\Microsoft\Windows\WindowsUpdate\DeferUpgradePeriod
- HKEY_LOCAL_MACHINE\Software\Policies\Microsoft\Windows\WindowsUpdate\DeferUpdatePeriod
- HKEY_LOCAL_MACHINE\Software\Policies\Microsoft\Windows\WindowsUpdate\PauseDeferrals
- Turn off access to all Windows Update features
- HKEY_LOCAL_MACHINE\Software\Policies\Microsoft\Windows\WindowsUpdate\DisableWindowsUpdateAccess
- Restrict Internet communication
- HKEY_LOCAL_MACHINE\Software\Policies\Microsoft\Windows\WindowsUpdate\DisableWindowsUpdateAccess
In this post, you will learn how to disable Windows Update in Windows 10 with Registry settings. I also posted a little PowerShell script that allows you to quickly switch between the five (hidden) automatic update options.
- Author
- Recent Posts

Michael Pietroforte is the founder and editor in chief of 4sysops. He has more than 35 years of experience in IT management and system administration.
It appears blogging about Windows Update in Windows 10 has become my new passion. This is my fourth post about the topic, and I am sure it won’t be the last.
With Group Policy
A previous post explained how you can disable Windows Update with the Group Policy Editor (Computer Configuration -> Administrative Templates -> Windows Components -> Windows Update).
After I published the article, I learned that disabling the policy is equivalent to option 1 (Never check for updates [not recommended]) in previous Windows versions.

Disable Automatic Updates in the Group Policy Editor
This inspired me to look for the corresponding Registry keys. For some reason, Microsoft keeps moving the location of the settings with every new Windows release.
In the Registry
In Windows 10 (final release), the Registry settings for automatic updates can be found here: HKLM:SOFTWARE\Policies\Microsoft\Windows\WindowsUpdate\. However, the WindowsUpdate key will only be created after you change the settings with the Group Policy Editor, and Windows will delete the key if you set the policy to “Not Configured.”
If you take a closer look at the Registry key, you will notice that it is in a Policies folder. Because Windows 10 Home doesn’t support Group Policy, these settings can’t be used for this Windows edition. Thus, you can use the procedures described here only with Windows 10 Pro and Windows 10 Enterprise.
If you really need to turn off automatic updates in Windows 10 Home, you can disable the Windows Update service as I described in my previous post. If I learn about the Registry settings for Windows 10 Home, I will post them here.
To disable Windows Update in the other Windows 10 editions, you have to set NoAutoUpdate to 1 in
HKEY_LOCAL_MACHINE\SOFTWARE\Policies\Microsoft\Windows\WindowsUpdate\AU.
If the corresponding keys don’t exist, you have to create them.
You can also copy the contents of the code below to a file with the extension .reg and then double-click it.
Disclaimer: I take no responsibility for what my guide will do to your computer. These changes are not documented, and you follow my instructions at your own risk!
Windows Registry Editor Version 5.00

[HKEY_LOCAL_MACHINE\SOFTWARE\Policies\Microsoft\Windows\WindowsUpdate]

[HKEY_LOCAL_MACHINE\SOFTWARE\Policies\Microsoft\Windows\WindowsUpdate\AU]
"NoAutoUpdate"=dword:00000001
Note that new settings become active in the Windows Update app only after you check for new updates. Even rebooting the computer does not activate the settings.

The “Never check for automatic updates” setting in Windows 10
As you can see in the screenshot above, you will no longer be able to change the automatic update settings in the Windows Update app. If you want to enable automatic updates again, you simply have to delete the WindowsUpdate key with its sub keys. This is what the REG file below will do when you double-click it.
Windows Registry Editor Version 5.00

[-HKEY_LOCAL_MACHINE\SOFTWARE\Policies\Microsoft\Windows\WindowsUpdate]
With PowerShell
Group Policy offers more options than the Windows Update app offers in Windows 10. If you want to quickly switch between the different settings without navigating to the corresponding folder in the Group Policy Editor, you can run the little PowerShell script below. Make sure that you have admin rights and that you configured the PowerShell execution policy accordingly.
I didn’t implement all settings that the policy offers. For instance, I didn’t include the fifth option (Allow local admin to choose setting) because it has no effect on standalone machines.
I added the options for the scheduled time to configure when Windows will reboot after installing the updates, but you have to edit the values in the script if you want to use this feature. Note that these settings only have meaning if you use option 4 (Auto download and schedule the install). You can find out what the values mean if you in the Group Policy Editor. Also note that the scheduled time only affects updates that have not yet been downloaded and installed.
The script essentially mimics the actions of the Group Policy Editor when you choose between the different options or when you disable the policy. I added the values ScheduledInstallDay and ScheduledInstallTime to options 2 (Notify for download and notify for install) and 3 (Auto download and notify for install) because the Group Policy Editor does the same when you select these settings. But I guess it is not required.
Note that the script always deletes all previous automatic update settings including those that you configured with the Group Policy Editor.
As always, use at your own risk!
Clear-Host

Write-Host "0 -> Change setting in Windows Update app (default)"
Write-Host "1 -> Never check for updates (not recommended)"
Write-Host "2 -> Notify for download and notify for install"
Write-Host "3 -> Auto download and notify for install"
Write-Host "4 -> Auto download and schedule the install"

Write-Host "Enter any character to exit"
Write-Host
switch(Read-Host "Choose Window Update Settings"){
       0 {$UpdateValue = 0}
       1 {$UpdateValue = 1}
       2 {$UpdateValue = 2}
       3 {$UpdateValue = 3}
       4 {$UpdateValue = 4}
       Default{Exit}
}

$WindowsUpdatePath = "HKLM:SOFTWARE\Policies\Microsoft\Windows\WindowsUpdate\"
$AutoUpdatePath = "HKLM:SOFTWARE\Policies\Microsoft\Windows\WindowsUpdate\AU"

If(Test-Path -Path $WindowsUpdatePath) {
    Remove-Item -Path $WindowsUpdatePath -Recurse
}


If ($UpdateValue -gt 0) {
    New-Item -Path $WindowsUpdatePath
    New-Item -Path $AutoUpdatePath
}

If ($UpdateValue -eq 1) {
    Set-ItemProperty -Path $AutoUpdatePath -Name NoAutoUpdate -Value 1
}

If ($UpdateValue -eq 2) {
    Set-ItemProperty -Path $AutoUpdatePath -Name NoAutoUpdate -Value 0
    Set-ItemProperty -Path $AutoUpdatePath -Name AUOptions -Value 2
    Set-ItemProperty -Path $AutoUpdatePath -Name ScheduledInstallDay -Value 0
    Set-ItemProperty -Path $AutoUpdatePath -Name ScheduledInstallTime -Value 3
}

If ($UpdateValue -eq 3) {
    Set-ItemProperty -Path $AutoUpdatePath -Name NoAutoUpdate -Value 0
    Set-ItemProperty -Path $AutoUpdatePath -Name AUOptions -Value 3
    Set-ItemProperty -Path $AutoUpdatePath -Name ScheduledInstallDay -Value 0
    Set-ItemProperty -Path $AutoUpdatePath -Name ScheduledInstallTime -Value 3
}

If ($UpdateValue -eq 4) {
    Set-ItemProperty -Path $AutoUpdatePath -Name NoAutoUpdate -Value 0
    Set-ItemProperty -Path $AutoUpdatePath -Name AUOptions -Value 4
    Set-ItemProperty -Path $AutoUpdatePath -Name ScheduledInstallDay -Value 0
    Set-ItemProperty -Path $AutoUpdatePath -Name ScheduledInstallTime -Value 3
}
![]()