Установка Windows 10 на Mac OS High Sierra может представлять интерес для тех пользователей, которые вместе с функциональностью Mac хотят использовать программы Windows. Существует несколько подходов к этому процессу.
Первым способом является использование встроенного инструмента Boot Camp, который позволяет установить Windows параллельно с Mac OS. С помощью Boot Camp вы можете создать раздел на жестком диске, настроить партицию и установить Windows 10 с помощью официального дистрибутива.
Второй способ — использование виртуальной машины. С помощью программного обеспечения, такого как Parallels Desktop или VMware Fusion, вы можете создать виртуальную машину, на которой будет работать Windows 10 на вашем Mac. При этом вы сможете переключаться между операционными системами без перезагрузки компьютера.
Третий вариант заключается в использовании веб-приложений и облачных сервисов. Если вам не требуются функциональные возможности Windows, а вам нужны только определенные программы, вы можете воспользоваться веб-версиями или облачными аналогами этих программ.
При выборе одного из этих способов установки Windows 10 на Mac OS High Sierra учтите системные требования и совместимость вашего компьютера с Windows 10. Также будьте внимательны при установке и настройке, чтобы избежать потери данных или проблем с работой систем.
Установка Windows 10 iMac 21 Mid 2010 A1311 BootCamp
Как установить Windows на Mac / Hackintosh в качестве второй ОС без BootCamp — Dual Boot Win macOS
Как установить MacOS (Hackintosh) на Windows / Hackintosh в качестве второй ОС — Dual Boot Win macOS
How to Install Windows 10 on a Mac with macOS High Sierra
Как установить и настроить Windows 10 на Mac (все тонкости и ответы на вопросы)
How to install Windows 10 on a Apple Mac using boot camp, MacOS Sierra, NO DVD OR USB REQUIRED
Install Windows 10 to Mac via Boot Camp Assistant (macOS High Sierra)
This can be done via console for Windows 10/11 iso images (Not sure about 8/7, but leave any comment if it worked for you).
Start connecting your usb drive and type diskutil list to display all connected drives.
You’ll see something like:
/dev/disk0 (internal):
   #:                       TYPE NAME                    SIZE       IDENTIFIER
   0:      GUID_partition_scheme                         500.3 GB   disk0
   1:                        EFI EFI                     314.6 MB   disk0s1
   2:                 Apple_APFS Container disk1         500.0 GB   disk0s2

/dev/disk1 (synthesized):
   #:                       TYPE NAME                    SIZE       IDENTIFIER
   0:      APFS Container Scheme -                      +500.0 GB   disk1
                                 Physical Store disk0s2
   1:                APFS Volume Macintosh HD            185.7 GB   disk1s1
   2:                APFS Volume Preboot                 47.1 MB    disk1s2
   3:                APFS Volume Recovery                512.8 MB   disk1s3
   4:                APFS Volume VM                      4.3 GB     disk1s4

/dev/disk2 (external, physical):
   #:                       TYPE NAME                    SIZE       IDENTIFIER
   0:     FDisk_partition_scheme                        *15.6 GB    disk2
   1:                 DOS_FAT_32 LALA                    15.6 GB    disk2s1
For my case, the usb drive was /dev/disk2. Knowing this, format your usb drive with:
diskutil eraseDisk MS-DOS "WINDOWS10" MBR disk2
where disk2 is the usb drive id known in the prior command and "WINDOWS10" is the volume label (to be used later).
Please double check this step, or you could delete all data in another drive.
Then mount your image with:
hdiutil mount your_windows_10_image.iso
the command will return the location of the mounted iso
/dev/disk3 /Volumes/CPRA_X64FREV_ES-MX_DV5
so finally copy all the files from the mounted iso to your usb drive:
cp -rpv /Volumes/CPRA_X64FREV_ES-MX_DV5/* /Volumes/WINDOWS10
Update:
Look closely the copied files, as if you see a message like:
cp: /Volumes/CPRA_X64FREV_ES-MX_DV5/sources/install.wim: File too large
that’s because the install.wim file is larger than 4GB, too large for your just created FAT32 partition in your USB stick (back in the day I originally posted this answer, probably the file wasn’t that big). In this case, you will need to slipt it and copy it with the Windows Imaging libraries. So, using Homebrew install them with:
brew install wimlib
then call after (clearly, replacing the volume folder names to yours):
wimlib-imagex split /Volumes/CPRA_X64FREV_ES-MX_DV5/sources/install.wim /Volumes/WINDOWS10/sources/install.swm 3000
and now you will have two or more files with a swm extension instead of wim, where they won’t be larger than 3GB
-rwxrwxrwx  1 alter  staff   2.9G 26 Nov 01:03 /Volumes/WINDOWS10/sources/install.swm
-rwxrwxrwx  1 alter  staff   1.5G 26 Nov 01:08 /Volumes/WINDOWS10/sources/install2.swm
On this page:
- Overview
- Pre-installation notes
- Installation guide
- Step 1: Check for macOS updates
- Step 2: Confirm your macOS version and processor
- Step 3: Turn off FileVault
- Step 4: Download Windows 10
- Step 5: Use Boot Camp Assistant
- Step 6: Install Windows 10
- Step 7: Configure Windows 10
- Step 8: Create your Windows administrator account
- Step 9: Install support software
- Step 10: Configure Windows Wi-Fi settings
- Step 11: Configure the default boot operating system
- Switch operating systems
- Get help
Overview
If you wish to run both macOS and Windows on a single Mac computer, UITS recommends using Apple’s Boot Camp utility to install Windows 10 on your Intel-based Mac. In macOS, the Boot Camp Assistant app will help you partition your Mac hard drive to accommodate both operating systems, so you can install Windows from an installation disk or an ISO image stored on a USB flash drive.
Important:
Partitioning your system’s hard drive with Boot Camp Assistant may erase all your data. Before proceeding, back up/copy all personal files (documents, pictures, music, videos) to a flash drive, external hard drive, or cloud storage. Alternatively, you can use Time Machine with an external hard drive to back up your entire Mac computer; for instructions, see Mac Basics: Time Machine backs up your Mac. If you need assistance setting up Time Machine, contact your campus Support Center.
Pre-installation notes
Notes:
- This guide is written for macOS Big Sur, version 11.x or newer. If your computer cannot run macOS High Sierra version 10.13.x or newer, you will need to follow Apple’s Boot Camp Help: Install Windows on your Mac.
- If you don’t have access to the online guide via a different device, print a copy of the Boot Camp Installation & Setup Guide.
- Determine whether your computer can run Windows 10; refer to Apple’s System requirements to install Windows on your Mac using Boot Camp.
- To determine if your Mac supports this feature, open Boot Camp Assistant (Go > Utilities > Boot Camp Assistant), and then click . If you see a «Create a Windows 10 or later install disk» checkbox, your Mac supports this feature.
- Windows 11 is not supported.
- Make sure your computer meets these requirements:
- At least 80 GB of free hard drive space
- You have either the keyboard and mouse (or trackpad) that came with your Mac, or a USB keyboard and mouse
- Obtain a USB flash drive (at least 16 GB).
- During installation, you will be prompted to enter an account name and password; this is for the administrator account, and should not be the one you generally use. You also will be prompted to enter your time zone.
- Ensure that the computer is plugged into a power source, as the entire process may take several hours.
Installation guide
Notes:
- These instructions are intended strictly as a guide for installing a fully updated 64-bit version of Windows 10 on an Intel-based macOS Big Sur 11.x or newer computer at IU. If your computer cannot run macOS High Sierra 10.13.x or newer, you’ll need to follow Apple’s Boot Camp Help: Install Windows on your Mac.
- Boot Camp requires an Intel processor. Macs with Apple Silicon (M1) processors cannot install Windows.
- Perform these steps in order.
Step 1: Check for macOS updates
Before configuring Boot Camp, it is critical to make sure that your Mac’s software is up to date, which lessens the risk of encountering problems during installation:
- In the menu bar, from the menu, click .
- On the left, go to .
- If there are updates for your computer, in the upper right corner of the window, click .
If you’re prompted, enter an administrator’s username and password, and if prompted, allow your computer to restart.
When your computer restarts, check for additional updates by repeating the steps above. Repeat the process until there are no new updates in System Preferences.
Step 2: Confirm your macOS version and processor
In the menu bar, from the menu, click . The window will display the version of macOS on your computer. If you aren’t running macOS High Sierra 10.13.x or newer, you need to follow Apple’s Boot Camp Help: Install Windows on your Mac. If your processor or chip name doesn’t include «Intel», you cannot install Windows with Boot Camp.
Step 3: Turn off FileVault
To proceed, you need to divide your Mac’s hard drive into a section for macOS and a section for Windows. This process is called partitioning a disk, and requires that you disable FileVault (whole-disk encryption provided by Apple):
- In the menu bar, from the menu, click .
- Click .

- Click . The FileVault control panel will open, locked by default.
- Before you can disable FileVault, it requires you to unlock the control panel to show that you’re an administrator on your computer. To do so, click the lock icon. Enter your administrator username (if required) and your password.
- You’ll then be able to click . To confirm, click .
Decrypting an encrypted drive can take some time, the exact time being determined by how much data is on your disk, the disk size, and your computer’s hardware capabilities.


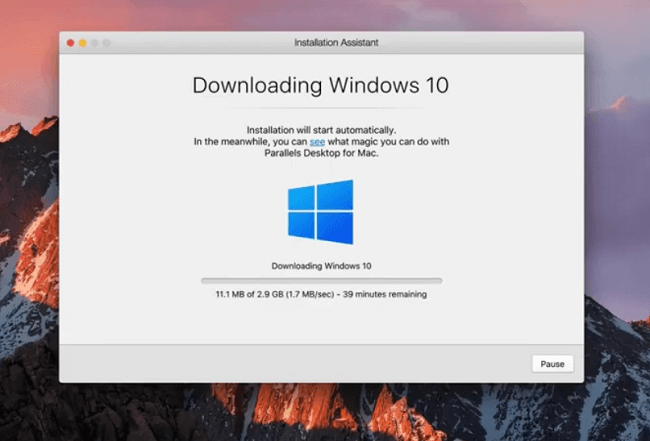
Step 4: Download Windows 10
Note:
The version of Windows 10 on IUware will not work with Boot Camp; you’ll need to download Windows directly from Microsoft, and use a product key you get from IUware.
Downloading Windows 10 Education takes some time, depending on the speed of your internet connection. Do not attempt the download on a metered connection, such as a tethered cell phone.
- Get a product key:
- Go to IUware.
- On the left, click .
- Click Windows 10 Education, and choose the 64-bit version.
- Click .
If prompted, log in with your IU username and passphrase.
- Write the product key (a series of letters and numbers that resembles «XXXXX-XXXXX-XXXXX-XXXXX-XXXXX») on paper, since you won’t be able to open anything on your Mac while Windows is being installed.
- Download Windows 10:
- Navigate to Microsoft’s Software Download page, and click .
- In the drop-down list, choose , and click .
- Select the appropriate language, and click .
Step 5: Use Boot Camp Assistant
Important:
Back up your files if you haven’t yet done so. Partitioning your system’s hard drive with Boot Camp Assistant may erase all files. To learn more, see Back up your Mac. For details about backing up your documents and content using cloud services at IU, see Store and share your individual files at IU.
The Boot Camp Assistant will help guide you through the process of adding Windows to your Mac.
- For an easy way to begin, click
, the Spotlight icon. In the search bar, type boot camp assistant, and press . - The next screen describes what Boot Camp Assistant does, and warns you to back up your disk if you haven’t already done so. Click .
- Boot Camp Assistant will automatically remove older Time Machine snapshots and cached iCloud to make space for Boot Camp. This process may take a long time to complete. If you wish to skip this process, click .
- To select the installation tasks to complete, make sure , , and are all selected.
Before continuing, make sure a USB drive (at least 16 GB) is connected to the system, and be aware that the entire contents of that flash drive will be erased.
- On the next screen, make sure the ISO file you just downloaded from Microsoft and the appropriate flash drive are both selected. Click .
- To confirm that the drive will be overwritten, click .
This step will take some time, depending on your computer’s hardware capabilities and your internet connection speed. Make sure your computer remains plugged into an AC outlet during this process.
- To begin creating a partition on your Mac’s hard disk to hold Windows, authenticate with your administrator password.
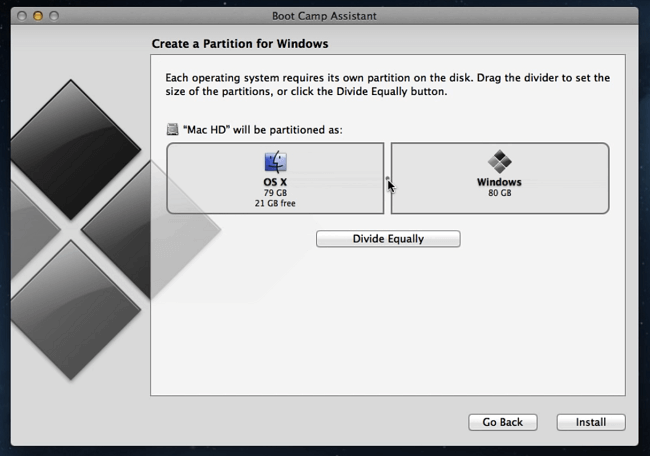
- Use the slider between the Mac and Windows icons to select a size for the Windows partition.
UITS recommends that you use 80 GB for just Windows, and 90 GB for Windows plus Microsoft Office.
- Click .
This process will take several minutes to complete. Once the partition is created, your Mac will restart and begin installing Windows 10. You may be prompted several times for your administrator password.
 , the Spotlight icon. In the search bar, type
 Step 6: Install Windows 10
Follow the Windows installation wizard to begin installing Windows. You’ll be prompted with several questions about how to configure Windows for your needs.
These steps will take some time, depending on your computer’s hardware capabilities. Make sure your computer remains plugged into an AC outlet during this process.
- Select the language, time and currency format, and keyboard or input method for Windows. Click .
- On the next screen, enter the product key you got from IUWare.
- Choose the version of Windows that the product key unlocks (Windows 10 Education) and click .
- Read and accept the license terms, and click .
- Choose the partition on which Windows will be installed, called «BOOTCAMP». Click .
- To confirm that you wish to format the partition, click . To continue, click .
- The installer will copy Windows files and install any features and updates required. When prompted, click to restart your Mac and continue the Windows Installation process.
Step 7: Configure Windows 10
After Windows restarts, you’ll need to do some configuration.
Note:
Microsoft’s digital assistant, Cortana, will help guide you through this process. If you are wearing headphones, remove them while your computer is restarting. Until you can install the Boot Camp support software, you may not be able to control the volume of Cortana with the volume keys on your computer.
- To select the appropriate region, choose , and click .
- To select the keyboard layout, make sure is selected, and click .
- If you would like to add a secondary keyboard layout, use the next screen to do so; otherwise, click .
- On the «Let’s connect you to a network «screen, click .
Step 8: Create your Windows administrator account
Note:
The Windows administrator account you create should not be an account you use for general use of this computer.
- To create your account, type your name and click .
- Type a password and click . Do not use your IU network passphrase.
- Confirm your password by typing it again, and click .
- Select a series of three security questions, clicking after each one.
- Decide whether or not you want to use Cortana in Windows. Decide what privacy settings you would like to enable or disable, and click .
Windows will do its final configurations. This step will take some time, depending on your computer’s hardware capabilities. Make sure your computer remains plugged in to an AC outlet during this process.
Step 9: Install support software
Once Windows has started (may take some time), the Boot Camp installer will walk you through installing Apple’s support software.
- To begin the process, click .
- Read and accept the license agreement, and click . All the Apple-specific software you need to run Windows efficiently on your computer will be installed.
- When the installer finishes, click .
- To restart the computer, click .
- When the computer restarts, click the trackpad or press any key to display the login field. Log in with the password you created earlier in the configuration process.
Step 10: Configure Windows Wi-Fi settings
Note:
eduroam is replacing IU Secure as the default wireless network for students, faculty, staff, and affiliates on all IU campuses. As of May 26, 2021, IU Secure is no longer available in the residence halls, and will fully retire in the near future. All new wireless connections should use eduroam; see Connect to eduroam.
- eduroam:
The simplest and most secure way to connect to eduroam is to use the Eduroam Network Setup Tool. Alternatively, you can use the instructions below to connect manually.
To connect manually, select from the list of available wireless networks, and enter your full IU email address (for example,
johndoe@iu.edu) and passphrase.Notes:
- If you connect to eduroam at an institution other than an IU campus, you’ll need to use the IU VPN to access some resources (such as remote desktop, library resources, and department drives).
- For troubleshooting tips, see Troubleshoot your eduroam connection.
- IU Secure:
To connect, select from the list of available wireless networks, and enter your IU username and passphrase.
You have finished installing Windows on your Mac. If you need to install Microsoft Office, see About Microsoft 365 at IU.
Step 11: Configure the default boot operating system
You have the option to boot to either Windows or macOS when starting your Mac. You can also select one operating system for the computer to start by default.
- To shut down your Mac while you’re in Windows, from the menu, click the button, and then click .
- To boot into macOS, with the power off, press and hold the
Optionkey and power on your Mac. - Hold the
Optionkey until you see two hard disk icons and a Wi-Fi network selector. Boot into macOS by clicking (you’ll select the default boot operating system momentarily). - From the Startup Disk control panel, click the menu. Click , and then .
- To unlock the settings, click the Lock icon, and then type your administrator passphrase.
- To select the default boot operating system, click the disk that correlates to the operating system you would like to select. For macOS, choose ; for Windows, choose . If you would like to boot into the selected operating system now, click .
Switch operating systems
Whenever you would like to switch operating systems:
- Shut down the computer.
- Press and hold the option key and power on your computer by pressing and releasing the power button.
- When you see two hard disk icons, release the option key.
- Click the hard disk icon that corresponds with the operating system you would like to boot. For macOS, choose ; for Windows, choose .
Как установить Windows 10 на macOS High Sirerra
Если вам нужно установить ОС Windows на Mac High Sirerra, вы можете использовать Ассистент Mac Boot Camp или создать виртуальную машину с помощью Parallels Desktop, VMware Fusion or VirtualBox. Boot Camp позволяет вам установить вторую операционную систему на ваш Macbook, поэтому вы можете запускать macOS или Windows в зависимости от того, какие приложения вы хотите запускать прямо сейчас. Если вы используете программное обеспечение виртуализации для установки Windows, вы можете открыть Windows внутри macOS: Windows будет работать внутри приложения, но будет «думать», что оно работает на обычном ПК. У обоих методов есть свои преимущества и недостатки; вы можете прочитать эту статью, чтобы узнать о плюсах и минусах каждого способа установки Windows на Mac.
Вариант 1. Загрузите Windows 10 на macOS High Sirerra с BootCamp
Boot Camp поставляется с Macbook бесплатно и позволяет устанавливать Windows вместе с macOS, поэтому вы можете выбрать, какие из них загружать при запуске. Ассистент Mac Boot Camp поможет вам установить Windows, разбить загрузочный диск и установить необходимые драйверы.
Если вы устанавливаете Windows через Boot Camp, Windows будет иметь все ресурсы вашего Macbook и сможет запускать программы с максимально возможной производительностью. Вот почему двойная загрузка идеально подходит для запуска ресурсоемких программ, таких как программное обеспечение для редактирования видео или высокопроизводительные игры.
С другой стороны, только одна операционная система сможет работать одновременно, поэтому вам придется перезагружаться между ними в зависимости от того, какие приложения вам нужно запускать в данный момент. Еще один возможный недостаток заключается в том, что Windows и macOS используют разные файловые системы, и вы не сможете открывать файлы Mac в Windows или наоборот, если не установите для них определенные сторонние диски. Это не проблема при использовании виртуальных машин.
Вариант 2. Запустите Windows 10 на Macbook без BootCamp, используя виртуальную машину
Виртуальные машины позволяют устанавливать и открывать Windows 10 в окне на рабочем столе Mac. Windows будет «думать», что она работает на реальном компьютере, когда она работает внутри приложения. На виртуальных машинах вы одновременно запускаете и macOS, и Windows, что удобно, если вы хотите открыть одну программу Windows вместе с приложениями Mac. Однако, когда вы запускаете виртуальную машину, ресурсы вашего компьютера распределяются между двумя операционными системами, поэтому все может работать медленнее, чем обычно.
Установите Windows 10 на Mac High Sirerra с помощью Parallels Desktop
Parallels Desktop очень интуитивно понятен и прост в использовании для обычных пользователей компьютеров. Приложение настроит все за вас, даже загрузит Windows 10 или использует ту, которую вы уже скачали через Boot Camp. Вы можете открывать Windows в отдельном окне (в том числе в полноэкранном режиме) или можете включить режим Coherence. В режиме Coherence виртуальная машина будет работать в фоновом режиме, а программы Windows могут работать вместе с вашими приложениями Mac. Вы даже можете разместить программы Windows на рабочем столе MacOS или закрепить их в Dock. Parallels Desktop позволяет без проблем копировать и вставлять или перетаскивать файлы между Windows и macOS.
Цены на Parallels Desktop начинаются с 79.99 долларов США, однако доступен бесплатный пробный период.
Получите Windows 10 на Mac High Sirerra с VMware Fusion
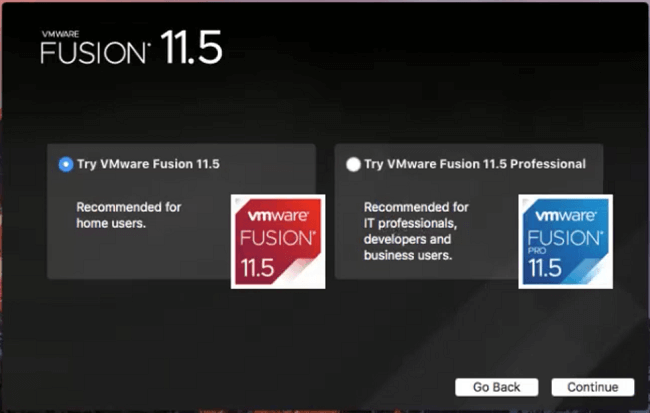
VMware Fusion — еще одно популярное программное обеспечение для виртуализации Macbook. Он близок к Parallels по функциональности и цене, но Fusion от VMware поддерживает большее количество операционных систем, чем Parallels. С другой стороны, Parallels проще для новичков и работает немного плавнее. В остальном эти две программы находятся примерно на одном уровне.
Установите Windows 10 на Mac через VirtualBox
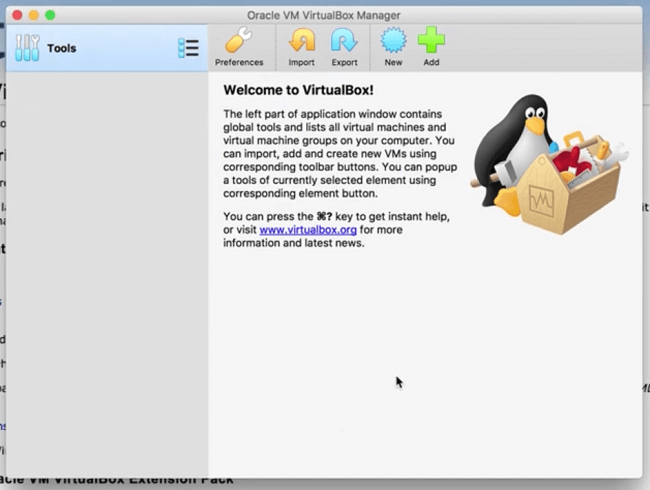
Если вы не планируете тратить дополнительные деньги на программное обеспечение для виртуализации, всегда есть VirtualBox от Oracle. VirtualBox — довольно приличная бесплатная альтернатива платному программному обеспечению, если не более медленная, менее доработанная и в которой отсутствуют некоторые удобные функции. Если вам нужно запустить некоторые ресурсоемкие программы Windows, VirtualBox может быть не лучшим выбором для вас. VirtualBox также требует больше технических знаний, чем, например, Parallels, поскольку пользователям необходимо самостоятельно настраивать некоторые параметры при его установке. Однако, если вы уже являетесь опытным пользователем или не против поработать еще немного, и вы не собираетесь запускать новейшие игры для Windows или программное обеспечение для редактирования видео, VirtualBox — хорошая (и бесплатная!) Альтернатива.
I’m having an issue getting my MBP High Sierra 10.13.2 (17C88) to function with Windows 10 on Bootcamp. I’ve used the bootcamp assistant to successfully partition out 85GB of space from 250GB APFS mac partition and download the windows support software — but then after restart nothing happens. There is a black screen with a delay (where otherwise Windows should load) and then it goes back to loading OSX.
I’ve been really struggling with getting this working on my mac, before updates to Windows 10 or to OSX, I had a fully functioning system, but then issues on the bootcamp partition (blue screens, driver errors) forced me to wipe the bootcamp partition. After wiping I tried reinstalling Windows but nothing worked. Then I wiped my whole OSX through recovery and restarted the process, and now I am stuck here. So I am installing bootcamp on an untouched, new OSX system.
Output from diskutil list:
/dev/disk0 (internal, physical):
#: TYPE NAME SIZE IDENTIFIER
0: GUID_partition_scheme *251.0 GB disk0
1: EFI EFI 209.7 MB disk0s1
2: Apple_APFS Container disk1 165.0 GB disk0s2
3: Microsoft Basic Data BOOTCAMP 85.8 GB disk0s3
/dev/disk1 (synthesized):
#: TYPE NAME SIZE IDENTIFIER
0: APFS Container Scheme — +165.0 GB disk1
Physical Store disk0s2
1: APFS Volume Macintosh HD 156.3 GB disk1s1
2: APFS Volume Preboot 43.4 MB disk1s2
3: APFS Volume Recovery 1.0 GB disk1s3
4: APFS Volume VM 2.1 GB disk1s4
/dev/disk4 (disk image):
#: TYPE NAME SIZE IDENTIFIER
0: GUID_partition_scheme +49.3 MB disk4
1: Apple_HFS Keka 49.2 MB disk4s1