If you find your ASUS keyboard backlight not working, please rest assured that you’re not alone. Just follow this tutorial step by step and you’ll easily get the problem fixed.
2 Ways to fix ASUS keyboard backlight not working
Here are two ways that have proved useful to other ASUS users. You don’t have to try them all; just work your way from the top down until you find the one that works for you.
Way 1: Start the HControl.exe program
Way 2: Download and install the latest drivers
Way 1: Start the HControl.exe program
Before you try this fix, make sure that you have installed the ATK package in your ASUS notebook. The ATK package, containing drivers that control your hotkeys, backlight and some other optional functionality, is usually pre-installed in every new ASUS laptop. And the HControl.exe program we need to start is also within this ATK package. In most cases you can navigate to HControl.exe through the following path:
C:\Program Files (x86)\ASUS\ATK Package\ATK Hotkey\Hcontrol.exe
Just copy this path and paste it to the address bar of your File Explorer. After finding HControl.exe, you should double-click on it to execute the program.

Then, on your keyboard, press Fn and F4 at the same time to test if the backlight of your keyboard can be turned on.
If you cannot navigate to this program, then perhaps your ATK package is installed in another folder. In this case, you should search for “ATK Package” in File Explorer until you find Hcontrol.exe in a folder named ATK Hotkey.
There’s also a chance that your ATK package has not been pre-installed on the laptop. If so, move on to Way 2.
If this fix didn’t work for you, please proceed to the next fix below.
Way 2: Download and install the latest drivers
As reported by some users, they couldn’t turn on the keyboard backlight after updating their operating system. If that’s when you encountered the issue, you should download and install the latest drivers (including ATK Package drivers and Smart Gesture drivers) that control the backlight function of your notebook.
There are mainly two options for you to download and install the drivers.
Option 1 – Manually – You’ll need some computer skills and patience to update your drivers this way, because you need to find exactly the right drivers online, download it and install it step by step.
OR
Option 2 – Automatically (Recommended) – This is the quickest and easiest option. It’s all done with just a couple of mouse clicks – easy even if you’re a computer newbie.
Option 1 – Update the drivers manually
To update the drivers manually, you should perform the following procedure:
- Find your way to the download center of ASUS, or you can simply click here.
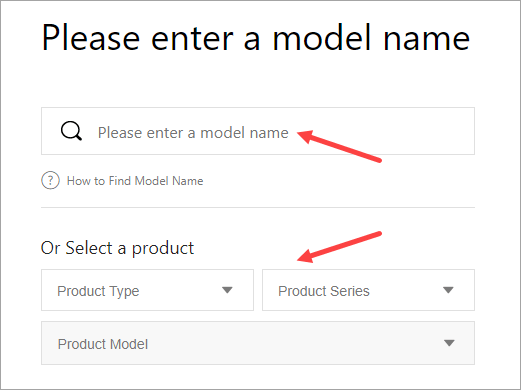
- On the pop-up page, enter the model name of your laptop to search for its drivers. If you don’t know its exact model, then try to select a product from the given list. After that, hit Enter on your keyboard.

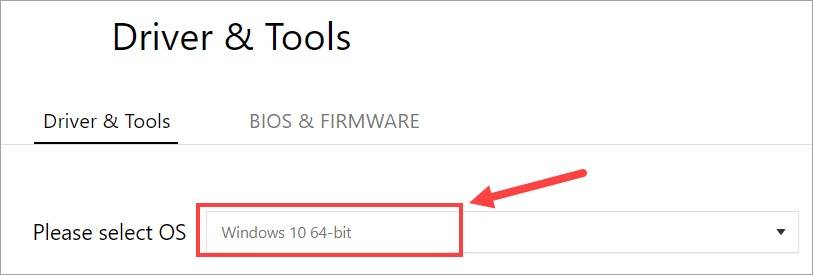
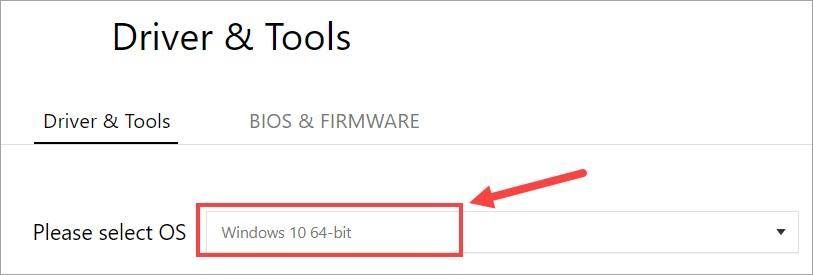
- On the next page, select your Windows version. Then you’ll be greeted with a list of drivers and programs available for download.

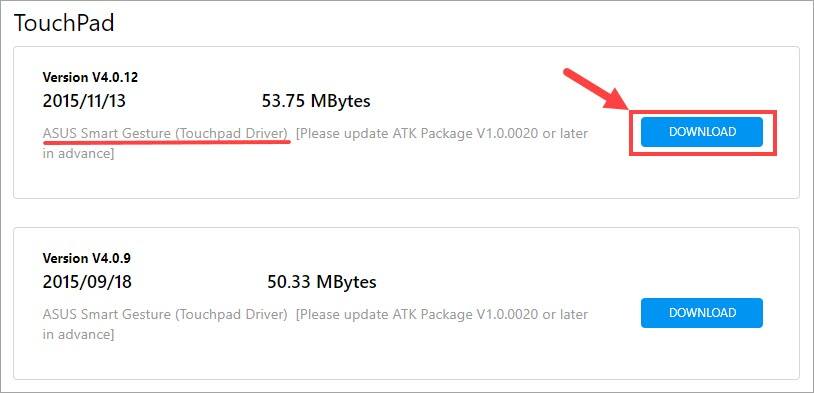
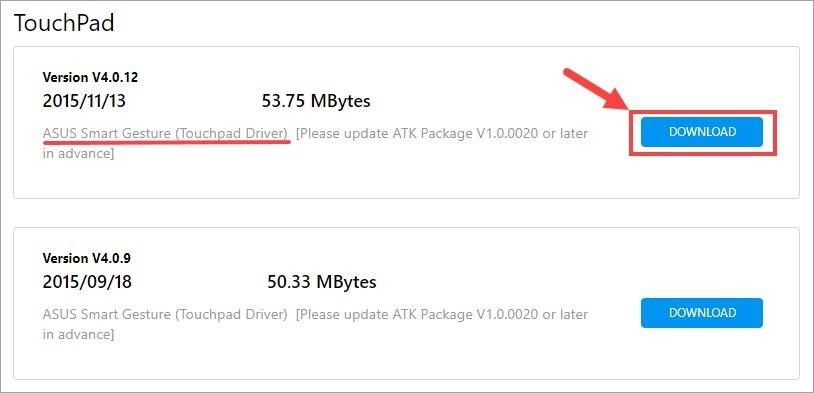
- Scroll through the list until you find the following two drivers: Smart Gesture driver and ATK Package driver. Then, click on the DOWNLOAD button next to each driver.


- Wait till the download process is complete. The two downloaded files are compressed files, so you need to extract them to a desired location.
- Open the extracted folders of the two drivers. Find Setup.exe in their folders respectively and click on it. Then, follow the onscreen instructions to install the drivers.
- When everything’s done, restart your computer for the changes to take effect. Then check to see if your keyboard backlight can be turned on properly (press Fn+F4 on your keyboard to enable the backlight).

Option 2 – Automatically update the drivers
Downloading and installing the drivers manually can be somewhat time-consuming and error-prone. So if you don’t have the time, patience or computer skills to update your Insignia drivers manually, you can do it automatically with Driver Easy.
Driver Easy will automatically recognize your system and find the correct drivers for it. You don’t need to know exactly what system your computer is running, you don’t need to risk downloading and installing the wrong driver, and you don’t need to worry about making a mistake when installing. Driver Easy takes care of everything.
You can update your drivers automatically with either the FREE or the Pro version of Driver Easy. But with the Pro version it takes just 2 clicks (and you get full support and a 30-day money back guarantee):
- Download and install Driver Easy.
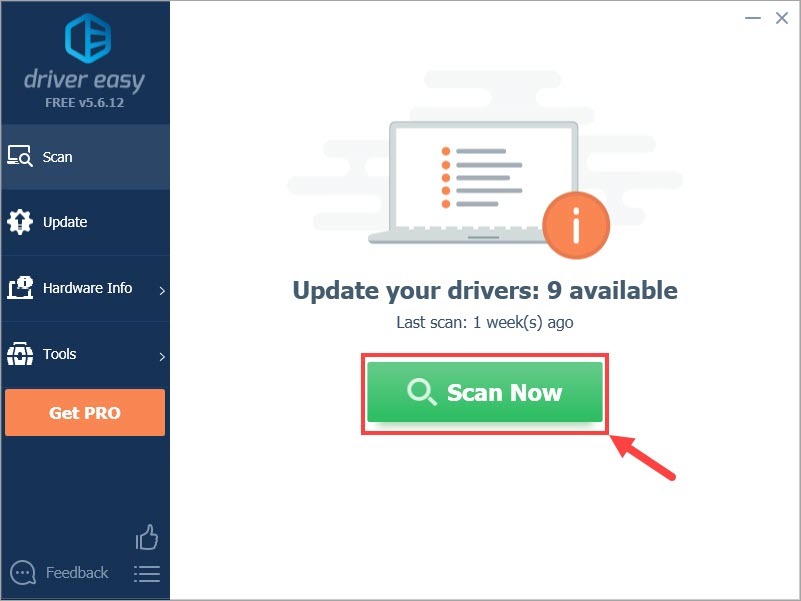
- Run Driver Easy and click the Scan Now button. Driver Easy will then scan your computer and detect any problem drivers.

- Click Update All to automatically download and install the correct version of all the drivers that are missing or out of date on your system (this requires the Pro version – you’ll be prompted to upgrade when you click Update All). Or if you just want to update the ATK Package driver for now, simply click the Update button next to it.


Note: you can do it for free if you like, but it’s partly manual.
If you have any problems when using Driver Easy to update your driver, please feel free to email us at support@drivereasy.com.
Hopefully you find this post useful. Please feel free to leave a comment below if you have any further questions or ideas. Thanks for reading!
35
35 people found this helpful
Попробуйте наш инструмент устранения неполадок
Выберите операционную систему
Выберите язык програмирования (опционально)
‘>
Если ты найдешь свой Подсветка клавиатуры ASUS не работает , будьте уверены, вы не одиноки. Просто следуйте этому руководству шаг за шагом, и вы легко решите проблему.
Вот два способа, которые оказались полезными для других пользователей ASUS. Необязательно пробовать их все; просто работайте сверху вниз, пока не найдете тот, который вам подходит.
Способ 1: Запустить программу HControl.exe
Способ 2: Загрузите и установите последние версии драйверов
Способ 1: запустить HControl.exe программа
Перед тем, как попробовать это исправление, убедитесь, что вы установили пакет ATK на свой ноутбук ASUS. Пакет ATK, содержащий драйверы, управляющие горячими клавишами, подсветкой и некоторыми другими дополнительными функциями, обычно предустановлен на каждом новом ноутбуке ASUS. И программа HControl.exe, которую нам нужно запустить, также входит в этот пакет ATK. В большинстве случаев вы можете перейти к HControl.exe по следующему пути:
C: Program Files (x86) ASUS ATK Package ATK Hotkey Hcontrol.exe
Просто скопируйте этот путь и вставьте его в адресную строку проводника. После нахождения HControl.exe , вам следует дважды щелкнуть по нему, чтобы запустить программу.

Затем на клавиатуре нажмите Fn и F4 в то же время, чтобы проверить, можно ли включить подсветку клавиатуры.
Если вы не можете перейти к этой программе, возможно, ваш пакет ATK установлен в другой папке. В этом случае вы должны искать «Пакет ATK» в проводнике, пока не найдете Hcontrol.exe в папке с именем ATK Hotkey.
Также есть вероятность, что ваш пакет ATK не был предварительно установлен на ноутбуке. Если да, переходите к Способ 2 .
Если это исправление не помогло, перейдите к следующему исправлению ниже.
Способ 2: Загрузите и установите последние версии драйверов
По сообщениям некоторых пользователей, им не удалось включить подсветку клавиатуры после обновления операционной системы. Если именно тогда вы столкнулись с проблемой, вам следует загрузить и установить последние версии драйверов (включая драйверы пакета ATK и драйверы Smart Gesture), которые управляют функцией подсветки вашего ноутбука.
Есть два основных варианта загрузки и установки драйверов.
Вариант 1 — Вручную — Чтобы обновить драйверы таким способом, вам потребуются некоторые навыки работы с компьютером и терпение, потому что вам нужно найти именно те драйверы в Интернете, загрузить их и установить шаг за шагом.
ИЛИ ЖЕ
Вариант 2 — автоматически (рекомендуется) — Это самый быстрый и простой вариант. Все это делается парой щелчков мышью — легко, даже если вы компьютерный новичок.
Вариант 1. Обновите драйверы вручную
Чтобы обновить драйверы вручную, необходимо выполнить следующую процедуру:
- Найдите свой путь к центру загрузок ASUS или просто нажмите Вот .
- На всплывающей странице введите название модели вашего ноутбука для поиска драйверов. Если вы не знаете его точную модель, попробуйте выбрать товар из представленного списка. После этого нажмите Войти на клавиатуре.

- На следующей странице выберите свою версию Windows. После этого вы увидите список драйверов и программ, доступных для загрузки.
- Прокрутите список, пока не найдете следующие два драйвера: Умный жест водитель и Пакет ATK Водитель. Затем нажмите на СКАЧАТЬ кнопка рядом с каждым водителем.
- Дождитесь завершения процесса загрузки. Два загруженных файла представляют собой сжатые файлы, поэтому вам необходимо извлечь их в нужное место.
- Откройте извлеченные папки двух драйверов. найти Setup.exe в своих папках соответственно и щелкните по нему. Затем следуйте инструкциям на экране, чтобы установить драйверы.
- Когда все будет готово, перезагрузите компьютер, чтобы изменения вступили в силу. Затем проверьте, правильно ли включается подсветка клавиатуры (нажмите Fn + F4 на клавиатуре, чтобы включить подсветку).

Вариант 2 — автоматическое обновление драйверов
Загрузка и установка драйверов вручную может занять некоторое время и привести к ошибкам. Так что, если у вас нет времени, терпения или навыков работы с компьютером для обновления драйверов Insignia вручную, вы можете сделать это автоматически с помощью Водитель Easy .
Driver Easy автоматически распознает вашу систему и найдет для нее подходящие драйверы. Вам не нужно точно знать, на какой системе работает ваш компьютер, вам не нужно рисковать, загружая и устанавливая неправильный драйвер, и вам не нужно беспокоиться о том, чтобы сделать ошибку при установке. Driver Easy позаботится обо всем.
Вы можете автоматически обновлять драйверы с помощью БЕСПЛАТНОЙ или Pro версии Driver Easy. Но с версией Pro это займет всего 2 клика (и вы получите полную поддержку и 30-дневную гарантию возврата денег):
- Скачать и установите Driver Easy.
- Запустите Driver Easy и щелкните Сканировать сейчас кнопка. Driver Easy просканирует ваш компьютер и обнаружит проблемы с драйверами.
- Нажмите Обновить все для автоматической загрузки и установки правильной версии всех драйверов, которые отсутствуют или устарели в вашей системе (для этого требуется Pro версия — вам будет предложено выполнить обновление, когда вы нажмете «Обновить все»). Или, если вы просто хотите обновить драйвер пакета ATK прямо сейчас, просто нажмите кнопку Обновить рядом с ним.


Заметка: вы можете сделать это бесплатно, если хотите, но отчасти это делается вручную.
Если у вас возникли проблемы при использовании Driver Easy для обновления драйвера, напишите нам по адресу support@drivereasy.com .
Надеюсь, этот пост окажется для вас полезным. Не стесняйтесь оставлять комментарии ниже, если у вас есть дополнительные вопросы или идеи. Спасибо за прочтение!
С подсветкой на клавиатуре ноутбука ASUS могут возникнуть несколько проблем. Она может вообще не работать, или становится неуправляемой – не меняется яркость и цвет.

Почему подсветка клавиатуры ASUS не работает в Windows 10?
В большинстве случаев проблему можно решить путем обновления Windows 10 до последней версии. Вместе с обновлением операционной системы обновляется и масса модулей производителя.
Основные причины, из-за которых подсветка может не работать в вашей операционной системе.
- Устаревшие или неправильные драйвера. Если драйвера клавиатуры (на ноутбуке или внешней) не обновлены до последней версии, то не сможете получить доступ ко всем функциям, включая подсветку.
- Аппаратные проблемы. Иногда оборудование производителя не синхронизируется должным образом с операционной системой. Обновление системы, а также диагностика и устранение неполадок оборудования может решить проблему.
- Запуск исполняемого файла hcontrol.exe, который отвечает за управление горячими клавишами. Проверьте наличие этой программы от Asus в фоновых процессах или запустите вручную.
Прежде чем перейти к конкретным решениям, убедитесь, что вы вошли в систему как администратор. Также потребуется подключение к интернету.
Решение 1: Перезагрузка ноутбука
Иногда проблема решается банально просто. Достаточно полностью выключить ноутбук и избавится от накопленного статического заряда. Таким образом, принудительно сбрасываем временные конфигурации и заставляем устройство повторно инициализировать каждую из них. Убедитесь, что сохранили свою работу, прежде чем продолжить.
Выключите устройство, выдерните кабель питания. Извлеките батарею, нажмите и удерживайте кнопку питания 5 -7 секунд.
Подождите 2-3 минуты и подключите все обратно. Теперь включите ноутбук и проверьте, как работает подсветка.
Решение 2: Устранение неполадок компьютера
Попробуйте запустить средство устранения неполадок. Этот инструмент проверит все оборудование по одному и быстро определит неисправность. С его помощью можно обнаружить не установленный драйвер или устаревшие модули.
- Нажмите клавиши Windows + R, в диалоговом окне наберите «control», подтвердите выполнение на Enter.
- В правой верхней части экрана кликните на «Категории», выберите «Крупные значки» из списка.
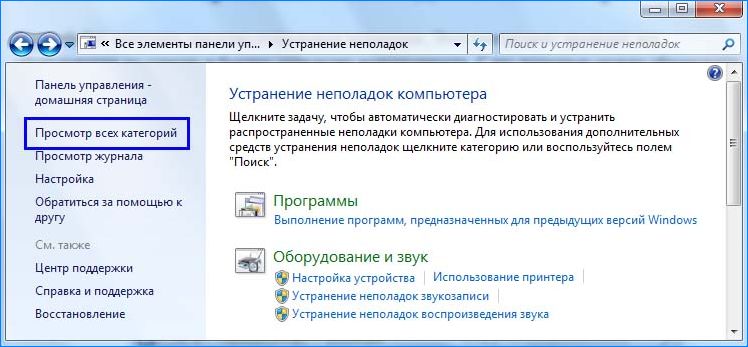
- Перейдите на вкладку «Устранение неполадок».
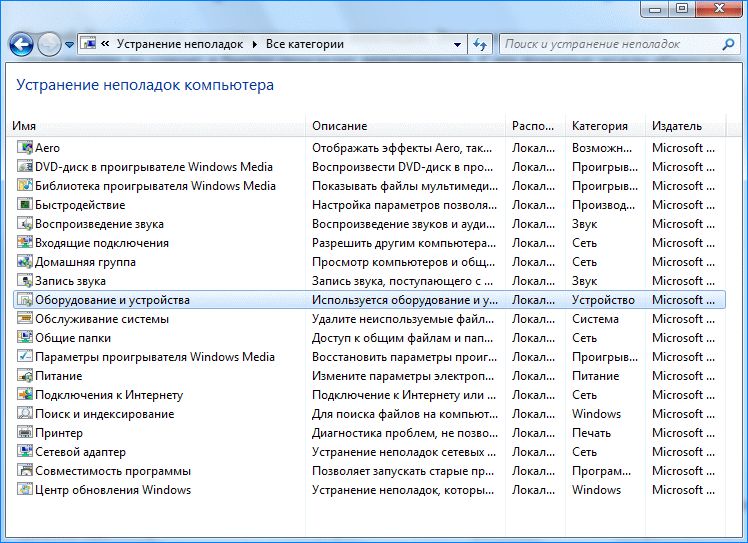
- В левой части окна выберите пункт «Просмотр всех категорий», чтобы получить доступ ко всем пакетам устранения неполадок, доступных на компьютере.

- В списке выберите «Оборудование и устройства».

- Windows начнет сканирование компьютера на наличие неполадок с оборудованием. Если найдет, то выбросит уведомление. Нажмите «ОК», если рекомендуется какое-либо исправление.
Перезагрузите ноутбук после применения исправления.
Решение 3. Запуск модуля hcontrol.exe
В наборе программного обеспечения ASUS для каждой модели ноутбука есть исполняемый файл hcontrol.exe, который используется для управления всеми горячими клавишами и функциями, связанными с ними. Кроме того, он также отвечает за управления другими модулями, такими как подсветка. Если он отсутствует в фоновых процессах, то есть не стартует автоматически вместе с загрузкой системы, то попробуйте запустить его вручную, и посмотреть, имеет ли это значение.
Нажмите одновременно клавиши Windows + E, перейдите по следующему пути к файлу:
C:\Program Files (x86)\ASUS\ATK Package\ATK Hotkey
Найдите файл hcontrol.exe и кликните по нему дважды, чтобы запустить.
Теперь проверьте, правильно ли работает подсветка на ноутбуке.
Решение 4: Переустановка драйвера клавиатуры вручную (через пакет ATK)
Если перечисленные методы не работают, и не можете получить доступ к подсветке, попробуйте обновить драйверы клавиатуры. Пользователи утверждали, что при обновлении до Windows 10, либо теряли правильный драйвер клавиатуры или был установлен несовместимый.
Перейдите на официальный сайт ASUS, выберите вкладку Сервис – Поддержка – Введите Центр поддержки. Введите сведения о продукте (Ноутбуки), серию и модель.
С правой стороны отобразится пункт «Драйвера и утилиты», перейдите в него. Выберите операционную систему, установленную на вашем ноутбуке ASUS. Откроется список всех драйверов для указанной модели.
Пролистайте вниз, найдите пакет АТК (при наличии Hotfix, Smart Gesture, Touchpad/Keyboard).

Скачайте их в любое доступное место на диске. Затем кликните на нем правой кнопкой мыши, выберите запуск от имени администратора.
После установки драйверов перезагрузите ноутбук, проверьте, правильно ли работает подсветка.
Перейти к содержанию
На чтение 2 мин Просмотров 6.2к. Опубликовано
32
Когда горячие клавиши на вашем ноутбуке ASUS теряют свои функции, вы не можете использовать их правильно. Если горячие клавиши на вашем ноутбуке ASUS перестают работать, в этом посте вы найдете решения, применимые к Windows 10, 7, 8, 8.1, XP и Vista.
Содержание
- Решение 1. Откройте файл HControl.exe
- Решение 2. Восстановите приложение ASUS Hotkey
- Решение 3. Обновите драйверы
Решение 1. Откройте файл HControl.exe
Перейдите в C: Program Files (x86) ASUS ATK Package ATK Hotkey Hcontrol.exe . Затем нажмите клавишу Enter . Это самое простое решение. Попробуйте и посмотрите, решится ли проблема.
Решение 2. Восстановите приложение ASUS Hotkey
Выполните следующие действия:
1. Перейдите в Панель управления -> Программы и компоненты .
2. Найдите и найдите в списке программу « ATK Package ».
3. Щелкните его правой кнопкой мыши и выберите Восстановить в контекстном меню.
4. Перезагрузите компьютер, чтобы изменения вступили в силу.
Решение 3. Обновите драйверы
Если решение 1 и решение 2 не работают для вас, попробуйте обновить горячую ключевые драйверы. Если у вас нет времени, терпения или компьютерных навыков для обновления драйверов вручную, вы можете сделать это автоматически с помощью Driver Easy .
Driver Easy автоматически распознает вашей системе и найдите для нее подходящие драйверы. Вам не нужно точно знать, в какой системе работает ваш компьютер, вам не нужно рисковать загрузкой и установкой неправильного драйвера, и вам не нужно беспокоиться об ошибке при установке.
Вы можете автоматически обновлять драйверы с помощью БЕСПЛАТНОЙ или Pro версии Driver Easy. Но с версией Pro требуется всего 2 клика (и вы получаете полную поддержку и 30-дневную гарантию возврата денег):
1) Загрузите и установите драйвер Легко.
2) Запустите Driver Easy и нажмите кнопку Сканировать сейчас . Затем Driver Easy просканирует ваш компьютер и обнаружит все проблемные драйверы.

3) Нажмите Обновить рядом с драйвером горячей клавиши Asus, чтобы автоматически загрузить и установить правильную версию этого драйвера (вы можете сделать это в БЕСПЛАТНОЙ версии). Или нажмите Обновить все , чтобы автоматически загрузить и установить правильную версию всех драйверов, которые отсутствуют или устарели в вашей системе (для этого требуется версия Pro – вам будет предложено выполнить обновление, когда вы нажмете «Обновить все»).

Попробовав решения, описанные выше, горячие клавиши должны снова работать.
Are you feeling bothered because your ASUS laptop keyboard backlight not working on Windows 10? Here’s how to fix Asus keyboard backlight not working problem.
ASUS makes some great products in the personal computing space, Laptops, all-in-ones, and whatnot. Are you the owner of an Asus laptop which worked well for a long time but has had the keyboard backlight not working lately?
Is your ASUS keyboard backlight not working after the recent Windows update? Want to know how to fix ASUS laptop keyboard backlight not working on windows 10? We have all the answers you ask.
In this guide, we will take a look at the ASUS keyboard backlight not working Windows 10 issue and we will also explain what are the main reasons behind laptop keyboard light not working on Asus laptops as well as on laptops by other OEMs.

(Disclosure: This post contains affiliate links and images. I earn advertising/referral fees if you make a purchase by clicking them. There is no extra cost to you. See our full disclosure here. )
So, without further ado, let’s jump right in and get the answer to your question, how to fix Asus keyboard backlight not working on Windows 10 operating systems? Let’s begin.
How to Enable the Backlight Keyboard on ASUS Laptop
In the cases when your ASUS laptop keyboard backlight not working on Windows 10, your foremost priority should be to check if your laptop supports keyboard backlighting. If the F3 and F4 keys have a keyboard symbol with a sun coming out of it then keyboard backlight is supported on your device.
If you have a laptop with a basic single color backlight then enabling and controlling the keyboard backlight is fairly easy. You can easily change the intensity and turn the backlight on or off using the following keyboard shortcuts keys:
- Press the Fn (Function key) on your keyboard which is usually found near the left or right Alt Key.
- And then press the F4 key while pressing Fn Key
Once you press these shortcuts keys properly, it will enable the backlight keyboard on your ASUS laptop.
In case, if you wish to dim the keyboard backlight or increase its intensity:
- Press Fn + F4 keys together to increase the brightness.
- Press Fn + F3 keys together to reduce the brightness and turn it off.
If you have a gaming laptop that comes with a keyboard with RGB backlight then you can use ASUS Armoury crate to customize the backlight.
The Potential Causes of Why ASUS Laptop Keyboard Backlight Not Working
Before moving forward and start following the solutions, let’s learn about the possible reasons behind ASUS laptop keyboard backlight not working on Windows 10 first. Well, there are many reasons that can cause the ASUS laptop keyboard light not working error and some of them are:
- Corrupt or Incorrect Drivers: Sometimes the drivers can get corrupted after a Windows update. Updates to certain software can also make the previous drivers incompatible.
- Error State or Incorrect Boot Condition: If the system was unable to boot properly and fails to go through all the pre-boot checks then the system may cause the keyboard backlight not working error.
- Hardware Malfunctions: In rare cases, the hardware starts to deteriorate and malfunctions which cause issues with keyboard backlights.
- Major System Updates: If you are running Windows 10 then you must be familiar with the irritating updates Microsoft keeps pushing to devices. Many times, these updates are what cause the Asus laptop keyboard backlight not working error.
Since now we know what are the circumstances that can cause the ASUS keyboard backlight not working issue, it’s time to check out the solutions to deal with it. Here we have described some of the quickest ways to fix ASUS laptop keyboard backlight not working on Windows 10 issue so that you can apply them straightforwardly and get back your keyboard backlight operating smoothly again like before. The top four methods which I personally recommend are:
Method 1: Power Cycle Your ASUS laptop
Power cycling a system means to shut it down completely, drain any leftover static and reboot again. Power cycling helps reset any temporary configurations or errors that usually cause keyboard backlight not working errors. Make sure to save all your work before you power cycle to ensure that you don’t lose data.
Follow these steps and learn how to power cycle your ASUS laptop in order to get rid of keyboard backlight not working problem:
- At first, Shut down your Windows 10 system.
- Remove the power cord or charger which may be attached.
- Take out the battery from your laptop, you will need to unlock it from the bottom of the laptop to remove it.
- Click and hold the power button on your laptop for 10 seconds with the battery removed. This will discharge any static that may be built up.
- Wait for 5 to 10 minutes and then assemble your laptop with the battery.
- Turn your laptop on to check if the Asus laptop keyboard backlight not working issue is resolved.
In most cases, this method fixes the Asus keyboard backlight not working Windows 10 error. But if this method doesn’t fix your issue then move to the next one.
Method 2: Reinstall the Keyboard Driver Manually (with latest ATK)
If the power cycling your ASUS laptop didn’t fix the keyboard backlight not working issue that means the problem is on the software or hardware level. This solution will help you fix the AUS laptop keyboard light not working issue if it is on the software level.
Follow these instructions and learn how to reinstall the keyboard driver Manually and get the latest ATK drivers for the keyboard:
- At first, check the model number for your laptop. This is usually found on the bottom of the laptop on a sticker with the serial number.
- After that, navigate to the official Download Center of ASUS.
- Enter the model name you found in step one in the box on the left or manually search for your model from the drop-down menus.
- Once found, select the OS you are running on. In most cases, it will be Windows 10 64-bit.
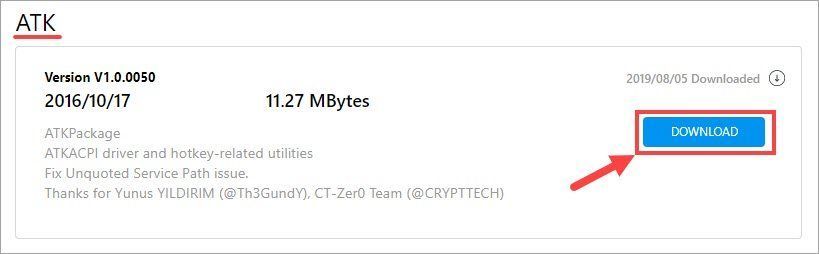
- Scroll down on the page and once you find ATK, click on the Download button beside it. Wait for the download to complete.
- Once downloaded, click on the zip file and extract it to your desired location.
- Finally, double-click on the Setup.exe file to run the installation wizard and then follow the instructions on the screen to install it.
Once the installation is completed, your keyboard backlight should be back on. If still not, restart your laptop and check if the ASUS laptop keyboard light not working glitch is resolved.
This is another quick and easy method that should fix the AUSU laptop keyboard backlight not working on Windows 10 problem. In case if it doesn’t, we have a few more tricks up our sleeves.
Method 3: Execute the HControl.exe Program
If you want to try this method, make sure that you have installed the latest ATK package (as we have explained in the above method) because the HControl.exe program we are going to execute is within this ATK package.
So, once you have installed all the drivers that are needed, you can manually try to start and execute the HControl.exe program which is responsible for managing the keyboard backlighting module.
Follow these steps and learn how to find the HControl.exe program and execute it to get rid of AUSU laptop keyboard backlight not working on Windows 10 issue
Step (1): First of all, open the File Explorer and navigate to the following path:
C:\Program Files (x86)\ASUS\ATK Package\ATK Hotkey
This is the default path of the installation of the drivers. If you have installed it somewhere else then navigate to that path.
Step (2): A folder with multiple files will appear. Here you have to find the HControl.exe file.
Step (3): And once you find the HControl.exe, double click on it to execute the program.
Once the program starts, you should see the backlight turn on. If it doesn’t, try pressing the Fn + F4 key together to check if that turns it on. If this method fixes your problem then you are good to go. If not, there’s one last thing you can try.
Method 4: Use the ASUS Armoury Crate Software
This method is primarily useful for people with Gaming laptops. Armoury Crate (AC) by ASUS is a versatile piece of the system controlling software that allows you to control a lot of things on your laptop. One of them is the keyboard backlighting. To try and fix the Asus keyboard backlight not working Windows 10 problem on an Asus laptop using Armoury Crate you need to:
- At first, download Armoury Crate from the ASUS Official Support website.
- Once downloaded, install the software on your laptop and reboot.
- Now, open ASUS Armoury Crate and click on the gaming console icon on the left side, then click on the System.
- On the System section, click on the Lighting and then scroll down till you see Customize option.
- Click on the Customize option and then click on the OK button if the popup appears.
- Next, look for an Edit button on the right side of the Customize menu which says Customize AURA. Once found, click on it.
- Now customize the lighting as you want from the menu and then click on the OK button to save the changes.
Once you save your keyboard will be compatible and AURA synced once again. This method will most likely fix issues with RGB backlighting on gaming laptops. If it doesn’t then most likely the fault is on a hardware level. I recommend you visit your closest service center to get your laptop checked.
Conclusions
After following these four most effective solutions, your ASUS laptop keyboard backlight not working on Windows 10 problem should be solved by now. But if neither of these methods helped you fix your ASUS keyboard light not working issue then the only option that remains is to get your laptop checked at the hardware level from a service center near you.
You can try the Hardware and Devices troubleshooter built-in to windows 10 to try and fix the issue but the chances are quite slim.
We hope these step by step methods here helped you fix the keyboard backlight not working issue on your Asus laptop. We also hope that we were able to thoroughly answer your question; how to fix ASUS laptop keyboard backlight not working on Windows 10?
If you have still any questions regarding the ASUS keyboard backlight not working then feel free to ask them in the comments below or just drop us an email and we will surely help you out. Until next time, Ciao!
You may also be interested in checking out:
- How to Fix ASUS Smart Gesture Not Working Windows 10 Issue
- How to Change Keyboard Settings on Windows 10
- How to Fix Windows Spotlight Not Working in Windows 10
- How to Fix Windows 10 Night Light Not Working After Update