I have Windows 10 HOME installed on my system. After I installed Windows 10 HOME, I installed Ubuntu 14.04 LTS on a separate partition so that I could dual boot.
I removed Ubuntu 14.04 LTS by deleting the partition it was installed on. Now I am unable to start my system. At boot, my system stops at the Grub command line.
I want to boot to my Windows 10 installation which I haven’t removed from my system.
This is displayed at startup:
GNU GRUB version 2.02 beta2-9ubuntu1.3 <br>
minimal BASH-like editing is supported.for the first word, TAB lists
possible commands completions.anywhere else TAB lists the possible device or file completion.
grub>
How can I boot my Windows partition from this grub command?
![]()
Chris Davies
108k14 gold badges142 silver badges265 bronze badges
asked Feb 1, 2016 at 13:01
![]()
The following worked for me with a GPT partitioned disk.
insmod part_gpt
insmod chain
set root=(hd0,gpt1)
chainloader /EFI/Microsoft/Boot/bootmgfw.efi
boot
Note that you can enter a command line from the grub boot menu and just type commands as above to test out different combinations.
You need to enter the id of the EFI boot partition (not the windows partition) for the set root= command.
In the command line grub mode ls will list the hard drive partitions, help lists available commands.
Once you have set the root correctly you can ls / to view files and directories to find the correct path to the windows boot manager if it is not in the default location.
answered Mar 9, 2018 at 21:46
![]()
79E0979679E09796
7305 silver badges4 bronze badges
4
Just enter the command exit. It should take you to another menu that makes you select the Windows bootloader.
Worked on Lenovo Y50
![]()
AdminBee
21.8k21 gold badges47 silver badges71 bronze badges
answered Nov 7, 2017 at 18:44
![]()
adonayresomadonayresom
6695 silver badges6 bronze badges
7
Guesing you have an UEFI device, the windows bootloader is still installed. You can select it back in UEFI setup menu under boot, where you will prbably have two options (GRUB and the old default as the second), delete the first one or switch the order.
answered Feb 5, 2016 at 9:00
![]()
AlkoAlko
9121 gold badge7 silver badges17 bronze badges
1
This answer is for those with UEFI who have deleted the Ubuntu partitions before removing grub
You will be doing this from Windows 10. No bootable media required.
Where
bootrec /fixmbr,bootsect /nt60and the Ubuntu live with theboot-repairsuggestions have failed, this has worked for me:(This answer borrowed verbatim from here)
- Run a
cmd.exeprocess with administrator privileges- Run
diskpart- Type:
list diskthensel disk Xwhere X is the drive your boot files reside on- Type
list volto see all partitions (volumes) on the disk- Select the EFI volume by typing:
sel vol Ywhere Y is theSYSTEMvolume (this is almost always the EFI partition)- For convenience, assign a drive letter by typing:
assign letter=Z:where Z is a free (unused) drive letter- Type
exitto leave disk part- While still in the
cmdprompt, type:Z:and hit enter, where Z was the drive letter you just created.- Type
dirto list directories on this mounted EFI partition- If you are in the right place, you should see a directory called
EFI- Type
cd EFIand thendirto list the child directories insideEFI- Type
rmdir /S ubuntuto delete the ubuntu boot directoryAssuming you only ever had two operating systems (Win 10 & Ubuntu) you should now be able to boot directly to Windows without hitting the black grub screen.
Copied from https://askubuntu.com/questions/429610/uninstall-grub-and-use-windows-bootloader
![]()
answered Sep 4, 2018 at 22:58
![]()
sa mysa my
811 silver badge1 bronze badge
2
Just exit the grub by typing exit and go to bios setup and restore to default settings and restart the computer.
![]()
AdminBee
21.8k21 gold badges47 silver badges71 bronze badges
answered Dec 8, 2018 at 7:01
![]()
0
I recently bumped into the same problem. (i.e. originally have a a separate partition with Ubuntu installed, dual bootable from a grub menu. I then deleted that Ubuntu partition from Windows disk management, and when I rebooted, just the grub command menu).
What I did to get back to my Windows 10:
- Do a
Ctrl+Alt+Deleteto reboot. While rebooting, hold down theshiftbutton. - My PC then give me to option to press
F12for boot option. I clickedF12, and it gives me back a menu with Windows boot manager on it. - I selected the Windows boot manager and click enter. I’m now back to Windows 10.
answered May 29, 2017 at 16:35
![]()
Atlas7Atlas7
1113 bronze badges
This worked for me, now I have to find a way to permanently fix the mbr.
I recently bumped into the same problem. (i.e. originally have a a separate partition with Ubuntu installed, dual bootable from a grub menu. I then deleted that Ubuntu partition from Windows disk management, and when I rebooted, just the grub command menu).
What I did to get back to my Windows 10:
Do a Ctrl+Alt+Delete to reboot. While rebooting, hold down the shift button.
My PC then give me to option to press F12 for boot option. I clicked F12, and it gives me back a menu with Windows boot manager on it.
I selected the Windows boot manager and click enter. I’m now back to Windows 10.
![]()
answered Aug 26, 2017 at 19:18
![]()
Try this, its worked in my case:
grub> exit
You will get a list of operating systems installed. Select one.
answered Feb 21, 2020 at 4:37
![]()
3
Try this:
rootnoverify (hd0,0)
chainloader +1
makeactive
boot
![]()
techraf
5,86110 gold badges34 silver badges51 bronze badges
answered Nov 23, 2016 at 1:10
![]()
You must log in to answer this question.
Not the answer you’re looking for? Browse other questions tagged
.
Not the answer you’re looking for? Browse other questions tagged
.
In this article, Let’s learn how to boot windows from grub rescue screen. Linux is the best platform available on the planet, it offers great customization. A highly customizable platform like Linux offers enormous benefits but has only one downside that it can potentially break your system and you can eventually land up in Linux grub rescue screen. If you are looking to boot Linux from grub rescue you can refer to this article.

Steps for how to boot windows from grub rescue.
Step 1 — Listing Partitions from Grub Rescue:
First, we need to find out our EFI partition or the partition where your boot files are stored. In order to find that we need to see the available partition, so simply execute the ls command.
ls
Step 2 — Listing EFI Partition from Grub Rescue
In the first step, we have got our directory listing. Now, we need to find the appropriate partitions where our boot files reside. Typically it resides in a partition that is very small in size (typically less than 1GB) and having an EFI/ partition in it. So, In order to find that you can simply execute the ls (hdx,gpty)/ one by one.
Note: You need to replace x with the hard disk number, and y with the partition number.
ls (hdx,gpty)/
For me, the same is found in (hd0,gpt1)
Step 3 — Select the EFI Partition
Since we have found the partition, now we need to select the partition. So simply execute the below command.
set root=(hdx,gpty)
Step 4 — Chainloading the Windows EFI File.
Now, we have selected the partition in which our boot files are present, now we need to execute the command chainloader for loading a boot file, so we can boot from that.
chainloader /efi/Microsoft/Boot/bootmgfwi.efi
Step 5 — Boot Windows from Grub rescue:
Finally, you are all set to boot windows from grub rescue. Just we need to execute the below command.
bootConclusion — Boot windows:
ls
ls (hdx,gpty)/
set root=(hdx,gpty)
chainloader /efi/Microsoft/Boot/bootmgfwi.efi
boot
That’s it for this article, If you have any queries or suggestion please write down in comment section below.
Check out our Latest Best Linux Picks
Contents
- 1 Other titles for this same problem.
- 2 README
- 3 Quick solution
- 4 Classical solution
- 5 TODO: MOVE TO STANDALONE WEBPAGE Advanced Solution
- 6 Grub solution
- 7 Ntldr is missing
Other titles for this same problem.
   * How to boot Windows without problems
   * I had Linux and Windows in dual boot and then Windows no longer boots.
   * I had both Ubuntu and Windows installed and now Windows boots just hangs.
README
This page is for knowing how to boot Windows from Grub. You might want to remove Grub boot and boot Windows automatically instead.
This page is for normal Windows installations where Windows is found at first partition on first hard disk.
Your Windows might be in a second hard disk (NTLDR is missing), might be in a second partition (laptop) or might be in a special place.
In the second part of the page (ntrl is missing and so on) you will find some clues for these installations where you boot Windows from Grub but then, somehow, Windows has errors and you do not see your Windows desktop.
Non permanent solutions:
Quick solution
!WIN! :(((
Classical solution
This option boots Windows found at first partition from first hard disk.
This is not a persistent solution. When you are going to reboot you will have to follow the same steps for booting Windows.
- Super Grub Disk (WITH HELP) :-)))

- English Super Grub Disk

- Gnu/Linux
- Windows
- Boot Windows
TODO: MOVE TO STANDALONE WEBPAGE Advanced Solution
TODO:Windows Advanced to boot any partition
- Super Grub Disk (WITH HELP) :-)))
- English Super Grub Disk
- Gnu/Linux
- Windows
- Windows (Advanced)
- Boot Windows
Permanent solutions:
Grub solution
This is a permanent solution. After having done it you will no longer have to edit menu.lst.
You need to know how to edit menu.lst as a root or superuser.
You should search for a piece of code very similar to this one:
# This entry automatically added by the Debian installer for a non-linux OS
# on /dev/sda1
title           Microsoft Windows XP Professional
root            (hd0,0)
savedefault
makeactive
chainloader     +1
and write this one instead of it:
title           Windows
rootnoverify            (hd0,0)
makeactive
chainloader     +1
boot
This way you can check if Windows boots. If Windows you might want to save it as the default option once you boot into it.
Edit the file once again and add the savedefault line after the rootnoverify line. (In some situations savedefault hangs Windows boot) boot line is not compulsory.
Ntldr is missing
First of all check that you are not trying to boot your second hard disk windows with the wrong commands in menu.lst.
Then you can try to activate the Windows partition, which might not be the one where you have your current Windows but the first FAT32 partition (where you once had windows 98 or whatever).
If Windows still refuses to boot you will a Windows recovery disk and..
TODO WINDOWS RECOVERY DISK INSTRUCTIONS
On a alternative option you can use the new SGD option:
Windows Partition Boot Restore
TODO: IMPLEMENT THE OPTION AND COMPLETE THIS EXPLANATION
Время на прочтение
9 мин
Количество просмотров 121K
Наверняка почти у каждого пользователя ОС Linux и ОС Windows, а я имею в виду именно тех, у кого, в силу ряда причин, установлены обе системы, время от времени возникал вопрос: «А нельзя ли, черт возьми, придумать способ, с помощью которого можно было бы устанавливать эти системы в произвольном порядке? Без порчи настроек загрузчика?» Ведь если ставим сначала Windows а потом Linux всё хорошо — линуксовый загрузчик (например GRUB) обычно подхватывает bootmgr. Если ставить в обратном порядке то увы. Даже с использованием GPT + EFI. В случае с EFI нет опасности перезаписи MBR, зато таки есть один нюанс, который лично мне не нравится — установщик Windows в режиме EFI хоть и не перезаписывает сектора диска своим кодом, но зато переопределяет NVRAM, подсовывая туда путь к своему загрузчику. Так что функционал GBUB всё равно приходится восстанавливать. В настройках штатного установщика нет опций для кастомизации процесса установки загрузчика. А что если… не использовать стандартный установщик?! Ну, или почти не использовать…

И такой способ есть. И основан он на технологии установки Windows, которую мы имеем в её дистрибутивах начиная с «семерки». Способ работает для случая Windows версий 7/8/8.1/10, как в случае с MBR + BIOS системы, так в случае с EFI + GPT. Установить систему можно как в раздел HDD, так и на VHD. При этом функционал установщика нужен нам в общем-то для запуска программы настройки BCD-хранилища конфигурации загрузчика. Вместо установочного диска можно использовать загрузочный носитель на основе WinPE. Если бы утилитам bcdedit.exe и BootICE была *nix альтернатива, весь процесс развертывания системы можно было бы вообще выполнить в среде Linux.
Предположим у вас имеется компьютер, с установленным на HDD загрузчиком GRUB2 и свободным разделом, отформатированном в NTFS. Устанавливать будем Windows 7 Ultimate SP1. Для этого потребуются:
- Установочный диск с виндой
- Чистая флешка объемом >= 4 Gb
- Архиватор 7-zip соответствующей разрядности
- Утилита BootICE, желательна, но совершенно не обязательна, можно обойтись и bcdedit.exe, входящим в дистрибутив винды
1. Создаем загрузочную флешку
Дело в том, что семерка не хочет устанавливаться в EFI-режиме с DVD. Вот не хочет и всё. К тому же, на установочном носителе нам понадобятся дополнительные утилиты, которые туда надо поместить, а в случае с флешкой это несколько проще, чем в случае с DVD.
Монтируем установочный образ с виндой, допустим он лежит у нас в /home/$USER/install с именем win7-setup.iso
$ mkdir ~/iso

$ sudo mount -t udf ~/install/win7-setup.iso ~/iso
Вставляем флешку в USB-порт. Допустим, она получила имя устройства /dev/sdb. Выполним её разметку в формате MBR
$ sudo fdisk /dev/sdb
Создем на флешке один единственный раздел. После чего форматируем её в FAT
$ sudo mkfs.vfat /dev/sdb1
Копируем содержимое дистрибутива винды на флешку
$ mkdir /tmp/flash

$ sudo mount /dev/sdb1 /tmp/flash -o uid=1000,gid=100,fmask=113,dmask=002

$ cp -rv ~/iso/* /tmp/flash/
Скопируем конфиги EFI-загрузчика на уровень выше
$ cp -rv ~/tmp/flash/efi/microsoft/* ~/tmp/flash/efi/
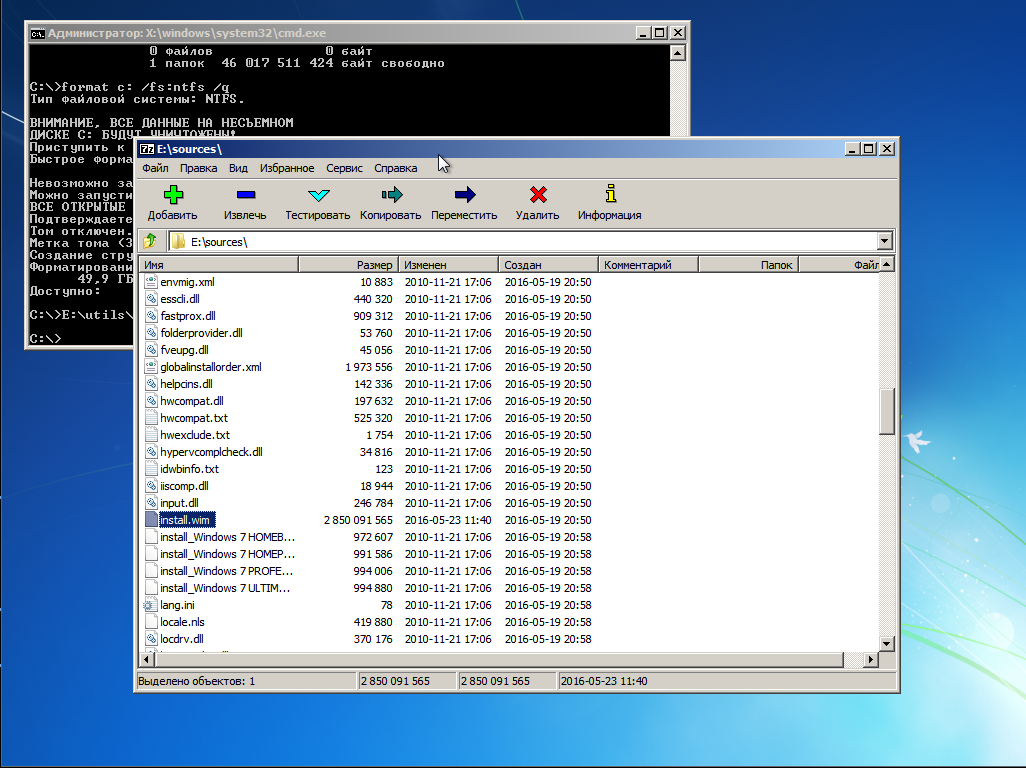
Теперь нам нужен EFI-загрузчик винды. Его придется выцарапать из дистрибутива. Это легко сделать с помощью архиватора 7-zip, который имеется в репозитории extra/p7zip. Все содержимое дистрибутива винды сжато в образ wim-формата находится на установочном DVD в файле source/install.wim. Обычно этот образ имеет следующую структуру
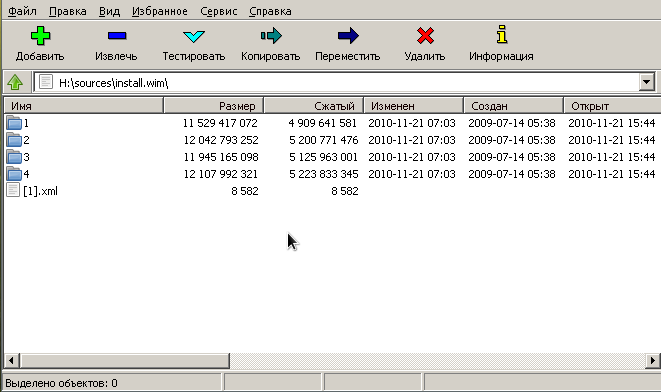
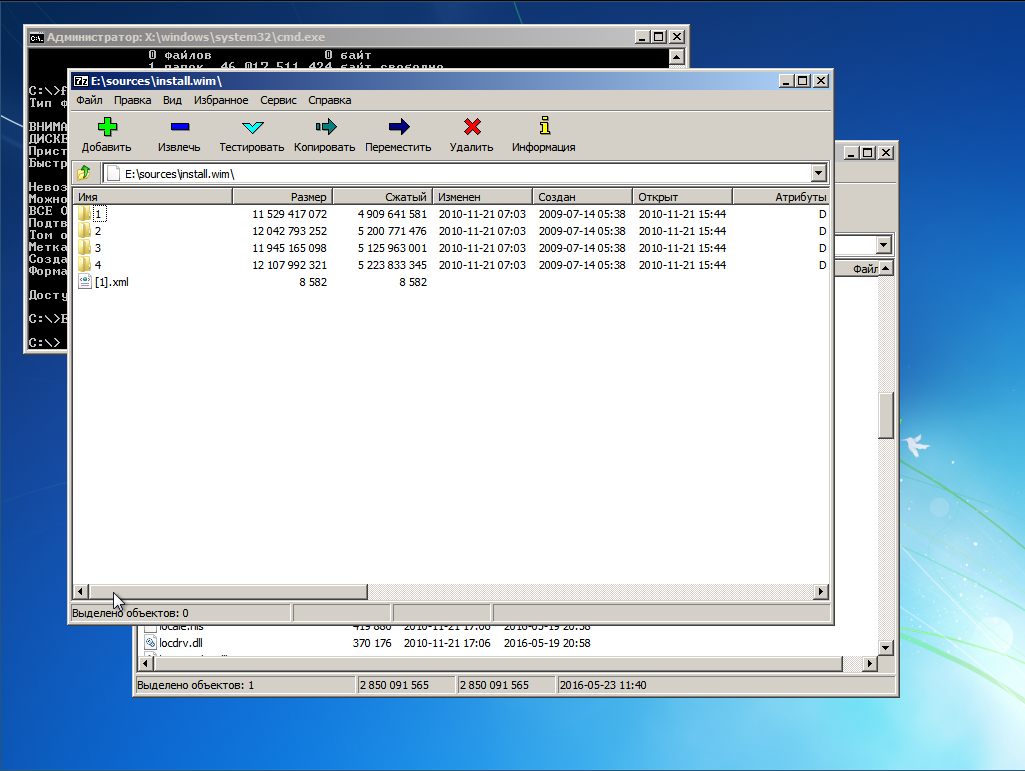
В каталогах с именами в виде цифр 1-4 находятся разные редакции винды. Чтобы выбрать нужную надо посмотреть внутрь файла с именем [1].xml. Распакуем его в /tmp
$ cd /tmp

$ 7z e ~/iso/sources/install.wim \[1\].xml
и посмотрим с помощью какого-нибудь браузера, ибо в текстовом редакторе он выглядит ужасно, а специального редактора xml у меня в наличии не оказалось. Каждую редакцию винды описывают структурой вида

где нода EDITIONID указывает на редакцию. Параметр INDEX — как раз номер каталога, в котором валяется нужная редакция. Итак, мне нужна Ultimate, а это индекс 4. Соответсвенно выковыриваем загрузчик оттуда
$ 7z e ~/iso/sources/install.wim 4/Windows/Boot/EFI/bootmgfw.efi
Оки, теперь перенесем полученный файл на флешку
$ mv bootmgfwm.efi /tmp/flash/efi/boot/bootx64.efi
Порядок, теперь у нас в наличии загрузочная флешка для установки винды. Теперь добавим на неё необходимые для установки утилиты — виндозную версию архиватора 7-zip и утилиту BootICE. Архиватор качаем с официального сайта и распаковываем на флешку в каталог utils
$ mkdir -p /tmp/flash/utils/7-Zip/

$ cd /tmp/flash/utils/7-Zip/

$ 7z x ~/downloads/7z1602-x64.exe
Туда же помещаем и bootice
$ cp ~/install/BOOTICEx64.exe /tmp/flash/utils
Уф, всё, отмонтируем флешку
$ cd ~

$ sudo umount /tmp/flash/
Перезагружаемся. Если у вас система с EFI и съемные диски стоят в приоритете загрузки, то компьютер загрузится в установку винды автоматом. Если же появилось таки меню GRUB, ничего страшного, жмем «С» и в консоли набиваем команду exit. Вас вывалит в меню EFI, где выбираем загрузку с флешки. Если же ваша система с BIOS, то тут чуть сложнее, ибо мы не стали заморачиваться с настройкой MBR на флешке. Тогда в консоли GRUB даем команду ls — появится список всех дисков и разделов. Находим нашу флешку, она отобразится в виде (hdX, msdosY), где X, Y — номер диска и раздела соответственно. Теперь вбиваем в консоли команды
grub> set root=hdX,Y

grub> ntldr /bootmgr

grub> boot
Начнется загрузка установщика винды. Он то загрузится, но нам он и не нужен — мы всё будем делать руками. Чтобы стало понятно, что к чему, придется рассмотреть некоторую теорию
2. О развертывании Windows из WIM-образа и капризном нраве Sysprep
Начиная с семерки установка Windows заключается в следующих этапах
- Разметка диска в соответствии с архитектурой системы инициализации оборудования. Если BIOS — установщик размечает диск в MBR. При наличии активной EFI — разметка будет GPT.
- Распаковка образа install.wim в выбранный для установки раздел
- Установка загрузчика и перезагрузка
- Инициализация оборудования. Ребут
- Локализация, ввод ключа, окончание настройки системы
Это стандартный путь. У нас же диск уже размечен. И нам не нужна автоматическая установка загрузчика — мы поставим его вручную. Разметка диска должна удовлетворять следующим требованиям
- Если система с EFI на диске должен присутствовать FAT-раздел с типом 0xEF. Если у нас уже установлен линукс с EFI-загрузчиком, то таковой раздел уже имеется
- Если система с BIOS, то раздел, в котором располагается загрузчик, а это наш NTFS-раздел должен быть активным. Это очень важно! Почему, будет объяснено ниже.
Таким образом, перед распаковкой системы мы должны убедится в том, что перечисленные требования выполнены. После того, как мы распакуем все файл системы и установим загрузчик, система перезагрузиться. После перезагрузки запустится утилита Sysprep, среди прочего настраивающая оборудования и проверяющая конфигурацию системы. Так вот, если в режиме EFI Sysprep не найдет загрузчик и его конфигурацию в EFI-разделе по пути EFI/microsof/boot, а в системе с BIOS каталог \Boot и bootmgr будут лежать в неактивном разделе, то Sysprep завершится с ошибкой sysprep generalize error, а в лог, расположенный по адресу \Windows\Panther\sysperr.log выплюнет что-то похожее на
2015-03-11 16:55:42, Error [0x0e00b3] TOOL Sysprep_Specialize_Bcd: There was an error opening the system store. Status=[0xC0000098]

2015-03-11 16:55:42, Error [0x0f0082] SYSPRP LaunchDll:Failure occurred while executing 'c:\Windows\System32\spbcd.dll,Sysprep_Specialize_Bcd', returned error code 1006

2015-03-11 16:55:42, Error [0x060435] IBS Callback_Specialize: An error occurred while either deciding if we need to specialize or while specializing; dwRet = 0x3ee
и никакие танцы с бубном нам уже не помогут. Винда требует, чтобы загручик лежал в загрузочном разделе и точка. В случае с BIOS просто делаем активным раздел NTFS в котором лежит винда и туда же кладем и загрузчик. Грузится будем всё равно с помощью GRUB, а ему все равно, какой раздел будет активным. В случае с EFI загрузчик придется положить рядом с GRUB в EFI-разделе.
3. Распаковка системы
Итак, определимся, куда мы хотим ставить винду. Можно поставить в NTFS-раздел, а можно и в VHD-диск. Это уж как вам хочется. Я буду показывать процесс на примере с виртуальной машиной EFI, имеющей следующую разметку
The protective MBR's 0xEE partition is oversized! Auto-repairing.
Partition table scan:
MBR: protective
BSD: not present
APM: not present
GPT: present
Found valid GPT with protective MBR; using GPT.
Command (? for help): p
Disk /dev/loop1: 104857600 sectors, 50.0 GiB
Logical sector size: 512 bytes
Disk identifier (GUID): 0D217C93-6699-435A-9BBB-61DFAA6F30B7
Partition table holds up to 128 entries
First usable sector is 34, last usable sector is 104857566
Partitions will be aligned on 2048-sector boundaries
Total free space is 4029 sectors (2.0 MiB)
Number Start (sector) End (sector) Size Code Name
1 2048 206847 100.0 MiB EF00 EFI system partition
2 206848 104855551 49.9 GiB 0700 Basic data partition
На этом диске нет линукса, установлен только GRUB в раздел с EFI. Если мы ставим систему непосредственно в NTFS-раздел, то загружаемся с флешки, дожидаемся запуска программы установки и жмем Shift + F10, чтобы вызвать консоль. Запускаем утилиту diskpart и смотрим список подключенных томов
X:\sources> diskpart

DISKPART> list vol
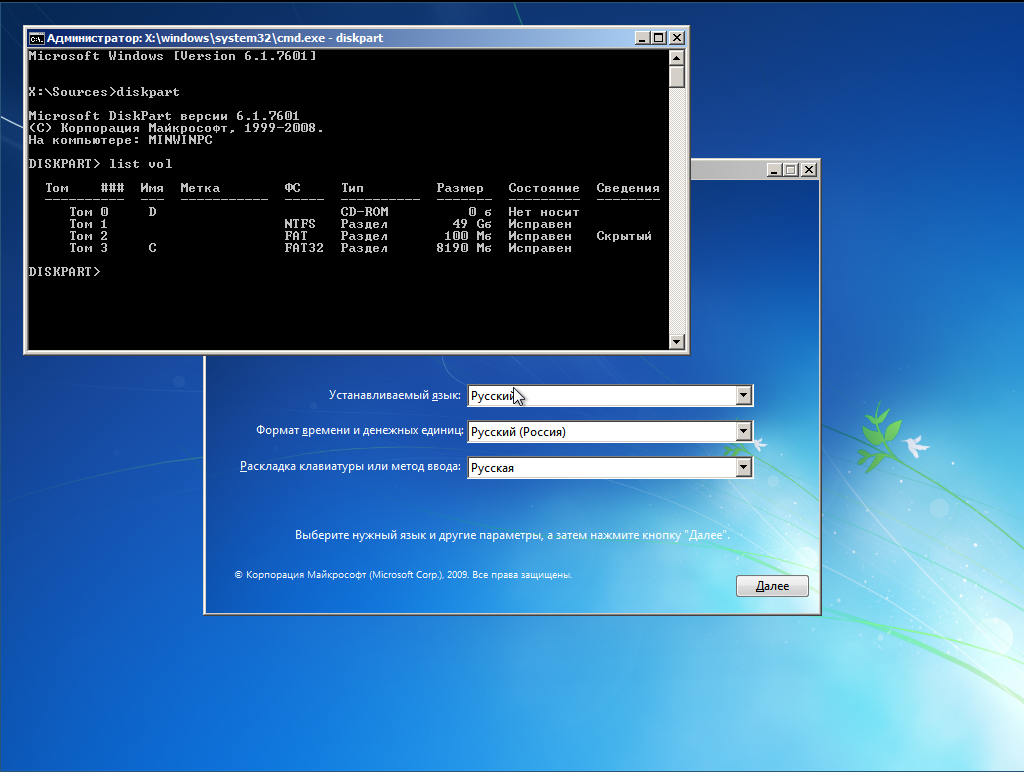
Видим, что флешка (объемом 8 Гб) подключена как диск C:, а раздел для установки вовсе не смонтирован. Непорядок. Делаем так
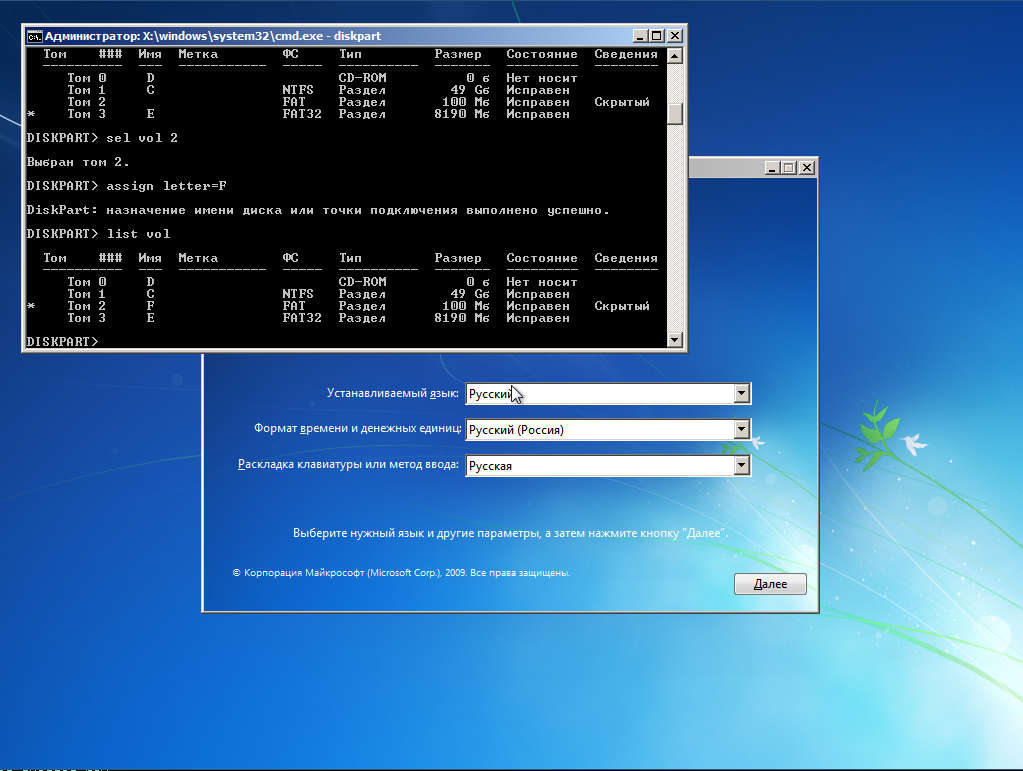
DISKPART> sel vol 3

DISKPART> remove

DISKPART> assign letter=E

DISKPART> sel vol 1

DISKPART> assign letter=C

DISKPART> list vol

DISKPART> sel vol 2

DISKPART> assign letter=F
Вот теперь порядок, диск на который будем ставить винду стал диском C:, флешка — диском E:, а EFI-раздел — диском F:
Если же мы хотим поставить систему на VHD, то делаем так
DISKPART> sel vol 3

DISKPART> remove

DISKPART> assign letter=E

DISKPART> sel vol 1

DISKPART> assign letter=G

DISKPART> exit
Для порядка создаем каталог с образами
X:\sources> md G:\vhd

X:\sources> diskpart
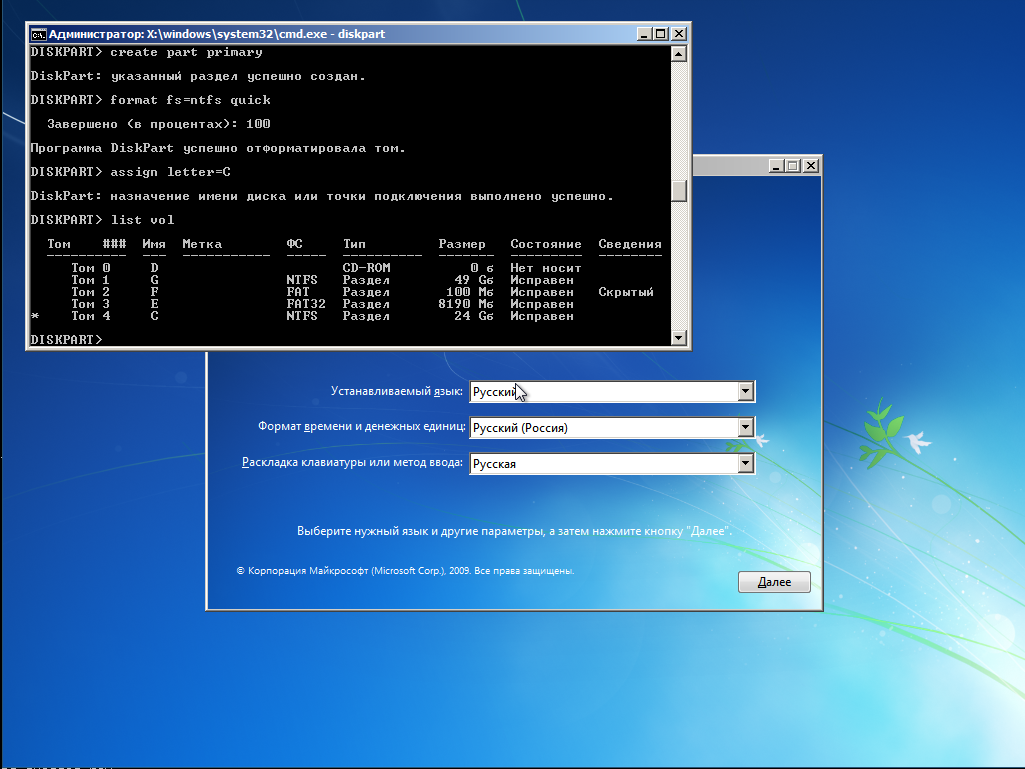
Создаем виртуальный диск, создаем на нем разметку GPT и раздел NTFS и монтируем его к C:
DISKPART> create vdisk file="G:\vhd\win7.vhd" maximum=25600 type=fixed

DISKPART> attach vdisk

DISKPART> clean

DISKPART> convert gpt

DISKPART> create part primary

DISKPART> format fs=ntfs quick

DISKPART> assign letter=C
EFI-раздел монтируем к F:
DISKPART> sel vol 2

DISKPART> assign letter=F
Получаем такую картину
Очень важно! Убеждаемся в том, что EFI-раздел отформатирован именно в FAT, а не в FAT32. Иначе Sysprep не простит нам этой ошибки. Если на компе уже есть линукс, то настройки будут верны.
Теперь распаковываем дистрибутив на диск C:
X:\sources> E:

E:\> utils\7-Zip\7zFM.exe
Откроется GUI архиватора 7-zip. В нем открываем каталог E:\sources, находим там файл install.wim
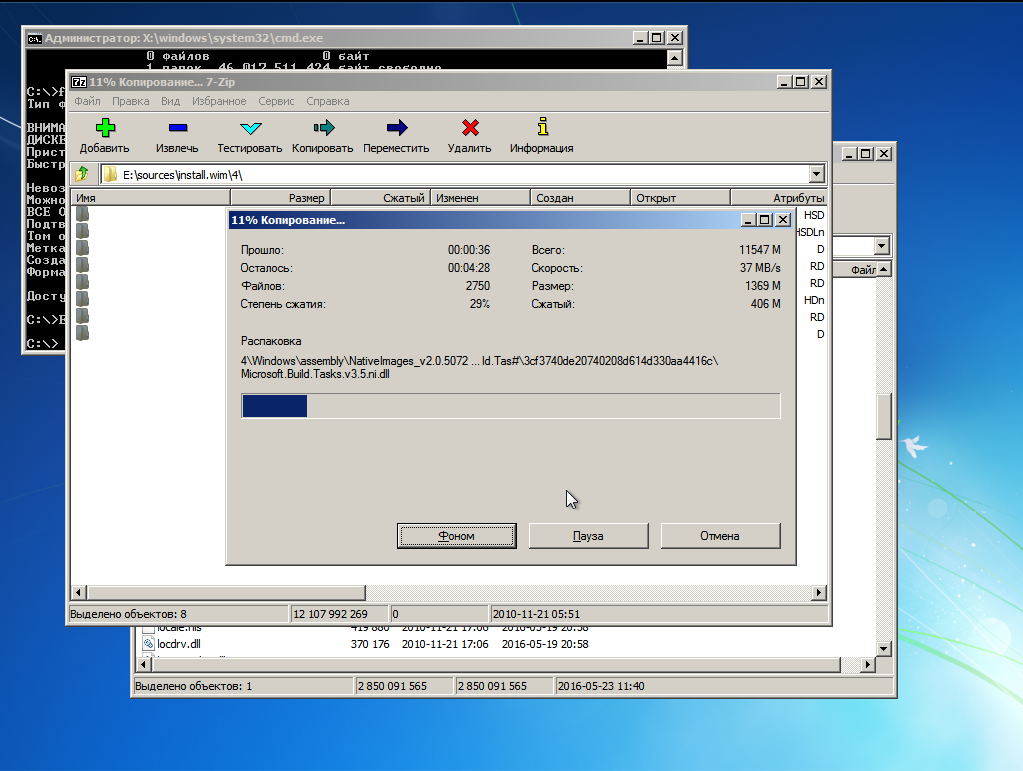
Правой кнопкой на этом файле вызываем контектстное меню и переходим по 7-zip -> Открыть архив. Появится содержимое образа.
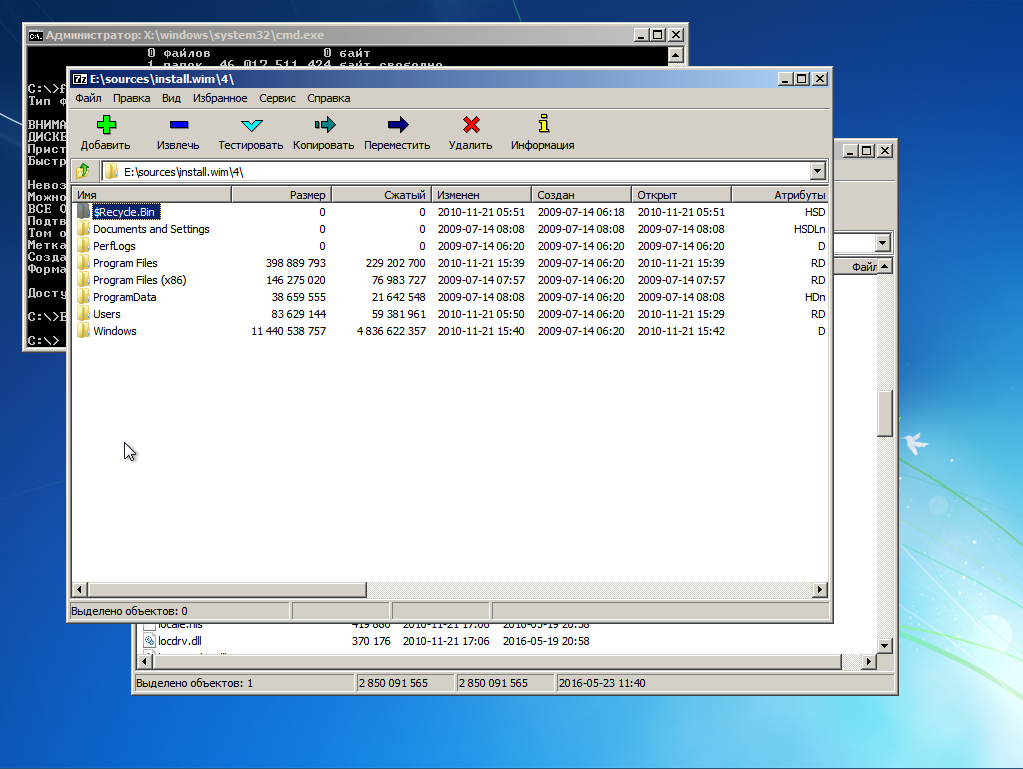
Лезем в папку 4 — там лежит Ultimate
Выделяем всё Ctrl + A и жмем кнопку «Извлечь». Появится окно, где нам предложат указать путь распаковки
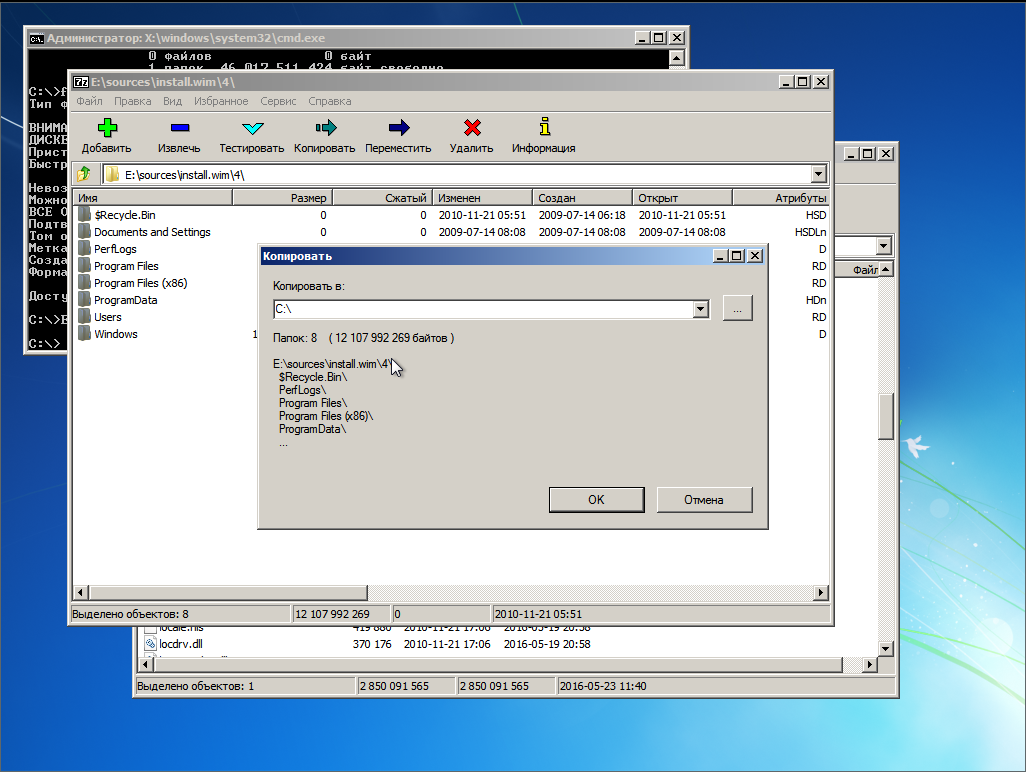
Указываем корень диска C: и жмем ОК.
Ну и теперь, как говорится: «Откиньтесь на спинку кресла и…»
4. Установка и настройка загрузчика
Итак, после некоторого время ожидания распаковка окончена. И вот тут, вот в этом месте винда обчно делает бяку, а именно портит MBR или перенастраивает NVRAM. Но мы не дадим ей этого сделать — мы установим загрузчик вручную.
В случае с EFI, переходим на раздел EFI, смонтированный к F: и создаем необходимые пути и копируем файлы загрузчика
E:\> F:

F:\> mkdir EFI\microsoft\boot

F:\> xcopy C:\Windows\Boot\EFI\* F:\EFI\microsoft\boot /s /e

F:\> mkdir EFI\microsoft\boot\Fonts

F:\> xcopy C:\Windows\Boot\Fonts\* F:\EFI\microsoft\boot\Fonts\ /s /e

F:\> copy C:\Windows\System32\config\BCD-Template F:\EFI\microsoft\boot\BCD
Отлично, загрузчик скопирован. Теперь настроим его
F:\> E:\utils\BOOTICEx64.exe
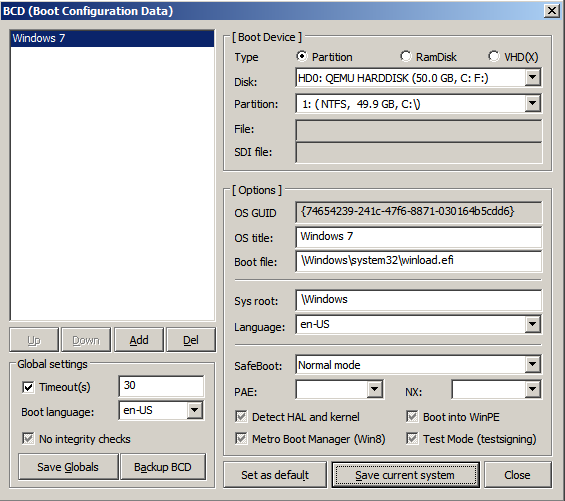
Открываем файл F:\EFI\Microsoft\Boot\BCD. В случае установки на раздел, его параметры задаются так
Если же мы устанавливали систему на VHD, то настройки будут такими
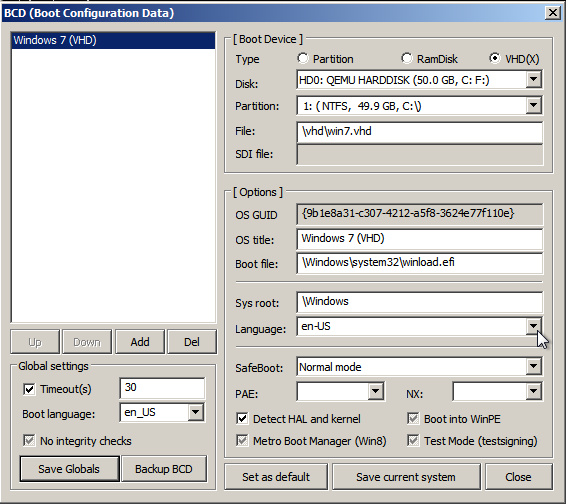
Важно! Имя вторичного загрузчика для EFI-системы winload.efi, для BIOS-системы — winload.exe.
В случае, если мы устанавливаем BIOS-систему установка загрузчика будет выглядеть так
F:\> mkdir C:\Boot

F:\> xcopy C:\Windows\Boot\PCAT\* C:\Boot /s /e

F:\> mkdir C:\Boot\Fonts

F:\> xcopy C:\Windows\Boot\Fonts\* C:\Boot\Fonts /s /e

F:\> copy C:\Boot\bootmgr C:\bootmgr

F:\> copy C:\Windows\System32\config\BCD-Template C:\Boot\BCD
Важно! Раздел, смонтированный к C: (там где размещен загрузчик) обязан быть активным! Убедитесь в этом перед перезагрузкой!
Настройку выполняем так же точно, используя BootICE.
Ну, вроде все. Закрываем все окна и идем в ребут. Флешку можно вытащить из компа.
5. Скрестим пальцы да вознесем молитвы тебе, о Великий и Ужасный Sysprep…!
GRUB у нас еще не настроен пункта для винды в меню нет. Как только появится меню GRUB жмем «C». В консоли набираем
grub> set root=hdX,Y

grub> chainloader /EFI/Microsoft/Boot/bootmgfw.efi

grub> boot
X, Y — соответственно диск и раздел, где лежит загрузчик. Это в случае EFI. В случае с BIOS делаем так
grub> set root=hdX,Y

grub> ntldr /bootmgr

grub> boot
X, Y — диск и раздел с NTFS. Там где распакована винда и лежит её загрузчик.
В режиме EFI вместо логотипа винды я увидел черный экран, так как не нашел в дистрибутиве билиотеки bootres.dll, которую надо поместить в папку EFI\Mictosoft\Boot\Resourses. В случае с BIOS всё в порядке — знакомая эмблема «семерки». А потом в обоих случаях увидим это

Это работает Sysprep. На 57% моргнет экран — настраивается видяха. И если мы все сделали верно, то надпись «Применение параметров системы» повисит довольно долго, потом система сообщит, что установка будет продолжена после перезагрузки. Если мы где-то напортачили с установкой загрузчика — неправильный EFI раздел или неактивный NTFS, то тогда будет ошибка  Но мы молодцы и у нас все получится, и после очередной перезагрузки мы увидим это

а потом, наконец вот это
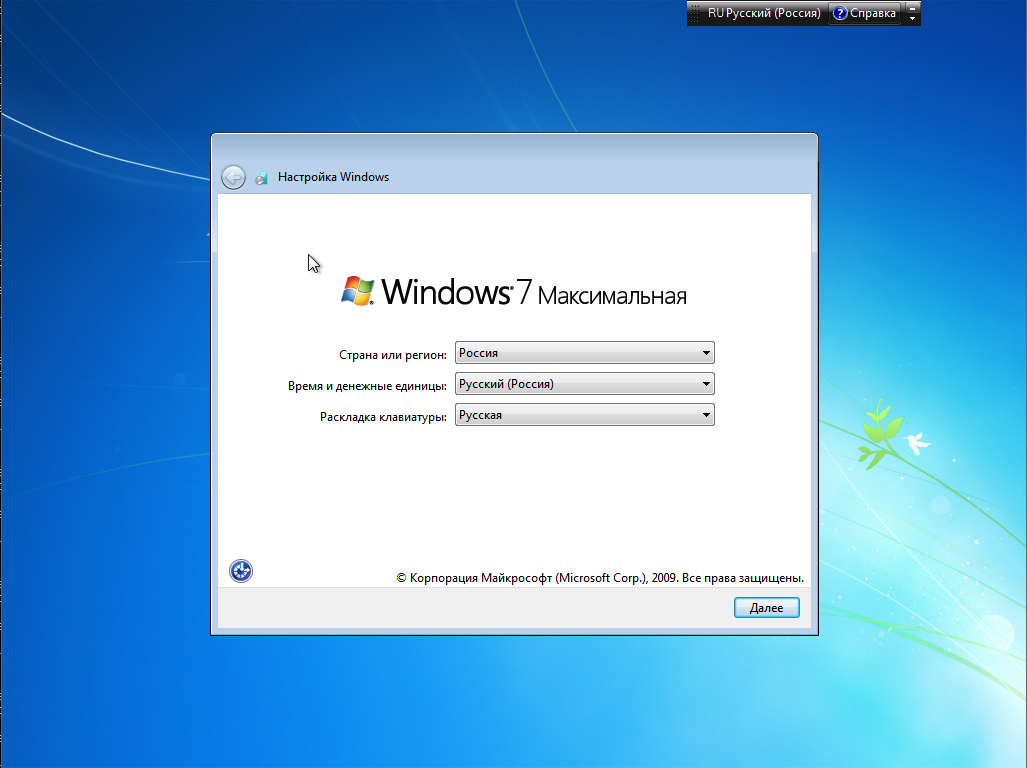
Дальше все как при обычной, штатной установке.
6. Настраиваем GRUB
Обратили внимание на то, что каждый раз мы грузим систему из консоли GRUB руками. Это очень хорошо — значит ни MBR ни NVRAM не перезаписаны коварным майкрософтом. Настало время грузится в арч и добавить в меню GRUB новый пункт
menuentry 'Windows 7 Ultimate SP1 (EFI)' {
set root=hdX,Y
chainloader /EFI/Microsoft/Boot/bootmgfw.efi
}
в случае EFI. Или
menuentry 'Windows 7 Ultimate SP1' {
set root=hdX,Y
ntldr /bootmgr
}
в случае BIOS. Применяем настройки GRUB и перезагружаемся и видем систему в пункте меню загрузки
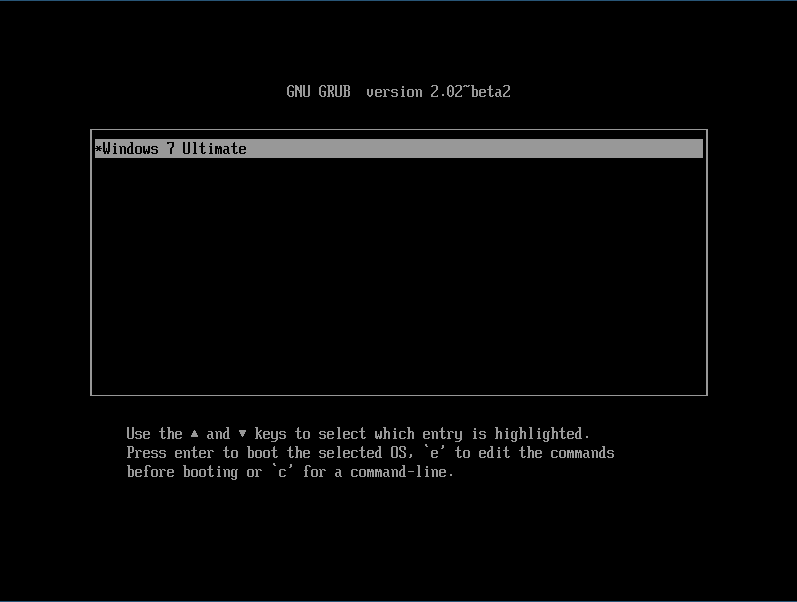
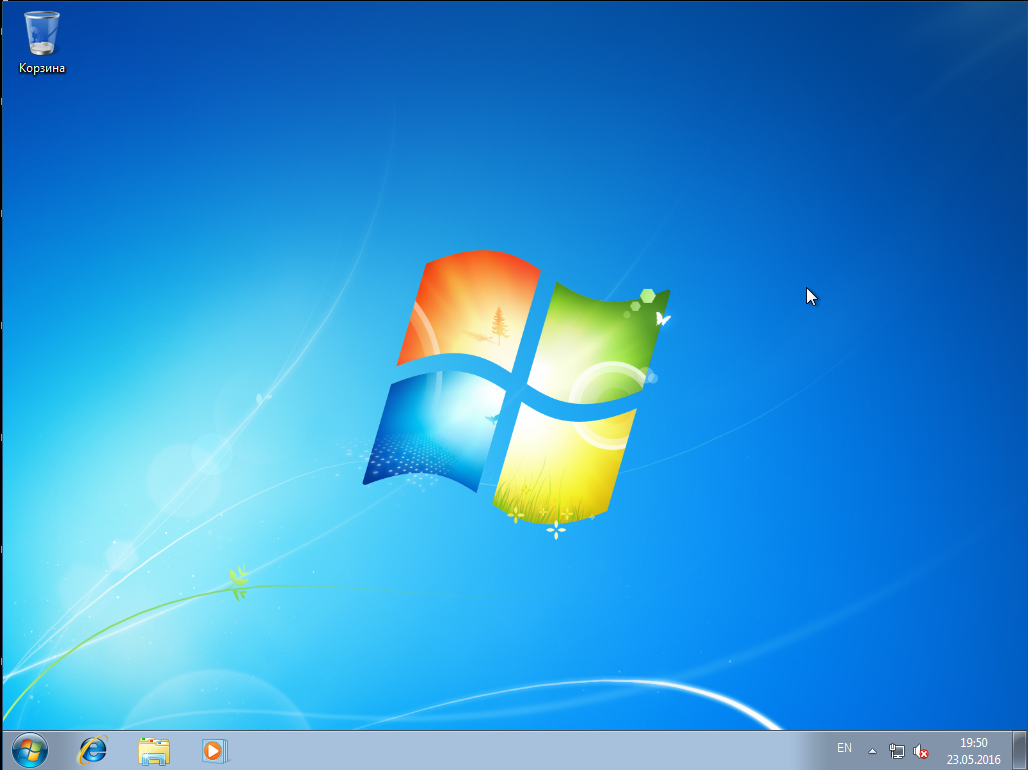
после выбора которого получаем загруженную Windows
Заключение
Упреждая гнев профессиональных win-админов, скажу сразу — я знаю о DISM. Именно информация об этой системе и привела меня к описанному решению. Цель была одна — выяснить сколько нужно возможностей собственно Windows для установки Windows.
Оказалось вот что — для установки Windows её среда необходима только для одного — настройки BCD-хранилища. Всё. Остальное можно сделать из среды любой другой операционной системы.
Если написать аналог bcdedit.exe под Linux, то установить Windows можно будет с линуксового Live-носителя.